
Unleashing Productivity: A Guide to Remote Desktop Dual Monitor Setup on Windows 10. In today’s digital landscape, remote work has become the new norm, demanding efficient solutions to replicate the office environment seamlessly. Windows 10, Microsoft’s versatile operating system, offers native support for Remote Desktop, empowering users to access their computers remotely from anywhere. However, for those with dual monitor setups, maximizing productivity through Remote Desktop’s dual monitor feature is paramount. In this comprehensive guide, we’ll explore how to set up and optimize Remote Desktop dual monitor functionality on Windows 10, unlocking new levels of efficiency and flexibility.
Understanding Remote Desktop Dual Monitor Support
Remote Desktop on Windows 10 boasts robust capabilities, including native support for dual monitors. This feature allows users to extend their remote desktop session across multiple monitors, replicating the multi-screen setup of their local computer. With dual monitor support, users can seamlessly work with multiple applications, view expansive spreadsheets, and enhance productivity by leveraging the additional screen real estate.
Prerequisites for Remote Desktop Dual Monitor Setup
Before configuring Remote Desktop for dual monitor support on Windows 10, ensure the following prerequisites are met:
- Windows 10 Edition: Remote Desktop with dual monitor support is available in Windows 10 Professional, Enterprise, and Education editions. Ensure you’re using one of these editions to access this feature.
- Dual Monitor Setup: Both the local and remote computers must have dual monitor setups for Remote Desktop dual monitor functionality to work effectively. Ensure that both monitors are properly connected and configured on both computers.
- Remote Desktop Connection: Familiarize yourself with Remote Desktop Connection, the built-in tool in Windows 10 used to establish remote desktop sessions. This tool will be used to initiate the dual monitor connection.
Configuring Remote Desktop for Dual Monitor Support
To set up a Remote Desktop with dual monitor support on Windows 10, follow these step-by-step instructions:
Enable Remote Desktop: On the remote computer (the computer you want to connect to), ensure that Remote Desktop is enabled. Go to “Settings” > “System” > “Remote Desktop,” and toggle the switch to enable Remote Desktop. Make note of the computer’s IP address or hostname.
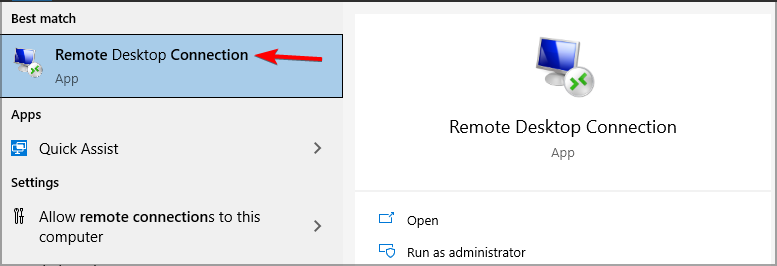
Connect to Remote Desktop: On the local computer (the computer you’re connecting from), launch Remote Desktop Connection by typing “Remote Desktop Connection” in the search bar and selecting the app from the search results.
Enter Remote Computer’s IP Address: In the Remote Desktop Connection window, enter the IP address or hostname of the remote computer you want to connect to. Click “Connect” to initiate the remote desktop session.
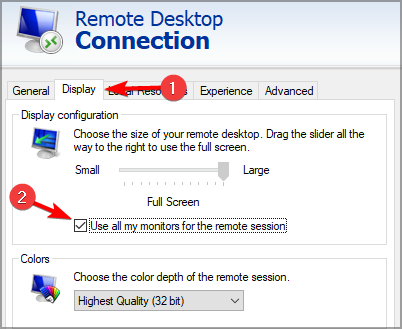
Configure Display Settings: Once connected, navigate to the “Display” settings in Remote Desktop Connection. Select “Use all my monitors for the remote session” to enable dual monitor support. This ensures that the remote desktop session spans across all monitors connected to the local computer.
Initiate Remote Desktop Session: Click “Connect” to initiate the Remote Desktop session with dual monitor support. The remote desktop session will now extend across all monitors connected to the local computer, replicating the dual monitor setup of the remote computer.
Optimizing Remote Desktop Dual Monitor Experience
To optimize the Remote Desktop dual monitor experience on Windows 10, consider the following tips:
- Bandwidth Considerations: Remote Desktop with dual monitor support may require more bandwidth due to the increased screen real estate being transmitted. Ensure a stable and high-speed internet connection to avoid lag and latency issues.
- Resolution Settings: Adjust the resolution settings in Remote Desktop Connection to match the native resolution of the local monitors. This ensures crisp and clear display across all monitors during the remote desktop session.
- Multitasking Efficiency: Leverage the dual monitor setup to enhance multitasking efficiency. Arrange windows and applications across both monitors to maximize productivity and workflow efficiency.
- Keyboard Shortcuts: Familiarize yourself with Remote Desktop keyboard shortcuts to streamline navigation and window management during the remote desktop session. Keyboard shortcuts such as Alt + Tab and Windows + Shift + Left/Right Arrow facilitate seamless switching between applications and monitors.
- Display Settings: Experiment with display settings on the local and remote computers to optimize the visual quality and performance of the remote desktop session. Adjust settings such as color depth and display scaling to achieve the desired balance between visual fidelity and performance.
Conclusion
Remote Desktop dual monitor support on Windows 10 offers. A powerful solution for extending productivity beyond the confines of the office. By following the step-by-step instructions and optimizing the dual monitor experience. Users can seamlessly replicate their multi-screen setup and enhance productivity during remote work sessions. Whether collaborating on expansive spreadsheets, working with multiple applications, or conducting virtual meetings. Remote Desktop dual monitor functionality empowers users to work more efficiently and effectively from anywhere. Unlock the full potential of Remote Desktop dual monitor support. On Windows 10 to elevate your remote work experience and achieve new levels of productivity.
Nowadays, you can access your home computer from anywhere, owing to Windows’ built-in remote desktop capability, which allows you to operate your computer remotely. Especially When work had to be done remotely, employees are expected to be computer smart enough to grasp the job at hand.
Anyone can access your computer from some other place using Windows Remote Desktop, allowing you to see the desktop and operate with it as if it were next to you.
But MSPs and IT experts would need to be present with customers and clients without remote access equipment in order to troubleshoot, diagnose faults, or make adjustments to workstations and computers.
Users with multiple monitors can also utilize tools to personalize their desktops and improve their quality of life. You can use Remote Desktop to access several displays in a variety of ways using Windows 7 or newer operating systems. Here’s what you should know.
Set up RDP
- Navigate to the Windows Search Box.
- Open it by typing Remote Desktop Connection.

- Now you have to expand Show Option
- Check the Display box and use all my monitors for the remote session.
- Now you have to click on Connect and proceed to the server

Use command line
- Now you have to open Windows Search Box
- After that, you have to type Run in the search box and hit Enter
- There will be a dialog box where you have to write mstsc.exe -multimon then hit Enter.
You may also use the command line to start the Remote Desktop Protocol by entering the above-mentioned command.
This will launch the software without requiring any configuration changes. All that remains is for you to connect to the server.
This is the easiest method for using several displays with Remote Desktop on Windows 10, so give it a shot.
Enable monitors directly
- To connect the monitors directly you have to go to your Windows Search Bar.
- After that type Run in the dialog box.
- It will open a Run command box and there you have to type mstsc /span and hit Enter
Downsides of using Remote Desktop
It is helpful that Windows RDP is a remote access tool that is freely available in the market, but like with any free product, it has its own limits.
One of the significant disadvantages of utilizing Windows RDP for remote access is you are unable to modify any connection settings using the open session. This defines that in order for any changes to take effect, you have to end all sessions and connections from your side.
Connecting computers with different operating systems or that are using different sorts of equipment or machines might also be more complex.
For example, in Windows 7, multi-monitor mode is only available in Enterprise or Ultimate editions; hence, Windows 8 workstations would likewise require this build.
For some MSPs and IT professionals, utilizing Windows RDP causes significant slowness, which can be worsened when viewing numerous monitors.
Because time is money and customer happiness is key, frozen displays or high latency may not be worth the free price tag. If that’s the case, remote access software offers many more comprehensive and feature-rich choices for remote access to many monitors.
Conclusion
If the techniques offered did not work for you, we propose Mikogo as the ideal option for dual monitor remote desktops. If you need more options for third-party software, you may read our post on more remote control software solutions.
Fortunately, Microsoft has built a rather simple program to remotely connect your PC, which also works with several displays. To configure your system for remote access, utilize the techniques listed above.
Using remote desktop is a convenient way to get access to an office computer or server from home or while on the go. However, when using remote desktop, you may need to use multiple monitors to increase your productivity or to view multiple applications at the same time. Dual monitors can really be a gamechanger. In this article, we will discuss how to use dual monitors with Remote Desktop on Windows 10.
Video Tutorial:
What’s Needed
Before we get started, make sure you have a few things ready:
- A Windows 10 computer with remote desktop access
- At least two monitors attached to the remote Windows 10 computer
- A steady internet connection with enough bandwidth to support two monitors
What Requires Your Focus?
Using dual monitors can improve your productivity and allows you to keep different applications open side by side. However, setting it up on remote desktop can be a bit confusing for new users. While it is possible, you do need to ensure that both your local computer and remote computer support multiple monitors. Additionally, if your internet connection is not stable or is slow, you may face lag or display issues.
Method 1: Via Remote Desktop Connection
Steps:
1. Open Remote Desktop Connection on your local computer.
2. Enter the IP address or hostname of the remote Windows 10 computer and click Connect.
3. Enter your login credentials for the remote computer and click OK.
4. In the Remote Desktop window, click on the Show Options button at the bottom.
5. Select the Display tab.
6. Under Display configuration, select the option «Use all my monitors for the remote session«.
7. Click Connect to start the remote session.
8. Once connected, rearrange and resize the application windows across both monitors as needed.
Pros:
– Easy to set up with Remote Desktop Connection
– No additional software needed
Cons:
– May require a stable internet connection for the best display quality
– Only works if both the local and remote computers support multiple monitors
Method 2: Using Remote Desktop App for Windows 10
Steps:
1. Download and install the Remote Desktop app on your local Windows 10 computer from the Microsoft Store.
2. Open the Remote Desktop app.
3. Click on Add PC (the + symbol) and enter the IP address or hostname of the remote computer you want to connect to.
4. Enter your login credentials for the remote computer and click Save.
5. Click on the remote computer tile to start the remote session.
6. Once connected, use the taskbar at the top to click on the «Expand to all monitors» button.
7. Rearrange and resize the application windows across both monitors as needed.
Pros:
– The Remote Desktop app is designed for Windows 10 and supports touch inputs, making it easier to use on tablets and touch screen devices
– Can adjust resolution and display options easily
Cons:
– Requires installation of the Remote Desktop app on your local computer
– May not work well with older versions of Windows and macOS
Method 3: Using Third-Party Software
Steps:
1. Download and install a third-party software such as TeamViewer or AnyDesk.
2. Start a remote session with the remote Windows 10 computer using the third-party software.
3. If you are using TeamViewer, click on the «View» menu and select «Use all displays for remote session«. If you are using AnyDesk, click on the «View» menu and select «Multiple Monitors«.
4. Rearrange and resize the application windows across both monitors as needed.
Pros:
– Third-party software can provide additional features and customization options
– Can work with a wider range of operating systems
Cons:
– May not be as secure as using native Remote Desktop or Remote Desktop app
– Some third-party software may require a paid subscription for use
Why Can’t I Use Dual Monitors with Remote Desktop on Windows 10?
1. Unstable internet connection: This can cause lag and display issues when using dual monitors on remote desktop.
Fix: Ensure your internet connection is strong and stable before attempting to use dual monitors on remote desktop.
2. Unsupported hardware: Your local or remote computer may not support multiple monitors.
Fix: Check your computer specifications and ensure both your local and remote computers support multiple monitors.
3. Incorrect display settings: The display settings on your local or remote computer may not be correctly configured.
Fix: Go to display settings and ensure that your monitors are detected and configured correctly.
Implications and Recommendations
Using dual monitors on remote desktop can vastly improve your productivity, especially when working remotely. However, it is important to ensure that both your local and remote computers support multiple monitors and that your internet connection is stable. If you frequently use remote desktop with multiple monitors, consider investing in a high-quality remote access software that supports multiple monitors.
5 FAQs about Using Dual Monitors with Remote Desktop Windows 10
Q1: Can I use two different sized monitors with remote desktop?
A: Yes, you can use two different sized monitors with remote desktop, but you may experience issues with scaling.
Q2: How do I switch between monitors during a remote session?
A: To switch between monitors during a remote session, simply click on the «Monitor» button on the toolbar and select the monitor you want to switch to.
Q3: Will using dual monitors on remote desktop affect the performance of my local computer?
A: No, using dual monitors on remote desktop will not affect the performance of your local computer.
Q4: Can I use dual monitors on remote desktop with a Mac?
A: Yes, you can use dual monitors on remote desktop with a Mac as long as both your local and remote computers support multiple monitors.
Q5: How do I resize my application windows across both monitors?
A: To resize your application windows across both monitors, simply click on the top of the window and drag it to the desired size and location on either monitor.
Final Words
Using dual monitors with remote desktop can really boost your productivity and make your remote work experience more efficient. By following the steps outlined in this article, you can easily set up dual monitors with remote desktop on your Windows 10 computer. Remember to ensure that both your local and remote computers support multiple monitors and that your internet connection is stable before attempting to use dual monitors on remote desktop.
1. Выполните команду «mstsc /l», чтобы получить список доступных идентификаторов мониторов.
Это номера мониторов, начиная с нуля, и будьте внимательны, чтобы выбрать мониторы,
которые соприкасаются (это может быть непросто, так как в списке отображается только
набор сопоставлений пикселей, поэтому монитор 0 не обязательно находится рядом с монитором 1.
2. Выполните команду «mstsc», чтобы открыть RDP, настройте все параметры и установите флажок
«Использовать все мои мониторы», затем СОХРАНИТЕ файл RDP.
3. Этот последний шаг нельзя добавить через обычный интерфейс (но, возможно, когда-нибудь его добавят).
Откройте сохранённый файл RDP в блокноте. Добавьте в файл новую строку сразу после строки «usemultimon»,
которая будет выглядеть как «selectedmonitors:s:0,1» без кавычек, где 0,1 — это мониторы, которые вы выбрали
на предыдущих шагах. Да, это работает для любого набора мониторов, если они соприкасаются.
Если у вас 5 мониторов, вы можете выбрать 2, 3 или 4 из них.
Пример:
span monitors:i:1
use multimon:i:1
selectedmonitors:s:0,1
Are you struggling to maximize your productivity with dual monitors and remote desktop on Windows 10? Look no further. In this guide, we will walk you through the steps to effectively utilize dual monitors for remote desktop on Windows 10, ensuring that you can seamlessly multitask and collaborate across different screens.
To make the most of dual monitors while using remote desktop on Windows 10, it is essential to have the right setup and configurations. By extending your desktop across two monitors, you can have more screen real estate to work with, allowing you to effortlessly move applications and windows between the two screens. With Windows 10, you can easily establish a remote desktop connection and navigate through multiple displays to enhance your remote working experience. This not only improves your efficiency but also enables better collaboration with colleagues and clients.
Using dual monitors with Remote Desktop on Windows 10 is a convenient way to increase productivity. Here’s how to do it:
- Ensure your remote computer has multiple monitors connected.
- Launch Remote Desktop Connection on your local computer.
- Enter the remote computer’s IP address and click «Connect.»
- In the Remote Desktop Connection window, click the «Display» tab.
- Select the «Use all my monitors for the remote session» option.
- Click «Connect» to establish the remote connection.
You can now enjoy using dual monitors with Remote Desktop, enhancing your workflow and multitasking capabilities.

Setting Up Dual Monitors for Remote Desktop on Windows 10
The ability to connect to a remote desktop with dual monitors can greatly enhance productivity and improve multitasking capabilities. With Windows 10, you can easily configure dual monitors while using the Remote Desktop feature to connect to a remote computer. This article will guide you through the process of setting up and using dual monitors in the Remote Desktop application on Windows 10.
Enabling the Dual Monitor Support on the Remote Desktop Host
In order to use dual monitors in the Remote Desktop application, you need to ensure that the remote desktop host (the computer you are connecting to) has dual monitor support enabled. Here’s how:
- On the remote desktop host computer, press the Windows key + X and select «System» from the menu.
- In the System settings, click on «Display» in the left-hand menu.
- Scroll down to the «Multiple displays» section and ensure that the option «Extend these displays» is selected.
- Click on the «Apply» button to save the changes.
By enabling the «Extend these displays» option, you are allowing the remote desktop host to utilize multiple monitors when someone connects to it using the Remote Desktop application.
Adjusting Display Settings for Dual Monitors in the Remote Desktop Client
Once dual monitor support is enabled on the remote desktop host, you can configure the Remote Desktop client on your Windows 10 computer to utilize the dual monitors. Follow these steps:
- Launch the Remote Desktop application on your Windows 10 computer.
- Click on the «Show options» button at the bottom of the window.
- In the «Display» tab, select the «Use all my monitors for the remote session» option.
- Click on the «Connect» button to establish the remote desktop connection.
By selecting the «Use all my monitors for the remote session» option, the Remote Desktop client will extend the remote desktop session across all available monitors on your Windows 10 computer.
Optimizing Dual Monitor Setup in the Remote Desktop Environment
Now that you have successfully enabled dual monitor support on the remote desktop host and configured the Remote Desktop client to use multiple monitors, there are a few additional tips to optimize your dual monitor experience:
Adjusting the Display Resolution
In some cases, the default display resolution may not be ideal for your dual monitor setup. To adjust the display resolution:
- While in the remote desktop session, right-click on the desktop and select «Display settings.»
- In the Display settings, adjust the resolution for each monitor to your preference.
- Click on the «Apply» button to save the changes.
By optimizing the display resolution, you can ensure that the content on both monitors is clear and properly scaled.
Using the Snap Assist Feature
The Snap Assist feature in Windows 10 allows you to easily arrange and organize windows on your dual monitor setup. To use Snap Assist:
- Click and drag a window to the edge of a screen until it snaps into place.
- Select another window and drag it to the opposite edge of the screen.
- The windows will automatically resize and fill each half of the monitor.
With Snap Assist, you can efficiently utilize the screen space on both monitors by snapping windows into place.
Troubleshooting Dual Monitor Issues in Remote Desktop
If you encounter any issues while using dual monitors in the Remote Desktop environment on Windows 10, here are some troubleshooting tips:
Check Network Connection
Ensure that the network connection between your Windows 10 computer and the remote desktop host is stable. A weak or unstable network connection can result in lag or loss of display on one or both monitors.
Update Graphics Drivers
Make sure that the graphics drivers on both your Windows 10 computer and the remote desktop host are up to date. Outdated or incompatible graphics drivers can cause display issues on dual monitors.
Enable Network Level Authentication
Check if Network Level Authentication (NLA) is enabled on the remote desktop host. NLA provides an extra layer of security for remote desktop connections and can help resolve compatibility issues with dual monitor support.
Enhancing Productivity with Dual Monitors in Remote Desktop
Utilizing dual monitors in the Remote Desktop application on Windows 10 can significantly enhance productivity and streamline workflows. Whether you are working remotely or accessing a remote computer in your office, the ability to extend your desktop across multiple monitors provides more screen real estate for multitasking and improving efficiency. Follow the steps outlined in this article to set up and optimize dual monitors in the Remote Desktop environment, and experience the benefits of a multi-monitor setup.

Using Dual Monitors with Remote Desktop on Windows 10
Utilizing dual monitors with Remote Desktop on Windows 10 can greatly enhance productivity and multitasking capabilities. Here’s how you can set it up:
1. Configure Remote Desktop Settings
- Open the «Remote Desktop» app on your Windows 10 computer.
- Click on «Show Options» to reveal additional settings.
- Under the «Display» tab, select «Use all my monitors for the remote session.»
- Click «Connect» to establish a remote desktop connection.
2. Adjust Remote Desktop Display Settings
Once connected to the remote desktop session:
- Right-click on the desktop and select «Display settings.»
- In the display settings, click on the drop-down menu under «Multiple displays» and select «Extend these displays.»
- Click «Apply» and then «Keep changes» to confirm.
With these steps, you can effectively use dual monitors on your Windows 10 remote desktop, allowing for a seamless and expanded working experience.
Key Takeaways: How to Use Dual Monitors Remote Desktop Windows 10
- Configure dual monitors in Windows 10 settings for remote desktop.
- Enable multiple displays in the remote desktop connection settings.
- Ensure both monitors are connected and recognized by your computer.
- Adjust display settings in the remote desktop connection for optimal use.
- Drag and drop windows between monitors using the remote desktop interface.
Frequently Asked Questions
Using dual monitors with remote desktop on Windows 10 can greatly enhance productivity and multitasking capabilities. This feature allows you to extend your desktop across multiple screens, giving you more workspace to work with. If you have any questions on how to use dual monitors with remote desktop on Windows 10, we have provided answers to some common inquiries below.
1. How do I set up dual monitors for remote desktop on Windows 10?
To set up dual monitors for remote desktop on Windows 10, you first need to ensure that both monitors are connected to the remote computer. Once the monitors are connected, launch the Remote Desktop app on your Windows 10 computer. Go to the «Display» tab in the app and select «Use all my monitors for the remote session» option. This will enable dual monitor support during your remote session.
Next, connect to the remote computer by entering the computer’s name or IP address in the remote desktop connection window. Once connected, you can use your dual monitors as if you were physically sitting in front of the remote computer.
2. Can I use different resolutions for each monitor in remote desktop?
Yes, you can use different resolutions for each monitor in remote desktop. Windows 10 allows you to customize the display settings for each monitor individually. To do this, right-click on the desktop and select «Display settings». From there, you can choose the resolution, orientation, and scaling options for each monitor. These settings will be applied to the remote desktop session as well, allowing you to have different resolutions on each monitor.
Keep in mind that the remote computer needs to support the resolutions you set for each monitor. If the remote computer’s graphics card does not support a specific resolution, you may encounter display issues.
3. How do I switch between monitors in remote desktop?
To switch between monitors in remote desktop on Windows 10, you can use the keyboard shortcut «Ctrl + Alt + Left Arrow/Right Arrow». This will allow you to cycle through the available monitors connected to the remote computer. You can also use the «Display» tab in the Remote Desktop app to select a specific monitor to use during the session.
If you have a dual monitor setup and want to use both monitors simultaneously in the remote desktop session, make sure to select the «Use all my monitors for the remote session» option in the «Display» tab of the Remote Desktop app.
4. Can I use dual monitors with remote desktop on Windows 10 from a different network?
Yes, you can use dual monitors with remote desktop on Windows 10 from a different network as long as you have a stable internet connection on both the remote computer and the local computer. However, using remote desktop over a different network may introduce additional latency and slower performance compared to using it on the same network.
To ensure a smooth remote desktop experience, consider using a VPN connection between the local and remote computers or optimizing your internet connection for remote desktop usage.
5. How do I enable audio on dual monitors in remote desktop?
To enable audio on dual monitors in remote desktop on Windows 10, make sure the «Remote Computer Sound» setting is enabled in the «Local Resources» tab of the Remote Desktop app. This will allow audio to be played on both the local and remote computers simultaneously.
If you’re not hearing any audio on your remote desktop session, check the audio settings on both the local and remote computers to ensure they are not muted or set to low volume. You can also try restarting the remote desktop session to troubleshoot any audio issues.
In summary, using dual monitors with Remote Desktop on Windows 10 can greatly enhance your productivity and multitasking abilities. By following the steps outlined in this article, you can easily set up and configure your dual monitors for seamless remote desktop access.
Remember to ensure that both your local and remote computers are running Windows 10 and have the necessary hardware requirements. Additionally, make sure that you have the proper permissions and network access to establish a remote desktop connection.