
Данная настройка рекомендована Microsoft и является более безопасной, чем полное делегирование.
Настройка
Настройка сервисной учетной записи
Внимание! Данная настройка должна быть выполнена поэтапно и полностью. При незавершенной конфигурации не гарантируется корректная работа системы.
1. Создайте пользователя, который будет использоваться в качестве сервисной УЗ для балансируемых серверов. Эта УЗ будет использована в качестве удостоверения для пулов сервера.
В примере создана следующая УЗ: ServiceAdmin
2. Настройте servicePrincipalName для созданной учетной записи. Для этого выполните следующие команды (Для выполнения команд консоль должна быть запущена от имени Администратора):
-
- setspn /s HTTP/balancer indeed\ServiceAdmin
- setspn /s HTTP/balancer.indeed.local indeed\ServiceAdmin
- setspn /s HTTP/indeedam1 indeed\ServiceAdmin
- setspn /s HTTP/indeedam1.indeed.local indeed\ServiceAdmin
- setspn /s HTTP/indeedam2 indeed\ServiceAdmin
- setspn /s HTTP/indeedam2.indeed.local indeed\ServiceAdmin
HTTP/balancer — Указывается метод и имя балансировщика.
HTTP/balancer.bal.local — Указывается метод и полное имя балансировщика.
HTTP/indeedam1 — Указывается имя первого сервера Indeed AM.
HTTP/indeedam1.indeed.local — Указывается полное имя первого сервера Indeed AM.
HTTP/indeedam2 — Указывается имя второго сервера Indeed AM.
HTTP/indeedam2.indeed.local — Указывается полное имя второго сервера Indeed AM.
INDEED\ServiceAdmin — Указывается имя сервисной учетной записи в формате DOMAIN\USERNAME.
3. Находим учетную запись в ADUC.
4. Переходим на вкладку «Delegation»
5. Включаем ограниченное делегирование для учетной записи, нажимаем «Add…» и, в открывшемся окне, «Users or Computers…»:
6. Добавляем созданную ранее сервисную УЗ:
7. Нажимаем «Select All» и «OK»:
8. Нажимаем «Apply» и «OK»:
Настройки IIS на серверах Indeed AM
Данные действия необходимо выполнить на каждом балансируемом сервере Indeed AM.
В этом примере настраивается прозрачный вход в Management Console.
1. Откройте «IIS Manager» и выберете пулы приложений.
2. Для пулов IndeedAM.Core и IndeedAM.MC выберете «Advanced Settings…«.
3. Найдите «Identity» и нажмите «…«.
4. Выберите «Custom Account:», нажмите «Set…» и введите данные сервисной УЗ:
5. Во всех окнах нажмите «OK«.
6. Выберите приложение core или mc и перейдите в «Configuration Editor«.
7. Откройте конфигурацию system.webServer/security/authentication/windowsAuthentication и измените параметр «useAppPoolCredentials» в «true«. Нажмите «Apply«.
8. Проверьте провайдеры для Windows аутентификации и их порядок. Для этого откройте приложение core и mc, в пункте «IIS» выберите «Authentication«. Выберите «Windows authentication» и нажмите «Providers…«.
9. В окне «Providers» провайдеры должны располагаться как на скриншоте. Если один или оба провайдера отсутствуют или располагаются в другом порядке, то необходимо изменить/добавить, выбрав в пункте «Available Providers«.
10. Проделайте эти действия для всех необходимых приложений и пулов.
11. После выполнения всех действий перезагрузите IIS и выполните команду klist purge на каждом сервере Indeed AM. Команда klist purge выполняет сброс билетов Kerberos на компьютере.
Настройка браузеров
Для корректной работы прозрачного входа, необходимо настроить браузеры соответствующим образом.
Internet Explorer
Действия для данного браузера выполняются всегда.
1. Открываем IE -> Нажимаем шестеренку справа вверху -> «Internet options«
1.1 Если IE не удается открыть, можно перейти в Панель управления -> «Internet Options«
2. Добавить Url адреса серверов Indeed AM и балансировщика в интрасеть:
3. Возможно, потребуется включить опцию «Разрешить встроенную проверку подлинности Windows«/»Enable Integrated Windows Authentication«. После применения данной настройки необходимо перезагрузить ПК.
4. Возможно, потребуется включить опцию «Автоматический вход в сеть только в зоне интрасети«:
Chrome
- Необходимо установить и настроить шаблоны правил Chrome. Для установки шаблонов необходимо скачать архив с политиками.
- После распаковки архива необходимо скопировать из каталога «Configuration\admx» файл chrome.admx и, как минимум, каталоги en-US и ru-RU в каталог «C:\Windows\PolicyDefinitions».
- Далее открыть «Редактор локальной групповой политики» (gpedit.msc) и включить настройку «Конфигурация компьютера -> Административные шаблоны-> Google -> Google Chrome -> HTTP-аутентификация -> Список разрешенных серверов для аутентификации и в параметрах прописать домен, например «*.indeed.local».
Настройка через реестр
В ветке «HKEY_LOCAL_MACHINE\SOFTWARE\Policies\Google\Chrome» добавить строковой параметр «AuthServerAllowlist» и в значении указать домен, например «*.indeed.local».
Файл с выгрузкой реестра для данного примера приложен (Chrome Kerberos.reg).
Firefox
- Необходимо скачать политики.
- После распаковки архива необходимо скопировать из каталога «windows» файлы admx и, как минимум, каталоги en-US и ru-RU в каталог «C:\Windows\PolicyDefinitions».
- Далее открыть «Редактор локальной групповой политики» (gpedit.msc) и включить настройку «Конфигурация компьютера -> Административные шаблоны->Mozilla -> Firefox -> Aутентификация -> Делегированная авторизация» и в параметрах прописать домен (полностью), например «*.indeed.local».
Настройка через реестрВ ветке «HKEY_LOCAL_MACHINE\SOFTWARE\Policies\Mozilla\Firefox\Authentication\Delegated» добавить строковой параметр «1» и в значении указать домен, например «*.indeed.local».
Файл с выгрузкой реестра для данного примера приложен (Mozilla Kerberos.reg).
- Далее открыть браузер, в адресной строке набрать «about:config», затем в поиске найти параметр network.negotiate-auth.trusted-uris и задать ему значение: домен (полностью), например «indeed.local».
- Тут же, в поиске найти параметр network.automatic-ntlm-auth.trusted-uris и задать ему значение: домен (полностью), например «indeed.local».
Microsoft Edge
- Выполните загрузку архива с политиками по ссылке. Для загрузки требуется выбрать ОС, указать текущую версию браузера и нажать «Download <OS> <xx>-bit Policy«.
- После загрузки извлеките содержимое «cab» архива в необходимую директорию, после распакуйте вложенный «zip» архив.
- Скопируйте содержимое «MicrosoftEdgePolicyTemplates\windows\admx» в хранилище GPO в соответствии с требуемой локалью.
- Для настройки политики откройте: Редактор локальной групповой политики (gpedit.msc) -> Конфигурация компьютера -> Административные шаблоны -> Microsoft Edge -> Проверка подлинности HTTP.
- Выберете файл «Настройка списка разрешенных серверов проверки подлинности«.
В политике выберете «Включено» и укажите в параметре DNS машины с Admin Console или DNS балансировщика(можно указать несколько через запятую) или регулярное выражение. Например: «*.indeed.local».
Настройка через реестр
В ветке «HKEY_LOCAL_MACHINE\SOFTWARE\Policies\Microsoft\Edge» добавить строковой параметр «AuthServerAllowlist» и в значении указать домен, например «*.indeed.local».
Файл с выгрузкой реестра для данного примера приложен (Edge Kerberos.reg).
Yandex
- Необходимо скачать политики (ADMX и ADML файлы).
- Далее нужно:
- скопировать файл ADMX в каталоги C:\Windows\PolicyDefinitions и C:\Windows\SYSVOL\sysvol\<domain_name.local>\Policies\PolicyDefinitions.
- скопировать файл ADML в каталоги C:\Windows\PolicyDefinitions\<язык_ОС> и C:\Windows\SYSVOL\sysvol\<domain_name.local>\Policies\PolicyDefinitions\<язык_ОС>.
- Теперь требуется открыть «Редактор локальной групповой политики» (gpedit.msc) и включить настройку «Конфигурация компьютера -> Административные шаблоны -> Яндекс -> Яндекс Браузер -> Настройки прокси-сервера и аутентификации -> Разрешить аутентификацию на серверах из списка, в параметрах прописать домен, например «*.indeed.local».
Настройка через реестр
В ветке «HKEY_LOCAL_MACHINE\SOFTWARE\Policies\YandexBrowser» добавить строковой параметр «AuthServerAllowlist» и в значении указать домен, например «*.indeed.local».
Файл с выгрузкой реестра для данного примера приложен (Yandex Kerberos.reg).
Отладка
Если все действия были проделаны, но при входе в MC возникает 401 ошибка, то попробуйте следующие действия:
- Выполните команду klist purge;
- Перезагрузите машину;
- Очистите кеш и cookie-файлы браузера;
- Закройте все вкладки браузера и перезапустите его;
- На странице с 401 ошибкой, перезагрузите страницу.
- Соберите трафик WireShark с пакетами Kerberos и отправьте нам.
Поделиться через
В этом разделе для ИТ-специалистов перечислены источники документации по способам проверки подлинности и входа в систему в Windows, которые включают оценку продукта, руководства по началу работы, процедуры, руководства по разработке и развертыванию, технические справочники и справочники по командам.
Описание функции
Проверка подлинности — это процесс проверки удостоверения объекта, службы или пользователя. Задача проверки подлинности объекта заключается в проверке подлинности объекта. Целью проверки подлинности службы или пользователя является проверка подлинности предоставленных учетных данных.
В контексте сети проверка подлинности — это подтверждение удостоверения сетевого приложения или ресурса. Как правило, удостоверение подтверждается криптографической операцией, которая использует только ключ, который знает только пользователь , как с криптографией открытого ключа или общим ключом. Во время проверки подлинности на стороне сервера выполняется сравнение подписанных данных с известным криптографическим ключом для проверки попытки проверки подлинности.
Благодаря тому что криптографические ключи хранятся в безопасном центральном местоположении, процесс проверки подлинности можно масштабировать и поддерживать. службы домен Active Directory — это рекомендуемая технология и по умолчанию для хранения сведений об удостоверениях (включая криптографические ключи, которые являются учетными данными пользователя). Служба каталогов Active Directory необходима для реализаций NTLM и Kerberos по умолчанию.
Методы проверки подлинности варьируются от простого входа, который определяет пользователей на основе того, что знает только пользователь , например пароль, к более мощным механизмам безопасности, которые используют то, что пользователь имеет — например, маркеры, сертификаты открытого ключа и биометрические данные. В бизнес-среде службы или пользователи могут открывать множество приложений или ресурсов на различных типах серверов из одного или многих местоположений. Поэтому проверка подлинности должна поддерживать среды для других платформ и других операционных систем Windows.
Операционная система Windows реализует набор протоколов проверки подлинности по умолчанию, включая Kerberos, NTLM, протокол TLS/SSL и дайджест, в рамках расширяемой архитектуры. Кроме того, некоторые протоколы объединены в пакеты проверки подлинности, такие как поставщик поддержки согласования и безопасности учетных данных. Эти протоколы и пакеты обеспечивают выполнение проверки подлинности пользователей, компьютеров и служб; процесс проверки подлинности, в свою очередь, позволяет авторизованным пользователям и службам осуществлять безопасный доступ к ресурсам.
Дополнительные сведения о проверке подлинности Windows, включая:
-
Основные понятия проверки подлинности Windows
-
Сценарии входа в Windows
-
Архитектура проверки подлинности Windows
-
Архитектура интерфейса поставщика поддержки безопасности
-
Процедуры с учетными данными в проверке подлинности Windows
-
Параметры групповой политики в проверке подлинности Windows
См. технический обзор проверки подлинности Windows.
Практическое применение
Проверка подлинности Windows используется для проверки сведений, поступающих от доверенного источника, пользователя или объекта компьютера, например другого компьютера. Windows предоставляет множество различных способов достижения этой цели, как описано ниже.
| Кому… | Возможность | Описание |
|---|---|---|
| Проверка подлинности в домене Active Directory | Kerberos | Операционные системы Microsoft Windows Server реализуют протокол проверки подлинности Kerberos версии 5 и расширения для проверки подлинности с помощью открытого ключа. Клиент проверки подлинности Kerberos применяется в качестве поставщика поддержки безопасности (SSP), и получить к нему доступ можно через интерфейс поставщика поддержки безопасности (SSPI). Начальная проверка подлинности пользователя интегрирована в архитектуру единого входа Winlogon. Центр распространения ключей Kerberos (KDC) встроен в другие службы безопасности Windows Server, работающие на контроллере домена. KDC использует базу данных службы active Directory домена в качестве базы данных учетной записи безопасности. Служба каталогов Active Directory необходима для реализаций Kerberos по умолчанию.
Дополнительные ресурсы см. в разделе «Обзор проверки подлинности Kerberos». |
| Безопасная проверка подлинности в сети | Протокол TLS/SSL в качестве реализованного в Schannel поставщика поддержки безопасности | Протокол TLS версии 1.0, 1.1 и 1.2, протокол SSL, версии 2.0 и 3.0, протокол datagram Transport Layer Security версии 1.0 и протокол p.1.0, а также протокол «Частный транспорт связи» версии 1.0, основан на криптографии открытого ключа. Эти протоколы предоставляются в наборе протоколов проверки подлинности поставщика безопасности Channel (Schannel). Все протоколы Schannel используют модель клиента и сервера.
Дополнительные ресурсы см. в разделе TLS — SSL (Schannel SSP). |
| Проверка подлинности веб-службы или приложения | Встроенная проверка подлинности Windows
Дайджест-проверка подлинности |
Дополнительные ресурсы см. в разделах Встроенная проверка подлинности Windows, Дайджест-проверка подлинности и Расширенная дайджест-проверка подлинности. |
| Проверка подлинности приложений прежних версий | NTLM | NTLM — это протокол проверки подлинности в стиле ответа на вызовы. В дополнение к проверке подлинности протокол NTLM дополнительно обеспечивает безопасность сеанса, в частности целостность сообщений и конфиденциальность, путем подписывания и запечатывания функций в NTLM.
Дополнительные ресурсы см. в разделе «Обзор NTLM». |
| Использование многофакторной проверки подлинности | Поддержка смарт-карты
Поддержка биометрии |
Смарт-карты являются портативными, защищенными от несанкционированного вмешательства устройствами, которые позволяют решить проблемы безопасности в таких областях, как идентификация клиентов, вход в домены, подписывание кода и защита электронной почты.
Биометрия основывается на измерении неизменных физических характеристик человека для его уникальной идентификации. Отпечатки пальцев — наиболее часто используемые биометрические характеристики. Существуют миллионы встроенных в персональные компьютеры и периферийные устройства биометрических устройств для снятия отпечатков пальцев. Дополнительные ресурсы см. в техническом справочнике по смарт-картам. |
| Осуществление локального управления, хранения и повторного использования учетных данных | Управление учетными данными
Локальная система безопасности Пароли |
Диспетчер учетных данных системы Windows обеспечивает безопасное хранение учетных данных. Через приложения и веб-сайты учетные данные собираются на безопасном рабочем столе (для локального доступа и доступа к домену), поэтому каждый раз при доступе к ресурсу предоставляются правильные учетные данные. |
| Расширение современной защиты устаревших систем с помощью проверки подлинности | Расширенная защита для проверки подлинности | Эта функция улучшает защиту и обработку учетных данных во время проверки подлинности сетевых подключений с помощью встроенной проверки подлинности Windows (IWA). |
Требования к программному обеспечению
Проверка подлинности Windows совместима с более ранними версиями операционной системы Windows. Однако это не значит, что усовершенствования новых выпусков будут работать в более ранних версиях. Дополнительные сведения см. в документации по определенным функциям.
Сведения о диспетчере сервера
Многие функции проверки подлинности можно настроить с помощью групповой политики, которую можно установить с помощью диспетчера сервера. Функция биометрической платформы Windows устанавливается с помощью диспетчера сервера. Другие роли сервера, зависящие от методов проверки подлинности, такие как веб-сервер (IIS) и службы доменов Active Directory, также можно установить с помощью диспетчера сервера.
| Технологии проверки подлинности | Ресурсы |
|---|---|
| Проверка подлинности Windows | Технический обзор проверки подлинности Windows Разделы, описывающие различия между версиями, общие понятия проверки подлинности, сценарии входа в систему, архитектуры для поддерживаемых версий и применимые параметры. |
| Kerberos | Обзор проверки подлинности Kerberos
(Обзор ограниченного делегирования Kerberos) Технический справочник по проверке подлинности Kerberos(2003) Форум Kerberos |
| Протокол TLS/SSL и DTLS (поставщик поддержки безопасности Schannel) | Общие сведения о протоколе TLS — SSL (Schannel SSP)
Технический справочник по поставщику поддержки безопасности Schannel |
| Дайджест-аутентификация | Технический справочник по дайджест-проверке подлинности(2003) |
| NTLM | Обзор NTLM Содержит ссылки на текущие и прошлые ресурсы |
| PKU2U | Знакомство с PKU2U в Windows |
| Смарт-карта | Технический справочник по смарт-картам |
| Подтверждение компетенции | Защита учетных данных и управление ими Содержит ссылки на текущие и прошлые ресурсы Общие сведения о паролях |
(Last updated on April 30, 2025)
Windows Integrated Authentication (WIA) comes as standard with Microsoft’s own internet browsers. However, you may want the benefits that comes with it while using the internet browser of your own choosing. Thankfully you can still get the benefits of Windows Integrated Authentication (WIA) with both Chrome and Firefox browsers, but it requires some configuration to ensure that the browsers can properly handle the authentication process. We’ll run through why this is worth some brief effort and show you the practical steps you’ll need to take.
What is Windows Integrated Authentication (WIA)?
Windows Integrated Authentication allows a users’ Active Directory credentials to pass through their browser to a web server. Windows Integrated Authentication is enabled by default for Internet Explorer but not Google Chrome or Mozilla Firefox. Users who use the non-Microsoft browsers will receive a pop-up box to enter their Active Directory credentials before continuing to the website.
This adds additional steps and complexity for users who are using web based applications like self-service password reset solutions such as Specops uReset. In an effort to make this process as easy as possible for end-users, many IT administrators enable Windows Integrated Authentication for the third party browsers. This can be done with Chrome and Firefox with a few additional steps. This article will show you how to enable Windows Integrated Authentication for Google Chrome and Mozilla Firefox.
Why use Windows Integrated Authentication (WIA) for Firefox and Chrome?
Using Windows Integrated Authentication (WIA) offers several benefits, making it a popular choice in many corporate and enterprise environments. Here are some key reasons why you might want to use it on whichever browser you have equipped:
-
Enhanced Security:
- Single Sign-On (SSO): Users only need to log in once to their Windows machine, reducing the risk of password exposure and making it harder for unauthorized users to gain access.
- Strong authentication: WIA primarily uses Kerberos, which is a robust and secure protocol that provides strong authentication and reduces the risk of credential theft.
-
Improved user experience:
- Seamless access: Users can access network resources and applications without the need to re-enter their credentials, making the process more efficient and user-friendly.
- Reduced friction: Fewer login prompts mean less interruption and a smoother workflow, which can increase productivity.
-
Centralized management:
- Active Directory integration: WIA works seamlessly with Active Directory, allowing for centralized management of user accounts and permissions.
- Policy enforcement: Administrators can enforce security policies and manage user access more effectively through Active Directory.
-
Reduced administrative overhead:
- Less password management: With SSO, users are less likely to forget their passwords, reducing the number of password reset requests and support calls.
- Simplified configuration: Once set up, WIA requires minimal ongoing configuration and maintenance.
-
Compliance and auditing:
- Audit trails: WIA can help in maintaining detailed audit logs of user activities, which is crucial for compliance with regulatory requirements.
- Consistent authentication: Ensures that all users are authenticated in a consistent and secure manner, which is important for maintaining compliance standards.
-
Scalability:
- Easily scalable: WIA can be easily scaled to accommodate growing numbers of users and resources, making it suitable for large organizations.
- Flexible deployment: It can be deployed in various network environments, including both on-premises and cloud-based setups.
-
Integration with other Microsoft services:
- Integration: WIA works well with other Microsoft services and products, such as SharePoint, Exchange, and SQL Server, providing a cohesive and integrated security solution.
Configuring delegated security for Mozilla Firefox
To configure Firefox to use Windows Integrated Authentication:
1. Open Firefox.
2. In the address bar type about:config
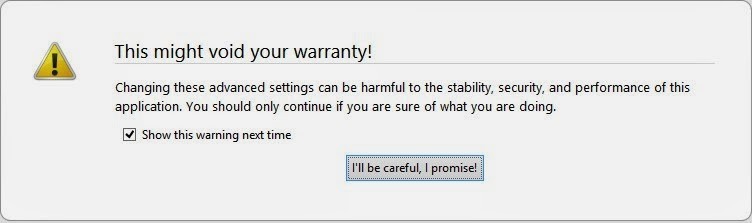
3. You will receive a security warning. To continue, click I’ll be careful, I promise.
4. You will see a list of preferences listed. Find the settings below by browsing through the list or searching for them in the search box. Once you have located each setting, update the value to the following:
| Setting | Value |
|---|---|
| network.automatic-ntlm-auth.trusted-uris | MyIISServer.domain.com |
| network.automatic-ntlm-auth.allow-proxies | True |
| network.negotiate-auth.allow-proxies | True |
** MyIISServer.domain.com should be the fully qualified name of your IIS server that you are setting up the Windows Integrated Authentication to.
Negotiate authentication is not supported in versions of Firefox prior to 2006.
Configuring delegated security in Google Chrome
Note: The latest version of Chrome uses existing Internet Explorer settings. Older version of Chrome require additional configurations (see below).
You can use three methods to enable Chrome to use Windows Integrated Authentication. Your options are the command line, editing the registry, or using ADMX templates through group policy. If you choose to use the command line or edit the registry, you could use Group Policy Preferences to distribute those changes on a broader scale. Below are the steps for the three methods:
To use the command line to configure Google Chrome
Start Chrome with the following command:
Chrome.exe –auth-server-whitelist=”MYIISSERVER.DOMAIN.COM” –auth-negotiate-delegatewhitelist=”MYIISSERVER.DOMAIN.COM” –auth-schemes=”digest,ntlm,negotiate”
To modify the registry to configure Google Chrome
Configure the following registry settings with the corresponding values:
Registry: AuthSchemes
Data type: String (REG_SZ)
Windows registry location: Software\Policies\Google\Chrome\AuthSchemes
Mac/Linux preference name: AuthSchemes
Supported on: Google Chrome (Linux, Mac, Windows) since version 9
Supported features:Dynamic Policy Refresh: No, Per Profile: No
Description: Specifies which HTTP Authentication schemes are supported by Google Chrome. Possible values are ‘basic’, ‘digest’, ‘ntlm’ and ‘negotiate’. Separate multiple values with commas. If this policy is left not set, all four schemes will be used.
Value: “basic,digest,ntlm,negotiate”
AuthServerWhitelist
Data type: String (REG_SZ)
Windows registry location: Software\Policies\Google\Chrome\AuthServerWhitelist
Mac/Linux preference name: AuthServerWhitelist
Supported on: Google Chrome (Linux, Mac, Windows) since version 9
Supported features: Dynamic Policy Refresh: No, Per Profile: No
Description: Specifies which servers should be whitelisted for integrated authentication. Integrated authentication is only enabled when Google Chrome receives an authentication challenge from a proxy or from a server which is in this permitted list. Separate multiple server names with commas. Wildcards (*) are allowed. If you leave this policy not set Chrome will try to detect if a server is on the Intranet and only then will it respond to IWA requests. If a server is detected as Internet then IWA requests from it will be ignored by Chrome.
Value: “MYIISSERVER.DOMAIN.COM”
AuthNegotiateDelegateWhitelist
Data type: String (REG_SZ)
Windows registry location: Software\Policies\Google\Chrome\AuthNegotiateDelegateWhitelist
Mac/Linux preference name: AuthNegotiateDelegateWhitelist
Supported on: Google Chrome (Linux, Mac, Windows) since version 9
Supported features: Dynamic Policy Refresh: No, Per Profile: No
Description: Servers that Google Chrome may delegate to. Separate multiple server names with commas. Wildcards (*) are allowed. If you leave this policy not set Chrome will not delegate user credentials even if a server is detected as Intranet.
Example Value: ”MYIISSERVER.DOMAIN.COM”
To use ADM/ADMX templates through Group Policy to configure Google Chrome
1. Download Zip file of ADM/ADMX templates and documentation from: https://www.chromium.org/administrators/policy-templates
2. Add the ADMX template to your central store, if you are using a central store.
3. Configure a GPO with your application server DNS host name with Kerberos Delegation Server Whitelist and Authentication Server Whitelist enabled.
Each of these three methods achieve the same results for configuring Google Chrome for Windows Integrated Authentication. The method that is best for you will depend on how your organization is set up. Personally, I would use the command line or the registry if you are deploying across an enterprise. You can easily distribute a shortcut on the user’s desktop with the command and distribute that with Group Policy preferences. If you choose to use the registry method, that is able to be distributed with Group Policy.
With a variety of third-party browsers available, many users will receive a pop-up box to enter their Active Directory credentials before continuing to an IIS hosted web application. This leads to additional steps, complexity and confusion for many end-users. By setting up Windows Integrated Authentication into Chrome and Firefox, you will be able to give your users the greatest amount of flexibility for their choice of browser as well as ease of use with your web-based applications.
Making everyday IT tasks easier for end users and IT admins is something we specialize in. Our self-service password reset solution Specops uReset guarantees end user adoption thanks to its flexible approach to multi-factor authentication.
(Last updated on April 30, 2025)
Written by
Brandon Lee
Brandon Lee has been in the industry 20+ years, is a prolific blogger focusing on networking, virtualization, storage, security & cloud, and contributes to the community through various blog posts and technical documentation primarily at Virtualizationhowto.com.
Related Articles
-
Creating a WinPE boot image with Windows 10 Drivers
Wouldn’t it be nice if you didn’t have to wait for your Windows 7, 8 and/or 8.1 NIC/Storage drivers to be imported into my WinPE Boot image every time you added a NIC driver? The Windows PE boot image in Specops Deploy 6 (the latest version) uses the Windows 10 x86/x64 Kernel, and as such,…
Read More
-
Intel I217, I218 and I219 NIC drivers in Windows PE
We receive a lot of support requests from customers that have problems with getting Windows PE to work with new hardware from HP, Dell, and Lenovo. What they all have in common is the Intel I217, I218, and I219 network interface cards. Depending on the version of Specops Deploy OS, different NIC drivers are needed….
Read More
-
Customize the Windows 10 start menu
If you are ready to install Windows 10, stop for a minute to find out how you customize the Windows 10 start menu. You will save yourself time and avoid a major hassle for your end users. We love Windows 10, but not the start menu, which still contains many icons that most users do…
Read More
Download Windows Speedup Tool to fix errors and make PC run faster
LAN Manager Authentication Level lets you set the authentication protocol for network logons. You can change the LAN Manager authentication level using the Local Group Policy Editor and the Registry Editor.

Connecting your computer to a network printer or any other computer in the same network requires an authentication protocol for the network logons. It establishes a link between your host computer and the network computer or any other device. There are six different authentication levels you can choose from, and they are:
- Send LM & NTLM responses
- Send LM & NTLM – use NTLMv2 session security if negotiated
- Send NTLM responses only
- Send NTLMv2 responses only
- Send NTLMv2 responses only. Refuse LM
- Send NTLMv2 responses only. Refuse LM & NTLM
Now, let’s say you want to connect to a network printer, but you are ending up getting an error message saying Windows cannot connect to the printer. At such a moment, changing the LAN Manager authentication level may solve the issue.
What is the LAN Manager authentication protocol?
You can change the LAN Manager authentication level using the Local Group Policy Editor and the Registry Editor. If you use Windows 11/10 Home version, use the REGEDIT method. Otherwise, either method does the same job.
Using Local Group Policy Editor
Search for gpedit.msc in the Taskbar search box, and click on the result to open the Local Group Policy Editor on your computer. Next, follow this path-
Computer Configuration > Windows Settings > Security Settings > Local Policies > Security Options
Double-click on the Network security: LAN Manager authentication level policy on your right-hand side and choose the Send LM & NTLM – use NTLMv2 session security if negotiated or any other required option from the drop-down list.
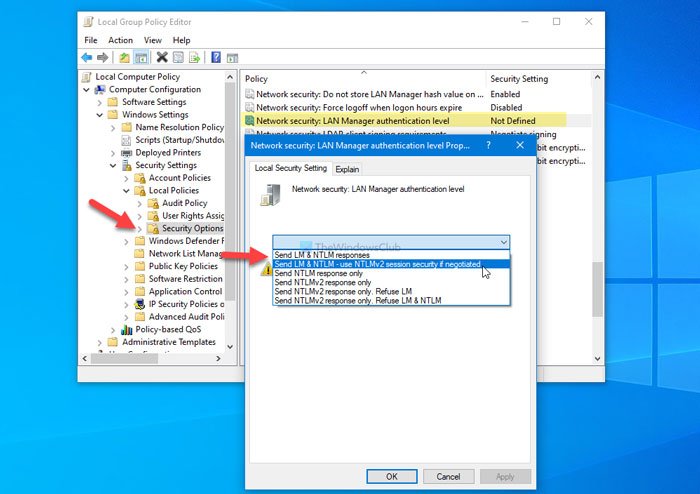
Click on the OK button to save the change.
Then, restart your computer and check if you can use your network printer or not.
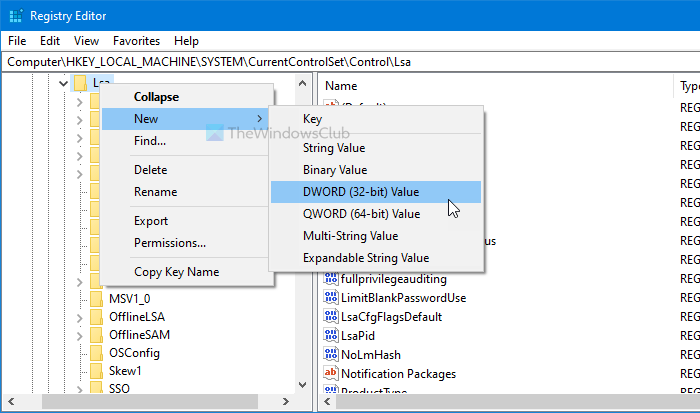
Using Registry Editor
Search for registry editor in the Taskbar search box, click on the search result, and select the Yes option to open the Registry Editor on your computer.
Then, follow this path-
HKEY_LOCAL_MACHINE\SYSTEM\CurrentControlSet\Control\Lsa
Here you have to create a REG_DWORD value. To do so, right-click on the Lsa key, select New > DWORD (32-bit) Value, and name it LmCompatibilityLevel.
Now, enter the Value data as mentioned below.
- Send LM & NTLM responses: 0
- Send LM & NTLM – use NTLMv2 session security if negotiated: 1
- Send NTLM responses only: 2
- Send NTLMv2 responses only: 3
- Send NTLMv2 responses only. Refuse LM: 4
- Send NTLMv2 responses only. Refuse LM & NTLM: 5
For that, double-click on the REG_DWORD value, enter 1 or any other Value data in the box, and click the OK button.
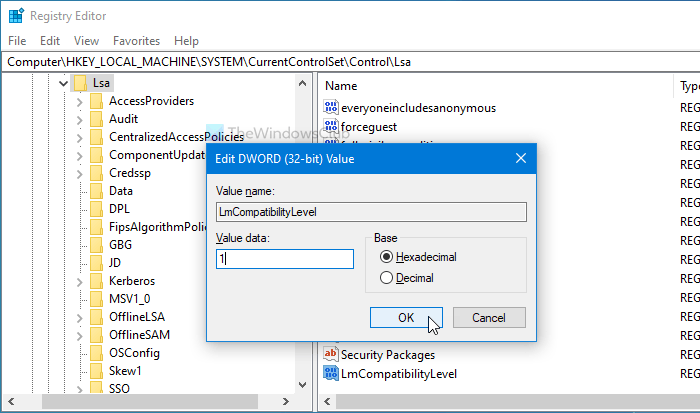
Next, restart your computer to get the change.
That’s it! This is how you can change LAN Manager authentication level in Windows 11/10.
How to check NTLM version in Windows?
To check the NTLM version in Windows, use the command line tool by running nltest /sc_query:domain in Command Prompt. This displays domain controller details showing which authentication protocols, including NTLM version, are in use. Regularly updating Windows ensures the latest security protocols are utilized, keeping your system secure.
What is the default value of Lmcompatibilitylevel in Windows?
The default value of LmCompatibilityLevel in Windows 11/10 is 3. This setting allows the system to use LM and NTLMv1 authentication if necessary but prefers NTLMv2 if the server supports it.
When he is not writing about Microsoft Windows or Office, Sudip likes to work with Photoshop. He has managed the front end and back end of many websites over the years. He is currently pursuing his Bachelor’s degree.
Usually in practice, biometrics considered as more secure sign-in options when you login to Windows. The reason behind this is the unique identity verification these biometrics sign-in options provide. Being an administrator of your system, you can allow users to log on using biometrics in Windows 11. This will help you to increase the security of your user’s systems as well as of your workplace or organization. In this article, we will see how you can enable use of biometrics for login in Windows 11.
When you enable use of biometrics for login, users can use biometrics sign-in options to enter into their account. Also, they can use biometrics sign-in options with User Account Control (UAC) prompts. Note that if users are on a domain-based systems, you need to first deploy Allow domain users to log on biometrics policy before below steps.
Page Contents
Method 1: Using Group Policy
1. Open Group Policy Editor snap-in.
2. In the Group Policy Editor window, navigate here:
Computer Configuration > Administrative Templates > Windows Components > Biometrics
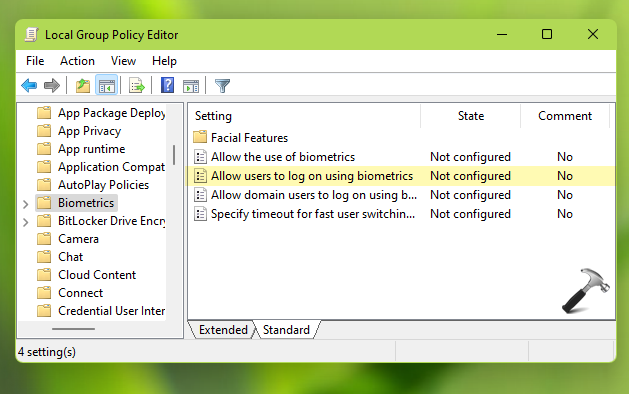
3. In the right pane of Biometrics, locate Allow users to log on using biometrics policy setting. Double click to modify the policy.
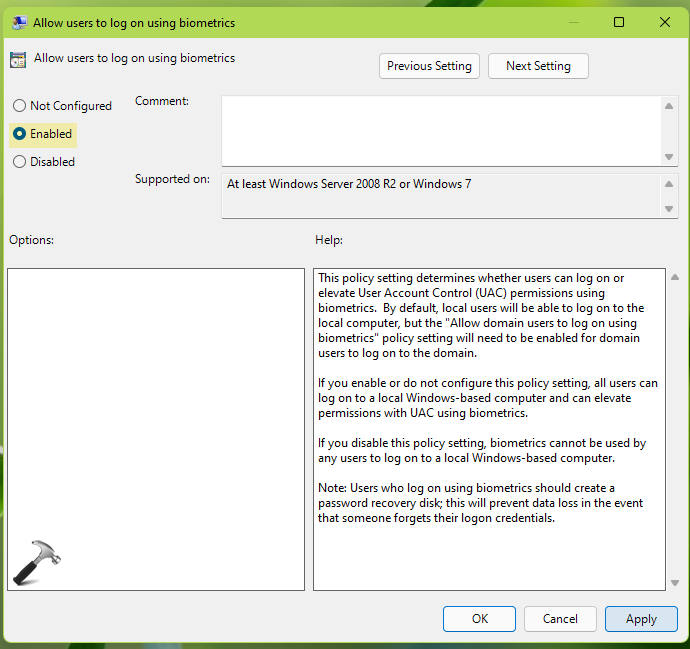
4. In the policy configuration window, select Enabled and click Apply, OK.
5. Close Group Policy Editor and update GP engine to make changes effective.
Method 2: Using Registry
Registry Disclaimer: It is recommended to create a System Restore point first, if you’re not familiar with registry manipulation.
1. Run regedit command to open Registry Editor.
2. In the Registry Editor window, navigate to:
HKEY_LOCAL_MACHINE\SOFTWARE\Policies\Microsoft
3. On the Microsoft registry key, right click and select New > Key. Name the newly created registry sub-key as Biometrics. Again create a sub key next to Biometrics and name it as Credential Provider. In the right pane of Credential Provider, create Enabled named registry DWORD and set it to 1 as Value data.
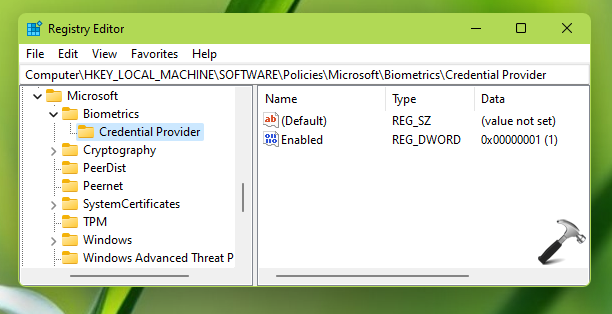
4. Close Registry Editor and restart your system to make changes effective.
You can also enable specific biometric sign-in with these steps:
1. Open Command Prompt and execute the following command to get your user account’s SID:
wmic user account get name, Sid
2. Go to the following registry key:
HKEY_LOCAL_MACHINE\SOFTWARE\Microsoft\Windows\CurrentVersion\Authentication\LogonUI\UserTile
3. Locate your current account’s SID on the right pane, and double-click on it to modify.
4. Type {D6886603-9D2F-4EB2-B667-1971041FA96B} in the Value data field and click OK. This GUID will enable PIN as biometric sign-in. For other sign-in options, you can use following GUIDs:
- Picture Logon: {2135F72A-90B5-4ED3-A7F1-8BB705AC276A}
- Password: {60B78E88-EAD8-445C-9CFD-0B87F74EA6CD}
- Fingerprint Logon: {BEC09223-B018-416D-A0AC-523971B639F5}
5. Reboot your computer and it will the sign-in option you’ve use GUID for in step 4.
That’s it!
Related: Download Windows 11 Administrative Templates.