
Протокол Remote Desktop Protocol (RDP) позволяет удаленно подключиться к рабочему столу компьютера с Windows и работать с ним, как будто это ваш локальный компьютер. По умолчанию RDP доступ в Windows запрещен. В этой статье, мы покажем, как включить и настроить RDP доступ в Windows 10 и Windows Server 2016/2019.
Содержание:
- Включаем удаленный рабочий стол в Windows 10
- Как включить RDP доступ с помощью PowerShell?
- RDP доступ к Windows Server 2016/2019
- Включение RDP с групповых политик в домене Active Direcrtory
- Как удаленно включить RDP на компьютере Windows?
Включаем удаленный рабочий стол в Windows 10
Самый простой способ включить RDP доступ в Windows – воспользоваться графическим интерфейсом.
Откройте свойства системы через панель управления, или выполнив команду SystemPropertiesRemote.
Перейдите на вкладку Remote Settings (Удаленный доступ), включите опцию Allow remote connection to this computer (Разрешить удалённые подключения к этому компьютеру).
В целях безопасности желательно разрешить подключение только с клиентов RDP с поддержкой протокола NLA (Allow connections only from computers running Remote Desktop with Network Level Authentication/ Разрешить подключение только с компьютеров, на которых работает удаленный рабочий стол с проверкой подлинности на уровне сети).

Сохраните изменения, нажав ОК.
По умолчанию право на подключение к компьютеру через RDP есть только у членов группы локальных администраторов. Если вам нужно разрешить RDP доступ другим пользователям, нажмите кнопку Select Users.
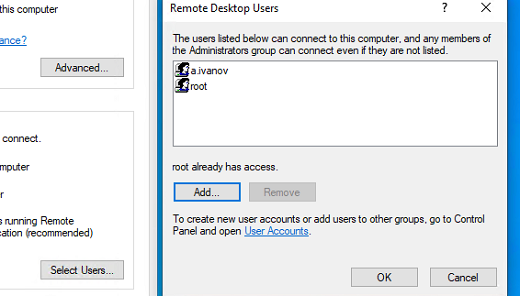
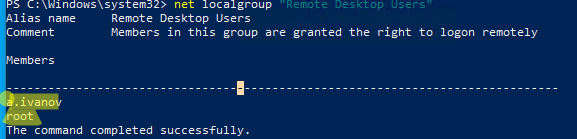
Все пользователи, которых вы укажете здесь будет добавлены в локальную группу Remote Desktop Users. Вы можете в командной строке вывести список пользователей в этой группе:
net localgroup "Remote Desktop Users"
или
net localgroup “Пользователи удаленного рабочего стола”
Чтобы добавить нового пользователя в группу доступа RDP, выполните:
net localgroup "Remote Desktop Users" /add publicuser
В русской версии Windows измените название группы на “Пользователи удаленного рабочего стола”.
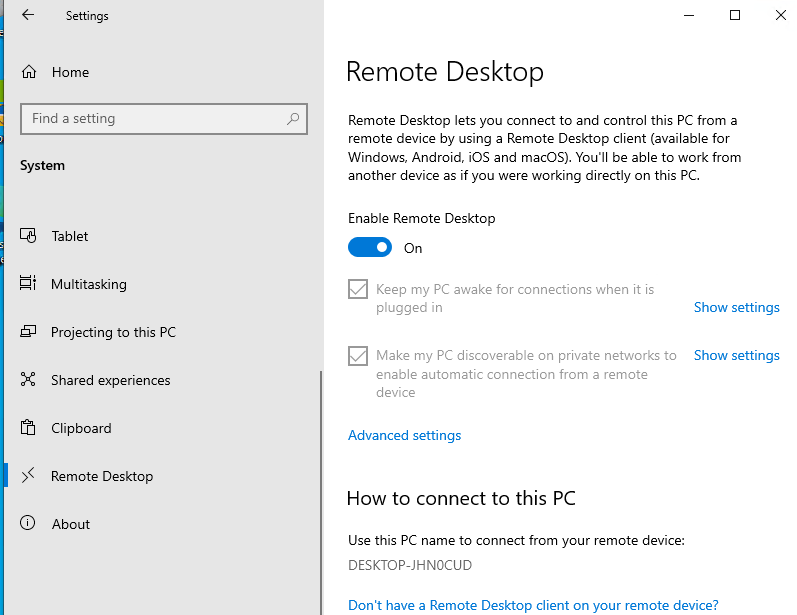
В новых билдах Windows 10 классическая панель для включения RDP доступа теперь спрятана и Microsoft рекомендует пользоваться новой панелью Setting.
- Перейдите в Settings -> System —> Remote Desktop;
- Включите опцию Enable Remote Desktop;

- Подтвердите включение RDP на компьютере.
Обратите внимание, что вы не можете включить RDP доступ к редакции Windows 10 Home. RDP сервер работает только на Windows 10 Pro и Enterprise. Впрочем, есть обходное решение.
Обратите внимание, что по умолчанию при включении Remote Desktop, включаются две опции:
- Keep my PC awake for connection when it is plugged in ;
- Make my PC discoverable on private networks to enable automatic connection from a remote device
На жмите на ссылку “Advanced settings”. Здесь можно включить использование протокола “Network Level Authentication” для RDP подключений (рекомендуется).
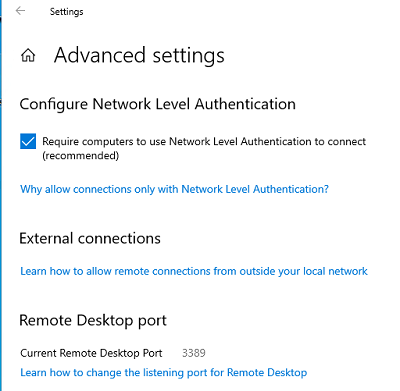
Если на компьютере включен Windows Defender Firewall (брандмауэр), то нужно проверить, что в нем разрешены входящие RDP подключения. По умолчанию для RDP подключений используется порт TCP
3389
, а в последних билдах Windows также используется
UDP 3389
( см. статью про кейс с черным экраном вместо рабочего стола при RDP доступе).
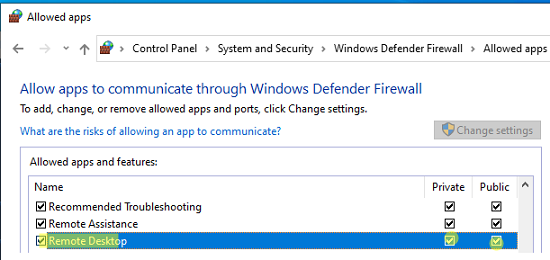
Перейдите в панель управления и выберите элемент Windows Defender Firewall. Откройте список стандартных правил брандмауэра Windows, щелкнув в левом столбце по ссылке Allow an app or feature through Windows Firewall.
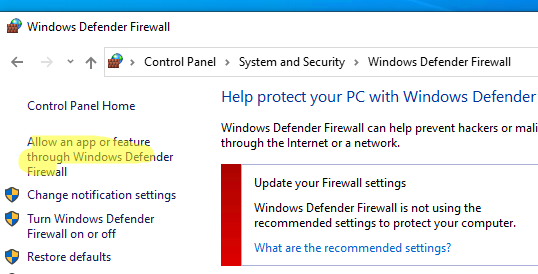
Проверьте, что правило Remote Desktop включено для профиля Private (домашняя или рабочая сеть) и, если необходимо, для профиля Public (общедоступные сети).
Подробнее про типы сетей и профили брандмауэра Windows здесь.
Если нужно, вы можете дополнительно ограничить длительность RDP сессий с помощью GPO.
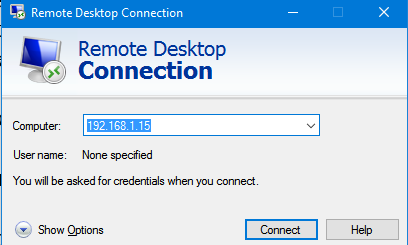
Теперь к данному компьютеру можно подключится с помощью RDP клиента. Встроенный RDP клиент Windows –
mstsc.exe
. Он сохраняет всю историю RDP подключений с компьютера. Поддерживается копирование файлов между локальным и удаленным компьютером прямо через буфер обмена RDP.
Также вы можете использовать менеджеры RDP подключений, такие как RDCMan или mRemoteNG, или альтернативные клиенты.
Для удобства пользователей пароль для RDP подключения можно сохранить в Windows Credential Manager.
Как включить RDP доступ с помощью PowerShell?
Вы можете включить RDP доступ в Windows с помощью пары PowerShell команд. Это гораздо быстрее:
- Запустите консоль PowerShell.exe с правами администратора;
- Включите RDP доступ в реестре с помощью командлета Set-ItemProperty:
Set-ItemProperty -Path 'HKLM:\System\CurrentControlSet\Control\Terminal Server' -name "fDenyTSConnections" -value 0Чтобы закрыть RDP доступ, измените значение fDenyTSConnections на 1.
- Разрешите RDP подключения к компьютеру в Windows Defender Firewall. Для этого включите предустановленное правило :
Enable-NetFirewallRule -DisplayGroup "Remote Desktop"
- Если нужно добавить пользователя в группу в локальную группу RDP доступа, выполните:
Add-LocalGroupMember -Group "Remote Desktop Users" -Member 'a.petrov'

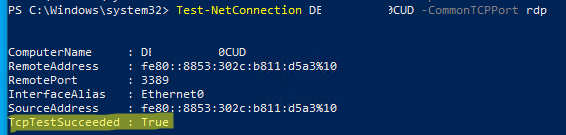
Чтобы проверить, что на компьютере открыт RDP порт, воспользуйтесь командлетом Test-NetConnection:
Test-NetConnection -ComputerName deskcomp323 -CommonTCPPort rdp
RDP доступ к Windows Server 2016/2019
В отличии от десктопной редакции Windows 10, в Windows Server по умолчанию поддерживается два одновременных RDP подключения. Эти подключения используются администраторами для управления сервером.
Включается RDP в Windows Server аналогично. Через SystemPropertiesRemote, через Server Manager или командами PowerShell, рассмотренными выше.
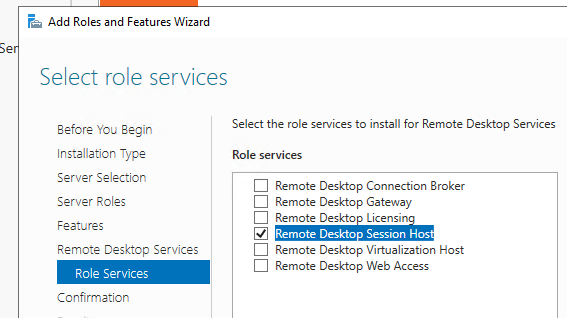
Вы можете использовать Windows Server в качестве терминального сервера. В этом случае множество пользователей могут одновременно подключаться к собственному рабочему столу на сервере. Для этого нужно установить и настроить на сервере роль Remote Desktop Session Host. Это требует приобретения специальных RDS лицензии (CAL). Подробнее о RDS лицензировании здесь.
Для дополнительно защиты RDP сессий можно использовать SSL/TLS сертификаты.
Включение RDP с групповых политик в домене Active Direcrtory
Если вам нужно включить RDP доступ сразу на большом количестве компьютеров, можно воспользоваться групповыми политиками (GPO). Мы подразумеваем, что все компьютеры включены в домен Windows.
- Запустите консоль управления доменными GPO
gpmc.msc
; - Создайте новую (или отредактируйте уже существующую) групповую политику и привяжите ее к целевой OU с компьютерами или серверами;
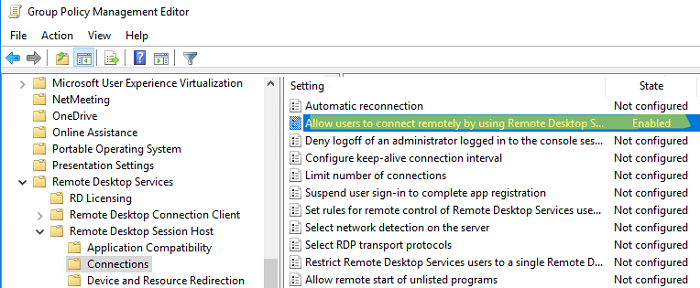
- Переключитесь в режим редактирования политики и перейдите в секцию GPO Computer Configuration -> Administrative Templates -> Windows Components -> Remote Desktop Services -> Remote Desktop Session Host -> Connections;
- Найдите и включите политику Allow Users to connect remotely by using Remote Desktop Services, установив ее в Enable;
- Обновите параметры групповых политик на клиентах;
- После применения данной политики вы сможете подключится ко всем компьютерам по RDP (политика применится как к десктопным клиентам с Windows 10, так и к Windows Server). Если нужно, вы можете более тонко нацелить политики на компьютеры с помощью WMI фильтров GPO.
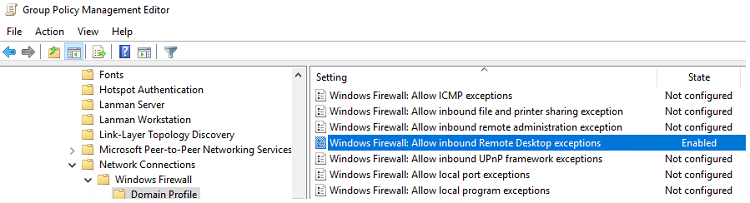
- Если на компьютерах включен Windows Defender Firewall, нужно в этой же GPO разрешить RDP-трафик для доменного профиля. Для этого нужно активировать правило Windows Firewall: Allow inbound Remote Desktop Exceptions (находится в разделе Computer Configuration -> Administrative Templates -> Network -> Network Connections -> Windows Firewall -> Domain Profile).
Подробнее о настройке правил брандмаура Windows через GPO рассказано здесь.
Как удаленно включить RDP на компьютере Windows?
Также вы можете удаленно включить RDP на любом компьютере Windows. Для этого у вас должен быть удаленный доступ к этому компьютеру (через PowerShell или WMI) и ваша учетная запись состоять в группе локальных администраторов на этом компьютере.
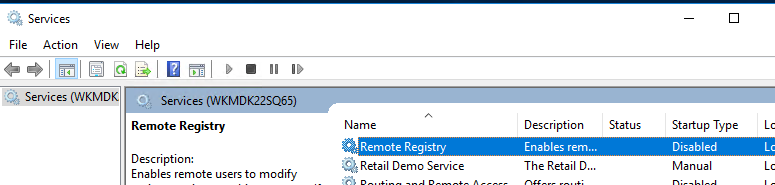
Вы можете удаленно включить RDP через реестр. Для этого на удаленном компьютере должна быть включена служба Remote Registry (по умолчанию она отключена). Чтобы запустить службу:
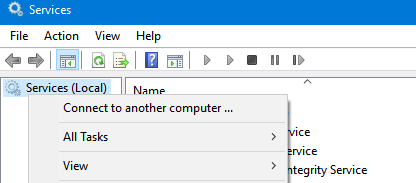
- Запустите консоль управления службами (
services.msc
); - Выберите Connect to another computer и укажите имя удаленного компьютера;
- Найдите в списке службу Remote Registry, измените тип запуска на Manual (ручной) и затем запустите службу – Start.
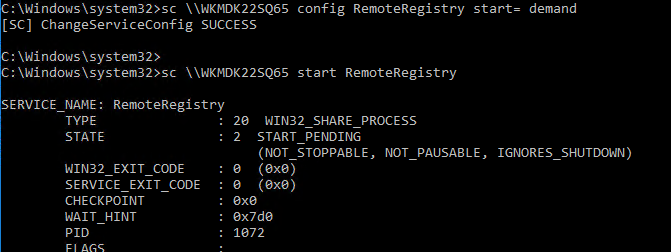
Тоже самое можно выполнить удаленно из командной строки с помощью встроенной утилиты
sc
(позволяет создавать, управлять или удалять службы Windows):
sc \\WKMDK22SQ65 config RemoteRegistry start= demand
sc \\WKMDK22SQ65 start RemoteRegistry
Затем на локальном компьютере
- Запустите редактор реестра
regedit.exe - Выберите в меню Файл пункт Connect Network Registry (Подключить сетевой реестр)
- Укажите имя или IP адрес удаленного компьютера, на котором нужно включить службу RDP;
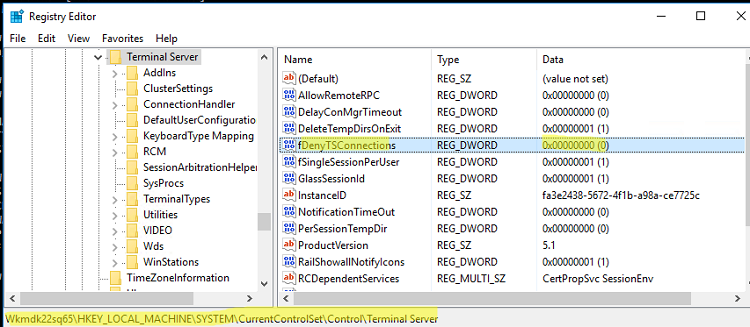
- Перейдите в раздел
HKEY_LOCAL_MACHINE\SYSTEM\CurrentControlSet\Control\Terminal Server
; - Найдите параметр fDenyTSConnections (тип REG_DWORD). Если данный ключ отсутствует – создайте его. Измените его значение на 0, чтобы включить RDP.
Для отключения RDP доступа нужно изменить значение fDenyTSConnections на 1.
Сразу после этого без перезагрузки удаленный компьютер должен стать доступным по RDP.
Но гораздо быстрее можно включить RDP в реестре удаленого компьютера через командную строку:
REG ADD "\\WKMDK22SQ65\HKLM\SYSTEM\CurrentControlSet\Control\Terminal Server" /v fDenyTSConnections /t REG_DWORD /d 0 /f
Если на удаленном компьютере настроен PowerShell remoting, вы можете выполнить на нем удаленную команду через Invoke-Command:
Invoke-Command -Computername WKMDK22SQ65 -ScriptBlock {Set-ItemProperty -Path "HKLM:\System\CurrentControlSet\Control\Terminal Server" -Name "fDenyTSConnections" –Value 0}
Если в Windows установлен OpenSSH сервер, вы можете подключиться к нему любым ssh клиентом и внести изменения в реестр в локальной ssh сессии.
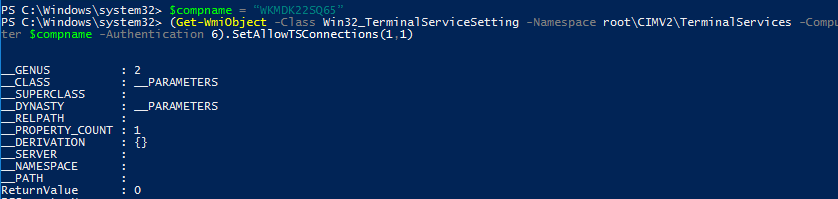
Также вы можете подключиться к удаленному компьютеру и включить RDP через WMI:
$compname = “WKMDK22SQ65”
(Get-WmiObject -Class Win32_TerminalServiceSetting -Namespace root\CIMV2\TerminalServices -Computer $compname -Authentication 6).SetAllowTSConnections(1,1)

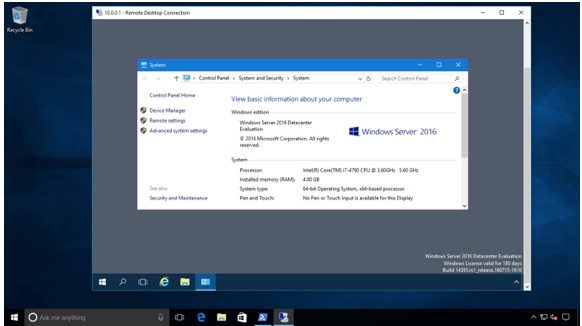
Remote Desktop Protocol (RDP) is a Microsoft-proprietary remote access protocol that is used by Windows systems administrators to manage Windows Server systems remotely. What sets RDP apart from, say, Windows PowerShell or Secure Shell (SSH) remoting is the presence of the full graphical desktop, as shown in Figure 1.
MORE: Best Remote Access Software and Solutions
By default, the RDP server component listens for incoming connections on TCP port 3389 by default, although this can be changed by the administrator for security reasons.
To be sure, Microsoft’s current push is for admins to reduce their reliance upon RDP and instead (a) deploy Windows Servers in Server Core or Nano mode; and (b) employ Windows PowerShell command-line remote administration instead of RDP.
Microsoft’s justification for this advice is two-fold:
- A GUI layer consumes unnecessary system resources
- A GUI layer broadens the attack surface of your servers
Regardless, many admins are accustomed to RDP-based remote administration, and seek to do so even in the newly released Windows Server 2016 operating system. Let’s learn how to enable RDP in Server 2016 (tl;dr: the process is identical to Windows Server 2012 R2).
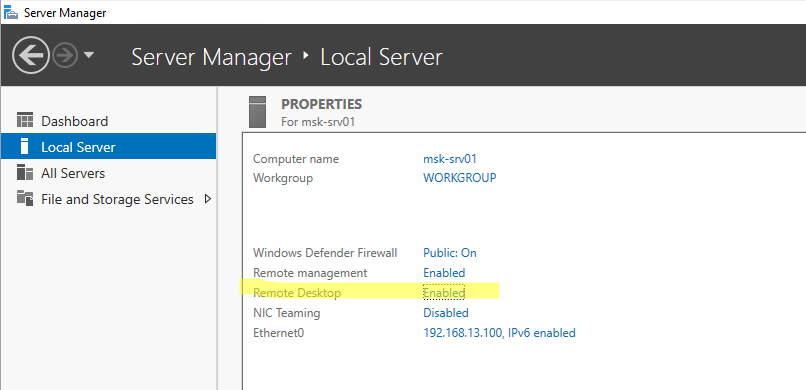
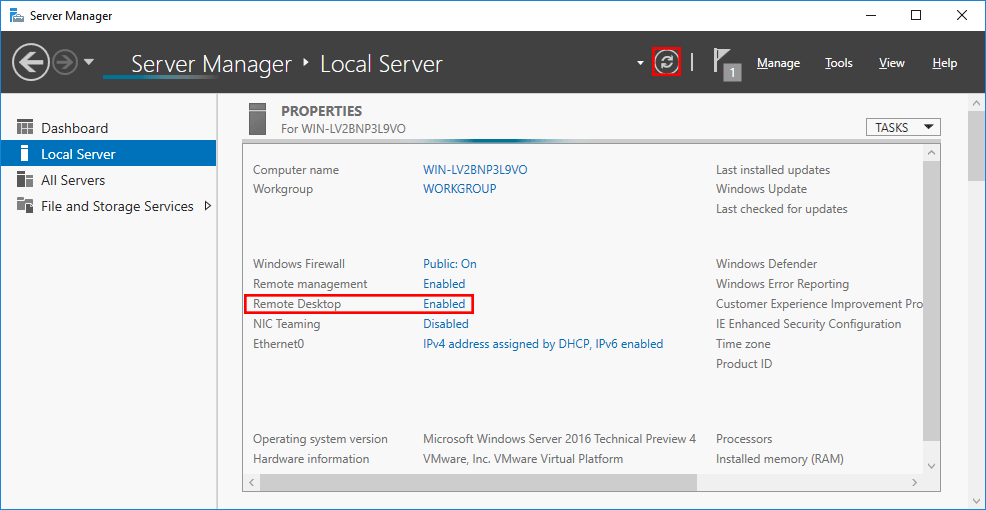
Server Manager
Open the Server Manager console, navigate to the Local Server node, and click the Remote Desktop hyperlink as shown in Figure 2.
Get Tom’s Hardware’s best news and in-depth reviews, straight to your inbox.
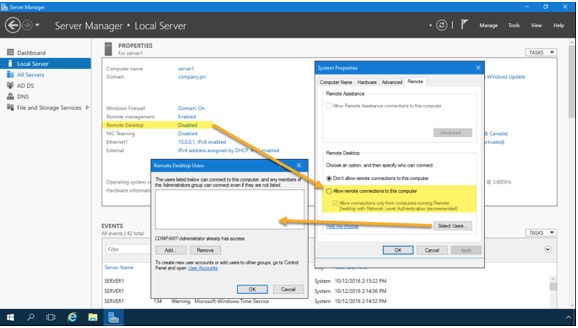
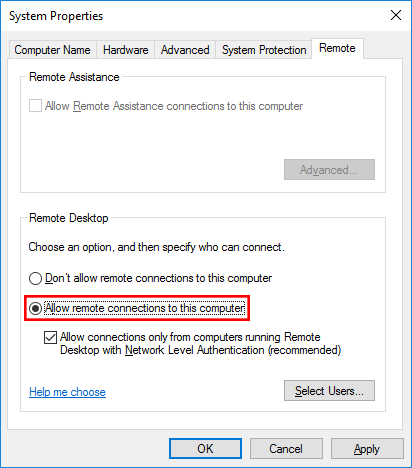
The Remote Desktop hyperlink is simply a shortcut to the System Properties sheet from the System Control Panel item. Select Allow remote connections to this computer, and optionally enable Allow connections only from computers running Remote Destkop with Network Level Authentication (recommended).
Network Level Authentication (NLA) protects Windows Server against denial-of-service (DoS) attacks by requiring authentication to take place before any graphical session is established by the server. NLA also conserves server system resources.
Windows PowerShell
From a lower-level perspective, incoming RDP connections are enabled on a server through two Registry values and a Windows Firewall rule.
Open an elevated Windows PowerShell session and run the following commands. This first one creates the fDenyTSConnections value and sets it to 0 (off). This makes sense, because we don’t want to deny Terminal Services (TS) connections.
New-ItemProperty -Path ‘HKLM:SystemCurrentControlSetControlTerminal Server’ -Name ‘fDenyTSConnections’ -Value 0 -PropertyType dword -Force
The next command creates and enables the UserAuthentication (Network Layer Authentication) value; NLA is a good idea and you should consider enabling it by default on your servers.
New-ItemProperty -Path ‘HKLM:SystemCurrentControlSetControlTerminal ServerWinStationsRDP-Tcp’ -Name ‘UserAuthentication’ -Value 1 -PropertyType dword -Force
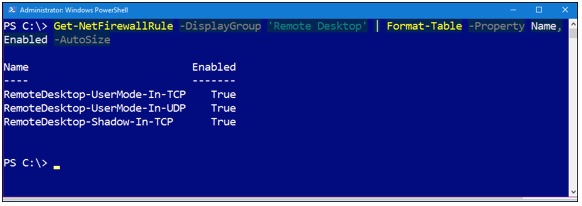
The next command enables the predefined «Remote Desktop» Windows Firewall rule. We can then invoke the Get-NetFirewallRule PowerShell cmdlet to verify as shown in Figure 3.
Enable-NetFirewallRule -DisplayGroup ‘Remote Desktop’
Group Policy
The chances are good that you want to standardize RDP behavior across all your infrastructure servers. Therefore, we turn to Group Policy to accomplish this goal.
Start by creating, linking and scoping a new Group Policy Object (GPO) that targets the servers that should share RDP server settings.
Next, navigate to the following Group Policy path and add a new Restricted Groups entry (shown in Figure 4):
Computer ConfigurationPoliciesWindows SettingsSecurity SettingsRestricted Groups
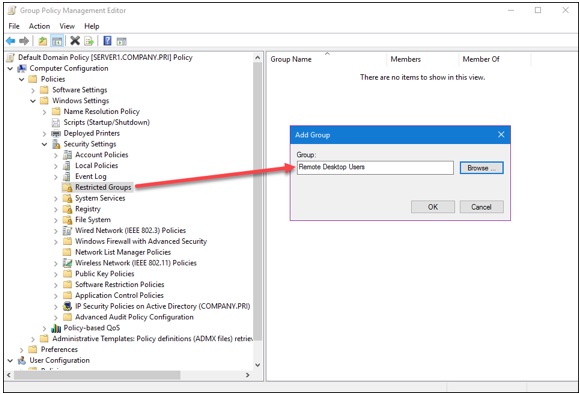
You can customize the membership in the servers’ built-in Remote Desktop Users group; members of this group can establish RDP sessions to the server. Note that the local Administrators group (and, by extension, the Domain Admins global group) is automatically granted this privilege in Active Directory.
The following three Group Policy settings govern:
- Windows Firewall incoming RDP exceptions
- User right to establish RDP sessions
- Requiring NLA
Computer ConfigurationAdministrative TemplatesNetworkNetwork ConnectionsWindows FirewallDomain ProfileWindows Firewall: Allow Inbound Remote Desktop exceptions
Computer ConfigurationAdministrative TemplatesWindows ComponentsRemote Desktop ServicesRemote Desktop Session HostConnectionsAllow user to connect remotely by using Remote Desktop Services
Computer ConfigurationAdministrative TemplatesWindows ComponentsRemote Desktop ServicesRemote Desktop Session HostSecurityRequire user authentication for remote connections by using NLA
Creating the Client Connection
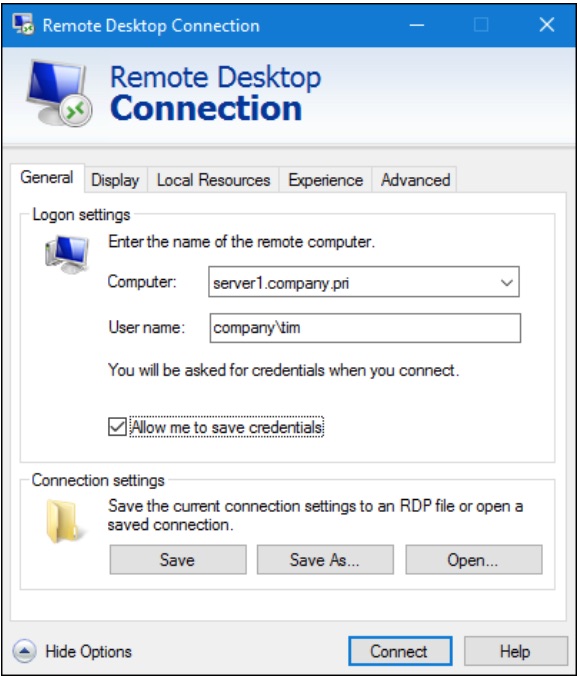
Windows Client and Windows Server both include the Microsoft RDP client, called Remote Desktop Connection. My favorite way to invoke this tool is to:
Press WINDOWS KEY+R
Type mstsc (which stands for «Microsoft Terminal Services Client»)
Press ENTER
I show you the Remote Desktop Connection user interface in Figure 5.
What’s cool about RDP clients is that they are available for just about every desktop or mobile operating system. Here is a representative list:
- Android: Microsoft Remote Desktop
- iOS: Microsoft Remote Desktop
- Linux: rdesktop
- macOS: Microsoft Remote Desktop
- Windows Phone: Microsoft Remote Desktop
Note that Windows Server supports only two simultaneous RDP sessions at once. If you need more than that, then you’ll have to install the Remote Desktop Services (RDS) Session Host server role and purchase additional RDS connection licenses from Microsoft.
Final Thoughts
If you’ve configured RDP on previous Windows Server versions, then you’ll find that Windows Server 2016 behaves the exact same way. Keep in mind, however, that Microsoft’s ever-widening embrace of «assume breach» security posture and the hybrid cloud scenario and its accompanying «manage herds, not pets» philosophy means the emphasis is on command-line automation rather than on-off RDP GUI sessions.
- 10 Best New Features in Windows Server 2016
- Windows 10 for IT Pros: Tutorials, Tips and Tricks
- Top 6 Windows 10 Apps for IT Pros
Enable Remote Desktop Protocol on Windows Server 2016 system allows you to manage the server remotely from any location, making it easier to perform administrative tasks, troubleshoot issues, and provide support. This article provides a comprehensive guide to enabling RDP on Windows Server 2016, ensuring a secure and efficient setup.
What is RDP?
Remote Desktop Protocol (RDP) is a proprietary protocol developed by Microsoft that allows users to connect to another personal computer over a network connection. By using RDP, you can control and manage a remote machine as if you were sitting in front of it. RDP is widely used by IT administrators, remote workers, and anyone who needs to access a computer remotely.
Why Enable RDP on Windows Server 2016?
Enabling RDP on Windows Server 2016 provides several key benefits:
- Remote Management: Easily manage your server from any location without needing physical access.
- Troubleshooting: Quickly diagnose and fix issues on the server remotely.
- Support: Provide remote support to users or clients who need assistance.
- Flexibility: Work from anywhere, improving productivity and reducing downtime.
Prerequisites for Enabling RDP on Server 2016
Before enabling RDP on your Windows Server 2016, ensure that the following prerequisites are met:
- Administrative Access: You need to have administrative privileges on the server.
- Network Configuration: The server must have a static IP address and be reachable over the network.
- Firewall Settings: Ensure that the firewall allows RDP traffic (TCP port 3389).
- Server Updates: It’s recommended to update the server with the latest security patches and updates.
Step-by-Step Guide to Enable RDP on Server 2016
Step-1: Log in to the Server
- Access the server: Log in to your Windows Server 2016 either through a physical console or an existing remote connection.
- Administrative rights: Ensure that you are logged in with an account that has administrative privileges.
Step-2: Open Server Manager
- Launch Server Manager: Click on the Start button and select Server Manager from the list of applications.
- Wait for Server Manager to load: Server Manager might take a few moments to load completely, depending on your system’s performance.
Step-3: Access System Properties
- Go to the Local Server: In Server Manager, find the Local Server option on the left-hand side and click on it.
- Locate Remote Desktop: In the Properties section, find the Remote Desktop field. By default, this will show as “Disabled.”
Step-4: Enable Remote Desktop
- Change Settings: Click on the Disabled status next to Remote Desktop. This will open the method Properties window.
- Select Allow Remote Connections: In the System Properties window, under the Remote tab, select Allow Remote Connections to this computer.
- Confirm the Security Warning: A warning message may appear, indicating that remote connections might expose your server to security risks. Check the box for Allow connections only from computers running Remote Desktop with Network Level Authentication (recommended) to enhance security.
Step-5: Configure Firewall Settings
- Open Windows Firewall: Click on the Start button, type Windows Firewall, and open Windows Firewall with Advanced Security.
- Inbound Rules: In the left-hand pane, click on Inbound Rules.
- Find RDP Rule: Scroll down the list of rules until you find the Remote Desktop Protocol – User Mode (TCP-In) rule.
- Enable Rule: Ensure that the rule is enabled. If not, right-click on it and select Enable Rule.
Step-6: Test the RDP Connection
- Find the IP Address: To connect remotely, you need the IP address of your server. You can find it by typing ipconfig in the Order Prompt.
- Open Remote Desktop Client: On a different computer, open the Remote Desktop Connection application by typing mstsc in the Run dialog (Windows + R).
- Enter IP Address: Enter the IP address of your Windows Server 2016 in the Remote Desktop Connection window.
- Connect: Click Connect and log in with your server credentials. If everything is configured correctly, you should be able to access your server remotely.
Enhancing Security for RDP on Server 2016
While RDP is a powerful tool, it can also be a target for cyberattacks. Here are a few best practices to enhance the security of your RDP setup:
- Use Strong Passwords
Ensure that all user accounts, especially those with administrative privileges, use strong and complex passwords. - Enable Network Level Authentication (NLA)
Network Level Authentication adds an extra layer of security by requiring users to authenticate before a full RDP connection is established. - Limit User Access
Restrict RDP access to only those users who want it. Use the Remote Desktop Users group to manage which users can connect remotely. - Change the Default RDP Port
By default, RDP uses TCP port 3389. Changing this port can help reduce the risk of automated attacks. - Use a VPN
Consider using a Virtual Private Network (VPN) to access your server. This adds an additional layer of security by encrypting the connection and limiting access to the internal network. - Enable Two-Factor Authentication (2FA)
Use two-factor authentication to add an extra layer of security. Tools like Duo Security can integrate with Windows Server to provide 2FA for RDP connections. - Regularly Monitor RDP Logs
Keep an eye on your RDP logs for any unusual activity. Windows Server 2016 logs RDP events, which can help you identify potential security breaches. - Apply Security Patches and Updates
Ensure that your Windows Server 2016 regularly updated with the latest security patches to protect against vulnerabilities.
Troubleshooting RDP Issues on Server 2016
Even after enabling RDP, you may encounter some common issues. Here are some troubleshooting tips:
- RDP Connection Refused
If your connection is refused, check that the RDP service is running and that the firewall rules are correctly configured. - Black Screen After Login
A black screen can indicate a problem with the RDP session. Try reconnecting or restarting the server. Ensure that the server’s display drivers are up to date. - Credential Error
If you receive a credential error, ensure that you are using the correct username and password. Also, verify that the user account has the necessary permissions to access the server remotely. - Slow Connection
A slow RDP connection may be due to network latency. Try optimizing the RDP settings by lowering the display quality or disabling features like sound and local resources. - Session Timeouts
If your RDP session frequently times out, check the session timeout settings in Group Policy or on the server. Adjusting these settings can help maintain a stable connection.
Conclusion
Enabe RDP on Windows Server 2016 is a straightforward process that significantly enhances your ability to manage and access your server remotely. By following the steps outlined in this guide, you can configure RDP securely and efficiently, ensuring that you have the tools needed for remote administration. Additionally, by applying the recommended security measures, you can protect your server from potential threats while enjoying the flexibility of remote access.
Posted by
on April 27, 2016
By default in Windows Server 2016 remote desktop is disabled.
Here we cover how to turn on and enable remote desktop protocol (RDP).
Note: In Windows Server 2016 Essentials edition, remote desktop is already enabled by default so you will not need to manually do this.
Remote desktop can be enabled through the graphical user interface (GUI) with the following easy steps.
Allowing Remote Desktop
- Open Server Manager. By default Server Manager will open when you log in to the GUI, otherwise you can select it from the task bar.
- Within the Server Manager window, select Local Server from the left hand side. You may need to wait a little for it to detect the current state of your system. You should see that Remote Desktop is listed as Disabled as shown below.

- Click on the Disabled text which will open the System Properties window in the Remote tab.
- From the System Properties window, select “Allow remote connections to this Computer” as shown below.

Tip: You can also open the System Properties window shown above by entering “SystemPropertiesRemote” into a Command Prompt or PowerShell terminal.
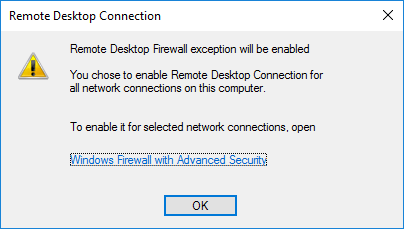
- Once you select “Allow remote connections to this computer” the below warning message will appear, advising that this will create the required firewall rules in Windows firewall to allow remote desktop traffic in from any source address, select OK to proceed.

- At this point you can optionally click the “Select Users…” button to define specific users or groups that have permission to connect via remote desktop. Select the OK button to close out of the System Properties window and enable remote desktop.
- Back in Server Manager, Remote Desktop may still show as Disabled until you refresh the view. After clicking the refresh button as highlighted below, the status should update to Enabled.

That’s it, remote desktop should now be ready to use!
Summary
By default Windows Server 2016 sets external remote desktop access to disabled as a security measure, we can easily optionally enable it from within the server console to everyone or a specific set of users or groups.
Обновлено:
Опубликовано:
Удаленный рабочий стол применяется для дистанционного администрирования системы. Для его настройки нужно сделать, буквально, несколько шагов.
Как включить
Настройка доступа
Ограничения
Доступ из Интернет
Включение
1. Открываем сведения о системе. В Windows Server 2012 R2 / 2016 или 10 кликаем правой кнопкой мыши по Пуск и выбираем Система.
В Windows Server 2012 / 8 и ниже открываем проводник или меню Пуск. Кликаем правой кнопкой по Компьютер и выбираем Свойства.
2. Настраиваем удаленный рабочий стол. В меню слева кликаем по Настройка удаленного доступа.
В открывшемся окне ставим переключатель в положение Разрешить удаленные подключения к этому компьютеру.
* желательно, если будет установлен флажок Разрешить подключение только с компьютеров, на которых работает удаленный рабочий стол с проверкой подлинности на уровне сети. Но если компьютер, с которого мы будем заходить с устаревшей операционной системой, это может вызвать проблемы.
Предоставление доступа
Очень важно, чтобы у пользователя был установлен пароль. Без него зайти в систему с использованием RDP будет невозможно — это программное ограничение. Поэтому всем учетным записям ставим пароли.
У пользователей с правами администратора права на использование удаленного стола есть по умолчанию. Чтобы обычная учетная запись могла использоваться для удаленного входа в систему, добавьте ее в группу Пользователи удаленного рабочего стола. Для этого открываем консоль управления компьютером (команда compmgmt.msc) — переходим по разделам Служебные программы — Локальные пользователи и группы — Группы и кликаем дважды по Пользователи удаленного рабочего стола:

В открывшемся окне добавляем необходимых пользователей.
Для проверки правильности настроек, используйте программу Подключение к удаленному рабочему столу (находится в меню Пуск или вызывается командой mstsc) на любом другом компьютере в сети.
Ограничение по количеству пользователей
По умолчанию, в серверных операционных системах Windows разрешено подключение для одновременно двух пользователей. Чтобы несколько пользователей (больше 2-х) могли использовать удаленный стол, необходима установка роли удаленных рабочих столов (терминального сервера) и активации терминальных лицензий — подробнее, читайте в инструкции Установка и настройка терминального сервера на Windows Server.
В пользовательских системах (Windows 10 / 8 / 7) разрешено подключение только одному пользователю. Это лицензионное ограничение. В сети Интернет можно найти патчи для его снятия и предоставления возможности подключаться удаленным рабочим столом для нескольких пользователей. Однако, это нарушение лицензионного соглашения.
Доступ через глобальную сеть (Интернет)
Для возможности подключения по RDP из вне необходим статический внешний IP-адрес. Его можно заказать у Интернет провайдера, стоимость услуги, примерно, 150 рублей в месяц (некоторые поставщики могут предоставлять бесплатно). Для подключения нужно использовать полученный внешний IP.
Если компьютер подключен к Интернету напрямую, никаких дополнительных действий не потребуется. Если мы подключены через NAT (роутер), необходима настройка проброса портов. Пример того, как это можно сделать на Mikrotik.