
В Windows Server 2016, 2019 и 2022 ICMP или Ping отключены по умолчанию, делает систему более безопасной, но иногда это приносит с собой некие сложности в мониторинге.
Поскольку команда ping говорит/показывает, что удаленный компьютер подключен к сети, то это полезная команда для системных администраторов.
Если Вам для каких-то своих целей или же для мониторинга необходимо включить ICMP пакеты, или же ping, то можно воспользоваться ниже приведенной инструкцией.
Его можно включить вручную без использования групповых политик.
Если ICMP пакеты на вашем компьютере не включены, вы получите сообщение об истечении времени ожидания.
Как включить Ping в брандмауэре Windows
Чтобы включить проверку связи в брандмауэре, выполните следующие действия:
Откройте брандмауэр, нажав Win+R и напишите команду firewall.cpl.
В открывшемся окне нажмите Advanced Settings на правой панели.
Выберите Inbound Rules на левой панели и на правой панели New Rule.
Выберите File and Printer Sharing в разделе PredefinedRules. И нажмите Next.
Выберите следующие два правила:
- Общий доступ к файлам и принтерам (Echo Request – ICMPv6-In )
- Общий доступ к файлам и принтерам (Echo Request – ICMPv4-In )
И нажмите Next.
Выберите пункт Allow the connection. Нажмите Finish .
Как включить ICMP (Ping) с командной строки или PowerShell
Для этого откройте командную строку, нажав Win+R и напишите команду cmd.
Разрешить пинг IPv4 с командной строки:
netsh advfirewall firewall add rule name="ICMP Allow Ping V4" protocol="icmpv4:8,any" dir=in action=allowРазрешить ping IPv4 с помощью PowerShell:
New-NetFirewallRule -DisplayName "ICMP Allow Ping V4" -Direction Inbound -Protocol ICMPv4 -IcmpType 8 -RemoteAddress <localsubnet> -Action AllowЕсли после тестирования и настроек необходимо отключить ICMP пакеты, то так же можем воспользоваться командной строкой для этого.
Заблокировать ping IPv4 с командной строки:
netsh advfirewall firewall add rule name="ICMP Allow Ping V4" protocol="icmpv4:8,any" dir=in action=block
Заблокировать ping IPv4 с помощью PowerShell:
New-NetFirewallRule -DisplayName "ICMP Allow Ping V4" -Direction Inbound -Protocol ICMPv4 -IcmpType 8 -RemoteAddress <localsubnet> -Action BlockТакже предлагаем рассмотреть другие полезные статьи:
- Как подключиться к серверу по FTP, SFTP и SCP
- Как установить и настроить FTP-сервер IIS на Windows Server 2019
- Как подключиться к Docker контейнеру по sFTP
This guide will teach us how to enable ping response in Windows 2019/2016 and 2012 R2 servers. Though the original post was written with the screenshots from Windows 2012 R2 server, the same steps apply to any recent Windows servers, including version 2022.
Enabling ping will help you to monitor and troubleshoot network issues on your network. The ping request will work according to your domain environment policies and settings. If it works by default, we will also show you how to disable the ping in Windows servers. We have mentioned the Powershell commands if you want to work on a remote system or Core edition of Windows OS.
Read Also: How to enable ping on Windows 10/11 client PC
1) Go to the control panel and open ‘Windows Firewall’. There are plenty of ways to reach the control panel on a Windows server.
2) Click on ‘Advanced Settings.’

Additionally, you can search for ‘Firewall’ in Windows search to reach the advanced Firewall settings as below.
3) In the earlier Operating Systems, we need to create a firewall rule to allow ICMP echo packets. Luckily the rule is already there, and we just need to enable it.
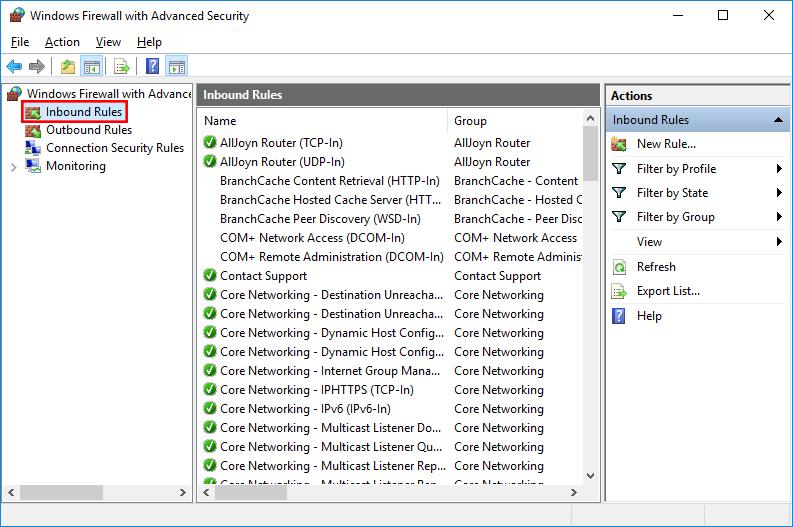
To enable the inbound rule allowing ICMP packets, select ‘Inbound Rules.’
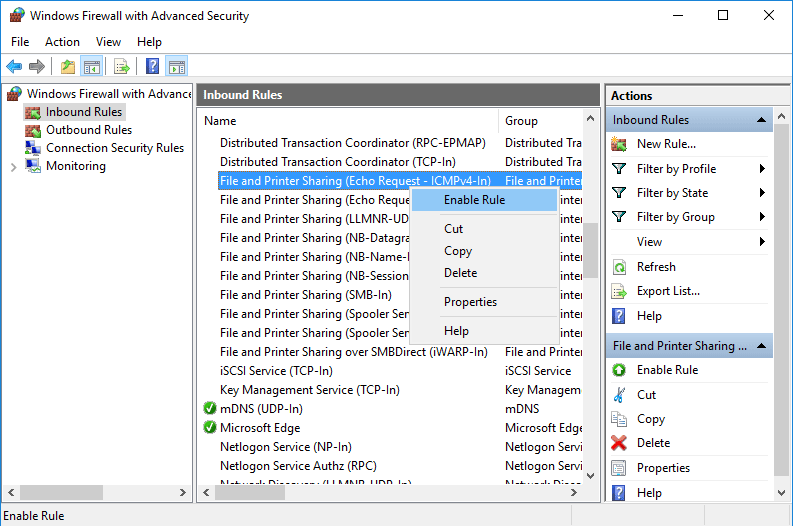
Locate the ‘File and Printer Sharing (Echo Request –ICMPv4-In’), right-click on it and select Enable Rule.

That will allow incoming ping requests and respond to them without completely disabling the Windows firewall service. As we enabled this rule only for IPv4 packets, we need to enable a separate similar rule for ICMPv6-In for the IPv6 network.
The below screenshot shows a Windows server started responding to ping requests once the above rule was enabled.

In a similar scenario, if a server is responding to ping/ICMP requests but needs to stop it for tight security, you can simply disable the same rule.
Visit the Windows firewall advances settings and disable the ‘File and Printer Sharing (Echo Request –ICMPv4-In’) rule.
Enable Ping by PowerShell Commands in Windows Servers
Geeks like command lines, especially the Windows OS admins love PowerShell. We can use the below commands to enable/disable ping on Windows Server and Client Operating Systems. Especially if you work on remote systems via PowerShell or have the Server Core OS without GUI.
Make sure to run the below commands ‘as administrator’ on the command prompt or PowerShell.
Enable IPv4 – This will create an exception in the default Windows firewall rule.
netsh advfirewall firewall add rule name="ICMP Allow incoming V4 echo request" protocol="icmpv4:8,any" dir=in action=allow
For IPv6:
netsh advfirewall firewall add rule name="ICMP Allow incoming V6 echo request" protocol="icmpv6:8,any" dir=in action=allow
To disable ping on IPv4:
netsh advfirewall firewall add rule name="ICMP Allow incoming V4 echo request" protocol=icmpv4:8,any dir=in action=block
For IPv6:
netsh advfirewall firewall add rule name="ICMP Allow incoming V6 echo request" protocol=icmpv6:8,any dir=in action=block
As ping is a useful utility to troubleshoot and find the presence of a network device, it completely depends on the network security policies of your environment to enable or disable it. We mentioned the easy steps you can do by GUI and command prompt in this guide.
Posted by
on May 18, 2016
By default in Windows Server 2016 the Windows Firewall is configured to drop all inbound ICMP traffic. This includes echo requests which are common from ping, which can make network troubleshooting difficult.
Here we cover how to allow ping through Windows Firewall.
A common response is usually to simply disable the whole Windows Firewall, however this is not recommended as the Windows Firewall does a good job at providing a basic level of system protection. We will only be allowing the specific rules required to allow ping to succeed.
Allow ping through Windows Firewall
- First we need to open Windows Firewall, this can be done a few ways. My favourite method is to simply hit the Windows key to open start, then start typing firewall. As shown below Windows Firewall with Advanced Security should show, click this.
Alternatively you can simply type ‘firewall’ and press enter in PowerShell to open the same interface.
- From the Windows Firewall with Advanced Security window that opens up, select Inbound Rules from the menu on the left.

- From the rules listed under Inbound Rules, select “File and printer Sharing (Echo Request – ICMPv4-In)” and enable the rule.

Note that this will only allow IPv4 requests in, if you need IPv6 then you will want to enable the “File and Printer Sharing (Echo Request – ICMPv6-In)” rule.
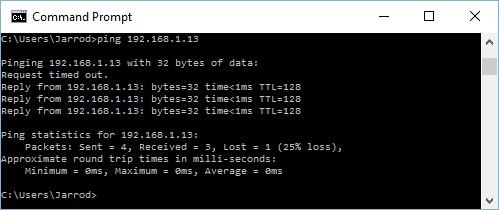
- Once enabled the server should now respond to ping requests. From my desktop I begun to ping my Windows Server 2016 virtual machine at 192.168.1.13 before enabling the rule. You can see the first request timed out. I then enabled the rule while the ping was running and the following requests succeeded, confirming that this is working as expected.

Summary
By Default Windows Firewall prevents ICMP echo requests, this results in the server not responding to ping. By enabling this firewall rule we have enabled ping, which can help us with network troubleshooting.
Typically, by default Windows Server Firewall 2019 is blocked by ICMP (ping). This means that the server never responds to ping packets from different hosts within your local network. Here, we will show you how to enable/allow ping of Windows Server 2016/2019 Firewall ICMP on Windows Firewall.
To Enable/ Allow Ping in windows server 2019 Firewall:
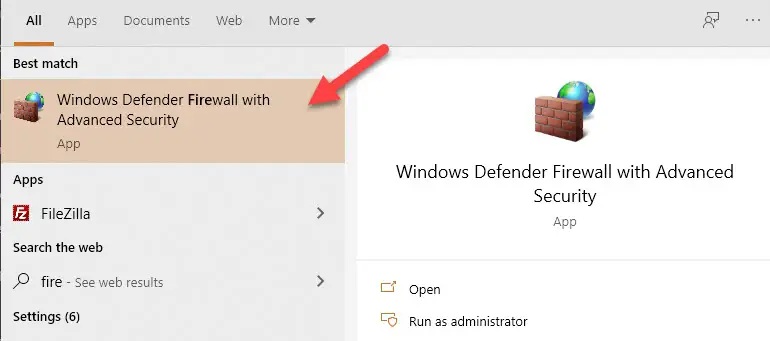
- First Step- Login to your windows server and click the Windows key to start Windows Firewall. Then, go to the search bar and start typing firewall. This will be followed by “Windows Defender Firewall with Advanced Security” which is shown in the image.
- Second Step- After clicking “Windows Defender Firewall with Advanced Security”, or if you go the other way, click Advanced Settings. Either way, open the Windows Defender firewall with the Advanced Security window and then select “Inbound Rules” from the left menu.
- Third Step- From the Inbound Rules, go to the list and select ”File and Printer Sharing (Echo- Request- ICMPv4-In)” and click the “enable rule”. It is only allowed/ enabled for IPv4 requests.
If you want to allow IPv6, you need to enable “File and Printer Sharing (Echo-Request-ICMP 6in)” which is listed below. See the image below:
- Fourth/Final Step- Once enabled, go to the “Command Prompt” to ping the request. At the command prompt, type the “ping and the server IP /domain name” ( ping 103.78.162.57/ domain name) and press Enter. It will show that the ping request has been successful (when it is the enabled rule)When it is the disabled rule, it shows “Request timed out”.
To enable this firewall rule, we have ping / enabled the network on Windows Server 2019. It can help us explore our network.
ICMP or Ping is disabled by default on Windows Server and Windows 11 / Windows 10. Keeping Ping disabled makes the system safer, but troubleshooting becomes more difficult.
As ping indicates that the remote computer is connected to the network and capable of communicating, it is a useful command, especially for sysadmins.
As a sysadmin myself, I have to install Windows Server and client frequently. Since our network is secured by hardware firewalls, it’s safe to allow ping on Windows Server and Windows client computers.
 1")
I prefer to enable Ping manually and not use Group Policy. In this article, we will go through the step-by-step process of enabling Ping through Windows Firewall.
If ping is not enabled on your computer, you will get a request timed out message when you ping the computer.
 2")
How to enable Ping in Windows Firewall
To enable ping on Firewall, follow the steps below:
-
Open Firewall by going to Run –> firewall.cpl
-
Click on Advanced Settings from the right-hand pane
 3")
Firewall advanced settings -
Right-click on Inbound Rules on the left-hand pane and select New Rule
 4")
New inbound rule in Firewall -
Select File and Printer Sharing under Predefined. Click on Next.
-
Select the following two rules:
- File and Printer Sharing (Echo Request – ICMPv6-In)
- File and Printer Sharing (Echo Request – ICMPv4-In)
 5")
Enable ICMP rules from Group Policy Click on Next.
-
Make sure “Allow the connection” is selected. Click on Finish.
 6")
Allow the connection rule for ping
 3")
 4")
 5")
 6")
How to enable Ping using Command Line
To enable Ping using Command Line, open Command Prompt or PowerShell and run the following commands:
Allow IPv4 ping using cmd:
netsh advfirewall firewall add rule name="ICMP Allow Ping V4" protocol="icmpv4:8,any" dir=in action=allowAllow IPv4 ping using PowerShell:
New-NetFirewallRule -DisplayName "ICMP Allow Ping V4" -Direction Inbound -Protocol ICMPv4 -IcmpType 8 -RemoteAddress <localsubnet> -Action AllowAllow IPv6 ping using cmd:
netsh advfirewall firewall add rule name="ICMP Allow Ping V6" protocol="icmpv6:8,any" dir=in action=allowAllow IPv6 ping using PowerShell:
New-NetFirewallRule -DisplayName "ICMP Allow Ping V6" -Direction Inbound -Protocol ICMPv4 -IcmpType 8 -RemoteAddress <localsubnet> -Action AllowTo disable Ping using Command Line, open Command Prompt or PowerShell and run the following commands:
Block IPv4 ping using cmd:
netsh advfirewall firewall add rule name="ICMP Allow Ping V4" protocol=icmpv4:8,any dir=in action=blockBlock IPv4 ping using PowerShell:
New-NetFirewallRule -DisplayName "ICMP Allow Ping V6" -Direction Inbound -Protocol ICMPv4 -IcmpType 8 -RemoteAddress <localsubnet> -Action BlockBlock IPv6 ping using cmd:
netsh advfirewall firewall add rule name="ICMP Allow Ping V6" protocol="icmpv6:8,any" dir=in action=blockBlock IPv6 ping using PowerShell:
New-NetFirewallRule -DisplayName "ICMP Allow Ping V6" -Direction Inbound -Protocol ICMPv4 -IcmpType 8 -RemoteAddress <localsubnet> -Action BlockHow to enable Ping through Firewall using Group Policy
Sometimes it becomes cumbersome to go through each computer in the network and enable ping. A rather easier way would be to disable Windows Firewall by default. This could be a security rick. Alternatively, we can enable ping for all computers (or a set of computers) in the network using the Group Policy.
Here’s how to enable ping using Group Policy:
-
Open the Group Policy Management Console on your Domain Controller from Server Manager –> Tools –> Group Policy Management.
-
You can either create a new Group Policy Object and apply it to relevant computers or edit the already existing universal GPO.
 7")
Edit Default Domain Policy -
Navigate to the following:
Computer Configuration -> Policies -> Windows Settings -> Security Settings -> Windows Defender Firewall with Advanced Security -> Windows Defender Firewall with Advanced Security -> Inbound Rules
-
Right-click Inbound Rules and create a New Rule.
 8")
New inbound rule -
Select File and Printer Sharing under Predefined. Click on Next.
-
Select the following two rules:
- File and Printer Sharing (Echo Request – ICMPv6-In)
- File and Printer Sharing (Echo Request – ICMPv4-In)
Enable ICMP rules from Group Policy Click on Next.
-
Make sure “Allow the connection” is selected. Click on Finish.
Allow the connection rule for ping
 7")
 8")
That’s it. Now ping is enabled across the internal network. If any computer still does not allow ping traffic, please run the following command on that computer:
gpupdate /force 11")