
Hi,
I don’t know if the developers at windows will read this but thank you for the work you’ve done on virtual desktops in Windows 11.
However, it would also be great if Microsoft can work towards having different icons in different virtual desktops.
While i can change the backgrounds and rename them, it means I constantly need to open apps just to have them sitting in a specific desktop which in turn becomes memory heavy.
It would be great if i could demacate apps for separate use (e.g music production, video production, programming) into different desktops via the icons I’ve installed or created shortcuts for on the corresponding desktops.
That way when i switch desktops, the icons i see reflect the use or function of that desktop without me clicking on the start button to find apps needed or even seeing all apps for all functions pinned to the task bar or worse case scenario, all app icons for all functions in specific function desktops.
Thanks.
PS — another great improvement would be the ability to turn off recommendations on the start button or an option to show all apps (not just pinned ones) by default. It’s hard getting used to this new way.
Возможно, у вас нет нескольких мониторов, но у вас может быть несколько экранов
Что нужно знать
- Чтобы открыть «Просмотр задач«, щелкните ярлык «Просмотр задач» на панели задач или нажмите Win + Tab.
- Используйте «Просмотр задач» для переключения между рабочими столами, добавления новых рабочих столов, переименования рабочих столов, перемещения приложений и многого другого.
- «Настройки» > «Персонализация» > «Панель задач» и нажмите переключатель «Просмотр задач«, чтобы включить кнопку «Просмотр задач«.
В этой статье мы расскажем, как использовать несколько рабочих столов в Windows 11, в том числе как просматривать виртуальные рабочие столы и переключаться между ними, настраивать виртуальные рабочие столы и использовать одно и то же приложение на нескольких рабочих столах.
Как просмотреть ваши виртуальные рабочие столы
Есть два способа просмотреть ваши текущие виртуальные рабочие столы. Вы можете либо открыть «Просмотр задач» для полного обзора рабочих столов и активных приложений на вашем текущем рабочем столе, либо просмотреть с помощью быстрого просмотра только ваши активные рабочие столы.
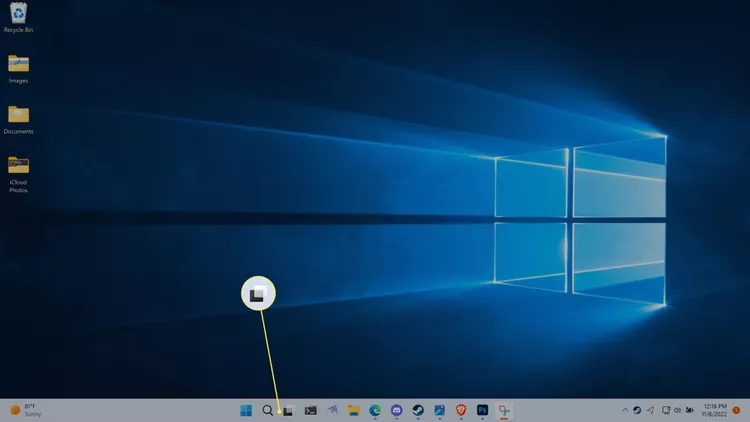
«Просмотр задач» похож на «Переключатель задач«, открыть который можно нажатием Alt + Tab, но он показывает как ваши активные приложения, так и ваши рабочие столы. Чтобы открыть «Просмотр задач«, вы можете нажать Win + Tab или щелкнуть ярлык «Просмотр задач» на панели задач. В Windows 11 значок «Просмотра задач» выглядит как темный прямоугольник с наложенным на него более светлым, частично прозрачным прямоугольником.
Другой способ просмотреть ваши виртуальные рабочие столы – навести курсор мыши на значок «Просмотр задач«, но не нажимать на него. Если вы наведете курсор мыши на этот значок, вы увидите всплывающее окно, в котором отображаются ваши текущие рабочие столы в дополнение к опции создания нового рабочего стола.
Совет: Кнопка «Просмотр задач» задач включена по умолчанию, но её можно отключить. Если вы не можете найти её у себя, перейдите в «Настройки» > «Персонализация» > «Панель задач» и убедитесь, что переключатель «Просмотр задач» включен.
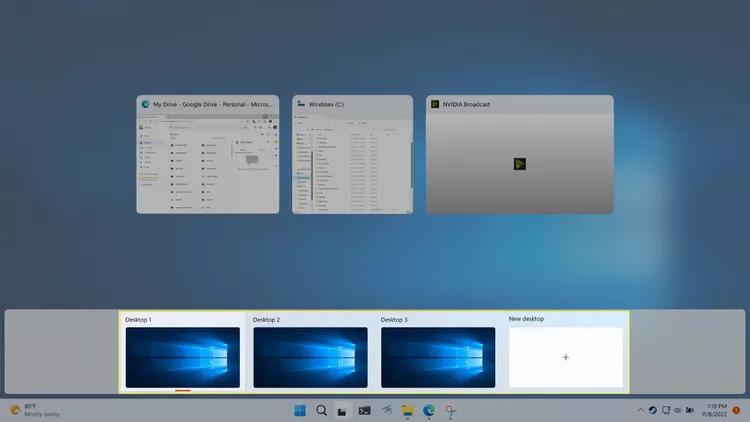
Пока вы просматриваете свои виртуальные рабочие столы, вы можете создать новый, нажав «Создать рабочий стол+«.
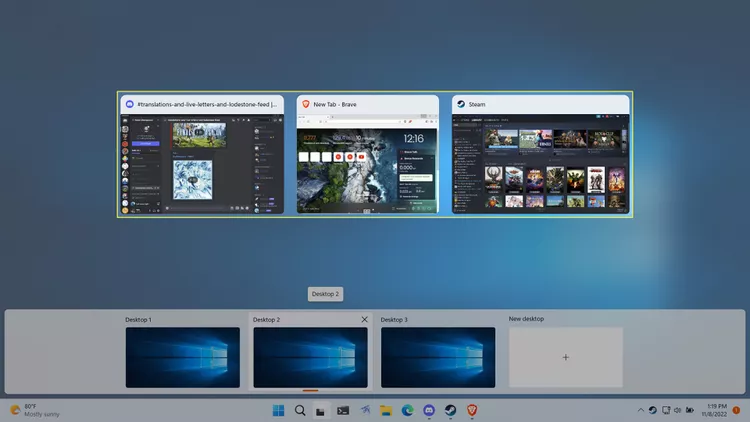
Также во время просмотра своих рабочих столов вы можете закрыть рабочий стол. Когда вы наведете курсор мыши на миниатюру рабочего стола, в углу миниатюры появится крестик. Нажмите крестик, чтобы закрыть рабочий стол.
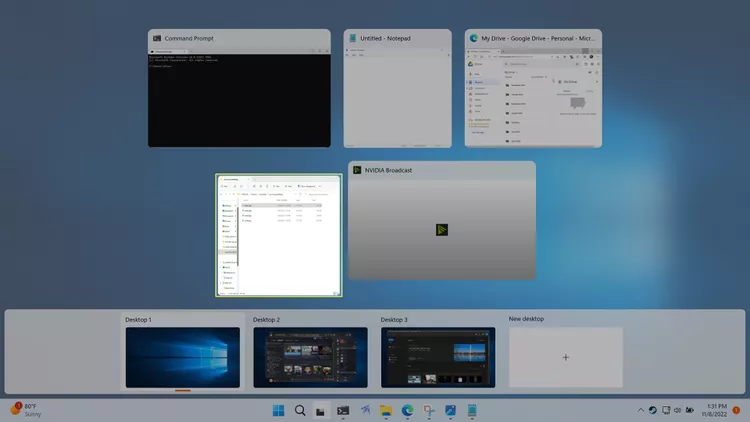
Вот как открыть «Просмотр задач» и проверить свои рабочие столы с панели задач:
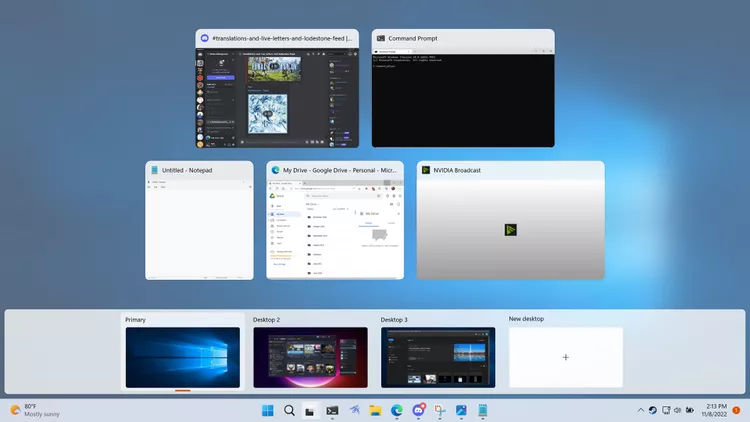
1. Щелкните значок «Просмотр задач» (черный прямоугольник с прозрачной рамкой над ним).
2. В режиме просмотра задач ваши рабочие столы отображаются в нижнем ряду, а приложения активного рабочего стола отображаются выше.
3. Если вы наведете курсор мыши на миниатюру рабочего стола, вы сможете просмотреть приложения, открытые на этом рабочем столе.
4. Вы также можете навести курсор мыши на кнопку «Просмотра задач» для быстрого просмотра ваших рабочих столов и навести курсор мыши на миниатюру рабочего стола, чтобы просмотреть этот рабочий стол, не переключаясь на него.
Как переключать рабочие столы в Windows 11
Существует три способа переключения рабочих столов в Windows 11. Вы можете использовать полное окно «Просмотра задач«, всплывающее окно «Просмотра задач» или сочетание клавиш.
«Просмотр задач» предоставляет обзор ваших виртуальных рабочих столов и активных приложений на вашем текущем рабочем столе, а также позволяет переключать активный рабочий стол. Вы можете перемещаться по этому экрану с помощью клавиш со стрелками и переключаться на другой рабочий стол или приложение, выделив нужное и нажав enter. Вы также можете просто щелкнуть мышью по нужному рабочему столу.
Другой способ переключения рабочих столов с помощью «Просмотра задач» – это навести курсор мыши на значок «Просмотр задач» на панели задач и щелкнуть нужный рабочий стол. Этот метод немного быстрее, потому что он не требует фактического открытия «Просмотра задач«. Однако используя его, вы не сможете видеть ваши активные приложения, как на экране полного просмотра задач.
Когда вы выбираете новый рабочий стол в режиме «Просмотра задач«, ваш активный рабочий стол заменится на тот, который вы выбрали. Активные приложения переключатся на те, которые связаны с новым рабочим столом, а обои изменятся, если вы установили другие обои.
Чтобы переключаться между рабочими столами с помощью сочетания клавиш, нажмите либо Win + Ctrl + Стрелка влево, либо Win + Ctrl + стрелка вправо. По умолчанию ваши рабочие столы расположены так, что самый старый находится в крайнем левом углу, а самый новый — в крайнем правом.
Совет: В командах переключения рабочего стола нет циклического перехода, поэтому многократное нажатие Win + Ctrl + Стрелка влево в конечном итоге приведет вас к исходному рабочему столу, а затем прекратит что-либо делать.
Как перемещать приложения между рабочими столами в Windows 11
Когда вы открываете приложение в Windows 11 и у вас настроено несколько рабочих столов, приложение отображается только на вашем текущем активном рабочем столе. Это упрощает настройку рабочего стола именно с теми приложениями, которые вам нужны, поскольку вы можете открыть новый рабочий стол, переключиться на этот рабочий стол, а затем запустить там конкретные приложения, которые вам нужны.
Если вы передумаете относительно принадлежности приложения, приложения можно перемещать между рабочими столами с помощью «Просмотра задач».
Вот как перемещать приложения между рабочими столами в Windows 11:
1. Щелкните значок «Просмотр задач» на панели задач.
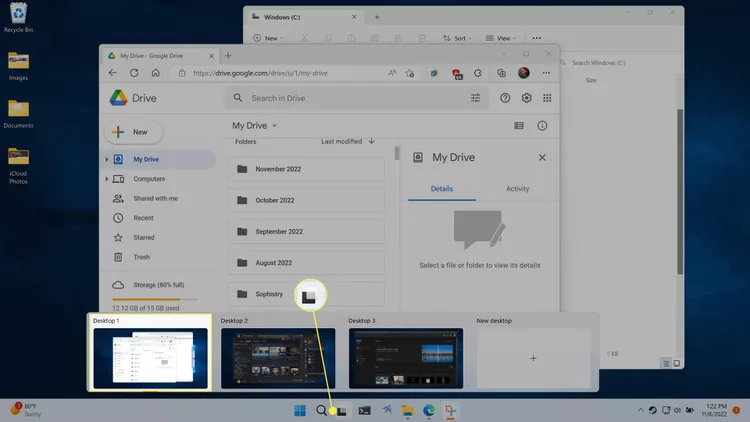
2. Нажмите и перетащите приложение, которое вы хотите переместить.
3. Поместите приложение на миниатюру рабочего стола, где вы хотите разместить приложение.
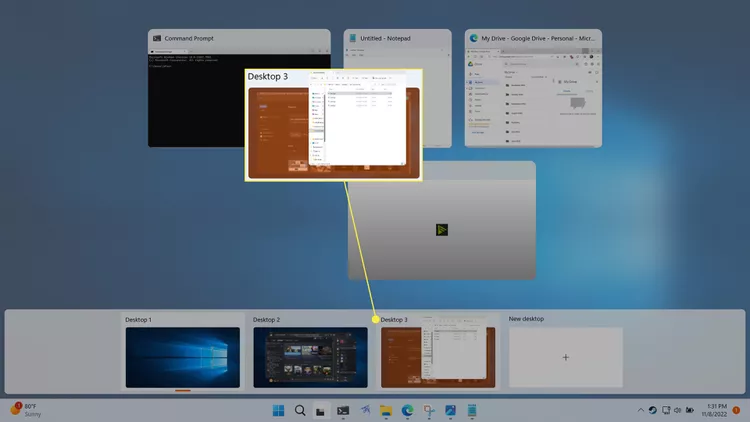
4. Приложение переключится на новый рабочий стол.
Как переименовать рабочий стол в Windows 11
Если вы используете несколько рабочих столов для организации своих приложений в определенные группы, возможно, вам будет удобно переименовать свои рабочие столы. Выбор описательных названий, таких как «производительность» или «игры», облегчит распознавание каждого рабочего стола с помощью передвижения курсора мыши без открытия «Просмотра задач«.
Вот как переименовать рабочий стол в Windows 11:
1. Щелкните значок «Просмотр задач» на панели задач.
2. Щелкните название рабочего стола на одном из эскизов рабочего стола. Введите новое имя, затем нажмите ввод.
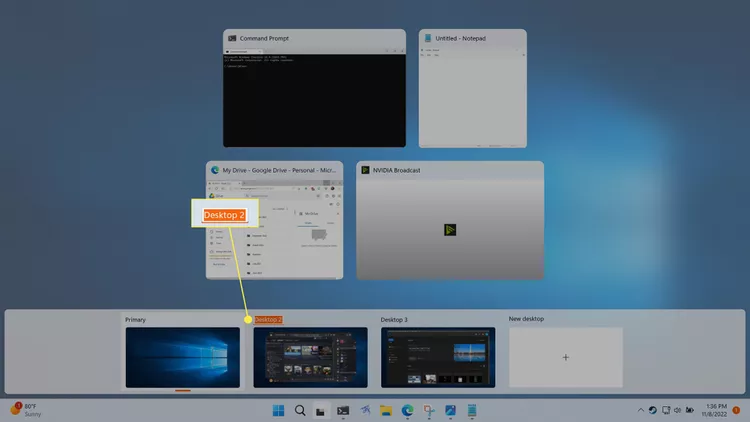
3. Вы можете повторить этот процесс, чтобы переименовать другие рабочие столы.
Как изменить фон рабочих столов
Каждый виртуальный рабочий стол может иметь свои собственные фоновые обои в Windows 11, но каждый рабочий стол имеет один набор файлов, папок и ярлыков. Это означает, что вы можете установить уникальные обои, чтобы выделить рабочий стол, но если вы создадите новый ярлык на одном рабочем столе, ярлык появится на всех ваших рабочих столах сразу.
Примечание: Если вы выберете параметр сплошной цвет или фон слайд-шоу, он будет применяться ко всем вашим рабочим столам. Если вы хотите иметь уникальные фоны для каждого рабочего стола, вам нужно выбрать один из фонов Windows по умолчанию или свое собственное изображение обоев.
Вот как изменить обои на виртуальном рабочем столе Windows 11:
1. Щелкните или наведите курсор мыши на значок просмотра задач на панели задач.
2. Щелкните правой кнопкой мыши миниатюру рабочего стола и выберите «Выбрать фон«.
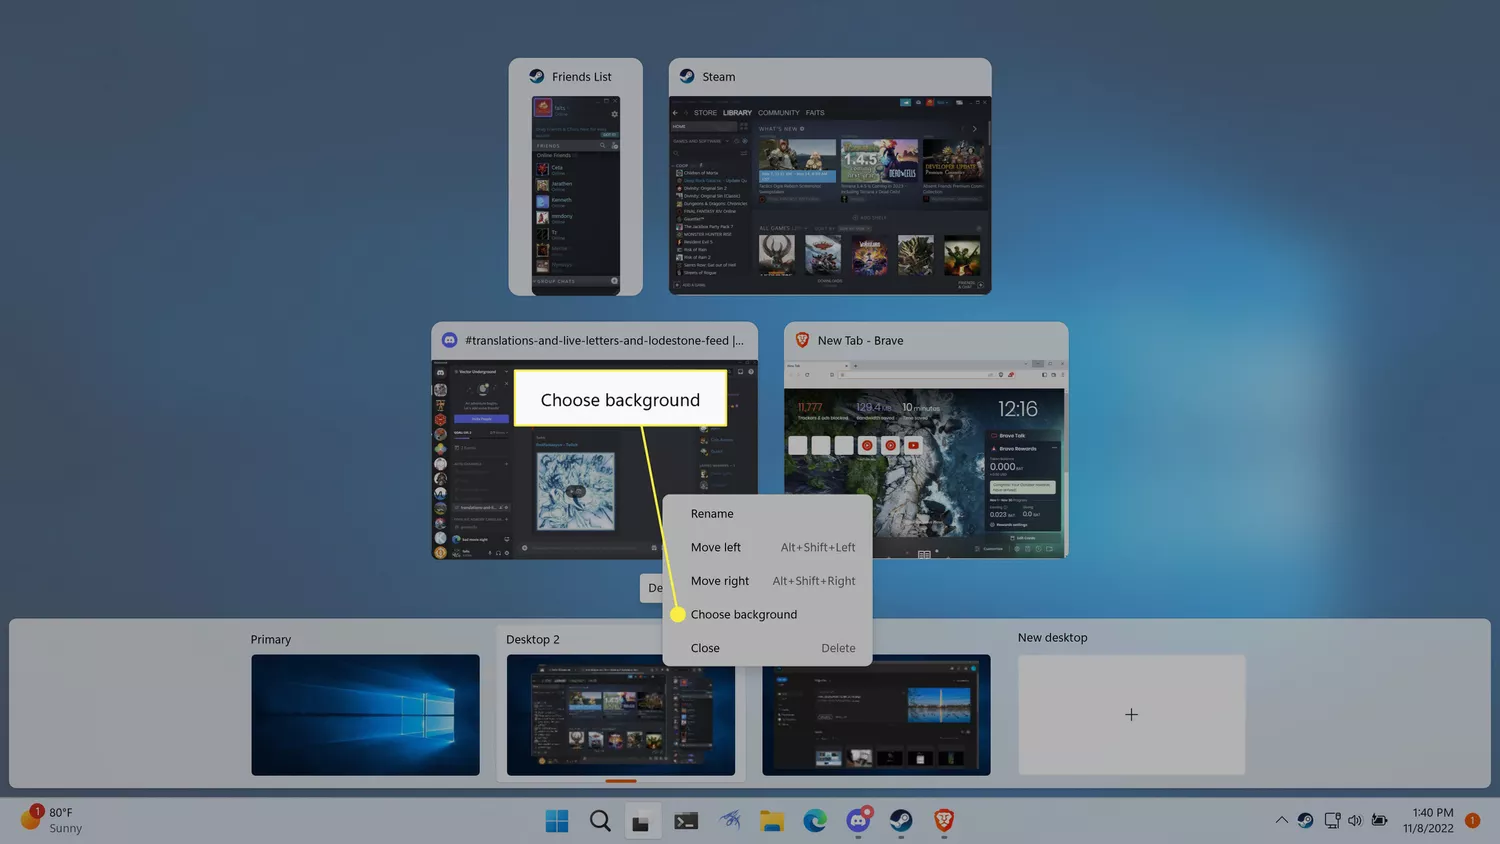
3. Щелкните одно из фоновых изображений в разделе «Последние изображения».
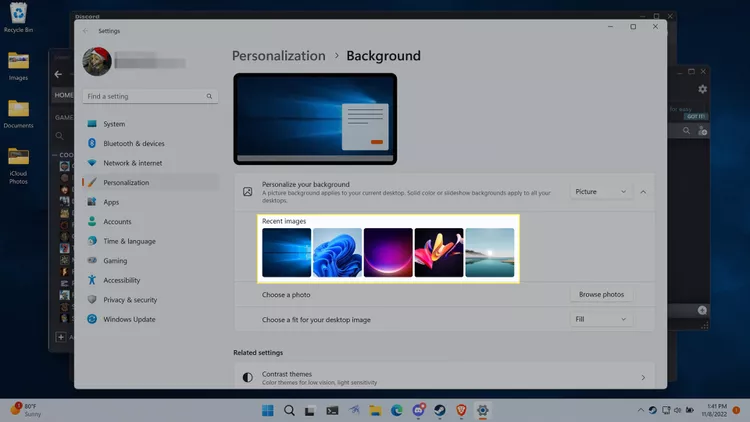
Совет: Если у вас есть пользовательские обои, которые вы хотите использовать, нажмите «Просмотреть фотографии» и выберите изображение для обоев.
4. Ваш новый фон теперь будет виден при использовании этого рабочего стола, а также при предварительном просмотра рабочего стола в режиме просмотра задач.
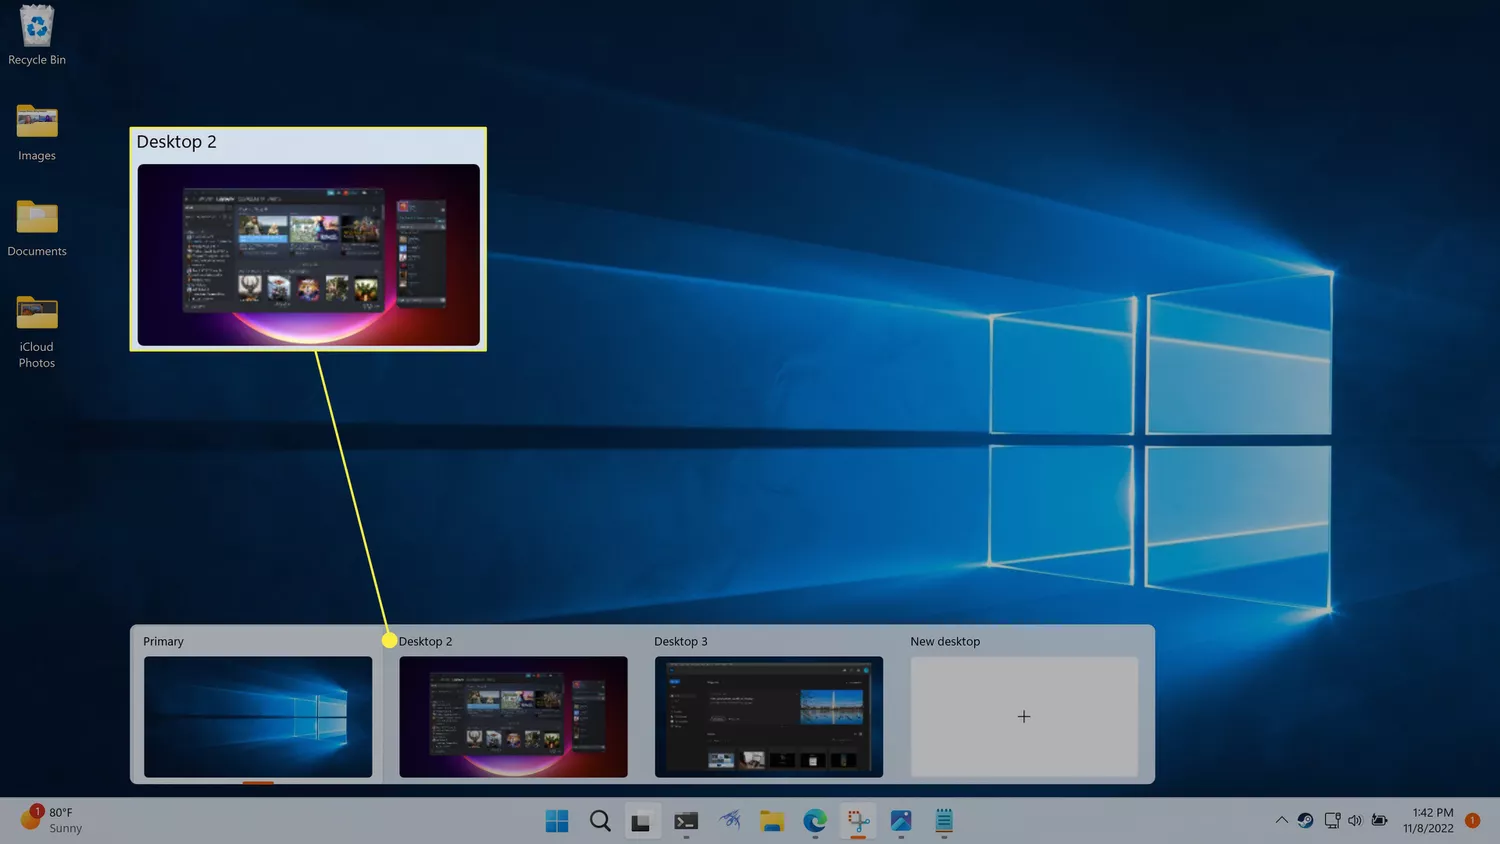
Совет: Каждый рабочий стол может иметь свой собственный фон, поэтому вы можете повторить эти шаги для каждого из ваших рабочих столов.
Как использовать одно и то же приложение на разных рабочих столах
Основная цель использования разных рабочих столов – сгруппировать приложения в соответствии с разными темами или целями, но иногда вы можете запускать одно и то же приложение на нескольких рабочих столах. В разных приложениях это работает по-разному, поэтому единственный способ узнать наверняка – это попробовать.
В некоторых случаях вы можете открыть одно и то же приложение на нескольких рабочих столах и иметь уникальные представления этого приложения на каждом из них. Например, вы можете открыть Edge на нескольких рабочих столах, и у каждой копии может быть открыт свой собственный уникальный набор вкладок.
Другие приложения так не работают. Например, если вы откроете Photoshop на втором рабочем столе, когда он запущен на вашем первом рабочем столе, Windows автоматически вернет вас на ваш первый рабочий стол и экземпляр Photoshop, который уже был открыт.
Если вы хотите, чтобы приложение отображалось на нескольких рабочих столах, вы можете сделать это с помощью «Просмотра задач«. Это также относится к каждому приложению, поэтому некоторые приложения могут отображаться на всех ваших рабочих столах, а другие — только на одном рабочем столе.
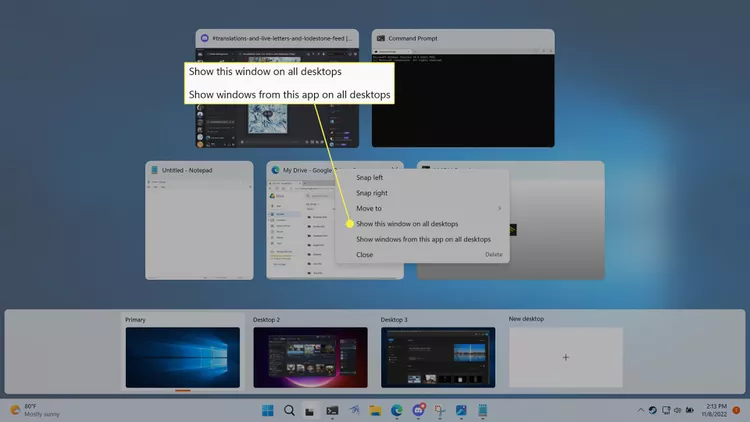
При изменении этого параметра у вас есть возможность отображать только одно окно из приложения на всех рабочих столах или отображать все приложение, включая все его окна, на всех рабочих столах.
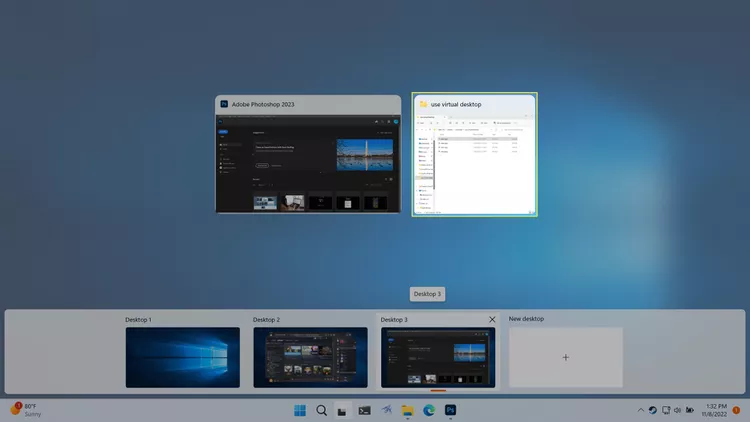
Вот как использовать одно приложение на нескольких рабочих столах в Windows 11:
1. Щелкните значок «Просмотр задач«.
2. Щелкните правой кнопкой мыши приложение, которое вы хотите использовать на нескольких рабочих столах.
3. Выберите «Показывать это окно на всех рабочих столах», чтобы на всех ваших рабочих столах было только одно окно, или «Показывать окна из этого приложения на всех рабочих столах», чтобы все приложения отображались на всех ваших рабочих столах.
Что такое виртуальный рабочий стол?
Windows 11 основана на рабочем столе, который представляет собой рабочее пространство, используемое для организации и выполнения задач на вашем компьютере. Основные компоненты рабочего стола включают панель задач, где вы можете запускать приложения и переключаться между ними, а также область рабочего стола, которая может содержать папки, файлы и ярлыки.
Когда вы добавляете новый рабочий стол в Windows 11, он создает новый экземпляр панели задач, который может содержать свои собственные уникальные приложения. Однако сам рабочий стол не меняется, и на нем всегда будет отображаться один и тот же набор папок, файлов и ярлыков. Вы можете изменить обои каждого виртуального рабочего стола, чтобы легче различать их, но вы не можете размещать на них уникальные файлы, папки или ярлыки.
Поскольку каждый виртуальный рабочий стол имеет свою собственную панель задач, на каждом рабочем столе могут быть разные приложения. Это может быть полезно для организационных целей, и вы можете настроить, чтобы приложения, относящиеся к разным проектам или задачам, имели свой собственный рабочий стол. Одна из простых реализаций заключается в том, чтобы иметь один рабочий стол для приложений, связанных с работой, и другой для социальных приложений или игр.
Добавление нового рабочего стола Windows 11 — это не то же самое, что создание или запуск виртуальной машины, поэтому между рабочими столами нет разделения. Каждый рабочий стол подключен к одному и тому же экземпляру Windows 11, соответствует одному и тому же пользователю и даже имеет один и тот же набор файлов и ярлыков на самом рабочем столе.
FAQ
Могу ли я отключить функцию нескольких рабочих столов в Windows 11?
Нет. Отключить функцию виртуальных рабочих столов невозможно, но вы можете скрыть значок «Просмотра задач«. Перейдите в «Настройки» > «Персонализация» > «Панель задач» и отключите переключатель «Просмотра задач«.
Как мне разделить свой рабочий стол в Windows 11?
Чтобы разделить экран в Windows 11, наведите курсор мыши на кнопку «Развернуть окно«, чтобы открыть параметры компоновки привязки. Выберите тот вариант, который вам больше нравится.
Как мне использовать несколько мониторов в Windows 11?
Чтобы добавить монитор в Windows, подключите монитор к ПК с помощью кабеля HDMI. Затем перейдите в «Настройки» > «Система» > «Дисплей» > «Несколько дисплеев» > «Обнаружить«.
Download Windows Speedup Tool to fix errors and make PC run faster
There have been multiple instances when users of the Windows OS face issues with desktop or taskbar icons. We have previously covered issues where desktop icon spacing gets messed up or the icons rearrange and move after a reboot. In this post, we will talk about a similar icon overlapping issue in which the desktop or taskbar icons overlap each other. This causes trouble, as sometimes, the overlapping increases to such an extent that the icons appear stacked on top of each other, and it becomes difficult for the user to locate and click on a particular icon.
If you see desktop or taskbar icons overlapping on Windows 11, the issue may happen accidentally, there may be a buggy Windows update, an altered screen resolution, or a third-party app conflict that may be causing the icons to overlap. Switch to a different user profile to see if the issue is profile-specific. If so, your profile may have got corrupted. In such a scenario, the issue may be resolved by fixing the corrupt profile.
If the issue is not profile-specific, follow these solutions to fix overlapping icons on a Windows 11 PC:
- Turn on Align Icons to Grid.
- Change the Icon Size.
- Restore the default Icon Spacing in Windows Registry.
- Change the Display Resolution.
- Reinstall built-in Windows Apps.
- Troubleshoot in Clean Boot State.
Let us see these in detail.
1] Turn on Align Icons to Grid
One of the prime reasons for the overlapping icon issue is that the Align icons to grid setting is disabled.
When you enable the ‘Align icons to grid’ setting, your icons will be snapped into place by an invisible grid on your desktop screen. This grid keeps the icons aligned and prevents them from overlapping.
To enable the setting, right-click anywhere on the empty space of your desktop screen and select View > Align icons to grid.
Read: No Desktop folder in Users folder in Windows
2] Change the Icon Size
Windows allow you to change the size of the desktop and the taskbar icons and you may use this fix to see if it works for you. A few users have resolved the icon overlapping issue by changing the icon size on their Windows 11 PC.
Next, try to adjust the size of your taskbar and see if the icon size adjusts accordingly. Also, set the DPI scaling level to its recommended value.
3] Restore the default Icon Spacing in Windows Registry

2 out of 3 users could fix the icon overlapping issue by restoring the default icon spacing in Windows. Follow the steps and see if it helps:
- Press Win+R.
- Type ‘regedit’ in the Run dialogue box.
- Click on Yes in the User Account Control (UAC) prompt.
- In the Registry Editor window, navigate to the following path:
HKEY_CURRENT_USER\Control Panel\Desktop\WindowMetrics - In the right panel, double-click on the IconSpacing key. Set its value to -1125.
- Now double-click on the IconVerticalSpacing key and set its value to -1125.
- Close the Registry Editor.
- Reboot Windows and see if the issue is gone.
4] Change the Display Resolution
Change the Display Resolution and see if that helps in any way.
Read: Fix Display problems & Screen Resolution issues.
5] Reinstall built-in Windows Apps
A few users have also been able to fix the icon overlapping issue by reinstalling built-in apps on their Windows 11 PC. Use this fix and see if it works for you:
- Click on Windows Search and type ‘powershell’.
- Click on the ‘Run as Administrator’ option below the Windows PowerShell app.
- Click on Yes in the UAC prompt window.
- Enter the following command in the PowerShell window:
Get-AppxPackage -allusers | foreach {Add-AppxPackage -register “$($_.InstallLocation)\appxmanifest.xml” -DisableDevelopmentMode} - Press the Enter key.
- Wait for a while till Windows reinstalls and re-registers all its default built-in apps.
- Exit PowerShell and reboot your PC.
6] Troubleshoot in Clean Boot State
It may be possible that the overlapping is caused due to a third-party app conflict. To fix this, enter the clean boot state and troubleshoot using the trial and error method.
I hope this helps.
Also read: Can’t move desktop icons in Windows.
How do I fix overlapping icons on my desktop?
To fix overlapping icons, turn on the ‘Align icons to grid’ settings. Right-click on your desktop and select View > Align icons to grid. If the issue persists, change the default icon spacing using Windows Registry. Also, update your Windows 11 PC to the latest and see if it helps.
Why are my desktop icons stacked on top of each other in Windows 11?
Your desktop icons appear stacked or glued on top of each other due to extreme overlapping. This happens when you change your screen resolution or have a buggy update installed. This may also happen when you accidentally change the DPI settings or modify the default icon spacing in Windows.
Read Next: How to Unhide or Hide Desktop icons in Windows.
Sangeeta holds a Bachelor’s in Computer Science, and a Post Graduate Diploma in Computer Applications. She has been associated with the Information Technology industry for over 10 years, and enjoys reading and sharing Windows & technology-related tips.
Taskbar is an integral part of a Windows computer since it offers a quick access to your most-used applications. Besides letting Windows arrange them, you can also organize those icons to make it easier to access your favorite apps. In this article, we will guide you with effict ways to ungroup taskbar icons in Windows 11. That’ll give you the flexibility to tailor your desktop experience to your preferences.
But why would anyone want to ungroup taskbar items in Windows 11, you might wonder? Ungrouping taskbar icons wills how you all the open applications and you can switch between them seamlessly. Let’s methods to prevent Windows 11 from never combining taskbar buttons.
1. Enable ‘Never Combine Taskbar Icons’ From Settings
This is one of the easiest and most common ways to ungroup taskbar items in Windows 11. Follow the below instructions.
Step 1: Press the Windows key on your keyboard, type Settings, and click Open.
Note: Press the Windows key + I keyboard shortcut to quickly open Windows Settings.
Step 2: From the side pane, go to Personalization.
Step 3: Under Personalization, choose the Taskbar option.
Step 4: Scroll down to the bottom and click on Taskbar behaviors to expand it.
Step 5: In the expanded menu, next to ‘Combine taskbar buttons and hide labels,’ select Never from the drop-down menu.
You will immediately see the taskbar icons ungrouped and expanded. It is important to note that this change in setting is only applicable to the primary display device. If you have multiple displays, then continue.
Step 6: Beside the ‘Combine taskbar buttons and hide labels on other taskbars’ option at the bottom, select Never from the drop-down menu.
That’s that. If, for some reason, you are unable to find any of the options missing from your Settings app, go to Windows Update > Install any pending updates. If you still can’t get through, check out the next method.
Also read: How to enable clipboard syncing in Windows 11
2. Ungroup Taskbar Icons From Windows Registry
This method is not as straightforward as the above method because we will use the Windows Registry Editor to separate taskbar icons on your Windows 11 machine. Before we begin with the steps, we recommend backing up the Windows Registry. This will help restore your data if things go south.
Step 1: Press the Windows key on your keyboard, type Registry Editor, and click ‘Run as administrator.’
Note: Press Windows key + R keyboard shortcut to open the Run dialog box, type regedit.exe, and click OK to open Registry Editor.
In the prompt, select Yes.
Step 2: In the top address bar, enter the following path:
HKEY_CURRENT_USER\SOFTWARE\Microsoft\Windows\CurrentVersion\Policies\
Note: You can manually navigate to the section too.
Step 3: Under Policies, right-click, select New, and choose Key.
Step 4: Set the new key value name to Explorer by double-clicking it.
Note: If the Explorer key already exists under the Policies key, skip this step.
Step 5: Right-click the Explorer key, select New, and choose ‘DWORD (32-bit) Value.’
Step 6: Double-click the DWORD Value name, type NoTaskGrouping, and press Enter.
Step 7: Double-click the new value, type 1 in the Value Data field, and press OK.
Finally, reboot your computer to implement the changes. And that’s it! When the system boots back up, you will ungroup taskbar items.
There is another way that lets you separate taskbar icons on a Windows 11 PC; continue reading.
3. Never Combine Taskbar Buttons Using Group Policy
The Local Group Policy Editor helps you control Windows. This also includes ungrouping taskbar items in Windows 11. However, Group Policy Editor is only available for Windows 11 Pro and Enterprise versions. Follow the below instructions.
Note: You can skip this method if you are on Windows 11 Home Edition. If you don’t know your Windows version, read the top ways to check the edition, version, and built-in Windows 11.
Step 1: Press the Windows key on your keyboard, type gpedit, and click Open. You may press the Windows key + I keyboard shortcut to open Settings in Windows.
Step 2: In the left pane, select User Configuration under ‘Local Computer Policy’.
Step 3: In the right pane, double-click on Administrative Templates.
Step 4: Select the ‘Start Menu and Taskbar’ option.
Step 5: Under the ‘Start Menu and Taskbar’ option, double-click on ‘Prevent grouping of taskbar items.’
Step 6: Choose the Enabled option. Finally, click on Apply, followed by OK.
You have successfully separated taskbar icons from your Windows 11 PC. After that, Windows 11 will never combine taskbar buttons.
If the above-mentioned methods are too complicated to implement, take an easy route and use third-party applications; keep reading.
Also read: Ways to remove recommended in Windows 11
4. Ungroup Taskbar Icons Using a Third-Party App
There are many third-party tools available to ungroup taskbar items in Windows 11. One such tool is StartAllBack. This tool helps you configure the layout and set your preferences, enabling your PC to never combine taskbar buttons. Let’s begin with the steps.
Step 1: Go to the StartAllBack website from your preferred browser and download the app.
Go to StartAllBack
Step 2: After download completes, double-click on the setup file and run it.
Step 3: Select the following installation options: ‘Install for me’ or ‘Install for everyone.’
After you select it, the application will be installed immediately, and you may see some changes to your taskbar.
Step 4: If the app automatically doesn’t start, launch it by pressing the Windows key on your keyboard, typing StartAllBack, and clicking Open.
Step 5: When it launches, navigate to the Taskbar menu from the side pane.
Step 6: Under the ‘Tweak behavior and superpowers’ section on the right side of the Taskbar menu, select Never next to ‘Combine taskbar buttons.’
You will immediately see the change in your taskbar. You will have to do one more step if you have multiple displays.
Step 7: Next to ‘On secondary taskbars,’ select Never from the drop-down menu.
The taskbar should now display individual icons with labels instead of grouped icons. If you ever want to go back to grouping the taskbar icons.
That said, if you have any queries, check out the FAQ section below.
FAQs on Ungrouping Taskbar in Windows 11
1. Can I ungroup specific icons and keep others grouped?
No, the ungrouping setting is global, affecting all icons. There isn’t a built-in option to ungroup specific icons while keeping others grouped.
2. Will ungrouping affect my system’s performance?
Yes, to some extent. Ungrouping icons on the taskbar have a negligible impact on system performance. It’s primarily a visual preference.
3. Will ungrouping taskbar icons persist after updates?
The ungrouping setting should persist after regular Windows updates. However, major feature updates might reset certain settings, so checking after significant updates is advisable.
Untangling the Organized Chaos
Whether it’s about streamlining your multitasking efforts or simply enjoying a cleaner desktop, by knowing how to ungroup taskbar icons in Windows, you can quickly declutter and organize your taskbar according to your workflow and preferences. You may also want to read about ways to access and view all shared folders in Windows 11.
Was this helpful?
Thanks for your feedback!
The article above may contain affiliate links which help support Guiding Tech. The content remains unbiased and authentic and will never affect our editorial integrity.
-
Home
-
News
- How to Fix Desktop Icons Are Overlapping Windows 10/11
How to Fix Desktop Icons Are Overlapping Windows 10/11
By Shirley | Follow |
Last Updated
Windows 11 and Windows 10 desktop icons are overlapping? Here in this post from MiniTool, we will provide you with a couple of useful solutions to help you get rid of this Windows desktop icons bug.
Windows desktop icons are designed to help you quickly access frequently used programs, files, and folders. However, these icons sometimes have various problems. In our previous article, we discussed the problem of “desktop shortcut reappears after deletion”. Now, we are going to illustrate another Windows desktop icons bug – desktop icons are overlapping.
First, let’s see a true example.
The icons on my desktop are overlapping. I have the «Auto-Arrange» and «Align to Grid» options enabled. Also changed the scale of the display back to 150%. I am currently using 175%. None of them made a difference. Any ideas?answers.microsoft.com
If the icons are overlapping on the desktop, try the ways listed below.
How to Fix Desktop Icons Are Overlapping Windows 10/11
Fix 1. Set the Desktop Icons to Small Icons
Windows allows you to change the size of the desktop icons. To make the desktop icons separate and not overlap, you can try to change the desktop icon size to small. On your desktop, right-click any blank area to choose View > Small icons.
After that, check if your desktop icons are not overlapping. If the issue persists, try the next way.
Fix 2. Turn On Desktop Icon Arrangement Rules
One of the main causes of the Windows desktop icons bug is that the “Auto arrange icons” and “Align icons to grid” settings are disabled.
You can follow the guide below to enable them.
Tips:
After enabling the “Auto arrange icons” feature, the desktop icons will be automatically arranged in a column starting from the left side of the screen immediately. Please think carefully if you have arranged different partitions for files and icons.
Right-click on any blank area on your desktop and click View. Check the options of “Auto arrange icons” and “Align icons to grid“, as depicted in the figure below.
Fix 3. Restart the Windows Explorer Task
Windows Explorer is used to view and manage all file resources on the computer. If your desktop icons are overlapping, try to restart the Windows Explorer task.
Step 1. Right-click the Windows logo button to select Task Manager.
Step 2. Select Windows Explorer and click the Restart button.
Fix 4. Edit the Registry
Incorrect icon spacing can cause desktop icons to overlap. In this situation, you can restore the default icon spacing by modifying the registry.
Note:
Windows registry is vital for the proper functioning of the computer. So, before making any changes to the registry, it is highly recommended to create a registry backup in case of any accidents.
Step 1. Press Windows + R key combination to open the Run command window.
Step 2. Type regedit and press Enter. Then select Yes in the UAC window.
Step 3. In Registry Editor, navigate to the following location:
Computer\HKEY_CURRENT_USER\Control Panel\Desktop\WindowMetrics
Step 4. In the right panel, find and double-click IconSpacing. Then set up its value data to -1125. After that, click OK.
Step 5. Double-click IconVerticalSpacing and set its value data to -1125 as well.
Restart your computer and check if the desktop icons are separated.
Fix 5. Update Windows
Outdated versions of Windows can cause a variety of computer problems, including overlapping desktop icons. So, you need to go to Windows Settings and check Windows for updates. If there are awaiting updates, follow the on-screen instructions and this post “Update Windows 11/10 to Download & Install Latest Updates” to complete the update.
Further Reading
Windows claims that Windows update does not affect your personal data. However, according to user experience, many users have encountered data loss after updating Windows. If you are one of them, you can use MiniTool Power Data Recovery to recover files lost after Windows update.
MiniTool Power Data Recovery excels at recovering various types of files, such as recovering not showing Word recent documents, Excel files, PPTs, PDFs, pictures, videos, and so on.
MiniTool Power Data Recovery FreeClick to Download100%Clean & Safe
Wrapping Things Up
This post focuses on the topic of “desktop icons are overlapping” and offers you several useful solutions to this issue.
If you have found any other good solutions to restore the desktop icons to normal, welcome to share them with us in the comment zone below. Thank you so much.
About The Author
Position: Columnist
Shirley graduated from English major and is currently an editor of MiniTool Team. She likes browsing and writing IT-related articles, and is committed to becoming a professional IT problem solver. The topic of her articles are generally about data recovery, data backup, and computer disk management, as well as other IT issues. In spare time, she likes watching movies, hiking and fishing.