
Applies ToWindows 10
Поддержка Windows 10 прекратится в октябре 2025 г.
После 14 октября 2025 г. корпорация Майкрософт больше не будет предоставлять бесплатные обновления программного обеспечения из Центра обновления Windows, техническую помощь и исправления безопасности для Windows 10. Ваш компьютер по-прежнему будет работать, но мы рекомендуем перейти на Windows 11.
Подробнее
Если к компьютеру подключено несколько дисплеев или конфигурация дисплея изменится, некоторые классические приложения могут выглядеть размытыми. Windows 10 (версии 1803 или более поздней) могут попытаться исправить это автоматически, чтобы приложения не отображались размытыми. Windows может не исправить размытость в некоторых приложениях, поэтому они по-прежнему будут выглядеть расплывчато на дисплеях с высоким разрешением.
Вот несколько примеров ситуаций, когда это может происходить.
-
Вы открываете приложение на дисплее с высоким разрешением, а затем перемещаете приложение на другой дисплей с другим разрешением.
-
Вы подключаете ноутбук или планшет к дисплею с другим разрешением, а затем проецируете изображение в режиме Только второй экран.
-
Вы выполняете удаленное подключение к другому компьютеру, разрешение дисплея которого отличается от разрешения дисплея компьютера, с которого выполняется подключение.
Примечания:
-
Чтобы автоматически использовать параметр для автоматического исправления размытых приложений, необходимо установить Windows 10 (версия 1803). Чтобы узнать версию Windows на своем компьютере, изучите статью Какая у меня версия операционной системы Windows?
-
Если у вас установлена Windows 10 (версия 1903), параметр исправления размытых приложений по умолчанию включен. Однако вы можете выключить его в любой момент. Уведомление об исправлении размытых приложений зависит от приложения и может по-прежнему отображаться.
Исправление размытости приложений
Если приложение выглядит размытым или на основном мониторе отображается уведомление о размытых приложениях, выполните следующие действия.
-
Выполните одно из следующих действий в зависимости от того, отобразился ли запрос «Исправить размытость в приложениях?»
-
Если запрос отобразился, выберите Да, открыть параметры и нажмите кнопку Применить.
-
Если запрос не отображается, в поле поиска на панели задач введите дополнительные параметры масштабирования и выберите Исправить размытость в приложениях.
-
-
В разделе Исправление масштабирования для приложений включите параметр Разрешить Windows пытаться исправить приложения, чтобы они не были размытыми.

Чтобы проверить способность Windows исправить проблему, закройте классическое приложение, которое выглядит размыто на основном дисплее, а затем снова откройте его.
Если приложение по-прежнему выглядит размытым, можно попробовать использовать другой параметр совместимости с высоким разрешением на дюйм для этого приложения вместо параметра Разрешить Windows исправить приложения, чтобы они не были размытыми . Дополнительные сведения об этом см. в разделе Настройка совместимости старых программ с данной версией Windows.
Независимо от того, были ли у вас размытые приложения или вы видели уведомление о размытых приложениях, вы можете включить или отключить эту функцию в любое время.
-
В поле поиска на панели задач введите расширенные параметры масштабирования и выберите Исправление размытых приложений.
-
В разделе Исправление масштабирования для приложений включите или отключите параметр Разрешить Windows попытаться исправить приложения, чтобы они не были размытыми.
Хотя уведомление о автоматическом исправлении размытых приложений может оказаться полезным, иногда уведомление может не отображаться. Вы можете отключить уведомление двумя способами:
-
Нажмите кнопку Пуск , затем выберите Параметры > Системные > уведомления & действия, а затем отключите Параметры отображения.
-
Выберите Центр уведомлений , а затем — Фокусировка помощи. Эта Windows 10 функция позволяет управлять отображением уведомлений. Дополнительные сведения см. в статье Упрощение фокусировки на задачах.
Нужна дополнительная помощь?
Нужны дополнительные параметры?
Изучите преимущества подписки, просмотрите учебные курсы, узнайте, как защитить свое устройство и т. д.
Все способы:
- Устранение размытого экрана
- Способ 1: Установка корректного разрешения
- Способ 2: Параметры масштабирования
- Способ 3: Устранение размытых шрифтов
- Способ 4: Обновление или переустановка драйверов
- Заключение
- Вопросы и ответы: 14
Порой после обновления на «десятку» пользователи сталкиваются с проблемой в виде размытой картинки на дисплее. Сегодня мы хотим рассказать о методах ее устранения.
Устранение размытого экрана
Эта проблема возникает в основном по причине неверного разрешения, некорректно работающего масштабирования или же из-за сбоя в драйвере видеокарты или монитора. Следовательно, способы её устранения зависит от причины появления.
Способ 1: Установка корректного разрешения
Чаще всего такая проблема возникает вследствие неправильно выбранного разрешения – например, 1366×768 при «родных» 1920×1080. Проверить это и установить корректные показатели можно через «Параметры экрана».
- Перейдите на «Рабочий стол», наведите курсор на любое пустое пространство на нём и щёлкните правой кнопкой мыши. Появится меню, в котором выберите пункт «Параметры экрана».
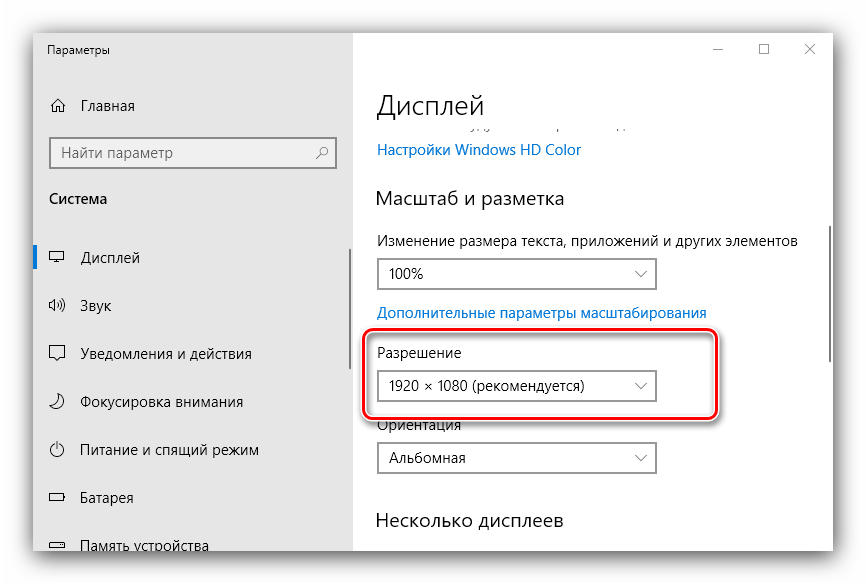
- Откройте раздел «Дисплей», если этого не произошло автоматически, и переходите к блоку «Масштаб и разметка». Найдите в этом блоке выпадающее меню «Разрешения».

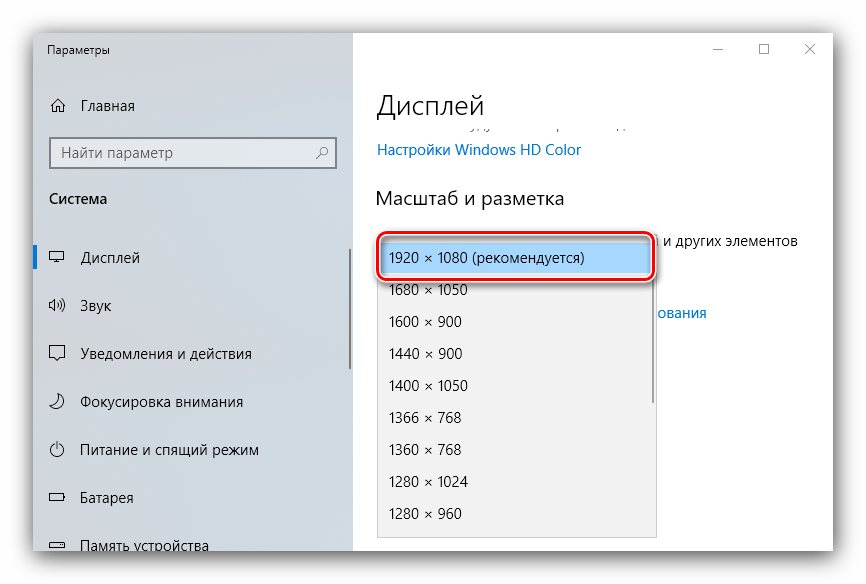
Если в этом списке установлено разрешение, рядом с показателями которого нет надписи «(рекомендуется)», раскройте меню и установите корректное.
Примите изменения и проверяйте результат – проблема будет решена, если её источник заключался именно в этом.
Способ 2: Параметры масштабирования
Если изменение разрешения не принесло результатов, тогда причина неполадки может заключаться в неправильно настроенном масштабировании. Исправить его можно следующим образом:
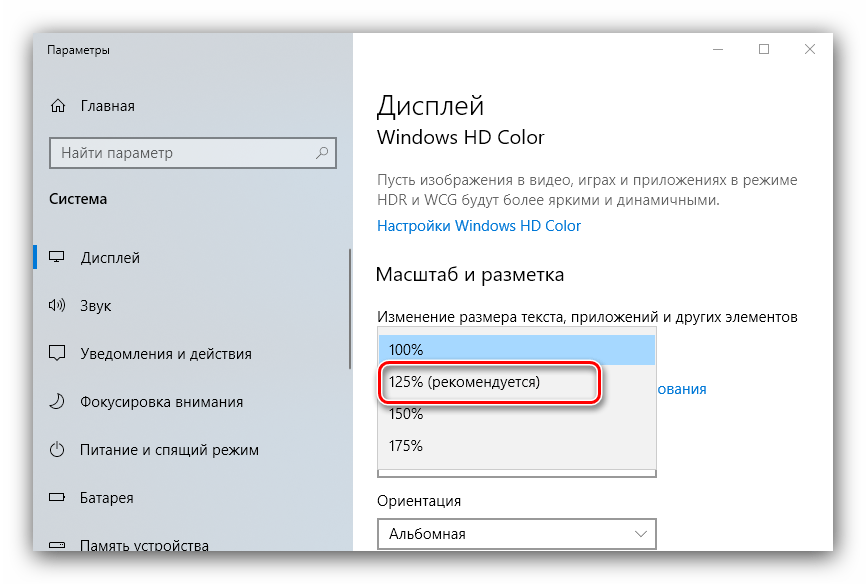
- Проделайте шаги 1-2 из предыдущего способа, но на этот раз найдите список «Изменение размера текста, приложений и других элементов». Как и в случае с разрешением, желательно выбирать параметр с припиской «(рекомендуется)».
- Скорее всего, Виндовс попросит вас выйти из системы для применения изменений – для этого раскройте «Пуск», кликните по иконке аватара учётки и выберите «Выход».
После снова зайдите в систему – скорее всего, ваша проблема будет устранена.
Сразу же проверьте результат. Если рекомендуемый масштаб всё равно выдаёт замыленную картинку, поставьте вариант «100%» – технически это отключение увеличения картинки.
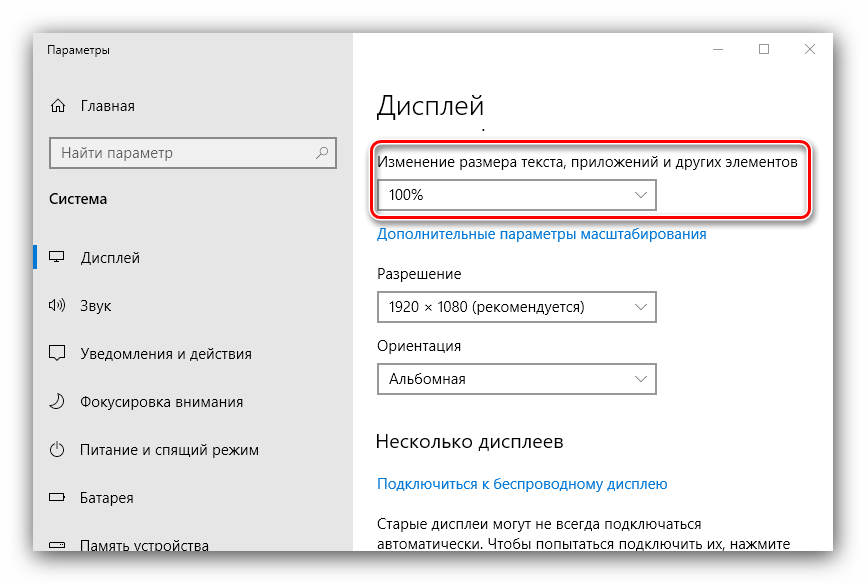
Отключение масштабирования должно обязательно помочь, если причина заключается в нём. Если же элементы на дисплее слишком мелкие, можно попробовать установить пользовательское увеличение.
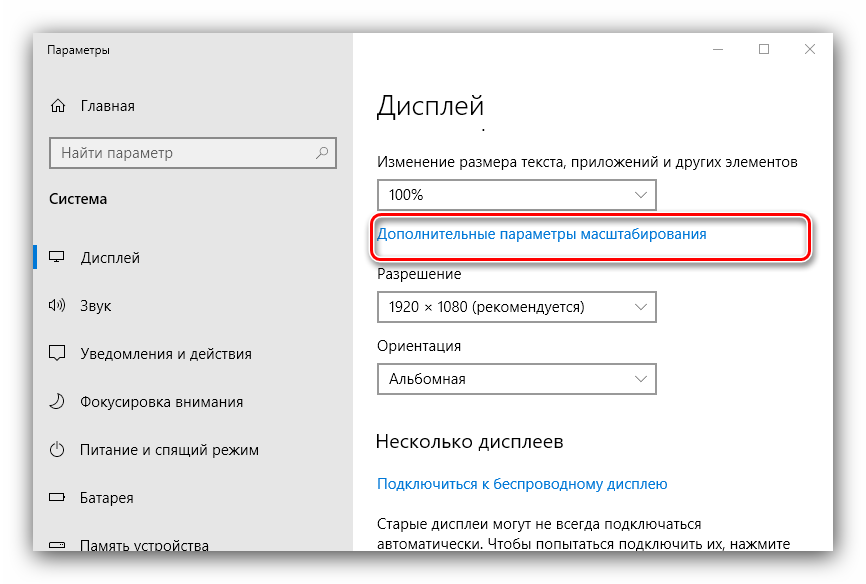
- В окне параметров дисплея прокрутите страницу до блока «Масштаб и разметка», в котором кликните по ссылке «Дополнительные параметры масштабирования».
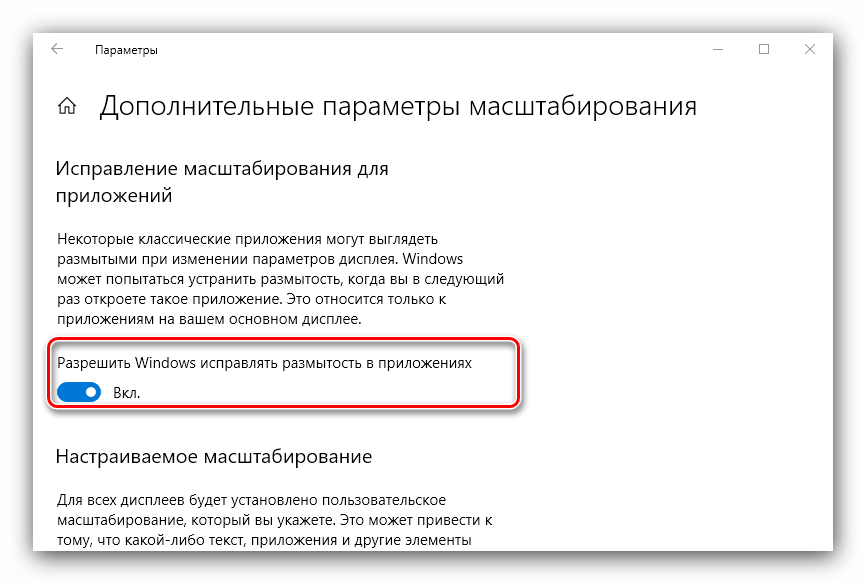
- Первым делом активируйте переключатель «Разрешить Windows исправлять размытость в приложениях».
Проверьте результат – если «мыло» не пропало, продолжайте выполнять текущую инструкцию.
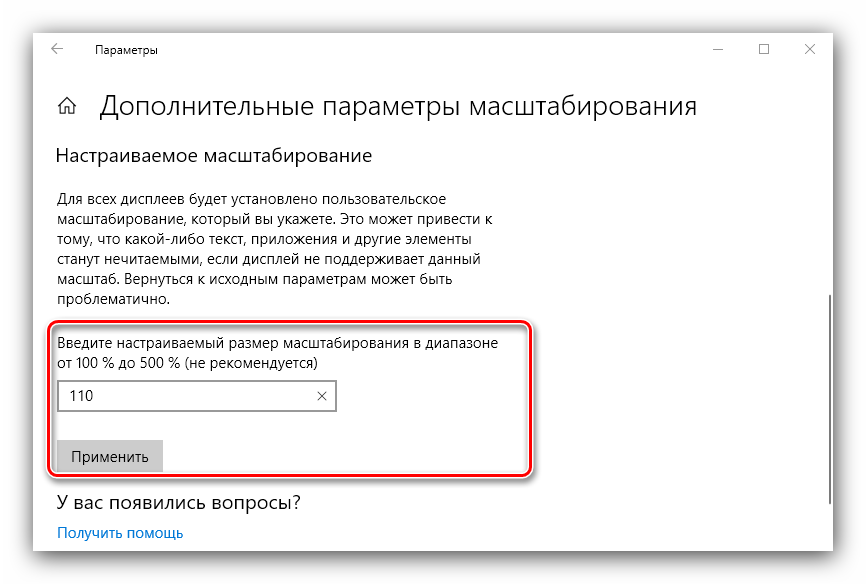
- Под блоком «Настраиваемое масштабирование» присутствует поле ввода, в котором можно вводить произвольный процент увеличения (но не меньше 100% и не больше 500%). Следует вводить значение, которое больше 100%, но при этом меньше рекомендованного параметра: например, если рекомендуемым считается 125%, то имеет смысл поставить число между 110 и 120.
- Нажимайте на кнопку «Применить» и проверяйте результат – скорее всего, размытие исчезнет, а значки в системе и на «Рабочем столе» станут приемлемого размера.
Способ 3: Устранение размытых шрифтов
Если замыленным выглядит только текст, но не вся отображаемая картинка, можно попробовать включить опции сглаживания шрифтов. Подробнее об этой функции и нюансах её использования можете узнать из следующего руководства.
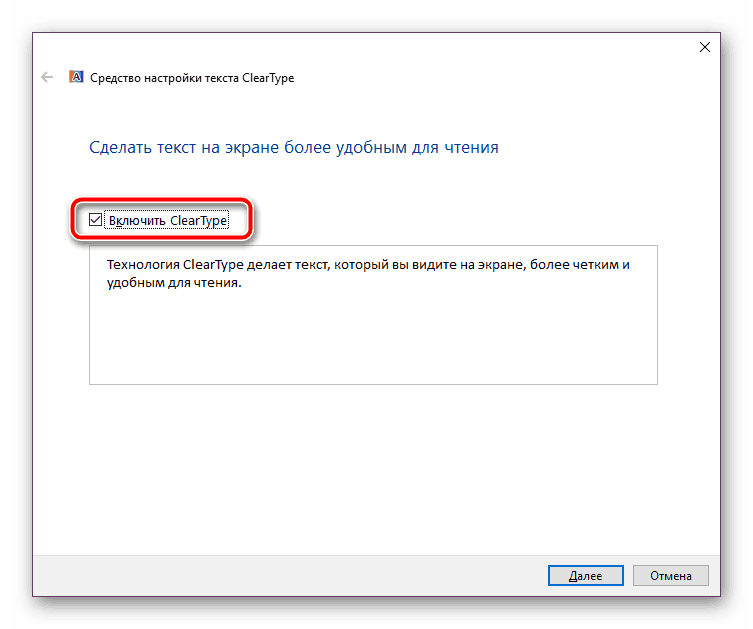
Подробнее: Устранение размытых шрифтов на Windows 10
Способ 4: Обновление или переустановка драйверов
Одной из причин проблемы могут быть неподходящие или устаревшие драйвера. Следует обновить либо переустановить таковые для чипсета материнской платы, видеокарты и монитора. Для пользователей ноутбуков с гибридной видеосистемой (встроенный энергоэффективный и производительный дискретный графические чипы) нужно обновить драйвера на оба GPU.
Подробнее:
Установка драйверов для материнской платы
Поиск и инсталляция драйверов для монитора
Переустанавливаем драйвера видеокарты
Заключение
Устранение размытости картинки на компьютере под управлением Windows 10 на первый взгляд не слишком сложно, но порой проблема может заключаться в самой системе, если ни один из представленных выше методов не помогает.
Наша группа в TelegramПолезные советы и помощь
Are your desktop icons blurry in Windows 10? Well, Windows 10 has a massive scaling problem for high-resolution screens. Because of the broken scaling system, the icons appear to be blurry. Many users have reported that they are facing this issue, and understandably it can be very hard to work on a blurry computer screen.
If you are also facing this issue then don’t worry as in this article, we have discussed the various ways in which you can troubleshoot the Windows 10 blurry icons issue.
We have shown a VIDEO walk through at the end of the post for easy solution.
Why Is Desktop Icon Blurry In Windows 10?
Generally, the blurry screen is caused when the scaling of the screen is not done correctly, but there can also be other reasons for this issue. Let’s take a look at some of the other reasons behind this problem.
- The resolution may not bet set correctly, which can cause the icons to look blurry.
- Faulty or corrupted GPU drivers are known to cause many display-related problems. They can also be the culprit for the icons to look blurry.
- If the Windows is outdated or corrupted, then also this problem can appear.
- A high DPI setting is another common cause of this problem.
Troubleshooting Windows 10 Blurry Icons Issue
As mentioned above, there are various different causes of this issue. In Windows 10, the blurry screen can be fixed by troubleshooting these causes one by one.
Solution 1: Set The Recommended Resolution
As mentioned above, if the resolution is not set as recommended, then you can face blurry icons or a pixelated screen in Windows 10. In this scenario, changing the resolution to the recommended resolution should fix the blurry icons in Windows 10.
To set the recommended resolution, follow the steps given below:
- Right-click on your desktop and then click on the Display settings option from the pop-up menu on your screen.
- Locate the Resolution option in the Scale and Layout section and click on the downward arrow.
- Choose the resolution value that has Recommended written next to it.
If the recommended resolution was already selected for you, then don’t change anything and skip to Solution 2.
- Next, it will ask if you want to keep changes or revert back. Click on the Keep changes option.
Now, check if the desktop icons are still blurry.
Solution 2: Install Appropriate GPU Drivers
Faulty GPU drivers are known to cause these types of display-related issues, it may also be the cause of this problem. The basic graphics drivers are known to not allow the GPU to properly configure the DPI of high-resolution monitors.
In this scenario, downloading the latest driver version for your computer and installing it should fix this problem. If you don’t know the drivers that you are using, then follow the steps given below:
- Press the Windows + R keys to open the Run utility. Type devmgmt.msc and click on OK.
Windows Device Manager will open on your screen.
- Locate the GPU driver and right-click on it.
- Click on the Properties option from the pop-up menu.
- Then, select the Details tab and change the Property to Hardware Ids. Copy the first value given and paste it on the web address bar.
Now, after you have found out the GPU details, visit one of these websites and download the drivers.
- AMD/ATI
- Intel
- NVidia
Once you have downloaded and installed the drivers, check if the problem remains.
Solution 3: Change The DPI Size
If the DPI has been set to a higher level than recommended, then the icons on your screen can become blurry. Normally 100% is the recommended value for the standard monitors, but it can become a problem for the high-resolution monitors as the elements in the interface will become so small that it will be hard to recognize anything.
If you are facing this in a standard monitor, then most likely changing the DPI to 100% should fix this issue.
To change your DPI, follow the steps given below:
- Open the Display Settings following Solution 1 and scroll down to Scale and layout section.
- Click on the Change the size of text, apps, and other items option and select the Recommended option.
- Now, click on the Advanced scaling settings just below the DPI settings.
- Turn on the Let Windows try to fix apps so they’re not blurry toggle.
This should fix the desktop icons blurry in Windows 10 issue if it was caused by high DPI.
Solution 4: Change The Visual Effects Settings
Some users have reported that they fixed this problem by changing the Visual effects settings to Best performance. To change the Visual effects settings, follow the steps given below:
- Type View advanced system settings in the Windows search bar and select the appropriate option.
- Click the Settings option in the Performance section. It will open the Performance Options on your screen.
- Select the Adjust for best performance option in the Visual effects tab.
- Finally, click on Apply and OK to save the changes.
Solution 5: Update Windows
If your Windows firmware is outdated, then it can cause several problems for your computer including the pixelated screen in Windows 10 issue. In this scenario, updating the Windows should fix this issue.
To update your Windows, follow the steps given below:
- Type Check for updates in the Windows search bar and select the appropriate option.
- Click on the Check for updates option. Your Windows will now check if any update is available and then download it automatically. Make sure the internet connection is turned on.
Once the update finishes and the Windows restarts to desktop, check if the problem has been fixed.
Solution 6: Reset Your Computer
If none of the above solutions were able to help you fix this issue, then try resetting Windows. Resetting Windows should fix any system corruption on your computer.
To reset Windows, follow the steps given below:
- Type, Reset this PC in the Windows search bar and select the appropriate option.
- In the Reset this PC section, click on the Get started option.
- Now, follow the instructions on your screen and wait for Windows to reset back to factory settings.
Wrapping Up
So if in Windows 10, blurry icons issue happens with you again, then you can easily fix it now. Follow the above troubleshooting methods carefully and you should be able to fix this problem. Don’t forget to share your views on this article in the comment section below.
Blurry and Pixelated Icons in Windows 10: 5 Solutions to Use
Windows 10 is known for its user-friendly interface, providing an experience that is both visually appealing and functional. However, many users confront a pesky issue: blurry and pixelated icons. This problem can range from slight blurriness that is hardly noticeable to extreme pixelation that significantly detracts from the user experience. In this article, we will delve into the causes of these visual nuisances and present you with five effective solutions to restore the beauty of your icons.
Understanding the Problem
Before we dive into the solutions, it’s vital to understand what causes icon blurriness and pixelation in Windows 10. This issue can arise from multiple factors:
-
Display Settings: Your screen resolution or scaling settings may not be appropriate for your display, leading to distortions in icon appearance.
-
Graphics Driver Issues: Outdated or corrupted graphics drivers can adversely affect how images and icons render on your screen.
-
High DPI Scaling: On high-resolution displays, Windows 10 may struggle with scaling applications correctly, causing icons to appear fuzzy or pixelated.
-
Theme and Personalization Settings: Sometimes, custom themes or poorly designed icons can be the culprits.
-
Corrupted Icon Cache: Windows maintains a database of icon images for fast loading. If this cache becomes corrupted, you may notice issues with icon clarity.
With this understanding, let’s explore five solutions that can help resolve the problem.
Solution 1: Adjust Display Settings
Step-by-Step Guide to Changing Resolution and Scaling
-
Open Settings: Click the Start menu and select the gear icon to open the Settings app.
-
System: Navigate to the «System» option, where you’ll find settings related to display, notifications, and more.
-
Display: In the left sidebar, choose «Display». Here, you’ll see various options for adjusting your monitor’s settings.
-
Resolution: Under the «Scale and layout» section, look for the «Display resolution» dropdown. Ensure that you are using the recommended resolution for your monitor. If you’re unsure about the optimal resolution, it typically indicates in parentheses next to it.
-
Scale and Layout: Depending on your preferences and display size, adjust the scaling settings. Common values are 100%, 125%, and 150%. Try setting it to 100% to see if that resolves the blurriness.
-
Apply Changes: After making adjustments, click «Apply» to implement the changes. If everything looks good, keep the settings; if not, revert as needed.
Solution 2: Update Graphics Drivers
Ensuring Your Graphics Drivers Are Current
-
Device Manager: Right-click the Start button and select «Device Manager». This will open the hardware management console.
-
Display Adapters: In Device Manager, expand the «Display adapters» section. Here, you’ll find the graphics driver currently in use.
-
Update Driver: Right-click on your graphics driver and select «Update driver». You’ll have the option to search automatically for updated driver software or browse your computer for drivers if you have a specific one in mind.
-
Follow Prompts: If you choose to search automatically, follow the prompts Windows provides. Allow it to update if it finds a newer driver.
-
Reboot: After the update finishes, restart your computer to ensure changes take effect.
Keeping your graphics drivers updated is vital for the overall performance of your system and can resolve many display-related issues.
Solution 3: Modify High DPI Scaling Settings
Adjusting Application Scaling
Many users experience icon blurriness on high-DPI displays because Windows doesn’t scale applications properly. You can adjust high DPI settings specifically for individual applications.
-
Find the Application: Locate the executable file for the application you want to correct (usually in Program Files) or use a shortcut.
-
Properties: Right-click on the application icon and choose «Properties».
-
Compatibility Tab: Navigate to the «Compatibility» tab within the Properties window.
-
Change High DPI Settings: Click on the button labeled «Change high DPI settings».
-
Override High DPI Scaling Behavior: In the new window, check the box for «Override high DPI scaling behavior» and choose «Application» from the dropdown menu.
-
Apply and OK: Click both «OK» and then «Apply».
-
Test: Open the application to see if the icons appear sharper.
Solution 4: Rebuild the Icon Cache
Steps to Reset Windows Icon Caches
An icon cache rebuild often resolves issues tied to corrupted icons.
-
Open Command Prompt: Type «cmd» in the Start menu search bar, then right-click on «Command Prompt» and select «Run as administrator».
-
Terminate Windows Explorer: In the Command Prompt, type
taskkill /IM explorer.exe /Fand press Enter. This command will close Explorer, which includes the taskbar and desktop icons. -
Delete Icon Cache: Type the following commands to delete the icon cache:
cd /d %userprofile%AppDataLocal del IconCache.db /a -
Restart Windows Explorer: Type
start explorer.exeand press Enter to relaunch Windows Explorer. -
Restart Your Computer: A full reboot ensures that all settings and cache files are properly reset.
Rebuilding the icon cache usually results in crisp, clear icons across your system.
Solution 5: Check Theme and Personalization Settings
Steps to Change Themes in Windows 10
Custom themes can sometimes lead to blurry icons, especially if they use low-resolution images.
-
Open Settings: Click the Start menu and launch the settings by selecting the gear icon.
-
Personalization: Choose «Personalization» from the options available.
-
Theme: In the left sidebar, click on «Themes».
-
Select a Default Theme: Choose a default Windows theme to see if the icons display correctly. Microsoft’s default themes typically have high-resolution icons.
-
Custom Icons: If you are using custom icons, ensure they are in high resolution. You can find various icon packs online, but make certain they are well-reviewed and designed for Windows 10.
-
Check for Updates: Ensure your theme is updated, as theme developers often release patches for bugs or compatibility issues.
Conclusion
Blurry and pixelated icons in Windows 10 can stem from a variety of issues, from incorrect display settings to corrupted icon caches. By implementing the solutions outlined above, you can significantly improve your visual experience.
Remember to regularly maintain your system by updating drivers, adjusting display settings for optimal resolutions, and checking your icon cache occasionally. By taking these preventive measures, you can enjoy a seamless and visually appealing interface on your Windows 10 machine.
While some solutions may solve the issue more quickly than others, consider the context of your specific situation. If one solution doesn’t provide immediate results, do not hesitate to move on to the next. Each of these methods has proven effective for various users, and the journey to clearer, more vibrant icons is worth the effort.
Lastly, staying informed about Windows 10 updates can also help preempt potential issues related to display. Enjoy your improved workspace with refreshed icons, and may your digital experience be as smooth as it is vibrant!
Fix Windows 10 Blurry Icons. In this article, you will get to know why do desktop icons get blurry in Windows 10 and how to fix Windows 10 blurry icons issue. Many times there is a scaling problem for high-resolution screens in Windows 10. Due to the broken scaling, the icons on the desktop get blurred and it is very difficult to work on the blurred screen. But, don’t worry, we will troubleshoot the pixelated screen in Windows 10
Why Do Desktop Icons Get Blurry In Windows 10?
The blurry screen is due to the wrong scaling of the screen. But, there are also many other reasons for this issue:
-Resolution is not set correctly.
-Faulty and corrupted GPU drivers.
-High DPI setting.
-Windows is outdated and corrupted.
How To Fix Windows 10 Blurry Icons Issue?
Method 1 – Set To Recommended Resolution:
When the resolution is not set as recommended, you can face blurry icons or pixelated screen in Windows 10. So, by changing the resolution to the recommended one can fix the issue. To do so:
1.Right-click on your desktop.
2.Then click on the Display settings option from the pop-up menu on your screen.
3.Locate the Resolution option in the Scale and Layout section.
4.Click on the downward arrow.
5.Choose the resolution value that has Recommended written next to it.
6.Click on the Keep changes option from the pop-up box.
If your resolution is already set to the recommended resolution, then do not change it to any other resolution.
Method 2 – Install New GPU Drivers:
Sometimes this issue can also occur due to faulty or corrupted GPU drivers. They can cause many display related issues. To solve this problem, you have to install the latest version of GPU drivers for your computer. To install the latest GPU drivers, follow the below-given steps:
1.Press the Windows + R keys to open the Run utility.
2.Type devmgmt.msc and click on OK.
3.Windows Device Manager will open on the screen.
4.Locate the GPU driver and right-click on it.
5.Click on the Properties option from the pop-up menu.
6.Then, select the Details tab and change the Property to Hardware Ids.
7.Copy the first value given and paste it onto the web address bar.
Now, after seeing the GPU details, visit any of the websites to download the latest drivers.
-Intel
-AMD
-Nvidia
Method 3 – Change The DPI Size:
When DPI is set to a higher level, then icons become blurry. Normally, it is set at 100%. But, it can become a problem for high-resolution monitors. Because the elements in the interface will become so small that it will be hard to recognize anything. If you face this issue in a standard monitor, then changing the DPI to 100% can fix the issue. To change the DPI:
1.Open the Display Settings following Solution 1.
2.Scroll down to Scale and layout section.
3.Click on the Change the size of text, apps, and other items option.
4.Select the Recommended option.
5.Now, click on the Advanced scaling settings just below the DPI settings.
6.Turn on the Let Windows try to fix apps so they’re not blurry toggle.
If the desktop icons blurry in Windows 10 issue is caused by the high DPI, then it can be fixed by trying this method.
Method 4 – Change The Visual Effects Settings:
This problem can be fixed by changing the Visual effects settings to Best performance. To change the settings, follow the steps given below:
1.Type View advanced system settings in the Windows search bar and select the appropriate option.
2.Click the Settings option in the Performance section. It will open the Performance Options on your screen.
3.Select the Adjust for best performance option in the Visual effects tab.
4.Finally, click on Apply and OK to save the changes.
Method 5 – Update Windows:
Outdated firmware can cause the pixelated screen in Windows 10 issue. So, updating Windows can fix the issue. To update the Windows:
1.Type Check for updates in the Windows search bar.
2.Select the appropriate option.
3.Click on the Check for updates option.
4.Windows will now check if any update is available.
5.Then download it automatically.
6.Make sure the internet connection is turned on.
7.When the update is finished, restart the computer to check if the problem is solved.
Method 6 – Reset Your computer:
If none of the solutions works, then try resetting Windows. It will fix all the disabilities happening in your system. To rest the Windows:
1.Type, Reset this PC in the Windows search bar.
2.Select the appropriate option.
3.In the Reset this PC section, click on the Get started option.
4.Now, follow the instructions on your screen.
5.Wait for Windows to reset back to factory settings.
featured image source: https://hp.teveotecno.com.ar/