
В журналах событий Windows хранится полезная информация, которая нужна при анализе состояния служб и приложений в Windows, отладки ошибок и аварийный ситуаций, аудите различных событий безопасности. По умолчанию для журналов Event Viewer в Windows заданы максимальные размеры, при достижении которых новые события начинают перезаписывать более старые. Если на вход Event Viewer попадает слишком большое количество событий, может случится, что в журнал помещаются события лишь за последние несколько часов, что может быть не достаточно.
Чтобы предотвратить перезапись старых событий и всегда иметь под рукой события за достаточно большой промежуток времени, вы можете увеличить максимальный размер журналов Event Viewer.
Содержание:
- Получить информацию о журналах событий Windows с помощью PowerShell
- Изменить размер журнала событий из консоли Event Viewer
- Увеличить размер журнала событий Windows через GPO
Получить информацию о журналах событий Windows с помощью PowerShell
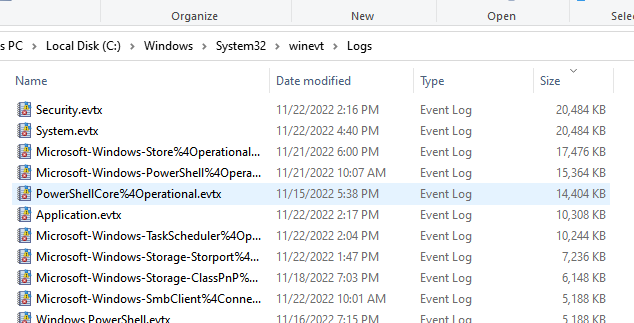
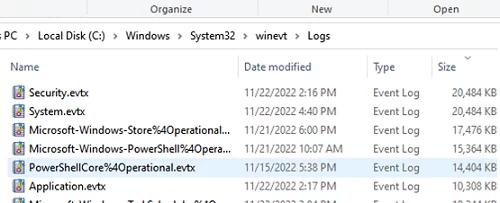
Файлы журналы событий Windows хранятся в каталог
%SystemRoot%\System32\Winevt\Logs\
в виде файлов с расширением .EVTX. Обратите внимание, что для каждого журнала используется собственный файл. Соответственно, вы можете управлять размерами только того лога Windows, который вам нужен и оставить остальные значения по-умолчанию.
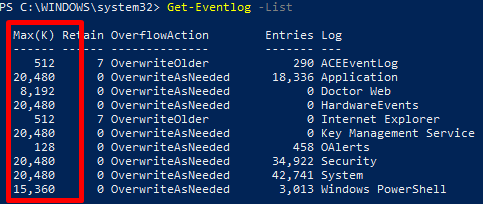
Текущие лимиты на все включенные журналы событий в Windows можно вывести с помощью PowerShell:
Get-Eventlog -List
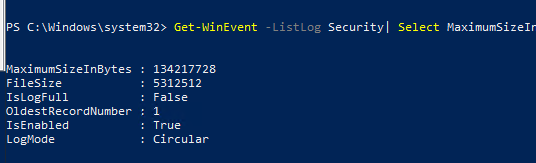
Вы можно вывести размер определенного лога с помощью командлета Get-WinEvent. Например, получим текущий и максимальный размер журнала Security:
Get-WinEvent -ListLog Security| Select MaximumSizeInBytes, FileSize, IsLogFull, OldestRecordNumber, IsEnabled, LogMode
Суммарный размер паки с файлами журналов событий можно получить с помощью PowerShell:
«{0:N2} MB» -f ((gci c:\windows\System32\Winevt\Logs\| measure Length -s).sum / 1Mb)
Чтобы увеличить максимальный размер лога, можно использовать утилиту wevtutul (новый размер задается в Кб):
wevtutil sl "Application" /ms:200000
Или с помощью PowerShell:
Limit-Eventlog -Logname Application -MaximumSize 200MB -OverflowAction OverwriteOlder
Изменить размер журнала событий из консоли Event Viewer
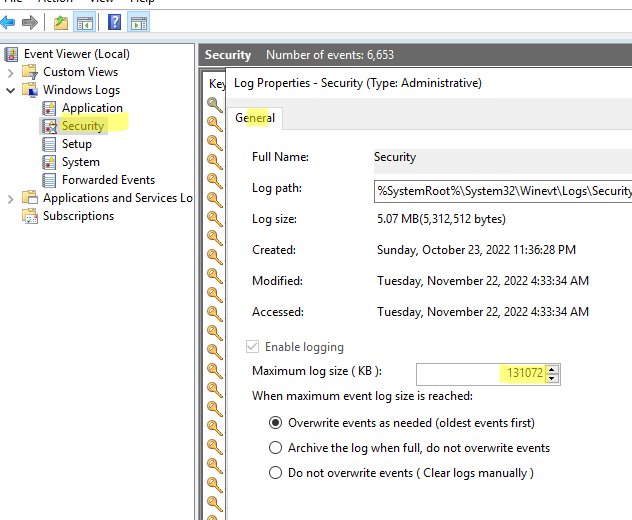
Проще всего увеличить максимальный размер журнала прямо из консоли Event Viewer.
- Откройте
eventvwr.msc
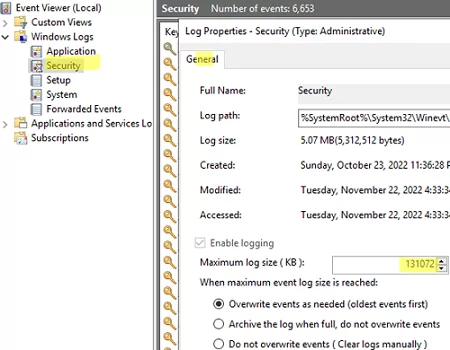
; - Найдите в консоли свойства нужного журнала и откройте его свойства (например, Security);
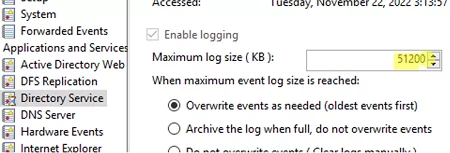
- Задайте ограничение в разделе Maximum log size (KB) и сохраните изменения;

- Здесь же можно изменить поведение при достижение максимального размера:
Owerwrite events as needed (oldest events first) – этот режим исопльзуется по умолчанию. Новые события просто перезаписывают более старые.
Archive the log when full, do not owerwrite events – текущий журнал событий при заполнении архивируется в папке \System32\Winevt\Logs\ и новые события записываются в новый evtx файл. Архивные файлы событий можно открыть через меню Open Saved Log в Event Viewer.
Do not owerwrite events (Clear log manually) – события никогда не перезатираются. Для записи новых событий нужно очистить журнал.
Увеличить размер журнала событий Windows через GPO
Чтобы централизованно управлять размерами журналов событий на компьютерах или серверах в домене Active Directory, можно использовать групповые политики.
- Запустите консоль Group Policy Management (
gpmc.msc
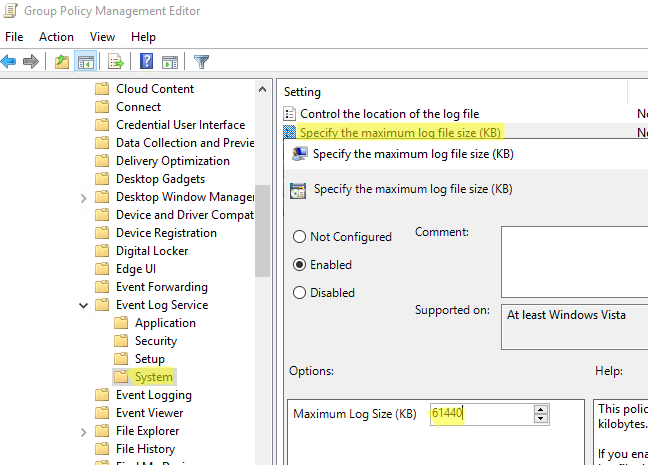
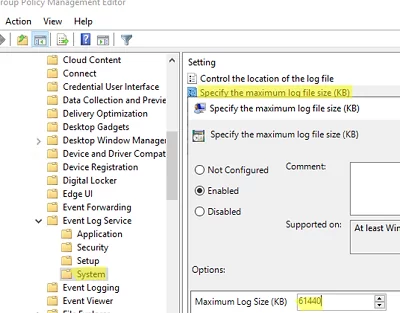
), создайте новую GPO и назначьте на OU с компьютерами или серверами, для которых вы хотите изменить настройки Event Viewer (или назначьте GPO на корень домена); - Перейдите в раздел GPO Computer Configuration -> Policies -> Administrative Templates -> Windows Components -> Event Log Service. Как вы видите, в этом ветке есть подразделы для управления базовыми журналами Windows:
Application
Security
Setup
System
- Чтобы увеличить максимальный размер любого из журналов, откройте параметр Specify the maximum log file size (KB), включите его и задайте нужный вам размер;

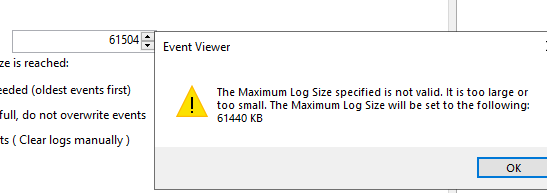
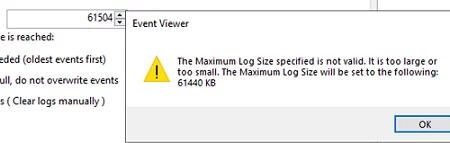
- Обновите настройки политики на клиентах и проверьте, что в свойствах журнала теперь указан новый размер, который вы не можете изменить. При попытке задать другой размер появится ошибка:

Event Viewer
The Maximum Log Size specified is not valid. It is too large or too small. The Maximum Log Size will be set to the following: 61440 KB
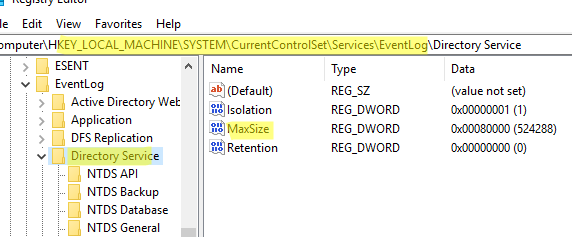
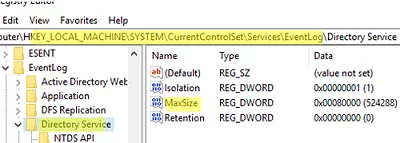
Обратите внимание, что в описанном выше разделе GPO отсутствуют настройки для других журналов из раздела Applications and Services Logs -> Microsoft.Если вам нужно увеличить размер любого другого журнала событий (кроме стандартного), это можно сделать через реестр. Настройки журналов событий Windows хранятся в разделе реестра HKEY_LOCAL_MACHINE\SYSTEM\CurrentControlSet\Services\EventLog\<log_name>. Размер журнала задается с помощью параметра MaxSize (тип REG_DWORD). Вы можете распространить нужное вам значение параметра реестра MaxSize на компьютеры домена с помощью Group Policy Preferences.
Подробнее о настройке ключей и параметров реестра через GPO здесь.
В этом примере мы увеличим размер журнала Directory Service на контроллерах домена. Настройки этого лога хранятся в ветке HKLM\SYSTEM\CurrentControlSet\Services\EventLog\Directory Service.
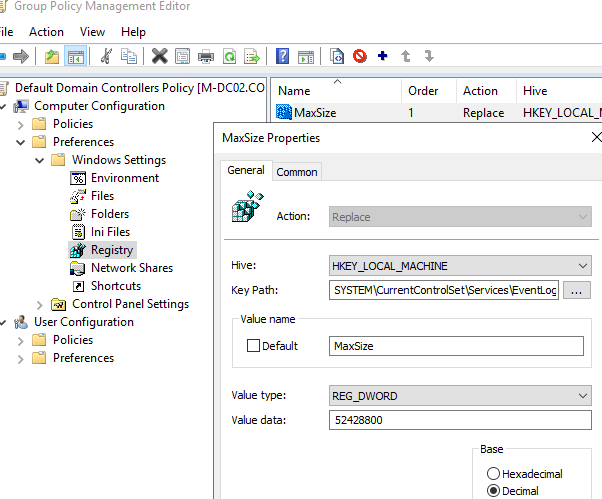
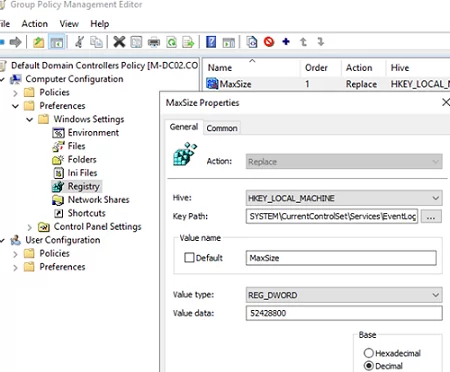
- Откройте GPO и перейдите в раздел Computer Configuration -> Preferences -> Windows Settings -> Registry;
- Выберите New -> Registry Item;
- Создайте новый параметр со следующими настройками:
Hive: HKEY_LOCAL_MACHINE
Key path: SYSTEM\CurrentControlSet\Services\EventLog\Directory Service
Value name: MaxSize
Value type: REG_DWORD
Value data: 52428800 (значение задается в байтах. В нашем примере это 50 Мб)

- Проверьте, что после обновления GPO на DC увеличится максимальный размер журнала.

Например, если вам нужно хранить историю RDP подключений к RDS хосту за продолжительное время, нужно увеличить размер лога Terminal-Services-RemoteConnectionManager.
За счет увеличения размеров журналов событий Windows вы можете получить различную информацию за более длительный промежуток времени. Например, из журналов событий можно получить историю перезагрузок Windows, понять кто удалил файл в сетевой папке или кто изменил NTFS права доступа.
GPO — Настройка размера и удержания журнала событий
GPO — Настройка размера и удержания журнала событий
Хотите узнать, как использовать политику группы для настройки размера журнала событий и времени хранения? В этом учебнике мы покажем вам, как настроить время хранения и размер журналов просмотра событий Windows.
• Windows 2012 R2
• Windows 2016
• Windows 2019
• Windows 10
• Windows 7
Список оборудования
В следующем разделе представлен список оборудования, используемого для создания этого учебника.
Как Amazon Associate, я зарабатываю от квалификационных покупок.
Windows Связанные Учебник:
На этой странице мы предлагаем быстрый доступ к списку учебников, связанных с Windows.
Учебник GPO — Настройка размера и удержания журнала событий
На контроллере домена откройте инструмент управления групповой политикой.

Создание новой групповой политики.

Введите имя для новой политики группы.

В нашем примере, новый GPO был назван: MY-GPO.
На экране управления групповой политикой расширьте папку под названием «Объекты групповой политики».
Нажмите правой кнопкой мыши на новый объект групповой политики и выберите опцию редактирования.
На экране редактора групповой политики расширьте папку конфигурации компьютера и найдите следующий элемент.
Доступ к папке под названием Служба журнала событий.
Доступ к одной из следующих папок: приложение, безопасность, система или настройка.
Включите названный элемент: Укажите максимальный размер файла журнала.
Настройте максимальный размер журнала между 1024 и 4194240.
Это от 1 МБ до 4 ГБ.

Отключите элемент, названный: Поведение журнала событий Управления, когда файл журнала достигает своего максимального размера.
Новые события переназвонят старые события, когда файл журнала достигнет своего максимального размера.
Это поведение по умолчанию на Windows.

Чтобы сохранить конфигурацию групповой политики, необходимо закрыть редактор групповой политики.
Поздравляю! Вы закончили создание GPO.
Учебник GPO — журнал событий Windows
На экране управления политикой Группы необходимо правильно нажать на желаемую Организационную группу и выбрать возможность связать существующий GPO.

В нашем примере мы собираемся связать групповую политику под названием MY-GPO с корнем домена.

После применения GPO вам нужно подождать 10 или 20 минут.
В течение этого времени GPO будет реплицироваться на другие контроллеры доменов.
На удаленном компьютере пройдите проверку размера журнала и конфигурации его удержания.

В нашем примере мы настроили размер файла журнала Windows и его удержание.
VirtualCoin CISSP, PMP, CCNP, MCSE, LPIC22021-04-01T10:21:01-03:00
Related Posts
Page load link
Ok
Windows Event Viewer Logs store useful information that is needed when analyzing the status of services and applications in Windows, troubleshooting errors, and auditing security events. By default, the sizes of the Event Viewer logs in Windows are limited and when the file sizes are exceeded, new events begin to overwrite older ones. If too many events are sent to the Event Viewer, only the last few hours of events may be logged, which may not be sufficient for efficient monitoring and log analysis.
To prevent old events from being overwritten, and to ensure that you always have events for a long enough period, you can increase the maximum size of Event Viewer logs.
Contents:
- How to Set Windows Event Log Size with PowerShell?
- Adjusting the Event Log File Size from the Event Viewer Console
- Increase the Size of Windows Event Log Files Using GPO
How to Set Windows Event Log Size with PowerShell?
Windows event log files are stored in the %SystemRoot%\System32\Winevt\Logs\ directory as .EVTX files. Note that there is a separate file for each log. So you can manage the maximum size of only the Windows log you need and leave the default settings for others.
You can use PowerShell to view the current limits for all enabled Event Viewer Logs on Windows:
Get-Eventlog -List
You can use the Get-WinEvent cmdlet to get the size of a specific event log file. For example, here’s how you can get the current and maximum size of the Security log file:
Get-WinEvent -ListLog Security| Select MaximumSizeInBytes, FileSize, IsLogFull, OldestRecordNumber, IsEnabled, LogMode
To increase the maximum size of the log, you can use the wevtutul command line tool (the new size is set in bytes):
wevtutil sl "Application" /ms:200000000
Or you can use PowerShell to set a new maximum Application log file size:
Limit-Eventlog -Logname Application -MaximumSize 200MB -OverflowAction OverwriteOlder
Adjusting the Event Log File Size from the Event Viewer Console
The easiest way to increase the maximum log size is directly from the Event Viewer console.
- Open the Event Viewer MMC snap-in (
eventvwr.msc); - Select the required log (for example, Security) and open its properties;
- Set a new limit under Maximum log size (KB) and save the changes;
- You can also select the action to be taken when the maximum log file size is reached: Overwrite events as needed (oldest events first). This mode is used by default and implies that new events simply overwrite older events.
Archive the log when full, do not overwrite events – the current event log is archived in the\System32\Winevt\Logs\folder when full, and new events are written to a new EVTX file. You can access the archived event files through the Open Saved Log menu in the Event Viewer.
Do not overwrite events (Clear log manually) – enable this option to protect your old events from being overwritten. Note that the log must be cleared manually to write new events.
Increase the Size of Windows Event Log Files Using GPO
You can use Group Policies to centrally manage the size of event log files on computers or servers in an Active Directory domain.
- Run the Group Policy Management snap-in (
gpmc.msc), create a new GPO, and link it to the Organizational Units with the computers or servers you want to change the Event Viewer settings for (you may also link the GPO to the domain root); - Navigate to the following GPO section Computer Configuration -> Policies -> Administrative Templates -> Windows Components -> Event Log Service. This directory contains nodes for managing the basic Windows logs:
Application
Security
Setup
System
- To increase the maximum size of the log, select the Specify the maximum log file size (KB) option, enable it, and set the required size
;
- Update the Group Policy settings on the clients and check that the new maximum log file is now specified in the log properties and that you cannot change it. If you try to set a different size, an error will appear:
Event Viewer
The Maximum Log Size specified is not valid. It is too large or too small. The Maximum Log Size will be set to the following: 61440 KB
The GPO section described above doesn’t contain options for other Event Logs from Applications and Services Logs -> Microsoft. If you need to increase the size of another event log (other than the standard one), you can do it through the registry. Windows event log settings are stored in the HKEY_LOCAL_MACHINE\SYSTEM\CurrentControlSet\Services\EventLog\<log_name> registry key. The maximum log file size is determined by the MaxSize parameter (REG_DWORD type). You can configure the registry value of the MaxSize parameter for a custom event log on domain computers by using Group Policy Preferences.
In this example, we are going to increase the size of the Directory Service log on the domain controllers. This log’s settings are stored in the following registry key HKLM\SYSTEM\CurrentControlSet\Services\EventLog\Directory Service.
- Open GPO and go to Computer Configuration -> Preferences -> Windows Settings -> Registry;
- Select New -> Registry Item;
- Create a new registry parameter with the following settings:
Hive: HKEY_LOCAL_MACHINE
Key path: SYSTEM\CurrentControlSet\Services\EventLog\Directory Service
Value name: MaxSize
Value type: REG_DWORD
Value data: 52428800 (the maximum file size is given in bytes. In our example it is 50 MB.)
- Check that the maximum log size is after updating the GPO on the DCs.
For example, if you want to store logs with a history of Remote Desktop connections to an RDS host for a long period, you need to increase the size of the Terminal-Services-RemoteConnectionManager log.
By increasing the size of Windows event logs, you can get more information over a longer time. For example, you can use event logs to get the Windows reboot history, find out who deleted a file from a shared network folder, or changed NTFS permissions.

Ever been in a situation where suppose you have been involved in investigating an issue that requires you to grab Windows Event logs from a user’s workstation. But while going through the Event logs, you notice that the log file got overwritten with newer events, purging the previous events which are required for you to trace to the root cause of the issue.
This is expected as, by default, windows event log maximum file size is capped at 20Mb. After it reaches the defined value, it will overwrite the previous events with the latest ones.
You can get this max file size capping info, as usual, from the windows registry under HKEY_LOCAL_MACHINE\SYSTEM\CurrentControlSet\Services\Eventlog
The below snapshot shows the default max file size limit for the Application event logs. You can see the same for the other standard event log categories namely Hardware Events, Security, and System from their respective nodes.

However, this max file size capping can be changed using local admin privilege on the workstation, or via GPO. Now obviously, we can’t use GPO for cloud-native Intune-managed workstations!
So this blog post here will show you how you can make use of Intune to change the max file size capping of the Windows Event log on the managed workstations.
Table of Contents
Increase the max file size limit of Windows Events logs with Intune
The EventLogService Policy CSP can come to our aid for the purpose.
However, gone are the days of creating custom OMA-URI policies with the introduction of Settings Catalog and MS adding more and more controls to it every month.
So today in this blog post, we will be creating a Settings Catalog policy in Intune (or MEM) to change the max file size capping of 20 MB for the standard Windows Event log files on the workstation to something more, let’s say 100 MB.
Policy creation
On the MEM Admin portal, navigate to Devices -> Windows Devices -> Configuration profiles and click on Create profile to create a profile for Platform -> Windows 10 and later and Profile type -> Settings catalog.

Provide a Name and Description (optional) for the profile being created.

Click on Add settings.

From the settings picker, navigate to Administrative Templates > Windows Components > Event Log Service and for each of the four standard event categories, select the settings named Specify the maximum log file size (KB).

Once you have selected the settings for all the categories (or the categories for which you want to increase the max file size capping), flip the settings to Enabled for that category and put in the required file size calculated in KB.

In the next stage, you can make your assignments (or you can do that later as well post the profile gets created, your way!)

The final stage is reviewing the profile as created so far and once we are satisfied, we just complete the profile creation.

A notification will be received for the successful profile/policy creation.

The policy/profile as created if subjected to active assignment, all we would need to do is check if the policy as created did the thing that it was intended for.
End-result
After doing a few syncs from my test device and checking back at Intune policy reporting, I can see that the policy succeeded for my test device.

This is a good sign, at least Intune is not showing any error.
And from the endpoint, you can open Event Viewer and then from the Log properties, check if the value as configured is being reflected or not.

But it’s not the end…
One thing important to note here is that what we have done till now only works for setting the max size of the four standard Windows Event logs, namely Application, Security, Setup, and System event logs.
The above policy/profile will not help to set the max size for other event logs, such as those under Applications and Services Logs → Microsoft within Event Viewer.
To change the max file size capping limit of other event logs like those under Applications and Services Logs → Microsoft within Event Viewer, there are no equivalent GPO settings, and as such, no equivalent MDM settings as well.
But it can still be controlled via Windows Registry. The different Windows Events channels that form the Events tree other than the 4 standard Windows events can be seen from the registry under HKEY_LOCAL_MACHINE\SOFTWARE\Microsoft\Windows\CurrentVersion\WINEVT\Channels
So if I want to increase or play with the max log file size of say DeviceManagement-Enterprise-Diagnostics-Provider/Operational, all I need to do is find the node for it under the reg_path as mentioned above and see if contains the MaxSize reg_DWORD key. If yes, I can change the value of the key to the one I want, or if the key is not present, I can create it altogether.

The above snap shows the default log file size for DeviceManagement-Enterprise-Diagnostics-Provider/Operational event logs.
Now I go to the registry and I see that DeviceManagement-Enterprise-Diagnostics-Provider/Operational node does not contain the MaxSize reg key by default.

So let’s go ahead a create one like below.

Let’s now open the Event Viewer and check if the change we made has been replicated in reality.

On checking, sure it does the work!
Thus, by adding/modifying the registry key and value, as shown above, you can play with the max file size capping for any event log that you want, other than the standard four Windows Events logs.
For this, you may resort to using a Powershell deployment from Intune, or if license permits, then maybe use the Proactive remediation as well. Not in the scope of this blog post 😅
That’s all for today…
С помощью аудита событий безопасности администратор может получать достоверную информацию обо всех событиях в системе, контролировать действия пользователей, и использовать информацию для выявления уязвимых мест в системе безопасности сервера или AD. В Windows такие события записываются в журнал Security операционной системы. В этой статье мы покажем, как настраивать политики аудита безопасности в Windows на примере настройки аудит доступа к файлам и папкам.
Для настройки политик аудита в Windows используется консоль настройки групповых политик. Если вы настраиваете политики для компьютеров/серверов домена, используйте Group Policy Management Console (gpmc.msc). При настройке политики аудита на отдельном сервере можно использовать консоль Local Group Policy Editor (gpedit.msc).
В консоли GPO есть две секции, в которых находятся политики аудита базовая и расширенная.
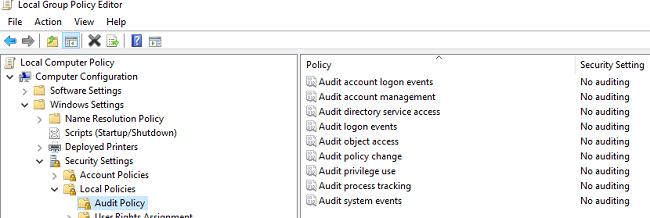
Базовая политика аудита находится в разделе Computer Configuration –> Windows Settings -> Security Settings -> Local Policies -> Audit Policy. В ней доступны следующие категории событий:
- Audit account logon events
- Audit account management
- Audit directory service access
- Audit logon events
- Audit object access
- Audit policy change
- Audit privilege use
- Audit process tracking
- Audit system events
Расширенные политики аудита находятся в секции: Computer Configuration -> Windows Settings -> Security Settings -> Advanced Audit Policy Configuration. Здесь находится 60 различных политик аудита, разделенные на 10 категорий:
- Account Logon
- Account Management
- Detailed Tracking
- DS Access
- Logon/Logoff
- Object Access
- Policy Change
- Privilege Use
- System
- Global Object Access Auditing
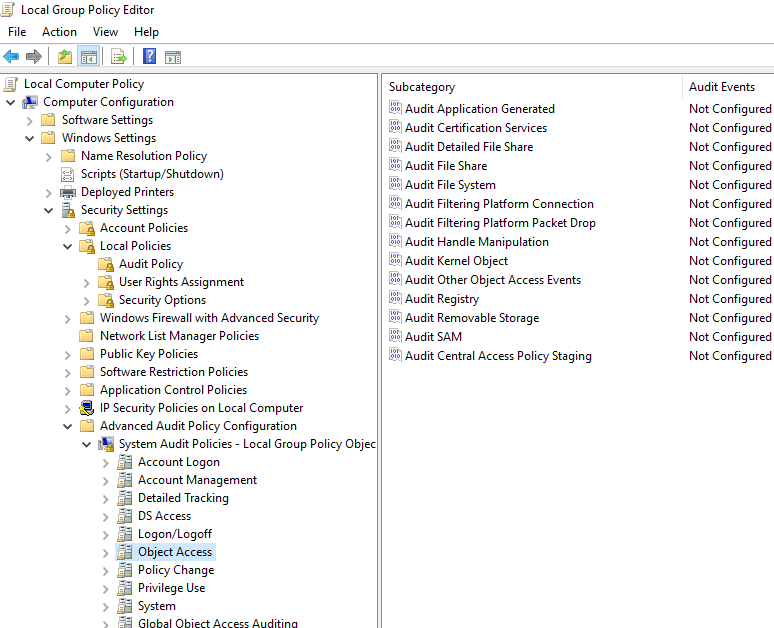
В большинстве случаев нужно использовать политики аудита из секции Advanced Audit Policy Configuration. Они позволяют настроить аудит более тонко и исключить ненужные события безопасности.
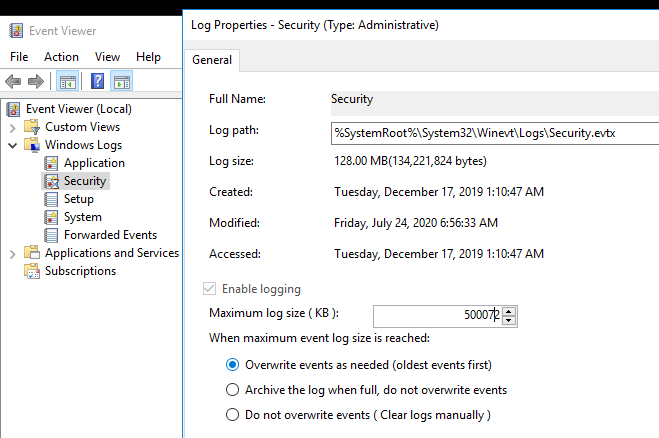
Прежде чем включать политики аудита в Windows рекомендуем увеличить максимальный размер журнала Security со 128 Mb (по-умолчанию в Windows Server)
Запустите консоль Event Viewer (eventvwr.msc), разверните Windows Logs и откройте свойства журнала Security. Увеличьте значение в поле Maximum log size (KB).
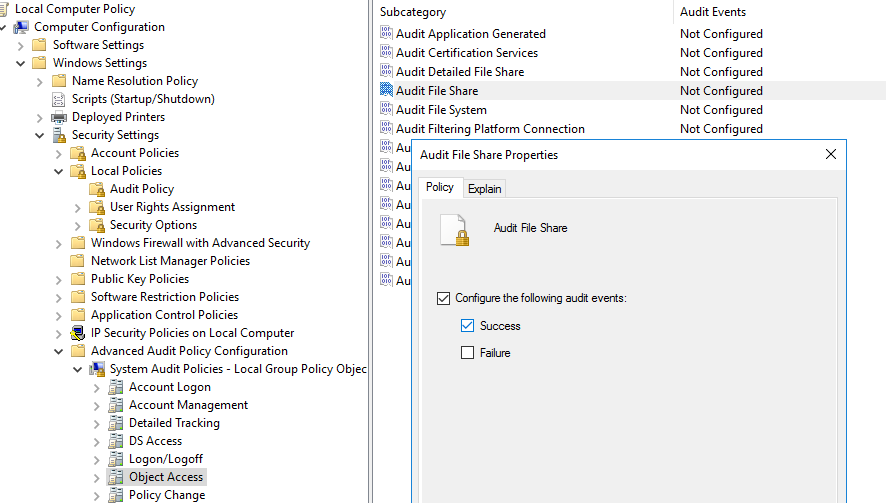
Теперь нужно настроить политику аудита доступа пользователей к файлам и папкам в сетевой папке. Перейдите в секцию Advanced Audit Policy -> Object Access. Откройте свойства подкатегории Audit File Share и Audit File System.
Включите политику: Configure the following audit events.
Укажите, какие события нужно записывать в журнал Security:
- Success – успешный доступ пользователя к объектам в сетевой папке
- Failure – события неуспешного доступа к папкам.
В нашем случае достаточно вести аудит только Success событий.
Теперь нужно назначить политику аудита к сетевой папке (создать системные списки управления доступом – SACL).
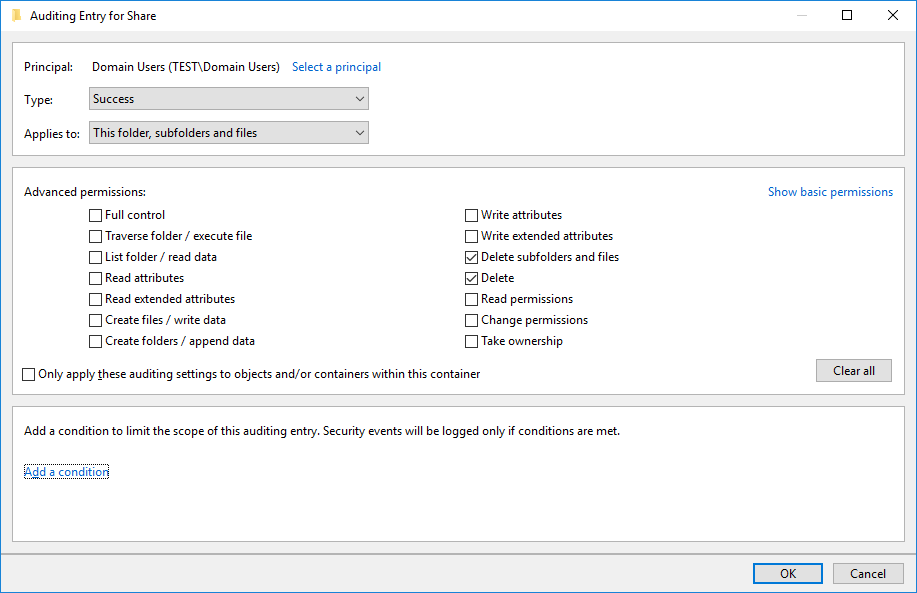
Откройте свойства сетевой папки, перейдите на вкладку Security -> Advanced -> Auditing tab -> Continue.
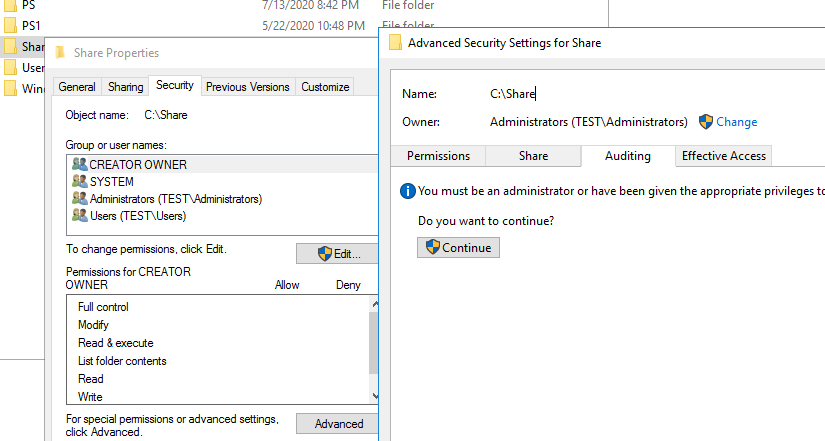
Нажмите кнопку Add -> Select a principal и добавьте субъекты – это пользователи или группы (локальные или из Active Directory), чьи действия нужно аудировать. Я добавил группы Domain Users или Everyone (это значит, я буду вести аудит доступа к сетевой папке для всех пользователей).
Далее в секции Permissions укажите, какие действия пользователей нужно записывать в журнал. Я выбрал события из категории Delete.
Сохраните изменения и обновите политики на компьютере с помощью команды:
gpupdate /force
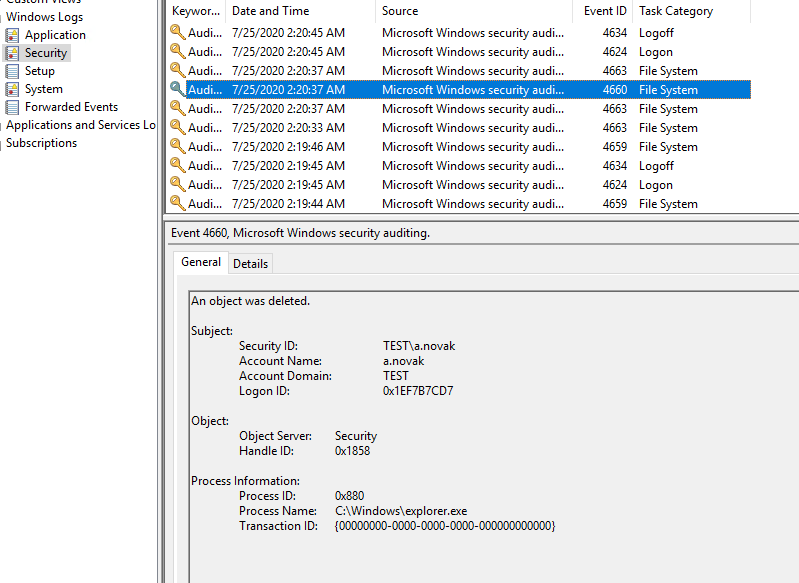
Теперь, если любой пользователь удалит файл или папку в вашей сетевой папке, в журнале Security появится событие c EventID 4660 от источника Microsoft Windows security с Task Сategory File System: An object was deleted.
В событии указан пользователь, который удалил файл (Account Name).
Не рекомендуется включать много событий аудита сразу – это может вызвать повышенную нагрузку на компьютер. Кроме того, в большом количестве событий безопасности сложно искать.
Также вы можете управлять политиками аудита через утилиту командной строки auditpol.exe.
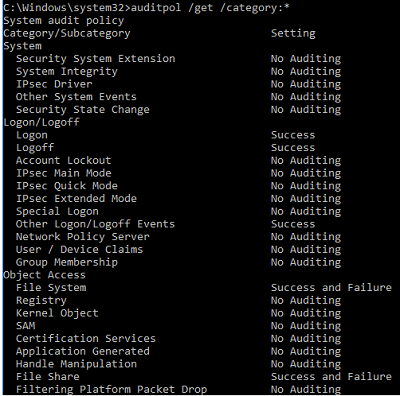
Чтобы вывести информацию о всех включенных политиках аудита, выполните:
auditpol /get /category:*
Чтобы включить определенную политику аудита, используется такой синтаксис:
auditpol /set /subcategory:"Registry" /success:enable
Для сброса политик аудита в исходное состояние, используется команда:
AuditPol /clear