
This guide explains how to split the sound of 2 or more apps between different audio output devices such as speakers and headphones on Windows 11. For example, you can set Windows to use speakers for YouTube on Chrome, and headsets for your game, etc. so that sound from different apps can be output separately to speakers and headphones.
By default, Windows 11 will use the default output device for all kinds of sound coming from your computer regardless of apps if the settings are still at their defaults. However, it is possible to split the sound of different apps between speakers and headphones in Windows 11 with the help of a feature called Volume Mixer.
Split sound between speakers and headphones (Windows 11)
By following the instructions below, you will learn how to split sound in Windows 11 by choosing an output device (speakers, headphones, etc.) for different apps, applicable to all apps that produce sound.
Also see: How to Use Both Speakers and Headphones in Windows 11
Step 1: Open Volume Mixer
You can split sound by assigning an output device of your choice (speakers or headphones) for any running app through the Volume Mixer settings in Windows 11. To open Volume Mixer control, right-click the sound icon on the taskbar and select Volume Mixer.
Alternatively, you can press Win + i keys to open Settings first and then navigate to System > Sound > Volume mixer.
Related: How to Boost Volume Above 100% in Windows 11
Step 2: Select speakers or headphones for different apps
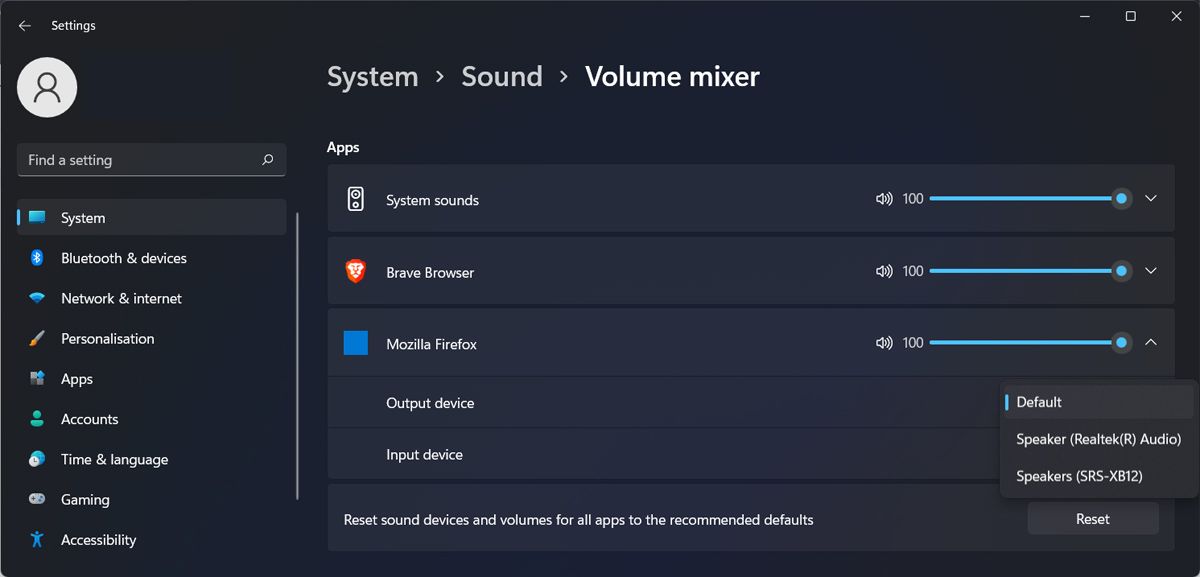
In the Volume Mixer settings, under the list of apps, click the app you want to configure to expand it. Then, click the drop-down menu next to Output device and select your speakers or headphones that you want to use for this particular app.
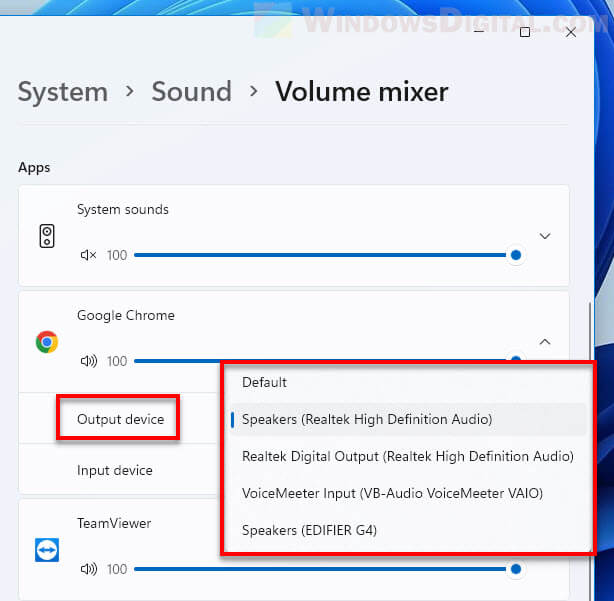
Repeat the same for each app you want to assign a different output device for. The sound of these apps will then be split between speakers and headphones you selected.
In the example screenshot below, I assigned my speakers for Google Chrome, and headphones for Microsoft Edge. With these settings, Chrome will play sound on my speakers while Edge will output audio on my headphones instead.
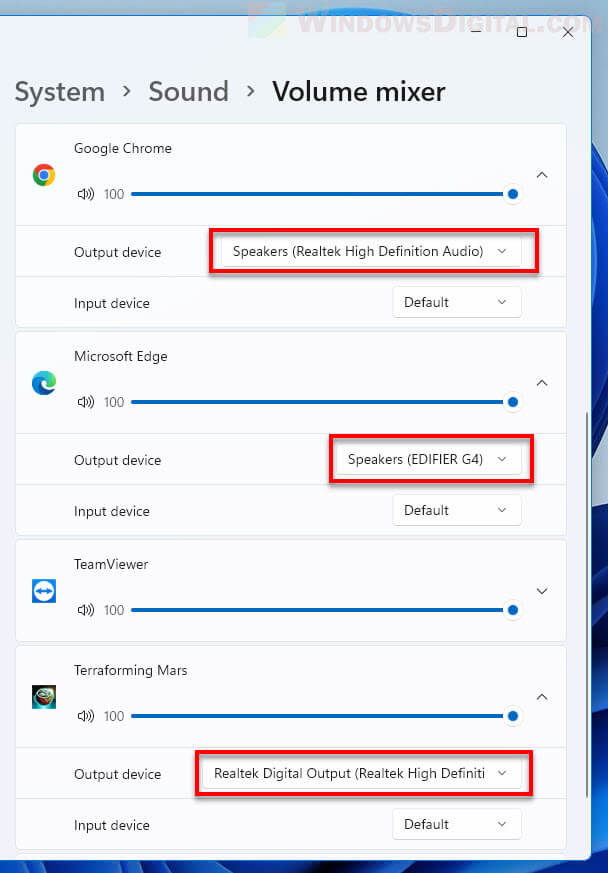
Alternatively, you can also set a different volume level and a different input device (microphone or any other recording device) for each app. Leaving the settings as default will allow Windows 11 to use the default device for the apps.
App doesn’t appear in Volume Mixer
If you don’t see the app you want to set on the list of apps in Volume Mixer, run the app first in order for the app to appear on the list. You can set your desired output device for as many apps as you want as long as the apps are on the Volume mixer app list.
An app will only appear on the Volume Mixer app list if the app is currently running and producing sound. If you open a website on Chrome and that website doesn’t produce any audio, Chrome won’t appear on the list of apps in Volume Mixer.
Reset sound settings for all apps to default
Windows 11 will remember all output devices you have selected for each app. The next time you open the same app, it will automatically use the output device – speakers or headphones, you have previously selected for the app. However, if an output device is disconnected or couldn’t be found, the default output device will be used instead.
You can reset the audio devices for all apps to default by clicking the “Reset” button next to “Reset sound devices and volumes for all apps to the recommended defaults” at the bottom of the Volume Mixer settings.
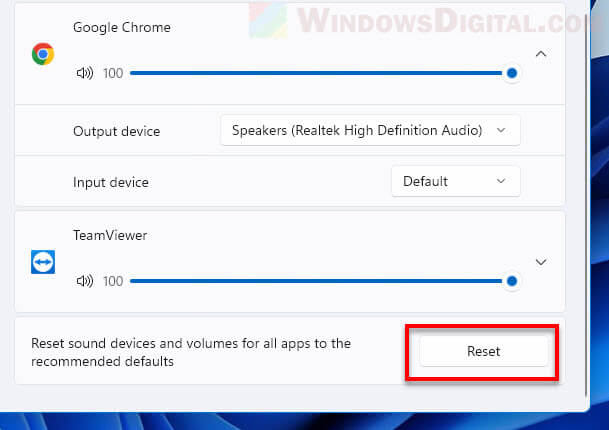
Doing so will automatically change the output device of all apps you have changed previously back to “default”, regardless if the app is now on the list or not. By selecting default for an app, Windows will use the default output device for the app instead.
If you’ve ever wanted to play sound from two different speakers or headphones at the same time on Windows 11, you’re in luck! Windows 11 has a built-in feature that allows you to split your audio output. Whether you’re a multitasker watching videos while gaming or you just want to share your music with a friend, this guide will show you how to get it done quickly and easily.
Here’s how you can play sound from two different audio devices simultaneously on your Windows 11 computer. Follow these steps for a straightforward setup.
Step 1: Open Sound Settings
First, open the Sound settings in your Windows 11.
To do this, right-click the speaker icon in the taskbar and select “Open Sound settings.” This will bring up the Sound settings page, where you can manage your audio devices.
Step 2: Access Sound Control Panel
Next, access the Sound Control Panel.
Scroll down and click on “More sound settings” under the Advanced section. This will open the classic Sound Control Panel, where you can see all your audio input and output devices.
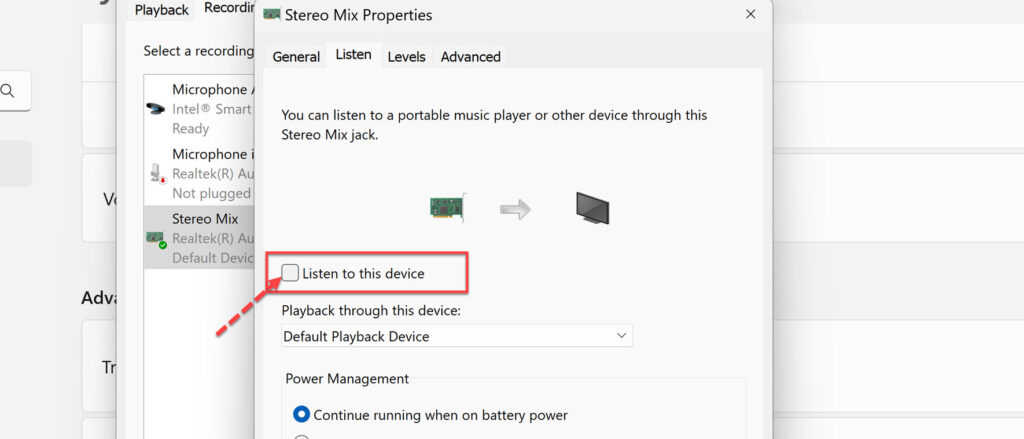
Step 3: Enable Stereo Mix
Now, enable the Stereo Mix feature.
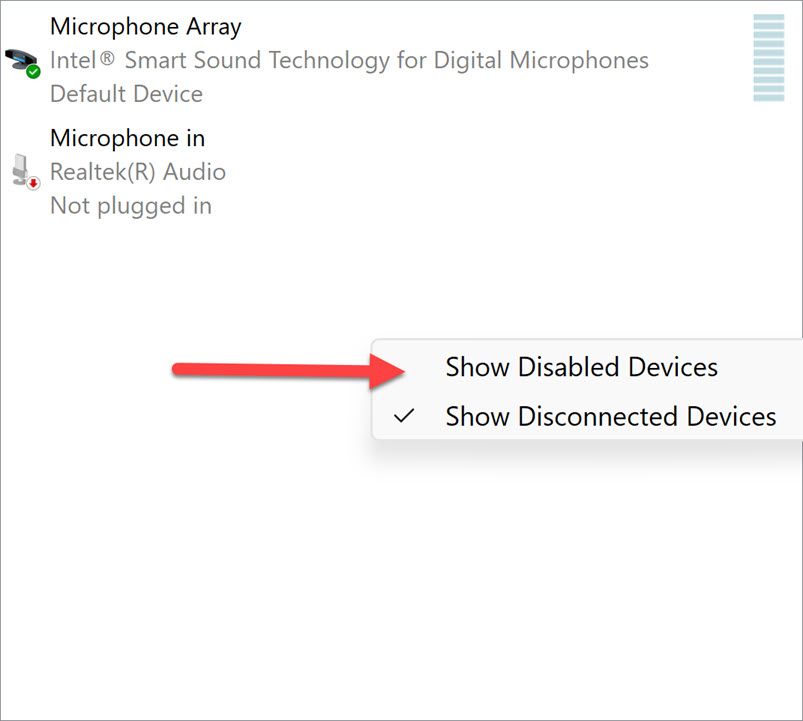
Go to the “Recording” tab, right-click on an empty space, and select “Show Disabled Devices.” Find “Stereo Mix,” right-click it, and choose “Enable.” This feature allows you to duplicate the audio to another device.
Step 4: Set Stereo Mix as Default
Set Stereo Mix as your default device.
Right-click on “Stereo Mix” again and select “Set as Default Device.” This will direct your primary audio to the Stereo Mix, preparing it to be shared.
Step 5: Configure Playback Devices
Configure your playback devices to use Stereo Mix.
Go to the “Playback” tab, right-click on your primary audio device (like your speakers or headphones), and select “Properties.” Navigate to the “Listen” tab and check the box labeled “Listen to this device.” Choose “Stereo Mix” from the dropdown menu and click “Apply.”
After completing these steps, your audio will play through both selected devices simultaneously.
Tips for Using 2 Audio Outputs at the Same Time on Windows 11
- Update Drivers: Ensure your audio drivers are up-to-date to avoid compatibility issues.
- Check Connections: Make sure all your audio devices are properly connected.
- Test Sound: Do a quick sound test to confirm audio is playing through both outputs.
- Adjust Volume: Manage the volume levels for each device separately for a balanced sound.
- Restart if Needed: If it doesn’t work right away, a quick restart of your computer might help.
Frequently Asked Questions
Can I use Bluetooth and a wired device at the same time?
Yes, you can use a Bluetooth device and a wired device simultaneously using the Stereo Mix method.
What if I don’t see Stereo Mix in my recording devices?
You might need to enable disabled devices, update your drivers, or check your sound card for support.
Is there a software alternative to this method?
Yes, third-party software like VoiceMeeter can also be used to achieve the same result.
Can I revert these changes easily?
Yes, simply go back into the Sound Control Panel and reset your default devices.
Will this method work with gaming?
Yes, but be mindful of potential audio lag, especially with Bluetooth devices.
Summary of Steps
- Open Sound Settings.
- Access Sound Control Panel.
- Enable Stereo Mix.
- Set Stereo Mix as Default.
- Configure Playback Devices.
Conclusion
Being able to use 2 audio outputs at the same time on Windows 11 is quite handy. Whether you’re a gamer, a DJ, or just someone who loves sharing music, this feature makes it easy to get more out of your audio setup.
Remember, you might need to tweak a few settings or restart your PC to get everything working smoothly. But once set, it can enhance your audio experience significantly.
If you’re looking for more advanced features, consider exploring third-party software options. And if you run into trouble, check out online forums and guides for additional help.
Happy listening!
Matthew Burleigh has been writing tech tutorials since 2008. His writing has appeared on dozens of different websites and been read over 50 million times.
After receiving his Bachelor’s and Master’s degrees in Computer Science he spent several years working in IT management for small businesses. However, he now works full time writing content online and creating websites.
His main writing topics include iPhones, Microsoft Office, Google Apps, Android, and Photoshop, but he has also written about many other tech topics as well.
Read his full bio here.
An audio output device is a device that can play sound and drive signals into another device’s audio input. If you connect only one audio device to Windows 11, the computer will identify and configure it such that you can play audio through it by default. What if more than one audio device is connected to the same PC? Can you play audio from two or more audio output devices simultaneously on a PC? Is it possible to configure two or more audio outputs in Windows 11? Luckily, the answer is yes. This Techschumz guide will show you how you can play sounds on two devices on Windows 11 by setting up multiple audio outputs using the Stereo Mix feature.
Read also: How to update Realtek HD Audio Drivers on Windows 11
How to Output Audio to Multiple Devices on Windows 11
To set up and use multiple audio outputs on your Windows 11 PC or laptop, follow the below steps:
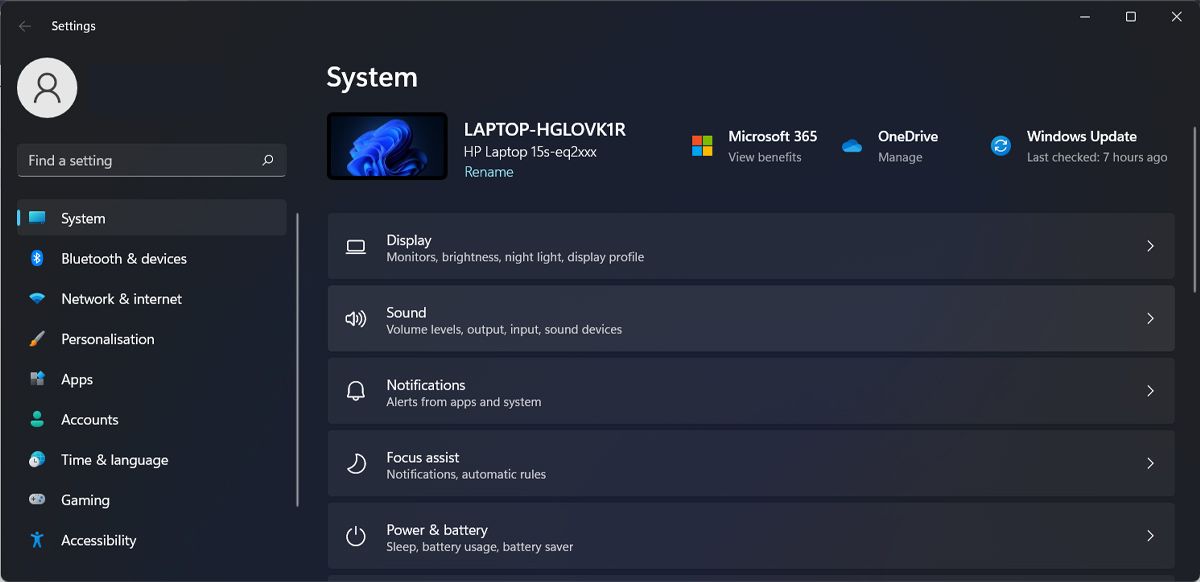
Step 1. To begin with, open the Settings app by searching for it in the Start Menu.
Step 2. Now, from the left pane click on the “System“, and select “Sound” from the right pane.
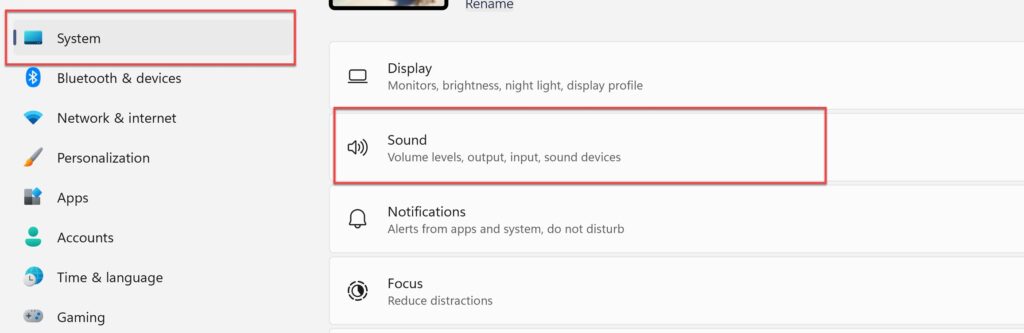
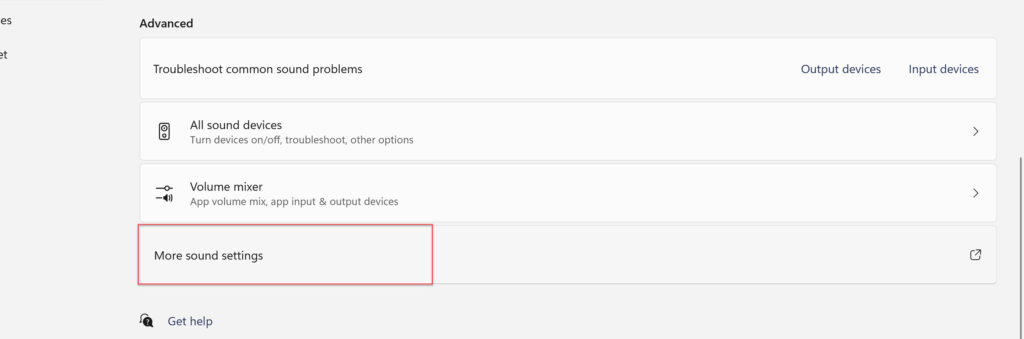
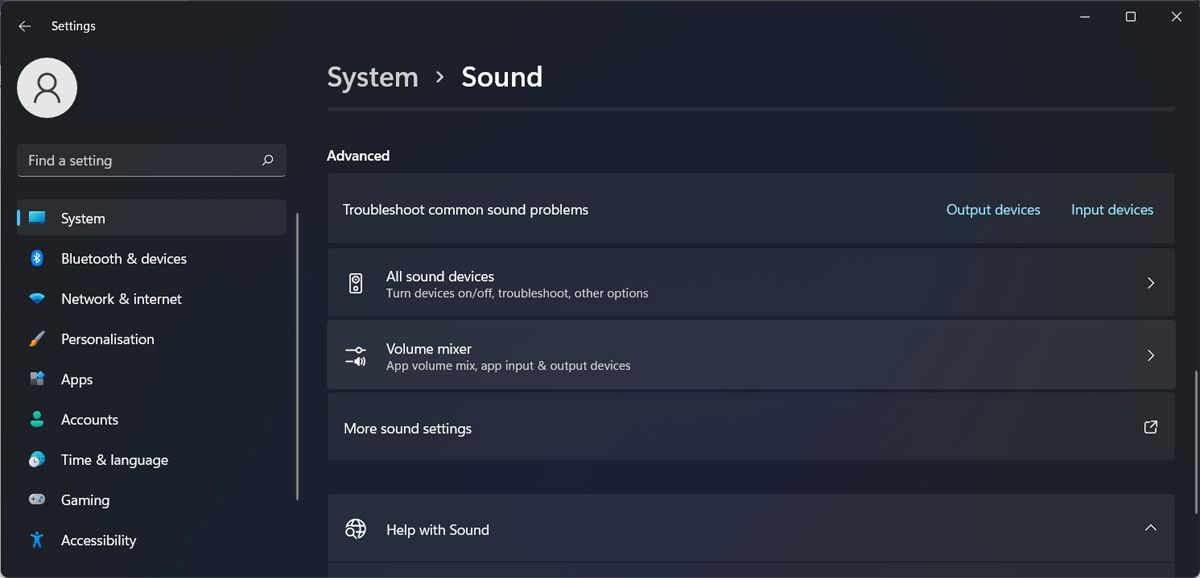
Step 3. Now, scroll down to the bottom of the Sounds settings page, and select “More sound settings“. This will open a new pop-up window.
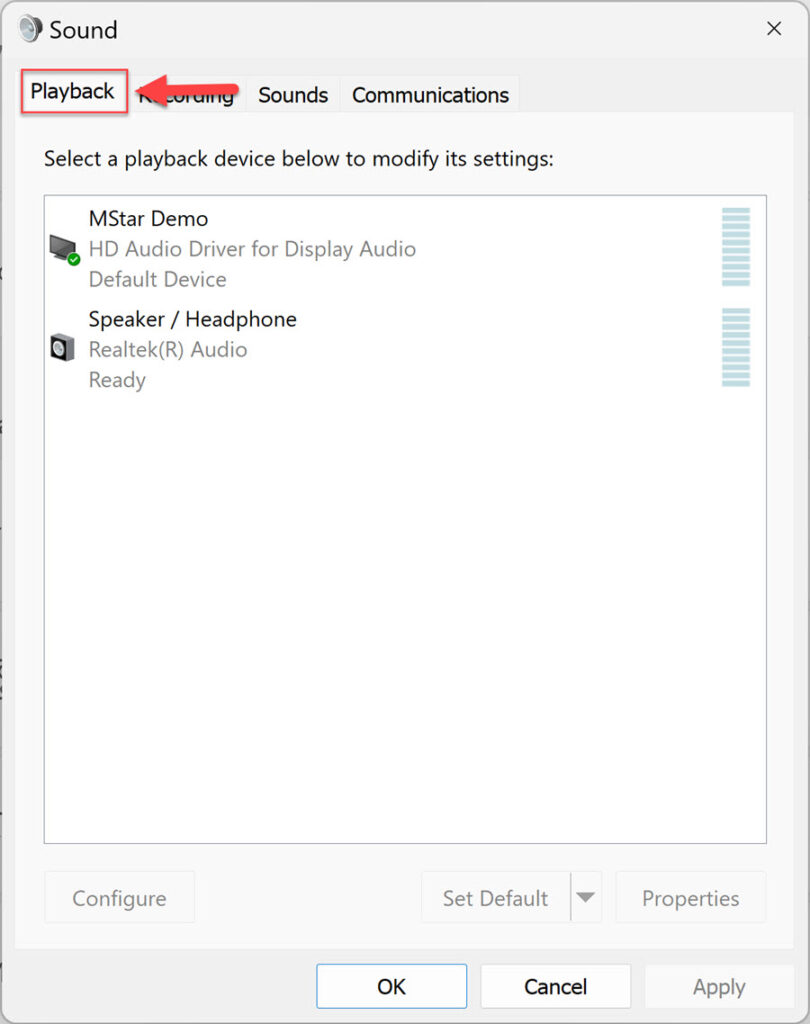
Step 4. Here, go to the “Playback” tab and ensure that the desired speakers are set as the default device. If it isn’t already, right-click on it and choose “Set as default device” from the context menu.
Step 5. Now, click the “Recording” tab as shown below.
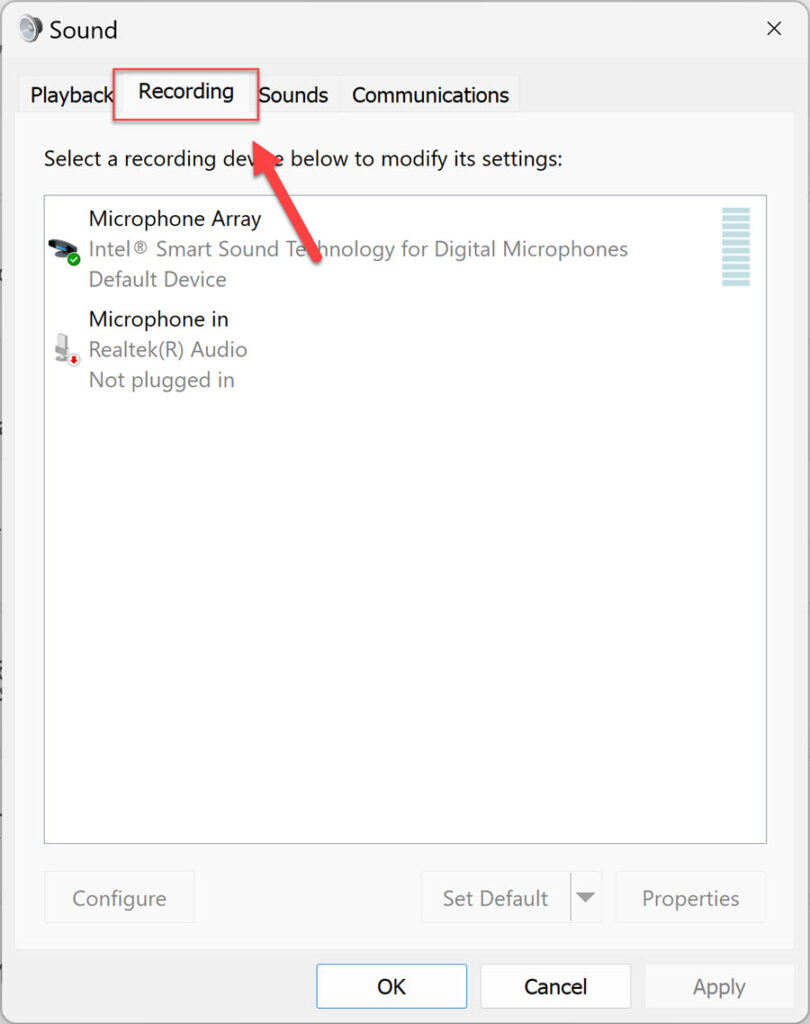
Step 6. Next, right-click on the blank space, and select “Show Disabled Devices“.
Step 7. The “Stereo Mix” option will now appear. Right-click on it and select “Enable” to enable it!

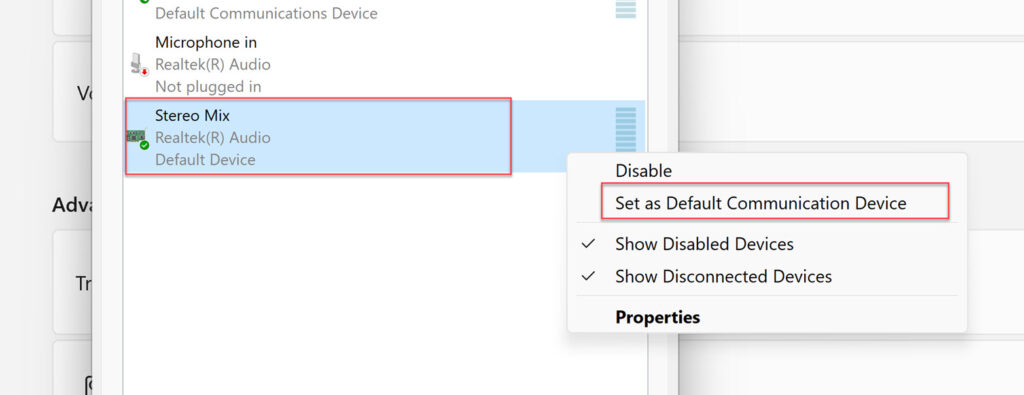
Step 8. Then right-click Stereo Mix, and select the “Set as Default Communication Device” option.
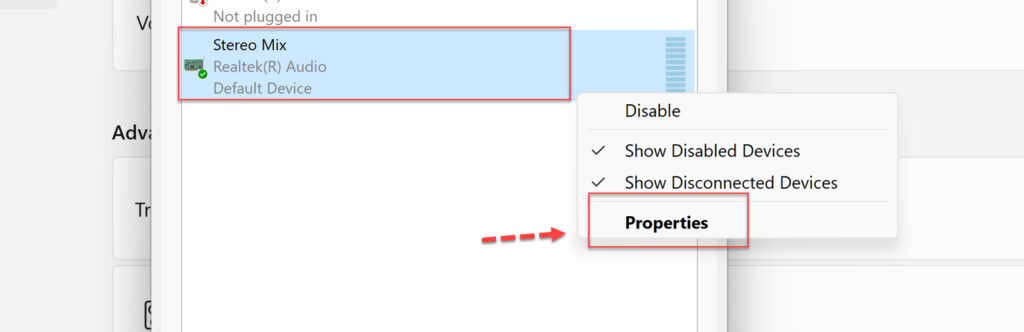
Step 9. Next, either right-click on the “Stereo Mix” option and select “Properties“, or simply double-click on it.
Step 10. In the Stereo Mix window, go to the “Listen” tab.
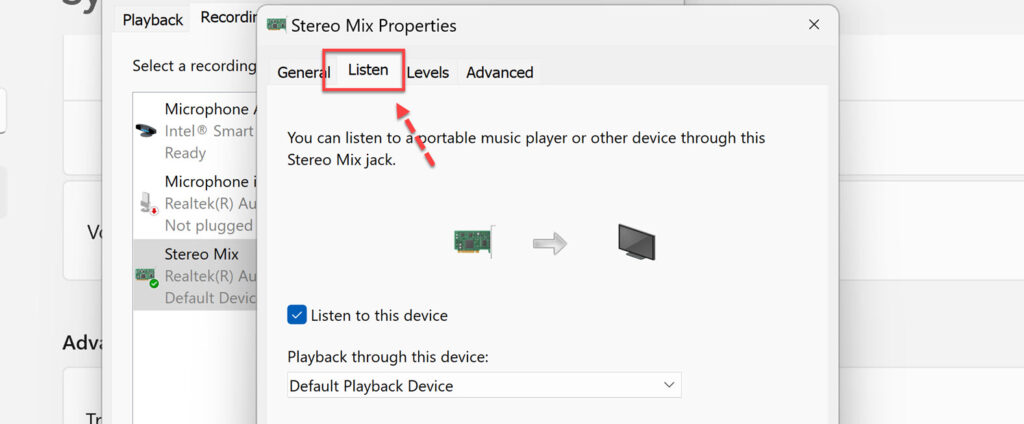
Step 11. Then tick the option labeled “Listen to this device.”
Step 11. Now, click the box under the “Playback through this device” section, and the other output devices will appear in the drop-down menu. Finally, select the one you wish to add and then press the “OK” button at the bottom.

That’s it! This is how you can play sounds on two devices on Windows 11. From now on, all audio will be routed through the output devices you’ve specified as well as the default. Additionally, it boosts the volume, which comes in handy if you want to play the music that’s rather loud.
Lastly, if you have any questions or have anything to add, please leave them in the comments section below.
Read also:
- How to check RAM usage on Samsung phones
- How to connect your Kurdene earbuds to your devices
- How to change your Messenger theme and color on iOS and Android
Sign in to your MUO account

Do you want to know how to play different apps’ audio through your speakers and headphones? Well, with Windows 11, you don’t need to install a third-party app as you can use its built-in tools to customize your system’s sound settings.
How to Change Output Devices for Different Apps in Windows 11
As we’ve mentioned, you don’t need to install any software to have your Windows 11 computer play different audio through different devices. To change the output device for each app, we’ll use the volume mixer.
Here’s how to set it up:
- Connect and test the Bluetooth speaker or headphone set that you’re using and make sure they’re working properly. You can even connect multiple Bluetooth audio devices to your Windows computer.
- Open the apps and start playing the media content. Let’s say you’re listening to a podcast on YouTube. If you mute the tab or pause the podcast, your browser will not show up in the audio mixer.
-
With the audio playing, press the Win + I to bring up the Windows Settings menu. There, head to System and select Sound.

-
Scroll down to Advanced and open Volume mixer.

-
You should see the apps playing media content and the default output devices for each one of them. Extend the Output drop-down menu and select a new device.

Before closing Volume Mixer, you should adjust the volume for each app to ensure you haven’t set the audio volume too low and thus won’t hear anything.
How to Reset the Volume Mixer
Windows 11 will remember your sound settings and keep playing the audio through the app’s selected output device as long as the device is connected to your computer. If you want to go back to the default settings, open Volume Mixer, as shown above, scroll down, and click Reset.
Different Devices, Different Sound
Hopefully, you’re now hearing the video game’s audio through your headphones while someone in the room listens to a podcast at the same time.
Now that you’ve got this set up, why not explore other ways you can customize your Windows audio? For instance, you can have two different devices play the same audio content.
Have you ever been creating a presentation or live streaming a gaming session and wished to output your audio to multiple devices simultaneously? This is particularly useful if you use distinct recording devices, such as Elgato. Here, we’ll simplify the process for you.
Modern motherboards, particularly those powered by Realtek audio, come with a built-in virtual input named ‘Stereo Mix’. This feature, when enabled, lets you hear the device’s audio and simultaneously playback through different devices. However, Stereo Mix might not always function as expected, failing to transmit sounds from your computer to the chosen device.
Fortunately, there is an easy fix to this issue by using a third-party program called VoiceMeeter. It’s a free, user-friendly application that lets you direct your computer’s audio output to multiple hardware devices concurrently. Like playing your computer sound to your Headset/Speaker and to other devices. In my case, I want to output sounds to my Headset and at the same time I want to output the sound to my video recording device (Elgato HD60s). VoiceMeeter handles this task effortlessly, enabling sound output on both your chosen devices, it will work to any Windows version (XP, Windows 7, 10) and including 11.
How to use Voice Meeter to Output Audio to Multiplay Playback Devices
Here’s a step-by-step guide to use VoiceMeeter for audio output to multiple playback devices:
Step 1: Visit the VoiceMeeter official website at https://voicemeeter.com/ to download VoiceMeeter. You can opt for either the Zip package or the Exe file.

Step 2: Install the program. You may need to restart your computer, but this is optional.
Step 3: Launch the VoiceMeeter application. In the ‘Hardware Out’ section located in the upper right corner, you’ll find A1 and A2 where the devices that will output your sound. For A1, select your primary or first output device (Eg. Headset/Speaker). Then on the A2, your second output device (Eg. Elgato HD60 or other device).

4. Finally, click on the Windows volume icon, situated in the bottom right corner of your screen. Select ‘VoiceMeeter Input (VB-Audio VoiceMeeter VAIO)’ as your playback option.
Now, your computer should successfully output audio to both your headset or speakers, as well as to your other chosen device.
Additionally, if you wish to direct your microphone’s output to one of these devices, simply navigate to the ‘Recording Devices’ option in your Windows sound settings. Right-click on your microphone, go to ‘Listen’, check ‘Listen to this device’ and select your desired playback device.
We hope this streamlined guide enhances your audio recording experiences and alleviates any related issues you might encounter.
Note: As of May 23, 2023, we have revised this article to accommodate the latest operating system and VoiceMeeter current version.