
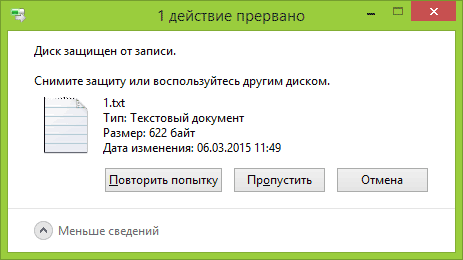
Иногда невозможно отформатировать флешку или SD-карту, перенести или записать на нее данные. Система Windows отображает сообщение об ошибке: «Накопитель защищен от записи. Снимите защиту или используйте другой привод». В этой статье мы разберем причины и способы решения этой проблемы.

Содержание
- Механическая защита от записи
- Проверка флешки на вирусы и другое вредоносное ПО
- Как разблокировать флешку с помощью реестра Windows
- Снятие защиты через групповую политику
- Снятие защиты от записи с помощью утилиты Diskpart
- Снятие защиты с помощью внешних программ
- Как снять защиту от записи с файла
- Что делать, если потеряны важные данные
Посмотреть видео

Как снять защиту от записи с флешки
Механическая защита от записи
Производители уже довольно давно не используют аппаратную защиту от записи на флешках. Но если говорить о SD-картах, на них все еще есть переключатель. Иногда даже опытные пользователи забывают проверить его.
Поэтому первое, что нужно сделать, – посмотреть, не включена ли защита от записи, и если это так – поменять положение переключателя.

Ошибка записи может возникнуть из-за переполнения флешки. Проверьте свободное место, а также файловую систему флешки. Например, на раздел FAT невозможно будет записать файл размером более 4ГБ.
Проверка флешки на вирусы и другое вредоносное ПО
Иногда блокировать запись на карту памяти USB может вирус, который уже присутствует в системе. Вдобавок он может попасть и на флешку, в таких ситуациях защита от записи автоматически включается в целях безопасности.
В этом случае есть смысл проверить накопитель на вирусы, как встроенными средствами системы, так и профессиональным антивирусом. Вы можете скачать, например, загрузочный антивирусный комплект от Avast или Nod32. Кроме того, можно создать загрузочную флешку с Windows 10, загрузиться с нее, установить антивирус и проверить проблемную флешку.
Чтобы начать сканирование, вам нужно запустить антивирус, а затем выбрать, какой диск сканировать. У всех современных антивирусных программ интерфейс примерно одинаков, поэтому проблем со сканированием возникнуть не должно.

Если антивирус обнаружил вредоносное ПО, немедленно удалите его. После этого снимите защиту от записи.
Как разблокировать флешку с помощью реестра Windows
Часто случается, что проблема не в вирусах, а в системе Windows, которая блокирует файлы, и проблема заключается в реестре.
Важно! Перед внесением изменений создайте точку восстановления Windows. Если вы допустите ошибку и у вас возникнет проблема с компьютером, вы сможете восстановить реестр и вернуть систему в исходное состояние.
Чтобы разблокировать флешку с помощью реестра:
Шаг 1: Щелкните «Пуск» правой кнопкой мыши, выберите «Выполнить«, введите команду regedit и подтвердите действие, нажав «Enter«.

Шаг 2. В редакторе реестра перейдите в HKEY_LOCAL_MACHINE> SYSTEM> CurrentControlSet> Control > StorageDevicePolicies.
Создайте эту опцию, если она недоступна в вашей системе.

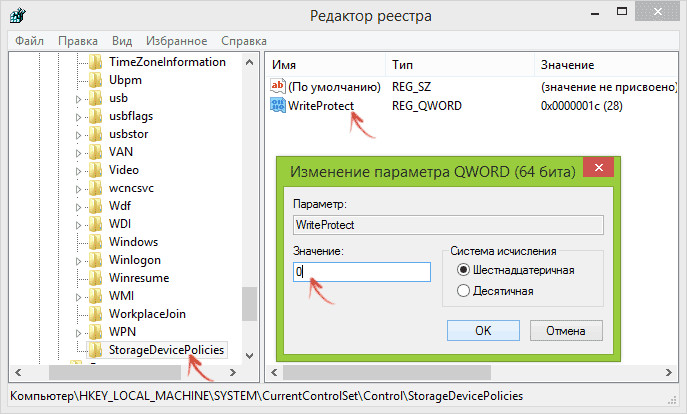
Шаг 3. После создания перейдите в этот раздел, создайте там 32-битное значение DWORD (или 64-битное в зависимости от вашей системы) и назовите его WriteProtect.

Шаг 4. В текстовом поле «Значение» напишите «0» (ноль).

Шаг 5. Перезагрузите компьютер.
После перезагрузки, защита от записи с флешки должна быть отключена.
Снятие защиты через групповую политику
Если вы не можете отключить защиту реестра, это может быть связано с групповой политикой.
В этом случае для снятия защиты с флешки
Шаг 1. Нажмите комбинацию клавиш «Win + R«, введите команду «gpedit.msc» и нажмите Enter. Отобразится редактор локальной групповой политики Windows.

Шаг 2. Перейдите по следующему пути: Конфигурация компьютера \ Административные шаблоны \ Система \ Доступ к съемному хранилищу.
Найдите «Доступ к съемному хранилищу» и убедитесь, что параметры «Съемные диски: запретить доступ на выполнение», «Съемные диски: запретить доступ для чтения» и «Съемные диски: запретить доступ для записи» отключены.

Шаг 3. Если какой-либо из этих параметров включен, дважды щелкните по нему и выберите «Отключено«, чтобы выключить его.

Шаг 4. Перезагрузите компьютер.
Снятие защиты от записи с помощью утилиты Diskpart
Если пользователь боится вносить изменения в разделы реестра Windows и не хочет тратить время на манипулирование групповыми политиками Windows, вы можете использовать утилиту Diskpart.
Шаг 1. Щелкните правой кнопкой мыши «Пуск» и выберите «Windows PowerShell (Admin)«.
Шаг 2. Введите команду diskpart

Шаг 3. Выполните следующие команды одну за другой:
- введите «list disk» и нажмите Enter (эта команда отображает список дисков, подключенных к вашему ПК);
- «select disk 0» (вместо 0 введите номер защищенного от записи устройства) и нажмите Enter;
- «attributes disk clear readonly» и подтвердите действие, нажав Enter (эта команда снимает защиту с накопителя);
- «exit» (Выход из утилиты Diskpart)

После выполнения этих команд устройство готово к работе
Снятие защиты с помощью внешних программ
Производители флешек выпускают специальные программы для работы с ними, и некоторые из них могут помочь вам снять защиту от записи. Кроме того, защиту с флешки снимают многие универсальные приложения. Принцип их работы примерно одинаков. В качестве примера рассмотрим программу EaseUS Tools M.
Шаг 1. Загрузите приложение и установите его на свой компьютер.
Шаг 2. Откройте приложение и выберите «Защита от записи».

Шаг 3. Выберите диск, защищенный от записи, и нажмите «Disable».
Готово! Вы можете использовать диск.
Что касается программ от производителей фирменных флешек, самыми популярными среди них стали:
- Transcend JetFlash Online Recovery
- Silicon Power Flash Drive Recovery Software
- Kingston Format Utility
- SD Memory Card Formatter
Как снять защиту от записи с файла
Иногда бывает, что у вас есть один файл, в который вы хотите внести изменения, но не можете, потому что файл защищен от записи. Когда это происходит, он помечается как доступный только для чтения. Для внесения изменений необходимо добавить возможность изменять файл:
Шаг 1. Щелкните правой кнопкой мыши нужный файл и выберите «Свойства«.
Шаг 2. Снимите флажок с атрибута «Только чтение» и нажмите «ОК«.
После этого вы можете вносить изменения в нужный вам файл.
Что делать, если потеряны важные данные
Часто в попытке снять защиту от записи с флэшки пользователи совершают манипуляции, которые приводят к выходу накопителя из строя. Это могут быть как повреждения файловой системы накопителя, так и случайное форматирование или удаление важных файлов. Помимо этих примеров существует много причин проблем с накопителем, но важно другое – какой бы не была причина, все эти действия приводят к потере ценной информации.
Если вы заметили отсутствие нужных файлов или странное поведение накопителя – лучше не ждать, когда он полностью выйдет из строя, а сразу же восстановить всю ценную информацию чтобы избежать ее потери.
Кроме того, вы можете использовать этот метод извлечения данных перед тем, как приступать к снятию защиты от записи с флэшки. Таким образом вы обезопасите себя от потери ценных файлов.
Однако, если данные все же исчезли – немедленно используйте программу RS Partition Recovery, так как каждая лишняя манипуляция только повышает вероятность потери данных.
Дело в том, что при удалении данных или форматировании накопителя система только удаляет так называемую «ссылку» на файл, позволяя перезаписать его другими данными. Сам же файл физически остается на диске. Соответственно любая из лишних манипуляций может привести к перезаписи важного файла и тем самым стать причиной безвозвратной потери информации. К сожалению, предвидеть, когда именно система перезапишет те или иные данные не представляется возможным ввиду слишком большого количества факторов, влияющего на распределение данных на диске.
Это и есть причина, почему настоятельно рекомендуется не тратить время, а стразу же использовать RS Partition Recovery.
Она проста в использовании и не требовательна к ресурсам ПК. То есть вы можете использовать RS Partition Recovery даже на старом ноутбуке.
Но самое главное – это поддержка ВСЕХ современных файловых систем, благодаря чему вы сможете восстановить утерянные данные независимо от того, в какой операционной системе использовалась флэшка – Windows, Linux, FreeBSD или Solaris.

Просто подключите накопитель к рабочему компьютеру и следуйте подсказкам встроенного мастера восстановления файлов. Все действия происходят практически в несколько кликов.
Часто задаваемые вопросы
Да, можно. Одной из причин может быть повреждение файловой структуры флешки.
Did you receive the message «the disk is write-protected» when you tried to copy files or folders to a USB flash drive or SD card in Windows 10/8/7? Take it easy now! This post will show you how to remove write protection from USB or SD card with ease.
Help! The Disk Is Write-protected on USB/SD Card
“We have a Canon Powershot and want to transfer photos from computer back to camera. Says SD card is write protected. How do we remove the write protection?”tomshardware
Actually, a disk suddenly becoming write-protected is a very common issue, and it often comes out of the blue on a USB flash drive, pen drive, SD card or other data storage devices.
After plugging a drive into your PC to copy or modify a file & folder, a window might pop up with the error: “The disk is write-protected. Remove this write-protection or use another disk”.
According to users, the problem may be with Windows 10 Home and SD card built-in slot. When using a USB SD card reader, this problem may not happen.
When the write protection error occurs in Windows 10/8/7, it will continue to stay even if you click the Try Again button. Because of this, you might think that the disk is no longer usable and should be thrown into the dustbin.
Actually, it might not be completely unusable. This disk is still healthy; it is just in the write-protected state. That is, you can only read data from your device, but you are not allowed to write, delete, copy or do any other operations to modify the data.
As a result, the disk write-protected error will be invoked when files or folders are being copied to a USB drive, pen drive or micro SD card.
If you are also facing a similar situation, take it easy now. This post will show you how to remove the write protection from USB drive, SD card, or pen drive in Windows 10/8/7.
How to Remove Write Protection from USB Windows 10/8/7
You might ask: how do I remove write protection on a USB drive or SD card?
When searching for solutions to “the disk is write-protected” error online, you will find many related forums and articles. Then, you might start to think removing the SD card/USB drive write protection could be troublesome.
But actually, it is a very simple process, and here we have summarized seven methods as follows. Just try them to easily remove write protection from USB/SD card/pen drive in Windows 7/8/10.
Solution 1: Format the USB/Pen Drive/SD Card
While you look for the solutions to the issue of USB/SD card write protected on the internet, you will find formatting the USB drive, SD card or other external storage devices being mentioned.
This is considered a good method to remove write protection from USB/pen drive/SD card because the file system might have been corrupted, causing your drive to be in a bad state.
Well then, how can you format USB drive, pen drive or SD card to fix the disk is write-protected error so that your device can work properly again? Generally speaking, there are four write protected USB format tools you could use to perform this operation in Windows 10/8/7.
Note: Sometimes you can’t format a write-protected SD card/USB after booting to Windows normally; you might end up receiving the same error message saying the disk is write-protected. To avoid this, we suggest rebooting Windows with safe mode before attempting to format the write-protected USB drive.
① Run MiniTool Partition Wizard
In order to successfully format your USB drive and remove the write-protected error, you could use a third-party write protection removal software as a good helper.
Which one is worth recommending? Here we will show you MiniTool Partition Wizard Free Edition which is compatible with Windows 10/8/7.
It is a professional and reliable partition and disk management tool with many powerful functions, such as extend partition, resize partition, delete partition, format drive, wipe partition, rebuild MBR, recover lost partition and so on.
You could use this freeware to remove write protection from USB drive or other devices via formatting. Now, download MiniTool Partition Wizard Free Edition and install it on your computer.
MiniTool Partition Wizard FreeClick to Download100%Clean & Safe
Follow the guide below to format your device in Windows 7/8/10:
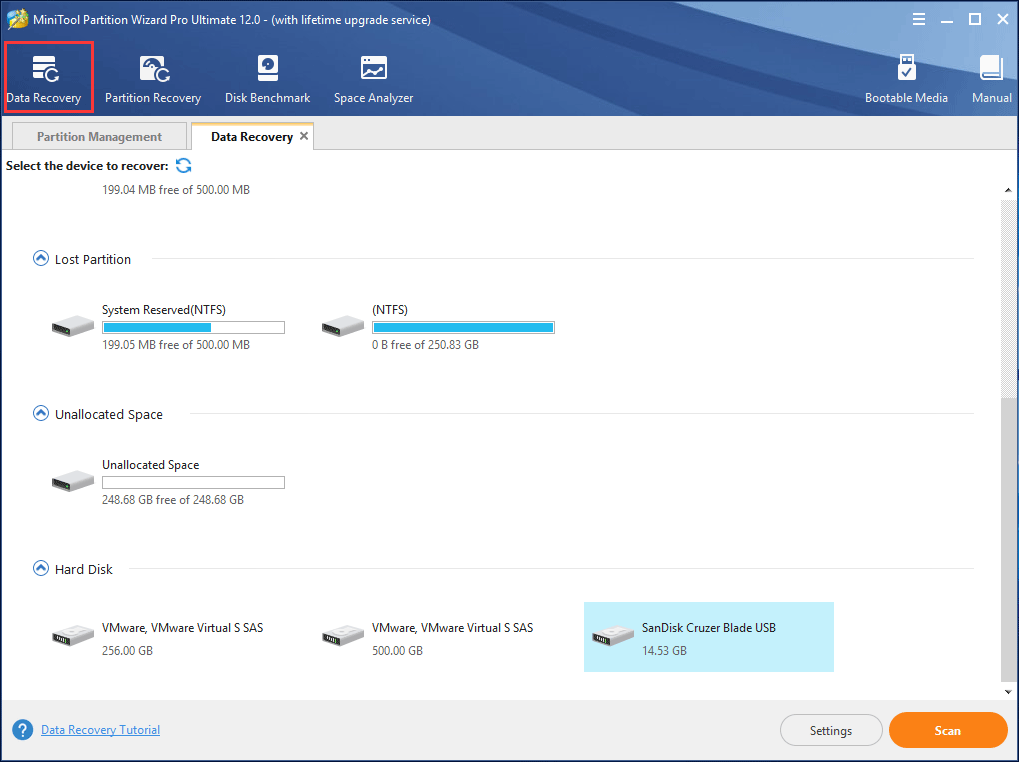
Step 1: Launch MiniTool Partition Wizard Free Edition.
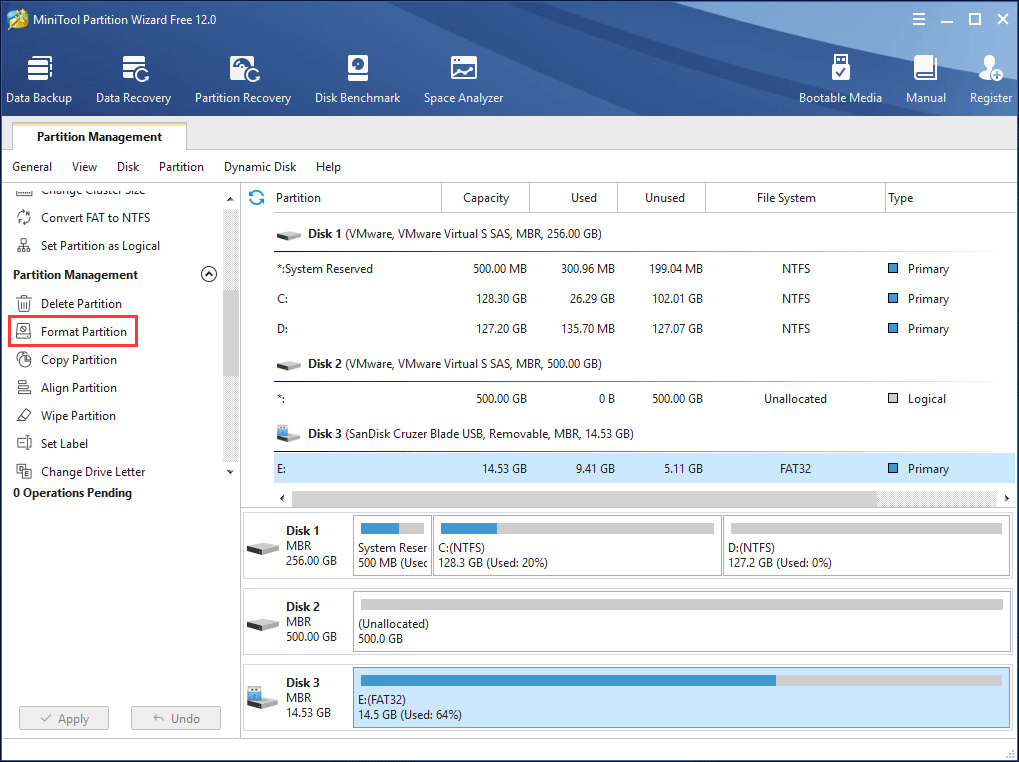
Step 2: You will be directed to the main interface. After selecting this partition of USB flash drive or SD card, you will see the many features about partition management.
Here click Format Partition from the Partition Management menu. Alternatively, you can right-click the target drive and then select Format in Windows 7/8/10.
Step 3: Choose a file system as you’d like – FAT32, NTFS, Ext2, Ext3, Ext4 or Linux Swap. Click OK to continue.
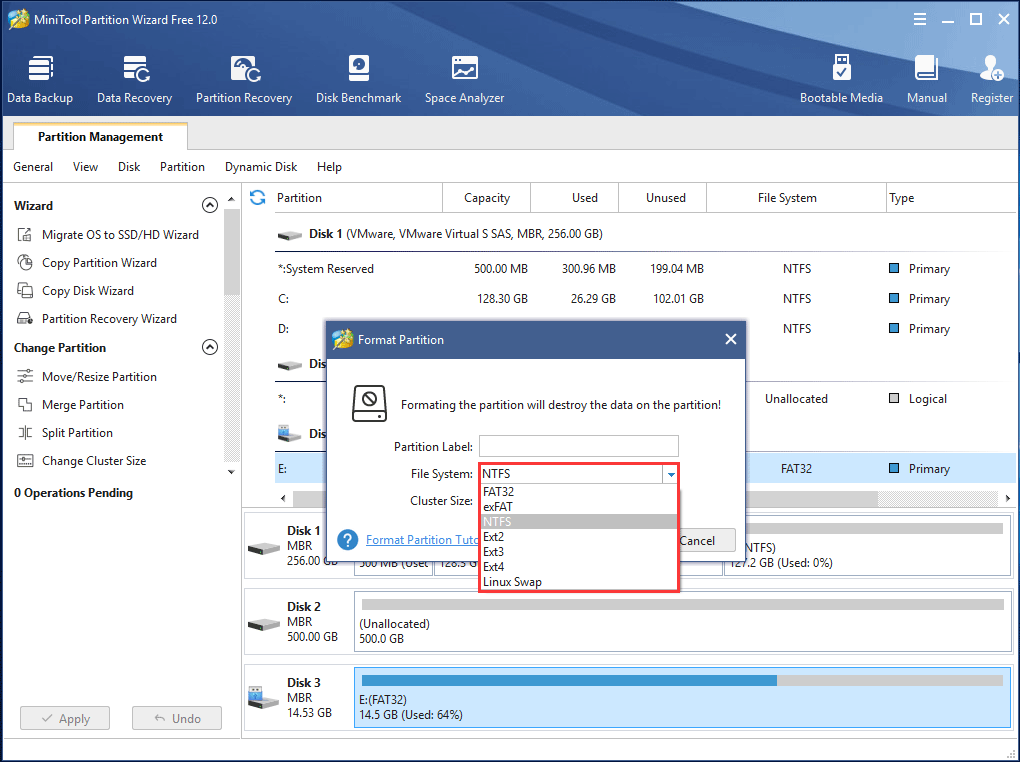
Step 4: Execute this change by clicking the Apply button to remove write protection on SD card/USB flash drive.
② Use Diskpart
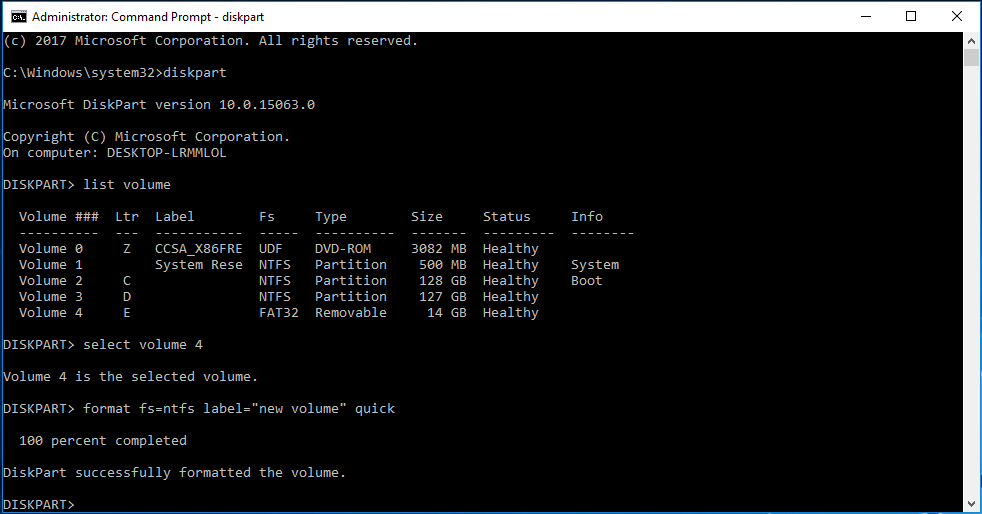
At your PC’s desktop, type cmd to the search box and right-click it to choose Run as administrator to open Command Prompt. In the new window, type the following bolded commands one by one and each one should be ended by pressing the Enter key:
diskpart
list volume (all volumes on hard disks in your PC will be displayed here)
select volume n (n means the volume number of your SD card, USB flash drive or other devices)
format fs=ntfs label=”new volume” quick (this command can directly format your storage device to NTFS file system)
exit
Hope the following screenshot will make this operation more intuitive:
③ Open Windows Explorer
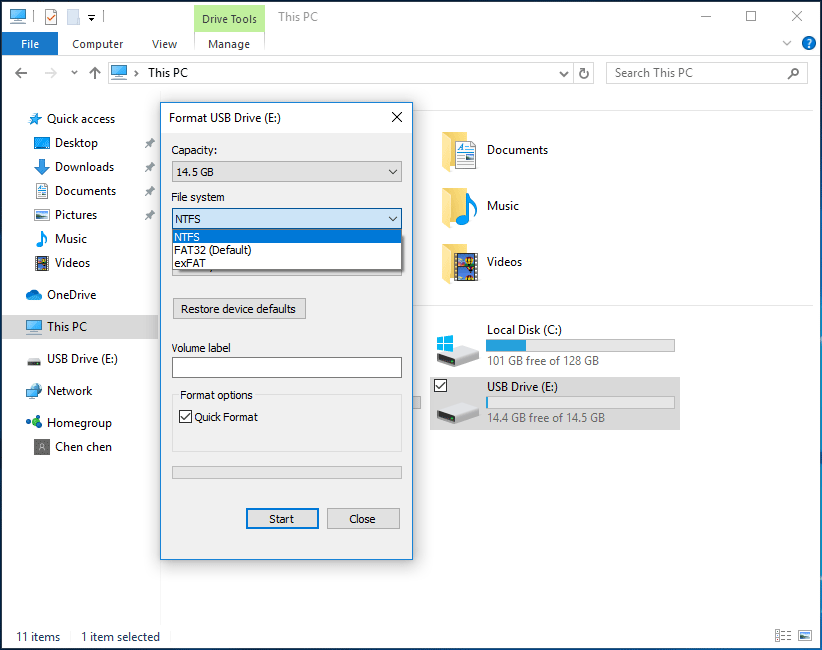
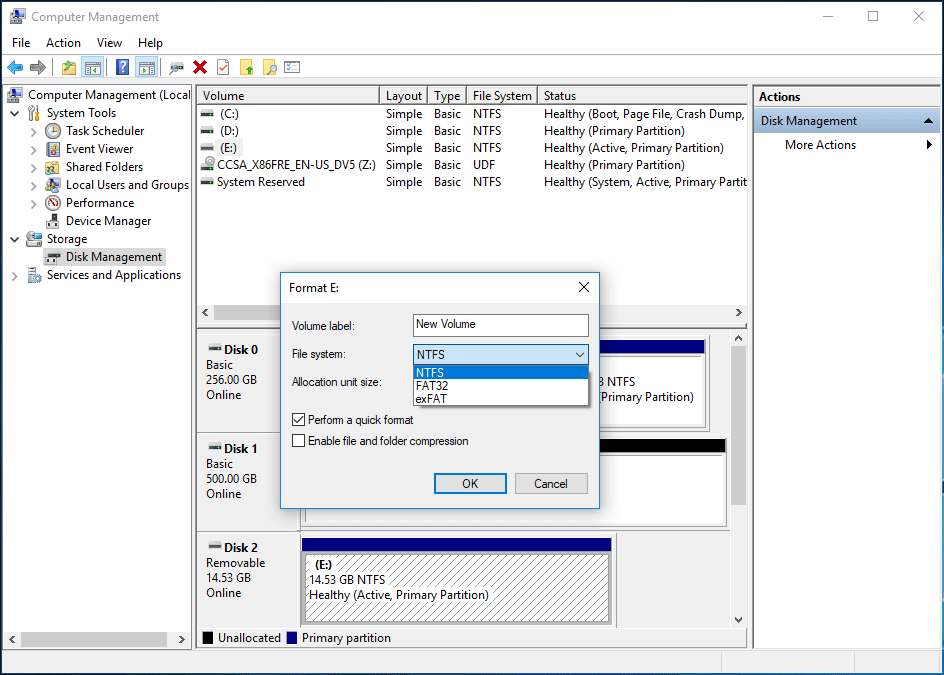
In addition, you can directly open Windows Explorer, and then right-click the USB drive or SD card partition to select Format in Windows 7/8/10. Then choose a file system from the list and check the Quick Format option. Finally, click the Start button to format write-protected USB drive/SD card.
Tip: It is possible to get the “Windows was unable to complete the format” message. For more information about this, refer to this post for help.
④ Run Disk Management
Disk Management can also be used to format a write-protected USB drive/SD card. Right-click on the target drive and select Format to FAT32 or NTFS. Finally, click OK to perform this operation on Windows 7/8/10.
If the target partition on your USB flash drive/ micro SD card is larger than 32 GB, it can’t be formatted to FAT32 with Disk Management and Windows Explorer.
In this case, please ask the third-party write protection removal software – MiniTool Partition Wizard for help; it can quickly perform formatting without any limit to fix the disk is write-protected error.
MiniTool Partition Wizard FreeClick to Download100%Clean & Safe
“Here are four format tools for you to do disk formatting to remove write-protected USB/pen drive/SD card if “the disk is write-protected” error occurs when copying folders.” Click to Tweet
Kindly remind:
After finish formatting in Windows 7/8/10, the write protection on a USB drive, pen drive or SD card should be removed. However, formatting the drive will cause data loss. If you had important files on the device, they are erased.
Thus, we suggest recovering those files with a professional data recovery software; MiniTool Partition Wizard can help you with its Data Recovery feature to recover data from formatted USB drive.
Since this solution will lead to data loss, you might be reluctant to format your USB drive just to remove the write protection error. In this case, you should consider backing up all your data using MiniTool ShadowMaker.
Solution 2: Check and Kill USB Flash Drive Viruses
When a USB flash drive, pen drive, or SD card is plugged into a PC, it could be easily attacked by viruses attached to spyware downloaded from an illegal website. The files or folders on this device could also be easily filled with viruses that can lead to the disk is write-protected error on your storage device.
In this case, you need to download anti-virus software and set it to automatically scan your device. Once a virus is found, please kill it at once to remove the write protection from USB drive, pen drive or SD card.
Tips:
Discover and eliminate deceptive antivirus with MiniTool System Booster, your safeguard against digital threats.
MiniTool System Booster TrialClick to Download100%Clean & Safe
Solution 3: Check and Unlock USB Flash Drive
Some external devices including pen drives, or USB flash drives have a mechanical switch used to lock or unlock your device, but some don’t.
Therefore, you should check whether there is a switch like this on your device. It could be put into write protection mode to prevent accidental writing.
If it is, please move the switch to the unlocked position and then try copying files again. Perhaps this operation can be done successfully after the switch has been unlocked. If this method still cannot solve the disk is write-protected error in Windows 7/8/10, please try the next one to remove write protection on USB or pen drive.
Solution 4: Check and Make Sure USB Flash Drive/SD Card Isn’t Full
Sometimes if the USB stick or SD card is full with files, it is very likely to receive the write protection error when files are being copied to it.
Right-click this drive and select Properties. Then you can view the size of used space and free space in Windows 7/8/10. If there is enough free disk space and you still encounter this issue, it might be because the file you are trying to copy to the USB drive is too large.
Solution 5: Change File Not in “Read-only” Status
In addition, sometimes the file is set to the Read-only status, which indeed could cause the disk is write-protected error on a USB flash drive, micro SD card or pen drive.
To remove write-protection in USB, pen drive or SD card, right-click the file you want to copy and select Properties.
Then you can view three options on the bottom, among them, please ensure that the Read-only option is unchecked. Finally, click Apply to let this change effective.
Solution 6: Run Diskpart to Clear Write Protection
To fix the disk is write-protected error, you can also adopt the Command Prompt to do this work.
Please run CMD as an administrator, then type diskpart command and hit Enter to run diskpart. It is a built-in disk partition tool in Windows 7/8/10.
With this tool, you can modify the value related to your USB drive/SD card. Then type the following bolded commands one by one:
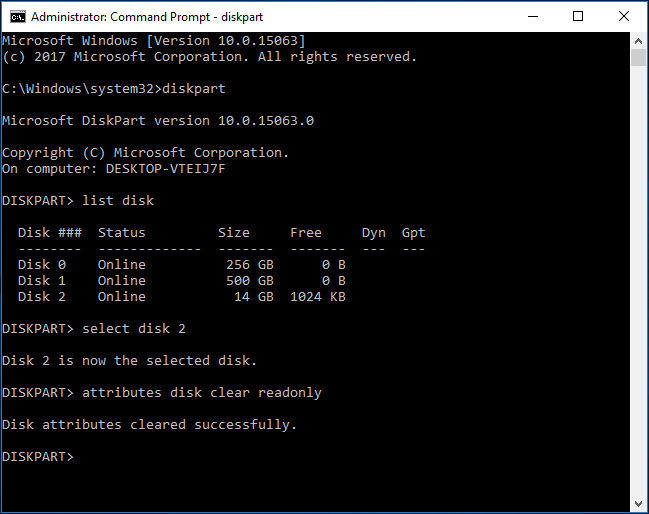
list disk (all disks on your computer will be listed here)
select disk n (n refers to the number of your USB flash drive or SD card)
attributes disk clear readonly (this command can disable write protection)
After performing this operation, try copying files again. The USB write protected error should be removed.
Solution 7: Edit The Registry
If the issue still persists, you should consider modifying the registry to remove the write protection from USB. The USB write.reg file could be enabled.
Click Win+R and then type regedit to open Registry Editor. Then navigate to the following location to look for a key named WriteProtect:
HKEY_LOCAL_MACHINESYSTEMCurrentControlSetControlStorageDevicePolicies
If this key exists, please right click it to select Modify to change the value from 1 to 0.
If you still get the disk is write-protected message, your best bet is to format the drive and recover files to disable this error, as shown in Solution 7.
Bottom Line
Here we have come to the end of this post. You should now have learned how to remove write protection from USB/pen drive/SD card in Windows 10/8/7 when you face the “disk is write-protected” error message while trying to copy files/folders.
Now, it is time for you to try the solutions above so you can start modifying the data in your storage device.
Should you have any question or suggestion, just leave a comment below or email us via [email protected]. And we will reply you as soon as possible. Thanks in advance.
Disk Write Protected FAQ
How do I remove write protection?
If your USB flash drive, SD card or hard drive is write-protected, you can easily remove write protection. You can try running a virus scan, checking and ensuring the device isn’t full, disabling read-only status for a file, using diskpart, editing Windows Registry and formatting the device.
How do I format a write protected flash drive?
It is best to reboot Windows with safe mode and then format the write-protected flash drive in Windows 10/8/7. To performing drive formatting, you can use a professional partition manager, MiniTool Partition Wizard.
How do I remove write protection from a USB drive using command prompt?
Run Command Prompt as administrator. Then type the following commands one by one and press Enter after each one.
- diskpart
- list disk
- select disk n (n means the disk number of the write-protected device)
- attributes disk clear readonly
What does it mean when a USB is write protected?
If you receive the “the disk is write-protected” error when using a USB flash drive, this means your system administrator has set limitations, the registry entry is damaged, or the drive itself is damaged. Also, the flash drive may be actually write-protected.
HELP! — Can’t format my USB, «Disk is write protected»
“Hello, recently I wanted to install my new Win update onto my USB but I had to delete some games that were there but there was no delete button in the drop down menu when I right clicked..I decided to format the drive since I didn’t need the games anyway but then it showed me an error Disk is write protected. Is there’s anything I can do please lmk.”
-A User from Reddit
Many people on various social media platforms have raised their voices that they faced an issue where their USB drives suddenly got write protection and they couldn’t delete or modify any contents on it. If your USB drive is write-protected as well, take it easy now!This post will walk you through on how to remove write protection on USB drive, pen drive or SD cards. With these five effective methods outlined here, you will defenitly get back working with the files on your storage drives.
- Part 1: Overview of Write-Protected USB
-
Part 2: How to Remove Write Protection from USB Drive?
- Fix 1: Check for a Physical Write Protection Switch
- Fix 2: Run Diskpart to Remove Write Protection from USB
- Fix 3: Remove Write Protection from USB Using Registry Editor
- Fix 4: Format USB Using Write Protection Removal Tool HOT
- Part 3: How to Recover Data after Formatting Write-protected USB?HOT
- Part 4: FAQs about Remove Write Protection from USB
Part 1: Overview of Write-Protected USB
Before we dive into the detailed methods to remove write protection from USB, let’s first figure out the following questions:
1. What is a Write Protected USB?
When write protection is enabled on a USB device, it means that your control over the drive is restricted. You can’t transfer data to it, nor can you modify or delete any files already stored on it. The USB write protection feature is typically used to prevent the stored data from being accidentially overwritten or erased. However, it could also cause inconvinence when you need to update or manage the content on the USB. In this case, removing or disabling write protection becomes crucial for regaining control over the storage device.
2. Why does my USB keep getting write-protected?
There can be several reasons that cause a USB drive to be write-protected and we’ve listed them below:
- Some USB drives come with a physical write protection switch. If this switch is turned on, it activates write protection.
- If there are file system issues with your USB drive, it may become write-protected to prevent further damage.
- When you’re running out of space on your USB drive, the write protection error message can appear to prevent any additional data from being written.
- If your USB flash drive is affected by viruses or malware, it can potentially become locked or write-protected.
Removing write protection on USB drive is not as complicated as you think. Below we will show you 6 methods on how to remove write protection from USB in windows 10 or 11. Just check them out and select the one that works best for you.
Fix 1: Check for a Physical Write Protection Switch
As mentioned earlier, there might be a physical switch on your USB flash drives that allows you to turn on or off the write protection feature. So when you get «The disk is write protected» error message, you should first check if there is such a switch on your flash drive and ensure that it is in the «unlock» position. If the USB drive remains write protected after toggling the switch or if there is no such a physical button, proceed to the next fix.
Fix 2: Run Diskpart to Remove Write Protection from USB
As a useful command-line utility included in Windows, Diskpart allows Windows users to manage disk partitions. With Diskpart, you can manipulate various disk attributes, including removing the write protection status. Let’s show you how to remove write protection from usb drive in Windows 10 or 11 using Diskpart.
-
With your USB drive connected with your computer, press Windows+R keys to open the Command Prompt window. Type «diskpart» and hit Enter.
-
Type the commands below and press Enter after each command:
- List disk — Enter this command will display all of the disks connected to the computer, including internal hard drives. Identify the number associated with your USB drive.
- Select disk X — Replace X with with the number of your USB drive.
- Disc characteristics clear readonly — This command will modify the properties of your USB and clear the write protection on it.
- When the write protection removal process is finished, type Exit and press Enter close DiskPart Command Prompt.
Now re-plug your USB flash drive to verify if you have removed write protection off your USB drive. If not, move towards the next fix.
Fix 3: Remove Write Protection from USB Using Registry Editor
-
On your keyboard, press «Windows + R,» then type «Regedit» in the pop-up Run dialogue box and hit Enter to open the Registry Editor.
- In Registry Editor, navigate to registry key: Computer\HKEY_LOCAL_MACHINE\SYSTEM\CurrentControlSet\Control.
-
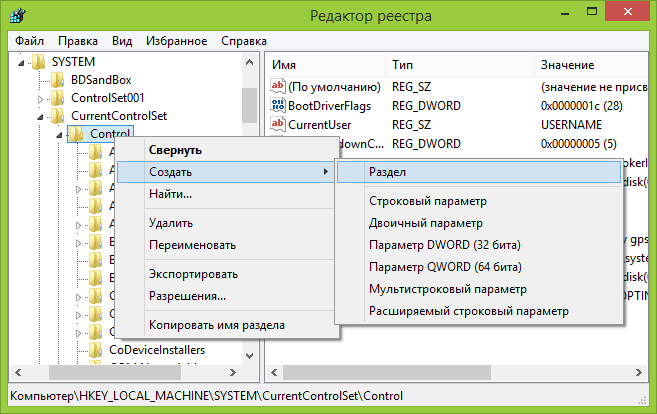
Right-click on the Control folder, then navigate to “New” > “Key.” Create a new key named StorageDevicePolicies.
-
Right-click on the white space in the right-hand pane and select the newly generated key. Choose “New” and then DWORD (32-bit) Value. Create a new DWORD named WriteProtect.
-
Double-click on the «WriteProtect» entry in the right pane and set the value to 0. Click OK to save the changes.
- Restart your computer after closing Registry Editor and check if the write protection on your USB flash drive is removed or not.
Fix 4: Format USB Using Write Protection Removal Tool
If you have tried the above methods and still cannot solve the problem of disk write protected, consider using a specialized write protection removal tool like 4DDiG Partition Manager to format the write-protected USB drive. Offering a user-friendly interface, this partition management tool is quite ideal for users who are not familiar with command-line utilities and are looking for quick and straightforward formatting solution.
Additionally, this powerful tool supports formatting USB drives to various file systems such as FAT32, exFAT, and NTFS, catering to all your formatting needs.
Note: The formatting process will erase all data on the USB drive, so ensure you have a backup of any important data to prevent data loss before you proceed to remove write protection from USB via formatting.
Here’s how to format write-protected USB.
-
Launch 4DDiG Partition Manager on your PC after installation. Insert your write-protected USB drive into the PC and select the «Partition Management» tab. Click Format to proceed.
-
Adjust the file system (e.g., FAT32, NTFS), allocation unit size, or volume label of the USB according to your preferences.
-
When a confirmation prompt appears, click «OK.»
-
Wait for the write-protected USB to be formatted and that’s it! You should be able to get rid of the write protection error message.
Part 3: How to Recover Data after Formatting Write-protected USB?
After formatting the write-protected USB drive, all data stored on it will be erased. If you don’t back up your data before the formatting, don’t fret. With Tenorshare 4DDiG Data Recovery tool, you can easily recover any lost, corrupted or overwritten files from crashed or formatted USB drives.
Key Features of 4DDiG Data Recovery:
- Recover lost or deleted data from various loss scenarios like deletion, formatting, RAW, etc.
- Support data recovery from USB flash drives, hard drives, memory cards, digital cameras, and camcorders, among other storage devices.
- Recover lost data from Bitlock encrypted drives.
- Work with Windows 11/10/8/1/8/7 and Mac computers.
- Compatible with over 2,000 file types and file systems, including photos, video, documents, audios and others.
Follow the steps below to get how to recover data from formatted USB drives with simply 3 steps.
-
Connect the USB and Select It to Scan
Download and install Tenorshare 4DDiG on your computer. Once installed, open 4DDiG and connect the formatted USB to the computer. After it is detected by the program, click Scan to proceed. Before the scanning, you can also choose target file types.
-
Scan the USB Drive
4DDiG promptly looks for lost files in the chosen USB drive all over based on your preferences. And you can switch from Tree View to File View or simply use Filter to find lost data.
-
Preview and Recover Files
Once the files are found, you can preview and restore them to a safe location on your PC. It is not advised to save the files back to the folder where you lost them to avoid data overwriting.
FAQs about Remove Write Protection from USB
Q1: Why does my USB keep getting write protected?
There are several potential reasons why a USB drive may become write-protected. It could be due to a physical switch on the USB drive, issues with the file system, malware, or problems with the drive itself.
Q2: How can I change write protected USB in Windows 10?
Look for a lock switch on the USB device and toggle it to the off position. Use the diskpart command instead, or set the WriteProtect value to 0 in the Windows Registry Editor. Clear the Read-only check box in the file’s Properties for individual files.
Q3: Why can’t I remove write protection from USB?
If the USB drive is broken or not working properly, it might stay write-protected. In such situations, you might need to get a new one.
Summary
This post provides many strategies to assist you to remove write protection from USB in Windows 10 or 11. From checking for physical switch to formatting the write-protected USB drive using 4DDiG Partition Manager. By following these approaches step by step, you can effortlessly address write protection issues and get back working with your storage drive. In case you are in need of the erased data on the formatted USB, don’t hesitate to rely on 4DDiG Data Recovery to get it back.
☞ You May Also Like: Should You Disable Write Caching on Your SSD? Answers Here
4DDiG Partition Manager
4DDiG Partition Manager is a simple and secure professional system migration tool that can migrate Windows OS to SSD in one click without reinstalling your system, effectively clone your entire hard drive to backup your data and more. It supports securely moving installed applications, system updates, drivers, custom settings from one PC to another.
Free Download
BUY NOW
Free Download
BUY NOW
Флешка пишет диск защищен от записи
Извиняюсь за заголовок, но именно так задают вопрос, когда при действиях с USB флешкой или SD картой памяти Windows сообщает об ошибке «Диск защищен от записи. Снимите защиту или воспользуйтесь другим диском» (The disk is write-protected). В этой инструкции покажу несколько способов снять защиту с флешки или карты памяти и расскажу, откуда она берется.
Отмечу, что в разных случаях сообщение о том, что диск защищен от записи может появляться по разным причинам — часто по причине настроек Windows, но иногда — из-за испорченной флешки. Коснусь всех вариантов и соответствующих им методов снятия защиты в Windows 10, 8.1 или Windows 7. Если что-то оказалось не совсем понятным, то внизу статьи есть видео, в котором продемонстрированы почти все способы исправить ошибку.
Примечания: бывают USB флешки, на которых есть физический переключатель защиты от записи, обычно подписанный Lock или с изображением замка (проверьте и передвиньте, а еще он иногда ломается и не переключается обратно).
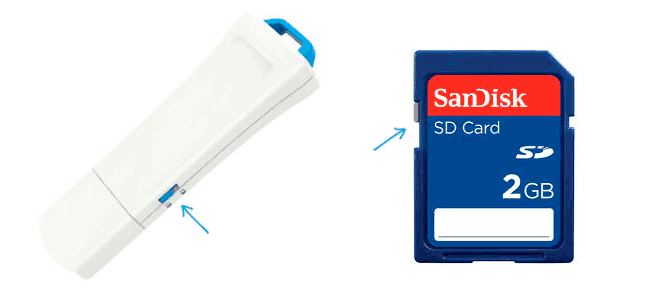
Если под флешкой, защищенной от записи подразумевается SD карта памяти или карта MicroSD, подключаемая через переходник на формат SD, обратите внимание на два нюанса:
- Карты памяти SD и переходники с MicroSD на SD имеют сбоку небольшой переключатель: одно из его положений — защита от записи, второе — запись разрешена.
- Нередко этот переключатель ломается, в результате мы можем получить постоянную защиту от записи, независимо от положения «рычажка». Это легко решается заменой адаптера, если дело в нем и сложнее в случае с полноформатной картой памяти SD.
Убираем защиту от записи с USB в редакторе реестра Windows
Для первого способа исправить ошибку потребуется редактор реестра:
- Для его запуска вы можете нажать клавиши Windows + R на клавиатуре и ввести regedit, после чего нажать Enter.
- В левой части редактора реестра вы увидите структуру разделов редакторе реестра, найдите раздел
HKEY_LOCAL_MACHINE\SYSTEM\CurrentControlSet\Control\StorageDevicePolicies
Учтите, что этого пункта может и не быть, тогда читаем дальше
- Если этот раздел присутствует, то выберите его и посмотрите в правой части редактора реестра, есть ли там параметр с именем WriteProtect и значением 1 (именно это значение может вызывать ошибку Диск защищен от записи). Если он есть, то кликните по нему дважды и в поле «Значение» введите 0 (ноль). После чего сохраните изменения, закройте редактор реестра, извлеките флешку и перезагрузите компьютер. Проверьте, была ли исправлена ошибка.

- Если такого раздела нет, то кликните правой кнопкой мыши по разделу, находящемуся на уровень выше (Control) и выберите «Создать раздел». Назовите его StorageDevicePolicies и выберите его.

- Затем кликните правой кнопкой мыши в пустой области справа и выберите пункт «Параметр DWORD32» (даже для x64 Windows). Назовите его WriteProtect и оставьте значение равным 0. Также, как и в предыдущем случае, закройте редактор реестра, извлеките USB накопитель и перезагрузите компьютер. После чего можно проверить, сохранилась ли ошибка.
Дополнительно, проверьте 2 раздела реестра
HKEY_LOCAL_MACHINE\SOFTWARE\Policies\Microsoft\Windows\RemovableStorageDevices\
HKEY_CURRENT_USER\SOFTWARE\Policies\Microsoft\Windows\RemovableStorageDevices\
По умолчанию такой раздел отсутствует в реестре (и, если у вас его нет — значит дело не в нем). При наличии раздела RemovableStorageDevices, обратите внимание на вложенный подраздел и содержащиеся в нем Deny_Write, Deny_Read, Denya_Execute, при значении этих параметров равному 1, они запрещают запись, чтение и выполнение со съемных накопителей.
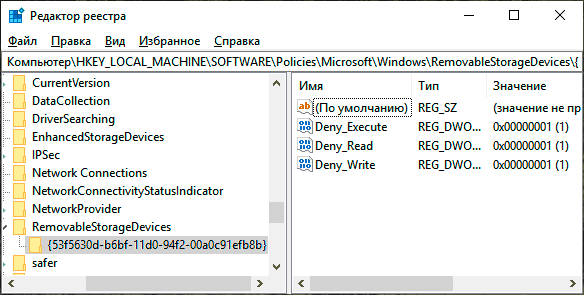
Удалите такие параметры — это должно снять защиту от записи. Перезапустите компьютер (может оказаться достаточным отключить и заново подключить флешку): проблема с защитой флешки от записи должна быть решена.
Как убрать защиту от записи в командной строке
Еще один способ, который может помочь убрать ошибку USB диска, который вдруг показывает ошибку при записи — снять защиту в командной строке.
Для этого проделайте следующие действия:
- Запустите командную строку от имени администратора (В Windows 10 это проще всего сделать через поиск в панели задач, в Windows 8.1 — используя меню правого клика по кнопке Пуск, в Windows 7 — через правый клик по командной строке в меню Пуск).
- В командной строке введите diskpart и нажмите Enter. Затем введите команду list disk и в списке дисков найдите свою флешку, вам потребуется ее номер. Введите по порядку следующие команды, нажимая Enter после каждой.
- select disk N (где N номер флешки из предыдущего шага)
- attributes disk clear readonly
- exit
Закройте командную строку, отключите и заново подключите флешку, затем попробуйте произвести какие-либо действия с флешкой, например, отформатировать ее или записать какую-либо информацию, чтобы проверить, исчезла ли ошибка.
Диск защищен от записи — решение для флешек Transcend, Kingston, Silicon Power и других
Многие производители USB накопителей выпускают собственные утилиты для исправления ошибок с флешками и картами памяти. Часто они срабатывают и в рассматриваемом нами случае, позволяя снять защиту. Подробно обо всех таких утилитах: Программы для ремонта флешки.
Видео инструкция
Ниже — видео по данной ошибке, в которой показаны все описанные выше способы. Возможно, она сможет вам помочь разобраться с проблемой.
Надеюсь, один из подходов помог вам в решении проблемы. Если же нет, рекомендую также проверить вашу флешку на другом компьютере или ноутбуке: это позволит определить, является ли защита от записи следствием параметров системы или же виноват сам накопитель.
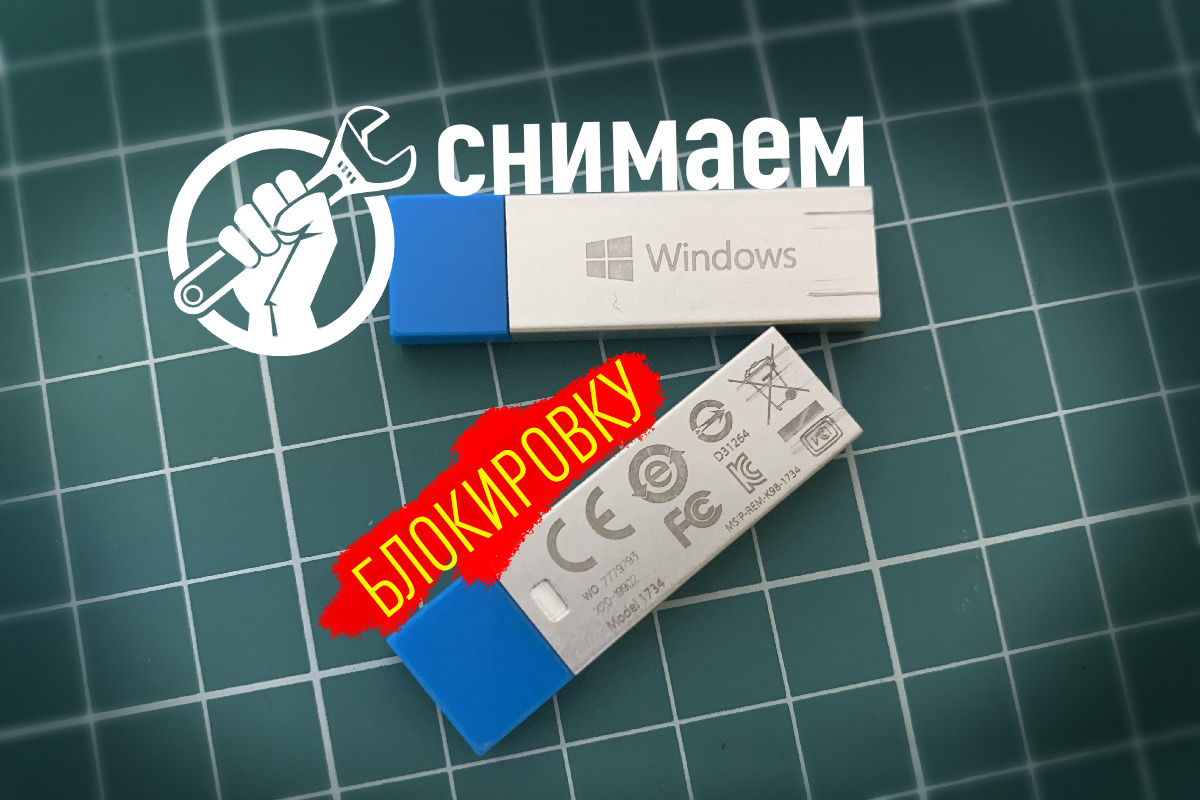
Долгое время у меня мёртвым грузом лежало несколько лицензионных флешек с Windows 10. Ставить с них систему не было никакого желания, так как установочные дистрибутивы давно устарели и каждый раз качать обновления в несколько гигабайт, такое себе удовольствие. Но главная проблема в другом — сами флешки защищены от записи и накатить туда свежий дистрибутив или просто их отформатировать не представлялось возможным.
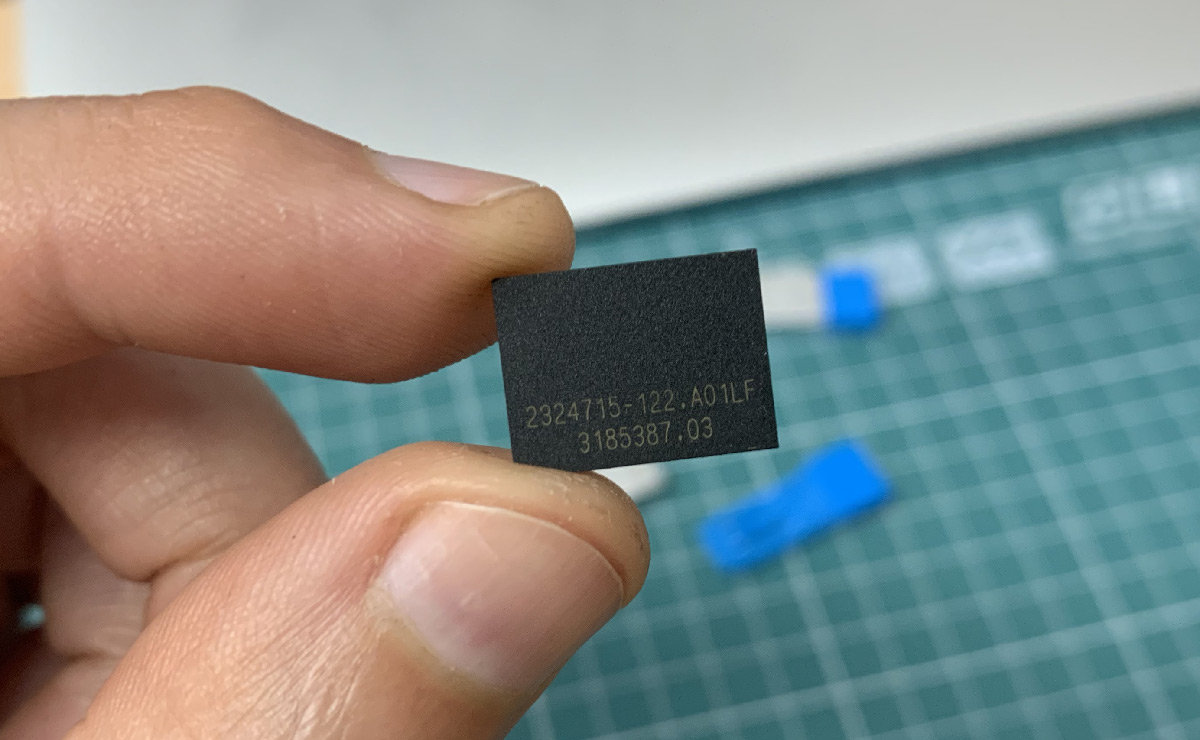
Функция защиты от записи, как правило, висит на одном из выводов контроллера флешки. Конечно, можно найти в сети даташит (datasheet) на контроллер Phison 2307, на котором построена данная флешка и выяснить какая нога микросхемы отвечает за защиту от записи.
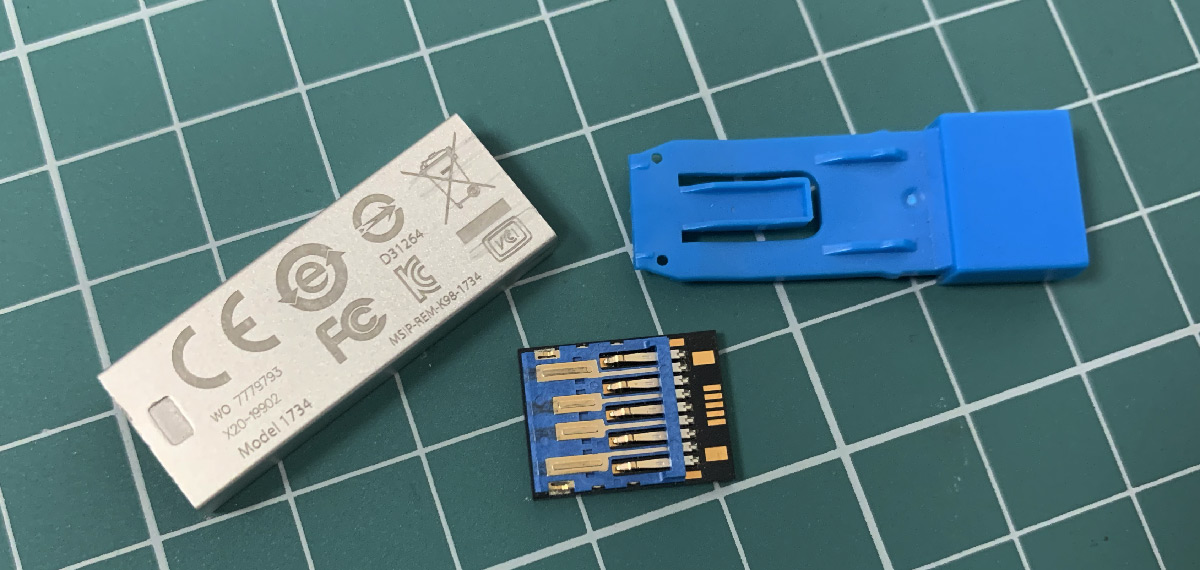
Правда, в данном случае, нам это ничего не даст.Дело в том, что установочные лицензионные флешки с Windows 10 монолитные и добраться к контактам печатной платы точно не получится.
Однако, выход был найден. На сайте usbdev.ru, один добрый человек под ником null21 выложил небольшую утилитку, которая программно снимает защиту от записи с контроллера.
- Утилита PhisonWP для снятия защиты от записи с флешек на контроллерах Phison https://www.usbdev.ru/files/phison/phisonwp/
По ссылке можно найти две версии программы 0.0 и 0.1. Над версией 0.1 поработали кубинские товарищи, адаптировав её под старые ОС (включая WinXP) и осуществили перевод на английский язык. Что касается меня, то я использовал версию 0.0.
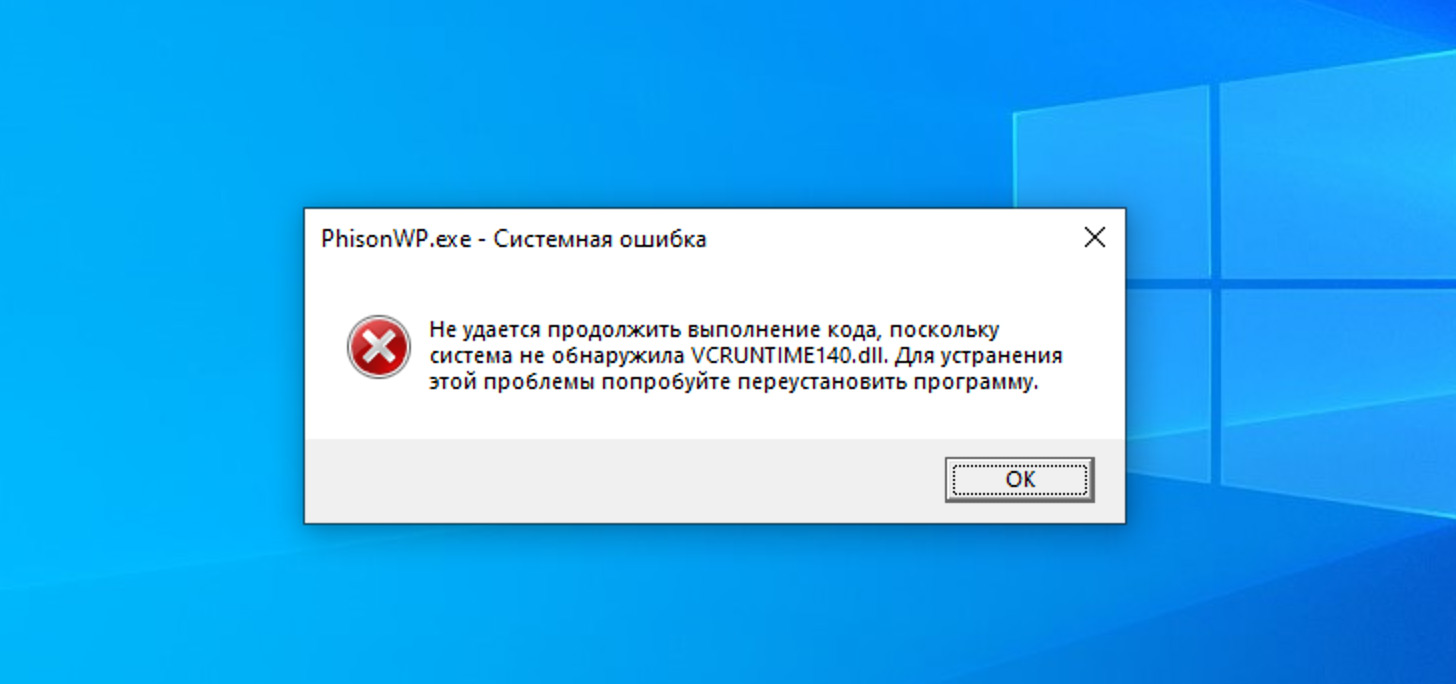
Утилита запускается из командной строки Windows и при запуске может выдать ошибку о недостающей библиотеке VCRUNTIME140.dll. Данную библиотеку можно загрузить непосредственно с сайта Microsoft, вот ссылка на страничку с последними поддерживаемыми версиями Visual C++ https://support.microsoft.com/ru-ru/help/2977003.
В использовании утилита максимально простая и выполняет всего два действия: запрос информации об устройстве и смену статуса. Флешку «окирпичить» не должна.
PhisonWP [буква диска] [WP-статус для установки]
Примеры использования:
PhisonWP.exe F   — получить текущий статус
PhisonWP.exe F OFF  — отключить защиту от записи
PhisonWP.exe F ON   — активировать защиту от записи
// "F" — буква диска, присвоенная вашей флешке в системе
У меня всё прошло, как по маслу и таким образом удалось разблокировать обе лицензионные флешки Windows 10 на контроллерах Phison 2307 и залить на них свежие установочные образы «десятки» с сайта Microsoft.
Подписывайтесь на канал
Яндекс.Дзен
и узнавайте первыми о новых материалах, опубликованных на сайте.