
Все способы:
- Вариант 1: Заблокирован файл из интернета
- Способ 1: Редактирование свойств файла
- Способ 2: «PowerShell»
- Способ 3: Настройки антивируса
- Вариант 2: Файл удерживается процессом
- Способ 1: Перезагрузка или «Безопасный режим»
- Способ 2: Process Explorer
- Вопросы и ответы: 0
Вариант 1: Заблокирован файл из интернета
Под блокировкой файлов следует понимать невозможность совершения с ними определенных действий: запуска, редактирования, перемещения или удаления. В первом случае речь идет в основном об исполняемых файлах, блокируемых системой безопасности, во втором – о файлах, удерживаемых другими процессами. Способы разблокировки будут отличаться в зависимости от того, как именно блокируется файл.
Способ 1: Редактирование свойств файла
Если при открытии скачанного из интернета файла Windows 10 выдает сообщение «Не удается проверить издателя» или «Система защитила ваш компьютер», сделайте следующее:
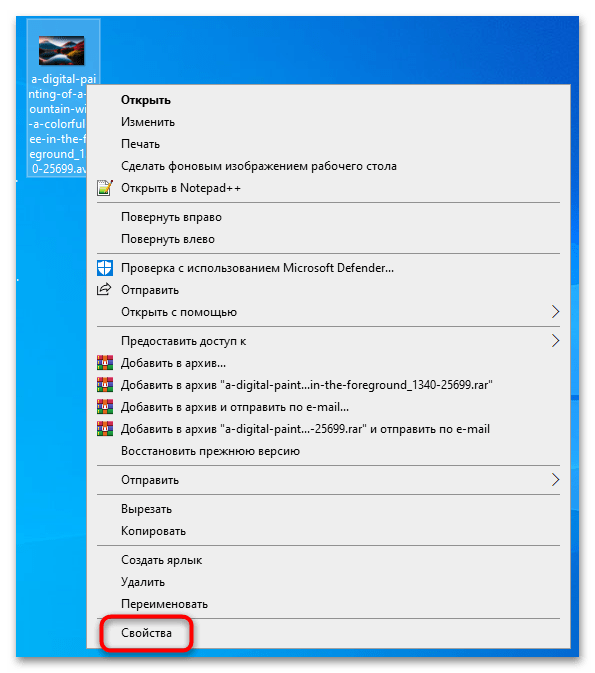
- Кликните по файлу правой кнопкой мыши и выберите из контекстного меню опцию «Свойства».
- Окно свойств откроется на вкладке «Общие». Посмотрите, имеется в нижней области окна уведомление «Этот файл получен с другого компьютера…». Если да, снимите флажок с чекбокса «Разблокировать» и нажмите «ОК».
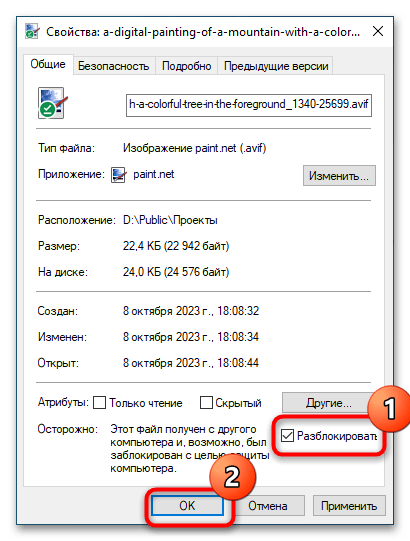
Файл будет разблокирован, после чего его можно будет использовать без ограничений.
Способ 2: «PowerShell»
Для разблокировки скачанных из интернета файлов также можно использовать консоль «PowerShell». Это удобно, когда нужно снять блокировку с группы файлов.
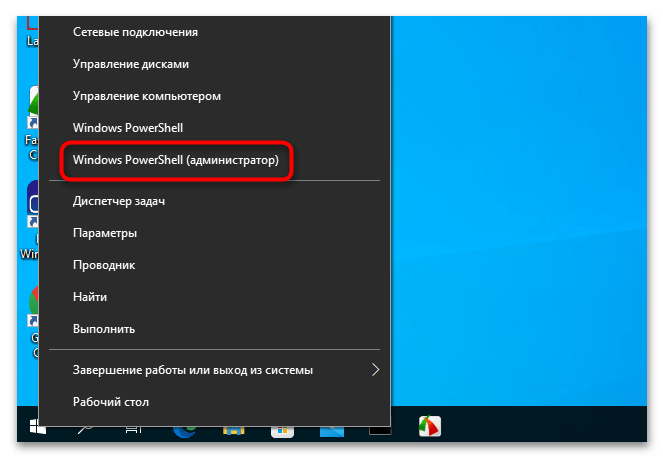
- Откройте от имени администратора «PowerShell» из контекстного меню кнопки «Пуск».
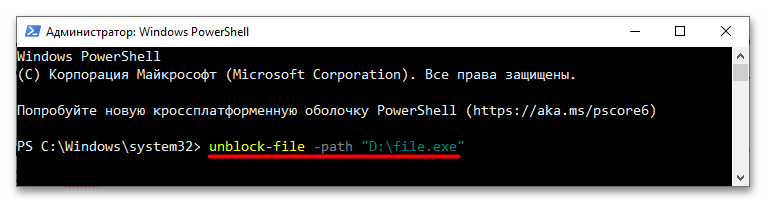
- Выполните команду
unblock-file -path "D:\file.exe"илиget-childitem "D:\folder" | unblock-file, если нужно разблокировать файлы в папке, где составляющие команды «file.exe» и «D:\folder» замените своими. Если нужно, подтвердите действие вводом Y.
Способ 3: Настройки антивируса
Возможно, открытие файла блокируется встроенным или сторонним антивирусом. Чтобы исключить этот сценарий, добавьте файл в исключения антивирусной программы или временно отключите защиту. О том, как исключить файл из проверки в разных антивирусах, читайте по ссылке ниже.
Подробнее: Добавление файла в исключения антивируса
Вариант 2: Файл удерживается процессом
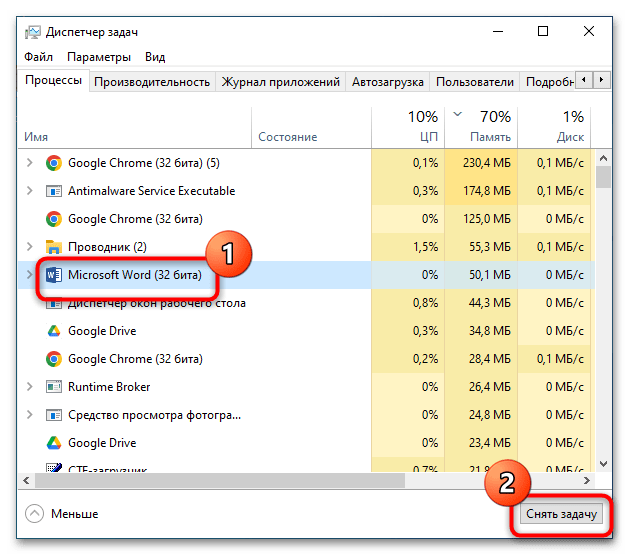
Если при попытке удалить, отредактировать или переместить файл Windows выдает сообщение, что файл занят, заблокирован или используется, снятие блокировки будет означать завершение того процесса, который удерживает этот файл. В ряде случаев блокирующий процесс указывается в окошке с сообщением. Это самый простой случай, так как зная название процесса (программы), можно легко его найти и завершить. В том числе через «Диспетчер задач» или консоль.
Подробнее: Завершение процессов в Windows 10
Но нередко встречаются ситуации, когда какой-то файл используется неизвестным или системным процессом. В этом случае снять блокировку будет немного сложнее.
Способ 1: Перезагрузка или «Безопасный режим»
Отвязать файл от блокирующего его процесса можно простой перезагрузкой компьютера, если же это не даст положительного результата, загрузите компьютер в «Безопасном режиме» и попробуйте выполнить с файлом нужное действие.
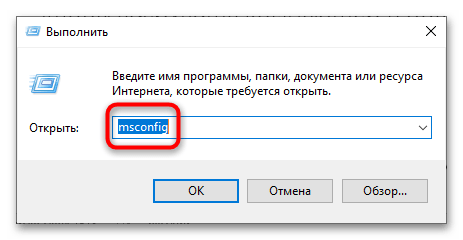
- Запустите штатную утилиту «Конфигурация системы», выполнив в вызванном нажатием клавиш Win + R окне команду
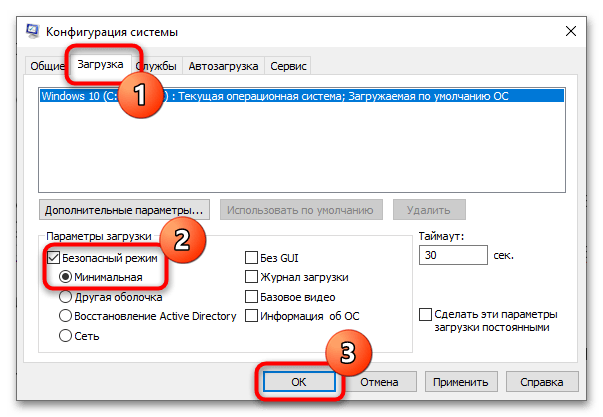
msconfig. - Переключитесь на вкладку «Загрузка», отметьте флажком чекбокс «Безопасный режим» и нажмите «ОК» и подтвердите перезагрузку.
- Проверьте, блокируется ли файл.
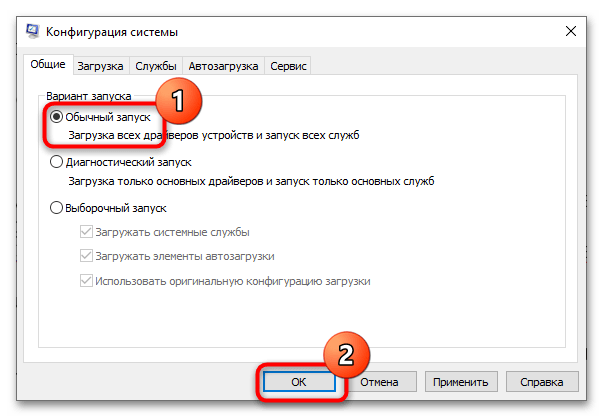
Чтобы загрузить компьютер в обычном режиме, вновь запустите утилиту и на этот раз на вкладке «Общие» активируйте радиокнопку «Обычный запуск».
Способ 2: Process Explorer
Для определения и снятия блокирующего процесса можно использовать профессиональную утилиту Process Explorer.
Скачать Process Explorer с официального сайта
- Скачайте инструмент со страницы разработчика и запустите с правами администратора.
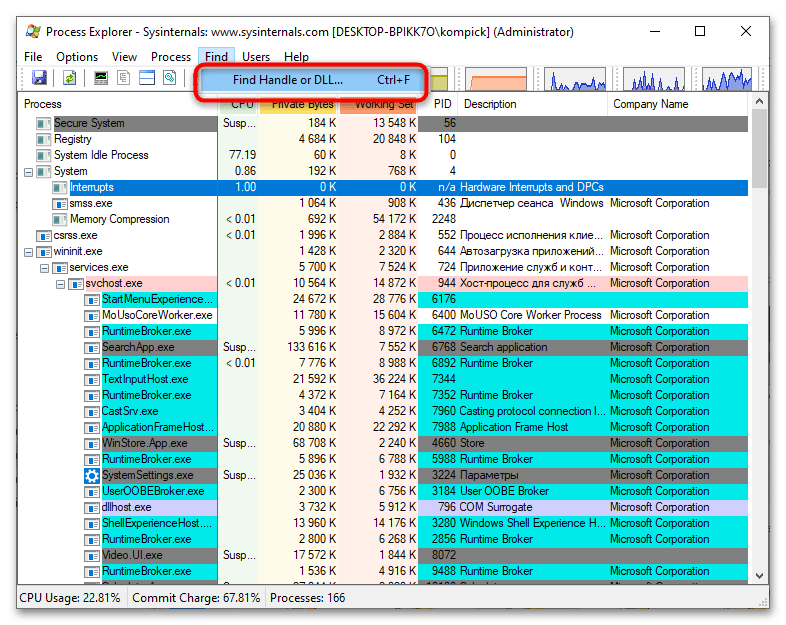
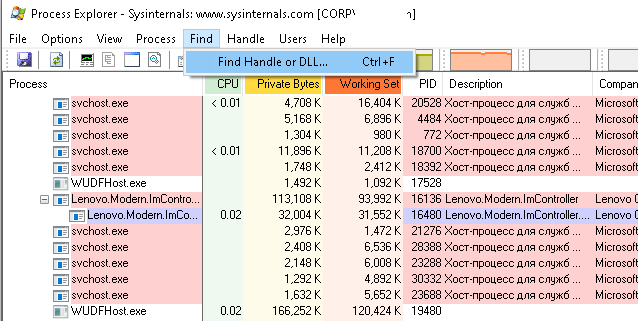
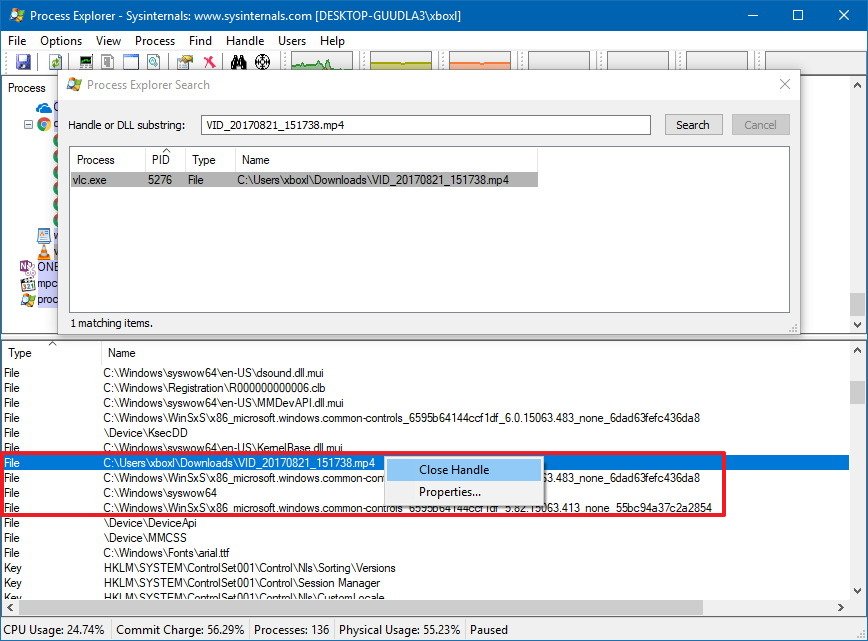
- В главном меню выберите опцию «Find» → «Find Handle or DLL».
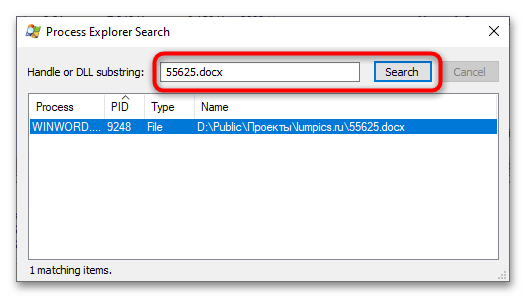
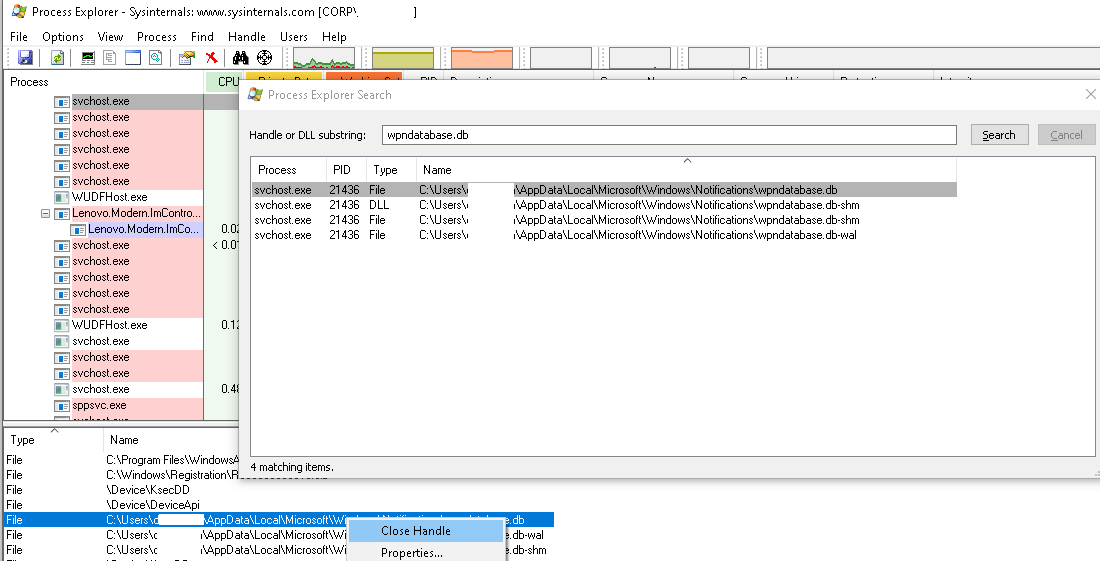
- В поле «Handle or DLL substring» открывшегося окошка вставьте название (с расширением) заблокированного файла и нажмите «Search».
- В результате Process Explorer выдаст список блокирующих процессов с указанием их названий и идентификаторов (PID).
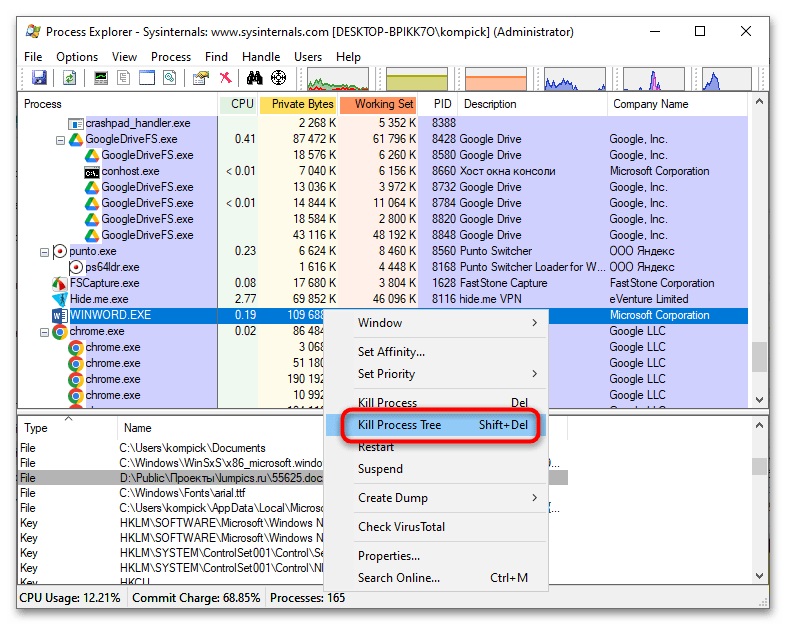
- Если это пользовательский процесс, найдите его по имени или PID в окне Process Explorer и завершите принудительно. Для этого нажмите по процессу правой кнопкой мыши и выберите из контекстного меню опцию «Kill Process Tree».
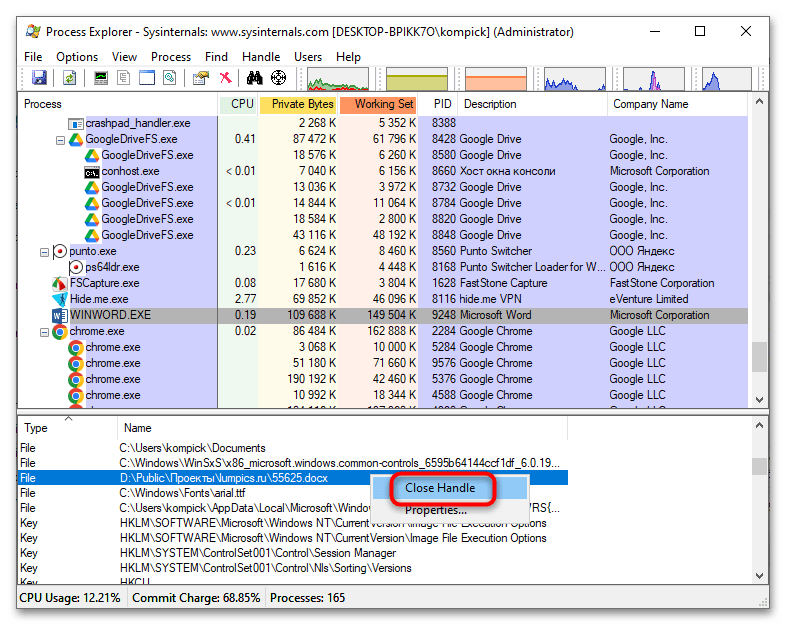
- Если блокирующим оказался системный процесс, можно попробовать закрыть только дескриптор файла. Последний автоматически выделяется в нижней панели Process Explorer. Кликните по нему правой кнопкой, выберите опцию «Close handle» и подтвердите действие.

Если нижняя панель Process Explorer скрыта, включите ее показ, выбрав из главного меню опцию «View» → «Lower Pane View» → «Handles».
Помимо Process Explorer, существуют также и другие сторонние инструменты для разблокирования файлов, но они не столь эффективны и функциональны. Многие из них не позволяют получать сведения о дереве процессов и нередко требуют перезагрузки компьютера.
Наша группа в TelegramПолезные советы и помощь
Иногда при попытке удалить, переименовать или переместить какой-то файл в Windows вы можете получить сообщение, что файл занят/заблокирован/используется) другим процессом. Чаще всего имя программы, которая держит файл открытым указывается прямо в окне сообщения File Explorer. Чтобы снять блокировку файла достаточно просто закрыть эту программу. Но бывает ситуации, когда какой-то файл и библиотека используется неизвестным или системным процессом. В этом случае снять блокировку с файла немного сложнее.
Многие приложения открывают файлы в монопольном (эксклюзивном) режиме. При этом файл блокируется файловой системой от операций ввода вывода других приложений. Если вы закрываете приложение, блокировка с файла снимается.
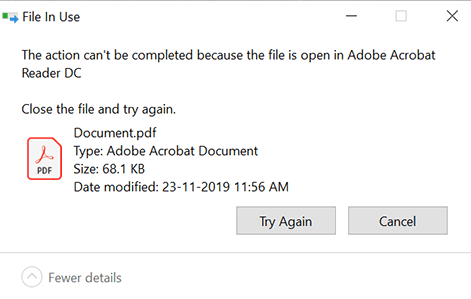
Сообщение о блокировке файла может выглядеть по-разному. Например в следующем примере указан тип файла и с каким приложением он ассоциирован:
File/Folder in Use. The action can’t be completed because the file is open in another program. Close the folder or file and try again.
Файл уже используется. Операция не может быть завершена, так как файл или папка открыта в другой программе. Закройте файл и повторите попытку.
В этом случае вы можете легко понять какое приложение заблокировало файл и закрыть его.
Однако иногда можно увидеть более интересное сообщение, о том, что файл заблокирован неизвестным или системным процессом Windows. Это может быть, как процесс самой ОС Windows, так и другие процессе, работающий с правами System, например, антивирус, агент резервного копирования, база данных mssql и т.д.):
The action can’t be completed because the file is open in SYSTEM.
Файл уже используется. Действие не может быть выполнено, так как этот файл открыт в System.
Попробуем разобраться, как понять какой программой, службой или системным процессом Windows занят файл, как разблокировать файл и можно ли разблокировать файл не закрывая родительский процесс.
Самый простой вариант разблокировать файл – завершить процесс, которые его заблокировал. Но это не всегда возможно, особенно на серверах.
Чаще всего для поиска процесса, который заблокировал файл рекомендуют использовать утилиту Unlocker. Лично я
Unlocker
не использую, т.к. она не позволяет получить подробную информацию о процессе или цепочке процессов, которые заблокировали файл. Также нельзя освободить конкретный файл, занятый процессом – приходится завершать приложение целиком.
Кроме того, это сторонняя утилита, при установке которой нужно быть внимательным, т.к. в процессе она предлагает установить пачку ненужные программы в нагрузку.
Когда процесс в Windows открывает файл, этому потоку ввода/вывода назначается файловый дескриптор (handler). Процесс и его дочерние процессы получают доступ к файлу по этому дескриптору. Через Window API вы можете послать сигнал файловой системе на освобождение данного дескриптора и снятие блокировки с файла.
Принудительное закрытие файловых дескрипторов может вызвать нестабильную работу приложения или компьютера. Если вы не знаете, к чему приведет закрытие дескриптора файла для конкретного приложения, то не пытайтесь выполнить это на продуктивном сервере без предварительного теста.
Как разблокировать файл с помощью Process Explorer?
ProcessExplorer это бесплатная утилита из набора системных утилит Sysinternals, которую можно скачать на сайте Microsoft (https://docs.microsoft.com/en-us/sysinternals/downloads/process-explorer). Попробуем с помощью Process Explorer найти, какой процесс заблокировал определенный файл и освободить этот файл, сбросив файловый дескриптор процесса.
- ProcessExplorer не требует установки, просто скачайте распакуйте и запустите с правами администратора
procexp.exe
; - Выберите меню Find -> Find Handle or DLL (или нажмите
Ctrl-F
);
- Укажите имя файла, который нужно разблокировать и нажмите Search;
- Выберите нужный файл. Процесс, который открыл файлы будет выделен в дереве процессов. Можно завершить этот процесс, щелкнув по нему правой кнопкой и выбрав Kill Process Tree. Но можно попробовать закрыть дескриптор файла, не завершая процесс целиком. Дескриптор файла, который вы искали, автоматически выделяется в нижней панели Process Explorer. Щелкните по дескриптору правой кнопкой и выберите Close handle. Подтвердите закрытие файла.
Если у вас в Process Explorer не отображается нижняя панель со списком открытых дескрипторов процесса, включите пункт меню View -> Lower Pane View -> Handles
Итак, вы закрыли дескриптор файла, не завершая родительский процесс. Теперь вы можете спокойно удалить или переименовать файл.
Сброс дескриптора файла с помощью утилиты Handle
Handle – это еще одна утилита командной строки из комплекта инструментов Sysinternals (доступна для скачивания на сайте Microsoft (https://docs.microsoft.com/en-us/sysinternals/downloads/handle. Она позволяет найти процесс, который заблокировал ваш файл и снять блокировку, освободив дескриптор.
- Скачайте и распакуйте архив с утилитой Handle;
- Запустите командную строку с правами администратора и выполните команду:
handle64.exe > listproc.txt
Данная команда сохранит список открытых дескрипторов в файл. Можно вывести дескрипторы для каталога, в котором находится файл, который вы хотите изменить:
Handle64.exe -a C:\Some\Path
или конкретного процесса:
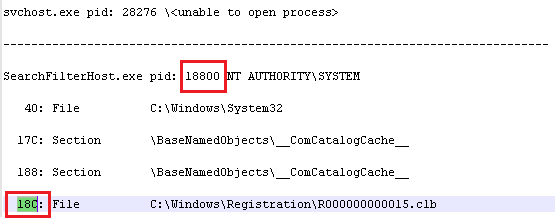
handle64.exe -p winword.exe - Откройте файл listproc.txt в любом текстовом редакторе и найдите строку, в которой указано имя заблокированного файла. Скопируйте ID дескриптора файла (значение в hex формате). Затем поднимитесь немного выше к разделу, в котором указан процесс, являющийся владельцем данного дескриптора и запишите его ID. Для процесса запущенного от имени системы скорее всего будет PID 4.
Для некоторых системных процессов handle.exe вернет следующий текст:
wininit.exe pid: 732 \<unable to open process>
. Это означает, что вы не может получить информацию об этих системных процессах (даже с правами администратора). Для получения дескрипторов файлов, открытых такими процессами, запустите командную строку с правами System и попробуйте получить список дескрипторов еще раз. - Теперь вернитесь в командную строку и сбросьте дескриптор файла по полученным HandleID и ProcessID. Формат команды следующий:
handl64e.exe -c HandleID -p ProcessID
Например:
handl64e.exe -c 18C -p 18800
- Утилита запросит подтвердить закрытие файла для указанного процесса. Подтвердите, нажав y -> enter

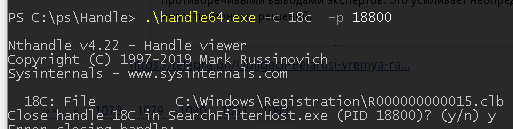
Если система отреагирует на закрытие файла корректно, вы разблокируете ваш файл без необходимости завершать процесс или перезагружать сервер/компьютер.
Whether you’re a student working on an important research paper, a photographer editing your latest masterpiece, or a professional navigating through countless documents, encountering locked files can be frustrating. I we will explore ways to unlock files on Windows 10, providing you with the tools and knowledge to regain access to your valuable data.
Understanding File Locking in Windows 10

Before diving into the solutions, it’s essential to understand the basics of file locking in Windows 10. File locking occurs when a file is in use by a program or process, preventing other programs from accessing or modifying it. This can happen unintentionally due to software glitches, or intentionally to protect files from unauthorized access or accidental changes.
File locking is a crucial aspect of file management in Windows 10, ensuring data integrity and preventing conflicts when multiple applications attempt to access the same file simultaneously. When a file is locked, it allows other programs to read its content but restricts them from making any modifications or deletions. This mechanism plays a vital role in maintaining the stability and security of files within the operating system.
The Basics of File Locking
File locking is a mechanism that Windows 10 uses to ensure data integrity and prevent conflicts when multiple applications try to access the same file simultaneously. When a file is locked, other programs can still read its content but cannot modify or delete it. Understanding how file locking works is crucial to unlocking files successfully.
Furthermore, file locking helps in preventing data corruption and loss by controlling access to files during critical operations such as saving or editing. It acts as a safeguard against potential data breaches and ensures that files are accessed and modified in a controlled and secure manner.
Reasons for Locked Files
Files can become locked for various reasons. It could be due to an application crash, an ongoing synchronization process, or a program error. Sometimes, the culprit is an antivirus software scanning the file, or Windows itself might lock system files for security purposes. Identifying the cause of the lock is the first step towards unlocking the file.
Understanding the reasons behind file locking is essential for troubleshooting issues related to inaccessible files. By recognizing the factors that lead to file locks, users can take proactive measures to prevent such situations and ensure smooth file operations within the Windows 10 environment. It is crucial to address locked files promptly to maintain system efficiency and prevent any disruptions in workflow.
Essential Tools for Unlocking Files
To effectively unlock files on Windows 10, you have two main options: built-in Windows tools and third-party software solutions. Let’s explore both to determine which approach suits your needs.
When it comes to dealing with locked files on Windows 10, having the right tools at your disposal can make all the difference. Whether you’re trying to delete a stubborn file or modify one that’s in use, understanding the available options can save you time and frustration.
Built-in Windows Tools
Windows 10 provides several built-in tools that can help in unlocking files. The Resource Monitor, accessible through the Task Manager, allows you to identify which processes are using a specific file. This can be particularly useful when you need to track down the source of a lock to release it effectively. Additionally, the command-line utility, Handle, provides detailed information about locked files and the processes locking them, giving you insights into what actions are preventing you from accessing or modifying the file.
Furthermore, Windows 10 offers a feature called “Previous Versions,” which allows you to restore previous versions of files or folders. This can be handy if you accidentally lock a file and need to revert to an earlier state to regain access.
Third-Party Software Solutions
If the built-in tools fail to unlock your file or you require advanced functionalities, third-party software solutions might be the answer. There are various file unlocking tools available, such as Unlocker and LockHunter, which provide a user-friendly interface and additional features to tackle stubborn locks. These tools often offer more flexibility and options for dealing with locked files, giving you a wider range of strategies to try when unlocking a file.
Moreover, some third-party software solutions come with integration options for Windows Explorer, making it easier to unlock files directly from the file explorer interface. This can streamline the process of managing locked files and provide a more seamless experience when dealing with file locks across your system.
Step-by-Step Guide to Unlocking Files
Now that you are equipped with the necessary knowledge and tools, let’s go through a step-by-step process to unlock files on Windows 10.
Identifying the Locked File
The first step is to identify the locked file. Use the Resource Monitor or third-party file unlocking software to determine which process is holding the lock. Take note of the file’s location and the name of the locking process.
Using Windows Tools to Unlock Files
If a built-in Windows tool is suitable for your situation, access the Task Manager and navigate to the Resource Monitor. Locate the locked file and the corresponding process, then terminate the process using the End Task option. This should release the lock on the file, allowing you to access it freely.
Using Third-Party Software to Unlock Files
If the file lock persists or you need advanced features, install and launch a third-party file unlocking tool. Use the tool to select the locked file and choose the option to unlock or terminate the process holding the lock. Follow the tool’s instructions to successfully unlock the file.
Troubleshooting Common Issues

Whilst unlocking files on Windows 10 is generally straightforward, you may encounter some common issues during the process. Let’s address a couple of these issues and provide troubleshooting tips.
Dealing with Persistent File Locks
In some cases, files might remain locked even after terminating the process. This usually happens when the process that locked the file was not properly terminated. To resolve this issue, restart your computer, and the locked file should become accessible again.
Resolving Access Denied Errors
If you encounter an “Access Denied” error when attempting to unlock a file, it could be due to insufficient permissions. To resolve this, log in as an administrator and adjust the file’s permissions accordingly. Right-click on the file, select “Properties,” navigate to the “Security” tab, and modify the permissions to allow full control for your user account.
Maintaining File Security While Unlocking
Unlocking files on Windows 10 should be approached with caution to ensure data security and prevent unintended consequences. It’s crucial to understand file permissions and practice safe unlocking practices.
Understanding File Permissions
File permissions determine who can access, modify, or delete a file. It’s important to be mindful of the permissions assigned to files, especially when unlocking them. Regularly review and manage file permissions to maintain a secure and organized file system.
Ensuring Safe Unlocking Practices
When unlocking files, avoid terminating processes that you are not familiar with. Make sure to verify the legitimacy of the locking process before taking any action. Additionally, always keep your operating system and security programs up to date to protect against potential threats.
Key Takeaways
- Windows 10 uses file locking to prevent conflicts and unauthorized access.
- Locked files can be identified using built-in tools or third-party software.
- Unlock files by terminating the locking process or using specialized unlocking software.
- Persistent file locks can be resolved by restarting the computer.
- Maintain file security by understanding permissions and practicing safe unlocking techniques.
FAQs
1. How can I determine which process is locking a file in Windows 10?
You can use the Resource Monitor or third-party file unlocking software to identify the process locking a file in Windows 10. These tools provide detailed information about locked files and the corresponding locking processes.
2. Why do files become locked in Windows 10?
Files can become locked due to various reasons, such as an application crash, ongoing synchronization process, or program error. Antivirus software scanning or Windows security measures can also cause file locks.
3. What should I do if a file remains locked even after terminating the locking process?
If a file remains locked after terminating the process, restart your computer. This should release the lock on the file and allow you to access it again.
4. How can I avoid unintended consequences when unlocking files?
To avoid unintended consequences, verify the legitimacy of the locking process before terminating it. Only terminate processes that you are familiar with and ensure that your operating system and security programs are up to date.
5. Is it necessary to regularly review and manage file permissions?
Yes, regularly reviewing and managing file permissions is essential for maintaining a secure and organized file system. It helps prevent unauthorized access and ensures that files are accessible to the appropriate users.
Conclusion

When a file is open by another app or process, Windows 10 puts the file into a locked state, and you can’t delete, modify, or move it to another location. Usually, after the file is no longer in use, the application will unlock it automatically, but that’s not always the case. Sometimes, a file may not unlock successfully, and even if you try to take any action, you’ll see a warning that the operation can’t be completed because it’s open by another program.
If you must delete or take different actions with a locked file, there are at least two methods you can use to unlock it, including using Microsoft’s Process Explorer tool and Safe Mode.
In this Windows 10 guide, we walk you through the steps to get rid of files even if they’re locked by an app or process.
- How to unlock files using Process Explorer
- How to unlock files using Safe Mode
How to unlock files using Process Explorer
If you need to unlock a file currently being used by a program or system process and you can’t restart your device, you can use these steps:
- Download Process Explorer from this Microsoft website.
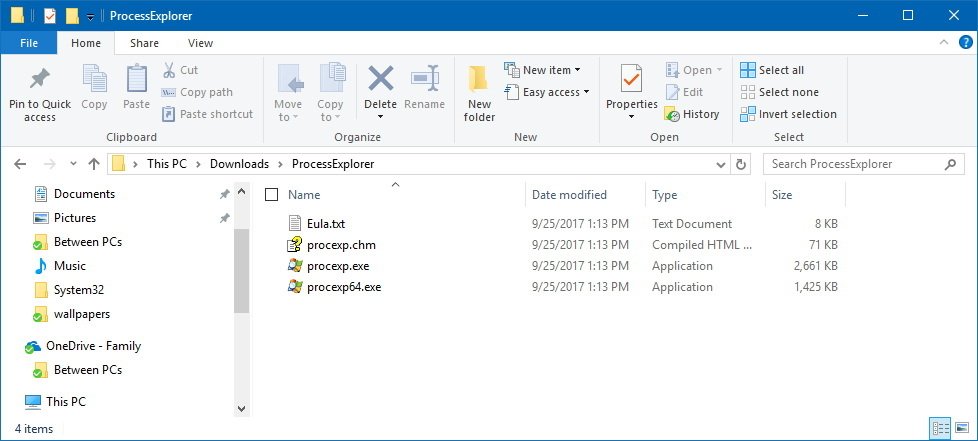
- Extract the content inside the ProcessExplorer.zip compressed folder. (You can refer to these instructions if you need additional help on how to do this task.)
- Double-click the procexp.exe if you’re running a 32-bit version of Windows 10 or procexp64.exe if you’re running a 64-bit version10 to launch the app.
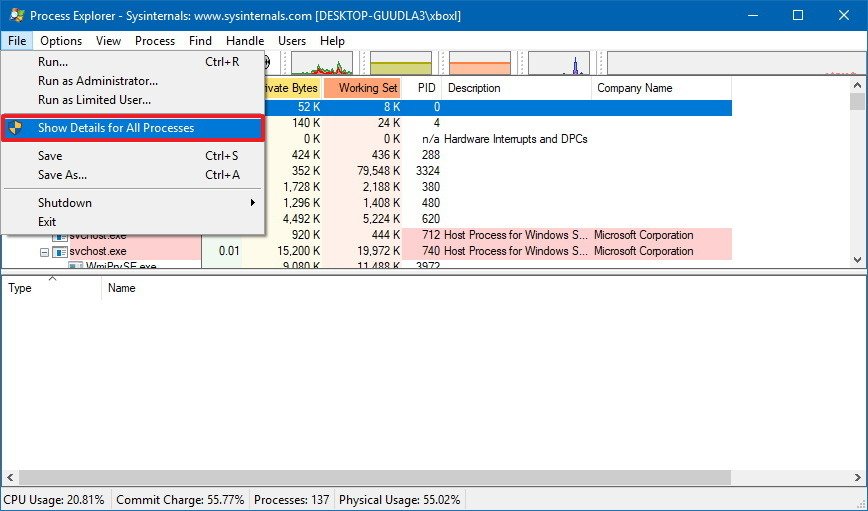
- Click on File, and select the Show Details for All Processes option.
- Click on Find, and select the Find Handle or DLL option.

- Type the name of the locked file in the field, and click the Search button.
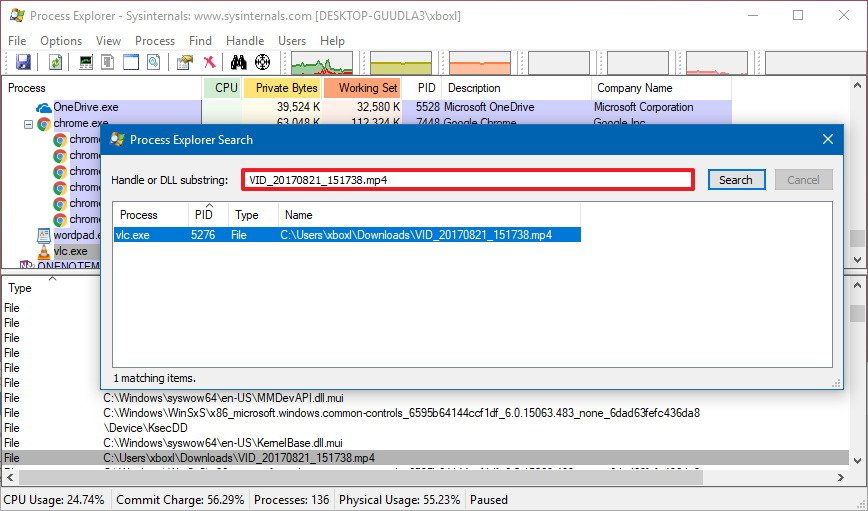
- Select the file from the search result.
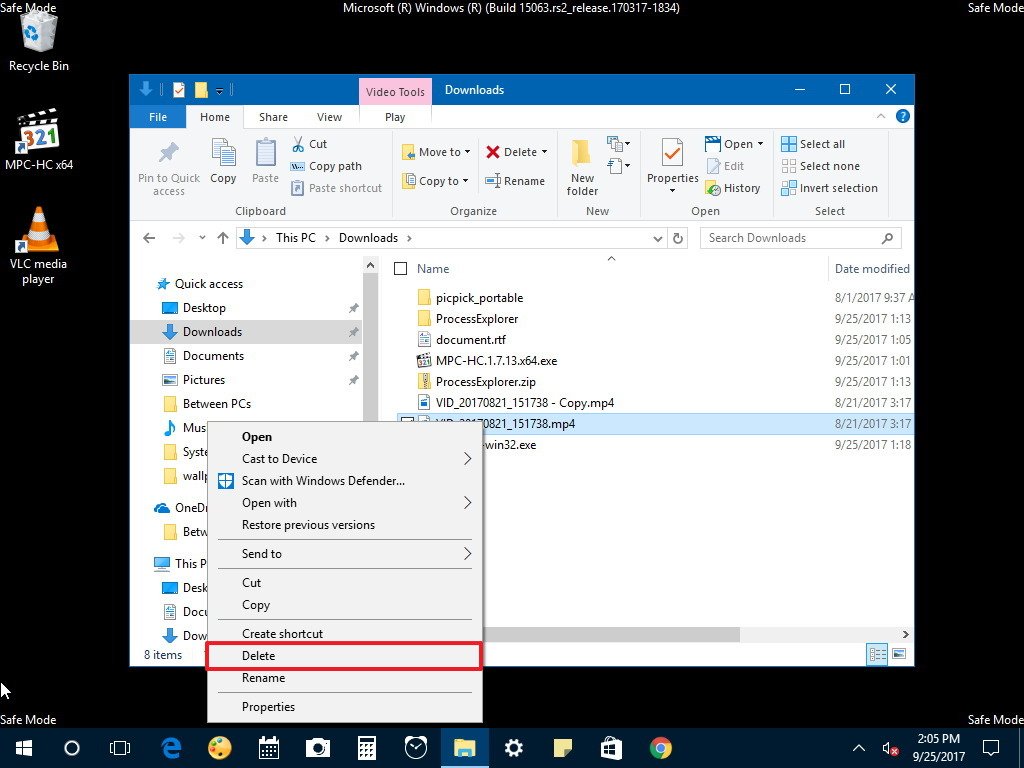
- Behind the search window, in «Process Explorer,» right-click the locked file, and select Close Handle to unlock it.
- Important: If the file is being used by more than one process, repeat the steps to close all handles.
Once you complete these steps, you can go ahead and safely delete or modify the unlocked file.
How to unlock files using Safe Mode
Usually, when you come across a locked file, you can simply restart your device to unlock it. However, if the application has a service that loads during startup, it might keep locking a file as soon as you sign in. You can either disable the app from loading at startup, or you can boot into Safe Mode to unlock and delete the file. Here’s how:
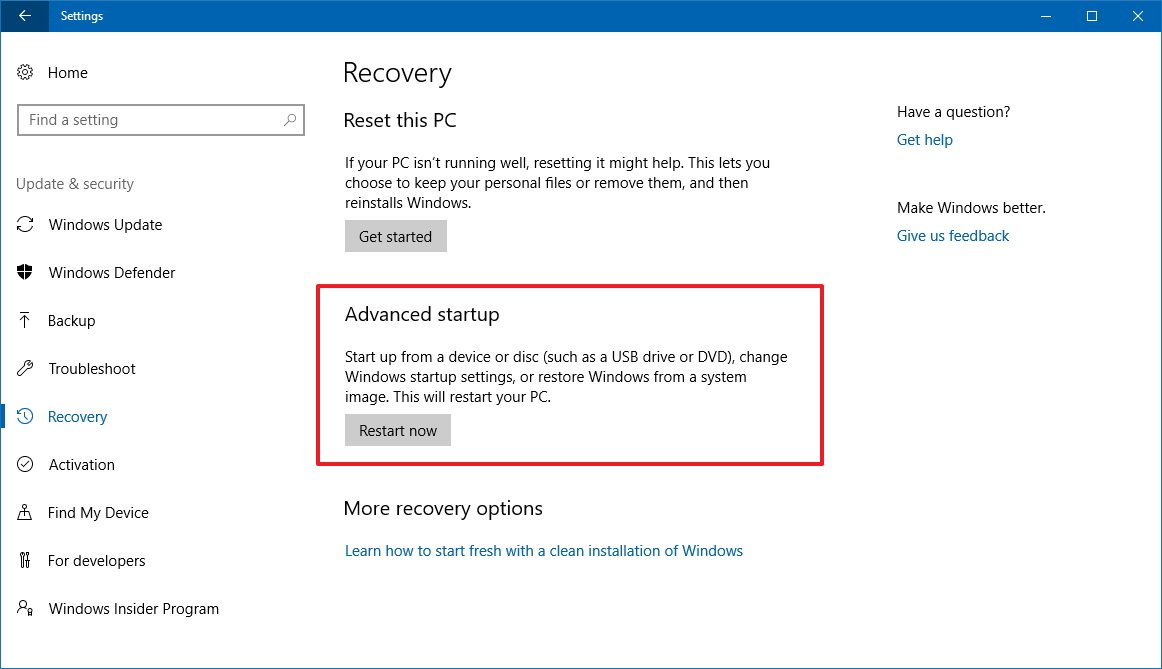
- Open Settings.
- Click on Update & Security.
- Click on Recovery.
- Under «Advanced Startup,» click the Restart now button.
- Click on Troubleshoot.

- Click on Advanced options.

- Click on Startup Settings.
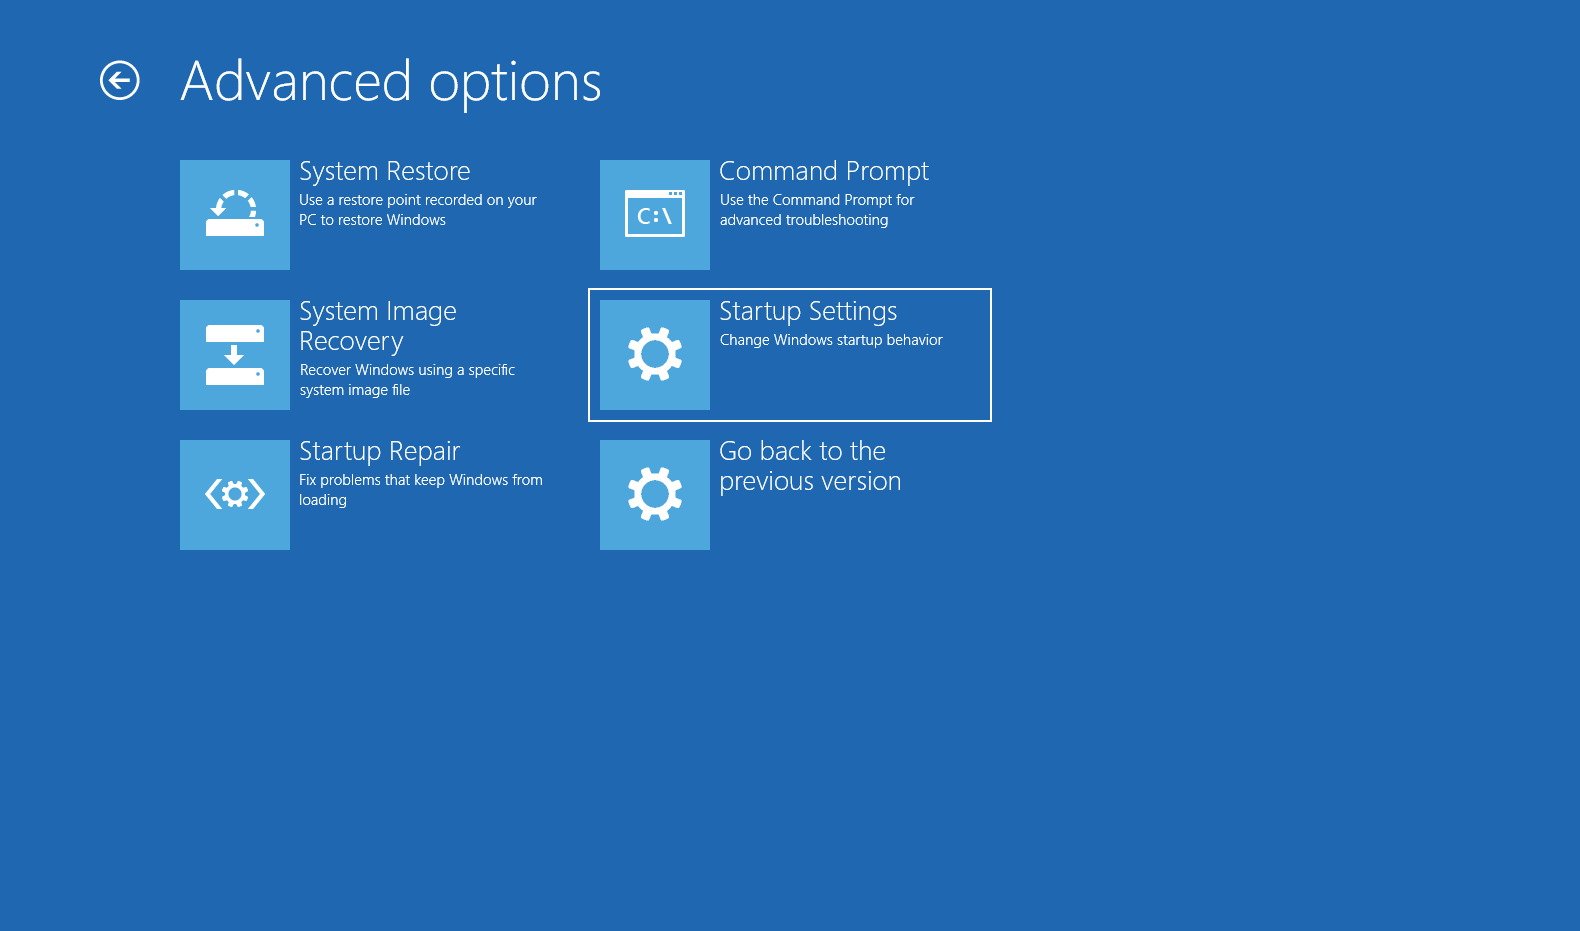
- Click the Restart button.

- On «Startup Settings,» press F4 to enable Safe Mode.
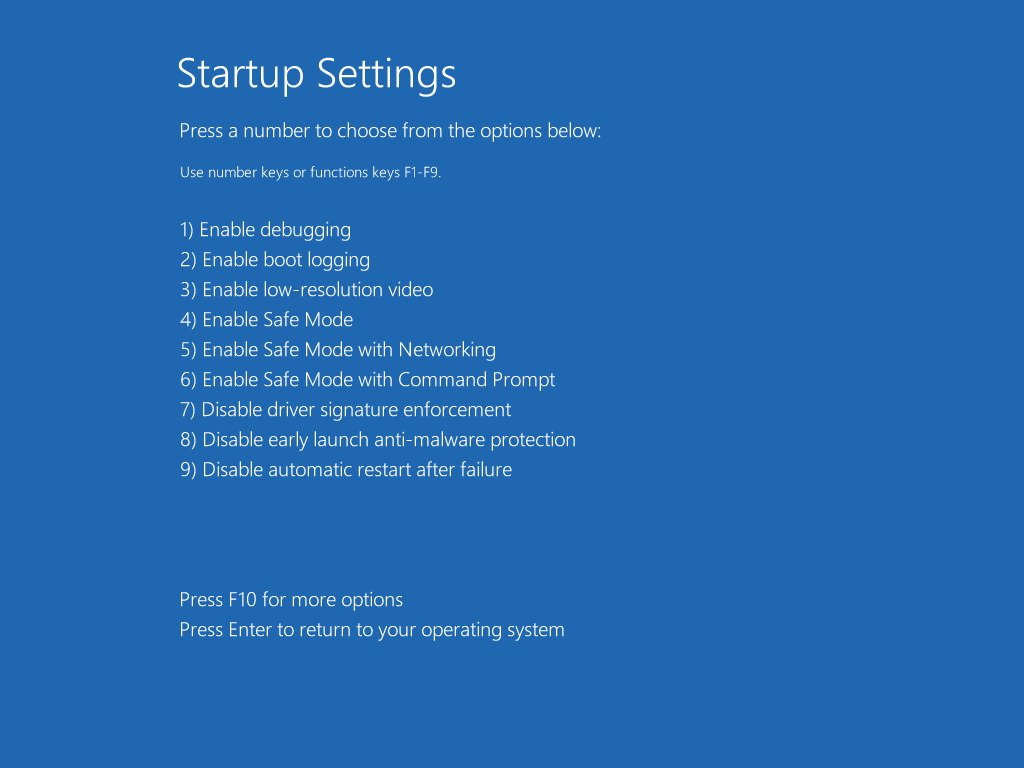
While in Safe Mode, use File Explorer to locate and delete the files that were previously locked, then simply restart your device as you would normally to exit Safe Mode.
All the latest news, reviews, and guides for Windows and Xbox diehards.
Wrapping things up
Although there a number of tools available on the internet designed specifically to deal with locked files, on Windows 10 there is more than one way to remove these type of files without having to get software from unknown sources.
It’s important to note that unlocking and deleting files on Windows 10 may cause system and program issues, depending on the type of files you’re trying to unlock. So be careful of what you delete if you’re not sure of the consequences.
More Windows 10 resources
For more helpful articles, coverage, and answers to common questions about Windows 10, visit the following resources:
- Windows 10 on Windows Central – All you need to know
- Windows 10 help, tips, and tricks
- Windows 10 forums on Windows Central
Mauro Huculak has been a Windows How-To Expert contributor for WindowsCentral.com for nearly a decade and has over 15 years of experience writing comprehensive guides. He also has an IT background and has achieved different professional certifications from Microsoft, Cisco, VMware, and CompTIA. He has been recognized as a Microsoft MVP for many years.
Windows 10 can prevent you from opening files that it considers as a threat. More often than not, ‘.reg’ files. If you want to unblock a blocked file, then you’ve come to the right place.
In this guide we would discuss some easy methods to unblock a file on Windows 10
To fix various Windows 10/11 problems, we recommend Outbyte PC Repair:
This software will repair common computer errors, protect you from file loss, malware damage, hardware failure, and optimise your computer for peak performance. In three simple steps, you can resolve PC issues and remove virus damage:
- Download Outbyte PC Repair Software
- Click Start Scan to detect Windows 10/11 issues that may be causing PC issues.
- Click Repair All to fix issues with your computer’s security and performance.
This month, Outbyte has been downloaded by 23,167 readers.
Disable User Account Control
If you disable UAC, then you’ll never see the warnings of the “open file” again. And the process of doing so is quite easy as well. Of course, you’ll need administrator permissions for this.
-
Type “UAC” in your Windows search bar, and open User Account Control Settings with administrator permissions
-
Drag the bar down to never notify, hit OK

-
User Access Control would be disabled and you can access the locked file.

Again, we do not recommend disabling it as it might decrease your overall computer security. If you want to do it, then do it at your own risk.
Use PowerShell To Unblock a Single File
Once again, you’ll need administrator permissions to perform this.
- Type “PowerShell” in your windows search bar and launch the program with Administrative Rights.
- Copy and paste this command: unblock-file -path “Full path of blocked file”. Proceed to insert the file path of the file that you want to unblock and hit enter


Use PowerShell to Unblock All Files in a Folder
For implementing this method, it would require you to log in as the Administrator.
- Launch Windows PowerShell with admin rights from settings or by searching on windows search.
- Type the following command and press the Enter key: get-childitem “full path of folder” | unblock-file


Unblock a File From Smart Screen
- If your smart screen is blocking the file, right-click on the blocked file of your choice.
- Then, click on properties and on the bottom of the window.
- Finally, click on the tick box which says “Unblock”
Do keep in mind that you’ll need administrator permissions to do that. For that, you don’t necessarily have to be logged in to your administrator account. However, you do need to know the administrator password.
Unblock a File From “Open File”
With “open file”, every time that you open a program which needs to perform changes on your computer, it greets you with a warning. To clarify, it asks you if you want to let that program run.
All you have to do in order to prevent “open file” from coming up every single time that you want to run your programs, is untick the “Always ask before opening this file” box.
This only works for one program at a time. So, if you want to apply this to another program as well, then you’re pretty much forced to repeat the process.
Unless you’re interested in completely turning off UAC which completely disables the “open file” warnings. However, do keep in mind that this is generally not recommended.
Why Would Windows Block a File/Program?
Mostly as a security precaution. It’s no secret that the internet is full of trolls, malware, viruses, scammers, hackers, you name it.
The more that you dwell on untrustworthy websites, the more likely that it is that you’ll experience a file block at least once. Especially if the programs that you’re downloading mess with your system files in any way.