
Джордан, Обновлено: 8 ноября 2024 г.
Жесткий диск является незаменимым компонентом сервера, вам необходим надежный инструмент для создания разделов диска для этого устройства хранения. Есть 2 вида инструментов — Windows встроенное программное обеспечение Disk Management и disk partition. В этой статье описываются возможности Disk Management и недостатки по сравнению с лучшим программным обеспечением disk partition для Server 2008/ 2012/2016 / 2019/2022.
Содержание:
- Встроенный инструмент для разметки диска Server 2008
- Мощный и надежный инструмент для разбиения разделов на серверах
- Преимущества NIUBI Partition Editor
То же самое с другими версиями, Windows Server 2008 имеет встроенную утилиту «Управление дисками». Ее можно использовать для выполнения некоторых базовых операций управления, таких как инициализация нового диска, создание, удаление и форматирование раздела.
Щелкните правой кнопкой мыши по разделу или передней части диска, и вы увидите доступные операции:


По сравнению с предыдущим Server 2003, Windows Server 2008 улучшить способность, добавив новый «Уменьшить объем» и «Увеличить объем» функции, чтобы помочь изменить размер выделенного раздела без потери данных. Однако не все разделы можно сжимать и расширять.
- Поддерживаются только разделы формата NTFS.
- Он может только сжимать раздел слева и создавать нераспределенное пространство справа.
- Расширить раздел можно только в том случае, если справа есть смежное нераспределенное пространство.
Управление дисками не может расширить раздел путем сжатия другого. Он может только сжать раздел NTFS, чтобы создать новый том, или расширить раздел NTFS, удалив смежный раздел с правой стороны.
Помимо изменения размера разделов, Disk Management имеет возможности преобразования базового диска в динамический и преобразования диска между MBR и GPT. Однако он не может конвертировать динамический диск в базовый без потери данных. конвертировать MBR в GPT или GPT в MBR, для этого сначала потребуется удалить все разделы.

Как самое безопасное программное обеспечение для разметки дисков Windows Server 2008 и другие версии, NIUBI Partition Editor имеет виртуальный режим, отмену по желанию, откат за 1 секунду и технологию горячего клонирования для защиты системы и разделов. Помимо базовой возможности создания, удаления, форматирования разделов и изменения буквы диска, он может сжимать, расширять, перемещать и объединять разделы для оптимизации использования пространства без потери данных. Клонируйте раздел диска для резервного копирования или миграции ОС и данных, преобразуйте тип раздела диска и многое другое.
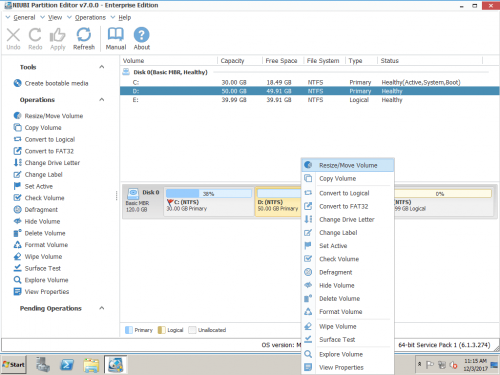
Скачать и справа вы увидите главное окно со структурой разделов диска и другой информацией. Доступные операции перечислены слева и после щелчка правой кнопкой мыши.

Доступные операции для раздела:
- Изменить размер тома (уменьшить и расширить)
- Переместить расположение раздела
- Объединить два смежных тома за 1 шаг
- Оптимизировать файловую систему
- Копировать том в нераспределенное пространство
- Преобразование раздела между логическим и основным
- Конвертировать NTFS в FAT32
- Изменить букву диска (например, D:)
- Изменить метку (добавить или изменить имя раздела)
- Сделать активным
- Проверьте целостность файловой системы
- Дефрагментация для улучшения производительности
- Скрыть из проводника
- Удалить (файлы можно восстановить)
- Формат тома для использования в качестве нового
- Протрите (стереть данные навсегда)
- Тест поверхности (сканирование поврежденных секторов)
- Исследуйте (просмотр файлов / папок с каталогом)
- Посмотреть недвижимость

Доступные операции на весь диск:
- Инициализировать новый диск
- Изменить статус на оффлайн или онлайн
- Установить атрибут только для чтения
- Протрите диск (не может быть восстановлено)
- Тест поверхности
- Посмотреть недвижимость
- Клонировать диск для переноса данных и ОС
- Конвертировать MBR диск в GPT
- Удалите все разделы
- Очистка диска
Преимущества NIUBI Partition Editor
Сравнение с другими инструментами раздела диска для Windows Server 2008/ 2016 / 2019 / 2022, NIUBI Partition Editor намного быстрее и безопаснее благодаря своим уникальным и инновационным технологиям.
1 второй откат
Данные наиболее важны для сервера, но существует риск потери данных при изменении разделов диска, поскольку параметры всех связанных дисков, разделов и файлов должны быть изменены абсолютно правильно. Некоторые программные ошибки или проблемы с оборудованием могут привести к тому, что часть параметров не будет изменена. В этом случае система и разделы будут повреждены. Поэтому очень важно сначала сделать резервную копию и использовать безопасный инструмент для разделов.
Лучше, чем другие инструменты. Если NIUBI Partition Editor обнаруживает любые ошибки при изменении размера разделов, автоматически возвращает сервер в исходное состояние в мгновение ока, как будто ничего не произошло, так что сервер может быть снова подключен к сети в течение короткого времени без повреждений.
Виртуальный режим
Этот инструмент для разбиения диска предназначен для работы в собственном виртуальном режиме. Операции, которые вы делаете, не вступят в силу немедленно. Вместо этого они будут перечислены как ожидающие в левом нижнем углу для предварительного просмотра. Если вы сделали что-то неправильно или передумали, просто нажмите «Отменить», чтобы отменить. Реальный раздел диска не будет изменен, пока вы не нажмете кнопку «Применить» для подтверждения.
Отмена по желанию
Что делать, если вы сделали что-то не так, но модификация началась? Другие инструменты для разметки дисков не позволят отменить текущие операции с самого начала или более чем на 50%, так как отмена приведет к тому, что часть параметров не сможет быть изменена. В этом случае система и раздел будут повреждены.
С помощью Отменить-на-воли Благодаря этой технологии вы можете отменить текущие операции в любой момент без потери данных.
Более быстрое перемещение файлов
При сжатии раздела слева направо или перемещении этого раздела начальная позиция изменяется, поэтому все файлы в этом разделе также будут перемещены в новые места. Это занимает гораздо больше времени, особенно когда в этом разделе находится большое количество файлов. Хороший алгоритм очень помогает сэкономить время. Благодаря уникальному алгоритму перемещения файлов, NIUBI Partition Editor на 30–300 % быстрее других инструментов для работы с разделами диска.
Горячее Resize
Сохранение в сети также важно для сервера, но когда вы модифицируете жесткие диски, некоторые модификации требуют перезагрузки сервера для выполнения. С помощью технологии Hot-Resize, NIUBI Partition Editor имеет меньшую вероятность перезагрузки. Даже если перезагрузка неизбежна, NIUBI можно завершить модификацию гораздо быстрее.
Ожидающие операции с может быть сделано в Windowsи те, с требует перезагрузки.
Благодаря улучшенной защите данных и возможности быстрого изменения размера, полному набору функций и простоте использования, NIUBI Partition Editor это первый выбор, когда вы ищете надежный инструмент для раздела диска для Windows Server 2008, 2003, 2012, 2016, 2019, 2022 и 2025.
Скачать
Обновлено 12 ноября 2024 г. в 3:27| Рекомендуемые
Как переразметить жесткий диск в Windows Server 2008 R2
Размер раздела уже выделен при установке операционной системы или производителями серверов. Но запланированный размер раздела может не соответствовать вашим потребностям через некоторое время. Например, C диск становится полным и свободного места не осталось. Многие спрашивают, можно ли переделать жесткий диск Server 2008 без потери данных. Ответ положительный, если вы используете правильный инструмент.
Для переразметки жесткого диска в Windows Server 2008 r2 есть 2 вида инструментов – собственное Disk Management и стороннее программное обеспечение. Из-за множества ограничений Disk Management не является лучшим. Чтобы защитить вашу систему и данные, вам лучше сделать резервную копию заранее и запустить безопасное программное обеспечение для разметки диска. В этой статье я покажу вам, как переразметить диск для Windows 2008 Server с помощью обоих видов инструментов.
Диск Repartition Server 2008 с управлением дисками
Чтобы открыть Управление дисками, нажмите Windows + R ключи, тип diskmgmt.msc и нажмите Enter.
В консоли управления дисками вы увидите все жесткие диски со структурой разделов, емкостью, используемым пространством и другой информацией о каждом разделе. Щелкните правой кнопкой мыши каждый раздел, и вы увидите доступные параметры. Сокращение объема и Расширение объема используются для перераспределения. В общем, расширение раздела безопасно, но это не безопасно уменьшить перегородку, особенно когда есть изоферменты печени Первичный и логический диски на одном диске.
Чтобы уменьшить размер раздела:
- Щелкните правой кнопкой мыши раздел NTFS и выберите «Сжать том».
- В следующем окне введите размер сжимаемого пространства, все доступное пространство будет использовано по умолчанию.
- Подтвердите и продолжайте.
Чтобы увеличить размер раздела:
- Щелкните правой кнопкой мыши раздел NTFS с смежный Нераспределенное пространство и выберите «Расширить том».
- Просто нажмите Далее во всплывающем окне Мастера расширения тома.
- Выберите доступный диск и нераспределенное пространство в следующем окне.
- Подтвердите и продолжайте.
Ограничения управления дисками для переделки Server 2008 R2:
- Нераспределенное пространство можно сделать только справа при сжатии раздела.
- Он не может сжимать раздел за пределы положения, в котором непоколебимы файлы расположены. Эти типы файлов могут быть файлами подкачки, гибернации и другими большими файлами.
- Поддерживается только раздел NTFS, другой общий раздел FAT32 не может быть уменьшен.
- Он может расширить раздел только тогда, когда справа есть непрерывное незанятое пространство, но он не может создать такое необходимое пространство, сжав другой другой раздел.
Переразметить Windows Server 2008 r2 с помощью безопасного программного обеспечения
С помощью программного обеспечения для разбиения диска вы можете легко переразбить диск Server 2008 без стольких ограничений. Пока на любом диске есть свободное место, вы можете перенести его на другой диск на том же диске. Для этого вам просто нужно перетащить его на карту диска.
Следуйте инструкциям по перераспределению жесткого диска в Windows Server 2008 (R2):
Скачать NIUBI Partition Editor, щелкните правой кнопкой мыши диск, например D :, и нажмите «Изменить размер / переместить объем».
Если во всплывающем окне перетащить оставил граница правота, Нераспределенное пространство сделано налево сторона D. Если перетащить правую границу влево, незанятое пространство будет справа.

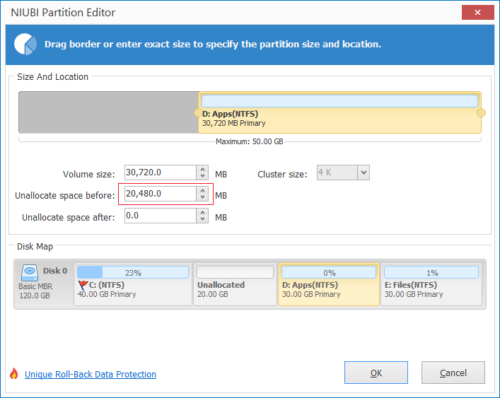
Нажмите OK и обратно в главное окно, ожидающая операция добавляется в нижнем левом углу. Реальный раздел диска не будет изменен, пока не нажмете Применить вступить в силу.
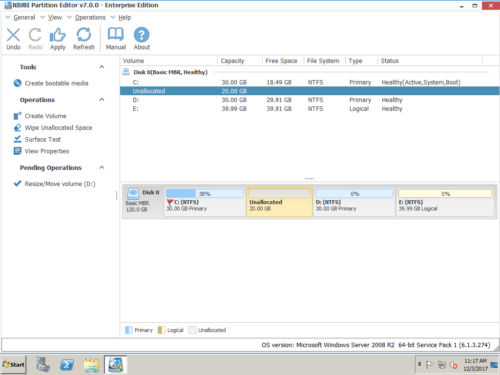
После сжатия раздела вы можете создать новый том с нераспределенным пространством или расширить другой раздел с помощью этого нераспределенного пространства. Если вы хотите расширить диск C, сократите диск D и создайте нераспределенное пространство слева. Затем щелкните правой кнопкой мыши C привод и снова выберите «Изменить размер/Переместить том», во всплывающем окне перетащите правую граница правота чтобы объединить это Нераспределенное пространство.


И C, и D перераспределяются, диск C расширяется за счет добавления части свободного места на диске D.
Наконечник: Если в D недостаточно свободного места, вы можете сжать любой несмежный раздел на том же диске.
Видео гид по перераспределению жесткого диска Server 2008:
Чтобы переразбить жесткий диск в Windows Server 2008/2012/2016/2019/2022, NIUBI Partition Editor рекомендуется многими профессионалами. Потому что он имеет технологии Virtual Mode, 1-Second Rollback, Cancel-at-will и Hot Clone для защиты вашей серверной системы и данных. Он поддерживает все типы аппаратных RAID (например, RAID 0/1/5/10) с любым RAID-контроллером. Поддерживаются VMware/Hyper-V, HDD, SSD, USB-накопители.
Подробнее Скачать
| Previous | Table of Contents | Next |
| Adding New GPT and MBR Disks to Windows Server 2008 R2 Systems | Creating and Managing GPT Disk Partitions on Windows Server 2008 R2 Basic Disks |
<google>BUY_WINSERV_2008R2</google>
The previous chapter looked at the two different disk partition styles (MBR and GPT) supported by Windows Server 2008 R2, and then covered the steps necessary to perform a disk initialization. Once a disk is initialized, the next step is to create the partitions or volumes on the disk and then format them with the appropriate file system type (FAT, FAT32 or NTFS).
In this chapter we will cover the steps required to create partitions and assign drive letters and mount points on a basic disk initialized with the MBR partition style. The next chapter will then cover Extending and Shrinking Windows Server 2008 R2 Partitions and Volumes. For details on performing these tasks on a GPT basic disk read Creating and Managing GPT Disk Partitions on Windows Server 2008 R2 Basic Disks.
Contents
Contents
|
||
Creating Partitions on an MBR Basic Disk
As described in Adding New GPT and MBR Disks to Windows Server 2008 R2 Systems, a basic disk initialized with the MBR partition style can support either four primary partitions or three primary partitions and one extended partition. The extended partition can, in turn, be divided into one or more logical drives.
New volumes are created using the Disk Manager which may be accessed either from the Server Manager or Computer Management tools or from the command prompt using the diskpart tool (covered in the next section). To launch the Server Manager, open the Start menu and click on the Server Manager option, or click on the Server Manager icon in the task bar. Alternatively, launch Computer Management from Start -> All Programs -> Administration Tools -> Computer Management or run compmgmt.csc.
When creating new volumes on an MBR disk the first three volumes created will be configured as primary partitions. The fourth partition created will be configured as an extended partition within which the first logical drive will be created to match the size requested for the fourth volume. Any available space left in the extended partition after the first logical drive has been created will be marked as Free Space and may be used to create additional logical drives within the extended partition.
To begin the partitioning process right click on the Unallocated or Free Space area of the appropriate drive in the graphical section of Drive Manager screen and select New Simple Volume…. This will launch the New Simple Volume Wizard. Click Next on the initial screen to proceed to the Specify Volume Size screen as illustrated below:
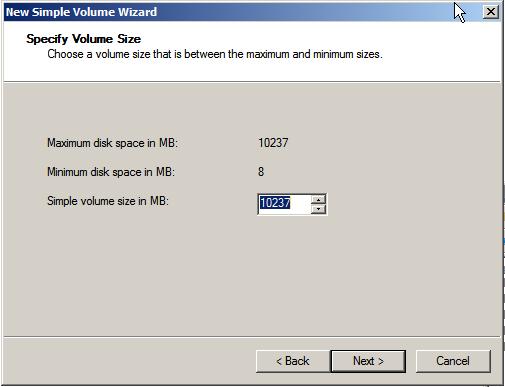
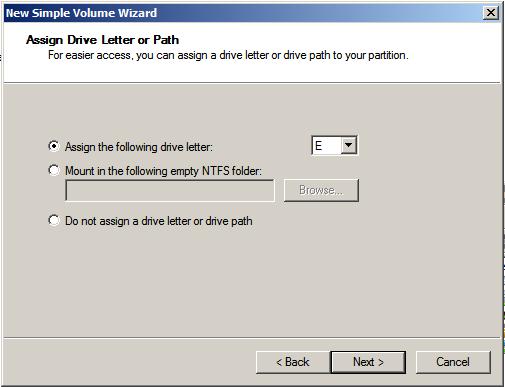
On this screen enter the size of the volume to be created. The screen shows the maximum and minimum allowed sizes. If you only need one partition, use the maximum amount available. Once the size has been defined, click Next to configure the drive letter or mount point. By default, the wizard will allocate the next available drive letter to the new volume. If this is not acceptable however, select another drive letter from the drop down list. Alternatively, to have the volume mounted in an empty folder use the Browse button to locate or create a suitable empty folder on the file system via which the new volume will be accessible. The wizard also provides the option to leave the new volume unassigned at this point. Note that these settings may be changed at any time by right clicking on the volume in graphical view and selecting Change Drive Letter and Paths from the popup menu. The Assign and Drive Letter or Path screen is shown below:
Click the Next button to proceed to the Format Partition screen. On this screen two choices are available in terms of the type of file system to be created on the new volume, namely FAT, FAT32 and NTFS. FAT file systems are limited to 4GB in size and a maximum file size limit of 2GB. FAT32 file systems have a maximum volume size of 32GB with a file size limit of 4GB. NTFS volumes can be up to 2TB on an MBR disk and 18 Exabytes (EB) on GPT disks. NTFS is recommended unless FAT32 is specifically required. FAT32, for example, does not support many of the file system security or compression features inherent in NTFS. In addition, the disk management tools can be used to shrink the size of NTFS partitions, but not FAT or FAT32 partitions.
<google>WIN28BOX</google>
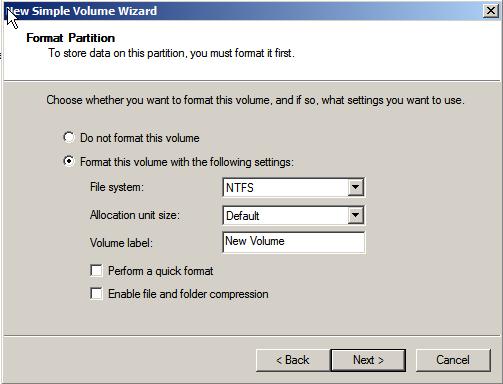
The Allocation unit size value specifies the file system cluster size. In general the default setting for this value is the preferable choice, although a smaller value may be useful in situations where the volume is intended to store large quantities of small files. In the Volume label field enter a suitable volume name.
If selected, the Quick Format option will cause the format to be performed without any error checking. The Enable file and folder compression option dictates whether the data stored in the volume is to be compressed to maximize use of space. This option is only available for NTFS volumes and has some inherent disk performance issues associated with the compressed and subsequent decompression of data.
Click on the Next button to proceed to the summary screen. Assuming the settings are satisfactory, click on Finish to begin the formatting process. The wizard will close and the disk in the graphical display will show the new volume as a primary volume and show the progress of the formatting process.
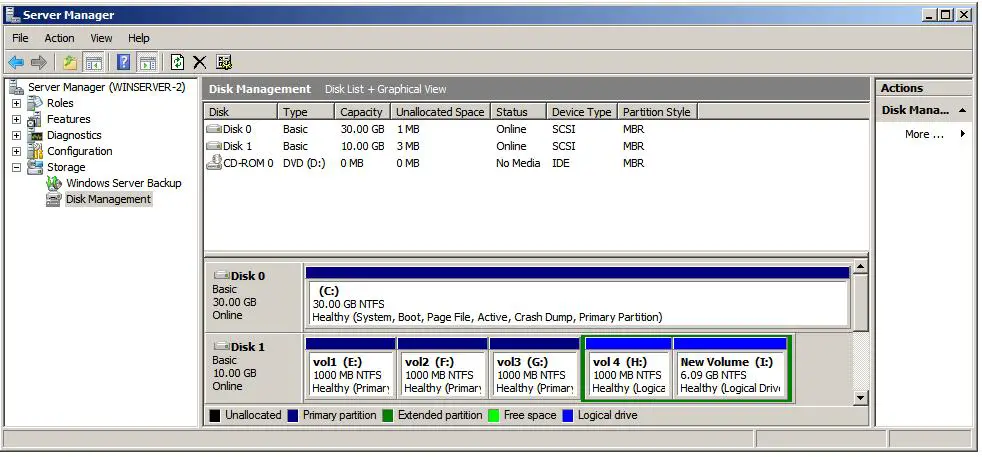
Once the process is completed the disk will be ready for use. To create additional volumes, repeat the above steps. When the fourth volume is created the wizard will create it as an extended volume and all subsequent volumes will be created as logical drives within the extended partition. For example, the following figure shows Disk 1 with three primary partitions (E, F and G) and one extended partition containing two logical drives (H and I):
Formatting a Volume using Disk Management
During the volume creation process outlined in the preceding sections of this chapter it was mentioned that a new partition on a disk drive may be created without formatting it for a particular file system. This is known as a raw partition and will be listed in the disk manager as having a RAW file system type.
Before the volume can be used it must be formatted. This can be achieved using either the Disk Management interface or from the command line using the diskpart tool. To perform the format from Disk Management simply select the desired volume from the graphical display, right click and select Format…. The format dialog will appear requesting the file system type, volume name, allocation unit size and volume label. Options to perform a quick format (which does not perform an error check) and enable disk compression (for NTFS file systems only) are also provided.
Once the desired settings are selected, initiate the format simply by clicking on OK and then respond affirmatively to the warning dialog.
Formatting a Volume from the Command Line
Windows Server 2008 R2 provides the ability to format volumes from the command line using the diskpart tool. This can be invoked by entering diskpart either at the command prompt or in a Run dialog. Once started, diskpart presents a DISKPART> prompt at which commands can be entered.
The first step is to identify the disks on the system. This information is obtained using the list disk command:
DISKPART> list disk
  Disk ###  Status      Size     Free     Dyn  Gpt
  --------  ----------  -------  -------  ---  ---
  Disk 0    Online        30 GB      0 B
  Disk 1    Online        10 GB      0 B
For the purposes of this tutorial we will be working on a partition on disk 1. To select the required disk use the select disk command:
DISKPART> select disk 1
Disk 1 is now the selected disk.
Having selected the disk, the next step is to select the partition which is to be formatted. To obtain a list of partitions on the selected disk the list partition command is used:
DISKPART> list partition
  Partition ###  Type              Size     Offset
  -------------  ----------------  -------  -------
  Partition 1    Primary           1000 MB  1024 KB
  Partition 2    Primary           1000 MB  1001 MB
  Partition 3    Primary            998 MB  2001 MB
  Partition 0    Extended          7238 MB  3001 MB
  Partition 4    Logical           1000 MB  3002 MB
  Partition 5    Logical           6236 MB  4003 MB
For this example we are going to format partition 3 so need to select this partition using the select partition command:
DISKPART> select partition 3
Partition 3 is now the selected partition.
After making the appropriate selections we are now ready to format the chosen partition. As with formatting through the Disk Management interface, a number of options are available. In the first instance the type of file system required must be specified using the fs= directive. Acceptable options include FAT, FAT32 or NTFS. Alternatively, simply use recommended to format using the recommended file system. The label= directive allows a volume label to be specified. When using this directive, the label name should be encapsulated in double quotes («).
In addition, the quick directive may be used to perform a quick format where the disk is not checked for errors and compress may be used with an NTFS format to enable file and folder compression.
The following example performs a quick format of the currently selected partition as NTFS with a volume label of «My Volume»:
DISKPART> format fs=ntfs label="My Volume" quick
  100 percent completed
DiskPart successfully formatted the volume.
Assigning and Changing Drive Letters and Mount Points
As with the choice to perform a format during the partition creation phase, the Disk Management snap-in also provides the option to assign drive letters or mount point paths at a later time. If you chose to defer these settings they can be assigned at any time after the creation of the partition.
To assign or change a drive letter or mount point simply open the Disk Management interface, right click on the required volume in the graphical view and select Change Drive Letter and Paths… from the popup menu. In the resulting dialog configure the drive letter or mount point accordingly.
Assigning and Changing Drive Letters and Mount Points from the Command Line
In order to assign or change a drive letter or mount point for a partition using the command line begin by invoking diskpart from the command prompt or Run dialog.
The first step is to identify the disks on the system. This information is obtained using the list disk command:
DISKPART> list disk
  Disk ###  Status      Size     Free     Dyn  Gpt
  --------  ----------  -------  -------  ---  ---
  Disk 0    Online        30 GB      0 B
  Disk 1    Online        10 GB      0 B
To select the required disk use the select disk command:
DISKPART> select disk 1
Disk 1 is now the selected disk.
Having selected the disk the next step is to select the partition to which a drive letter or mount point is to be assigned. To obtain a list of partitions on the selected disk, use the list partition command as follows:
DISKPART> list partition
  Partition ###  Type              Size     Offset
  -------------  ----------------  -------  -------
  Partition 1    Primary           1000 MB  1024 KB
  Partition 2    Primary           1000 MB  1001 MB
  Partition 3    Primary            998 MB  2001 MB
  Partition 0    Extended          7238 MB  3001 MB
  Partition 4    Logical           1000 MB  3002 MB
  Partition 5    Logical           6236 MB  4003 MB
For this example we are going to work with partition 3 so we need to select this partition using the select partition command:
DISKPART> select partition 3
Partition 3 is now the selected partition.
Finally, the drive letter or mount point can be assigned. To assign a drive letter to the currently selected partition:
DISKPART> assign letter L:
DiskPart successfully assigned the drive letter or mount point.
Similarly, assign a mount point as follows (note that the designated mount folder must already exist and be empty):
DISKPART> assign mount=\bigvol
DiskPart successfully assigned the drive letter or mount point.
<google>BUY_WINSERV_2008R2_BOTTOM</google>
Summary
This guide introduces disk management in Windows Server 2008 R2, detailing how to perform essential tasks such as creating partitions, extending or shrinking volumes, formatting disks, and converting disks to GPT. Additionally, we explore the use of **IM-Magic Partition Resizer Server** for scenarios where the built-in Disk Management tool is insufficient.
Table of Contents
- 1. Creating a Partition
- 2. Deleting a Volume
- 3. Extending a Volume
- 4. Shrinking a Volume
- 5. Formatting a Volume
- 6. Converting a Disk to GPT
- 7. Using IM-Magic Partition Resizer Server
Here is a brief comparison table between disk management and Partition Resizer.
| Disk Management | Partition Resizer Server | |
| Shrink fat32 partition | NO | |
| Extend fat32 partition | YES when unallocated space at right side | |
| Extend fat32 C drive | NO | |
| Clone disk/partition | NO | |
| Convert logical to primary | ||
| Convert basic dynamic | ||
| Convert mbr gpt | data loss | no data loss |
| Extend ntfs C drive | YES when right unallocated space is available | |
| Delete/move recovery partition | NO | |
| Move unallocated space or partition | NO | |
| Download Win Server (Free Demo) |
1. Creating a Partition
To create a new partition in Windows Server 2008 R2, follow these steps:
- Open **Disk Management** from the Server Manager or by typing `diskmgmt.msc` in the Run dialog.
- Right-click on the unallocated space on a disk and choose **New Simple Volume**.
- Follow the wizard to assign a drive letter, format the volume, and finalize the partition.
Note: Creating a new volume is based on unallocated space on the disk, if there is no unallocated space, you need to shrink a large volume, or delete a volume.
2. Deleting a Volume
To delete an existing volume:
- Open **Disk Management** and locate the volume you wish to delete.
- Right-click on the volume and select **Delete Volume**.
- Confirm the action.
Note: Ensure you back up data before deletion, as it will be permanently lost. IM-Magic Partition Resizer can help manage disk spaces without losing data, or help clone a disk or partition for backup.
3. Extending a Volume
Extend an existing volume to utilize unallocated space:
- In **Disk Management**, right-click on the volume you wish to extend.
- Select **Extend Volume** from the context menu.
- Use the Extend Volume Wizard to add unallocated space to the selected volume.
Note: The unallocated space must be contiguous to the volume you want to extend. And it must be NTFS file system. Disk Management cannot help extend a volume when
- The c drive is not NTFS file system
- The c drive has no adjacent unallocated space, or any drive that has no adjacent unallocated space
- It cannot help move partition or unallocated space
All the above failure can be fixed by using the tool IM-Magic Partition Resizer Server that can help resize partitions without losing data.
4. Shrinking a Volume
To shrink an existing volume and create unallocated space:
- Right-click on the volume in **Disk Management** and select **Shrink Volume**.
- Specify the amount of space to shrink and click **Shrink**.
- This process will create unallocated space without affecting the remaining data.
If the shrinking volume is not working on Disk Management, try IM-Magic Partition Resizer Server that can safely help shrink a volume without losing data.
5. Formatting a Volume
To format a volume:
- Right-click on the desired volume in **Disk Management**.
- Choose **Format** and set options like the file system (NTFS, FAT32, etc.).
- Confirm and proceed to format the volume. Be aware that formatting erases all data on the volume.
6. Converting a Disk to GPT
To convert a disk to GPT:
- Ensure the disk is empty. Backup any important data, as the conversion process will erase all data.
- Right-click on the disk in **Disk Management** and choose **Convert to GPT Disk**.
- If the option is grayed out, delete all partitions first and retry.
Note: Disk Management can only convert disk GPT when the disk has removed all its partitions while IM-Magic Partition Resizer Server can help convert disk to GPT without losing data.
Also read: how to convert disk gpt
7. Using IM-Magic Partition Resizer Server
When Windows Server 2008 R2 Disk Management cannot perform specific tasks, or when it encounters limitations such as:
- Unable to extend a volume due to non-contiguous unallocated space.
- Risk of data loss during partition management.
- Inability to perform certain advanced resizing or conversion operations.
Consider using **IM-Magic Partition Resizer Server**. This third-party tool offers more flexibility and safety for managing partitions.
Video Tutorial to Resize Partitions with Partition Tool
Here’s how to use it:
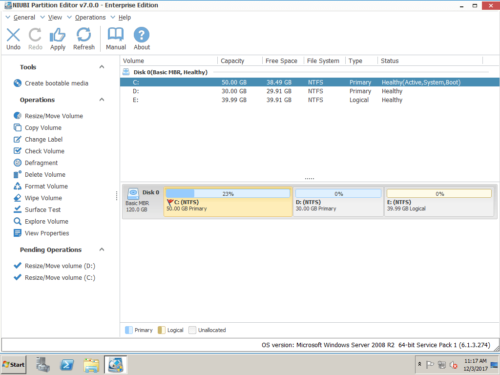
- Download and Install: Download the tool from the official website and install it on your server.
- Launch the Application: Open the program and view all connected disks and partitions.
- Resize Partitions: Right-click on a partition and select options like **Resize/Move**, **Extend**, or **Shrink**.
- Move Unallocated Space: Drag and drop to move unallocated space next to the volume you wish to extend.
- Apply Changes: Click **Apply** to finalize all changes without data loss.
IM-Magic Partition Resizer also supports converting between NTFS and FAT32, creating partitions, and merging volumes seamlessly. It is an excellent alternative when Disk Management cannot meet your requirements.
Features of IM-Magic Partition Resizer
- Clone disks or partitions
- Migrate OS from smaller to larger HDD/SSD
- Resize partitions without data loss
- Convert GPT disks without losing data
- Convert NTFS to FAT32 without data loss
- Change a logical drive to primary
- Move partitions safely
- Extend volumes without losing data
- 100% data and OS safety
- Rollback protection against unexpected power surges
Download: IM-Magic Partition Resizer Server Edition.
Авторизация
Логин или эл. почта:
Пароль:
Запомнить меня
Напомнить пароль
Регистрация
OnlyPRO
Для работы со всеми дисками которые подключены к системе необходимо открыть Диспечер сервера — Хранилище — Управление дисками.
Открывая меню каждого диска (нажатием правой кнопки на соответствующем диске) можно делать следующие операции с дисками: Форматировать, Изменить букву или путь к диску, Расширить том и другие.

- Работа с дисками,
- windows
-
0
- 08 апреля 2013, 11:39
- admin
x
Похожие топики:
Автоматическое расширение тома С: для Windows систем.
0
GreatAlex
→
HowTo
Как очистить диск С: на Windows
0
GreatAlex
→
HowTo
Подключаемся к Windows серверу по RDP с Android и iPhone
0
Alexandr
→
Блог им. Alexandr
Установить сервер терминалов на Windows Server
0
GreatAlex
→
HowTo
Защита Windows сервера до установки обновления MS17-010
0
apereshein
→
OnlyPRO
Не показывать никогда это окно
Комментарии (0)
RSS
свернуть /
развернуть
Только зарегистрированные и авторизованные пользователи могут оставлять комментарии.