
Raspberry Pi Board Support Package for Windows 10
Welcome to the Raspberry Pi Board Support Package (BSP) for Windows 10
This repository contains BSP components for the Raspberry Pi 2, 3 and Compute Modules running 32-bit Windows 10 IoT Core (version 1809).
It also contains BSP components for the Raspberry Pi 2 (v1.2), 3, 4 and corresponding Compute Modules running 64-bit Windows 10.
This BSP repository is under community support; it is not actively maintained by Microsoft.
For Raspberry Pi 4 onwards, it’s designed for use with Windows 10 version 2004 and later, because of use of newer driver frameworks which are not available on earlier releases.
64-bit firmware
For the Raspberry Pi 4, firmware from the Pi Firmware Task Force is used, which provides UEFI and ACPI support. It is available at https://github.com/pftf/RPi4/releases.
For the Raspberry Pi 2 (v1.2) and Raspberry Pi 3, the Pi Firmware Task Force provides firmware at https://github.com/pftf/RPi3/releases, which provides UEFI and ACPI support.
32-bit firmware
Sample binaries of the firmware is included in RPi.BootFirmware to enable quick prototyping. The sources for these binaries are listed below.
- Firmware binaries : RaspberryPi/Firmware
- UEFI Sources : RPi/UEFI
32-bit EFI Customisations
Note: this section is only applicable to 32-bit Windows 10 IoT Core on Raspberry Pi 3 and earlier.
SMBIOS requirements of Windows 10 IoT Core OEM Licensing requires a custom version of kernel.img file with the proper SMBIOS values.
See PlatformSmbiosDxe.c to update the SMBIOS data. Steps to build the kernel.img is provided in the RPi/UEFI Github.
Build the drivers
- Clone https://github.com/raspberrypi/windows-drivers
- Open Visual Studio with Administrator privileges
- In Visual Studio: File -> Open -> Project/Solution -> Select
windows-drivers\build\bcm2836\buildbcm2836.sln - Set your build configuration (Release or Debug)
- Build -> Build Solution
The resulting driver binaries will be located in the windows-drivers\build\bcm2836\ARM\Output folder, or windows-drivers\build\bcm2836\ARM64\Output if you picked an Arm 64-bit configuration.
Export the bsp
Note: this section is only applicable to Windows 10 IoT Core.
We provide a binexport.ps1 script to scrape the BSP components together into a zip file for easy use with the IoT ADK AddonKit.
- Open Powershell
- Navigate to rpi-iotcore\tools
- Run
binexport.ps1with the appropriate arguments..\binexport.ps1 C:\Release (or) .\binexport.ps1 C:\Release -IsDebug # for debug binaries
- The script will generate a zip file RPi_BSP_xx.zip that can be imported into the IoT-ADK-Addonkit shell using Import-IoTBSP.
Import-IoTBSP RPi C:\Temp\RPi_BSP_xx.zip
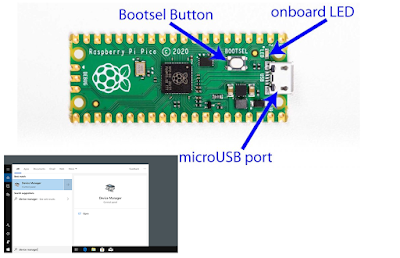
For Raspberry Pi Pico W, you need to install Driver for Windows 10 operating system. When you connect the Raspberry Pi Pico W to your computer, the Port will appear as RP2 Boot in the COM&LPT menu and is unusable. To use Raspberry Pi Pico W, you need to download the driver from https://zadig.akeo.ie/.
https://github.com/pbatard/libwdi/releases/download/v1.5.0/zadig-2.8.exe
To download the current version, go to the zadig website.
Zadig settings should be as on the screen.


First Run Pi Pico W for MicroPython
Download the Firmware Releases v1.20.0 (2023-04-26) .uf2 [Release notes] (latest) file from https://micropython.org/download/RPI_PICO_W/. Download direkt link: https://micropython.org/resources/firmware/RPI_PICO_W-20230426-v1.20.0.uf2
Then drag and drop this file into the Pico W’s USB flash drive.
After this process, Pico W will be seen as a USB Serial Device.
Now open Serial Terminal and type the following codes in order. You will see your Pico’s LED blinking.
from machine import Pin
from utime import sleep
pin = Pin(«LED», Pin.OUT)
print(«LED starts flashing…»)
while True:
pin.toggle()
sleep(1) # sleep 1sec
This article provides a detailed guide on how to install and run Windows on a Raspberry Pi 5. Due to the ARM architecture of the Raspberry Pi, installing a full Windows OS requires specific tools and techniques. This guide will teach you the step-by-step process, the necessary components, and tips to enhance performance. While there are limitations, this project allows you to explore Windows functionality on your compact Raspberry Pi device.
Introduction to Windows on Raspberry Pi 5
Running Windows on a Raspberry Pi 5 has become an interesting project for tech enthusiasts and developers. While the Raspberry Pi was initially designed to run lightweight, Linux-based operating systems, it’s possible to install a full version of Windows on ARM using third-party tools. The primary motivation for running Windows on a Raspberry Pi is to access Windows applications, explore Windows settings, or create a familiar environment for development. While not officially supported, the Raspberry Pi community has developed tools to make it possible. This article will explain how to set up Windows on the Raspberry Pi 5 and maximize its capabilities, even within the constraints of the ARM-based architecture.
Why Windows on ARM?
Windows on ARM (WoA) is designed for devices with ARM architecture, which includes smartphones, tablets, and some laptops. The Raspberry Pi’s ARM architecture aligns with this, making it possible to use Windows on the device, even though Microsoft has not officially supported a version for Raspberry Pi. ARM-based Windows versions are optimized for battery life and lightweight performance, but they have limitations, such as limited app compatibility. Running Windows on the Raspberry Pi 5 is ideal for lightweight tasks and basic Windows apps that are ARM-compatible. Although it won’t replace a PC, it can run simple applications and perform certain tasks effectively on a budget.
Components and Requirements
To run Windows on the Raspberry Pi 5, you’ll need a few components:
- Raspberry Pi 5 (preferably 4GB or 8GB RAM)
- MicroSD Card (32GB or larger) or an SSD for better performance
- WoR (Windows on Raspberry) Installer: A tool that facilitates Windows installation on Raspberry Pi
- Windows 10/11 ARM Image: Obtainable through UUPDump, which provides ARM-based Windows builds
- USB keyboard, mouse, and HDMI monitor for initial setup
- Official Raspberry Pi power supply for stable power
Make sure you have all these items to avoid interruptions during installation. The microSD card or SSD will serve as your primary drive for Windows, and an SSD is recommended for faster performance.
Preparing the Windows Image with UUPDump
To install Windows on ARM, you need a compatible image. Visit UUPDump, a tool that allows you to download Windows builds for ARM devices:
- Go to UUPDump and select a Windows 10/11 ARM64 version.
- Choose the latest stable build, as newer builds may have fewer bugs and improved compatibility.
- Follow the UUPDump instructions to download and compile the Windows image as an ISO file on your PC.
- Once downloaded, extract the ISO file to prepare it for the WoR installer.
Having the correct image ensures compatibility with the ARM-based Raspberry Pi 5 and minimizes potential issues during installation.
Setting Up the WoR Installer
The Windows on Raspberry (WoR) installer simplifies installing Windows on a Raspberry Pi. Here’s how to set it up:
- Download the WoR Installer from the official website.
- Run the installer on a Windows PC to prepare the microSD card or SSD.
- Insert your microSD card or SSD into your PC and launch the WoR Installer.
- Select the Windows Image you prepared earlier.
- Choose the microSD card or SSD as the target drive and follow the prompts to complete setup.
The WoR installer will guide you through the process, including driver selection and partitioning, to prepare the storage device for booting Windows on your Raspberry Pi.
Creating a Bootable SD Card or SSD
The WoR Installer will help create a bootable drive. Here’s how to complete the process:
- Select the Windows 10/11 ARM Image in the WoR Installer.
- Choose the Storage Device (microSD card or SSD) as the installation target.
- Configure the driver options to ensure compatibility with the Raspberry Pi 5.
- Finalize the installation process, and let the WoR installer create the bootable drive.
Using an SSD instead of an SD card can greatly improve performance. Make sure to use high-quality storage devices to avoid potential slowdowns or issues when running Windows on the Raspberry Pi.
Installing Windows on the Raspberry Pi 5
After creating the bootable drive, it’s time to install Windows on your Raspberry Pi 5:
- Insert the bootable microSD card or SSD into the Raspberry Pi.
- Connect a keyboard, mouse, and monitor to the Raspberry Pi.
- Power on the Raspberry Pi and follow the initial Windows installation prompts.
- Complete the setup by selecting your language, region, and network preferences.
Windows installation on the Raspberry Pi will take a few minutes. Once installed, the system will restart, and you’ll see the familiar Windows desktop interface. You can now begin customizing the settings and installing applications.
Configuring Essential Windows Settings
After installation, you’ll want to optimize Windows settings for performance on the Raspberry Pi:
- Display Settings: Go to Settings > Display and adjust the resolution to fit your monitor.
- Performance Settings: Under System > Performance, select “Adjust for best performance” to reduce animations.
- Privacy Settings: Disable background apps in Settings > Privacy > Background apps to save resources.
Making these adjustments will help Windows run more smoothly on the limited hardware of the Raspberry Pi 5. This step is essential for improving responsiveness and reducing lag.
Updating Drivers for Optimal Performance
Having the right drivers is crucial to ensure that all hardware components work effectively. The WoR installer will automatically install most drivers, but you may need to update a few:
- Graphics Driver: Visit the Windows Device Manager and ensure that the graphics driver
- is up to date.
- Sound and Network Drivers: These are often provided in WoR, but check for updates to ensure compatibility.
- System Updates: Regularly update Windows to keep drivers current and optimize system performance.
Ensuring that all drivers are up to date will minimize crashes and improve stability when using Windows on Raspberry Pi.
Running Windows Applications on Raspberry Pi 5
Running x86 applications on an ARM-based Windows is challenging, but there are a few workarounds:
- Microsoft Store: Access ARM-compatible applications from the Microsoft Store.
- Emulation: Use QEMU or Box86 for x86 application emulation, although performance may be slow.
- Windows Subsystem for Linux (WSL): Run Linux applications within Windows for greater versatility.
While some Windows applications may not be compatible, these methods allow you to run essential software on your Raspberry Pi.
Using Remote Desktop for Windows Applications
If your Raspberry Pi struggles with certain applications, consider using Remote Desktop Protocol (RDP):
- Set up RDP on a Windows PC.
- Use your Raspberry Pi to connect to the Windows PC via Remote Desktop.
- Run Windows applications on the PC and control them from your Raspberry Pi.
This setup leverages the power of your main PC, allowing you to access x86 applications and more demanding software on the Raspberry Pi.
Using Windows 10 IoT Core as an Alternative
If running a full version of Windows proves challenging, Windows 10 IoT Core is an alternative:
- Download Windows 10 IoT Core from Microsoft’s website.
- Install it on your Raspberry Pi using an SD card.
- Although limited, Windows 10 IoT Core can run basic Universal Windows Platform (UWP) applications.
While IoT Core lacks the full Windows experience, it offers a lightweight option for running Windows on the Raspberry Pi 5.
Optimizing Performance on Windows
To improve performance, consider these tips:
- SSD vs. SD Card: Using an SSD improves read/write speeds significantly.
- Disable Background Apps: Turn off unnecessary services and background applications.
- RAM Management: Use tools like Task Manager to monitor and manage memory usage.
These optimizations help make Windows on Raspberry Pi more responsive and reduce lag.
Troubleshooting Common Issues
Common issues and solutions:
- Slow Performance: Use an SSD and reduce background services.
- Driver Issues: Reinstall drivers or update through Device Manager.
- Network Problems: Check network drivers and settings.
For other issues, consult the WoR Project community forums.
Running Windows on the Raspberry Pi 5 is feasible and opens new possibilities for using Windows applications on a small, affordable platform. Though limited in performance, this setup allows you to explore and experiment with Windows on ARM. It’s a great project for anyone interested in learning about the ARM architecture and running Windows in a resource-constrained environment.
Future Prospects and Expansions
Looking ahead, the Raspberry Pi community is continuously improving support for Windows on ARM. Future updates to Windows ARM and new development tools may offer enhanced performance and compatibility. For now, this project remains an innovative way to use Windows on Raspberry Pi, expanding its potential uses.
Before you proceed to download the software below, see our official installation guide.
Chances are that you’re coming from an outdated tutorial, so it’s recommended to follow the guide above to prevent any issues with the installation.
Windows on Raspberry imager
Download version 2.3.1
See the changelog
Customization options
Requirements:
- a computer with Windows 10 version 1703 or later. (Wine is not supported — see the PE-based installer for other OSes)
- a Raspberry Pi 2 rev 1.2, 3, 4 or 400. (minimum RAM requirement is 1 GB, but it will generally result in poor performance, especially on boards older than Raspberry Pi 4)
-
a good/reliable drive that has at least 8 GB of available space. It can be:
- an SD card (A1 rating is highly recommended; non-A1 rated cards may be too slow)
- an USB device (preferably SSD, or any drive that has decent random I/O speeds).
A slow drive can also cause other issues, besides being a bottleneck.
- a Windows 10 ARM64 build 19041 or newer image (up to Windows 11 version 2022 / build 22621): WIM/ESD, ISO or FFU
Windows on Raspberry PE-based installer
This is not a straightforward wizard tool like the Windows-only imager, so please follow the appropriate guide for it: How to install from other OSes.
Download package version 1.1.0
See the changelog
Customization options
Requirements:
Same as for the Windows-only version, with some exceptions:
- no specific OS required, as long as the tools needed to create the PE-based installer are available or can be compiled for it.
- the Windows ARM64 image can only have the ISO format. The reason for this is that some required files from the ISO cannot be found in the WIM/ESD.
- storage-wise, you need either:
- a drive that has at least 32 GB, for self-installation
- a drive that has at least 8 GB for the installation media, and another destination drive that has at least 16 GB for the OS (e.g.: an USB drive and an SD card)
Boot partition mount utility
Easily mount the boot partition of your Windows on Raspberry installation. Works directly on the Raspberry Pi or another computer.
Download version 1.1.0
PiMon
A simple hardware monitor for your Raspberry Pi running Windows. (https://github.com/driver1998/PiMon)
Download the latest version
See the changelog
Windows images
See the Getting Windows Images guide.
What about FFU images?
FFU images can speed up the deployment process significantly, especially on slow devices. They are not available for download due to legal reasons, but you can safely generate them yourself: How to generate FFU images?
При подключении Raspberry Pi Pico к Windows 7 x64 в диспетчере устройство появляется устройство RP2 Boot
Устройство в диспетчере себя объявляет как:
RP2 Boot
USB\VID_2E8A&PID_0003&REV_0100&MI_01
USB\VID_2E8A&PID_0003&MI_01\6&22BBAD76&0&0001
Никакой другой полезной информации от самого устройства нет.
Драйвер для устройства по-умолчанию в системе отсутствует, на просторах интернета рабочее решение найти не удалось. Максимум что выяснил что это Serial адаптер, использующий файл драйвера usbser.sys, который изначально присутствует в системе, и сейчас есть в папке: C:\Windows\System32\drivers
Выяснил что можно использовать inf-файл от ATMEL, Inc.
Скачал с гитхаба по этой ссылке: https://github.com/tewarid/atmel-usb-cdc-virtual-c…
Добавил строки:
[DeviceList]
%PI_CDC_PICO%=DriverInstall, USB\VID_2E8A&PID_0005&MI_00
[DeviceList.NTAMD64]
%PI_CDC_PICO%=DriverInstall, USB\VID_2E8A&PID_0005&MI_00
[DeviceList.NTIA64]
%PI_CDC_PICO%=DriverInstall, USB\VID_2E8A&PID_0005&MI_00
[DeviceList.NT]
%PI_CDC_PICO%=DriverInstall, USB\VID_2E8A&PID_0005&MI_00
[Strings]
Manufacturer = "ATMEL, Inc."
PI_CDC_PICO = "Pi Pico Serial Port"
Serial.SvcDesc = "Pi Pico Serial Driver"
Дальше издевался над операционкой по-разному: пытался поставить его в лоб через ПКМ-установить — получал что данный тип установки не поддерживается, пытался поставить на само устройство через диспетчер — получал сообщение что не подходит драйвер, пытался ручным выбором драйвера из списка уже установленных драйверов с командой pnputil -a «файл.inf» — в данном случае драйвер хоть и цеплялся, но запуск устройства был невозможен (код 52)
В общем ничего не помогло, из перечисленных попыток.
Кто-нибудь знает какой драйвер нужен для Raspberry Pi Pico чтобы сконнектить его с Win7x64 как COM-устройство? Или если драйвер тот самый, то как его корректно поставить?
Заранее благодарен.