
Cloud Solution Architects
In this post, App Dev Manager, Robert Schumann shows how to get started with Windows 10 IoT Core with Raspberry Bi 3 B+.
Jumping right in, let’s get a few matters out of the way upfront.
- This article specifically uses the Raspberry Pi 3 model B+
- If you’re not sure what model of Pi you’re running then review how-to details here: https://www.raspberrypi-spy.co.uk/2012/09/checking-your-raspberry-pi-board-version/
- Topics covered should take about 30 minutes to complete provided everything you need is readily available.
- Disclaimers
- At present, there is no supported version of Windows 10 IoT Core specifically for the Raspberry Pi 3 model B+. This article demonstrates an unsupported technical preview for a Raspberry Pi 3 B+.
- I love Pi. For me it’s been a faithful hacker/maker companion for years from which I’ve learned a lot.
- I work for Microsoft as a Senior Premier Application Development Manager. As such I often, and increasingly, support non-Windows platforms and open source projects, including cloud-based.
Everything you need (to complete this article)
- Laptop or desktop running Windows 10
- Raspberry Pi 3 model B+
- 5V 2A microUSB power supply for Pi
- 8GB or larger Class 10 microSD, with ability to read/write from standard Windows 10 laptop or desktop
- Ethernet cable
- HDMI cable
- USB or proprietary wireless Keyboard for Pi
- USB or proprietary wireless Mouse for Pi
You will need the HDMI cable to connect the Pi to a monitor for checking installation status. Likewise, having a USB keyboard and mouse for installation is suggested in case they’re needed for troubleshooting. Technically speaking, a lot of functionality can be accomplished through the browser or remote connection once the OS is installed.
Install Windows 10 IoT Core on Raspberry Pi 3 B+
At date of writing, there is no supported version of Windows 10 IoT Core for the Pi 3 B+ model we need to take a somewhat non-linear installation path. We simply need to make one extra download and complete one out-of-band task. Beyound that, all steps are the same.
Using a standard Windows 10 laptop or desktop, start by downloading a preview build from here: https://www.microsoft.com/en-us/software-download/windowsiot
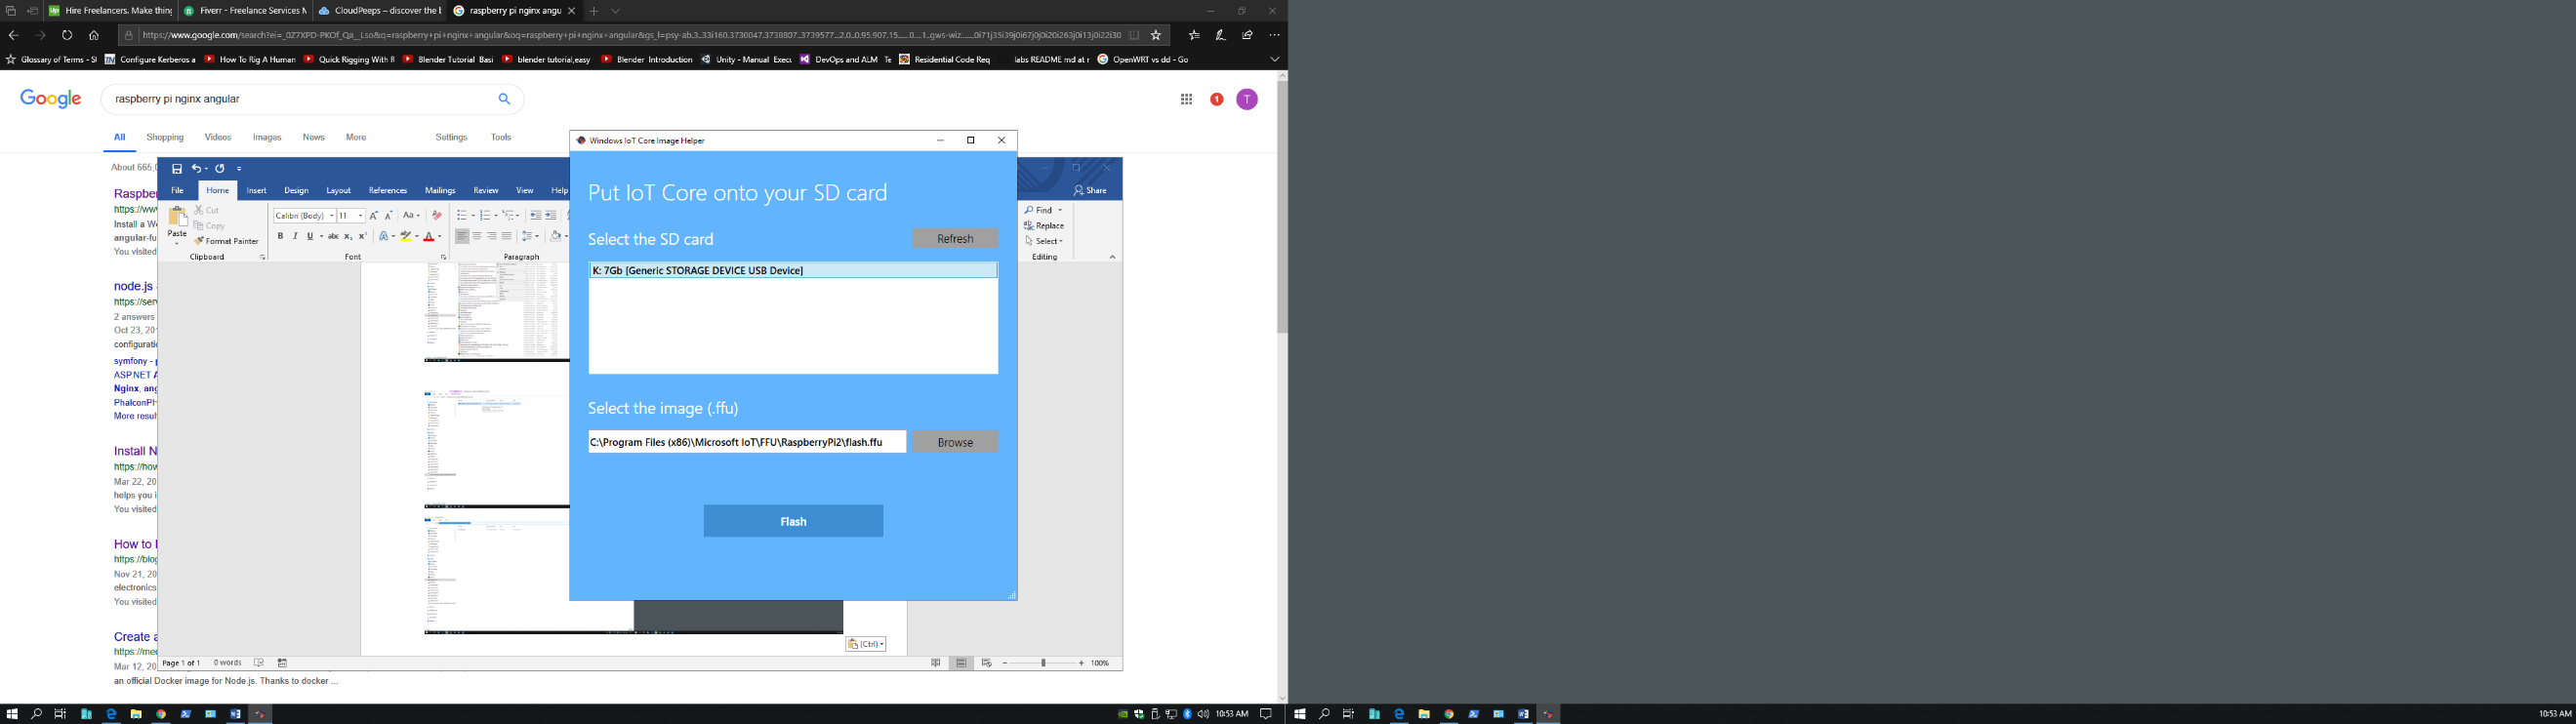
I’m using the latest ISO build version 17661 for this article. Once download is complete, right-click to mount the image and access the .msi installer. Because the supported IoT Dashboard cannot be used to setup the Raspberry Pi 3 B+, this “Windows IoT Core Image Helper” app is used instead. Double-click the .msi to launch the installer and follow directions, this process is straight forward and self-explanatory. By default, the image helper is installed to path C:\Program Files (x86)\Microsoft IoT.
Before launching the image helper app, make sure the microSD card being used for the Pi is read/write accessible to the laptop or desktop app host system. Then, start the Windows IoT Core Image Helper app. Once started, select the correct SD card. As for the required .ffu file that is located under the application folder in the FFU directory. Confirm the correct SD card is selected and the ffu file is identified then click Flash button. Flash will spawn a command dialog that provides percentage completion output. Once finished, a notification pops up with overall status. If successful then remove the microSD from the app host system and insert into Pi. Make sure all Pi hardware is good-to-go (monitor, power, mouse, keyboard), then power on the Pi.
And wait….

Comment: At least for me boots are slow even with the understanding this is a Pi. I tried several different microSD cards of varying vendors, sizes, and specs. Restarts from the box tended to hang so much so that out of impatience or frustration, I found myself pulling Pi power. Oddly, restarting remotely from the Windows IoT Dashboard worked better than directly on the system.
The initial boot is painfully slow; you’ll get the win logo and spinning donut for about the first 2 minutes, then just a spinning donut for about another 3-4 minutes. (Think taking away the logo was meant to be a distraction, like an attempted offset or rest to the “why is this taking so long” personal timer.) Once the system initially boots, and loads, things get better depending on where work is being managed. I found performance directly on the Raspberry Pi to be frustrating. Luckily there are alternatives…
So at this point, a preview version of Windows 10 IoT Core was flashed to a microSD, subsequently inserted into a Raspberry Pi 3 B+, which was then turned on, successfully boots, and is now running. The image helper app is no longer needed, and can be uninstalled if desired. In case you’ve not read any existing documentation, here’s a link that outlines known issues: https://docs.microsoft.com/en-us/windows/iot-core/troubleshooting
Of note:
- No Pi WiFi
- No Pi Bluetooth
- May experience boot problems
That’s quite a bunch of “OTB awesomeness”! Pressing forward, however, things look promising…
Windows IoT Dashboard
We can now use the supported dashboard found here: https://docs.microsoft.com/windows/iot-core/downloads

Example: 192.168.1.3:8080
| Default User Name: administrator
Default Password: p@ssw0rd |
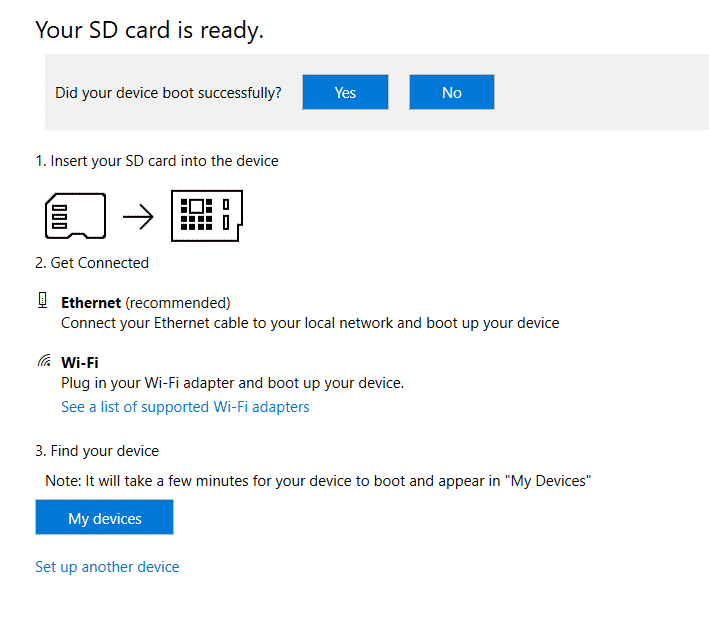
TIP: If your Pi is not listed under My Devices try the following:
|
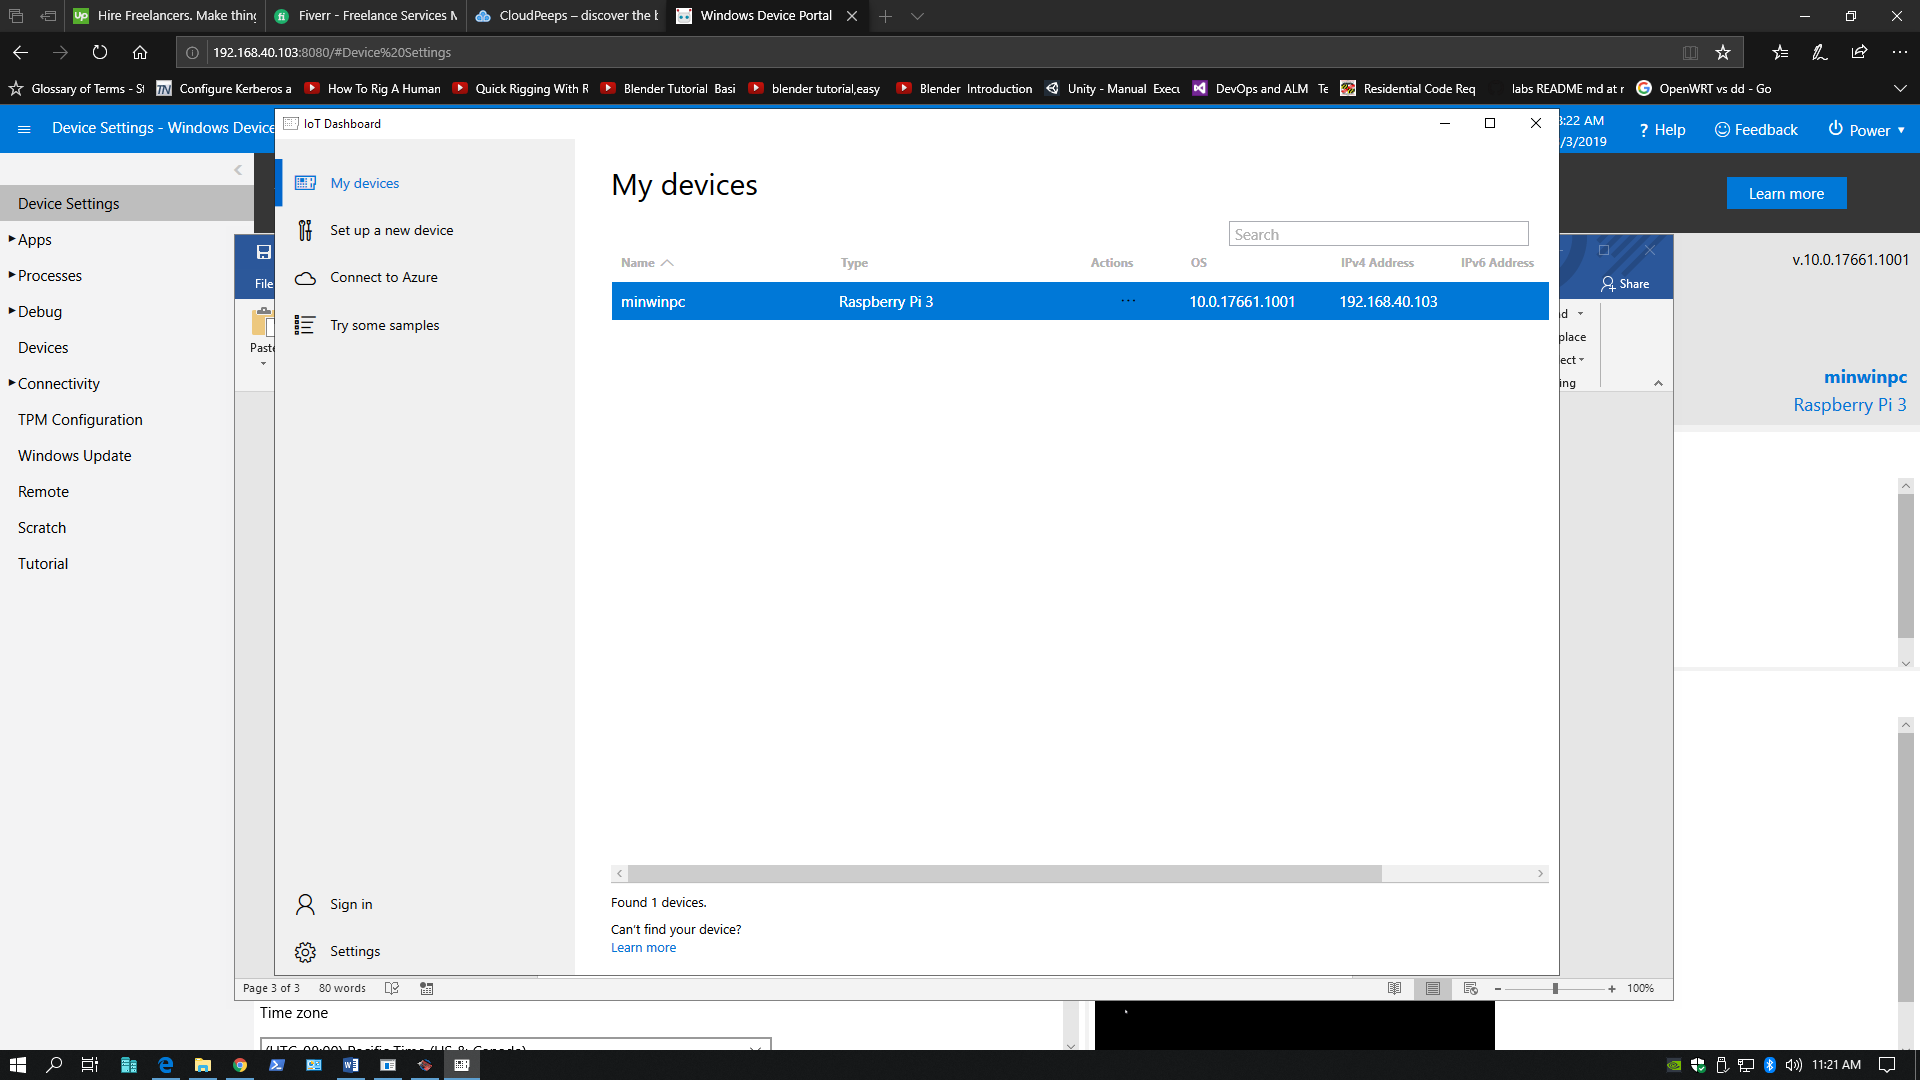
When the dashboard runs it should display a list of (Windows) IoT devices connected to the network. Your newly implemented Raspberry Pi 3 B+ should show. It likely contains default properties such as name and logon account. Double-click the listed Windows IoT Pi device to go to its properties page. From there you can change the device name and see the default account. Notice the link to the device portal at bottom, click that link. A browser should pop up the Windows Device Portal for the selected device using an network subnet address at port 8080.
All things considered, the device portal has a decent amount of capabilities and performance. There might be a couple matters to tend to first, such as applying updates and tweaking performance.
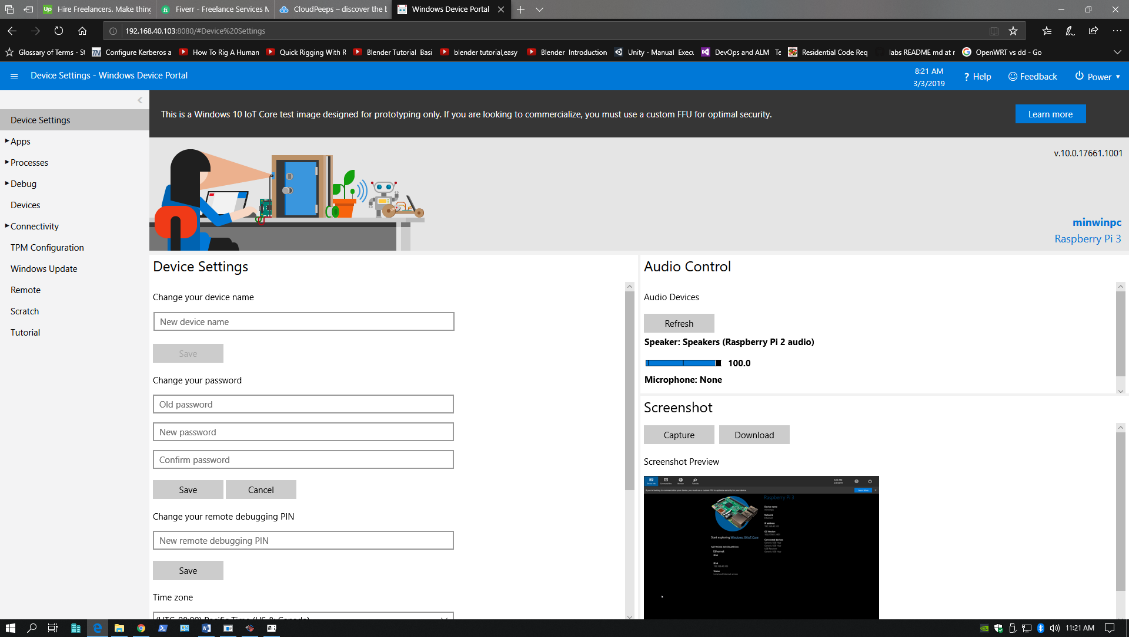
From the device portal page, expand Apps, click Apps Manager, then click Check for Updates. A prompt will display for any outstanding updates, click Ok. Reboots may be required. Rinse repeat until fully updated in which case the prompt with say 0 updates found.
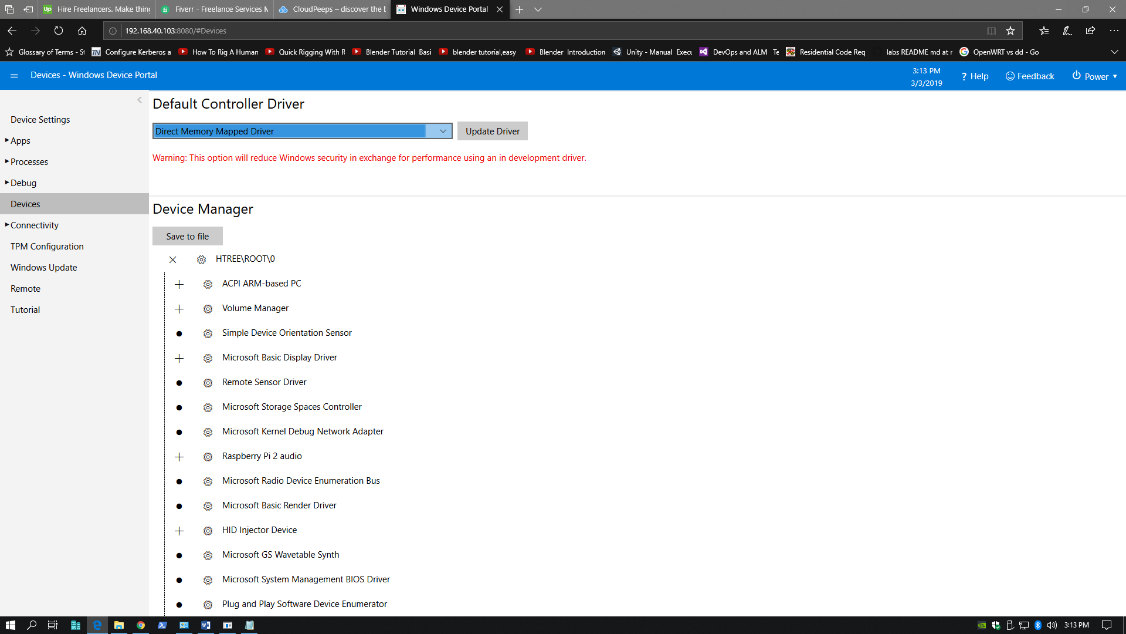
If you’re more concerned about performance than security then change the default controller driver. Click Devices left, then on right from the dropdown select Direct Memory Mapped Driver, click Update Driver. Reboot required.
Remote Connection
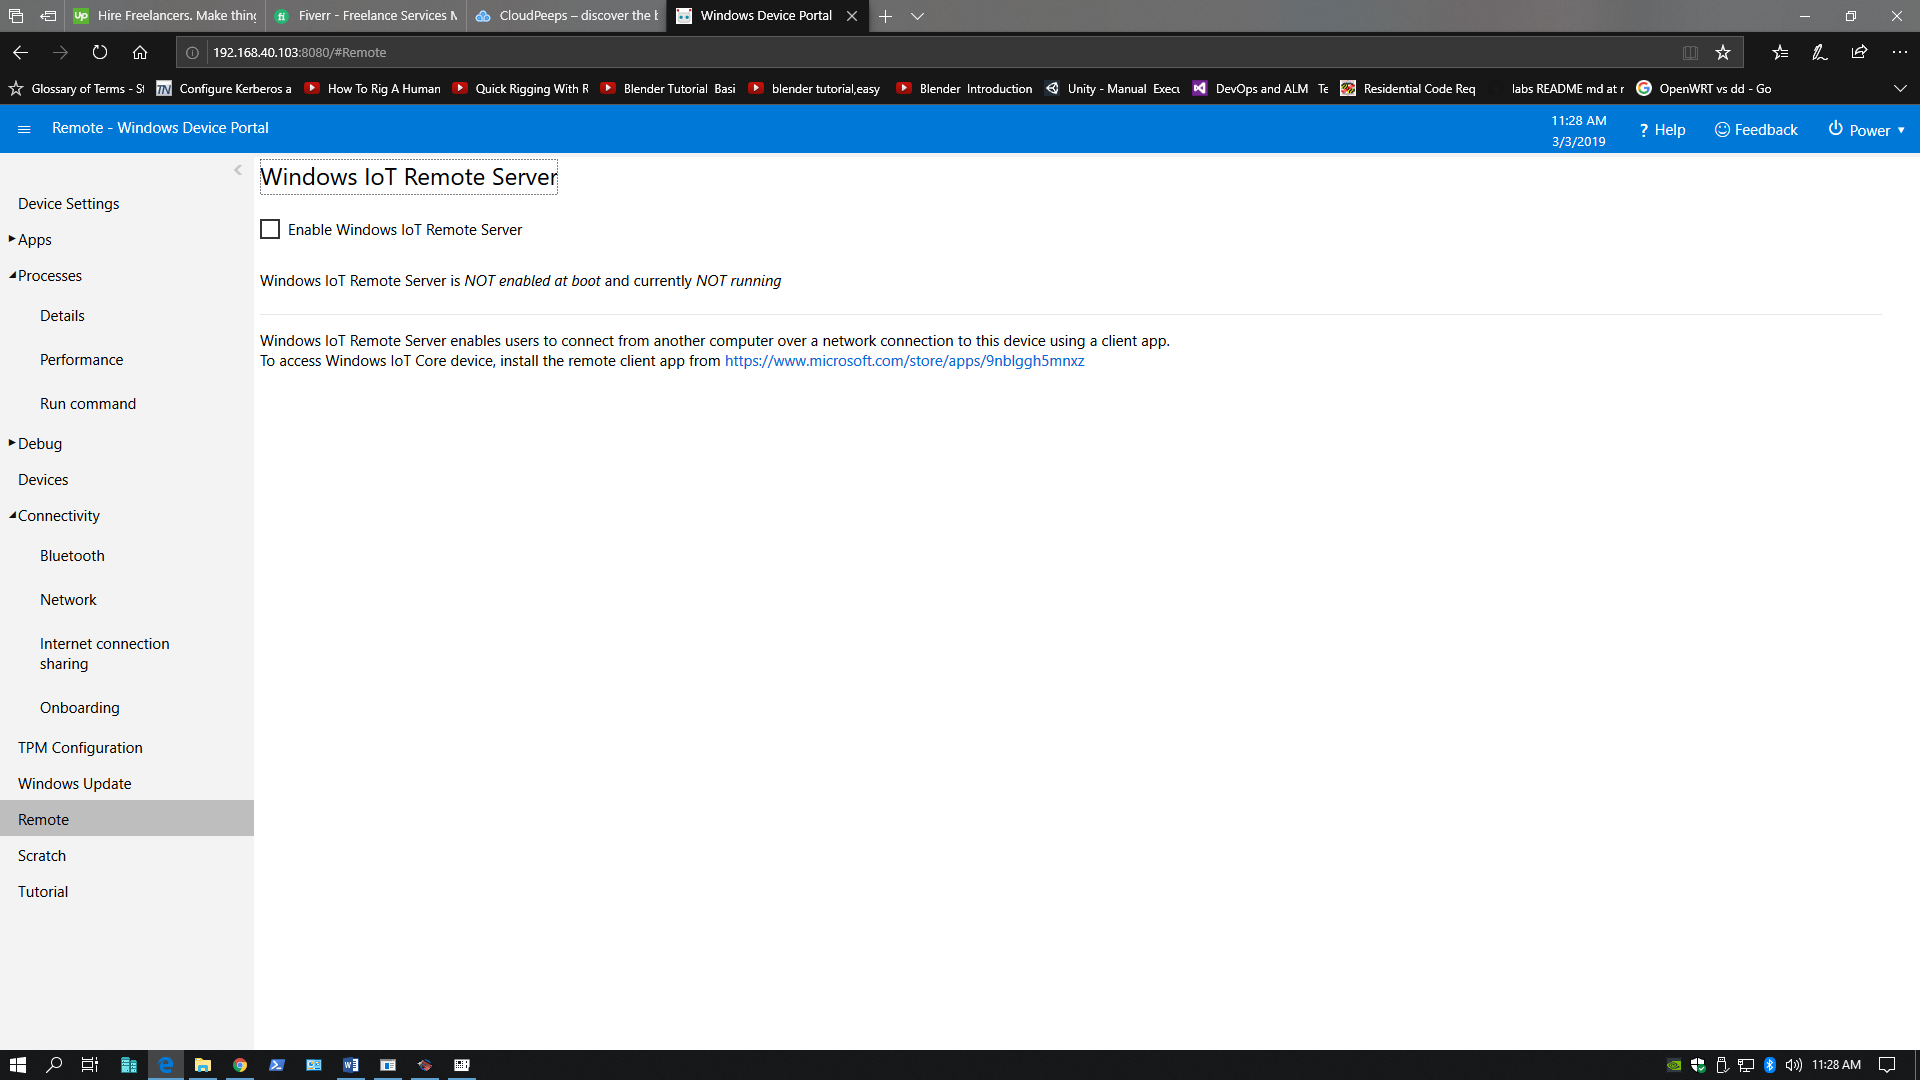
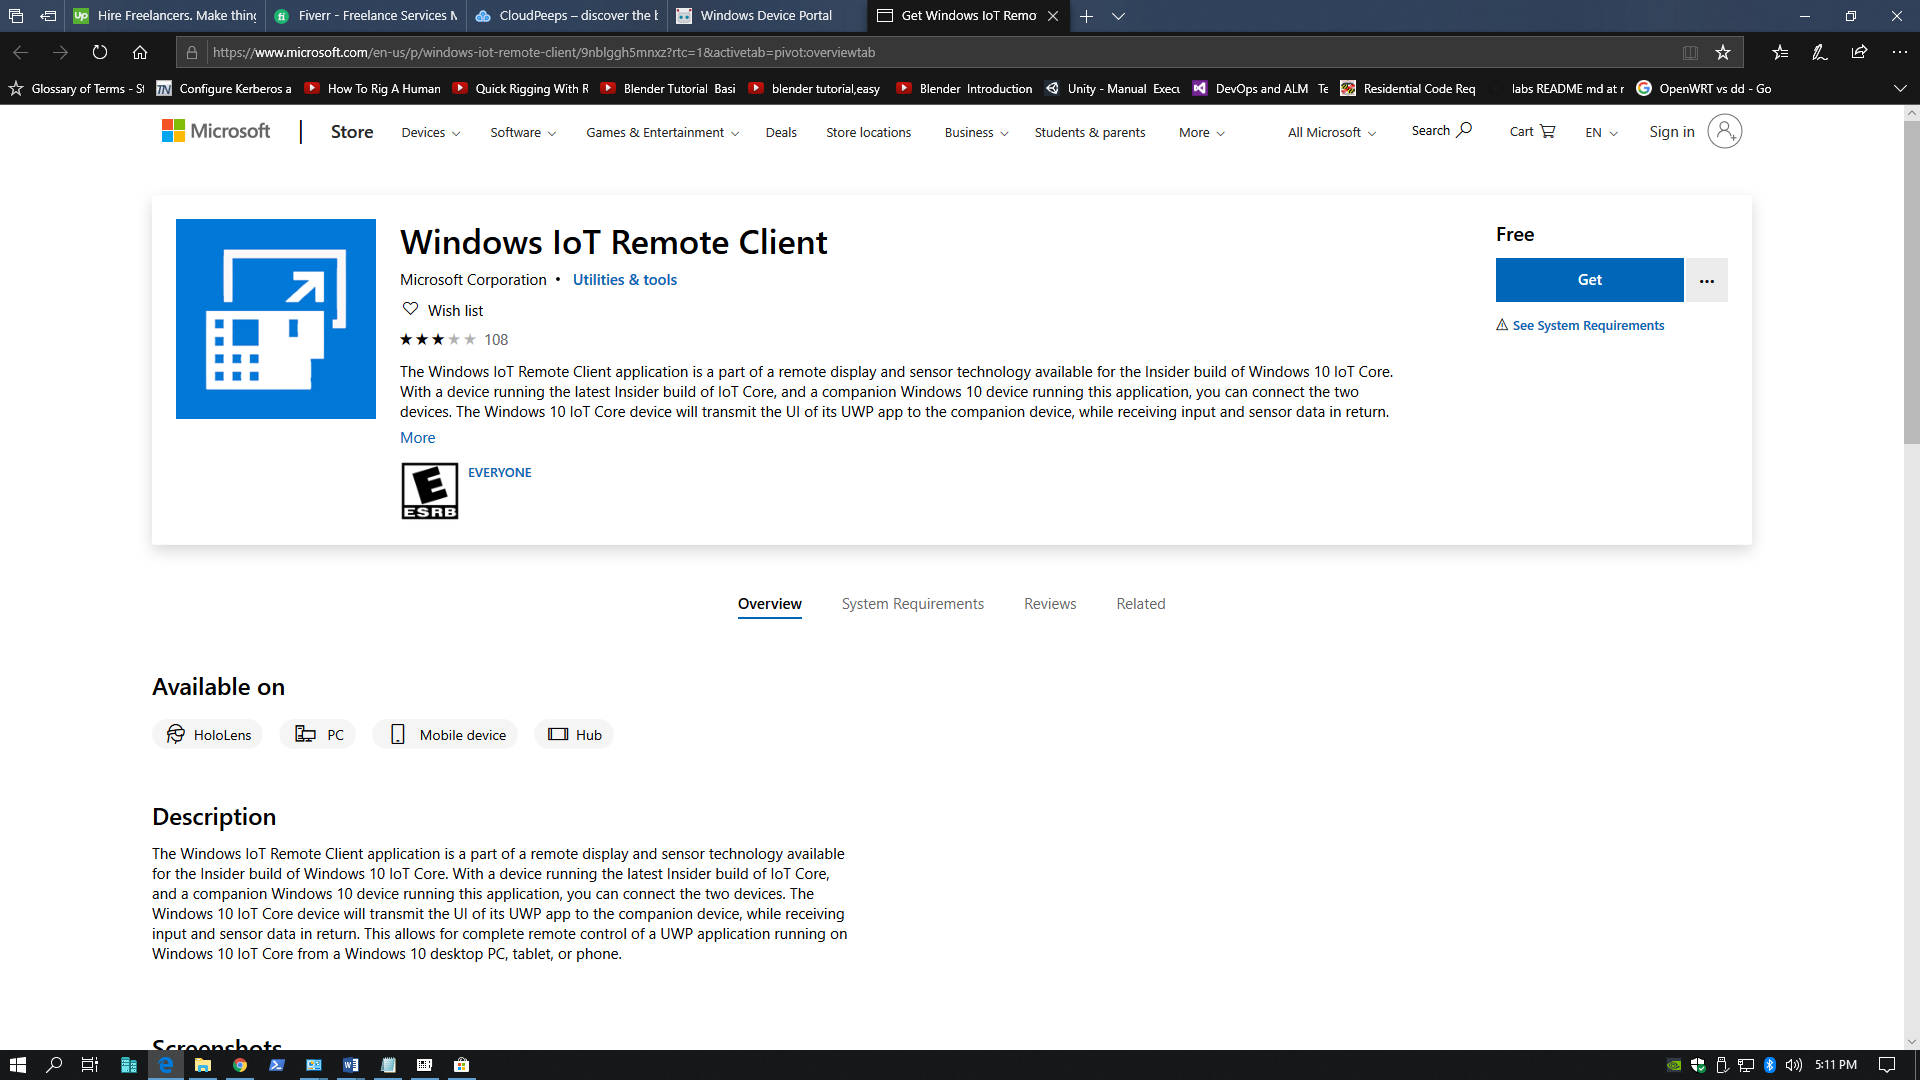
Another way to connect to the Pi is through the Windows Remote IoT Client application from Microsoft Store. Recommend reading the application’s description. Essentially what this app does is receive UI data from the Pi and sends sensor and input data to remotely manipulate the device. Somewhat of a different twist on establishing a remote “connection”.
Conclusion
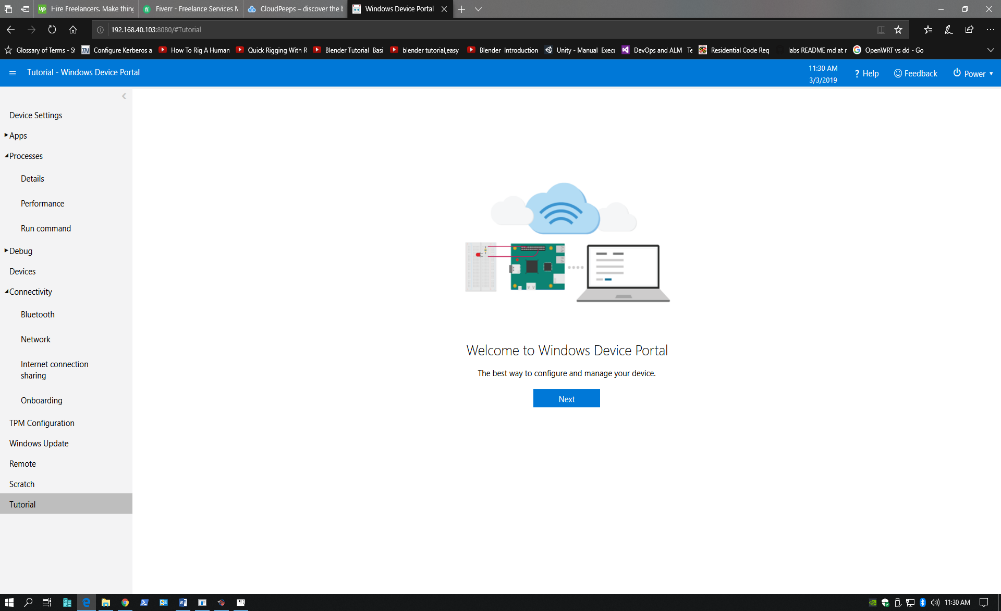
There are may more features in Windows 10 IoT Core to explore. Recommend starting with the device portal Tutorials option, lower left, to help get up-to-speed with navigating. There is also the dashboard Connect to Azure and Try some samples for development.
Overall, I like being able to repurpose my Raspberry Pi 3 B+. It makes sense that Microsoft wants to enable and optimize edge devices. Extending the Windows ecosystem via Windows 10 IoT Core and being able to run it on an expanded list of devices certainly helps. Like most emerging technology, Windows 10 IoT Core is evolving, and I look forward to future enhancements and capabilities.
Author
Cloud Solution Architects
Microsoft Developer Support helps software developers rapidly build and deploy quality applications for Microsoft platforms.
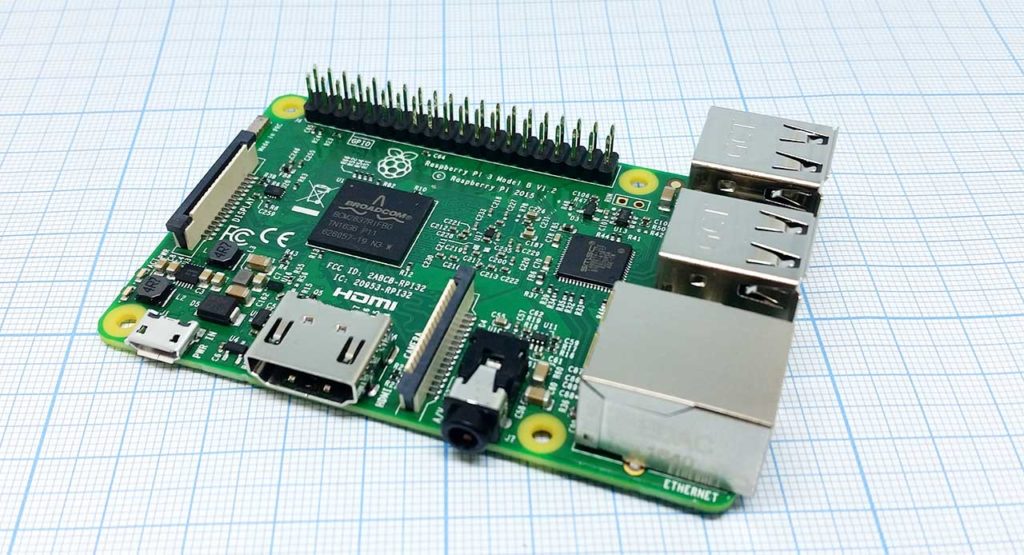
Плата микрокомпьютера Raspberry Pi 3
Честно говоря, идея опробовать одноплатный компьютер Raspberry пришла ко мне неожиданно. Опыт по Arduino и прочим ESP имеется, с «большими» ПК и серверами тоже. А вот промежуточный вариант, представленный сонмой разнокалиберных устройств, мной как-то совсем не изучен. А еще мне хотелось опробовать в деле, что же такое Windows IoT и для чего можно применить новинку от Microsoft. Выбор устройства оказался совсем очевидным: Raspberry Pi 3 с 1 Гб ОЗУ на борту, самое что ни на есть популярнейшее устройство. Конечно, различные Pine64 поджимают, но тут популярность играет на руку. Чем выше популярность, тем меньше проблем совместимости.
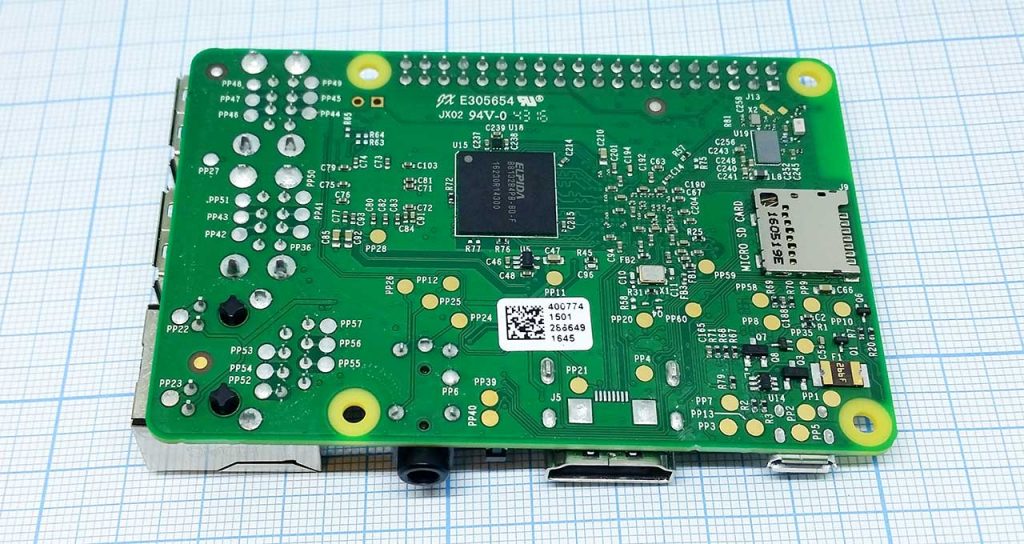
Обратная сторона Raspberry Pi 3. Виден чип ОЗУ.
И вот, спустя месяц ожидания, хорошо упакованная коробчонка с Raspberry обосновалась на моем столе. Я сразу же взял полный комплект: плата, мощный блок питания, радиаторы для чипов и пластиковый корпус. Придраться к комплектации и качеству изготовления сможет только самый мерзкий и дотошный критик. Все оборудование сделано на совесть. Плата с отмытым флюсом, пайка надежная, USB-порты на месте все, как и должно быть. Блок питания не свистит и не греется с избытком. Радиаторы чистые, с комплектным скотчем 3M для приклейки их к чипам. Корпус из пластика, хоть и маркий, но удобный в использовании. Если требуется, его можно открыть и протереть плату тряпочкой. А через многочисленные отверстия отлично подключаются кабеля для внешних устройств. Ладно, хватит описывать то, что давно всем известно. Настало время установки Windows.
Я еще помню времена, когда Windows устанавливался с дискетки. Потом уже операционка поставлялась на CD-диске, затем на DVD. А сейчас же все делается посредством простых «флешек». С Windows IoT и Raspberry все немного иначе.

Микрокомпьютер Raspberry Pi 3 в пластиковом блестящем корпусе и с установленными радиаторами
Существует как минимум два способа установки Windows IoT на Raspberry. Первый способ — воспользоваться услугами официального сайта Raspberry и скачать либо готовый образ Windows IoT, либо загрузить его через специализированный установщик NOOBS. Второй способ изобретен Microsoft. Он немного хитрее и именно им я и воспользуюсь. Да, способ применим только если на вашем рабочем компьютере используется зарегистрированная версия Windows 10. Иначе путь может быть осилен только первым способом.
Шаг 1. Скачиваем Windows IoT Dashboard
Dashboard — специальная утилита, позволяющая подготавливать носители, а в случае Raspberry Pi 3 это MicroSD, для запуска Windows IoT. Скачать утилиту можно с сайта Microsoft. Для бесплатной загрузки и использования доступны только две версии Windows IoT: Core и Insider Preview. Различий между ними не так много. Core — стабильная система, подходящая для большинства разработчиков, а Insider Preview позволят энтузиастам испытывать легкое волнение от новых «фич» и «багов».
Для версии Core существует одно, не очень существенное ограничение. Тут можно запускать только одно приложение UWP (Universal Windows Platform). Вернее, запускать их можно несколько, но активным в один момент времени будет только одно. Аналогичным образом работает и Insider Preview. В общем-то обе эти системы ориентированы на устройства с ограниченными ресурсами, к которым относится и Raspberry. Поэтому ограничение вполне разумное. А если хочется большего, то придется приобретать версию Enterprise.
Шаг 2. Подготавливаем карту памяти, устанавливаем на нее систему
Все делается в том же Dashboard. Выбираем тип платы, вставляем карту памяти, вводим сетевое имя устройства, меняем пароль. Кстати, по умолчанию, а иногда пароль, введенный на стадии подготовки карты не срабатывает, используется связка Administrator/p@ssw0rd в качестве пары логина и пароля. Тут же можно прописать и подключение к вашей Wi-Fi сети.
Если выбранный дистрибутив не был ранее скачен на компьютер, то Dashboard автоматически его скачивает. Далее происходит запись на карту памяти.
Шаг 3. Первый запуск Raspberry с Windows IoT на борту
После установки карты памяти, можно смело подключать плату к сети Ethernet (или не подключать, если настроен Wi-Fi), да подавать питание. Первая загрузка происходит дольше, чем все последующие, поскольку происходит первичное развертывание операционной системы. В моем случае первичная загрузка заняла минуты три или четыре. Первичная настройка может производиться в полностью Headless режиме, нет необходимости подключать дисплей или клавиатуру. Что, согласитесь, очень удобно, особенно если устройство у вас уже физически интегрировано куда-нибудь в подвал и приварено стальной арматурой к бетонному блоку, чтобы вандалы не уволокли.
Антенна с поддержкой Wi-Fi и Bluetooth на чипе у Raspberry Pi 3
Кстати, на Raspberry 3 есть два светодиода. Красный сигнализирует, что питание на плату подается. А зеленый горит, когда есть обращения к карте памяти. С Windows IoT зеленый светодиод бесполезен, по крайней мере в текущей редакции системы. Он ничего не сигнализирует, просто не горит и все.
Шаг 4. Дальнейшая настройка
После прохождения первоначальной настройки к устройству уже можно обращаться по сети и использовать его на полную. Если же в сети его, по каким-то причинам, не видно. То тогда придется подключить монитор и клавиатуру, а затем выполнить настройку сети через интерфейс Windows IoT.
Если же с сетью все в порядке, то основным способом настройки системы является Web-интерфейс. Попасть в него можно через тот же Dashboard. В разделе My Devices отображаются все ваши Windows IoT устройства доступные в вашей сети. Жмакаем правой кнопкой и выбираем панель управления устройством.
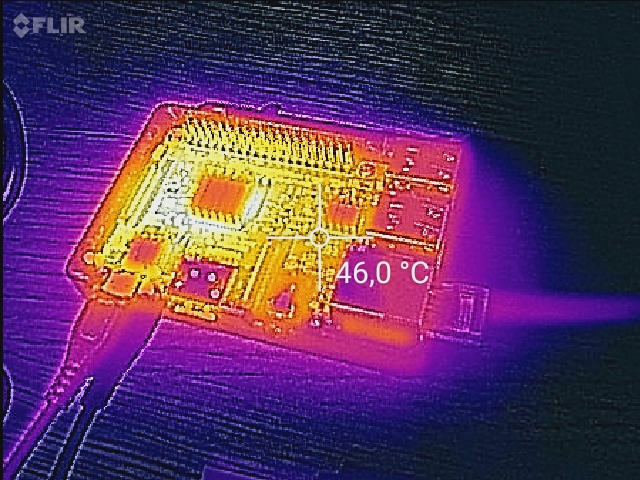
Под нагрузкой (установка апдейтов) плата греется до существенных значений. Радиаторы холоднее, чем сама плата, видимо используемый скотч 3M не очень здорово проводит тепло. Необходимо отклеить радиаторы от чипов, заменить скотч на нормальный термоинтерфейс.
Кстати, на удивление, отрабатывает Web-сервер в Windows IoT куда быстрее, чем даже на моем микросервере. Через интерфейс можно настроить все, что положено настраивать обычному пользователю, включая пароль доступа, пин-код для удаленной отладки и прочее вкусности. Не обойдены стороной и любимые Microsoft обновления для системы. Да, Windows IoT обновляется аналогично своим собратьям для больших ПК. Процесс обновления кстати не быстрый, а железо раскаляется от нагрузки.
Отдельно хочу упомянуть про мониторинг нагрузки на плату. На соответствующей вкладке доступны различные показометры, что вполне удобно, хотя бы с целью определения нагрузки на плату самой операционной системой. Графики наглядны и отображают сведения в режиме реального времени.
Что еще? Я заметил, что Dashboard хитро подготавливает карту памяти для записи. Вне зависимости от ее объема он ее форматирует как карту на 64 Гб. Возможно, что такой подход нужен для установки Windows IoT, но вот после, когда передумаете использовать Windows IoT, стоит не забыть и переформатировать карту под ее истинный размер. Иначе могут возникать различные коллизии, например, операционная система видит, что на карте осталось еще куча места, поэтому не ограничивает себя и пишет множество данных на карту, не стирая старое. А потом бац и система становится нестабильной, вплоть до невозможности ее загрузки.
Как управлять Raspberry с установленной Windows IoT
Вариантов тут несколько. Самое первое и самое простое, что может прийти в голову — использование монитора и клавиатуры. Подключаем и попадаем в интерфейс Windows IoT. Тут же можно слегка подшаманить сетевые настройки, перезагрузить плату, запустить установленные приложения.
Если вариант прямого управления не подходит, то можно (и даже нужно) управлять платой по сети. В настоящее время для этих целей присутствует целых три способа. Можно управлять Windows IoT через штатное средство Windows PowerShell. Легче всего подключиться к удаленной системе все через тот же Dashboard. Либо можно воспользоваться подключением по SSH. Тут уж подключаться можно вообще с любой системы, хоть из-под Windows, хоть с Android, а в Linux SSH так вообще стандартное средство. Даю наводку, для Windows можно использовать сверхпопулярный терминал PutTTY.
Но к плате можно подключиться и иным способом. Прямиком в графический интерфейс. Для этого необходимо включить удаленный доступ на плате, лучше всего это сделать через веб-интерфейс (самая нижняя вкладка). А затем скачать через Windows Store приложение для доступа к Windows IoT. Его вызов возможен так же через Dashboard. К моему стыду, мне так и не удалось подключиться к плате при помощи графического интерфейса. Приложение просто отказывалось подключаться и все, а все советы по поводу модификации конфигурационного файла не помогали, т.к. в актуальной версии Windows IoT эти советы уже внедрены в конфигурацию. Тем не менее, такая возможность существует.
Что можно запускать на Windows IoT?
Самый интересный для меня вопрос. На текущий момент (начало весны 2017), Windows IoT очень стремительно развивается и постоянно модернизируется. Но выбор ПО, вернее программных платформ, для системы ограничен. Microsoft делает ставку исключительно на UWP, как на новую парадигму ПО, работающего одинаково на всех устройства экосистемы Windows. Поэтому приложения UWP должны работать на Windows IoT Core почти без вопросов. Другое дело, что они будут так работать, но на текущий момент могут наблюдаться несовместимости, связанные с неполноценной поддержкой всех API доступных в UWP. Кроме UWP можно попробовать запустить Win32 приложения, по слухам от очевидцев, работать нормально с ними все равно не выйдет. Никакого ввода-вывода от приложений Win32 добиться не выйдет, только доступ извне, например, по сети на каком-то порту.
Для чего и выводы
Эксперимент по скрещиванию продукции Microsoft и крошечного компьютера Raspberry можно считать успешным. Связка работает, обновления ставятся, в сети видно. Вот только совсем непонятно для чего его использовать. Запустить нужное мне ПО под Windows IoT не представляется возможным. Тот же SoftEther VPN или FAR даже и не установить на плате. Нужных мне UWP приложений под рукой тоже нет. Остается только заниматься разработкой. А вот тут у Microsoft запасен такой козырь в рукаве, против которого мало кто сдюжит. Разрабатывать приложения, на множестве языков, для Windows IoT можно с использованием среды Visual Studio. С использованием всей ее мощи, включая развитые средства профилирования и отладки.
Но и тут есть одно, небольшое «но». Да, Raspberry обладает хорошо развитым интерфейсом связи с внешним миром. К плате можно подключить, хоть черта лысого. Да и производительности предостаточно. Но на мой взгляд, при наличии копеечных плат ESP8266 делающий все тоже самое, только куда дешевле и немного проще, целесообразность использования почти полноценного компьютера с реальной операционной системой и чрезмерной производительностью, излишне. Для реализации простых проектов по автоматизации ресурсов ESP8266 более чем достаточно. Впрочем, наверняка найдутся задачи, в которых Windows IoT вкупе с платами типа Raspberry придутся как нельзя кстати, но произойдет сие скорее всего в корпоративном секторе, например, некоторые банкоматы, наконец-то перейдут с уже устаревшей OS/2 на современную платформу.
Если же попытаться сформулировать вывод, например, для чего мне нужна плата Raspberry, то очень быстро приходишь к выводу, что в принципе ни для чего. Все, что мне нужно запрограммировать в плане автоматизации или поумневшего дома, отлично реализуется на чипах ESP и куда дешевле. Делать из Raspberry какой-то Hub при наличии полноценных серверов — тоже смысла не много. Разве что только установить на Raspberry операционную систему семейства Linux и организовать очередной серверок? Кстати, именно так я и поступлю.
Полезные ссылки:
Официальный FAQ по Windows IoT от Raspberry
Официальный сайт Microsoft по Windows IoT
Официальные образы операционных система для Raspberry и загрузчик NOOBS.
Windows 10 IOT Core is a version of Windows 10 that is optimized for small devices with or without a monitor and runs on Raspberry Pi 3 and 3, the Sword Dragon 410c and the Minnow Board MAX. The Windows 10 IOT core builds outstanding solutions with a rich, scalable Universal Windows Platform (UWP) API. If you are new to Windows 10 IOT, this article describes how to install Windows 10 IOT on the Raspberry Pi 3.
If you do not know, you can get a free upgrade if you are currently running Windows 8, Windows 8.1 or Windows 7. However, Microsoft also makes a completely free version of Windows 10 for the Raspberry Pi 3/3, This ultra-low-cost circuit board computer. It is also very easy to get. We installed the IOT version of the Windows operating system within two and a half hours.
All you need is a Raspberry Pi 3/3 mini SD memory card with an SD adapter (Microsoft recommends a minimum of 8GB) and a Windows computer with an internet connection and an SD card slot or USB card reader. Unfortunately, one of the steps requires an .EXE file and the process will not work with Apple Computer.
One thing to note before you’re so excited is that the Raspberry Pi 3 runs a special developer’s version of Windows 10 designed for IOT devices. This is a very easy way to run the application with a full version.
Step-by-Step process to install Windows 10 IoT on the Raspberry Pi 3
Step 1: Get the Board and Software tools Ready
Collect the requirements
- PC running Windows 10
- Raspberry pie 5v Micro USB power supply, the current is at least 1.0A. If you plan to use more power-consuming USB peripherals, use a higher-current power supply (> 2.0A).
- 8GB Micro SD Card – Class 10 or higher.
- HDMI cable and monitor Ethernet Cable
- Micro SD Card Reader – Due to the problem of most built-in mini SD card readers, we recommend using an external USB micro SD card reader
Step 2: Install the Windows 10 IOT Core Software’s
- Download the Windows 10 IOT Core image from here. Save the ISO to a local folder.
- Double-click ISO (IOT Core Raspberry Pi.iso). It will be automatically mounted as a virtual drive so you can access the content.
- Install Windows_10_IoT_Core_RPi3.msi. After the installation is complete, flash.ffu will be located at C: Program Files (x86) Microsoft IOT FFU RaspberryPi3.
- After the installation is complete, eject the virtual CD-ROM – This can be done by navigating to the top-level folder of File Explorer, right-clicking the virtual drive and selecting “Eject”.

Step 3: Put the Windows 10 IOT Core Image ISO files on Your micro SD Card
- Insert the Micro SD card into the SD card reader.
- Use IoTCoreImageHelper.exe to refresh the SD card. Search for “WindowsIOT” from the Start menu of your current window so then you select the shortcut “WindowsIoTImageHelper”.
- Select the SD card to flash, then provide the location of the FFU to blink the image.
- Safely remove the USB SD card reader by clicking “Safely Remove Hardware” in the taskbar or by finding the USB device in File Explorer, right-clicking and selecting “Eject”. Failure to do so may result in corruption of the image …….
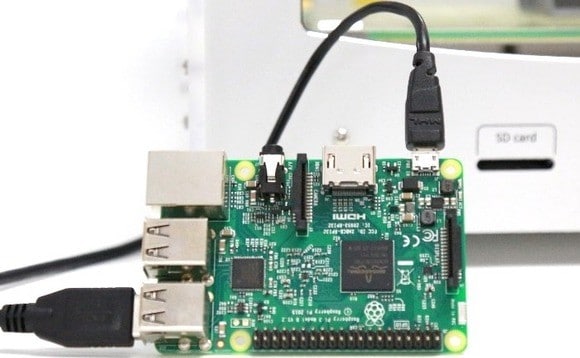
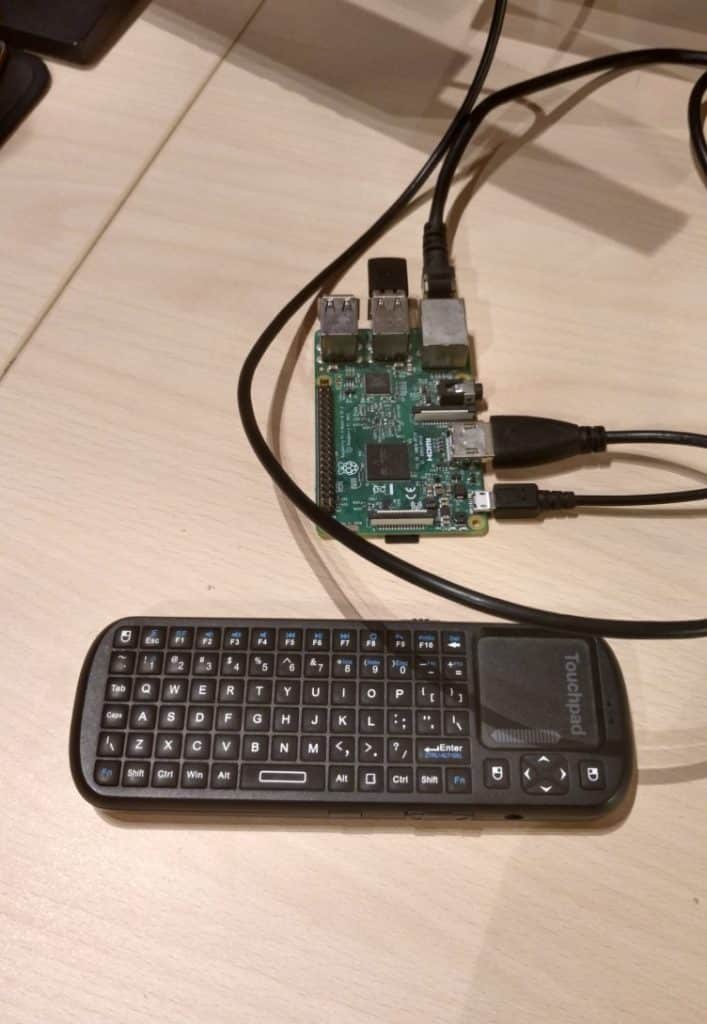
Step 4: Hook Up Your Raspberry pi 3 board
Insert the prepared micro SD card into the Raspberry Pi 3 (the slot is shown with arrow # 1 in the figure below).
Connect the local network cable to the Ethernet port on the circuit board.
Make sure your development computer is on the same network.
Connect the HDMI monitor to the HDMI port on the board.
Connect the power supply to the micro USB port on the board.
Step 5: Boot Windows 10 IOT Core
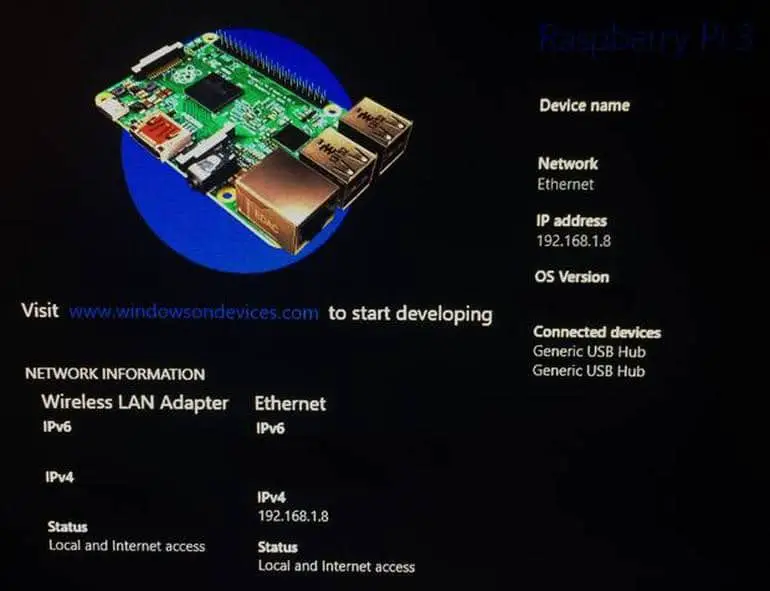
Windows 10 IOT Core will be started automatically after power is connected. This process will take a few minutes. After seeing the Windows logo, the screen may turn black for about a minute – do not worry, it is up and running. You may also see a screen prompting you to choose a language for your Windows 10 IOT Core device – connect the mouse and select your options, or wait about 1-2 minutes for the screen to disappear.
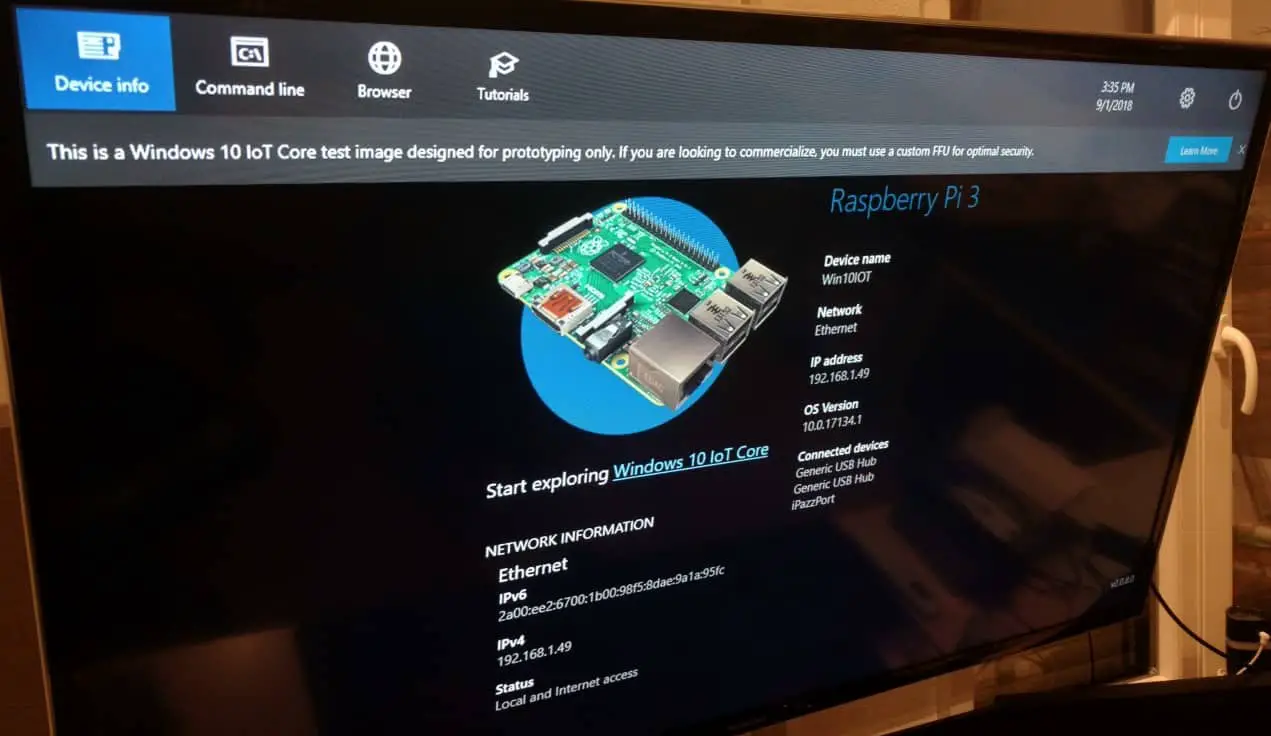
Once the device is up, Default App will launch and display the IP address of RPi3.
Step 6: Connecting to Your Device
You can use Windows Device Portal to connect to your device through your favorite web browser. In addition to advanced diagnostic tools, this Device Portal provides will be configuration and device management help you to troubleshoot with real-time performance of Windows IOT devices such as raspberry pi 3.
Step 7: Finish Off
Now you should be ready with a windows 10 raspberry pi. If you have any doubt just ask in the comments.
Installing #Windows IOT core on #Raspberry Pi 3
You may also like to read these articles
How to Build your own Super Computer with Raspberry Pi 3 Cluster
How to Build Project using CO2 Sensor with Raspberry pi Introduction
Hope this article “How to install Windows 10 IoT on the Raspberry Pi 3” helps you to install Windows 10 IoT on the Raspberry Pi 3. If you have any query, feel free to comment.
Windows 10 appears on a huge range of devices. Microsoft is also making strides with the Internet of Things (IoT), positioning the Windows 10 Internet of Things Core as a tiny-but-powerful version of their desktop environment.
As such, you can take Windows 10 IoT Core for a test drive today. All you need is a Raspberry Pi 3, and a little know how.
What Is Windows 10 IoT Core?
«Windows IoT Core is a version of Windows 10 that is optimized for smaller devices with or without a display that run on both ARM and x86/x64 devices.»
Seen by some as the spiritual successor to Windows Embedded Compact, the Windows 10 IoT Core offers extensive support for intelligent devices and IoT services.
Windows 10 IoT Core is a focal point of Microsoft’s $5 billion investment in IoT development, running through to 2022. As such, expect substantial support and exciting developments for the platform.
And you can use Windows 10 IoT Core do run some very cool projects on your Raspberry Pi.
Which Apps Work on Windows 10 IoT Core?
For starters, you won’t be using your Raspberry Pi 3 with Windows 10 IoT Core to run Microsoft Office or other «traditional» programs. These programs are incompatible with the Raspberry Pi’s ARM-based hardware.
However, Windows 10 IoT Core will run Universal Windows apps, as well as apps converted into Universal Windows apps. (You might run into some issues here and there, mind, as each app works differently.)
The Windows 10 IoT Core platform is just that, though: a platform focusing on Internet of Things apps and devices.
Can I Install Full Windows 10 on a Raspberry Pi 3?
Yes, you can. But the real question is, «Why would you want to?»
At this point, the Windows 10 on ARM project is working on Raspberry Pi 3 devices. Unfortunately, it is somewhat slow, as evidenced in the video below. Better still, it shows those traditional Win32 programs running, within Windows 10 on a Raspberry Pi 3.
What You’ll Need to Install Windows 10 IoT
Before embarking on your Windows 10 IoT Core journey, check you have the correct equipment in place to follow this tutorial.
- Raspberry Pi 3 (Raspberry Pi 2 will also work, but not a Zero. Windows 10 IoT Core only supports ARMv7 and above)
- 8GB or larger Class 10 microSD with full-size SD adapter
- Ethernet cable
- HDMI cable
- 5V 2A microUSB power supply
- (Optional) USB keyboard
You need an HDMI cable to connect the Raspberry Pi to a compatible monitor to check the installation. The USB keyboard is optional because the setup process will complete without any interaction—but you will have US English as your default language and keyboard choice. If you require a different language option, you need a USB keyboard.
How to Install Windows 10 IoT Core on Raspberry Pi 3
First things first: you need to download the Windows 10 IoT Core Dashboard.
Head to the Windows Dev Center IoT Downloads page [No Longer Available]. Select Download the Windows 10 IoT Core Dashboard (linked) and install the application. The installer downloads the rest of the dashboard package and takes a minute to complete, depending on your internet speed.
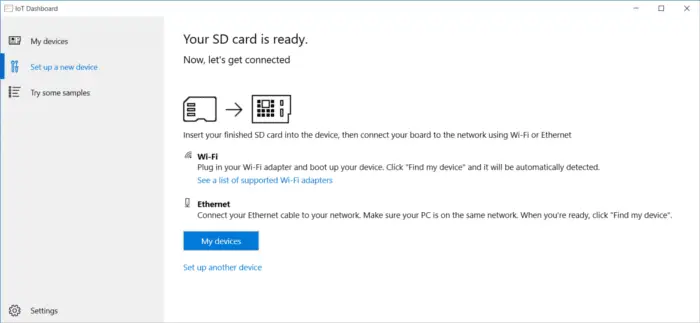
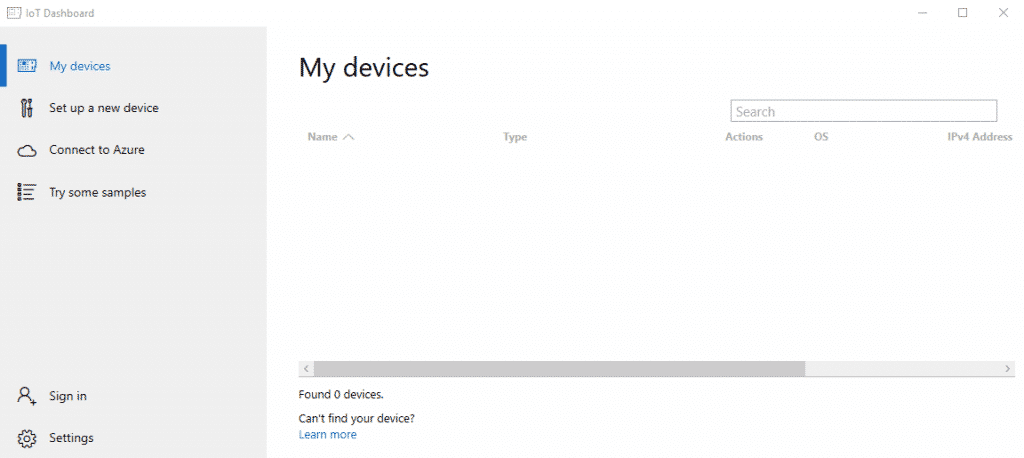
Now, you need to setup your device. Select Set up a new device from the panel that the IoT Dashboards opens on. If you cannot see that option, select Set up a new device from the right-hand column, then press the big blue button.
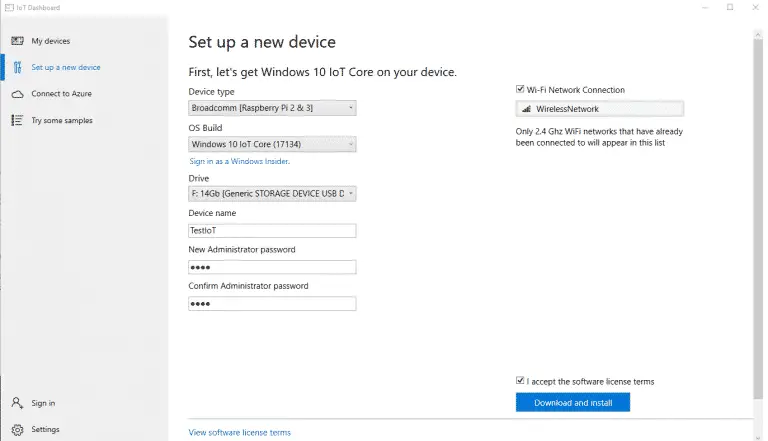
The device setup screen is fairly self-explanatory. Make sure you have the correct Device type (Broadcom [Raspberry Pi 2 & 3]), set the OS Build to Windows 10 IoT Core, and that you have the correct drive letter for your microSD card. Furthermore, make sure to set an admin name and password. When you’re all set, hit Download and install.

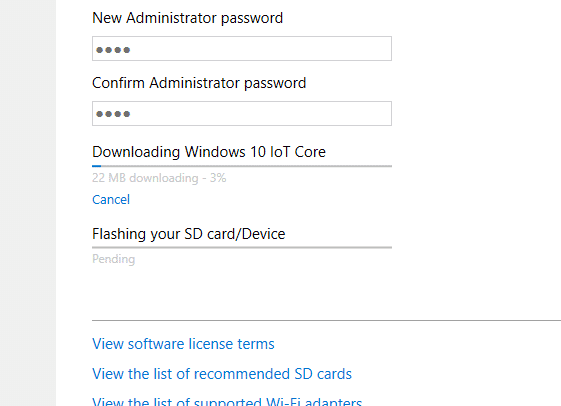
The process takes a few minutes, but you can track the progress within the Dashboard.
When the installation process completes, it is time to dig out your Raspberry Pi 3 for the next step.
How to Set Up Windows 10 IoT Core on Raspberry Pi 3
Before the setup process, you need to do four things:
- Insert the microSD card into the Raspberry Pi 3.
- Connect the HDMI cable to your monitor.
- Connect the Ethernet cable (or USB Wi-Fi).
- (Optional) Connect the USB keyboard.
Once you have done that, you are ready to turn on the Raspberry Pi 3 and begin the Windows 10 IoT Core setup process. Insert your microUSB power supply and let the Raspberry Pi boot process start. The setup process is quick, as you would expect with a lightweight operating system.
The setup first enters the language selection page. A connected keyboard can navigate the menu using the Tab, arrow keys, and Enter for selection. You will then arrive at the Windows 10 IoT Core device home page.

There are four menu tabs: Device info, Command line, Browser, and Tutorials. In addition, there’s a Settings menu and a power button.
Raspberry Pi Doesn’t Show Up in «My Devices»?
When your Raspberry Pi 3 running Windows 10 IoT Core connects to the internet, it will also appear in the My devices panel back in the Windows IoT Dashboard.
If your device doesn’t show up, there are a couple of things you can try:
- Restart your Raspberry Pi 3.
- Double check your Ethernet or USB Wi-Fi connection.
-
Make sure exe is able to communicate through your firewall:
- Type Network in the Start menu search bar. Under Status, find the type of network (Domain/Private/Public) your PC is connected to.
- In the Settings panel search bar (to the left of where it says Status), type fire, then scroll down and select Allow an app through Windows Firewall.
- When the new panel opens, click Change settings.
- Scroll down and find exe. Enable the appropriate network checkbox (i.e. the network type you found in step 1).
Connect to Raspberry Pi 3 Using Windows IoT Dashboard
When your device has internet access, you can connect directly using the Windows IoT Dashboard.
Simply head to My devices, right-click the Raspberry Pi 3, and select Open in Device Portal. This opens the Windows Device Portal.
Deploying a Sample App to Your Raspberry Pi 3
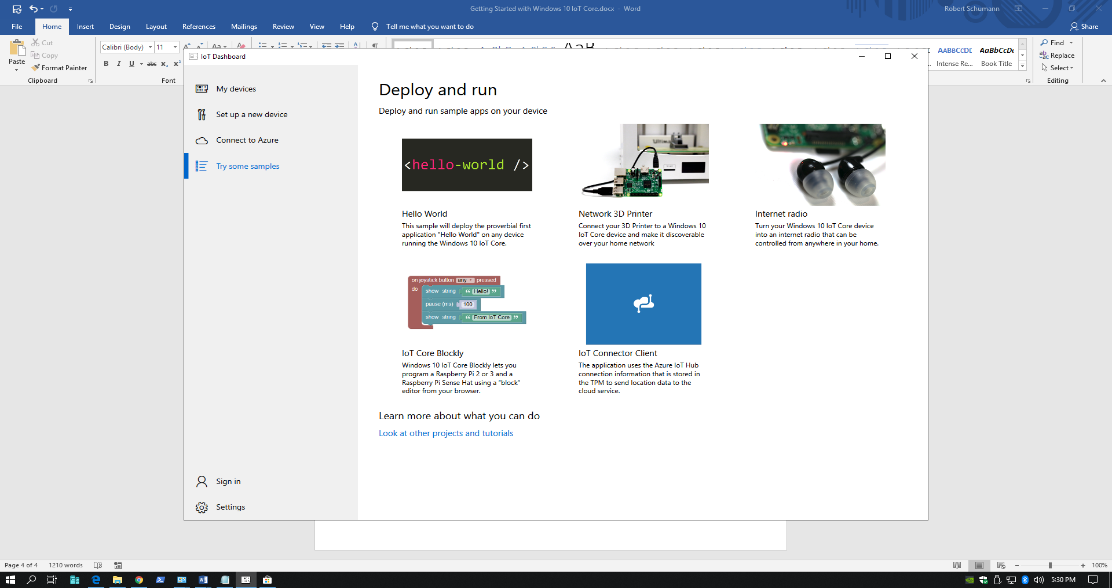
Next up, try deploying one of the sample Microsoft IoT apps to your Raspberry Pi. Microsoft provides a basic Hello World app, an Internet Radio app, and IoT Core Blockly, a block programming app.
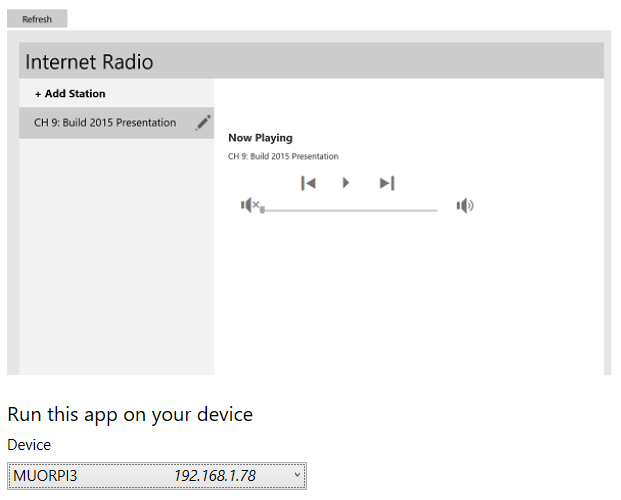
Within the Windows IoT Dashboard, select Try some samples. Make your selection and then select your device from the dropdown menu.
Each sample has an online tutorial available from the sample page, plus there are more Windows 10 IoT Core development tutorials available for anyone to access via the Look at other projects and tutorials link on the samples homepage.
Windows 10 IoT Core on Raspberry Pi 3: Installed!
You can see how easy it is to deploy Windows 10 IoT Core to your Raspberry Pi 3. You’re now perfectly situated to deploy any of the sample applications found within the IoT Dashboard, or the numerous free projects and tutorials available for beginners, intermediate, and advanced skill sets.
Moreover, if you want to get serious about IoT app and device development, learning a programming language like C#, C++ and/or XAML (Extensible Application Markup Language) is strongly advised.
About
In this tutorial, you will learn how to install Windows 10 IOT on the Raspberry Pi 3.
Hardware Used
- #adAmazon LinkRaspberry Pi
About Winndows 10 IOT
I won’t really go in too much detail about Windows 10 IOT. You can read about all the boring details here. Long story short it is a version of Windows meant for IOT(internet of things) purposes. It can run UWP apps(see how to do that here) and can be used with the following supported chips. Most notably it can be run on a Raspberry Pi.
Installing Windows 10 IOT on a Raspberry Pi
Click on Set up a new device and then:
-
- Select Raspberry Pi as your board.
- Select Windows IOT Core as the OS.
- Plug in the sd card and select it.
- Name the device and set a password.
- Finally, click Download and install and wait for the installation to complete.
Insert the SD card into your Raspberry Pi and connect power to it. Windows IOT will begin to boot up automatically.
Upon the first boot up, you will have to set up a few basic settings like the internet connection, Cortana settings, language, etc, … It’s all pretty intuitive and straight forward stuff so I just left it out of the tutorial.

And you are all done! If you are interested in making an app and deploying it to the Raspberry Pi running Windows 10 IOT check out this post.