
NOTE: RAM disks by their very nature are cleared on reboot. Do not use them to store any data that cannot be lost. A suitable use case would be temporary session files for a web server
Installing iSCSI Target Server
- Launch Server Manager if it does not automatically load
- Click the Start button > Server Manager
- Click Manage > Add roles and features
- Click Next on the Before you begin screen
- Select Role-based or feature-based installation > Next
- Leave Select a server from the server pool selected and select the current server > Next
- Expand File and Storage Services > Expand File and iSCSI Services > Select iSCSI Target Server
- A popup will appear with additional required roles and features, click the Add Features button
- Click Next
- Click Next on the Select features screen
- Click Install on the confirmation screen
- Leave the installation progress screen open until the install completes
Creating the RAM Disk
- Launch Powershell as administrator
- Enter the following commands to create the RAM disk, replacing the IP address with the current server’s IP address
# allow iSCSI loopback registry setting
Set-ItemProperty -Path ‘HKLM:\SOFTWARE\Microsoft\iSCSI Target’ -Name AllowLoopBack -Value 1
# start the iscsi initiator service
Start-Service -Name MSiSCSI
# set the iscsi initiator service to start automatically
Set-Service -Name MSiSCSI -StartupType Automatic
# create the ram disk, changing size as needed
New-IscsiVirtualDisk -Path «ramdisk:RAMDisk.vhdx» -Size 256MB
# initialize iSCSI target
New-IscsiServerTarget -TargetName RAMDisk -InitiatorIds @(«IPAddress:192.168.0.65»)
# connect to the ram disk
Add-IscsiVirtualDiskTargetMapping -TargetName RAMDisk -DevicePath «ramdisk:RAMDisk.vhdx» - Back in Server Manager, select Tools > iSCSI Initiator
- Enter the IP address in the Target field > Click Quick Connect…
- Click Done
- Back in Powershell, run the following command
# initialize the disk as NTFS
Get-Disk | Where partitionstyle -eq ‘raw’ | Initialize-Disk -PartitionStyle MBR -PassThru | New-Partition -DriveLetter R -UseMaximumSize | Format-Volume -FileSystem NTFS -NewFileSystemLabel «RAMDisk» -Confirm:$false - Open File Explorer and the new RAM disk should be listed as a usable NTFS drive
Re-creating the RAM Disk on Boot
After the RAM disk has been setup initially, follow the steps below to have it recreated on system boot.
- Open a text editor
- Paste the following Powershell commands, changing the size as needed
New-IscsiVirtualDisk -Path «ramdisk:RAMDisk.vhdx» -Size 256MB
Add-IscsiVirtualDiskTargetMapping -TargetName RAMDisk -DevicePath «ramdisk:RAMDisk.vhdx»
Get-Disk | Where partitionstyle -eq ‘raw’ | Initialize-Disk -PartitionStyle MBR -PassThru | New-Partition -DriveLetter R -UseMaximumSize | Format-Volume -FileSystem NTFS -NewFileSystemLabel «RAMDisk» -Confirm:$false - Save the file as ramdisk.ps1 to a safe location to run from, c:\scripts for example
- Click on the Start Button > Type task > Launch Task Scheduler
- Right click the Task Scheduler Library folder in the left pane > Create Basic Task…
- Set the name to RAM Disk and optionally set a Description > Click Next
- For the Trigger, select When the computer starts > Click Next
- For the Action, select Start a program > Click Next
- In the Program/script field, paste the following:
C:\Windows\System32\WindowsPowerShell\v1.0\powershell.exe
- In the Add arguments field, paste the following, editing the path to the .ps1 file if necessary:
«C:\Scripts\ramdisk.ps1»
- Click Next
- Check the Open the Properties dialog for this task when I click Finish box
- Click Finish
- In the Properties dialog, click the Change User or Group… button
- Type system > Press Enter
- Check the Run with highest privileges box
- Click OK to create the scheduled task
- Reboot the server to verify the RAM disk is re-created automatically
How To, i12bretro, iSCSI, Microsoft, PowerShell, RAM Disk, Tutorial, Windows, Windows Server, Windows Server 2012, Windows Server 2016, Windows Server 2019, Windows Server 2022
2 Minutes
View interactive steps on GitHub
NOTE: RAM disks by their very nature are cleared on reboot. Do not use them to store any data that cannot be lost. A suitable use case would be temporary session files for a web server
Installing iSCSI Target Server
- Launch Server Manager if it does not automatically load
- Click the Start button > Server Manager
- Click Manage > Add roles and features
- Click Next on the Before you begin screen
- Select Role-based or feature-based installation > Next
- Leave Select a server from the server pool selected and select the current server > Next
- Expand File and Storage Services > Expand File and iSCSI Services > Select iSCSI Target Server
- A popup will appear with additional required roles and features, click the Add Features button
- Click Next
- Click Next on the Select features screen
- Click Install on the confirmation screen
- Leave the installation progress screen open until the install completes
Creating the RAM Disk
- Launch Powershell as administrator
- Enter the following commands to create the RAM disk, replacing the IP address with the current server’s IP address
# allow iSCSI loopback registry setting
Set-ItemProperty -Path ‘HKLM:\SOFTWARE\Microsoft\iSCSI Target’ -Name AllowLoopBack -Value 1
# start the iscsi initiator service
Start-Service -Name MSiSCSI
# set the iscsi initiator service to start automatically
Set-Service -Name MSiSCSI -StartupType Automatic
# create the ram disk, changing size as needed
New-IscsiVirtualDisk -Path «ramdisk:RAMDisk.vhdx» -Size 256MB
# initialize iSCSI target
New-IscsiServerTarget -TargetName RAMDisk -InitiatorIds @(«IPAddress:192.168.0.65»)
# connect to the ram disk
Add-IscsiVirtualDiskTargetMapping -TargetName RAMDisk -DevicePath «ramdisk:RAMDisk.vhdx» - Back in Server Manager, select Tools > iSCSI Initiator
- Enter the IP address in the Target field > Click Quick Connect…
- Click Done
- Back in Powershell, run the following command
# initialize the disk as NTFS
Get-Disk | Where partitionstyle -eq ‘raw’ | Initialize-Disk -PartitionStyle MBR -PassThru | New-Partition -DriveLetter R -UseMaximumSize | Format-Volume -FileSystem NTFS -NewFileSystemLabel «RAMDisk» -Confirm:$false - Open File Explorer and the new RAM disk should be listed as a usable NTFS drive
Re-creating the RAM Disk on Boot
After the RAM disk has been setup initially, follow the steps below to have it recreated on system boot.
- Open a text editor
- Paste the following Powershell commands, changing the size as needed
New-IscsiVirtualDisk -Path «ramdisk:RAMDisk.vhdx» -Size 256MB
Add-IscsiVirtualDiskTargetMapping -TargetName RAMDisk -DevicePath «ramdisk:RAMDisk.vhdx»
Get-Disk | Where partitionstyle -eq ‘raw’ | Initialize-Disk -PartitionStyle MBR -PassThru | New-Partition -DriveLetter R -UseMaximumSize | Format-Volume -FileSystem NTFS -NewFileSystemLabel «RAMDisk» -Confirm:$false - Save the file as ramdisk.ps1 to a safe location to run from, c:\scripts for example
- Click on the Start Button > Type task > Launch Task Scheduler
- Right click the Task Scheduler Library folder in the left pane > Create Basic Task…
- Set the name to RAM Disk and optionally set a Description > Click Next
- For the Trigger, select When the computer starts > Click Next
- For the Action, select Start a program > Click Next
- In the Program/script field, paste the following:
C:\Windows\System32\WindowsPowerShell\v1.0\powershell.exe
- In the Add arguments field, paste the following, editing the path to the .ps1 file if necessary:
«C:\Scripts\ramdisk.ps1»
- Click Next
- Check the Open the Properties dialog for this task when I click Finish box
- Click Finish
- In the Properties dialog, click the Change User or Group… button
- Type system > Press Enter
- Check the Run with highest privileges box
- Click OK to create the scheduled task
- Reboot the server to verify the RAM disk is re-created automatically
Published
RAM диск – это виртуальный диск, который создается в свободной области оперативной памяти и с точки зрения операционной системы выглядит как обычный локальный диск. Преимущество RAM Drive – очень высокая скорость чтения и записи на него (до 10 раз быстрее чем SSD, и до 2-3 раз чем NVME M.2). RAM диск можно использовать на компьютерах с большим объёмом RAM для хранения кеша и временных файлов приложений. Чаще всего RAM Drive используется для хранения кэша браузера, временных баз SQL, кэша приложений обработки графики, видео, рендеринга. При перезагрузке компьютера содержимое RAM диска обычно очищается.
Содержание:
- Создать RAM диск в Windows 10 и 11
- Создаем RAM диск с помощью встроенных средств Windows Server
Создать RAM диск в Windows 10 и 11
В Windows 10 и 11 нет встроенных средств для создания RAM дисков, поэтому нужно использовать сторонние программы (AMD RAMDisk, ImDisk, PassMark OSFMount, StarWind RAM Disk и т.д.).
В этом примере рассмотрим open-source утилиту ImDisk Toolkit (https://sourceforge.net/projects/imdisk-toolkit/). Ее преимущества:
- Бесплатная
- Компактная
- Нет ограничений на максимальный размер RAM диска
- Позволяет сохранять данные на RAM диске после выключения
- Скачайте и установите программу ImDisk Toolkit, запустив install.bat;

- После установки откройте ярлык RamDisk Configuration на рабочем столе;
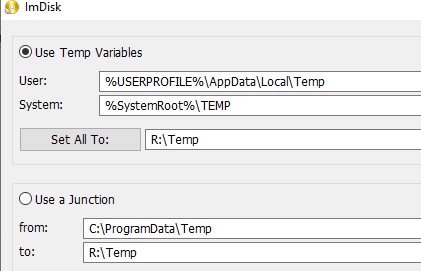
- На вкладке Basic нужно указать размер RAM диска (обычно рекомендуется использовать не более чем 20-30% RAM), назначить букву диска, указать нужно ли запускать RAM диск автоматически после загрузки Windows;
- Можно автоматически перенаправить папки TEMP на RAM диск через переменные окружения или через символические ссылки;

- Нажмите Mount чтобы включить RAM Drive. Откройте проводник и проверьте, что в нем появится новый диск указанного вами размера.
- По умолчанию содержимое RAM диска очищается при перезагрузке Windows. Вы можете настроить автоматическое сохранение содержимого RAM диска в локальную папку при выключении компьютера. Для этого перейдите на вкладку Data, укажите целевой каталог, включите Synchronize at System Shutdown. При загрузке операционной системы содержимое этого каталога будет копироваться на RAM диск.

Вы можете перенести кэш приложений на RAM диск с помощью символьный ссылок Windows. Например, чтобы хранить кэш 1С на RAM-диске:
mklink /j %USERPROFILE%\AppData\Local\1C\1cv8 R:\User\Local
mklink /j %USERPROFILE%\AppData\Roaming\1C\1cv8 R:\User\Roaming
Чтобы браузер Google Chrome хранил данные на RAM диске, нужно добавить в ярлык его запуска следующий параметр:
"C:\Program Files (x86)\Google\Chrome\Application\chrome.exe" --disk-cache-dir="R:\Chrome"
В таком режиме Google Chrome будет меньше изнашивать ваш SSD накопитель.
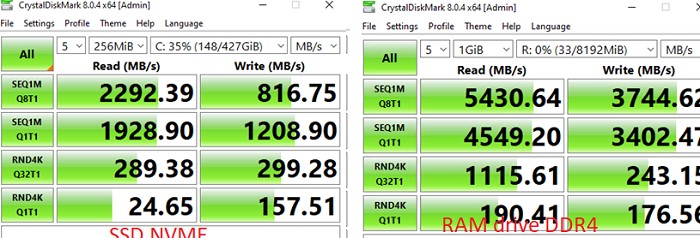
Скорость чтения и записи на RAM диск можно оценить с помощью утилиты Crystal Disk Mark. В нашем тесте скорость чтения/записи на RAM диск в DDR4 в 2-3 раза больше чем на SSD NVME M.2 накопитель.
Создаем RAM диск с помощью встроенных средств Windows Server
Windows Server вы можете создать RAM диск без использования сторонних программ. Можно выделить часть оперативной памяти сервера с помощью драйвера iSCSI.
Установите компонент iSCSI Target Server с помощью Server Manager (File and Storage Services -> File and iSCSI Services)
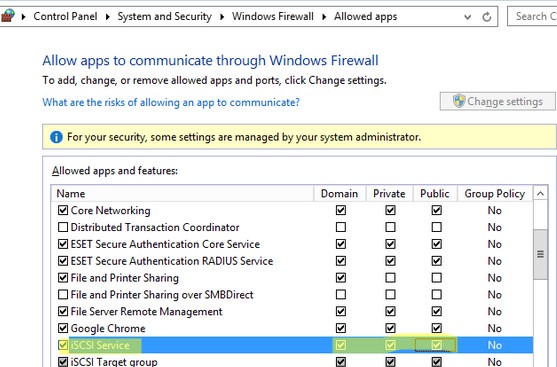
Откройте порты для службы iSCSI Service в Windows Defender Firewall. Можно разрешить доступ в графической консоли управления Windows Firewall или вы можете включить правила файервола с помощью PowerShell:
Set-NetFirewallRule -Name MsiScsi-in-TCP -Enabled True
Set-NetFirewallRule -Name MsiScsi-out-TCP -Enabled True
Чтобы разрешить трафик на loopback интерфейсе для iSCSI, измените в ветке реестра HKLM\Software\Microsoft\iSCSI Target значение DWORD параметра AllowLoopBack на 1: Можно изменить значение параметра реестра из PowerShell командой:
Set-ItemProperty -Path 'HKLM:\SOFTWARE\Microsoft\iSCSI Target' -Name AllowLoopBack -Value 1
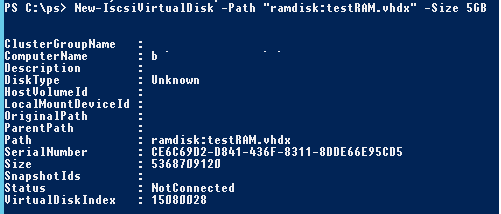
Затем создайте виртуальный RAM диск размером 5 Гб:
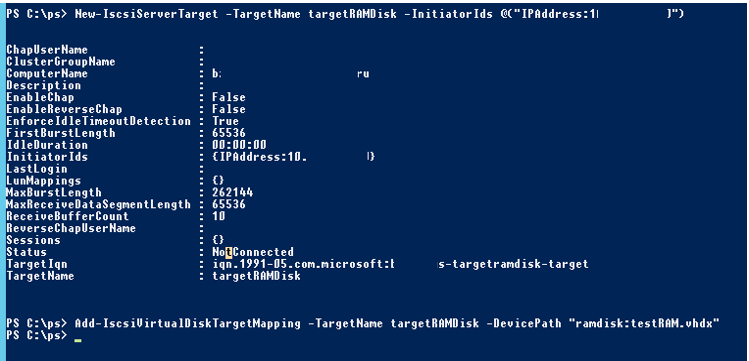
New-IscsiVirtualDisk -Path "ramdisk:testRAM.vhdx" -Size 5GB
Теперь нужно создать iSCSI таргет:
New-IscsiServerTarget -TargetName targetRAMDisk -InitiatorIds @("IPAddress:10.1.1.200")
Укажите здесь IP адрес вашего сетевого интерфейса.
Подключите RAM диск в созданный iSCSI таргет:
Add-IscsiVirtualDiskTargetMapping -TargetName targetRAMDisk -DevicePath "ramdisk:testRAM.vhdx"
Откройте консоль Server Manager -> Tools -> iSCSI Initiator.
На вкладке Targets укажите IP адрес вашего сервера, нажмите Quick Connect и подключите ваш iSCSI таргет.
Подключить ISCSI Target также можно так:
Get-IscsiTarget | Connect-IscsiTarget
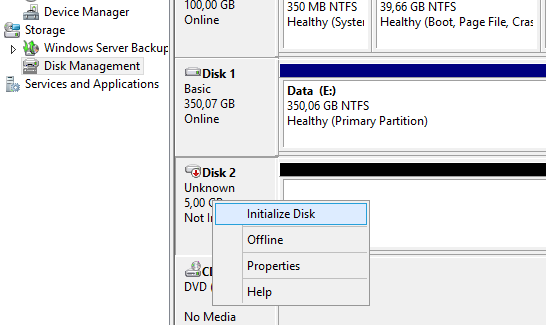
Теперь откройте консоль управления дисками (
diskmgmt.msс
), проверьте что у вас появился новый диск размером 5 Гб (это и есть ваш RAM диск). Инициализируйте, разметьте, отформатируйте диск, и назначьте ему букву диска.
Инициализировать дик и назначить ему букву тоже можно с помощью встроенных PowerShell командлетов из модуля управления дисками:
Get-Disk | Where partitionstyle -eq 'raw' | Initialize-Disk -PartitionStyle MBR -PassThru | New-Partition -AssignDriveLetter -UseMaximumSize | Format-Volume -FileSystem NTFS -NewFileSystemLabel "disk2" -Confirm:$false
Теперь вы можете перенести необходимые файлы на RAM диск и перенастроить ПО на использование данного диска.
После перезагрузки сервера RAM диск удаляется (вместе со всем содержимым) и его нужно пересоздавать заново.
Но к сожалению при тесте оказалось, что производительность (iOPS) RAM диска, созданного через iSCSI таргет на Windows Server почти в 2 раза меньше, чем у RAM диска на базе ImDisk.
#Windows #Server #RAMDisk
Full steps can be found at https://i12bretro.github.io/tutorials…
NOTE: RAM disks by their very nature are cleared on reboot. Do not use them to store any data that cannot be lost. A suitable use case would be temporary session files for a web server
———————————————————————
Installing iSCSI Target Server
———————————————————————
01. Launch Server Manager if it does not automatically load
a. Click the Start button ≫ Server Manager
03. Click Manage ≫ Add roles and features
04. Click Next on the Before you begin screen
05. Select Role-based or feature-based installation ≫ Next
06. Leave Select a server from the server pool selected and select the current server ≫ Next
07. Expand File and Storage Services ≫ Expand File and iSCSI Services ≫ Select iSCSI Target Server
08. A popup will appear with additional required roles and features, click the Add Features button
09. Click Next
10. Click Next on the Select features screen
11. Click Install on the confirmation screen
12. Leave the installation progress screen open until the install completes
———————————————————————
Creating the RAM Disk
———————————————————————
01. Launch Powershell as administrator
02. Enter the following commands to create the RAM disk, replacing the IP address with the current server’s IP address
allow iSCSI loopback registry setting
Set-ItemProperty -Path ‘HKLM:\SOFTWARE\Microsoft\iSCSI Target’ -Name AllowLoopBack -Value 1
start the iscsi initiator service
Start-Service -Name MSiSCSI
set the iscsi initiator service to start automatically
Set-Service -Name MSiSCSI -StartupType Automatic
create the ram disk, changing size as needed
New-IscsiVirtualDisk -Path «ramdisk:RAMDisk.vhdx» -Size 256MB
initialize iSCSI target
New-IscsiServerTarget -TargetName RAMDisk -InitiatorIds @(«IPAddress:192.168.0.65»)
connect to the ram disk
Add-IscsiVirtualDiskTargetMapping -TargetName RAMDisk -DevicePath «ramdisk:RAMDisk.vhdx»
03. Back in Server Manager, select Tools ≫ iSCSI Initiator
04. Enter the IP address in the Target field ≫ Click Quick Connect…
05. Click Done
06. Back in Powershell, run the following command
initialize the disk as NTFS
Get-Disk | Where partitionstyle -eq ‘raw’ | Initialize-Disk -PartitionStyle MBR -PassThru | New-Partition -DriveLetter R -UseMaximumSize | Format-Volume -FileSystem NTFS -NewFileSystemLabel «RAMDisk» -Confirm:$false
07. Open File Explorer and the new RAM disk should be listed as a usable NTFS drive
———————————————————————
Re-creating the RAM Disk on Boot
———————————————————————
After the RAM disk has been setup initially, follow the steps below to have it recreated on system boot.
01. Open a text editor
02. Paste the following Powershell commands, changing the size as needed
New-IscsiVirtualDisk -Path «ramdisk:RAMDisk.vhdx» -Size 256MB
Add-IscsiVirtualDiskTargetMapping -TargetName RAMDisk -DevicePath «ramdisk:RAMDisk.vhdx»
Get-Disk | Where partitionstyle -eq ‘raw’ | Initialize-Disk -PartitionStyle MBR -PassThru | New-Partition -DriveLetter R -UseMaximumSize | Format-Volume -FileSystem NTFS -NewFileSystemLabel «RAMDisk» -Confirm:$false
03. Save the file as ramdisk.ps1 to a safe location to run from, c:\scripts for example
04. Click on the Start Button ≫ Type task ≫ Launch Task Scheduler
05. Right click the Task Scheduler Library folder in the left pane ≫ Create Basic Task…
06. Set the name to RAM Disk and optionally set a Description ≫ Click Next
07. For the Trigger, select When the computer starts ≫ Click Next
08. For the Action, select Start a program ≫ Click Next
09. In the Program/script field, paste the following:
C:\Windows\System32\WindowsPowerShell\v1.0\powershell.exe
10. In the Add arguments field, paste the following, editing the path to the .ps1 file if necessary:
«C:\Scripts\ramdisk.ps1»
11. Click Next
12. Check the Open the Properties dialog for this task when I click Finish box
13. Click Finish
14. In the Properties dialog, click the Change User or Group… button
15. Type system ≫ Press Enter
16. Check the Run with highest privileges box
17. Click OK to create the scheduled task
18. Reboot the server to verify the RAM disk is re-created automatically
Connect with me and others ###
★ Discord: / discord
★ Reddit: / i12bretro
★ Twitter: / i12bretro
Предлагаем вашему вниманию ознакомиться с Windows Server RAM Disk Setup Guide [2012 2016 2019 2022] длительностью часов минут секунд в хорошем качестве, которое опубликовал пользователь i12bretro 20 Февраль 2022, поделитесь ссылкой с друзьями и знакомыми, на нашем сайте его посмотрели 2,581 раз и оно понравилось 27 людям.
На чтение2 мин
Опубликовано
Обновлено
Windows Server 2019 предлагает широкие возможности для оптимизации работы сервера, включая создание Ram disk – виртуального диска, который основан на оперативной памяти сервера. Ram disk позволяет значительно ускорить доступ к данным и повысить производительность системы в целом. В этом практическом руководстве рассмотрим процесс установки и настройки Ram disk на сервере под управлением Windows Server 2019.
Шаг 1. Перед началом установки необходимо убедиться, что сервер имеет достаточный объем оперативной памяти для создания Ram disk. Рекомендуется иметь не менее 4 гигабайт свободной оперативной памяти для наиболее эффективной работы Ram disk.
Шаг 2. Для установки Ram disk на Windows Server 2019 необходимо открыть «Диспетчер сервера», выбрать «Добавить роль и компоненты», а затем в списке компонентов найти и установить «Сервер Ram disk». После завершения установки система будет требовать перезагрузки сервера.
Шаг 3. После перезагрузки сервера необходимо настроить Ram disk под свои потребности. Для этого откройте «Диспетчер сервера», выберите «Сервер Ram disk» в списке служб и запустите консольный интерфейс Ram disk.
Примечание: Помимо консольного интерфейса, также доступен графический интерфейс управления Ram disk, но для настройки рекомендуется использовать консольный интерфейс, так как он обеспечивает более широкие возможности и более точную настройку.
Шаг 4. В консольном интерфейсе Ram disk выберите опцию «Создать новый диск» и укажите требуемую емкость и букву диска для нового Ram disk. Затем нажмите «Создать», чтобы завершить процесс создания Ram disk.
Поздравляем! Вы успешно установили и настроили Ram disk на сервере под управлением Windows Server 2019. Теперь ваш сервер будет работать гораздо быстрее и эффективнее благодаря использованию оперативной памяти в качестве виртуального диска.
Подготовка к установке Ram disk
Для установки и настройки Ram disk в Windows Server 2019 необходимо выполнить следующие шаги:
- Убедитесь, что в системе имеется свободная оперативная память, которую можно использовать для создания Ram disk. Размер Ram disk зависит от ваших потребностей, но обычно рекомендуется выделить не более половины доступной оперативной памяти.
- Определите, какую версию Ram disk вы хотите установить. В Windows Server 2019 доступны различные программные решения для создания Ram disk, такие как ImDisk, Dataram RAMDisk и другие. Ознакомьтесь со спецификацией и рекомендациями каждой программы перед установкой.
- Скачайте и установите выбранную программу для создания Ram disk.
- Запустите установленную программу и следуйте инструкциям по установке.
- После установки откройте программу и настройте параметры Ram disk. Выберите размер, букву диска, файловую систему и другие настройки в соответствии со своими потребностями.
- После завершения настройки, сохраните изменения и перезагрузите сервер, чтобы изменения вступили в силу.
Следуя этим простым шагам, вы сможете успешно установить и настроить Ram disk в Windows Server 2019, что позволит повысить производительность и ускорить работу сервера.