RAM диск – это виртуальный диск, который создается в свободной области оперативной памяти и с точки зрения операционной системы выглядит как обычный локальный диск. Преимущество RAM Drive – очень высокая скорость чтения и записи на него (до 10 раз быстрее чем SSD, и до 2-3 раз чем NVME M.2). RAM диск можно использовать на компьютерах с большим объёмом RAM для хранения кеша и временных файлов приложений. Чаще всего RAM Drive используется для хранения кэша браузера, временных баз SQL, кэша приложений обработки графики, видео, рендеринга. При перезагрузке компьютера содержимое RAM диска обычно очищается.
Содержание:
- Создать RAM диск в Windows 10 и 11
- Создаем RAM диск с помощью встроенных средств Windows Server
Создать RAM диск в Windows 10 и 11
В Windows 10 и 11 нет встроенных средств для создания RAM дисков, поэтому нужно использовать сторонние программы (AMD RAMDisk, ImDisk, PassMark OSFMount, StarWind RAM Disk и т.д.).
В этом примере рассмотрим open-source утилиту ImDisk Toolkit (https://sourceforge.net/projects/imdisk-toolkit/). Ее преимущества:
- Бесплатная
- Компактная
- Нет ограничений на максимальный размер RAM диска
- Позволяет сохранять данные на RAM диске после выключения
- Скачайте и установите программу ImDisk Toolkit, запустив install.bat;

- После установки откройте ярлык RamDisk Configuration на рабочем столе;
- На вкладке Basic нужно указать размер RAM диска (обычно рекомендуется использовать не более чем 20-30% RAM), назначить букву диска, указать нужно ли запускать RAM диск автоматически после загрузки Windows;
- Можно автоматически перенаправить папки TEMP на RAM диск через переменные окружения или через символические ссылки;

- Нажмите Mount чтобы включить RAM Drive. Откройте проводник и проверьте, что в нем появится новый диск указанного вами размера.
- По умолчанию содержимое RAM диска очищается при перезагрузке Windows. Вы можете настроить автоматическое сохранение содержимого RAM диска в локальную папку при выключении компьютера. Для этого перейдите на вкладку Data, укажите целевой каталог, включите Synchronize at System Shutdown. При загрузке операционной системы содержимое этого каталога будет копироваться на RAM диск.

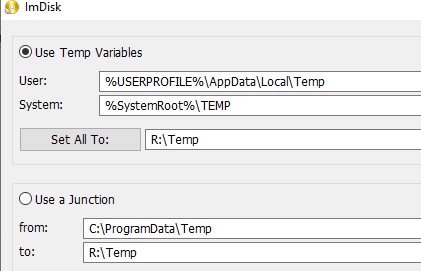
Вы можете перенести кэш приложений на RAM диск с помощью символьный ссылок Windows. Например, чтобы хранить кэш 1С на RAM-диске:
mklink /j %USERPROFILE%\AppData\Local\1C\1cv8 R:\User\Local
mklink /j %USERPROFILE%\AppData\Roaming\1C\1cv8 R:\User\Roaming
Чтобы браузер Google Chrome хранил данные на RAM диске, нужно добавить в ярлык его запуска следующий параметр:
"C:\Program Files (x86)\Google\Chrome\Application\chrome.exe" --disk-cache-dir="R:\Chrome"
В таком режиме Google Chrome будет меньше изнашивать ваш SSD накопитель.
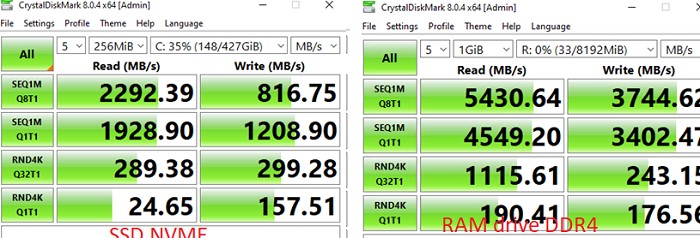
Скорость чтения и записи на RAM диск можно оценить с помощью утилиты Crystal Disk Mark. В нашем тесте скорость чтения/записи на RAM диск в DDR4 в 2-3 раза больше чем на SSD NVME M.2 накопитель.
Создаем RAM диск с помощью встроенных средств Windows Server
Windows Server вы можете создать RAM диск без использования сторонних программ. Можно выделить часть оперативной памяти сервера с помощью драйвера iSCSI.
Установите компонент iSCSI Target Server с помощью Server Manager (File and Storage Services -> File and iSCSI Services)
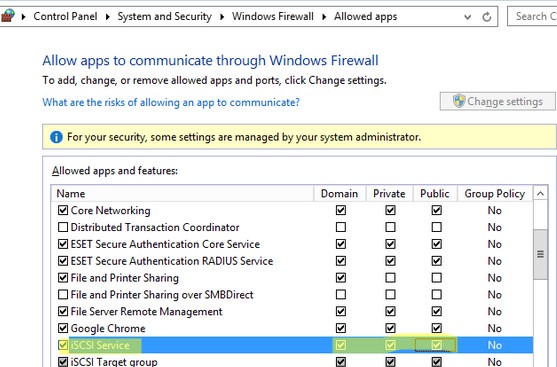
Откройте порты для службы iSCSI Service в Windows Defender Firewall. Можно разрешить доступ в графической консоли управления Windows Firewall или вы можете включить правила файервола с помощью PowerShell:
Set-NetFirewallRule -Name MsiScsi-in-TCP -Enabled True
Set-NetFirewallRule -Name MsiScsi-out-TCP -Enabled True
Чтобы разрешить трафик на loopback интерфейсе для iSCSI, измените в ветке реестра HKLM\Software\Microsoft\iSCSI Target значение DWORD параметра AllowLoopBack на 1: Можно изменить значение параметра реестра из PowerShell командой:
Set-ItemProperty -Path 'HKLM:\SOFTWARE\Microsoft\iSCSI Target' -Name AllowLoopBack -Value 1
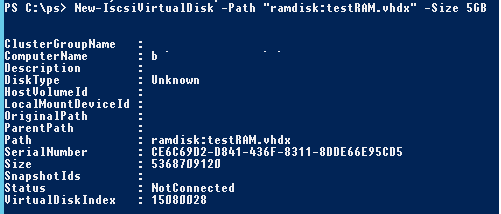
Затем создайте виртуальный RAM диск размером 5 Гб:
New-IscsiVirtualDisk -Path "ramdisk:testRAM.vhdx" -Size 5GB
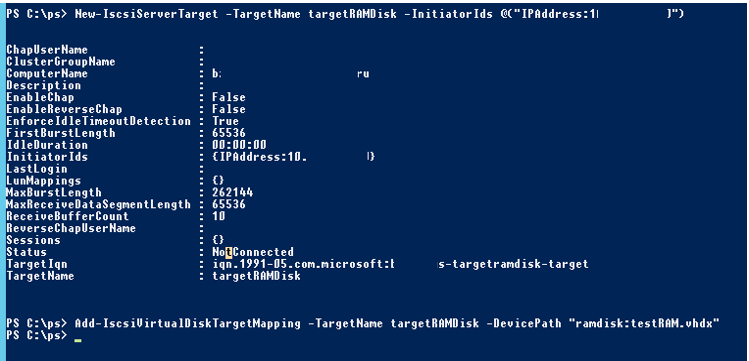
Теперь нужно создать iSCSI таргет:
New-IscsiServerTarget -TargetName targetRAMDisk -InitiatorIds @("IPAddress:10.1.1.200")
Укажите здесь IP адрес вашего сетевого интерфейса.
Подключите RAM диск в созданный iSCSI таргет:
Add-IscsiVirtualDiskTargetMapping -TargetName targetRAMDisk -DevicePath "ramdisk:testRAM.vhdx"
Откройте консоль Server Manager -> Tools -> iSCSI Initiator.
На вкладке Targets укажите IP адрес вашего сервера, нажмите Quick Connect и подключите ваш iSCSI таргет.
Подключить ISCSI Target также можно так:
Get-IscsiTarget | Connect-IscsiTarget
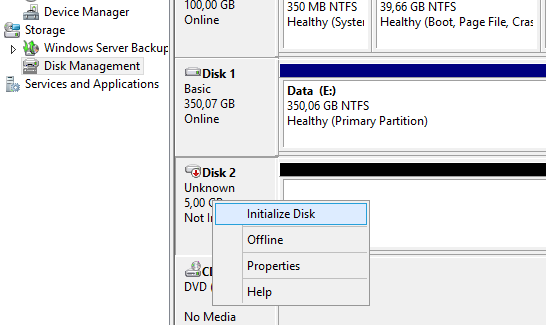
Теперь откройте консоль управления дисками (
diskmgmt.msс
), проверьте что у вас появился новый диск размером 5 Гб (это и есть ваш RAM диск). Инициализируйте, разметьте, отформатируйте диск, и назначьте ему букву диска.
Инициализировать дик и назначить ему букву тоже можно с помощью встроенных PowerShell командлетов из модуля управления дисками:
Get-Disk | Where partitionstyle -eq 'raw' | Initialize-Disk -PartitionStyle MBR -PassThru | New-Partition -AssignDriveLetter -UseMaximumSize | Format-Volume -FileSystem NTFS -NewFileSystemLabel "disk2" -Confirm:$false
Теперь вы можете перенести необходимые файлы на RAM диск и перенастроить ПО на использование данного диска.
После перезагрузки сервера RAM диск удаляется (вместе со всем содержимым) и его нужно пересоздавать заново.
Но к сожалению при тесте оказалось, что производительность (iOPS) RAM диска, созданного через iSCSI таргет на Windows Server почти в 2 раза меньше, чем у RAM диска на базе ImDisk.
NOTE: RAM disks by their very nature are cleared on reboot. Do not use them to store any data that cannot be lost. A suitable use case would be temporary session files for a web server
Installing iSCSI Target Server
- Launch Server Manager if it does not automatically load
- Click the Start button > Server Manager
- Click Manage > Add roles and features
- Click Next on the Before you begin screen
- Select Role-based or feature-based installation > Next
- Leave Select a server from the server pool selected and select the current server > Next
- Expand File and Storage Services > Expand File and iSCSI Services > Select iSCSI Target Server
- A popup will appear with additional required roles and features, click the Add Features button
- Click Next
- Click Next on the Select features screen
- Click Install on the confirmation screen
- Leave the installation progress screen open until the install completes
Creating the RAM Disk
- Launch Powershell as administrator
- Enter the following commands to create the RAM disk, replacing the IP address with the current server’s IP address
# allow iSCSI loopback registry setting
Set-ItemProperty -Path ‘HKLM:\SOFTWARE\Microsoft\iSCSI Target’ -Name AllowLoopBack -Value 1
# start the iscsi initiator service
Start-Service -Name MSiSCSI
# set the iscsi initiator service to start automatically
Set-Service -Name MSiSCSI -StartupType Automatic
# create the ram disk, changing size as needed
New-IscsiVirtualDisk -Path «ramdisk:RAMDisk.vhdx» -Size 256MB
# initialize iSCSI target
New-IscsiServerTarget -TargetName RAMDisk -InitiatorIds @(«IPAddress:192.168.0.65»)
# connect to the ram disk
Add-IscsiVirtualDiskTargetMapping -TargetName RAMDisk -DevicePath «ramdisk:RAMDisk.vhdx» - Back in Server Manager, select Tools > iSCSI Initiator
- Enter the IP address in the Target field > Click Quick Connect…
- Click Done
- Back in Powershell, run the following command
# initialize the disk as NTFS
Get-Disk | Where partitionstyle -eq ‘raw’ | Initialize-Disk -PartitionStyle MBR -PassThru | New-Partition -DriveLetter R -UseMaximumSize | Format-Volume -FileSystem NTFS -NewFileSystemLabel «RAMDisk» -Confirm:$false - Open File Explorer and the new RAM disk should be listed as a usable NTFS drive
Re-creating the RAM Disk on Boot
After the RAM disk has been setup initially, follow the steps below to have it recreated on system boot.
- Open a text editor
- Paste the following Powershell commands, changing the size as needed
New-IscsiVirtualDisk -Path «ramdisk:RAMDisk.vhdx» -Size 256MB
Add-IscsiVirtualDiskTargetMapping -TargetName RAMDisk -DevicePath «ramdisk:RAMDisk.vhdx»
Get-Disk | Where partitionstyle -eq ‘raw’ | Initialize-Disk -PartitionStyle MBR -PassThru | New-Partition -DriveLetter R -UseMaximumSize | Format-Volume -FileSystem NTFS -NewFileSystemLabel «RAMDisk» -Confirm:$false - Save the file as ramdisk.ps1 to a safe location to run from, c:\scripts for example
- Click on the Start Button > Type task > Launch Task Scheduler
- Right click the Task Scheduler Library folder in the left pane > Create Basic Task…
- Set the name to RAM Disk and optionally set a Description > Click Next
- For the Trigger, select When the computer starts > Click Next
- For the Action, select Start a program > Click Next
- In the Program/script field, paste the following:
C:\Windows\System32\WindowsPowerShell\v1.0\powershell.exe
- In the Add arguments field, paste the following, editing the path to the .ps1 file if necessary:
«C:\Scripts\ramdisk.ps1»
- Click Next
- Check the Open the Properties dialog for this task when I click Finish box
- Click Finish
- In the Properties dialog, click the Change User or Group… button
- Type system > Press Enter
- Check the Run with highest privileges box
- Click OK to create the scheduled task
- Reboot the server to verify the RAM disk is re-created automatically
How To, i12bretro, iSCSI, Microsoft, PowerShell, RAM Disk, Tutorial, Windows, Windows Server, Windows Server 2012, Windows Server 2016, Windows Server 2019, Windows Server 2022
2 Minutes
View interactive steps on GitHub
NOTE: RAM disks by their very nature are cleared on reboot. Do not use them to store any data that cannot be lost. A suitable use case would be temporary session files for a web server
Installing iSCSI Target Server
- Launch Server Manager if it does not automatically load
- Click the Start button > Server Manager
- Click Manage > Add roles and features
- Click Next on the Before you begin screen
- Select Role-based or feature-based installation > Next
- Leave Select a server from the server pool selected and select the current server > Next
- Expand File and Storage Services > Expand File and iSCSI Services > Select iSCSI Target Server
- A popup will appear with additional required roles and features, click the Add Features button
- Click Next
- Click Next on the Select features screen
- Click Install on the confirmation screen
- Leave the installation progress screen open until the install completes
Creating the RAM Disk
- Launch Powershell as administrator
- Enter the following commands to create the RAM disk, replacing the IP address with the current server’s IP address
# allow iSCSI loopback registry setting
Set-ItemProperty -Path ‘HKLM:\SOFTWARE\Microsoft\iSCSI Target’ -Name AllowLoopBack -Value 1
# start the iscsi initiator service
Start-Service -Name MSiSCSI
# set the iscsi initiator service to start automatically
Set-Service -Name MSiSCSI -StartupType Automatic
# create the ram disk, changing size as needed
New-IscsiVirtualDisk -Path «ramdisk:RAMDisk.vhdx» -Size 256MB
# initialize iSCSI target
New-IscsiServerTarget -TargetName RAMDisk -InitiatorIds @(«IPAddress:192.168.0.65»)
# connect to the ram disk
Add-IscsiVirtualDiskTargetMapping -TargetName RAMDisk -DevicePath «ramdisk:RAMDisk.vhdx» - Back in Server Manager, select Tools > iSCSI Initiator
- Enter the IP address in the Target field > Click Quick Connect…
- Click Done
- Back in Powershell, run the following command
# initialize the disk as NTFS
Get-Disk | Where partitionstyle -eq ‘raw’ | Initialize-Disk -PartitionStyle MBR -PassThru | New-Partition -DriveLetter R -UseMaximumSize | Format-Volume -FileSystem NTFS -NewFileSystemLabel «RAMDisk» -Confirm:$false - Open File Explorer and the new RAM disk should be listed as a usable NTFS drive
Re-creating the RAM Disk on Boot
After the RAM disk has been setup initially, follow the steps below to have it recreated on system boot.
- Open a text editor
- Paste the following Powershell commands, changing the size as needed
New-IscsiVirtualDisk -Path «ramdisk:RAMDisk.vhdx» -Size 256MB
Add-IscsiVirtualDiskTargetMapping -TargetName RAMDisk -DevicePath «ramdisk:RAMDisk.vhdx»
Get-Disk | Where partitionstyle -eq ‘raw’ | Initialize-Disk -PartitionStyle MBR -PassThru | New-Partition -DriveLetter R -UseMaximumSize | Format-Volume -FileSystem NTFS -NewFileSystemLabel «RAMDisk» -Confirm:$false - Save the file as ramdisk.ps1 to a safe location to run from, c:\scripts for example
- Click on the Start Button > Type task > Launch Task Scheduler
- Right click the Task Scheduler Library folder in the left pane > Create Basic Task…
- Set the name to RAM Disk and optionally set a Description > Click Next
- For the Trigger, select When the computer starts > Click Next
- For the Action, select Start a program > Click Next
- In the Program/script field, paste the following:
C:\Windows\System32\WindowsPowerShell\v1.0\powershell.exe
- In the Add arguments field, paste the following, editing the path to the .ps1 file if necessary:
«C:\Scripts\ramdisk.ps1»
- Click Next
- Check the Open the Properties dialog for this task when I click Finish box
- Click Finish
- In the Properties dialog, click the Change User or Group… button
- Type system > Press Enter
- Check the Run with highest privileges box
- Click OK to create the scheduled task
- Reboot the server to verify the RAM disk is re-created automatically
Published
#1
FelipeRolim
- LocationQuatiguá/Paraná/Brazil
Posted 08 November 2018 — 02:21 PM
Hello guys. After I spent a lot of time trying to make my dedicated computer work with RAMdisk, I finally managed to succeed in this endeavor. As I tried many different paths, I wrote down everything so that I had some «extra» information when I finally got it, and also to have a guide in case I had to do it again. Well, I didn’t have to do it again, hehe, but I hope the information I wrote down as «definitive» in terms of functioning is actually correct and helpful to colleagues in the forum. As I am Brazilian and I wrote the text originally in Portuguese, I spent some time transcribing it into English, so that it is possible to share with colleagues of this forum. I think it’s valid, because it really was very difficult to get it for the first time.
For those who don’t know, RAMdisk is one of the most high-performance methods for audiophiles in the world, and although I’ve never read anything about it in this forum and only have a personal friend who has tested before me, I’ve read a lot, a lot , much information in international scope, where it seems that the theme is more evolved. Reducing latency and high throughput is only a small part of the benefits. If that weren’t enough, I’ve never heard any «original» setup, with SSD, SD card, M.2, or anything else, that delivers audio quality as good as RAMdisk. For me, it’s the best, but what I don’t know is if there are different RAM models that deliver different sonorities (Corsair vs. Kingston; Kingston vs. Crucial; Corsair vs. GSkill; e.g.).
To make it easier for me and my colleagues, I created a PDF file that can be downloaded, because the text is large and I also attached some images to make the complicated parts more enlightening.
Finally, I remind colleagues that although there are Windows software that makes RAMdisk easily, they only allow a very limited part of RAM to be defined as storage, and they don’t allow the operating system itself to be installed or loaded on it. The guide I’ve tried to create effectively causes 100% of the operating system to go to RAM and run from it.
Here is a working video:
Attached Files
- mtan002, ho5456, XRumerTest and 9 others like this
— Speakers KEF Reference 203/2 with spikes;
— Schiit Freya preamp. (with Electro-Harmonix 6SN7 Gold-Pin tubes and Synergistic Research Orange Fuse) and Audio Research VS115 (with Tung-Sol KT120 and Svetlana 6H30 tubes and AMR Gold Fuse);
— DAC Ayre QB-9 192/24 + Furutech FI-03 ( R) + Synergistic Research Orange Fuse;
— Digital transport: the Control-PC is a dedicated computer with a Gigabyte H310N motherboard, a Intel Core i3-8100T processor, an Arctic Alpine 12 Passive Cooler, 16GB Corsair Vengeance DDR4 RAM 2400MHz, a JCAT Net Card FEMTO and 1TB Samsung 850 Pro SSD; the Audio-PC is a dedicated computer with a Gigabyte H310M M.2 2.0 motherboard, a Intel Core i3-9100T processor, an Arctic Alpine 12 Passive Cooler, 16GB Corsair Vengeance DDR4 RAM 2400MHz, a JCAT Net Card FEMTO and a JCAT USB Card FEMTO. Both computers use Windows Server 2019 Datacenter Core Mode (17763.737) with RAMdisk as Operational System, JPLAY FEMTO Alternative version, Minority Clean and Audiophile Optimizer v. 3.00 (1A in Control-PC and 4D in Audio-PC). Both also use hand made linear power supplies with a Furutech FI-06 ( R) NCF.
— Cables: Nordost Tyr (speaker), Nordost Valhalla XLR and Siltech 770i XLR (interconnects), Curious Evolved USB Cable, Nordost Valhalla Power Cable (DAC), Transparent PowerLink MM2 (power amp.), 2 x Purist Audio Design Canorus Praesto Revision Power Cable (power distributor and computers), Purist Audio Design Limited Edition Praesto Revision Power Cable (preamp.) and Jupiter Pure Silver Cotton Insulated (all internal wires from the computers).
— Acessories: Furutech GTX-D (G); Furutech GTX-D ( R) (x2); Sunrise Deep Line (x3); ebony spikes, carbon fiber bases; Nordost Qv2 (x3); acoustical and electrical reinforcements.
- Back to top
#2
taxman2
taxman2
- LocationSofia, Bulgaria
Posted 08 November 2018 — 03:37 PM
But this apply only if your library is stored inside the computer. On the same drive as Windows or could be on other drives inside the computer? Somehow I could not get it right.
Furman Elite (power conditioner), AO4, TC 3.1-server, JPlay iOS, HQP, fanless mini PC (Intel i7-Alderlake, 12th gen), 64GB RAM DDR4 (3200mHz), WS 2022 DataCenter core, JCAT USB XE Card, JCAT Femto Net Card, 200VA Ultra Low Noise LPS powering mini PC, 4 x 100VA Ultra Low Noise LPS powering Net, USB cards, router, switch and Singxer SU6; Gustard A26, Audia Flight Pre Mk III (dual mono class A preamplifier), Audia Flight FL50 Mk IV(dual mono class A amplifier), Focal Electra 1028BE,1008BE, Focal Electra sub;
- Back to top
#3
Marcin_gps
Marcin_gps
- Administrators
- 4,497 posts
JPLAY & JCAT Founder
Posted 08 November 2018 — 03:52 PM
Thanks for sharing
JPLAY for iOS: the new reference hi-fi app.
JCAT: streaming specific products for high-end audio
- Back to top
#4
FelipeRolim
FelipeRolim
- LocationQuatiguá/Paraná/Brazil
Posted 08 November 2018 — 03:54 PM
taxman2, this applies in any case. If your library is stored inside the computer, on the same drive as Windows, you’ll obtain reading exclusivity. If your library is stored inside the computer, but on another drive, you’ll obtain less SATA controllers usage. If your library is stored outside the computer, you’ll obtain no SATA controllers usage. In any case you gain sound quality. In my experience, it’s not only use or not to use SATA controllers.The less you use, the better. So, for Audio-PC, no SATA connections are necessary (perfect context), but, for Control-PC, if music files are stored on an SSD, you still gain some quality by removing at least one SSD (where Windows is installed).
I accidentally heard this when I removed one SSD (120GB) from my dedicated computer, leaving only an 1TB SSD, and the sound quality improved a little. I always used an audiophile SATA cable (Audiopheeling Statement) and a SOtM SATA filters. So, although the dedicated cable and the filter improves sound quality (a lot!), by removing cable and drive, the sound improves a little bit more. By removing all internal drives and disabling SATA connections, the sound goes to another level of quality. This I only did on Audio-PC. Control-PC is still not as improved. Even so, the gain does exist.
PS.: as my computer stays connected 24 hours a day, I load the Windows from the pendrive to the RAM, and then I remove the pendrive and replace it with an USB filter (I have one in each of the available ports). The computer therefore has no SATA connections, USB connections (other than the DAC, provided by the dedicated USB card), video connections, and nothing that isn’t strictly necessary. Only three cables are connected to it: power, network and USB. The performance is far superior so, and still reduce the cost of the SATA cable and the SATA filter (only for Audio-PC).
Edited by FelipeRolim, 09 November 2018 — 02:57 PM.
- peter.imrich likes this
— Speakers KEF Reference 203/2 with spikes;
— Schiit Freya preamp. (with Electro-Harmonix 6SN7 Gold-Pin tubes and Synergistic Research Orange Fuse) and Audio Research VS115 (with Tung-Sol KT120 and Svetlana 6H30 tubes and AMR Gold Fuse);
— DAC Ayre QB-9 192/24 + Furutech FI-03 ( R) + Synergistic Research Orange Fuse;
— Digital transport: the Control-PC is a dedicated computer with a Gigabyte H310N motherboard, a Intel Core i3-8100T processor, an Arctic Alpine 12 Passive Cooler, 16GB Corsair Vengeance DDR4 RAM 2400MHz, a JCAT Net Card FEMTO and 1TB Samsung 850 Pro SSD; the Audio-PC is a dedicated computer with a Gigabyte H310M M.2 2.0 motherboard, a Intel Core i3-9100T processor, an Arctic Alpine 12 Passive Cooler, 16GB Corsair Vengeance DDR4 RAM 2400MHz, a JCAT Net Card FEMTO and a JCAT USB Card FEMTO. Both computers use Windows Server 2019 Datacenter Core Mode (17763.737) with RAMdisk as Operational System, JPLAY FEMTO Alternative version, Minority Clean and Audiophile Optimizer v. 3.00 (1A in Control-PC and 4D in Audio-PC). Both also use hand made linear power supplies with a Furutech FI-06 ( R) NCF.
— Cables: Nordost Tyr (speaker), Nordost Valhalla XLR and Siltech 770i XLR (interconnects), Curious Evolved USB Cable, Nordost Valhalla Power Cable (DAC), Transparent PowerLink MM2 (power amp.), 2 x Purist Audio Design Canorus Praesto Revision Power Cable (power distributor and computers), Purist Audio Design Limited Edition Praesto Revision Power Cable (preamp.) and Jupiter Pure Silver Cotton Insulated (all internal wires from the computers).
— Acessories: Furutech GTX-D (G); Furutech GTX-D ( R) (x2); Sunrise Deep Line (x3); ebony spikes, carbon fiber bases; Nordost Qv2 (x3); acoustical and electrical reinforcements.
- Back to top
#5
FelipeRolim
FelipeRolim
- LocationQuatiguá/Paraná/Brazil
Posted 08 November 2018 — 04:22 PM
Another thing: as your Windows will be installed on a virtual disk (.vhd file), you won’t need to format the computer anymore. If you want to try different things and adjustments, it’s only make a copy of the original .vhd file and perpetuates it. Here I did it, and have a backup file stored on a well secured external drive. If pen drive crashes, e.g., I have a perfect copy stored.
— Speakers KEF Reference 203/2 with spikes;
— Schiit Freya preamp. (with Electro-Harmonix 6SN7 Gold-Pin tubes and Synergistic Research Orange Fuse) and Audio Research VS115 (with Tung-Sol KT120 and Svetlana 6H30 tubes and AMR Gold Fuse);
— DAC Ayre QB-9 192/24 + Furutech FI-03 ( R) + Synergistic Research Orange Fuse;
— Digital transport: the Control-PC is a dedicated computer with a Gigabyte H310N motherboard, a Intel Core i3-8100T processor, an Arctic Alpine 12 Passive Cooler, 16GB Corsair Vengeance DDR4 RAM 2400MHz, a JCAT Net Card FEMTO and 1TB Samsung 850 Pro SSD; the Audio-PC is a dedicated computer with a Gigabyte H310M M.2 2.0 motherboard, a Intel Core i3-9100T processor, an Arctic Alpine 12 Passive Cooler, 16GB Corsair Vengeance DDR4 RAM 2400MHz, a JCAT Net Card FEMTO and a JCAT USB Card FEMTO. Both computers use Windows Server 2019 Datacenter Core Mode (17763.737) with RAMdisk as Operational System, JPLAY FEMTO Alternative version, Minority Clean and Audiophile Optimizer v. 3.00 (1A in Control-PC and 4D in Audio-PC). Both also use hand made linear power supplies with a Furutech FI-06 ( R) NCF.
— Cables: Nordost Tyr (speaker), Nordost Valhalla XLR and Siltech 770i XLR (interconnects), Curious Evolved USB Cable, Nordost Valhalla Power Cable (DAC), Transparent PowerLink MM2 (power amp.), 2 x Purist Audio Design Canorus Praesto Revision Power Cable (power distributor and computers), Purist Audio Design Limited Edition Praesto Revision Power Cable (preamp.) and Jupiter Pure Silver Cotton Insulated (all internal wires from the computers).
— Acessories: Furutech GTX-D (G); Furutech GTX-D ( R) (x2); Sunrise Deep Line (x3); ebony spikes, carbon fiber bases; Nordost Qv2 (x3); acoustical and electrical reinforcements.
- Back to top
#6
taxman2
taxman2
- LocationSofia, Bulgaria
Posted 08 November 2018 — 05:16 PM
I think, I will skip this. I have 2 headless mini PCs, fully optimized (AO,PL,Fidelizer) with minimum processes running and the SQ rocks.
Furman Elite (power conditioner), AO4, TC 3.1-server, JPlay iOS, HQP, fanless mini PC (Intel i7-Alderlake, 12th gen), 64GB RAM DDR4 (3200mHz), WS 2022 DataCenter core, JCAT USB XE Card, JCAT Femto Net Card, 200VA Ultra Low Noise LPS powering mini PC, 4 x 100VA Ultra Low Noise LPS powering Net, USB cards, router, switch and Singxer SU6; Gustard A26, Audia Flight Pre Mk III (dual mono class A preamplifier), Audia Flight FL50 Mk IV(dual mono class A amplifier), Focal Electra 1028BE,1008BE, Focal Electra sub;
- Back to top
#7
FelipeRolim
FelipeRolim
- LocationQuatiguá/Paraná/Brazil
Posted 08 November 2018 — 05:43 PM
The only requirement is to have 16GB of RAM (8GB for load the SO and 8GB free for the rest). You don’t need to format anything, can maintain all of your data, because it’s just install everything directly on the pendrive and compare. Disabling SATA controllers is the worst task of the entire process. Probably you’ll need a monitor. At the and, hope everyone enjoy it and I await a feedback of the results.
PS.: I added to the initial post the results of the benchmark tests I did.
— Speakers KEF Reference 203/2 with spikes;
— Schiit Freya preamp. (with Electro-Harmonix 6SN7 Gold-Pin tubes and Synergistic Research Orange Fuse) and Audio Research VS115 (with Tung-Sol KT120 and Svetlana 6H30 tubes and AMR Gold Fuse);
— DAC Ayre QB-9 192/24 + Furutech FI-03 ( R) + Synergistic Research Orange Fuse;
— Digital transport: the Control-PC is a dedicated computer with a Gigabyte H310N motherboard, a Intel Core i3-8100T processor, an Arctic Alpine 12 Passive Cooler, 16GB Corsair Vengeance DDR4 RAM 2400MHz, a JCAT Net Card FEMTO and 1TB Samsung 850 Pro SSD; the Audio-PC is a dedicated computer with a Gigabyte H310M M.2 2.0 motherboard, a Intel Core i3-9100T processor, an Arctic Alpine 12 Passive Cooler, 16GB Corsair Vengeance DDR4 RAM 2400MHz, a JCAT Net Card FEMTO and a JCAT USB Card FEMTO. Both computers use Windows Server 2019 Datacenter Core Mode (17763.737) with RAMdisk as Operational System, JPLAY FEMTO Alternative version, Minority Clean and Audiophile Optimizer v. 3.00 (1A in Control-PC and 4D in Audio-PC). Both also use hand made linear power supplies with a Furutech FI-06 ( R) NCF.
— Cables: Nordost Tyr (speaker), Nordost Valhalla XLR and Siltech 770i XLR (interconnects), Curious Evolved USB Cable, Nordost Valhalla Power Cable (DAC), Transparent PowerLink MM2 (power amp.), 2 x Purist Audio Design Canorus Praesto Revision Power Cable (power distributor and computers), Purist Audio Design Limited Edition Praesto Revision Power Cable (preamp.) and Jupiter Pure Silver Cotton Insulated (all internal wires from the computers).
— Acessories: Furutech GTX-D (G); Furutech GTX-D ( R) (x2); Sunrise Deep Line (x3); ebony spikes, carbon fiber bases; Nordost Qv2 (x3); acoustical and electrical reinforcements.
- Back to top
#8
Thuan
Thuan
- LocationSillycon Valley
Posted 08 November 2018 — 06:49 PM
Thank you Felipe for your contributions to the forum.
- FelipeRolim likes this
WS2022, AO4, JPLAY, X26 DAC, Khozmo pre, Linkwitz Pluto, Puritan Ground Master.
- Back to top
#9
moriez
Posted 09 November 2018 — 07:07 AM
The only requirement is to have 16GB of RAM (8GB for load the SO and 8GB free for the rest).
Hi Felipe and many thanks for the guide.
Do you think there’s any way around this requirement? I’m using an Intel NUC that takes 8GB max internal RAM.
- Back to top
#10
FelipeRolim
FelipeRolim
- LocationQuatiguá/Paraná/Brazil
Posted 09 November 2018 — 11:47 AM
Hi Felipe and many thanks for the guide.
Do you think there’s any way around this requirement? I’m using an Intel NUC that takes 8GB max internal RAM.
Hello moriez. I’m afraid that with 8GB you won’t be able to make RAMdisk, unless you find an ultra-light Windows. I’ve verified that Windows Server 2016 Core has approximately 7.5GB and Windows Server 2016 GUI approximately 11GB. Both still use 500MB of memory for basic operation. To get a RAMdisk of 100% of the drive, you must have at least 12GB of RAM.
I’d like to remind colleagues that I didn’t try to redo the whole process. So, I don’t know if it works from beginning to the end without intercurrencies. Please, if anyone tries, give us a feedback. I’d like to know if it really works, but especially what do you think about sound using RAMdisk.
- moriez likes this
— Speakers KEF Reference 203/2 with spikes;
— Schiit Freya preamp. (with Electro-Harmonix 6SN7 Gold-Pin tubes and Synergistic Research Orange Fuse) and Audio Research VS115 (with Tung-Sol KT120 and Svetlana 6H30 tubes and AMR Gold Fuse);
— DAC Ayre QB-9 192/24 + Furutech FI-03 ( R) + Synergistic Research Orange Fuse;
— Digital transport: the Control-PC is a dedicated computer with a Gigabyte H310N motherboard, a Intel Core i3-8100T processor, an Arctic Alpine 12 Passive Cooler, 16GB Corsair Vengeance DDR4 RAM 2400MHz, a JCAT Net Card FEMTO and 1TB Samsung 850 Pro SSD; the Audio-PC is a dedicated computer with a Gigabyte H310M M.2 2.0 motherboard, a Intel Core i3-9100T processor, an Arctic Alpine 12 Passive Cooler, 16GB Corsair Vengeance DDR4 RAM 2400MHz, a JCAT Net Card FEMTO and a JCAT USB Card FEMTO. Both computers use Windows Server 2019 Datacenter Core Mode (17763.737) with RAMdisk as Operational System, JPLAY FEMTO Alternative version, Minority Clean and Audiophile Optimizer v. 3.00 (1A in Control-PC and 4D in Audio-PC). Both also use hand made linear power supplies with a Furutech FI-06 ( R) NCF.
— Cables: Nordost Tyr (speaker), Nordost Valhalla XLR and Siltech 770i XLR (interconnects), Curious Evolved USB Cable, Nordost Valhalla Power Cable (DAC), Transparent PowerLink MM2 (power amp.), 2 x Purist Audio Design Canorus Praesto Revision Power Cable (power distributor and computers), Purist Audio Design Limited Edition Praesto Revision Power Cable (preamp.) and Jupiter Pure Silver Cotton Insulated (all internal wires from the computers).
— Acessories: Furutech GTX-D (G); Furutech GTX-D ( R) (x2); Sunrise Deep Line (x3); ebony spikes, carbon fiber bases; Nordost Qv2 (x3); acoustical and electrical reinforcements.
- Back to top
#11
FelipeRolim
FelipeRolim
- LocationQuatiguá/Paraná/Brazil
Posted 10 November 2018 — 06:07 PM
I’ve tested the entire process twice yesterday, one for Windows Server 2016 Standard Core and one for Windows Server 2016 Standard GUI. It worked perfectly. For Core it took 8GB, and for GUI it took 14GB. The Core mode still uses 500MB of RAM to run and the GUI uses 1GB. I intended to use the 2016 Server Standard GUI for Control PC with RAMdisk, but without the Audiophile Optimizer. Unfortunately, only a small RAM remained free so I went back to Windows Server by SSD. I left a mixed-use Windows 10 (study, work, and music) for an exculsive Windows Server 2016 Standard. Another sensitive gain came through the speakers.
I don’t want to waste an Audiophile Optimizer licence with the notebook. So I’ll reserve it for the future dedicated computer, which will pair with the Audio-PC.
- motberg and moriez like this
— Speakers KEF Reference 203/2 with spikes;
— Schiit Freya preamp. (with Electro-Harmonix 6SN7 Gold-Pin tubes and Synergistic Research Orange Fuse) and Audio Research VS115 (with Tung-Sol KT120 and Svetlana 6H30 tubes and AMR Gold Fuse);
— DAC Ayre QB-9 192/24 + Furutech FI-03 ( R) + Synergistic Research Orange Fuse;
— Digital transport: the Control-PC is a dedicated computer with a Gigabyte H310N motherboard, a Intel Core i3-8100T processor, an Arctic Alpine 12 Passive Cooler, 16GB Corsair Vengeance DDR4 RAM 2400MHz, a JCAT Net Card FEMTO and 1TB Samsung 850 Pro SSD; the Audio-PC is a dedicated computer with a Gigabyte H310M M.2 2.0 motherboard, a Intel Core i3-9100T processor, an Arctic Alpine 12 Passive Cooler, 16GB Corsair Vengeance DDR4 RAM 2400MHz, a JCAT Net Card FEMTO and a JCAT USB Card FEMTO. Both computers use Windows Server 2019 Datacenter Core Mode (17763.737) with RAMdisk as Operational System, JPLAY FEMTO Alternative version, Minority Clean and Audiophile Optimizer v. 3.00 (1A in Control-PC and 4D in Audio-PC). Both also use hand made linear power supplies with a Furutech FI-06 ( R) NCF.
— Cables: Nordost Tyr (speaker), Nordost Valhalla XLR and Siltech 770i XLR (interconnects), Curious Evolved USB Cable, Nordost Valhalla Power Cable (DAC), Transparent PowerLink MM2 (power amp.), 2 x Purist Audio Design Canorus Praesto Revision Power Cable (power distributor and computers), Purist Audio Design Limited Edition Praesto Revision Power Cable (preamp.) and Jupiter Pure Silver Cotton Insulated (all internal wires from the computers).
— Acessories: Furutech GTX-D (G); Furutech GTX-D ( R) (x2); Sunrise Deep Line (x3); ebony spikes, carbon fiber bases; Nordost Qv2 (x3); acoustical and electrical reinforcements.
- Back to top
#12
FelipeRolim
FelipeRolim
- LocationQuatiguá/Paraná/Brazil
Posted 14 December 2018 — 05:10 PM
Hello friends. I was warned that the NTBOOT.iso link I shared in the initial post file is no longer working. That’s why I stored the file in Google Drive and created a sharing link. Follow:
https://drive.google…iew?usp=sharing
- TubemanRQ likes this
— Speakers KEF Reference 203/2 with spikes;
— Schiit Freya preamp. (with Electro-Harmonix 6SN7 Gold-Pin tubes and Synergistic Research Orange Fuse) and Audio Research VS115 (with Tung-Sol KT120 and Svetlana 6H30 tubes and AMR Gold Fuse);
— DAC Ayre QB-9 192/24 + Furutech FI-03 ( R) + Synergistic Research Orange Fuse;
— Digital transport: the Control-PC is a dedicated computer with a Gigabyte H310N motherboard, a Intel Core i3-8100T processor, an Arctic Alpine 12 Passive Cooler, 16GB Corsair Vengeance DDR4 RAM 2400MHz, a JCAT Net Card FEMTO and 1TB Samsung 850 Pro SSD; the Audio-PC is a dedicated computer with a Gigabyte H310M M.2 2.0 motherboard, a Intel Core i3-9100T processor, an Arctic Alpine 12 Passive Cooler, 16GB Corsair Vengeance DDR4 RAM 2400MHz, a JCAT Net Card FEMTO and a JCAT USB Card FEMTO. Both computers use Windows Server 2019 Datacenter Core Mode (17763.737) with RAMdisk as Operational System, JPLAY FEMTO Alternative version, Minority Clean and Audiophile Optimizer v. 3.00 (1A in Control-PC and 4D in Audio-PC). Both also use hand made linear power supplies with a Furutech FI-06 ( R) NCF.
— Cables: Nordost Tyr (speaker), Nordost Valhalla XLR and Siltech 770i XLR (interconnects), Curious Evolved USB Cable, Nordost Valhalla Power Cable (DAC), Transparent PowerLink MM2 (power amp.), 2 x Purist Audio Design Canorus Praesto Revision Power Cable (power distributor and computers), Purist Audio Design Limited Edition Praesto Revision Power Cable (preamp.) and Jupiter Pure Silver Cotton Insulated (all internal wires from the computers).
— Acessories: Furutech GTX-D (G); Furutech GTX-D ( R) (x2); Sunrise Deep Line (x3); ebony spikes, carbon fiber bases; Nordost Qv2 (x3); acoustical and electrical reinforcements.
- Back to top
#13
billgr
billgr
- LocationNew Zealand
Posted 15 December 2018 — 07:07 PM
Hi Philipe,
It’s great to be given some of the reasons why ramdisk should sound better. I don’t know whether I’m competent enough to follow your instructions but you’ve definitely got me interested.
Does the ram need to be a single module or can you use multiples? If so which is better?
Have you tried with Win 2019 yet?
Win2022 core, Audiophile Optimizer, JPlayFemto (2PC), Ramboot, BubbleUPnP, Matrix X-SPDIF3, PS Audio DirectStream DAC++, ATI1806 Amplifiers, Linkwitz LX521MG speakers with ASP4, JPS Labs Aluminata cables, PS Audio P10 Power Regenerator.
- Back to top
#14
FelipeRolim
FelipeRolim
- LocationQuatiguá/Paraná/Brazil
Posted 15 December 2018 — 10:05 PM
Hi Philipe,
It’s great to be given some of the reasons why ramdisk should sound better. I don’t know whether I’m competent enough to follow your instructions but you’ve definitely got me interested.
Does the ram need to be a single module or can you use multiples? If so which is better?
Have you tried with Win 2019 yet?
Hello billgr. I didn’t make comparisons with several types of RAM memory models, nor did I compare with 1 or 2 memory combs. I just made RAMdisk work with the setup I had at the time and compared. In my mind, the sound is much more fluid, natural, with clearer treble, without sounding artificial or «digitized». On the contrary. It looks more analog. I used, as a comparison, Windows stored on a Samsung 850Evo SSD with SATA filter from SOtM and an Audiopheeling SATA Statement cable (over $700.00; the best that I’ve hearded). At the time, Windows worked better on RAM than directly on the SSD. I spoke in more detail about the reasons why I believe RAMdisk is better on this topic. I hope you don’t mind the routing, but as the texts are also mine, I think it’s equally instructive. The topic is all interesting, but post #24 is the specific one. Regarding the Windows Server 2019, I haven’t tested it yet.
— Speakers KEF Reference 203/2 with spikes;
— Schiit Freya preamp. (with Electro-Harmonix 6SN7 Gold-Pin tubes and Synergistic Research Orange Fuse) and Audio Research VS115 (with Tung-Sol KT120 and Svetlana 6H30 tubes and AMR Gold Fuse);
— DAC Ayre QB-9 192/24 + Furutech FI-03 ( R) + Synergistic Research Orange Fuse;
— Digital transport: the Control-PC is a dedicated computer with a Gigabyte H310N motherboard, a Intel Core i3-8100T processor, an Arctic Alpine 12 Passive Cooler, 16GB Corsair Vengeance DDR4 RAM 2400MHz, a JCAT Net Card FEMTO and 1TB Samsung 850 Pro SSD; the Audio-PC is a dedicated computer with a Gigabyte H310M M.2 2.0 motherboard, a Intel Core i3-9100T processor, an Arctic Alpine 12 Passive Cooler, 16GB Corsair Vengeance DDR4 RAM 2400MHz, a JCAT Net Card FEMTO and a JCAT USB Card FEMTO. Both computers use Windows Server 2019 Datacenter Core Mode (17763.737) with RAMdisk as Operational System, JPLAY FEMTO Alternative version, Minority Clean and Audiophile Optimizer v. 3.00 (1A in Control-PC and 4D in Audio-PC). Both also use hand made linear power supplies with a Furutech FI-06 ( R) NCF.
— Cables: Nordost Tyr (speaker), Nordost Valhalla XLR and Siltech 770i XLR (interconnects), Curious Evolved USB Cable, Nordost Valhalla Power Cable (DAC), Transparent PowerLink MM2 (power amp.), 2 x Purist Audio Design Canorus Praesto Revision Power Cable (power distributor and computers), Purist Audio Design Limited Edition Praesto Revision Power Cable (preamp.) and Jupiter Pure Silver Cotton Insulated (all internal wires from the computers).
— Acessories: Furutech GTX-D (G); Furutech GTX-D ( R) (x2); Sunrise Deep Line (x3); ebony spikes, carbon fiber bases; Nordost Qv2 (x3); acoustical and electrical reinforcements.
- Back to top
#15
TubemanRQ
Posted 15 December 2018 — 10:10 PM
Hello friends. I was warned that the NTBOOT.iso link I shared in the initial post file is no longer working. That’s why I stored the file in Google Drive and created a sharing link. Follow:
https://drive.google…iew?usp=sharing
Thanks for all your incredible information, Felipe!
I truly agree with you and look forward to more of your posts!
Hi Philipe,
It’s great to be given some of the reasons why ramdisk should sound better. I don’t know whether I’m competent enough to follow your instructions but you’ve definitely got me interested.
Does the ram need to be a single module or can you use multiples? If so which is better?
Have you tried with Win 2019 yet?
Felipe, I am also curious if a single 16GB RAM module, or a dual-channel configuration of two 8GB RAM modules is better, as far as sound quality?
Does anyone have experience comparing dual-channel configuration vs single-channel for RAM?
Thanks!
- Back to top
#16
FelipeRolim
FelipeRolim
- LocationQuatiguá/Paraná/Brazil
Posted 15 December 2018 — 10:28 PM
In Control-PC I use a single 16GB DDR4 memory, and in Audio-PC I use two 8GB DDR3 memories. The only thing I compared in Audio-PC were the Corsair Value Select and Corsair Vengeance memories, both DDR3 1333MHz, and Vengeance was clearly superior. However, I didn’t compare single-channel with dual-channel and no other brands and models of memory. If anyone could collaborate, it will be interesting.
- Thuan likes this
— Speakers KEF Reference 203/2 with spikes;
— Schiit Freya preamp. (with Electro-Harmonix 6SN7 Gold-Pin tubes and Synergistic Research Orange Fuse) and Audio Research VS115 (with Tung-Sol KT120 and Svetlana 6H30 tubes and AMR Gold Fuse);
— DAC Ayre QB-9 192/24 + Furutech FI-03 ( R) + Synergistic Research Orange Fuse;
— Digital transport: the Control-PC is a dedicated computer with a Gigabyte H310N motherboard, a Intel Core i3-8100T processor, an Arctic Alpine 12 Passive Cooler, 16GB Corsair Vengeance DDR4 RAM 2400MHz, a JCAT Net Card FEMTO and 1TB Samsung 850 Pro SSD; the Audio-PC is a dedicated computer with a Gigabyte H310M M.2 2.0 motherboard, a Intel Core i3-9100T processor, an Arctic Alpine 12 Passive Cooler, 16GB Corsair Vengeance DDR4 RAM 2400MHz, a JCAT Net Card FEMTO and a JCAT USB Card FEMTO. Both computers use Windows Server 2019 Datacenter Core Mode (17763.737) with RAMdisk as Operational System, JPLAY FEMTO Alternative version, Minority Clean and Audiophile Optimizer v. 3.00 (1A in Control-PC and 4D in Audio-PC). Both also use hand made linear power supplies with a Furutech FI-06 ( R) NCF.
— Cables: Nordost Tyr (speaker), Nordost Valhalla XLR and Siltech 770i XLR (interconnects), Curious Evolved USB Cable, Nordost Valhalla Power Cable (DAC), Transparent PowerLink MM2 (power amp.), 2 x Purist Audio Design Canorus Praesto Revision Power Cable (power distributor and computers), Purist Audio Design Limited Edition Praesto Revision Power Cable (preamp.) and Jupiter Pure Silver Cotton Insulated (all internal wires from the computers).
— Acessories: Furutech GTX-D (G); Furutech GTX-D ( R) (x2); Sunrise Deep Line (x3); ebony spikes, carbon fiber bases; Nordost Qv2 (x3); acoustical and electrical reinforcements.
- Back to top
#17
billgr
billgr
- LocationNew Zealand
Posted 15 December 2018 — 11:47 PM
Yes, I read all the other posts. I’d like to play around with this but am short on time for a while (and aware of my limited abilities).
Plus I’m really happy with Femto and the new DirectStream firmware so want to bask in it’s glory for a while. But it’s on my list.
Win2022 core, Audiophile Optimizer, JPlayFemto (2PC), Ramboot, BubbleUPnP, Matrix X-SPDIF3, PS Audio DirectStream DAC++, ATI1806 Amplifiers, Linkwitz LX521MG speakers with ASP4, JPS Labs Aluminata cables, PS Audio P10 Power Regenerator.
- Back to top
#18
billgr
billgr
- LocationNew Zealand
Posted 18 December 2018 — 04:09 AM
Hi Philipe, I plan to try ramdisk on a test pc first. Can I use the same windows activation key on both the SSD and on the ramdisk or do I need another key?
Win2022 core, Audiophile Optimizer, JPlayFemto (2PC), Ramboot, BubbleUPnP, Matrix X-SPDIF3, PS Audio DirectStream DAC++, ATI1806 Amplifiers, Linkwitz LX521MG speakers with ASP4, JPS Labs Aluminata cables, PS Audio P10 Power Regenerator.
- Back to top
#19
FelipeRolim
FelipeRolim
- LocationQuatiguá/Paraná/Brazil
Posted 18 December 2018 — 04:03 PM
Hi Philipe, I plan to try ramdisk on a test pc first. Can I use the same windows activation key on both the SSD and on the ramdisk or do I need another key?
billgr, I don’t know precisely about this. Maybe, if Windows use MAC Address or another thing that identifies that computer as the same one, it will work. It’s similar to Audiophile Optimizer and JPLAY. In my Control-PC, the JPLAY is installed in both Windows, 10 and Server 2016, and working. You should try.
——————————————————————
Has anyone here come to experience the RAMdisk process and have some impression to report?
— Speakers KEF Reference 203/2 with spikes;
— Schiit Freya preamp. (with Electro-Harmonix 6SN7 Gold-Pin tubes and Synergistic Research Orange Fuse) and Audio Research VS115 (with Tung-Sol KT120 and Svetlana 6H30 tubes and AMR Gold Fuse);
— DAC Ayre QB-9 192/24 + Furutech FI-03 ( R) + Synergistic Research Orange Fuse;
— Digital transport: the Control-PC is a dedicated computer with a Gigabyte H310N motherboard, a Intel Core i3-8100T processor, an Arctic Alpine 12 Passive Cooler, 16GB Corsair Vengeance DDR4 RAM 2400MHz, a JCAT Net Card FEMTO and 1TB Samsung 850 Pro SSD; the Audio-PC is a dedicated computer with a Gigabyte H310M M.2 2.0 motherboard, a Intel Core i3-9100T processor, an Arctic Alpine 12 Passive Cooler, 16GB Corsair Vengeance DDR4 RAM 2400MHz, a JCAT Net Card FEMTO and a JCAT USB Card FEMTO. Both computers use Windows Server 2019 Datacenter Core Mode (17763.737) with RAMdisk as Operational System, JPLAY FEMTO Alternative version, Minority Clean and Audiophile Optimizer v. 3.00 (1A in Control-PC and 4D in Audio-PC). Both also use hand made linear power supplies with a Furutech FI-06 ( R) NCF.
— Cables: Nordost Tyr (speaker), Nordost Valhalla XLR and Siltech 770i XLR (interconnects), Curious Evolved USB Cable, Nordost Valhalla Power Cable (DAC), Transparent PowerLink MM2 (power amp.), 2 x Purist Audio Design Canorus Praesto Revision Power Cable (power distributor and computers), Purist Audio Design Limited Edition Praesto Revision Power Cable (preamp.) and Jupiter Pure Silver Cotton Insulated (all internal wires from the computers).
— Acessories: Furutech GTX-D (G); Furutech GTX-D ( R) (x2); Sunrise Deep Line (x3); ebony spikes, carbon fiber bases; Nordost Qv2 (x3); acoustical and electrical reinforcements.
- Back to top
#20
Rob
Rob
- LocationStamford, England.
Posted 18 December 2018 — 04:44 PM
Hi Philipe, I plan to try ramdisk on a test pc first. Can I use the same windows activation key on both the SSD and on the ramdisk or do I need another key?
Hi, it depends on whether the key is OEM or RETAIL, with the OEM the key, it is tied to the hardware, with a RETAIL key it seems you can use it on more than one hardware configuration, hope the ramdisk works out ok for you, I’am also interested in ramdisc for audio Pc.
Regards Rob.
- Back to top
A RAM disk is a virtual disk created in free memory (RAM) that is recognized by the operating system as a separate physical disk. Its storage in fast RAM allows for extremely fast read and write operations on this disk. In this article, we will guide you on how to create a RAM disk on Windows Server.
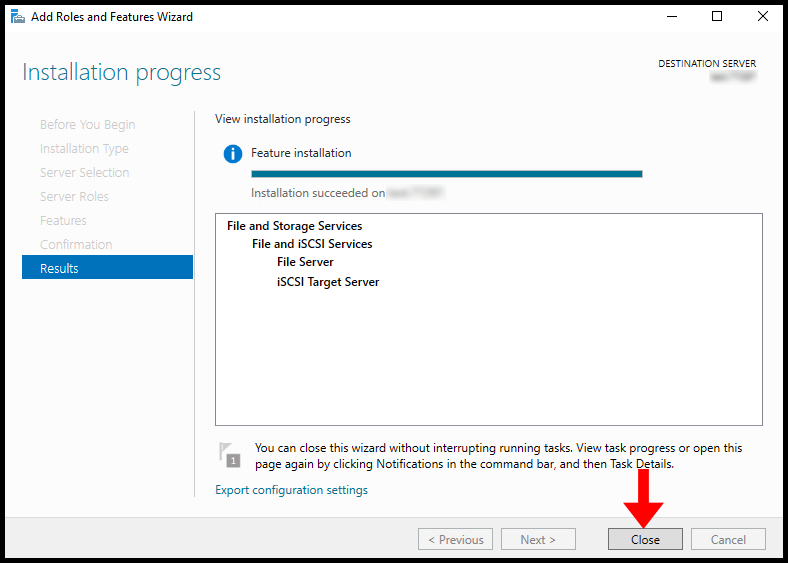
Install iSCSI Target Server
In this section, we will go over how to install iSCSI Target Server in order to create a RAM Disk on a Windows server via Server Manager.
1. To start, log into your Windows Server and use the Windows search function to search and open Server Manager.
2. Next, click on Add Roles and Features.
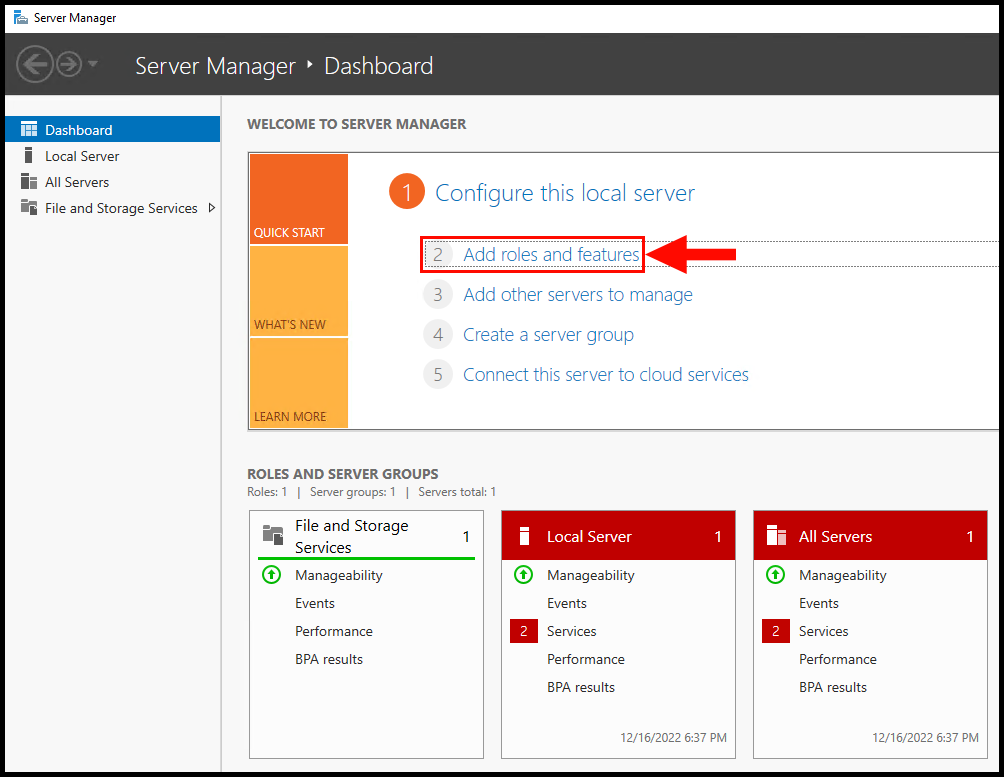
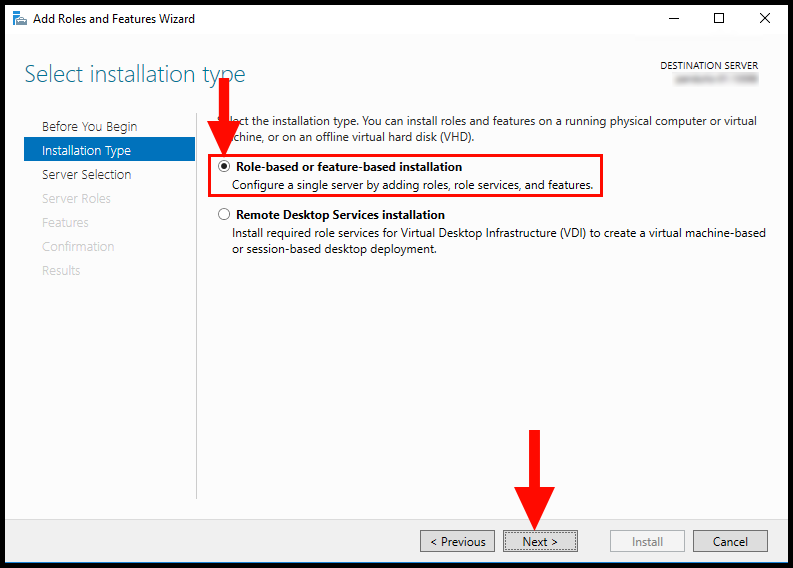
3. Next, the Add Roles and Features Wizard screen will appear. Click Next to move on from the Before You Begin tab.

4. In the Installation Type tab, select Role-based or feature-based installation and then click Next to move on.
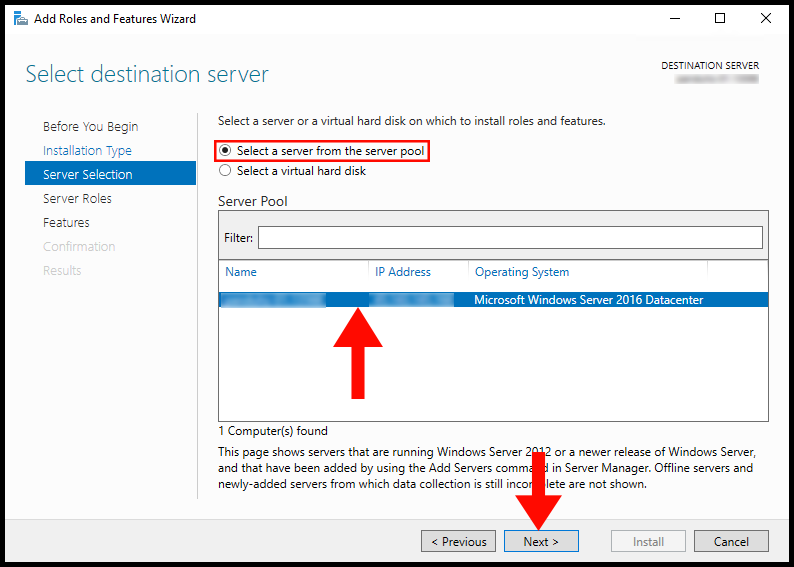
5. Now in the Server Selection tab, select your Windows Server and then click Next to continue.
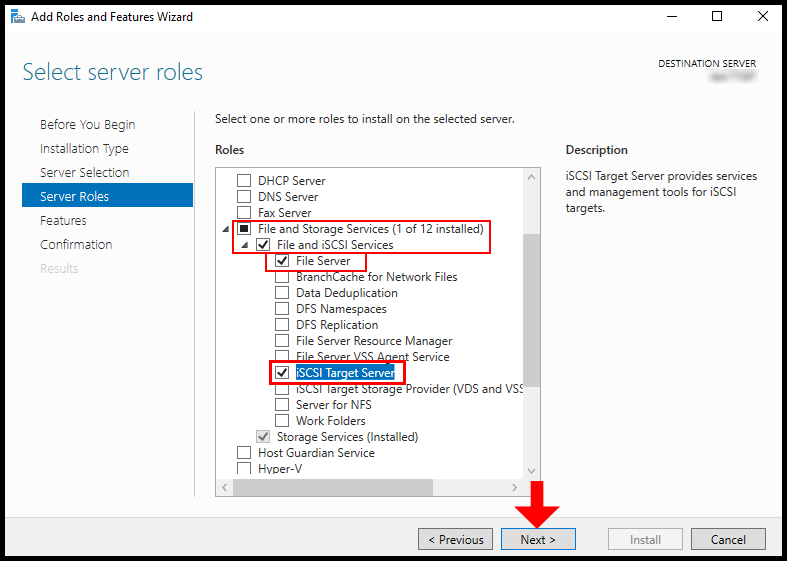
6. On the Server Roles tab, expand File and Storage Services, then expand File and iSCSI Services, and from the options check the boxes for File Server and iSCSI Target Server.
7. On the Features tab, refrain from making any modifications, then click Next to proceed.
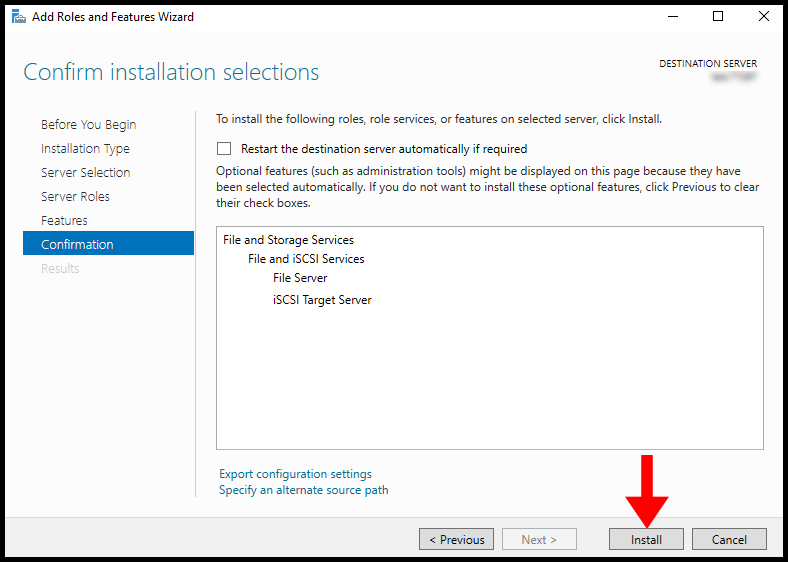
8. In the Confirmation section, click on Install.
9. Once the installation is complete the window will say Installation succeeded, then you can click Close.
Enable iSCSI Service Traffic
Once we are done with the installation of the iSCSI Service, we will need to make sure to allow its traffic through Windows. In this section, we will be using regedit to allow traffic.
1. To start, use the Windows search function to search and open regedit.
2. Then, expand the following items HKEY_LOCAL-MACHINE, SOFTWARE, and Microsoft.
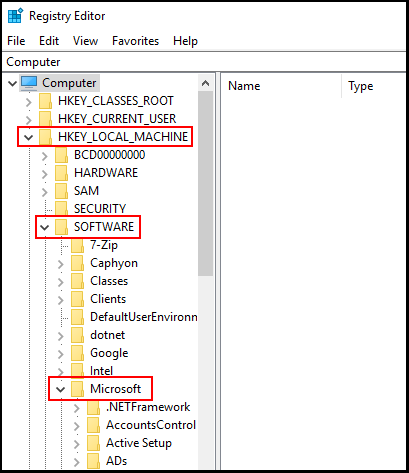
3. Next, in the left-hand menu scroll down and locate iSCSI Target, then click on it, and in the middle of the window double click AllowLoopback.
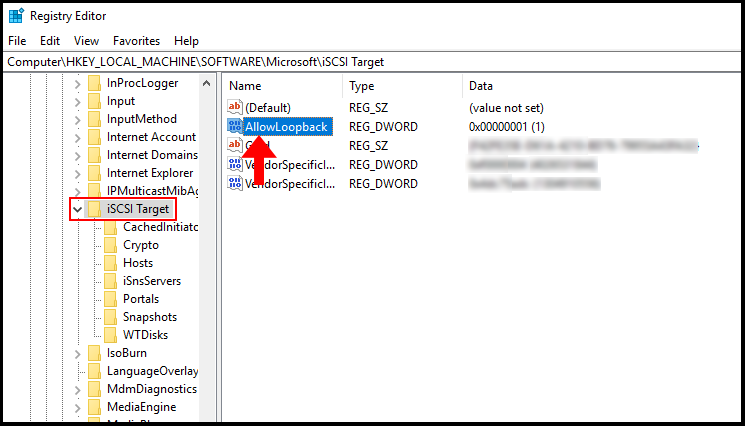
4. Now, change the value to 1 and click OK to finish.
Create a Virtual RAM Disk
In this section, we will guide you through the steps to create the virtual RAM disk via PowerShell.
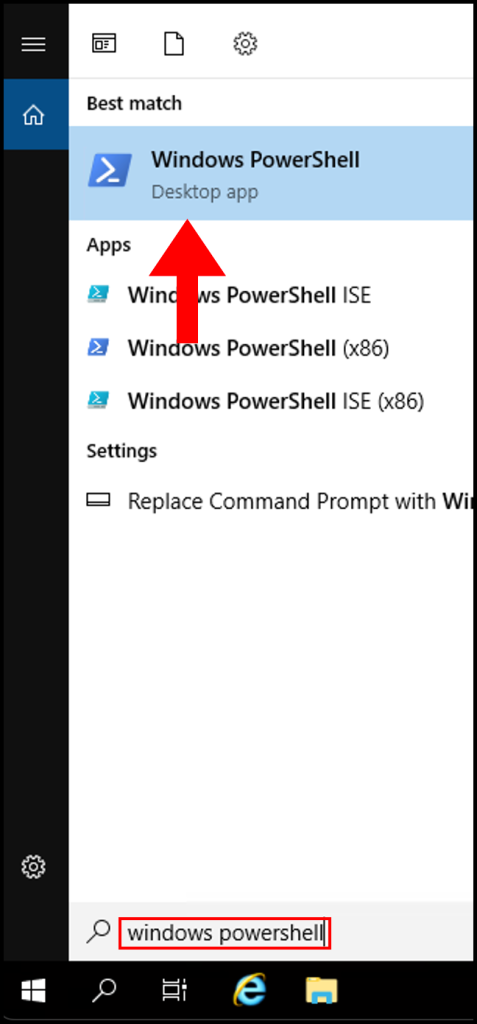
1. To start, log into your Windows Server, and use the Windows search function to search and open PowerShell.
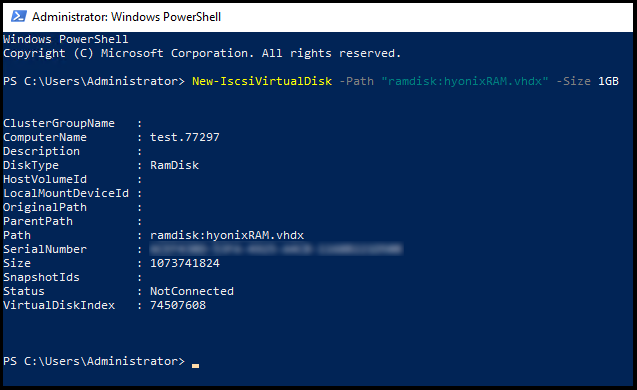
2. Next, run the following command to create a 1 GB virtual RAM Disk,
New-IscsiVirtualDisk -Path "ramdisk:hyonixRAM.vhdx" -Size 1GB
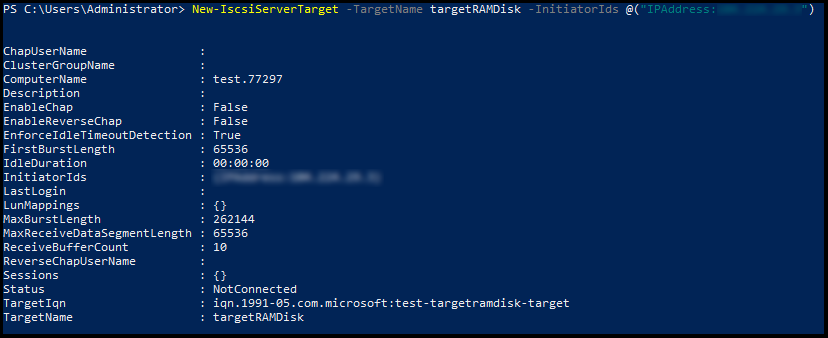
2. Then, create an iSCSI target using the following command and fill in the x‘s with your server’s IPv4 address.
New-IscsiServerTarget -TargetName targetRAMDisk -InitiatorIds @("IPAddress:xxx.xxx.xxx.xxx")
3. Now connect the created RAM Disk using the following command,
Add-IscsiVirtualDiskTargetMapping -TargetName targetRAMDisk -DevicePath "ramdisk:hyonixRAM.vhdx"
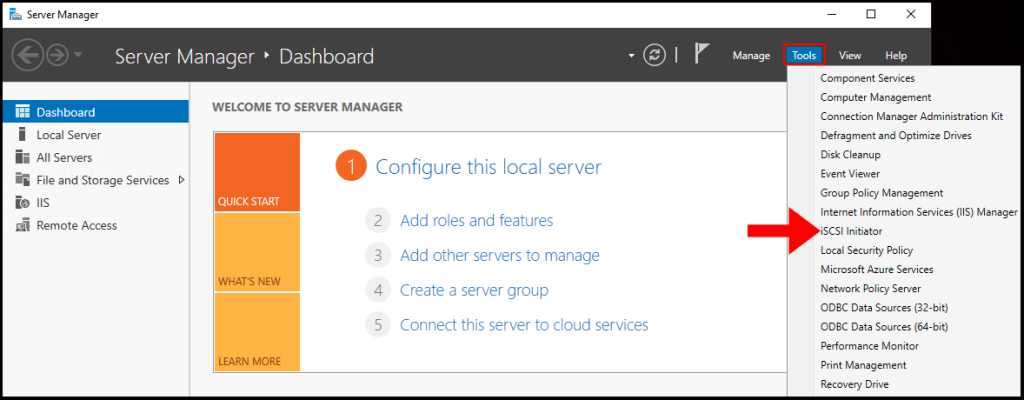
4. Now return to the Server Manager window and click Tools in the top right-hand corner, then select iSCSI Initiator.
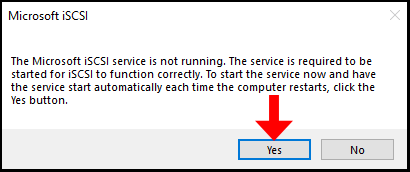
5. A pop-up will appear prompting you to start the iSCSI service, if you’d like to start the iSCSI service on startup of Windows, click Yes to proceed.
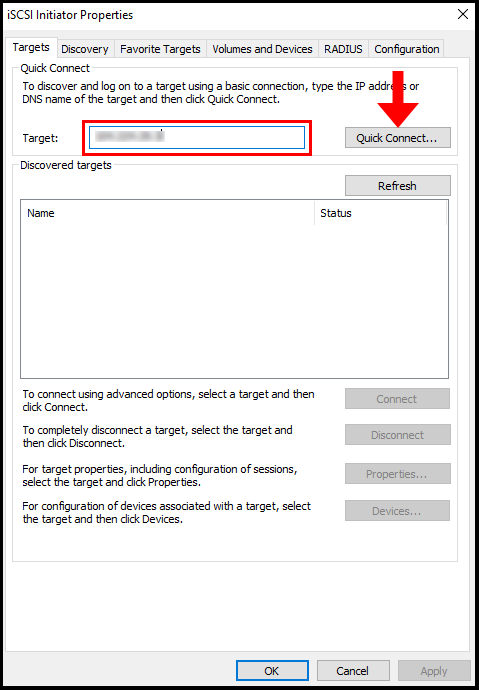
6. Then the iSCSI Initiator Properties window will appear, enter your server’s IP address in the Target text field as seen below, then click Quick Connect.
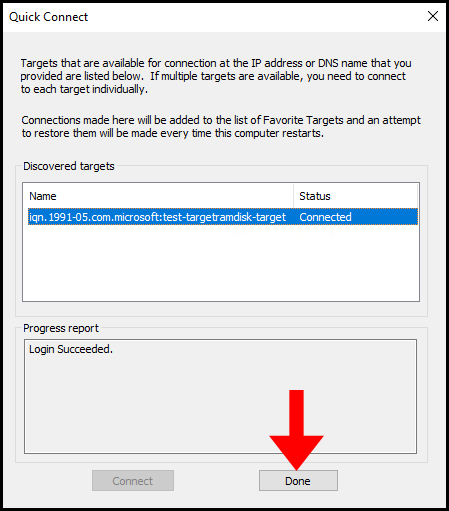
7. Now the Quick Connect page will open to show that our connection has been successful, click Done to close out of this window.
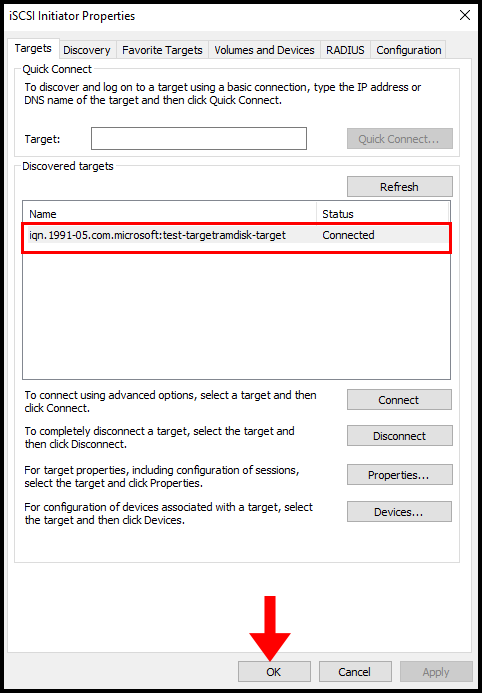
8. Now in the iSCSI Initiator Properties we will see the name of our target and the status as Connected, then click OK to close the window.
Initialize Ram Disk
In this section, we will go over how to initialize the RAM Disk so Windows can recognize it.
1. To start, use the Windows search function to search and open Create and format hard disk partitions.
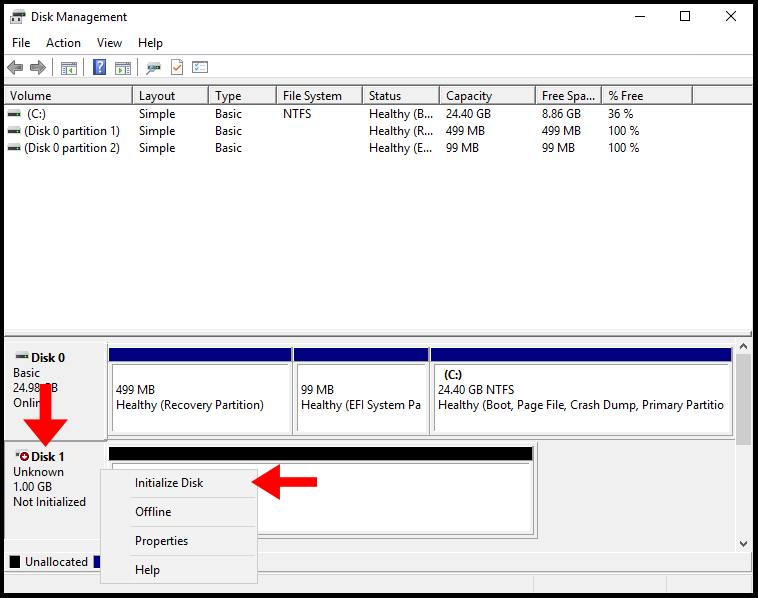
2. Now in the Disk Management window, locate the disk that is labeled as Offline, then right-click the disk and click Online.

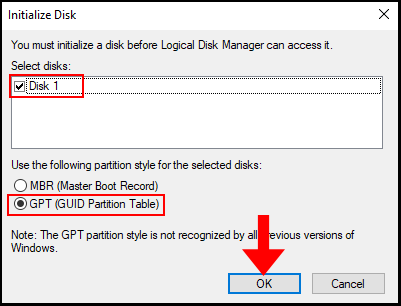
3. Now, the disk will be labeled as Not Initialized in order to initialize it, right-click the disk and click Initialize Disk.
4. Then the Initialize Disk window will appear, select the Disk you’d like to initialize (in this case, it is Disk 1) and select GPT (GUID Partition Table) as the partition style. Now click OK to complete the initialization.
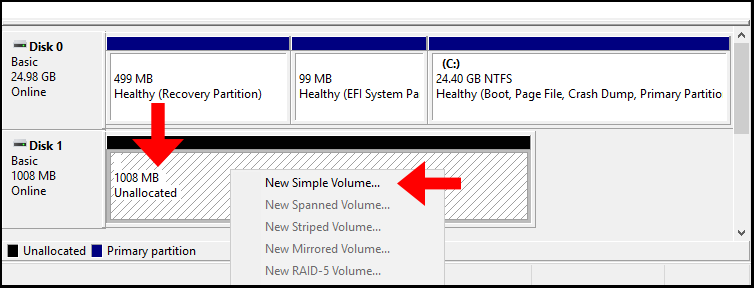
5. Now in the Disk Management window, we will see the disk is now Online. Next, right-click the unallocated space and click New Simple Volume.
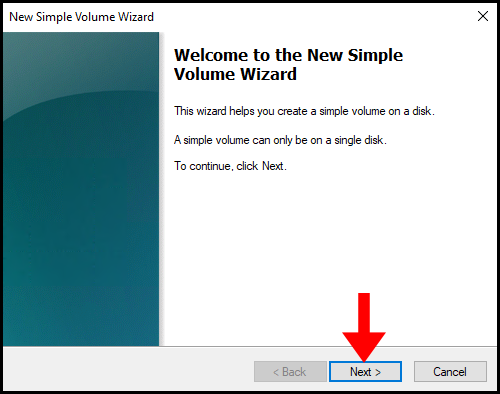
6. The New Simple Volume Wizard will open, click Next to continue.
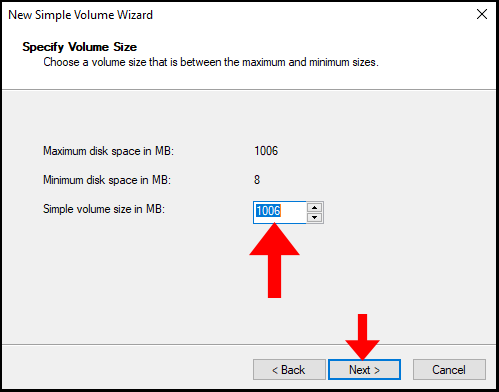
7. Then in the Specify Volume Size enter how much disk space we would like for our RAM Disk, in this case, we will be utilizing the full amount which is 1006 MB. Click Next to move on.
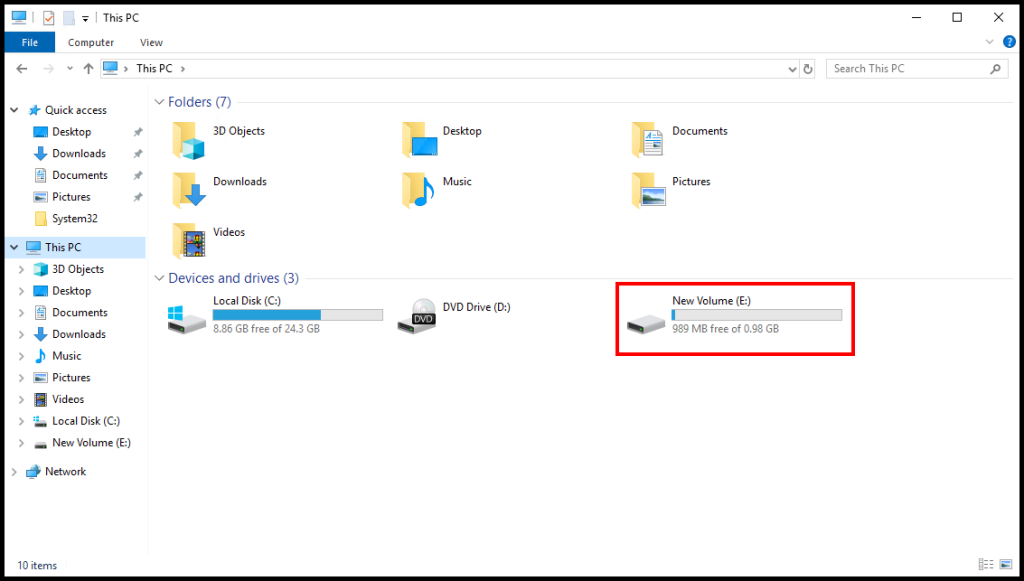
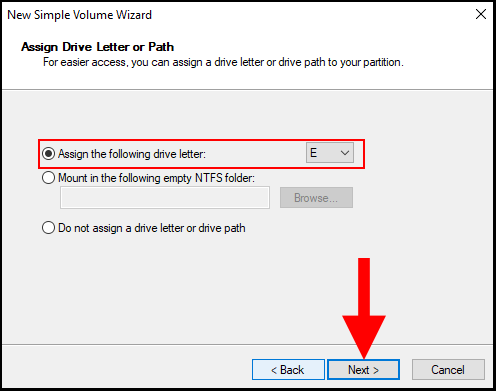
8. On the next page, you can assign a Drive Letter to your newly initialized RAM Disk. In this case, we will be assigning it the letter E. Click Next to continue.
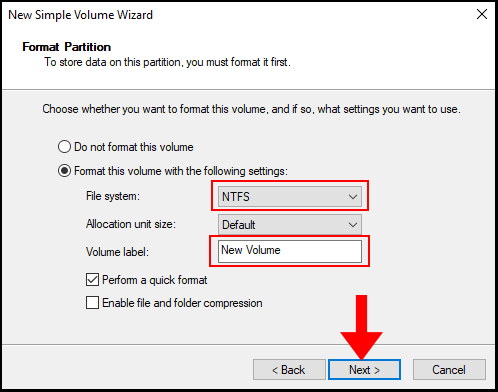
9. In the Format Partition section, make sure the File System is selected as NTFS. Additionally, you may change the Volume label, in this case, we will leave it as default. Click Next to move on.
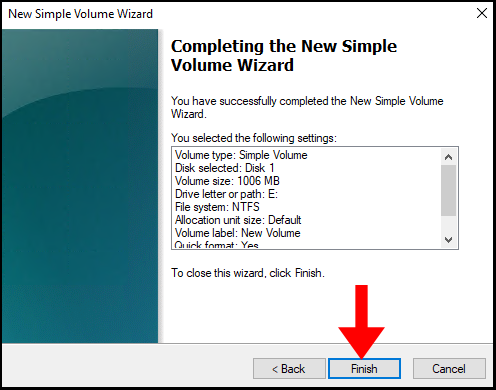
10. The next page, will confirm that we have successfully completed the New Simple Volume Wizard and Windows has formatted the RAM Disk. Now we can click Finish to close out of the wizard.
11. Lastly, to verify we created the RAM Disk we can go to File Explorer and verify that there is a new drive with our selected drive letter and volume label. We have successfully learned how to create a RAM disk on a Windows server.