

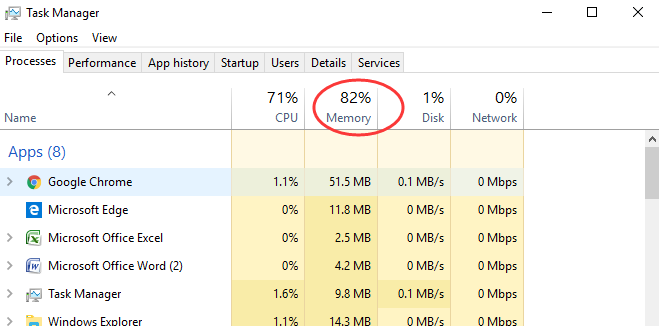
My RAM memory is at 100 in Windows 10, I show you how to reduce memory consumption in Windows 10, probably in the task manager you will see 100% of RAM consumption, this is because it is full and if it is still at 100% most likely you will see the blue screen or your computer is very slow.
Previously in these tutorials we taught the solutions for the CPU to 100% and also that of DISCO to 100% only the RAM was missing and in this guide we will focus on how to empty the RAM.
Reasons for high RAM consumption at 100 percent in Windows 10
- Using Google Chrome
- Have less than 4 GB of RAM on a PC running Windows 10
- Many tabs in the browser
- Many open programs
- Working in Word and Excel for long periods of time without saving
- Many running processes
- Using demanding software on a PC with few features
- RAM very old
- ddr2 RAM instead of the latest ddr4 standards
- Lack of formatting
- Malware such as worms or viruses
Solution to 100% RAM consumption in Windows 10
- Do not use Google Chrome instead use browsers such as Firefox, Opera or Microsoft Edge, as Chrome is a memory hog.
- From the task manager close programs and processes that use a lot of memory.
- Restart Windows 10 Explorer
- Close programs that start with Windows
- Using third-party software to clean RAM memory
- Restart our PC regularly every hour
- Deactivate services we do not use
- Check for malware with Windows defender or other anti-virus software
- Add more RAM OR replace other RAM
How to deactivate unused services
- In the beginning we are looking to execute
- type msconfig then system settings
- In Services we deactivate the services we are not using or will not use.
OTHER TIPS (page premium)
- Remove background apps
- Remove Windows defender
- Remove Apps in applications and features
- If your PC is very old, consider using LINUX instead of Windows 10.
- Do not use Windows 7, it is outdated and therefore has a lot of vulnerabilities.
- Keep your PC with few programs, only the necessary ones.
Source: hardzone
VIDEO ON HOW TO MAKE THE GUIDE (coming soon)
This div height required for enabling the sticky sidebar
Hey, How to Fix RAM 100% Issue on Windows 10? I just updated my Sony laptop Windows 7 to Windows 10 three days ago. But after some use, I feel this new system is very sluggish, everything starts very slow, programs often get stuck and laptop frequently gets frozen or crashes down. I checked and know this problem is actually due to high memory usage. It is soon up to 100%. I did a restart, then everything came back to normal, total usage was just around 30% of 8GB of RAM. However, during few hours of usage memory builds up again to 80% and if not restarted it further goes to 100% and later on even freezes. I don’t know how to check what kind of process or program causes this high memory usage. Could you please help me solve this high memory usage problem?
What will be the Reasons Resulting in RAM 100% Issue?
Recently, many Windows 10 users complain that their PC slows down due to high usage of RAM, CPU or Disk. It even consumes 100% usage within few minutes even though PC user just open few program and perform one task on PC. How to Fix RAM 100% Issue on Windows 10 – More and more PC users are asking this query. RAM 100% Issue will freeze PC totally and it’s impossible to continue any tasks on problematic PC. Anyway, RAM 100% Issue slows down computer performance completely. So What will be the Reasons Resulting in RAM 100% Issue? Less RAM of your PC is not the main reason triggering this issue. Users having 4GB of RAM have less complaints, while users with 8GB and even 16GB of RAM have experienced high memory usage problems especially after updating their PCs to Windows 10. When you get Windows 10 full memory usage error or receive high disk usage warning, the RAM or memory in Windows 10 may not be really full. There are several key reasons why the memory usage runs out. Here below we will explain some main reasons in detail for PC users:
1. Windows 10 memory leak
Memory leak is a failure in a program to release discarded memory, causing impaired performance or failure. Besides, Windows 10 is experiencing driver incompatibility issues. A faulty or outdated driver can lead to a Memory leak. When a program needs to store some temporary information during execution, it can dynamically request a chunk of memory from the system. However, the system has a fixed amount of total memory available. If one application uses up all of the system’s free memory, then other applications will not be able to obtain the memory that they require. A memory leak reduces the performance of the computer by reducing the amount of available memory. Eventually, in the worst case, too much of the available memory may become allocated and all or part of the system or device stops working correctly, the application fails, or the system slows down vastly due to thrashing. Therefore, if applications stay in memory when not in use, system run–time is expected to be unlimited or systems typically have lower total available system memory, high Ram usage RAM 100% issue will happen to slow down computer performance.
2. Low space due to high usage by multiple apps or big installation patches
We usually will download many applications and program to access certain sites or finish our works. However, while we download the application we need, the other additional programs would be sneakingly installed into system at the same time. Or some add-on and extension is installed into web browser’s background. And then multiple useless applications or programs will take up too much memory. Besides failure of updating Windows patches is a big program to consume too much available RAM. Windows update usually can silently do its job in the background like downloading updates automatically, installing the ones it can and saving others to install when you restart or shut down the computer. However, in some cases the update installation gets stuck or freezes when it fixes patch even install service pack during shutdown or startup. Note that sometimes an update installation fails and that can prevent other updates from being installed properly too. In this case, these installation patches will soon occupy available RAM space. Then RAM 100% Issue happens and computer performance slows down immediately.
3. Memory got taken up by system error and large number of useless junk files
System error is a major reason that may cause the false information to the computer such as high RAM, CPU and Disk usage. And junk files in computer can really take a large amount of capacity and system resources and it’s quite necessary to clean up junk files in PC regularly. Optimizing Windows disk will surely improve system performance. Windows system can record of all the acts of your pc. Improperly shutting down, crashing or freezing and uninstalling programs, massive virus, Trojan virus, spyware and rogue programs and unnecessary files can cause registry errors. Junk files or temporary files will be created while you’re browsing online, running programs or performing tasks with some application even by massive Trojan horse, virus, worm or spyware. If you don’t regularly clean junk files for your computer and also computer is infected with threats, there will be no doubt that RAM memory gets taken up by system error and large number of useless junk files.
How to Fix RAM 100% Issue on Windows 10
If you know what exactly is the main reason to cause RAM 100% issue on your PC, you can figure out the correct solution to fix this issue accurately. However, fixing RAM 100% issue needs expertise and skills in dealing any parts of computer. If you haven’t sufficient expertise in dealing with program files, processes, .dllfiles and registry entries, it may lead to mistakes damaging your system and cause severely system problem. Here below we offer some step-by-step guides on how to fix RAM 100% issue for computer literate only. The guides can be applied to different brands of different Windows 10 laptop and desktop like Lenovo, Asus, Acer, Dell, HP, ThinkPad, Toshiba, IBM, Sony, Gateway, Samsung, IBM, etc. If you are not able to handle fixing RAM 100% issue by following the instructions on How to Fix RAM 100% Issue on Windows 10 below, you’re suggested to contact YooSecurity Online Tech Support Team by clicking ‘Live Chat’ button here for help, the technician will take care everything of your computer for you!
Here’s the detailed instruction on How to Fix RAM 100% Issue on Windows 10
1. Registry Hack:
Hit Win Key + R
Type in “Regedit” and then hit Enter.
Go to ‘HKEY_LOCAL_MACHINE\SYSTEM\CurrentControlSet\Control\Session Manager\Memory Management’
Find ‘ClearPageFileAtShutDown’ and change its value to 1
Restart the computer
2. Fix the driver issue:
Open ‘Device manager’ and ‘Scan for hardware changes’
3. Adjust your Windows 10 for the best performance
Right click on “Computer” icon and select “Properties”
Select “Advanced System settings”
Go to the “System properties”
Select “Settings”
Choose “Adjust for best performance” and “Apply”.
Click “OK” and Restart your computer.
4. Disable startup programs
Hit Win Key + R
Type ‘msconfig’ and press enter
The Task manager window will open. Click on the “Startup” tab and you will see a list of programs that run at startup.
Right click on the applications that you don’t want to run at startup and select “Disable”.
5. Defragment Hard DrivesHit Win Key + R
Hit Win Key + R
Type “dfrgui” and press enter
In the new window click on the hard drives you want to defragment (Prefer the drive in which Windows is installed)
Click “Optimize” and follow the instructions on the screen to finish the defragment process.
Restart your computer.
Conclusion (How to Fix RAM 100% Issue on Windows 10)
High memory usage on Windows computer is a common problem which usually slows down computer performance. It takes a long time to run the program you need even though you just open web browser. Once the memory space becomes less, PC will not be able to run many process, registry entries, files and programs at the same time. Computer will soon get stuck or frozen even crash down immediately, and you have to restart it even force to shut it down then turn it back on. This sluggish status must be fixed as soon as possible or you will not use computer properly. But How to Fix RAM 100% Issue on Windows 10? Before you fix it, you should know what leads to this RAM 100% Issue. Of course, there are various factors leading to this high RAM usage even RAM 100% Issue. but usually memory leak, Windows update installation patches, multiple applications and programs, junk files and computer virus like Trojan horse, worm or spyware etc will consume too much system RAM available usage even eat up RAM usage and system resources. system errors caused by some aggressive virus can give wrong system order and send false information about CPU, RAM or DISK usage. That means, in fact, your PC’s RAM usage is not so high. However, don’t worry, RAM 100% Issue on Windows 10 PC is fixable. Many effective and accurate fix solutions are figured out by computer technician who qualified with professional computer technique and skills. If you can do it by yourself, you can follow our instructions above on How to Fix RAM 100% Issue on Windows 10.
Warm Suggestion: If you want to check out what exactly the reason leading to your computer’s high RAM usage RAM 100% Issue on Windows 10 computer or get help on how to Fix RAM 100% Issue on Windows 10, you’re welcome to start a live chat below to consult with our YooSecurity Online Tech Expert.
Published by Tony Shepherd & last updated on February 13, 2017 6:05 am
In this article, you will learn some basic knowledge about computer memory and the common causes of 100 memory usage. Also, you will find out 10 solutions to fix the issue of Windows 10 high memory usage.
Memory is one of the most indispensable physical devices in your computer to store information temporarily or permanently. The computer memory includes RAM (random access memory), ROM (read-only memory), and Cache. It enables the computer CPU to access instructions and data at a fast speed.
The memory is used to store the operational data of the CPU temporarily and the data is exchanged with external memory (i.e a hard disk). That is to say, the CPU can transfer the data that needs to be operated into the memory for operation, and transmit the result out when the operation is finished.
What’s more, the program installed on the hard drive disk is also loaded into memory for running. Undoubtedly, the main memory is a major factor in determining your computer’s performance and operational stability as well.
Quick Links
- 1 Check the Windows 10 High Memory Usage Problem
- 2 How to Quickly Fix Windows 10 High Memory Usage?
- 2.1 Close some programs you do not need
- 2.2 Disable the Superfetch Service (Sysmain)
- 2.3 Turn off the Startup Programs
- 2.4 Increase the Virtual Memory
- 2.5 Set the Registry Hack
- 2.6 Defragment the Hard Drives
- 2.7 Try the Methods to Solve Software Problems
- 2.8 Virus or Antivirus Programs
- 2.9 Adjust for Best Performance
- 2.10 Re-install Windows 10
Check the Windows 10 High Memory Usage Problem
Windows 10 high memory usage is closely related to virtual memory and RAM. Although computer memory has a close relationship with the CPU and hard drive, the 100 memory usage problem is very different from the problems of high CPU usage and high disk usage.
In many cases, your computer will freeze if it encounters a high memory usage problem. This situation happens often when a large game is running, suddenly, you will see “Your computer is low on memory” error message window.
In fact, you could do a small diagnosis and determine 100 memory usage issues in Windows 10 on Task Manager.
Right-click the taskbar → select Task Manager.
First of all, you should be aware of the common causes of the high CPU/RAM/memory usage problems in Windows 10.
- You are running many different programs at the same time.
- The defective program design.
- The startup programs.
- The registry hack.
- The disk capacity is insufficient.
- Virus or antivirus software.
How to Quickly Fix Windows 10 High Memory Usage?
If you are experiencing Windows 10 running slow or High memory usage problems apply the solutions listed below.
Close some programs you do not need
If the 100 memory usage is caused by many programs that are running simultaneously, you need to manually close some unnecessary programs. Or if you notice a program takes up too much memory, end this program to have a try.
Open Task Manager, after that, right-click the application you want to end up under Processes and click End task (see the image below).
Disable the Superfetch Service (Sysmain)
Superfetch (Sysmain) service, designed for traditional HDD, is booted by default. It can improve computer performance by only allowing the memory to load a fraction of the data needed to run common programs quickly.
If your computer disk is hard drive disk, you are not suggested to disable sysmain service, even though it may cause high memory usage on Windows 10. But if your computer disk is SSD, this service should be disabled. Please follow the instructions to disable Superfetch or Sysmain service this way.
- Press the “Windows + R” keys, and type “services.msc” to open the Services window,
- When it’s done, scroll down to select SysMain, right-click on it, and finally, select Stop to disable the service.
Turn off the Startup Programs
Some programs will run automatically when the computer starts up. If you don’t need these programs to run at startup, you can follow the tutorial to disable them.
Load up your Task Manager, and access the startup programs tab by typing in Task Manager in the Windows search menu. When that’s done, right-click one program or multiple programs that you don’t want to run at startup, at last, select Disable.
Increase the Virtual Memory
Virtual memory can make a portion of disk space work as memory to relieve memory stress. On your computer’s hard disk, the virtual memory is a big file named PageFile.sys. Follow the instructions below to see how to set virtual memory in Windows 10.
Find virtual memory, click Change
- Open File Explorer, right-click This PC and then select Properties.
- Head to select Advanced system settings in the pop-up window.
- When that’s done, click Settings in the Performance box under the Advanced page of System Properties
- Now please navigate to the Advanced page in the pop-up Performance Options window, finally, you can click Change in the Virtual memory box.
Cancel virtual memory on partition C
- First of all, uncheck Automatically manage paging file size for all drives.
- Heard to select partition C and then check No paging file, then click Set to save it.
- You should click Yes in the pop-up warning window now.
Set suitable virtual memory on the non-system partition
- Go and select a non-system partition, and check the Custom size.
- Then you should set the same value in Initial size and Maximum size to avoid the system from frequently requesting page files of different sizes. (That can reduce the consumption of system resources and boost operating efficiency).
- When it is done, click Set and OK to save.
Set the Registry Hack
Please follow the simple instructions.
- Go to press “Windows + R” and then type “regedit” to open Registry Editor.
- When it’s done, please navigate to HKEY_LOCAL_MACHINE > SYSTEM > CurrentControlSet > Control > Session Manager > Memory Management.
- Find ClearPageFileAtShutDown, right-click it to modify its value to 1, and after that, click OK.
- Finally, you need to restart your computer to boot up the Registry Hack setting.
Defragment the Hard Drives
Defragmenting hard drives is a feasible way to save some memory space. Now we’ll show you how to use Disk Defragmenter to do defragmentation.
Open File Explorer, select Partition C, and, please click Manage on the toolbar, and then click Optimize, When it’s done, select Partition C and click Optimize.
Furthermore, Windows users are suggested to delete unnecessary files on Partition C.
Try the Methods to Solve Software Problems
Sometimes, Windows 10 high memory usage happens because of memory leak, which is caused by defective software design. The memory leak will influence the computer server where programs will run for a long time. It is going to make memory space smaller and smaller and even result in downtime.
You should know that Windows 10 memory leaks will consume nearly all the memory space. Rebooting the computer can solve this problem temporarily, nevertheless, when the software runs again, the problem will reoccur.
Virus or Antivirus Programs
The virus is another reason to cause Windows 10 100 memory usage. Users can run trustworthy, secure antivirus programs, or they can run the built-in Windows Defender on Windows if they don’t install other antivirus programs. Below is a guide for you to know how to use Windows Defender.
Find Windows Defender.
Click the Start button, select Settings, then select Security & Update.
Run Windows Defender
Click Windows Defender and Open Windows Defender Security Center, when it’s done, select Virus & Threat Protection, and then click Quick Scan.
Here is one tip. Some Windows users have reported that certain antivirus programs, including Windows Defender, may cause Windows 10 high memory usage. In this situation, you could head to end the process of antivirus programs in Task Manager.
Adjust for Best Performance
- Open File Explorer, right-click This PC-> choose Properties.
- Click Advanced system settings, after that, please click Settings in the Performance box.
- Now check Adjust for best performance and click Apply, and finally click OK.
Re-install Windows 10
Some users also report that Windows 10 high memory usage only occurs when they stop using the computer for half an hour or nearly one hour. Some other people complain that this problem happens after upgrading to Windows 10. They have tried the above-mentioned methods but still failed to solve the problem. In this case, they need to re-install Windows 10 or reset PC.
There could be various reasons for high RAM and CPU Usage on your computer, ranging from the drivers becoming outdated or corrupted to startup and background running apps using up excessive resources on the computer.
Apart from this, High RAM & CPU usage on a Windows computer can also be caused due to malware, rogue programs, Incorrect or corrupted registry settings and other reasons.
If your computer has become noisy and painfully slow, it is most likely suffering from High RAM and CPU Usage. You can find below the steps to fix the problem of High RAM and CPU Usage in Windows 10.
1. Scan for Malware and Uninstall Unwanted Programs
You can start by ruling out the possibility of your computer being infected with malware by using the Antivirus program installed on your computer.
Advertisement
If you are not using a third-party antivirus program, you can use Microsoft Defender Offline Scan.
2. Prevent Apps from Running in Background
Apps like OneDrive, Microsoft Teams, Skype and others have an inherent tendency to startup with the computer and keep running in the background.
1. Open Settings > click on the Privacy Icon.
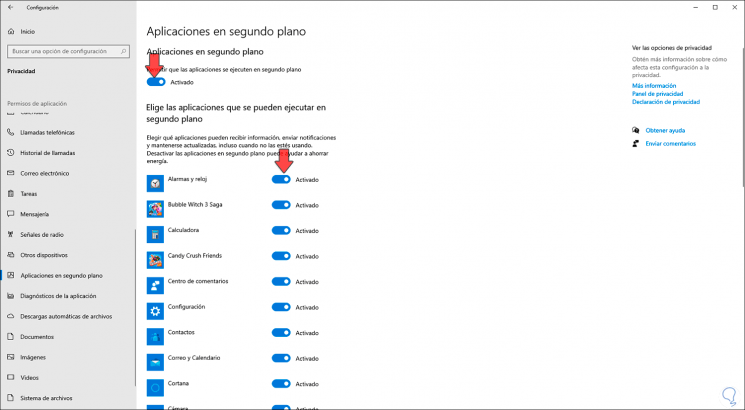
2. On the next screen, select Background Apps in the left-pane. In the right-pane, toggle OFF the option to Let Apps Run in the background.

This will prevent Apps from running in background and unnecessarily using up resources on your computer.
3. Disable Runtime Broker
Runtime Broker has been reported as being one of the main reasons for High RAM and CPU Usage in Windows 10.
1. Open Settings > click on the System Icon.
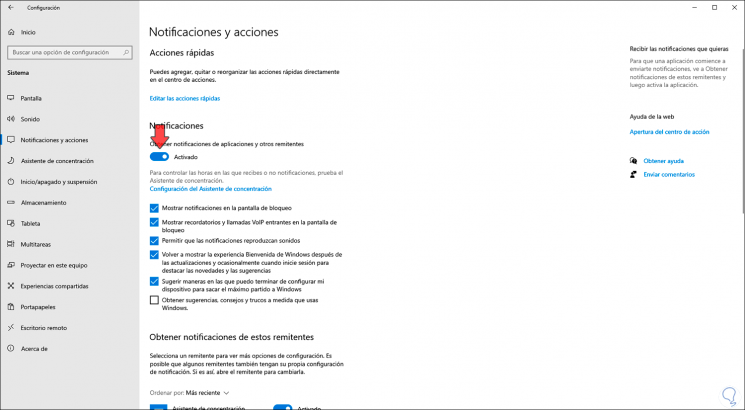
2. On the next screen, select Notifications & Actions in the left-pane. In the right-pane, scroll down and disable Get tips, tricks, and suggestions as you use Windows option.

Restart your computer and you should now see it running better than before.
Advertisement
Many users have reported significant reduction in Runtime Broker activity after making this single change on their computer.
4. Disable Startup Programs
Preventing unwanted apps and programs from starting up with the computer can help in reducing CPU & RAM usage on your computer.
You can find the steps to prevent apps and programs from starting up with the computer in this guide: How to Prevent Apps from Opening At Startup In Windows.
5. Update Device Drivers
1. Right-click on the Start button and click on Device Manager.
2. On the Device Manager Screen, click on Action > Scan for hardware changes.

3. Allow Windows to scan the computer for Hardware changes and update device drivers.
6. Disable Downloads from other PCs
Disabling “Allow Downloads from other PCs” option for updates is known to reduce Runtime Broker Activity and this should help in reducing resource usage on your computer.
1. Go to Settings > Update & Security > Advanced Options > Delivery Optimization.
2. On the next screen, disable Allow Downloads from other PCs option.

7. Modify Memory Management System
It is recommended that you create a system Restore Point on your computer before following the steps below to make changes to Registry Values on your computer.
1. Right-click on Start button and click on Run.
2. Type Regedit in the Run command window and click on OK.
3. On the Registry Editor screen, navigate to “HKEY_LOCAL_MACHINE\SYSTEM\CurrentControlSet\Control\Session Manager” and click on Memory Management (1) Folder.

In the right-pane, right-click on ClearPageFileAtShutDown (2) and click on Modify (3).
4. On Edit DWORD pop-up, change the value of ClearPageFileAtShutDown from 0 to 1 and click on OK.

5. Make sure you Restart the computer, in order to apply the changes.
8. Setup Visual Effects for Best Performance
1. Right-click on Start button and click on Run.
2. In the Run Command window, type SystemPropertiesAdvanced and click on OK.

3. On the next screen, switch to Advanced tab and click on Settings button under “Performance” section.

4. On the next screen, click on Visual Effects tab and select Adjust for best performance option.

5. Click on Apply > OK to save these settings on your computer.
9. Defragment Hard Drives
Defragmenting the Hard Drive can help, if your computer is equipped with the traditional HDD drive.
1. Open the Control Panel on your computer.
2. Go to System and Security > scroll down to “Administrative Tools” section and click on Defragment and optimize your drives.

3. On the next screen, select the Drive that you want to defragment and click on Optimize button.

Patiently wait for Windows to complete the process of optimizing the selected drive.
1. Disable Windows 10 system suggestions
2. Disable background applications Windows 10
3. Edit registries Windows 10
4. Configure Windows 10 system performance
Both the processor and the RAM in Windows 10 are fundamental parts in any operating system since without them it simply would not run, much less it would be possible to process any information. This is why there are currently different types of processors and memory modules to help us be more efficient in PC tasks, but in special cases we can see that from the Task Manager both the CPU and RAM reach 100 % of its use without an apparent cause (open applications, large processes) for which it can be given for different reasons such as:
RAM errors 100
- Presence of viruses
- Background processes
- Hidden services
If this is your case, TechnoWikis will give you a series of solutions to correct this and enjoy the best use of RAM..
To stay up to date, remember to subscribe to our YouTube channel! SUBSCRIBE
1. Disable Windows 10 system suggestions
Step 1
Windows 10 enables by default that tricks and suggestions are launched on the system and on the lock screen to help the end user, but this can cause an overload in the system processes, so it is ideal to disable this option, for this we must go to the following route:
- Start
- Setting
- System
- Notifications and actions
Step 2
There we deactivate the box «Get tips, advice and tricks as you use Windows»:
2. Disable background applications Windows 10
As we mentioned, there are a series of applications that can run in the background in Windows 10 affecting the use of RAM and CPU, we can disable them temporarily to verify that this is the cause of the errors.
Step 1
For this we will go to the following route:
- Start
- Setting
- Privacy
- Background apps
Step 2
We will see the following:
Step 3
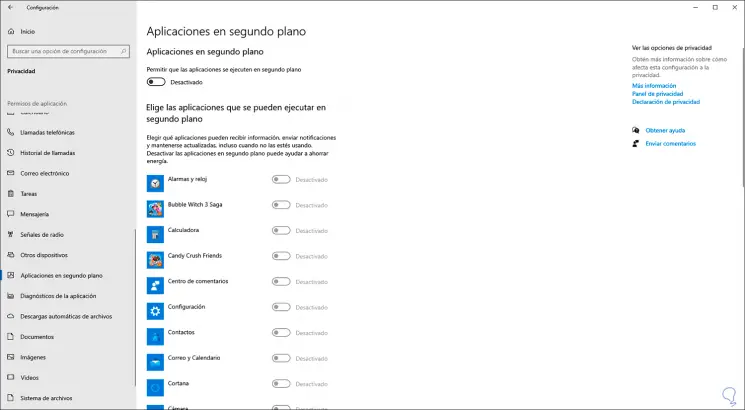
It is possible to disable each application individually, but by definition issue we can click on the switch «Allow applications to run in the background»:
3. Edit registries Windows 10
Step 1
Before performing any action on the registers, it is essential to create a backup in case something fails, then we open the editor by entering «regedit» in the Start search box, we will go to the following path:
HKEY_LOCAL_MACHINE - SYSTEM - CurrentControlSet - Services - TimeBrokerSvc
Step 2
There we select the DWORD value «Start»:
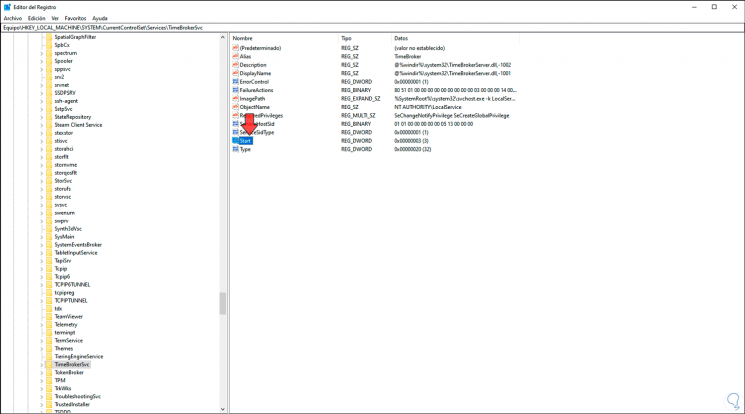
Step 3
We double click on this and in the field «Value information» we assign the number 4. We click OK to save the changes. We advise after this to restart the system.
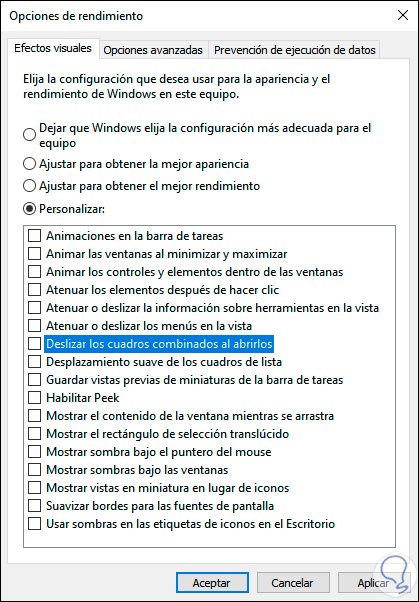
4. Configure Windows 10 system performance
This is a set of functions that allow system actions to be performed visually, but can have a negative impact on CPU and RAM performance.
Step 1
To edit this we go to the following path.
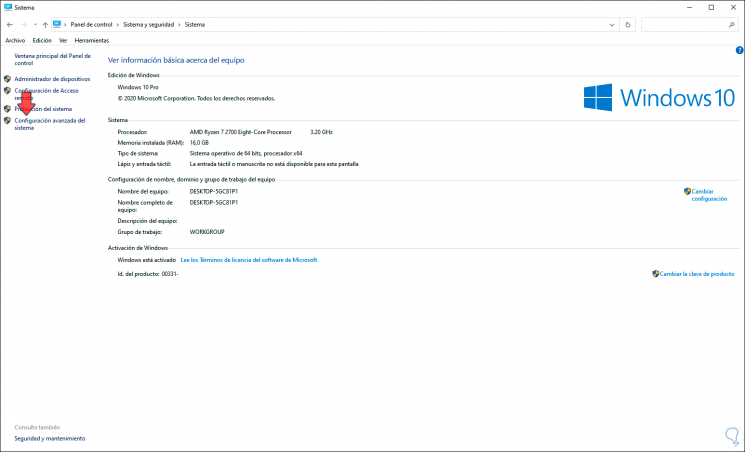
- Control Panel
- Security system
- System
Step 2
Or we can right-click on «This Computer» in File Explorer> Properties. We will see the following:
Step 3
We click on «Advanced system settings» and the following pop-up window will open:
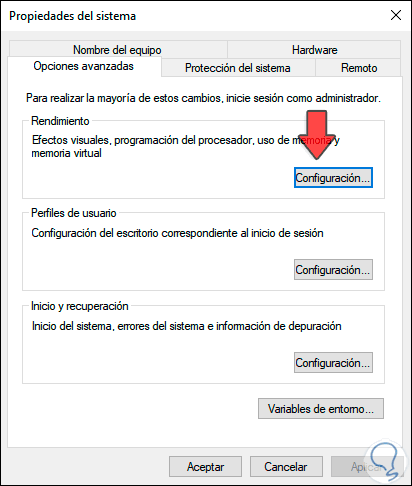
Step 4
We click on the «Settings» button in the Performance section and in the next window we go to the «Visual Effects» tab where we will see the following:
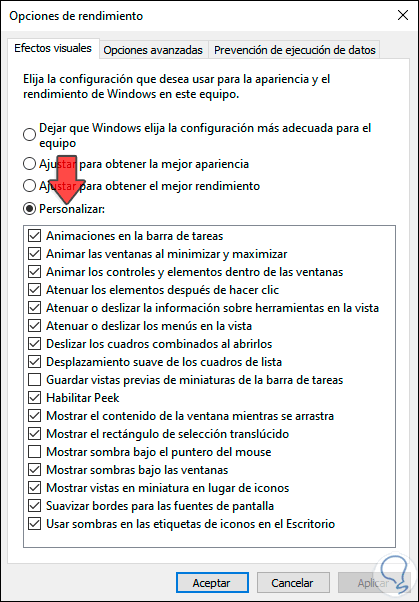
Step 5
We activate the «Customize» box and deactivate the boxes that we consider may affect the general performance of Windows 10. We click Apply and OK to save the changes.
With any of these options it is possible to allow the RAM operation to be stable in the system..