Командная строка Windows (CMD) — мощный инструмент, который предоставляет доступ к широкому набору команд для выполнения различных задач, от работы с файлами до настройки сети и автоматизации процессов. В статье рассмотрим 100 популярных команд CMD, которые пригодятся как новичкам, так и опытным пользователям. Для удобства они разделены по категориям.

Разделы
- Общие команды CMD
- Сетевые команды CMD
- Команды для управления процессами
- Команды для управления файловой системой
- Команды для управления пользователями
- Команды для управления безопасностью
- Команды для диагностики и устранения неполадок
- Команды для скриптинга и автоматизации
- Команды для управления сетевыми подключениями
- Команды для управления печатью
- Дополнительные команды в Windows
Общие команды командной строки (CMD) позволяют пользователям управлять ОС Windows через интерфейс командной строки. Они нацелены на различные задачи – от получения справочной информации до управления процессами.
- hel — выводит список всех доступных команд и их краткое описание, что полезно для получения информации о базовых командах.
- cls — очищает экран командной строки. Если в окне CMD много текста, этой командой можно убрать весь вывод и начать работу «с чистого листа».
- exit — завершает текущую сессию командной строки и закрывает окно CMD.
- echo — выводит сообщения в консоль или включает/выключает отображение команд в пакетных файлах – echo Hello, World! выведет Hello, World! на экран.
- ver — отображает версию операционной системы Windows.
- title — изменяет заголовок окна командной строки. Например, title Моя Командная Строка изменит заголовок на «Моя Командная Строка».
- pause — временно приостанавливает выполнение скрипта, но при нажатии любой клавиши можно продолжить работу.
- date — позволяет узнать или изменить текущую дату в системе.
- time — отображает или изменяет текущее время в системе.
- tasklist — выводит список всех запущенных процессов с их PID (идентификатором процесса).
- powercfg — управляет настройками энергопотребления и профилями питания.
- fc — сравнивает два файла и отображает их различия.
Сетевые команды CMD
В разделе собраны основные сетевые команды CMD, которые помогут управлять подключениями, диагностировать сетевые проблемы и выполнять разнообразные операции с сетью. Они незаменимы для системных администраторов и пользователей, нуждающихся в решении сетевых задач.
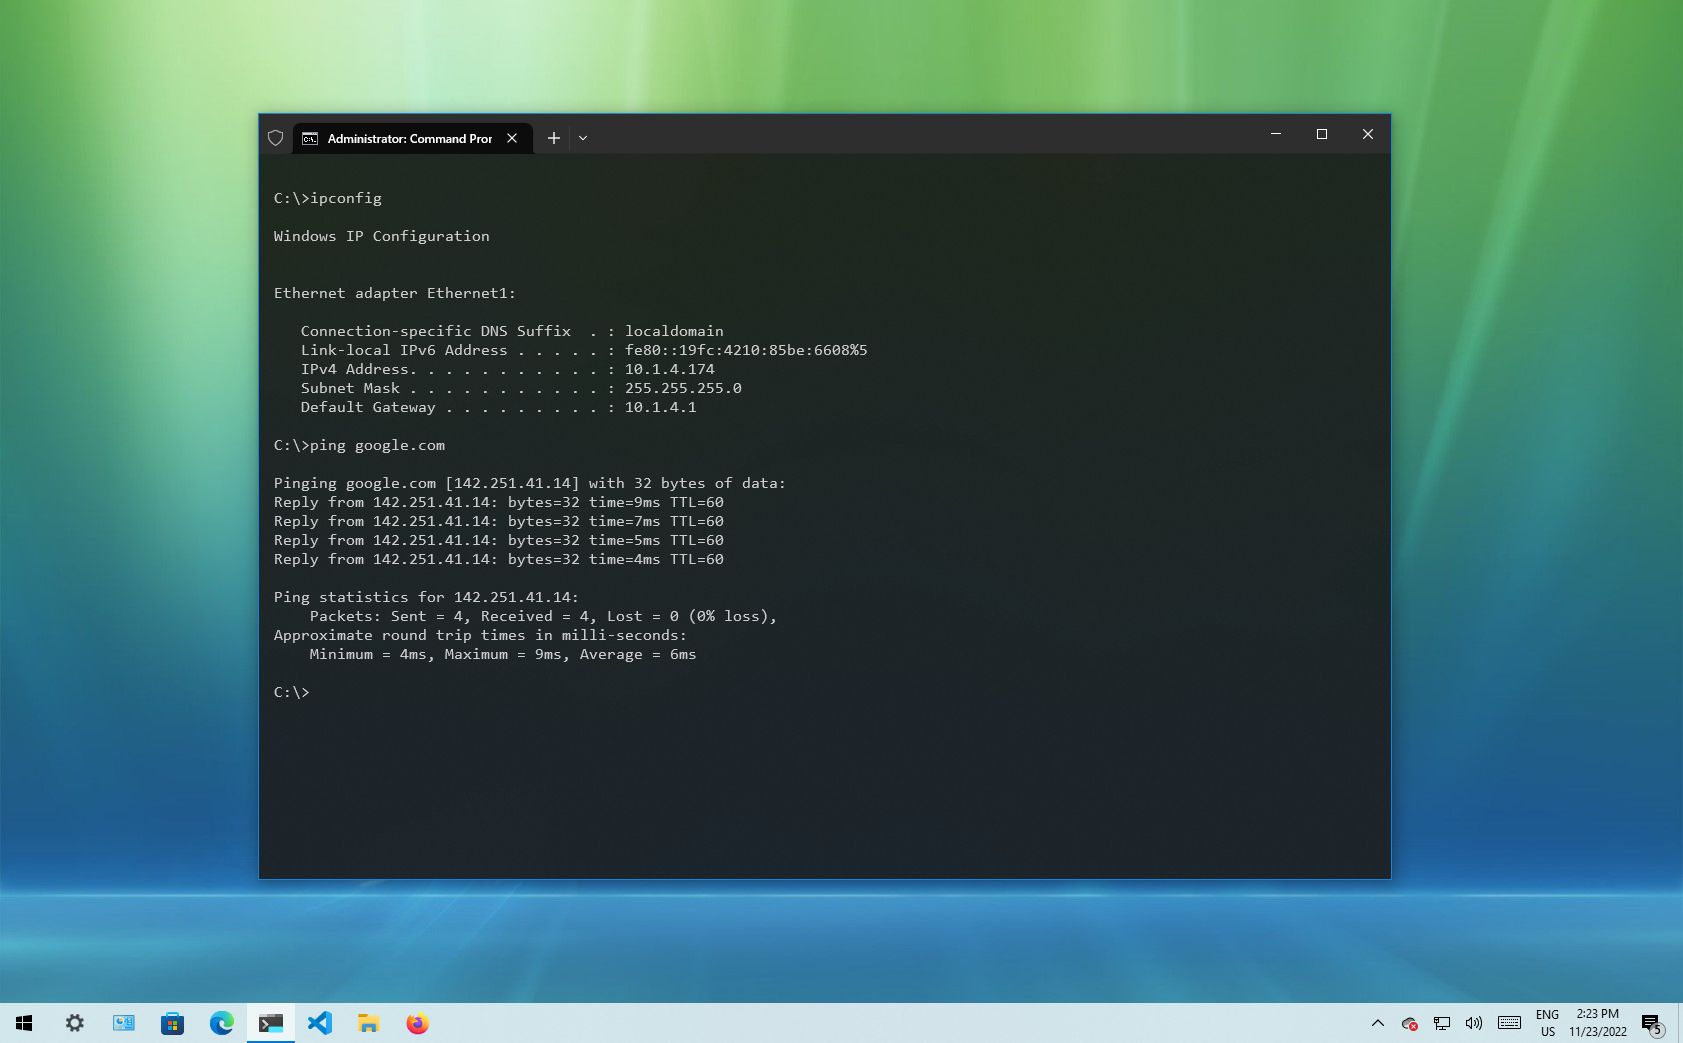
- ping — проверяет связь с удаленным узлом, отправляя ему пакеты данных. Например, ping google.com проверит доступность сервера Google.
- ipconfig — отображает конфигурацию сетевых интерфейсов системы (IP-адреса, маску подсети и шлюзы).
- netstat — выводит информацию о сетевых соединениях и открытых портах
- netstat -an — показывает все активные соединения.
- tracert — отслеживает маршрут пакета до целевого узла – tracert yandex.ru покажет все узлы, через которые проходит запрос.
- nslookup — используется для проверки информации о DNS-серверах.
- nslookup example.com — отображает IP-адрес сайта example.com.
- arp — выводит или изменяет записи ARP (Address Resolution Protocol) –: arp -a покажет текущие записи ARP.
- route — управляет таблицей маршрутизации сети – route print выведет все существующие маршруты в системе.
- net use — подключает сетевые диски. Например, net use Z: \\server\folder подключит сетевой ресурс как диск Z:.
- netsh — позволяет настраивать различные параметры сети через командную строку.
- netsh wlan show profiles — отображает сохраненные профили Wi-Fi.
Команды для управления процессами
Команды ниже позволяют эффективно управлять процессами и службами на вашем ПК: помогают запускать службы, планировать задачи, управлять активными процессами, а также выключать или перезагружать систему. С их помощью можно автоматизировать выполнение задач, получать информацию о состоянии системы и контролировать её работоспособность.
- sc — управляет службами Windows. Пример: sc start servicename запустит службу с именем servicename.
- schtasks — управляет планировщиком задач. Так, schtasks /create /tn «Моя Задача» /tr notepad.exe /sc once /st 12:00 создаст задачу для запуска.
- start — запускает программу или команду в новом окне. Например, start notepad откроет блокнот.
- wmic — взаимодействует с системой через Windows Management Instrumentation – wmic process list brief покажет список процессов.
- shutdown — выключает, перезагружает или завершает работу системы. Так, shutdown /s /f /t 0 немедленно выключит компьютер.
- systeminfo — выводит информацию о системе, включая версию Windows, параметры оборудования и установленные обновления.
Команды для управления файловой системой
Команды для управления файловой системой в CMD позволяют работать с файлами и папками: просматривать содержимое директорий, перемещаться между папками, создавать и удалять файлы и каталоги, копировать данные с использованием различных опций.
- dir — отображает список файлов и каталогов в указанной директории. Пример: dir C:\Windows выведет содержимое папки Windows.
- cd — меняет текущий каталог. Так, cd C:\Users перейдет в папку пользователей.
- md NewFolder — создает новую папку.
- rd — удаляет пустую папку. Пример: rd NewFolder удалит папку NewFolder.
- copy — копирует файлы из одного места в другое.
- move — перемещает файлы или папки.
- del — удаляет файлы. Например, del file.txt удалит файл file.txt.
- xcopy — копирует файлы и директории, включая их структуру. Так, xcopy C:\Source D:\Destination /s /e скопирует все файлы и папки из Source в Destination.
- robocopy — более продвинутая версия xcopy, используется для надежного копирования данных. Например, robocopy C:\Source D:\Destination /mir синхронизирует две папки.
Команды для управления пользователями
Команды для управления пользователями предоставляют средства для администрирования учетных записей, настройки групповых прав и управления политиками безопасности. А также позволяют администраторам эффективно управлять пользователями в системе, добавлять новых пользователей, изменять их права и настраивать параметры учетных записей.
- net user — управляет учетными записями пользователей.
- net user UserName /add — добавляет нового пользователя с именем UserName.
- net localgroup — управляет локальными группами пользователей.
- net localgroup Administrators UserName /add — добавляет пользователя в группу администраторов.
- whoami — выводит имя текущего пользователя и информацию о его правах.
- runas — позволяет запускать программы от имени другого пользователя. Так, runas /user:administrator cmd запустит CMD с правами администратора.
- net accounts — управляет параметрами учетных записей, например, минимальной длиной пароля и периодом его действия.
- gpupdate — обновляет групповые политики на локальном компьютере, что полезно для администраторов, управляемых сетей.
- taskview — открывает таймлайн Windows, показывая историю активности пользователя, полезно для управления и поиска ранее использованных файлов и приложений.
- msg — отправляет сообщение пользователям, подключенным к системе. Пример: msg «Система будет перезагружена через 5 минут» отправит сообщение всем пользователям.
Команды для управления безопасностью
Команды для управления безопасностью предназначены для обеспечения защиты данных и управления доступом к файлам и системным ресурсам, что позволяет шифровать файлы, проверять целостность системных файлов и управлять правами доступа.
- cipher — управляет шифрованием файлов на дисках NTFS.
- cipher/e — зашифровывает файлы в указанной директории.
- sfc — проверяет целостность системных файлов и автоматически восстанавливает их при обнаружении повреждений.
- sfc /verifyonly — проверяет системные файлы на наличие повреждений, но не исправляет их автоматически.
- sfc /scannow — выполняет полную проверку системы.
- cacls — изменяет права доступа к файлам. Пример: cacls file.txt /g UserName:F даст пользователю полный доступ к файлу.
- icacls — расширяет возможности команды cacls и предоставляет дополнительные параметры для управления правами доступа.
- takeown — позволяет взять владение файлом или директорией. Так, takeown /f file.txt предоставит доступ к файлам.
- attrib — изменяет атрибуты файлов и папок. Например, attrib +r file.txt сделает файл доступным только для чтения.
Команды для диагностики и устранения неполадок
Команды из раздела помогают находить и устранять неполадки в системе, восстанавливать загрузочные параметры и проверять целостность данных на диске, а также они позволяют решать проблемы, связанные с запуском операционной системы или со сбоями на уровне файловой системы.
- chkdsk — проверяет диск на наличие ошибок и исправляет их. Так, chkdsk C: /f выполнит проверку диска C.
- bootrec — восстанавливает загрузочный сектор.
- bcdedit — управляет параметрами загрузки системы.
- bcdedit /set {current} safeboot minimal — включает безопасный режим.
Команды для скриптинга и автоматизации
Команды, приведенные ниже, предназначены для создания сложных сценариев выполнения команд, что позволяет автоматизировать повседневные задачи и более эффективно управлять процессами.
- for — создает цикл для выполнения команд. Например, for %i in (1 2 3) do echo %i выведет числа 1, 2, 3.
- if — выполняет условное выполнение команд.
- goto — перенаправляет выполнение скрипта к определенной метке.
- call — вызывает другую команду или скрипт.
Команды для управления сетевыми подключениями
Команды для управления сетевыми подключениями предоставляют возможности для настройки, диагностики и оптимизации сетевых параметров и соединений, позволяя управлять IP-адресами, подключаться и отключаться от сетей.
- ipconfig /release — освобождает текущий IP-адрес, назначенный DHCP сервером, что позволяет при необходимости сбросить сетевое подключение.
- ipconfig /renew — обновляет IP-адрес, полученный от DHCP сервера. Часто используется после команды ipconfig /release для восстановления подключения.
- ipconfig /flushdns — очищает кэш DNS, если изменился DNS-сервер или необходимо устранить проблемы с доступом к сайтам.
- ipconfig /displaydns — выводит содержимое кэша DNS, часто используется для диагностики проблем с DNS.
- netsh interface ip set address — используется для назначения статического IP-адреса сетевому интерфейсу. Пример: netsh interface ip set address Ethernet static 192.168.1.100 255.255.255.0 192.168.1.1.
- netsh wlan show drivers — выводит информацию о драйверах беспроводной сети, что полезно при настройке Wi-Fi подключения.
- netsh wlan show interfaces — отображает текущие активные беспроводные подключения и их параметры, например, мощность сигнала.
- netsh wlan connect — подключает к указанной Wi-Fi сети. Для этого нужно ввести: netsh wlan connect name=MyWiFi.
- netsh wlan disconnect — отключает текущее беспроводное подключение.
- netsh advfirewall set allprofiles state — управляет состоянием брандмауэра Windows – netsh advfirewall set allprofiles state off отключает брандмауэр для всех профилей.
- netsh int ip reset — сбрасывает настройки IP стека (TCP/IP) к значениям по умолчанию, помогая при сетевых неполадках.
- route add — добавляет маршрут в таблицу маршрутизации. Например, route add 192.168.2.0 mask 255.255.255.0 192.168.1.1 добавит маршрут для подсети 192.168.2.0 через шлюз 192.168.1.1.
- route delete — удаляет указанный маршрут из таблицы маршрутизации.
- netsh interface show interface — выводит список всех сетевых интерфейсов в системе, включая их состояние и тип.
- net view — отображает список компьютеров в локальной сети – net view \\server покажет общие ресурсы на указанном сервере.
- net use /delete — удаляет существующее подключение к сетевому ресурсу. Так, net use Z: /delete отключает сетевой диск Z:.
- ftp — открывает FTP-клиент для передачи файлов между локальной и удаленной системами. Например, по команде ftp ftp.example.com ПК подключится к FTP-серверу.
- telnet — используется для подключения к удаленным системам через Telnet-протокол. Так, telnet example.com 23 подключит ПК к серверу на порту 23.
- getmac — выводит MAC-адреса всех сетевых интерфейсов компьютера.
Команды для управления печатью
В этом разделе команды для управления печатью позволяют эффективно управлять процессом печати (включая очередью на печать), настройками принтеров и заданиями на печать.
- print — отправляет файл на печать. Например, print C:\Documents\file.txt отправит текстовый файл на принтер по умолчанию.
- rundll32 printui.dll,PrintUIEntry — открывает диалоговое окно для установки или управления принтерами – rundll32 printui.dll,PrintUIEntry /in /n\\server\printer установит сетевой принтер.
- net print — отображает список заданий на печать – net print \\server\printer покажет очередь печати на указанном принтере.
- net stop spooler — останавливает службу диспетчера очереди печати (spooler), особенно когда требуется устранить зависшие задания печати.
- net start spooler — запускает службу диспетчера очереди печати после её остановки.
- wmic printer list brief — выводит список установленных принтеров с краткой информацией о каждом из них.
- wmic printer where default=true get name — выводит имя принтера, установленного по умолчанию.
- wmic printer where name=’PrinterName’ delete — удаляет указанный принтер из системы.
- wmic printerconfig — отображает информацию о конфигурации принтера, включая его настройки и параметры печати.
- cscript prnjobs.vbs — используется для управления заданиями печати через скрипт prnjobs.vbs, который можно использовать для удаления, приостановки или возобновления заданий.
Дополнительные команды в Windows
В дополнение к основным инструментам для управления системой, командная строка Windows предоставляет ряд дополнительных команд, которые расширяют возможности администрирования и диагностики.
- wevtutil — управляет журналами событий Windows. Например, wevtutil qe System выведет события из системного журнала.
- tzutil — управляет настройками часовых поясов. tzutil /s Pacific Standard Time установит часовой пояс на Тихоокеанское стандартное время.
- taskkill — завершает процесс по его PID или имени. Так, taskkill /F /PID 1234 завершит процесс с PID 1234.
- powercfg /hibernate off — отключает режим гибернации.
- powercfg /energy — создает отчет об использовании энергии системой.
(Image credit: Future)
Windows 10 makes it easy to connect to a network and the internet using a wired or wireless connection. However, sometimes, you may still need to manually manage settings or troubleshoot connectivity problems, which is when the built-in command-line tools can come in handy.
Regardless of the issue, Windows 10 will likely have a Command Prompt tool to help you resolve the most common problems. For instance, ipconfig and ping are among the most important tools for viewing network settings and troubleshooting connectivity issues. If you are dealing with a routing problem, the route command can display the current routing table to examine and determine related problems, and with the nslookup tool, you can diagnose DNS problems.
You also have tools like arp to troubleshoot switching problems and determine the MAC address from an IP address. The netstat command-line tool allows you to view statistics for all the connections. And you can use the netsh tool to display and change many aspects of the network configuration, such as checking the current configuration, resetting settings, managing Wi-Fi and Ethernet settings, enabling or disabling the firewall, and a lot more.
This guide highlights eight Command Prompt tools that should help you manage and troubleshoot networking problems on your device and across the network.
1. IPConfig
On Windows 10, ipconfig (Internet Protocol configuration) is among the most common networking tools that allow you to query and show current TCP/IP (Transmission Control Protocol/Internet Protocol) network configuration. The command also includes options to perform different actions, such as refreshing Dynamic Host Configuration Protocol (DHCP) and Domain Name System (DNS) settings.
Display network configuration
To get started with ipconfig on Windows 10, use these steps:
All the latest news, reviews, and guides for Windows and Xbox diehards.
- Open Start.
- Search for Command Prompt, right-click the top result, and select the Run as administrator option.
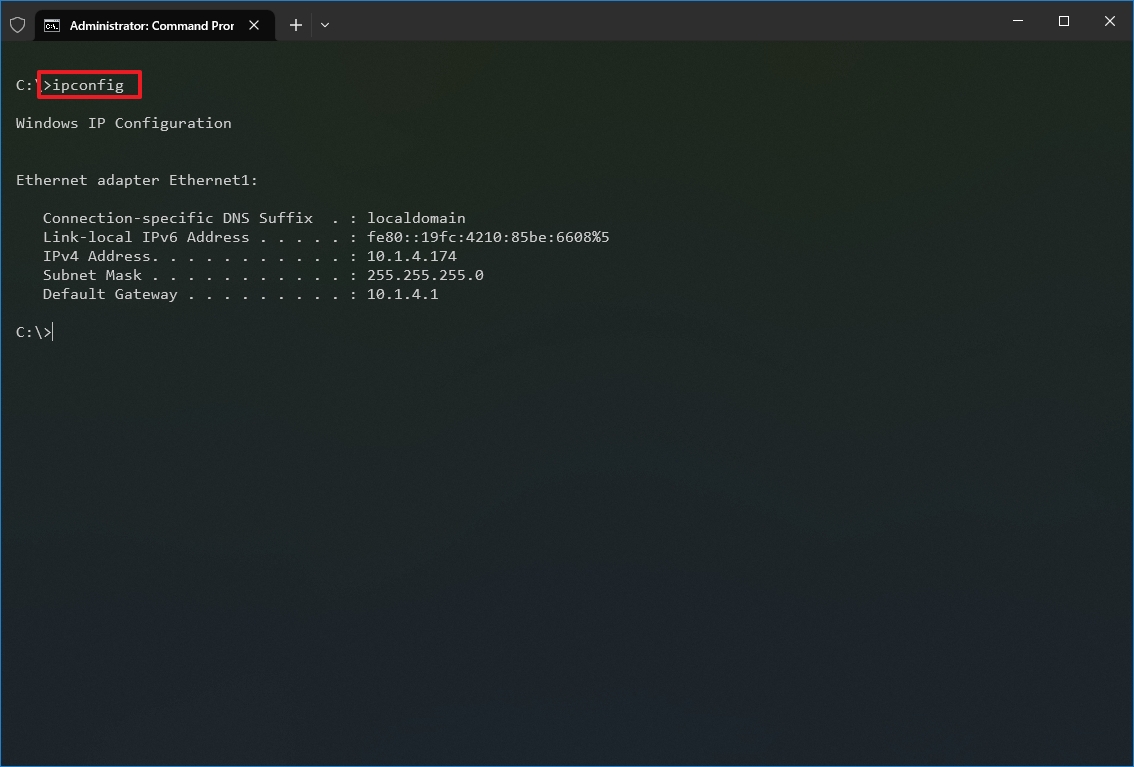
- Type the following command to view a summary of the TCP/IP network configuration and press Enter: ipconfig
- Quick tip: In Command Prompt, you can use the CLS command to clear the screen after you no longer need the information to continue running commands without clutter.
- Type the following command to view the complete TCP/IP network configuration and press Enter: ipconfig /all
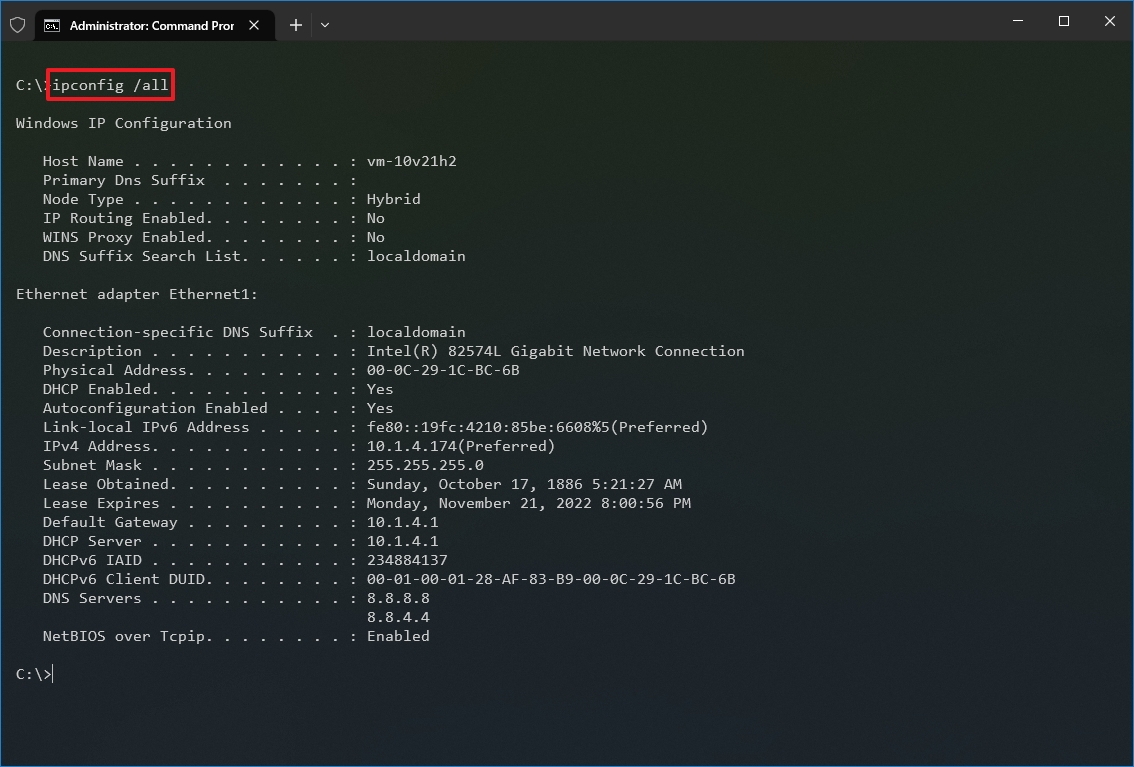
Once you complete the steps, you will have an overview of the PC’s entire TCP/IP configuration.
Refresh network settings
To release and renew the network configuration with Command Prompt, use these steps:
- Open Start.
- Search for Command Prompt, right-click the top result, and select the Run as administrator option.
- Type the following command to remove the current network configuration and press Enter: ipconfig /release
- Type the following command to reconfigure the network configuration and press Enter: ipconfig /renew
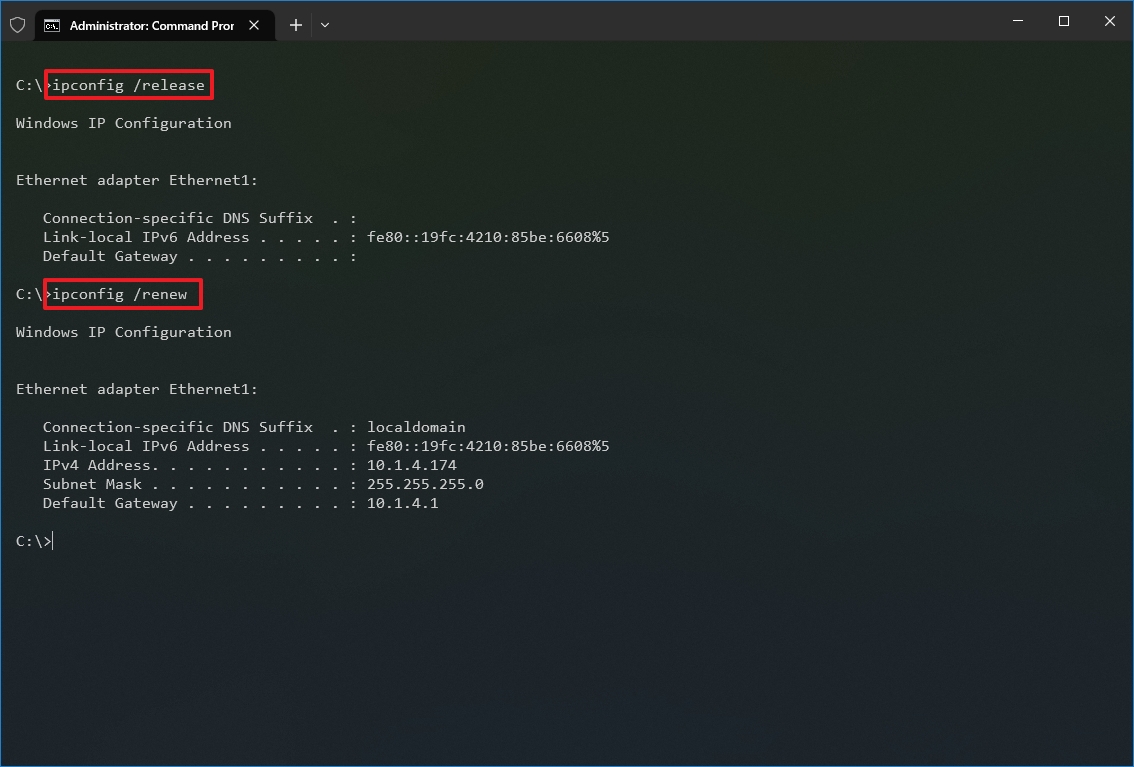
After you complete the steps, the first command will clear the current configuration, and the second command will fetch new settings from the DHCP server to resolve connectivity issues. If the dynamically assigned settings have not expired in the server, it is common to see the same IP address reconfigured on the device.
Refresh DNS settings
To flush and rebuild the current DNS cache entries on Windows 10, use these steps:
- Open Start.
- Search for Command Prompt, right-click the top result, and select the Run as administrator option.
- Type the following command to clear the DNS system cache on the device and press Enter: ipconfig /flushdns
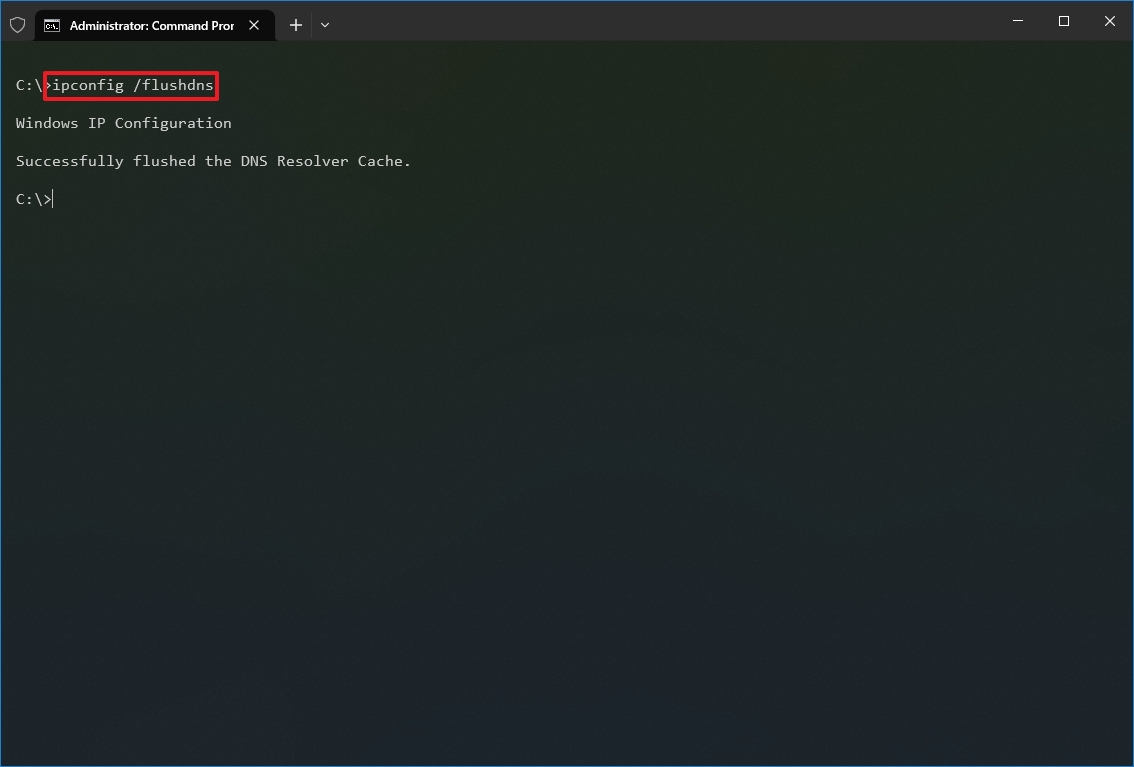
Once you complete the steps, the entries stored in the DNS cache of Windows 10 will be deleted and refreshed. Usually, this command will come in handy when you cannot connect to another computer or website using the host or domain name due to outdated information in the local cache.
2. Ping
Ping is another essential networking tool because it allows you to send ICMP (Internet Control Message Protocol) echo request messages to test the IP connectivity with other devices, whether it is another computer in the network or internet service.
Test device connectivity
To test the network connectivity with the ping command on Windows 10, use these steps:
- Open Start.
- Search for Command Prompt, right-click the top result, and select the Run as administrator option.
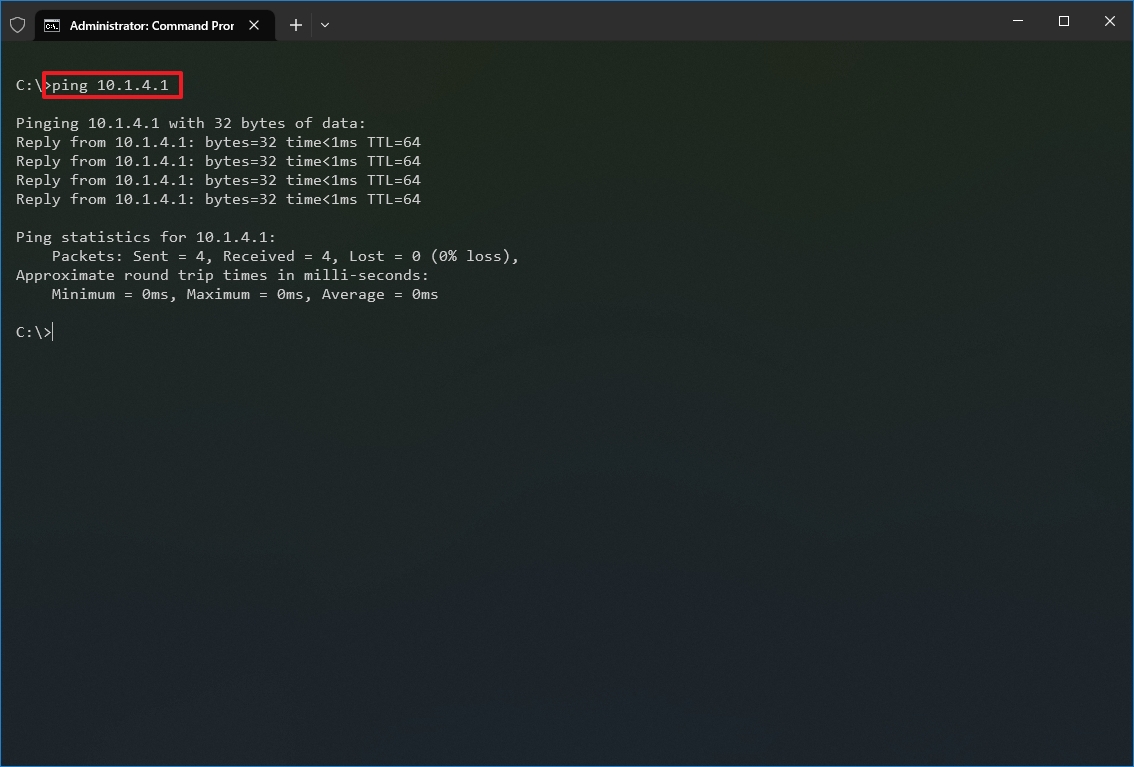
- Type the following command to send ICMP echo requests to test connectivity and press Enter: ping IP-OR-DOMAIN
In the command, replace IP-OR-DOMAIN with the actual IP address or domain name of the computer or service you want to test. For example, this command tests the communication between the local device and router: ping 10.1.4.1
- Quick tip: If you use the -a option (for example, ping -a 10.1.4.1), the command will also resolve the address to a hostname.
- (Optional) Type the following command to test the local computer networking stack and press Enter: ping 127.0.0.1 or ping loopback
- Quick note: The 127.0.0.1 is a well-known address, and it is referred to as the loopback address. When you run the command, if you get a reply, it means that the networking stack on Windows 10 is up and running. This is the same as pinging the device using its own network address.
Once you complete the steps, receiving four successful echo replies from the destination means the device can talk with the remote host. If the request times out, there is a problem between the host and the remote device.
If you are dealing with connectivity problems, start pinning the local computer to ensure the network stack is working. Then test the router’s connection to ensure the issue is not in the local network. Then try to ping a website to find out whether there is a problem with the internet connection or the remote host.
You should also know that the ping command will always time out if the remote device or service blocks the ICMP protocol.
Diagnose packet loss activity
The ping command includes many options that you can access with the «ping /?» command, and one of these options is the ability to set the time you want to run the tool, which can come in handy to examine packets lost when you are troubleshooting connectivity problems.
To run the ping command for a specific period, use these steps:
- Open Start.
- Search for Command Prompt, right-click the top result, and select the Run as administrator option.
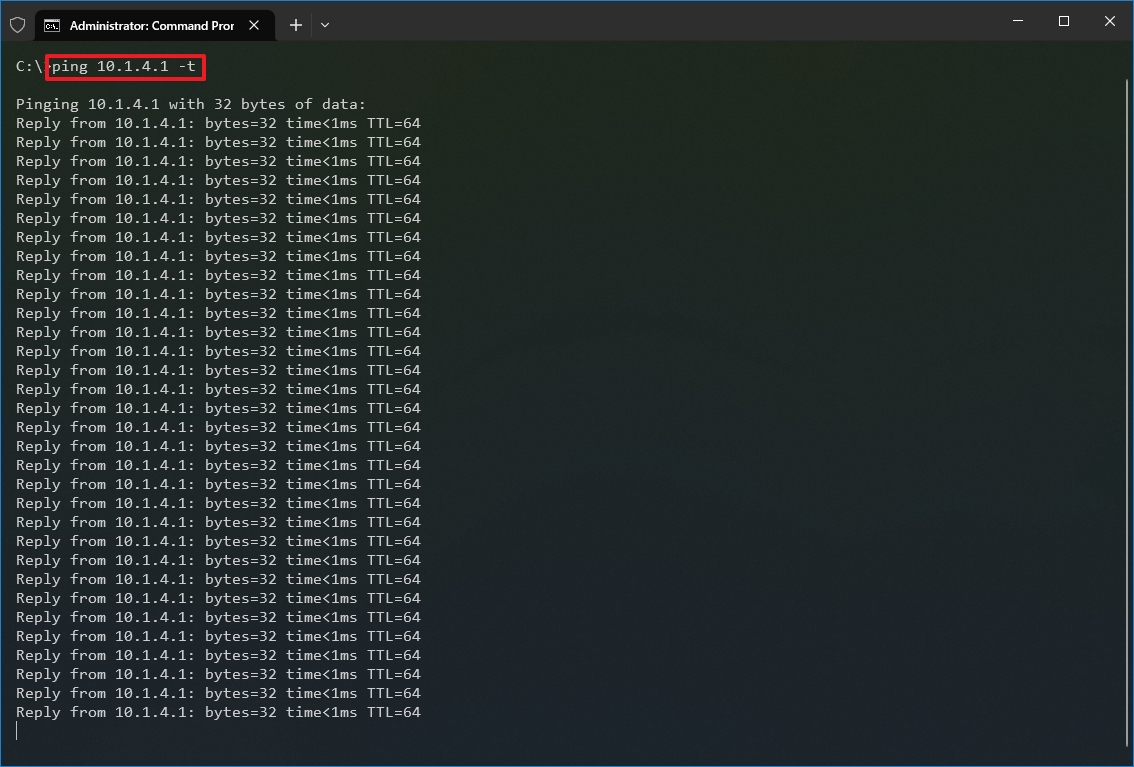
- Type the following command to continue pinging until stopped and press Enter: ping IP-OR-DOMAIN -t
In the command, replace IP-OR-DOMAIN with the actual IP address or domain name of the computer or service you want to test. For example, this command tests the communication between the local device and router: ping 10.1.4.1 -t
- Use the «Control + C» keyboard shortcut to stop the ping.
After you complete the steps, you will be able to see the successful and lost requests that can give you a clue on how to continue troubleshooting and resolving the connectivity problem. Administrators usually use the ping command in a local network to find out when a service goes down quickly. Also, the tool can be used as a quick way to know when the server is up and running again when restarting a server remotely.
3. Tracert
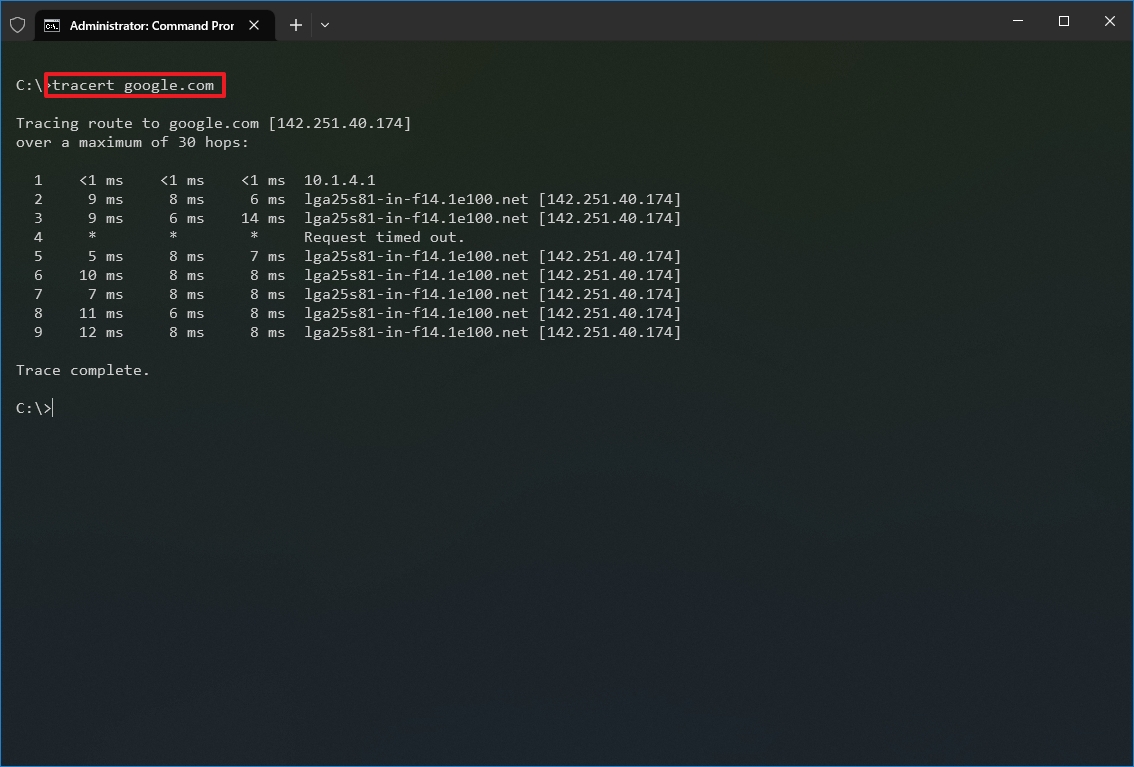
Windows 10 also includes tracert (Trace Route), a diagnostic tool to determine the network path to a destination using a series of ICMP echo requests. However, unlike the ping command, each request includes a TTL (Time to Live) value that increases by one each time, allowing to display of a list of the route the requests have taken and their duration.
To trace the route to a destination with Command Prompt on Windows 10, use these steps:
- Open Start.
- Search for Command Prompt, right-click the top result, and select the Run as administrator option.
- Type the following command to understand the path taken to the destination and press Enter: tracert IP-OR-DOMAIN
In the command, replace IP-OR-DOMAIN with the actual IP address or domain name for the destination you want to troubleshoot. For example, this command allows you to view the path the packets are taking to reach Google.com: tracert google.com
- (Optional) Type the following command to adjust the hop counts to the destination and press Enter: tracert -h HOP-COUNT IP-OR-DOMAIN
In the command, replace IP-OR-DOMAIN with the actual IP address or domain name for the destination you want to troubleshoot and HOP-COUNT for the number of hops you want to trace. For example, this command puts the limit of 5 hops (nodes) to the destination: tracert -h 5 google.com
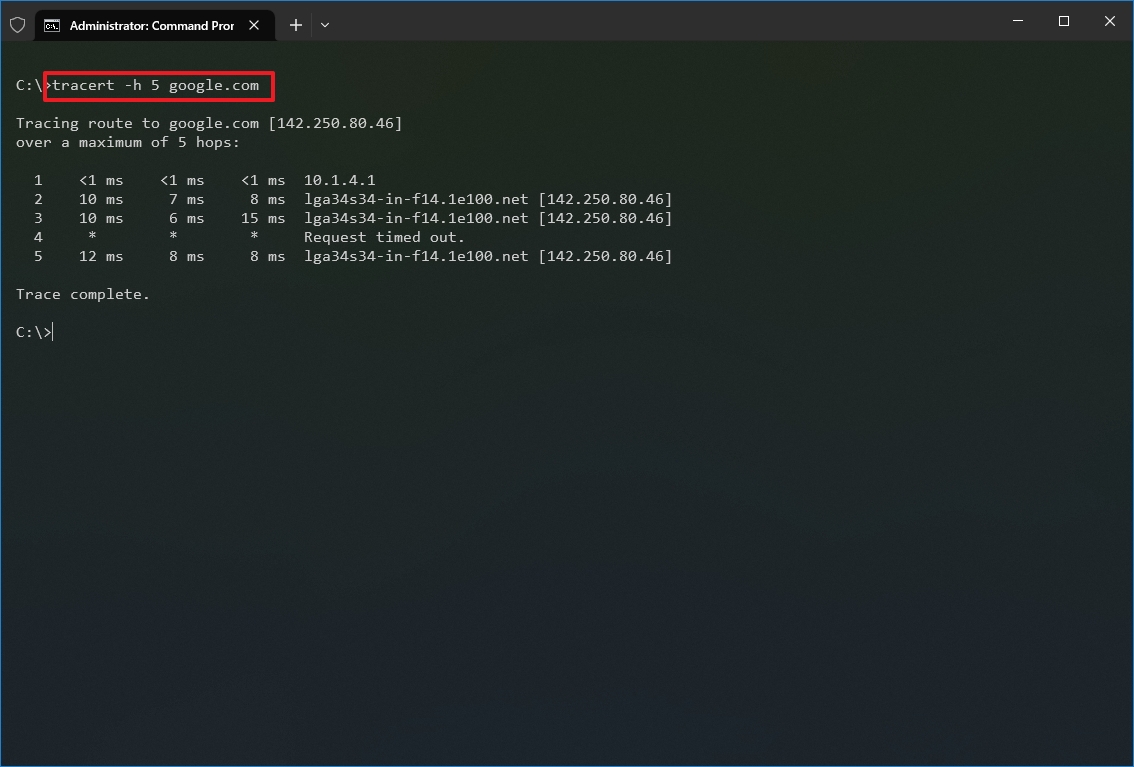
Once you complete the steps, you will know if the destination is reachable or if there is a networking problem along the way.
Similar to the ping tool, tracert includes several options, which you can view with the «tracert /?» command.
4. NSLookup
The nslookup (Name Server Lookup) tool can show valuable details to troubleshoot and resolve DNS-related issues. The tool includes an interactive and non-interactive modes. However, you will be using the non-interactive mode more often than not, which means you will type the full command to obtain the necessary information.
You can use this command to display the default DNS name and address of the local device and determine the domain name of an IP address or the name servers for a specific node.
To get started with nslookup on Windows 10, use these steps:
- Open Start.
- Search for Command Prompt, right-click the top result, and select the Run as administrator option.
- Type the following command to look up the local DNS name and address and press Enter: nslookup
- Quick note: This command also happens to open the nslookup interactive mode.
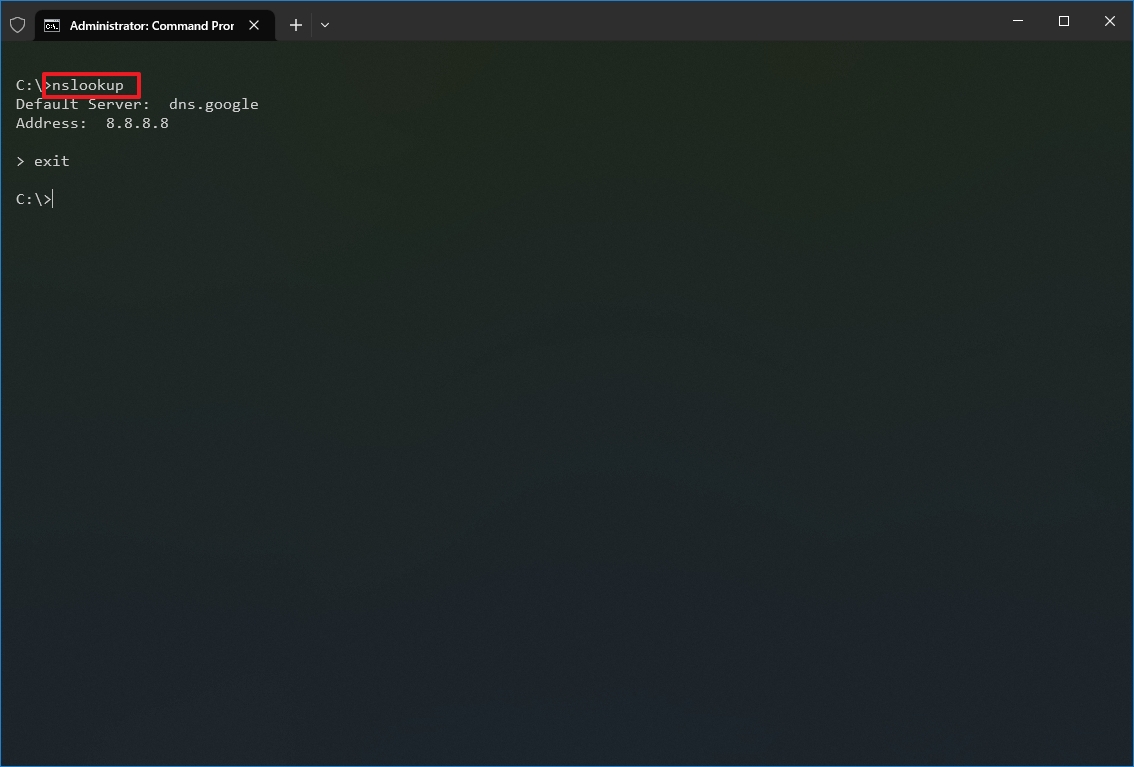
- Confirm the current DNS information.
- Type the following command to exit the interactive mode and press Enter: exit
- Type the following command to determine the name and address of a specific server and press Enter: nslookup IP-ADDRESS
In the command, replace the IP-ADDRESS with the address of the remote device. For example, this command looks up the IP address 172.217.165.142 address: nslookup 172.217.165.142
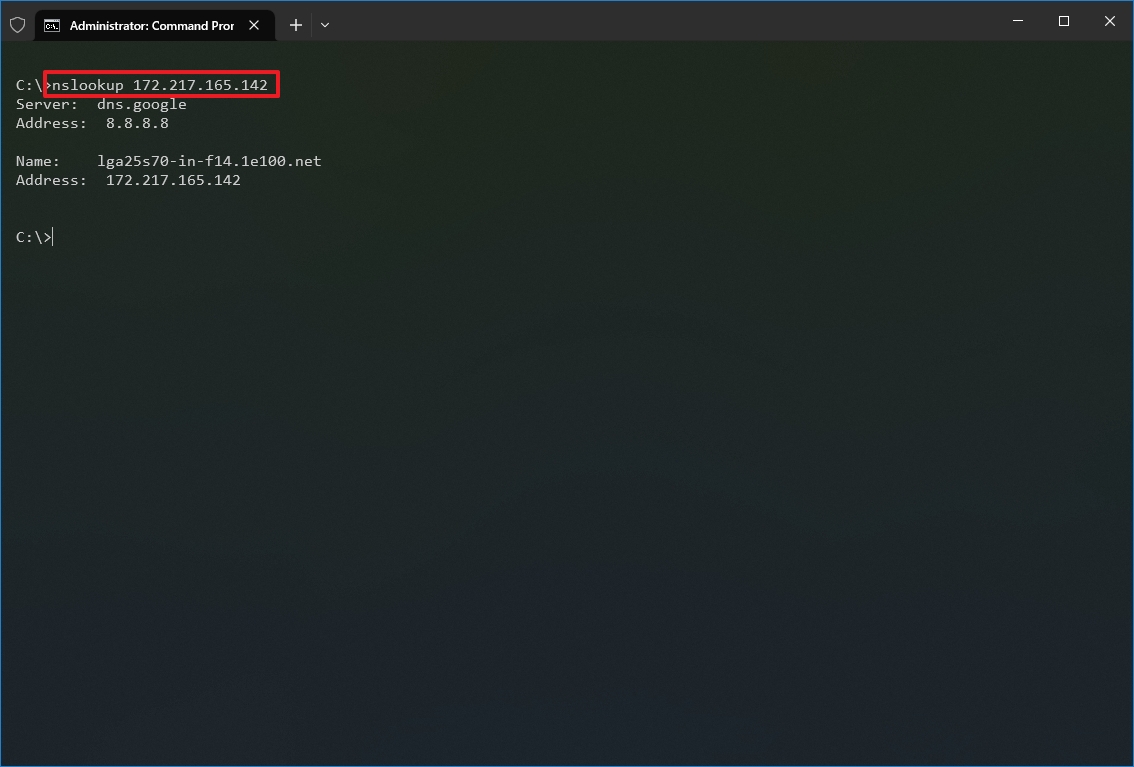
- Type the following command to determine the address of a specific server and press Enter: nslookup DOMAIN-NAME
In the command, replace the DOMAIN-NAME with the address of the remote device. For example, this command looks up the IP address Google.com address: nslookup google.com
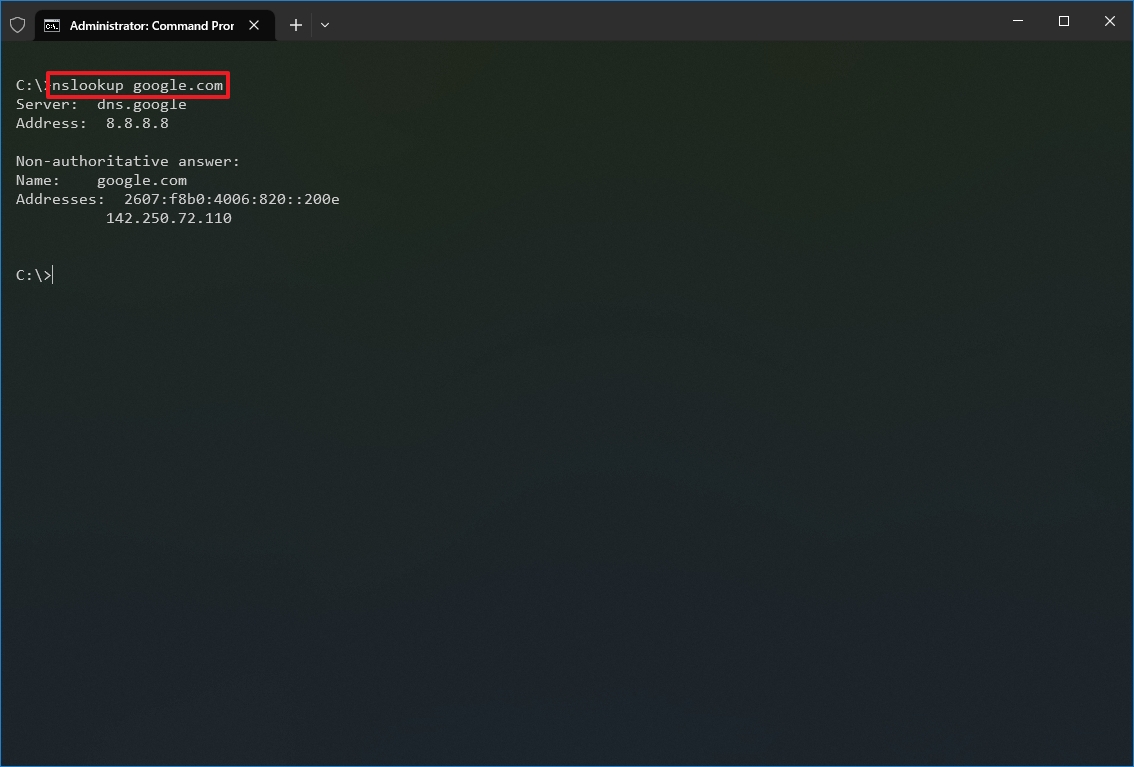
After you complete the steps, depending on the command, you will know whether the device has a DNS resolver and the IP address or domain and vice versa of the remote host.
5. NetStat
The netstat (Network Statistics) tool displays statistics for all network connections. It allows you to understand open and connected ports to monitor and troubleshoot networking problems for Windows 10 and apps.
When using the netstat tool, you can list active network connections and listening ports. You can view network adapter and protocol statistics. You can even display the current routing table and much more.
To get started with netstat, use these steps:
- Open Start.
- Search for Command Prompt, right-click the top result, and select the Run as administrator option.
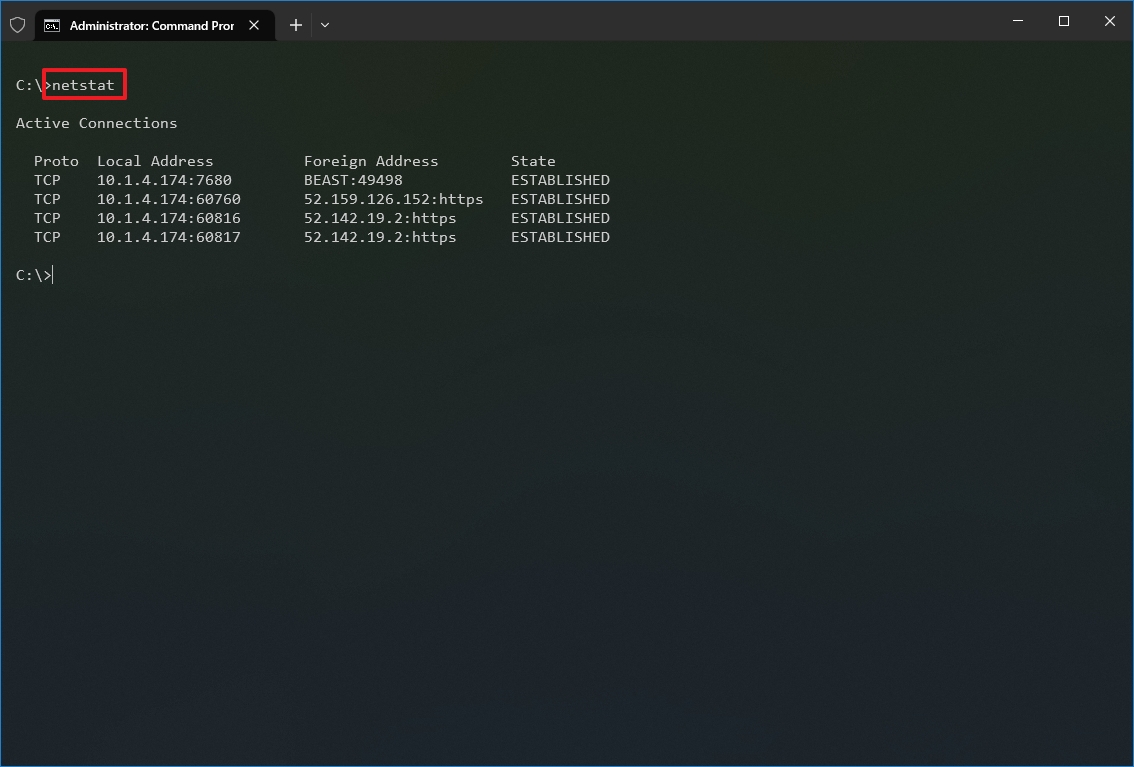
- Type the following command to show all active TCP connections and press Enter: netstat
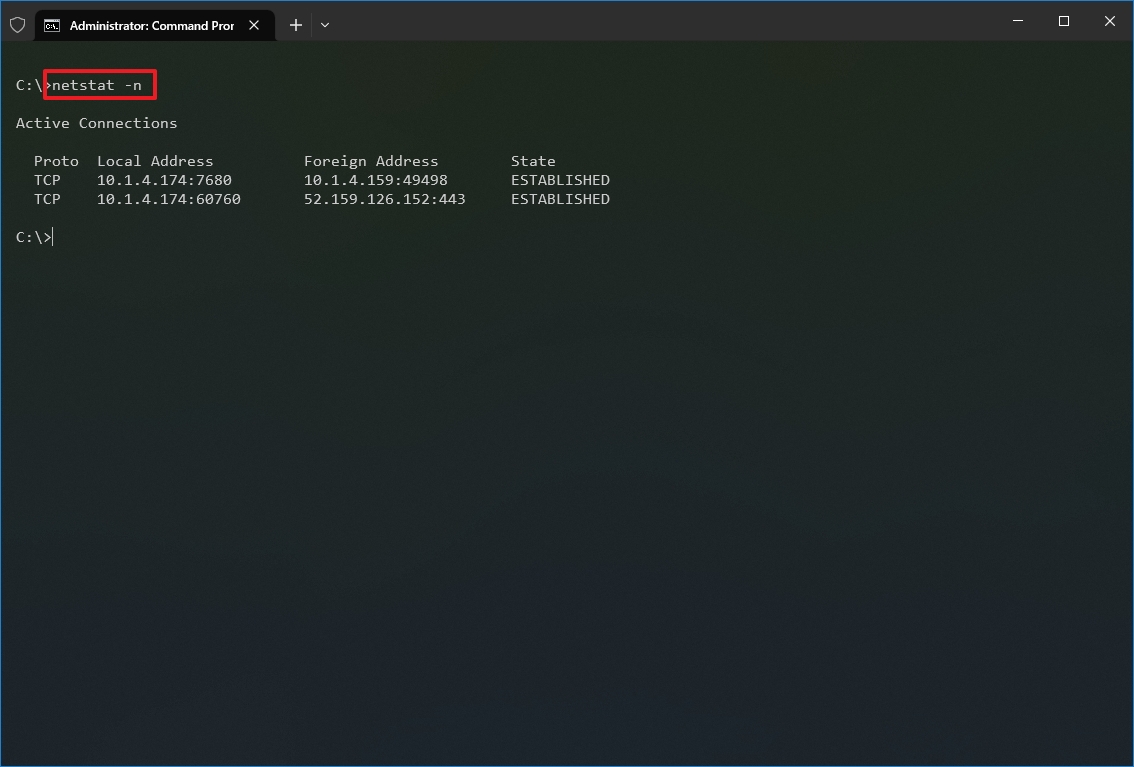
- (Optional) Type the following command to display active connections showing numeric IP address and port number instead of trying to determine the names and press Enter: netstat -n
- (Optional) Type the following command to refresh the information at a specific interval and press Enter: netstat -n INTERVAL
In the command, make sure to replace INTERVAL for the number (in seconds) you want to redisplay the information. This example refreshes the command in question every five seconds: netstat -n 5
- Quick note: When using the interval parameter, you can terminate the command using the «Ctrl + C» keyboard shortcut in the console.
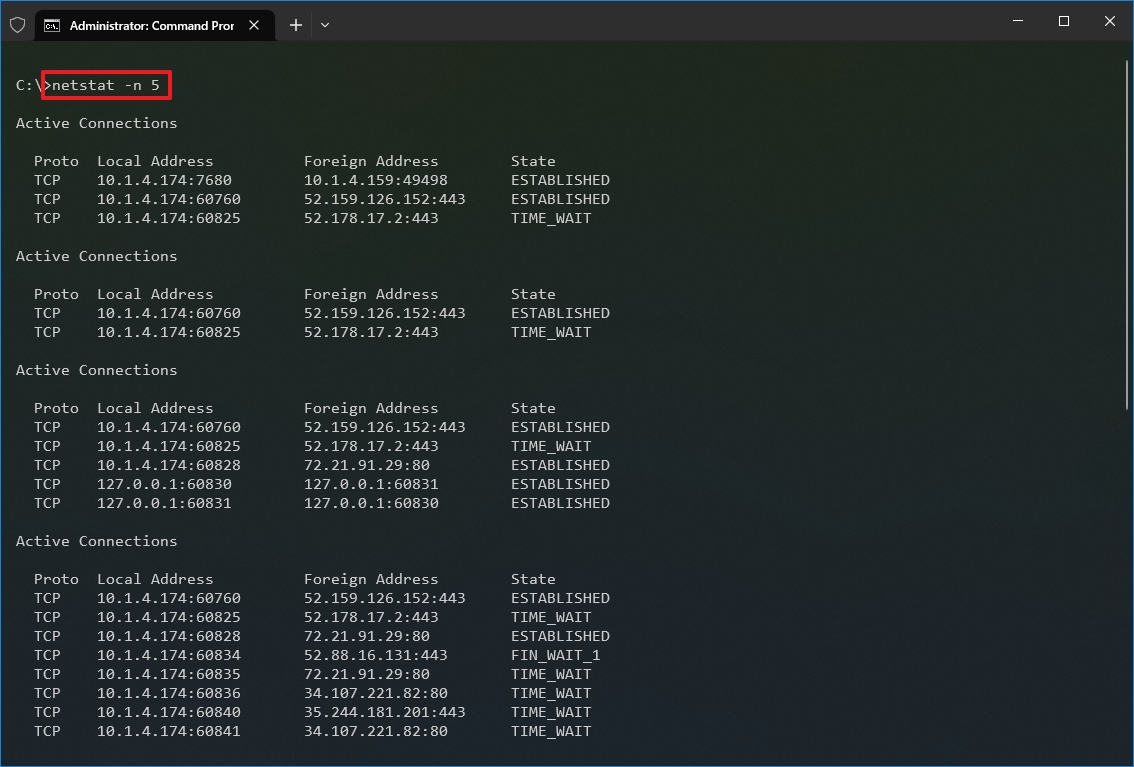
Once you run the command, it will return a list of all active connections in four columns, including:
- Proto: Displays the connection protocol, including TCP or UDP.
- Local Address: Displays the device’s IP address followed by a semicolon with a port number of the connection. The double-semicolon inside brackets indicates the local IPv6 address. The «0.0.0.0» address also refers to the local address.
- Foreign Address: Shows the remote computer’s IP (or FQDN) address with the port number after the semicolon port name (for instance, https, http, microsoft-ds, wsd).
- State: Shows whether the connection is active (established), if the port has been closed (time_wait) and if the program has not closed the port (close_wait). Other statuses available include closed, fin_wait_1, fin_wait_2, last_ack, listen, syn_received, syn_send, and timed_wait.
6. ARP
Windows 10 maintains an arp (Address Resolution Protocol) table, which stores IP to Media Access Control (MAC) entries that the system has resolved. The arp tool lets you view the entire table, modify the entries, and use it to determine a remote computer’s MAC address.
Usually, you do not need to worry about MAC addresses, but there are scenarios when this information may come in handy. For example, when troubleshooting network problems at the data link layer (switching) or when restricting access or filtering content through the network for specific devices.
To get started with arp on Windows 10, use these steps:
- Open Start.
- Search for Command Prompt, right-click the top result, and select the Run as administrator option.
- Type the following command to view the current arp table cache on Windows 10 and press Enter: arp -a
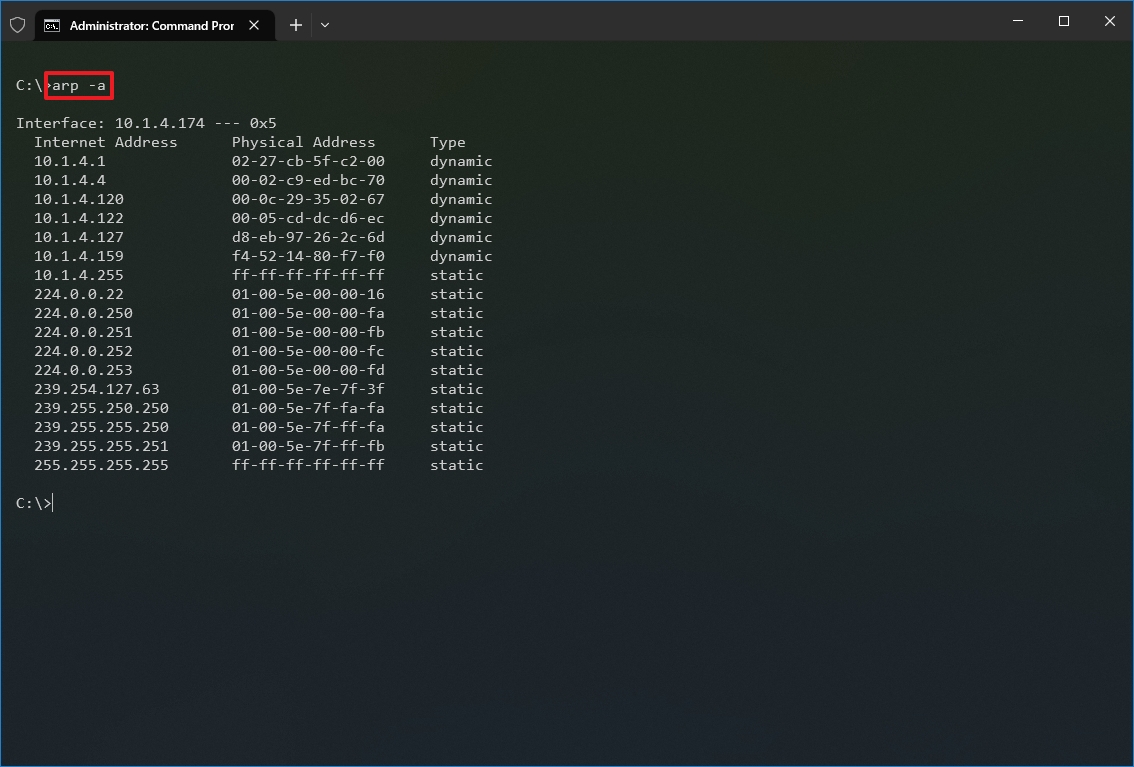
- Type the following command to determine the MAC address of a remote device and press Enter: arp -a IP
In the command, make sure to replace IP with the address of the destination. For example, this command reveals the physical address of the 10.1.4.120 destination: arp -a 10.1.4.120

- Confirm the MAC (physical) address for the remote device.
After you complete the steps, you will be able to view the entire arp table and MAC address of a specific IP address.
If you want to know all the available options, use the «arp /?» command to list the available options with their corresponding descriptions.
7. Route
The route tool displays the routing table that allows Windows 10 to understand the network and communicate with other devices and services. The tool also offers some options to modify and clear the table as needed.
Like the arp tool, you typically do not have to worry about the routing table, but the command-line tool will come in handy when troubleshooting related problems.
To view or flush the routing table available on Windows 10, use these steps:
- Open Start.
- Search for Command Prompt, right-click the top result, and select the Run as administrator option.
- Type the following command to view the routing table known to Windows 10 and press Enter: route print
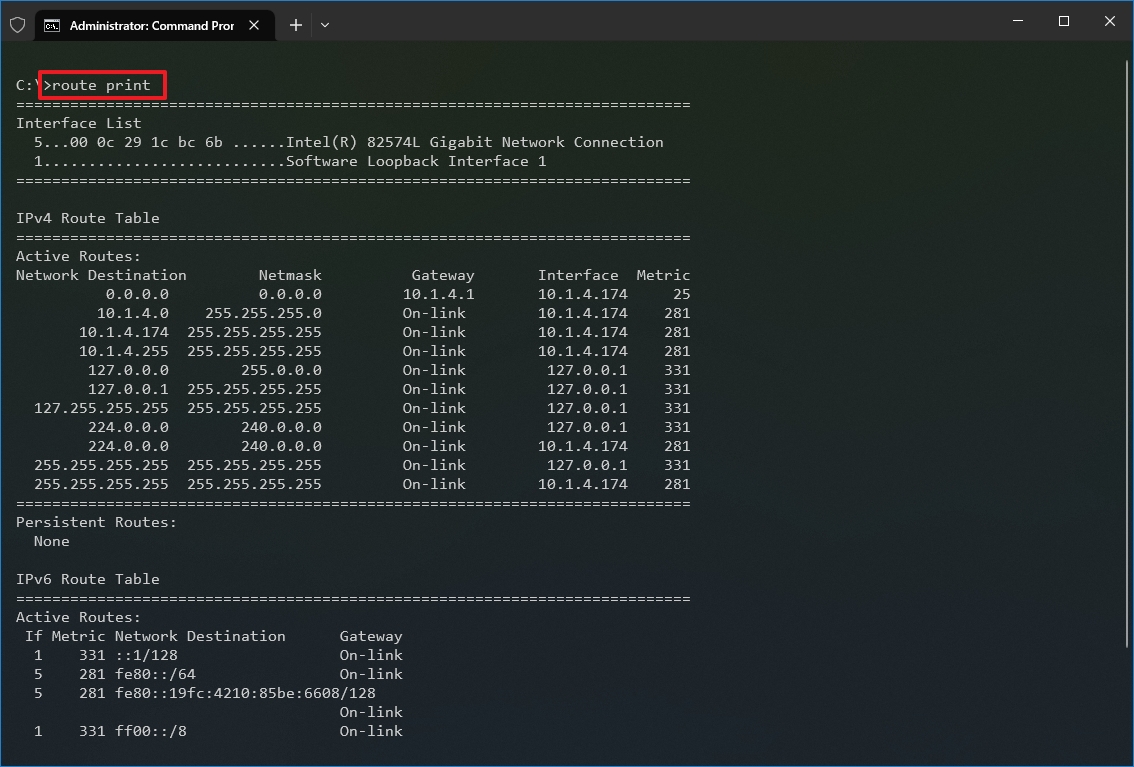
- Confirm the routing table information.
- (Optional) Type the following command to clear the routing table and press Enter: route -f
- Quick note: When running this command, the device will lose network connectivity since the system no longer understands the network topology. After running the command, restart the machine to allow the networking stack to rebuild the routing table. Usually, you should not have to clear the table unless you modify some of the entries and you need to reset the table.
Once you complete the steps, you will understand the routing table and how to clear the information.
You can also use the «route /?» command to view a list of available options, including options to change networking metrics, specify a gateway, add a new route, and much more. However, modifying these settings is usually not recommended unless you understand how the network works.
8. Netsh
On Windows 10, netsh (Network Shell) is a legacy command-line tool that allows you to display and change virtually any network configuration. For instance, you can use the tool to view the current network configurations, manage wireless connections, reset the network stack to fix most common problems, enable or disable the firewall, and a lot more.
To get started with the netsh command-line tool, use these steps:
- Open Start.
- Search for Command Prompt, right-click the top result, and select the Run as administrator option.
- Type the following command to view a list of the available commands (contexts) and press Enter: netsh /?
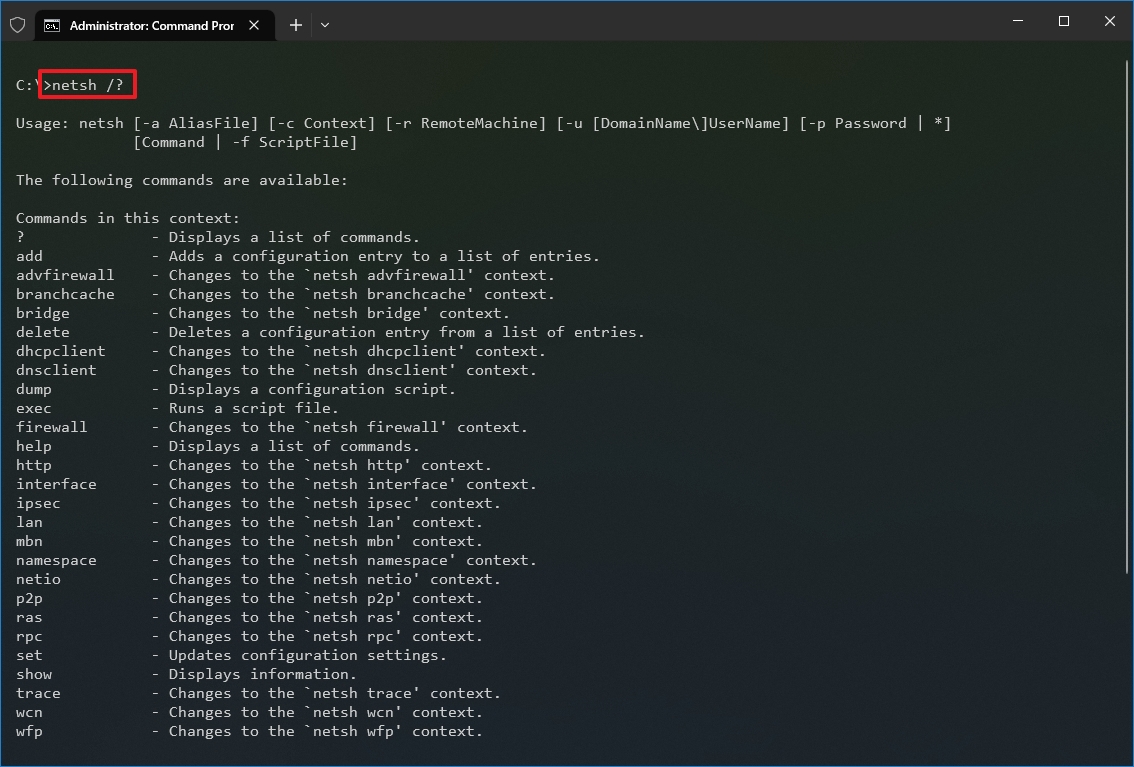
- Type the following command to view the list of available subcommands (subcontexts) for a specific option and press Enter: netsh CONTEXT-COMMAND
In the command, change the CONTEXT-COMMAND for the command that includes additional options. For example, this command shows the commands available to manage the firewall with netsh: netsh advfirewall /?
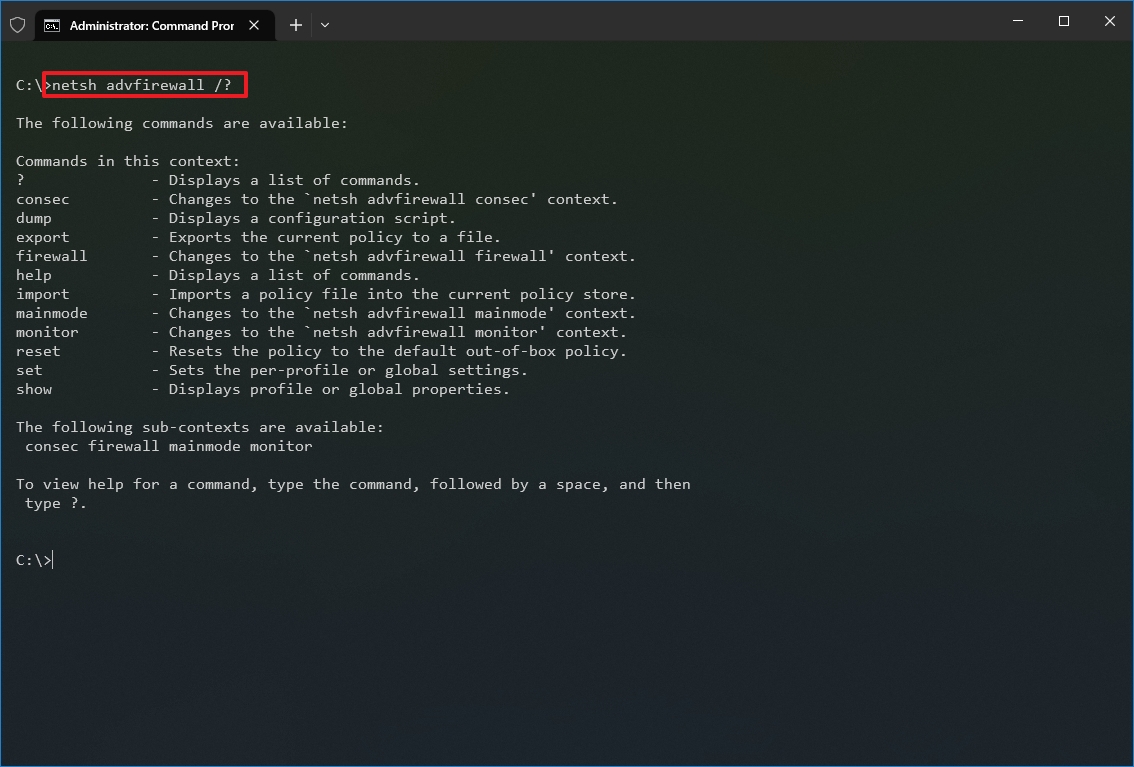
Once you complete the steps, you will know how to navigate the netsh contexts and subcontexts command to manage networking settings.
Reset system network stack
To reset the network stack to resolve common connectivity problems, use these steps:
- Open Start.
- Search for Command Prompt, right-click the top result, and select the Run as administrator option.
- Type the following command to reset the winsock stack and press Enter: netsh winsock reset
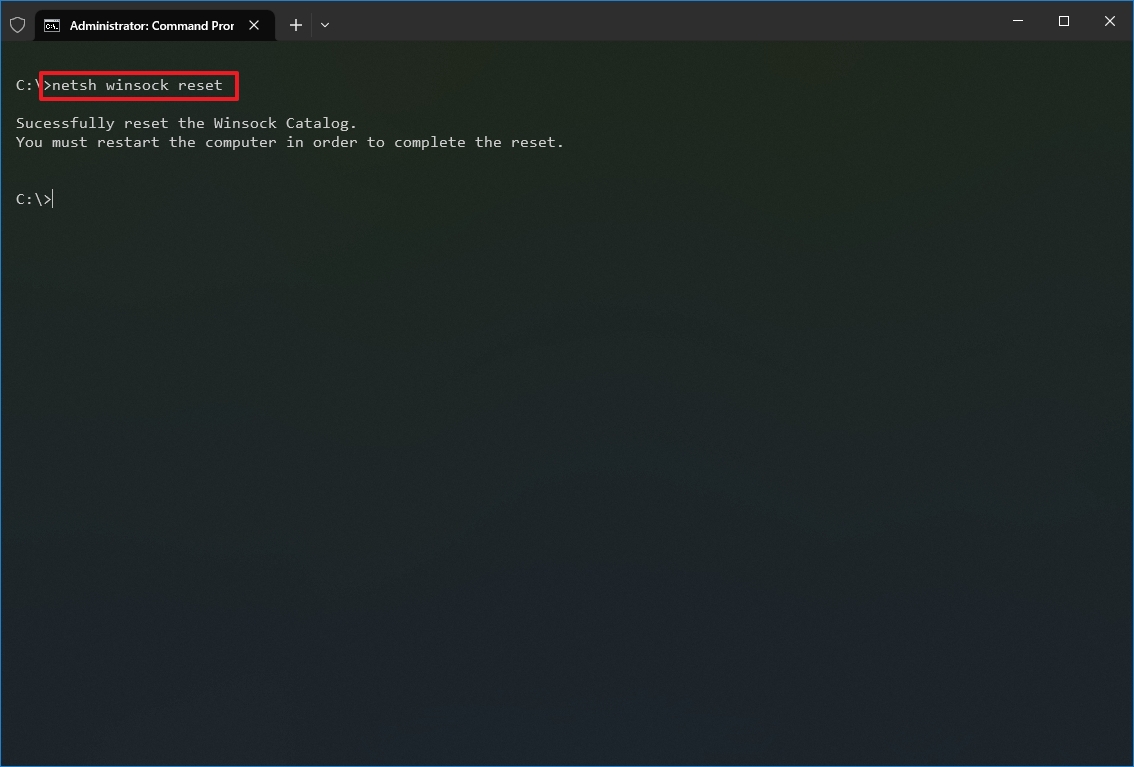
- Restart your computer.
After you complete the steps, the winsock configuration will reset, hopefully fixing the problems connecting to a network and the internet.
Export and import network configuration
To export the network configuration with netsh on Windows 10, use these steps:
- Open Start.
- Search for Command Prompt, right-click the top result, and select the Run as administrator option.
- Type the following command to export the current configuration for all the network adapters and press Enter: netsh -c interface dump>PATH\TO\EXPORTED.txt
In the command, replace the PATH\TO\EXPORTED.txt with the path and name of the file to store the configuration. For example, the following command exports the settings to the netshconfig.txt file: netsh -c interface dump>c:\netshconfig.txt
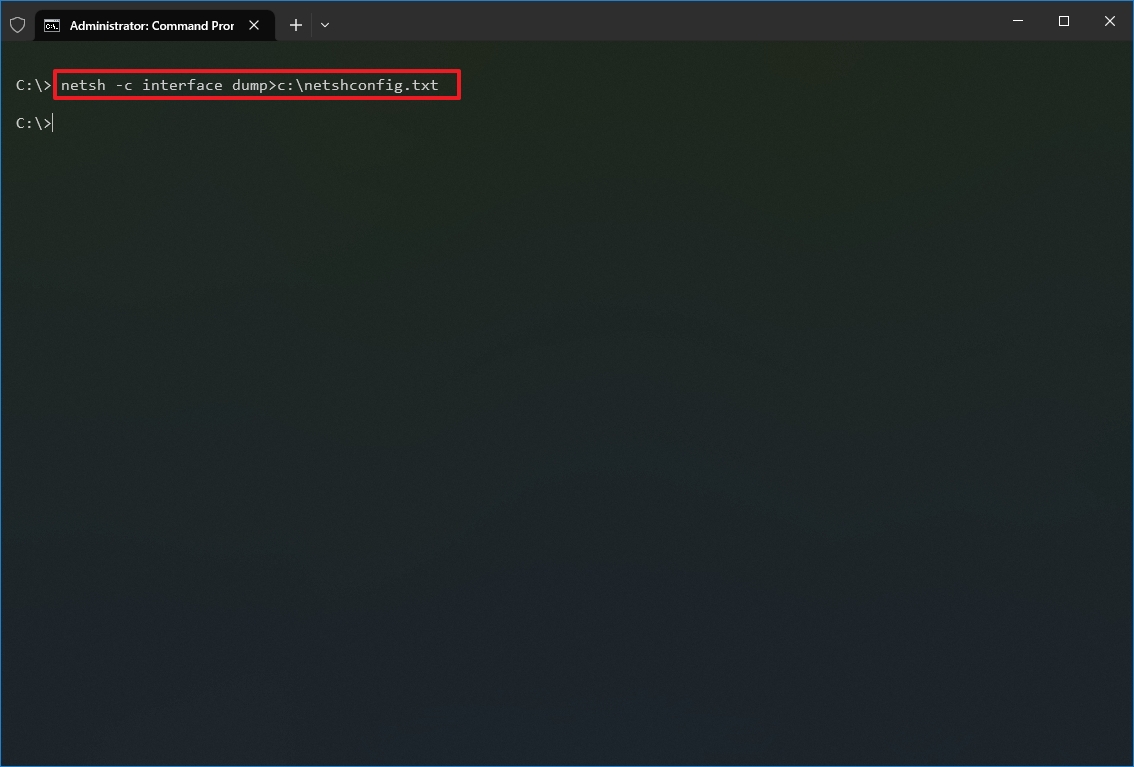
Once you complete the steps, you can open the file with any text editor to view the exported configuration.
Import network configuration
To import the network configuration settings with netsh, use these steps:
- Open Start.
- Search for Command Prompt, right-click the top result, and select the Run as administrator option.
- Type the following command to import the network configuration and press Enter: netsh -c interface dump>PATH\TO\IMPORTED.txt
In the command, replace the PATH\TO\EXPORTED.txt with the path and name of the file you want with the exported configuration. For example, the following command imports the settings from the netshconfig.txt file: netsh -f c:\netshconfig.txt
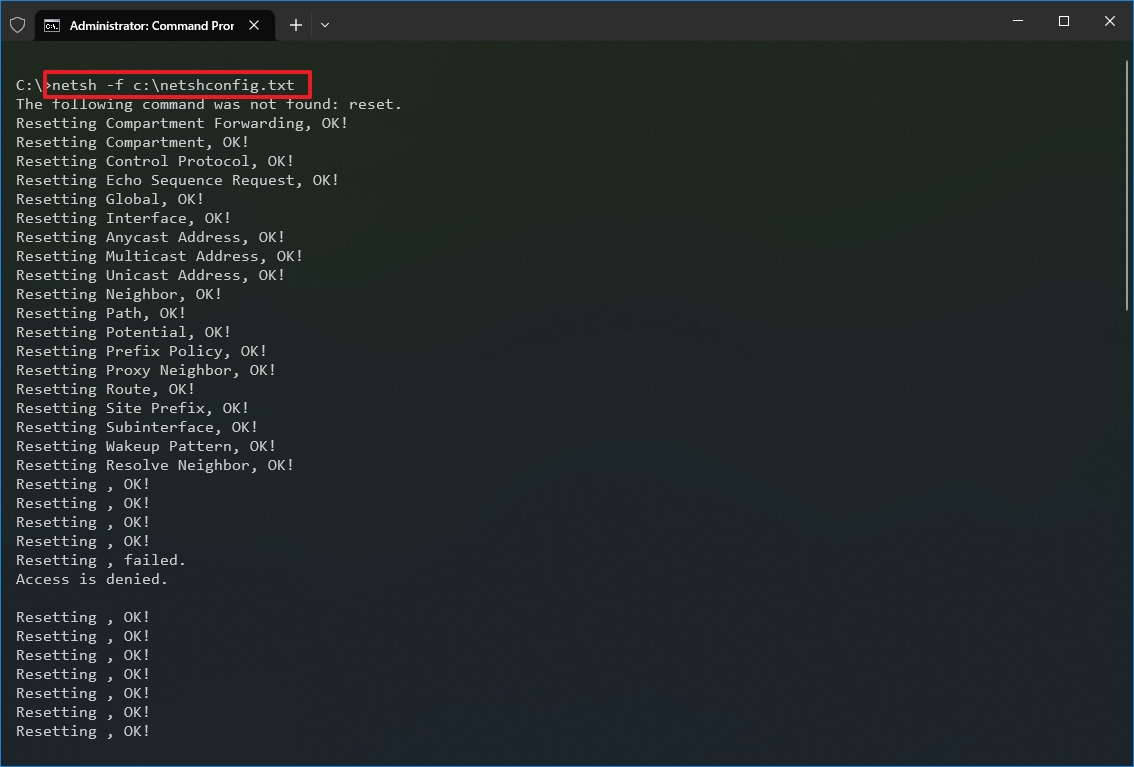
After you complete the steps, the new networking configuration will be imported and applied to Windows 10.
Enable and disable firewall
To enable the Windows 10 firewall with netsh, use these steps:
- Open Start.
- Search for Command Prompt, right-click the top result, and select the Run as administrator option.
- Type the following command to enable the default firewall and press Enter: netsh advfirewall set currentprofile state on
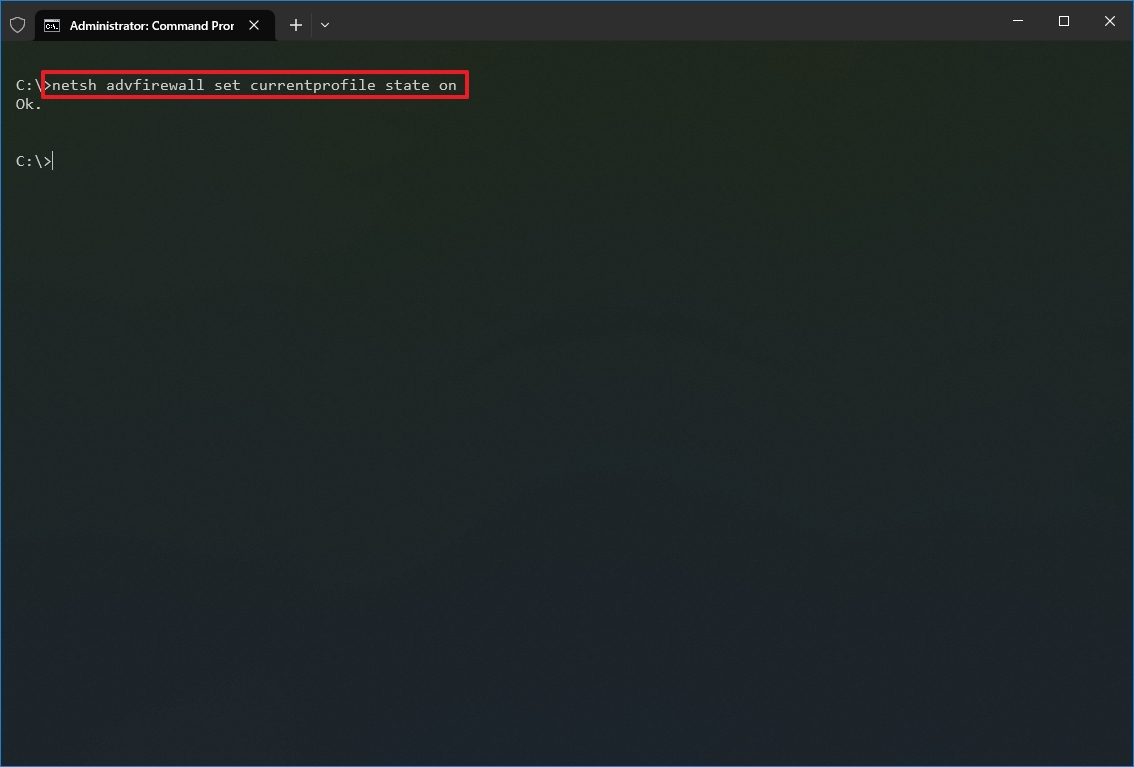
Once you complete the steps, the Windows Defender Firewall will enable on the device.
Disable firewall
To disable the Windows 10 firewall with netsh, use these steps:
- Open Start.
- Search for Command Prompt, right-click the top result, and select the Run as administrator option.
- Type the following command to disable the default firewall and press Enter: netsh advfirewall set currentprofile state off
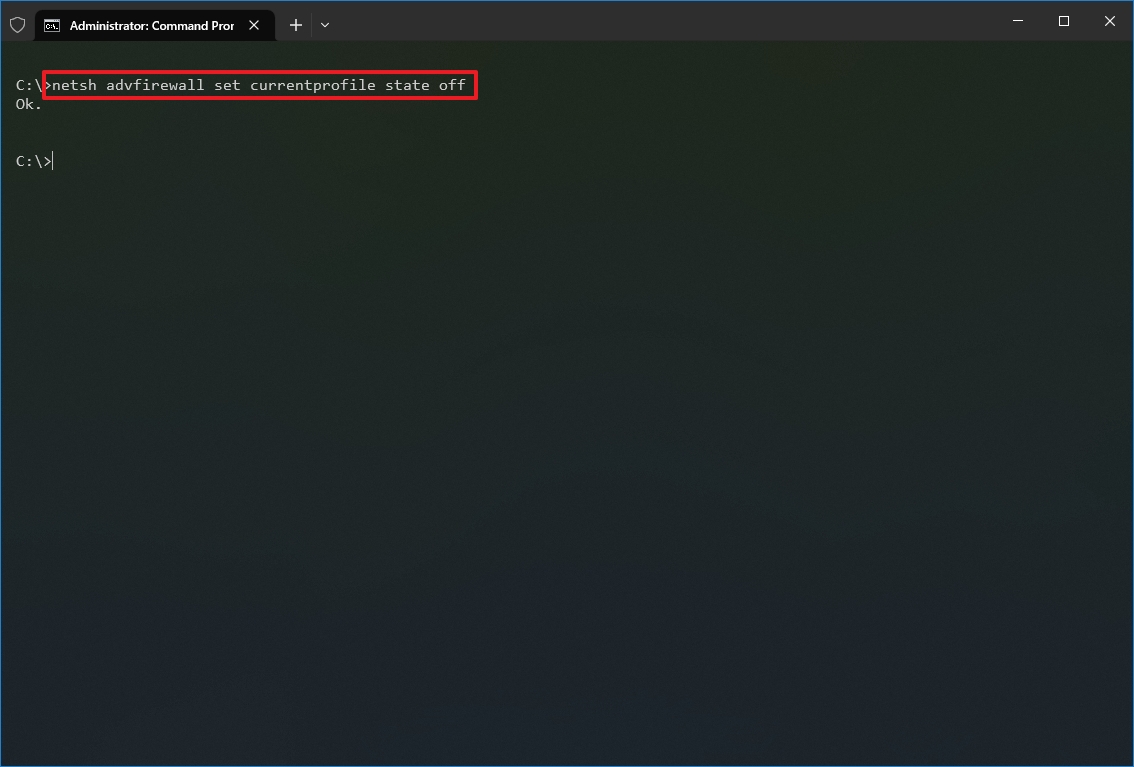
Once you complete the steps, the Windows Defender Firewall will be disabled on the device.
On Windows 10, there are many tools you can use to change settings and troubleshoot networking issues using Command Prompt, PowerShell, and graphical applications. However, in this guide, we only focus on getting you started with some of the most common tools available in Command Prompt.
More resources
For more helpful articles, coverage, and answers to common questions about Windows 10 and Windows 11, visit the following resources:
- Windows 11 on Windows Central — All you need to know
- Windows 10 on Windows Central — All you need to know
Mauro Huculak has been a Windows How-To Expert contributor for WindowsCentral.com for nearly a decade and has over 15 years of experience writing comprehensive guides. He also has an IT background and has achieved different professional certifications from Microsoft, Cisco, VMware, and CompTIA. He has been recognized as a Microsoft MVP for many years.
CMD Commands for Network
Windows has some handy networking utilities which might access from a command line (cmd console).
Ping Command
The ping command is used in networking utilities to detect devices on a network and troubleshoot network problems. When you ping an entity, you send that entity a short message, which it then returns (the echo). The general layout is ping hostname or ping IP address. For example,
ping www.google.com or ping 216.58.208.68
Tracert Command
It’s by far the second command for community management. Tracert is a short form of traceroute instructions to hint at network problems, and it additionally tunes the direction of the packets. For example: To trace the path to the host named dc1.microsoft.com, Input:
tracert dc1.microsoft.com
nbtstat command
nbstat is an application that shows protocol statistics and contemporary TCP/IP connections using NBT (NetBIOS over TCP/IP). In ethical hacking, a term referred to as enumeration to extract person names, device names, network sources, stocks, and offerings from a machine. So for enumeration, the nbtstat command is used to enumerate sharing offerings. As an example: Open your window terminal and run the
'nbstat ip_address'
command.
IPConfig/IFConfig
Suppose you are attempting to display the current configuration for a host system. In that case, this command is the most critical because it offers you a list of the ip address, subnet mask, default gateway, and DNS server configured for a sever. This command can also manage the host configuration with each DHCP and DNS service. It’s critical to start right here. Otherwise, you’ll find it extremely difficult to troubleshoot the system from a network connectivity angle. Parameters to apply with the ipconfig command:
-
ipconfig/all
— Shows a complete TCP/IP configuration for all adapters.
-
ipconfig/displaydns
— Shows the contents of the DNS client resolver cache.
-
ipconfig/flushdns
— Flushes and resets the contents of the DNS client resolver cache.
-
ipconfig/registerdns
— Initiates a manual registration for the DNS name of the host to the community configured DNS provider.
IP/Networking Commands
There are many IP commands with short descriptions indexed here, but you have to most effectively want those mentioned below to diagnose and configure your network.
C:>hostname
: this is the easiest to execute of all TCP/IP instructions, and it indeed shows the name of your computer.
C:>Ipconfig /renew
: the usage of this command will continue all the IP addresses that you are currently (leasing) borrowing from the DHCP server. This command is a quick trouble solver if you are having connection problems. However, it does now not work if you have configured it with a static IP address.
C:>nbtstat –a
: This Command aids in solving troubles with NetBIOS name resolution. (Not stands for NetBIOS over TCP/IP)
Speed up Streaming
In case you’re getting the good available internet streaming speed, but video streaming websites like YouTube are streaming slow, then there’s a threat your ISP might be throttling your connection. It’s far common for ISPs to throttle streaming to keep bandwidth. Happily, an effortless command can restore this issue. Within the command, set off, enter the under-cited command, and hit enter:
netsh advfirewall firewall add rule name="StopThrottling"
dir=in action=block
remoteip=173.194.55.0/24,206.111.0.0/16 enable=yes
The above code provides a rule for your firewall to save your ISP from throttling your connection simultaneously as streaming. Data security is a hot topic that necessitates organizations enlisting the help of specialists when dealing with significant volumes of sensitive data. It’s crucial to remember that better data security doesn’t come immediately.
Other useful articles:
- Basic Windows CMD commands
- Cool CMD Commands Tips and Tricks
- Best CMD Commands for Hacking
- CMD Commands for Wireless Network Speed
- Useful Keyboard Shortcuts for CMD
- What Info about My Laptop Can I Check with CMD and How?
- Getting Started with CMD Windows
- TOP-12 Command-Line Interview Questions (Basic)
- Command-Line Interview Questions (Advanced)
- CMD Commands to Repair Windows
- CMD Commands to Speed Up Computer
- CMD Commands for MAC OS
- How Does the Command Line Work?
- MS-Dos Interview Questions in 2021
- Windows OS Versions and History
- Recent Windows Versions Compared
- Basic Windows Prompt Commands for Every Day
- Windows Command Line Cheat Sheet For Everyone
- Windows Command Line Restart
- Windows Command Line for Loop
- Windows Command — Change Directory
- Windows Command — Delete Directory
- Windows Command Line – Set Environment Variable
- How Do I Run Command Line
- Windows Command Line Create File
- Windows Command Line Editor
- CMD Commands for Network
Windows has some very useful networking utilities that are accessed from a command line (cmd console).
On Windows 10 type cmd in the search box to open a command console.
These basic networking commands are mainly used for getting system information and troubleshooting networking problems.
Here we look at 10 commands that I use most often.
1. Ping Command
The ping command is one of the most often used networking utilities for detecting devices on a network and for troubleshooting network problems.
When you ping a device you send that device a short message, which it then sends back (the echo).
The general format is ping hostname or ping IPaddress.
Example
ping www.google.com or ping 216.58.208.68
This article covers the ping command in more detail.
2. ipconfig Command
Another indispensable and frequently used utility that is used for finding network information about your local machine like IP addresses, DNS addresses etc
Basic Use: Finding Your IP Address and Default Gateway
Type the command ipconfig at the prompt.
The following is displayed

Ip config has a number of switches the most common are:
ipconfig /all – displays more information about the network setup on your systems including the MAC address.
ipconfig /release – release the current IP address
ipconfig /renew – renew IP address
ipconfig /? -shows help
ipconfig/flushdns – flush the dns cache
3. Hostname Command
A very simple command that displays the host name of your machine. This is much quicker than going to the control panel>system route.
4. getmac Command
Another very simple command that shows the MAC address of your network interfaces

5. arp Command
This is used for showing the address resolution cache. This command must be used with a command line switch arp -a is the most common.

Type arp at the command line to see all available options.
See using arp in the basic networking course
6. NSlookup
Used for checking DNS record entries. See Using NSlookup for more details
7. Nbtstat
Diagnostic tool for troubleshooting netBIOS problems. See This technet article.
8 Net Command
Used for managing users,service,shares etc see here
9. Netstat Command
Used for displaying information about tcp and udp connections and ports. See tcp and udp ports and sockets and how to use the netstat command
10. TaskKill Command
View a list of running tasks using the tasklist command and kill them by name or processor ID using the taskKill command- See this tutorial.
Resources:
- Microsoft- using command line tools for networking information
Related Articles:
- Basic networking Course
- Home Network Addressing
- Setting Up Static IPAddresses on Windows 10
- Using The Ping Command For Home Network Testing
- Windows File Sharing Guide
- Configuring Networking on the Raspberry Pi
- 10 Useful Linux (Raspberry Pi) Networking Commands
Please Let me Know if you found it Useful
Я уже писал, о том, что такое IP-адреса и как проверить, под каким адресом вас видит внешний мир.
Однако часто этой информации недостаточно для того, чтобы понять, какой все-таки адрес присвоен вашей сетевой карте, а также провести диагностику проблем подключения. Приведу список команд, которые можно использовать. (также у меня на сайте можно прочитать про визуальную настройку сетевых подключений)
Для начала необходимо открыть командную строку. Делается это так: нажимаете кнопку пуск, выбираете пункт «выполнить».
Альтернативные способ — нужно нажать клавишу Win (между Ctrl и Alt) и R одновременно, этот способ работает также и на Висте
Появляется окошко, в которое нужно вписать cmd и нажать ОК

Появляется та самая командная строка
В ней можно набирать и «вводить» команды, нажимая Enter. Результаты можно копировать — если нажать правую кнопку можно выделить нужный кусок, далее нужно еще раз нажать правую кнопку мыши.
Команда ping
Первая команда, с которой нужно познакомиться — это ping, проверяющую доступность заданного адреса. Введите команду ping 127.0.0.1. Должно получиться что-то такое (если команда не ping не работает, то, возможно, решить проблему поможет инструкция по исправлению ошибки cmd no command):
C:\Documents and Settings\Администратор>ping 127.0.0.1
Обмен пакетами с 127.0.0.1 по 32 байт:
Ответ от 127.0.0.1: число байт=32 время<1мс TTL=128
Ответ от 127.0.0.1: число байт=32 время<1мс TTL=128
Ответ от 127.0.0.1: число байт=32 время<1мс TTL=128
Ответ от 127.0.0.1: число байт=32 время<1мс TTL=128
Статистика Ping для 127.0.0.1:
Пакетов: отправлено = 4, получено = 4, потеряно = 0 (0% потерь),
Приблизительное время приема-передачи в мс:
Минимальное = 0мсек, Максимальное = 0 мсек, Среднее = 0 мсек
C:\Documents and Settings\Администратор>
Как мы видим, на адрес 127.0.0.1 было отправлено 4 пакета, и они все достигли цели. Что же это был за адрес и почему я был уверен, что пакеты дойдут? Ответ прост — пакеты никуда не отправлялись, а оставались на вашем компьютере. Этот адрес специфичен и используется для loopback — пакетов, не уходящих никуда вовне. Отлично, можем теперь «пропинговать» адрес этого сайта: 212.193.236.38
C:\Documents and Settings\Администратор>ping 212.193.236.38
Обмен пакетами с 212.193.236.38 по 32 байт:
Ответ от 212.193.236.38: число байт=32 время=3мс TTL=55
Ответ от 212.193.236.38: число байт=32 время=3мс TTL=55
Ответ от 212.193.236.38: число байт=32 время=3мс TTL=55
Ответ от 212.193.236.38: число байт=32 время=3мс TTL=55
Статистика Ping для 212.193.236.38:
Пакетов: отправлено = 4, получено = 4, потеряно = 0 (0% потерь),
Приблизительное время приема-передачи в мс:
Минимальное = 3мсек, Максимальное = 3 мсек, Среднее = 3 мсек
C:\Documents and Settings\Администратор>
Можно заметить только одно отличие — пакеты доходили не мгновенно, а за 3 миллисекунды. Надеюсь, у вас тоже не было никакой задержки при доставке пакетов, а главное — вы не увидели строчки типа
Превышен интервал ожидания для запроса.
Появление таких строчек означает, что часть пакетов теряется. Это свидетельствует о проблемах на линии или не сервере, к которомы вы обращаетесь.
Команда ipconfig
Следующая важная команда — ipconfig. Введите ее. У меня получилось вот так:
Настройка протокола IP для Windows
Ethernet — Ethernet адаптер:
DNS-суффикс этого подключения . . : srcc.msu.ru
IP-адрес . . . . . . . . . . . . : 192.168.17.139
Маска подсети . . . . . . . . . . : 255.255.255.0
Основной шлюз . . . . . . . . . . : 192.168.17.240
C:\Documents and Settings\Администратор>
В данном случае получился адрес 192.168.17.139. Можно этот адрес тоже пропинговать (вы пингуйте свой) — пакеты должны доходить мгновенно. Основной шлюз — это адрес, на который компьютер отправляет пакеты, не найдя подходящего адреса в своей сети. Так, в моем случае все пакеты, кроме пакетов на 192.168.17.* будут отправлены на 192.168.17.240, а тот компьюьтер уже должен решить, что с ними делать и куда их переправлять дальше. Примечание: локальная сеть, то есть те адреса, пакеты на которые не отправляются на шлюз, определяется при помощи маски — нолик на последнем месте и 255 на всех предыдующих как раз и означает, что может буть произвольным последнее число в IP-адресе.
Одно из стандартных действий при поиске проблем подключения — пропинговать свой шлюз. Если пакеты до него не доходят, то, видимо, проблема где-то рядом, например, поврежден или плохо воткнут сетевой шнур. Также стоит знать, где физически находится компьютер с вашим основным шлюзом — у провайдера, где-то в доме, а, может, это — можем в вашей квартире. Примечание: некоторые компьютеры настроены не откликаться на запросы команды ping. Поэтому отсутствие пинга — не стопроцентная гарантия отсутствия связи с адресом.
Более подробную информацию можно получить командой ipconfig /all. У меня получилось:
C:\Documents and Settings\Администратор>ipconfig /all
Настройка протокола IP для Windows
Имя компьютера . . . . . . . . . : sander
Основной DNS-суффикс . . . . . . : MSHOME
Тип узла. . . . . . . . . . . . . : смешанный
IP-маршрутизация включена . . . . : нет
WINS-прокси включен . . . . . . . : нет
Порядок просмотра суффиксов DNS . : MSHOME
srcc.msu.ru
Ethernet — Ethernet адаптер:
DNS-суффикс этого подключения . . : srcc.msu.ru
Описание . . . . . . . . . . . . : Broadcom 440x 10/100 Integrated Controller
Физический адрес. . . . . . . . . : 00-16-D4-63-03-65
Dhcp включен. . . . . . . . . . . : да
Автонастройка включена . . . . . : да
IP-адрес . . . . . . . . . . . . : 192.168.17.139
Маска подсети . . . . . . . . . . : 255.255.255.0
Основной шлюз . . . . . . . . . . : 192.168.17.240
DHCP-сервер . . . . . . . . . . . : 192.168.17.240
DNS-серверы . . . . . . . . . . . : 212.192.244.2
212.192.244.3
Аренда получена . . . . . . . . . : 2 февраля 2009 г. 11:00:28
Аренда истекает . . . . . . . . . : 9 февраля 2009 г. 11:00:28
C:\Documents and Settings\Администратор>
Самую полезную информацию я выделил жирным. DHCP-сервер выделил мне динамиеский адрес на основе моего MAC-адреса или физического адреса. Мои DNS-сервера — это 212.192.244.2 и 212.192.244.3.
Другие команды
Команда tracert позволяет проследить путь пакетов от вашего компьютера до цели. Попробуйте, например протрассировать путь до этого сайта: tracert it.sander.su. Строки в выводе трассировки есть точки, через которые проходит пакет на своем пути. Первой точкой будет ваш шлюз. Использование команды tracert позволяет найти источник проблем при связи с каким-либо адресом. Пакеты, посылаемые командой tracert, имеют показатель TTL — time to live — целое положительное число. Каждый маршрутизатор на пути уменьшает этот показатель на 1, если TTL падает до нуля, то трассировка заканчивается. По умолчанию используется начальный TTL равный 30, задать другое значение можно опцией -h.
Посмотреть таблицу маршрутизации можно командой route print, однако я не буду подробно останавливаться на ней — это тема отдельной статьи.
Команда netstat позволяет просмотреть список установленных соединений. В режиме по умолчанию команда пытается преобразовывать все IP-адреса в доманные имена (при помощи службы DNS), что может работать медленно. Если вас устраивает числовой вывод, вызывайте команду netstat -n. Если вас также интересуют открытые порты на вашем компьютере (что означает, что он готов принимать соединения по этим портам), то вызовите команду с ключом -a: например, netstat -na. Можно также вызвать команду netstat -nb, чтобы посмотреть, какие процессы установили соединения. Команда netstat -r эквивалентна команде route print.
Команда netsh позволяет изменить настройки сети через командную строку. Введите команду netsh interface ip show address. У меня получилось:
C:\Documents and Settings\Администратор>ipconfig /all
Настройка интерфейса «Ethernet»
DHCP разрешен: да
Метрика интерфейса: 0
Запоминаем название (Ethernet) и теперь командой netsh interface ip set address name=»Ethernet» source=static addr=192.168.0.33 mask=255.255.255.0 gateway=192.168.0.1 gwmetric=30 задаем IP-адрес. Для динамического подключения: netsh interface ip set address name=»Ethernet» source=dhcp. На этом сайте также можно прочитать об интерактивной настройке параметров сети
comments powered by
