
There are times when it’s extremely useful to be able to pass some data between different programs running on the same system. For example, you might have multiple programs forming part of the same package, and they need to share some important information or work together to process something.
There are several ways to do it, but my choice in a recent C++ project was to use named pipes in the Win32 API. Note that pipes on other operating systems are a little different so not all of this information is portable.
You can find the Win32 named pipe example programs on GitHub.
What are named pipes?
The “pipe” metaphor is fairly simple. Just like a literal pipe can carry water from one place to another, the metaphorical pipe carries data from one program to another. However, unlike most literal pipes around your home, the metaphorical pipes can support two-way flow.
In practical terms, the pipe is accessed very much like a file. Some of the behaviour is a little different though (it is more like a client-server architecture), and there are various other commands to be aware of. It is especially important to learn where things can go wrong, and what error codes to look out for.
As a side note, unnamed pipes (or anonymous pipes) also exist on various operating systems, but usually work in a different way and are used for slightly different purposes. They are beyond the scope of this post.
A simple example
Here’s a quick overview of the steps required to create and use a simple named pipe to send data from a server program to a client program.
Server program:
- Call CreateNamedPipe(..) to create an instance of a named pipe.
- Call ConnectNamedPipe(..) to wait for the client program to connect.
- Call WriteFile(..) to send data down the pipe.
- Call CloseHandle(..) to disconnect and close the pipe instance.
Client program:
- Call CreateFile(..) to connect to the pipe.
- Call ReadFile(..) to get data from the pipe.
- Process or output the data.
- Call CloseHandle(..) to disconnect from the pipe.
I’ve included full source code for each program at the bottom of this article, and you can also find them on Github. This is a very simple example though and there’s lots more you can do with pipes on Win32. Take a look at the MSDN article on Named Pipe Operations for more information on other useful functions.
Pipe names
You can name Win32 pipes almost anything you like, but they must start with the prefix \\.pipe\. In practice, the prefix will usually be \\\\.pipe\\ because you have to escape backslashes in C/C++ strings. Everything after that in the name is up to you, as long as you don’t use backslashes and don’t exceed 256 characters in total.
Read/write modes
There are two main modes of read/write operation available on pipes: byte stream and message. The difference is fairly small, but can be significant depending on your application.
Message mode simply makes a distinction between each set of data sent down the pipe. If a program sends 50 bytes, then 100 bytes, then 40 bytes, the receiving program will receive it in these separate blocks. It will therefore need to read the pipe at least 3 times to receive everything.
On the other hand, byte stream mode lets all the sent data flow continuously. In our example of 50, 100, then 40 bytes, the client could receive everything in a single 190-byte chunk. Which mode you choose depends on what your programs need to do.
Overlapped pipe IO
By default, pipe operations in Win32 are synchronous (aka blocking). That means your program (or specifically the thread which handles the pipe operations) will need to wait for each operation to complete before it can continue. This can seem frustrating, but it makes programming much simpler. When one of the pipe functions returns, it means you know it has either been successful or it has failed.
Using overlapped pipe IO means that pipe operations can process in the background while your program continues to do other things, including running other pipe operations in some cases. This can be very helpful, but it means you have to keep track of which operations are in progress and monitor them for completion.
An alternative to overlapped operation is to run synchronous pipe operations in a separate thread. If your pipe IO needs are fairly simple then this may be a simpler option. However, make sure your thread can terminate cleanly when needed.
Buffered input/output
When calling CreateNamedPipe(..), you can choose to specify buffer sizes for outbound and inbound data. These can be very helpful for program performance, particularly in synchronous operation. If your buffer size is 0 (which is entirely valid) then every byte of data must be read from the other end of the pipe before the write operation can be completed.
However, if a buffer is specified then a certain amount of data can linger in the pipe before it gets read. This can allow the sending program to carry on with other tasks without needing to use overlapped pipe IO.
The “Hello Pipe World” named pipe example
To see synchronous named pipes in action, have a look at the Win32 named pipe example programs on GitHub. It includes project/solution files for Visual Studio 2015.
Alternatively, I’ve included the source code below if you just want to browse it. It should be possible to compile it using any version of Visual Studio. Simply add the code for each program to a Win32 console application, and make sure you are linking against the Windows libraries.
Important note: When running the programs, run the server first! The client program fails if the pipe is not available.
Server program
1 2 3 4 5 6 7 8 9 10 11 12 13 14 15 16 17 18 19 20 21 22 23 24 25 26 27 28 29 30 31 32 33 34 35 36 37 38 39 40 41 42 43 44 45 46 47 48 49 50 51 52 53 54 55 56 57 |
///// SERVER PROGRAM ///// #include <iostream> #include <windows.h> using namespace std; int main(int argc, const char **argv) { wcout << "Creating an instance of a named pipe..." << endl; // Create a pipe to send data HANDLE pipe = CreateNamedPipe( L"\\\\.\\pipe\\my_pipe", // name of the pipe PIPE_ACCESS_OUTBOUND, // 1-way pipe -- send only PIPE_TYPE_BYTE, // send data as a byte stream 1, // only allow 1 instance of this pipe 0, // no outbound buffer 0, // no inbound buffer 0, // use default wait time NULL // use default security attributes ); if (pipe == NULL || pipe == INVALID_HANDLE_VALUE) { wcout << "Failed to create outbound pipe instance."; // look up error code here using GetLastError() system("pause"); return 1; } wcout << "Waiting for a client to connect to the pipe..." << endl; // This call blocks until a client process connects to the pipe BOOL result = ConnectNamedPipe(pipe, NULL); if (!result) { wcout << "Failed to make connection on named pipe." << endl; // look up error code here using GetLastError() CloseHandle(pipe); // close the pipe system("pause"); return 1; } wcout << "Sending data to pipe..." << endl; // This call blocks until a client process reads all the data const wchar_t *data = L" ***Hello Pipe World***"; DWORD numBytesWritten = 0; result = WriteFile( pipe, // handle to our outbound pipe data, // data to send wcslen(data) * sizeof(wchar_t), // length of data to send (bytes) &numBytesWritten, // will store actual amount of data sent NULL // not using overlapped IO ); if (result) { wcout << "Number of bytes sent: " << numBytesWritten << endl; } else { wcout << "Failed to send data." << endl; // look up error code here using GetLastError() } // Close the pipe (automatically disconnects client too) CloseHandle(pipe); wcout << "Done." << endl; system("pause"); return 0; } |
Client program
1 2 3 4 5 6 7 8 9 10 11 12 13 14 15 16 17 18 19 20 21 22 23 24 25 26 27 28 29 30 31 32 33 34 35 36 37 38 39 40 41 42 43 44 45 46 47 48 |
///// CLIENT PROGRAM ///// #include <iostream> #include <windows.h> using namespace std; int main(int argc, const char **argv) { wcout << "Connecting to pipe..." << endl; // Open the named pipe // Most of these parameters aren't very relevant for pipes. HANDLE pipe = CreateFile( L"\\\\.\\pipe\\my_pipe", GENERIC_READ, // only need read access FILE_SHARE_READ | FILE_SHARE_WRITE, NULL, OPEN_EXISTING, FILE_ATTRIBUTE_NORMAL, NULL ); if (pipe == INVALID_HANDLE_VALUE) { wcout << "Failed to connect to pipe." << endl; // look up error code here using GetLastError() system("pause"); return 1; } wcout << "Reading data from pipe..." << endl; // The read operation will block until there is data to read wchar_t buffer[128]; DWORD numBytesRead = 0; BOOL result = ReadFile( pipe, buffer, // the data from the pipe will be put here 127 * sizeof(wchar_t), // number of bytes allocated &numBytesRead, // this will store number of bytes actually read NULL // not using overlapped IO ); if (result) { buffer[numBytesRead / sizeof(wchar_t)] = '\0'; // null terminate the string wcout << "Number of bytes read: " << numBytesRead << endl; wcout << "Message: " << buffer << endl; } else { wcout << "Failed to read data from the pipe." << endl; } // Close our pipe handle CloseHandle(pipe); wcout << "Done." << endl; system("pause"); return 0; } |
Contents:
- Introduction
- Named Pipe Messaging
- Data Transfer Modes
- Overlapping Pipe I/O, Blocking mode & In-/Out Buffers
- Named Pipe Security
- Impersonation
- Impersonating a Named Pipe Client
- Attack Surface
- Client Impersonation
- Attack scenario
- Prerequisites
- Misleading Documentation
- Implementation
- Instance Creation Race Condition
- Attack scenario
- Prerequisites
- Implementation
- Instance Creation Special Flavors
- Unanswered Pipe Connections
- Killing Pipe Servers
- PeekNamedPipe
- Prerequisites
- Implementation
- Client Impersonation
- References
- The Series: Part 2
Introduction
This post marks the start of a series of posts about the internals and interesting bits of various Windows based Inter-Process-Communication (IPC) technology components. Initially this series will cover the following topics:
- Named Pipes
- LPC
- ALPC
- RPC
A few IPC technology components are therefore left out, but I might append this series sometime and include for example some of these:
- Window Messages
- DDE (which is based on Window Messages)
- Windows Sockets
- Mail Slots
Alright so let’s get down to it with Named Pipes…
Although the name might sound a bit odd pipes are a very basic and simple technology to enable communication and share data between two processes, where the term pipe simply describes a section of shared memory used by these two processes.
To term this correctly right from the beginning, the IPC technology we’re speaking about is called ‘pipes’ and there are two types of pipes:
- Named Pipes
- Anonymous Pipes
Most of the time when speaking about pipes you’re likely referring to Named Pipes as these offer the full feature set, where anonymous pipes are mostly used for child-parent communications. This also implies: Pipe communication can be between two processes on the same system (with named and anonymous pipes), but can also be made across machine boundaries (only named pipes can talk across machine boundaries). As Named Pipes are most relevant and support the full feature set, this post will focus only on Named Pipes.
To add some historical background for Named Pipes: Named Pipes originated from the OS/2 times. It’s hart to pin down the exact release date named pipes were introduced to Windows, but at least it can be said that it must have been supported in Windows 3.1 in 1992 — as this support is stated in the Windows/DOS Developer’s Journal Volume 4, so it’s fair to assume named pipes have been added to Windows in the early 1990’s.
Before we dive into the Named Pipe internals, please take note that a few code snippets will follow that are taken from my public Named Pipe Sample Implementation. Whenever you feel you want some more context around the snippets head over to the code repo and review the bigger picture.
Named Pipe Messaging
Alright so let’s break things down to get a hold of Named Pipe internals. When you’ve never heard of Named Pipes before imaging this communication technology like a real, steel pipe — you got a hollow bar with two ends and if you shout something into one end a listener will hear your words on the other end. That’s all a Named Pipe does, it transports information from one end to another.
If you’re a Unix user you sure have used pipes before (as this is not a pure Windows technology) with something like this:
cat file.txt | wc -l. A command that outputs the contents of file.txt, but instead of displaying the output to STDOUT (which could be your terminal window) the output is redirected (“piped”) to the input of your second command wc -l, which thereby counts the lines of your file. That’s an example of an anonymous pipe.
A Windows based Named Pipe is as easily understood as the above example. To enable us to use the full feature set of pipes, we’ll move away from Anonymous Pipes and create a Server and a Client that talk to each other.
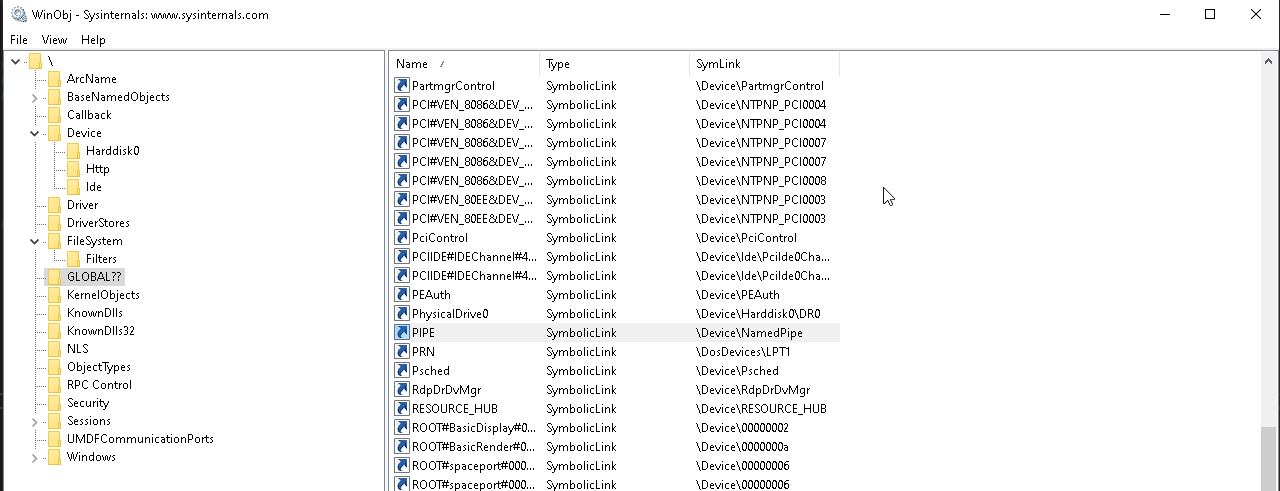
A Named Pipe simply is an Object, more specifically a FILE_OBJECT, that is managed by a special file system, the Named Pipe File System (NPFS):

When you create a Named Pipe, let’s say we call it ‘fpipe’, under the hood you’re creating a FILE_OBJECT with your given name of ‘fpipe’ (hence: named pipe) on a special device drive called ‘pipe’.
Let’s wrap that into a something practical. A named pipe is created by calling the WinAPI function CreateNamedPipe, such as with the below [Source]:
HANDLE serverPipe = CreateNamedPipe(
    L"\\\\.\\pipe\\fpipe",	// name of our pipe, must be in the form of \\.\pipe\<NAME>
    PIPE_ACCESS_DUPLEX, // open mode, specifying a duplex pipe so server and client can send and receive data
    PIPE_TYPE_MESSAGE,	// MESSAGE mode to send/receive messages in discrete units (instead of a byte stream)
    1,			// number of instanced for this pipe, 1 is enough for our use case
    2048,		// output buffer size
    2048,		// input buffer size
    0,			// default timeout value, equal to 50 milliseconds
    NULL		// use default security attributes
);
For now the most interesting part of this call is the \\\\.\\pipe\\fpipe.
C++ requires escaping of slashes, so language independent this is equal to \\.\pipe\fpipe. The leading ‘\.’ refers to your machines global root directory, where the term ‘pipe’ is a symbolic link to the NamedPipe Device.
Since a Named Pipe Object is a FILE_OBJECT, accessing the named pipe we just created is equal to accessing a “normal” file.
Therefore connecting to a named pipe from a client is therefore as easy as calling CreateFile[Source]:
HANDLE hPipeFile = CreateFile(L"\\\\127.0.0.1\\pipe\\fpipe", GENERIC_READ | GENERIC_WRITE, 0, NULL, OPEN_EXISTING, 0, NULL);
Once connected reading from a pipe just needs a call to ReadFile[Source]:
ReadFile(hPipeFile, pReadBuf, MESSAGE_SIZE, pdwBytesRead, NULL);
Before you can read some data off a pipe, you want your server to write some data to it (which you can read.). That is done by calling — who would have guessed it — WriteFile[Source]:
WriteFile(serverPipe, message, messageLenght, &bytesWritten, NULL);
But what actually happens when you “write” to a pipe?
Once a client connects to your server pipe, the pipe that you created is no longer in a listening state and data can be written to it. The user land call to WriteFile is dispatched to kernel land, where NtWriteFile is called, which determines all the bits and pieces about the Write-Operation, e.g. which device object is associated with the given file, whether or not the Write-Operation should be made synchronous (see section Overlapping Pipe I/O, Blocking mode & In-/Out Buffers), the I/O Request Packet (IRP) is set up and eventually NtWriteFile takes care that your data is written to the file. In our case the specified data is not written to an actual file on disk, but to a shared memory section that is referenced by the file handle return from CreateNamedPipe.
Finally — as mentioned in the introduction — Named Pipes can also be used over a network connection across system boundaries.
There are no additional implementations needed to call a remote Named Pipe server, just make sure that your call to CreateFile specifies an IP or hostname (as with the example above).
Let’s make a guess: What network protocol will be used when calling a remote pipe server? …. drum rolls … absolutely unsurprising it is SMB.
An SMB connection is made to the remote server, which is by default initialized by a negotiation request to determine the network authentication protocol. Unlike with other IPC mechanisms, such as with RPC, you as a server developer can not control the network authentication protocol as this is always negotiated through SMB. Since Kerberos is the preferred authentication scheme since Windows 2000, Kerberos will be negotiated if possible.
Note: From a client perspective you can effectively choose the authentication protocol by choosing to connect to a hostname or to an IP. Due to the design of Kerberos it cannot handle IPs very well and as such if you choose to connect to an IP address the result of the negotiation will always be NTLM(v2). Whereas when you connect to a hostname you will most likely always end up using Kerberos.
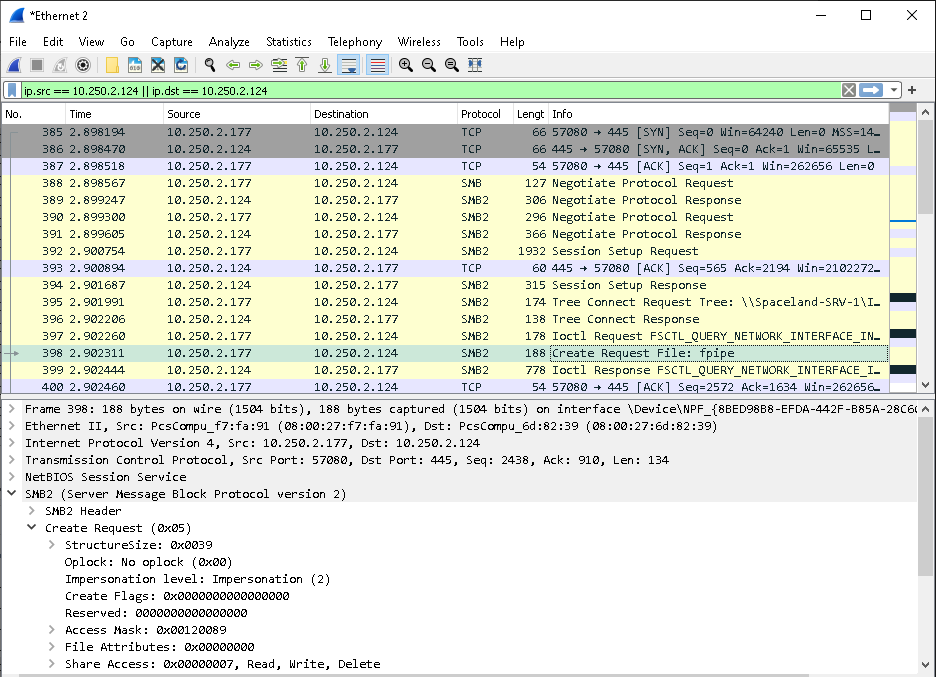
Once the authentication is settled, the actions that client and server want to perform are once again just classic file actions, that are handled by SMB just as any other file operation, e.g. by starting a ‘Create Request File’ request as shown below:
Data Transfer Modes
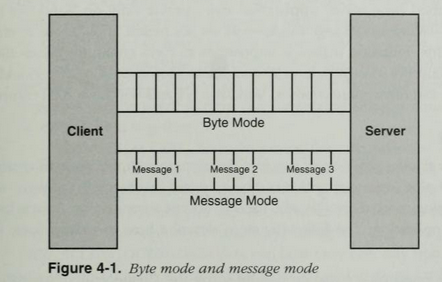
Named pipes offer two basic communication modes: byte mode and message mode.
In byte mode, messages travel as a continuous stream of bytes between the client and the server. This means that a client application and a server application do not know precisely how many bytes are being read from or written to a pipe at any given moment. Therefore a write on one side will not always result in a same-size read on the other. This allows a client and a server to transfer data without caring about the size of the data.
In message mode, the client and the server send and receive data in discrete units. Every time a message is sent on the pipe, it must be read as a complete message. If you read from a server pipe in message mode, but your read buffer is too small to hold all of the data then the portion of data that fits in your buffer will be copied over to it, the remaining data stays in the server’s shared memory section and you’ll get an error 234 (0xEA, ERROR_MORE_DATA) to indicate that there is more data to fetch.
A visual comparison of the messages modes is shown below, taken from “Network programming for Microsoft Windows” (1999):
Overlapping Pipe I/O, Blocking mode & In-/Out Buffers
Overlapping I/O, Blocking mode and In-/Out Buffers are not amazingly important from a security standpoint, but being aware that these exists and what they mean can aid understanding, communication, building and debugging named pipes. Therefore I will add these concepts here briefly.
Overlapping I/O
Several Named Pipe related functions, such as ReadFile, WriteFile, TransactNamedPipe, and ConnectNamedPipe can perform pipe operations either synchronous, meaning the executing thread is waiting for the operation to complete before continuing, or asynchronous, meaning the executing thread fires the action and continues without waiting for its completion.
It’s important to note that asynchronous pipe operations can only be made on a pipe (server) that allows overlapped I/O by setting the FILE_FLAG_OVERLAPPED within the CreateNamedPipe call.
Asynchronous calls can be made either by specifying an OVERLAPPED structure as the last parameter to each of the above mentioned ‘standard’ pipe actions. such as ReadFile, or by specifying a COMPLETION_ROUTINE as the last parameter to the ‘extended’ pipe actions, such as ReadFileEx. The former, OVERLAPPED structure, method is event based, meaning an event object must be created and is signaled once the operation is completed, while the COMPLETION_ROUTINE method is callback based, meaning a callback routine is passed to the executing thread, which is queued and executed once signaled. More details on this can be found here with a sample implementation by Microsoft here.
Blocking mode
The blocking mode behavior is defined when setting up a named pipe server with CreateNamedPipe by using (or omitting) a flag in the dwPipeMode parameter. The following two dwPipeMode flags define the blocking mode of the server:
- PIPE_WAIT (default): Blocking mode enabled. When using named pipe operations, such as ReadFile on a pipe that enabled blocking mode the operation waits for completion. Meaning that a read operation on such a pipe would wait until there is data to read, a write operation would wait until all data is written. This can of course cause an operation to wait indefinitely in some situations.
- PIPE_NOWAIT: Blocking mode disabled. Named pipe operations, such as ReadFile, return immediately. You need routines, such as Overlapping I/O, to ensure all data is read or written.
In-/Out Buffers
By In-/Out Buffers I’m referring to the input and output buffers of the named pipe server that you create when calling CreateNamedPipe and more precisely to the sizes of these buffers in the nInBufferSize and nOutBufferSize parameters.
When performing read and write operations your named pipe server uses non-paged memory (meaning physical memory) to temporarily store data which is to be read or written. An attacker who is allowed to influence these values for a created server can abuse these to potentially cause a system crash by choosing large buffers or to delay pipe operations by choosing a small buffer (e.g. 0):
- Large buffers: As the In-/Out Buffers are non-paged the server will run out of memory if they are chosen too big. However, the nInBufferSize and nOutBufferSize parameters are not ‘blindly’ accepted by the system. The upper limit is defined by a system depended constant; I couldn’t find super accurate information about this constant (and didn’t dig through the headers); This post indicates that it’s ~4GB for an x64 Windows7 system.
- Small buffers: A buffer size of 0 is absolutely valid for nInBufferSize and nOutBufferSize. If the system would strictly enforce what it’s been told you wouldn’t be able to write anything to your pipe, cause a buffer of size 0 is … well, a not existing buffer. Gladly the system is smart enough to understand that you’re asking for a minimum buffer and will therefore expand the actual buffer allocated to the size it receives, but that comes with a consequence to performance. A buffer size of 0 means every byte must be read by the process on the other side of the pipe (and thereby clearing the buffer) before new data can be written to the buffer. This is true for both, the nInBufferSize and nOutBufferSize. A buffer of size 0 could thereby cause server delays.
Named Pipe Security
Once again we can make this chapter about how to set and control the security of a named pipe rather short, but it’s important to be aware how this is done.
The only gear you can turn when you want to secure your named pipe setup is setting a Security Descriptor for the named pipe server as the last parameter (lpSecurityAttributes) to the CreateNamedPipe call.
If you want some background on what a Security Descriptor is, how it’s used and how it could look like you’ll find the answers in my post A Windows Authorization Guide.
Setting this Security Descriptor is optional; A default Security Descriptor can be be set by specifying NULL to the lpSecurityAttributes parameter.
The Windows docs define what the default Security Descriptor does for your named pipe server:
The ACLs in the default security descriptor for a named pipe grant full control
to the LocalSystem account, administrators, and the creator owner.
They also grant read access to members of the Everyone group and the anonymous account.
Source: CreateNamedPipe > Paremter > lpSecurityAttributes
So by default Everyone can read from your named pipe server if you don’t specify a Security Descriptor, regardless if the reading client is on the same machine or not.
If you connect to a named pipe server without a Security Descriptor set but still get an Access Denied Error (error code: 5) be sure you’ve only specified READ access (note that the example above specifies READ and WRITE access with GENERIC_READ | GENERIC_WRITE).
For remote connections, note once again — as described at the end of the Named Pipe Messaging chapter — that the network authentication protocol is negotiated between the client and server through the SMB protocol. There is no way to programmatically enforce the use of the stronger Kerberos protocol (you only could disable NTLM on the server host).
Impersonation
Impersonation is a simple concept that we’ll need in the following section to talk about attack vectors with named pipes.
If you’re familiar with Impersonation feel free to skip this section; Impersonation is not specific to Named Pipes.
If you’re not yet came across Impersonation in a Windows environment, let me summarize this concept quickly for you:
Impersonation is the ability of a thread to execute in a security context different from the security context of the process that owns the thread. Impersonation typically applies in a Client-Server architecture where a client connects to the server and the server could (if needed) impersonate the client. Impersonation enables the server (thread) to perform actions on behalf of the client, but within the limits of the client’s access rights.
A typical scenario would be a server that wants the access some records (say in database), but only the client is allowed to access its own records. The server could now reply back to the client, asking to fetch the records itself and send these over to the server, or the server could use an authorization protocol to prove the client allowed the server to access the record, or — and this is what Impersonation is — the client sends the server some identification information and allows the server to switch into the role of the client. Somewhat like the client giving its driver license to the server along with the permission to use that license to identify towards other parties, such as a gatekeeper (or more technically a database server).
The identification information, such as the information specifying who the client is (such as the SID) are packed in a structure called a security context. This structure is baked deeply into the internals of the operating system and is a required piece of information for inter process communication. Due to that the client can’t make an IPC call without a security context, but it needs a way to specify what it allows the server to know about and do with its identity. To control that Microsoft created so called Impersonation Levels.
The SECURITY_IMPERSONATION_LEVEL enumeration structure defines four Impersonation Levels that determine the operations a server can perform in the client’s context.
| SECURITY_IMPERSONATION_LEVEL | Description |
|---|---|
| SecurityAnonymous | The server cannot impersonate or identify the client. |
| SecurityIdentification | The server can get the identity and privileges of the client, but cannot impersonate the client. |
| SecurityImpersonation | The server can impersonate the client’s security context on the local system. |
| SecurityDelegation | The server can impersonate the client’s security context on remote systems. |
For more background information on Impersonation have a read through Microsoft’s docs for Client Impersonation.
For some context around Impersonation have a look at the Access Tokens and the following Impersonation section in my post about Windows Authorization.
Impersonating a Named Pipe Client
Okay, so while we’re on the topic and in case you’re not totally bored yet. Let’s have a quick run down of what actually happens under the hood if a server impersonated a client.
If you’re more interested in how to implement this, you’ll find the answer in my sample implementation here.
- Step 1: The server waits for an incoming connection from a client and afterwards calls the ImpersonateNamedPipeClient function.
- Step 2: This call results in a call to NtCreateEvent (to create a callback event) and to NtFsControlFile, which is the function executing the impersonation.
- Step 3: NtFsControlFile is a general purpose function where its action is specified by an argument, which in this case is FSCTL_PIPE_Impersonate.
The below is based on the open source code of ReactOS, but i think it’s fair to assume the Windows Kernel Team implemented it in a similar way.
- Step 4: Further down the call stack NpCommonFileSystemControl is called where FSCTL_PIPE_IMPERSONATE is passed as an argument and used in a switch-case instruction to determine what to do.
- Step 5: NpCommonFileSystemControl calls NbAcquireExeclusiveVcb to lock an object and NpImpersonate is called given the server’s pipe object and the IRP (I/O Request Object) issued by the client.
- Step 6: NpImpersonate then in turn calls SeImpersonateClientEx with the client’s security context, which has been obtained from the client’s IRP, as a parameter.
- Step 7: SeImpersonateClientEx in turn calls PsImpersonateClient with the server’s thread object and the client’s security token, which is extracted from the client’s security context
- Step 8: The server’s thread context is then changed to the client’s security context.
- Step 9: Any action the server takes and any function the server calls while in the security context of the client are made with the identify of the client and thereby impersonating the client.
- Step 10: If the server is done with what it intended to do while being the client, the server calls RevertToSelf to switch back to its own, original thread context.
Attack Surface
Client Impersonation
Sooo finally we’re talking about attack surface. The most important attack vector based on named pipes is Impersonation.
Luckily we’ve introduced and understood the concept of Impersonation already in the above section, so we can dive right in.
Attack scenario
Impersonation with named pipes can best be abused when you got a service, program or routine that allows you to specify or control to access a file (doesn’t matter if it allows you READ or WRITE access or both). Due to the fact that Named Pipes are basically FILE_OBJECTs and operate on the same access functions as regular files (ReadFile, WriteFile, CreateFile, …) you can specify a named pipe instead of a regular file name and make your victim process connect to a named pipe under your control.
Prerequisites
There are two important aspects you need to check when attempting to impersonate a client.
The first is to check how the client implements the file access, more specifically does the client specify the SECURITY_SQOS_PRESENT flag when calling CreateFile ?
A vulnerable call to CreateFile looks like this:
hFile = CreateFile(pipeName, GENERIC_READ, 0, NULL, OPEN_EXISTING, 0, NULL);
Whereas a safe call to CreateFile like this:
// calling with explicit SECURITY_IMPERSONATION_LEVEL
hFile = CreateFile(pipeName, GENERIC_READ, 0, NULL, OPEN_EXISTING, SECURITY_SQOS_PRESENT | SECURITY_IDENTIFICATION , NULL);
// calling without explicit SECURITY_IMPERSONATION_LEVEL
hFile = CreateFile(pipeName, GENERIC_READ, 0, NULL, OPEN_EXISTING, SECURITY_SQOS_PRESENT, NULL);
By default a call without explicitly specifying the SECURITY_IMPERSONATION_LEVEL (as with the later example above) is made with the Impersonation Level of SecurityAnonymous.
If the SECURITY_SQOS_PRESENT flag is set without any additional Impersonation Level (IL) or with an IL set to SECURITY_IDENTIFICATION or SECURITY_ANONYMOUS you cannot impersonate the client.
The second important aspect to check is the file name, aka. the lpFileName parameter, given to CreateFile. There is an important distinction between calling local named pipes or calling remote named pipes.
A call to a local named pipe is defined by the file location \\.\pipe\<SomeName>.
Calls to local pipes can only be impersonated when the SECURITY_SQOS_PRESENT flag is explicitly set with an Impersonation Level above SECURITY_IDENTIFICATION. Therefore a vulnerable call looks like this:
hFile = CreateFile(L"\\.\pipe\fpipe", GENERIC_READ, 0, NULL, OPEN_EXISTING, SECURITY_SQOS_PRESENT | SECURITY_IMPERSONATION, NULL);
To be clear. A safe call to a local pipe would look like this:
hFile = CreateFile(L"\\.\pipe\fpipe", GENERIC_READ, 0, NULL, OPEN_EXISTING, 0, NULL);
This later call is safe even without the SECURITY_SQOS_PRESENT, because a local pipe is called.
A remote named pipe on the other hand is defined by a lpFileName beginning with a hostname or an IP, such as: \\ServerA.domain.local\pipe\<SomeName>.
Now comes the important bit:
When the SECURITY_SQOS_PRESENT flag is not present and a remote named pipe is called the impersonation level is defined by the user privileges running the name pipe server.
That means that when you call a remote named pipe without the SECURITY_SQOS_PRESENT flag, your attacker user that runs the pipe must hold the SeImpersonatePrivilege (SE_IMPERSONATE_NAME) in order to impersonate the client.
If your user does not hold this privilege the Impersonation Level will be set to SecurityIdentification (which allows you to identify, but not impersonate the user).
But that also means that if your user holds the SeEnableDelegationPrivilege (SE_ENABLE_DELEGATION_NAME), the Impersonation Level is set to SecurityDelegation and you can even authenticate the victim user against other network services.
An important take away here is:
You can make a remote pipe call to a named pipe running on the same machine by specifying
\\127.0.0.1\pipe\<SomeName>
To finally bring the pieces together:
- If the SECURITY_SQOS_PRESENT is not set you can impersonate a client if you have a user with at least SE_IMPERSONATE_NAME privileges, but for named pipes running on the same machine you need to call them via
\\127.0.0.1\pipe\... - If the SECURITY_SQOS_PRESENT is set you can only impersonate a client if an Impersonation Level above SECURITY_IDENTIFICATION is set along with it (regardless if you call a named pipe locally or remote).
Misleading Documentation
Microsoft’s documentation about Impersonation Levels (Authorization) states the following:
When the named pipe, RPC, or DDE connection is remote, the flags passed to CreateFile to set the impersonation level are ignored. In this case, the impersonation level of the client is determined by the impersonation levels enabled by the server, which is set by a flag on the server’s account in the directory service. For example, if the server is enabled for delegation, the client’s impersonation level will also be set to delegation even if the flags passed to CreateFile specify the identification impersonation level.
Source: Windows Docs: Impersonation Levels (Authorization)
Be aware here that this is technically true, but it’s somewhat misleading…
The accurate version is: When calling a remote named pipe and you only specify Impersonation Level flags (and nothing else) to CreateFile then these will be ignore, but if you specify Impersonation Flags alongside with the SECURITY_SQOS_PRESENT flag, then these will be respected.
Examples:
// In the below call the SECURITY_IDENTIFICATION flag will be respected by the remote server
hFile = CreateFile(L"\\ServerA.domain.local", GENERIC_READ, 0, NULL, OPEN_EXISTING, SECURITY_SQOS_PRESENT | SECURITY_IDENTIFICATION, NULL);
/* --> The server will obtain a SECURITY_IDENTIFICATION token */

// In this call the SECURITY_IDENTIFICATION flag will be ignored
hFile = CreateFile(L"\\ServerA.domain.local", GENERIC_READ, 0, NULL, OPEN_EXISTING, SECURITY_IDENTIFICATION, NULL);
/* --> The server will obtain a token based on the privileges of the user running the server.
        A user holding SeImpersonatePrivilege will get an SECURITY_IMPERSONATION token */

// In this call the Impersonation Level will default to SECURITY_ANONYMOUS and will be respected
hFile = CreateFile(L"\\ServerA.domain.local", GENERIC_READ, 0, NULL, OPEN_EXISTING, SECURITY_SQOS_PRESENT, NULL);
/* --> The server will obtain a SECURITY_ANONYMOUS token. A call to  OpenThreadToken will result in error 1347 (0x543, ERROR_CANT_OPEN_ANONYMOUS)*/
Implementation
You can find an a full implementation in my sample code here. A quick run down of the implementation is shown below:
// Create a server named pipe
serverPipe = CreateNamedPipe(
pipeName, // name of our pipe, must be in the form of \\.\pipe\<NAME>
PIPE_ACCESS_DUPLEX, // The rest of the parameters don't really matter
PIPE_TYPE_MESSAGE, // as all you want is impersonate the client...
1, //
2048, //
2048, //
0, //
NULL // This should ne NULL so every client can connect
);
// wait for pipe connections
BOOL bPipeConnected = ConnectNamedPipe(serverPipe, NULL);
// Impersonate client
BOOL bImpersonated = ImpersonateNamedPipeClient(serverPipe);
// if successful open Thread token - your current thread token is now the client's token
BOOL bSuccess = OpenThreadToken(GetCurrentThread(), TOKEN_ALL_ACCESS, FALSE, &hToken);
// now you got the client token saved in hToken and you can safeyl revert back to self
bSuccess = RevertToSelf();
// Now duplicate the client's token to get a Primary token
bSuccess = DuplicateTokenEx(hToken,
TOKEN_ALL_ACCESS,
NULL,
SecurityImpersonation,
TokenPrimary,
&hDuppedToken
);
// If that succeeds you got a Primary token as hDuppedToken and you can create a proccess with that token
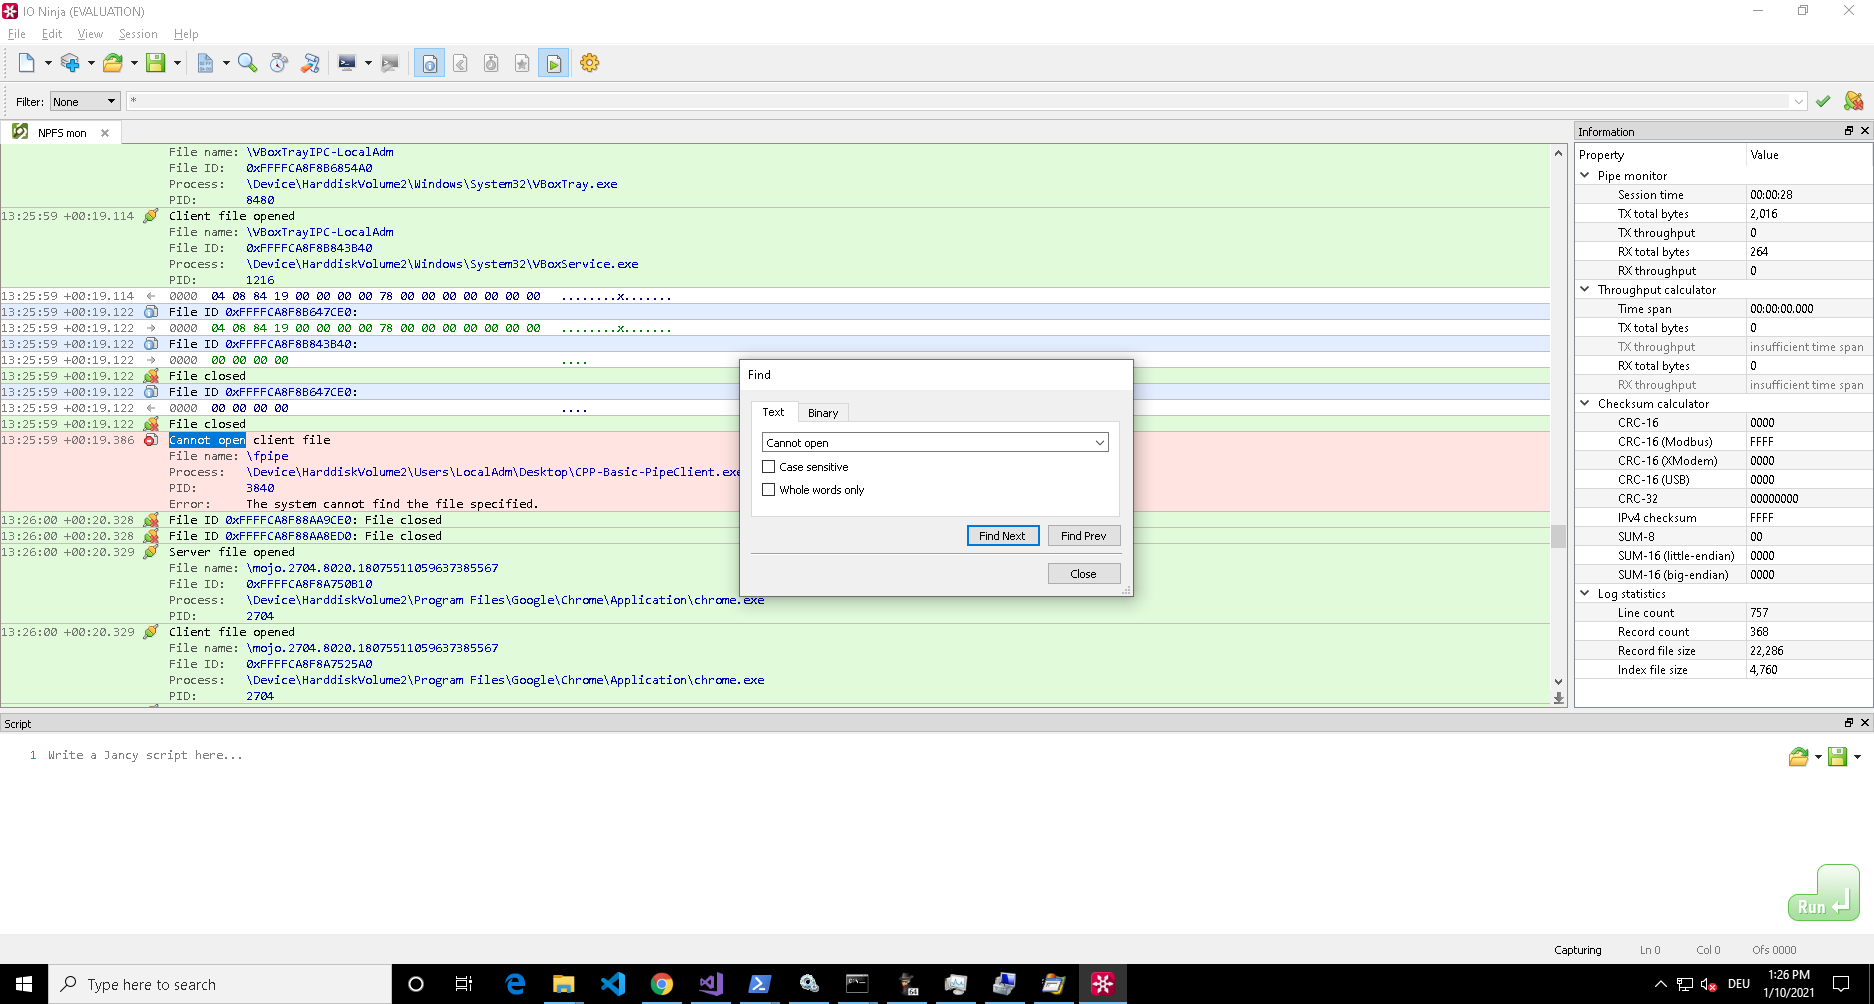
CreateProcessWithTokenW(hDuppedToken, LOGON_WITH_PROFILE, command, NULL, CREATE_NEW_CONSOLE, NULL, NULL, &si, &pi);
The result can be seen below:
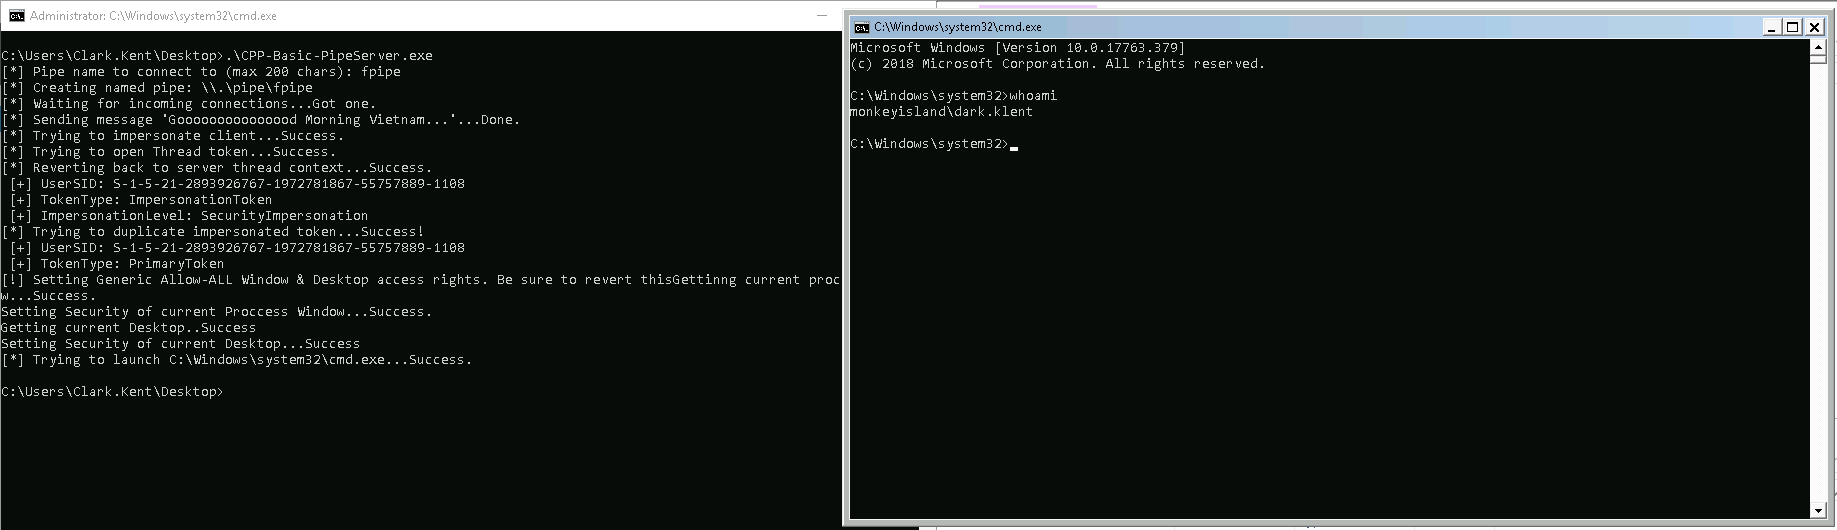
There are some catches when you implement this on your own:
- When you create a process with CreateProcessWithTokenW, you need to RevertToSelf before calling CreateProcessWithTokenW otherwise you’ll receive an error.
- When you want to create a window based process (something with a window that pops up, such as calc.exe or cmd.exe) you need to grant the client access to your Window and Desktop. A sample implementation allowing all users to access to your Window and Desktop can be found here.
Instance Creation Race Condition
Named Pipes instances are created and live within a global ‘namespace’ (actually technically there is no namespace, but this aids understanding that all named pipes live under to same roof) within the Name Pipe File System (NPFS) device drive. Moreover multiple named pipes with the same name can exist under this one roof.
So what happens if an application creates a named pipe that already exists? Well if you don’t set the right flags nothing happens, meaning you won’t get an error and even worse you won’t get client connections, due to the fact that Named Pipe instances are organized in a FIFO (First In First Out) stack.
This design makes Named Pipes vulnerable for instance creation race condition vulnerabilities.
Attack scenario
The attack scenario to exploit such a race condition is as follows: You’ve identified a service, program or routine that creates a named pipe that is used by client applications running in a different security context (let’s say they run under the NT Service user). The server creates a named pipe for communication with the client application(s). Once in a while a client connects to the server’s named pipe — it wouldn’t be uncommon if the server application triggers the clients to connect after the server pipe is created. You figure out when and how the server is started and the name of the pipe it creates.
Now you’re writing a program that creates a named pipe with the same name in a scenario where your named pipe instance is created before the target server’s named pipe. If the server’s named pipe is created insecurely it will not notice that a named pipe with the same name already exist and will trigger the clients to connect. Due to the FIFO stack the clients will connect to you and you can read or write their data or try to impersonate the clients.
Prerequisites
For this attack to work you need a target server that doesn’t check if a named pipe with the same name already exists. Usually a server doesn’t have extra code to check manually if a pipe with the same name already exists — thinking about it you would expect to get an error if your pipe name already exists right? But that doesn’t happen because two named pipe instances with the same name are absolutely valid … for whatever reason.
But to counter this attack Microsoft has added the FILE_FLAG_FIRST_PIPE_INSTANCE flag that can be specified when creating your named pipe through CreateNamedPipe. When this flag is set your create call will return an INVALID_HANDLE_VALUE, which will cause an error in a subsequent call to ConnectNamedPipe.
If you’re target server does not specify the FILE_FLAG_FIRST_PIPE_INSTANCE flag it is likely vulnerable, however there is one additional thing you need to be aware of on the attacker side. When creating a named pipe through CreateNamedPipe there is a nMaxInstances parameter, which specifies…:
The maximum number of instances that can be created for this pipe. The first instance of the pipe can specify this value;
Source: CreateNamedPipe
So if you set this to ‘1’ (as in the sample code above) you kill your own attack vector. To exploit an instance creation race condition vulnerability set this to PIPE_UNLIMITED_INSTANCES.
Implementation
All you need to do for exploitation is create a named pipe instance with the right name at the right time.
My sample implementation here can be used as an implementation template. Throw this in you favorite IDE, set in your pipe name, ensure your named pipe is created with the PIPE_UNLIMITED_INSTANCES flag and fire away.
Instance Creation Special Flavors
Unanswered Pipe Connections
Unanswered pipe connections are those connection attempts issued by clients that — who would have guessed it — are not successful, hence unanswered, because the pipe that is requested by the client is not existing.
The exploit potential here is quite clear and simple: If a client wants to connect to a pipe that’s not existing, we create a pipe that the client can connect to and attempt to manipulate the client with malicious communication or impersonate the client to gain additional privileges.
This vulnerability is sometimes also referred to as superfluous pipe connections (but in my mind that’s not the best terminology for it).
The real question here is: How do we find such clients?
My initial immediate answer would have been: Fire up Procmon and search for failed
CreateFile system calls. But I tested this and it turns out Procmon does not list these calls for pipes… maybe that is because the tool is only inspecting/listening on file operations through the NTFS driver, but i haven’t looked any deeper into this (maybe there is a trick/switch i didn’t know) — I’ll update if I stumble across the answer…
Another option is the Pipe Monitor of the IO Ninja toolset. This tool requires a license, but offers a free trial period to play around with it. The Pipe Monitor offers functionality to inspect pipe activity on the system and comes with a few basic filters for processes, file names and such. As you want to search for all processes and all file names I filtered for ‘*’, let it run and used the search function to look for ‘Cannot open’:
If you know any other way to do this using open source tooling, let me know (/ 0xcsandker) 
Killing Pipe Servers
If you can’t find unanswered pipe connection attempts, but identified an interesting pipe client, that you’d like to talk to or impersonate, another option to get the client’s connection is to kill its current pipe server.
In the Instance Creation Race Condition section I’ve described that you can have multiple named pipes with the same name in the same ‘namespace’.
If your target server didn’t set the nMaxInstances parameter to ‘1’, you can create a second named pipe server with the same name and place yourself in the queue to serve clients. You will not receive any client calls as long as the original pipe server is serving, so the idea for this attack is to disrupt or kill the original pipe server to step in with your malicious server.
When it comes to killing or disrupting the original pipe server I can’t assist with any general purpose prerequisites or implementations, because this always depends on who is running the target server and on your access rights and user privileges.
When analyzing your target server for kill techniques try to think outside the box, there is more than just sending a shutdown signal to a process, e.g. there could be error conditions that cause the server to shutdown or restart (remember you’re number 2 in the queue — a restart might be enough to get in position).
Also note that a pipe server is just an instance running on a virtual FILE_OBJECT, therefore all named pipe servers will be terminated once their handle reference count reaches 0. A handle is for example opened by a client connecting to it. So a server could also be killed by killing all its handles (of course you only gain something if the clients come back to you after loosing connection).
PeekNamedPipe
There might be scenarios where you’re interested in the data that is exchanged rather than in manipulating or impersonating pipe clients.
Due to the fact that all named pipe instances live under the same roof, aka. in the same global ‘namespace’ aka. on the same virtual NPFS device drive (as briefly mentioned before) there is no system barrier that stops you from connecting to any arbitrary (SYSTEM or non-SYSTEM) named pipe instance and have a look at the data in the pipe (technically ‘in the pipe’ means within the shared memory section allocated by the pipe server).
Prerequisites
As mentioned in the section Named Pipe Security the only gear you can turn when securing your named pipe is using a Security Descriptor as the last parameter (lpSecurityAttributes) to the CreateNamedPipe call. And that’s all that would prevent you from accessing any arbitrary named pipe instance. So all you need to check for when searching for a target is if this parameter is set and secured to prevent unauthorized access.
If you need some background on Security Descriptors and what to look for (the ACLs in the DACL) check out my post: A Windows Authorization Guide
Implementation
When you found a suitable target there is one more thing you need to keep in mind: If you’re reading from a named pipe by using ReadFile, you’re removing the data from the server’s shared memory and the next, potentially legitimate client, who attempts to read from the pipe will not find any data and potentially raise an error.
But you can use the PeekNamedPipe function to view the data without removing it from shared memory.
An implementation snippet based on the my sample code could look like this:
// all the vars you need
const int MESSAGE_SIZE = 512;
BOOL bSuccess;
LPCWSTR pipeName = L"\\\\.\\pipe\\fpipe";
HANDLE hFile = NULL;
LPWSTR pReadBuf[MESSAGE_SIZE] = { 0 };
LPDWORD pdwBytesRead = { 0 };
LPDWORD pTotalBytesAvail = { 0 };
LPDWORD pBytesLeftThisMessage = { 0 };
// connect to named pipe
hFile = CreateFile(pipeName, GENERIC_READ, 0, NULL, OPEN_EXISTING, SECURITY_SQOS_PRESENT | SECURITY_ANONYMOUS, NULL);
// sneak peek data
bSuccess = PeekNamedPipe(
    hFile,
    pReadBuf,
    MESSAGE_SIZE,
    pdwBytesRead,
    pTotalBytesAvail,
    pBytesLeftThisMessage
);
References
That’s about it, if you want to continue to dig into Named Pipes here are some good references to start with:
- Microsoft’s Docs about pipes at https://docs.microsoft.com/en-us/windows/win32/ipc/pipes
- Blake Watts paper about Named Pipe Security at http://www.blakewatts.com/namedpipepaper.html
- My Sample C++ Implementation at https://github.com/csandker/InterProcessCommunication-Samples/tree/master/NamedPipes/CPP-NamedPipe-Basic-Client-Server
The Series: Part 2
Part 2 of the series, covering RPC can be found here: Offensive Windows IPC Internals 2: RPC
- SS64
- CMD
- How-to
How-to: Redirection
command > filename
command >&n
Redirect command output to a file
Redirect command output to the input of handle n
command >> filename
APPEND into a file
command < filename
command <&n
Type a text file and pass the text to command.
Read input from handle n and write it to command.
commandA | commandB
Pipe the output from commandA into commandB
commandA & commandB Run commandA and then run commandB commandA && commandB Run commandA, if it succeeds then run commandB commandA || commandB Run commandA, if it fails then run commandB commandA && commandB || commandC
If commandA succeeds run commandB, if commandA fails run commandC
If commandB fails, that will also trigger running commandC.
Success and failure are based on the Exit Code of the command.
In most cases the Exit Code is the same as the ErrorLevel
For clarity the syntax on this page has spaces before and after the redirection operators, in practice you may want to omit those to avoid additional space characters being added to the output. Echo Demo Text> Demofile.txt
Numeric handles:
STDIN  = 0  Keyboard input
STDOUT = 1  Text output
STDERR = 2  Error text output
UNDEFINED = 3-9 (In PowerShell 3.0+ these are defined)
When redirection is performed without specifying a numeric handle, the the default < redirection input operator is zero (0) and the default > redirection output operator is one (1). This means that ‘>‘ alone will not redirect error messages.
   command 2> filename       Redirect any error message into a file
   command 2>> filename      Append any error message into a file
  (command)2> filename       Redirect any CMD.exe error into a file
   command > file 2>&1       Redirect errors and output to one file
   command > fileA 2> fileB  Redirect output and errors to separate files

   command 2>&1 >filename    This will fail!

Redirect to NUL (hide errors)

   command 2> nul            Redirect error messages to NUL
   command >nul 2>&1         Redirect error and output to NUL
   command >filename 2> nul  Redirect output to file but suppress error
  (command)>filename 2> nul  Redirect output to file but suppress CMD.exe errors
Any long filenames must be surrounded in «double quotes».
A CMD error is an error raised by the command processor itself rather than the program/command.
Some commands, (e.g. COPY) do not place all their error mesages on the error stream, so to capture those you must redirect both STDOUT and
STDERR with command > file 2>&1
Redirection with > or 2> will overwrite any existing file.
You can also redirect to a printer with > PRN or >LPT1 or to the console with >CON
To prevent the > and < characters from causing redirection, escape with a caret: ^> or ^<
Redirection — issues with trailing numbers
Redirecting a string (or variable containing a string) will fail to work properly if there is a single numeral at the end, anything from 0 to 9.
e.g. this will fail:
Set _demo=abc 5
Echo %_demo%>>demofile.txtOne workaround for this is to add a space before the ‘>>’ but that space will end up in the output.
Moving the redirection operator to the front of the line completely avoids this issue, but is undocumented syntax.:Set _demo=abc 5
>>demofile.txt Echo %_demo%
Create a new file
Create an empty file using the NUL device:
Type NUL >EmptyFile.txt
or
Copy NUL EmptyFile.txt
or
BREAK > EmptyFile.txt
Multiple commands on one line
In a batch file the default behaviour is to read and expand variables one line at a time, if you use & to run multiple commands on a single line, then any variable changes will not be visible until execution moves to the next line. For example:
SET /P _cost=»Enter the price: » & ECHO %_cost%
This behaviour can be changed using SETLOCAL EnableDelayedExpansion
Redirect multiple lines
Redirect multiple lines by bracketing a set of commands:
(
  Echo sample text1
  Echo sample text2
) > c:\logfile.txt
Unicode
The CMD Shell can redirect ASCII/ANSI (the default) or Unicode (UCS-2 le) but not UTF-8.
This can be selected by launching CMD /A or CMD /UIn Windows 7 and earlier versions of Windows, the redirection operator ‘>’ would strip many Extended ASCII /Unicode characters from the output.
Windows 10 no longer does this.
Pipes and CMD.exe
You can redirect and execute a batch file into CMD.exe with:
CMD < sample.cmd
Surprisingly this will work with any file extension (.txt .xls etc) if the file contains text then CMD will attempt to execute it. No sanity checking is performed.
When a command is piped into any external command/utility ( command | command ) this will instantiate a new CMD.exe instance.
e.g.
TYPE test.txt | FIND «Smith»Is in effect running:
TYPE test.txt | cmd.exe /S /D /C FIND «Smith»
This has a couple of side effects:
If the items being piped (the left hand side of the pipe) include any caret escape characters ^ they will need to be doubled up so that they survive into the new CMD shell.
Any newline (CR/LF) characters in the first command will be turned into & operators. (see StackOverflow)On modern hardware, starting a new CMD shell has no noticable effect on performance.
For example, this syntax works, but would fail if the second or subsequent (piped) lines were indented with a space:
@Echo Off
Echo abc def |^
Find «abc» |^
Find «def»> outfile.txtMulti-line single commands with lots of parameters, can be indented as in this example:
Echo abc def ^
ghi jkl ^
mno pqr
Redirection anywhere on the line
Although the redirection operator traditionally appears at the end of a command line, there is no requirement that it do so.
All of these commands are equivalent:Echo A B>C
Echo A>C B
Echo>C A B
>C Echo A BAll of them Echo «A B» to the file «C».
If the command involves a pipe such as DIR /b | SORT /r then you will still want to put the redirection at the end so that it captures the result of the SORT, but there are some advantages to putting the redirection at the start of the line.
Code like this:
Set _message=Meet at 2
Echo %_message%>schedule.txtWill inadvertently interpret the “2” as part of the redirection operator.
One solution is to insert a space:
Echo %_message% >schedule.txtThis assumes that the space won’t cause a problem. If you’re in a case where that space will indeed cause a problem, you can use the trick above to move the redirection operator to a location where it won’t cause any trouble:
>schedule.txt Echo %_message%Example via Raymond Chen
The idea of redirection anywhere in the line was first introduced in version 2 of sh, written by Ken Thompson in 1972.
Exit Codes
If the filename or command is not found then redirection will set an Exit Code of 1
When redirecting the output of DIR to a file, you may notice that the output file (if in the same folder) will be listed with a size of 0 bytes. The command interpreter first creates the empty destination file, then runs the DIR command and finally saves the redirected text into the file.
The maximum number of consecutive pipes is 2042
Examples
   DIR >MyFileListing.txt

   DIR /o:n >"Another list of Files.txt"

   DIR C:\ >List_of_C.txt 2>errorlog.txt

   DIR C:\ >List_of_C.txt & DIR D:\ >List_of_D.txt

   ECHO y| DEL *.txt

   ECHO Some text ^<html tag^> more text

   COPY nul empty.txt

   MEM /C >>MemLog.txt

   Date /T >>MemLog.txt

   SORT < MyTextFile.txt

   SET _output=%_missing% 2>nul

   FIND /i "Jones" < names.txt >logfile.txt

   (TYPE logfile.txt >> newfile.txt) 2>nul
“Stupidity, outrage, vanity, cruelty, iniquity, bad faith, falsehood,
we fail to see the whole array when it is facing in the same direction as we” ~ Jean Rostand (French Historian)
Related commands
CON — Console device.
conIN$ and conOUT$ behave like stdin and stdout, or 0 and 1 streams but only with internal commands.
SORT — Sort input.
CMD Syntax
TYPE — Display the contents of one or more text files.
Command Redirection — Microsoft Help page (archived)
Successive redirections explained (1>&3 ) — Stack Overflow.
Equivalent PowerShell: Redirection — Spooling output to a file, piping input.
Equivalent bash command (Linux): Redirection — Spooling output to a file, piping input.
Copyright © 1999-2025 SS64.com
Some rights reserved
Предыстория
В процессе разработки одного B2B проекта возникла необходимость обращения к нашему приложению из различных систем вроде 1C, Oracle, MS Sql Server. Первый «универсальный» вариант, который пришел в голову – использовать веб-сервисы. Но, к сожалению, у вышеупомянутых систем несколько разное понимание этого стандарта (например, не факт, что тот же oracle и 1C будут понимать друг друга), кроме того нам не хотелось раздувать проект использованием тяжелых сторонних библиотек (на тот момент мы уже использовали boost и Intel TBB, притягивать же еще Qt или gSoap нам не хотелось).
Поэтому было решено писать свой велосипед.
Вышеупомянутые системы имеют механизм расширения возможностей внутренних языков с помощью dll-плагинов, так называемых внешних компонент. Идея их использования для общения с внешним миром не является новой – на хабре уже были статьи по данной теме:
habrahabr.ru/post/149956
habrahabr.ru/company/Centrobit/blog/165441
habrahabr.ru/post/163859
Итак, мы решили использовать внешние компоненты для решения задачи. Затем нам следовало решить, каким способом, да еще и желательно кроссплатформенным (т.е. чтобы компоненту и приложение под разные платформы можно было бы собирать простой перекомпиляцией), мы будем связывать компоненту с нашим приложением. Проще всего было бы не заморачиваться и найти готовые IPC-решения на эту тему (QLocalSocket в Qt, Named Pipes в ACE), но опять-таки из соображений сокращения числа используемых библиотек было решено написать свой маленький велосипед.
Идеальным решением была бы boost::interprocess::message_queue, но она была не простой очередью, а очередью с приоритетами, что несколько снижало производительность (стремление к высокой производительности также было одной из причин, почему мы отказались от web-сервисов). Кроме того, нам было нужно некое подобие клиент-серверного решения.
От сокетов через loopback мы отказались сразу – у них слишком большой overhead в windows (см. habrahabr.ru/post/81067 ). Поэтому мы стали смотреть в сторону именованных каналов windows и domain sockets в unix.
Часть 1. Составляем ТЗ
Фактически, смысл наших внешних компонент заключался лишь в получении некоего xml-сообщения из системы и отправке ее в канал (конечно, связь должна быть двусторонней, но механизм передачи сообщений назад в систему мы не всегда реализовывали через компоненты). Поэтому мы решили, что не будем погружаться в дебри асинхронной работы с каналами, а нам хватит лишь реализации обычных блокирующих операций чтения-записи (и обработки клиентов). Требования к функциям чтения-записи были следующие:
- Функции должны принимать два параметра void* указатель на буфер в который надо писать или из которого надо читать и размер данных которые надо прочитать/отправить
- В случае любой ошибки (например, число принятых или отправленных байт не равно переданному в параметре) функция должна бросить исключение std::runtime_error (да, обработка исключений немного снижает производительность, можно бы использовать коды ошибок)
- В рамках одного класса реализуется и работа с серверными каналами (акцепт) и работа с клиентскими. В случае создания серверного канала функции чтения-записи не должны работать, а должны бросать исключения
Последний пункт требует пояснения – серверный канал нужен лишь для того, чтобы в цикле выполнять блокирующий метод ожидания клиента, возвращаемым значением которого является объект-канал с подключенным клиентом (по такой идеологии работает напиример функция accept для POSIX сокетов. В windows API же с каналами все наоборот – в случае блокирующей работы функция ожидания просто останавливает поток до тех пор, пока на том конце канала не появится клиент, затем его нужно обработать, а для следующих клиентов создать новый слушающий канал и т.д. )
В результате был сочинен следующий абстрактный класс INamedPipe от которого затем наследуются классы WinNamedPipe и POSIXNamedPipe
#pragma once
#include <stdexcept>
	class INamedPipe
	{
	protected:
                std::string _name;
		bool _server;
		INamedPipe(){};
		virtual void  internalReadBytes(void* buf,size_t size)=0;
		virtual void internalWriteBytes(const void* buf,size_t size)=0;
		virtual void internalFlush()=0;
	public:

		INamedPipe(const std::string prefix, const std::string& name, bool server):_name(prefix),_server(server)
		{
			_name.append(name);
		}
		void ConnectOrOpen()
		{
				if(_server)
					open();
				else
					connect();
		}
		virtual void ReadBytes(void* buf,size_t size)
		{
			if(!_server)
			{
				if(size<1)
					throw std::out_of_range("Size is 0 or less");
				internalReadBytes(buf,size);
			}
			else
				throw std::runtime_error("This operation is not supported on server pipe");
		}
		virtual void WriteBytes(const void* buf,size_t size)
		{
			if(!_server)
			{
				if(size<1)
					throw std::out_of_range("Size is 0 or less");
				internalWriteBytes(buf,size);
Конструктор INamedPipe принимает три параметра – префикс пути, где будет расположен канал в системе, имя канала, и параметр указывающий тип канала – клиентский или серверный (было решено объединить оба типа в одном классе).
Функция ConnectOrOpen() вызывает необходимый метод для открытия канала в зависимости от его типа (для сервера – open(), для клиента — connect()).
Часть 2. Пишем windows-реализацию WinNamedPipe
Перед реализацией мы решили погуглить примеры. Первым делом нагуглились туториалы из MSDN ( msdn.microsoft.com/ru-ru/library/windows/desktop/aa365592, msdn.microsoft.com/ru-ru/library/windows/desktop/aa365588 ) и документация на русском — www.frolov-lib.ru/books/bsp/v27/ch2_3.htm. С помощью этих статей и была написана первая версия класса WinNamedPipe. Спустя некоторое время мы нашли хорошую статью по написанию класса работы с именованными каналами на примере создания внешней компоненты для MetaTrader ( www.mql5.com/ru/articles/115 ), которую тоже рекомедуем к прочтению.
В конструкторе WinNamedPipe уже задан префикс – согласно требованиям MSDN полный путь к именованному каналу должен иметь вид «\\имя_компьютера\pipe\имя_канала» и в случае работы с именованным каналом на локальной машине имеет вид «\\.\pipe\pipe_name» (да, именованные каналы в Windows позволяют обмениваться информацией и по сети).
В классе также присутствует конструктор, принимающий на вход параметр типа HANDLE – число, идентифицирующее в операционной системе какую-нибудь структуру или объект (с помощью данного конструктора мы сможем создавать новый экземпляр класса WinNamedPipe зная только HANDLE уже существующего именованного канала). Данный конструктор будет использоваться в функции WaitForConnection() (см. далее)
Реализация open() выглядит следующим образом:
void WinNamedPipe::open(){
_hPipe = CreateNamedPipe(
		(LPSTR)_name.data(),             // имя создаваемого канала
		PIPE_ACCESS_DUPLEX,       // разрешен доступ на чтение и запись
		PIPE_TYPE_BYTE |   //читаем побайтово
		PIPE_WAIT,                // блокирующий режим
		PIPE_UNLIMITED_INSTANCES, // число экземпляров канала неограниченно
		BUFFER_PIPE_SIZE,                  // размер буфера исходящих сообщений
		BUFFER_PIPE_SIZE,                  // размер буфера входящих сообщений
		0,                        // тайм-аут ожидания (0=бесконечно)
		NULL);                    // атрибут безопасности по умолчанию – доступ разрешен всем

	if (_hPipe == INVALID_HANDLE_VALUE)
	{
		THROW_LAST_ERROR("CreateNamedPipe failed");
	}
Заметим, что размер буфера BUFFER_PIPE_SIZE мы задаем в самом начале файла. Фактически, его размер не влияет на максимальный размер передаваемых данных – в нашем проекте мы успешно передавали куски, которые были больше буфера в несколько раз.
Особое внимание следует обратить на первый параметр: (LPSTR)_name.data()
Поскольку имя канала в нашем классе хранится в std::string, то для корректной его передачи в WinAPI функции надо устанавливать в свойствах проекта в Visual Studio «Use Multi-Byte character Set» (подробнее см. статью habrahabr.ru/post/164193 ).
Подробное описание параметров функции CreateNamedPipe можно прочитать в MSDN ( msdn.microsoft.com/en-us/library/windows/desktop/aa365150 и на www.frolov-lib.ru/books/bsp/v27/ch2_3.htm ).
Клиентское подключение к каналу осуществляется с помощью функции connect(), которая имеет следующую реализацию:
void WinNamedPipe::connect()
	for(;;)
	{
		WaitNamedPipe((LPSTR)_name.data(), NMPWAIT_WAIT_FOREVER);
		_hPipe = CreateFile(
			(LPSTR)_name.data(),   // имя канала
			GENERIC_READ |  // доступ на чтение и запись
			GENERIC_WRITE,
			0,
			NULL,           // доступ по умолчанию разрешен всем
			OPEN_EXISTING,  // открываем существующий канал
			0,
			NULL);
			// Break if the pipe handle is valid or error!=232
		 if (_hPipe != INVALID_HANDLE_VALUE||GetLastError() != ERROR_PIPE_BUSY)
         break;
	}
	if (_hPipe == INVALID_HANDLE_VALUE)
			THROW_LAST_ERROR("Could not open pipe");
	DWORD dwMode = PIPE_TYPE_BYTE;
	BOOL fSuccess = SetNamedPipeHandleState(
		_hPipe,    // указатель на созданный канал
		&dwMode,  //  параметры чтения-записи
		NULL,     // максимальный размер чтения и записи неограничен
		NULL);    // таймаут не ограничен
	if ( ! fSuccess)
	{
		THROW_LAST_ERROR("SetNamedPipeHandleState failed");
	}
}
Сначала с помощью функции WaitNamedPipe мы встаем на «вечное» ожидание свободного экземпляра серверного канала, затем с помощью CreateFile соединяемся с ним. После этого мы проверяем, удачно ли прошло соединение. Если указатель на объект-канал валиден (или произошла ошибка отличная от ERROR_PIPE_BUSY – ошибки, обозначающей, что свободный канал отсутствует) мы выходим из цикла и настраиваем нужный нам режим работы с каналом. В противном случае цикл повторяется до тех пор, пока подключиться нормально не удастся или же произойдет ошибка, отличная от ERROR_PIPE_BUSY. Если серверный именованный канал с данным именем не существует, то WaitNamedPipe завершится сразу, GetLastError вернет код ошибки 2 (The system cannot find the file specified) и connect() бросит исключение.
Согласно нашей задумке WaitForConnection() должна возвращать указатель на новый WinNamedPipe, к которому уже присоединен клиент и к которому можно применять функции чтения-записи. Однако в Windows стандартный механизм приема клиентов осуществляется по-другому – функция ConnectNamedPipe (получающая на вход HANDLE созданного канала) просто блокирует поток до тех пор, пока на другом конце канала не появится клиент. Затем, чтобы не потерять других клиентов, нужно создать новый слушающий канал и передать его в данную функцию и т.д. Поэтому для реализации нашей задумки приходится из WaitForConnection вызывать open() еще раз.
Функция WaitForConnection() выглядит следующим образом:
WinNamedPipe* WinNamedPipe::WaitForConnection()
{
	if(_server)
	{
		DWORD error;
		if (ConnectNamedPipe(_hPipe, NULL)||(error=GetLastError())==ERROR_PIPE_CONNECTED)
		{
			HANDLE client=_hPipe;
			open();
			return new WinNamedPipe(client);
		}
		else
		{
			THROW_LAST_ERROR("WaitForConnection failed");
		}
	}
	else
	{
		throw std::runtime_error("WaitForConnection is not supported on server pipe\n");
	}
}
Отметим важный момент – если клиентских каналов создается множество, то возможна ситуация, когда клиент подключится к каналу еще до вызова ConnectNamedPipe. В этом случае GetLastError вернет код ошибки 535 (но это не будет являться ошибкой)
Функции чтения и записи и просты и понятны без дополнительных комментариев:
void  WinNamedPipe::internalReadBytes(void* buf,size_t size)
{
	DWORD cbBytesRead = 0;
	BOOL fSuccess = FALSE;
	// Начинаем читать из канала
	fSuccess = ReadFile(
		_hPipe,        // указатель на канал
		buf,    // буфер-приемник для данных
		size, // размер буфера
		&cbBytesRead, // ссылка на переменную, куда будет записано число прочитанных байт
		NULL);        // не используем асинхронные операции

	if (!fSuccess || cbBytesRead == 0 ||cbBytesRead!=size)
	{
		if (GetLastError() == ERROR_BROKEN_PIPE)
		{
			THROW_LAST_ERROR("pipe disconnected");
		}
		else
		{
			THROW_LAST_ERROR("read failed");
		}
	}

}

void  WinNamedPipe::internalWriteBytes(const void* buf,size_t size)
{
	DWORD cbWritten;
	BOOL fSuccess = FALSE;

	fSuccess = WriteFile(
		_hPipe,        // указатель на канал
		buf,     // буфер из которого читаем данные для отправки
		size, // число байт для отправки
		&cbWritten,   // ссылка  на переменную куда записать число отправленных байт
		NULL);        // не используем асинхронные операции

	if (!fSuccess || size != cbWritten)
	{
		THROW_LAST_ERROR("WriteFile failed");
	}
}
На функции Close() следует остановиться поподробней. Для того, чтобы закрыть серверный канал и сообщить клиенту на другом его конце об этом используют DisconnectNamedPipe(HANDLE pipe). После этого на нем можно снова ожидать новых клиентов, а можно сообщить операционной системе, что он не нужен, используя CloseHandle(HANDLE pipe). CloseHandle можно также вызывать и на клиентских каналах, однако данный метод должен вызываться только один раз – либо на серверном пайпе с подключенным клиентом, либо на клиенте. Поэтому было решено, что вызывать DisconnectNamedPipe и CloseHandle мы будем только на серверных экземплярах каналов, а на клиентских Close будет методом-пустышкой.
void WinNamedPipe::Close()
{
	if(_server||_server_with_client)
	{
		DisconnectNamedPipe(_hPipe);
		CloseHandle(_hPipe); //May throw an exception if a debugger is attached to the process and handle is not valid
	}
}
Также следует помнить, что при отправке или получении больших объемов данных клиент должен уведомить противоположную сторону о том, что все данные прочитаны, а сервер не должен закрывать канал до получения этого уведомления.
Для уменьшения копипасты был создан макрос, получающий GetLastError и бросающий исключения:
#define THROW_LAST_ERROR(e){			\
	int error=GetLastError();				\
	std::stringstream err;					\
	err<<e<<", GLE="<<error;				\
	throw std::runtime_error(err.str().data());		\
}
Часть 3. Пишем unix-реализацию – PosixNamedPipe
Для реализации posix-совместимой части библиотеки мы решили использовать Unix domain sockets (подробнее про работу с сокетами в unix можно прочитать тут — wiki.linuxformat.ru/index.php/LXF83:Unix_API ).
В отличие от windows, файл-указатель на локальный сокет может быть расположен в любом месте файловой системы. Мы решили передавать в качестве префикса пути /tmp/. Следует отметить, что если в качестве префикса передать пустую строку, то клиент не сможет подключиться к сокету и будет возвращать ошибку file not found. Кроме этого, если файл с именем локального сокета будет существовать перед функцией, создающей локальный сокет, то ни один клиент не сможет подключиться к серверу (ошибка Connection refused). Поэтому перед созданием сокета следует проверить наличие данного файла и попытаться его удалить. Отсюда же и возникла идея с фиксированным префиксом пути – надо же как-то ликвидировать потенциальную уязвимость, дающую возможность затереть файл в любом месте системы (и тут неплохо бы вспомнить о правах доступа и использовании функции basename). Также отсюда следует тот факт, что серверных экземпляров класса PosixNamedPipe с одинаковыми именами более одного быть не должно – для корректной работы каждому имени должен соответствовать только один экземпляр класса.
Код функции open() выглядит следующим образом:
void PosixNamedPipe::open()
{
	sock= socket(AF_UNIX, SOCK_STREAM, 0);
	if(sock == -1) {
		THROW_ERROR("Create_socket failed: ");
	}
	unlink(_name.c_str());
	desc.sun_family = AF_UNIX;
	strcpy(desc.sun_path, _name.c_str());
	if (bind(sock, (sockaddr*)&desc, sizeof(struct sockaddr_un)) == -1) {
		THROW_ERROR("Connection failed(bind): ");
	}
	if (listen(sock,SOMAXCONN) == -1) {
    THROW_ERROR("Connection failed(listen): ");
  }
}
Функция connect() почти идентична:
void PosixNamedPipe::connect()
{
	sock= socket(AF_UNIX, SOCK_STREAM, 0);
	if(sock == -1)
	{
		THROW_ERROR("Create_socket failed: ");
	}
	desc.sun_family = AF_UNIX;
	strcpy(desc.sun_path, _name.c_str());
	if (::connect(sock, (sockaddr*)&desc, sizeof(struct sockaddr_un)) == -1)
	{
		THROW_ERROR("Connection failed(connect): ");
	}
}
Для того, чтобы написать WaitForConnection() согласно нашему ТЗ, в отличие от windows-версии кода тут даже не пришлось извращаться.
PosixNamedPipe* PosixNamedPipe::WaitForConnection()
{
	int client=accept(sock,NULL,NULL);
	if(client!=-1)
		return new PosixNamedPipe(client);
	else {
		THROW_ERROR("Accept error: ");
	}
}
Конструктор, вызываемый в ней также банален:
PosixNamedPipe::PosixNamedPipe(int pipe)
{
	sock=pipe;
	_server=false;
	memset(&desc, 0, sizeof(struct sockaddr_un));
}
Тут следует заметить, что для корректной работы функций bind и ::connect рекомендуется обнулять экземпляр структуры sockaddr_un перед инициализацией ее полей, в связи с чем в конструкторы класса была добавлена строчка memset(&desc, 0, sizeof(struct sockaddr_un)).
Функции чтения-записи для сокетов также довольно просты:
void PosixNamedPipe::internalReadBytes(void* buf,size_t size)
{
  size_t ret=-1;
  if ((recv(sock, buf, size, MSG_WAITALL)) == -1) {
    THROW_ERROR("Error while reading: ");
  }
}

void PosixNamedPipe::internalWriteBytes(const void* buf,size_t size)
{
  size_t ret=-1;
  if ((ret = send(sock, buf, size, 0)) == -1||ret!=size) {
    THROW_ERROR("Error while sending: ");
  }
}
В функции закрытия канала на всякий случай предусмотрено удаление файла при закрытии серверного экземпляра класса (и вызов функции закрытия также автоматически осуществляется в деструкторе):
void PosixNamedPipe::Close()
{
	if(_server)
		unlink(desc.sun_path);
	close(sock);
}
PosixNamedPipe::~PosixNamedPipe()
{
  this->Close();
}
Часть 4. Пишем многопоточный сервер для обработки клиентов
Итак, классы для работы с именованными каналами созданы. Теперь сделаем небольшой трюк, чтобы не писать #ifdef _WIN32 и подобные вещи при создании экземпляров данных классов в наших приложениях:
//NamedPipe.h
#pragma once
#ifdef _WIN32
	#include "WinNamedPipe.h"
	typedef WinNamedPipe NamedPipe;
#else
	#include <unistd.h>
	#include "PosixNamedPipe.h"
	typedef PosixNamedPipe NamedPipe;
#endif
Теперь в любом проекте делаем #include «NamedPipe.h» и можем писать код вида NamedPipe* client=new NamedPipe(«NamedPipe.h»,0) не заботясь о том, под какую из операционных систем будет собираться наше приложение.
Для обработки входящих запросов из внешних компонент в нашем проекте был написан простой многопоточный класс-сервер на основе паттерна thread pool с использованием библиотек boost::thread и Intel TBB. Основная идея была такой – в одном потоке в бесконечном цикле идет вызов WaitForConnection(), а указатели на объекты NamedPipe с подключенными клиентами складываются в очередь tbb::concurrent_queue, откуда их забирают потоки, непосредственно занятые чтением-записью и обработкой входящих сообщений.
Код функции, занимающейся приемом входящих соединений выглядит так:
void NamedPipeServer::run()
{
	NamedPipe* client;
	_pipe=new NamedPipe(_name, 1);
	try
	{
		_pipe->ConnectOrOpen();
	}
	catch(const std::exception& e)
	{
	}
	while(_active)
	{
		try
		{
			client=_pipe->WaitForConnection();
			_clients.push(client);
		}
		catch(const std::exception& e)
		{
		}
	}
	delete _pipe;
}
Заметим, что на месте пустых скобок после catch у нас стоял вызов макросов логирования, но в коде, переписанном для данной статьи, данные вызовы были убраны, чтобы не перегружать нашу библиотеку зависимостями.
По нашему замыслу работа с клиентами должна описываться в функции handleClient(NamedPipe* client), которая в классе сервера сделана виртуальной и должна переопределяться в классе-наследнике.
В каждом потоке-обработчике крутится следующий цикл:
void NamedPipeServer::workerProc()
{
	NamedPipe* client;
	while(_active)
		if(_clients.try_pop(client))
		{
			handleClient(client);
		}
		else
			boost::this_thread::sleep(boost::posix_time::milliseconds(100));
}
В цикле поток пытается достать клиента из очереди и в случае успеха вызывает handleClient, иначе – засыпает на некоторое время, чтобы избежать холостой загрузки процессора.
Для запуска всех потоков вызывается метод Start(), который вызывает метод startWorkers(), создающий потоки:
void NamedPipeServer::Start()
{
	_active=true;
	startWorkers();
}
void NamedPipeServer::startWorkers()
{
	for (size_t i = 0; i < _thread_pool_size; ++i)
	{
		boost::shared_ptr<boost::thread> thread(new boost::thread(boost::bind(&NamedPipeServer::workerProc, this)));
		_threads.push_back(thread);
	}
	boost::shared_ptr<boost::thread> dispatcher(new boost::thread(boost::bind(&NamedPipeServer::run,this)));
	_threads.push_back(dispatcher);
}
Отметим, что метод Start() не блокирует поток выполнения. Для блокировки его до завершения всех потоков сервера следует использовать метод JoinWorkers:
void NamedPipeServer::JoinWorkers()
{
	size_t size=_threads.size();
	for (std::size_t i = 0; i < size; ++i)
		_threads[i]->join();
	for (std::size_t i = 0; i < size; ++i)
		_threads[i].reset();
	_threads.clear();
}
На практике в нашем приложении считается, что запущенные серверы работают до тех пор, пока приложение не закроется. Это избавило нас от проблем, возникающих при попытке остановки потоков сервера именованных каналов.
Для того, чтобы попробовать остановить потоки сервера можно написать, например, такой метод Stop():
void NamedPipeServer::Stop()
{
	_active=false;
	this->JoinWorkers();
}
Однако при вызове данного метода поток «встанет». Причина тому – тот факт, что один из потоков заблокирован функцией WaitForConnection().
И выход возможен только после того, как к нам присоединится очередной клиент (соответственно после такого соединения клиент обломается).
Самый простой (но не самый хороший) вариант решения проблемы возможного блокирования – создать в функции Stop клиентский именованный канал и подключиться к нашему серверу, сбросив тем самым блокировку потока WaitForConnection.
Для более правильного решения этой проблемы нам следует изменить поведение функции WaitForConnection(), добавив в нее таймаут.
Новая функция для Windows-версии выглядит так:
WinNamedPipe*  WinNamedPipe::WaitForConnection(unsigned int timeout)
{
	if(_server)
	{
		OVERLAPPED lpOverlapped = {0};
		lpOverlapped.hEvent = CreateEvent(0,1,1,0);
		if(ConnectNamedPipe(_hPipe, &lpOverlapped)==0)
		{
			if(GetLastError()==ERROR_PIPE_CONNECTED)
				if (!SetEvent(lpOverlapped.hEvent))
					THROW_LAST_ERROR("AsyncWaitForConnection failed");
			int result = WaitForSingleObject(lpOverlapped.hEvent,timeout);
			if (WAIT_OBJECT_0 == result)
			{
				HANDLE client=_hPipe;
				open();
				return new WinNamedPipe(client);
			}
			else
			{
				return NULL;
			}
		}
		else
		{
			THROW_LAST_ERROR("AsyncWaitForConnection failed");
		}
	}
	else
	{
		throw std::runtime_error("WaitForConnection is not supported on client pipe\n");
	}
}
Для того, чтобы данный метод корректно работал, надо изменить вызов функции CreateNamedPipe в open() следующим образом:
_hPipe = CreateNamedPipe(
		(LPSTR)_name.data(),
		PIPE_ACCESS_DUPLEX |
             FILE_FLAG_OVERLAPPED,       // Вот тут мы включили поддержку неблокирующих операций
		PIPE_TYPE_BYTE |
		PIPE_WAIT,
		PIPE_UNLIMITED_INSTANCES,
		BUFFER_PIPE_SIZE,
		BUFFER_PIPE_SIZE,
		0,
		NULL);                    // default security attribute
Реализация для linux выглядит так:
PosixNamedPipe* PosixNamedPipe::WaitForConnection(unsigned int timeout)
{
	int nsock;
	int retour;
	fd_set readf;
	fd_set writef;
	struct timeval to;

	FD_ZERO(&readf);
	FD_ZERO(&writef);
	FD_SET(sock, &readf);
	FD_SET(sock, &writef);
	to.tv_usec = timeout*1000;

	retour = select(sock+1, &readf, &writef, 0, &to);

	if (retour == 0)
	{
		return NULL;
	}

	if ( (FD_ISSET(sock, &readf)) || (FD_ISSET(sock,&writef)))
	{
			nsock = accept(sock, NULL, NULL);
			return new PosixNamedPipe(nsock);
	}
	else
	{
		throw std::runtime_error("invalid socket descriptor!\n");
	}
}
В завершение отметим, что деструктор класса сервера для корректной работы должен вызывать метод Stop() и затем очищать всю очередь _clients при наличии там необработанных клиентов. Так как очередь клиентов в сервере состоит из указателей, то ее также надо очистить вручную:
NamedPipeServer::~NamedPipeServer(void)
{
	this->Stop();
	while(!_clients.empty())
	{
		if(_clients.try_pop(_pipe))
			delete _pipe;
	}
}
Часть 5. Пример использования библиотеки.
Для тестирования библиотеки была написана спамилка, в бесконечном цикле создающая два потока, которые пытаются соединиться с сервером и отправить ему 10 строчек. После завершения потоков цикл повторяется.
Каждый поток выглядит так:
void spamming_thread()
{
	std::vector<std::string> words;
	words.push_back(std::string("one "));
	words.push_back(std::string("two "));
	words.push_back(std::string("three "));
	words.push_back(std::string("four "));
	words.push_back(std::string("five "));
	words.push_back(std::string("six "));
	words.push_back(std::string("seven "));
	words.push_back(std::string("eight "));
	words.push_back(std::string("nine "));
	words.push_back(std::string("ten "));

	NamedPipe client("NamedPipeTester",0);
	try
	{
		client.ConnectOrOpen();
		for(int i=0;i<words.size();++i)
		{
			std::cout<<"sending "<<words[i]<<"\n";
			size_t size=words[i].size();
			client.WriteBytes(&size,sizeof(size));
			client.WriteBytes(words[i].data(),size);
		}
		client.Close();
	}
	catch(const std::runtime_error &e)
	{
		std::cout<<"Exception: "<<e.what()<<"\n";
	}
}
Теперь напишем сервер, который принимает подключения:
#pragma once
#include "../NamedPipeServer.h"

class SimpleServer: public NamedPipeServer
{
protected:
	void handleClient(NamedPipe* client);
public:
	SimpleServer(const std::string &name):NamedPipeServer(name,1){};
	~SimpleServer(){};
};
void SimpleServer::handleClient(NamedPipe* client)
{
	for(int i=0;i<10;++i)
	{
		try
		{
			size_t size;
			client->ReadBytes(&size,sizeof(size));
			if(size>0)
			{
				char* message=new char[size];
				client->ReadBytes(message,size);
				//Using std::cout is bad in multi-threading apps
				//std::string msg(message,size);
				//std::cout<<"Message from pipe: "<<msg<<"\n";
				delete[] message;
			}
		}
		catch(const std::exception& e)
		{
			std::cout<<"Exception!:"<<e.what()<<"\n";
		}
	}
	client->Close();
}
Запустим его, подождем полминуты и попробуем остановить:
		SimpleServer* s=new SimpleServer("NamedPipeTester");
		s->Start();
		boost::this_thread::sleep(boost::posix_time::milliseconds(30000));
		delete s;
		system("pause");
Заключение.
Данная библиотека вот уже полгода успешно используется в нашем проекте. Для хабра код библиотеки был исправлен и дополнен. Тем не менее, так как статья написана начинающим программистом, то в коде возможны ошибки. Автор будет благодарен за конструктивную критику, замечания и предложения по улучшению и за найденные ошибки.
Данная статья не претендует на полноту. В ней не рассмотрены такие вещи, как неблокирующее чтение и запись, установка прав доступа для именованных каналов и альтернатива побайтовому режиму чтения-записи — режим обмена сообщениями.
Весь исходный код к статье вы можете найти на github.com/xpavlov/libNamedPipe
Стандартный способ коммуникации windows приложений — использование именованных пайпов. Широкие возможности настройки пайпа при создании и открытии позволяют организовывать большое количество различных сценариев работы.
Дескриптор безопасности по умолчанию
Пример функций, позволяющих клиенту работать с именованным пайпом:
Client.c
/* Open named pipe */
pipe = CreateFileA(
         "\\\\.\\pipe\\g3k0nPipe",
         GENERIC_READ | GENERIC_WRITE,
         0,
         NULL,
         OPEN_EXISTING,
         0,
         NULL);

if (pipe == INVALID_HANDLE_VALUE) {
  printf("[-] Failed to open pipe with error: %#X\n", GetLastError());
  return -1;
}
/*...*/
/* Writing to named pipe */
/*...*/
uint32_t success = WriteFile(
                      pipe,
                      buf,
                      bufSz,
                      &written,
                      NULL);

if (!success) {
  printf("[-] Failed write to pipe");
  return -2;
}
/*...*/
/* Reading from named pipe */
/*...*/
success = ReadFile(
            pipe,
            buf,
            BUFFSIZE,
            &read,
            NULL);

if (!success) {
  printf("[-] Failed read from pipe");
  return -2;
}

/*...*/
/* Closing named pipe */
/*...*/
CloseHandle(pipe);
Пример функций, необходимых серверу для создания именованного пайпа:
Server.c
/* Create named pipe */
pipe = CreateNamedPipeA(
         "\\\\.\\pipe\\g3k0nPipe",
         PIPE_ACCESS_DUPLEX | FILE_FLAG_OVERLAPPED,
         PIPE_TYPE_MESSAGE |
         PIPE_READMODE_MESSAGE |
         PIPE_WAIT,
         PIPE_UNLIMITED_INSTANCES,
         BUFFSIZE,
         BUFFSIZE,
         0,
         NULL);

if (pipe == INVALID_HANDLE_VALUE) {
  printf("[-] Failed to create named pipe with error: %#X\n", GetLastError());
  return -1;
}

/* Wait connection to named pipe */
const uint32_t connected = ConnectNamedPipe(pipe, NULL);
if (!connected) {
  CloseHandle(pipe);
  printf("[-] Failed to connect to named pipe\n");
  return -2;
}
При таком способе создания именованного пайпа мы не указывает аттрибуты безопасности (параметр lpSecurityAttributes в функции CreateNamedPipeA).
typedef struct _SECURITY_ATTRIBUTES {
  DWORD  nLength;
  LPVOID lpSecurityDescriptor;
  BOOL   bInheritHandle;
} SECURITY_ATTRIBUTES, *PSECURITY_ATTRIBUTES, *LPSECURITY_ATTRIBUTES;
Следовательно, согласно MSDN, пайп получает дескриптор безопасности по умолчанию. Используя следующий код (оригинал) выведем на экран значение по умолчанию для дескриптора безопасности.
GetDescriptor.cpp
#include <windows.h>
#include <sddl.h> // ConvertSecurityDescriptorToStringSecurityDescriptor

int WINAPI
WinMain(HINSTANCE, HINSTANCE, LPSTR, int)
{
  HANDLE Token;
  if (OpenProcessToken(GetCurrentProcess(), TOKEN_QUERY, &Token)) {
    DWORD RequiredSize = 0;
    GetTokenInformation(Token, TokenDefaultDacl, NULL, 0, &RequiredSize);
    TOKEN_DEFAULT_DACL* DefaultDacl =
      reinterpret_cast<TOKEN_DEFAULT_DACL*>(LocalAlloc(LPTR, RequiredSize));
    if (DefaultDacl) {
      SECURITY_DESCRIPTOR Sd;
      LPTSTR StringSd;
      if (GetTokenInformation(Token, TokenDefaultDacl, DefaultDacl,
        RequiredSize, &RequiredSize) &&
        InitializeSecurityDescriptor(&Sd, SECURITY_DESCRIPTOR_REVISION) &&
        SetSecurityDescriptorDacl(&Sd, TRUE,
          DefaultDacl->DefaultDacl, FALSE) &&
        ConvertSecurityDescriptorToStringSecurityDescriptor(&Sd,
          SDDL_REVISION_1, DACL_SECURITY_INFORMATION, &StringSd, NULL)) {
        MessageBox(NULL, StringSd, TEXT("Result"), MB_OK);
        LocalFree(StringSd);
      }
      LocalFree(DefaultDacl);
    }
    CloseHandle(Token);
  }
  return 0;
}
Значение, выведенное на экран будет отличаться в зависимости от системы и пользователя, под которым создаётся объект. Для моей системы дескриптор имеет следующее значение:
D:(A;;GA;;;BA)(A;;GA;;;SY)(A;;GXGR;;;S-1-5-5-0-283393)
Для расшифровки этой строки обратимся к MSDN:
D: — следующая строка описывает DACL
(A;;GA;;;BA) — Даёт полный доступ к объекту группе встроеных администраторов
(A;;GA;;;SY) — Даёт полный доступ к объекту локальному системному пользователю
(A;;GXGR;;;S-1-5-5-0-283393) — Даёт права на чтение и исполнение моему текущему пользователю
Следовательно, если приложение не имеет указанных привилегий, то при попытке открыть именованный пайп функция CreateFileA вернёт ошибку 0x5.
Настройка дескриптора безопасности
Для того, чтобы любое непривилегированное приложение могло открыть пайп и работать с ним, необходимо установить соответствующие права при создании пайпа.
ConfiguredServer.c
SID_IDENTIFIER_AUTHORITY SIDAuthWorld;
PSID pEveryoneSID;
if (!AllocateAndInitializeSid(&SIDAuthWorld, 1,
  SECURITY_WORLD_RID,
  0, 0, 0, 0, 0, 0, 0,
  &pEveryoneSID)) {
  printf("AllocateAndInitializeSid Error %#X\n", GetLastError());
  return FALSE;
}

EXPLICIT_ACCESS_A ea;
ZeroMemory(&ea, sizeof(EXPLICIT_ACCESS));
ea.grfAccessPermissions = FILE_READ_DATA | FILE_WRITE_DATA;;
ea.grfAccessMode = SET_ACCESS;
ea.grfInheritance = NO_INHERITANCE;
ea.Trustee.TrusteeForm = TRUSTEE_IS_SID;
ea.Trustee.TrusteeType = TRUSTEE_IS_WELL_KNOWN_GROUP;
ea.Trustee.ptstrName = (LPSTR)pEveryoneSID;

PACL pACL;
DWORD dwRes;
dwRes = SetEntriesInAclA(2, &ea, NULL, &pACL);

PSECURITY_DESCRIPTOR pSD;
pSD = (PSECURITY_DESCRIPTOR)LocalAlloc(LPTR, SECURITY_DESCRIPTOR_MIN_LENGTH);
if (NULL == pSD) {
  printf("LocalAlloc Error %#X\n", GetLastError());
}

if (!InitializeSecurityDescriptor(pSD,
  SECURITY_DESCRIPTOR_REVISION)) {
  printf("InitializeSecurityDescriptor Error %#X\n", GetLastError());
}

if (!SetSecurityDescriptorDacl(pSD, TRUE, pACL, FALSE))
{
  printf("SetSecurityDescriptorDacl Error %#X\n", GetLastError());
}

SECURITY_ATTRIBUTES sa;
sa.nLength = sizeof(SECURITY_ATTRIBUTES);
sa.lpSecurityDescriptor = pSD;
sa.bInheritHandle = FALSE;

printf("[>] Creating named pipe...\n");
pipe = CreateNamedPipeA(
         "\\\\.\\pipe\\g3k0nPipe",
         PIPE_ACCESS_DUPLEX | FILE_FLAG_OVERLAPPED,
         PIPE_TYPE_MESSAGE |
         PIPE_READMODE_MESSAGE |
         PIPE_WAIT,
         PIPE_UNLIMITED_INSTANCES,
         BUFFSIZE,
         BUFFSIZE,
         0,
         &sa);
Данный код позволяет создать именованный пайп, присвоив ему дескриптор безопасности, который позволяет осуществлять операции чтения и записи любому авторизованному пользователю в системе.
Проверка на практике
Получим значения дескрипторов по умолчанию для обычного пользователя (первый скриншот) и для администратора (второй скриншот).
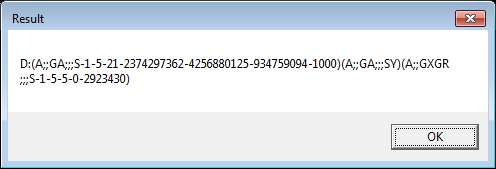
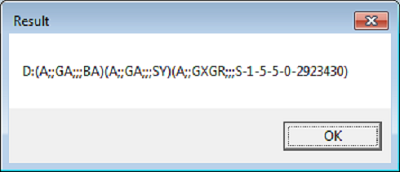
Теперь попробуем запустить файл Server.exe (сверху) от имени пользователя, и от его же имени Client.exe (снизу).
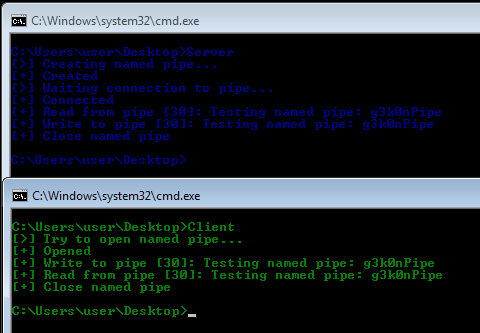
Как видно из скриншота, соединение между сервером и клиентом произошло без ошибок. Это ожидаемое поведение, так как при создании именованного пайпа было установлено значение по умолчанию для дескриптора безопасности, позволяющее процессам, запущенным от имени того же пользователя иметь доступ на чтение и запись к пайпу.
Теперь запустим файл Server.exe (сверху) от имени администратора, а файл Client.exe (снизу) по прежнему от имени пользователя.
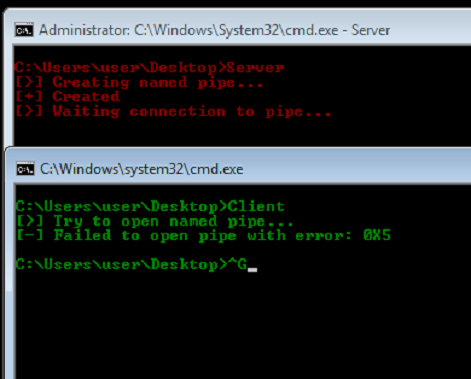
В данном случае, сервер остаётся ожидать подключения, в то время как клиент получает ошибку с кодом 0x5 (ERROR_ACCESS_DENIED), возникшую в процессе подключения. Происходит так потому, что дескриптор безопасности по умолчанию не позволяет пользователю открывать на запись именованный пайп, созданный администратором.
Если при создании именованного пайпа вместо значений по умолчанию задать определённый дескриптор безопасности, то можно позволить определённым пользователям совершать указанные действия над объектом пайпа.
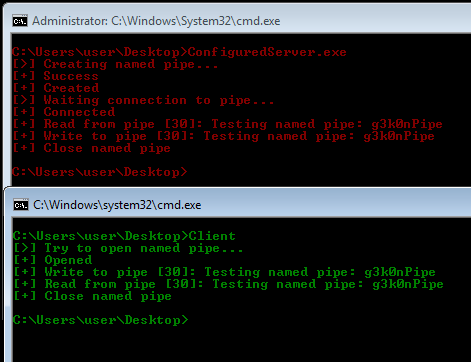
Скриншот демонстрирует, что правильно настроенный сервер ConfiguredServer.exe, запущенный из под администратора, создаёт именованный пайп, к которому может подключиться Client.exe, запущенный из под пользователя.
Все примеры кода представлены в моём репозитории на github.
Ссылки
Информация по теме
- Named Pipe Server Using Completion Routines
- Named Pipe Server Using Overlapped I/O
- Named Pipes
- Mark Russinovich «Windows Internal Part 1», 6 edition, Chapter 7 «Networking»
Использованные источники:
- Named Pipe Client
- Multithreaded Pipe Server
- CreateNamedPipe function on MSDN
- Raymond Chen blog post
- ACE Strings description
- System Error Codes