
Last Updated :
16 Sep, 2024
GitLab is a popular DevOps platform that provides a robust solution for source code management, continuous integration/continuous deployment (CI/CD), and other development workflows. While GitLab is typically hosted on Linux servers, it can also be installed on Windows using a virtual machine or Docker.
In this article, we will walk you through the steps to install GitLab on Windows using Docker, which provides a manageable and efficient way to run GitLab without needing to configure a full Linux environment.
Prerequisites
Before installing GitLab on Windows, ensure you have the following prerequisites:
- Windows 10 Pro, Enterprise, or Education: Required for Docker Desktop.
- Docker Desktop: A platform that allows you to run Docker containers on Windows.
- Sufficient System Resources: At least 4 CPU cores and 4GB of RAM for GitLab to run smoothly. Higher specifications are recommended for production environments.
Installing Docker on Windows
To run GitLab on Windows, you’ll need to install Docker Desktop, which enables running containers on Windows systems.
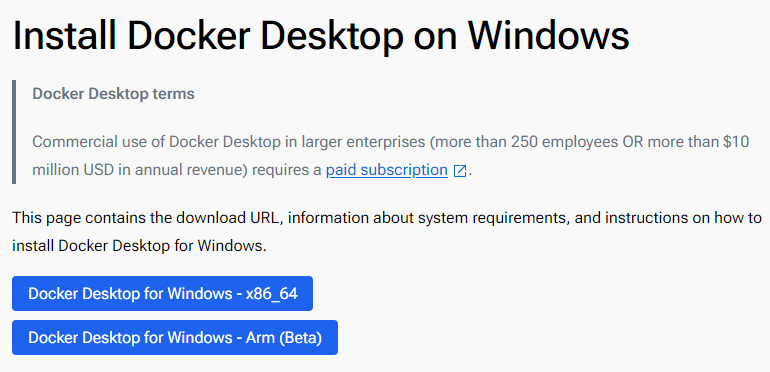
Step 1: Download Docker Desktop
Go to the Docker Desktop website and download the installer for Windows.
Step 2: Install Docker Desktop
- Run the installer and follow the on-screen instructions.
- When prompted, enable the option for Windows Subsystem for Linux (WSL 2) for better performance.
Step 3: Start Docker Desktop
- Once installed, launch Docker Desktop and ensure it is running. You should see the Docker icon in the system tray.
Step 4: Verify Docker Installation
Open Command Prompt or PowerShell and type:
docker --version
You should see the version of Docker installed, confirming that Docker is set up correctly.
Downloading and Running GitLab Using Docker
With Docker installed, you can now download and run GitLab using Docker containers.
Step 1: Pull the GitLab Docker Image
Open PowerShell or Command Prompt and pull the GitLab image from Docker Hub:
docker pull gitlab/gitlab-ee:latest
This command pulls the latest version of GitLab Enterprise Edition. If you prefer the Community Edition, use gitlab/gitlab-ce:latest.
Step 2: Run GitLab in a Docker Container
Create a new directory on your Windows system to store GitLab configuration and data. This ensures data persists even if the container is removed:
mkdir C:\gitlab\data
mkdir C:\gitlab\logs
mkdir C:\gitlab\config
Step 3: Start the GitLab container:
docker run --detach `
  --hostname gitlab.local `
  --publish 443:443 --publish 80:80 --publish 22:22 `
  --name gitlab `
  --restart always `
  --volume C:\gitlab\config:/etc/gitlab `
  --volume C:\gitlab\logs:/var/log/gitlab `
  --volume C:\gitlab\data:/var/opt/gitlab `
  gitlab/gitlab-ee:latest
Options:
- —hostname: Sets the hostname for GitLab (e.g., gitlab.local).
- —publish: Maps ports from the container to the host (HTTP, HTTPS, and SSH).
- —name: Names the container gitlab.
- —restart always: Ensures GitLab restarts automatically if the container stops or the host reboots.
- —volume: Maps local directories to container directories for persistent storage.
Step 3: Wait for GitLab to Initialize:
It may take several minutes for GitLab to initialize. You can monitor the process using:
docker logs -f gitlab
Wait until you see the message indicating that GitLab is ready.
Configuring GitLab
After GitLab starts, you can configure it through the GitLab interface:
Step 1: Access GitLab
- Open a web browser and navigate to http://localhost.
- You should see the GitLab login screen.
Step 2: Set Up the Root Password
The first time you access GitLab, you’ll be prompted to set the root password. Enter a secure password and save it.
Step 3: Log In:
Log in using the username root and the password you just set.
Step 4: Configure GitLab Settings
Navigate to the Admin area to configure GitLab settings, such as email notifications, user management, and project settings.
Accessing GitLab
To access GitLab, simply navigate to the hostname you set during the Docker run command (e.g., http://localhost if using the default setup). If you mapped the ports differently or used a different hostname, adjust the URL accordingly.
Setting Up GitLab Runner (Optional)
GitLab Runner is a tool used for running CI/CD jobs on your GitLab instance. Installing GitLab Runner on Windows allows you to leverage GitLab’s powerful CI/CD pipelines.
Step 1: Download GitLab Runner
Visit the GitLab Runner downloads page and download the binary for Windows.
Step 2: Install GitLab Runner:
- Extract the binary to a directory, for example, C:\GitLab-Runner.
- Open Command Prompt as Administrator and register the runner:
C:\GitLab-Runner\gitlab-runner.exe register
- Follow the prompts to configure the runner with your GitLab instance, including:
- GitLab URL.
- Registration token (found in GitLab’s Admin area under Runners).
- Runner description, tags, and executor type (use shell for simplicity on Windows).
Step 3: Start the Runner
Install and start GitLab Runner as a service:
C:\GitLab-Runner\gitlab-runner.exe install
C:\GitLab-Runner\gitlab-runner.exe start
Содержание
- ¶ Git и GitLab
- ¶ Установка Git
- ¶ Авторизация в GitLab
- ¶ Установка пароля
- ¶ Создание репозитория
- ¶ Что такое репозиторий?
- ¶ Как создавать репозиторий?
- ¶ Локальная работа с репозиторием
- ¶ Переход в консоль
- ¶ Клонирование репозитория
- ¶ Заполнение данных
- ¶ Добавление файлов в репозиторий
- ¶ Встроенный редактор GitLab
- ¶ Изменения в существующем файле
- ¶ Что такое коммит?
- ¶ Добавление нового файла в удаленный репозиторий
- ¶ Отмена действий
- ¶ Проблемы при входе
- Git для новичков (часть 1)
- Что такое Git и зачем он нужен?
- Как работает
- Установка
- Настройка
- Создание репозитория
- Процесс работы с Git
- Визуальный интерфейс
- Создаем свой первый проект и выкладываем на GitHub
- Как пользоваться GitLab
- Как пользоваться GitLab
- 1. Создание аккаунта
- 2. Создание репозитория
- 4. Загрузка файлов проекта
- 5. SSH ключи
- 6. Ветки репозитория
- 6. Слияние веток
- 8. Добавление пользователей
- 9. Удаление проекта
- Выводы
- Что такое GitLab? Настройка и использование GitLab
- Возможности GitLab
- GitLab и GitHub
- Как использовать GitLab? Настройка сервиса
- 1. Создание аккаунта
- 2. Создание репозитория
- 3. Загрузка файлов проекта
- 4. SSH-ключи
- 5. Ветки репозитория
- 5. Слияние веток
- 7. Добавление пользователей
- 8. Удаление проекта
- Послесловие
¶ Git и GitLab
Git — распределённая система контроля версий, которая даёт возможность разработчикам отслеживать изменения в файлах и работать совместно с другими разработчиками. Git выполняет все операции локально, что увеличивает его скорость. Кроме того, он локально сохраняет весь репозиторий в небольшой файл без потери качества данных.
GitLab — веб-приложение и система управления репозиториями программного кода для Git. Обычно GitLab используется вместе с Git и даёт разработчикам возможность сохранять их код онлайн, а затем взаимодействовать с другими разработчиками в разных проектах.
¶ Установка Git
Перед началом работы с GitLab установите себе на устройство приложение Git по ссылке.
Найти подробную инструкцию по установке Git можно здесь.
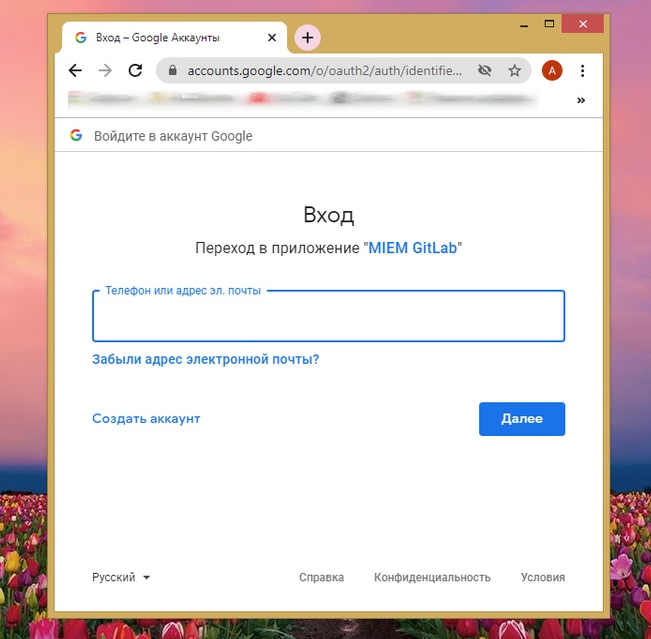
¶ Авторизация в GitLab
Авторизуйтесь в сервисе GitLab через корпоративную почту @miem.hse.ru.
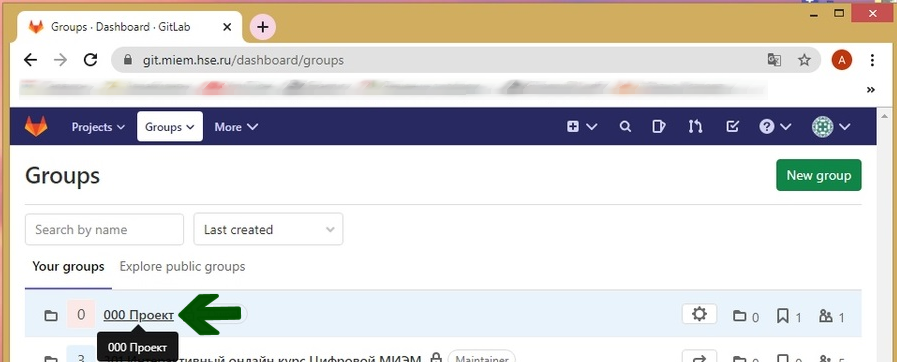
Затем выберите в верхней панели раздел «Groups». Щелкните на «Your Groups». На этой странице должна находиться группа с номером и названием вашего проекта. Нажмите на нее, чтобы открыть.
Если после авторизации вы не видите группу своего проекта, то обратитесь в Техподдержку.
¶ Установка пароля
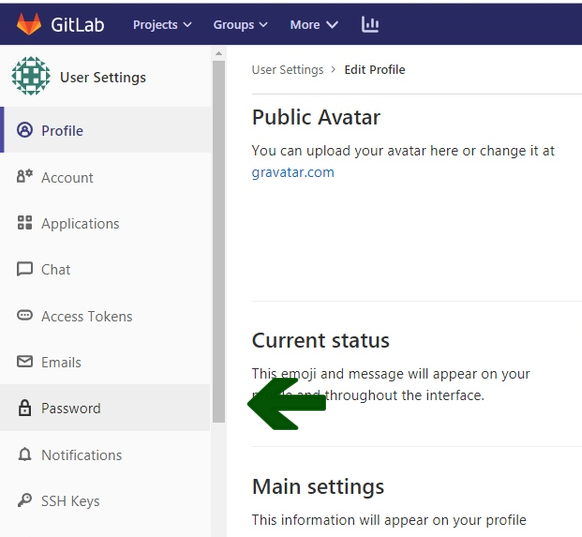
После авторизации нужно установить пароль для вашего аккаунта в GitLab.
Нажмите на вашу иконку в правом верхнем углу и перейдите в раздел «Настройки» (settings).
Затем перейдите во вкладку «Пароль» (password).
¶ Создание репозитория
¶ Что такое репозиторий?
Репозиторий (хранилище) — место, где хранятся и поддерживаются данные. Чаще всего данные в репозитории хранятся в виде файлов.
В GitLab используются проекты — структура, включающая в себя репозиторий Git, настройки, обсуждения и другие сопутствующие инструменты.
Узнать более подробную информацию можно перейдя по ссылке: что такое репозиторий?
¶ Как создавать репозиторий?
Шаг 1. Зайдите в свой аккаунт на GitLab и нажмите на иконку «Groups» в верхней панели.

Шаг 2. Затем перейдите во вкладку «Your group».
Шаг 3. Выберите команду с названием вашего учебного проекта.
Если вы не видите в разделе «Your group» команду вашего проекта, то обратитесь в Техподдержку.
Шаг 4. Вы перешли на страницу своей команды. Теперь нужно создать репозиторий. Для этого нажмите на кнопку «New project».
Если у вас уже есть нужный вам репозиторий, то перейдите к шагу 6.

Шаг 5. Напишите название вашего репозитория и добавьте нужные данные. Готово!
_%D1%80%D0%B5%D0%B4_0.png)
Шаг 6.

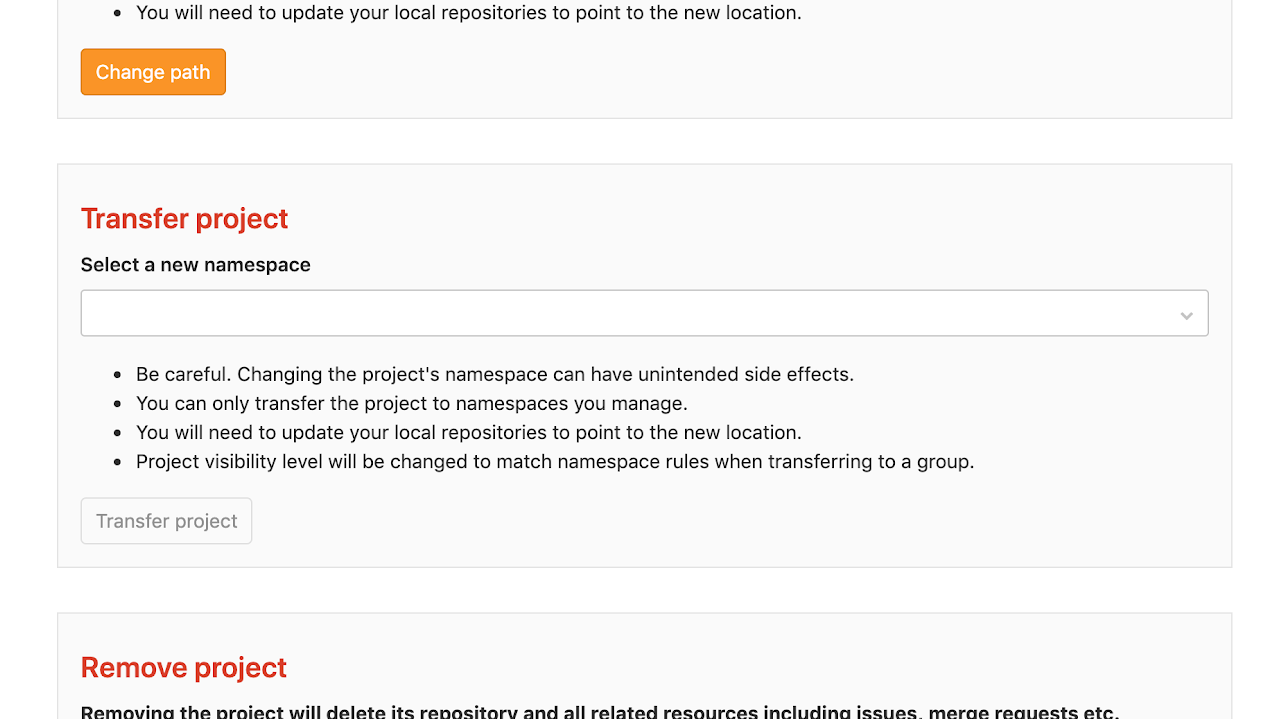
Переместить проект может человек только с ролью «Maintainer»(подробнее в разделе участники и роли)
Если проект был создан на другой платформе (Github, Bitbucket и т.д.), то при создании нового репозитория откройте вверху вкладку «Import project» вместо «Blank project«, а затем выберите » Repo by URL«.

Нужно обязательно выбрать «Repo by URL«, в остальных случаях импорт не всегда проходит успешно
При этом вся информация по коммитам будет перенесена. Однако, чтобы она корректно отображалась и учитывалась в статистике, необходимо, чтобы коммиты были сделаны с почты @miem.hse.ru. Если коммиты были сделаны с другой почты, то необходимо добавить ее адрес в личном кабинете в Git.miem.hse.ru (подробнее в блоке «Коммит»)
¶ Локальная работа с репозиторием
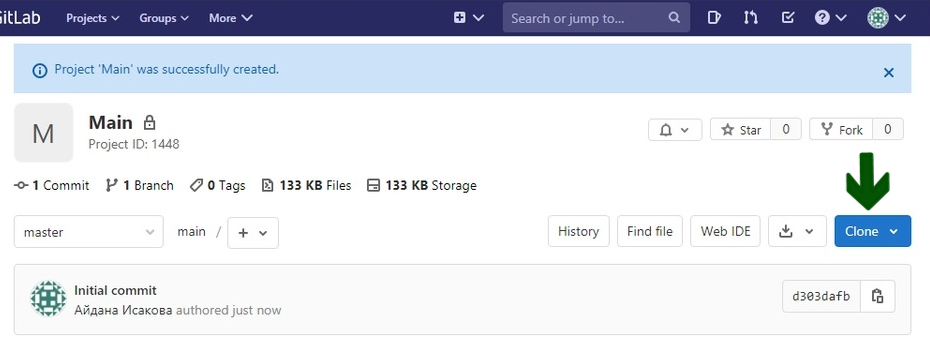
Откройте нужный репозиторий и нажмите на кнопку «Clone». Скопируйте ссылку.
¶ Переход в консоль
Далее вам нужно перейти в консоль.
Как это сделать?


¶ Клонирование репозитория
То есть мы просим Git создать копию репозитория, который находится по ссылке ( ), и можем указать путь к директории, в которую Git скопирует репозиторий ( ). Если его не указать, директория создастся в каталоге, где вы находитесь, когда выполняете команду и будет называться так же, как и сам репозиторий.
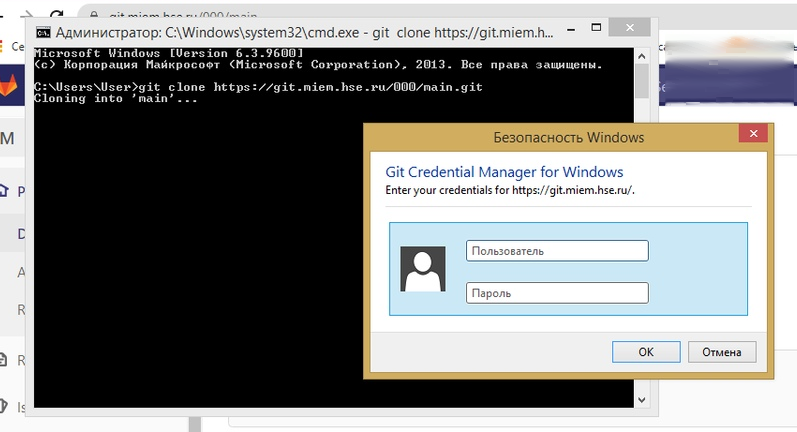
Клонирование репозитория осуществляется командой:
git clone
После вы должны ввести имя пользователя и пароль от своей учетной записи в GitLab.
Вы можете в любой момент перейти к папке с вашим репозиторием с помощью команды:
cd путь/к/директории
Следующая команда показывает, что файл «README.md» скачался и лежит в нашей папке:
dir (ls в Unix)
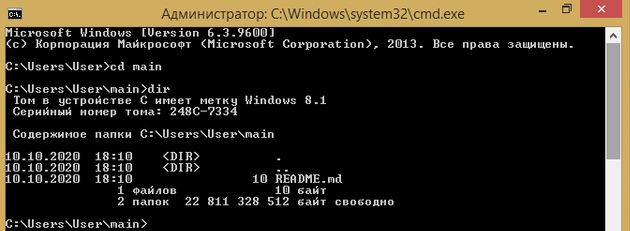
клонирование репозитория прошло успешно
¶ Заполнение данных
¶ Добавление файлов в репозиторий

Это означает, что у вас чистый рабочий каталог. Другими словами, в нем нет отслеживаемых измененных файлов. Git также не обнаружил неотслеживаемых файлов, в противном случае они бы были перечислены здесь.
Если у вас уже есть некоторые файлы, которые нужно перенести в репозиторий, вы можете скопировать их в рабочий каталог.
¶ Встроенный редактор GitLab
¶ Изменения в существующем файле
Чтобы внести изменения в файл, который скопировался вместе с репозиторием, просто перейдите в папку с копией репозитория на компьютере и откройте этот файл. В нашем случае, это файл «README.md». Он должен содержать описание репозитория, отображаемое на его странице на сайте. Добавьте в него новую строку и сохраните:

_0.png)
Мы видим, что у нас есть недобавленные изменения.
¶ Что такое коммит?

Теперь все нужные изменения добавлены в наш локальный репозиторий.
¶ Добавление нового файла в удаленный репозиторий
Рассмотрим пример:
Создадим новый файл «text.txt» в папке «main» и выполним следующие действия:
Шаг 1. Добавим файл в нашу папку main;
Шаг 2. Зафиксируем изменения и узнаем текущее состояние файла;
_0.png)
Шаг 3. Отправим изменения в локальное хранилище (то есть выполним коммит).
_0.png)
_0.png)
Заходим в GitLab и видим, что отправка данных прошла успешно.

¶ Отмена действий
Укажите, какой файл необходимо удалить из ожидания на коммит.
¶ Проблемы при входе
Источник
Git для новичков (часть 1)
Что такое Git и зачем он нужен?
С помощью Git-a вы можете откатить свой проект до более старой версии, сравнивать, анализировать или сливать свои изменения в репозиторий.
Репозиторием называют хранилище вашего кода и историю его изменений. Git работает локально и все ваши репозитории хранятся в определенных папках на жестком диске.
Так же ваши репозитории можно хранить и в интернете. Обычно для этого используют три сервиса:
Как работает
В итоге получается очень простой граф, состоящий из одной ветки ( main ) и четырех commit. Все это может превратиться в более сложный граф, состоящий из нескольких веток, которые сливаются в одну.
Об этом мы поговорим в следующих статьях. Для начала разберем работу с одной веткой.
Установка
Основой интерфейс для работы с Git-ом является консоль/терминал. Это не совсем удобно, тем более для новичков, поэтому предлагаю поставить дополнительную программу с графическим интерфейсом (кнопками, графиками и т.д.). О них я расскажу чуть позже.
Но для начала, все же установим сам Git.
Windows. Проходим по этой ссылке, выбираем под вашу ОС (32 или 64 битную), скачиваем и устанавливаем.
Для Mac OS. Открываем терминал и пишем:
Linux. Открываем терминал и вводим следующую команду.
Настройка
Вы установили себе Git и можете им пользоваться. Давайте теперь его настроим, чтобы когда вы создавали commit, указывался автор, кто его создал.
Открываем терминал (Linux и MacOS) или консоль (Windows) и вводим следующие команды.
Создание репозитория
Теперь вы готовы к работе с Git локально на компьютере.
Создадим наш первый репозиторий. Для этого пройдите в папку вашего проекта.
Теперь Git отслеживает изменения файлов вашего проекта. Но, так как вы только создали репозиторий в нем нет вашего кода. Для этого необходимо создать commit.
Отлично. Вы создали свой первый репозиторий и заполнили его первым commit.
Процесс работы с Git
Не стоит после каждого изменения файла делать commit. Чаще всего их создают, когда:
Создан новый функционал
Добавлен новый блок на верстке
Исправлены ошибки по коду
Вы завершили рабочий день и хотите сохранить код
Это поможет держать вашу ветки в чистоте и порядке. Тем самым, вы будете видеть историю изменений по каждому нововведению в вашем проекте, а не по каждому файлу.
Визуальный интерфейс
Как я и говорил ранее, существуют дополнительные программы для облегчения использования Git. Некоторые текстовые редакторы или полноценные среды разработки уже включают в себя вспомогательный интерфейс для работы с ним.
Но существуют и отдельные программы по работе с Git. Могу посоветовать эти:
Я не буду рассказывать как они работают. Предлагаю разобраться с этим самостоятельно.
Создаем свой первый проект и выкладываем на GitHub
Давайте разберемся как это сделать, с помощью среды разработки Visual Studio Code (VS Code).
Перед началом предлагаю зарегистрироваться на GitHub.
Создайте папку, где будет храниться ваш проект. Если такая папка уже есть, то создавать новую не надо.
Установите себе дополнительно анализаторы кода для JavaScript и PHP
Откройте вашу папку, которую создали ранее
После этого у вас появится вот такой интерфейс
Здесь будут располагаться все файлы вашего проекта
Здесь можно работать с Git-ом
Кнопка для создания нового файла
Кнопка для создания новой папки
Давайте теперь перейдем во вкладу для работы с Git-ом.
Откроется вот такое окно:
Кнопка для публикации нашего проекта на GitHub
Вы создали и опубликовали репозиторий на GitHub.
Теперь сделаем изменения в коде и попробуем их снова опубликовать. Перейдите во вкладку с файлами, отредактируйте какой-нибудь файл, не забудьте нажать crtl+s (Windows) или cmd+s (MacOS), чтобы сохранить файл. Вернитесь обратно во вкладу управления Git.
Если посмотреть на значок вкладки Git, то можно увидеть цифру 1 в синем кружке. Она означает, сколько файлов у нас изменено и незакоммичено. Давайте его закоммитим и опубликуем:
Кнопка для просмотра изменений в файле. Необязательно нажимать, указал для справки
Добавляем наш файл для будущего commit
Отправляем наш commit в GitHub
Поздравляю, вы научились создавать commit и отправлять его в GitHub!
Это первая вводная статья по утилите Git. Здесь мы рассмотрели:
Как его устанавливать
Как его настраивать
Как инициализировать репозиторий и создать commit через консоль
Как на примере VS Code, опубликовать свой код на GitHub
Забегая вперед, советую вам погуглить, как работают следующие команды:
P.S. Для облегчения обучения, оставлю вам ссылку на бесплатный тренажер по Git.
Источник
Как пользоваться GitLab
В этой статье мы поговорим о том, как пользоваться GitLab для разработки своих проектов. Как создавать репозитории и взаимодействовать с ними. Если вам нужна информация по Git, то лучше смотрите статью как пользоваться git.
Как пользоваться GitLab
1. Создание аккаунта
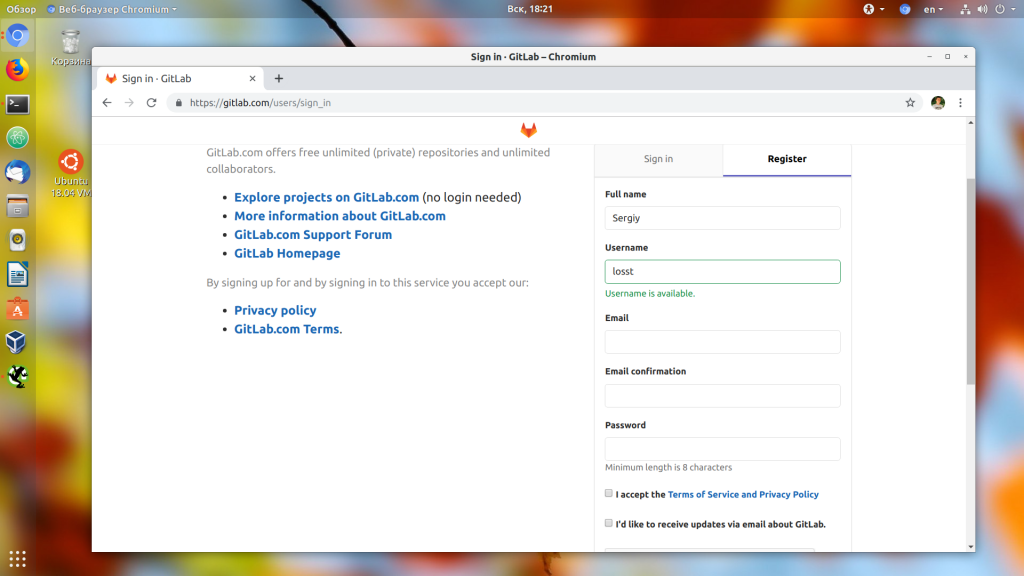
Зарегистрироваться на GitLab очень просто. Откройте главную страницу GitLab найдите в правой части экрана форму входа и перейдите на вкладку Register. Здесь вам нужно ввести ваше имя, логин, адрес электронной почты, согласится с условиями использования и нажать кнопку Register:

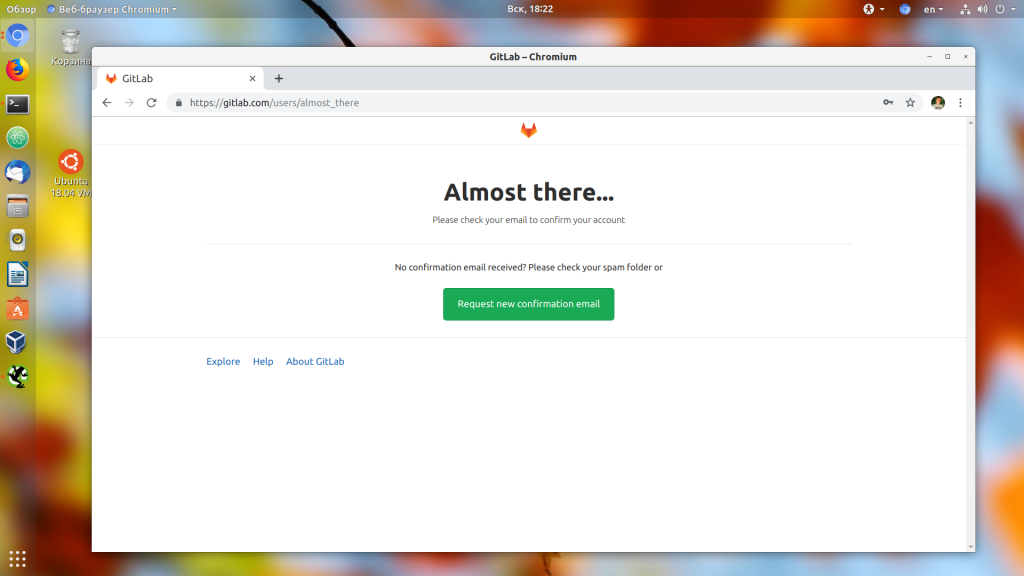
После этого вам на почту придет сообщение со ссылкой для подтверждения аккаунта, перейдите по ней:
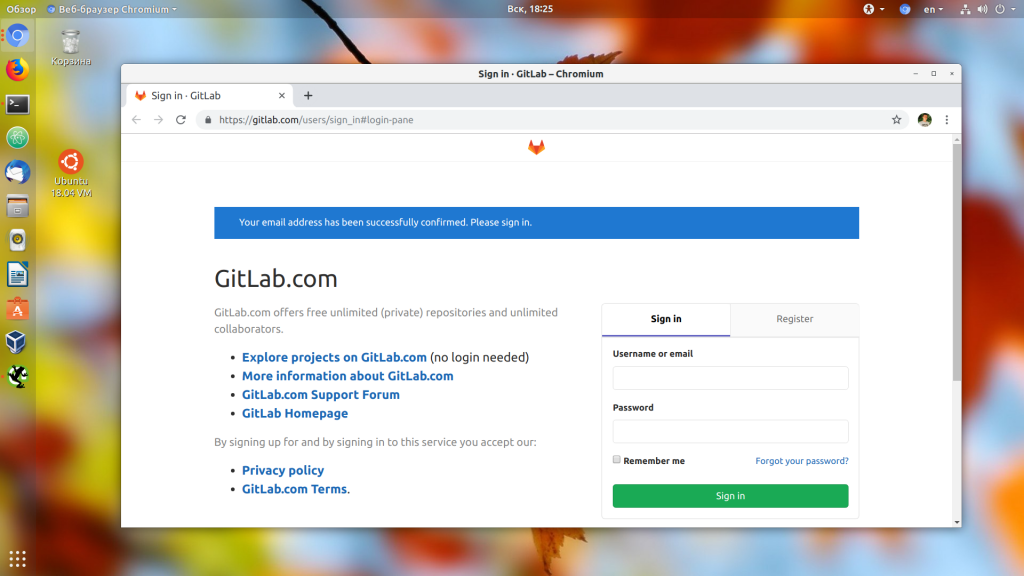
Теперь ваш аккаунт подтвержден и вы можете в нём авторизоваться:
После ввода логина и пароля вы попадете на главную страницу профиля. Сейчас здесь страница приветствия, но позже тут будет список ваших репозиториев:

2. Создание репозитория
Чтобы добавить проект GitLab кликните по значку + по центру верхней панели и выберите New Project:

Здесь вам нужно ввести имя репозитория, его описание, а также выбрать уровень доступа:
Ещё вы можете установить галочку напротив Инициализировать репозиторий файлом README, но если вы хотите залить сюда файлы из уже существующего репозитория, делать этого не следует:

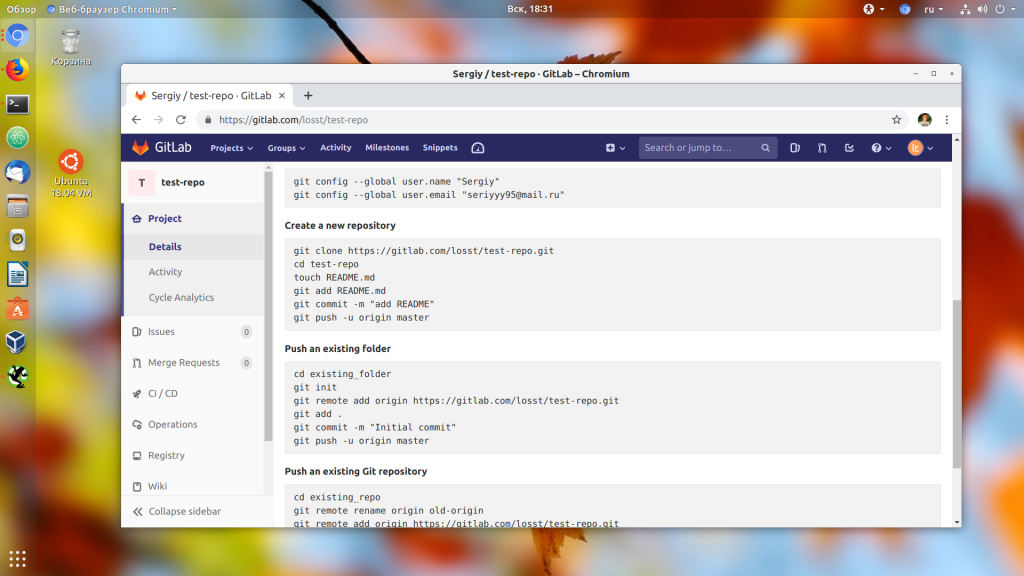
После нажатия на кнопку Create repo вы попадаете на страницу репозитория. Здесь GitLab уже предлагает первоначальный набор действий, чтобы проиниализировать ваш репозиторий. Например, вы можете создать здесь файлы или загрузить сюда файлы из вашего компьютера.
4. Загрузка файлов проекта
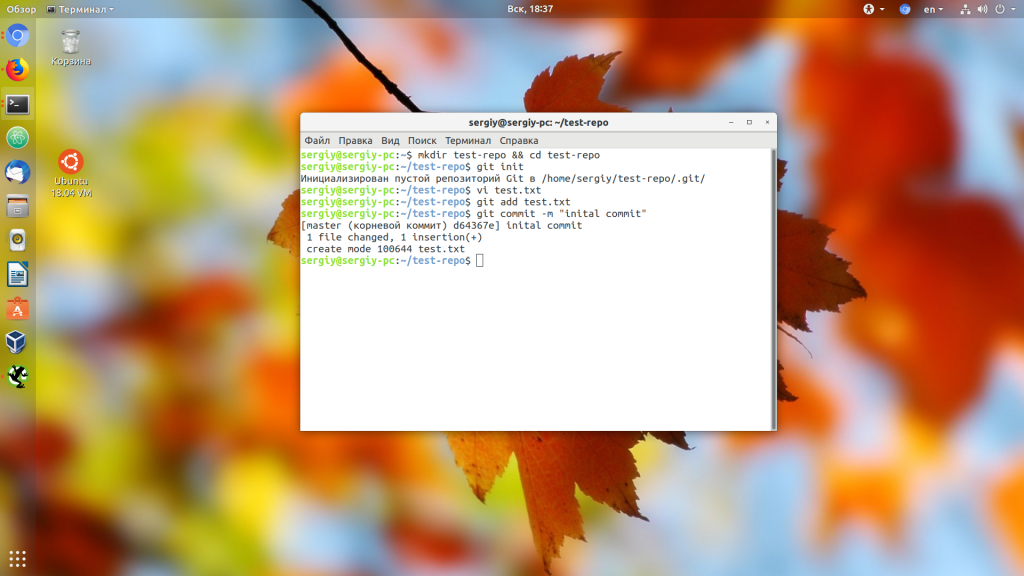
Давайте создадим новый локальный репозиторий на компьютере и загрузим его содержимое на GitLab. Для этого создайте папку репозитория, например, test-repo и инициализируйте в ней новый репозиторий командой git:
mkdir test-repo && cd test-repo
Затем давайте создадим файл test.txt:
This is test losst repo
И зафиксируем изменения:

Дальше нам нужно добавить наш удаленный репозиторий с GitLab к нашему локальному. Для этого выполните:
git remote add origin https://gitlab.com/losst/test-repo.git
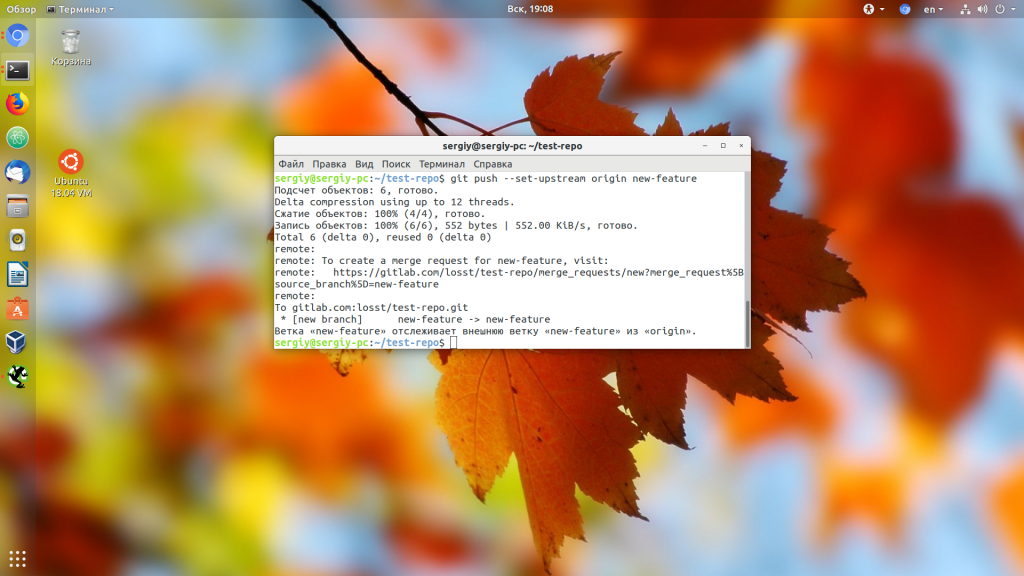
Затем отправляем изменения в удаленный репозиторий:
git push origin master
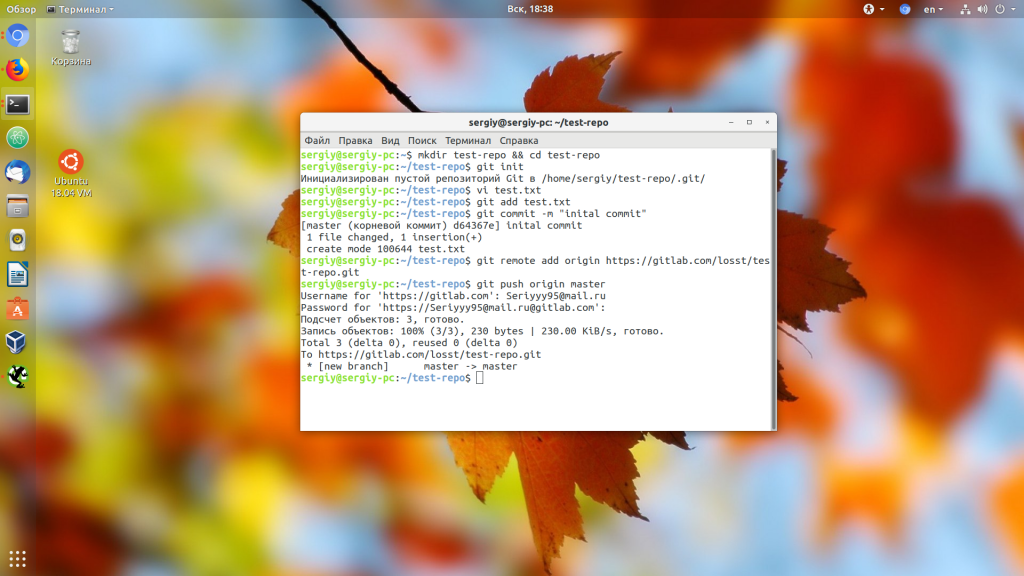
Для отправки данных нужно ввести ваш логин и пароль на GitLab. Теперь, если вы обновите страницу репозитория на GitLab, то увидите там наш файл:
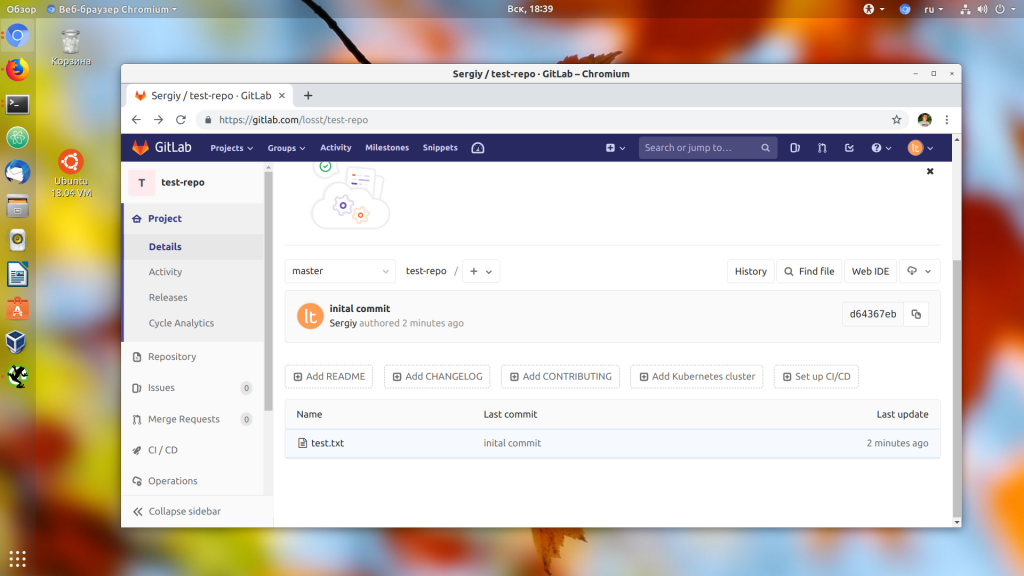
Важно отметить, что если удаленный репозиторий не пуст, то у вас не получиться так сделать. Вам нужно будет сначала скачать удаленный репозиторий, слить локальные изменения с ним, а потом уже отправить всё назад.
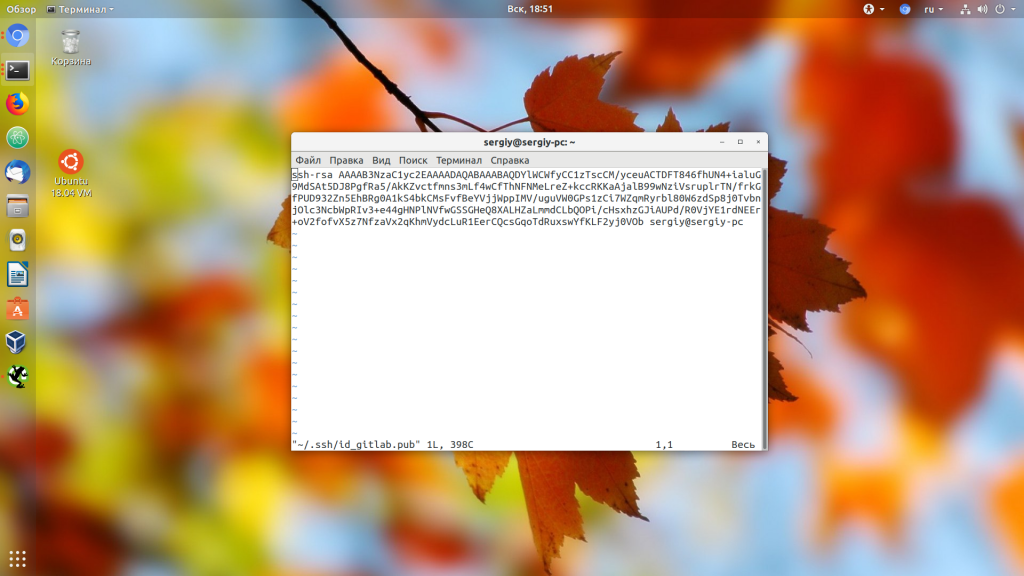
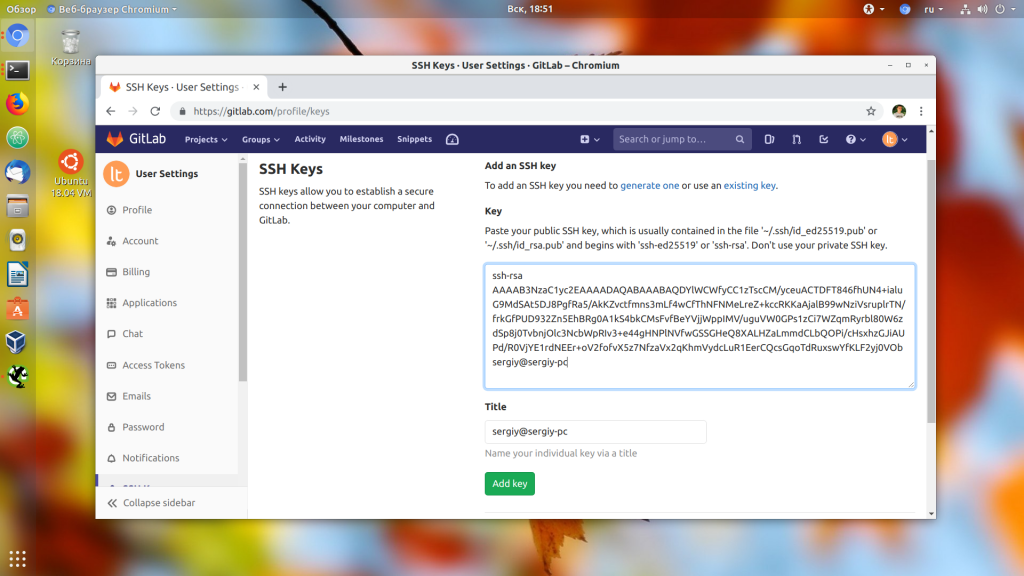
5. SSH ключи
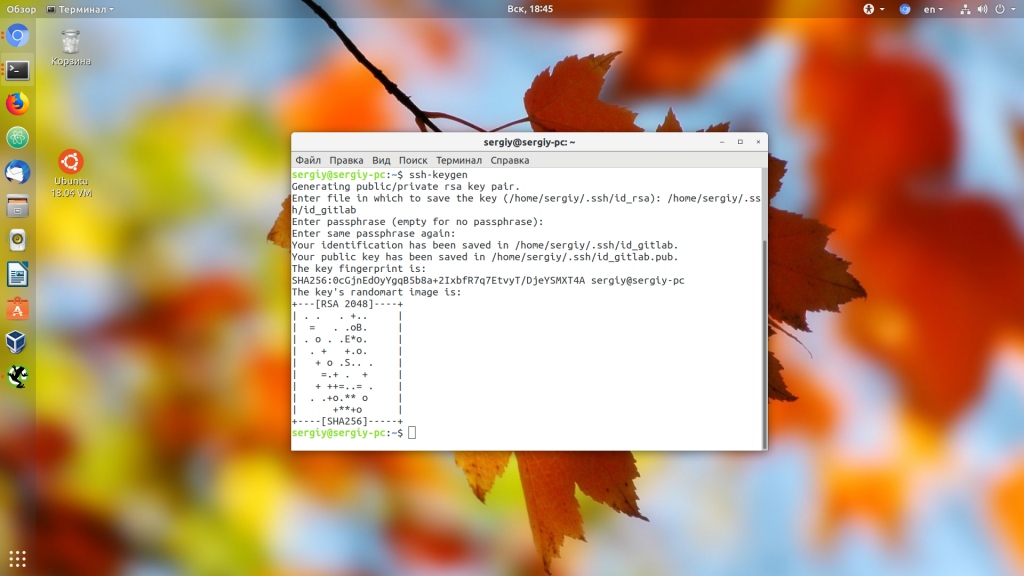
Во время загрузки данных репозитория на GitLab нам нужно было ввести логин и пароль на сервере. Чтобы этого избежать можно использовать SSH ключи для авторизации. Сначала вам нужно создать такой ключ. Для этого откройте терминал и выполните:

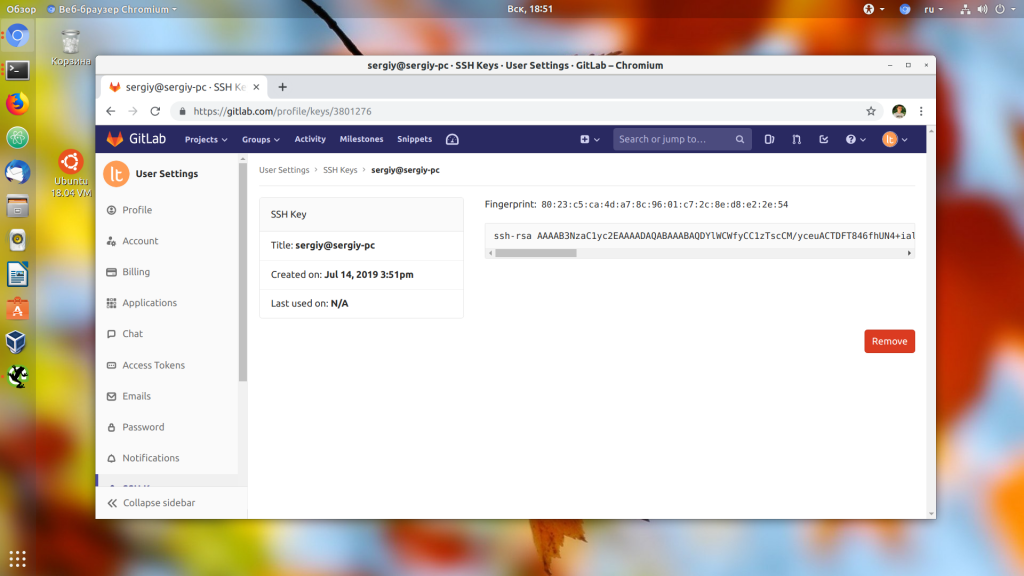
Далее возвращайтесь к интерфейсу GitLab кликните по иконке профиля и выберите Settings:

Здесь на левой панели найдите пункт SSH Keys. В этом окне найдите поле Key и вставьте туда скопированный ключ. Далее сохраните изменения. Теперь ваш ключ добавлен:
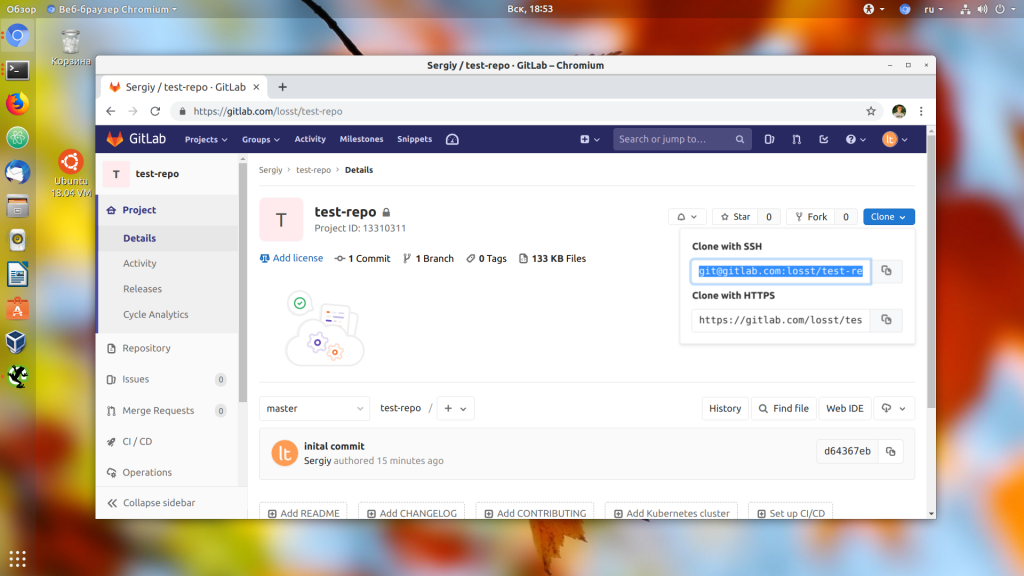
Далее вернитесь в ваш репозиторий, найдите в правом верхнем углу кнопку Clone и кликните по ней. Нас интересует адрес Clone with SSH:

Возвращаемся к нашему локальному репозиторию, удаляем адрес https и добавляем ssh:
git remote remove origin
git remote add origin git@gitlab.com:losst/test-repo.git
Настройка ssh GitLab завершена. Теперь все действия будут выполняться по SSH и у вас не будет необходимости вводить логин и пароль.
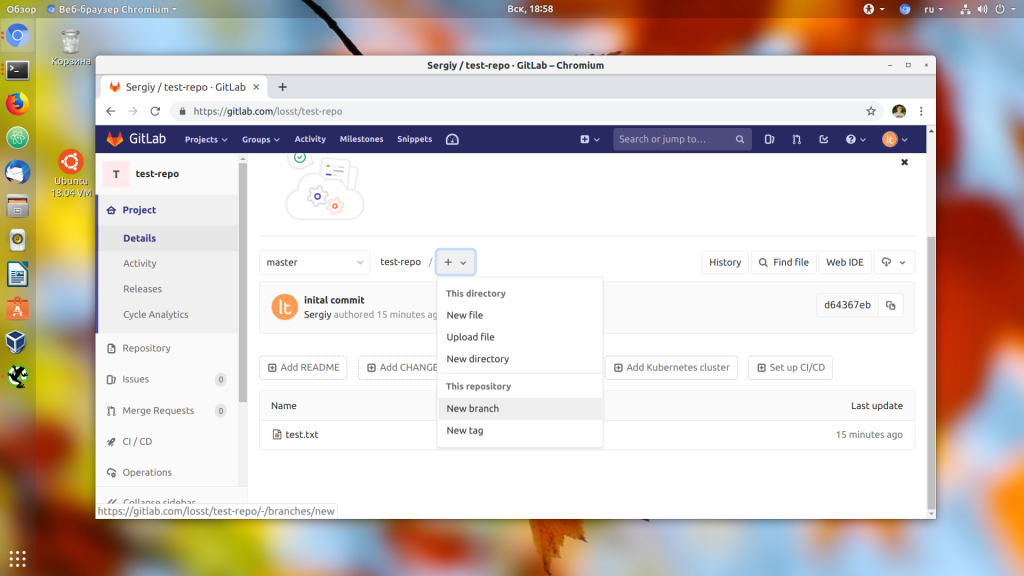
6. Ветки репозитория

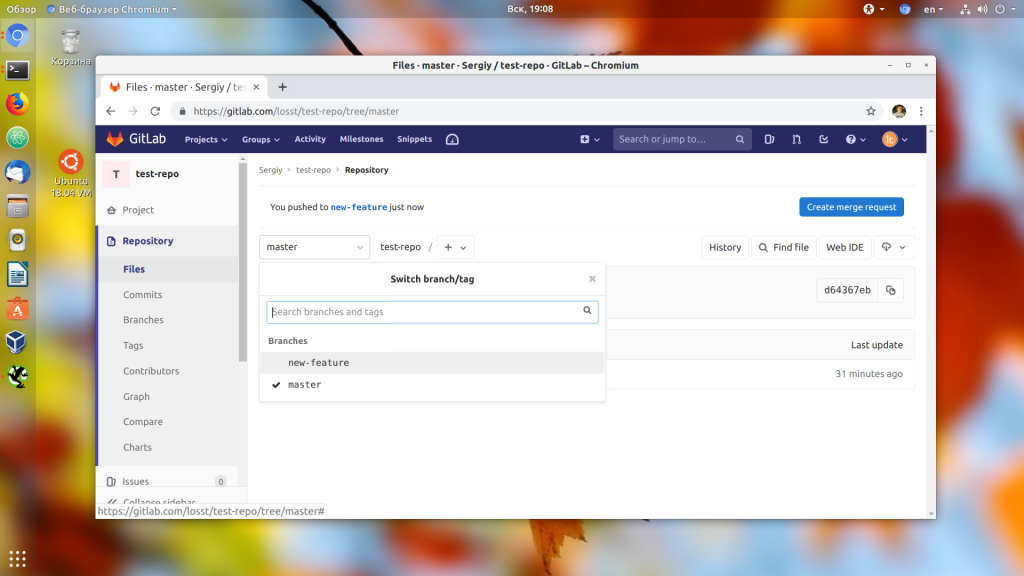
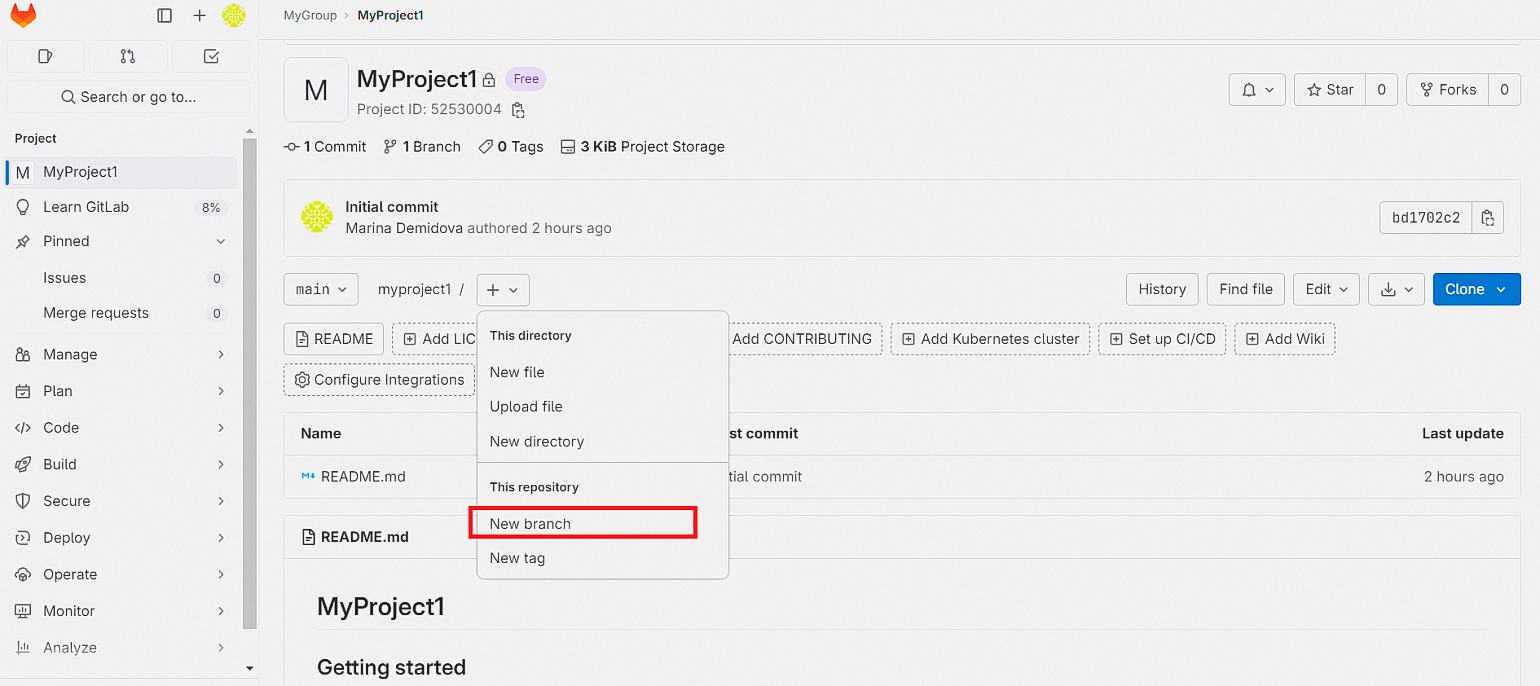
Создать новую ветку можно кликнув по значку плюс и выбрав New branch. Но это не обязательно, так как если вы создадите ветку в git и зальете изменения в репозиторий, то ветка появится там автоматически.


6. Слияние веток
Поскольку у нас есть ветки и в них разрабатывается функциональность может возникнуть необходимость перенести её из одной ветки в другую. Для этого используются запросы слияния (Merge request gitlab). Давайте добавим ветку new-feature, а в ней создадим файл new-feature с текстом:
New feature with change
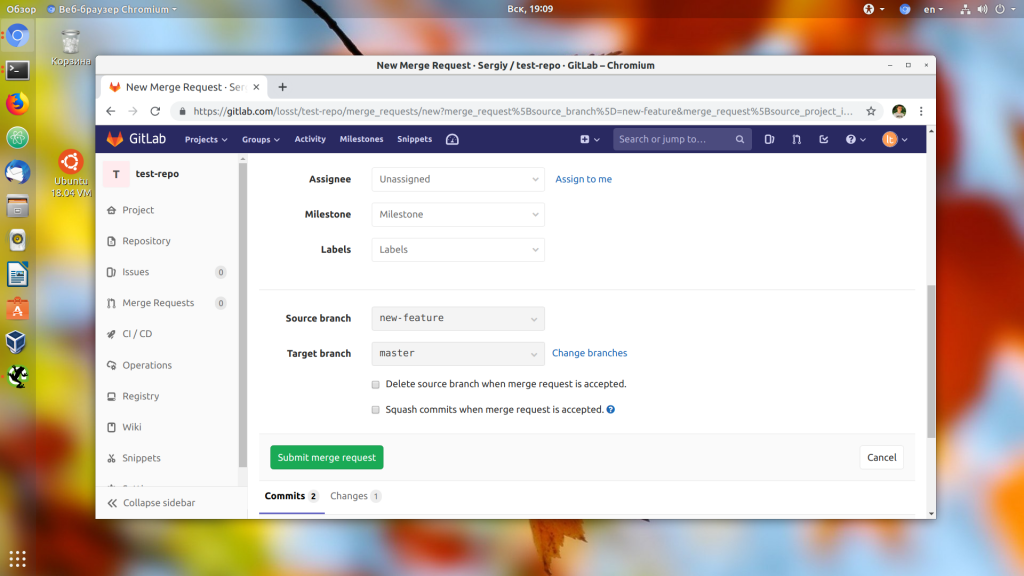
Теперь, когда мы перейдем в новую ветку через интерфейс GitLab появится кнопка Create merge request. Нажмите на неё:

Здесь нужно написать описание Merge Request, который вы создаете, выбрать ветку источник и ветку цель. Также можно выбрать пользователя, которому будет оправлено уведомление о созданном запросе:
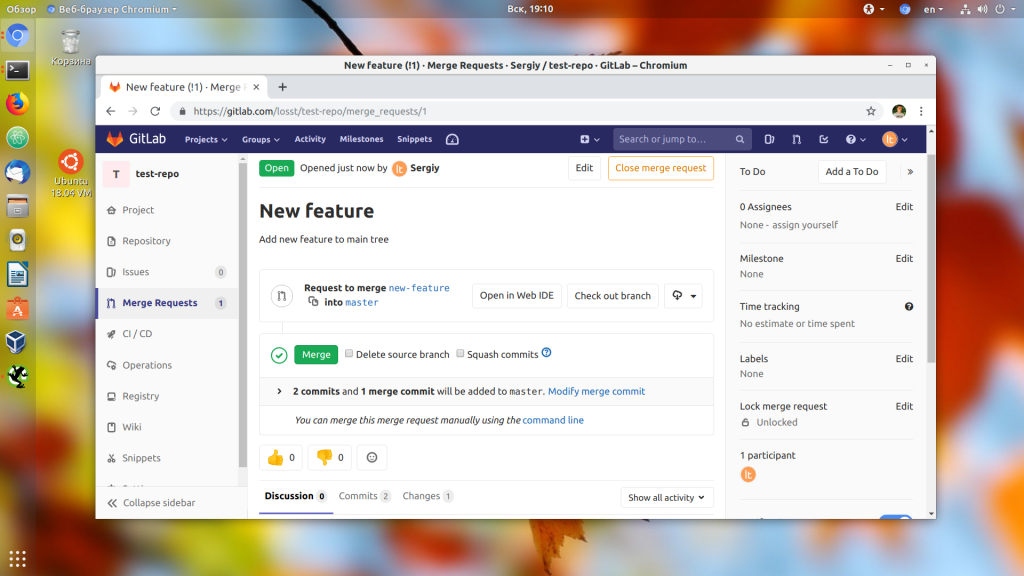
Далее запрос на слияние нужно одобрить. Вы можете посмотреть изменения нажав кнопку Open IDE или через терминал:
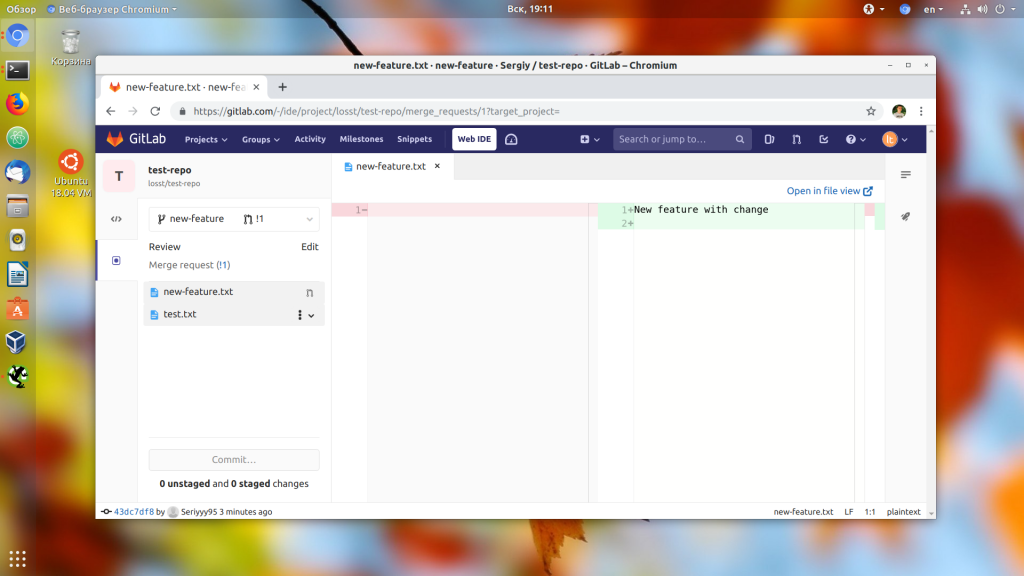
Далее просто нажмите кнопку Merge, если хотите слить ветки. Файлы ветки источника заменят файлы в ветке преемника, поэтому будьте осторожны, чтобы не потерять важные данные.

8. Добавление пользователей

Затем нажмите кнопку Add to project.
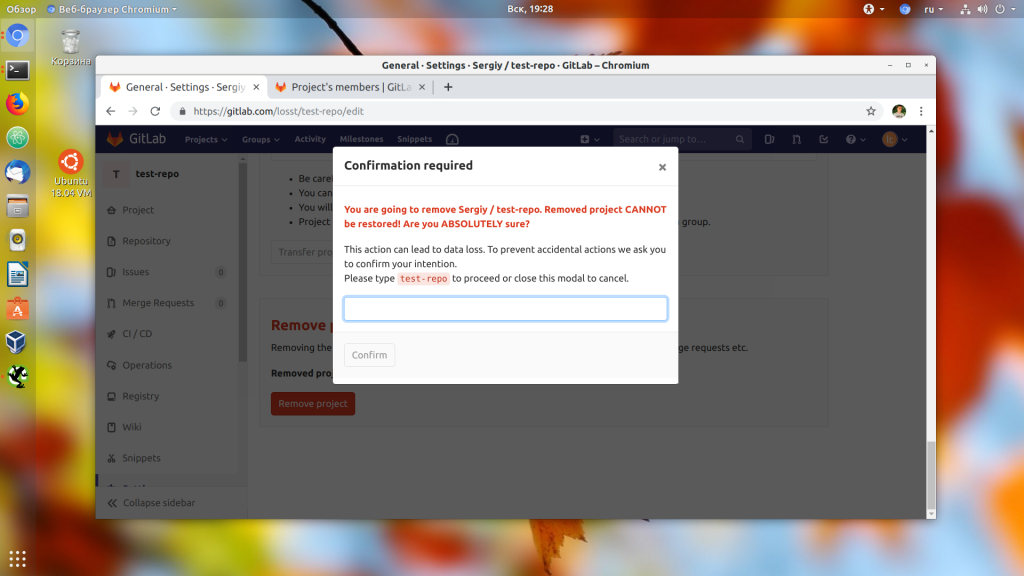
9. Удаление проекта
После нажатия на кнопку вам нужно будет ввести имя проекта, после чего он будет удален:
Выводы
В этой статье мы кратко разобрали как пользоваться GitLab для разработки программного обеспечения. Это далеко не все возможности GitLab, которые заслуживают внимания, там ещё есть релизы, сообщения об ошибках, инструменты автоматизации и тестирования, удобный редактор кода и многое другое. В общем это полноценная альтернатива для GitHub если тот сервис больше вам не нравится. А что вы предпочитаете, GitHub или GitLab? Напишите в комментариях!
Источник
Что такое GitLab? Настройка и использование GitLab
Мы с вами уже говорили про Git и GitHub. В этой статье расскажем о том, что такое GitLab, как им пользоваться, какая настройка потребуется.
GitLab — это онлайн-сервис, предназначенный для работы с git-репозиториями. Его можно использовать непосредственно на официальном сайте (gitlab.com), зарегистрировав аккаунт, или установить и развернуть на своём сервере.
Возможности GitLab
GitLab — это отличный инструмент для разработчиков, который предоставляет следующие возможности: — управление публичными и приватными git-репозиториями; — управление пользователями и группами, правами доступа к git-репозиториям; — отслеживание ошибок, деплой, анализ кода; — интеграция с разными CI-системами CI (Jenkins и т. п.), организация самостоятельного процесса CI посредством встроенных средств.
Есть и другие возможности (функционал api, wiki страниц, доски задач и идей, отслеживание изменений, комментарии к проектам и прочие). Подробнее можно узнать из официальной документации.
GitLab и GitHub
Как известно, главный конкурент GitLab — это сервис GitHub. Появился он на три года раньше (в 2008), поэтому более популярен. Да что там говорить, GitHub сегодня — это сайт номер один по размещению open source-проектов. Они почти все на нём и размещаются.))) И у многих людей Git напрямую ассоциируется с сервисом GitHub.
Да, плюсов у GitHub много, но мы не будем сейчас сравнивать оба сервиса. Скажем только, что несмотря на повышенную популярность и огромнейшее комьюнити GitHub (26 млн. человек), наблюдается тенденция перехода крупных команд разработчиков на GitLab. Это происходит благодаря расширенным возможностям второго.
Как использовать GitLab? Настройка сервиса
1. Создание аккаунта
Для начала, зарегистрируемся на сайте GitLab. Для этого нужно перейти на вкладку Register, которая находится в правой части экрана. Появится форма, где нужно будет ввести имя, логин, электронную почту.
Далее вы получите на почту сообщение, где будет находиться ссылка для подтверждения аккаунта. После перехода по ней появится форма авторизации.

Путём ввода пароля и логина вы окажетесь на главной странице вашего профиля на GitLab. Сначала это будет страница приветствия, но позже здесь появится перечень ваших Git-репозиториев.
2. Создание репозитория
Теперь вводим имя и описание репозитория, выбираем уровень доступа. Их существует три: — Private. Доступен только для вас; — Internal. К репозиторию смогут получить доступ все зарегистрированные пользователи; — Public. Свободный доступ для всех.
Также можно инициализировать репозиторий файлом README, поставив соответствующую галочку. Однако, если планируете залить файлы из уже существующего Git-репозитория, то не стоит этого делать.
Чтобы попасть на страницу репозитория, нажмите кнопку «Create repo». GitLab предложит первоначальный набор действий с целью проинициализировать ваш репозиторий. В итоге вы сможете создать файлы здесь либо загрузить их из своего ПК.

3. Загрузка файлов проекта
Теперь перейдём к созданию нового локального репозитория на ПК и загрузим содержимое на GitLab. Сначала создадим папку репозитория, назвав её, к примеру, test-repo. Теперь проинициализириуем в ней новый репозиторий, используя команду git:
Теперь создаём файл test.txt:
И фиксируем изменения:
Сейчас давайте добавим наш удалённый репозиторий с GitLab к нашему локальному, выполнив следующую команду:
Потом отправим изменения в удалённый репозиторий:

Чтобы отправить данные, введём пароль и логин на GitLab. После обновления страницы на GitLab, увидим наш файл:
Кстати, если удалённый репозиторий пустым не является, так сделать не получится. Потребуется сначала его скачать, слить с ним локальные изменения, а только потом отправить всё назад.
4. SSH-ключи
При загрузке данных на GitLab требовалось ввести пароль и логин на сервере. Но есть и другой путь — SSH-ключи для авторизации. Для создания ключа выполните:
Потом возвращаемся GitLab-интерфейсу, кликаем по иконке профиля и выбираем настройки Settings:

Потом ищем на левой панели пункт SSH Keys. Далее находим Key и вставляем в соответствующее поле скопированный ключ. Всё, осталось лишь сохранить изменения.
Теперь возвращаемся в репозиторий, находим кнопку Clone (правый верхний угол) и кликаем по ней. Интересует адрес Clone with SSH:

Возвращаемся в локальный репозиторий, удаляем https, добавляем ssh:
На этом настройка ssh в GitLab закончена. С этого момента все действия выполняются по SSH, поэтому вводить логин и пароль не потребуется.
5. Ветки репозитория
Давайте посмотрим, как использовать GitLab при работе с ветками. По умолчанию репозиторий имеет лишь master-ветку. Однако разработку можно выносить и в отдельные ветки, что позволит реализовать дополнительные функции.
Ветки в GitLab-интерфейсе отображаются слева:
Для создания новой, кликаем по значку + и выбираем New branch. Также, если вы создадите ветку в git, а потом зальёте в репозиторий изменения, ветка появится там автоматически.
5. Слияние веток
Иногда возникает необходимость выполнить слияние веток. Для этого используют Merge request gitlab — запросы слияния. Продемонстрируем это на ветке new-feature, где создадим файл new-feature с текстом:
Если мы после этого перейдём в новую ветвь с помощью интерфейса GitLab, мы увидим появившуюся кнопку Create merge request. Естественно, нажимаем:

Тут пишем описание Merge Request, выбираем ветку-цель и ветку-источник. Кроме того, можно выбрать пользователя, который получит уведомление о созданном запросе.
Теперь запрос на слияние следует одобрить. Посмотреть изменения можно через терминал или, нажав кнопку Open IDE. Чтобы слить ветки, осталось нажать кнопку Merge.
7. Добавление пользователей
В GitLab можно работать с командой, добавляя неограниченное число разработчиков.
8. Удаление проекта
Послесловие
В нашей статье мы вкратце разобрали, как пользоваться GitLab при разработке софта. Однако это далеко не все возможности, которые предоставляет данный сервис. И совершенно неслучайно GitLab сегодня называют полноценной альтернативой GitHub. Впрочем, что выбирать, GitHub или GitLab, — решать вам.
Источник
#статьи
-
0
Руководство для начинающих и тех, кому не понравился GitHub.
Иллюстрация: Оля Ежак для Skillbox Media
Программист, консультант, специалист по документированию. Легко и доступно рассказывает о сложных вещах в программировании и дизайне.
GitLab — это сервис для хранения кода, управления версиями и совместной разработки программного обеспечения. В статье мы подробно разберём его основные термины, поймём, для чего он используется и потренируемся на своём компьютере.
Вы узнаете:
- что такое GitLab;
- зачем он нужен;
- как он помогает разработчику;
- чем GitLab отличается от GitHub;
- как с ним работать на своём компьютере.
GitLab — это веб-платформа для управления проектами и репозиториями программного кода, работа которой основана на популярной системе контроля версий Git. Чтобы понять, что она умеет и как именно помогает разработчикам, начнём с разбора основных понятий.
Система контроля версий Git используется для хранения промежуточных версий кода. Например, когда разработчик вносит в него изменения или добавляет новые части, то в Git он делает это с помощью коммитов.
Коммит (commit) — это пакет изменений, хранящий информацию с добавленными, отредактированными или удалёнными файлами кода. Благодаря этому основной код проекта всегда можно вернуть в работоспособное состояние, восстановив его прошлые версии.
Репозиторий. Место, где хранится код и дополнительные файлы, необходимые для его работы или вёрстки окон приложения: иконки, картинки и так далее. Репозиторий похож на обычную папку на компьютере, только с дополнительными функциями. Например, у каждого файла, который он хранит, есть история изменений.
Ветки (branch). Это параллельные линии разработки, которые существуют независимо друг от друга. В Git-системах разработчики пишут код в отдельных ветках, избегая таким образом конфликтов между вносимыми изменениями.
Когда бэкендер, фронтендер или другой специалист завершает работу над кодом в своей ветке, он создаёт запрос на слияние (merge request) с главной веткой (master или main), где находится основной код программы, чтобы перенести туда свои изменения.
Слияние — это процесс объединения двух или более веток в одну.
Другие разработчики могут оценить изменения и прокомментировать их. После тестирования и утверждения со стороны сеньора или тимлида запрос на слияние выполняется. В GitLab можно настроить процесс разработки так, чтобы изменения автоматически вносились в основную ветку при выполнении определённых условий, например после успешного прохождения тестов.
GitLab помогает командам совместно разрабатывать программное обеспечение: планировать процессы, тестировать код, собирать проект и публиковать релизы.
В GitLab можно создавать задачи и группировать их в проекты, назначая ответственных и определяя дедлайны. Этим он похож на Jira, «Битрикс24» и другие приложения для менеджеров.
С его помощью тимлид или старший разработчик могут проверить скорость, с которой команда выполняет задачи. Это полезно при планировании спринтов, когда требуется определить времязатраты на разработку той или иной фичи в приложении.
Участники могут совместно работать над проектом в GitLab благодаря системе репозиториев и веток. Разработчики пишут код параллельно друг с другом, не переживая о совместимости новых или изменённых частей программы.
После написания или обновления части кода разработчик подаёт запрос на слияние своей ветви с главным репозиторием проекта. Сеньор-разработчик или тимлид проверяют его и принимают запрос на слияние или же отправляют код на доработку, оставляя комментарии.

GitLab автоматизирует процессы тестирования при внесении любого изменения в код. Например, когда в проект добавляют новую функцию или изменяют старую, GitLab отправляет её в центральный репозиторий, где автоматически запускается тестирование.
Обычно этот процесс устроен следующим образом:
- Система проверяет код на ошибки компиляции.
- После этого запускаются тесты, написанные разработчиками: модульные — для проверки отдельных частей кода, интеграционные, проверяющие работу нового кода со старым, и другие. Цель всех тестов — убедиться, что новые изменения не ломают существующую функциональность приложения.
- Разработчик получает отчёт о пройденных тестах и при необходимости дорабатывает код. Когда все необходимые изменения будут внесены, GitLab интегрирует их в основной репозиторий проекта.
В GitLab есть репозитории контейнеров — автономных исполняемых пакетов, включающих в себя всё необходимое для работы приложения: библиотеки, файлы конфигураций и другое. Благодаря этому они запускаются в любой системе, вне зависимости от её окружения. Контейнеры создаются, развёртываются и управляются на платформе Docker.

В репозитории проекта можно хранить разные версии контейнеров для своего приложения и настроить их автоматическое обновление при изменении кода.
Встроенные средства continuous integration (CI) и continuous deployment (CD) автоматизируют весь процесс от сборки кода до загрузки приложения или его новой версии в среду выполнения: на веб-сервер, мобильное устройство или другую платформу.
Разработчик может определить тип окружения, например, выбрав продакшен-сервер, и автоматически развёртывать приложение в нём после тестирования.
В GitLab встроено несколько вариантов развёртывания «из коробки». Их выбирают в зависимости от задач:
- Сине-зелёное развёртывание (blue-green deployment). Используется две среды: рабочая («синяя») и тестовая («зелёная») — для проверки работы приложения после внесения изменений. Когда новую версию кода проверили, она становится «зелёной».
- Канареечное развёртывание (canary deployment). Сначала новая версия приложения разворачивается для небольшой части пользователей. Так её тестируют в реальных условиях, ограниченной аудитории, а затем становится основной для всех.
- Плавное развёртывание (rolling deployment). Приложение заменяется новой версией без прерывания работы. Если у команды несколько серверов, она обновляет код на одном из них, затем на следующем и так далее.
Эти стратегии снижают риски, возникающие при установке новых версий приложения. Например, связанные с его несовместимостью с конкретными пользовательскими устройствами. В случае сине-зелёного или канареечного развёртывания можно быстро откатиться к стабильной версии приложения.
И это не всё. В GitLab есть готовые шаблоны CI/CD templates. Это наборы инструкций или конфигураций для автоматизированной сборки, тестирования и развёртывания кода. Вместо того чтобы каждый раз создавать конфигурацию с нуля, разработчики могут использовать готовый шаблон и настроить его параметры для своего приложения.
GitLab собирает различные метрики процесса CI/CD и производительности приложения: время сборки, процент успешного прохождения тестов, количество выявленных ошибок и другие. Если их не хватает, то можно интегрировать сторонние инструменты мониторинга, например Prometheus или Grafana.
GitLab не только предоставляет разработчикам хранилище кода со встроенной системой контроля версий Git, но и облегчает работу с помощью дополнительных возможностей.
Гибкие настройки доступа к репозиториям с кодом. В проекте может работать несколько десятков специалистов. GitLab позволяет настроить их права доступа к репозиториям — определить, кто может читать, редактировать или загружать код. Например, пользователи с гостевым доступом к репозиторию могут просматривать его, но не вносить изменения. Это повышает безопасность проекта и облегчает управление разработкой.
Можно настроить доступ к отдельным веткам, а также создать группы пользователей, которые участвуют в нескольких проектах одновременно.
Инструменты управления CI/CD. Continuous integration (CI) и continuous deployment (CD) — подход в разработке программного обеспечения, который автоматизирует процессы сборки, тестирования и развёртывания приложения.
Непрерывная интеграция (continuous integration, CI) — это практика, при которой код регулярно, чаще всего несколько раз в день, сливается в общий репозиторий с автоматизированной сборкой проекта. Благодаря этому можно быстро выявить баги в коде и проблемы совместимости с существующей кодовой базой.
Непрерывное развёртывание (continuous deployment, CD) — продолжение CI. Когда код успешно проходит тестирование после слияния, система автоматически разворачивает изменения в рабочей среде. Это означает, что новая версия приложения сразу становится доступной для заказчиков и пользователей.
База знаний. В GitLab есть инструменты для создания вики-страниц с документацией проекта. Они поддерживают различные форматы: текст, изображения, видео и таблицы.
Благодаря базе знаний о проекте новые сотрудники могут быстро понять, как настроить рабочую среду, какие версии библиотек использовать и так далее.
Проекты и задачи. В GitLab реализована система управления разработкой. В ней можно создавать задачи для членов команды, выбирая ответственных и устанавливая дедлайны, и описывать результаты работы.
Интеграция с другими инструментами. GitLab поддерживает интеграцию с популярными платформами и сервисами, использующимися в разработке: Docker, Kubernetes, Jira, Slack и другими.
В общем, GitLab — это централизованное место не только для хранения кода, но и для управления проектами, ведения базы знаний и автоматизации процессов разработки.
GitLab и GitHub — это два популярных веб-сервиса для хостинга проектов с использованием системы контроля версий Git. Внешне они очень похожи, но между ними есть несколько различий:
- GitHub — это облачный сервис, принадлежащий Microsoft, на котором вы можете хранить свои проекты и управлять ими. В отличие от него, GitLab можно развернуть на своём собственном сервере.
- В GitHub для работы с CI/CD придётся использовать дополнительный инструмент — GitHub Actions. GitLab — это полностью интегрированное решение со встроенными инструментами CI/CD.
- В бесплатной версии GitHub в приватных репозиториях используется два уровня доступа: владелец (owner) и соавтор (collaborator). В GitLab таких ограничений нет. Количество пользователей с разным уровнем доступа не ограничено.
В целом и GitLab, и GitHub предоставляют одинаковый набор возможностей. Разница лишь в том, что в GitHub часть из них доступна через интеграции со сторонними приложениями, а в GitHub они есть по умолчанию.
Работа с GitLab проходит в несколько шагов: создание аккаунта и репозитория, добавление пользователей и веток, загрузка файлов проекта, внесение изменений в код и слияние веток.
Если у вас ещё нет учётной записи на GitLab, то начните с создания аккаунта на официальном сайте и заполните регистрационную форму:
- Username: уникальное имя вашего аккаунта.
- Email: рабочая или личная электронная почта.
- Password: пароль с надёжной комбинацией.
После регистрации подтвердите её по ссылке из письма, отправленного на электронную почту. Теперь ваш аккаунт в GitLab создан и готов к работе.
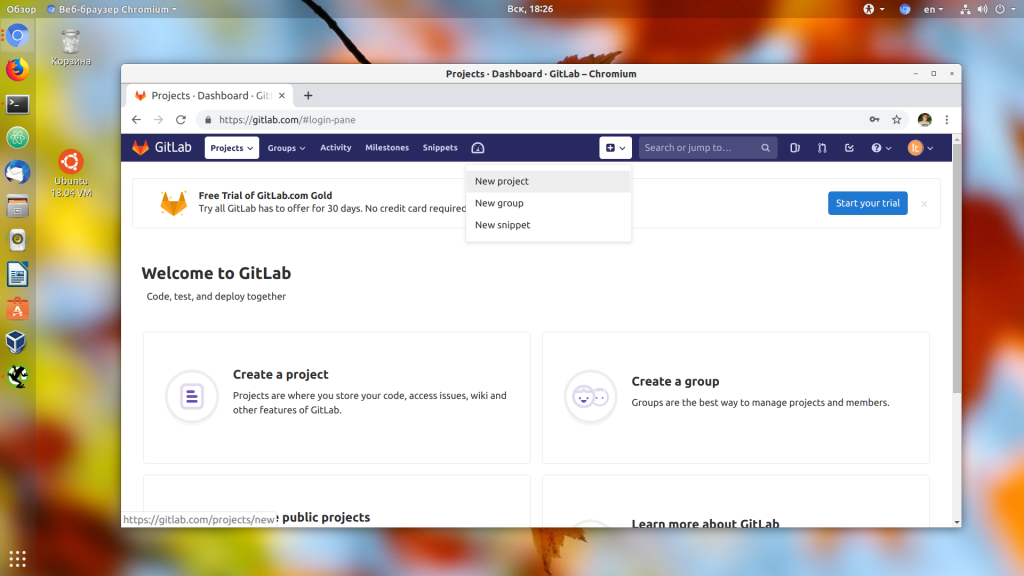
На главной странице или в боковой панели нажмите на значок + и выберите пункт New project/repository:
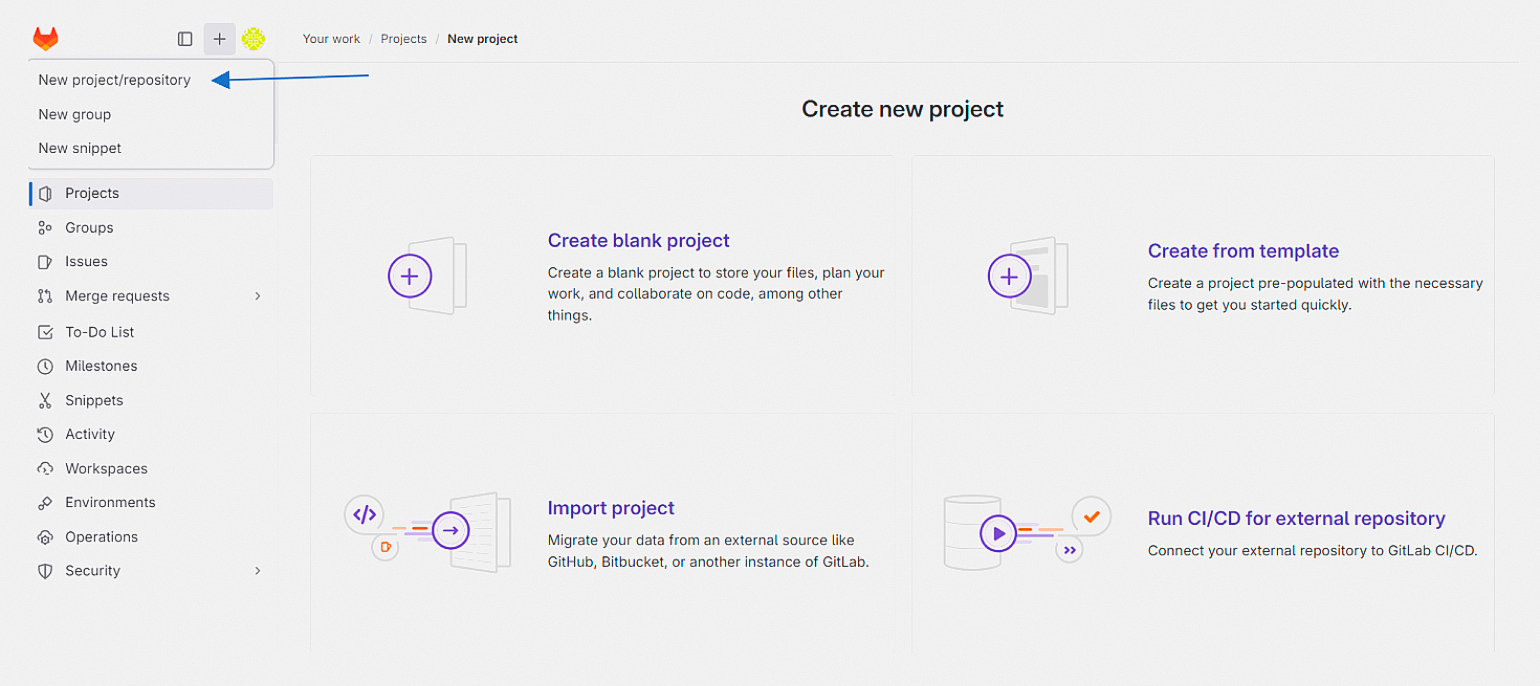
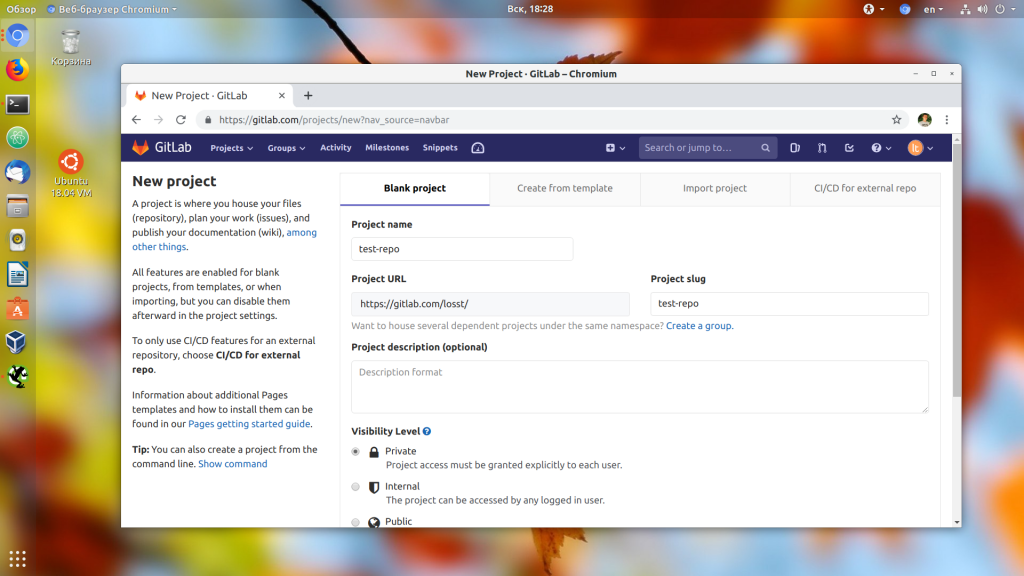
Создать проект в GitLab можно несколькими способами: с нуля, на основе шаблона, импортировать его из другого сервиса или компьютера или с помощью CI/CD. Мы начнём работать с пустого проекта, поэтому выберите Create blank project и заполните информацию:
- Project name: имя проекта.
- Project slug определяется автоматически на основе Project name.
- Visibility Level: Public — для всех, Private — только для вас и выбранных соавторов проекта.
- Initialize repository with a README: автоматически создаст README в вашем репозитории. Это текстовый файл, который содержит информацию о проекте: описание его задач, принципов работы, инструкцию по установке и настройке.
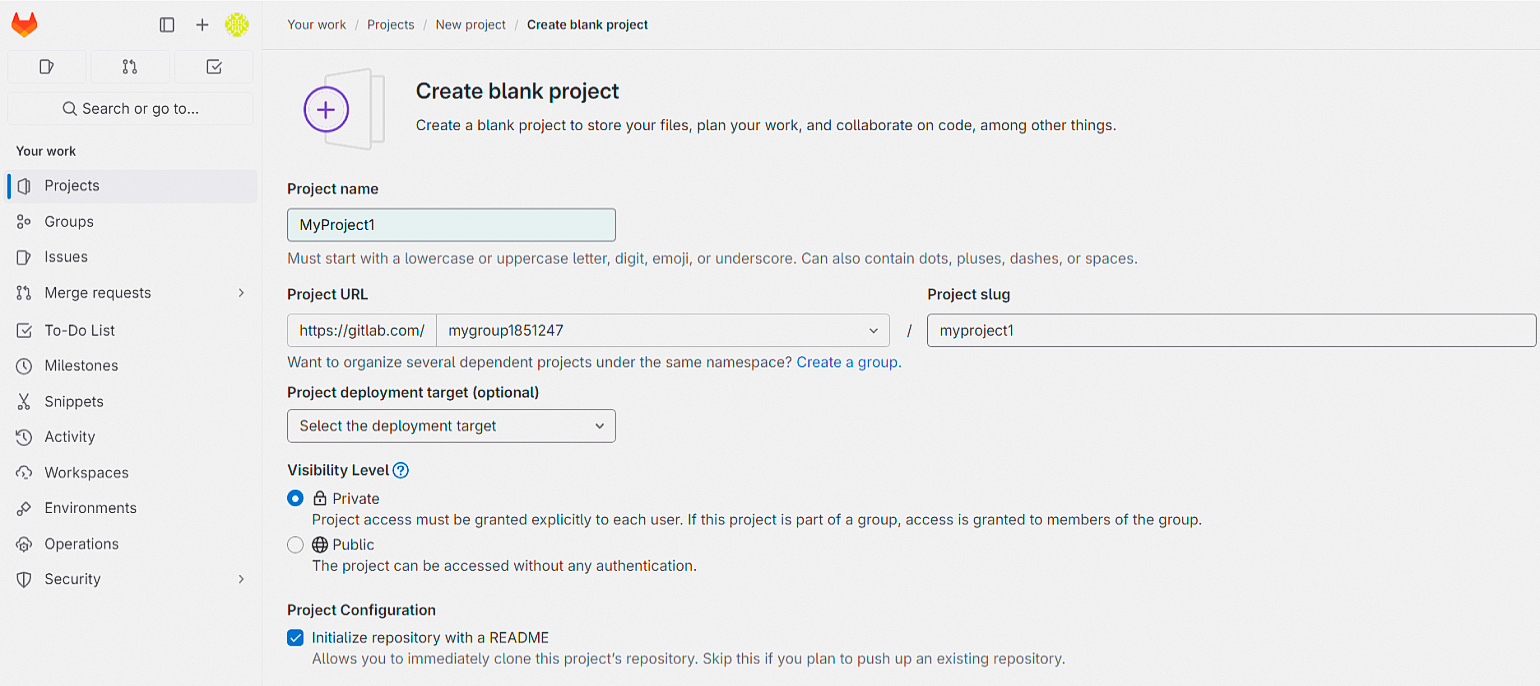
После заполнения данных нажмите кнопку Create Project. Теперь репозиторий готов к работе:

SSH-ключи используются для аутентификации вашего компьютера на удалённом сервере, в данном случае на сервере GitLab. Благодаря этому вы можете подтверждать свою личность без ввода пароля.
Чтобы создать ключ, откройте терминал или командную строку и введите команду для генерации ключей ssh-keygen. Если вы хотите сгенерировать их в определённой папке, то введите путь до неё.
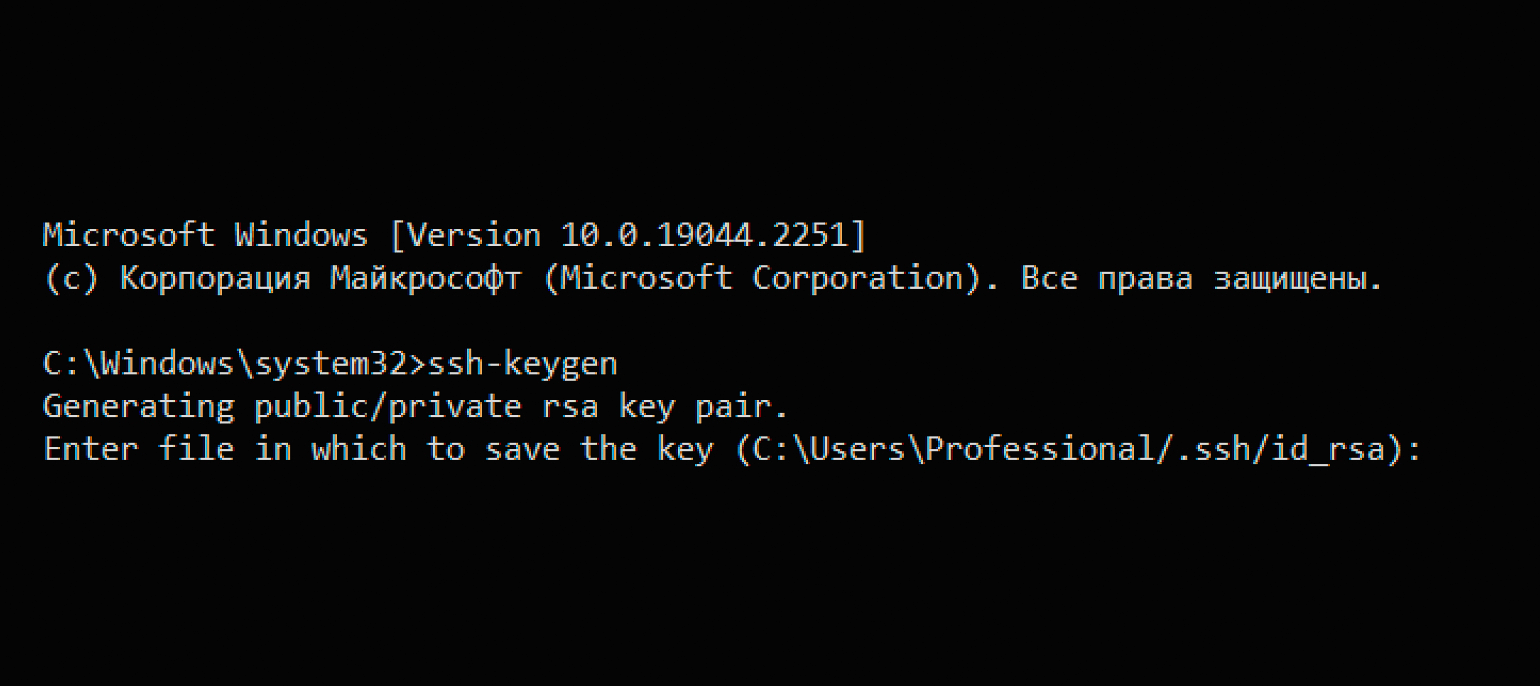
Скриншот: Skillbox Media
Теперь в указанной папке у вас появится два файла с ключами — приватный и открытый. Для создания ключей в GitLab нужен второй — файл с расширением .pub. Откройте его в текстовом редакторе и скопируйте содержимое в буфер обмена.
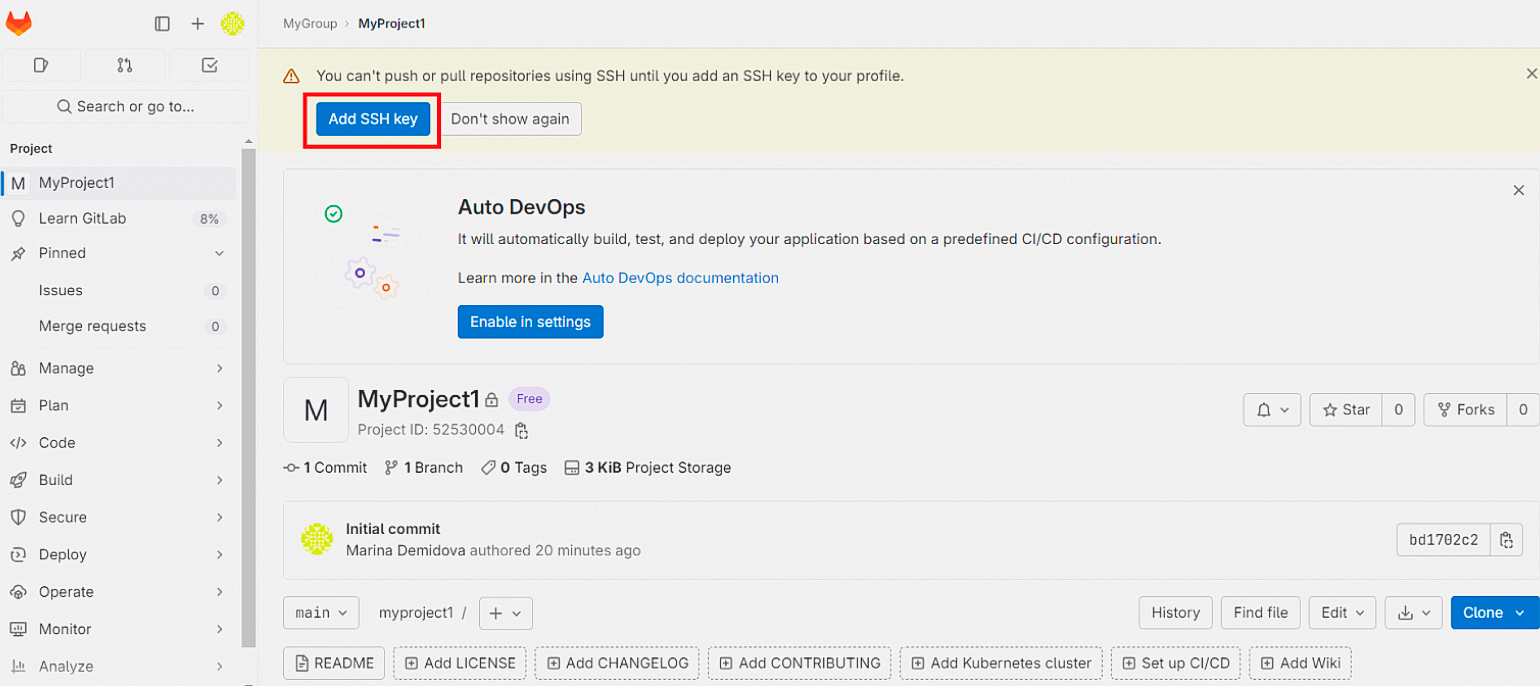
Перейдите в свой репозиторий на сайте GitLab, нажмите на кнопку Add SSH key:
А затем на кнопку Add new key:
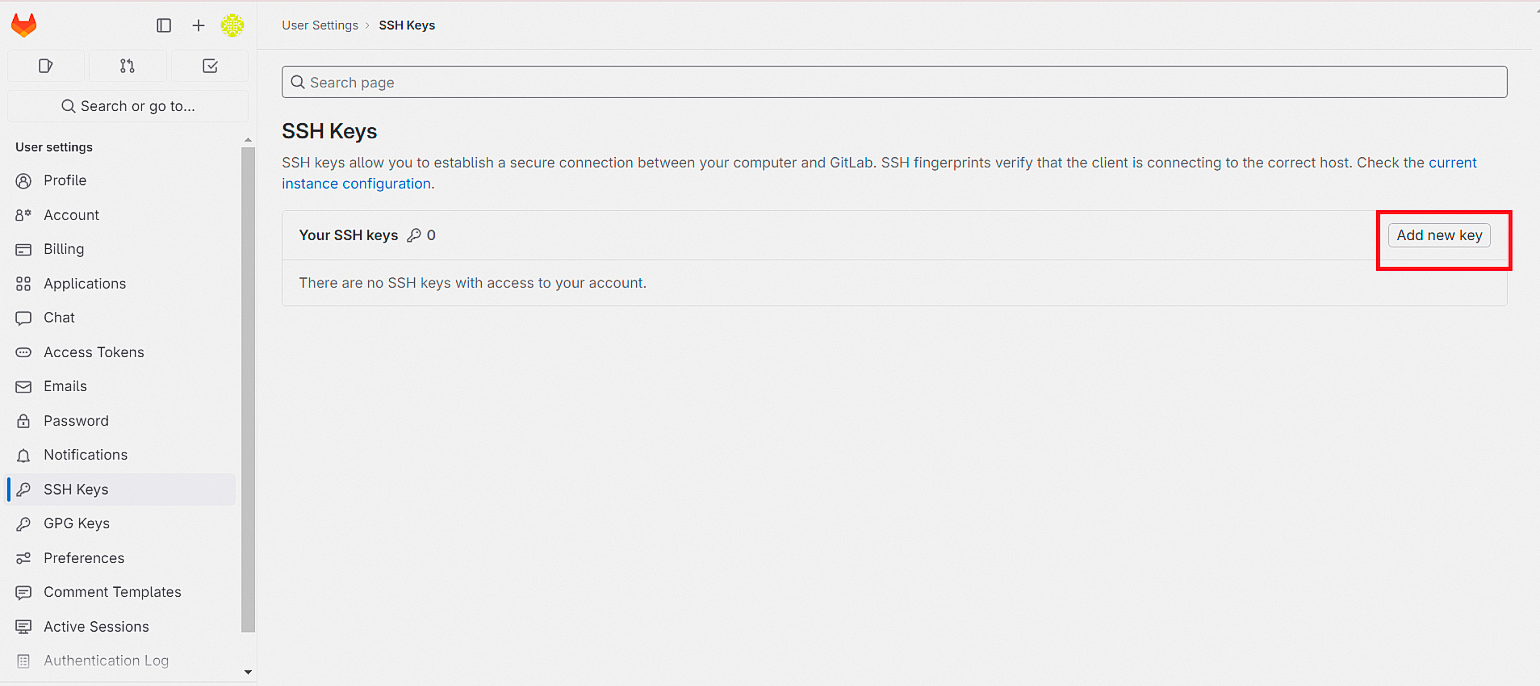
Вставьте скопированный ключ в поле Key и дайте ему осмысленное имя, например, совпадающее с именем репозитория.
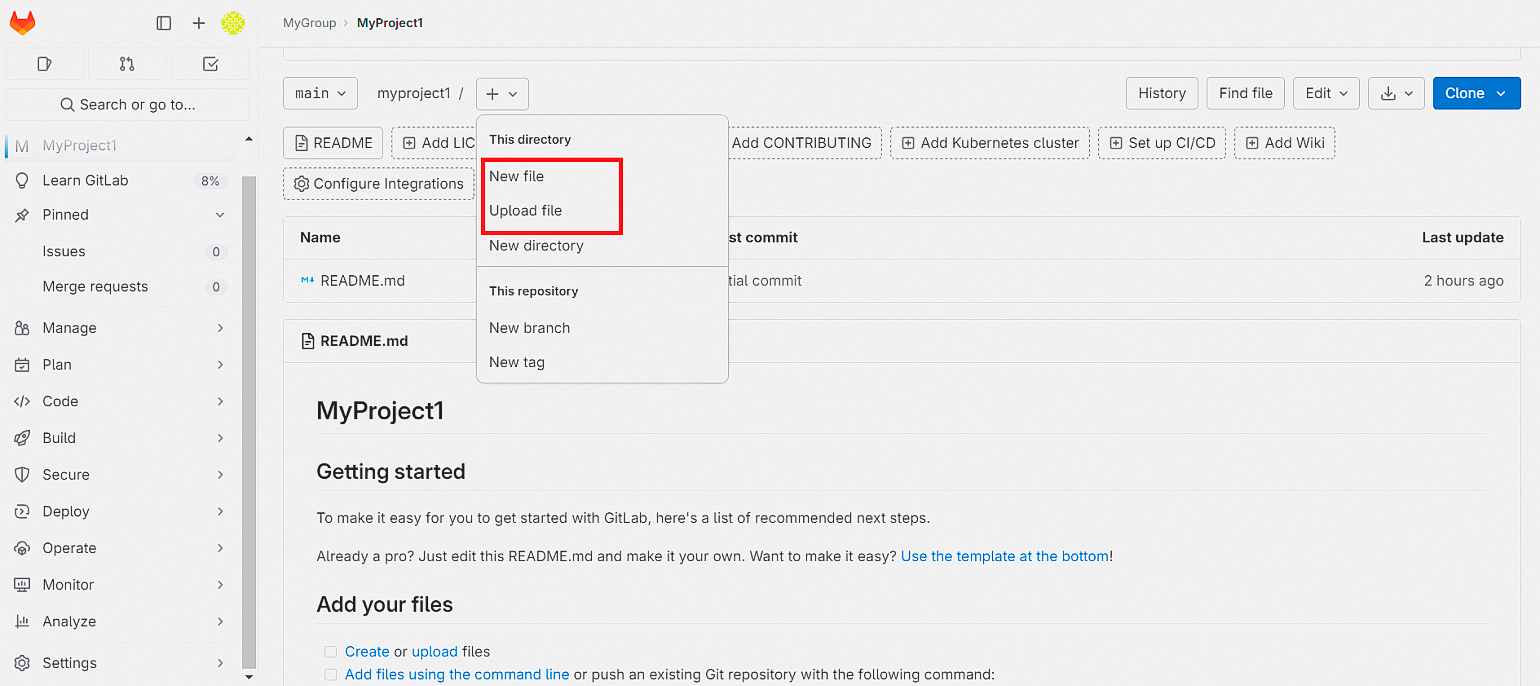
Вы можете загрузить существующие файлы проекта в свой репозиторий или создать новые. Для этого нажмите на + и выберите New file или Upload file.
Теперь вы можете редактировать код непосредственно в веб-интерфейсе. Для этого нажмите кнопку Edit:
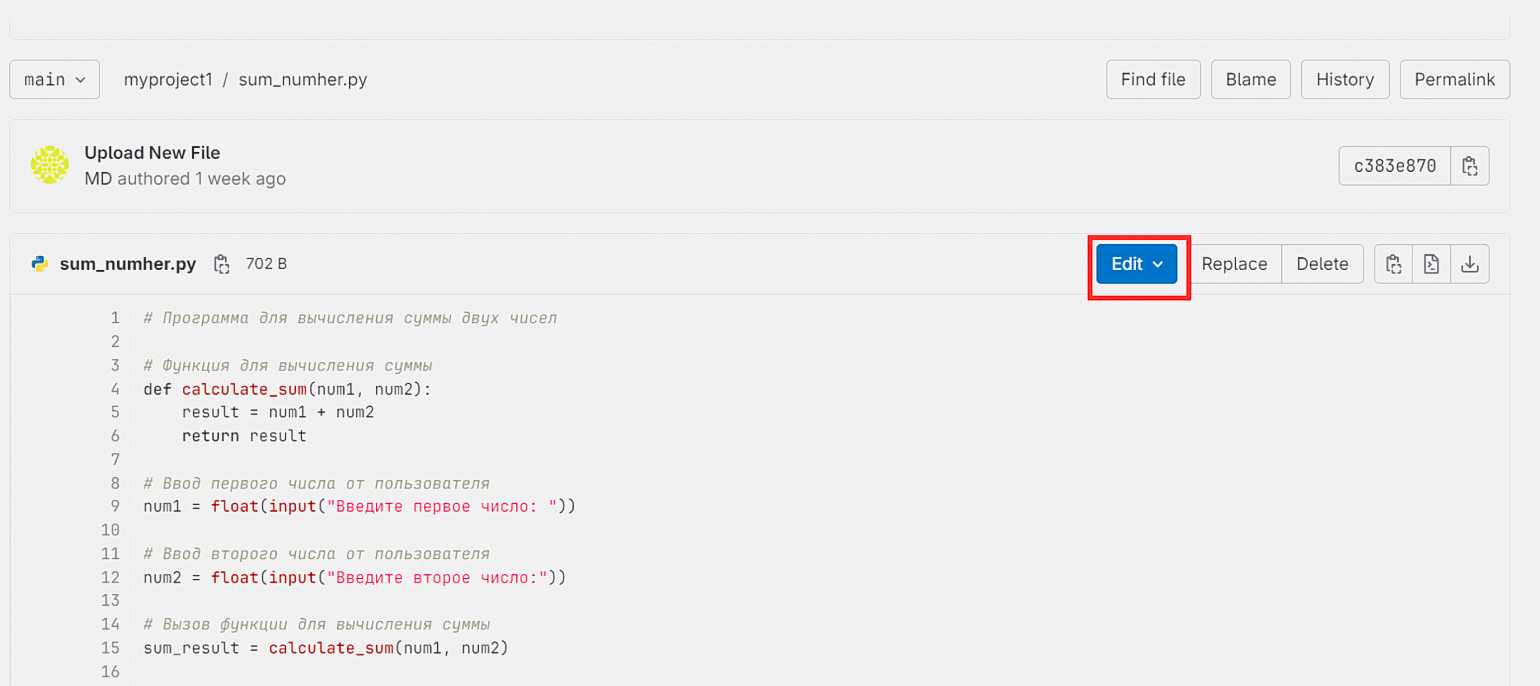
Репозиторий можно клонировать на свой компьютер и работать в удобном редакторе или IDE. Подробнее об этом напишем дальше.
Каждая ветка представляет собой отдельное направление работы. В них разработчики создают новые функции, исправляют ошибки, тестируют изменения и проводят эксперименты, которые не влияют на основной проект и другие ветки. После завершения работы в ветке производится её слияние с основной веткой.
По умолчанию в новом репозитории есть одна ветка — main. Обычно с кодом в main не работают напрямую, а вносят изменения посредством слияния с другими ветками.
Чтобы создать новую ветку нажмите на + и выберите пункт меню New branch.
Новая ветка содержит копии всех файлов проекта. Теперь можно вносить изменения в код, добавлять новые фичи в ПО, исправлять ошибки, и это не будет влиять на основной код.
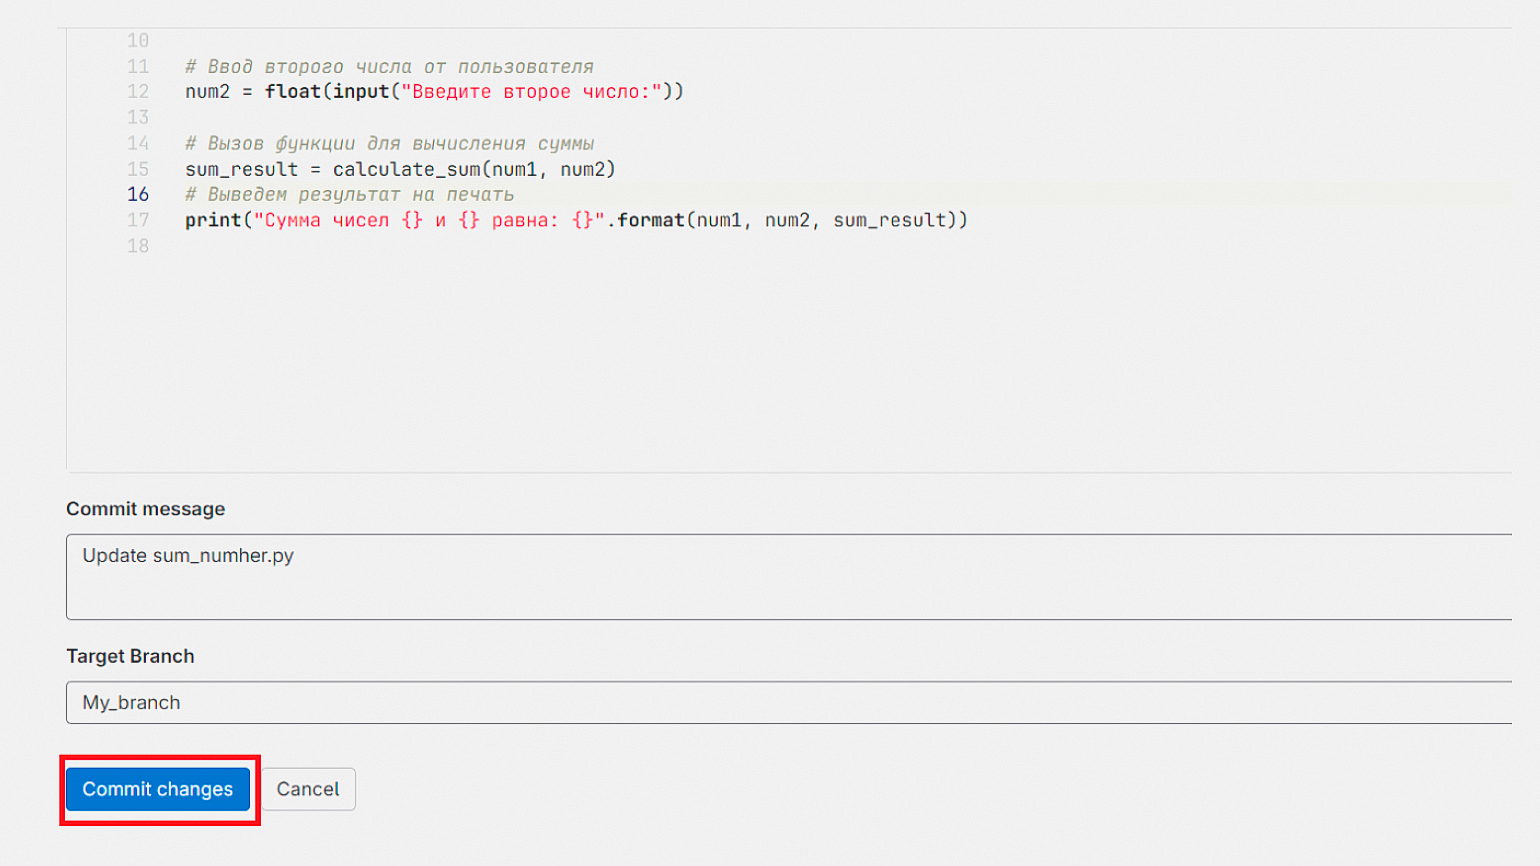
Чтобы перенести новый код в основную ветку, нажмите на кнопку Commit changes внизу страницы.
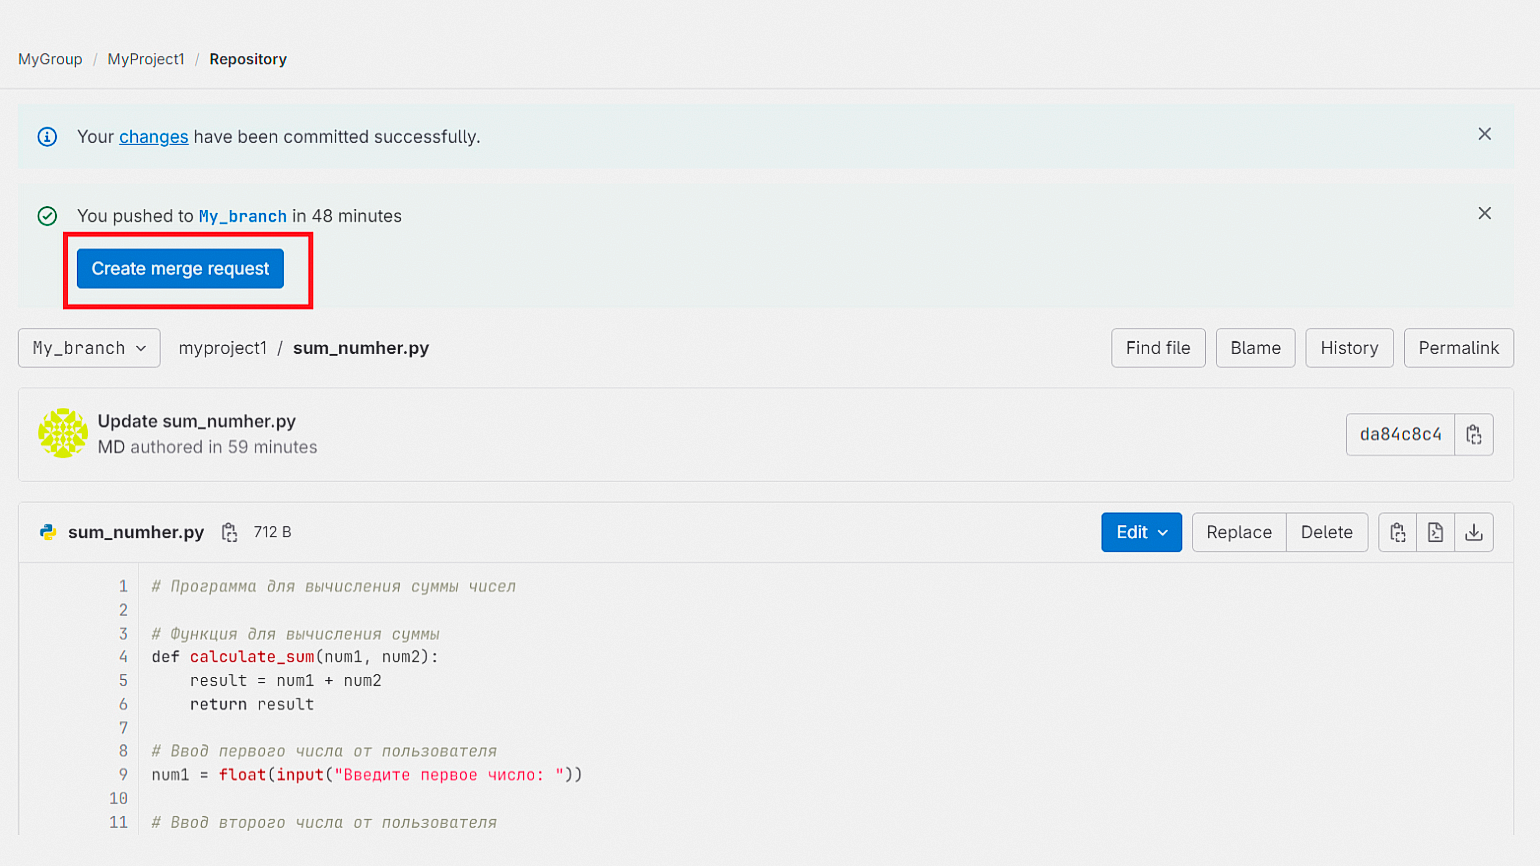
А затем нажмите на кнопку Create merge request, создав запрос на слияние.
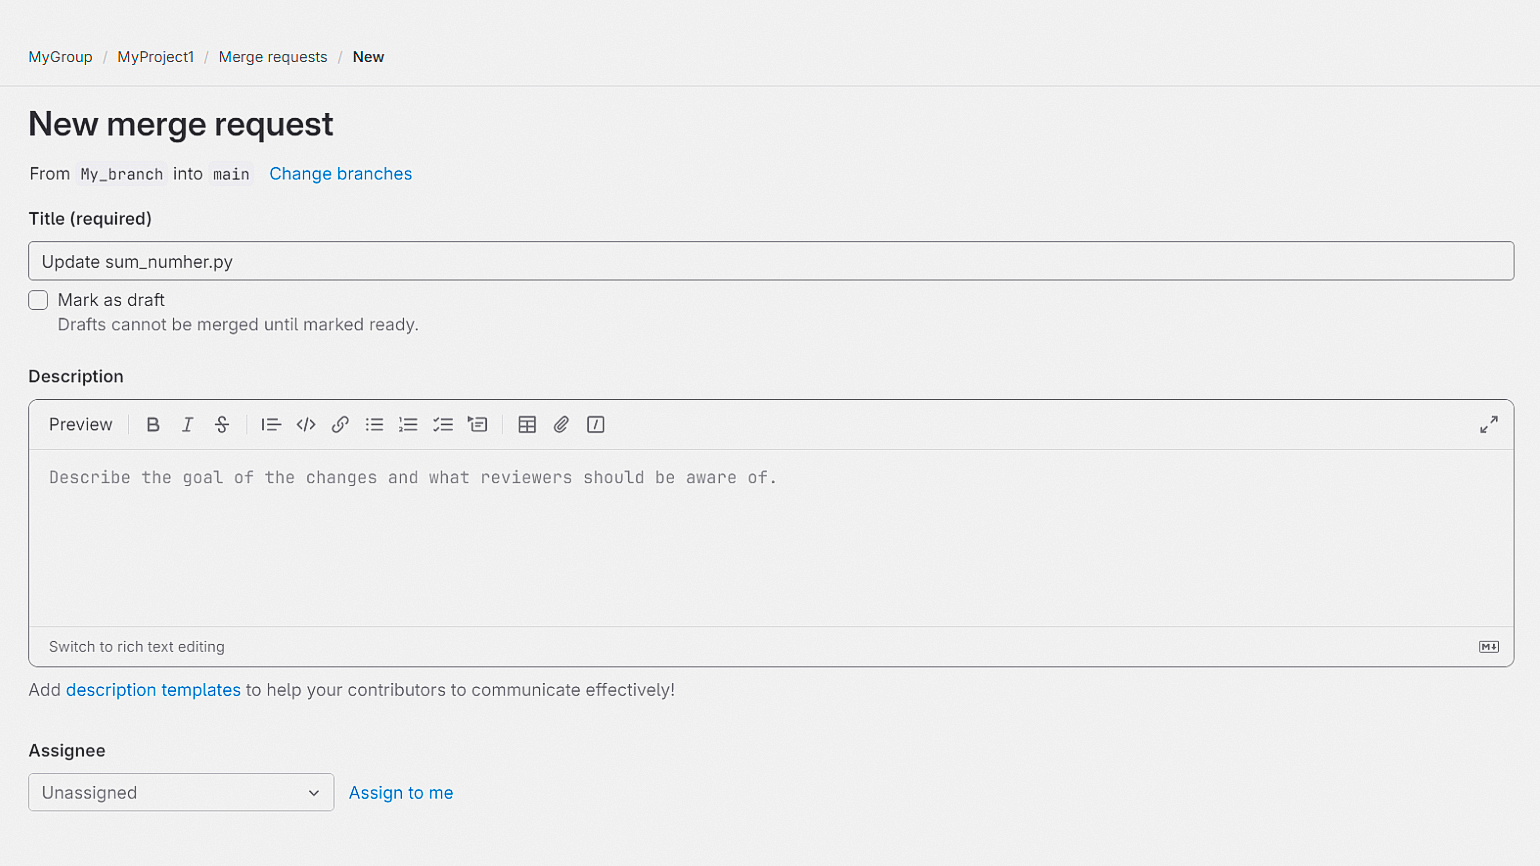
На открывшейся странице введите название слияния, опишите его, указав, что именно вы изменили, и выберите ответственных за проверку. Теперь нажмите на кнопку Create merge request внизу страницы.
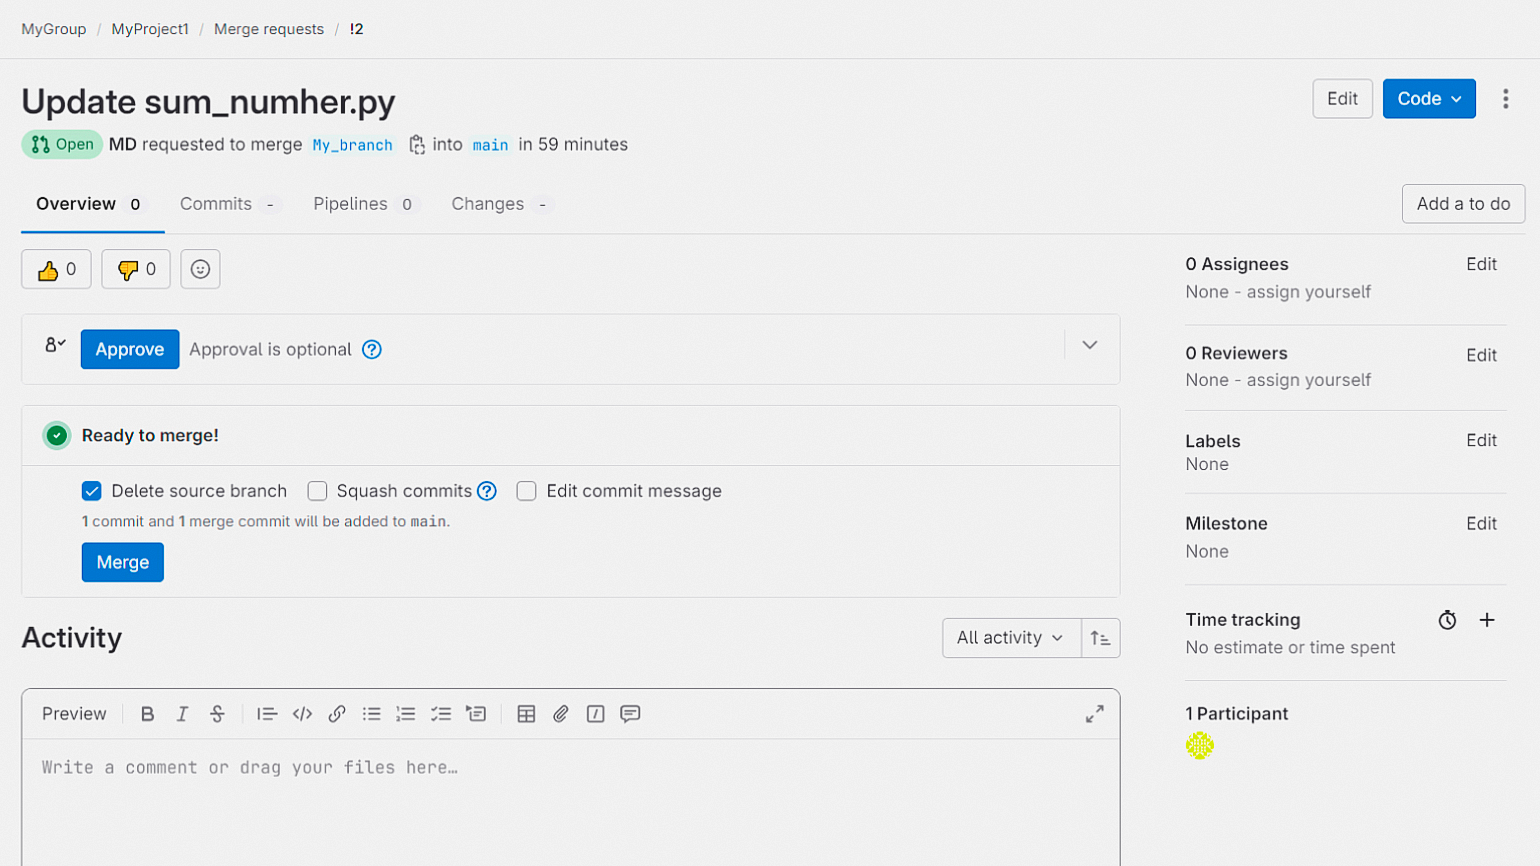
Чтобы принять изменения на следующей странице, нажмите кнопки Approve и Merge:
На практике согласовывать и производить слияние, скорее всего, будет кто-то другой, например ваш тимлид.
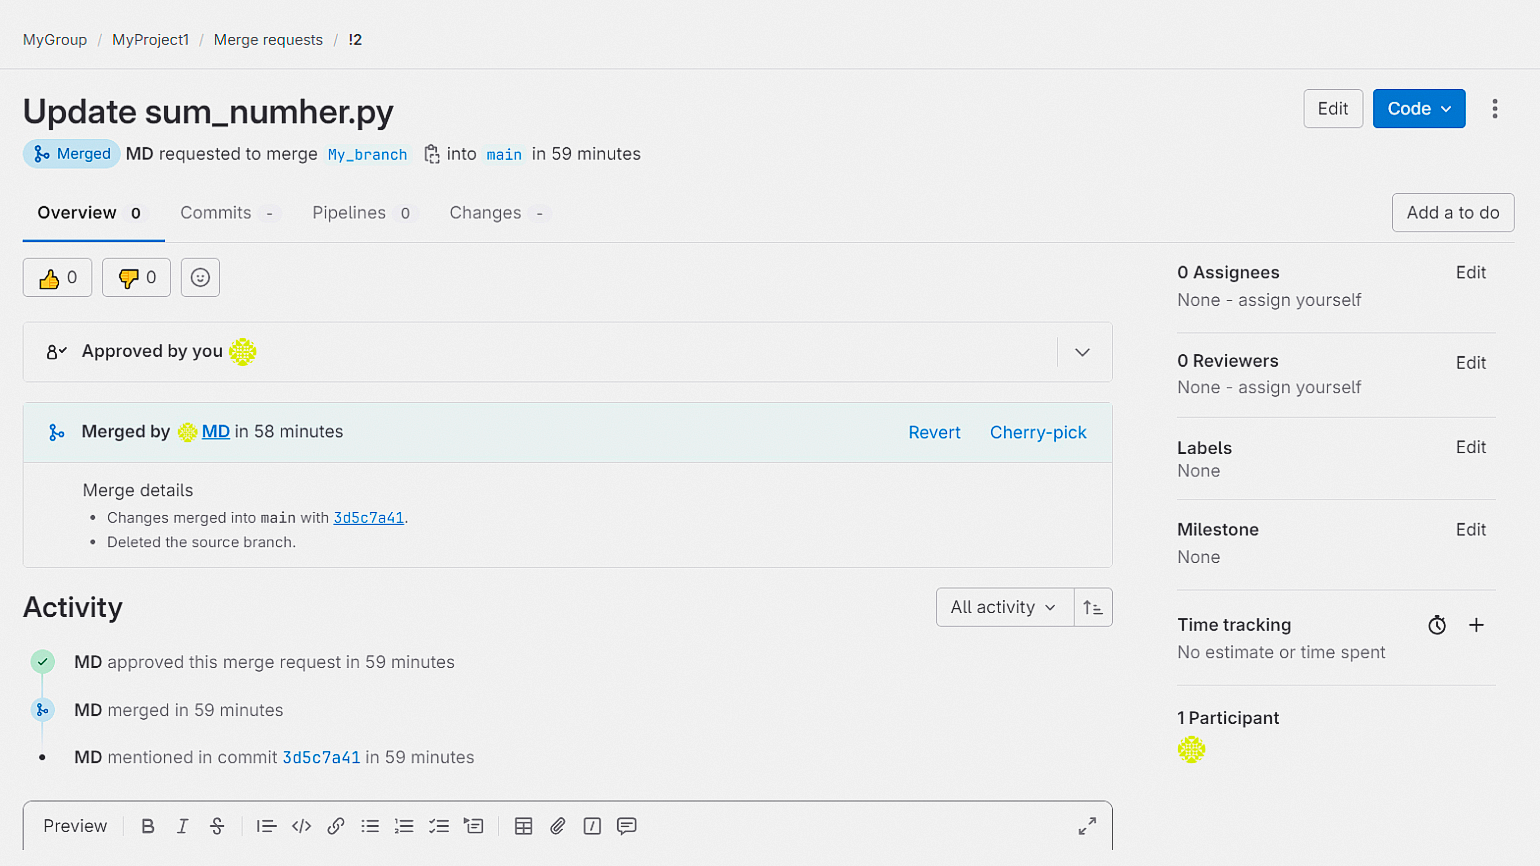
Когда слияние веток будет выполнено, информация о нём появится в описании:
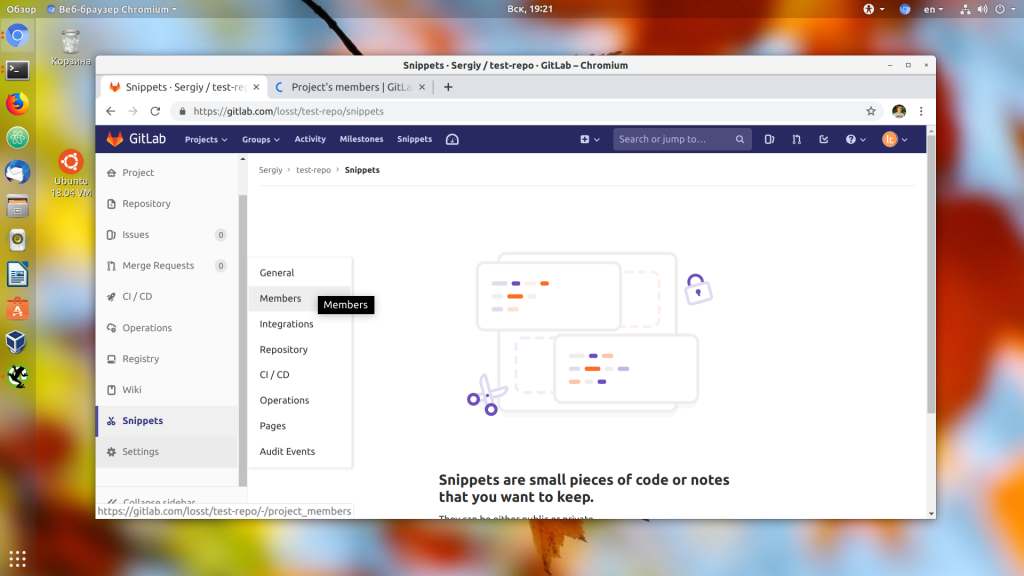
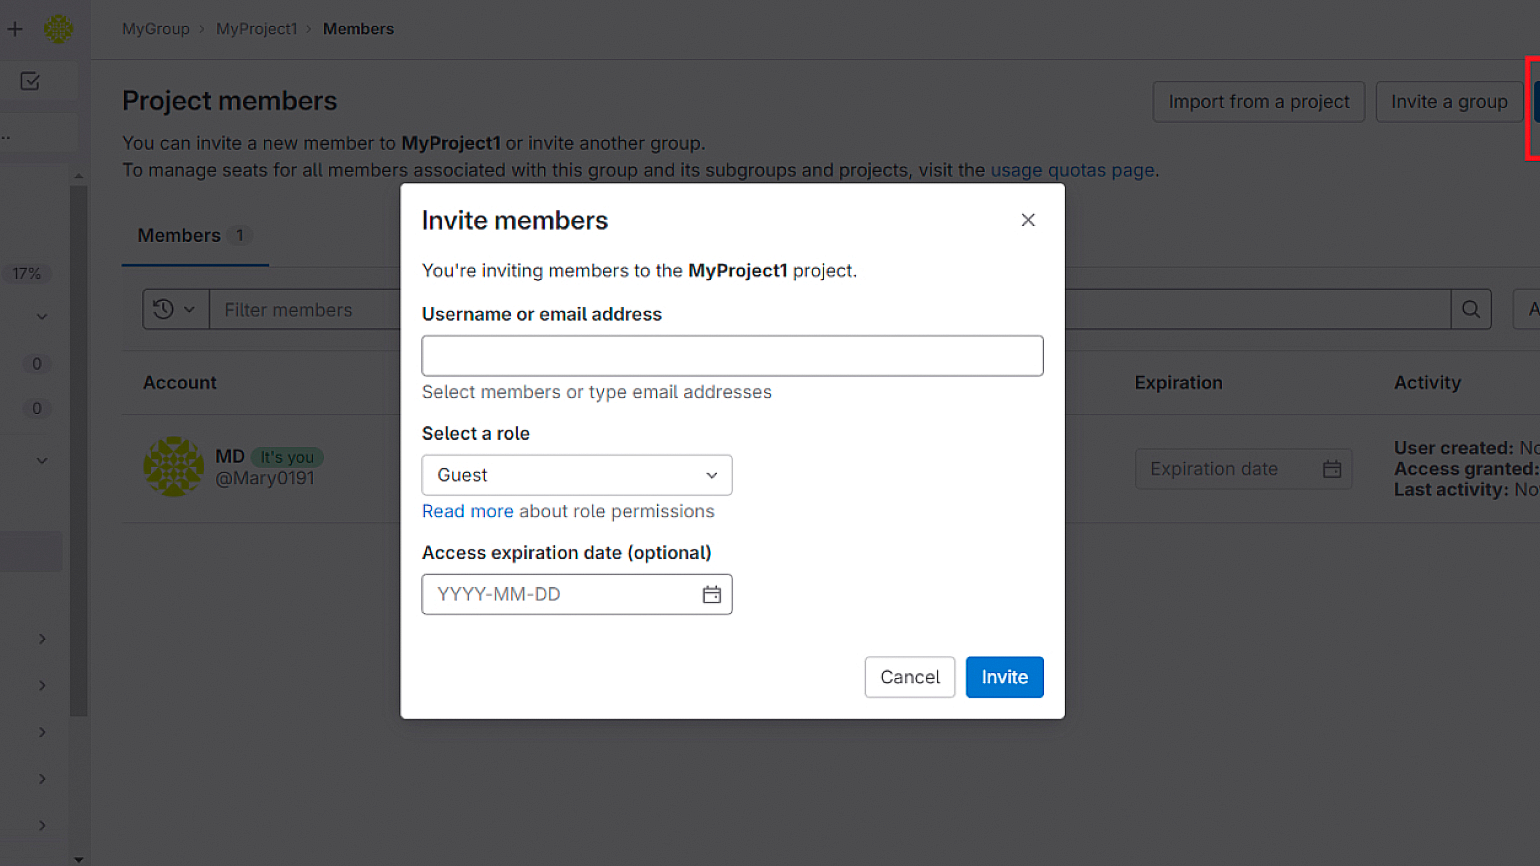
Вы можете добавлять к своему проекту участников с разными уровнями доступа. Для этого выберите на панели слева пункт Members.
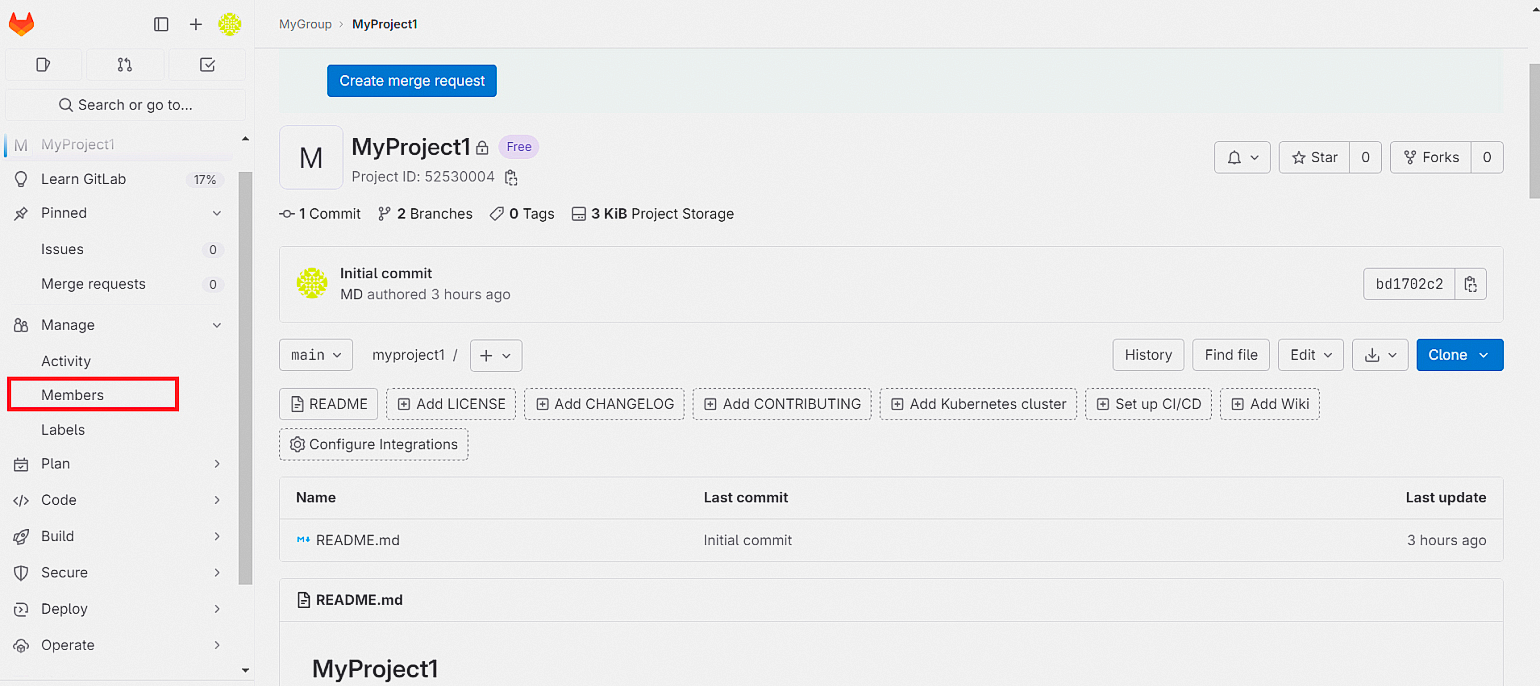
В новом окне нажмите Invite members, введите никнейм или адрес электронной почты пользователя, выберите для него роль и нажмите кнопку Invite.
Большую часть времени вы будете писать код локально, в любимом редакторе или IDE, а не в панели GitLab. Для этого нужно будет клонировать репозиторий — после завершения работы его также можно будет слить с основным репозиторием.
Как работать локально:
- Скопируйте URL репозитория. На своём компьютере откройте командную строку или терминал и выполните команду git clone <URL репозитория> для загрузки репозитория на локальную машину.
- В созданном клоне репозитория вносите изменения в файлы проекта или добавляйте новые.
- После завершения работы с кодом откройте командную строку или терминал в папке вашего проекта. Выполните команду git add ., чтобы добавить все изменения в стейдж. Стейдж (staging area) в Git — это место, где собираются изменения перед коммитом. Если вы хотите добавить только конкретные файлы, используйте команду git add <имя_файла>.
- Чтобы посмотреть, какие файлы находятся в стейдже и какие изменения готовы к коммиту, используйте команду git status.
- Для создания коммита наберите команду git commit -m «Ваш комментарий к изменениям». В кавычках можете написать короткий комментарий, например: «Добавлены новые функции» или «Исправлены ошибки».
- Чтобы отправить коммит на сервер, используйте команду git push.
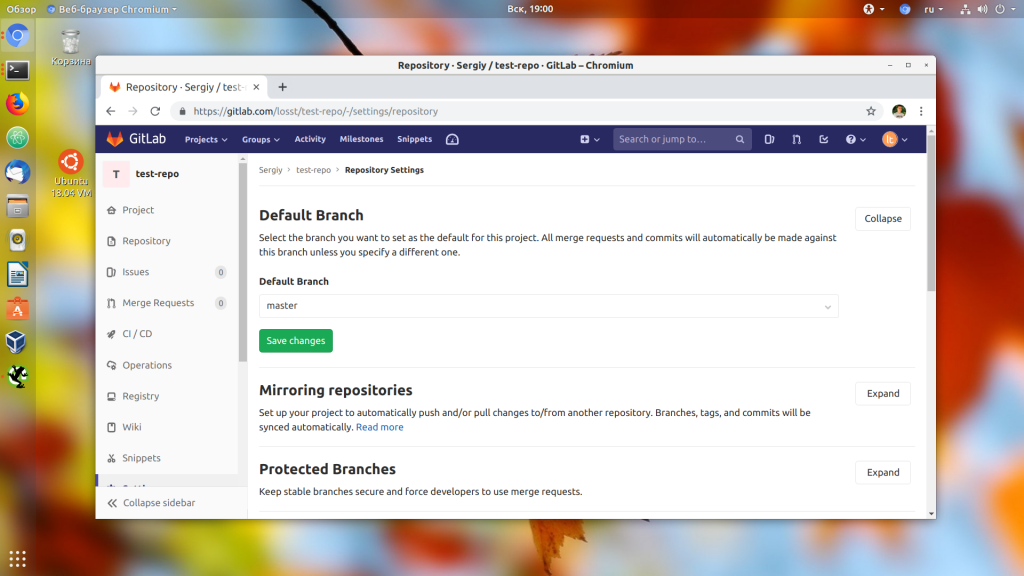
Удалить проект в GitLab может администратор проекта или пользователь с соответствующими правами доступа.
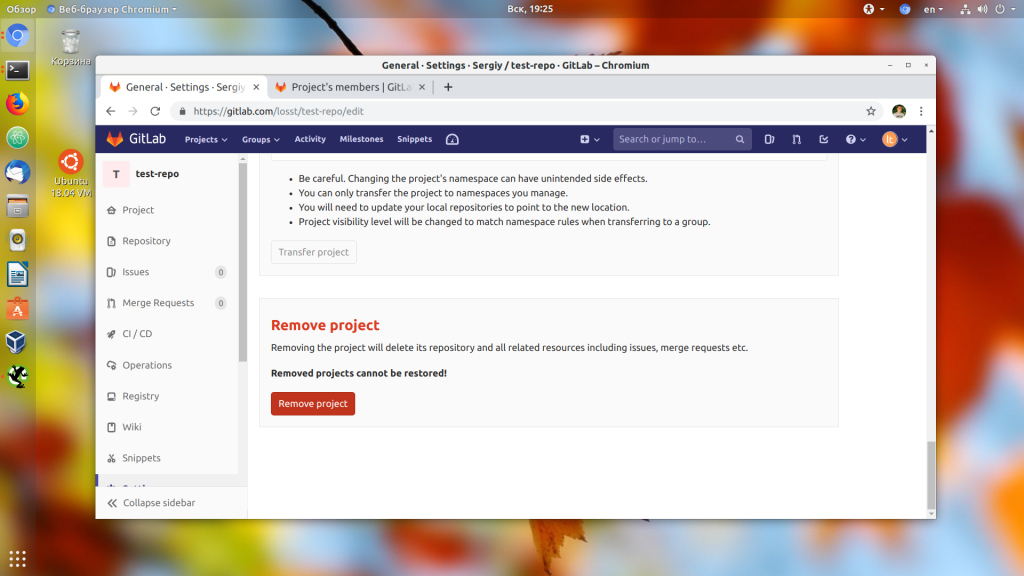
Войдите в GitLab и перейдите в проект, который хотите удалить. Откройте раздел Settings и выберите General. Прокрутите страницу вниз до раздела Advanced и откройте его. Внизу вы увидите кнопку Delete project. Нажмите на неё и подтвердите, что вы действительно хотите удалить проект.
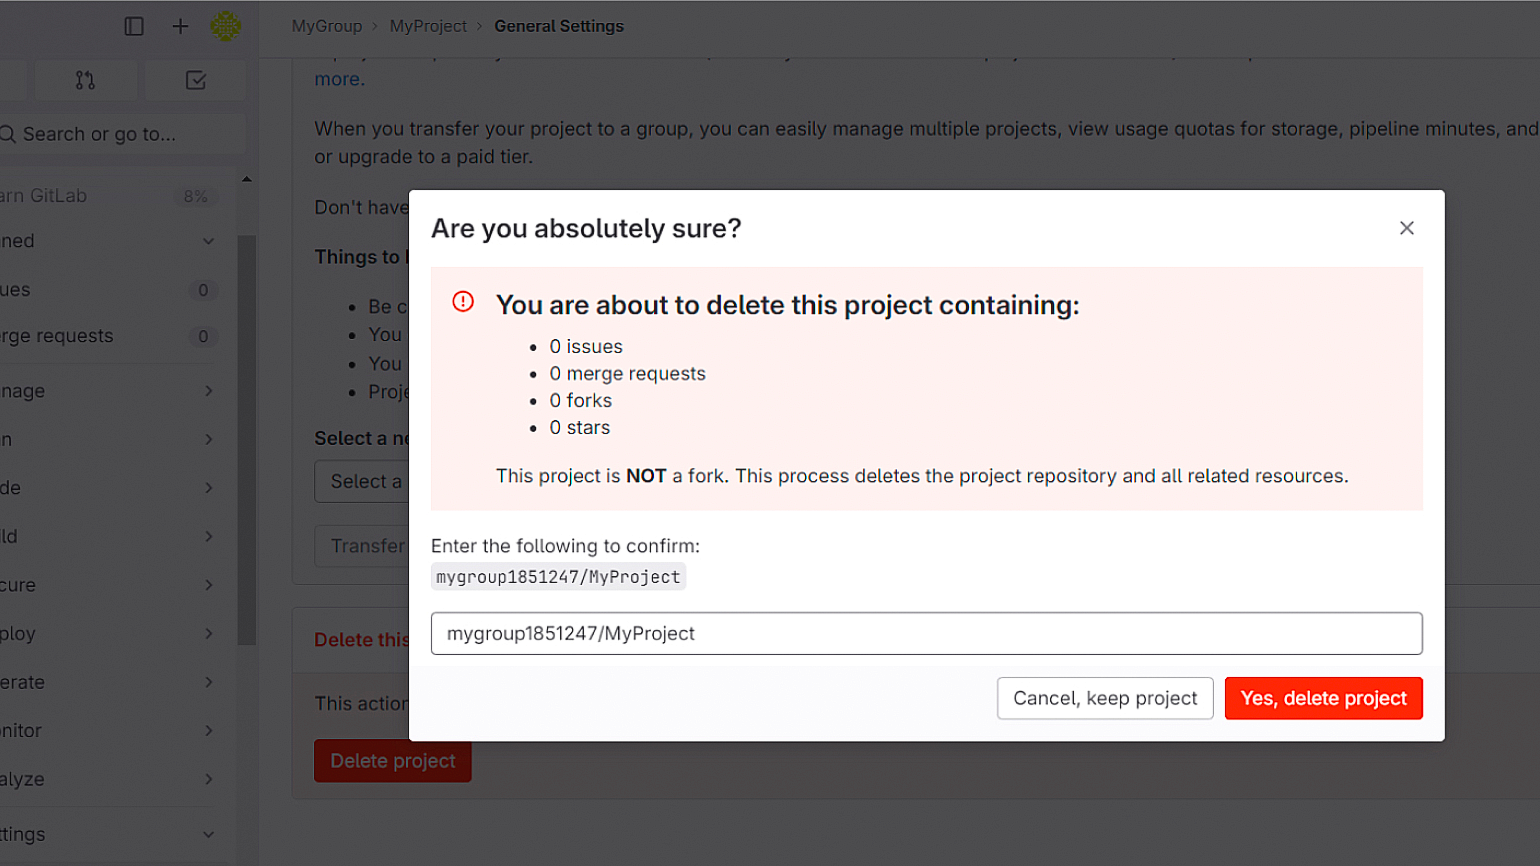
Всё. Проект безвозвратно удалён.
Пробежимся по тому, что узнали сегодня:
- GitLab — удобный и полезный инструмент для команд, занимающихся разработкой программного обеспечения. Он позволяет совместно работать над кодом и сохранять его промежуточные версии, к которым можно вернуться при необходимости.
- Разработчики, которые используют GitLab, пишут код в отдельных ветвях или клонах репозитория на своих компьютерах. После дополнения, изменения или удаления кода они создают коммит, содержащий все изменения, которые будут внесены в основной репозиторий. Сеньор или тимлид проверяют их и принимают или отправляют на доработку.
- GitLab включает в себя встроенные средства continuous integration (CI) и continuous deployment (CD), которые автоматизируют процессы тестирования, сборки приложения и развёртывания.
- GitLab отличается от GitHub встроенным инструментом для CI/CD, возможностью развёртывания сервиса на собственном сервере и отсутствием ограничений на число групп пользователей с разным уровнем доступа.

Научитесь: Профессия Специалист по кибербезопасности
Узнать больше
In the last article, we saw the various parts of GitLab, its architecture and how GitLab works. If you haven’t already, I suggest reading the previous article first before reading this one. Here is the link
GitLab, A Complete Beginner’s Guide!
In this article lets look at how to set it up locally on your Windows PC, so that you can have your very own GitLab setup running right at your home or organization!
If you are using Mac or Linux, you can follow the links below.
Complete Guide To Setting Up GitLab Locally On Mac.
Complete Guide To Setting Up GitLab Locally On Linux PC..!!
So let’s begin!
Things you will need
All you need are a computer running Windows OS with enough resources (CPU, memory, and disk space) for running the GitLab Server and GitLab Runner. How much resources is enough depends on how much performance you need, the more you have the better it is!
You can also set it up on the cloud over at Gitlab.com, but
- the free plans have some limitations in terms of processing power and hard disk space.
- Also doing it locally gives you more control over the setup and
- it will also be an opportunity to learn you more about GitLab
Hence I suggest taking this route of a local installation.
If you are part of a larger organization, and you wish to install it on the cloud, then you can always take a look at the paid plans of GitLab here link
Approach to install GitLab on Windows
Okay, let’s get back to the task in hand.
As we saw in the previous article GitLab consists of 2 parts.
- GitLab Server and
- GitLab Runner
Also, we have learned in the previous article that it is preferable to set the GitLab server and runners on separate computers. But I am going for a home set up, so I will be setting them both upon the same Windows computer.
The GitLab Server relies heavily on Linux technologies and hence it cannot be installed in our Windows PC natively. If you do some research, there are ways you can do it through the Linux subsystem in windows, but we are not going to take that approach.
The
problem with these workarounds are
- The installation process is a bit complicated and is not recommended for beginners.
- They are only guaranteed to work on a version to version basis. What I mean by that is you need to have a particular version of Windows and a particular version of GitLab for everything to run smoothly. If you update your Windows or if you wish to upgrade your GitLab then you might break your GtiLab set up. Since both Windows and GitLab updates come frequently, it is not such a good idea to waste time trying to fix things every few months.
- It is unofficial and hence support for future versions cannot be guaranteed.
- These unofficial methods will bring their own limitations as opposed to running natively on Linux
Due to these above reasons, we are going to go for a more stable approach of installing the GitLab server in a virtual environment. We will also see in this article the ways to make it run as smoothly and efficiently as possible while making sure it consumes as few resources as possible.
So this
is what we are going to do
- Install the GitLab Server on a Virtual Box running Ubuntu server
- Install GitLab runner natively on Windows.
This approach takes away the cons of using unofficial hacks, as it will work on all versions of you Windows and GitLab and you don’t need to worry too much while updating your software either!
By following the step by step guide shown below you should be able to set everything up and running in an hour or 2 (depending upon how good your internet connection is, it can take longer!)
GitLab Installation Process
STEP#1: Download and install VirtualBox
You can download and install VirtualBox from this link
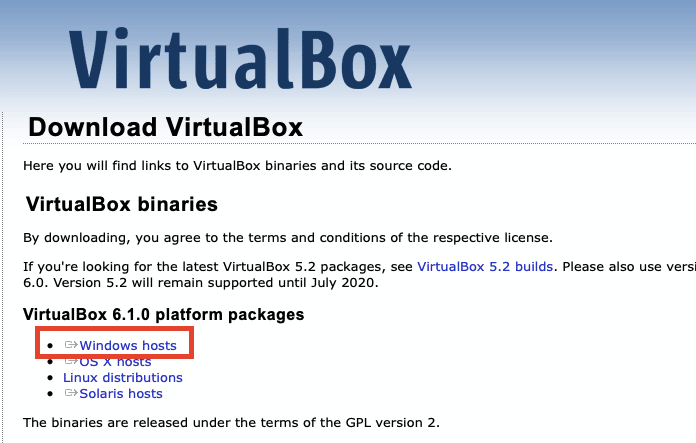
Just click on the Windows hosts and the download should start automatically. The installation process is pretty straightforward, you can just accept the default options and click through to complete the process.
Once the installation is completed you can open VirtualBox from the Start menu in Windows.
STEP#2: Install Ubuntu Server as a Virtual Machine in your Windows PC.
The next step is to get a Linux distro to install our GitLab server. For this purpose, I recommend Ubuntu Server. I chose this particular distro for 2 reasons.
- Ubuntu is known for its stability.
- GitLab Server software has support for Ubuntu
- The server edition is chosen so that it will consume fewer resources on your computer.
For this first, you need the Ubuntu Server image. You can download it from this link.
Ubuntu usually offers 2 sets of packages for us to choose from.
- Long term support version: Has a support period of 5 years
- Latest Version: has all the latest features.
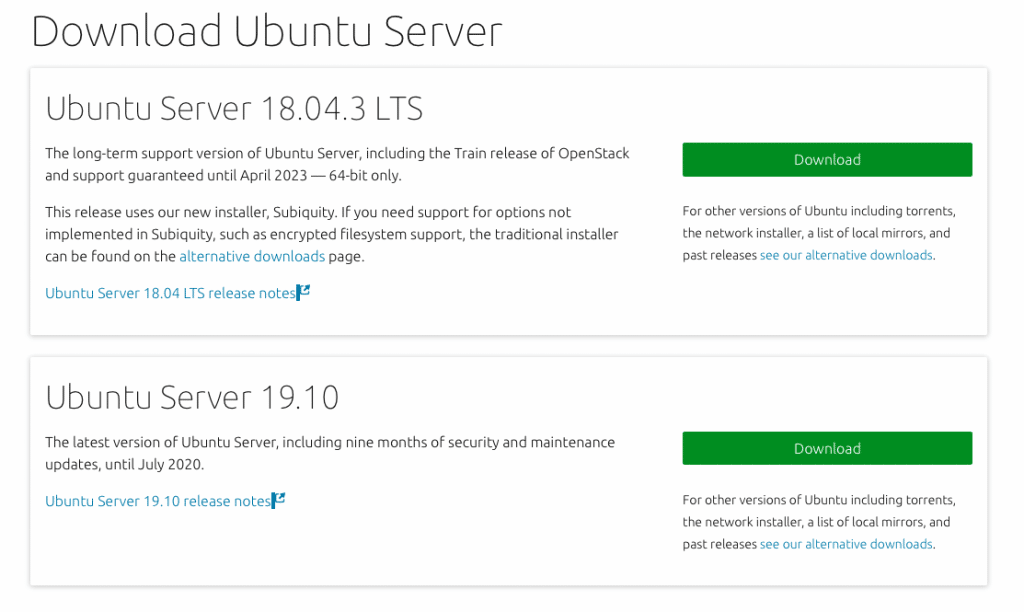
I suggest you go for the LTS one, but then the latest version should also work just fine. So click on a “Download” button and your download should start automatically. It will take some time to complete as the iso is around 900MB.
Once the download is complete you can proceed to the installation process on VirtualBox.
STEP#3: Install Ubuntu Server on VirtualBox
Open VirtualBox Application and click on the “New” button
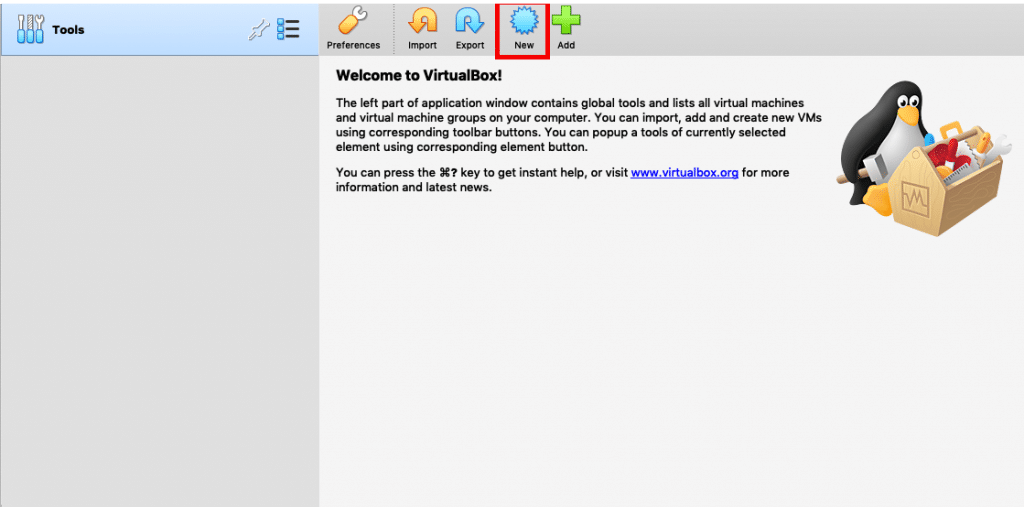
A window like this should pop up
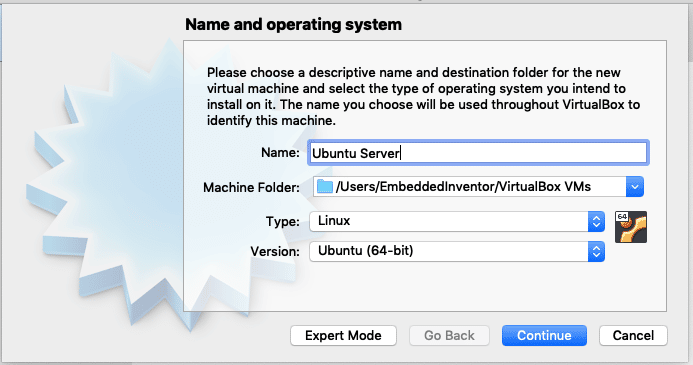
Give your virtual machine a name and choose Linux for type and ubuntu 64 bit for version and click “Continue”.
The next screen usually asks for RAM. GitLab recommends 8GB for a GitLab system with 100 users, I suggest a minimum of 2GB RAM for a home set up, you can give more if you can, just make sure you don’t allot more than 50% of your total available RAM.
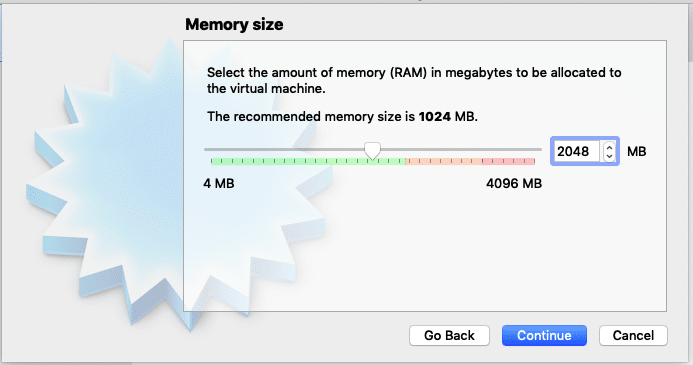
Once you have allocated RAM space, Click “Continue” to the next page.
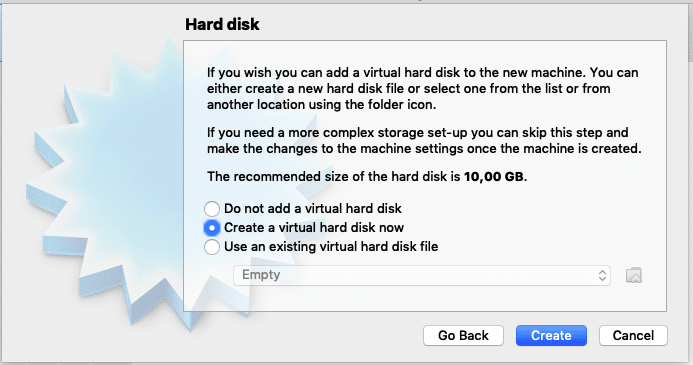
Next, you will be prompted for hard disk. Make sure “Create a virtual hard disk now” is selected and click “Create”
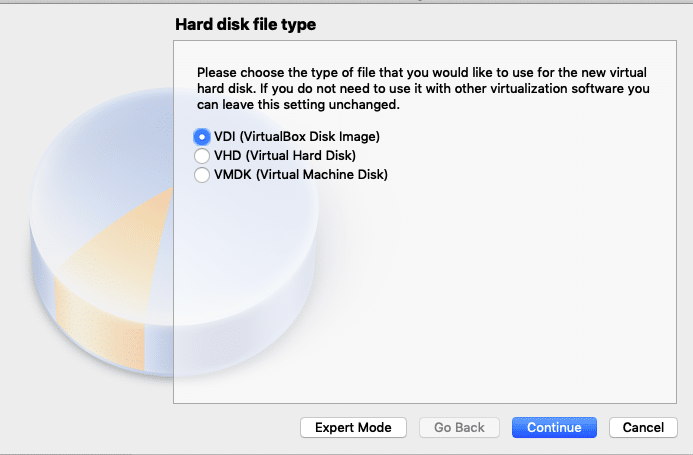
Accept
the default “VDI (VirtualBox Disk Image)” and click
“Continue”

Accept “Dynamically Allocated” and Press continue. This option allocates hard disk space to the virtual machine on the run, so that as you use the more space, more will be allocated.
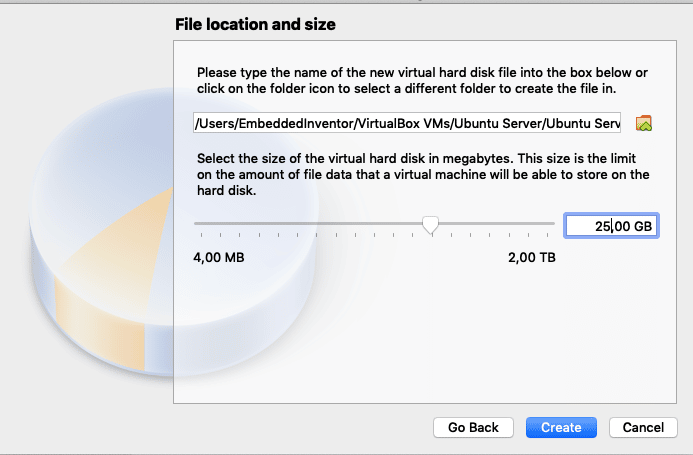
I suggest you allocate at least 25GB of space to the virtual machine, you can allot more if you can. Once you have chosen the disk space click create
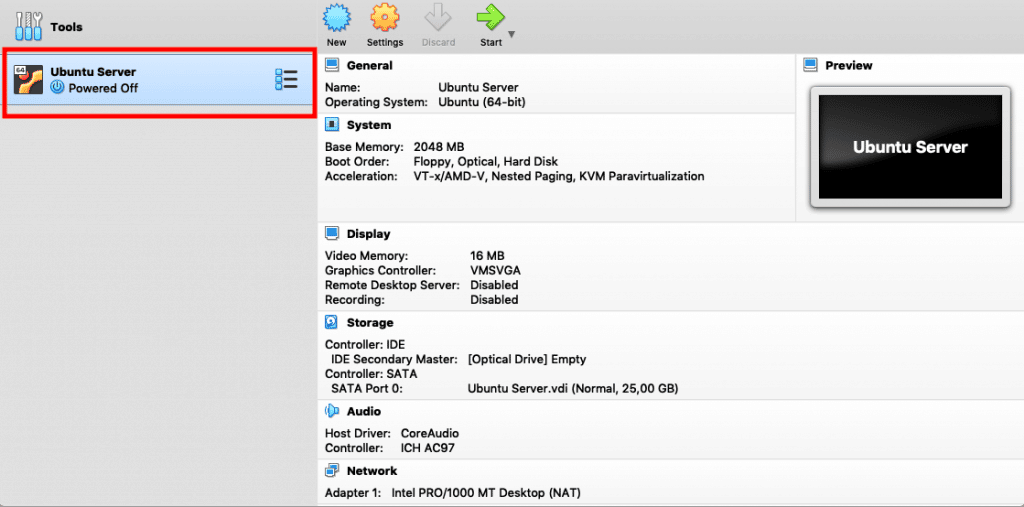
Once you have done this, you should be taken back to the main window of VirtualBox and you should see the virtual machine you just created on the left pane of the window as shown in the screenshot below.
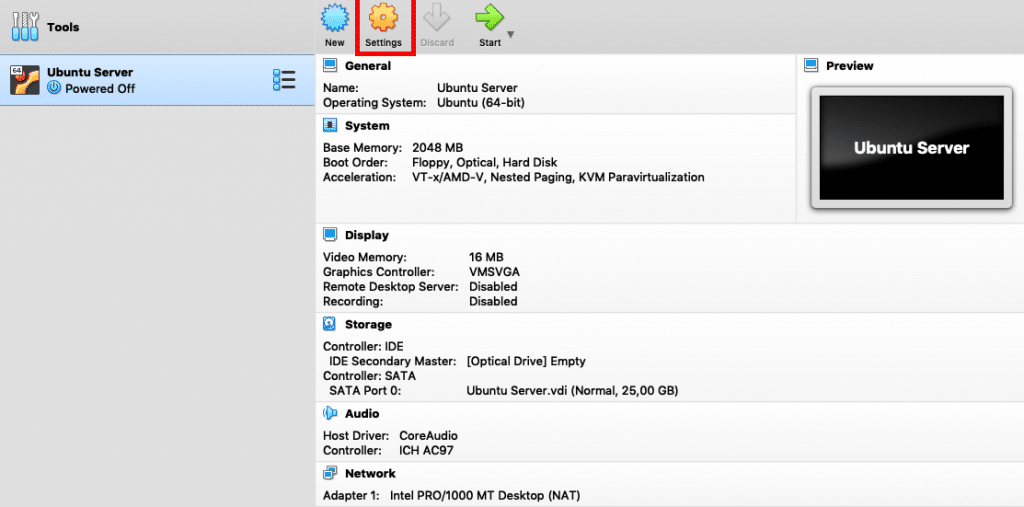
Next click on the “Settings”
And click on storage -> empty -> disk icon -> “Choose a disk file”
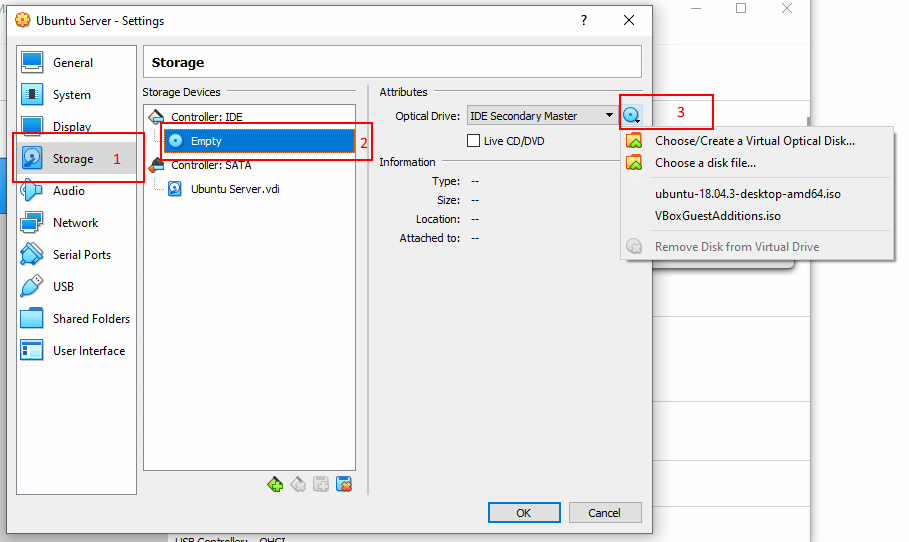
Select the ubuntu server iso image you have just downloaded and press ok. This is equivalent to inserting the Ubuntu disk in a real machine.

Next, go to settings->Network and choose “Bridged Adapter” in the “Attached to:” drop-down menu and press “OK”
I have explained the reason behind using these network settings in detail in this article, you can go ahead and read that if you are into computer networks.
The short explanation is, we will not be able to access the GitLab server from our other machines on the network unless we choose this option.
That’s it, the configuration is done!
You can now go ahead and click the start button!
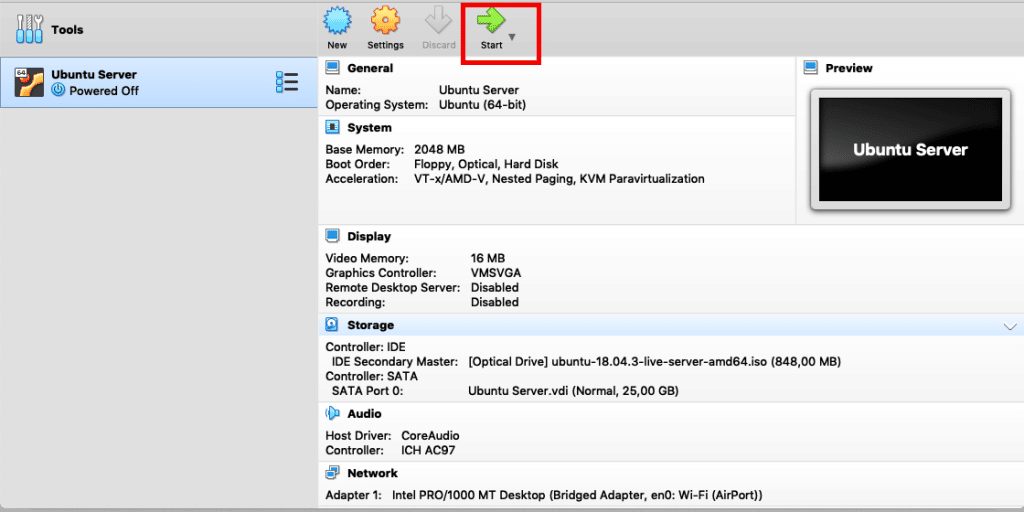
Now the installation process will start. Since we have chosen to go with “Ubuntu server” in order to minimize the resource consumption (so that GitLab can take up as many resources as it needs) we don’t get a fancy Graphical UI, like in the desktop version of Ubuntu. You need to navigate the menus during installation only using Keyboard (tab, enter and arrow keys) since the Ubuntu server doesn’t come with mouse support. So go through the process and get it done.
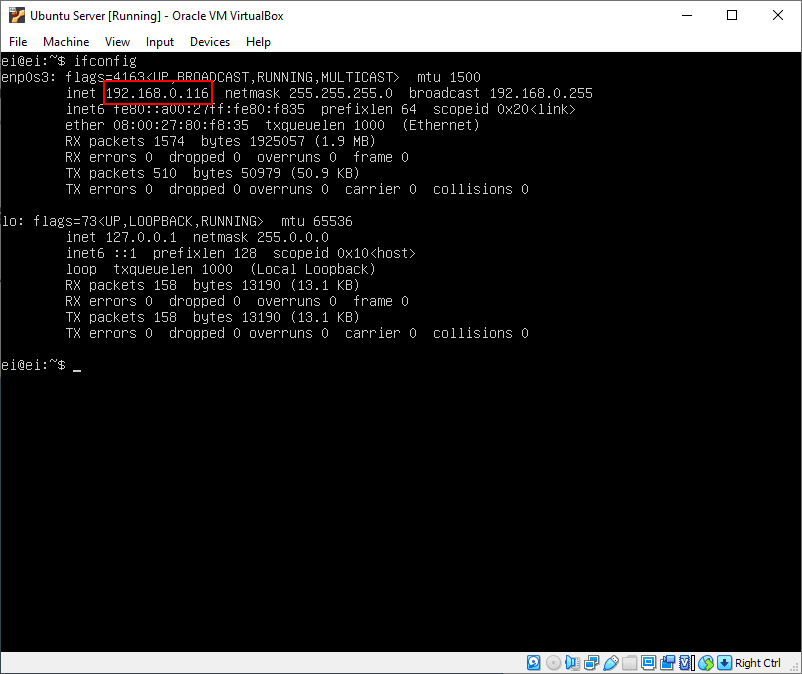
STEP#4: Get the IP address of your ubuntu server
Okay now
once you got the Ubuntu server up and running, you need to find its IP address
and make a note of it.
To do that, use the “ifconfig” command on your Ubuntu server’s terminal
STEP#5: Download and install GitLab server
To download GitLab server, go to the official link on the Gitlab’s Website
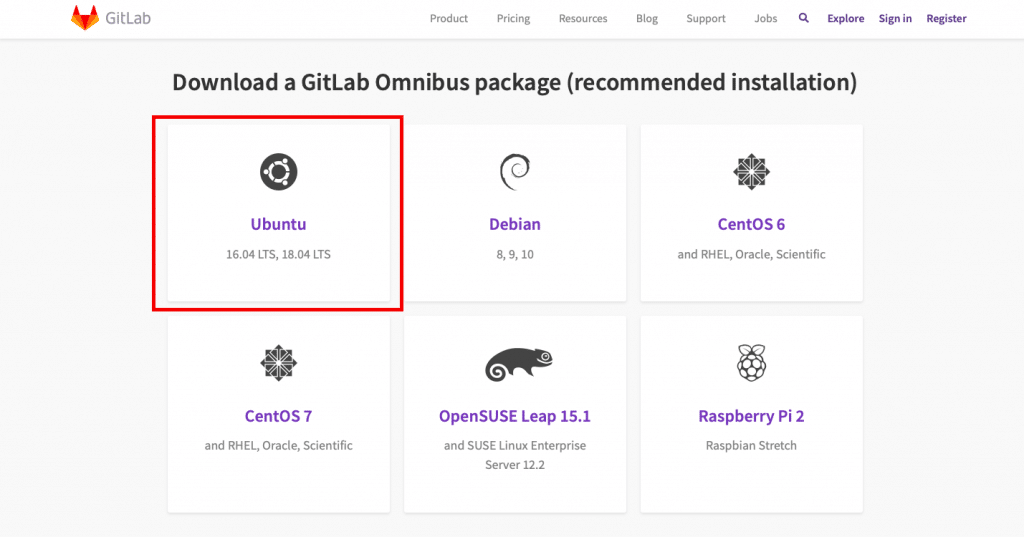
As you can see GitLab official supports several Linux distros, even a Raspberry Pi 2’s Raspbian! We are interested in Ubuntu, so click on the Omnibus Ubuntu Link on as shown in the screenshot above.
Once you click on Ubuntu, the commands you need to enter to install GitLab server will be shown to you.
I am not showing each instruction here since GitLab updates the information presented on their website all the time and that can make this section of the article outdated. Just follow the step by step instructions given in the link to install the GitLab Server on your VM.
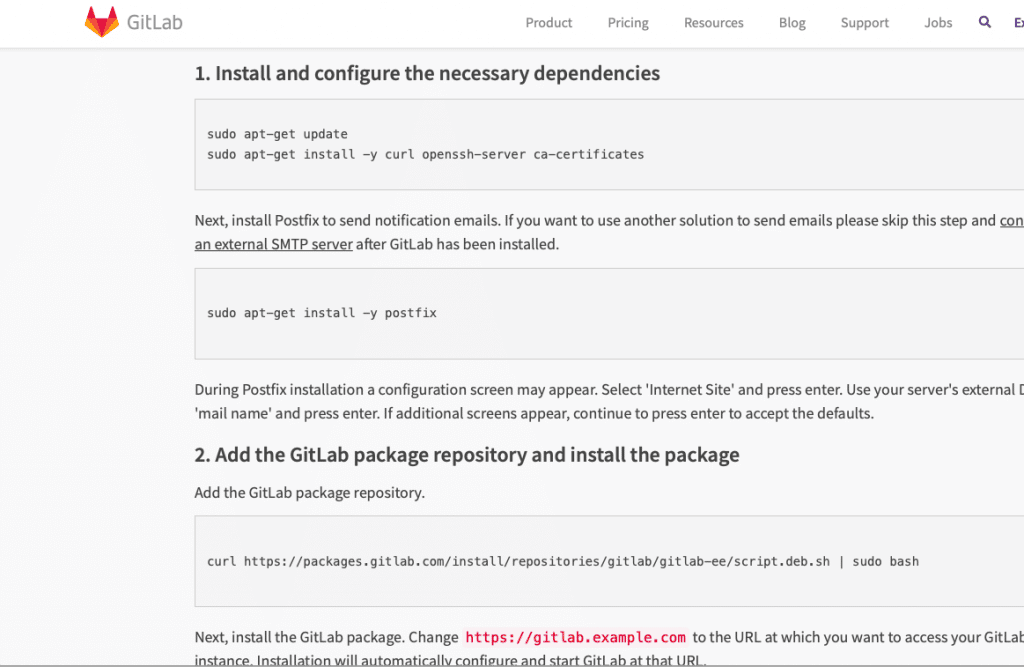
Just type in the commands shown there on you Ubuntu server’s terminal one by one to get GitLab Server installed.
A couple of tips on the GitLab installation instructions
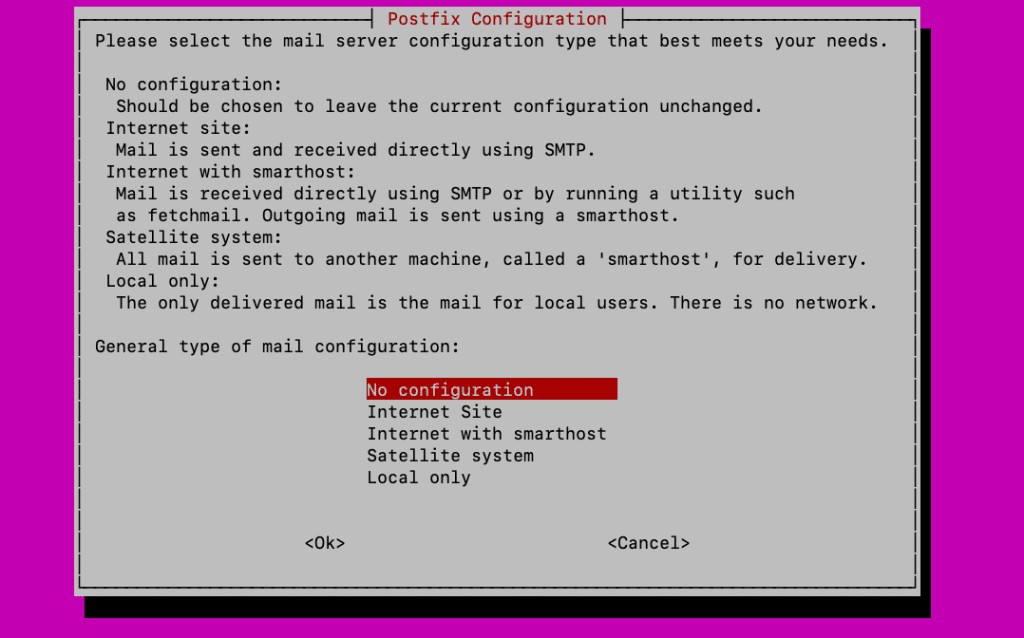
Tip#1
In the postfix installation step (step 1 last command on the GitLab website)
sudo apt-get install -y postfix
you can skip the mail option by choosing the “no configuration” option as shown in the screenshot below.
Tip#2
In the last command of step 2 at GitLab website
sudo EXTERNAL_URL="https://gitlab.example.com" apt-get install gitlab-ee
Make sure you replace the URL with the IP address of the VM that we have made a note of in Step 5 above like this
sudo EXTERNAL_URL="192.168.0.116" apt-get install gitlab-ee
Or to be more precise just place the VM’s IP address that we obtained in Step#4 in its appropriate place
sudo EXTERNAL_URL=”<Your VM’s IP address>” apt-get install gitlab-ee
This step will take a while, so be patient. In my machine it took 4 minutes 48 seconds as shown in the screenshot below, yours can vary depending on the processing power it has.
Once done it will show u something like in the screenshot below.
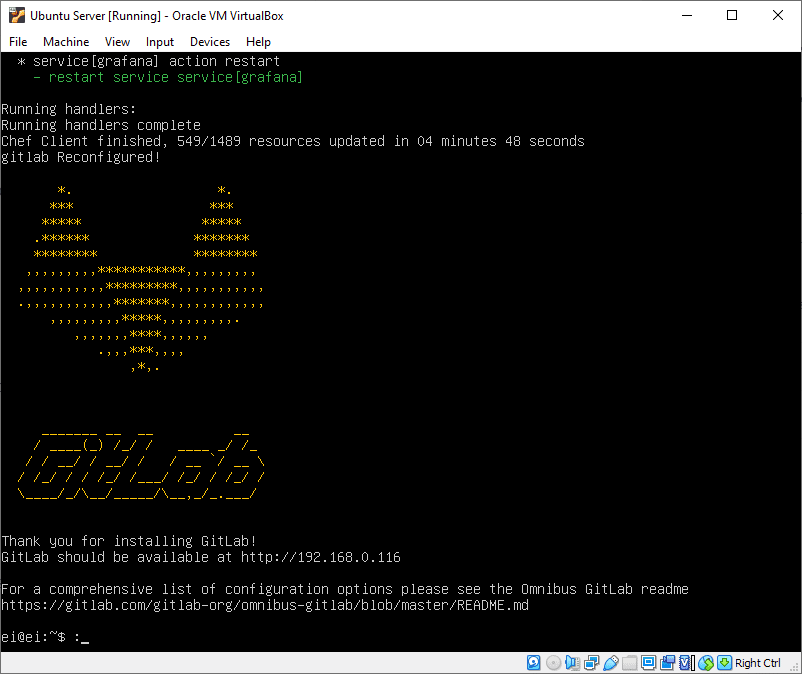
Once it’s done, you can go ahead to your favorite browser and type in the IP address of your VM and check if the installation has succeeded.
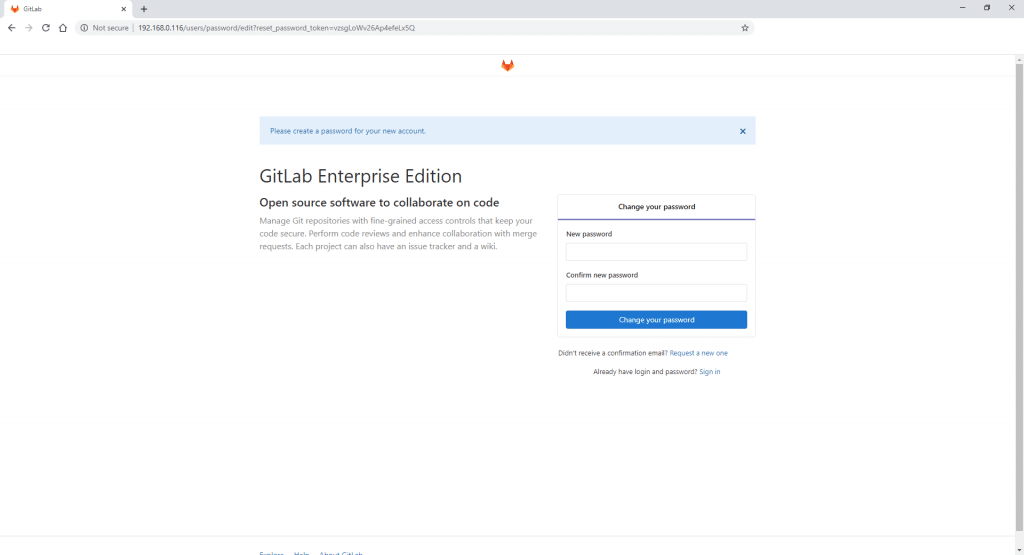
And voila! GitLab server installation has succeeded!
Go ahead and follow the onscreen instructions to set up your password, accounts and everything else!
STEP#6: Download GitLab runners
Before installing GitLab runners you need to install Git on your Windows PC. You can download the latest version of Git in this link.
Now that we have set up the Gitlab server and Git, the next step is to set up the GitLab runner!
At the time of writing this article, the installation process goes like this:
Make a folder on your computer and go to either this link for 32bit version or this link for 64bit version to download the binaries and put them in the folder you created
For getting the most up to date instruction, I am gonna ask you to follow the process given in the GitLab website
STEP#7: Connect the GitLab server to the GitLab runner
GitLab
calls this process of connecting the Server to Runner as “Registering the
GitLab Runner to the Server”
You can follow the instructions for Windows in this link to do the same.
Scroll down to the windows section and you will see something similar to this

Step# 7.1: Start the registration process
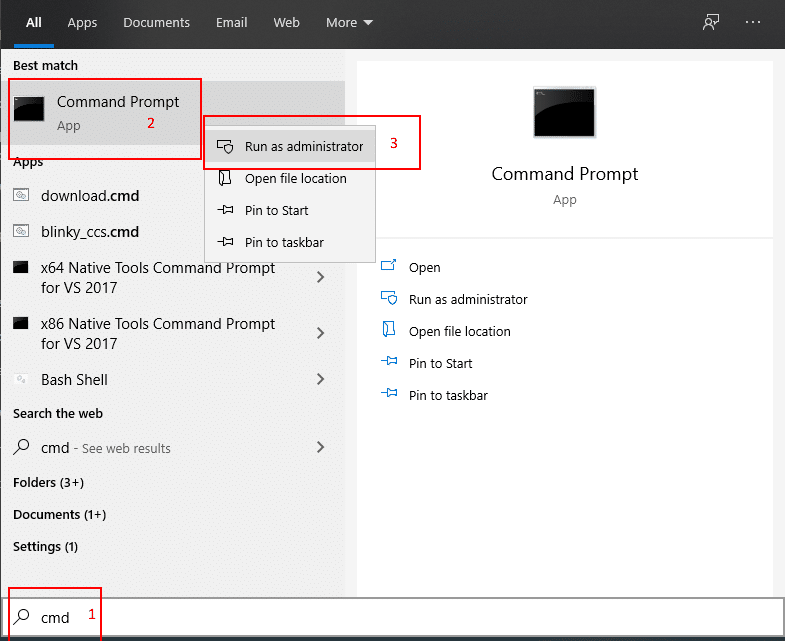
To enter these commands you need to open a command prompt with administrator privileges. For this just type cmd on the search menu, right-click on Command prompt and choose run as administrator
After that, just go to the folder to which you have downloaded the Gitlab Runner to and copy the path to that folder
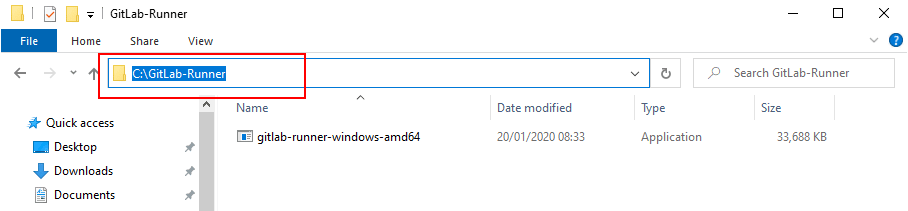
Next, go back to the command line and give the following command
cd <path you copied>
Run the following command to start the registration process
gitlab-runner-windows-amd64.exe register

As shown in the screenshots above, enter your Virtual Machine’s IP address when prompted. Make sure you add “http://” before the IP address.
Once the IP address is entered, the next prompt appears asking you to enter a token, so let’s first go get a token from our GitLab server.
Step#7.2: Obtain token from GitLab Server
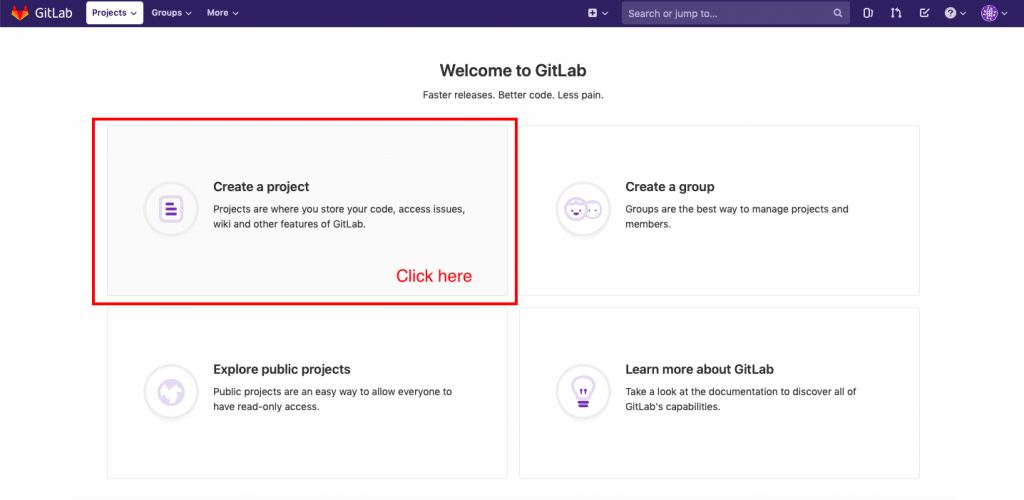
Go to your browser and enter the GitLab Server’s IP address. Once you have logged in you can create your first project by clicking on the respective pane as shown in the screenshot below.
Just give the project a name and click on the create project button. The other field should get populated automatically.
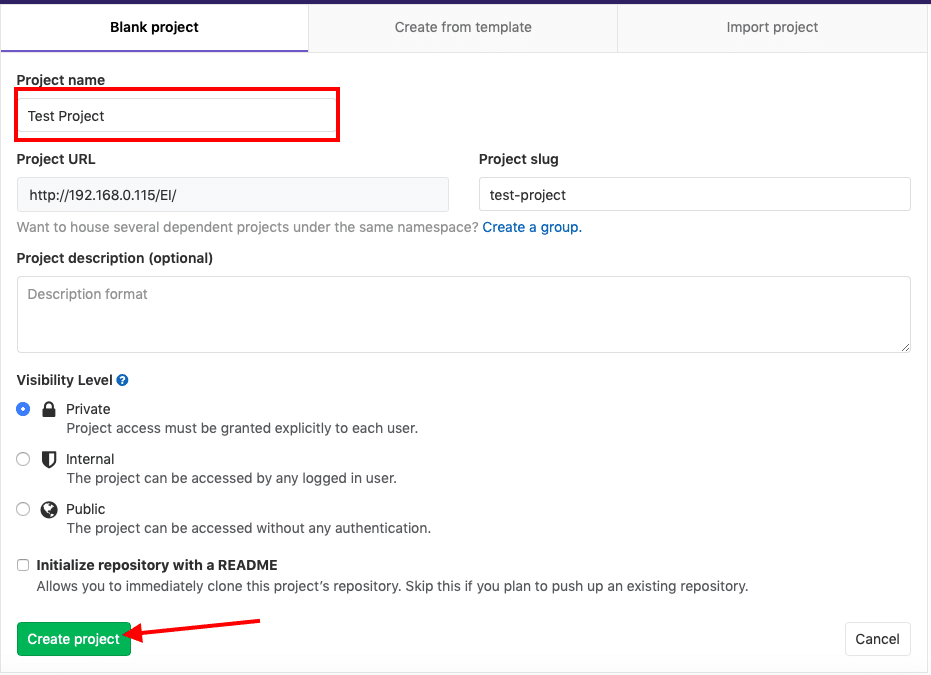
Once you click the button as shown in the screenshot above, you will be taken to your project page.
From there just click on Settings->CI/CD and scroll down a bit and click the “Expand” button next to “Runners” and you will find the token you need as shown in the screenshot below.
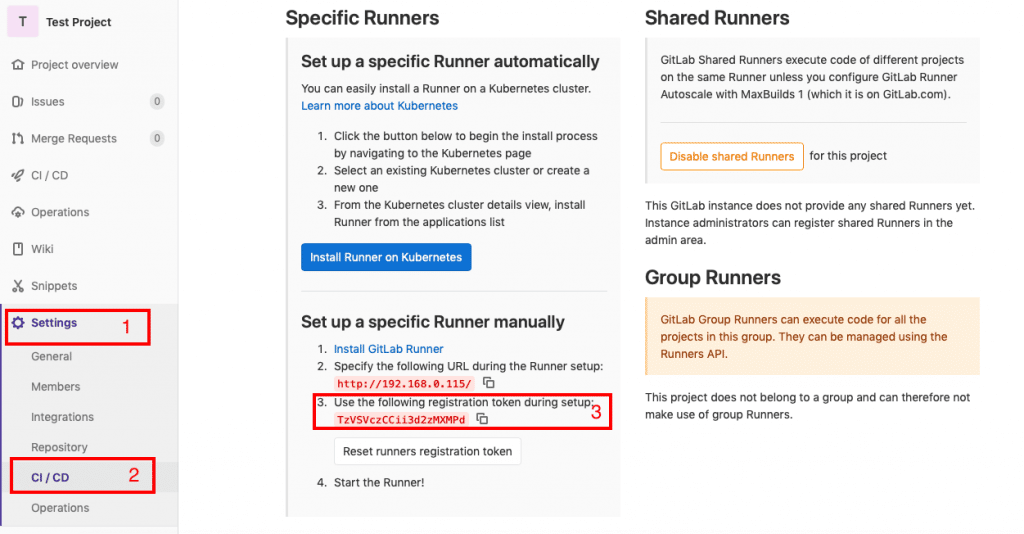
This token basically connects your project on the GitLab Server to the GitLab runner.
Step#7.3: Enter the token
Now that we have the token let’s enter it on the Command prompt
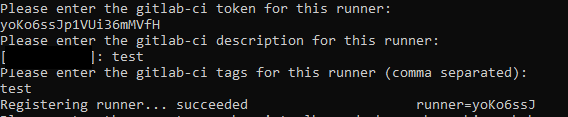
Once
entering the token, you will be prompted to give the runner a description, go
ahead and do that.
After that, you will be asked to enter some tags.
What are tags? Why are they needed for GitLab runners?
The
better term for tags can be capabilities.
Consider
this scenario.
Assume you are working in a large team of 1000 developers, who are doing say 50 different projects and your GitLab system has 100 different runners set up with several capabilities to do specific tasks. Some projects may need C compilers, while others may need python interpreters.
Now in order to connect a given project with a free-runner, we need some sort of parameter to tell the GitLab server that this particular free runner is capable of running the scripts needed for that particular job.
This is where tags come into the picture. By giving tags like “C” or “Python” a single runner can be connected to multiple projects and a single project can execute its jobs on several runners to ensure the best possible performance.
Using
these tags the Gitlab server can find a runner with the specific capability to
use for a given job. So give some suitable tags that will imply the
capabilities of your runner.
Once that is done, you will be prompted to enter “executor”.
Executors are programs that run our CI/CD scripts. Type shell and press enter

This will end the registration process the Runner to the server
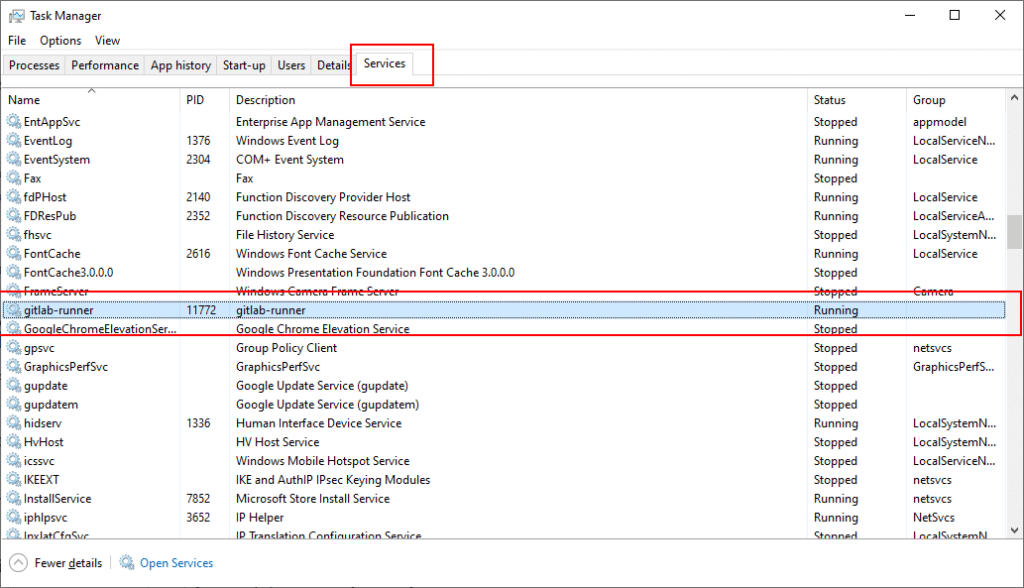
Once registered you can start the GitLab runner as a Service (background task) by issuing the commands
gitlab-runner-windows-amd64.exe install
gitlab-runner-windows-amd64.exe start

As you can see in the screenshot below, in the task manager app we can see that our gitlab-runner service is running!
Test to see if everything works
By following the 7 steps above, you should have a set up with GitLab Server and Runner running on your system. Its time to test and see if everything works the way it is supposed to work!
First, let’s test the GitLab server by creating a repo and pushing it to the server.
Testing GitLab Server
STEP#1: Make a test git repo
Let’s make a simple git repo on a new folder on our Desktop and push it to the GitLab server.
So open your Git-Bash app, which got installed as you were installing git.

Once opened type in the following commands
cd
cd Desktop
mkdir test_project
cd test_project
touch test.c
The above lines of command are just the fancy way of creating a folder named test_project on your Desktop and a file named test.c inside it. You can also do it through the Graphical User Interface if you want to.
So next, please open the C file using your favorite text editor and type in a simple program for testing, something like the following.
#include <stdio.h>

int main()
{
	printf("Hello Embedded Inventors!");
	return 0;
}
Next, let’s initialize a git repository on our test_project folder. So go back to the terminal cd into the test_project folder and type in the following command
You should receive a reply saying “Initialized empty Git repository”
STEP#2: Push it to the server
Now that we have our git repo ready, let’s push it to our git server. To do that login to your GitLab and go to the project we created earlier. There GitLab shows us the commands needed to push our repo to the server.
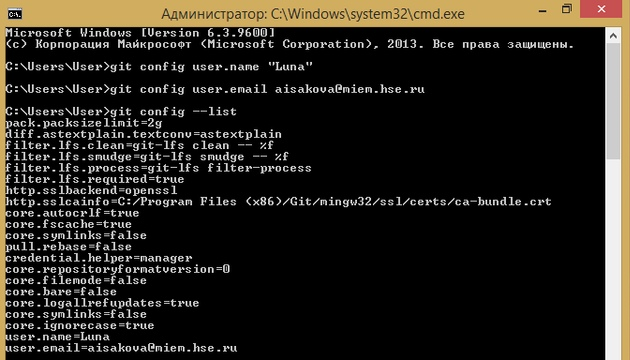
First, let’s configure our name and email on the git repository to the ones set on the GitLab server
So enter
the following command.
git config --global user.name "<enter your name here>"
git config --global user.email "<enter your email here>"
Next, we need to connect our server and our repository. To do that just enter the following commands
git remote add origin <your project URL>.git
In my case it is
git remote add origin http://192.168.0.115/EI/test-project.git
To find your project URL, just copy the address bar of your browser while you are on your project’s page in GitLab
Then add our test.c file and commit the changes using the following commands
git add .
git commit -m"first commit"
Then push
your git repo onto the GitLab using the command
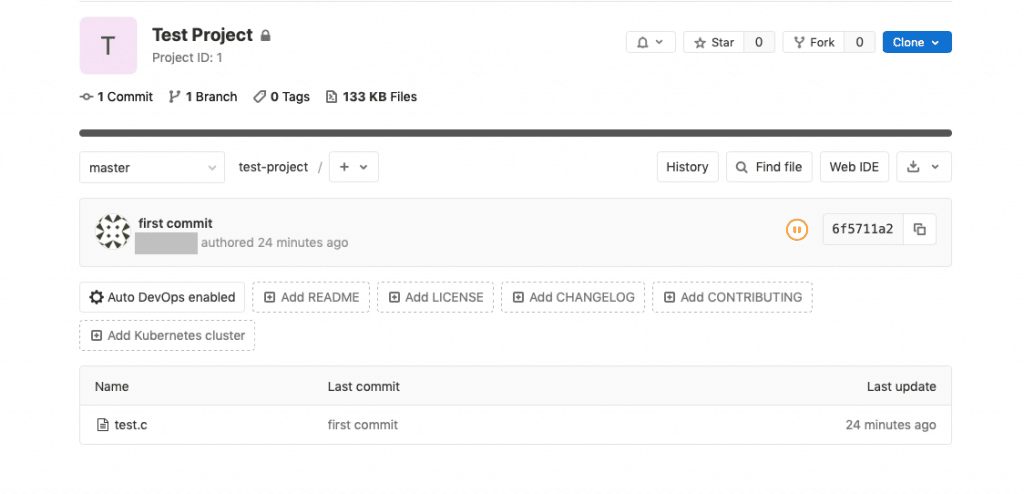
git push -u origin master
You will be prompted to enter the user name and password of your GitLab account, once done go to your browser and just refresh the page and you should be able to see your test project page in GitLab!
Testing GitLab Runner
STEP#3: Make a simple bash script to build the test.c
file
Create a bash script on your project folder
cd
cd Desktop/test_project
touch build.ps1
Edit it so that it looks something like this
gcc test.c -o test
echo "Build completed"
STEP#4: Create and edit .gitlab_ci.yml to run the
above script
What is .gitlab-ci.yml and why it is needed? This is the file that contains the instructions for the GitLab runners to execute the CI/CD tasks. It should be present in the project’s root folder. It can be used to test if a commit builds correctly, passes some unit tests and if it needs packaging and deployment.
You can
learn more about how to configure it from the official quick start tutorial
here
For the
purpose of testing our installation let’s create a file named .gitlab-ci.yml in
the test_project folder and put the following lines in there.
Make sure you are in the right directory
cd
cd Desktop/test_project
Create the file using the command
Open it with your favorite text editor and type the following lines into it.
build:
  script:
    - powershell -File build.ps1
  tags:
    - test
The last line tells the GitLab server to use the GitLab runner with the tag named “test”. If you gave your GitLab runner installation a different tag, make sure you make the appropriate change to the above lines.
Also,
make sure you use spaces instead of tabs at the beginning of the above lines.
Now add it to the git repository and push it to the Gitlab server
git add .
git commit -m"gitlab yml added"
git push
Now let’s get back to our GitLab server’s URL and see if it worked. Go to the project page and click on CI/CD
You will
be taken to the pipeline page which shows the result of your latest commit.

It will
take a minute or so before it completes the pipeline and as you can see in the
screenshot above, mine took 41 seconds to complete and the status is
“passed”
If you
click on “jobs” under the CI/CD menu, you will be taken to another
page which shows you more information about the execution of our yml file
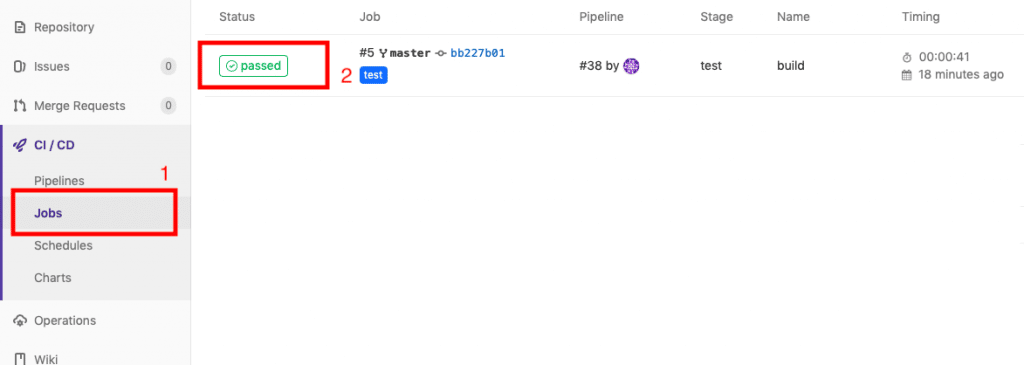
Next click on “passed” as shown in the screenshot above, this will take you to another page which will look something like this.

As you can see, our build.ps1 gets executed by the GitLab runner and it succeeds to compile our project.
And with that, I will conclude this tutorial!
I leave the rest to you to play, explore, experiment and learn GitLab!
I hope you guys enjoyed this article and learned something useful.
You can email us or contact us through this link if you have any questions or suggestions.
If you liked the post, feel free to share this post with your friends and colleagues!
This article provides a step-by-step guide on how to configure GitLab in Windows. It covers the installation process, setting up the GitLab server, working with GitLab repositories, integrating GitLab with CI/CD, and securing GitLab. By following this guide, you will be able to effectively use GitLab for version control and collaboration in your Windows environment.
Key Takeaways
- Install GitLab on Windows by following the provided steps.
- Create a new project, manage users and permissions, and configure webhooks in GitLab.
- Learn how to clone a repository, push and pull changes, and perform branching and merging in GitLab.
- Configure CI/CD pipelines, run tests and deployments, and monitor and log activities in GitLab.
- Implement security measures such as enabling two-factor authentication, setting up SSL/TLS, and implementing access controls in GitLab.
Installing GitLab on Windows

Prerequisites
Before you can configure GitLab, there are a few things you need to have in place. First, make sure you have all the necessary requirements to use this module. For more details, check out the Requirements section. Once you have everything set up, follow these steps to create a configuration source provider from GitLab:
- Open the navigation menu and click on Developer Services.
- Under Resource Manager, click on Configuration Source Providers.
- On the Configuration source providers page, select a compartment.
- Click on Create configuration source provider.
- In the Create configuration source provider panel, enter a name and optional description for the configuration source provider. Avoid entering confidential information.
- Select the compartment where you want to create the configuration source provider.
That’s it! Once you have completed these steps, you will be ready to move on to the next section and start configuring GitLab.
Downloading GitLab
To download GitLab, follow these steps:
- Go to the GitLab website.
- Click on the ‘Download’ button.
- Select the appropriate version for your operating system.
- Choose the installation method that suits your needs.
- Follow the on-screen instructions to complete the installation.
Once GitLab is downloaded and installed, you can start configuring it to meet your requirements.
Configuring GitLab
To configure GitLab, follow these steps:
- Open the GitLab settings page.
- Navigate to the ‘Server URL’ section and enter the service endpoint. Examples include:
- GitLab.com product: https://gitlab.com/
- GitLab installation (relative URL): https://example.com/gitlab
- GitLab installation (subdomain): https://gitlab.example.com/
- Provide the personal access token (PAT) in the designated field.
- (Optional) Click ‘Show advanced options’ to assign tags to the configuration source provider. You can add a defined tag by selecting an existing namespace or add a free-form tag by leaving the value blank.
Remember to save your changes after configuring GitLab.
Setting up GitLab Server

Creating a New Project
To create a new project in GitLab, follow these steps:
- Open GitLab and click on ‘Create a project’ to start the project creation process.
- Select the ‘Blank Project’ option and provide a name and slug for your project.
- For better security, it is recommended to set the visibility level of the repository to private.
- Once you have configured the project settings, click on ‘Create project’ to proceed.
If you are importing an existing project, you can also associate it with a Git repository. Simply go to ‘VCS’ and select ‘Create Git Repository’. Specify the directory where the repository will be created and follow the prompts.
Remember to regularly commit and push your changes to ensure continuous delivery of your project.
Managing Users and Permissions
To manage users and permissions in GitLab, you must have the Owner role for the project. This role gives you full control over the project and its settings. To access the project settings, go to the left sidebar and select Search or find your project. Then, navigate to Settings > General. In the Visibility, project features, permissions section, you can enable or disable various features by toggling the corresponding options. Make sure to save your changes.
It is important to note that GitLab Premium offers additional features and capabilities for managing users and permissions. With GitLab Premium, you can take advantage of advanced access controls, group-level permissions, and more. If you’re looking for enhanced user management capabilities, consider upgrading to GitLab Premium.
For more information on managing users and permissions in GitLab, refer to the GitLab documentation or reach out to the GitLab support team for assistance.
Configuring Webhooks
To configure webhooks in GitLab, follow these steps:
- Go to the project’s settings in GitLab.
- Navigate to the ‘Webhooks’ section.
- Click on ‘Add webhook’ to create a new webhook.
- Enter the webhook URL and choose the events you want to trigger the webhook.
- Optionally, you can add a secret token for added security.
- Save the webhook configuration.
Once the webhook is set up, GitLab will send HTTP POST requests to the specified URL whenever the selected events occur. This allows you to integrate GitLab with other tools and services for automated actions and notifications.
Working with GitLab Repositories

Cloning a Repository
When cloning a repository, you have a few options depending on your specific situation. If you have already logged in to the selected hosting service, completion will suggest the list of available repositories that you can clone. Simply click on the Clone button to initiate the cloning process. If you want to create a project based on the sources you have cloned, click Yes in the confirmation dialog. Git root mapping will be automatically set to the project root directory. If your project contains submodules, they will also be cloned and automatically registered as project roots.
Pushing and Pulling Changes
When you are ready to push your commits, you can do so by selecting Git | Push from the main menu or pressing Control+Shift+K. If you haven’t added any remotes yet, you can click the Define remote link to add a remote. In the dialog that opens, specify the remote name and the URL where it will be hosted, and click OK. Once you have added a remote, you can push your commits by selecting Git | Push from the main menu or pressing Control+Shift+K. GitLab provides a direct link to create a merge request in response to the git push. Simply copy the link and paste it in your browser to create the merge request.
Branching and Merging
To create a merge request in GitLab, there are several methods you can use. Here are a few options:
-
From the merge request list: Go to your project and select Code > Merge requests. Click on New merge request in the upper-right corner. Choose the source and target branches, then click on Compare branches and continue. Fill out the required fields on the New merge request page and click on Create merge request.
-
When adding, editing, or uploading a file: If you’re making changes to a file in the repository, you can create a merge request directly from there. After making your changes, enter a commit message and select the target branch or create a new branch. Make sure to check the ‘Start a new merge request with these changes’ checkbox. Click on Commit changes to create the merge request.
-
When creating a new branch: If you’re creating a new branch, you can also create a merge request at the same time. Go to your project and select Code > Branches. Enter a branch name and click on New branch. On the right side, click on ‘Create merge request’ to open the merge request page. Fill out the necessary details and click on Create merge request.
Remember to provide a clear and concise description of the changes you’re proposing in the merge request. This will help reviewers understand the purpose and impact of your changes.
Integrating GitLab with CI/CD

Configuring CI/CD Pipelines
In GitLab, CI/CD Pipelines are a powerful tool for automating the build, test, and deployment processes of your software projects. With CI/CD Pipelines, you can ensure that your code is continuously integrated, tested, and delivered to production with ease. Here are some key points to keep in mind when configuring CI/CD Pipelines in GitLab:
- Use components to create modular and reusable pipeline configurations. Components can be listed in the CI/CD Catalog and released with specific versions, allowing for better organization and versioning of your pipeline configurations.
- Tag pipelines can be used to test components before running the release job. By configuring the tag pipeline, you can ensure that your components are thoroughly tested before being released.
- Take advantage of GitLab’s extensive documentation and resources to learn more about CI/CD Pipelines and how to configure them effectively. GitLab provides a wealth of resources, including videos, ebooks, and webcasts, to help you get started and optimize your CI/CD workflows.
Implementing CI/CD Pipelines in GitLab can greatly streamline your software development process and improve the quality and reliability of your code. By automating the build, test, and deployment processes, you can ensure that your software is always ready for production.
Running Tests and Deployments
In this section, we will cover the process of running tests and deployments in GitLab. Running tests and deployments is a crucial step in ensuring the quality and reliability of your code. It allows you to test your code changes and deploy them to your live environment.
To run tests and deployments in GitLab, follow these steps:
- Configure your CI/CD pipelines to include the necessary tests for your project.
- Once your pipelines are set up, GitLab will automatically run the tests whenever a new commit is pushed to the relevant branch.
- Monitor the test results in the CI/CD pipelines dashboard.
- If the tests pass, you can proceed with the deployment process.
- Configure your deployment settings in GitLab to specify the target environment and any additional configurations.
- GitLab will automatically deploy the code changes to your live environment based on your configuration.
Remember to regularly monitor the test results and ensure that your deployments are successful. This will help you catch any issues early and maintain the stability of your application.
Monitoring and Logging
Monitoring and logging are crucial aspects of managing a GitLab server. They provide valuable insights into the performance and security of your system. Separate machines should be dedicated to monitoring and logging to ensure accurate and reliable data. Here are some key points to consider:
- Implement a table for presenting structured, quantitative data. Ensure it’s succinct and formatted correctly in Markdown.
- Use a bulleted or numbered list for less structured content, like steps, qualitative points, or a series of related items.
Additionally, it’s important to regularly review the monitoring and logging data to identify any issues or anomalies. This can help in troubleshooting server errors, debugging performance problems, and ensuring the overall health of your GitLab environment.
Tip: Make sure to configure alerts and notifications based on specific metrics or events to proactively address any potential issues.
By following these best practices, you can effectively monitor and log activities in your GitLab server.
Securing GitLab

Enabling Two-Factor Authentication
To enable two-factor authentication for your GitLab account, follow these steps:
- Go to your GitLab account settings.
- Select the ‘Security’ tab.
- Under the ‘Two-Factor Authentication’ section, click on the ‘Enable’ button.
- Follow the prompts to set up two-factor authentication using an authentication app on your mobile device.
- Once set up, you will be required to enter a verification code from your authentication app every time you log in to GitLab.
By enabling two-factor authentication, you add an extra layer of security to your GitLab account, protecting it from unauthorized access even if your password is compromised.
Setting up SSL/TLS
To set up SSL/TLS for your GitLab server, follow these steps:
- Get the certificate information for your private Git server.
- Install the OpenSSL command line application.
- Get the certificate chain.
- Get the server certificate.
To get the certificate information, you can select the certificate in the Certificates service when creating the configuration source provider. For Linux, run the command sudo yum install openssl. For MacOS, run brew install openssl. For Windows, download the openssl binary from Win32/Win64 OpenSSL and configure the environment. To get the certificate chain, run the command openssl s_client -connect $SERVERNAME:$PORT -servername $SERVERNAME -showcerts 2>&1 < /dev/null | sed -n '/-----BEGIN/,/-----END/p' > certChain.pem. Finally, to get the server certificate, run the command openssl s_client -connect $SERVERNAME:$PORT -servername $SERVERNAME -showcerts 2>&1 < /dev/null | sed -n '/-----BEGIN/,/-----END/p' > serverCert.pem.
Implementing Access Controls
To implement access controls for your project, you must have the Owner role. On the left sidebar, select Search or go to and find your project. Select Settings > General. Expand Visibility, project features, permissions. From the Project visibility dropdown list, select an option. The visibility setting for a project must be at least as restrictive as the visibility of its parent group. Select Save changes.
You can also change the visibility of individual features in a project. Prerequisites: You must have the Owner role for the project. On the left sidebar, select Search or go to and find your project. Select Settings > General. Expand Visibility, project features, permissions. To enable or disable a feature, turn on or turn off the feature toggle. Select Save changes.
Additionally, you have the ability to change the visibility of all groups. On the left sidebar, select Search or go to and find your group. Select Settings > General. Expand Naming, visibility. For Visibility level, select an option. The visibility setting for a project must be at least as restrictive as the visibility of its parent group. Select Save changes.
Administrators can also restrict the use of public or internal projects. This setting helps prevent users from publicly exposing their projects. Public projects and groups have certain access permissions for unauthenticated users, including users with the Guest role. Public groups can have public, internal, or private subgroups.
Remember, to implement access controls, you must have the Owner role for the project or group. Make sure to save your changes and consider the visibility settings of your parent group.
Securing GitLab is crucial for maintaining the security of your codebase. With the increasing number of cyber threats, it is important to implement robust security measures to protect your GitLab instance. At Home Page – DevSecOps, we specialize in providing comprehensive security solutions for GitLab. Our team of experts can help you secure your GitLab environment by implementing best practices, conducting security audits, and providing ongoing support. Don’t wait until it’s too late, take action now and ensure the security of your GitLab instance. Contact us today to learn more about our services and how we can help you secure your GitLab environment.
Conclusion
Configuring GitLab on Windows is a straightforward process that allows you to take advantage of powerful version control and collaboration features. By following the steps outlined in this article, you can easily install GitLab, set up a GitLab server, work with repositories, integrate with CI/CD, and secure your GitLab environment. Whether you’re a developer, project manager, or system administrator, GitLab provides a robust platform for managing your code and streamlining your development workflow. So, get started with GitLab on Windows and unlock the full potential of your software projects!
Frequently Asked Questions
What are the prerequisites for installing GitLab on Windows?
The prerequisites for installing GitLab on Windows include a compatible version of Windows, a supported version of Git, and a server with sufficient resources.
How do I download GitLab on Windows?
To download GitLab on Windows, you can visit the official GitLab website and download the installer for Windows. Follow the installation instructions to complete the installation process.
What are the steps to configure GitLab on Windows?
The steps to configure GitLab on Windows include setting up the server, creating a new project, managing users and permissions, and configuring webhooks.
How do I clone a repository in GitLab?
To clone a repository in GitLab, you can use the ‘git clone’ command followed by the repository URL. This will create a local copy of the repository on your machine.
How do I push and pull changes in GitLab?
To push changes to GitLab, you can use the ‘git push’ command. To pull changes from GitLab, you can use the ‘git pull’ command. Make sure you are in the correct branch before executing these commands.
How do I create a new project in GitLab?
To create a new project in GitLab, you can navigate to the GitLab interface and click on the ‘New Project’ button. Follow the prompts to set up the project and configure its settings.
How do I configure the GitLab CI/CD pipeline?
To configure the GitLab CI/CD pipeline, you can create a ‘.gitlab-ci.yml’ file in your project repository and define the stages, jobs, and scripts for your pipeline. GitLab will automatically run the pipeline based on the configuration.
How do I enable two-factor authentication in GitLab?
To enable two-factor authentication in GitLab, you can navigate to your account settings and enable the option for two-factor authentication. Follow the prompts to set up and verify your authentication method.