
Applies ToWindows 11 Windows 10
Если на устройстве с Windows отображается черный или пустой экран, попробуйте выполнить следующие действия:
-
Чтобы разбудить экран, используйте одно из следующих сочетаний клавиш:
-
Клавиша с логотипом
Windows + P , чтобы выбрать режим отображения презентации или проекции. -
CTRL + ALT + DEL для отображения параметров безопасности.
-
-
Для черного экрана используйте следующее сочетание клавиш: клавиша с логотипом Windows + CTRL + SHIFT + B, чтобы сбросить графический драйвер.
Если у вас есть Surface, см. статью Surface не включается и не запускается.
Нужна дополнительная помощь?
Нужны дополнительные параметры?
Изучите преимущества подписки, просмотрите учебные курсы, узнайте, как защитить свое устройство и т. д.
Если после обновления или установки Windows 10, а также после перезагрузки уже успешно установленной системы вас встречает черный экран с указателем мыши (а возможно, и без него), в статье ниже я расскажу о возможных способах исправить проблему, не прибегая к переустановке системы.
Проблема обычно связана с неправильной работой драйверов видеокарт NVidia и AMD Radeon, однако это не единственная причина. В рамках этой инструкции будет рассматриваться тот случай (наиболее распространенный в последнее время), когда, судя по всем признакам (звуки, работа компьютера), Windows 10 загружается, однако на экране ничего не отображается (кроме, возможно, указателя мыши), также возможен вариант, когда черный экран появляется после сна или гибернации (или после выключения и повторного включения компьютера). Дополнительные варианты этой проблемы в инструкции Не запускается Windows 10. Для начала несколько быстрых способов решения для распространенных ситуаций.
- Если при последнем выключении Windows 10 вы видели сообщение Подождите, не выключайте компьютер (идет установка обновлений), а при включении видите черный экран — просто подождите, иногда так устанавливаются обновления, это может занять вплоть до получаса, особенно на медленных ноутбуках (Еще один признак того, что дело именно в этом — высокая нагрузка на процессор, вызываемая Windows Modules Installer Worker).
- В некоторых случаях проблема может быть вызвана подключенным вторым монитором. В этом случае попробуйте его отключить, а если это не сработало, то зайти в систему вслепую (описано ниже, в разделе про перезагрузку), после чего нажать клавиши Windows+P (английская), один раз клавишу вниз и Enter.
- Если вы видите экран входа, а после входа появляется черный экран, то попробуйте следующий вариант. На экране входа нажмите по кнопке вкл-выкл справа внизу, а затем, удерживая Shift, нажмите «Перезагрузка». В открывшемся меню выберите Диагностика — Дополнительные параметры — Восстановление системы.
Если вы столкнулись с описываемой проблемой после удаления какого-либо вируса с компьютера, а на экране видите указатель мыши, то вам с большей вероятностью поможет следующее руководство: Не загружается рабочий стол — что делать. Есть еще один вариант: если проблема появилась после изменения структуры разделов на жестком диске или после повреждений HDD, то черный экран сразу после логотипа загрузки, без всяких звуков может быть признаком недоступности тома с системой. Подробнее: Ошибка Inaccessible_boot_device в Windows 10 (см. раздел про изменившуюся структуру разделов, несмотря на то, что текст ошибки у вас не показывается, это может быть ваш случай).
Перезагрузка Windows 10
Один из работающих способов исправить проблему с черным экраном после повторного включения Windows 10, судя по всему, вполне работоспособный для владельцев видеокарт AMD (ATI) Radeon — полностью перезагрузить компьютер, после чего отключить быстрый запуск Windows 10.
Для того, чтобы сделать это вслепую (будет описано два способа), после загрузки компьютера с черным экраном несколько раз нажмите на клавишу Backspace (стрелка влево для удаления символа) — это уберет заставку экрана блокировки и удалит любые символы из поля ввода пароля, если вы их туда случайно ввели.
После этого, переключите раскладку клавиатуры (если требуется, по умолчанию в Windows 10 обычно русский, переключить почти гарантированно можно клавишами Windows + Пробел) и введите свой пароль учетной записи. Нажмите Enter и подождите, пока система загрузится.
Следующий шаг — перезагрузка компьютера. Для этого, нажмите на клавиатуре клавиши Windows (клавиша с эмблемой) + R, подождите 5-10 секунд, введите (опять же, может потребоваться переключить раскладку клавиатуры, если по умолчанию в системе у вас русский): shutdown /r и нажмите Enter. Через несколько секунд еще раз нажмите Enter и подождите около минуты, компьютер должен будет перезагрузиться — вполне возможно, в этот раз вы увидите изображение на экране.
Второй способ перезагрузки Windows 10 при черном экране — после включения компьютера несколько раз нажать клавишу Backspace (а можно пробел или любой символ), затем — пять раз нажать клавишу Tab (это переведет нас к иконке включения-выключения на экране блокировки), нажать Enter, затем — клавишу «Вверх» и еще раз Enter. После этого компьютер перезагрузится.
Если ни один из этих вариантов не позволяет перезагрузить компьютер, вы можете попробовать (потенциально опасно) принудительное выключение компьютера долгим удерживанием кнопки питания. А затем снова включить его.
Если в результате вышеописанного изображение на экране появилось, значит дело именно в работе драйверов видеокарты после быстрого запуска (который по умолчанию используется в Windows 10) и для исключения повторения ошибки.
Отключение быстрого запуска Windows 10:
- Кликните правой кнопкой мыши по кнопке Пуск, выберите Панель управления, а в ней — Электропитание.
- Слева выберите «Действия кнопок питания».
- Вверху нажмите «Изменение параметров, которые сейчас недоступны».
- Пролистайте окно вниз и снимите отметку с пункта «Включить быстрый запуск».
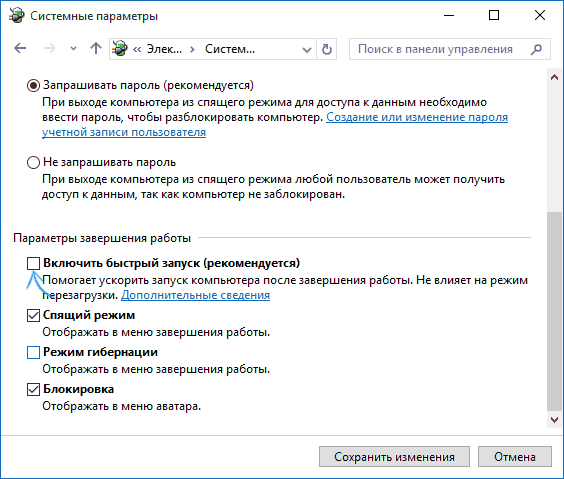
Сохраните сделанные изменения. Проблема в дальнейшем повториться не должна.
Использование интегрированного видео
Если у вас имеется выход для подключения монитора не от дискретной видеокарты, а на материнской плате, попробуйте выключить компьютер, подключить монитор к данному выходу и снова включить компьютер.
Есть немалая вероятность (если интегрированный адаптер не отключен в UEFI), что после включения, вы увидите изображение на экране и сможете выполнить откат драйверов дискретной видеокарты (через диспетчер устройств), установить новые или же использовать восстановление системы.
Удаление и переустановка драйверов видеокарты
Если предыдущий способ не сработал, следует попробовать удалить драйвера видеокарты из Windows 10. Сделать это можно в безопасном режиме или в режиме с низким разрешением экрана, а о том, как в него попасть, видя только черный экран, я сейчас расскажу (два способа для разных ситуаций).
Первый вариант. На экране входа (черном) несколько раз нажмите Backspace, затем — 5 раз Tab, нажмите Enter, потом — один раз вверх и, удерживая Shift, снова Enter. Подождите около минуты (загрузится меню диагностики, восстановления, отката системы, которое вы, вероятно, тоже не увидите).
Следующие шаги:
- Три раза вниз – Enter — два раза вниз — Enter – два раза влево.
- Для компьютеров с BIOS и MBR — один раз вниз, Enter. Для компьютеров с UEFI — два раза вниз – Enter. Если вы не знаете, какой у вас вариант — нажмите «вниз» один раз, а если попадете в настройки UEFI (BIOS), то используйте вариант с двумя нажатиями.
- Еще раз нажмите Enter.
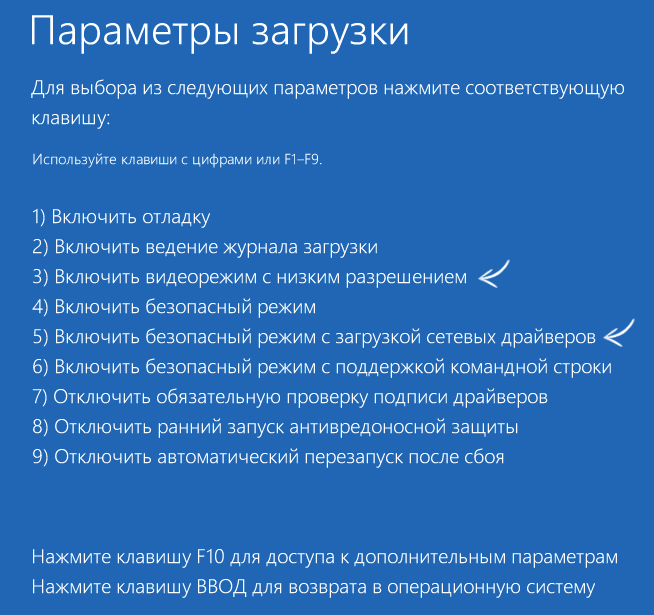
Компьютер перезагрузится и покажет вам особые варианты загрузки. Используя числовые клавиши 3 (F3) или 5 (F5) для того, чтобы запустить режим с низким разрешением экрана или безопасный режим с поддержкой сети. Загрузившись, вы можете либо попробовать запустить восстановление системы в панели управления, либо удалить имеющиеся драйвера видеокарты, после чего, перезапустив Windows 10 в обычном режиме (изображение должно появиться), установить их заново. (см. Установка драйверов NVidia для Windows 10 — для AMD Radeon шаги будут почти теми же самыми)
Если такой способ загрузить компьютер по какой-то причине не срабатывает, можно попробовать следующий вариант:
- Зайти в Windows 10 с паролем (так как это описывалось в начале инструкции).
- Нажать клавиши Win+X.
- 8 раз нажать вверх, а затем — Enter (откроется командная строка от имени администратора).
В командной строке введите (должна быть английская раскладка): bcdedit /set {default} safeboot network и нажмите Enter. После этого введите shutdown /r нажмите Enter, через 10-20 секунд (или после звукового оповещения)— еще раз Enter и подождите, пока компьютер не перезагрузится: он должен загрузиться в безопасном режиме, где можно будет удалить текущие драйвера видеокарты или запустить восстановление системы. (Для того, чтобы в дальнейшем вернуть обычную загрузку, в командной строке от имени администратора используйте команду bcdedit /deletevalue {default} safeboot )
Дополнительно: если у вас имеется загрузочная флешка с Windows 10 или диск восстановления, то вы можете воспользоваться ими: Восстановление Windows 10 (можно попробовать использовать точки восстановления, в крайнем случае — сброс системы).
Если проблема сохраняется и разобраться не получается, пишите (с подробностями о том, что, как и после каких действий произошло и происходит), правда не обещаю, что смогу дать решение.
Each time you boot up your Windows PC, you expect it to work. It’s not every day that it starts up the exact same way though, especially if there’s an underlying fault you didn’t know about and have no clue how to solve it.
Among these faults is the dreaded black screen. There are several reasons why it crops up in Windows 10, which we’ll look at next, so follow along to find out how you can fix black desktop screen issues.

Causes Of Black Desktop Screen Problems In Windows 10
You’ve probably heard of the black screen of death, which is common across operating systems. This usually happens when you turn on your computer and get a blank black screen back.
The main culprits of black desktop screen Windows 10 problems are a malfunctioning screen, a bad video card or a bad connection.

Other causes include a corrupted system file, which manifests with a blinking prompt and a blank screen, a faulty display adapter, or your computer just crashed due to a motherboard failure.
- Check for any loose connections
- Force the display to wake up
- Try a different monitor to check for a faulty video card
- Examine your computer’s motherboard for damage
- Repair or replace the monitor
- Boot into Safe Mode
- Reinstall Display Driver
Check For Any Loose Connections

A black desktop screen can be caused by loose connections in your computer’s circuit board or various cords. Check the adapter plug to ensure it is fastened securely to the monitor and plugged into the power source for proper electricity flow.
Make sure the video cable connections are secure at the back of your computer and monitor, and that the graphics card is well placed in the motherboard with all the cables and wires securely and properly connected.
If you don’t see a standby light when you connect your monitor to the power outlet, it could be an issue with the monitor or power cable. You can also try using a different cable or other connection if you see the standby light but no signal from your computer.
Disconnect any external devices like your mouse, hard drive or keyboard and restart the computer. If the black screen goes away, plug in each of these peripherals one at a time to find out the culprit among them, and update its drivers.
Force The Display To Wake Up

Not all black desktop screen issues in Windows 10 indicate a serious problem with the hardware or other components. It could be that your display isn’t detected by Windows 10, in which case you can use your keyboard keys to force the display to wake up.
To do this, hit the Windows key+CTRL+SHIFT+B keys at the same time. This will restart your computer’s graphics drivers and resolve some underlying issues.

Alternatively, press CTRL+ALT+DEL on your keyboard, click the power button at the lower right side of the screen and click Restart to reboot the computer. Your computer will restart without the black screen.

The black desktop screen issue may have been brought about by a Windows 10 update issue, so using the key combination above can help you get out of different states, including the black screen.
You can also check that the computer’s display brightness levels are up, and whether the device turned down the display to save on power.
Try a Different Monitor To Check For a Faulty Video Card
The main causes of faulty video cards are manufacturer defects or damage, but you can check whether yours is at fault or needs replacement by trying it on a different monitor and check for a display. If the second monitor has a normal display, then your current one has failed.
Examine Your Computer’s Motherboard For Damage

Your video card may be working perfectly fine, but the motherboard may not. Everything within your computer’s casing connects to this large circuit motherboard that lets them interact and communicate properly. If there’s a short circuit in the motherboard from a power surge or spill, it may not be able to read and use the attached cards or components, and eventually malfunctions.
Examine it for any damage and try a different video card to see if the display comes up again. If not, replace the entire board.
Repair Or Replace The Monitor

A black desktop screen may also indicate that it has reached its end-of-life span due to factors like moisture or high levels of humidity, or failed electronics within the monitor. If you connect to a different computer and it doesn’t work, the monitor is faulty and needs to be replaced.
Boot Into Safe Mode
Safe Mode starts Windows 10 with the very basic and essential apps and programs so that you can know whether there’s something else causing the black desktop screen.
To enter Safe Mode while your screen is black, press the power button on the computer and reboot the machine. Repeat this process three times to trigger the Automatic Repair function or Diagnostics Mode.
Next, click Advanced startup menu and click on the Troubleshoot option.

In the Advanced options screen, click Startup Settings.

Press 4 on your keyboard to start Windows 10 in Safe Mode.

Next, sign in and press Win+X, select Device Manager and then click to expand the Display Adapter section.
Right click your display driver from the list and select Disable device.

Reboot your computer to complete the setup and check whether you can see your desktop. If you can, check for the latest driver from Windows Update or the manufacturer’s website.
Reinstall Display Driver
To do this, you need to boot into Safe Mode using the steps above, press Win+X, and then select Device Manager.
In the Device Manager window, click on Display Adapters, right-click your video card and select Uninstall. Press OK to complete the uninstallation.

When your computer boots up again, Windows will automatically reinstall the video card driver, and you can check if you encounter the black screen again.
Wrapping Up
Sometimes a black desktop screen can be resolved by waiting it out for up to six hours if your PC is slow so that Windows can sort itself out. It’s worth trying this and the other solutions above.
We’d love to hear your experience with fixing the black screen issue in Windows 10. Tell us which of these solutions worked, or if you have a specific issue, share it in a comment below.
Related Posts
- How to Fix a “This file does not have an app associated with it” Error on Windows
- How to Fix an Update Error 0x800705b4 on Windows
- How to Resolve “A JavaScript error occured in the main process” Error on Windows
- How to Fix the Network Discovery Is Turned Off Error on Windows
- How to Change Folder Icons in Windows
FAQ
[Ноутбук] Устранение неполадок: как устранить проблему, из-за которой фон рабочего стола становится черным
Поддерживаемые продукты: ноутбук, настольный компьютер, моноблок, игровая консоль
После обновления Windows 10 до версии , 2004 (сборка 18362.657) или более поздней на некоторых моделях может возникнуть проблема: фон главного экрана, расширенного экрана или ScreenPad становится черным. Пожалуйста, обратитесь к инструкциям по устранению неполадок ниже.
Вы можете обнаружить, что фон главного экрана, расширенного экрана или ScreenPad стал черным. Если Вы столкнулись с этой проблемой, то Вам нужно сбросить фон для решения проблемы.
Пожалуйста, перейдите к соответствующей инструкции в зависимости от текущей операционной системы Windows на Вашем компьютере:
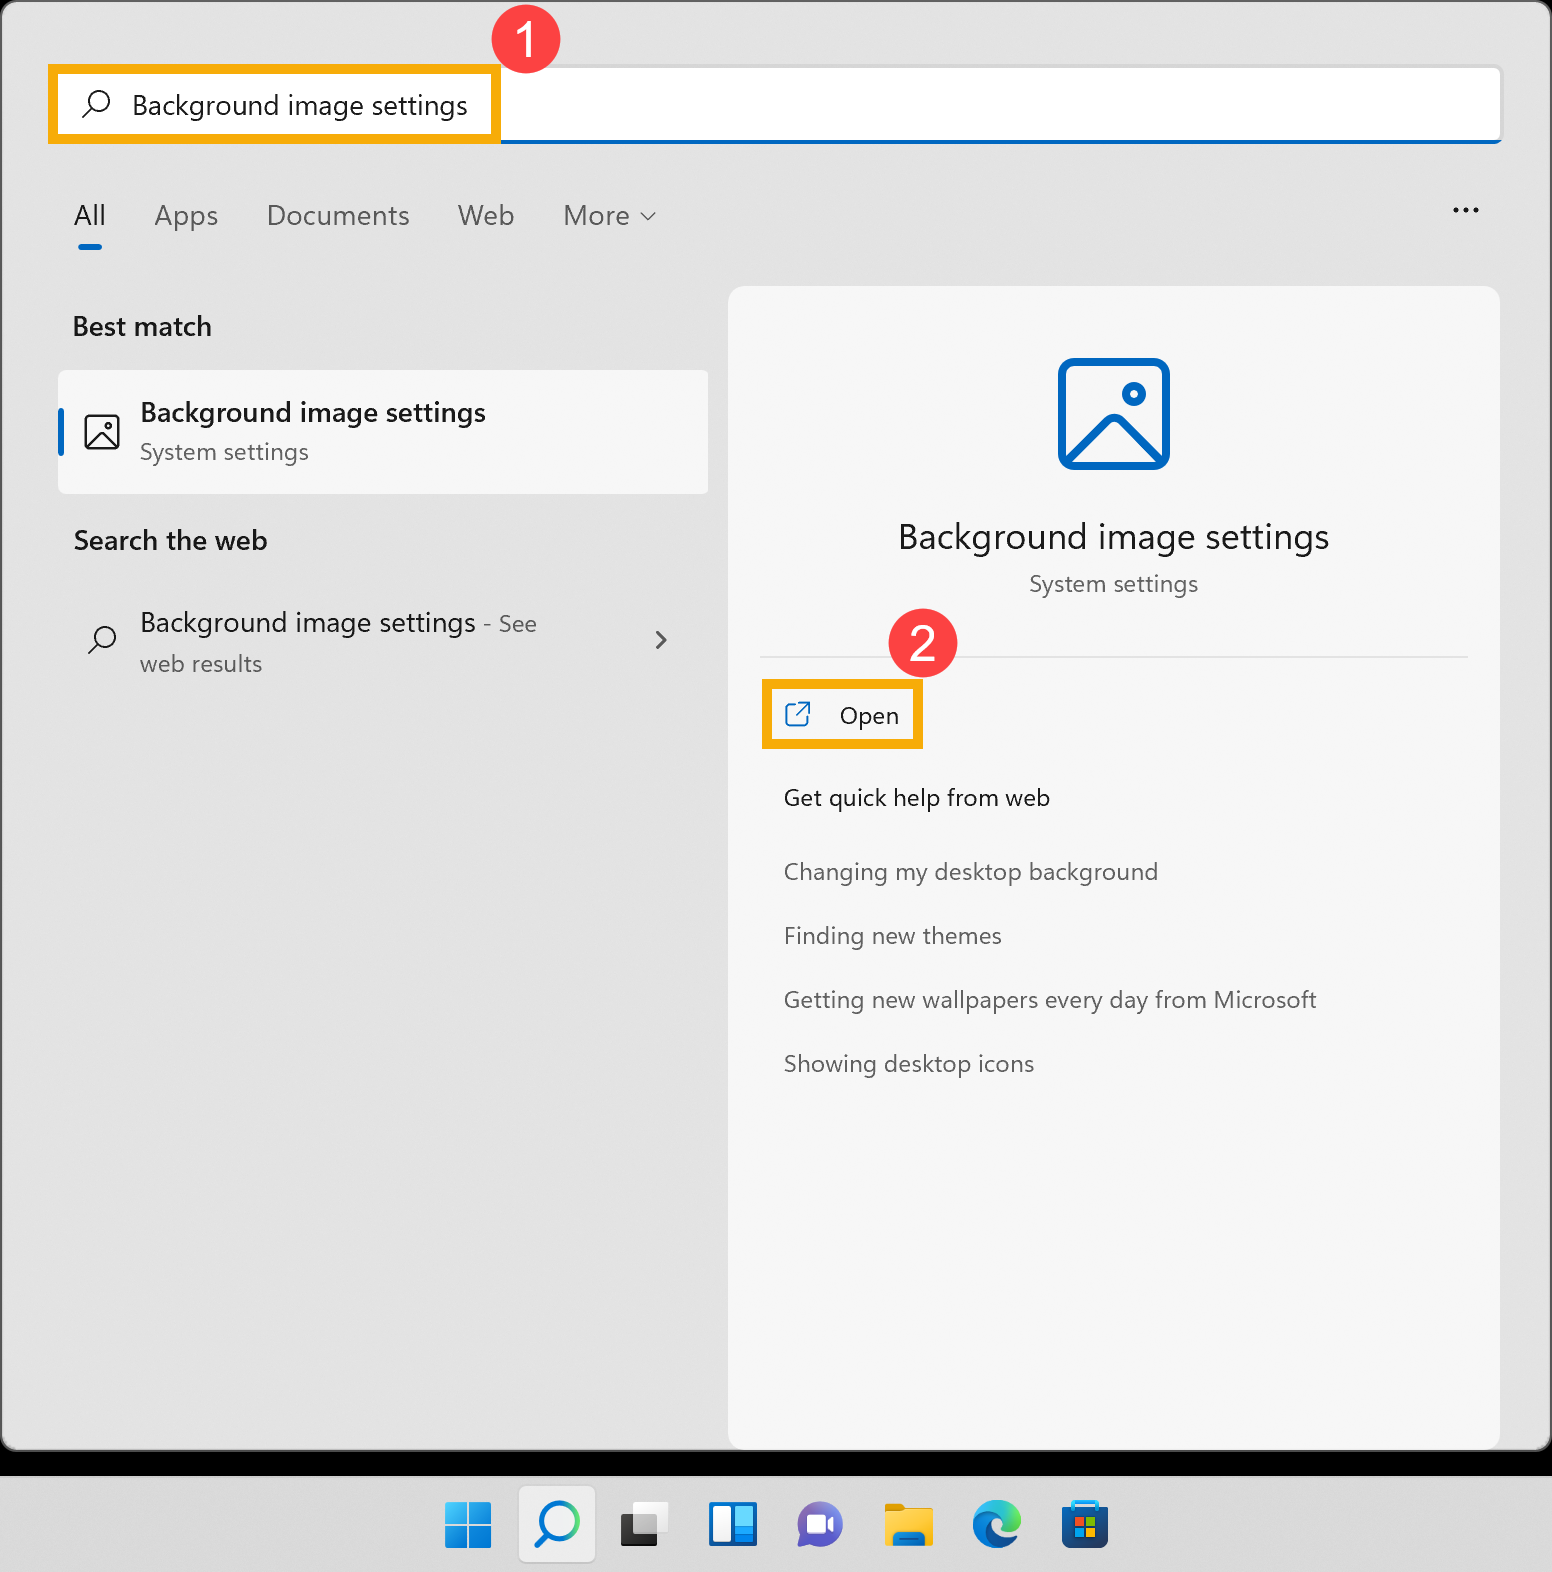
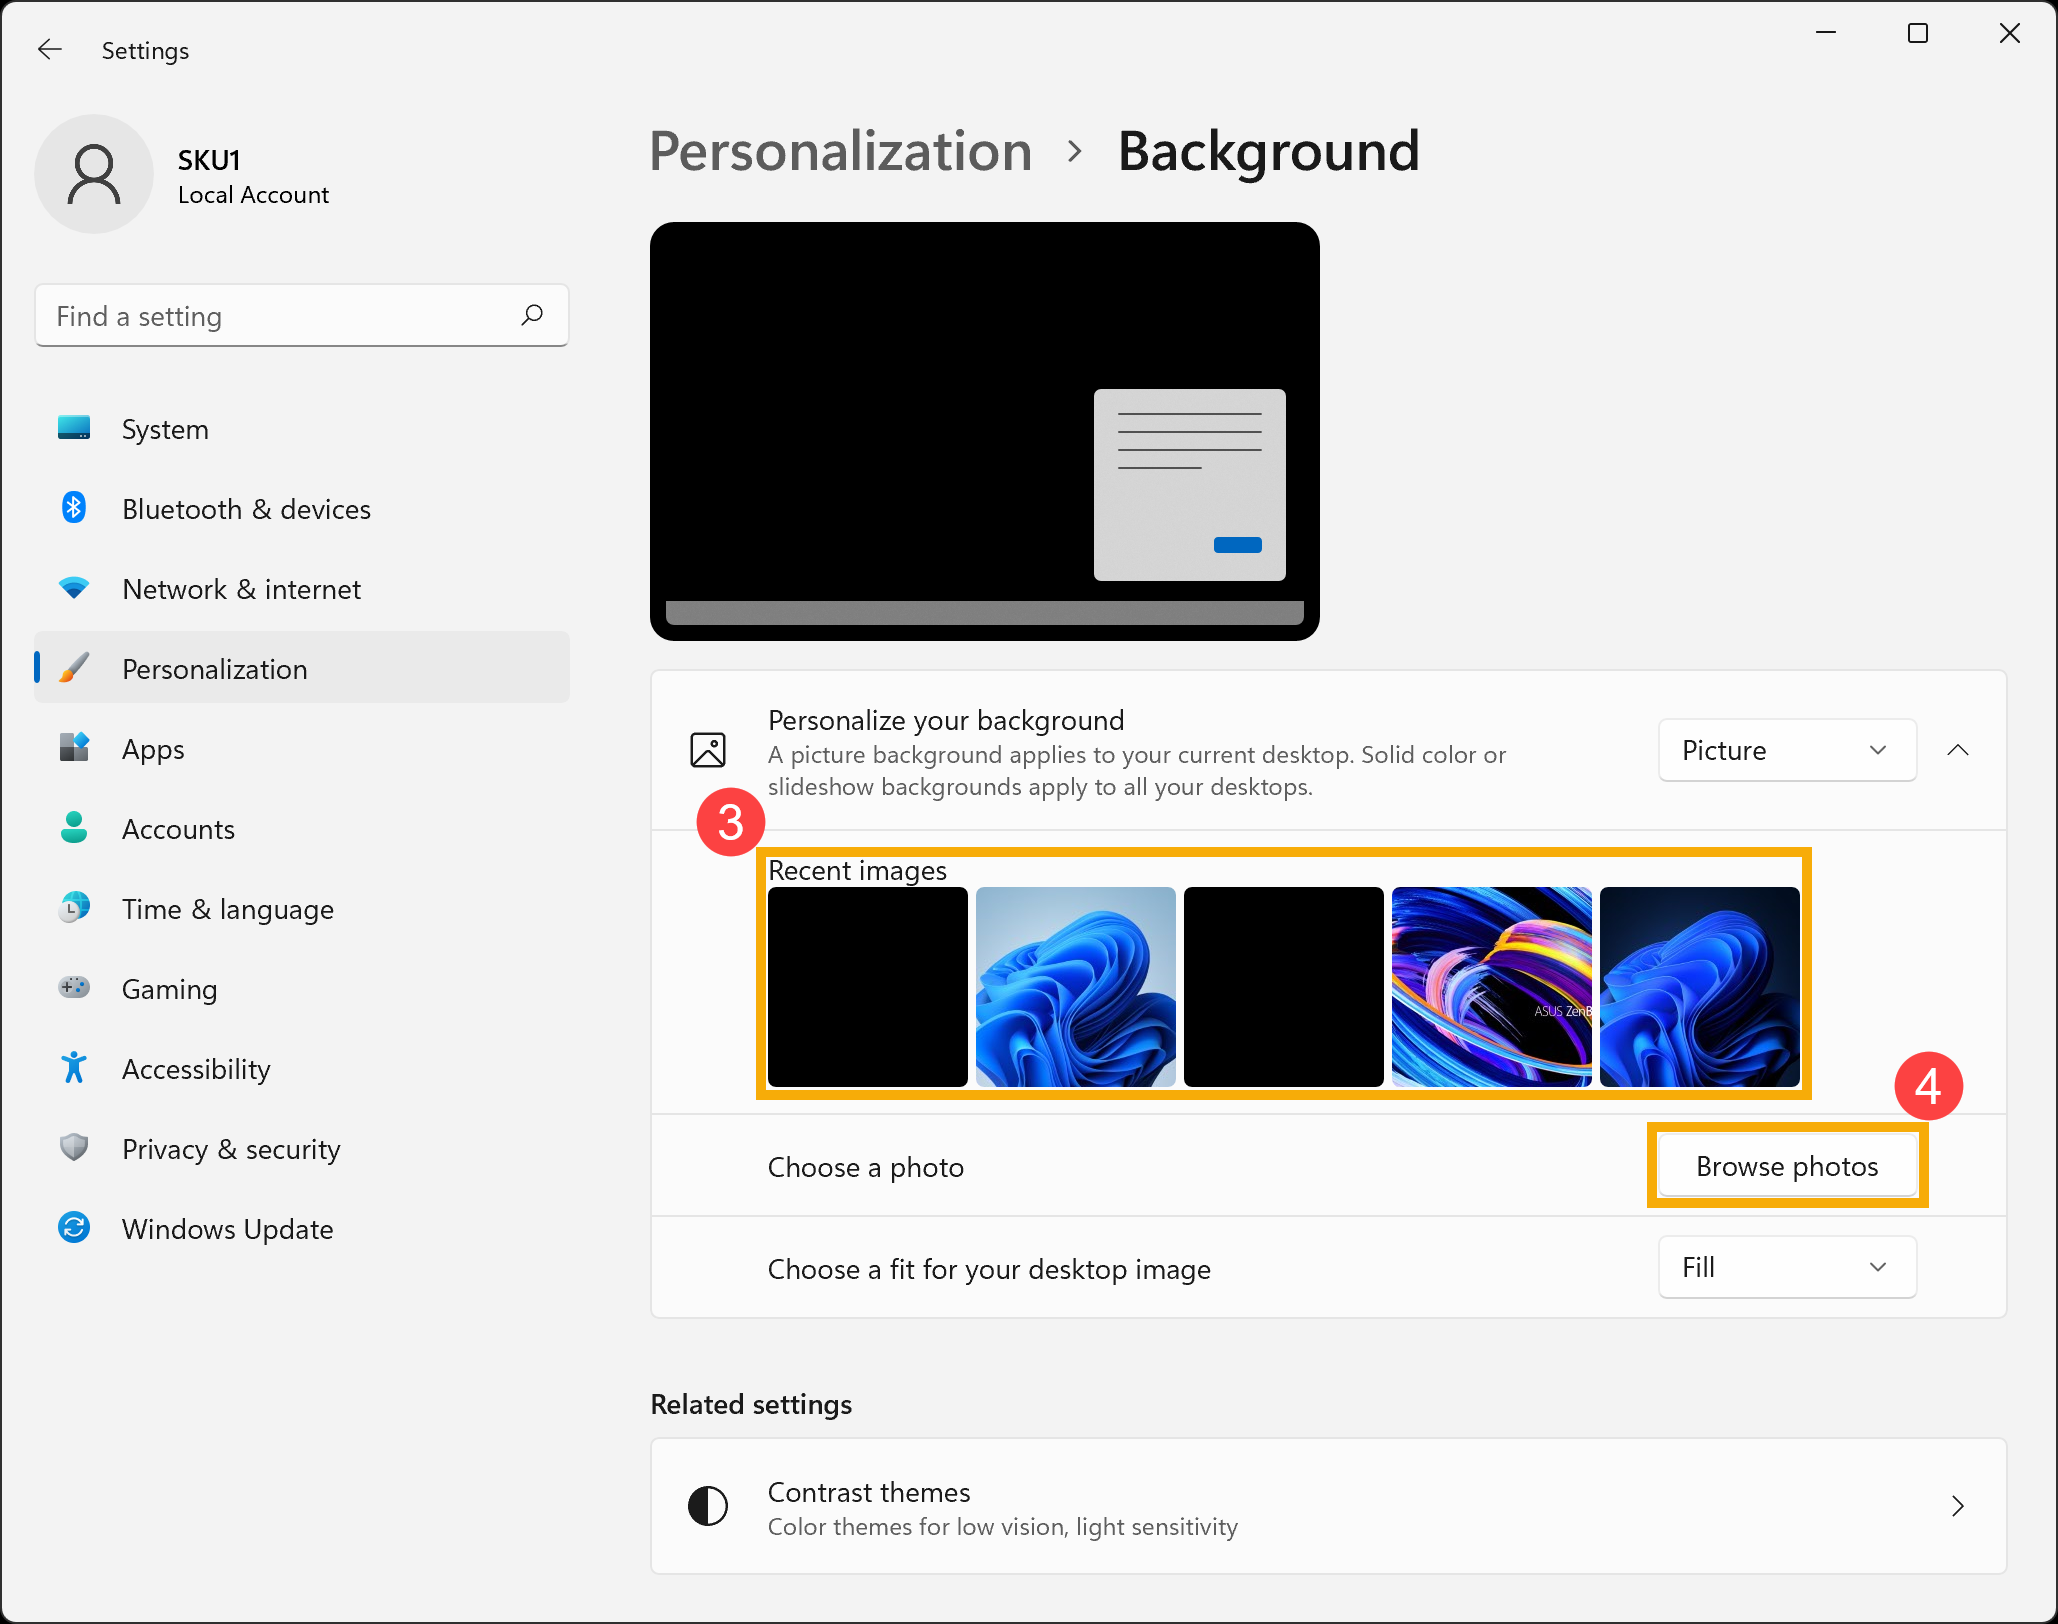
Windows 11Как сбросить фон Рабочего Стола
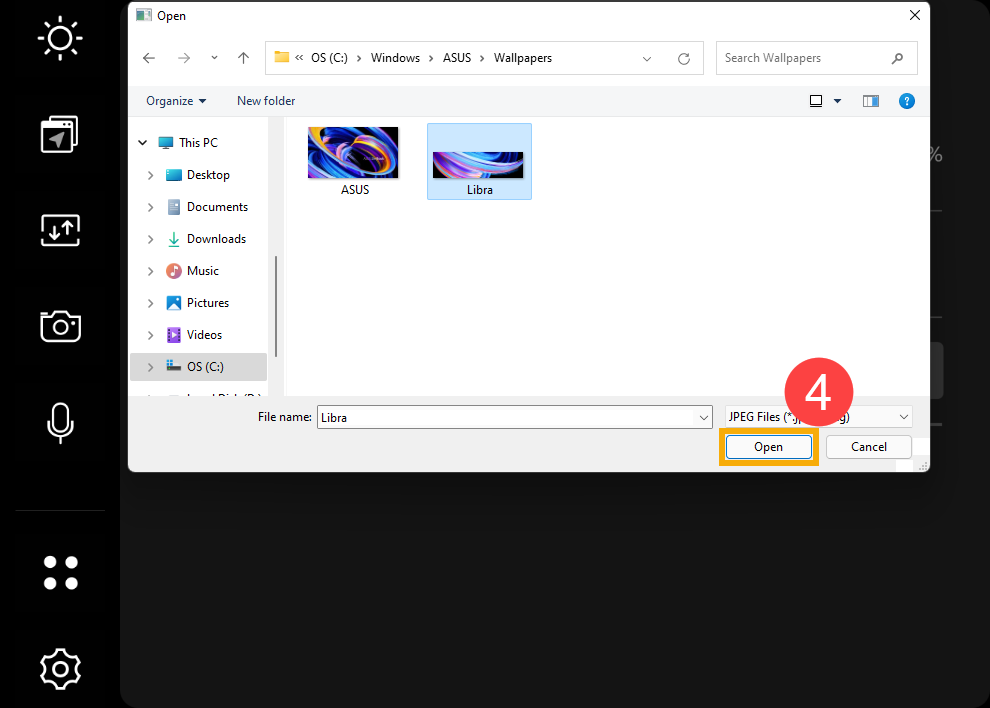
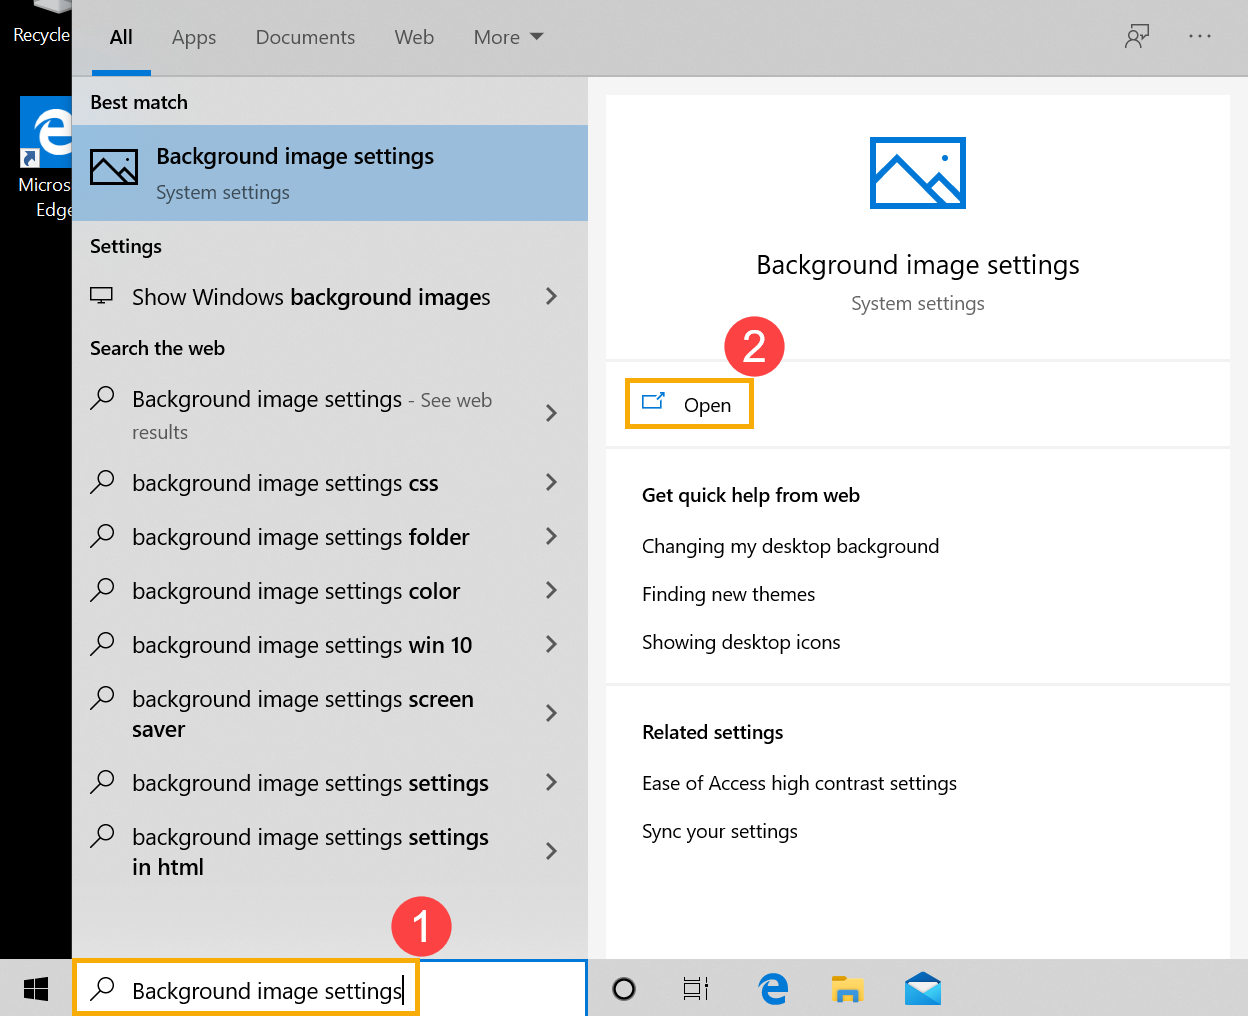
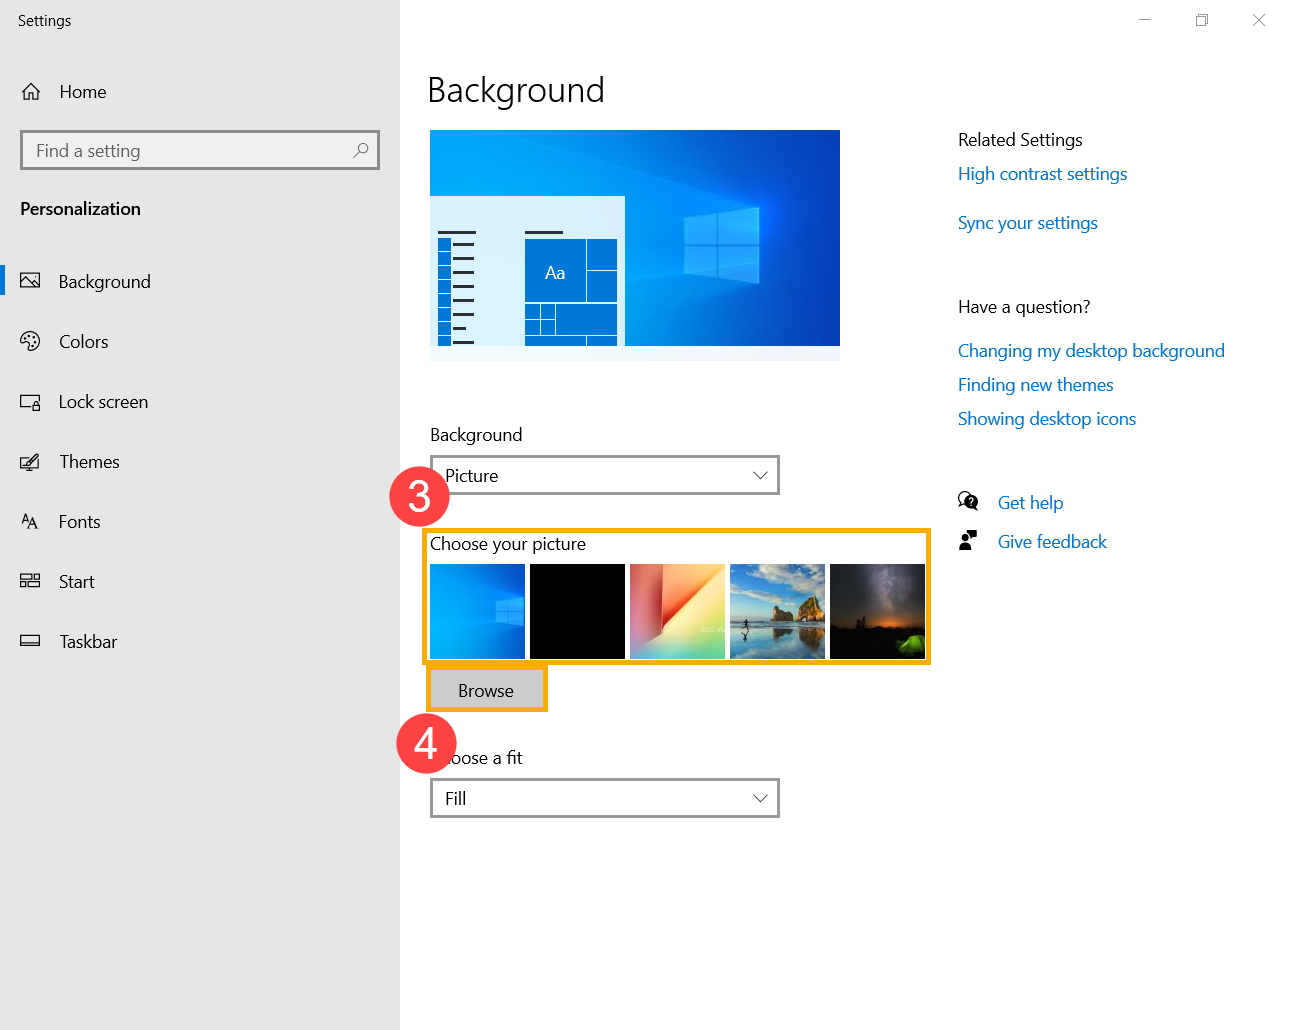
- Введите и найдите [Параметры фонового изображения] ①, затем нажмите [Открыть] ②.

- Выберите Вашу картинку ③ или нажмите [Обзор] ④, чтобы выбрать изображения из других папок для установки в качестве фона Рабочего Стола. Здесь Вы можете узнать больше о [Windows 11/10] Изменить фоновое изображение и тему
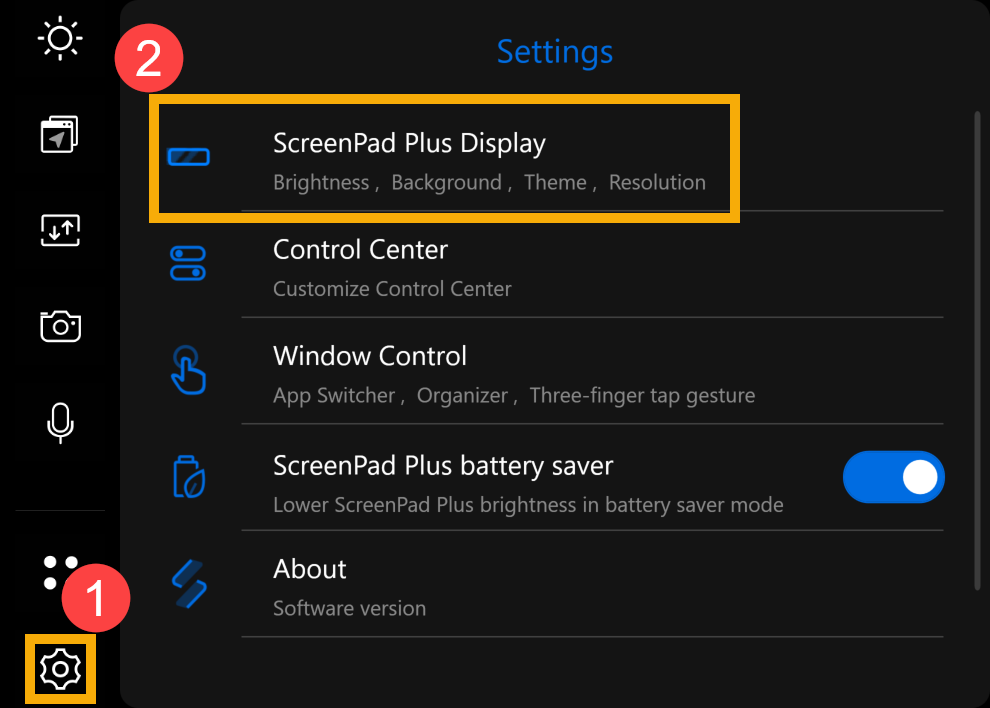
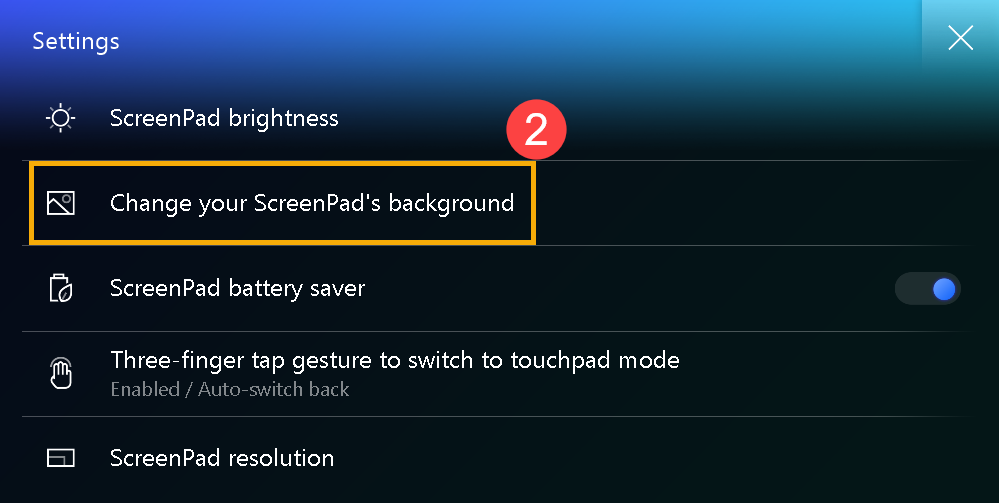
Как сбросить фон ScreenPad
Ниже в качестве примера используется ScreenPad Plus. Здесь Вы можете узнать больше об ASUS ScreenXpert (Screenpad 2.0) — Введение, ScreenPad Plus c ScreenXpert 3 — Введение.
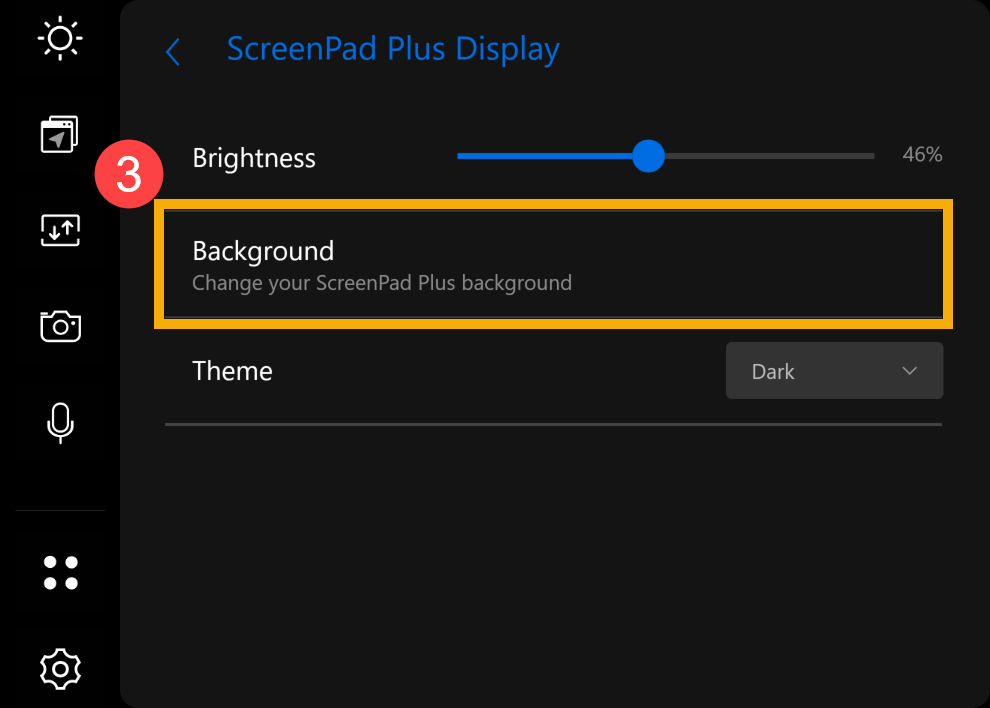
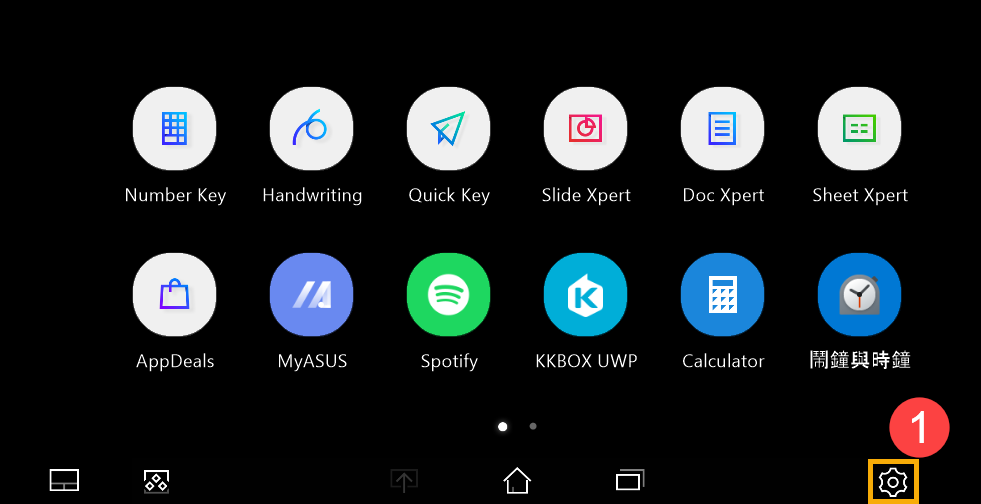
- В ScreenPad Plus нажмите на экране [Настройки] ①, затем выберите [Дисплей ScreenPad Plus] ②.
- Нажмите [Фон] ③.
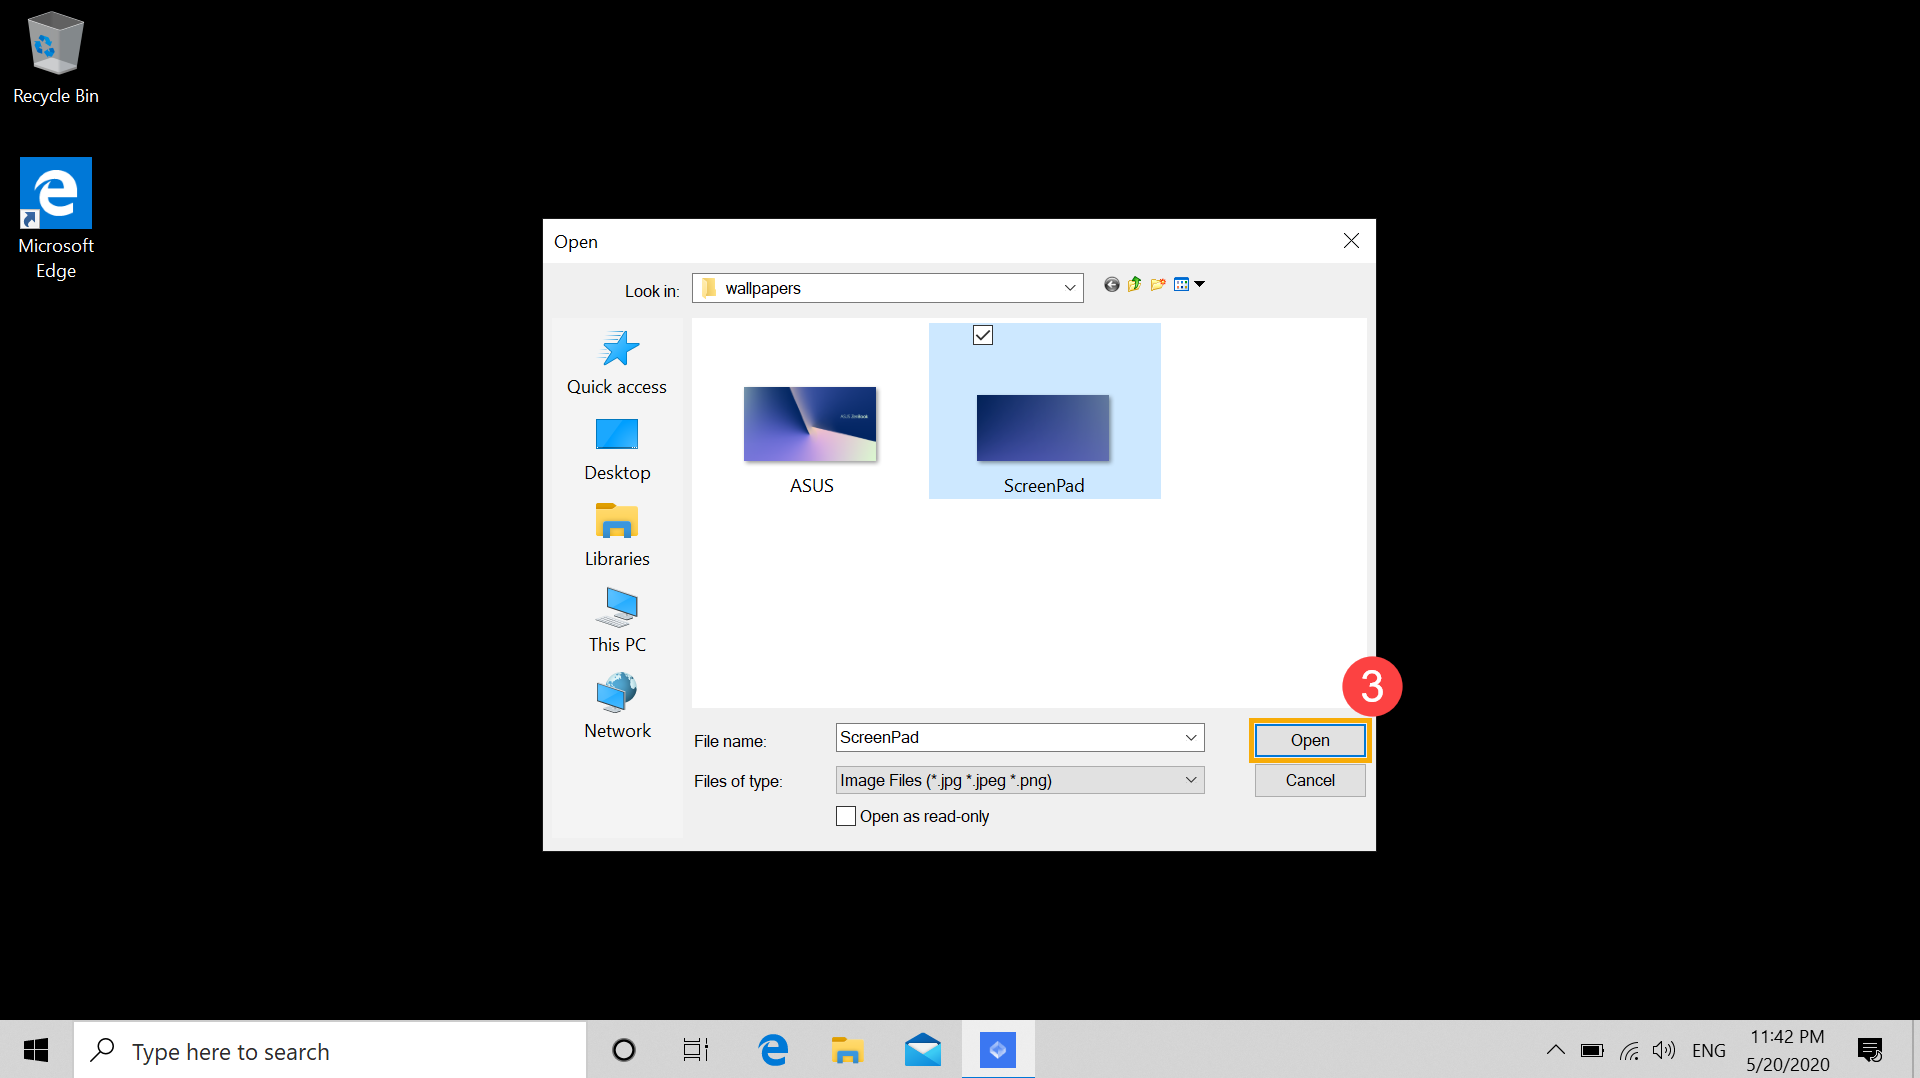
- Выберите изображение с помощью Диспетчера Файлов на экране или выберите любое другое изображение, которое Вам нравится, а затем нажмите [Открыть] ④, чтобы установить его в качестве фона ScreenPad Plus.
Windows 10Как сбросить фон Рабочего Стола
- Введите и найдите [Параметры фонового изображения] ①, затем нажмите [Открыть] ②.
- Выберите Вашу картинку ③ или нажмите [Обзор] ④, чтобы выбрать изображения из других папок для установки в качестве фона Рабочего Стола. Здесь Вы можете узнать больше о [Windows 11/10] Изменить фоновое изображение и тему
Как сбросить фон ScreenPad
Ниже в качестве примера используется ScreenPad Plus. Здесь Вы можете узнать больше об ASUS ScreenXpert (Screenpad 2.0) — Введение, ScreenPad Plus c ScreenXpert 3 — Введение.
- В ScreenPad нажмите [Настройки] ①, в нижнем правом углу экрана.
- Выберите [Изменить фон ScreenPad] ②.
- Выберите изображение, используя Диспетчер Файлов на главном экране или выберите любые другие изображения, которые Вам нравятся, а затем нажмите [Открыть] ③, чтобы установить в качестве фона экрана.
Если Ваша проблема не решилась, обратитесь, пожалуйста, в Службу Поддержки ASUS для получения дополнительной информации.
Эта информация была полезной?
Yes
No
- Приведенная выше информация может быть частично или полностью процитирована с внешних веб-сайтов или источников. Пожалуйста, обратитесь к информации на основе источника, который мы отметили. Пожалуйста, свяжитесь напрямую или спросите у источников, если есть какие-либо дополнительные вопросы, и обратите внимание, что ASUS не имеет отношения к данному контенту / услуге и не несет ответственности за него.
- Эта информация может не подходить для всех продуктов из той же категории / серии. Некоторые снимки экрана и операции могут отличаться от версий программного обеспечения.
- ASUS предоставляет вышеуказанную информацию только для справки. Если у вас есть какие-либо вопросы о содержании, пожалуйста, свяжитесь напрямую с поставщиком вышеуказанного продукта. Обратите внимание, что ASUS не несет ответственности за контент или услуги, предоставляемые вышеуказанным поставщиком продукта.
You may occasionally be able to boot your computer correctly and view the Windows 10 login screen, but you may also have the «Windows 10 black screen with cursor» issue. This problem affects many Windows users when the Windows 10 PC is stuck at a black screen with only the cursor. This problem may annoy you and prevent you from using your laptop or computer. However, you can use several solutions to resolve the Windows 10 blank screen with only the cursor before login.
There are numerous ways to resolve the black screen with cursor issue in Windows 10. You can try any of the methods listed below to see if they can help you solve the problem.
- Fix 1. Update your Graphics Card Drivers
- Fix 2. Disable Fast Startup
- Fix 3. Update BIOS
- Fix 4. Add a New User Account
- Fix 5. Restore Windows 10 to a Previous State
- Fix 6. Run Startup/Automatic Repair
- Fix 7. Run SFC and DISM
- Fix 8. Reset your PC
Fix 1. Update your Graphics Card Drivers
You can attempt uninstalling or updating the graphics card drivers to fix the Windows 10 black screen with cursor issue if your computer’s graphics card drivers are incorrect. The detailed steps are as follows:
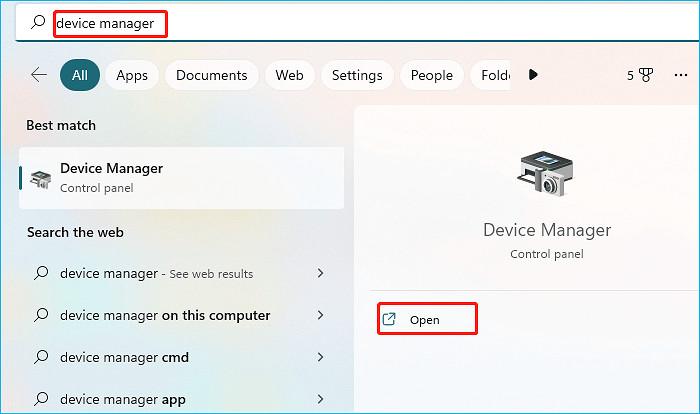
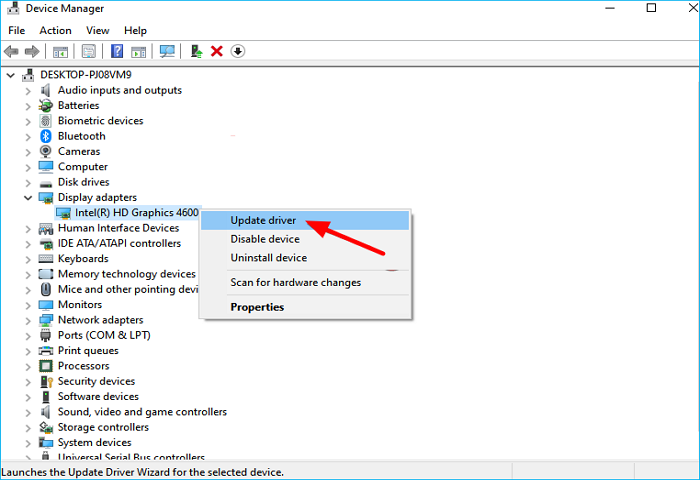
Step 1. Type Device Manager in the Windows search bar and open it.
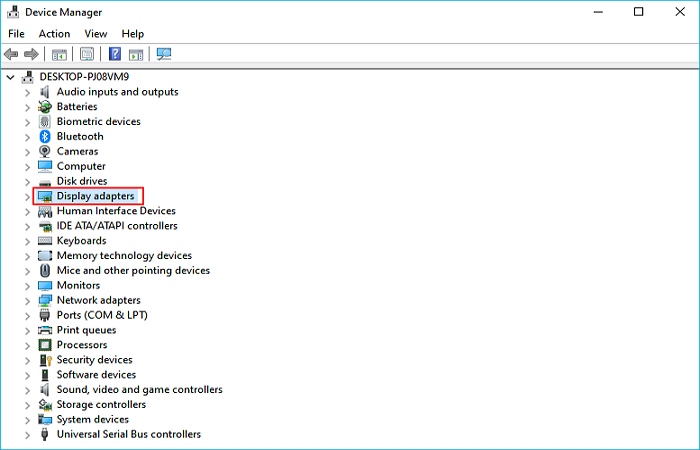
Step 2. Expand the Display adapter.
Step 3. Right-click on the graphics device and select Update driver.
Step 4. Select Search automatically for drivers.
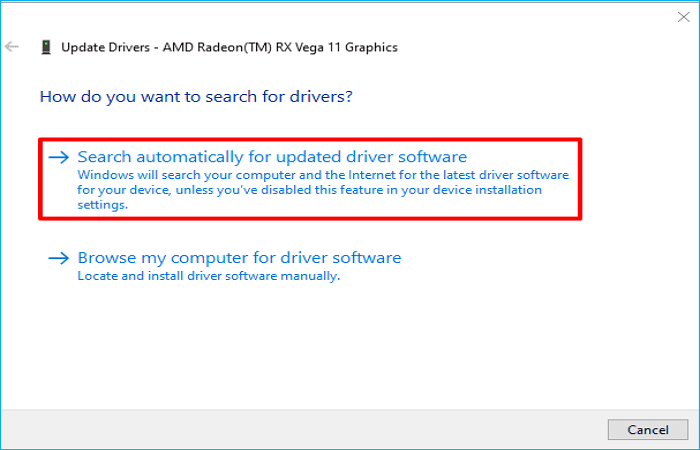
Step 5. Windows will search for a pending update and download it.
Step 6. Once done, you can see if you have fixed the issue.
Fix 2. Disable Fast Startup
Microsoft included a tool called Fast Startup in Windows. It shortens the time it takes Windows to boot from sleep mode or shutdown. However, numerous users claim it causes compatibility problems when Windows first starts up. The Windows 10 black screen with just cursor issue could be solved by disabling Fast Startup. This is how you can do it:
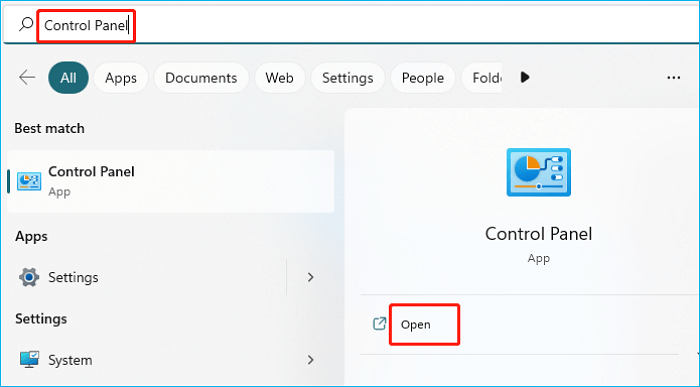
Step 1. Restart your PC in Safe Mode.
Step 2. Type Control Panel in the search box, and click on Control Panel in the pop-up menu.
Step 3. View by Small icons and click on Power Options.
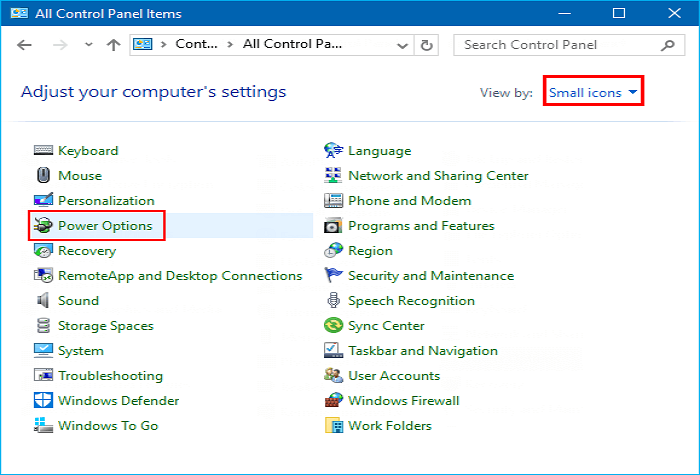
Step 4. Click Choose what the power buttons do.
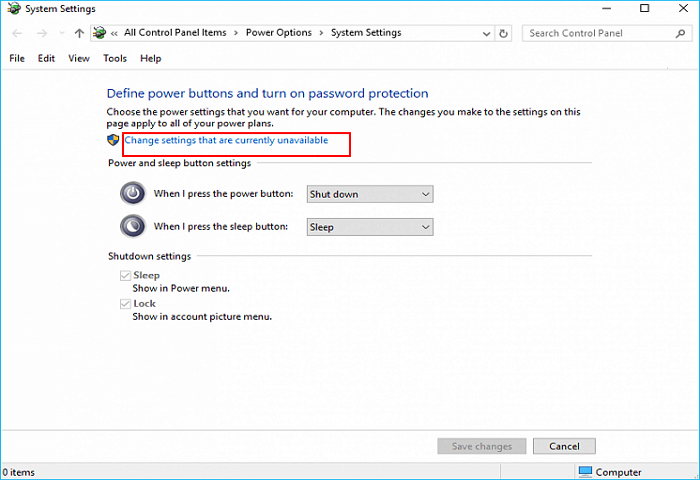
Step 5. Click Change settings that are currently unavailable.
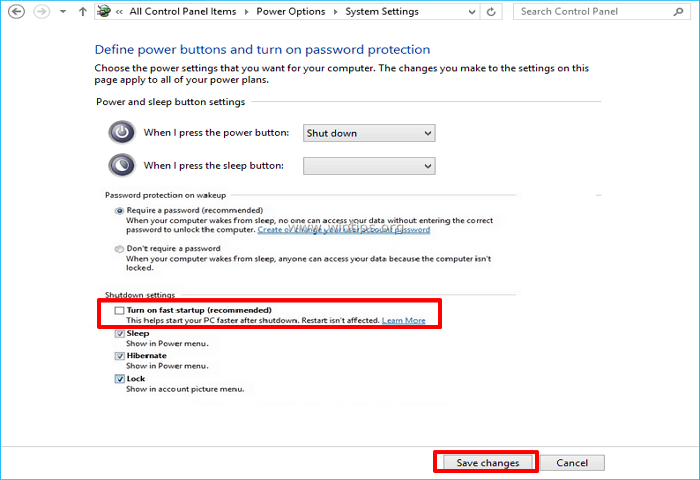
Step 6. Uncheck Turn on fast startup(recommended), then click on Save changes and close the window.
Fix 3. Update BIOS
You need to upgrade the BIOS to resolve the problem of Windows 10 having a black screen with a cursor if the BIOS version is too outdated. Updating the BIOS is a procedure for advanced users. However, remember that you could permanently harm your hardware if you don’t do it correctly.
Step 1. Press F6 to launch Safe Mode with a network connection in the Windows recovery environment.
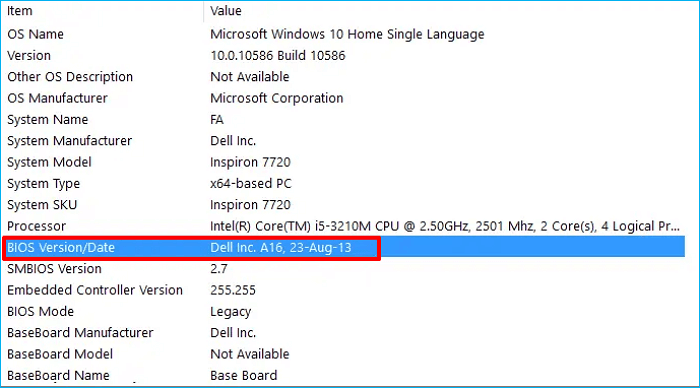
Step 2. Open the Run dialogue by pressing the Windows + R keys, entering msinfo32, then pressing Enter to launch System Information.
Step 3. It is possible to find the BIOS Version in the System Information window. First, note the Date and Manufacturer, then use your browser to search for and download the most recent BIOS version to your USB drive from the manufacturer’s website.
Step 4. Your PC will restart and enter the BIOS once more once you insert the USB flash drive with the most recent BIOS file. Next, find the downloaded BIOS update file and run the update.
Please note: Avoid disconnecting the power or turning off your computer while the BIOS is being updated, as this could harm your computer.
Fix 4. Add a New User Account
Windows 10 can also boot to a black screen with a cursor due to a corrupted user profile. The functioning user profile folder can be swapped out for the corrupted user profile folder. Here is what to do:
Step 1. Restart your PC in Safe Mode.
Step 2. Login with an active user account.
Step 3. Navigate to the folder below:
C:\Users\{working-user-profile-name}\AppData\Local\Microsoft\Windows\Caches
Step 4. Copy the Caches folder. Then log in with the corrupted user account.
Step 5. Navigate to the following folder:
C:\Users\{broken-user-profile-name}\AppData\Local\Microsoft\Windows\Caches
Step 6. Replace that Cashes folder with the folder from the working user file.
Fix 5. Restore Windows 10 to a Previous State
Try restoring your system to a previous operating state if none of the above solutions work. For that:
Step 1. Type «restore» in the taskbar search box when in safe mode, then find and click «Create a restore point.»
Step2. Click System Restore… in the System Protection tab under the System Properties window.

Step 3. Select the restore point before the problem happens by clicking the Choose a different restore point option in the System Restore window. Then click Next and wait for the system restore to finish.
Fix 6. Run Startup/Automatic Repair
You can also try to run the Automatic/Startup Repair in WinRE to fix the laptop black screen with cursor issue. The following is how to run it step by step.
Step 1. Boot up your computer after inserting your Windows installation CD, DVD, or USB bootable device.
Step 2. Enter the BIOS.
Step 3. Select the DVD or USB flash drive as the primary boot disk, then start the Windows 11/10 computer from that device.
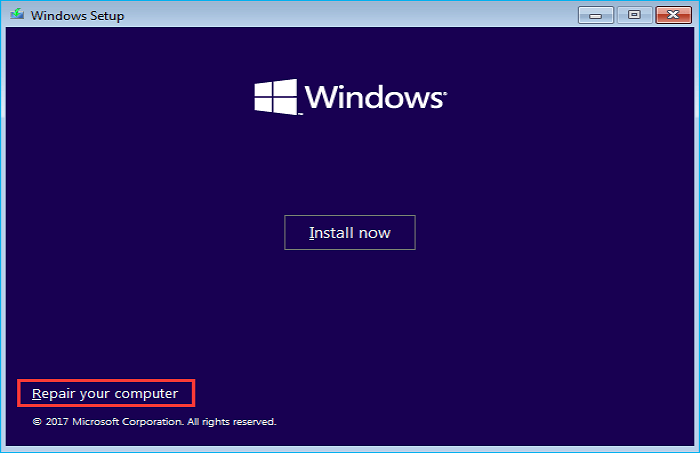
Step 4. To access WinRE, click Repair your computer in the bottom-left corner.
Step 5. To proceed, you must select Troubleshoot in the pop-up window.
Step 6. To advance to the following page, choose Advanced options.
Step 7. In the Advanced options window, select Startup Repair, and then wait for the procedure to be finished.
Fix 7. Run SFC and DISM
Try performing the DISM, and SFC commands to repair Windows images if the problem is still present. These commands are needed to fix damaged files, including system and DLL files. Run these commands in the terminal by following the below instructions if you can launch Task Manager.
Step 1. Type cmd in the search box, select it, and run as administrator.
Step 2. Type sfc /scannow and hit Enter.
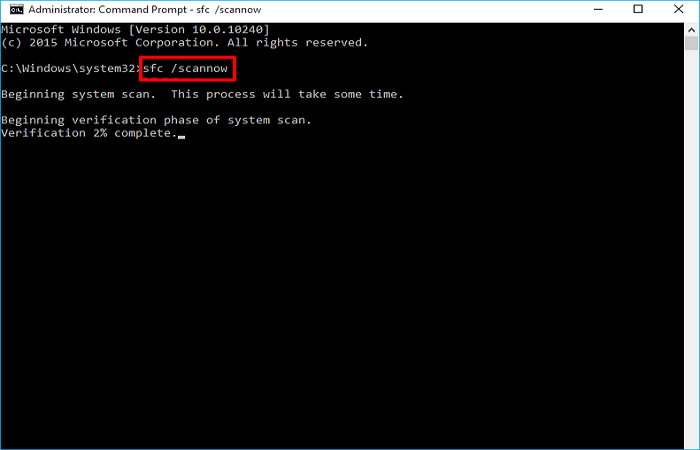
Step 3. If it doesn’t fix the problem, type DISM.exe /Online /Cleanup-image /Restorehealth and then hit Enter.
Step 4. Restart your PC.
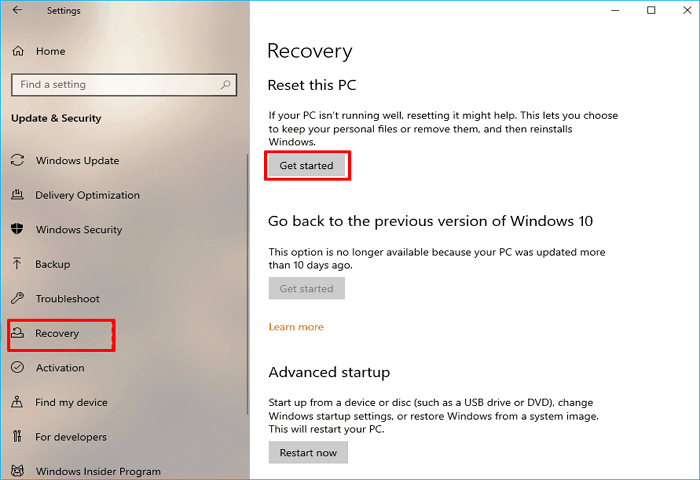
Fix 8. Reset your PC
If none of the previously mentioned fixes may resolve the «PC black screen with mouse» problem, the only remaining option is to reset Windows 10. But this will reinstall Windows entirely. Therefore, it is highly recommended that you create a backup of your Windows 10 PC. Here’s how to go about it:
Step 1. Restart your PC in Safe Mode.
Step 2. Type settings in the search box, then click Settings in the menu.
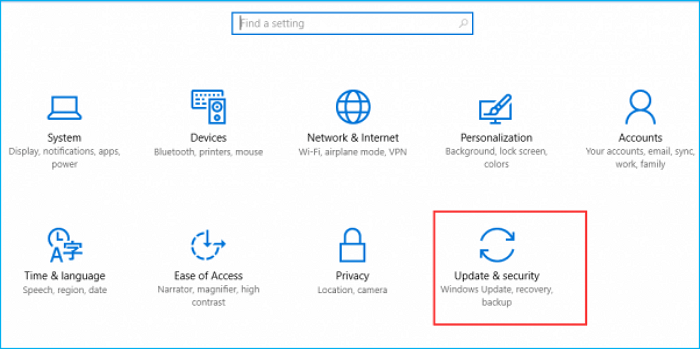
Step 3. Click on Update & security.
Step 4. Click Recovery.
Step 5. Under the «Reset this PC» window, click on Get started. Then follow the instructions to reset your PC.
Bonus Tip: How to Backup Windows 10 After Fixing the Issue
What should you do after resolving the bothersome problem? Backing up your computer is strongly advised so that you can restore it once something goes wrong. You can use Windows 10 built-in backup utilities to help you back up your PC. However, you sometimes may encounter Windows 10 backup taking so long issue. In that case, it’s better to use professional backup software. EaseUS Todo Backup Home is the one that can meet your needs.
EaseUS Todo Backup Home is a professional backup and recovery tool. It can help you automatically back up your files, systems, disks, partitions, and computer APPs. In addition, you can use it to create diverse backup modes, such as full, incremental and differential backups. It can also help you image a hard drive on Windows 10 PC and back up an SSD to an image. Finally, it is worth noting that it offers you a security zone and 250G free cloud to help store your data or backups.
Here is how to back up your Windows 10 PC:
Step 1. Launch EaseUS Todo Backup on your computer, and click Create Backup on the home screen and then hit the big question mark to select backup contents.

Step 2. To back up your Windows operating system, click «OS» to begin the backup task.

Step 3. Your Windows operating system information and all system related files and partitions will be automatically selected so you don’t need to do any manual selection at this step. Next, you’ll need to choose a location to save the system image backup by clicking the illustrated area.

Step 4. The backup location can be another local drive on your computer, an external hard drive, network, cloud or NAS. Generally, we recommend you use an external physical drive or cloud to preserve the system backup files.

Step 5. Customiztion settings like enabling an automatic backup schedule in daily, weekly, monthly, or upon an event, and making a differential and incremental backup are available in the Options button if you’re interested. Click «Backup Now«, and the Windows system backup process will begin. The completed backup task will display on the left side in a card style.

Why Is Windows 10 Booting to Black Screen with Cursor
When you update your Windows operating system, install Windows, or put in Windows connecting several displays, this issue may occur. This issue could also arise if you haven’t updated the device drivers or used the computer. This issue is characterized by a black, empty screen that only shows a cursor. As a result, you are unable to shut off your computer, log in, or use your PC.

Some primary causes that can be cited as the culprits are described below.
- Corrupted graphics driver.
- Corrupted system files.
- Outdated BIOS.
- Corrupted Windows update.
- Multiple monitor connection problems.
- Screen display anomaly.
The Final Say
When you encounter Windows 10 black screen with cursor issue, do not worry. You can try any above ways to help you solve Windows laptop black screen with a cursor. Hopefully, one of these fixes can help resolve your Windows 10 black screen with just cursor error.
It would be best if you always create a backup of your Windows computer. Using professional backup software, like EaseUS Todo Backup Home, will be your excellent choice. EaseUS Todo Backup Home can help back up almost everything on your computer and restore the backups to your computer or a new computer. You can also use it to compress backups and back up QuickBooks automatically.
FAQs
1. Does resetting PC fix black screen with cursor?
Windows that are more likely to fix the black screen with the cursor problem in Windows will be reinstalled if you choose to reset Windows. However, all settings, applications, and files will be deleted if the PC is reset. Therefore, before completing the instructions below, it is highly recommended that you back up any crucial data while in Safe Mode.
2. What is the difference between BSOD and black screen?
The blue screen problem often doesn’t damage your computer, but it might be inconvenient if it occurs while you’re working on something. The black screen error, commonly referred to as the BSOD (Black Screen of Death), typically results from a problematic device driver, a flaw in the hardware, or a Windows software mistake.