
ВАЖНО!
Имя компьютера в системе должно быть на латинице и в нижнем регистре. Иначе Erlang работать не будет.
Установить Erlang
-
Скачать и установить последнюю версию Erlang www.erlang.org
Желательно использовать файл с именем “Windows 64-bit Binary File”
Установить RabbitMQ
-
Скачать и установить последнюю версию RabbitMQ www.rabbitmq.com
-
Устанавливаем сам Erlang
yum install -y erlang
Настроить папки
-
Идем в раздел с установленным RabbitMQ, пути могут быть такими
C:\Program Files (x86)\RabbitMQ Server\rabbitmq_server-3.3.5\
C:\Program Files\RabbitMQ Server\rabbitmq_server-3.3.5\
Где rabbitmq_server-3.3.5 — это вресия сервера и у вас она может отличатся.
-
В разделе с установленным RabbitMQ создаем две папки conf и base, должно получиться вот так
C:\Program Files\RabbitMQ Server\rabbitmq_server-3.3.5\conf\
C:\Program Files\RabbitMQ Server\rabbitmq_server-3.3.5\base\
-
C:\Program Files\RabbitMQ Server\rabbitmq_server-3.3.5\etc\
Из указанной папки берем файл конфига и переименовываем его в rabbitmq.config, затем кладем в папку
C:\Program Files\RabbitMQ Server\rabbitmq_server-3.3.5\conf\
Настроить переменные окружения
Установка переменных окружения для windows находится вот по такому пути Свойства системы -> Перменные среды
-
Конфиг файла
имя:RABBITMQ_CONFIG_FILE
путь:%ProgramFiles%\RabbitMQ Server\rabbitmq_server-3.3.5\conf\rabbitmq -
Логи и базы данных
имя:RABBITMQ_BASE
путь:%ProgramFiles%\RabbitMQ Server\rabbitmq_server-3.3.5\base -
Переменная Path
имя:Path
путь:%PATH%Если она уже есть, то открываем на редактирование и в поле пути в самом начале (перед сущетвующим, текстом) добавляем
%PATH%;
Запуск сервера
Запускаем консольное прихожение windows.
-
В поиске набираем CMD и из списка можно выбрать два варианта, консоль от RabbitMQ или консоль от windows
Запускаем консоль от Администратора
-
Если выбрали консоль от windows то выполняем код
cd C:\Program Files\RabbitMQ Server\rabbitmq_server-3.6.11\sbin
-
запускаем установку сервера
rabbitmq-service install
-
проверяем статус сервера, если ошибки, то гуглим и исправляем их
rabbitmqctl status
-
устанавливаем менеджмент плагин
rabbitmq-plugins enable rabbitmq_management
-
Рестартуем сервис RabbitMQ
rabbitmq-service stop
rabbitmq-service start
Готово
Заходим в админку RabbitMQ http://localhost:15672
- логин:
guest - пароль:
guest
Рассмотрим установку RabbitMQ (программный брокер сообщений) на Windows.
Установка Erlang
Перед установкой RabbitMQ, убедитесь, что на вашем компьютере установлены Erlang и .NET Framework (обычно они уже установлены, но лучше проверить наличие обновлений).
Erlang. Загрузите установщик Erlang с официального сайта. Запустите установщик и следуйте инструкциям установки, установка очень простая – просто соглашайтесь со всеми пунктами. После установки проверьте, что Erlang правильно установлен, открыв командную строку и введите команду erl. Если Erlang успешно установлен, откроется интерактивная оболочка Erlang. Также разрешаем правила firewall Windows defender, которые срабатывают при запуске компонента.
Установка и запуск RabbitMQ
Теперь можно приступить к установке RabbitMQ. Загрузите установщик RabbitMQ с официального сайта. Запустите установщик RabbitMQ. Установка также простая, соглашаемся со всеми пунктами. Во время установки укажите путь для установки RabbitMQ и другие настройки, если требуется.
После завершения установки, можно запустить RabbitMQ и проверить его работу. Перейдите в папку, где установлен RabbitMQ, и найдите папку “sbin”. Запустите командную строку от имени администратора и перейдите в директорию. Например: C:Program FilesRabbitMQ Serverrabbitmq_server-3.12.2sbin
Выполняем команду для установки Web-плагина:
rabbitmq-plugins.bat enable rabbitmq_management
Далее запускаем последовательно команды:
rabbitmq-service.bat stop
rabbitmq-service.bat install
rabbitmq-service.bat start
Теперь можно заходить через веб-интерфейс, который по умолчанию работает на порту 15672. Для доступа к веб-интерфейсу откройте веб-браузер и перейдите по адресу http://localhost:15672/. Введите логин и пароль (по умолчанию “guest”/”guest”).
Теперь RabbitMQ установлен и готов к использованию.
Нужна помощь? Обслуживание и настройку RabbitMQ мы осуществляем в рамках услуги DevOps аутсорсинг.
Rabbit MQ on Windows and .NET
Rabbit MQ is a popular industrial strength open source implementation of the
AMQP messaging protocol for communicating with message queue middleware that runs
on all major operating systems.
Installing on Windows
Rabbit MQ is built on the robust Erlang OTP platform which is a prerequisite for installing Rabbit MQ Server, both are downloadable at:
- Download and install Erlang OTP For Windows (vR16B03)
- Run the Rabbit MQ Server Windows Installer (v3.2.3)
The windows installer will download, install and run the Rabbit MQ Server Windows Service listening for AMQP clients at the default port: 5672.
Enable Rabbit MQ’s Management Plugin
To provide better visibility of the state of the Rabbit MQ Server instance it’s highly recommended to enable
Rabbit MQ’s Management Plugin which you can do on the command line with:
"C:\Program Files (x86)\RabbitMQ Server\rabbitmq_server-3.2.3\sbin\rabbitmq-plugins.bat" enable rabbitmq_management
To see the new changes you need to restart the RabbitMQ Windows Service which can be done on the command line with:
net stop RabbitMQ && net start RabbitMQ
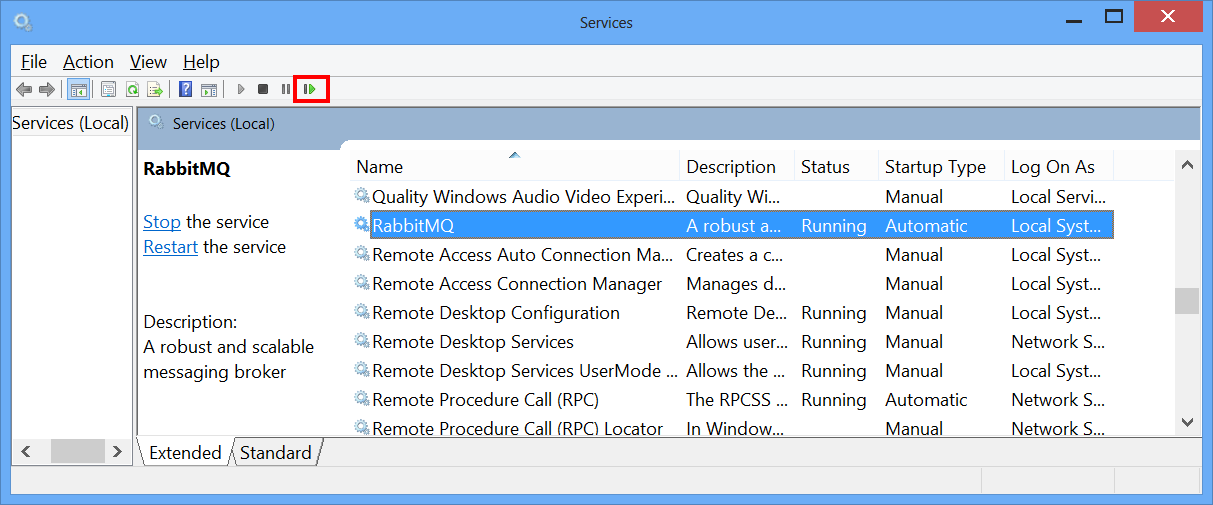
Or by restarting the service from the services.msc MMC applet UI:
- Open Windows Run dialog by pressing the Windows + R key:

- Select the RabbitMQ Windows Service and click the Restart Icon:
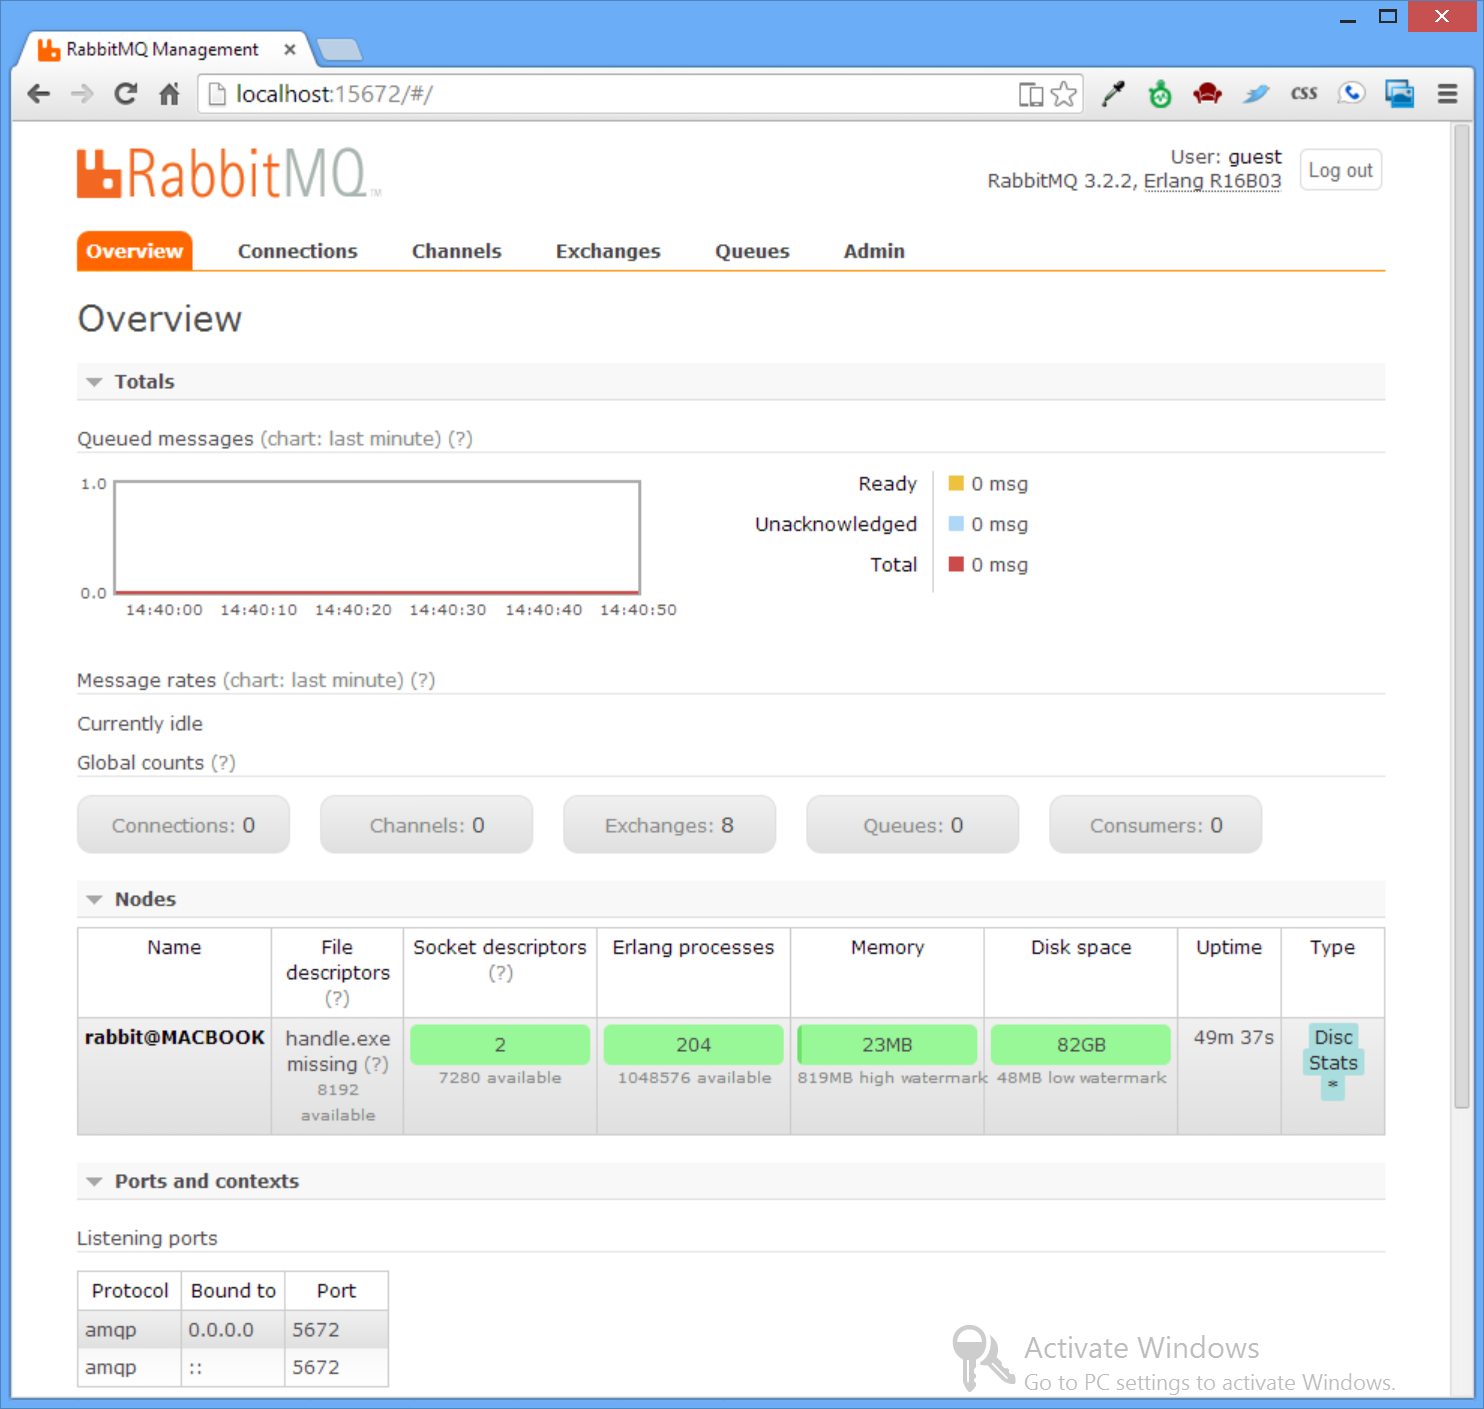
Once restarted, open the Rabbit MQ’s management UI with a web browser at: http://localhost:15672 to see an overview of
the state of the Rabbit MQ server instance:
Usage from .NET
To use Rabbit MQ from .NET get Rabbit MQ’s .NET client bindings from NuGet:
PM> Install-Package RabbitMQ.Client
With the package installed, we can go through a common scenario of sending and receiving durable messages with Rabbit MQ.
See RabbitMqTests.cs in this repo,
for runnable samples of this walkthru below:
Declare durable Exchange and Queue
Firstly, you will need to register the type of Exchange and Queue before you can use them.
To create a durable work queue, create a durable «direct» exchange and bind a durable queue to it, e.g:
const string ExchangeName = "test.exchange";
const string QueueName = "test.queue";

using (IConnection conn = rabbitMqFactory.CreateConnection())
using (IModel channel = conn.CreateModel())
{
    channel.ExchangeDeclare(ExchangeName, "direct", durable:true, autoDelete:false, arguments:null);

    channel.QueueDeclare(QueueName, durable:true, exclusive:false, autoDelete:false,arguments:null);
    channel.QueueBind(QueueName, ExchangeName, routingKey: QueueName);
}
In this example we’ll also reuse the QueueName for the routing key which will enable directly sending messages to a specific queue.
The registration code only needs to be run once to register and configure the Exchange and Queue we’ll be using in the remaining examples.
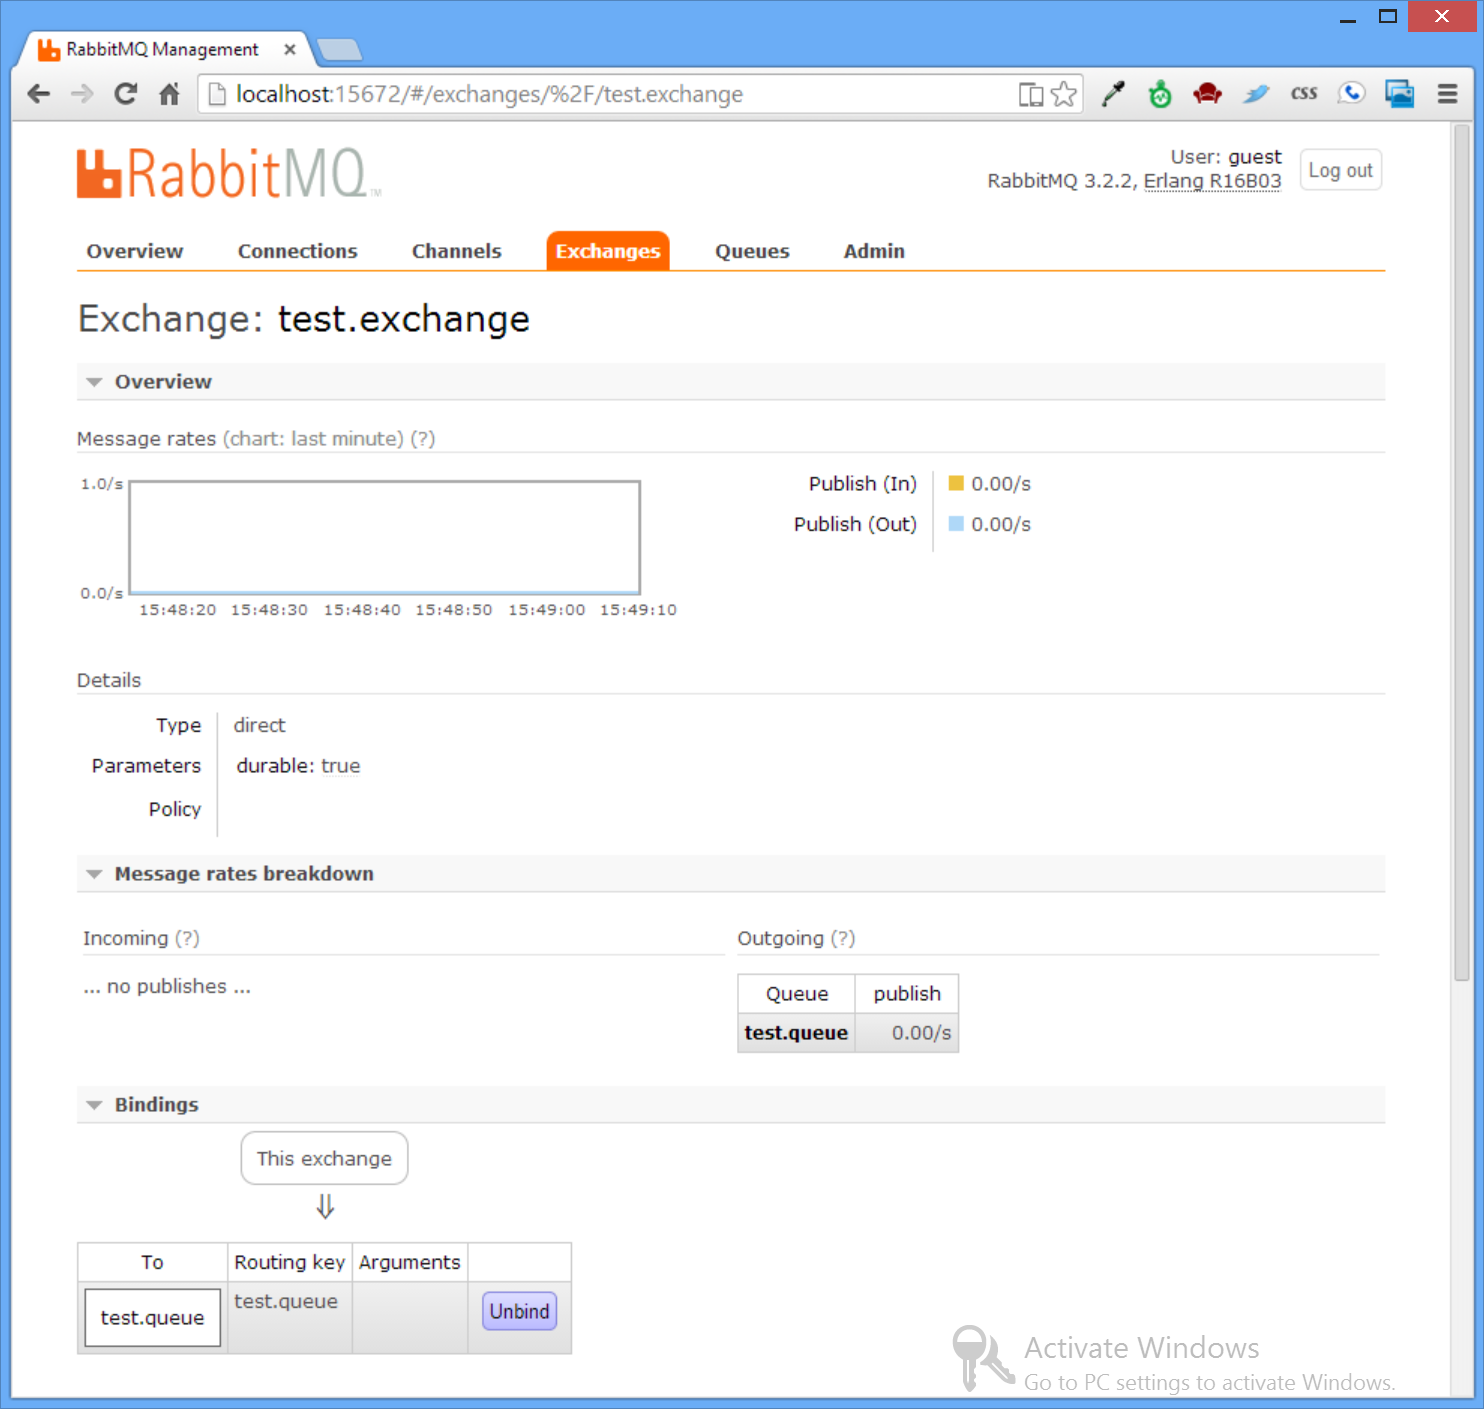
Once run, go back to the Management UI to see the new test.exchange Exchange with a binding to the newly created test.queue:
Publishing a persistent message to a queue
Once the exchange and queue is setup we can start publishing messages to it.
Rabbit MQ lets you send messages with any arbitrary byte[] body, for text messages you should send them as UTF8 bytes.
To ensure the message is persistent across Rabbit MQ Server starts you will want to mark the message as persistent as seen below:
var props = channel.CreateBasicProperties();
props.SetPersistent(true);

var msgBody = Encoding.UTF8.GetBytes("Hello, World!");
channel.BasicPublish(ExchangeName, routingKey:QueueName, basicProperties:props, body:msgBody);
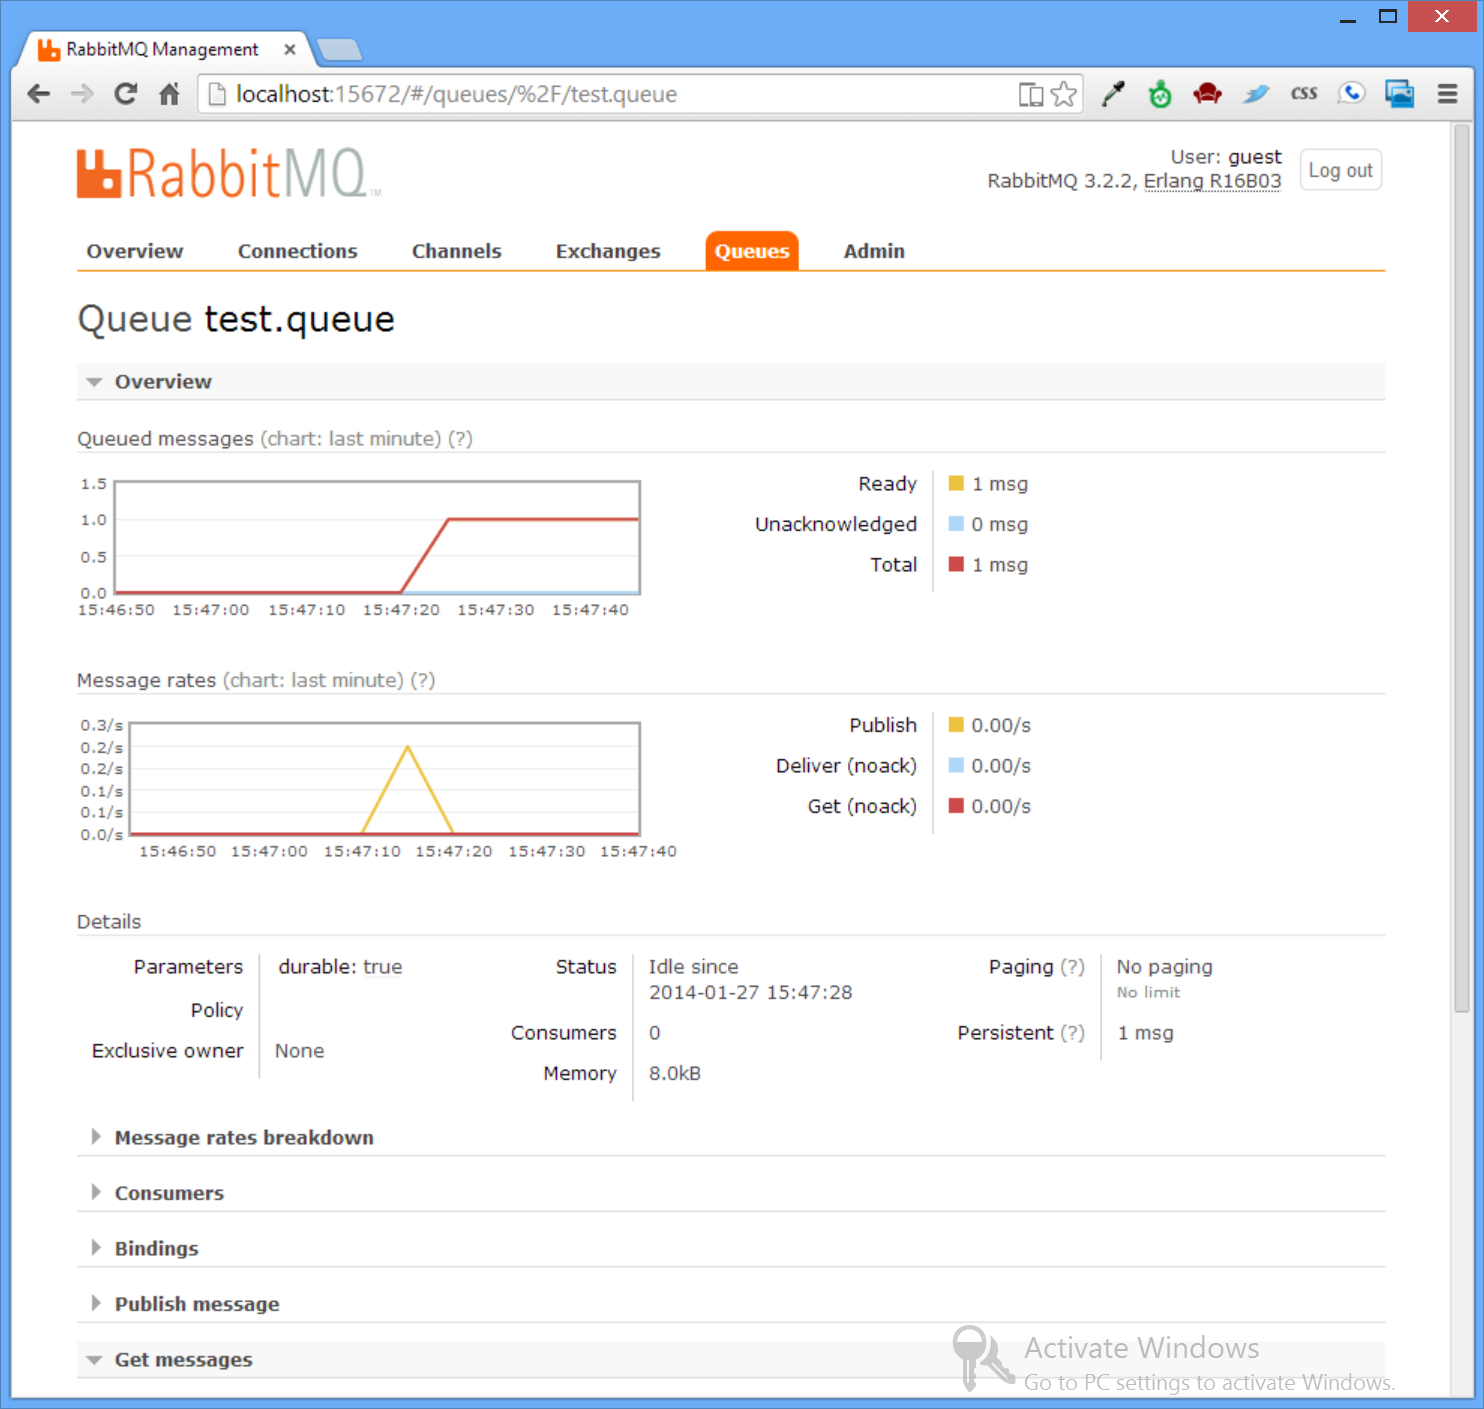
The routing key will ensure that a copy of the message is delievered to the test.queue which you can see in the Admin UI:
Receiving Messages
There are a couple of different ways you can read published messages from the queue, the most straightforward way is to use BasicGet:
BasicGetResult msgResponse = channel.BasicGet(QueueName, noAck:true);

var msgBody = Encoding.UTF8.GetString(msgResponse.Body);
msgBody //Hello, World!
The noAck:true flag tells Rabbit MQ to immediately remove the message from the queue.
Another popular use-case is to only send acknowledgement (and remove it from the queue) after you’ve successfully accepted the message,
which can be done with a separate call to BasicAck:
BasicGetResult msgResponse = channel.BasicGet(QueueName, noAck:false);

//process message ...

channel.BasicAck(msgResponse.DeliveryTag, multiple:false);
An alternate way to consume messages is via a push-based event subscription.
You can use the built-in QueueingBasicConsumer to provide a simplified programming model by allowing you to block on a
Shared Queue until a message is received, e.g:
var consumer = new QueueingBasicConsumer(channel);
channel.BasicConsume(QueueName, noAck:true, consumer:consumer);

var msgResponse = consumer.Queue.Dequeue(); //blocking

var msgBody = Encoding.UTF8.GetString(msgResponse.Body);
msgBody //Hello, World!
Processing multiple messages using a subscription
The Shared Queue will block until it receives a message or the channel it’s assigned to is closed which causes it to throw
an EndOfStreamException. With this, you can setup a long-running background thread to continually process multiple messages
in an infinite loop until the Queue is closed.
The sample below shows an example of this in action which publishes 5 messages on a separate thread before closing the channel
the subscription is bound to causing an EndOfStreamException to be thrown, ending the subscription and exiting the loop:
using (IConnection conn = rabbitMqFactory.CreateConnection())
using (IModel channel = conn.CreateModel())
{
    var consumer = new QueueingBasicConsumer(channel);
    channel.BasicConsume(QueueName, noAck: true, consumer: consumer);

    ThreadPool.QueueUserWorkItem(_ => {
        var now = DateTime.UtcNow;
        while (DateTime.UtcNow - now < TimeSpan.FromSeconds(5))
        {
            var props = channel.CreateBasicProperties();
            props.SetPersistent(true);

            var msgBody = Encoding.UTF8.GetBytes("Hello, World!");
            channel.BasicPublish(ExchangeName, routingKey:QueueName, basicProperties:props,
                body:msgBody);

            Thread.Sleep(1000);
        }

        channel.Close();
    });

    while (true)
    {
        try
        {
            var msgResponse = consumer.Queue.Dequeue(); //blocking

            var msgBody = Encoding.UTF8.GetString(msgResponse.Body);

            Console.WriteLine("Received Message: " + msgBody);

            Thread.Sleep(1000);
        }
        catch (EndOfStreamException ex)
        {
            Console.WriteLine("Channel was closed, Exiting...");
            break;
        }
    }
}
The complete source of these examples are available in the stand-alone RabbitMqTests.cs.
Rabbit MQ is a popular industrial strength open source implementation of the
AMQP messaging protocol for communicating with message queue middleware that runs
on all major operating systems.
Installing on Windows
Rabbit MQ is built on the robust Erlang OTP platform which is a prerequisite for installing Rabbit MQ Server, both are downloadable at:
- Download and install Erlang OTP For Windows (vR16B03)
- Run the Rabbit MQ Server Windows Installer (v3.2.3)
The windows installer will download, install and run the Rabbit MQ Server Windows Service listening for AMQP clients at the default port: 5672.
Enable Rabbit MQ’s Management Plugin
To provide better visibility of the state of the Rabbit MQ Server instance it’s highly recommended to enable
Rabbit MQ’s Management Plugin which you can do on the command line with:
"C:\Program Files (x86)\RabbitMQ Server\rabbitmq_server-3.2.3\sbin\rabbitmq-plugins.bat" enable rabbitmq_management
To see the new changes you need to restart the RabbitMQ Windows Service which can be done on the command line with:
net stop RabbitMQ && net start RabbitMQ
Or by restarting the service from the services.msc MMC applet UI:
- Open Windows Run dialog by pressing the Windows + R key:

- Select the RabbitMQ Windows Service and click the Restart Icon:
Once restarted, open the Rabbit MQ’s management UI with a web browser at: http://localhost:15672 to see an overview of
the state of the Rabbit MQ server instance:
Usage from .NET
To use Rabbit MQ from .NET get Rabbit MQ’s .NET client bindings from NuGet:
<PackageReference Include="RabbitMQ.Client" Version="8.*" />
With the package installed, we can go through a common scenario of sending and receiving durable messages with Rabbit MQ.
See RabbitMqTests.cs in this repo,
for runnable samples of this walkthru below:
Declare durable Exchange and Queue
Firstly, you will need to register the type of Exchange and Queue before you can use them.
To create a durable work queue, create a durable «direct» exchange and bind a durable queue to it, e.g:
const string ExchangeName = "test.exchange";
const string QueueName = "test.queue";

using (IConnection conn = rabbitMqFactory.CreateConnection())
using (IModel channel = conn.CreateModel())
{
    channel.ExchangeDeclare(ExchangeName, "direct", durable:true, autoDelete:false, arguments:null);

    channel.QueueDeclare(QueueName, durable:true, exclusive:false, autoDelete:false,arguments:null);
    channel.QueueBind(QueueName, ExchangeName, routingKey: QueueName);
}
In this example we’ll also reuse the QueueName for the routing key which will enable directly sending messages to a specific queue.
The registration code only needs to be run once to register and configure the Exchange and Queue we’ll be using in the remaining examples.
Once run, go back to the Management UI to see the new test.exchange Exchange with a binding to the newly created test.queue:
Publishing a persistent message to a queue
Once the exchange and queue is setup we can start publishing messages to it.
Rabbit MQ lets you send messages with any arbitrary byte[] body, for text messages you should send them as UTF8 bytes.
To ensure the message is persistent across Rabbit MQ Server starts you will want to mark the message as persistent as seen below:
var props = channel.CreateBasicProperties();
props.SetPersistent(true);

var msgBody = Encoding.UTF8.GetBytes("Hello, World!");
channel.BasicPublish(ExchangeName, routingKey:QueueName, basicProperties:props, body:msgBody);
The routing key will ensure that a copy of the message is delievered to the test.queue which you can see in the Admin UI:
Receiving Messages
There are a couple of different ways you can read published messages from the queue, the most straightforward way is to use BasicGet:
BasicGetResult msgResponse = channel.BasicGet(QueueName, noAck:true);

var msgBody = Encoding.UTF8.GetString(msgResponse.Body);
msgBody //Hello, World!
The noAck:true flag tells Rabbit MQ to immediately remove the message from the queue.
Another popular use-case is to only send acknowledgement (and remove it from the queue) after you’ve successfully accepted the message,
which can be done with a separate call to BasicAck:
BasicGetResult msgResponse = channel.BasicGet(QueueName, noAck:false);

//process message ...

channel.BasicAck(msgResponse.DeliveryTag, multiple:false);
An alternate way to consume messages is via a push-based event subscription.
You can use the built-in QueueingBasicConsumer to provide a simplified programming model by allowing you to block on a
Shared Queue until a message is received, e.g:
var consumer = new QueueingBasicConsumer(channel);
channel.BasicConsume(QueueName, noAck:true, consumer:consumer);

var msgResponse = consumer.Queue.Dequeue(); //blocking

var msgBody = Encoding.UTF8.GetString(msgResponse.Body);
msgBody //Hello, World!
Processing multiple messages using a subscription
The Shared Queue will block until it receives a message or the channel it’s assigned to is closed which causes it to throw
an EndOfStreamException. With this, you can setup a long-running background thread to continually process multiple messages
in an infinite loop until the Queue is closed.
The sample below shows an example of this in action which publishes 5 messages on a separate thread before closing the channel
the subscription is bound to causing an EndOfStreamException to be thrown, ending the subscription and exiting the loop:
using (IConnection conn = rabbitMqFactory.CreateConnection())
using (IModel channel = conn.CreateModel())
{
    var consumer = new QueueingBasicConsumer(channel);
    channel.BasicConsume(QueueName, noAck: true, consumer: consumer);

    ThreadPool.QueueUserWorkItem(_ => {
        var now = DateTime.UtcNow;
        while (DateTime.UtcNow - now < TimeSpan.FromSeconds(5))
        {
            var props = channel.CreateBasicProperties();
            props.SetPersistent(true);

            var msgBody = Encoding.UTF8.GetBytes("Hello, World!");
            channel.BasicPublish(ExchangeName, routingKey:QueueName, basicProperties:props,
                body:msgBody);

            Thread.Sleep(1000);
        }

        channel.Close();
    });

    while (true)
    {
        try
        {
            var msgResponse = consumer.Queue.Dequeue(); //blocking

            var msgBody = Encoding.UTF8.GetString(msgResponse.Body);

            Console.WriteLine("Received Message: " + msgBody);

            Thread.Sleep(1000);
        }
        catch (EndOfStreamException ex)
        {
            Console.WriteLine("Channel was closed, Exiting...");
            break;
        }
    }
}
The complete source of these examples are available in the stand-alone RabbitMqTests.cs.
Содержание
- Installing on Windows Manually
- Overview
- Install Erlang/OTP
- Make Sure ERLANG_HOME is Set
- Install RabbitMQ Server
- Direct Downloads
- Synchronise the Erlang Cookie
- Locating CLI Tools and App Data
- CLI tools
- Node Data Directory
- Running RabbitMQ Server as an Application
- Customise RabbitMQ Environment Variables
- Start the Broker as an Application
- Running RabbitMQ Server as a Service
- Customise RabbitMQ Environment Variables
- Install the Service
- Managing the Service
- Start the Broker as a Service
- Upgrading Erlang VM
- Managing a RabbitMQ Node
- Managing the Service
- Stopping a Node
- Checking Node Status
- Log Files and Management
- Troubleshooting When Running as a Service
- Default User Access
- Port Access
- Windows-specific Issues
- Getting Help and Providing Feedback
- Help Us Improve the Docs <3
- Установка и управление RabbitMQ
- Сообщения, брокеры сообщений и очерёдность
- Зачем нужны брокеры сообщений?
- Когда нужны брокеры сообщений?
- Краткий обзор RabbitMQ
- Как работает RabbitMQ?
- Преимущества RabbitMQ
- Краткий обзор AMQP
- Установка RabbitMQ
- Установка RabbitMQ в CentOS/RHEL
- Установка RabbitMQ в Ubuntu 13/Debian 7
- Управление RabbitMQ
- Включение консоли управления
- Управление RabbitMQ в CentOS/RHEL
- Управление RabbitMQ в Ubuntu/Debian
- Настройка RabbitMQ
- Installing on Windows
- Overview
- Using chocolatey
- Using the Installer
- Dependencies
- Direct Downloads
- Run RabbitMQ Windows Service
- CLI Tools
- Cookie File Location
- Node Configuration
- Environment Variable Changes on Windows
- Managing a RabbitMQ Node
- Managing the Service
- Stopping a Node
- Checking Node Status
- Log Files and Management
- Firewalls and Security Tools
- Default User Access
- Port Access
- Upgrading Erlang VM
- Dump File Location When Running as a Service
- Getting Help and Providing Feedback
- Help Us Improve the Docs <3
- Установка RabbitMQ в Windows 10 и Windows 201x Server
- Установка RabbitMQ на windows 10
- Установка Erlang
- Установка RabbitMQ
- Установка плагина управления RabbitMQ с WEB-интерфейса
- Протестируем работу сервиса
- Резюме
- Subscribe to Блог php программиста: статьи по PHP, JavaScript, MySql
Installing on Windows Manually
Overview
This guide describes how RabbitMQ can be installed and configured manually on Windows. In general we recommend using one the more automation-friendly options for Windows when possible.
Install Erlang/OTP
RabbitMQ requires a 64-bit supported version of Erlang for Windows to be installed. Latest binary builds for Windows can be obtained from the Erlang/OTP Version Tree page.
Erlang will appear in the Start Menu, and \erl\bin\erl.exe will be in C:\Program Files for 64-bit Erlang installations
Important: your system should only have one version of Erlang installed. Please consult the Windows-specific Issues page.
Make Sure ERLANG_HOME is Set
Install RabbitMQ Server
Direct Downloads
From the zip file, extract the folder named rabbitmq_server-3.8.14 into C:\Program Files\RabbitMQ (or somewhere suitable for application files).
Synchronise the Erlang Cookie
The Erlang cookie is a shared secret used for authentication between RabbitMQ nodes and CLI tools. The value is stored in a file commonly referred to as the Erlang cookie file.
The cookie file used by the service account and the user running rabbitmqctl.bat must be synchronised for CLI tools such as rabbitmqctl.bat to function. All nodes in a cluster must have the same cookie value (cookie file contents).
CLI tools
Within the rabbitmq_server-3.8.14\sbin directory are some scripts which run commands to control the RabbitMQ server.
The RabbitMQ server can be run as either an application or service (not both).
Log in as an administrator. To see the output, run these from a Command Prompt in the sbin directory.
Note: On Windows Vista (and later) it is necessary to elevate privilege (e.g. right-click on the icon to select Run as Administrator).
Set up the system path so RabbitMQ server and CLI tools from the sbin directory can be executed without using fully qualified paths.
Now it should be possible to run rabbitmq commands from any (administrator) Command Prompt.
Navigate to rabbitmq_server-3.8.14\sbin to run commands if the system path does not contain the RabbitMQ sbin directory.
Node Data Directory
Execute echo %APPDATA% at a Command Prompt to find this directory. Alternatively, Start > Run %APPDATA% will open this folder.
Running RabbitMQ Server as an Application
Customise RabbitMQ Environment Variables
The service will run fine using its default settings. It is possible to customise the RabbitMQ environment or edit configuration.
Important: after setting environment variables, it is necessary to restart the node.
Start the Broker as an Application
This will start a node in the background (not attached to the Command Prompt).
Alternatively, rabbitmq-server.bat can be executed in Windows Explorer to start a node in foreground.
When a node is started, a Command Prompt window opens, displays a short startup banner, indicating that the RabbitMQ broker has been started successfully.
Important: closing the original Command Prompt window will forcefully shut down a server started this way.
Running RabbitMQ Server as a Service
The service will run in the security context of the system account without the need for a user to be logged in on a console. This is normally more appropriate for production use. The server should not be run as a service and application simultaneously.
Customise RabbitMQ Environment Variables
The service will run fine using its default settings. It is possible to customise the RabbitMQ environment or edit configuration.
Important: after setting environment variables, it is necessary to reinstall the service.
Install the Service
Install the service by running
A service with the name defined by RABBITMQ_SERVICENAME should now appear in the Windows Services control panel (Start > Run services.msc ).
Managing the Service
To manage the service (install, remove, start, stop, enable, disable), use rabbitmq-service.bat commands. Alternatively, the Windows Services panel ( services.msc ) can be used to perform some of the same functions as the service script.
Start the Broker as a Service
To start the broker, execute
If the output from this command is » Service RABBITMQ_SERVICENAME started «, then the service was started successfully.
Upgrading Erlang VM
If you have an existing installation and are planning to upgrade the Erlang VM from a 32bit to a 64bit version then you must uninstall the broker before upgrading the VM. The installer will not be able to stop or remove a service that was installed with an Erlang VM of a different architecture.
Managing a RabbitMQ Node
Managing the Service
Links to RabbitMQ directories can be found in the Start Menu.
There is also a link to a command prompt window that will start in the sbin dir, in the Start Menu. This is the most convenient way to run the command line tools. Note that CLI tools will have to authenticate to the RabbitMQ node running locally. That involves a shared secret file which has to be placed into the correct location for the user.
Stopping a Node
To stop the broker or check its status, use rabbitmqctl.bat in sbin (as an administrator).
Checking Node Status
The following command performs the most basic node health check and displays some information about the node if it is running:
Log Files and Management
Server logs are critically important in troubleshooting and root cause analysis. See Logging and File and Directory Location guides to learn about log file location, log rotation and more.
Troubleshooting When Running as a Service
Default User Access
See the documentation on access control for information on how to create more users and delete the guest user.
Port Access
RabbitMQ nodes bind to ports (open server TCP sockets) in order to accept client and CLI tool connections. Other processes and tools such as anti-virus software may prevent RabbitMQ from binding to a port. When that happens, the node will fail to start.
CLI tools, client libraries and RabbitMQ nodes also open connections (client TCP sockets). Firewalls can prevent nodes and CLI tools from communicating with each other. Make sure the following ports are accessible:
Windows-specific Issues
We aim to make RabbitMQ a first-class citizen on Windows. However, sometimes there are circumstances beyond our control. Please consult the Windows-specific Issues page.
Getting Help and Providing Feedback
If you have questions about the contents of this guide or any other topic related to RabbitMQ, don’t hesitate to ask them on the RabbitMQ mailing list.
Help Us Improve the Docs <3
If you’d like to contribute an improvement to the site, its source is available on GitHub. Simply fork the repository and submit a pull request. Thank you!
Источник
Установка и управление RabbitMQ
Любой опытный системный администратор знает, что иногда откладывание задач на потом очень полезно и даже необходимо, особенно если задача трудоёмкая и отнимает много ресурсов. Для этого необходим брокер сообщений – программа, которая принимает сообщения (задачи) от различных отправителей (веб-приложений), формирует из них очередь, а затем распределяет их между рабочими процессами.
В данной статье речь пойдёт о проекте RabbitMQ – связке открытых приложений для осуществления функций брокера сообщений, которая реализует протокол Advanced Message Queuing Protocol (AMQP).
Сообщения, брокеры сообщений и очерёдность
Обмен сообщениями – это способ обмена определёнными данными между процессами, приложениями, виртуальными и физическими серверами. Эти сообщения, выполняющие некоторые вычислительные функции, могут содержать практически что угодно, от простого текста до больших блоков двоичных данных. Для корректного выполнения этого процесса необходима сторонняя программа – это и есть брокер сообщений (англ. Message Broker).
Брокер сообщений – это, как правило, группа приложений, каждый отдельный компонент которой предназначен для обработки определённого этапа обмена сообщениями: дл приёма сообщения, определении его в очередь и передаче сообщения рабочему процессу, ответственному за его выполнение. Часто вместо полноценных решений используются программы, изначально не предназначенные для этой работы (базы данных, демон cron, и т.д.); они просто создают очередь сообщений (что технически представляет бесконечные буферы), а затем передают их дл автоматической обработки либо для опроса.
Зачем нужны брокеры сообщений?
Брокеры сообщений выступают в роли посредника между различными сервисами (веб-приложениями). Они существенно снижают нагрузку и сокращают время доставки сообщений, поскольку задачи, на обработку которых уходит некоторое время, распределяются между рабочими процессами, предназначенными исключительно для выполнения этих задач. Они обеспечивают надёжный канал передачи сообщений от одного приложения другому.
Когда нужны брокеры сообщений?
В целом, основная функциональность брокеров сообщений охватывает множество областей, в том числе, но не ограничиваясь:
Краткий обзор RabbitMQ
RabbitMQ (вышел в 2007) – это один из наиболее популярных брокеров сообщений с открытым исходным кодом, который поставляется по лицензии Mozilla Public License v1.1 как реализация протокола Advanced Message Queuing Protocol. Разработанный на языке Erlang, RabbitMQ довольно прост в использовании и установке.
Как работает RabbitMQ?
RabbitMQ предоставляет интерфейс, соединяющий отправителей (Publishers) с получателями (Consumers) при помощи брокера, который распределяет данные в соответствующие списки – очереди сообщений (Message Queues).
Преимущества RabbitMQ
В отличие от других решений, RabbitMQ является полноценным стеком приложений, а не простой базой для применения выбранных вами приложений. Он предоставляет все необходимые инструменты в комплексе.
Краткий обзор AMQP
AMQP (Advanced Message Queuing Protocol) – это широко распространённый открытый стандарт для распространения и передачи сообщений. Как протокол и стандарт, он устанавливает общую основу для взаимодействия различных приложений и брокеров сообщений и устраняет проблемы, вызванные индивидуальным проектированием программ.
Установка RabbitMQ
Пакеты RabbitMQ поставляются системами CentOS/RHEL и Ubuntu/Debian. Но, как правило, такие пакеты устаревшие. Потому рекомендуется скачать и установить RabbitMQ вручную.
Примечание: Все действия руководства рекомендуется выполнять на свежем сервере, чтобы не нарушить работу запущенных ранее приложений и не вызвать сбой настроек.
Установка RabbitMQ в CentOS/RHEL
Прежде чем приступить к установке RabbitMQ, нужно установить зависимости программы, одной из которых является Erlang. Однако, прежде всего необходимо обновить систему и стандартные приложения; для этого запустите:
Для установки Erlang используйте команды:
Теперь можно установить RabbitMQ:
Установка RabbitMQ в Ubuntu 13/Debian 7
Процесс установки RabbitMQ в Ubuntu/Debian подобен установке в CentOS.
Для начала нужно обновить стандартные пакеты:
Включите репозиторий приложения RabbitMQ:
echo «deb http://www.rabbitmq.com/debian/ testing main» >> /etc/apt/sources.list
Добавьте ключ проверки пакета:
Снова обновите систему:
Теперь можно загрузить и установить RabbitMQ:
sudo apt-get install rabbitmq-server
Чтобы при запуске было обработано максимальное количество подключений, откройте и отредактируйте в nano следующий конфигурационный файл:
sudo nano /etc/default/rabbitmq-server
Раскомментируйте строку limit (просто удалите символ #), а затем сохраните и закройте файл (CTRL+X + Y).
Управление RabbitMQ
Как говорилось ранее, брокер RabbitMQ очень прост в использовании. В данном разделе приведены инструкции по управлению и настройке RabbitMQ.
Включение консоли управления
Консоль управления RabbitMQ (RabbitMQ Management Console) – это один из доступных плагинов, позволяющий мониторить процессы сервера RabbitMQ через графический пользовательский веб-интерфейс.
При помощи этой консоли можно:
Чтобы включить консоль RabbitMQ, запустите команду:
sudo rabbitmq-plugins enable rabbitmq_management
Теперь можно открыть консоль при помощи любого удобного браузера:
Стандартные имя и пароль – guest.
Примечание: Запустив консоль после запуска сервиса, не забудьте перезапустить его, чтобы обновить настройки.
Управление RabbitMQ в CentOS/RHEL
После установки приложение RabbitMQ не будет запускаться автоматически при загрузке системы.
Чтобы настроить автозапуск RabbitMQ, выполните:
chkconfig rabbitmq-server on
Для запуска, остановки, перезапуска и проверки состояния используйте команды:
# Запуск:
/sbin/service rabbitmq-server start
# Остановка:
/sbin/service rabbitmq-server stop
# Перезапуск:
/sbin/service rabbitmq-server restart
# Проверка статуса:
/sbin/service rabbitmq-server status
Управление RabbitMQ в Ubuntu/Debian
Чтобы запустить, остановить перезапустить и проверит статус приложения в Ubuntu и Debian, используйте:
# Запуск:
service rabbitmq-server start
# Остановка:
service rabbitmq-server stop
# Перезапуск:
service rabbitmq-server restart
# Проверка статуса:
service rabbitmq-server status
Готово! Теперь на сервере есть готовый к работе брокер сообщений.
Настройка RabbitMQ
RabbitMQ поставляется со стандартными настройками. В целом, они довольно надёжны инее требуют редактирования.
Чтобы получить информацию о пользовательской настройке RabbitMQ, обратитесь к документации приложения.
Источник
Installing on Windows
Overview
This guide covers RabbitMQ installation on Windows. It focuses on the two recommended installation options:
The guide also covers a few post-installation topics in the context of Windows:
and more. These topics are covered in more details in the rest of documentation guides.
A separate companion guide covers known Windows-specific issues and ways to mitigate them.
Using chocolatey
RabbitMQ packages are distributed via Chocolatey. New releases can take a while (sometimes weeks) to get through approvals, so this option is not guaranteed to provide the latest release. It does, however, manage the required dependencies.
To install RabbitMQ using Chocolatey, run the following command from the command line or from PowerShell:
For many use cases, Chocolatey is the optimal installation method.
The Chocolatey RabbitMQ package is open source and can be found on GitHub.
Using the Installer
The official RabbitMQ installer is produced for every RabbitMQ release.
Compared to installation via Chocolatey, this option gives Windows users the most flexibility but also requires them to be aware of certain assumptions and requirements in the installer:
When these conditions are not met, Windows service and CLI tools may require reinstallation or other manual steps to get them to function as expected.
This is covered in more detail in the Windows-specific Issues guide.
Dependencies
RabbitMQ requires a 64-bit supported version of Erlang for Windows to be installed. Latest binary builds for Windows can be obtained from the Erlang/OTP Version Tree page.
Note that Erlang must be installed using an administrative account or it won’t be discoverable to the RabbitMQ Windows service.
Once a supported version of Erlang is installed, download the RabbitMQ installer, rabbitmq-server-.exe and run it. It installs RabbitMQ as a Windows service and starts it using the default configuration.
Direct Downloads
Run RabbitMQ Windows Service
Once both Erlang and RabbitMQ have been installed, a RabbitMQ node can be started as a Windows service. The RabbitMQ service starts automatically. RabbitMQ Windows service ca be managed from the Start menu.
RabbitMQ nodes are often managed, inspected and operated using CLI Tools in PowerShell.
In order for these tools to work they must be able to authenticate with RabbitMQ nodes using a shared secret file called the Erlang cookie.
The main CLI tools guide covers most topics related to command line tool usage.
In order to explore what commands various RabbitMQ CLI tools provide, use the help command:
To learn about a specific command, pass its name as an argument to help :
Cookie File Location
On Windows, the cookie file location depends on whether the HOMEDRIVE and HOMEPATH environment variables are set.
If RabbitMQ is installed using a non-administrative account, a shared secret file used by nodes and CLI tools will not be placed into a correct location, leading to authentication failures when rabbitmqctl.bat and other CLI tools are used.
One of these options can be used to mitigate:
Node Configuration
The service starts using its default settings, listening for connections on default interfaces and ports.
Node configuration is primarily done using a configuration file. A number of available environment variables can be used to control node’s data location, configuration file path and so on.
This is covered in more detail in the Configuration guide
Environment Variable Changes on Windows
Important: after setting environment variables, it is necessary to re-install the Windows service. Restarting the service will not be sufficient.
Managing a RabbitMQ Node
Managing the Service
Links to RabbitMQ directories can be found in the Start Menu.
There is also a link to a command prompt window that will start in the sbin dir, in the Start Menu. This is the most convenient way to run the command line tools.
Stopping a Node
To stop the broker or check its status, use rabbitmqctl.bat in sbin (as an administrator).
Checking Node Status
The following CLI command runs a basic health check and displays some information about the node if it is running.
For it to work, two conditions must be true:
Log Files and Management
Server logs are critically important in troubleshooting and root cause analysis. See Logging and File and Directory Location guides to learn about log file location, log rotation and more.
Firewalls and security tools can prevent RabbitMQ Windows service and CLI tools from operating correctly.
Such tools should be configured to whitelist access to ports used by RabbitMQ.
Default User Access
See the documentation on access control for information on how to create more users and delete the guest user.
Port Access
RabbitMQ nodes bind to ports (open server TCP sockets) in order to accept client and CLI tool connections. Other processes and tools such as anti-virus software may prevent RabbitMQ from binding to a port. When that happens, the node will fail to start.
CLI tools, client libraries and RabbitMQ nodes also open connections (client TCP sockets). Firewalls can prevent nodes and CLI tools from communicating with each other. Make sure the following ports are accessible:
Upgrading Erlang VM
If you have an existing installation and are planning to upgrade the Erlang VM from a 32-bit to a 64-bit version then you must uninstall the broker before upgrading the VM. The installer will not be able to stop or remove a service that was installed with an Erlang VM of a different architecture.
Dump File Location When Running as a Service
Getting Help and Providing Feedback
If you have questions about the contents of this guide or any other topic related to RabbitMQ, don’t hesitate to ask them on the RabbitMQ mailing list.
Help Us Improve the Docs <3
If you’d like to contribute an improvement to the site, its source is available on GitHub. Simply fork the repository and submit a pull request. Thank you!
Источник
Установка RabbitMQ в Windows 10 и Windows 201x Server
Подробную информацию об установке и настройке см. в официальной документации https://www.rabbitmq.com/install-windows.html
С ошибками и проблемами установки RabbitMQ в Windows можно ознакомиться здесь https://www.rabbitmq.com/windows-quirks.html
Все действия по текущей инструкции необходимо выполнять под пользователем с административными правами, в имени которого:
например, Admin
Запустите установку Erlang, дополнительно выберите установку «Microsoft DLL`s (present)», все остальные параметры оставьте «по умолчанию»
Запустите установку RabbitMQ, все параметры оставьте «по умолчанию»
Откройте в сетевом экране TCP порты 15672 и 5672 (добавьте правило для входящих подключений), для этого:
Важно убедиться в том, что создано правило для входящих сообщений
Включите WEB UI RabbitMQ:
Перейдите в консоль сервера RabbitMQ:
После первого запуска консоли RabbitMQ настоятельно рекомендуется изменить пароль пользователя-администратора по умолчанию!
В консоли сервера RabbitMQ:
Источник
Установка RabbitMQ на windows 10
RabbitMQ считается одной из самых продвинутых систем по работе с очередями. Это всё благодаря тому, что RabbitMQ имеет много возможностей. Если хорошо разобраться в этой системе, то, в дальнейшем, работа с другими системами очередей не вызовет у вас конфуза.
Но, прежде, чем писать RabbitMQ tutorial, как обычно, начнём с установки и запуска. В этой статье я шаг за шагом продемонстрирую процесс установки. Если вы ещё не знакомы, с системами очередей, и слабо понимаете механизм их работы, то советую прочитать ранее опубликованную статью об основам очередей.
Установка Erlang
RabbitMQ запускается в виртуальной среде Erlang. Не спрашивайте зачем, просто установите Erlang, без которого RabbitMQ не сможет работать. Последнюю версию для windows можно скачать по ссылке.
На странице скачивания установочного файла нужно выбрать версию, в зависимости от вашей системы (в моём случае, это версия для 64-разрядного процессора):
Установка RabbitMQ
Установка плагина управления RabbitMQ с WEB-интерфейса
После установки, RabbitMQ сразу же будет запущен, потому, можно сразу же начинать с ним работать.
Обычным для программиста является работа из консоли. Но, иногда, одной консоли бывает недостаточно. Потому, в этом шаге будет установлен плагин RabbitMQ Web для работы с очередями из WEB-интерфейса. Этот интерфейс предоставляет удобный вывод статистики, информацию о работающих процессах, логах, и т.д.
Или же, проще нажать кнопку winsows, и начать печатать rabbit, и, из найденных результатов интересует в данном случае только RabbitMQ Command Prompt.
Запустив который мы окажемся в консоли, в нужной для работы директории.
Заключительным шагом от нас требуется перезапустить сервис, поочерёдно выполнив команды:
Ожидаемо должны увидеть страницу входа в WEB-интерфейс:
По умолчанию, данные для входа в панель управления:
Логин: guest
Пароль: guest
Вот, что вы должны увидеть в итоге:
На этом установка полностью завершена, и сервис RabbitMQ готов к работе. Теперь можно свободно работать, и использовать все функции этого мощного и полезного инструмента. В следующей статье по RabbitMQ будет рассмотрен практический пример по работе с системой очередей: добавление, удаление, обработка, и т.д.
Протестируем работу сервиса
Резюме
В этой статье я показал, как установить RabbitMQ на windows 10, как протестировать его работу, и установить плагин RabbitMQ WEB (для работы в WEB-интерфейсе). Это очень крутой инструмент, который рекомендовано освоить каждому программисту.
Subscribe to Блог php программиста: статьи по PHP, JavaScript, MySql
Get the latest posts delivered right to your inbox
Источник