
Readers help support Windows Report. We may get a commission if you buy through our links.
Read our disclosure page to find out how can you help Windows Report sustain the editorial team. Read more
When switching to a new operating system, there’s always a concern about whether your favorite apps will work on your new operating system.
According to reports, QuickTime no longer works after the upgrade from Windows 7 to Windows 10, so let’s see if there is a way to fix this issue.
What to do if QuickTime doesn’t work in Windows 10?
Users report that they can’t install QuickTime on Windows 10 to open QTL files, but there are a few workarounds that will allow you to install QuickTime even if you’re using Windows 10.
Before we start, you’ll need to download QuickTime for Windows as well as WinRAR or 7Zip. Remember the location where you’ve saved the QuickTime installation because you’ll need to visit that folder a couple of times to complete this process.
For simplicity, it’s best to save the installation in the C:\QT folder.
Repair the QuickTime installation
- Right-click the QuickTime installation and select the Extract Here option.
- Download the TRANSFORM file.
- Extract the content from FIX.zip to the C:\QT folder.
- Run and install AppleSoftwareUpdate.msi and AppleApplicationSupport.msi.
- Right-click QuickTime.msi file and choose Troubleshoot compatibility.
- Wait for the wizard to complete the scan.
- You should get a notification saying that Skip Version Check workaround has been applied.
- Now click Test the program and run the installation.
- Microsoft wants Windows 10 users to upgrade to Windows 11 or Copilot + PCs
- Deleting ‘inetpub’ folder lets hackers permanently stop Windows updates, Microsoft warns
- The latest KB5055612 for Windows 10 22H2 brings huge stability to the OS
If for some reason this solution didn’t work for you, you might want to try these steps as well:
- Run Command Prompt as administrator. You can open it by typing CMD into Search bar, right clicking Command
- Prompt from the list of results and choosing Run as administrator.
- Navigate using Command Prompt to the folder where you’ve extracted QuickTime installation files. You can do so by typing CD C:\QT in Command Prompt.
Enter the following command into Command Prompt and press Enter:- msiexec /i QuickTime.msi /qn TRANSFORMS=FIX.mst ALLUSERS=1 /log C:\QT\install.log
- Wait for the installation to complete.
- QuickTime should be installed now, but if QuickTime isn’t working, you can check the install.log file in the C:\QT folder to see what errors you encountered.
That would be all. I hope this solution helps you solve the problem with QuickTime in Windows 10. Elsewhere, if a qtcf.dll file is missing, we know how to get it back. If you have any questions, comments, or suggestions, see the comment section below.
Ivan Jenic
Windows Hardware Expert
Passionate about all elements related to Windows and combined with his innate curiosity, Ivan has delved deep into understanding this operating system, with a specialization in drivers and driver troubleshooting.
When he’s not tackling diverse driver-related problems, Ivan enjoys watching good movies and spending time hiking with his family and friends.
Small window opens saying «loading» but never goes any further. I tried re-installing but it mad no difference.
Windows 10,
desktop
Posted on Sep 7, 2018 10:33 AM
Posted on Sep 9, 2018 1:05 PM
Apparently you do not have a running version of QuickTime Player there, from which you can access its menu.
Lets take a few steps back. QuickTime Player 7 was for Windows 2000, XP, Vista and 7. It was never for Windows 8, 8.1, or 10. Apple stopped developing QuickTime for Windows in 2015, and advises users to uninstall it. About QuickTime 7.7.9 for Windows — Apple Support
| OS | Latest version |
| Windows 2000 | 7.1.6 |
| Windows XP RTM, SP1 | 7.3.1 |
| Windows XP SP2, SP3 | 7.7.6 |
| Windows Vista and Windows 7 | 7.7.9 |
- You probably don’t need it.
- If you are going to install it against advise, you will have to perform some tricks on later Windows versions. There are other websites that describe this in detail.
- If this is about other software suggesting to install QuickTime for its own codec support, then you can install just the “Essentials”, without the Player software. You will still need to do a trick by not using the regular installer, but do a custom install. There are other websites that describe this in detail.
Similar questions
-
Quicktime won’t open
Quicktime won’t open. I keep getting a crash report. Please help.
544
1
-
Quicktime player won’t open
Quicktime player won’t open on my computer. How should I troubleshoot this?
978
2
-
Quicktime player quit unexpectedly
I have been using QuickTime without an issue for a long time. However today it has crashed and every time I try to open it displays the following:-When I try to click re-open it just keeps showing the same message. Any support please on how to fix??Thanks
3086
6
windows 10 quicktime player wont load
QuickTime is a multimedia player developed by Apple. You can use it to view photos, play videos, and run other similar tasks.
Obviously, the tool was developed for macOS. But there are still many Windows 10 users who are running QuickTime on their devices.
Note: Apple no longer supports QuickTime 7 for Windows. As a matter of fact, Windows 10 users don’t actually need the tool. The latest Windows versions now support all the media formats and codecs that QuickTime enabled, including H.264 and AAC.
If, for some reason, you really need QuickTime on your device, but you can’t install it, here are some troubleshooting suggestions that may help you out.
Contents
- 1 Fix QuickTime Installation Issues on Windows 10
- 1.1 Download QuickTime from Apple
- 1.2 Disable Background Programs
- 1.3 Open the Installer in Compatibility Mode
- 1.4 Install a QuickTime Alternative for Windows
Fix QuickTime Installation Issues on Windows 10
Download QuickTime from Apple
If you did not download QuickTime directly from Apple, please do that now. Downloading the tool from third-party websites may bring along unwanted files that might break the installation process.
Get QuickTime from Apple.
Disable Background Programs
Since we’re talking about a non-Microsoft program, do close all the programs running in the background before downloading and installing QuickTime.
You can launch the Task Manager and click on the Processes tab. Then, close all the active programs by selecting End task.
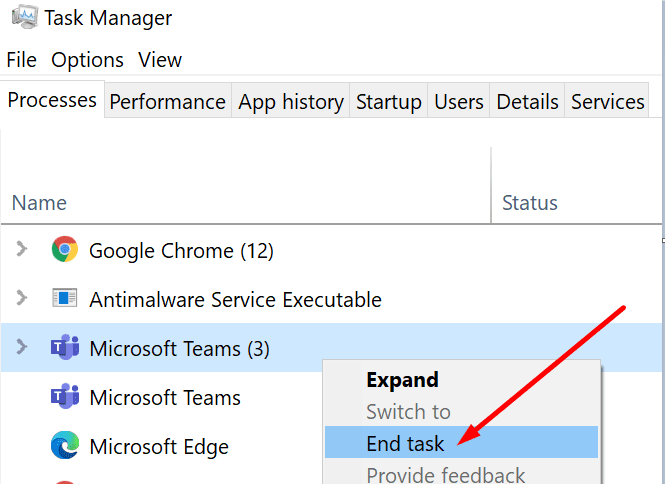
The same goes for your antivirus and firewall. It’s not uncommon for antivirus and firewall programs to block certain installation files.
Try to install QuickTime again after you did all that.
Open the Installer in Compatibility Mode
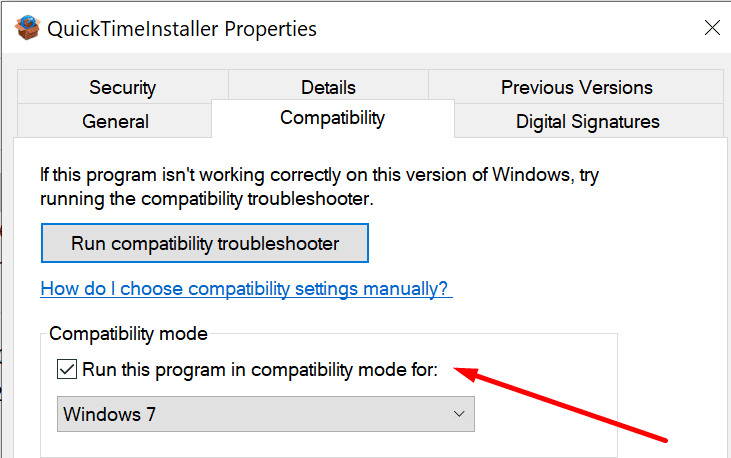
Running the QuickTime installer in compatibility mode may solve this problem. Try this method and check if you can complete the installation process.
- Open your Download folder and locate the QuickTimeInstaller.
- Right-click on it and select Properties.
- Click on the Compatibility tab.
- Then select Run this program in compatibility mode for Windows 7.

- Hit the Apply button to save the changes.
Install a QuickTime Alternative for Windows
If you’re still getting all sorts of errors when installing QuickTime, maybe it’s time to switch to an alternative tool. We expect the number of QuickTime installation issues to increase. After all, Apple stopped supporting QuickTime for Windows many years ago.
Some of the most popular QuickTime alternatives for Windows include Kodi, foobar2000, VLC Media Player, and 5KPlayer.
In this article, learn how to fix QuickTime install error in Windows 10.
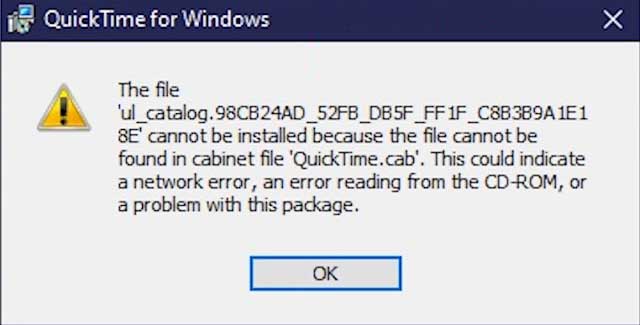
If you can’t install QuickTime in Windows 10, and receive the following error message “ul_catalog.98cb24ad_52fb_db5f_ff1f_c8b3b9a1e18e not found in cabinet file quicktime.cab. This could indicate a network error, an error reading from the cd-rom, or a problem with this package.“, we would recommend you follow the steps below.
How to fix QuickTime install error in Windows 10
Method 1. Run the installer in the compatibility mode
1. Download QuickTime for Windows 10 and save it.
2. Go to the download location, find the QuickTime installer then right-click on it and select Properties.
3. Go the Compatibility tab, tick the Run this program in compatibility mode for box.
4. Choose Windows Vista from the drop-down menu.
5. Tick the Run this program as an administrator box.
6. Click Apply > OK to save changes.
Now you should be able to run the QuickTime installer without any problem.
Method 2. Use a customized installer to install QuickTime (third-party source)
1. To begin, click here to download the Windows 10 installer for QuickTime.
2. Uninstall all previous versions of QuickTime. We would recommend you use a third-party uninstaller and our tools of choice is none other than Your Uninstaller.
3. Restart your PC.
4. After restarting, try running the installer and wait until the process is finished.
Method 3. Try installing an older version
1. Visit Apple’s support website and select an older version of QuickTime.
2. Download the QuickTime installer and run it in the compatibility mode for Vista and with the administrative permission.
3. Wait until the installation is finished and check if the problem is solved.
Method 4. Use a reliable QuickTime alternative
If you’re keep having Quicktime installation problem on Windows 10, perhaps you should consider switching to an alternative.
Cyberlink PowerDVD should be able to replace it just fine. Cyberlink PowerDVD offers great features, and there’s no current video format that can’t be played with Cyberlink PowerDVD. If you’re looking for a proper QuickTime replacement, be sure to try this tool.
Read more: Best DVD player apps for Windows 10
That’s about it.
FIX: QuickTime install error in Windows 10
Rate this post
QuickTime is an extensible multimedia framework developed by Apple Inc., capable of handling various formats of digital video, picture, sound, panoramic images, and interactivity on Windows and Mac OS X. QuickTime lets you view Internet video, HD movie trailers, and personal media in a wide range of file formats. However, when trying to install the latest Quicktime v7.7.8 in the latest Windows 10, users are alerted “Quicktime 7 requires that your computer is running Windows Vista or Windows 7”.
The true fact is that QuickTime 7 is not compatible with Windows 10/11. It can affects lots of people’s experience with Windows 10/11 if QuickTime cannot be installed in Windows 10. Some online video sties require QuickTime installed for playing movies in internet browser; some free editing or player applications rely on the QuickTime framework, such as Adobe After Effects, Adobe Audition, Adobe Premiere Elements, GoPro Studio.
Though QuickTime 7 is incompatible with Windows 10/11, there are workarounds of installing QuickTime in Windows 10/11.
- Solution 1 – Install the older version of QuickTime v7.7.6
- Solution 2 – Install the latest QuickTime v7.7.8 by tricks
Solution 1 – Install the older version of QuickTime, v7.7.6
If you are using Windows 10 and see an alert message saying that it’s impossible to install QuickTime on your system, please try QuickTime 7.7.6 instead.
Solution 2 – Install the latest QuickTime v7.7.8 by tricks
-
- Create a new folder like C:\QT or something similarly easy. All the content in this folder can deleted after QuickTime v7.7.8 is finished installation.
- Download the latest QuickTime 7.7.9 from the official QuickTime for Windows page. And save it to C:\QT.
- Extract QuickTimeInstaller.exe.
Right-click on the file QuickTimeInstaller.exe and choose “Extract here”. If you cannot see options of extraction, download and install WinRAR or 7Zip, then try to extract. - You should now have a folder that looks something like this, under C:\QT or whichever folder you chose.
-
- install the easy prerequisites:
- Double-click the AppleSoftwareUpdate.msi file and click “OK”, “I accept” etc. until the install finishes.
- Do the same with AppleApplicationSupport.msi.
- Ignore the file called QuickTimeInstallerAdmin.exe as we won’t be needing it!
- Right-click the QuickTime.msi file:
-
- Select “Troubleshoot compatibility”.
-
- Wait for the wizard to scan the QuickTime.msi file for possible culprits (which we already know to be the Windows version check).
- It should say that it has applied a “Skip Version Check” workaround to enable the QuickTime.msi installer to run.
- Click “Test the program” and run the installation. Then click “Next” and complete the installation.
- If it worked without error, you’re now done! If not, or if all else fails, continue to refer to point 7 to point 11.
-
- Download this TRANSFORM file and extract it to C:\QT. We will use this file to temporarily remove the OS checks preventing the installation. (A “transform” file or “.mst” is just a simple file that adds or removes things from an MSI-based installation (like QuickTime.msi).
- Click the Windows icon or Search icon and search CMD. Right-click the Command Prompt shortcut/icon and choose Run as administrator.
- install the easy prerequisites:
- Type the following command and hit ENTER:
msiexec /i QuickTime.msi /qn TRANSFORMS=FIX.mst ALLUSERS=1 /log C:\QT\install.log - Installation shouldn’t take more than a couple of minutes…
- NOTE: A log file called install.log will be created in the C:\QT folder, which should end with something along the lines of “Return code 0”. If not, and QuickTime wasn’t installed, you may look in this file for any possible error codes (opens fine in Notepad or WordPad). You will need to install the older version QuickTime v7.7.6.
Resources
The solution 2 for installing the latest QuickTime v7.7.8 is based on Tommy Stephansen’s post on TommyNation. Thanks to Tommy Stephansen, we can install the latest version of QuickTime and use our favorite applications in Windows 10 like before.
Resources
Blu Ray Player for Windows 11
Microsoft File Recovery Alternative Windows 10/11
CD Ripper for Windows 11
DVD Creator for Windows 11
How to Convert PFD to TIFF on Win 11?