
Windows XP set a standard for many Windows operating systems which followed – the Quick Launch bar was a useful feature that got lost in Windows 7 and and above. Here’s how to get it back in Windows 10. Also see:
Windows 10 review.
We would like to thank your US colleagues at
PCWorld for the screenshots.
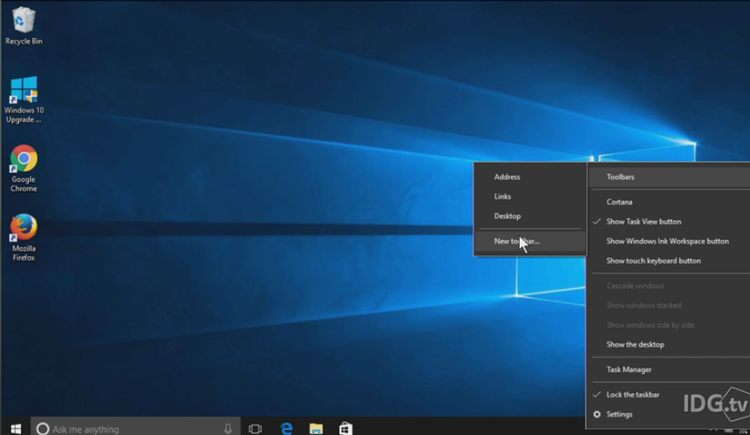
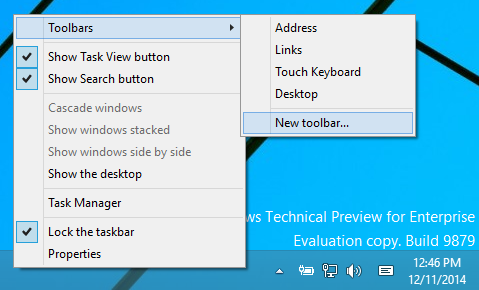
Right-click on an empty space on your taskbar and hover over ‘Toolbars’ to reveal another menu and click on ‘New toolbar…’
Once you’ve opened it, click on the address bar found at the top of Windows Explorer and paste this location: %appdata%MicrosoftInternet ExplorerQuick Launch
Once you’ve pasted (or typed out) the above location click on ‘Select Folder’

This will now present you with a Quick Launch bar at the right-hand side of your taskbar. Also see:
How to get Windows 10 Anniversary
How to get Quick Launch bar in Windows 10: Customise the Quick Launch bar in Windows 10
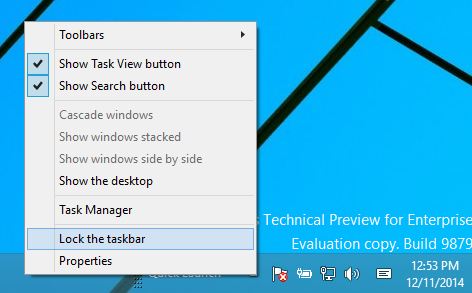
Now that you’ve got the Quick Launch bar on your taskbar you can customise the positioning and what’s found inside. First you’ll want to unlock the taskbar, by right-clicking on an empty space on your taskbar and untick the option.
Once it is unlocked you can right-click the dotted separator lines to dive into its settings and even customise the look of the bar.
You can also drag the bar by long-pressing it using your left-click button on the dotted separator lines – this will allow you to position it to the left or right side on your taskbar.
Once you’ve finished customising your taskbar and Quick Launch, lock your taskbar again: right-click on an empty space on your taskbar and tick the option. Also see:
How to stop Windows 10 update
How to get Quick Launch bar in Windows 10: How to remove the Quick Launch bar in Windows 10
If you no longer want to see the Quick Launch bar on your taskbar, right-click on an empty space on your taskbar, hover over ‘Toolbars’ and untick Quick Launch – the bar will now disappear. Also see:
Should I upgrade to Windows 10?
115
115 people found this article helpful
Tired of pinning apps? You can get your quick launch toolbar back!
Updated on August 4, 2021
What to Know
- The quick launch toolbar has been gone since Windows 7, but you can bring it back.
- Right-click the taskbar and navigate to Toolbars > New Toolbar to add a quick launch toolbar.
- Consider using the pin feature if you want easy access to a handful of commonly used apps.
This article explains how to add a Quick Launch toolbar to the taskbar in Windows 10.
How to Add the Quick Launch Toolbar in Windows 10
Microsoft added the quick launch toolbar in Windows XP to provide an easy way to access common apps from your taskbar, but it disappeared with the introduction of Windows 7. If you miss the quick launch toolbar and pinning apps to the taskbar isn’t good enough, it’s pretty easy to add a quick launch toolbar yourself.
Here’s how to add a quick launch toolbar to the taskbar in Windows 10:
-
Right-click your taskbar to bring up the menu.
Make sure to click a blank area. Don’t click an app icon, the search field, the system tray, or anything other than a blank area of the main taskbar.
-
Navigate to Toolbars > New toolbar.
-
Enter %APPDATA%\Microsoft\[AppName]Quick Launch\ into the navigation field at the top of the window, and press Enter.
-
Click Select Folder.
-
You now have a quick launch toolbar on your taskbar. However, it’s on the right side, and the original quick launch was on the left. If you prefer it on the left, continue following these directions.
-
Right-click the taskbar, and make sure the taskbar is unlocked.
If there’s a check next to Lock the taskbar, click the check to unlock the taskbar. If there is no check, it’s already unlocked.
-
Click the vertical line that’s located to the right of the search field and Cortana button, and drag it all the way to the right.
If you do this successfully, it will push the quick launch menu to the left side of the taskbar.
-
The quick launch bar is now on the left.
-
To hide the icons, click the vertical line that’s between your quick launch icons and the rest of the taskbar, and drag it left.
-
You now have a quick launch toolbar on your taskbar. Click the >> icon to access your quick launch toolbar.
-
If you want to hide the quick launch text, right-click the quick launch toolbar and click the checkmark next to Show title. When the checkmark is gone, the quick launch text will disappear from your taskbar, leaving just the >> icon.
-
For a more classic Windows XP look and feel, right-click the taskbar and navigate to Search > Hidden to hide the search box. Then click the checkmarks next to the Show Cortana text and Show task view button.
-
You now have a quick launch toolbar directly next to the Start menu, just like Windows XP, either with or without the quick launch title text, depending on your own preference.
Why Was the Quick Launch Toolbar Removed?
While the Quick Launch toolbar was quite helpful, and many people liked it, the ability to pin apps to the taskbar took its place in the default Windows design. If you don’t already take advantage of app pinning, it’s pretty useful in its own right. You can right-click any app on your taskbar and choose to pin it to either the start menu or taskbar for easy access.
If you have a set of apps that you use regularly but don’t necessarily want them to run on startup, consider pinning them to the taskbar. The quick launch menu is better if you have more than a handful of apps you want easy access to, but pinning is convenient for a handful of your most commonly used apps.
Thanks for letting us know!
Get the Latest Tech News Delivered Every Day
Subscribe
One of my favorite features of the taskbar is the Quick Launch toolbar. This small yet useful toolbar was located near the Start button in previous Windows versions like Windows XP and earlier. It was enabled by default for the last time in Windows Vista, but with the release of Windows 7, Microsoft decided to drop official support for the Quick Launch toolbar in favor of pinning icons to the taskbar. Quick Launch has not been completely removed and can be revived in Windows 10. It is not so obvious to a novice user how to enable Quick Launch in Windows 10 as it involves numerous steps and cannot be automated. In this article, we will see how to add the Quick Launch back to the taskbar in Windows 10.
There are a number of reasons why you might want to enable Quick Launch.
- Even if you set pinned icons to a small size, they are still spaced too far apart from one another.
- The taskbar mixes running programs with non-running ones, whereas if you use the Quick Launch toolbar, running programs will always appear to its right.
- Quick Launch has a more customizable appearance; you can easily put any shortcut or folder there without having to use tools like Winaero Taskbar Pinner or Pin to 8. You can change their icons, have multiple rows of icons if you make the taskbar larger, and save overall space on the taskbar.
To restore the Quick Launch toolbar, follow these simple steps:
Right click on an empty space of the taskbar. From its context menu select the Toolbars -> New Toolbar… item.
The following dialog will appear on the screen:
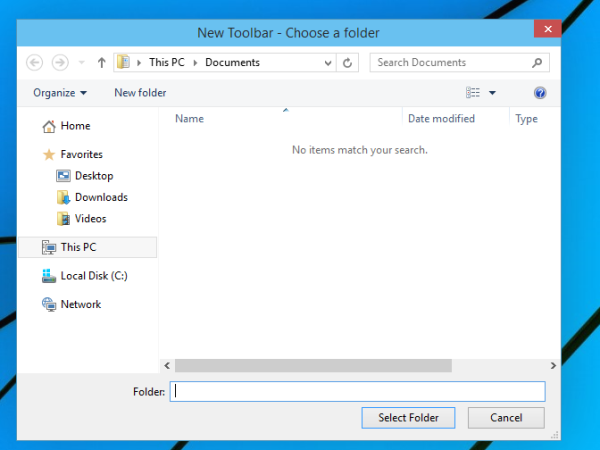
In this dialog, select the following folder:
C:\Users\YOUR USER NAME\AppData\Roaming\Microsoft\Internet Explorer\Quick Launch
Replace the «YOUR USER NAME» text with your actual user name in Windows 10.
Alternatively, you can type or copy-paste the following text into the Folder text box in the dialog above and then press Enter:
shell:Quick Launch
The shell: protocol gives quick access to special folders as I covered previously.
Yet another way to access the Quick Launch folder is by entering the following path instead of the shell command:
%userprofile%\AppData\Roaming\Microsoft\Internet Explorer\Quick Launch
%userprofile% is an environment variable which points directly to your user profile in Windows 10. This way, you don’t have to enter your user name in the path.
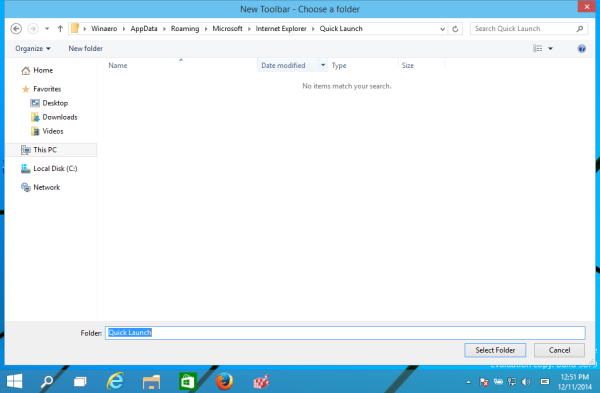
Now click the Select Folder button.
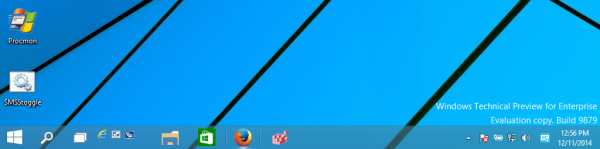
The Quick Launch toolbar will get added to the taskbar:
As you can see, it is locked to the right side of the taskbar and has a title. Let’s move it to the left side and hide the title.
Right click on the taskbar and untick Lock the taskbar.
Now drag the Quick Launch toolbar from the right to the left, using the dotted bar which appears after your have unlocked the taskbar. Drag all the way to the left of any pinned icons you may have.
After that, right click on the Quick Launch toolbar and untick the following options:
- Show title
- Show text
That’s it. Now you have the good old Quick Launch enabled in Windows 10.
Now see: Add Quick Launch to the Send To menu to create new shortcuts faster
.
This trick to enable Quick Launch also works on Windows 7 and Windows 8. You can also get rich tooltips to show useful information if you do this Registry tweak:

Support us
Winaero greatly relies on your support. You can help the site keep bringing you interesting and useful content and software by using these options:
If you like this article, please share it using the buttons below. It won’t take a lot from you, but it will help us grow. Thanks for your support!
Windows 10 has a myriad of features designed to enhance productivity, but one area that remains underutilized is the ‘Send to’ context menu. This tool, while handy for quickly sending files to different locations, can be augmented to improve efficiency further. One way to achieve this is by adding the Quick Launch Bar to the ‘Send to’ context menu. This article will guide you through the process of doing just that, along with the benefits, insights, and in-depth explanations about incorporating this feature into your Windows 10 setup.
Understanding the ‘Send to’ Context Menu
The ‘Send to’ context menu has been a fundamental feature of Windows since its inception, allowing users to swiftly send files and folders to designated destinations such as optical drives, compressed folders, and external devices. This context menu can significantly expedite file management tasks, but its capabilities can be expanded by customizing the available options.
Reasons to Customize the ‘Send to’ Menu
Before we dive into the technical aspects, it’s essential to understand why customizing the ‘Send to’ menu is beneficial:
-
Increased Efficiency: Customizing the menu means fewer clicks to perform routine actions. You can send files to preferred destinations without digging through multiple folders.
-
Personalization: Every user has unique workflows. Customizing the ‘Send to’ options helps tailor Windows 10 to your needs, making it more intuitive.
-
Enhanced Organization: By adding tools like the Quick Launch Bar, you can streamline how you manage and organize files and applications.
-
Quick Access to Applications: With the Quick Launch Bar, you can create a one-stop source for frequently used applications, enhancing accessibility.
The Quick Launch Bar: A Brief Overview
The Quick Launch Bar is a feature that allows users to add shortcuts to frequently used programs, files, or folders, enabling instant access. Although this feature has experienced a shift in prominence since Windows 7 and has become somewhat hidden in Windows 10, it can still be a valuable addition for users who need to streamline their processes.
Enabling the Quick Launch Bar in Windows 10
Before adding the Quick Launch Bar to your ‘Send to’ context menu, it must be enabled and set up on your system. Follow these simple steps to do so:
-
Create a Quick Launch Folder:
- Right-click on your desktop.
- Select New > Folder.
- Name the folder «Quick Launch».
- Alternatively, navigate to
C:Users\AppDataRoamingMicrosoftInternet ExplorerQuick Launch.
-
Add the Quick Launch Bar to Your Taskbar:
- Right-click on your taskbar.
- Hover over Toolbars and select New Toolbar.
- In the folder selection window, navigate to your newly created Quick Launch folder and select it.
- Click Select Folder. A Quick Launch Bar containing the folder will now appear on your taskbar.
-
Add Shortcuts to the Quick Launch Bar:
- Drag and drop the applications, files, or shortcuts directly into the Quick Launch folder. They will appear immediately in your Quick Launch Bar.
Step-by-Step Process to Add the Quick Launch Bar to the ‘Send to’ Context Menu
Now that your Quick Launch Bar is set up, you will want to integrate it into the ‘Send to’ context menu. Here’s how to do it in detail:
Step 1: Open the ‘Send to’ Folder
- Press
Windows + Rto open the Run dialog. - Type the following command and press Enter:
shell:sendto - This action will open the ‘Send to’ folder. It typically contains shortcuts to various destinations available in the context menu.
Step 2: Create a Shortcut to the Quick Launch Bar
- Once in the ‘Send to’ folder, right-click within the folder and select New > Shortcut.
- In the shortcut creation wizard, you will be prompted to enter the location of the item. Input the following (adjusting for your username):
C:Users\AppDataRoamingMicrosoftInternet ExplorerQuick Launch - Click Next and give the shortcut a name, such as “Quick Launch”.
- Click Finish to create the shortcut.
Step 3: Verifying the Addition
To ensure that the Quick Launch Bar is now part of the ‘Send to’ context menu:
- Right-click on a file or folder.
- Navigate to the
Send tooption. - You should see the newly added “Quick Launch” option.
Congratulations! You have successfully added the Quick Launch Bar to the ‘Send to’ context menu. This functionality allows you to quickly send files and folders to the Quick Launch Bar, from where you can easily access them at any time.
Benefits of the Quick Launch Bar Integration
Streamlined Workflow
Being able to send files directly to the Quick Launch Bar can save you valuable time. For instance, if you regularly access certain documents or applications, this integration minimizes the time spent navigating to various folders or other locations.
Consistent Access to Tools
By quickly sending applications or files to the Quick Launch Bar, you ensure a consistent environment tailored to your everyday tasks. You can even organize your Quick Launch shortcuts into subfolders if needed, further enhancing organization.
Enhanced File Management
Managing your files and applications becomes more accessible as you eliminate unnecessary clicks and navigation paths. This integration promotes effective file management which can be a game-changer in high-paced work environments.
Encouragement of Best Practices
Using the Quick Launch Bar within the context menu emphasizes the importance of best practices in file management. It serves as a daily reminder to keep your desktop and directory clean and organized.
Troubleshooting Common Issues
Issue 1: Quick Launch Shortcut Not Appearing
If you’ve followed the directions carefully but the Quick Launch Bar doesn’t appear in your ‘Send to’ menu, double-check that you’ve created and named the shortcut correctly. Ensure you are navigating to the correct user’s profile if you share a system with others.
Issue 2: Sometimes the ‘Send to’ Option is Missing for Files
In some instances, Windows may fail to show the ‘Send to’ option for particular files. This can often be resolved by ensuring your file associations are correctly set and that you’ve not inadvertently altered file permissions.
Issue 3: Quick Launch Shortcuts Not Working
If the shortcuts within your Quick Launch Bar do not perform as expected, ensure they point directly to the intended applications or files. You may need to recreate shortcuts if they are broken or outdated.
Tips for Optimizing the Quick Launch Bar Experience
Organize Your Shortcuts
Keep your Quick Launch Bar neat by organizing shortcuts into folders. For instance, you could have folders for work-related applications, personal projects, or frequently used documents.
Regularly Update Your Quick Launch Bar
As your work habits evolve, so too should your Quick Launch Bar. Make a habit of reviewing your shortcuts weekly or monthly to ensure you’re only keeping what’s necessary.
Utilize Application Grouping
If you use similar applications (like various Microsoft Office tools) through the Quick Launch Bar, consider grouping them for easy access. It reduces clutter and enhances workflows.
Pin Frequently Used Folders
If you frequently access specific folders alongside applications, consider adding folder shortcuts directly to the Quick Launch Bar. This can create a comprehensive toolset at your fingertips.
Conclusion
By following the steps outlined in this article, you can enhance your Windows 10 experience, making file management more efficient and tailored to your specific needs. The ability to add the Quick Launch Bar to the ‘Send to’ context menu incorporates a familiar but underutilized tool into a powerful workflow strategy, optimizing your time and improving productivity.
Integrating the Quick Launch Bar represents a relatively simple, yet impactful, transformation in how you interact with files and applications within Windows. In an era where digital productivity is paramount, such enhancements can lead to noticeable improvements in both personal and professional environments.
Take the time to explore and customize your Windows settings, and watch how small changes can lead to significant productivity gains. The ‘Send to’ context menu, when customized and complemented with tools like the Quick Launch Bar, creates a more efficient computing environment, suited to your personal workflow.
Do you want to enable Windows 10 Quick Launch toolbar to open programs quickly? Learn how to add Quick Launch toolbar in Windows 10 / 8 / 7 PC.
Are you familiar with the usefulness of Quick Launch toolbar in Windows 10 or other versions of Windows?
The Quick Launch toolbar is a useful section of the Microsoft Windows taskbar which provides you the option to add and launch the most frequently used programs quickly.
If you have used Windows XP and Vista operating system in the past, you might have noticed the Quick Launch toolbar located right next to the Start button. However, if you are using a latest Windows operating system after Windows Vista then you won’t get Quick Launch bar by default.

(Disclosure: This post contains affiliate links and images. I earn advertising/referral fees if you make a purchase by clicking them. There is no extra cost to you. See our full disclosure here. )
With the new versions of Windows, the idea of Quick Launch toolbar was dropped. So, if you are using Windows 10 operating system and wish to use Quick Launch toolbar feature then you are at the right place as today we are going to tell you how to add quick launch to Windows 10 PC.
Why Do You Need to Add Quick Launch Toolbar in Windows 10?
Before we tell you how to enable Windows 10 Quick Launch toolbar, let’s find out why you need to use Quick Launch Windows 10 toolbar.
We have listed few reasons below which might interest you to add quick launch bar on your Windows PC:
- Pinning multiple apps and folders lead to more space because they spaced too far apart from one another. This limits you from adding more applications and there is no space left for new applications which are opened. But with Windows quick launch bar, you don’t need to worry about spaces.
- It’s a fact that running programs get mixed with non-running programs on the taskbar which lead to a lot of confusion, whereas if you use the Quick Launch toolbar, all the running programs will always appear to its right.
- With Quick Launch bar, you get plenty of options to customize the appearance of your desktop. You get the ability to pin shortcuts or folders without using any tools. One of the best things which you get to use with the Windows quick launch is that it allows you to increase and decrease icon’s size.
We hope now you understand the importance of Quick Launch toolbar in Windows 10.
As we all know that by default, the Quick Launch toolbar is not available in Windows 10, Windows 8, and Windows 7 operating system. However, you can follow the below explained steps to restore and show Quick Launch button as it was in Microsoft Windows Vista and Windows XP.
Here’s how to add Quick Launch toolbar on Windows 10 / 8 / 7 computer:
Step (1): First of all, right click on the Taskbar and then go to Toolbars and select New toolbar from the menu.

Step (2): In the New toolbar dialog box, copy and paste the following text and then hit Enter key or click on the Select Folder button:
%UserProfile%\AppData\Roaming\Microsoft\Internet Explorer\Quick Launch

Step (3): Now you will be able to see the Quick Launch bar with the text on the right side of the taskbar.

Step (4): In case, if you want to hide the Quick Launch text and all program titles, just right-click on the Quick Launch bar and then uncheck Show Text and Show title option.

Step (5): You can also drag the Quick Launch bar to the left side of the taskbar. If you are unable to move the Quick Launch bar, right-click on the taskbar and then uncheck Lock the taskbar option.
Step (6): Accessing the Quick Launch items is pretty simple, click on the double arrow available right next to the Quick Launch toolbar on the taskbar and then select the desired program you want to open as per your preference.

Thus, you can see how simple is to add Windows 10 Quick Launch toolbar. You can follow the same process if you wish to add quick launch bar on Windows 7 or Windows 8 operating systems.
How to Add Programs to Quick Launch Windows 10
Adding programs in the Quick Launch toolbar is also a quite easy thing. If you decide to add an application in the Quick Launch bar, you have to only copy and paste the application shortcut and you are done.
Follow the steps mentioned below and learn how to add programs to Quick Launch toolbar in Windows 10 PC:
Step (1): To add a program in the Quick Launch bar, simply open File Explorer and copy and paste the following text and then hit Enter key to open Quick Launch folder:
%APPDATA%\Microsoft\Internet Explorer\Quick Launch

Step (2): Now add all the program’s shortcuts in this Quick Launch folder which you want to add in the Windows 10 Quick Launch bar.

Step (3): Once you have added the shortcuts of your desired programs in the Quick Launch folder, those programs will appear in the Quick Launch toolbar.
By following the exact same steps, you can add as much as programs you want in the Windows 10 Quick Launch toolbar.
Conclusion
We hope now you know everything about Quick Launch toolbar and why do you need to add quick launch bar in Windows 10 / 8 / 7 PC.
Follow the instructions explained above to enable Quick Launch in Windows 10 and place shortcuts to your most frequently used applications and open them quickly,
If you are still facing any difficulties in order to enable Windows 10 Quick Launch Toolbar or add programs to Quick Launch Windows 10 operating system then do let us know using the comments section below.
You might also like to know: How to Change Virtual Memory in Windows 10