
В Windows 10 версии 1607 (Anniversary Update) появилось несколько новых приложений, одно из них — «Быстрая помощь» (Quick Assist), предоставляющее возможность удаленного управления компьютером через Интернет для оказания поддержки пользователю.
Программ такого рода предостаточно (см. Лучшие программы удаленного рабочего стола), одна из них — Microsoft Remote Desktop присутствовала и в Windows. Преимущества же приложения «Быстрая помощь» — в том, что эта утилита присутствует во всех редакциях Windows 10, а также очень проста в использовании и подойдет для самого широкого круга пользователей. Обновление: приложение обновилось и теперь называется и выглядит иначе, подробнее: Приложение Быстрая поддержка для удаленного управления компьютером Windows 10 и Windows 11.
И один недостаток, который может вызвать неудобства при использовании программы — пользователь, который оказывает помощь, то есть подключается к удаленному рабочему столу для управления, должен иметь учетную запись Майкрософт (для стороны, к которой подключаются, это необязательно).
Использование приложения «Быстрая помощь» (Quick Assist)
Для того, чтобы использовать встроенное приложение для доступа к удаленному рабочему столу в Windows 10, его следует запустить на обоих компьютерах — том, к которому подключаются и на том, с которого будет оказываться помощь. Соответственно, на этих двух компьютерах должна быть установлена Windows 10 не ниже версии 1607.
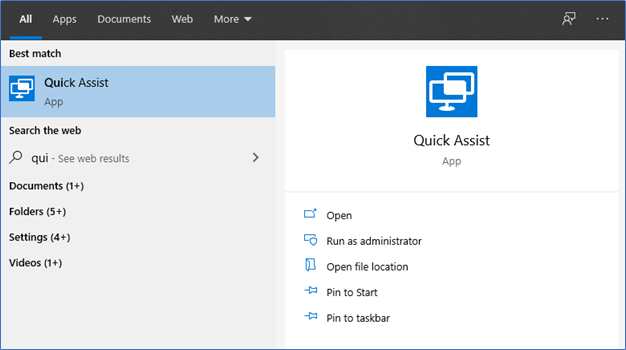
Для запуска можно использовать поиск в панели задач (просто начните вводить «Быстрая помощь» или «Quick Assist»), или отыскать программу в меню Пуск в разделе «Стандартные — Windows».
Подключение к удаленному компьютеру выполняется с помощью следующих простых шагов:
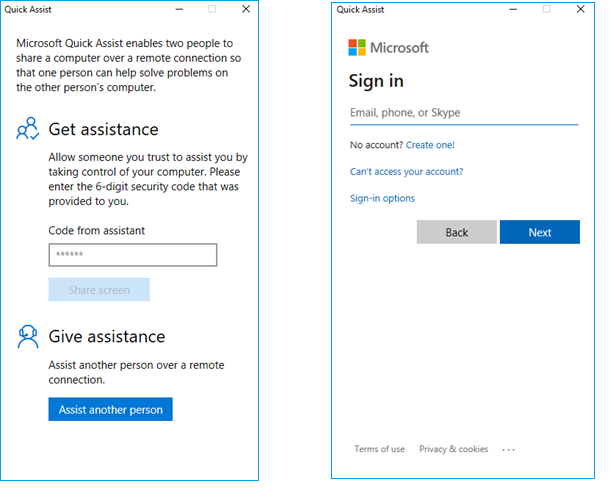
- На компьютере, с которого выполняется подключение нажмите «Оказать помощь». Возможно, потребуется вход в учетную запись Майкрософт для первого использования.
- Каким-либо образом передайте код безопасности, который отобразится в окне, человеку, к компьютеру которого вы подключаетесь (по телефону, e-mail, sms, через мессенджер).
- Пользователь, к которому подключаются, нажимает «Получить помощь» и вводит предоставленный код безопасности.
- Затем у него отображается информация о том, кто хочет подключиться, и кнопка «Разрешить» для того, чтобы одобрить удаленное подключение.
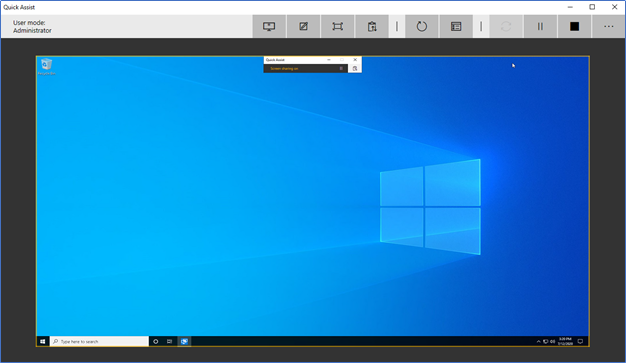
После того, как удаленный пользователь нажимает «Разрешить», после короткого ожидания подключения, на стороне оказывающего помощь появляется окно с рабочим столом Windows 10 удаленного пользователя с возможностью управления им.

Вверху окна «Быстрая помощь» также присутствуют несколько простых элементов управления:
- Информация об уровне доступа удаленного пользователя к системе (поле «Пользовательский режим» — администратор или пользователь).
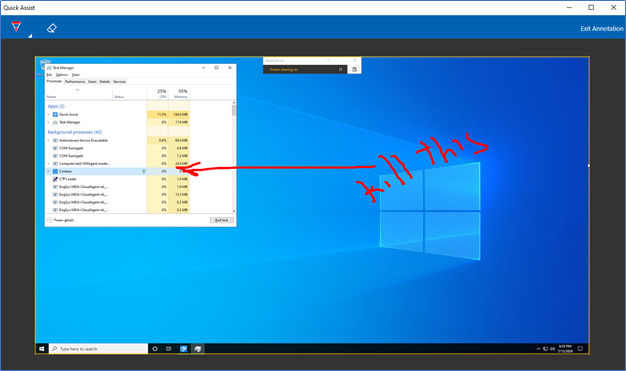
- Кнопка с карандашом — позволяет делать заметки, «рисовать» на удаленном рабочем столе (удаленный пользователь это тоже видит).
- Обновление подключения и вызов диспетчера задач.
- Пауза и прерывание сеанса удаленного рабочего стола.
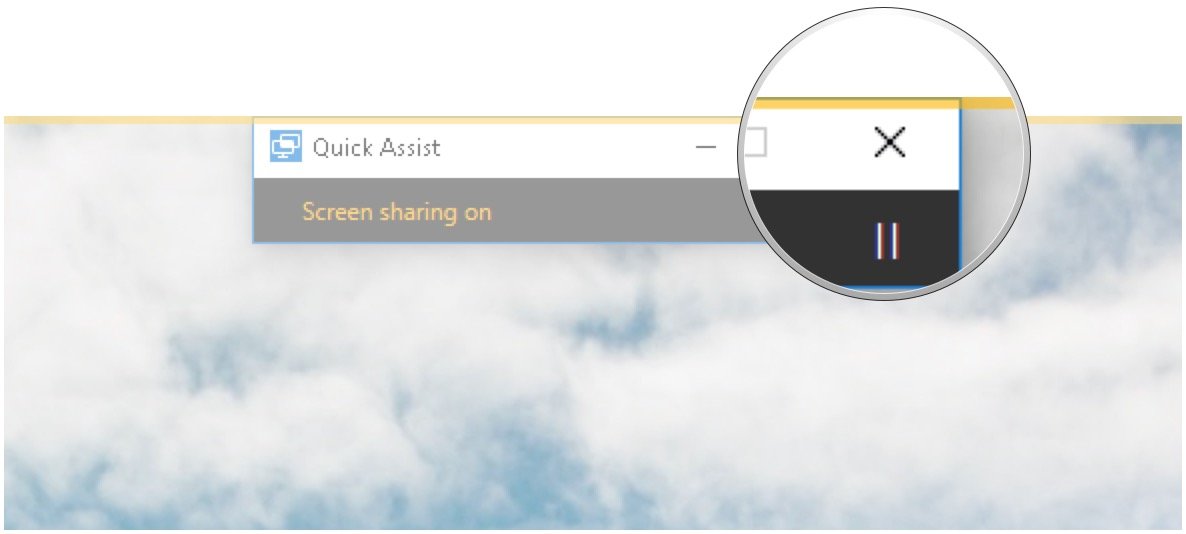
Со своей стороны, пользователь к которому подключились, может либо поставить сеанс «помощи» на паузу, либо закрыть приложение, если вдруг потребовалось резко прервать сеанс удаленного управления компьютером.
Среди незаметных возможностей — передача файлов на удаленный компьютер и с него: для этого просто скопируйте файл в одном расположении, например, на своём компьютере (Ctrl+C) и вставьте (Ctrl+V) в другом, например, на удаленном компьютере.
Вот, пожалуй, и всё по встроенному приложению Windows 10 для доступа к удаленному рабочему столу. Не слишком функционально, но с другой стороны, многие программы для схожих целей (тот же TeamViewer) большинством используются только ради тех возможностей, которые есть и в «Быстрая помощь».
К тому же, для использования встроенного приложения не нужно что-либо скачивать (в отличие от сторонних решений), а для подключения к удаленному рабочему столу через Интернет не требуется никаких особенных настроек (в отличие от Microsoft Remote Desktop): оба этих пункта могут быть препятствием для начинающего пользователя, которому нужна помощь с компьютером.
Microsoft Quick Assist is a preinstalled application in Windows 10 version 1607 and later, as well as Windows 11. This is a Windows-native application that can be used as an alternative for TeamViewer, AnyDesk, etc., that lets you view or take control of a remote PC over the internet.
Previously, this app only came preinstalled on the Windows OS. However, this app was moved to Microsoft Store a while back for greater performance and security optimization.
In this article, we show you how to use the app to establish a remote desktop connection using Quick Assist, how to install and uninstall it if needed, and everything else there is to know about the app.
Table of Contents
What is Microsoft Quick Assist
Quick Assist is an application from Microsoft which is an improvement on top of the legacy Remote Desktop Connection applet. This app uses your Microsoft account (Microsoft 365 or standalone Microsoft account), an active internet connection, and an authentication process so that a remote desktop connection can be established.
This application is designed with the intention of users needing remote assistance with their Windows computer from technical support when needed. Using Quick Assist, one no longer needs to download and install a third-party application like TeamViewer or AnyDesk.
Quick Assist uses the 443 port, the same as HTTPS, to establish the remote connection, and is encrypted with TLS 1.2.
If Microsoft Quick Assist is installed on your computer, then you can open it by searching for it from the Start menu, or by pressing the CTRL + Windows Key + Q shortcut keys.

Now before we show you how to use the app, there are a few things you must know.
Before You Begin
Here are a few things that you ought to know before establishing a remote connection using Quick Assist:
- Unline Remote Desktop Connection, a connection can be established using Quick Assist online, and the remote PC does not necessarily need to be on the same network as yours.
- Both of the computers need to be running at least Windows 10 version 1607 or later. To check which Windows version you are running, type in “winver” in the Run Command box.
- It is not necessary for both PCs to have the same OS build, as long as it meets the minimum version requirements.
- Since there is an authentication process involved, the person who requires the assistance needs to be available on the remote PC to allow a connection to be established.
- If you are the one providing the assistance, then you need a Microsoft account to log into the app.
- You cannot hear any sounds from the remote computer during a Quick Assist session. However, you can communicate with the person available at the remote end using other methods discussed below.
- Unlike most third-party apps, the person providing the assistance must generate a code for authentication and share it with the person who needs assistance.
- The generated code is only valid for 10 minutes and must be used within that time frame to establish a connection.
Let us now show you how to use the Quick Assist app to establish a remote desktop connection.
How to Establish a Remote Connection using Quick Assist
The method below showcases the steps that need o be applied on both of the computers involved in a Quick Assist connection.
For reference, we will assume that “Machine A” is the computer from where the assistance is being provided, and “Machine B” is the computer where assistance is needed.
-
Machine A: Launch the Quick Assist app either using the Start menu or using the CTRL + Windows Key + Q shortcut keys.
-
Machine A: Click “Assist another person.”
Assist another person -
Machine A: Sign into the app using your Microsoft credentials.
If you don’t have one already, you can sign up for free.
-
Machine A: Once signed in, share the security code with the person available at Machine B.
Security code generated -
Machine B: Enter the shared security code (while it is still valid) and click “Share screen.”

Enter code and share screen -
Machine A: Choose whether to only view the screen or take full control, then click Continue.
Take control or view the screen -
Machine B: Allow the person on Machine A to view your screen by clicking Allow.
Allow assistance


That’s it! The person on Machine A will now be able to view your screen/take control of your PC while the person on Machine B will be able to see what is happening.

At this point, the user on Machine B can leave their seat and allow Machine A to make any unsupervised changes to your computer.
You may now perform the necessary action to provide assistance to the remote user as needed. However, note that they can still use their keyboard and mouse to take over, which may hinder your remote work.
Now that you have successfully established a connection, let us show you the tools which the assistor can use on the remote computer using Quick Assist.
Tools in Microsoft Quick Assist
Once a connection is established, the user on the PC providing the assistance will be able to see a toolbar at the top of the window.
The list below denotes the tools going left-to-right, and what each of those can be used for.
-
Select Monitor: If the remote PC has multiple monitors, you can switch between them using this tool.
-
Pen: You can use a pen in different colors to write or highlight a portion of the screen to instruct or talk to the remote user, which they will also be able to see.
Using the Pen tool in Quick Assist -
Actual Size: Fits the entire remote screen within the Quick Assist window, as per its actual resolution.
-
Toggle Instruction Channel: Using this tool, you can send and receive text messages across the two computers using Quick Assist.
Communicate using Instruction Channel in Quick Assist -
Restart: This command restarts the remote computer and then reconnects to it using Quick Assist. Although this method does not require connecting using a new code, it still requires the remote PC user to allow you to establish a connection again.
-
Task Manager: This button opens the Task Manager without needing to press any shortcut keys or search for it.
-
Pause: This will pause the remote desktop connection and you will no longer be able to view the remote computer unless the connection is Resume.
Note that the user on the remote computer can also pause the connection by clicking the Pause button visible to them inside their toolbar.

Quick Assist toolbar on Remote computer -
Leave: This will terminate the remote connection.


When selecting most of the tools discussed above, you need to exit them before using another tool.
Up until now, we have discussed everything there is you need to know to use Microsoft Quick Assist. However, if you do not have one on your PC, you can install it from Microsoft Store.
Download and Install Microsoft Quick Assist
Perform the following steps to install Quick Assist in case it has been deleted, or you do not have one:
-
Open the Microsoft Quick Assist page in Microsoft Store using any web browser.
-
Click “Get in Store app.”

Get Quick Assist from Microsoft Store -
Now click “Open Microsoft Store.”
Open Microsoft Store The Microsoft Store app will now launch.
-
Click Install.

Install Quick Assist


Microsoft Store will now download and install Quick Assist on your computer, which you may then open directly from the Store app by clicking “Open,” by searching for it in the Start menu or using the CTRL + Windows Key + Q hotkeys.
Uninstall Microsoft Quick Assist
If you do not use Microsoft Quick Assist, you can remove it from your PC just like any regular app. Here’s how:
-
Navigate to:
Settings app >> Apps >> Installed apps
-
Search for Quick Assist.

Search for Quick Assist -
Click on the 3 dots in front of the app and then click Uninstall.
Uninstall Quick Assist -
Click “Uninstall” again.
Confirm uninstallation


The app will now be removed from your computer.
If needed, you can download ita gain from Microsoft Store when needed.
Final Verdict
If you are not looking to SSH or Telnet to other computers and mostly have to establish remote connections to Windows computers, then Quick Assist might be ideal for you.
Since it is a Windows native app, you do not have to download/install any third-party applications. Plus, the app uses secure encryption to keep your connection safe and reliable. Of course, it would help if both the computers had a good internet connection.
Let us know what you think of the Quick Assist app in the comments below, and how it compares to other remote desktop applications.
Frequently Asked Questions (FAQs)
Why are there two Quick Assist apps on my computer?
Microsoft moved the Quick Assist app to Microsoft Store a while back. It may be possible that you have both the new and old versions of the app installed on your computer. In this case, it is safe to uninstall the legacy Quick Assist app and continue with the new one.
Can you connect to a remote computer using Quick Assist with automatic authentication?
At the moment, you need a person present on the remote computer to allow you to connect to it using Quick Assist. Unfortunately, unlike TeamViewer, you cannot set a permanent password on the remote computer and allow automatic authentication using Quick Assist.
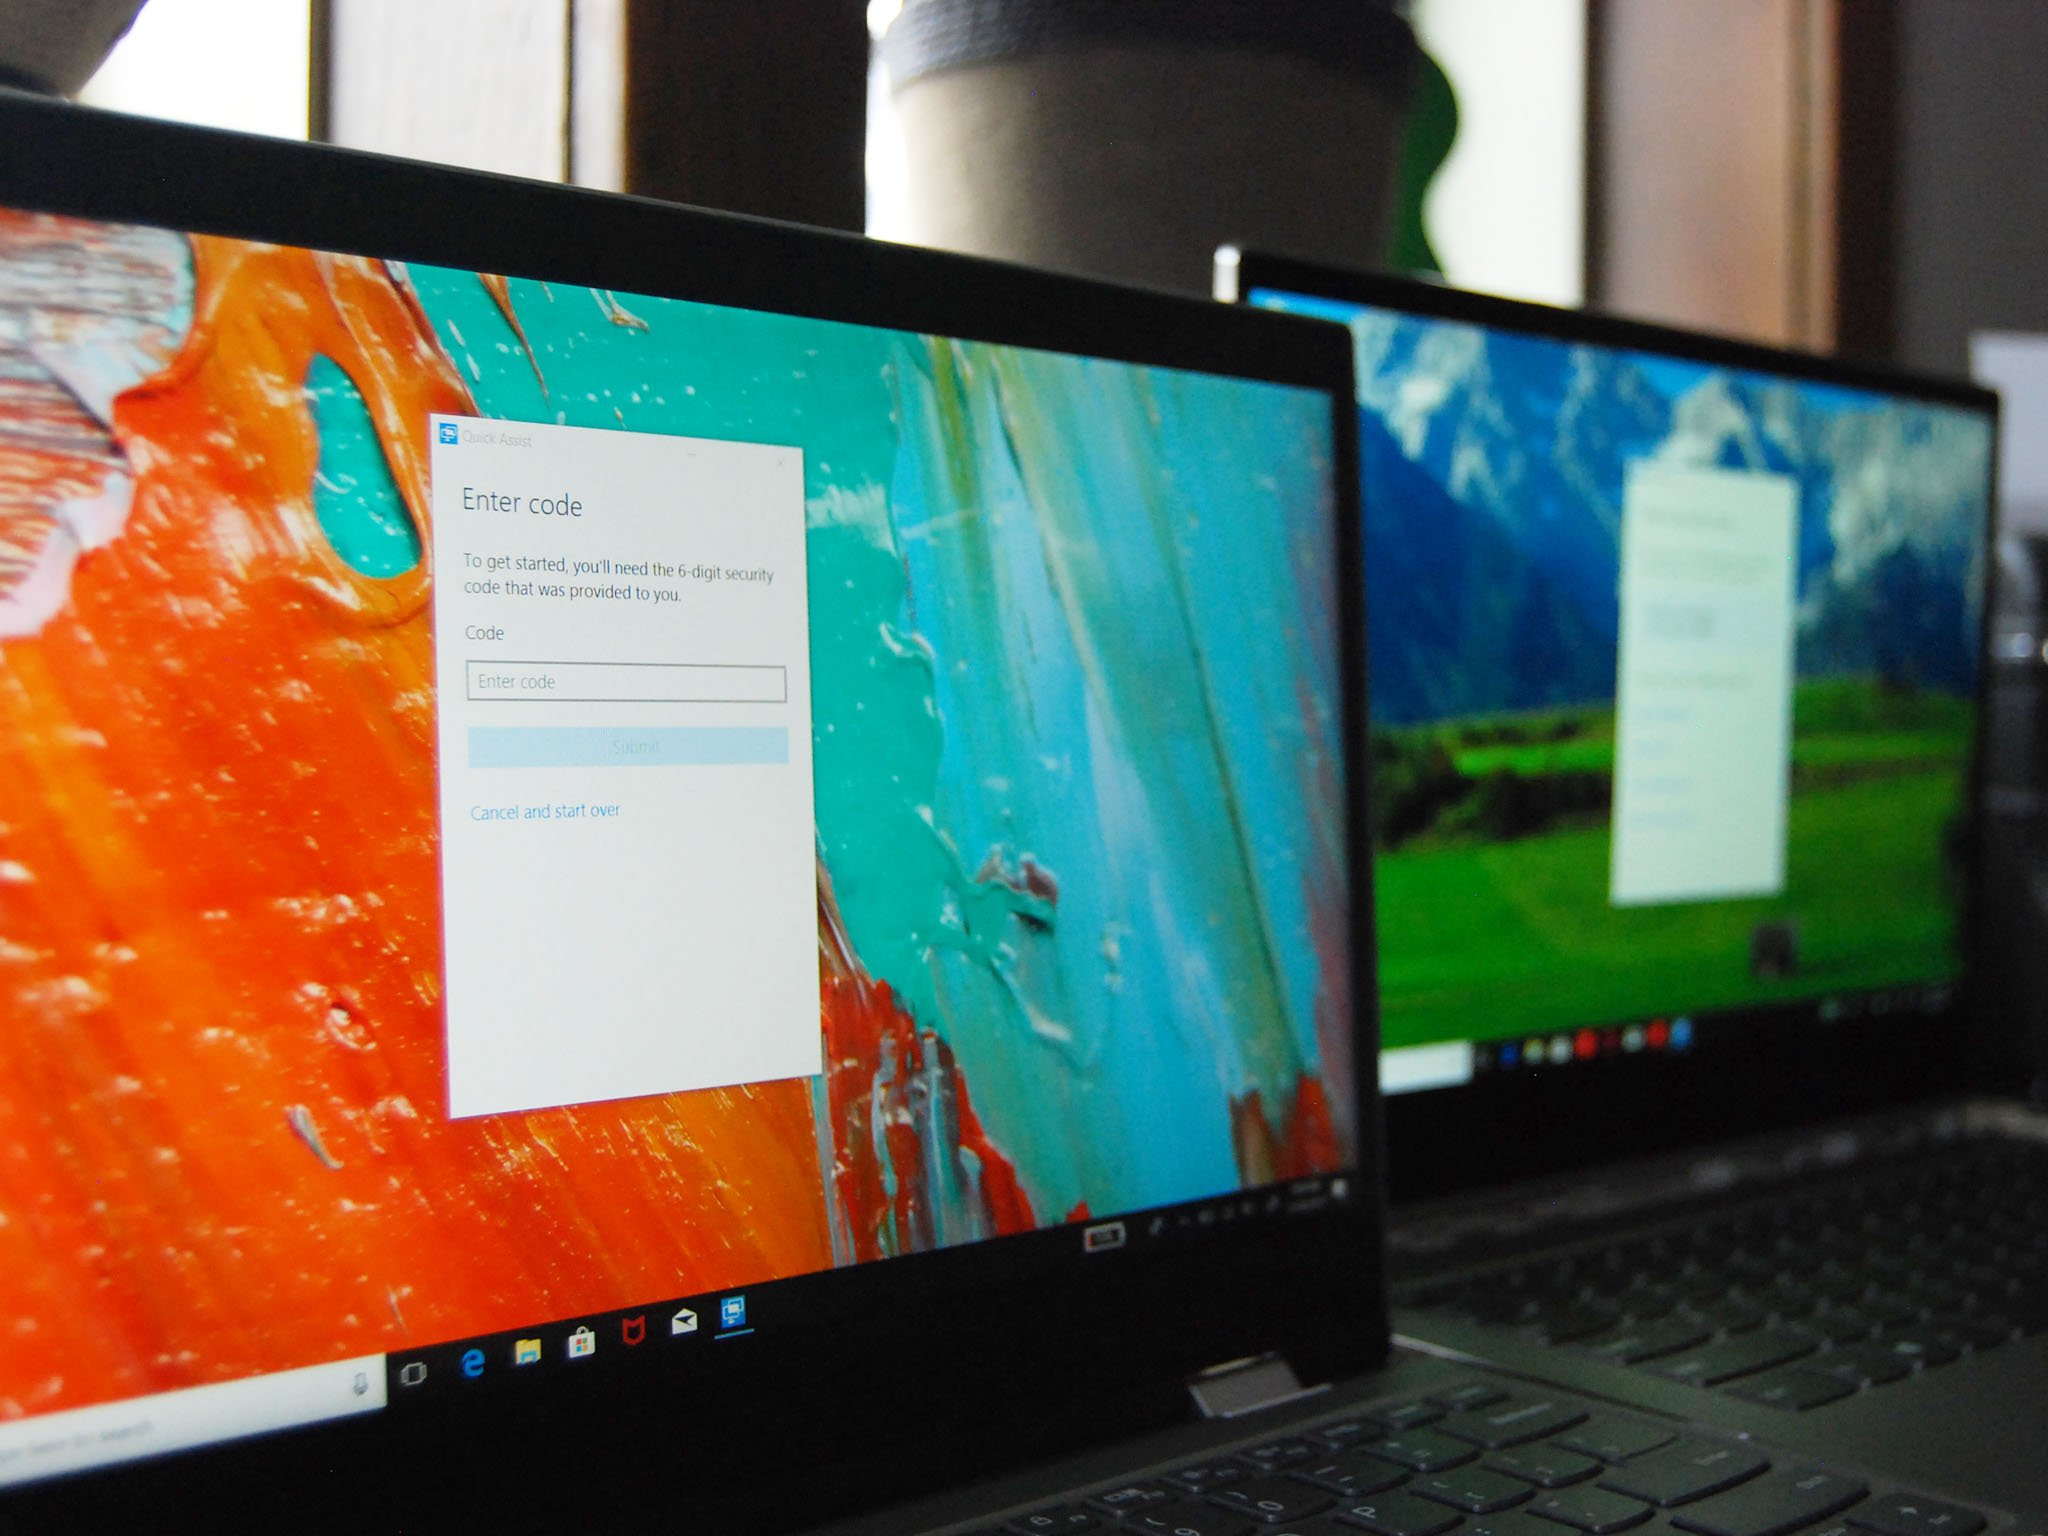
Have you ever had a friend or family member ask you for help setting something up on their PC? Maybe they asked you why it’s not running properly, or maybe they were unsure why a program wouldn’t install. In any case, if you aren’t able to meet them in person — more so now that many people are working from home — the Windows 10 Quick Assist feature allows you to remotely access their Windows 10 PC. This feature gives you full control, so you can quickly work your magic on their device.
Working from home and need to stay as productive as possible? A subscription to Office 365 will land you all the best Office apps, like Word, Excel, PowerPoint, and Outlook, as well as 1TB of OneDrive cloud storage space for all users.
Before allowing access …
Since this feature gives a person complete control over another’s PC, you should only use it with someone you trust. If you are the person giving assistance, you need to use a Microsoft account. If you are receiving assistance, you don’t have to be signed in to a Microsoft account. As long as you’re comfortable with allowing that person access to your Windows 10 PC, the following steps will get everything working.
How to set up Windows 10 Quick Assist
It doesn’t take long to get Quick Assist set up. This is what it looks like if you are the one providing assistance.
If you’re helping out
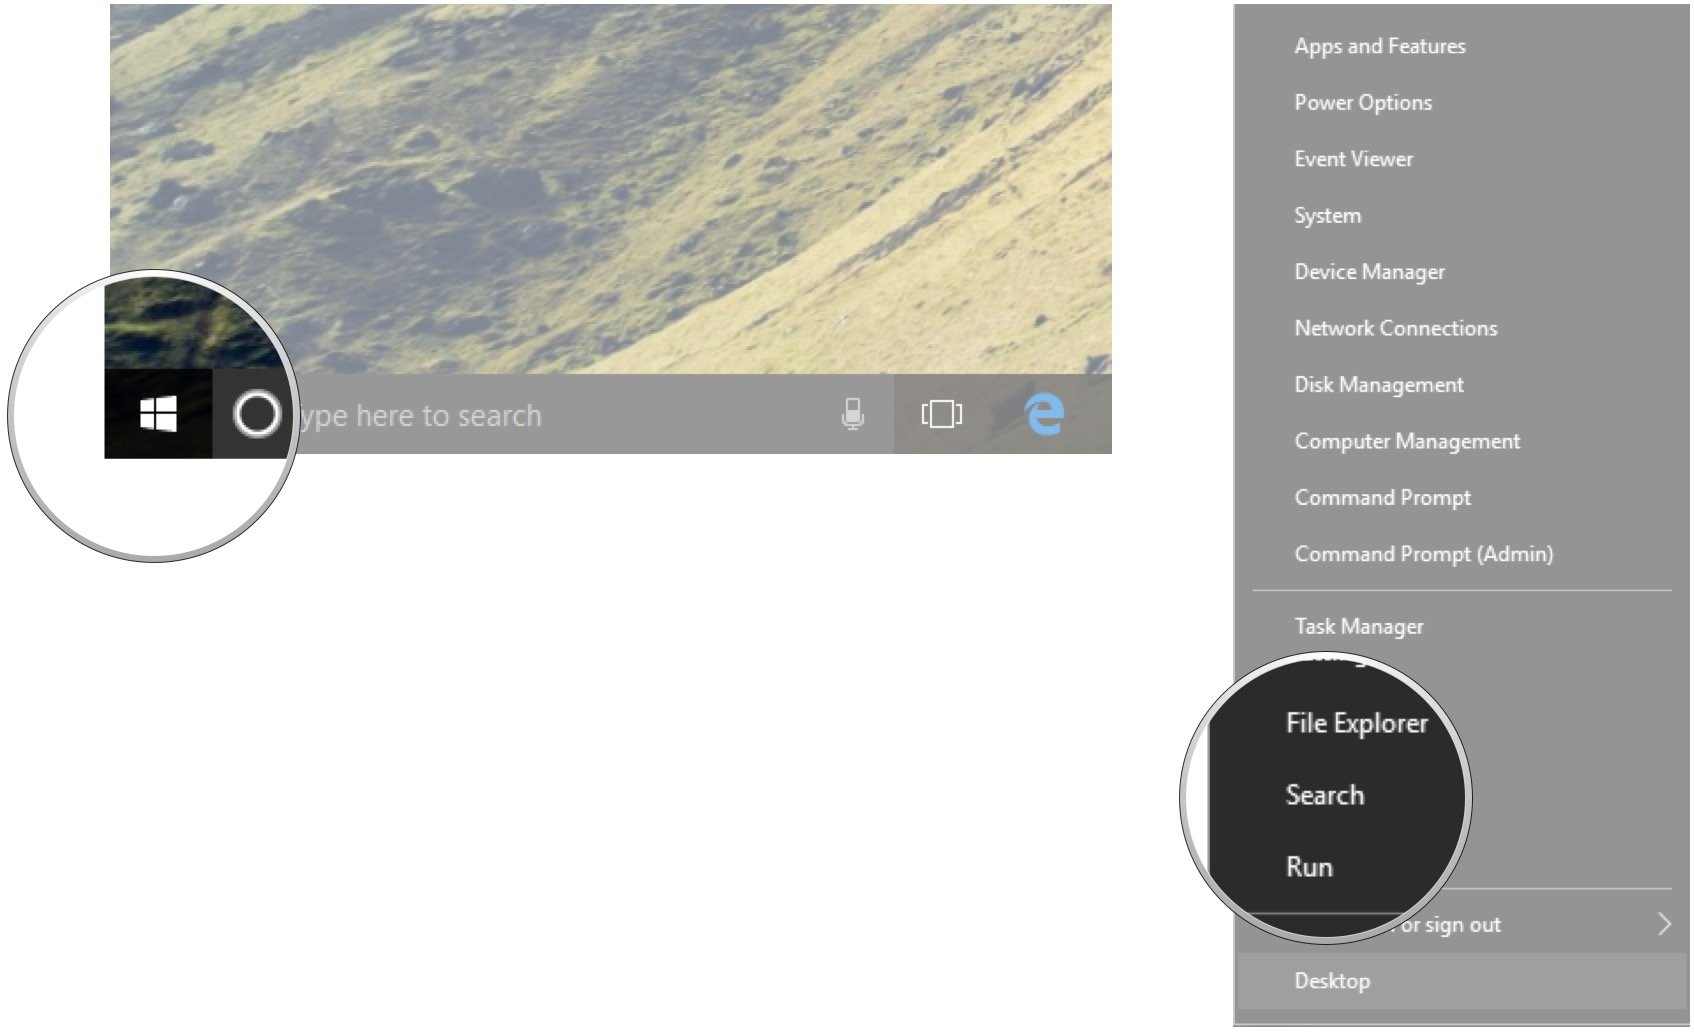
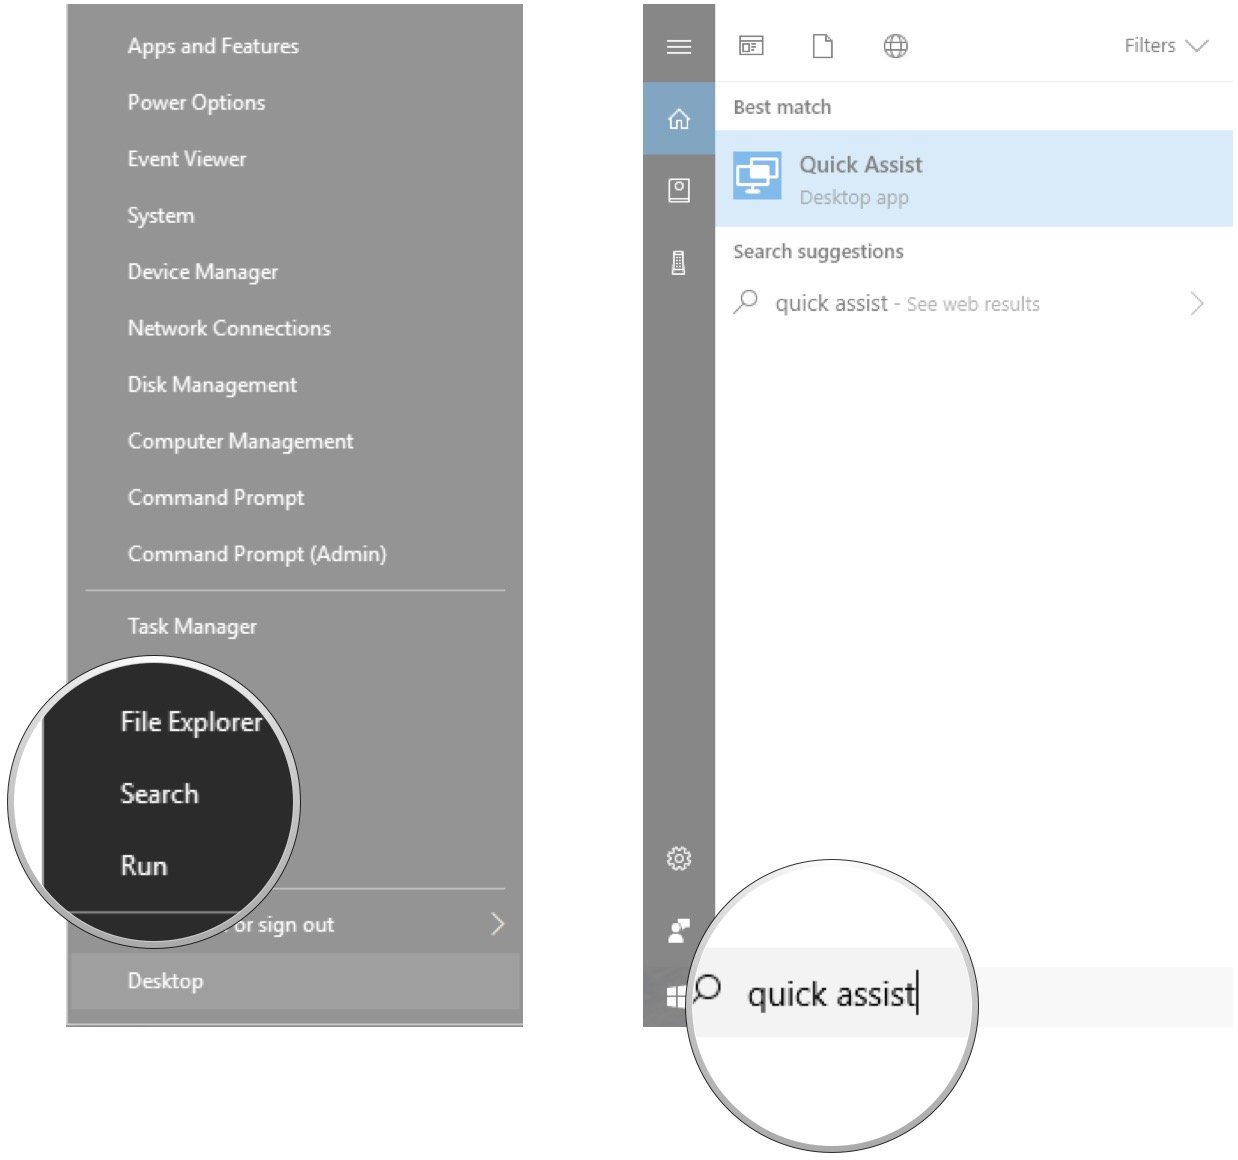
- Right-click the Start button
- Click Search
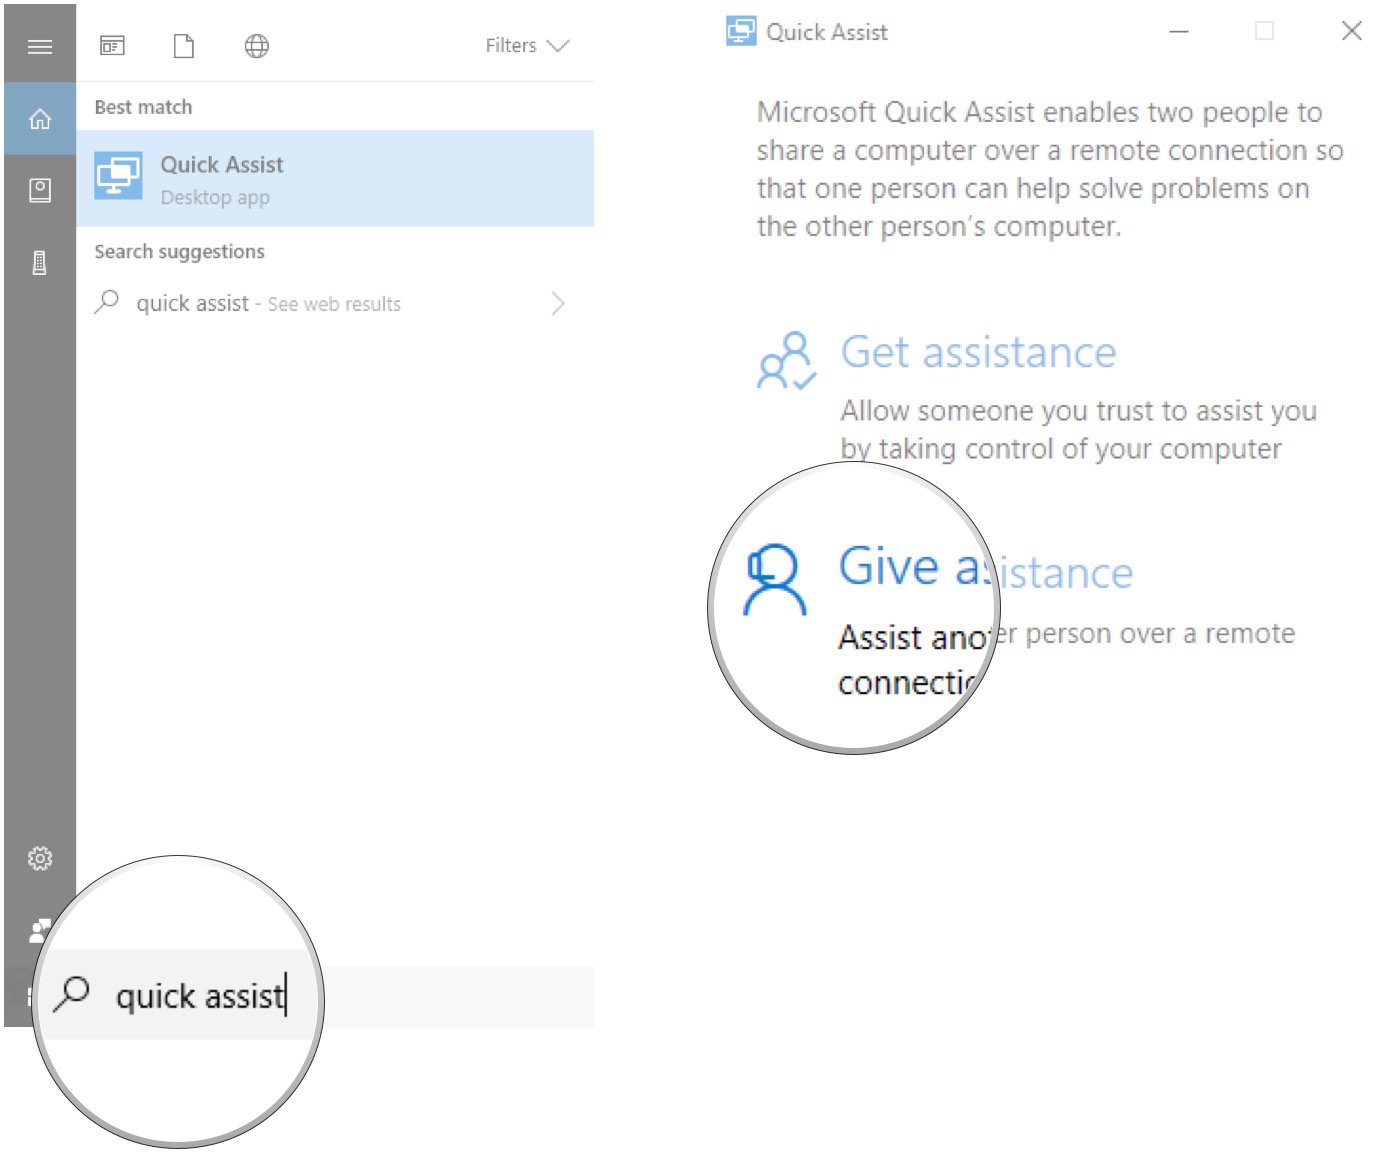
- Type Quick Assist and hit Enter on your keyboard
- Click Give assistance
- Type your Microsoft account username
- Click Next
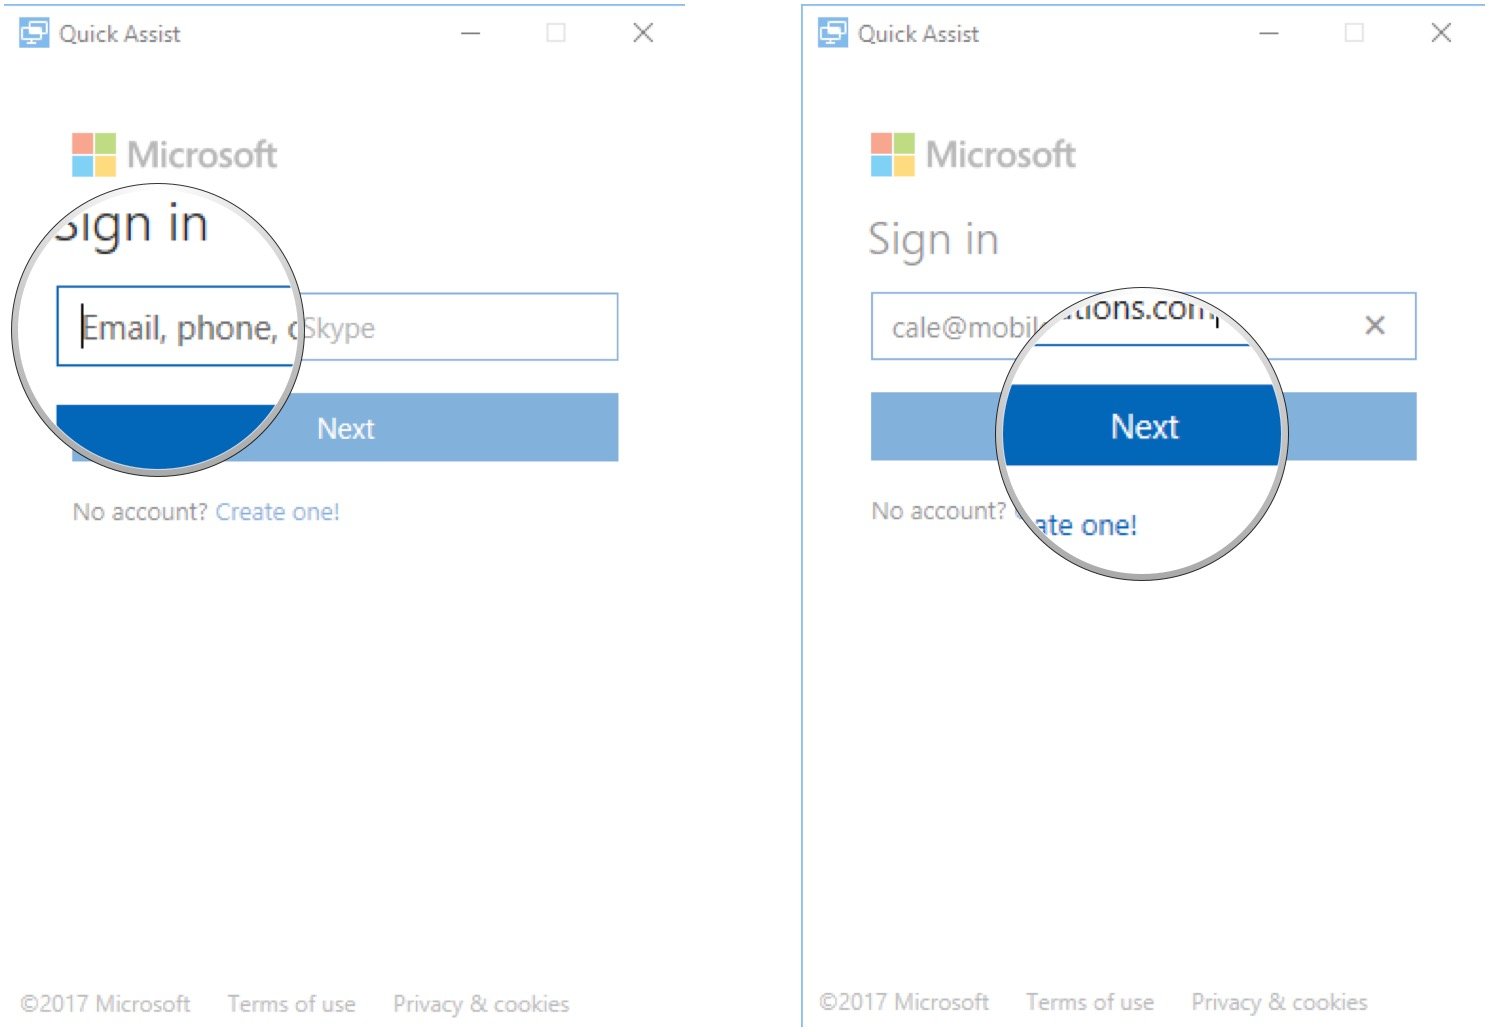
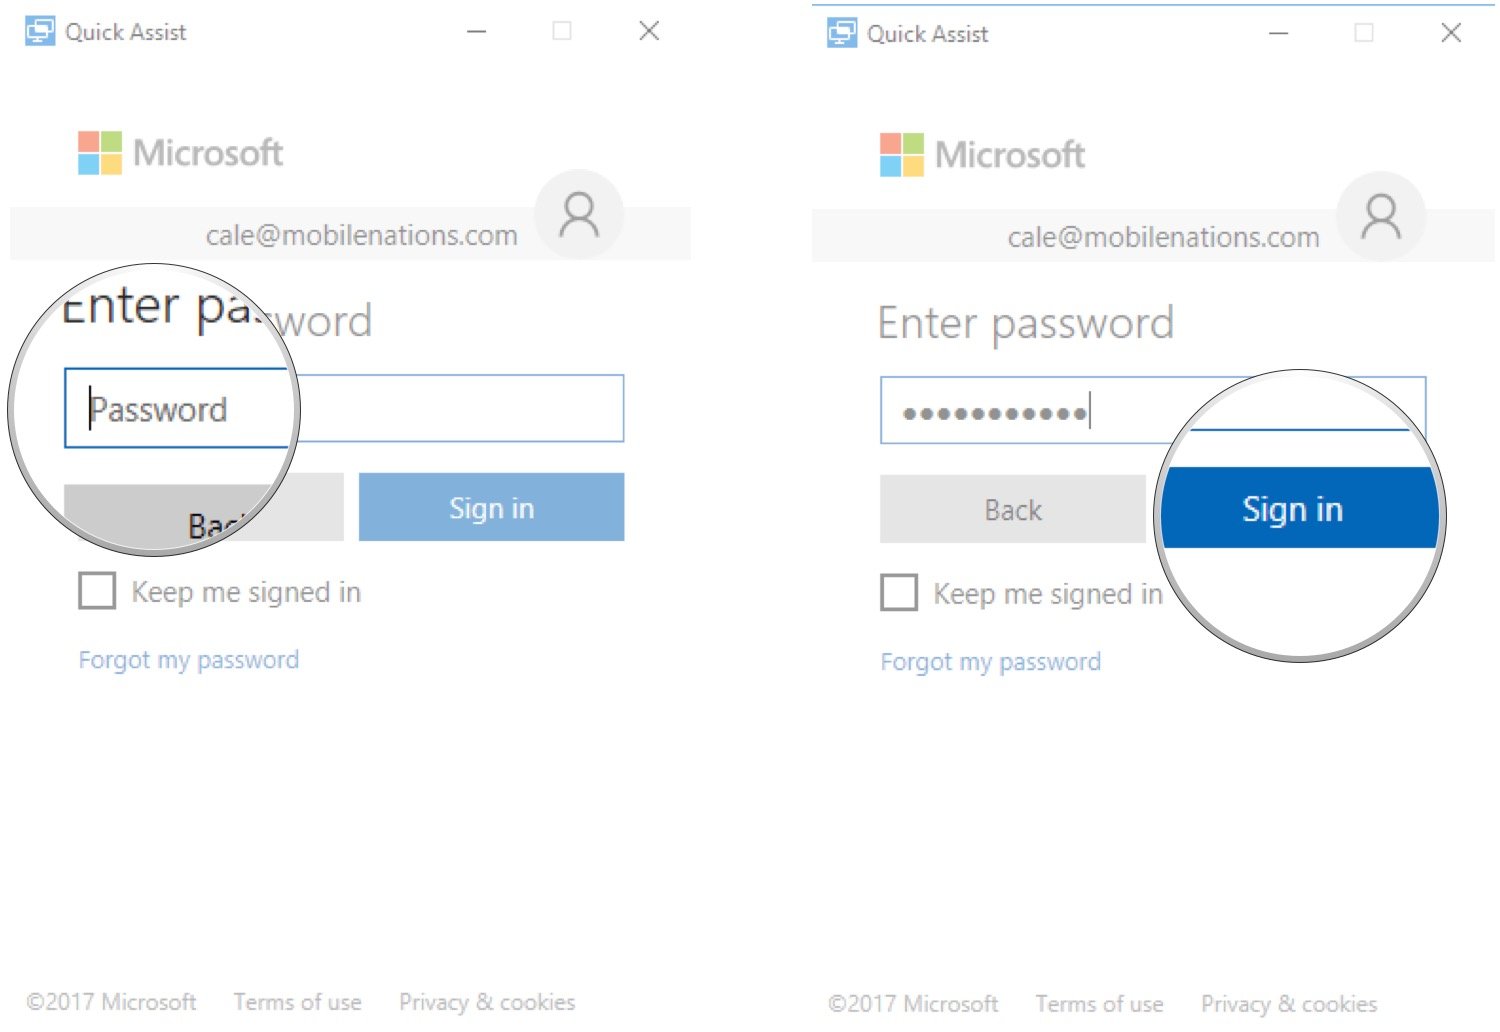
- Type your password
- Click Sign in
You’re then shown a six-digit code that must be shared with the person receiving assistance. There are a couple of options you can click right in the window (like email), but you can relay the code any way you want.
If you’re getting help
Once the other person has received the code, here’s how to get things set up for the person receiving assistance.
- Right-click the Start button
- Click Search
- Type Quick Assist and hit Enter on your keyboard
- Click Get assistance
- Type the six-digit code you received from the person giving assistance
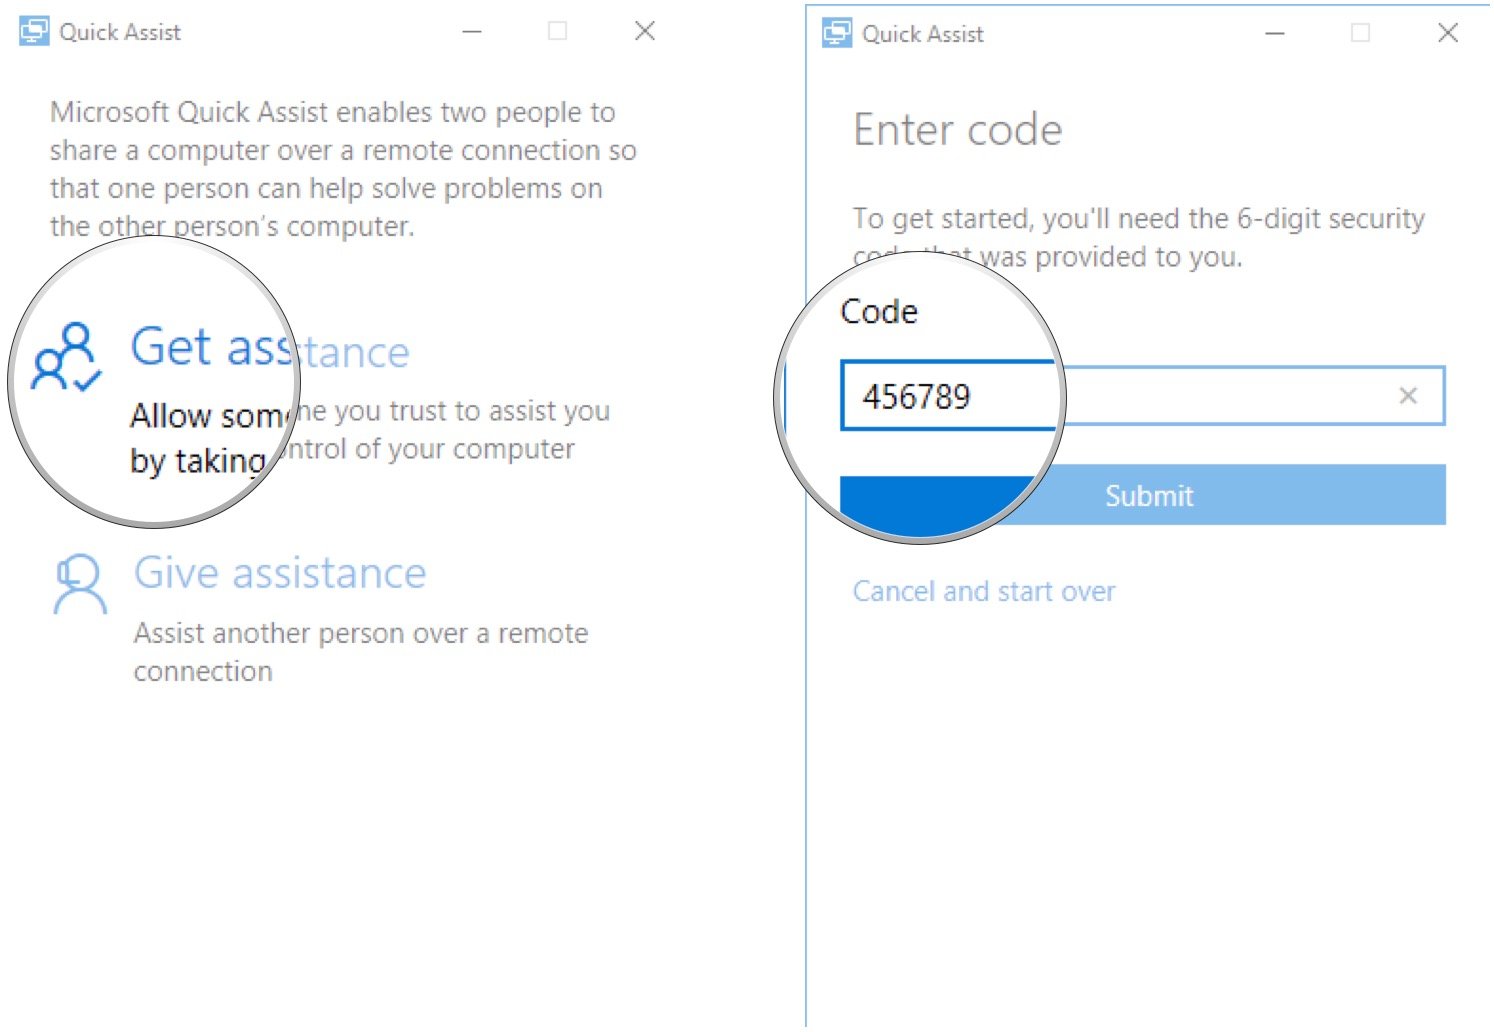
- Click Submit
- Click Allow as long as the name matches the person giving assistance
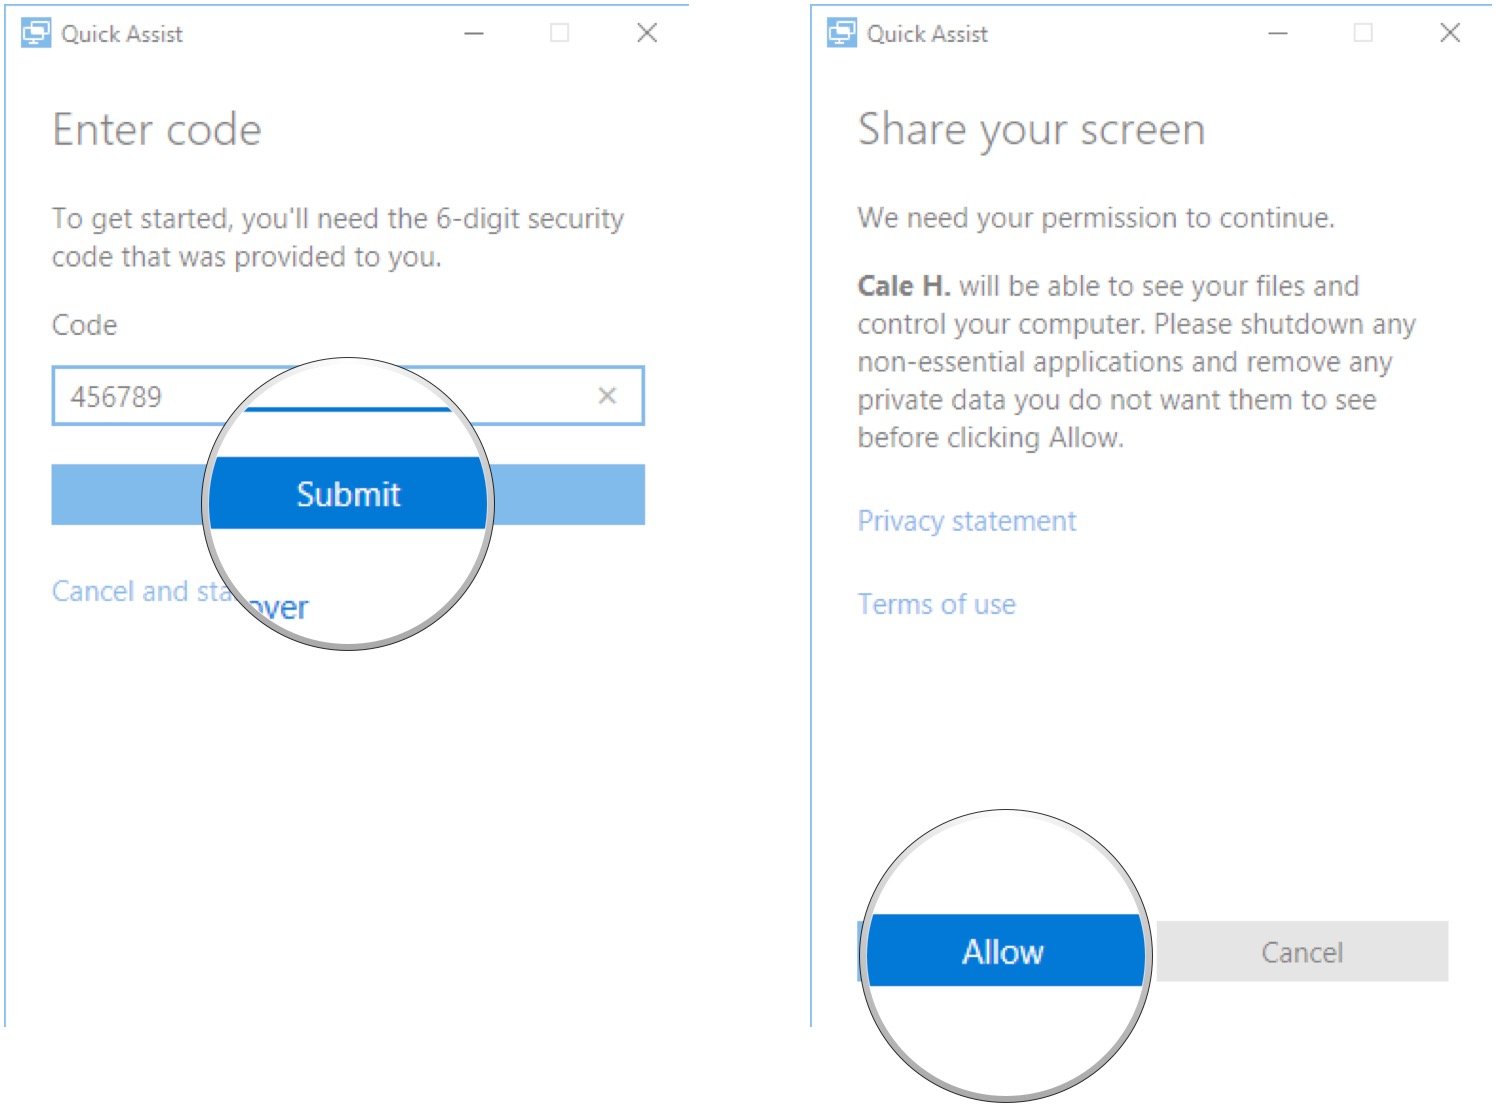
The person giving assistance will now have a window open that shows the other person’s desktop.
How to use Windows 10 Quick Assist
Once you have a working connection, the person offering assistance has a number of tools at their disposal.
All the latest news, reviews, and guides for Windows and Xbox diehards.
- To annotate both screens, click the Annotate button. This allows the person giving assistance to draw directly on both screens using their mouse cursor.

- To restart the other PC, click the Restart button. The Quick Assist connection will pause, but will automatically re-open when the PC restarts and boots Windows.

- To open the Task Manager on the other PC, click the Task Manager button.
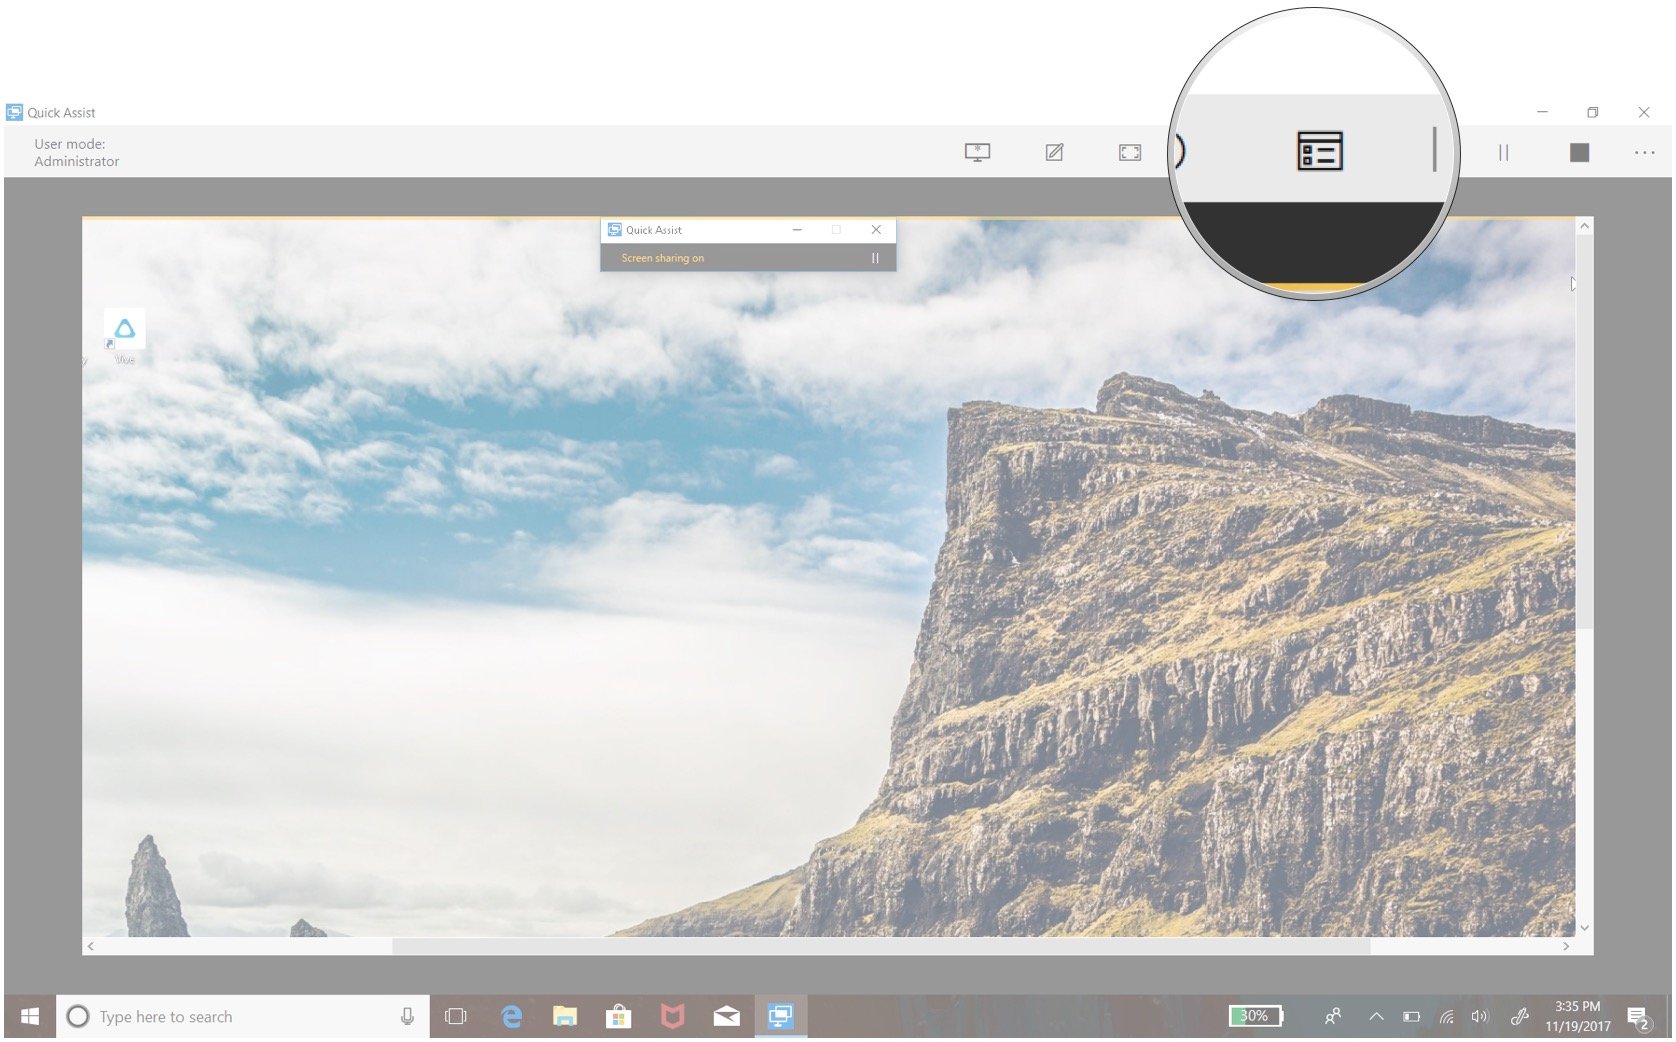
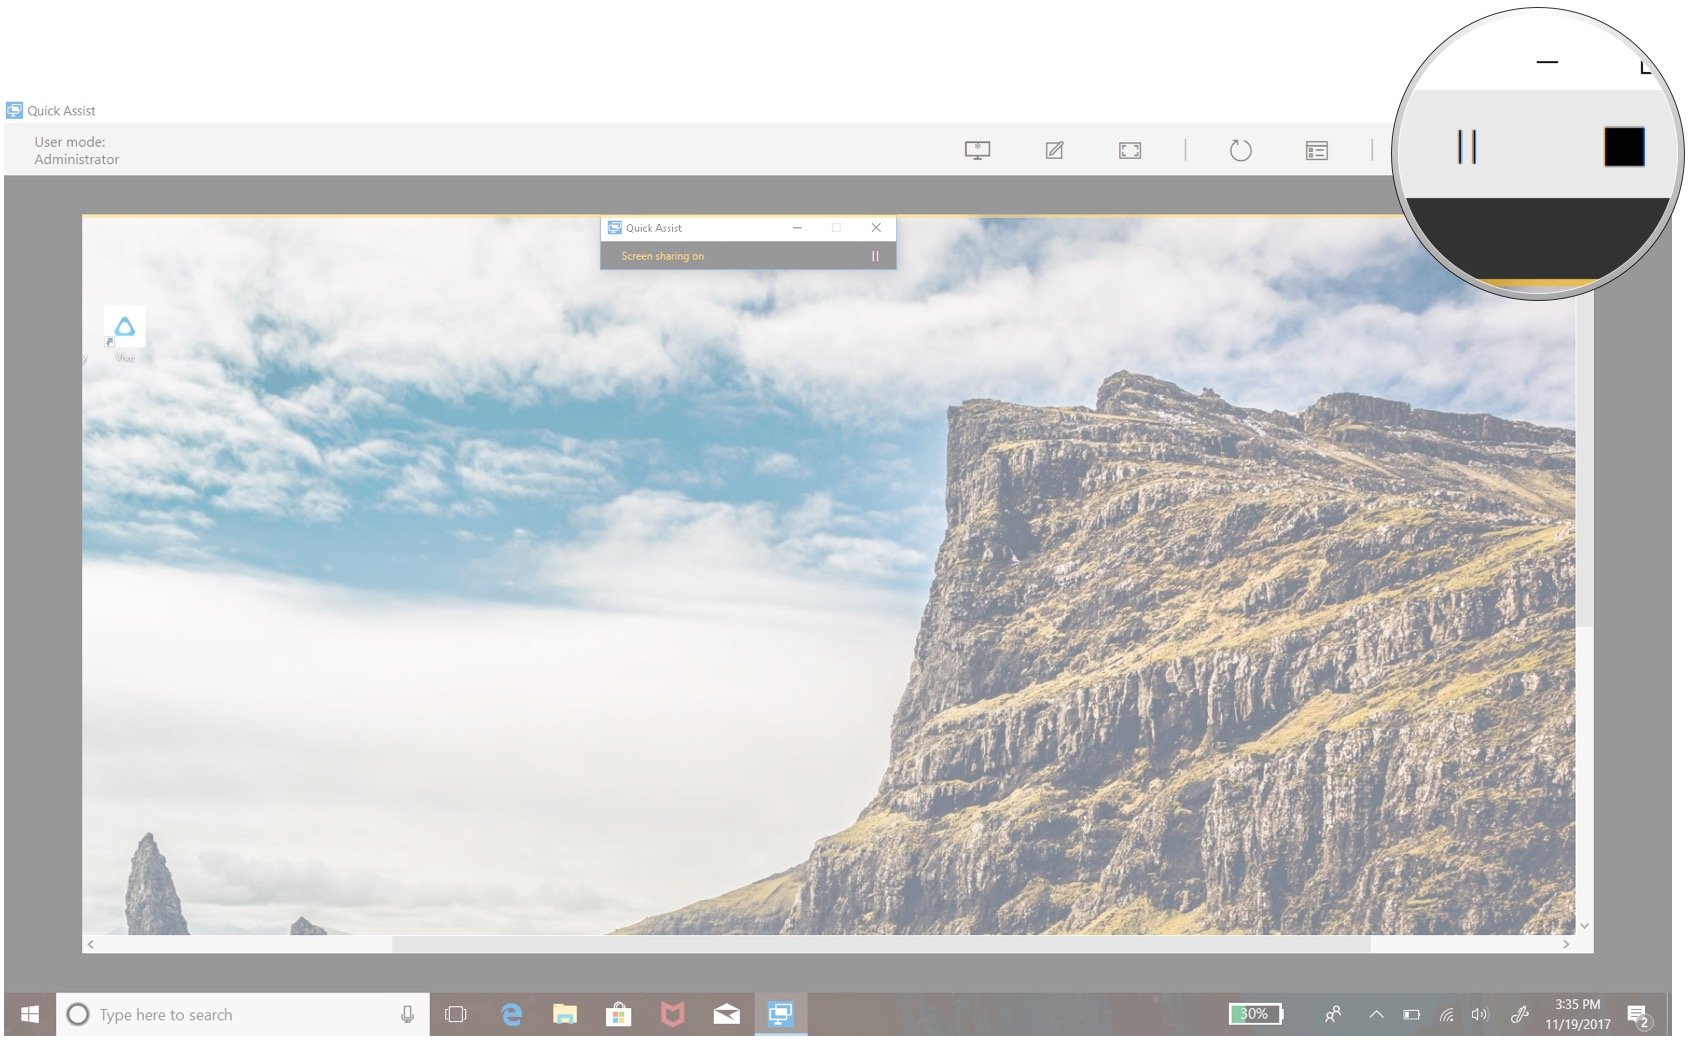
- To pause or stop the connection, click the Pause or Stop button. The connection can be resumed by hitting the Play button in the same spot.
- If the person receiving assistance would like to stop the Quick Assist, they can click the X in the top-right corner of the small window on their screen.
Working from home and need to stay as productive as possible? A subscription to Office 365 will land you all the best Office apps, like Word, Excel, PowerPoint, and Outlook, as well as 1TB of OneDrive cloud storage space for all users.
More resources
Looking for more information and help related to Windows 10? These articles should help.
- See all Windows 10 articles
- See all Windows 10 help and how-to articles
- See our Windows 10 forum for more help and information
Cale Hunt brings to Windows Central more than eight years of experience writing about laptops, PCs, accessories, games, and beyond. If it runs Windows or in some way complements the hardware, there’s a good chance he knows about it, has written about it, or is already busy testing it.
Microsoft Quick Assist enables two people to share a computer over a remote connection so that one person can help solve problems on the other person’s computer. It’s built into Windows 10, much flexible, easy to use remote support tools that can connect through the internet.
Over the years, Microsoft relies on the Remote Assistance tool for remote support. It is a popular remote support tool that initially comes up with Windows XP and continues to serve with windows 10. It’s not bad but not good as compared to devices such as TeamViewer, AnyDesk. However, with Quick Assist, you can feel the same experience, such as paid solutions.
Quick Assist app supports both Get assistance and Give assistance. When a quick assist app used to assist, a 6-digit code will be generated, which has 10 minutes of a lifetime. This code should be shared with the PC, where you are providing remote support. End-users need to use this code to invite the support engineer. Then support engineers have the option to select to take full control or viewing only. After this selection, the end-user is notified with the Name of the support engineer who is connecting and asking to allow the connection. Then the connection will be initiated, and a support engineer can start supporting.
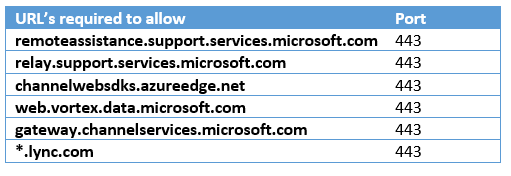
Network Connectivity Requirement
If your clients are behind a firewall or internet proxy, the following URLs need to be opened to outbound connectivity.
How to use Quick Assist
- If you are using windows 10 1709 or later, Quick Assist is built-in when you want to give remote support, Open the Quick Assist app by typing it in the start menu and click to open.

- Click Assist another person to provide assistance; you need to log in using a Microsoft account.
- You will get a security code that you need to share with the PC or user where the assistance is required. You can share it by text, call, or email. This code is only valid for 10 minutes.
- When the security code shared with the remote user, the user needs to add it in Code from Assistance and click Share Screen.
- After sharing, the Support engineer has the option to select full control or view only.
- When the support engineer selects Take full control or View screen, another message will pop-up to the user with the Name of the support engineer and to allow the session. Users need to review this message and need to click allow to initiate the connection.
- The following screen will be loaded to the support engineer to support the user. You would have full control if you requested.
- When the screen sharing started, a support engineer can use the following features to support the user, loading task manager, restart request, toggle monitors, pause, or end sessions. Screen annotate feature to act as a whiteboard where Admin can draw on the screen. It will help when training or explaining something to the user.
Screen Annotate

If you are not yet using this tool, start using it. It’s simple, easy to use tool with big potential. You can use this to support remote users, laptops, WVD sessions, Remote desktops, etc.
Hope this post is useful
Cheers
Asitha De Silva
On Windows 10, you can use many tools to troubleshoot and fix problems, and for those times when you need additional assistance, you can also use the Quick Assist app to get help remotely from another person.
Quick Assist is a new app that replaces the legacy “Windows Remote Assistance” functionality. It’s technically a remote desktop app, but it’s designed to be easier to use, and it’s more secure.
Unlike the Remote Desktop app, you’re not required to enable “Remote Desktop” or “Remote Assistance” through the System Properties, or open a firewall port. However, it requires two people (one on each end) to share a computer screen over a remote connection. It’s designed this way because the app is meant for one person to help another to solve problems on a remote computer.
In this guide, you’ll learn the steps to get started using the Quick Assist app to resolve a problem on Windows 10 or when you need assistance figuring out a piece of software.
To get remote assistance on Windows 10, the person offering help must initiate the process, and the person getting help must allow the connection. Here are these steps:
-
On the PC offering help, open Start on Windows 10.
-
Search for Quick Assist and click the top result to open the app.
-
Click the Assist another person button.
Quick Assist, Assist another person -
Sign-in with your Microsoft account.
Quick Assist Microsoft account -
Send the security code to the other person you’re trying to help.
Quick Assist security code Quick note: You can deliver the code any way you like, including by phone or text. Or you can also click the Send email button to deliver the code via an email address. (Keep in mind that the code must be used within 10 minutes, otherwise it’ll expire.)
-
On the PC receiving the help, open the Quick Assist app.
-
Under the “Get assistance” section, type the security code.

Remote assistance confirmation code -
Click the Share screen button.
-
On the PC offering help, select the Take full control option.
Remote assistance full control -
Click the Continue button.
-
On the PC receiving the help, click the Allow button.

Remote assistance with full control


Once connection is established, you’ll be able to see the screen of the remote computer with access to the mouse and keyboard.

Quick Assist app controls
The Quick Assist app on Windows 10 is very straightforward and simple to use.
While the remote computer only gets a simple set of controls to stop screen sharing and terminate the connection, the person giving the assistance (Administrator) get access to some nifty features, including the ability to select the monitor, annotate, see the actual size of the screen, restart the remote session, and even open Task Manager.

And you also get the reconnect, pause, and end button to terminate the connection.
Overall, Quick Assist is very easy to set up and use. One of the best features is that you don’t need to configure any settings in advance, and it works perfectly on PCs using a firewall.
Update July 9, 2020: This guide was originally published in August 2016, and it’s been updated to reflect the new changes.
Why You Can Trust Pureinfotech
The author combines expert insights with user-centric guidance, rigorously researching and testing to ensure you receive trustworthy, easy-to-follow tech guides. Review the publishing process.