
Qt Group Logo, Link to home page.
Qt Creator
Qt Creator is a cross-platform, integrated development environment (IDE) for
application developers to create applications for multiple desktop, embedded,
and mobile device platforms.
The Qt Creator Manual is available at:
https://doc.qt.io/qtcreator/index.html
For an overview of the Qt Creator IDE, see:
https://doc.qt.io/qtcreator/creator-overview.html
Supported Platforms
The standalone binary packages support the following platforms:
- Windows 10 (x86_64) or later
- Windows 11 (ARM64) or later
- (K)Ubuntu Linux 22.04 (x86_64) or later
- (K)Ubuntu Linux 24.04 (arm64) or later
- macOS 12 or later
When you compile Qt Creator yourself, the Qt version that you build with
determines the supported platforms.
Contributing
For instructions on how to set up the Qt Creator repository to contribute
patches back to Qt Creator, please check:
https://wiki.qt.io/Setting_up_Gerrit
See the following page for information about our coding standard:
https://doc.qt.io/qtcreator-extending/coding-style.html
Compiling Qt Creator
Prerequisites:
- Qt 6.5.3 or later. The Qt version that you use to build Qt Creator defines the
minimum platform versions that the result supports
(Windows 10, RHEL/CentOS 8.8, Ubuntu 22.04, macOS 11 for Qt 6.5.3). - Qt WebEngine module for QtWebEngine based help viewer
- On Windows:
- MinGW with GCC 11.2 or Visual Studio 2019 or later
- Python 3.8 or later (optional, needed for the python enabled debug helper)
- Debugging Tools for Windows (optional, for MSVC debugging support with CDB)
- On macOS: latest Xcode
- On Linux: GCC 10 or later
- LLVM/Clang 14 or later (optional, LLVM/Clang 17 is recommended.
See instructions on how to
get LLVM.
The ClangFormat plugin uses the LLVM C++ API.
Since the LLVM C++ API provides no compatibility guarantee,
if later versions don’t compile we don’t support that version.) - CMake
- Ninja (recommended)
The used toolchain has to be compatible with the one Qt was compiled with.
Getting Qt Creator from Git
The official mirror of the Qt Creator repository is located at
https://code.qt.io/cgit/qt-creator/qt-creator.git/. Run
git clone https://code.qt.io/qt-creator/qt-creator.git
to clone the Qt Creator sources from there. This creates a checkout of the
Qt Creator sources in the qt-creator/ directory of your current working
directory.
Qt Creator relies on some submodules, like
litehtml for displaying documentation. Get these
submodules with
cd qt-creator  # switch to the sources, if you just ran git clone
git submodule update --init --recursive
Note the --recursive in this command, which fetches also submodules within
submodules, and is necessary to get all the sources.
The git history contains some coding style cleanup commits, which you might
want to exclude for example when running git blame. Do this by running
git config blame.ignoreRevsFile .gitignore-blame
Linux and macOS
These instructions assume that Ninja is installed and in the PATH, Qt Creator
sources are located at /path/to/qtcreator_sources, Qt is installed in
/path/to/Qt, and LLVM is installed in /path/to/llvm.
Note that if you install Qt via the online installer, the path to Qt must
include the version number and compiler ABI. The path to the online installer
content is not enough.
Note that /path/to/Qt doesn’t imply the full path depth like:
$USER/Qt/6.4.3/gcc_64/lib/cmake/Qt6, but only $USER/Qt/6.4.3/gcc_64.
See instructions on how to
get LLVM.
mkdir qtcreator_build
cd qtcreator_build

cmake -DCMAKE_BUILD_TYPE=Debug -G Ninja "-DCMAKE_PREFIX_PATH=/path/to/Qt;/path/to/llvm" /path/to/qtcreator_sources
cmake --build .
Troubleshooting: libxcb plugin not found while using Qt libraries built locally from source
Ensure all prerequisites for building Qt are installed:
https://doc.qt.io/qt-6/linux.html
https://doc.qt.io/qt-6/linux-requirements.html
If they were installed before building Qt and xcb plugin is missing try reinstall them with
sudo apt-get --reinstall <package_name>
Reset building configuration for Qt libraries at ‘/path/to/qt_sources’
cmake --build . --target=clean
and remove CMakeCache.txt
Try building Qt source again.
Windows
These instructions assume that Ninja is installed and in the PATH, Qt Creator
sources are located at \path\to\qtcreator_sources, Qt is installed in
\path\to\Qt, and LLVM is installed in \path\to\llvm.
Note that if you install Qt via the online installer, the path to Qt must
include the version number and compiler ABI. The path to the online installer
content is not enough.
Note that \path\to\Qt doesn’t imply the full path depth like:
c:\Qt\6.4.3\msvc2019_64\lib\cmake\Qt6, but only c:/Qt/6.4.3/msvc2019_64.
The usage of slashes / is intentional, since CMake has issues with backslashes \
in CMAKE_PREFX_PATH, they are interpreted as escape codes.
See instructions on how to
get LLVM.
Decide which compiler to use: MinGW or Microsoft Visual Studio.
MinGW is available via the Qt online installer, for other options see
https://wiki.qt.io/MinGW. Run the commands below in a shell prompt that has
<path_to_mingw>\bin in the PATH.
For Microsoft Visual C++ you can use the «Build Tools for Visual Studio». Also
install the «Debugging Tools for Windows» from the Windows SDK installer. We
strongly recommend using the 64-bit version and 64-bit compilers on 64-bit
systems. Open the x64 Native Tools Command Prompt for VS <version> from the
start menu items that were created for Visual Studio, and run the commands
below in it.
md qtcreator_build
cd qtcreator_build

cmake -DCMAKE_BUILD_TYPE=Debug -G Ninja "-DCMAKE_PREFIX_PATH=/path/to/Qt;/path/to/llvm" \path\to\qtcreator_sources
cmake --build .
Qt Creator can be registered as a post-mortem debugger. This can be done in the
options page or by running the tool qtcdebugger with administrative privileges
passing the command line options -register/unregister, respectively.
Alternatively, the required registry entries
HKEY_LOCAL_MACHINE\SOFTWARE\Microsoft\Windows NT\CurrentVersion\AeDebug
HKEY_LOCAL_MACHINE\SOFTWARE\Wow6432Node\Microsoft\Windows NT\CurrentVersion\AeDebug
can be modified using the registry editor regedt32 to contain
qtcreator_build\bin\qtcdebugger %ld %ld
When using a self-built version of Qt Creator as post-mortem debugger, it needs
to be able to find all dependent Qt-libraries and plugins when being launched
by the system. The easiest way to do this is to create a self-contained Qt
Creator by installing it and installing its dependencies. See «Options» below
for details.
Note that unlike on Unix, you cannot overwrite executables that are running.
Thus, if you want to work on Qt Creator using Qt Creator, you need a separate
installation of it. We recommend using a separate, release-built version of Qt
Creator to work on a debug-built version of Qt Creator.
Alternatively, take the following template of CMakeUserPresets.json for
reference. Write your own configurePreset inheriting cmake-plugin-minimal in
CMakeUserPresets.json to build with IDEs (such as QtCreator, VSCode,
CLion…etc) locally:
{
  "version": 4,
  "cmakeMinimumRequired": {
    "major": 3,
    "minor": 23,
    "patch": 0
  },
  "configurePresets": [
    {
      "name": "custom",
      "displayName": "custom",
      "description": "custom",
      "inherits": "cmake-plugin-minimal",
      "binaryDir": "${sourceDir}/build/${presetName}",
      "toolset": {
        "value": "v142,host=x64",
        "strategy": "external"
      },
      "architecture": {
        "value": "x64",
        "strategy": "external"
      },
      "cacheVariables": {
        "CMAKE_CXX_COMPILER": "cl.exe",
        "CMAKE_C_COMPILER": "cl.exe",
        "CMAKE_PREFIX_PATH": "c:/Qt/6.4.3/msvc2019_64"
      }
    }
  ]
}
Options
If you do not have Ninja installed and in the PATH, remove -G Ninja from
the first cmake call. If you want to build in release mode, change the build
type to -DCMAKE_BUILD_TYPE=Release. You can also build with release
optimizations but debug information with -DCMAKE_BUILD_TYPE=RelWithDebInfo.
You can find more options in the generated CMakeCache.txt file. For instance,
building of Qbs together with Qt Creator can be enabled with -DBUILD_QBS=ON.
Installation is not needed. You can run Qt Creator directly from the build
directory. On Windows, make sure that your PATH environment variable points to
all required DLLs, like Qt and LLVM. On Linux and macOS, the build already
contains the necessary RPATHs for the dependencies.
If you want to install Qt Creator anyway, that is however possible using
cmake --install . --prefix /path/to/qtcreator_install
To create a self-contained Qt Creator installation, including all dependencies
like Qt and LLVM, additionally run
cmake --install . --prefix /path/to/qtcreator_install --component Dependencies
To install development files like headers, CMake files, and .lib files on
Windows, run
cmake --install . --prefix /path/to/qtcreator_install --component Devel
If you used the RelWithDebInfo configuration and want debug information to be
available to the installed Qt Creator, run
cmake --install . --prefix /path/to/qtcreator_install --component DebugInfo
QML Designer
To disable the build of the experimental QML Designer plugins and their dependencies,
use the CMake option -DWITH_QMLDESIGNER=OFF. The QML Designer plugin requires additional
testing for specific Qt versions. If that can not be provided we suggest to disable it.
Perf Profiler Support
Support for the perf profiler
requires the perfparser tool that is part of the Qt Creator source package, and also
part of the Qt Creator Git repository in form of a submodule in src/tools/perfparser.
Compilation of perfparser requires ELF and DWARF development packages.
You can either download and extract a prebuilt package from
https://download.qt.io/development_releases/prebuilt/elfutils/ and add the
directory to the CMAKE_PREFIX_PATH when configuring Qt Creator,
or install the libdw-dev package on Debian-style Linux systems.
You can also point Qt Creator to a separate installation of perfparser by
setting the PERFPROFILER_PARSER_FILEPATH environment variable to the full
path to the executable.
Partial building of executables and plugins
Set the following CMake definitions in order to configure and build only
parts of Qt Creator. Note that dependencies are not automatically handled.
-DBUILD_EXECUTABLES:STRING=QtCreator;ClangBackend;qtcreator_processlauncher
-DBUILD_PLUGINS:STRING=Core;TextEditor;ProjectExplorer;CppTools;CppEditor;QmakeProjectManager;CMakeProjectManager;Debugger;ResourceEditor;QtSupport;LanguageClient
Getting LLVM/Clang for the Clang Code Model
The Clang code model uses Clangd and the ClangFormat plugin depends on the
LLVM/Clang libraries. The currently recommended LLVM/Clang version is 14.0.
Prebuilt LLVM/Clang packages
Prebuilt packages of LLVM/Clang can be downloaded from
https://download.qt.io/development_releases/prebuilt/libclang/
This should be your preferred option because you will use the version that is
shipped together with Qt Creator (with backported/additional patches). In
addition, MinGW packages for Windows are faster due to profile-guided
optimization. If the prebuilt packages do not match your configuration, you
need to build LLVM/Clang manually.
If you use the MSVC compiler to build Qt Creator the suggested way is:
1. Download both MSVC and MinGW packages of libclang.
2. Use the MSVC version of libclang during the Qt Creator build.
3. Prepend PATH variable used for the run time with the location of MinGW version of libclang.dll.
4. Launch Qt Creator.
Building LLVM/Clang manually
You need to install CMake in order to build LLVM/Clang.
Build LLVM/Clang by roughly following the instructions at
http://llvm.org/docs/GettingStarted.html#git-mirror:
-
Clone LLVM/Clang and checkout a suitable branch
git clone -b release_17.0.6-based --recursive https://code.qt.io/clang/llvm-project.git -
Build and install LLVM/Clang
For Linux/macOS:
cmake \
  -D CMAKE_BUILD_TYPE=Release \
  -D LLVM_ENABLE_RTTI=ON \
  -D LLVM_ENABLE_PROJECTS="clang;clang-tools-extra" \
  -D CMAKE_INSTALL_PREFIX=<installation location> \
  ../llvm-project/llvm
cmake --build . --target install
For Windows:
cmake ^
  -G Ninja ^
  -D CMAKE_BUILD_TYPE=Release ^
  -D LLVM_ENABLE_RTTI=ON ^
  -D LLVM_ENABLE_PROJECTS="clang;clang-tools-extra" ^
  -D CMAKE_INSTALL_PREFIX=<installation location> ^
  ..\llvm-project\llvm
cmake --build . --target install
Licenses and Attributions
Qt Creator is available under commercial licenses from The Qt Company,
and under the GNU General Public License version 3,
annotated with The Qt Company GPL Exception 1.0.
See LICENSE.GPL3-EXCEPT for the details.
For more information about the third-party components that Qt Creator
includes, see the
Acknowledgements section in the documentation.
Parent Directory —
cpack_experimental/2025-03-12 08:09 —
installer_source/2025-03-12 08:09 —
md5sums.txt2025-03-12 08:09 707
qt-creator-opensource-linux-arm64-16.0.0.run2025-03-12 08:06 228M
qt-creator-opensource-linux-x86_64-16.0.0.run2025-03-12 08:06 245M
qt-creator-opensource-mac-x86_64-16.0.0.dmg2025-03-12 08:06 275M
qt-creator-opensource-mac-x86_64-16.0.0_installer.dmg2025-03-12 08:06 289M
qt-creator-opensource-src-16.0.0.tar.gz2025-03-12 08:06 62M
qt-creator-opensource-src-16.0.0.tar.xz2025-03-12 08:06 51M
qt-creator-opensource-src-16.0.0.zip2025-03-12 08:06 73M
qt-creator-opensource-windows-arm64-16.0.0.exe2025-03-12 08:06 271M
qt-creator-opensource-windows-x86_64-16.0.0.exe2025-03-12 08:06 357M
Последнее обновление: 07.12.2023
Для программирования с помощью фреймворка Qt нам естественно надо установить сам фреймворк Qt. И также установим среду разработки QtCreator. Устанавливать QtCreator в принципе необязательно,
можно обоитись и без среды разработки. Однако данная среда несколько упрощает создание приложений под Qt, что может быть особенно актуально для начинающих.
Сразу стоит сказать о предварительных требованиях. Прежде всего в операционной системе должен быть установлен компилятор C++. Например, на Windows это может быть
компилятор C++, который поставляется с Visual Studio (установить можно через установщик Visual Studio). В качестве альтернативы
можно взять компилятор GCC, например, в виде реализации от MSYS2. На MacOS следует установить XCode, а на Linux лучше доустановить компилятор Clang.
Поскольку для сборки проекта может потребоваться CMake, то также рекомендуется также установить данную утилиту. Это можно сделать, загрузив установочный пакет с официального сайта
https://cmake.org/download/ (доступны установщики для всех распространенных операционных систем). Либо это можно сделать через пакетный менеджер.
Для установки Qt и Qt Creator можно использовать разные способы: использование одного из менеджеров пакетов, установка вручную, установка с помощью инсталлятора. Вкратце рассмотрим все эти возможности.
Установка через пакетный менеджер
Самый простой способ установки Qt представляет использование пакетных менеджеров. Многие операционные системы поддерживают различные пакетные менеджеры, которые могут
предоставлять специальные пакеты Qt и Qt Creator. Данный способ прост — надо всего лишь ввести в
консоли несколько команд. Однако минусом данного способа является то, что часто пакеты в репозиториях пакетных менеджеров не самые актуальные и немного отстают от официального релиза. Кроме того,
подобные пакеты могут иметь зависимости от других пакетов, которые также потребуется установить. Третий минус — часто подобные пакеты собираются третьими лицами, а не самой компанией Qt.
Установка на MacOS
Предварительным условием работы на MacOS является установка XCode. Для установки Qt и Qt Creator на MacOS применяется пакетный менеджер Homebrew. Так, для установки Qt6 надо выполнить в консоли команду
brew install qt
Для сборки приложения может использоваться CMake, поэтому также следует установить соответстветствующий пакет:
brew install cmake
А для установки Qt Creator применяется команда
brew install --cask qt-creator
Стоит отметить, что в реальности эта команда скачивает программу с адреса «https://download.qt.io/official_releases/qtcreator/12.0/12.0.0/», соответственно, если доступа к адресу нет, то
соответственно, не удастся загрузить и саму программу. На этот счет чуть ниже в статье приведен список альтернативных зеркал для загрузки.
Установка на Linux на примере Ubuntu
Для установки Qt на Ubuntu/Debian применяется следующая команда
sudo apt install qt6-base-dev
А для установки Qt Creator применяется команда
sudo apt install qtcreator
Для запуска применяется команда qtcreator
Также надо установить пакет CMake, который может пригодится при построении проекта
sudo apt install cmake
и пакет Clang
sudo apt install clang
Установка на Windows
На Windows можно использовать один из пакетных менеджеров.
-
vcpkg
Например, установка Qt6 через менеджер vcpkg:
vcpkg install qt
Установка только базового пакета
vcpkg install qtbase
-
MSYS2/Packman
Установка Qt через MSYS с помощью пакетного менеджера packman:
pacman -S mingw-w64-x86_64-qt6
Только базовый пакет
pacman -S mingw-w64-x86_64-qt6-base
Установка Qt Creator
pacman -S mingw-w64-x86_64-qt-creator
-
chocolatey
Установка Qt6 с Qt Creator через менеджер chocolatey:
choco install -y qt6-base-dev cmake qtcreator
-
winget
Установка Qt6 через менеджер winget:
winget install --id=miurahr.aqtinstall -e
Установка через Qt Online Installer
Универсальный и рекомендуемый способ установки Qt и Qt Creator представляет использование онлайн-загрузчика. Официальный сайт предоставляет свои установщики для
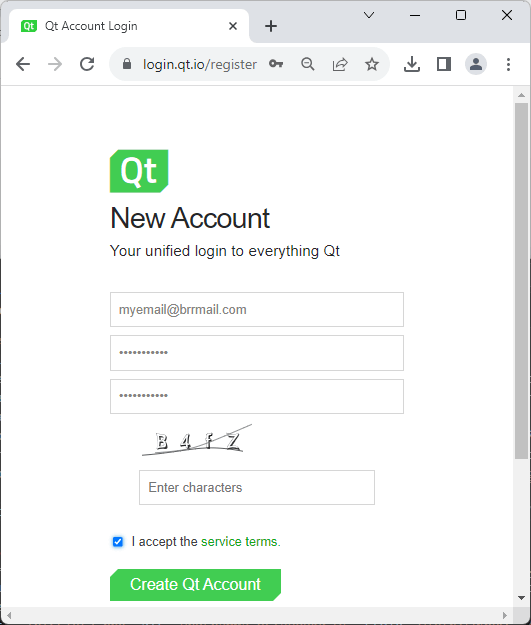
распространенных операционных систем. Главным минусом данного способа является то, что при загрузке могут быть ограничения по географическому признаку, и кроме того, надо иметь учетную запись на официальном сайте QT. Если такой учетной записи не имеется, то для регистрации аккаунта
можно перейти на страницу https://login.qt.io/register
После регистрации загрузим программу установки. Для этого перейдем на страницу
https://www.qt.io/download-qt-installer. При переходе на страницу автоматически начнется загрузка
установщика. Сайт автоматически определяет текущую операционную систему и отдает установщик, соответствующей этой системе.
После загрузки запустим программу установки (если операционная система Windows, то лучше запустить от имени администратора):
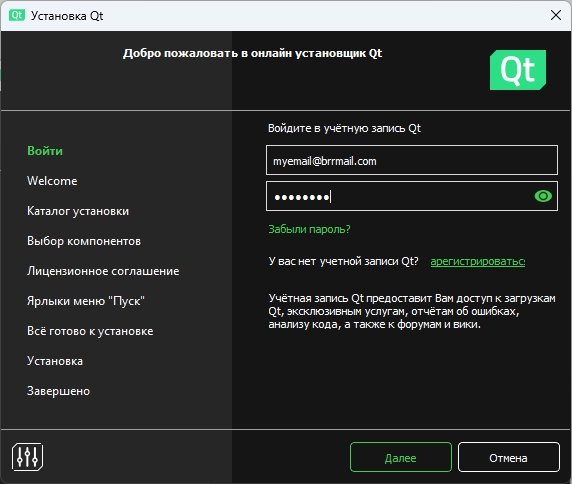
Вначале программа установки предложит осуществить вход с логином и паролем от учетной записи QT, которая выше была зарегистрирована.
И в поля ввода введем логин-электронный адрес и пароль и нажмем на кнопку «Далее».
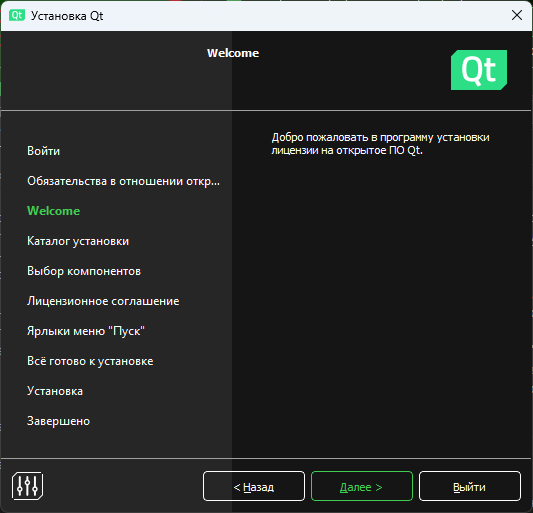
Затем на следующем шаге отметим пару флажков и нажмем на кнопку «Далее»:

На следующем шаге снова нажмем на кнопку «Далее»:
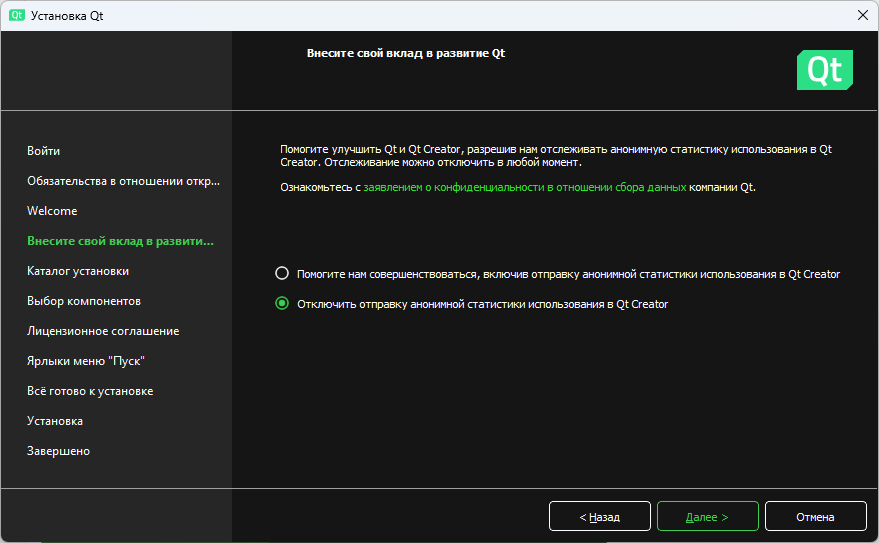
Затем нам будет предложено выбрать, надо ли отправлять отчет :
Далее надо будет указать каталог для установки (можно оставить каталог по умолчанию), а также тип установки:

В качестве типа установки можно указать «Выборочная установка», тогда на следующем шаге необходимо будет указать устанавливаемые компоненты:
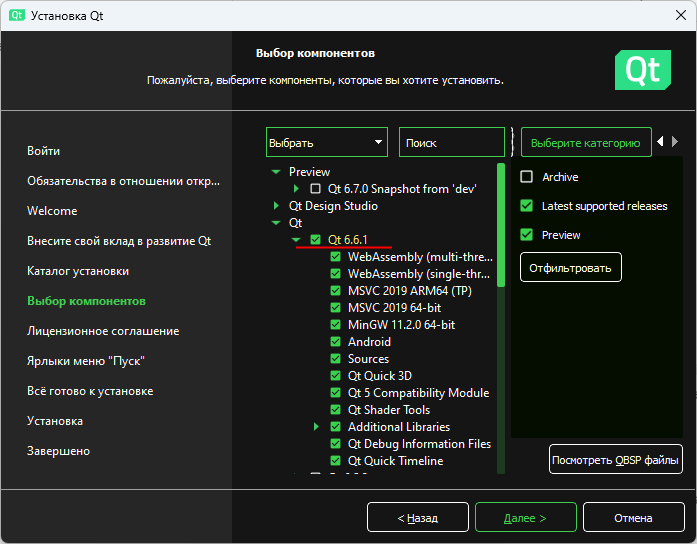
В данном случае выберем последнюю на данный момент версию Qt (которая не является Preview). В моем случае это версия Qt 6.6.1.
В зависимости от текущей операционной системы набор компонентов может отличаться. Но если программа устанавливается на Windows,
то у нас есть два варианта для компилятора С/С++ — MSVC (MSVC 2019 64-bit) и MinGW (MinGW 11.2.0. 64-bit). Можно оставить только один из них, можно выбрать оба. Но один из них обязательно
надо включить, если вы собираетесь создавать приложения под 64-разрядную Windows. Но следует отметить, что в операционной системе должен быть установлен соответствующий компилятор C++.
Так, при выборе опции MSVC 2019 64-bit должен быть установлен компилятор C++ с Visual Studio, а при выборе опции MinGW 11.2.0. 64-bit — компилятор GCC/MinGW (например,
от MSYS2). Остальные компоненты можно устанавливать при необходимости.
При установки следует учитывать свободное место на жестком диске, так как некоторые компоненты занимают довольно многом места.
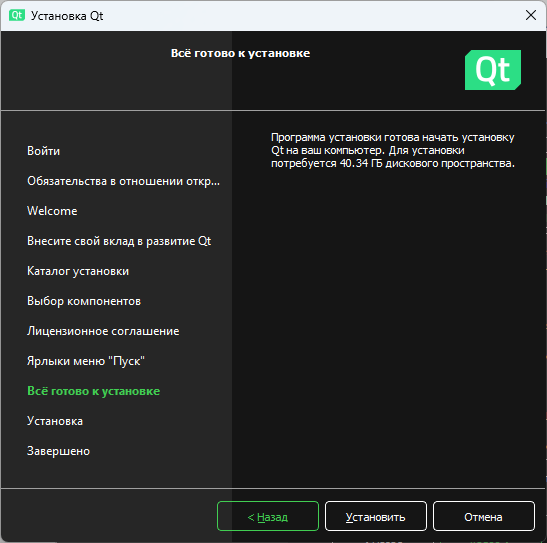
Затем надо принять лицензионное соглашение CMake и настроить ярлык для меню Пуск. И далее нажмем на кнопку «Установить»:
Загрузка офлайн-сборок с официального сайта
Также фреймворк Qt и все сопровождающие файлы можно загрузить с официального сайта с репозитория https://download.qt.io/online/qtsdkrepository/.
В частности, для версии Qt 6.6.1 пакеты для создания десктопного приложения под Windows, которые используют компилятор C++ из Visual Studio, доступны по адресу
https://download.qt.io/online/qtsdkrepository/windows_x86/desktop/qt6_661/qt.qt6.661.win64_msvc2019_64/
в виде пакетов с названиями
 6.6.1-0-202311210527qttranslations-Windows-Windows_10_22H2-MSVC2019-Windows-Windows_10_22H2-X86_64.7z
 6.6.1-0-202311210527qttools-Windows-Windows_10_22H2-MSVC2019-Windows-Windows_10_22H2-X86_64.7z
 6.6.1-0-202311210527qtsvg-Windows-Windows_10_22H2-MSVC2019-Windows-Windows_10_22H2-X86_64.7z
 6.6.1-0-202311210527qtdeclarative-Windows-Windows_10_22H2-MSVC2019-Windows-Windows_10_22H2-X86_64.7z
 6.6.1-0-202311210527qtbase-Windows-Windows_10_22H2-MSVC2019-Windows-Windows_10_22H2-X86_64.7z
Эти архивы помещаем в один каталог, например, c:\qt, и распаковывываем по одному и тому же пути.
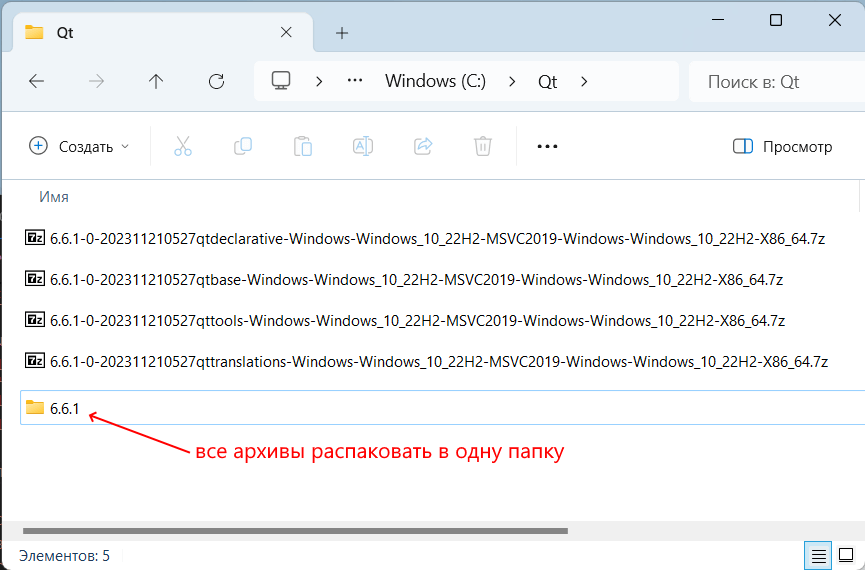
В итоге содержимое архивов объединяется и располагается в одних и тех же папках. Затем данное расположение цепляется в Qt Creator при создании проектов.
Если домен «https://download.qt.io» в силу различных причин недоступен, то те же пакеты можно найти по следующим официальным зеркалам:
Список зеркал
https://qt.mirror.constant.com/online/qtsdkrepository/windows_x86/desktop/qt6_661/qt.qt6.661.win64_msvc2019_64/ (us, prio 100)
https://mirrors.ukfast.co.uk/sites/qt.io/online/qtsdkrepository/windows_x86/desktop/qt6_661/qt.qt6.661.win64_msvc2019_64/ (gb, prio 100)
https://mirrors.20i.com/pub/qt.io/online/qtsdkrepository/windows_x86/desktop/qt6_661/qt.qt6.661.win64_msvc2019_64/ (gb, prio 100)
https://ftp.nluug.nl/languages/qt/online/qtsdkrepository/windows_x86/desktop/qt6_661/qt.qt6.661.win64_msvc2019_64/ (nl, prio 100)
https://mirror.netcologne.de/qtproject/online/qtsdkrepository/windows_x86/desktop/qt6_661/qt.qt6.661.win64_msvc2019_64/ (de, prio 100)
https://qt-mirror.dannhauer.de/online/qtsdkrepository/windows_x86/desktop/qt6_661/qt.qt6.661.win64_msvc2019_64/ (de, prio 100)
https://mirror.web4africa.ng/qt/online/qtsdkrepository/windows_x86/desktop/qt6_661/qt.qt6.661.win64_msvc2019_64/ (ng, prio 100)
https://ftp.fau.de/qtproject/online/qtsdkrepository/windows_x86/desktop/qt6_661/qt.qt6.661.win64_msvc2019_64/ (de, prio 100)
https://mirrors.dotsrc.org/qtproject/online/qtsdkrepository/windows_x86/desktop/qt6_661/qt.qt6.661.win64_msvc2019_64/ (dk, prio 100)
https://ftp.icm.edu.pl/packages/qt/online/qtsdkrepository/windows_x86/desktop/qt6_661/qt.qt6.661.win64_msvc2019_64/ (pl, prio 100)
https://ftp.acc.umu.se/mirror/qt.io/qtproject/online/qtsdkrepository/windows_x86/desktop/qt6_661/qt.qt6.661.win64_msvc2019_64/ (se, prio 100)
https://www.nic.funet.fi/pub/mirrors/download.qt-project.org/online/qtsdkrepository/windows_x86/desktop/qt6_661/qt.qt6.661.win64_msvc2019_64/ (fi, prio 100)
https://qtproject.mirror.liquidtelecom.com/online/qtsdkrepository/windows_x86/desktop/qt6_661/qt.qt6.661.win64_msvc2019_64/ (ke, prio 100)
https://mirrors.tuna.tsinghua.edu.cn/qt/online/qtsdkrepository/windows_x86/desktop/qt6_661/qt.qt6.661.win64_msvc2019_64/ (cn, prio 100)
https://mirrors.sau.edu.cn/qt/online/qtsdkrepository/windows_x86/desktop/qt6_661/qt.qt6.661.win64_msvc2019_64/ (cn, prio 100)
https://mirror.bjtu.edu.cn/qt/online/qtsdkrepository/windows_x86/desktop/qt6_661/qt.qt6.661.win64_msvc2019_64/ (cn, prio 100)
https://mirrors.ustc.edu.cn/qtproject/online/qtsdkrepository/windows_x86/desktop/qt6_661/qt.qt6.661.win64_msvc2019_64/ (cn, prio 100)
https://mirrors.sjtug.sjtu.edu.cn/qt/online/qtsdkrepository/windows_x86/desktop/qt6_661/qt.qt6.661.win64_msvc2019_64/ (cn, prio 100)
https://ftp.yz.yamagata-u.ac.jp/pub/qtproject/online/qtsdkrepository/windows_x86/desktop/qt6_661/qt.qt6.661.win64_msvc2019_64/ (jp, prio 100)
Аналогично в папке https://download.qt.io/online/qtsdkrepository/windows_x86/desktop/qt6_661/qt.qt6.661.win64_mingw/ можно найти те же пакеты Qt для Windows,
но которые вместо компилятор C++ из Visual Studio используют MinGW. Несколькими уровнями выше в «https://download.qt.io/online/qtsdkrepository» можно найти пакеты для других платформ.
Там же можно загрузить с официального сайта и Qt Creator. В частности, на момент написания текущей статьи последняя версия Qt Creator 12 доступна по следующему адресу
https://download.qt.io/official_releases/qtcreator/12.0/12.0.0/. По этой ссылки доступны официальные сборки
для Windows, MacOS, Linux и ряд других пакетов. Также доступны зеркала для скачивания Qt Creator:
Список зеркал
https://qt.mirror.constant.com/official_releases/qtcreator/12.0/12.0.0/ (us, prio 100)
https://mirrors.ukfast.co.uk/sites/qt.io/official_releases/qtcreator/12.0/12.0.0/ (gb, prio 100)
https://mirrors.20i.com/pub/qt.io/official_releases/qtcreator/12.0/12.0.0/ (gb, prio 100)
https://www.mirrorservice.org/sites/download.qt-project.org/official_releases/qtcreator/12.0/12.0.0/ (gb, prio 100)
https://ftp.nluug.nl/languages/qt/official_releases/qtcreator/12.0/12.0.0/ (nl, prio 100)
https://mirror.netcologne.de/qtproject/official_releases/qtcreator/12.0/12.0.0/ (de, prio 100)
https://qt-mirror.dannhauer.de/official_releases/qtcreator/12.0/12.0.0/ (de, prio 100)
https://mirror.web4africa.ng/qt/official_releases/qtcreator/12.0/12.0.0/ (ng, prio 100)
https://ftp.fau.de/qtproject/official_releases/qtcreator/12.0/12.0.0/ (de, prio 100)
https://mirrors.dotsrc.org/qtproject/official_releases/qtcreator/12.0/12.0.0/ (dk, prio 100)
https://ftp.icm.edu.pl/packages/qt/official_releases/qtcreator/12.0/12.0.0/ (pl, prio 100)
https://ftp.acc.umu.se/mirror/qt.io/qtproject/official_releases/qtcreator/12.0/12.0.0/ (se, prio 100)
https://www.nic.funet.fi/pub/mirrors/download.qt-project.org/official_releases/qtcreator/12.0/12.0.0/ (fi, prio 100)
https://qtproject.mirror.liquidtelecom.com/official_releases/qtcreator/12.0/12.0.0/ (ke, prio 100)
https://mirrors.tuna.tsinghua.edu.cn/qt/official_releases/qtcreator/12.0/12.0.0/ (cn, prio 100)
https://mirrors.sau.edu.cn/qt/official_releases/qtcreator/12.0/12.0.0/ (cn, prio 100)
https://mirror.bjtu.edu.cn/qt/official_releases/qtcreator/12.0/12.0.0/ (cn, prio 100)
https://mirrors.ustc.edu.cn/qtproject/official_releases/qtcreator/12.0/12.0.0/ (cn, prio 100)
https://mirrors.sjtug.sjtu.edu.cn/qt/official_releases/qtcreator/12.0/12.0.0/ (cn, prio 100)
https://ftp.jaist.ac.jp/pub/qtproject/official_releases/qtcreator/12.0/12.0.0/ (jp, prio 100)
https://ftp.yz.yamagata-u.ac.jp/pub/qtproject/official_releases/qtcreator/12.0/12.0.0/ (jp, prio 100)
При установке QtCreator программа установки также может потребовать учетную запись, но в принципе она необязательно — можно просто временно отключить интернет-подключение и перезапустить программу установки, так как установка Qt Creator не требует наличия подключения.
Также стоит отметить, что на официальном репозитории на гитхабе формируются бинарные файлы Qt Creator для основных операционных систем — https://github.com/qt-creator/qt-creator/releases/.
Мотивация
До присоединения Qt Group к санкциям, для установки Qt Framework and Tools было достаточно скачать Qt Online Installer, ввести данные учетной записи и выбрать интересующие компоненты в меню. Ныне приходится выбирать из нескольких вариантов установки: прибегнуть к помощи одного из пакетных менеджеров или собрать из исходников. У каждого варианта есть свои плюсы и минусы. В этой статье рассмотрим установку через Conan — один из наиболее популярных пакетных менеджеров для с++ .
Целевая операционная система: Windows 10
Шаг 0. Установка компилятора
Скачиваем с официального сайта VisualStudio Community
https://visualstudio.microsoft.com/ru/downloads/
Запускаем инсталлятор (для работы понадобится набор «Разработка классических приложений С++»)

Шаг 1. Скачать QtCreator и создать проект
QtCreator можно получить из github репозитория https://github.com/qt-creator/qt-creator/releases/tag/v15.0.1
Распаковать архив с бинарниками можно в любую удобную для работы директорию.
В поддиректории qtcreator-windows-x64-msvc-15.0.0\bin будет лежать исполняемый файл qtcreator.exe
Запускаем QtCreator и создаем проект, например: conan_qml.

Закрываем QtCreator
Шаг 2. Установка python и pip
Забираем очередной релиз с официального сайта https://www.python.org/downloads/
Выбираем кастомную установку

Проверяем, что будет установлен pip

Жмем next, запускаем установку, ждем завершение установки.
Добавляем путь к дирректории с python (у меня это C:\Program Files\Python312) в переменную окружения PATH. Должно получиться как-то так:

Шаг 2. Установка и настройка conan и cmake
Ставим пакетный менеджер conan и cmake через пакетный менеджер pip 
pip install cmake
pip install conan==2.10.2
Проверяем что conan доступен:
conan -v
Conan version 2.10.2
Настраиваем профиль conan:
conan profile detect -f
detect_api: Found msvc 17
Detected profile:
[settings]
arch=x86_64
build_type=Release
compiler=msvc
compiler.cppstd=14
compiler.runtime=dynamic
compiler.version=194
os=Windows
Профиль будет сохранен в директории C:\Users\Имя пользователя\.conan2\profiles\default
Шаг 3. Получение библиотек
Переходим в директорию conan_qml. Открываем cmd в этой директории (в адресной строке проводника стирается путь, вводится три буквы cmd, нажимается клавиша enter).
Проверяем какие версии Qt доступны (сейчас доступны версии начиная с 5.15.6 до qt/6.7.3):
conan search qt
Мне нужна версия qt/5.15.12, поэтому будем устанавливать её.
Создаем файл conanfile.py в директории conan_qml
from conan import ConanFile
from conan.tools.cmake import CMakeToolchain, CMake, cmake_layout, CMakeDeps
import os
class ExampleRecipe(ConanFile):
generators = «CMakeDeps», «CMakeToolchain»
# Binary configuration
settings = «os», «compiler», «build_type», «arch»
options = {«shared»: [True, False], «fPIC»: [True, False]}
default_options = {«shared»: False, «fPIC»: True}
def requirements(self):
self.requires(«qt/5.15.12»)
def layout(self):
self.folders.build = «cmake-build-{}».format(str(self.settings.build_type).lower())
self.folders.generators = os.path.join(os.path.curdir, «conan_find_libs»)
self.cpp.build.libdirs = os.path.join(self.folders.generators, «lib») # write the .libs to the library folder under build
self.cpp.build.bindirs = os.path.join(self.folders.generators, «bin») # write the .dll to the bin folder under build
self.folders.imports = self.folders.build
self.folders.source = «src»
# Настраиваем опции пакетов
def configure(self):
# Oбщие настройки
self.options[«qt»].shared = True
def source(self):
# In the source method, the current directory == self.source_folder
assert self.source_folder == os.getcwd()
# copy the libs to build/bin and build/lib folders
def generate(self):
print(«CWD», os.getcwd())
print(«SOURCE», self.source_folder)
print(«BUILD», self.build_folder)
print(«BUILD2», self.cpp.build)
print(«LIBDIRS», self.cpp.build.libdirs)
print(«BINDIRS», self.cpp.build.bindirs)
def package(self):
cmake = CMake(self)
cmake.install()
def deploy(self):
self.copy(self, «*», src=self.package_folder, dst=self.deploy_folder)
Следует обратить внимание на строку:
self.folders.generators = os.path.join(os.path.curdir, «conan_find_libs»)
Тут указано куда будут помещены будущие cmake файлы для поиска пакетов.
Запускаем установку библиотек с флагами определяющими:
— тип сборки ( build_type=Release\Debug);
— запуск сборки бинарников локально, если их нет на сервере (—build=missing);
— директория для размещения бинарных файлов (—deployer=full_deploy).
conan install . -s build_type=Debug —build=missing —deployer=full_deploy
Какое-то время conan будет искать подходящие зеркала:
qt/5.15.12: WARN: network: Error downloading file https://download.qt.io/official_releases/qt/5.15/5.15.12/single/qt-everywhere-opensource-src-5.15.12.tar.xz: ‘HTTPSConnectionPool(host=’download.qt.io’, port=443): Max retries exceeded with url: /official_releases/qt/5.15/5.15.12/single/qt-everywhere-opensource-src-5.15.12.tar.xz (Caused by ConnectTimeoutError(<urllib3.connection.HTTPSConnection object at 0x0000024FF62CB890>, ‘Connection to download.qt.io timed out. (connect timeout=30)’))’
qt/5.15.12: Waiting 5 seconds to retry…
После завершения сборки и установки пакетов, в директории full_deploy будут лежать собранные библиотеки, в conan_find_libs будут лежать конфигурационные файлы для cmake.
Добавляем полный путь до full_deploy в переменную PATH.
Шаг 5. Собрать “Hello qt\qml”
Возвращаемся в дирректорию conan_qml. Копируем файл CmakePresets.json из поддиректории conan_find_libs, в текущую директорию проекта conan_qml.
Открываем в QtCreator наш проект. В настройках проекта добавляем пресет.

После завершения конфигурации проекта, можно запустить наш «Hello qt qml»

Заключение.
Предложенный способ установки Qt относительно прост, но имеет и свои недостатки:
-
некоторых компонентов Qt нет в репозитории Conan.io, придется собирать отдельно;
-
Не удалось, быстро собрать Qt из Conan c помощью mingw64, сборка зависимостей завершается с ошибкой.
В следующей части будем разбираться с установкой Qt через pacman.