
The problem: You cannot access the SAMBA (SMB) shares on your QNAP NAS from the Windows File Explorer and after you tried, access to the web interface also stopped working. The NAS is still accessible from other PCs on the same network.
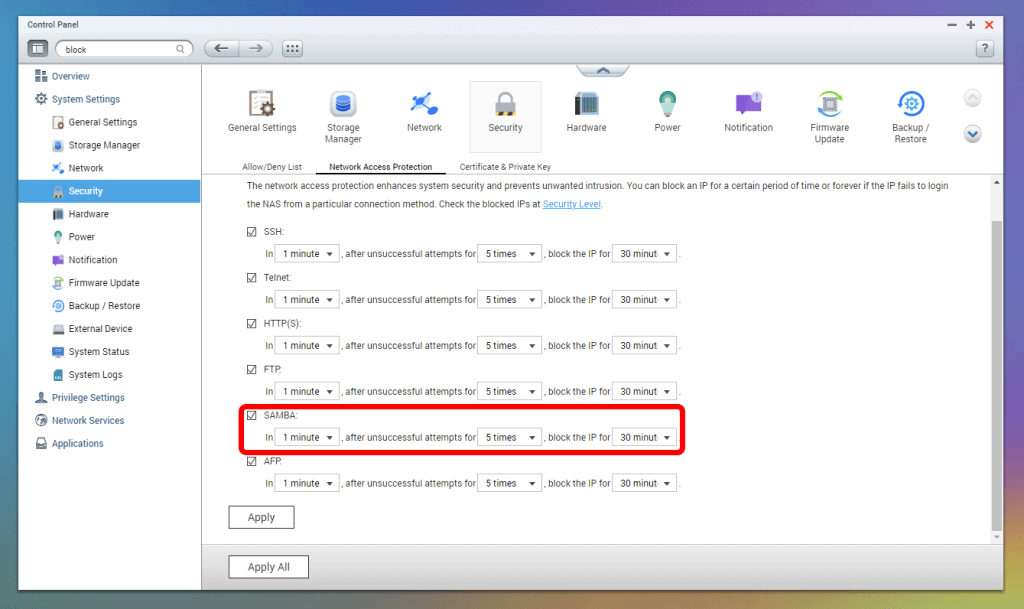
The reason: Windows will first try to connect to your NAS using your Windows login credentials. If this fails too many times and Network Access Protection on your NAS is enabled, your PC’s IP address will be banned:
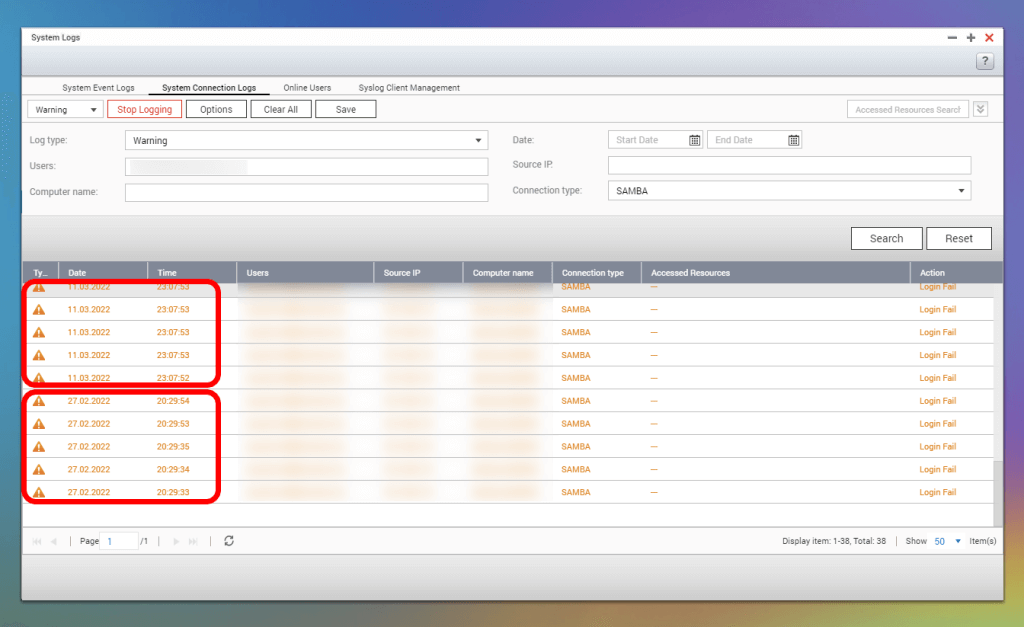
You can see the failed login attempts in the System Connection Logs (if enabled for SAMBA):
Solutions
There are many threads about this issue on the QNAP forum proposing various solutions, such as:
- Creating a user account on the NAS with the same user name and password as on Windows.
- Disabling Network Access Protection on the NAS.
- Making all folders public.
- Disabling all guest shares on the NAS to force Windows to show the network credentials dialog.
I tried a different solution which I found here. I left everything on the NAS unchanged. In the local group policy settings of my Windows PC, I enabled insecure guest logons for the SMB client. This allows the PC to connect to SAMBA shares which are not protected by a password (such as the Public folder on a QNAP NAS).
Note: The Group Policy Editor (gpedit.msc) is not available in all versions of Windows 10 and Windows 11. It is primarily included in the Professional, Enterprise, and Education editions of these operating systems. However, you can use a tool called ‘Policy Plus’ to add it to the home edition.
To start the Local Group Policy Editor, press your Windows key and start typing “group policy” (then select “Edit group policy”):
Alternatively, you can also press the Windows key and R, then type “gpedit.msc” and click on OK:
In the Local Group Policy Editor, the setting can be found under Local Computer Policy -> Computer Configuration -> Administrative Templates ->Network -> Lanman Workstation -> Enable insecure guest logons:
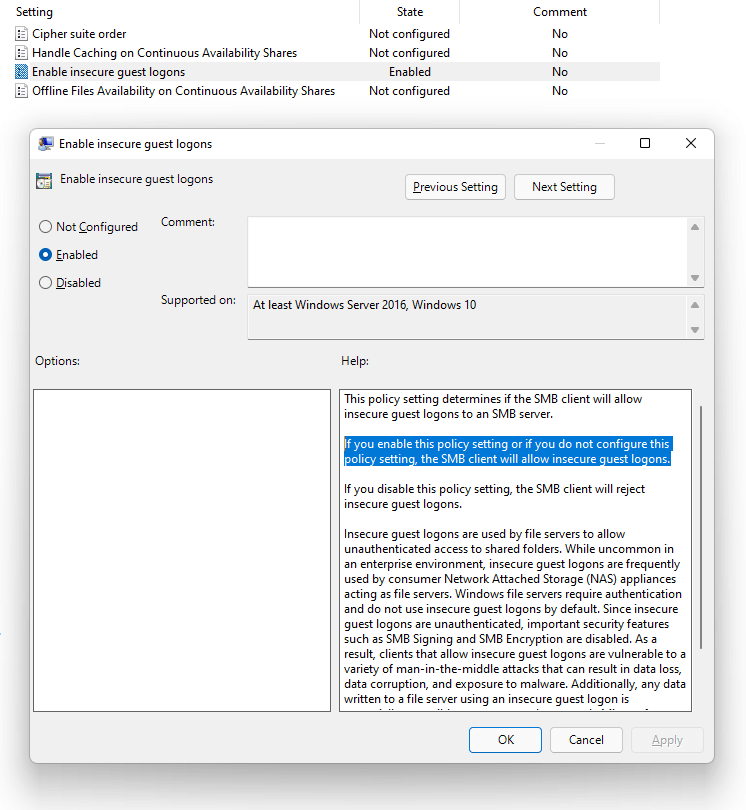
Note: The description says that “if you do not configure this policy setting, the SMB client will allow insecure guest logons.” This was not true for me on Windows 11 21H2, the setting had to be explicitly enabled. On other PCs running Windows 10, the described behavior was correct and the entire problem never appeared.
Now (and after the IP ban period has expired, of course) it was possible to access the NAS through the file explorer. Clicking on a protected folder brought up the Enter network credentials dialog:
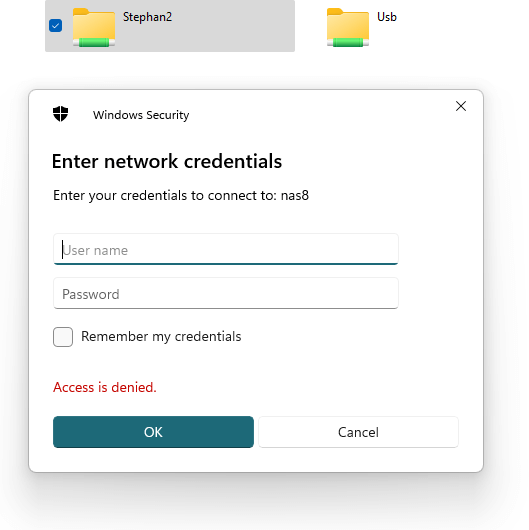
Why did this work? Apparently, Windows only tried to use the current user credentials once when connecting to the NAS and then used guest access. As this resulted only in a single failed access attempt, the PC’s IP address was not banned.
For further support, please visit the QNAP forum
Update February 15, 2023: A previous version of this article mentioned making changes to the registry, however the screenshot showed the Local Group Policy Editor (gpedit.msc) and not the registry editor (regedit.exe). Many thanks to Daniel for the comment.
Update March 28, 2023: Added a clarification that the Group Policy Editor (gpedit.msc) is only available on certain editions of Windows and changed the title accordingly.
ты подключаешься windows -> nas, убери то что ты там наковырял в настройках windows (зачем ты включил к нему доступ для гостя?)
подключившись в домен, текущий пользователь на машине будет уже доменным (на самом деле можно авторизоваться локальным принудительно) и даже если имена совпадают, с точки зрения авторизации это разные пользователи
мало того, при использовании домена перестает работать механизм общих имен и паролей в windows for workgroup (когда сеть без домена) позволяющий подключаться к шаре без ввода пароля.
Правильное решение — добавить nas в домен (если nas это умеет, если нет то укажи рабочую группу с тем же именем что и домен и делай как ниже).
Неправильное но простое решение — завести на windows и nas локальных пользователей с одинаковыми именем и паролями и делать подключение по ip адресу (ну в 10-ой версии wins сервер сломали, по уму можно включить и поковырять политики чтобы его вернуть, по уму рабочего dns сервера или правок в hosts должно хватить тоже), при подключении к nas указать этот логин и пароль и отметить сохранение их для последующих подключений (делать это придется вручную для каждого компьютера в сети и может даже для каждого пользователя, на сколько я помню это не переносится через сетевые профили)
Проблемы с доступом к общим папкам могут возникать как на NAS, так и на стороне клиента SMB. QNAP рекомендует последовательно пройти все возможные решения, перечисленные ниже.
NAS QNAP
- Обновите прошивку вашего NAS до текущей версии.
- Подтвердите доступность файлов через File Station.
- Включите SMB на NAS.
- Перейдите в Панель управления > Сетевые службы и службы файлов > Win/Mac/NFS/WebDAV > Сетевые службы Microsoft.
- Настройте минимальную и максимальную версию SMB.
- Перейдите в Панель управления > Сетевые службы и службы файлов > Win/Mac/NFS/WebDAV > Сетевые службы Microsoft > Дополнительные параметры.
Примечание: В целях безопасности, максимальная версия SMB — SMB 3, а минимальная — SMB 2. Некоторые устаревшие устройства поддерживают только менее безопасный стандарт SMB 1. В таких случаях установите минимальную версию SMB на SMB 1.
- Назначьте права доступа к папке для соответствующего пользователя NAS.
- Перейдите в Панель управления > Привилегии > Общая папка и отредактируйте разрешения на доступ к общей папке.
- Удалите все записи из общей папки.
- Перейдите в Панель управления > Привилегии > Общая папка. Нажмите «Изменить» и перейдите в доступ для хостов Microsoft Networking.
- Уберите сетевые блокировки.
- Проверьте, не заблокирован ли клиент QuFirewall.
- Перейдите в Панель управления > Безопасность и удалите клиента из списка Разрешить/Запретить.
Клиент SMB
- Убедитесь, что NAS и клиент SMB находятся в одной сети.
- Отключите Windows Hello Authentication в Windows 10 или 11, чтобы избежать использования учетной записи Microsoft для доступа к SMB.
- Удалите учетные данные NAS в Диспетчере учетных данных Windows.
- Если проблема не решена, разорвите текущее подключение сетевого диска и снова подключите сетевой диск.
- Закройте все окна Проводника Windows.
- Выполните следующую команду в командной строке:
net use * /y /d
- Если проблема сохраняется, выполните следующую команду в командной строке:
net use Z: \\NAS_IP_address\Public /user:Username_with_Public_folder_<span class="speller-hint" data-toggle="popover" data-hint="1" data-original-title="" title="">permission</span>
If you can’t see your QNAP NAS on your network, there are a few things you can try:
1. Check that your NAS is connected to your network.
2. Check that your NAS is turned on.
3. Check that your NAS has an IP address assigned to it.
4. Check that your computer is on the same network as your NAS.
5. Check that your computer’s firewall is not blocking access to your NAS.
6. Try accessing your NAS using its IP address.
If you still can’t see your NAS, please contact QNAP support for further assistance.
How do I access QNAP NAS in Windows 10?
Why is my NAS not showing on my network?
There are a few possible reasons why your NAS might not be appearing on your network. First, make sure that it is properly connected to your router and that all cables are secure. Next, check to see if your NAS is turned on and that all the lights are functioning properly. Finally, try restarting your NAS and see if that solves the problem. If none of these solutions work, then you may need to contact your NAS manufacturer for further assistance.
How do I find qnap on my network?
There are a few ways to find your QNAP device on your network. The first way is to check your router’s DHCP client list. This will show you all of the devices that are connected to your router. Another way is to use a network scanning tool like Nmap. This will scan your network for all devices that are online. Finally, you can check your QNAP device’s web interface to see its IP address.
How do I make my network NAS visible?
There are a few steps you can take to make your network attached storage (NAS) more visible:
1. Use a NAS that has a web interface. This will allow you to access your NAS from any web browser, making it more visible to you and any potential intruders.
2. Use a NAS that supports Active Directory. This will allow you to integrate your NAS with your existing network security infrastructure, making it more visible to you and any potential intruders.
3. Use a NAS that supports encryption. This will help to protect your data in the event that your NAS is compromised, making it more difficult for an attacker to access your data.
4. Use a NAS that supports two-factor authentication. This will help to protect your data in the event that your NAS is compromised, making it more difficult for an attacker to access your data.
5. Use a NAS that supports a firewall. This will help to protect your NAS from potential attacks, making it more difficult for an attacker to access your NAS.
How do I connect QNAP directly to PC NAS?
There are a few different ways that you can connect your QNAP NAS directly to your PC. The most common way is to use an Ethernet cable to connect the two devices together. You can also use a USB cable to connect the NAS to your PC.
How do I access QNAP NAS in Windows Explorer?
To access your QNAP NAS in Windows Explorer, simply enter the IP address or hostname of your NAS into the address bar. You can also map a network drive to your NAS to make it even easier to access. For more detailed instructions, please see the QNAP helpdesk.
Why can’t I see my mapped network drives?
There could be a few reasons why you cannot see your mapped network drives. First, check to make sure that the network drive is actually mapped. You can do this by going to My Computer and looking for the network drive under the Network Locations heading. If it is not mapped, you will need to map it by right-clicking on the network drive and selecting Map Network Drive.
If the network drive is mapped, the next thing to check is the permissions. Make sure that you have the correct permissions to access the network drive. If you do not have the correct permissions, you will need to contact your network administrator to request access.
Finally, if you are still having trouble accessing the network drive, it is possible that there is a problem with the network itself. If this is the case, you will need to contact your network administrator for further assistance.
Why can’t I see other computers on my network Windows 10?
There are a few potential reasons why you might not be able to see other computers on your network.
First, make sure that all of the computers on your network are connected to the same router or switch. If they are not, they will not be able to see each other on the network.
Second, check to see if all of the computers on the network have the same workgroup name. By default, Windows 10 computers are set to the «WORKGROUP» workgroup. If any of the computers on the network have a different workgroup name, they will not be able to see each other.
Third, make sure that the network discovery and file sharing settings are turned on for all of the computers on the network. Network discovery and file sharing can be turned on in the «Network and Sharing Center» control panel.
If you are still having trouble seeing other computers on your network, you can try restarting the network discovery and file sharing services on all of the computers. To do this, open the «Services» control panel and scroll down to the «Function Discovery Resource Publication» and «Function Discovery Provider Host» services. Restart both of these services and then try to see if the other computers
How do I find my QNAP IP address?
To find your QNAP IP address, you can either check the QNAP web interface or use a third-party tool like Angry IP Scanner.
1. To check the QNAP web interface, open a web browser and enter the IP address of your QNAP device. The default IP address is usually 192.168.1.1.
2. Once you’re logged in, go to the «Network» or «Network Settings» section.
3. Here you should see your QNAP IP address listed.
4. If you’re using a third-party tool like Angry IP Scanner, simply launch the tool and scan your network. The QNAP IP address should be listed in the results.
How do I find the IP address of my NAS?
There are a few ways to find the IP address of your NAS.
1. Check the documentation that came with your NAS. Many NAS devices will have the IP address listed in the documentation.
2. If you can’t find the IP address in the documentation, you can try connecting to the NAS using a web browser. To do this, enter the NAS’s IP address into the web browser’s address bar.
3. If you still can’t find the IP address, you can try using a network scanner tool such as Nmap. To use Nmap, open a terminal window and enter the following command:
sudo nmap -sP 192.168.1.0/24
Replace 192.168.1.0/24 with the IP address range for your network. This command will scan all of the IP addresses in that range and return any that are assigned to devices on your network.
How do I make my computer visible on network Windows 10?
To make your computer visible on a network in Windows 10, you’ll need to adjust your network settings. To do this, open the Control Panel and go to Network and Sharing Center. Then, click on Change advanced sharing settings. Next, under Network discovery, select Turn on network discovery and click Save changes. Now, your computer should be visible on the network.
How do I connect QNAP NAS to my laptop?
There are a few different ways that you can connect your QNAP NAS to your laptop. One way is to connect the NAS to your laptop via an Ethernet cable. Another way is to connect the NAS to your laptop via a USB cable. Finally, you can also connect the NAS to your laptop wirelessly.
How do I connect my NAS drive to my PC?
There are a few different ways to connect a NAS drive to a PC, depending on the specific NAS drive and PC. In general, though, most NAS drives can be connected to a PC via USB, Ethernet, or Wi-Fi.
To connect a NAS drive to a PC via USB, simply connect the NAS drive to an available USB port on the PC. To connect a NAS drive to a PC via Ethernet, connect the NAS drive to an available Ethernet port on the PC. To connect a NAS drive to a PC via Wi-Fi, connect the NAS drive to an available Wi-Fi network.
How do I access my NAS storage in Windows?
There are a few different ways to access your NAS storage in Windows. One way is to use the File Explorer application. To do this, open File Explorer and then click on the «Network» tab. From here, you should see your NAS listed as a network drive. You can then double-click on it to open it and access your files.
Another way to access your NAS storage is to use the Remote Desktop application. To do this, open the Remote Desktop application and then click on the «Options» button. From here, you will need to enter the IP address of your NAS into the «Computer» field. Once you have done this, click on the «Connect» button and you should be able to access your NAS storage.
I – Qnap Error Detect Steps;
II – Cant Find Qnap with Qnapfinder / Stuck at Booting / Corrupted Configuration / Device Startup Errors /
III – If You Can Login Qnap Interface, But Problem About Reaching Datas;
IV – Other Qnap Errors (Loading Driver, Mounting Volume)
I – Qnap Error Detect Steps;
A – Error Opening Device / LCD Screen Booting Problem;
If you can use your Qnap witout problem, but now it becames unreachable, Please, follow the steps indicated below for the detection of the fault;
Shut down Qnap Remove all HDD’s and Press ”Power” button.
1 – Led on the Front Panel Turns On?
Ans : Powersupply, adaptor or Mainboard Problem. Change electric cabe and check if problem still continue. If it doestn work, send device back to Vendor.
2 – Nas Sound a shot beep in a Few Seconds?
Ans : Mainboard or Flash Error. Contact to your Vender to send device for Repair. Sometimes taking off and plug in firmare flash back again solve problem, but ask this tou your vendor if this cause device out of warranty or not.
3 – After 2-4 minutes, The NAS Sound one or Three Long Beep (s)
Ans : Firmware Problem. Please check “Firmware Reflash Document” to solve the problem.
4 – Connect the NAS to PC Directly and Run QNAP Finder. Finder Should Find the NAS
Ans : Network Failure. Please Disable firewall / antivirus software on the PC. This kind of software may block the network access of Qnap finder.
+Also press around 15 second to reset button at the back of the device. I solve a few cases with this way.
If problem continues, please contact with Qnap Support
5 – Double Click the NAS to Start Initialization
Ans : Failed to initialization. The IP of the NAS unit should be on the same subnet of your PC. For example, if the IP of NAS is 169.254.100.100, you need to configure your PC’s ip to 169.254.100.101
6 – While device is working, Plug all of your HDD’s to NAS with right order. Wait around 10 second and press “details” on QNAPfinder. All of your HDD’s should be seen there with right size.
Ans : HDD or Qnap sata port problem.
-First check “How to understant Broken HDD” document.
If its HDD problem, You can plug out infected HDD and continue.
If its sata cable problem, contact with Qnap Support team, or send device to Vendor.
Important Note : Dont start installation at this point or you may lose all of your datas.
If everything is okey till this point, please go to next step to solve the problem.
II – Stuck at Booting / Corrupted Configuration / Device Startup Errors /
If your System starts properly without HDD’s, but stuck at booting / Starting services at LCD panel, or Red/ Green light flashes continuesly, please follow this document;
1 –Turn off the device. Remove Disks Drives and start device without any HDD installed ; (Do not forget the order of your HDDs!)
2 -You will hear a beep after pressing the power button, followed by 2 beeps in a few minutes later. Open Qnapfinder, double Click to be sure that you can enter Qnap setup screen. Close this installation screen and Place your HDD’s in right order. (Do not start the installation. The installation process will causes you to lose data on your HDDs)
3 – Download Putty software;
http://www.chiark.greenend.org.uk/~sgtatham/putty/download.html
4 –Log with putty by entering the Qnap IP / user name / password. (Username / Password: admin / admin will. Port need to enter 22.)
Now enter these command down below; (Choose command from this screen and “copy” Then go to putty, just press right mouse button once. By this way, you can paste commands automaticly)
# config_util 1 ->
# storage_boot_init 1 ->
# df
If dev/md9 (HDA_ROOT) appears full, please contact QNAP support team ofTurkey
After this step, you start again Qnap’ı QNAP will start up again without a problem. If you still get problem on starting device, do same steps and continue this document. I want to warn about continue the following steps as soon as all the configuration information (such as user rights) may be reset.
5 – To copy the original configuration file, follow these commands;
# cp /etc/default_config/uLinux.conf /mnt/HDA_ROOT/.config/
(Instead of uLinux.conf, you can use any of the following command in step 6, use the configuration files)
# rm -r /etc/config (etc altındaki konfig dosyasını silmek için)
# ln -sf /mnt/HDA_ROOT/.config /etc/config
# setcfg -f /etc/config/uLinux.conf Misc configured TRUE
# reboot
6 – Now all of your configuration reset, but you can reach all of your datas.
- uLinux.conf – most of the system settings are stored here
- smb.conf – Microsoft Network (Samba) configuration file. Samba stores the information about the parameters of the folder permissions.
- raidtab – Configuring RAID
- proftpd.conf – FTP server settings
- apache.conf – Web server configuration files
- passwd / shadow – the users password information. ->
III – If You Can Login Qnap Interface, But Problem About Reaching Datas;
Login Qnap and go Volume Managment -> Disk managment and check the status of your RAID.
A – RAID seems fine, but you cant see any folder under Share folders;
Go to “Share Folders -> Create a new share folder” Create a new share folder, and select “show path manually” option. Now you should see all of your Share folders. Just compete this process to make folders reachabla again.
Also if you download winscp software and login Qnap, you can reach all of your data under “Share” Folder.
Please check “My Share Folders Disappear” document.
B – RAID give “Volume free size 0″ Error.
Simply Restart Qnap, and delete some files after Qnap starts.
Please check “HDD capacity seems Full and I cannot Reach My Datas” Document
C – RAID seems “In Degreed” Mode.
Plug out broken HDD, wait around 20 second, and Plug in New HDD. This should start rebuilding.
Please check “A hard disk drive error is shown on the NAS” Document
D – If You Loose 2 HDD From RAID 5, or 3 HDD From RAID 6;
Quicly Recover your datas to another device / storage, and Reinstall Qnap with fine HDDs.
If you cant reach your datas, simply Plug HDDs to another Qnap NAS device (model is not problem)
Please check “RAID system Errors” document
E – RAID seems “Not Active” or “Unmounted”
Please check “RAID system Errors” document
F – Your RAID is lost and all HDD’s seems as Single Disk
Please check “RAID system Errors” document
IV – Other Errors & Solutions;
A – Qnapfinder couldn find my NAS;
Connect Qnap ethernet port directly to your laptop ethernet port. Be sure you close Antivirus and firewall. If you cant find Qnap by this way, Please step to II.th title.
B – If you can reach Qnap login interface by this way, but it doesnt work while device is at your network;
Please follow “Qnapfinder Cannot Find Qnap” Document
C – Qnapfinder can find Qnap, but device name seems as “ULinux”
Probably HDD failure. Please go to “Qnapfinder Cannot Detect My NAS” Document
D – Qnap Led panel stuck at “Booting”
HDD or Firmware failure. Please go to “Qnapfinder Cannot Detect My NAS” Document
E – Qnap Led panel stuck at “Loading Drive”
HDD failure. Please go to “Qnapfinder Cannot Detect My NAS” Document