
Приложение или пакет virt-manager использует библиотеку libvirt для предоставления услуг управления виртуальными машинами. Оно имеет интерфейс рабочего стола, который помогает создавать, удалять и управлять несколькими виртуальными машинами.
Интерфейс рабочего стола virt-manager и его компоненты предоставляют гибкое управление виртуальными машинами для различных случаев использования. Это бесплатное приложение с открытым исходным кодом, используемое в основном для виртуальных машин KVM. Однако оно может поддерживать и другие гипервизоры, такие как Xen и LXC.
Замечание о virtiofs
Общий доступ к файлам и папкам обеспечивается общей файловой системой libvirt под названием virtiofs. Она предоставляет все возможности и параметры для доступа к дереву каталогов на хост-машине. Поскольку большинство конфигураций виртуальных машин virt-manager переведены в XML, общие файлы/папки также могут быть заданы XML-файлом.
Интересно: VHD и VHDX в чем разница и когда их следует использовать?
Общая папка в virt-manager
<filesystem type="mount" accessmode="passthrough">
<driver type="virtiofs"/>
<binary path="/usr/libexec/virtiofsd"/>
<source dir="/home/debugpoint/Pictures/Screenshots"/>
<target dir="mount_tag_pictures"/>
<alias name="fs1"/>
<address type="pci" domain="0x0000" bus="0x08" slot="0x00" function="0x0"/>
</filesystem>
Нажмите кнопку Готово. В главном окне virt-manager щелкните правой кнопкой мыши на виртуальной машине и нажмите Run, чтобы запустить виртуальную машину. Не забудьте нажать на «показать графическую консоль» (значок монитора на панели инструментов – если ВМ не отображается.
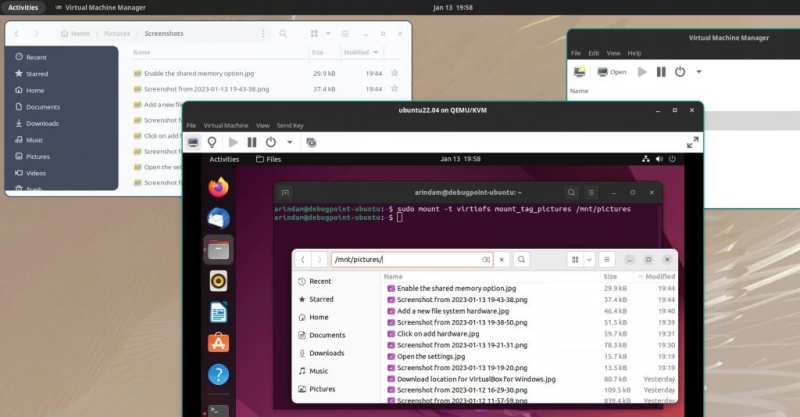
В гостевой машине создайте папку, в которую вы хотите смонтировать папку хоста. Для этого примера я использовал /mnt/pictures.
sudo mkdir /mnt/pictures
И, наконец, смонтируйте папку хоста с помощью метки, созданной в предыдущем шаге, в эту новую папку. Используйте следующую команду для этого. Убедитесь, что имя тега и папки в приведенной ниже команде соответствует вашей системе.
sudo mount -t virtiofs mount_tag_pictures /mnt/pictures
Теперь вы можете просматривать папки и добавлять/удалять элементы без проблем в virt-manager между хостом и гостем.
Подведение итогов
Надеюсь, это решение поможет вам получить доступ к файлам и папкам хоста с гостевой машины. Помните, что ваш идентификатор пользователя, который используется для запуска приложения virt-manager, должен иметь такой же доступ к папке хоста.
Shared Folder in QEMU Between Linux Host and Windows Guest
Update: I have found a much easier way, using QEMU’s built-in
Samba. See QEMU Windows Guest: Sharing Files with the Host.
Unexpectedly, one of the hardest parts of
Migrating
a VirtualBox Windows Virtual Machine to qemu/kvm/virt-manager
was finding a way to exchange files between Linux and Windows.
In virtualbox, setting up a shared folder is trivial.
In QEMU, not so much.
Mount the VM Image
First, it is possible to mount the .qcow image in the host Linux,
a nice feature that I never figured out how to do with virtualbox.
You need the libguestfs-tools package.
First, get a list of the available devices in the VM with
guestmount -a /path/to/Win10.qcow2 -m /dev/sda<something> /mnt
The «something» can be anything you like;
it’s a placeholder for the Windows filesystem device:
guestmount will complain and show you the available devices:
% guestmount -a Win10.qcow2 -m /dev/sda99 /mnt                /ssd/QEMU
libguestfs: error: mount_options: mount_options_stub: /dev/sda99: No such file or directory
guestmount: ‘/dev/sda99’ could not be mounted.
guestmount: Did you mean to mount one of these filesystems?
guestmount: 	/dev/sda1 (ntfs)
guestmount: 	/dev/sda2 (ntfs)
zsh: exit 1     guestmount -a Win10.qcow2 -m /dev/sda99 /mnt
(Note: this may be somewhat brittle. When I first intended to post
this article, I tried the above command and it gave a completely
different error message that gave no clue about the available virtual
partitions. But a few days later it was working again.)
In my Windows install, /dev/sda1 is boot partition stuff,
while /dev/sda2 is the user partition. So the real command was:
guestmount -a Win10.qcow2 -m /dev/sda2 <i>mount-point</i>
If you’re in the proper group, you can run this as your user
and don’t need to be root, as long as you pick a mount-point that’s
an empty directory that’s writable by you, like ~/mnt.
The exact group name you need probably varies by distro.
On Debian I added myself to kvm, libvirt and libvirt-qemu,
and I’m not sure which of those is the one that matters.
The mounted filesystem is only accessible to the user that ran guestmount;
to allow other users, add -o allow_other
To unmount, guestunmount mount-point
guestfs-tools can do other useful things too.
Check out programs like virt-ls and virt-cat to examine single files
from your guest OS. However, it’s very slow and error prone, so most
of the time you’re probably better off guestmounting the filesystem
and using normal Linux tools.
Mounting the VM image is a relatively easy way to pass info between the two
installs, as long as you can live with not being able to copy anything
while the guest is running. If you try to guestmount while the
guest is running, you’ll get an error message.
So that’s a rudimentary way to transfer files between host and guest.
But I still miss the nice, easy shared folders of VirtualBox, that let
me transfer files while both OSes were running.
Are there any other options?
There are — but I never got any of them to work.
Samba
Most people on the web recommend
setting up samba and using SMB to transfer files over the network
between the two installs. That’s probably a no-brainer if you’re
already running a samba daemon.
But I didn’t want to set up samba and have it running all the time
just to transfer files to and from a Windows installation that I use
maybe once or twice a month.
But after struggling for three days trying to get virtio-fs working,
I decided maybe having to install samba wasn’t so bad.
Supposedly, you can use QEMU’s built-in SMB sharing,
which requires installing the «samba» package (and its dependencies).
but supposedly doesn’t require actually running a samba daemon.
Nobody explains how to set this up, though.
These
pages
looked
promising,
but they didn’t work either: the lines in the first page to create a
network device didn’t result in Windows being able to see a network,
and the extra -net nic,model=virtio in the second page
resulted in an error dialog,
PCI: slot 1 function 0 not available for virtio-vga, in use by virtio-net-pci.
virtio-fs
That left two filesystems virt-manager supposedly understands.
When you’re editing info for your virtual machine in virt-manager,
click Filesystem. The Driver field offers two options,
virtiofs and virtio-9p. Virtio-9p is Plan 9 file sharing, but all the
comments I found about virtio-9p when used to communicate with OSes other
than Linux were very negative: it’s slow, poorly supported, buggy.
Virtiofs, on the other hand, was reputed to be fast and to work well if
you can manage to get it set up. That’s the kicker: there’s no real
documentation on this process as it applies to non-linux OSes.
It’s easy enough to set up the virtiofs driver on the Linux side,
and there’s a driver, winfsp-version.msi, but I tried various
ways of installing it on the Windows guest and never managed to get
it to talk to virtiofs.
Some pages say to go through the Windows «Add Hardware / Filesystem»
window, but I never got that to work.
I also found some pages recommending a series of «sc» commands (Windows’
Service Control command), such as:
C:\> sc create VirtioFsSvc binpath="(your binary location)\virtiofs.exe" start=auto depend="WinFsp.Launcher/VirtioFsDrv" DisplayName="Virtio FS Service"
    (Thank goodness CommandPrompt has autocomplete. On the other hand,
    every time it autocompletes it adds the close quote again and
    you have to delete it so you can type the next path component.)

C:\> sc start VirtioFsSvc
The dependency service does not exist or has been marked for deletion
There were various other approaches I tried, but they all ended in
error messages and no communication.
I’d love to hear from anyone who’s managed to get virtiofs working
between a Linux host and a Windows guest without needing a full-fledged
samba daemon.
Tags: linux, virtualization, QEMU, windows
[ 17:37 Nov 23, 2022
More linux |
permalink to this entry |
]
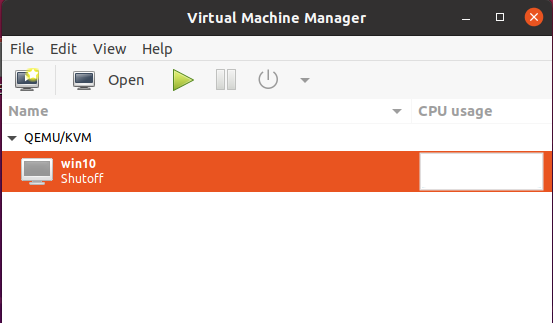
I’ve been using qemu and libvirt to create and manage virtual
machines under Linux. I’m using Virtual Machine
Manager to graphically manage the machines. I’ve
been really impressed with qemu + KVM performanace, and Virt-Manager provides a
very nice and easy to use interface. There is just one thing lacking, in
comparison to “traditional” desktop virtualization software (eg.
Virtualbox): there is no pre-configured way to
share files between the host and the guest. In contrast, Virtualbox provides a really easy
way to transfer files. As long as the agent is installed you can just “copy
and paste” them over, or drag them into the VM from the host (and vice
versa). In this article, I’ll try to configure an easy way to share files
between the host and the VM. My host is an ArchLinux system, and the two guests
are Fedora 35 and Windows 10. The steps in this article
should be generic enough to “just work” on most other distros, but YMMV.
NB: This is intended as an easy way to share files for classic “desktop”
virtualization settings. It’s not intended for servers, where there are
multiple users on the host or the guests.
We’ll be using the same method for both guests, because it works on Linux and
on Windows. Instead of the “traditional” way (sharing
over the network with SMB, NFS, or 9p), we’ll we using a file system
developed by libvirt called
virtiofs. Virtiofs was developed for
precisely this purpose (“Unlike existing approaches, it is designed to offer
local file system semantics and performance.”). This makes file sharing
easier to configure, since we don’t need to set up a server. It also should
offer very good performance.
Host
To set this up, we first need a folder on the host.
This can be done in several ways. I decided to just create a folder in
/mnt, and change its ownership to my user:
sudo mkdir /mnt/vfs_share
sudo chown foo:foo /mnt/vfs_share
Then we need to add a virtiofs device.
Virtiofs needs shared memory to work.
This can be enabled
in the hardware configuration window. Navigate to Hardware -> Memory and
select Enable shared memory.
After that, open virt-manager and navigate to the hardware settings of the
virtual machine. Click on Add Hardware.
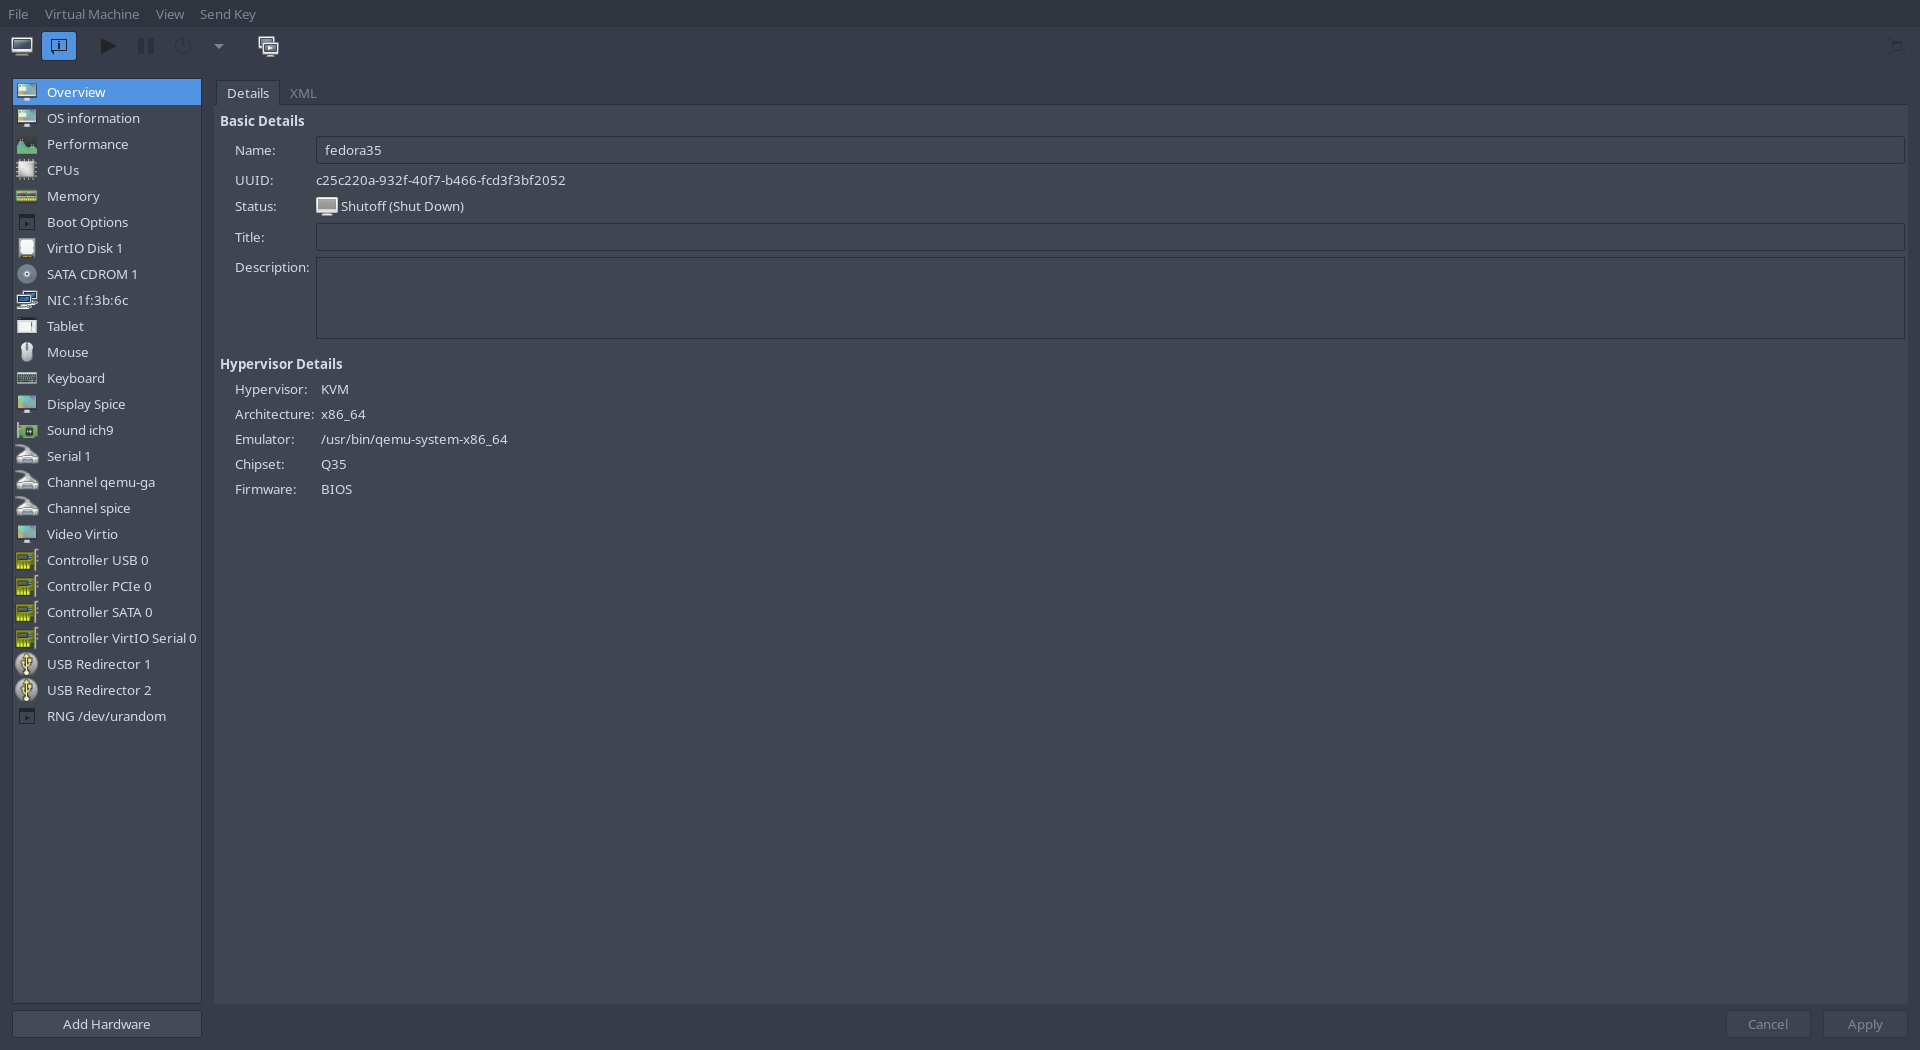
Virtual Machine Manager hardware configuration window.
A dialog box should pop up. In the pane on the left, click on Filesystem
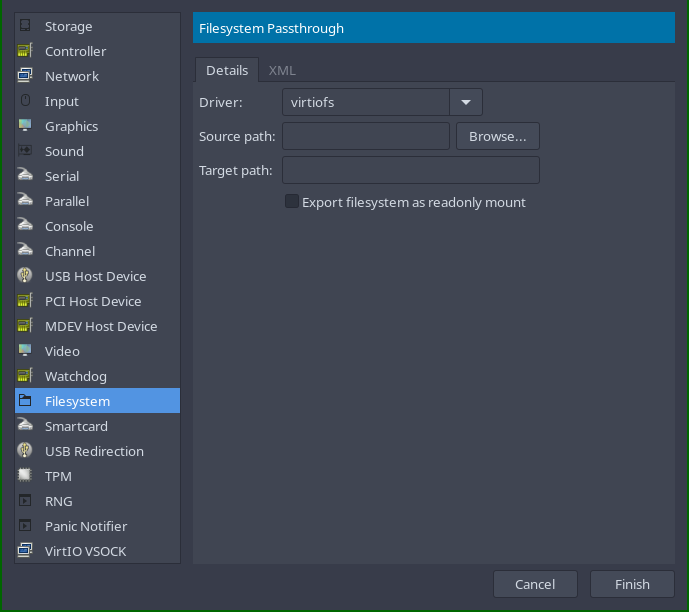
The ‘Add Hardware’ dialog window
Enter the necessary settings.
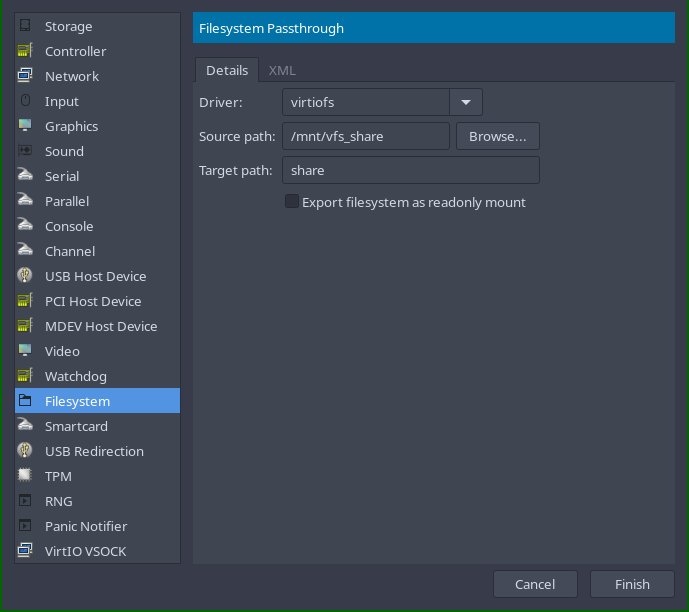
Filesystem options
The settings are as follows:
For the Driver, we keep the default (virtiofs). The source path is the path
on our host filesystem. The target path is a bit of a misnomer. It’s not
actually a path, just an identifier that we use as a mount point in our
guest file system. This will become clear when we mount the file system in the
guest later.
If you want a more detailed overview of these options and some
alternatives, check
out the libvirt knowledge base on
virtiofs
Guest
Linux
After that, it’s time to configure the guest. First we create a folder in our
users home directory that we will mount the share into.
After that, we can mount the share with:
sudo mount -t virtiofs share /home/foo/share
If we want to make this permanent, we can just add an entry
to /etc/fstab
share /home/foo/share virtiofs defaults 0 0
After rebooting, the share should be mounted! If your user on the host and the
guest are the same, you don’t even need to worry about any other permissions.
Otherwise, change the folder with chmod to suit your needs.
Windows 10
Windows 10 can also use virtiofs, but it needs some additional work. First, we
need to install 2 pieces of software:
- WinFSP
- Virtio drivers
This installation can be done in two ways: manually or with chocolatey.
Chocolatey
If you already have Chocolatey installed, it’s as
simple as:
choco install virtio-drivers winfsp
If you don’t have Chocolatey installed, I highly recommend that you check it
out. It’s a package manager for Windows that integrates quite well into the
system. It makes maintaining software on Windows a lot easier! Installation
instructions are here.
During the installation of the virtio-drivers it will pop up a dialog box
asking if you trust the drivers. Confirm the dialog box to install them.
Manual install
Download WinFSP here and install it. The default
options are fine if you just want to use the drivers.
After that, you need to download the latest ISO from the following
archive.
After downloading, mount the ISO. Then open Device Manager. Select the
appropriate device. It should appear under Other devices as a Mass storage
controller
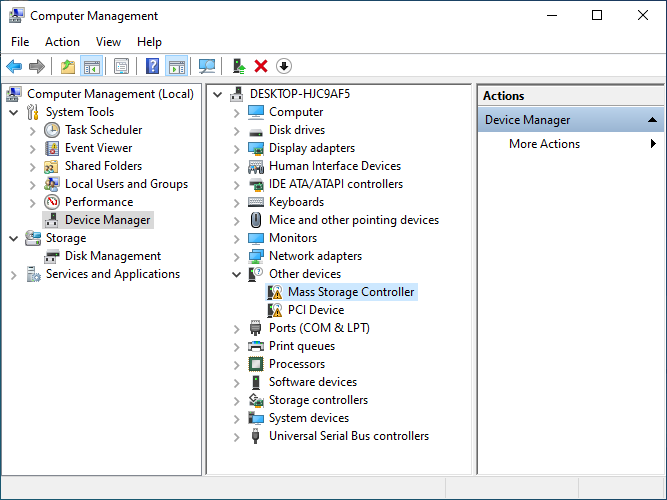
Device Manager
Right-click on the device and select Update driver. From that menu, select
Browse my computer for drivers. Browse to the location of the ISO, and select
the directory of the drivers.
Configuration
After that, it’s a good idea to create a service for the drivers, so they are
automatically loaded during system startup.
sc.exe create VirtioFsSvc binpath="C:\ProgramData\Chocolatey\bin\virtiofs.exe" start=auto depend="WinFsp.Launcher/VirtioFsDrv" DisplayName="Virtio FS Service"
sc.exe start VirtioFsSvc
If you’ve installed manually, find the location of the .exe and change the
binpath.
Benchmarks
All Benchmarks were done on a Dell Latitude 5401 with the following specs:
| Name | Value |
|---|---|
| CPU | Intel i5-9400H (8) @ 4.300GHz |
| GPU | Intel CoffeeLake-H GT2 [UHD Graphics 630] |
| Memory | 16 GB DDR4 |
| Storage | 512 GB NVMe |
Linux
For the benchmark, I simply copied over a 10 GB file with cp, measuring
it with time. That gave me the following result:
real    0m12.532s
user    0m0.002s
sys     0m5.785s
I also transferred the same file with rsync, to get a progress bar. That way
I could get a feel for the approximate speed of the transfer. The transfer
speed was around 250-300 MB/s consistently.
Windows
On Windows, I also copied the file in 2 ways. First using the windows File
transfer dialog. I got up speeds of about 550-700 MB/s. After that, I tried
the same using
robocopy
(A Microsoft tool for robust file copying).
-------------------------------------------------------------------------------
   ROBOCOPY     ::     Robust File Copy for Windows
-------------------------------------------------------------------------------

  Started : Friday, 11 March 2022 10:23:20
   Source : C:\Users\foo\Downloads\
     Dest = Z:\

    Files : *.*

  Options : *.* /DCOPY:DA /COPY:DAT /R:1000000 /W:30

------------------------------------------------------------------------------

                           1    C:\Users\foo\Downloads
100%        New File              10.0 g        10gig.img

------------------------------------------------------------------------------

               Total    Copied   Skipped  Mismatch    FAILED    Extras
    Dirs :         1         0         1         0         0         0
   Files :         1         1         0         0         0         2
   Bytes :  10.000 g  10.000 g         0         0         0   797.0 k
   Times :   0:00:18   0:00:18                       0:00:00   0:00:00


   Speed :           566020993 Bytes/sec.
   Speed :           32387.981 MegaBytes/min.
   Ended : Friday, 11 March 2022 10:23:39
Here we end up with roughly the same speed as the windows file dialog.
Conclusion
I’m very pleased with these results. The process of setting it up is quite easy
(although not as “seamless” as the solutions Virtualbox and VMWare provide).
The performance seems fantastic, at first glance. For now, I’m very happy
with it.
I will be testing this further. If I hit any
snags or discover something else that’s interesting, I’ll let you know.
Considering donating if you found my post helpful 😊

Clipboard and folder sharing are usually an important feature to have when we run virtual machines. So here am I sharing the complete guide for you guys.
I found people talking about Qemu/KVM on Reddit, so I decided to try. Main reason why I wanted to try because I want to move away from VirtualBox that I can never enable folder sharing, and VMWare which is paid.
I am currently running Ubuntu 20.04 as the Host and Windows 10 as the Guests.
Problems
It is quite confusing when you first started. I started with virt-manager and had no clipboard sharing enabled. By default, virt-manager is using SPICE. The key to this tutorial is, install spice-guest-tools and Spice WebDAV daemon.
Notes
I am writing this tutorial based on virt-manager. It should be working for any SPICE remote viewer too such as Cockpit (tested).
Solution – Clipboard sharing
(Updated as 26th Oct)
Step 1 – Download spice-guest-tools to Windows Guest
Open the download page (https://cutt.ly/2ROq8dK) on your Windows Guest, scroll down a bit until you found Windows binaries under Guest, click the Windows guest tools link to start the download. Or you can use this link
https://www.spice-space.org/download/windows/spice-guest-tools/spice-guest-tools-latest.exe

Or easier, shortened URL: https://cutt.ly/SROqBqZ

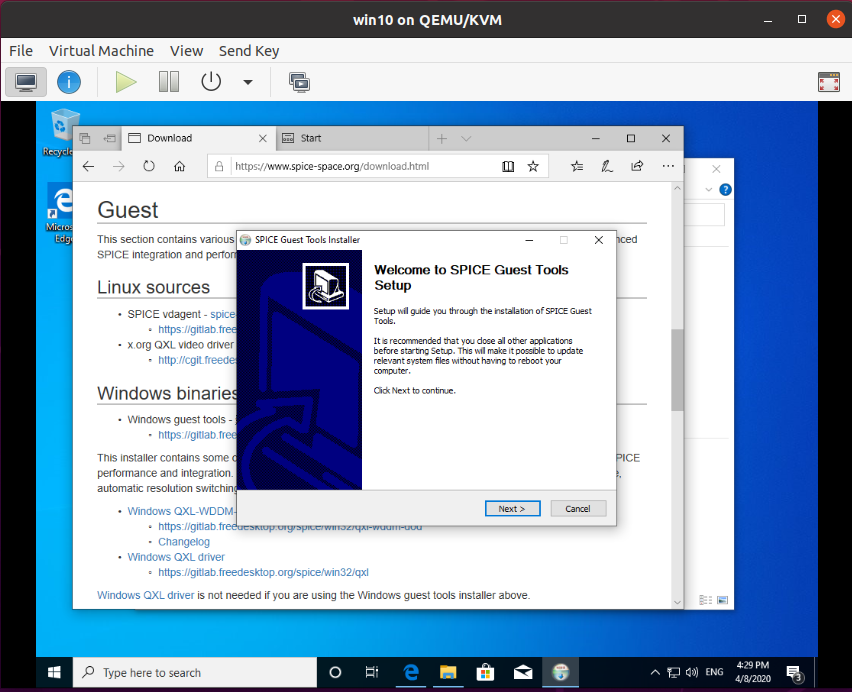
Step 2 – Run and install spice-guest-tools
After the file is available on your Windows Guest, run and install the program.
The display might blinking a few times, so don’t worry about that.
Step 3 – Test your copy/paste
You are pretty much finished. Try copying something in your Windows Guest and paste it in your Host, it should work. But if it doesn’t, try rebooting the VM. If it still won’t work, remove the program and reinstall. It should be working.
Solution – Folder sharing
(Updated as 26th Oct)
So, you have clipboard sharing enabled and now want to share folder?
We will be using virt-manager and Cockpit
Unfortunately, virt-manager has not implemented SPICE WebDAV in its client. So, we are going to use Cockpit, the alternative.
Step 1 – Install Cockpit and Cockpit Virtual Machines
First, install Cockpit and Cockpit Virtual Machines. For Ubuntu, run
Ubuntu: $ sudo apt install cockpit cockpit-machines
Arch: $ sudo pacman -Sy cockpit cockpit-machines
If you are using another Linux distribution, refer this page. You will still need to install cockpit-machines using your package manager to enable Virtual Machine manager.
Then enable and start cockpit
$ sudo systemctl enable cockpit.socket
$ sudo systemctl start cockpit.socket
Step 2 – Open the Web-UI in your browser
Cockpit provides Web-UI which you can access to use the program. Simply open this URL in your browser
http://localhost:9090
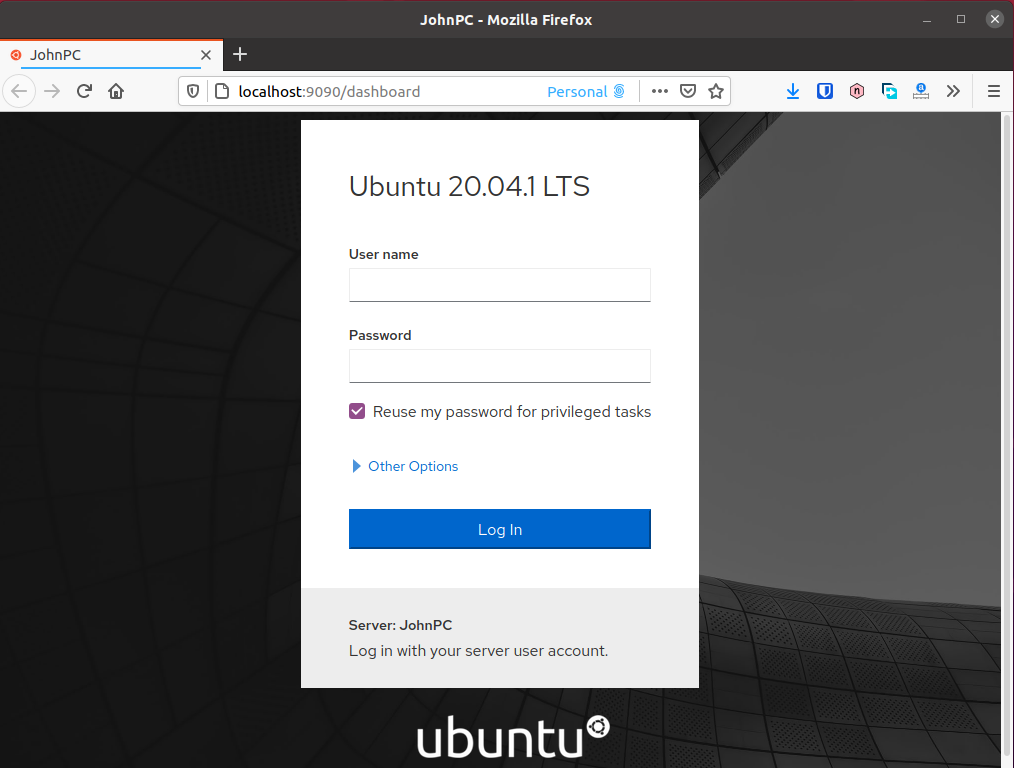
Login using your PC user and username
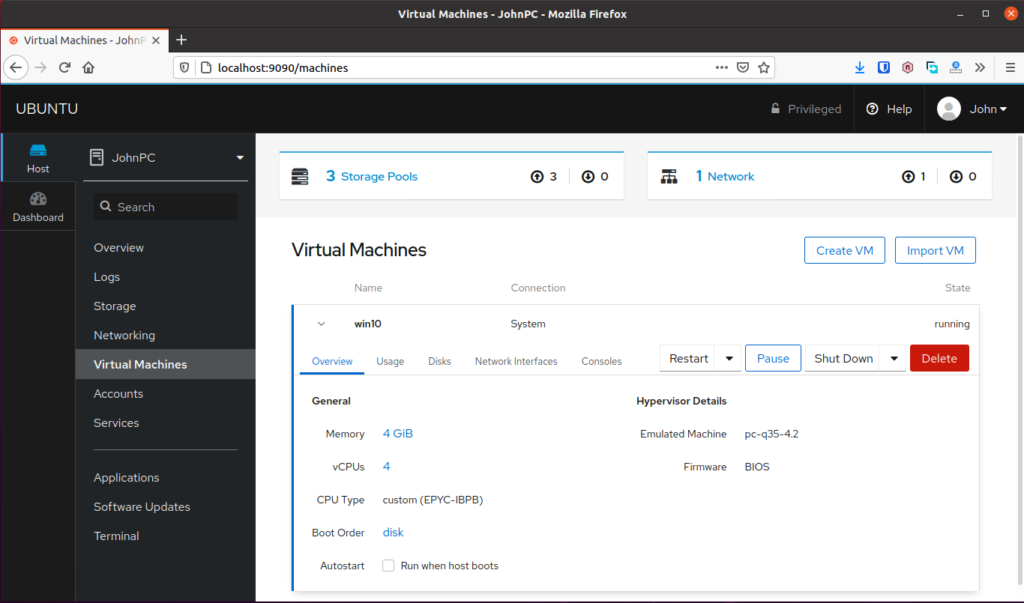
Step 2 – Go to Virtual Machine and shutdown your VM
You need to shutdown your VM or your settings in the next few steps probably won’t work. Simply go to Virtual Machines and hit the Shut Down button to turn off the VM.
Notes: If your Virtual Machine is empty, go to Overview and check if there is a notification at the top asking for a permission. Allow the access and your VMs should be showing up.
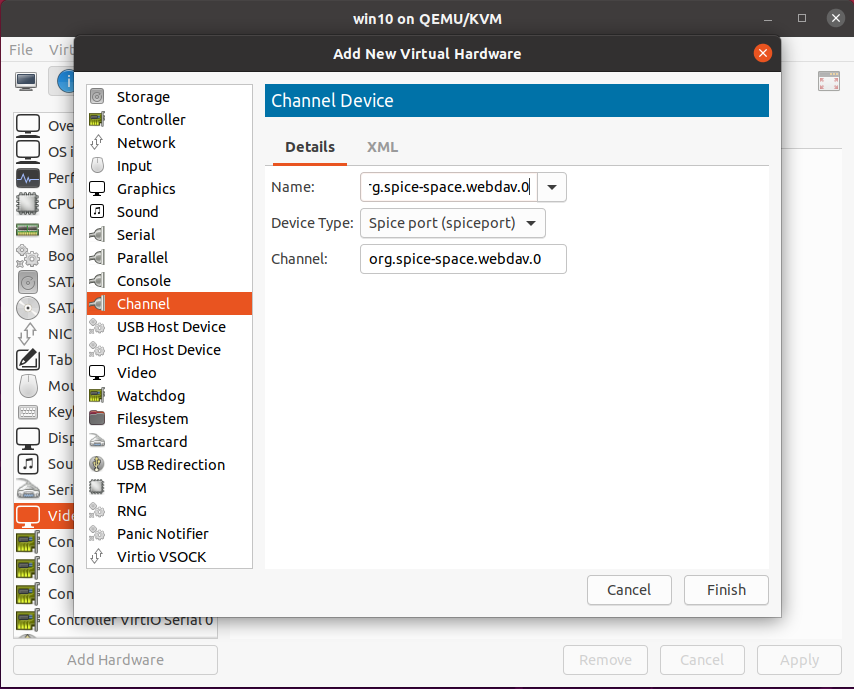
Step 3 – Open virt-manager, add new hardware
Open your virt-manager, right click on your VM and select open. You can also click on your VM, then hit the big “Open” button at the top.
Click Add Hardware and select Channel. Delete whatever in “Name” column, and insert this
org.spice-space.webdav.0
Step 4 – Return to Cockpit Web-UI, run your VM
You don’t need virt-manager for now, so you can close it. Then return to Cockpit Web-UI and hit Run button to start your VM.
Then go to Consoles tab and click “Launch remote viewer”
Notes: You probably need to install Remote Viewer if you are not on Ubuntu. On Arch, Install virt-viewer.
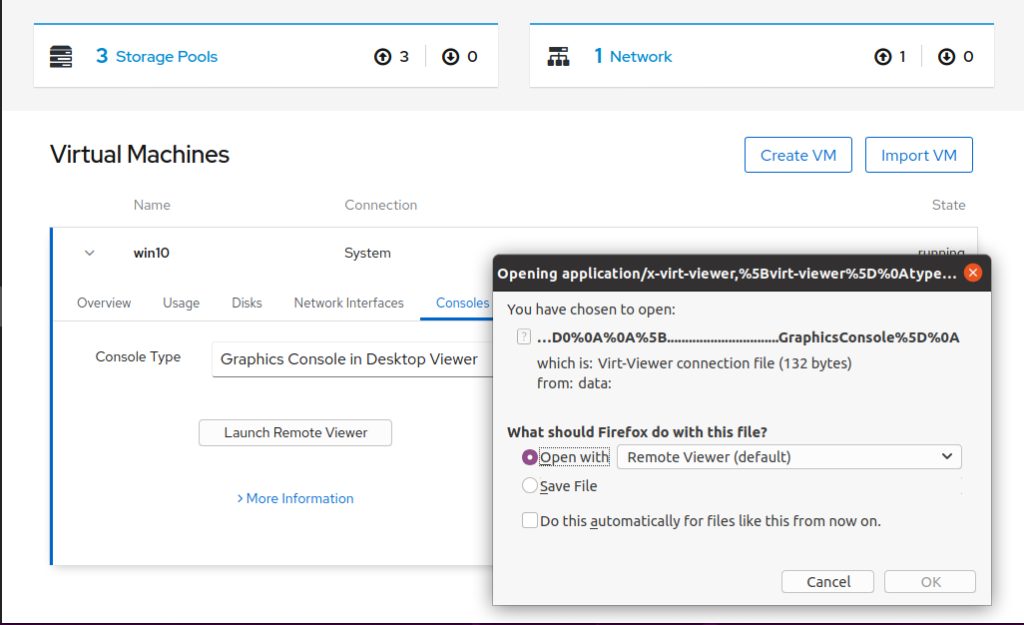
Click “OK” and you will see your Windows Desktop.
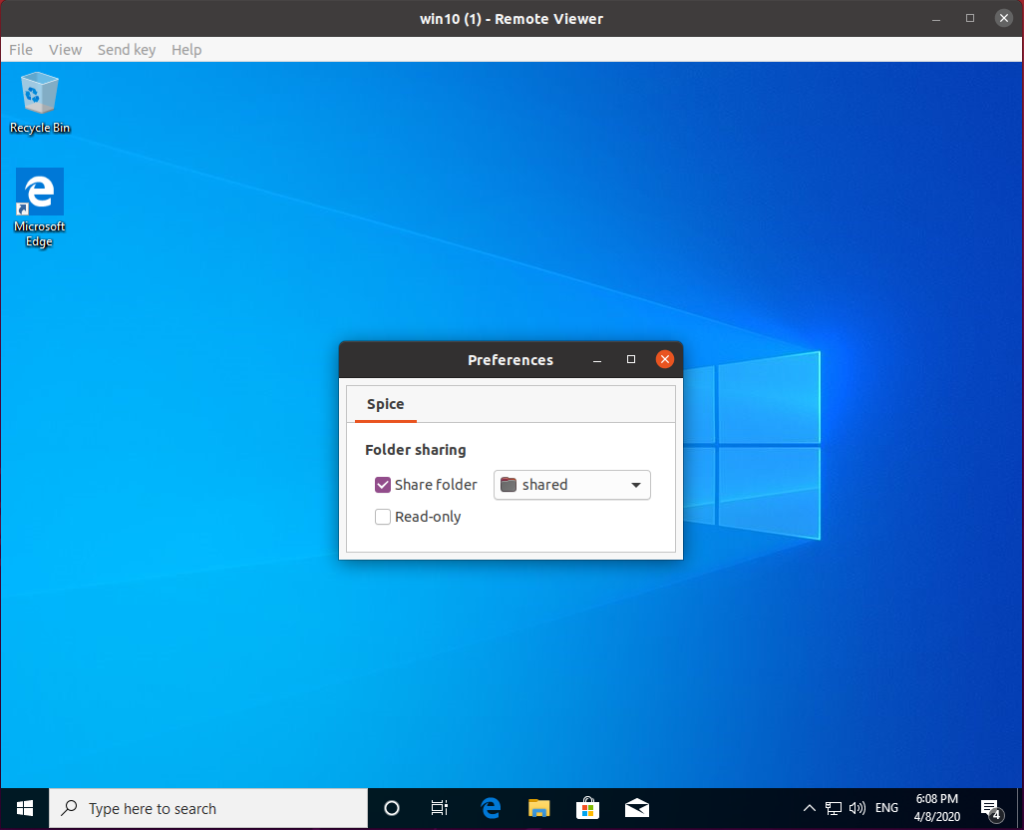
Step 5 – Enable Folder Sharing
Click menu File, then select Preferences. tick “Share Folder” and choose which folder you want to share with the Guest.
Notes: On Arch, Preferences is in hamburger menu on the right.
Download and install spice-webdavd in Windows Guest. Pay attention on the file extension. You will want to donwload .msi file which usually larger than the other. Or you can just use this link for the latest installer
https://www.spice-space.org/download/windows/spice-webdavd/spice-webdavd-x86-latest.msi

Be aware, some browsers will open the link instead of downloading it. At least Edge displaying the file content to me instead of downloading it.

Then in the Windows, open Task Manager and go to Services tab. Find “spice-webdavd” and start the process if it doesn’t.
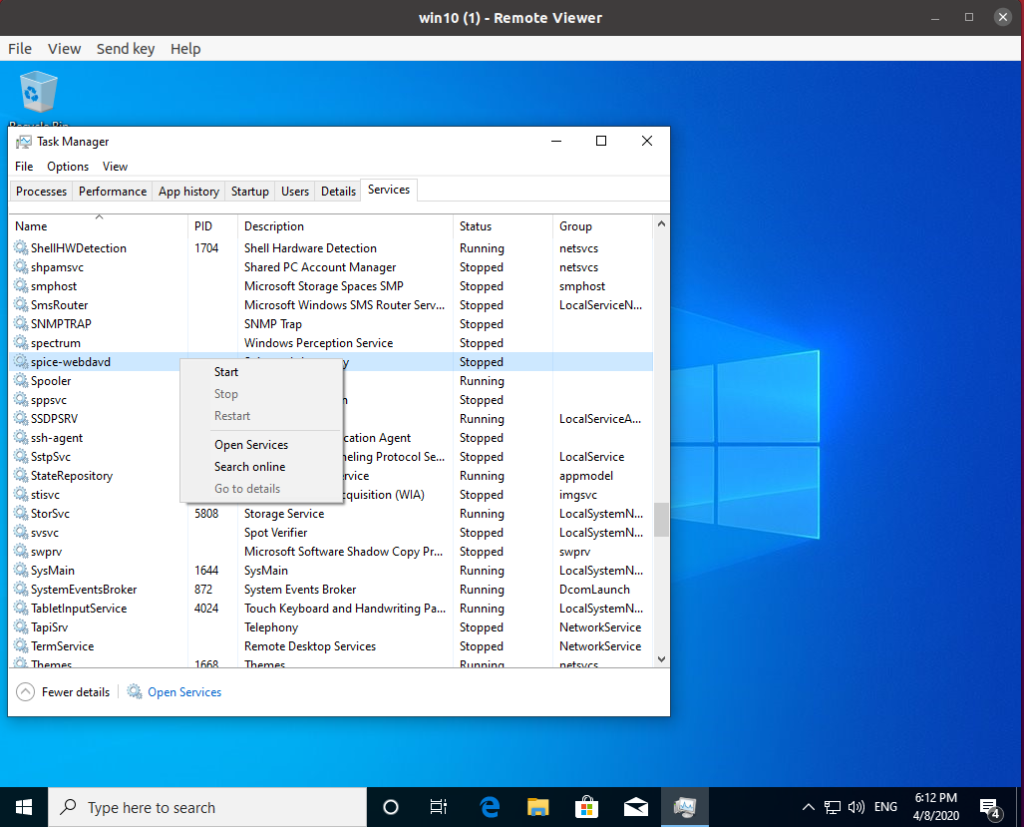
Step 7 – Verify the Folder Sharing is working
After running the “Spice webdav proxy” service, you should see a new storage in “This PC” or “My Computer”.
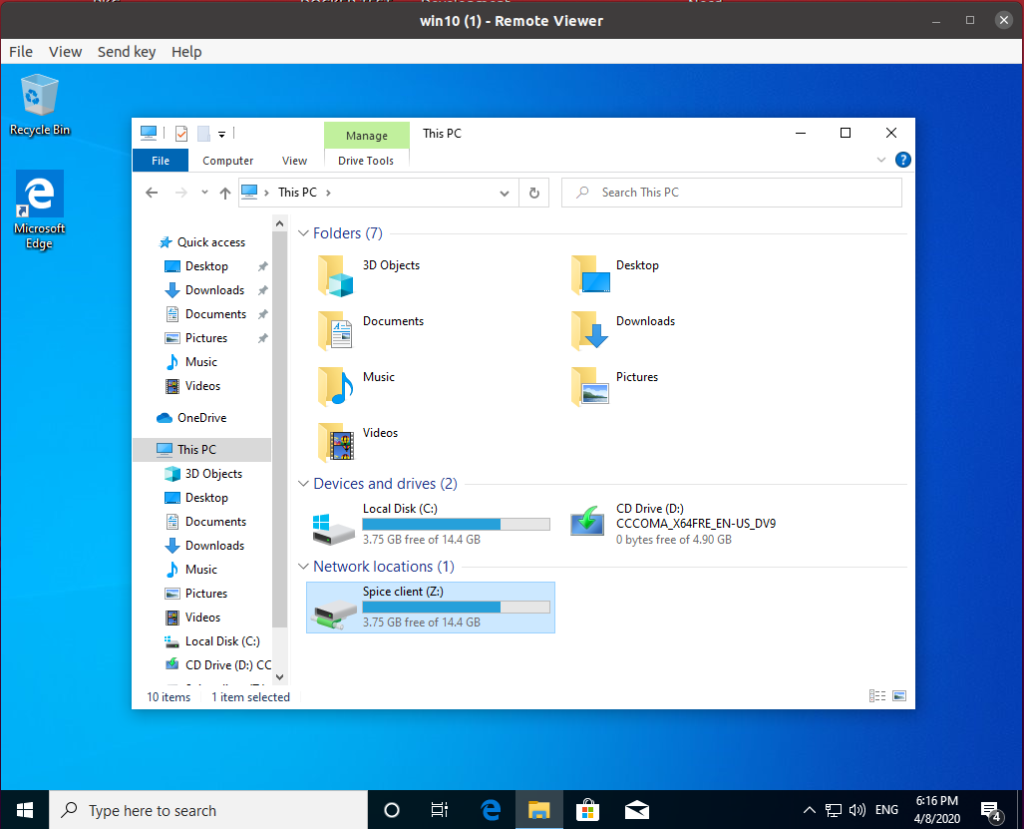
Try creating a file or folder and check shared folder on your Host to see if the changes reflected.
You are now done 🙂
Considering donating if you found my post helpful 😊
Provide feedback
Saved searches
Use saved searches to filter your results more quickly
Sign up
Appearance settings