
QEMU supports many disk image formats, including growable disk images
(their size increase as non empty sectors are written), compressed and
encrypted disk images.
Quick start for disk image creation
You can create a disk image with the command:
qemu-img create myimage.img mysize
where myimage.img is the disk image filename and mysize is its size in
kilobytes. You can add an M suffix to give the size in megabytes and
a G suffix for gigabytes.
See the qemu-img invocation documentation for more information.
Snapshot mode
If you use the option -snapshot, all disk images are considered as
read only. When sectors in written, they are written in a temporary file
created in /tmp. You can however force the write back to the raw
disk images by using the commit monitor command (or C-a s in the
serial console).
VM snapshots
VM snapshots are snapshots of the complete virtual machine including CPU
state, RAM, device state and the content of all the writable disks. In
order to use VM snapshots, you must have at least one non removable and
writable block device using the qcow2 disk image format. Normally
this device is the first virtual hard drive.
Use the monitor command savevm to create a new VM snapshot or
replace an existing one. A human readable name can be assigned to each
snapshot in addition to its numerical ID.
Use loadvm to restore a VM snapshot and delvm to remove a VM
snapshot. info snapshots lists the available snapshots with their
associated information:
(qemu) info snapshots
Snapshot devices: hda
Snapshot list (from hda):
ID        TAG                 VM SIZE                DATE       VM CLOCK
1         start                   41M 2006-08-06 12:38:02   00:00:14.954
2                                 40M 2006-08-06 12:43:29   00:00:18.633
3         msys                    40M 2006-08-06 12:44:04   00:00:23.514
A VM snapshot is made of a VM state info (its size is shown in
info snapshots) and a snapshot of every writable disk image. The VM
state info is stored in the first qcow2 non removable and writable
block device. The disk image snapshots are stored in every disk image.
The size of a snapshot in a disk image is difficult to evaluate and is
not shown by info snapshots because the associated disk sectors are
shared among all the snapshots to save disk space (otherwise each
snapshot would need a full copy of all the disk images).
When using the (unrelated) -snapshot option
(Snapshot mode),
you can always make VM snapshots, but they are deleted as soon as you
exit QEMU.
VM snapshots currently have the following known limitations:
-
They cannot cope with removable devices if they are removed or
inserted after a snapshot is done. -
A few device drivers still have incomplete snapshot support so their
state is not saved or restored properly (in particular USB).
Disk image file formats
QEMU supports many image file formats that can be used with VMs as well as with
any of the tools (like qemu-img). This includes the preferred formats
raw and qcow2 as well as formats that are supported for compatibility with
older QEMU versions or other hypervisors.
Depending on the image format, different options can be passed to
qemu-img create and qemu-img convert using the -o option.
This section describes each format and the options that are supported for it.
- raw
-
Raw disk image format. This format has the advantage of
being simple and easily exportable to all other emulators. If your
file system supports holes (for example in ext2 or ext3 on
Linux or NTFS on Windows), then only the written sectors will reserve
space. Useqemu-img infoto know the real size used by the
image orls -lson Unix/Linux.Supported options:
- preallocation
-
Preallocation mode (allowed values:
off,falloc,
full).fallocmode preallocates space for image by
callingposix_fallocate().fullmode preallocates space
for image by writing data to underlying storage. This data may or
may not be zero, depending on the storage location.
- qcow2
-
QEMU image format, the most versatile format. Use it to have smaller
images (useful if your filesystem does not supports holes, for example
on Windows), zlib based compression and support of multiple VM
snapshots.Supported options:
- compat
-
Determines the qcow2 version to use.
compat=0.10uses the
traditional image format that can be read by any QEMU since 0.10.
compat=1.1enables image format extensions that only QEMU 1.1 and
newer understand (this is the default). Amongst others, this includes
zero clusters, which allow efficient copy-on-read for sparse images.
- backing_file
-
File name of a base image (see
createsubcommand)
- backing_fmt
-
Image format of the base image
- encryption
-
This option is deprecated and equivalent to
encrypt.format=aes
- encrypt.format
-
If this is set to
luks, it requests that the qcow2 payload (not
qcow2 header) be encrypted using the LUKS format. The passphrase to
use to unlock the LUKS key slot is given by theencrypt.key-secret
parameter. LUKS encryption parameters can be tuned with the other
encrypt.*parameters.If this is set to
aes, the image is encrypted with 128-bit AES-CBC.
The encryption key is given by theencrypt.key-secretparameter.
This encryption format is considered to be flawed by modern cryptography
standards, suffering from a number of design problems:-
The AES-CBC cipher is used with predictable initialization vectors based
on the sector number. This makes it vulnerable to chosen plaintext attacks
which can reveal the existence of encrypted data. -
The user passphrase is directly used as the encryption key. A poorly
chosen or short passphrase will compromise the security of the encryption. -
In the event of the passphrase being compromised there is no way to
change the passphrase to protect data in any qcow images. The files must
be cloned, using a different encryption passphrase in the new file. The
original file must then be securely erased using a program like shred,
though even this is ineffective with many modern storage technologies.
The use of this is no longer supported in system emulators. Support only
remains in the command line utilities, for the purposes of data liberation
and interoperability with old versions of QEMU. Theluksformat
should be used instead. -
- encrypt.key-secret
-
Provides the ID of a
secretobject that contains the passphrase
(encrypt.format=luks) or encryption key (encrypt.format=aes).
- encrypt.cipher-alg
-
Name of the cipher algorithm and key length. Currently defaults
toaes-256. Only used whenencrypt.format=luks.
- encrypt.cipher-mode
-
Name of the encryption mode to use. Currently defaults to
xts.
Only used whenencrypt.format=luks.
- encrypt.ivgen-alg
-
Name of the initialization vector generator algorithm. Currently defaults
toplain64. Only used whenencrypt.format=luks.
- encrypt.ivgen-hash-alg
-
Name of the hash algorithm to use with the initialization vector generator
(if required). Defaults tosha256. Only used whenencrypt.format=luks.
- encrypt.hash-alg
-
Name of the hash algorithm to use for PBKDF algorithm
Defaults tosha256. Only used whenencrypt.format=luks.
- encrypt.iter-time
-
Amount of time, in milliseconds, to use for PBKDF algorithm per key slot.
Defaults to2000. Only used whenencrypt.format=luks.
- cluster_size
-
Changes the qcow2 cluster size (must be between 512 and 2M). Smaller cluster
sizes can improve the image file size whereas larger cluster sizes generally
provide better performance.
- preallocation
-
Preallocation mode (allowed values:
off,metadata,falloc,
full). An image with preallocated metadata is initially larger but can
improve performance when the image needs to grow.fallocandfull
preallocations are like the same options ofrawformat, but sets up
metadata also.
- lazy_refcounts
-
If this option is set to
on, reference count updates are postponed with
the goal of avoiding metadata I/O and improving performance. This is
particularly interesting withcache=writethroughwhich doesn’t batch
metadata updates. The tradeoff is that after a host crash, the reference count
tables must be rebuilt, i.e. on the next open an (automatic)qemu-imgis required, which may take some time.
check -r allThis option can only be enabled if
compat=1.1is specified.
- nocow
-
If this option is set to
on, it will turn off COW of the file. It’s only
valid on btrfs, no effect on other file systems.Btrfs has low performance when hosting a VM image file, even more
when the guest on the VM also using btrfs as file system. Turning off
COW is a way to mitigate this bad performance. Generally there are two
ways to turn off COW on btrfs:-
Disable it by mounting with nodatacow, then all newly created files
will be NOCOW. -
For an empty file, add the NOCOW file attribute. That’s what this
option does.
Note: this option is only valid to new or empty files. If there is
an existing file which is COW and has data blocks already, it couldn’t
be changed to NOCOW by settingnocow=on. One can issuelsattrto check if the NOCOW flag is set or not (Capital ‘C’ is
filename
NOCOW flag). -
- qed
-
Old QEMU image format with support for backing files and compact image files
(when your filesystem or transport medium does not support holes).When converting QED images to qcow2, you might want to consider using the
lazy_refcounts=onoption to get a more QED-like behaviour.Supported options:
- backing_file
-
File name of a base image (see
createsubcommand).
- backing_fmt
-
Image file format of backing file (optional). Useful if the format cannot be
autodetected because it has no header, like some vhd/vpc files.
- cluster_size
-
Changes the cluster size (must be power-of-2 between 4K and 64K). Smaller
cluster sizes can improve the image file size whereas larger cluster sizes
generally provide better performance.
- table_size
-
Changes the number of clusters per L1/L2 table (must be
power-of-2 between 1 and 16). There is normally no need to
change this value but this option can between used for
performance benchmarking.
- qcow
-
Old QEMU image format with support for backing files, compact image files,
encryption and compression.Supported options:
- backing_file
-
File name of a base image (see
createsubcommand)
- encryption
-
This option is deprecated and equivalent to
encrypt.format=aes
- encrypt.format
-
If this is set to
aes, the image is encrypted with 128-bit AES-CBC.
The encryption key is given by theencrypt.key-secretparameter.
This encryption format is considered to be flawed by modern cryptography
standards, suffering from a number of design problems enumerated previously
against theqcow2image format.The use of this is no longer supported in system emulators. Support only
remains in the command line utilities, for the purposes of data liberation
and interoperability with old versions of QEMU.Users requiring native encryption should use the
qcow2format
instead withencrypt.format=luks.
- encrypt.key-secret
-
Provides the ID of a
secretobject that contains the encryption
key (encrypt.format=aes).
- luks
-
LUKS v1 encryption format, compatible with Linux dm-crypt/cryptsetup
Supported options:
- key-secret
-
Provides the ID of a
secretobject that contains the passphrase.
- cipher-alg
-
Name of the cipher algorithm and key length. Currently defaults
toaes-256.
- cipher-mode
-
Name of the encryption mode to use. Currently defaults to
xts.
- ivgen-alg
-
Name of the initialization vector generator algorithm. Currently defaults
toplain64.
- ivgen-hash-alg
-
Name of the hash algorithm to use with the initialization vector generator
(if required). Defaults tosha256.
- hash-alg
-
Name of the hash algorithm to use for PBKDF algorithm
Defaults tosha256.
- iter-time
-
Amount of time, in milliseconds, to use for PBKDF algorithm per key slot.
Defaults to2000.
- vdi
-
VirtualBox 1.1 compatible image format.
Supported options:
- static
-
If this option is set to
on, the image is created with metadata
preallocation.
- vmdk
-
VMware 3 and 4 compatible image format.
Supported options:
- backing_file
-
File name of a base image (see
createsubcommand).
- compat6
-
Create a VMDK version 6 image (instead of version 4)
- hwversion
-
Specify vmdk virtual hardware version. Compat6 flag cannot be enabled
if hwversion is specified.
- subformat
-
Specifies which VMDK subformat to use. Valid options are
monolithicSparse(default),
monolithicFlat,
twoGbMaxExtentSparse,
twoGbMaxExtentFlatand
streamOptimized.
- vpc
-
VirtualPC compatible image format (VHD).
Supported options:
- subformat
-
Specifies which VHD subformat to use. Valid options are
dynamic(default) andfixed.
- VHDX
-
Hyper-V compatible image format (VHDX).
Supported options:
- subformat
-
Specifies which VHDX subformat to use. Valid options are
dynamic(default) andfixed.- block_state_zero
-
Force use of payload blocks of type ‘ZERO’. Can be set to
on(default)
oroff. When set tooff, new blocks will be created as
PAYLOAD_BLOCK_NOT_PRESENT, which means parsers are free to return
arbitrary data for those blocks. Do not set tooffwhen using
qemu-img convertwithsubformat=dynamic.
- block_size
-
Block size; min 1 MB, max 256 MB. 0 means auto-calculate based on
image size.
- log_size
-
Log size; min 1 MB.
Read-only formats
More disk image file formats are supported in a read-only mode.
- bochs
-
Bochs images of
growingtype.
- cloop
-
Linux Compressed Loop image, useful only to reuse directly compressed
CD-ROM images present for example in the Knoppix CD-ROMs.
- dmg
-
Apple disk image.
- parallels
-
Parallels disk image format.
Using host drives
In addition to disk image files, QEMU can directly access host
devices. We describe here the usage for QEMU version >= 0.8.3.
Linux
On Linux, you can directly use the host device filename instead of a
disk image filename provided you have enough privileges to access
it. For example, use /dev/cdrom to access to the CDROM.
- CD
-
You can specify a CDROM device even if no CDROM is loaded. QEMU has
specific code to detect CDROM insertion or removal. CDROM ejection by
the guest OS is supported. Currently only data CDs are supported. - Floppy
-
You can specify a floppy device even if no floppy is loaded. Floppy
removal is currently not detected accurately (if you change floppy
without doing floppy access while the floppy is not loaded, the guest
OS will think that the same floppy is loaded).
Use of the host’s floppy device is deprecated, and support for it will
be removed in a future release. - Hard disks
-
Hard disks can be used. Normally you must specify the whole disk
(/dev/hdbinstead of/dev/hdb1) so that the guest OS can
see it as a partitioned disk. WARNING: unless you know what you do, it
is better to only make READ-ONLY accesses to the hard disk otherwise
you may corrupt your host data (use the-snapshotcommand
line option or modify the device permissions accordingly). - Zoned block devices
-
Zoned block devices can be passed through to the guest if the emulated storage
controller supports zoned storage. Use--blockdev host_device,to pass through
node-name=drive0,filename=/dev/nullb0,cache.direct=on
/dev/nullb0asdrive0.
Windows
- CD
-
The preferred syntax is the drive letter (e.g.
d:). The
alternate syntax\\.\d:is supported./dev/cdromis
supported as an alias to the first CDROM drive.Currently there is no specific code to handle removable media, so it
is better to use thechangeorejectmonitor commands to
change or eject media. - Hard disks
-
Hard disks can be used with the syntax:
\\.\PhysicalDriveN
where N is the drive number (0 is the first hard disk).WARNING: unless you know what you do, it is better to only make
READ-ONLY accesses to the hard disk otherwise you may corrupt your
host data (use the-snapshotcommand line so that the
modifications are written in a temporary file).
Mac OS X
/dev/cdrom is an alias to the first CDROM.
Currently there is no specific code to handle removable media, so it
is better to use the change or eject monitor commands to
change or eject media.
Virtual FAT disk images
QEMU can automatically create a virtual FAT disk image from a
directory tree. In order to use it, just type:
qemu-system-x86_64 linux.img -hdb fat:/my_directory
Then you access access to all the files in the /my_directory
directory without having to copy them in a disk image or to export
them via SAMBA or NFS. The default access is read-only.
Floppies can be emulated with the :floppy: option:
qemu-system-x86_64 linux.img -fda fat:floppy:/my_directory
A read/write support is available for testing (beta stage) with the
:rw: option:
qemu-system-x86_64 linux.img -fda fat:floppy:rw:/my_directory
What you should never do:
-
use non-ASCII filenames
-
use “-snapshot” together with “:rw:”
-
expect it to work when loadvm’ing
-
write to the FAT directory on the host system while accessing it with the guest system
NBD access
QEMU can access directly to block device exported using the Network Block Device
protocol.
qemu-system-x86_64 linux.img -hdb nbd://my_nbd_server.mydomain.org:1024/
If the NBD server is located on the same host, you can use an unix socket instead
of an inet socket:
qemu-system-x86_64 linux.img -hdb nbd+unix://?socket=/tmp/my_socket
In this case, the block device must be exported using qemu-nbd:
qemu-nbd --socket=/tmp/my_socket my_disk.qcow2
The use of qemu-nbd allows sharing of a disk between several guests:
qemu-nbd --socket=/tmp/my_socket --share=2 my_disk.qcow2
and then you can use it with two guests:
qemu-system-x86_64 linux1.img -hdb nbd+unix://?socket=/tmp/my_socket
qemu-system-x86_64 linux2.img -hdb nbd+unix://?socket=/tmp/my_socket
If the nbd-server uses named exports (supported since NBD 2.9.18, or with QEMU’s
own embedded NBD server), you must specify an export name in the URI:
qemu-system-x86_64 -cdrom nbd://localhost/debian-500-ppc-netinst
qemu-system-x86_64 -cdrom nbd://localhost/openSUSE-11.1-ppc-netinst
The URI syntax for NBD is supported since QEMU 1.3. An alternative syntax is
also available. Here are some example of the older syntax:
qemu-system-x86_64 linux.img -hdb nbd:my_nbd_server.mydomain.org:1024
qemu-system-x86_64 linux2.img -hdb nbd:unix:/tmp/my_socket
qemu-system-x86_64 -cdrom nbd:localhost:10809:exportname=debian-500-ppc-netinst
iSCSI LUNs
iSCSI is a popular protocol used to access SCSI devices across a computer
network.
There are two different ways iSCSI devices can be used by QEMU.
The first method is to mount the iSCSI LUN on the host, and make it appear as
any other ordinary SCSI device on the host and then to access this device as a
/dev/sd device from QEMU. How to do this differs between host OSes.
The second method involves using the iSCSI initiator that is built into
QEMU. This provides a mechanism that works the same way regardless of which
host OS you are running QEMU on. This section will describe this second method
of using iSCSI together with QEMU.
In QEMU, iSCSI devices are described using special iSCSI URLs. URL syntax:
iscsi://[<username>[%<password>]@]<host>[:<port>]/<target-iqn-name>/<lun>
Username and password are optional and only used if your target is set up
using CHAP authentication for access control.
Alternatively the username and password can also be set via environment
variables to have these not show up in the process list:
export LIBISCSI_CHAP_USERNAME=<username>
export LIBISCSI_CHAP_PASSWORD=<password>
iscsi://<host>/<target-iqn-name>/<lun>
Various session related parameters can be set via special options, either
in a configuration file provided via ‘-readconfig’ or directly on the
command line.
If the initiator-name is not specified qemu will use a default name
of ‘iqn.2008-11.org.linux-kvm[:<uuid>’] where <uuid> is the UUID of the
virtual machine. If the UUID is not specified qemu will use
‘iqn.2008-11.org.linux-kvm[:<name>’] where <name> is the name of the
virtual machine.
Setting a specific initiator name to use when logging in to the target:
-iscsi initiator-name=iqn.qemu.test:my-initiator
Controlling which type of header digest to negotiate with the target:
-iscsi header-digest=CRC32C|CRC32C-NONE|NONE-CRC32C|NONE
These can also be set via a configuration file:
[iscsi]
  user = "CHAP username"
  password = "CHAP password"
  initiator-name = "iqn.qemu.test:my-initiator"
  # header digest is one of CRC32C|CRC32C-NONE|NONE-CRC32C|NONE
  header-digest = "CRC32C"
Setting the target name allows different options for different targets:
[iscsi "iqn.target.name"]
  user = "CHAP username"
  password = "CHAP password"
  initiator-name = "iqn.qemu.test:my-initiator"
  # header digest is one of CRC32C|CRC32C-NONE|NONE-CRC32C|NONE
  header-digest = "CRC32C"
How to use a configuration file to set iSCSI configuration options:
cat >iscsi.conf <<EOF
[iscsi]
  user = "me"
  password = "my password"
  initiator-name = "iqn.qemu.test:my-initiator"
  header-digest = "CRC32C"
EOF

qemu-system-x86_64 -drive file=iscsi://127.0.0.1/iqn.qemu.test/1 \
  -readconfig iscsi.conf
How to set up a simple iSCSI target on loopback and access it via QEMU:
this example shows how to set up an iSCSI target with one CDROM and one DISK
using the Linux STGT software target. This target is available on Red Hat based
systems as the package ‘scsi-target-utils’.
tgtd --iscsi portal=127.0.0.1:3260
tgtadm --lld iscsi --op new --mode target --tid 1 -T iqn.qemu.test
tgtadm --lld iscsi --mode logicalunit --op new --tid 1 --lun 1 \
    -b /IMAGES/disk.img --device-type=disk
tgtadm --lld iscsi --mode logicalunit --op new --tid 1 --lun 2 \
    -b /IMAGES/cd.iso --device-type=cd
tgtadm --lld iscsi --op bind --mode target --tid 1 -I ALL

qemu-system-x86_64 -iscsi initiator-name=iqn.qemu.test:my-initiator \
  -boot d -drive file=iscsi://127.0.0.1/iqn.qemu.test/1 \
  -cdrom iscsi://127.0.0.1/iqn.qemu.test/2
GlusterFS disk images
GlusterFS is a user space distributed file system.
You can boot from the GlusterFS disk image with the command:
URI:
qemu-system-x86_64 -drive file=gluster[+TYPE]://[HOST}[:PORT]]/VOLUME/PATH
                             [?socket=...][,file.debug=9][,file.logfile=...]
JSON:
qemu-system-x86_64 'json:{"driver":"qcow2",
                         "file":{"driver":"gluster",
                                  "volume":"testvol","path":"a.img","debug":9,"logfile":"...",
                                  "server":[{"type":"tcp","host":"...","port":"..."},
                                            {"type":"unix","socket":"..."}]}}'
gluster is the protocol.
TYPE specifies the transport type used to connect to gluster
management daemon (glusterd). Valid transport types are
tcp and unix. In the URI form, if a transport type isn’t specified,
then tcp type is assumed.
HOST specifies the server where the volume file specification for
the given volume resides. This can be either a hostname or an ipv4 address.
If transport type is unix, then HOST field should not be specified.
Instead socket field needs to be populated with the path to unix domain
socket.
PORT is the port number on which glusterd is listening. This is optional
and if not specified, it defaults to port 24007. If the transport type is unix,
then PORT should not be specified.
VOLUME is the name of the gluster volume which contains the disk image.
PATH is the path to the actual disk image that resides on gluster volume.
debug is the logging level of the gluster protocol driver. Debug levels
are 0-9, with 9 being the most verbose, and 0 representing no debugging output.
The default level is 4. The current logging levels defined in the gluster source
are 0 — None, 1 — Emergency, 2 — Alert, 3 — Critical, 4 — Error, 5 — Warning,
6 — Notice, 7 — Info, 8 — Debug, 9 — Trace
logfile is a commandline option to mention log file path which helps in
logging to the specified file and also help in persisting the gfapi logs. The
default is stderr.
You can create a GlusterFS disk image with the command:
qemu-img create gluster://HOST/VOLUME/PATH SIZE
Examples
qemu-system-x86_64 -drive file=gluster://1.2.3.4/testvol/a.img
qemu-system-x86_64 -drive file=gluster+tcp://1.2.3.4/testvol/a.img
qemu-system-x86_64 -drive file=gluster+tcp://1.2.3.4:24007/testvol/dir/a.img
qemu-system-x86_64 -drive file=gluster+tcp://[1:2:3:4:5:6:7:8]/testvol/dir/a.img
qemu-system-x86_64 -drive file=gluster+tcp://[1:2:3:4:5:6:7:8]:24007/testvol/dir/a.img
qemu-system-x86_64 -drive file=gluster+tcp://server.domain.com:24007/testvol/dir/a.img
qemu-system-x86_64 -drive file=gluster+unix:///testvol/dir/a.img?socket=/tmp/glusterd.socket
qemu-system-x86_64 -drive file=gluster://1.2.3.4/testvol/a.img,file.debug=9,file.logfile=/var/log/qemu-gluster.log
qemu-system-x86_64 'json:{"driver":"qcow2",
                         "file":{"driver":"gluster",
                                  "volume":"testvol","path":"a.img",
                                  "debug":9,"logfile":"/var/log/qemu-gluster.log",
                                  "server":[{"type":"tcp","host":"1.2.3.4","port":24007},
                                            {"type":"unix","socket":"/var/run/glusterd.socket"}]}}'
qemu-system-x86_64 -drive driver=qcow2,file.driver=gluster,file.volume=testvol,file.path=/path/a.img,
                                     file.debug=9,file.logfile=/var/log/qemu-gluster.log,
                                     file.server.0.type=tcp,file.server.0.host=1.2.3.4,file.server.0.port=24007,
                                     file.server.1.type=unix,file.server.1.socket=/var/run/glusterd.socket
Secure Shell (ssh) disk images
You can access disk images located on a remote ssh server
by using the ssh protocol:
qemu-system-x86_64 -drive file=ssh://[USER@]SERVER[:PORT]/PATH[?host_key_check=HOST_KEY_CHECK]
Alternative syntax using properties:
qemu-system-x86_64 -drive file.driver=ssh[,file.user=USER],file.host=SERVER[,file.port=PORT],file.path=PATH[,file.host_key_check=HOST_KEY_CHECK]
ssh is the protocol.
USER is the remote user. If not specified, then the local
username is tried.
SERVER specifies the remote ssh server. Any ssh server can be
used, but it must implement the sftp-server protocol. Most Unix/Linux
systems should work without requiring any extra configuration.
PORT is the port number on which sshd is listening. By default
the standard ssh port (22) is used.
PATH is the path to the disk image.
The optional HOST_KEY_CHECK parameter controls how the remote
host’s key is checked. The default is yes which means to use
the local .ssh/known_hosts file. Setting this to no
turns off known-hosts checking. Or you can check that the host key
matches a specific fingerprint. The fingerprint can be provided in
md5, sha1, or sha256 format, however, it is strongly
recommended to only use sha256, since the other options are
considered insecure by modern standards. The fingerprint value
must be given as a hex encoded string:
host_key_check=sha256:04ce2ae89ff4295a6b9c4111640bdcb3297858ee55cb434d9dd88796e93aa795
The key string may optionally contain “:” separators between
each pair of hex digits.
The $HOME/.ssh/known_hosts file contains the base64 encoded
host keys. These can be converted into the format needed for
QEMU using a command such as:
$ for key in `grep 10.33.8.112 known_hosts | awk '{print $3}'`
  do
    echo $key | base64 -d | sha256sum
  done
  6c3aa525beda9dc83eadfbd7e5ba7d976ecb59575d1633c87cd06ed2ed6e366f  -
  12214fd9ea5b408086f98ecccd9958609bd9ac7c0ea316734006bc7818b45dc8  -
  d36420137bcbd101209ef70c3b15dc07362fbe0fa53c5b135eba6e6afa82f0ce  -
Note that there can be multiple keys present per host, each with
different key ciphers. Care is needed to pick the key fingerprint
that matches the cipher QEMU will negotiate with the remote server.
Currently authentication must be done using ssh-agent. Other
authentication methods may be supported in future.
Note: Many ssh servers do not support an fsync-style operation.
The ssh driver cannot guarantee that disk flush requests are
obeyed, and this causes a risk of disk corruption if the remote
server or network goes down during writes. The driver will
print a warning when fsync is not supported:
warning: ssh server ssh.example.com:22 does not support fsync
With sufficiently new versions of libssh and OpenSSH, fsync is
supported.
NVMe disk images
NVM Express (NVMe) storage controllers can be accessed directly by a userspace
driver in QEMU. This bypasses the host kernel file system and block layers
while retaining QEMU block layer functionalities, such as block jobs, I/O
throttling, image formats, etc. Disk I/O performance is typically higher than
with -drive file=/dev/sda using either thread pool or linux-aio.
The controller will be exclusively used by the QEMU process once started. To be
able to share storage between multiple VMs and other applications on the host,
please use the file based protocols.
Before starting QEMU, bind the host NVMe controller to the host vfio-pci
driver. For example:
# modprobe vfio-pci
# lspci -n -s 0000:06:0d.0
06:0d.0 0401: 1102:0002 (rev 08)
# echo 0000:06:0d.0 > /sys/bus/pci/devices/0000:06:0d.0/driver/unbind
# echo 1102 0002 > /sys/bus/pci/drivers/vfio-pci/new_id

# qemu-system-x86_64 -drive file=nvme://HOST:BUS:SLOT.FUNC/NAMESPACE
Alternative syntax using properties:
qemu-system-x86_64 -drive file.driver=nvme,file.device=HOST:BUS:SLOT.FUNC,file.namespace=NAMESPACE
HOST:BUS:SLOT.FUNC is the NVMe controller’s PCI device
address on the host.
NAMESPACE is the NVMe namespace number, starting from 1.
Disk image file locking
By default, QEMU tries to protect image files from unexpected concurrent
access, as long as it’s supported by the block protocol driver and host
operating system. If multiple QEMU processes (including QEMU emulators and
utilities) try to open the same image with conflicting accessing modes, all but
the first one will get an error.
This feature is currently supported by the file protocol on Linux with the Open
File Descriptor (OFD) locking API, and can be configured to fall back to POSIX
locking if the POSIX host doesn’t support Linux OFD locking.
To explicitly enable image locking, specify “locking=on” in the file protocol
driver options. If OFD locking is not possible, a warning will be printed and
the POSIX locking API will be used. In this case there is a risk that the lock
will get silently lost when doing hot plugging and block jobs, due to the
shortcomings of the POSIX locking API.
QEMU transparently handles lock handover during shared storage migration. For
shared virtual disk images between multiple VMs, the “share-rw” device option
should be used.
By default, the guest has exclusive write access to its disk image. If the
guest can safely share the disk image with other writers the
-device ...,share-rw=on parameter can be used. This is only safe if
the guest is running software, such as a cluster file system, that
coordinates disk accesses to avoid corruption.
Note that share-rw=on only declares the guest’s ability to share the disk.
Some QEMU features, such as image file formats, require exclusive write access
to the disk image and this is unaffected by the share-rw=on option.
Alternatively, locking can be fully disabled by “locking=off” block device
option. In the command line, the option is usually in the form of
“file.locking=off” as the protocol driver is normally placed as a “file” child
under a format driver. For example:
-blockdev driver=qcow2,file.filename=/path/to/image,file.locking=off,file.driver=file
To check if image locking is active, check the output of the “lslocks” command
on host and see if there are locks held by the QEMU process on the image file.
More than one byte could be locked by the QEMU instance, each byte of which
reflects a particular permission that is acquired or protected by the running
block driver.
Filter drivers
QEMU supports several filter drivers, which don’t store any data, but perform
some additional tasks, hooking io requests.
- preallocate
-
The preallocate filter driver is intended to be inserted between format
and protocol nodes and preallocates some additional space
(expanding the protocol file) when writing past the file’s end. This can be
useful for file-systems with slow allocation.Supported options:
- prealloc-align
-
On preallocation, align the file length to this value (in bytes), default 1M.
- prealloc-size
-
How much to preallocate (in bytes), default 128M.
Эмулятор QEMU является кроссплатформенным приложением, доступным для 32- и 64-битных версий Windows. В этой статье мы расскажем, как скачать, установить и настроить QEMU для эффективного использования виртуальных машин на вашей системе.
Приобрести оригинальные ключи активации Windows всегда можно у нас в каталоге от 1099 ₽
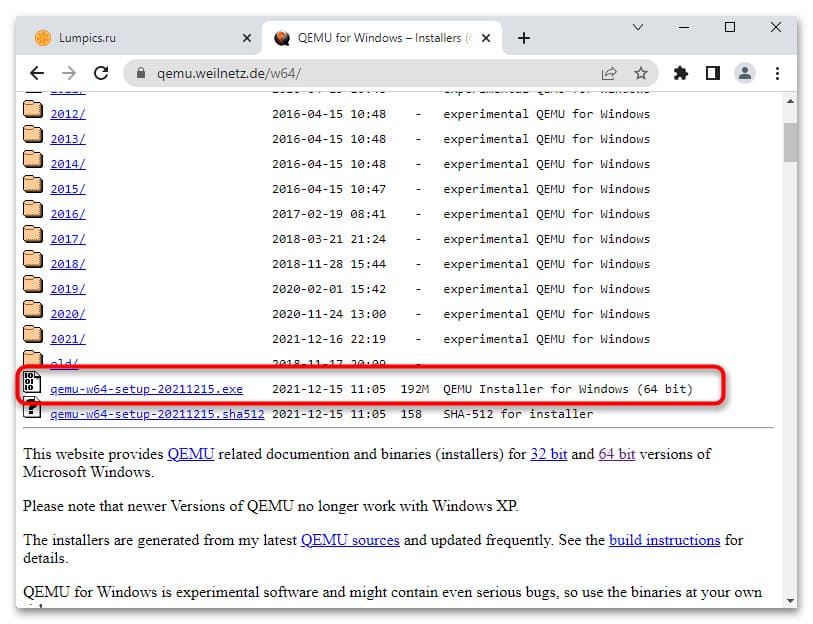
Скачивание QEMU с официального сайта
1. Перейдите на официальный сайт разработчика QEMU.
2. Выберите версию приложения, соответствующую разрядности вашей операционной системы.
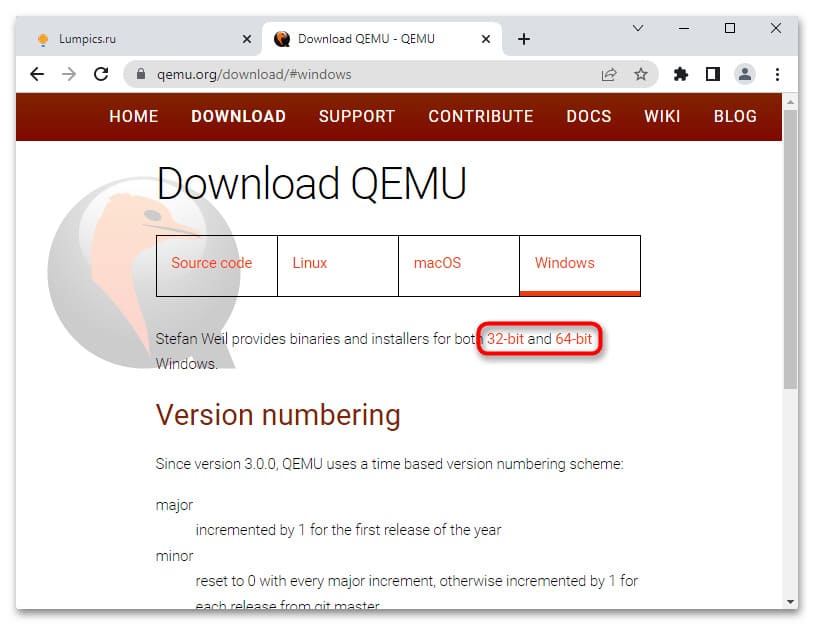
3. Скачайте актуальную (последнюю) версию эмулятора.
Так же скачать qemu для windows, можно напрямую с нашего сайта:
— qemu installer x64
— qemu installer x32
Установка QEMU на Windows
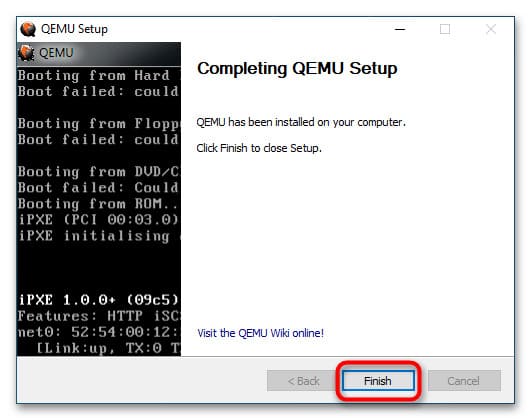
1. Запустите скачанный исполняемый файл программы и следуйте инструкциям мастера установки.
2. Во время установки вам будет предложено выбрать язык (русский язык отсутствует), принять условия лицензии, выбрать компоненты и указать путь установки. Рекомендуется оставить все настройки по умолчанию.
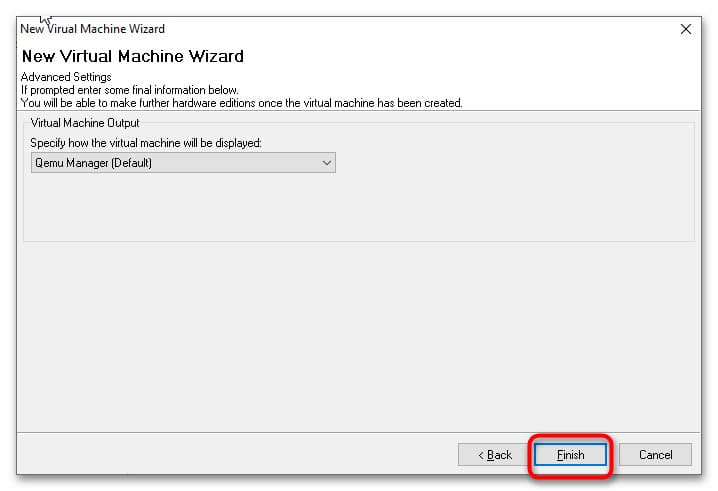
3. После завершения установки нажмите кнопку Finish.
Работа с QEMU через командную строку
Основные команды QEMU
QEMU является консольным приложением, поэтому для его использования необходимо работать через Командную строку, вводя текстовые команды вручную. Ниже приведены основные команды и параметры:
| Команда | Описание |
|---|---|
| qemu-system-архитектура | Определяет архитектуру эмулируемого устройства. Одноименные исполняемые файлы располагаются в папке установки эмулятора |
| qemu-img create | Команда создает файл в формате IMG, являющийся виртуальным диском, на который производится установка системы. В качестве аргумента передается произвольное имя IMG-контейнера |
| -hda | Параметр подключает созданный виртуальный жесткий диск, название которого передается в качестве аргумента |
| -m | Задает объем оперативной памяти, выделяемый эмулируемому устройству |
| -boot | Задает ресурс, с которого выполняется загрузка операционной системы. Имя ресурса должно соответствовать названию виртуального жесткого диска (без указания расширения) |
| cdrom | Эмулирует дисковод, используется для установки операционных систем и запуска LiveCD, то есть портативных ОС. В качестве аргумента передается путь к образу ISO |
Дополнительные команды
| Команда | Описание |
|---|---|
| -usb | Активирует поддержку USB |
| -smp | Эмулирует мультипроцессорную архитектуру |
| -full-screen | Запускает виртуальную машину в полноэкранном режиме |
| cpu | Задает тип процессора |
| -k | Задает раскладку клавиатуры по умолчанию |
| -soundhw | Подключает аудиокарту |
| usbdevice | Подключает устройства USB |
Установка операционной системы в QEMU
Предположим, вы хотите эмулировать компьютер с процессором Intel и операционной системой Windows XP.
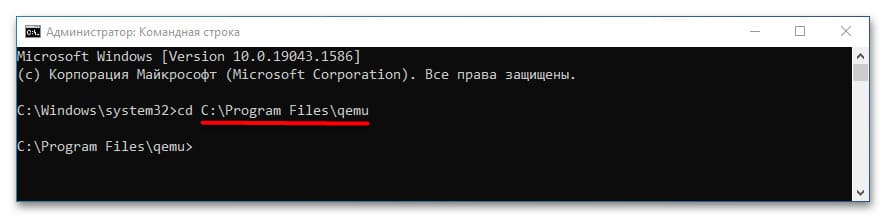
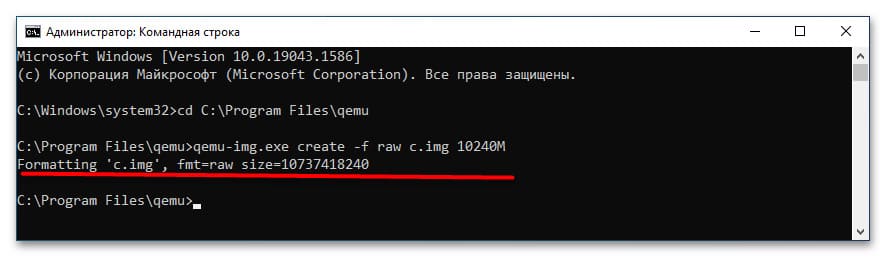
1. Откройте классическую Командную строку и перейдите в каталог установки QEMU:
cd C:\Program Files\qemu
Если эмулятор установлен в другой папке, укажите соответствующий путь после команды cd.
2. Создайте виртуальный жесткий диск для установки операционной системы:
qemu-img.exe create -f raw c.img 10240M
Здесь c.img — название виртуального диска, а 10240M — его размер в мегабайтах. Размер диска должен соответствовать требованиям устанавливаемой ОС.
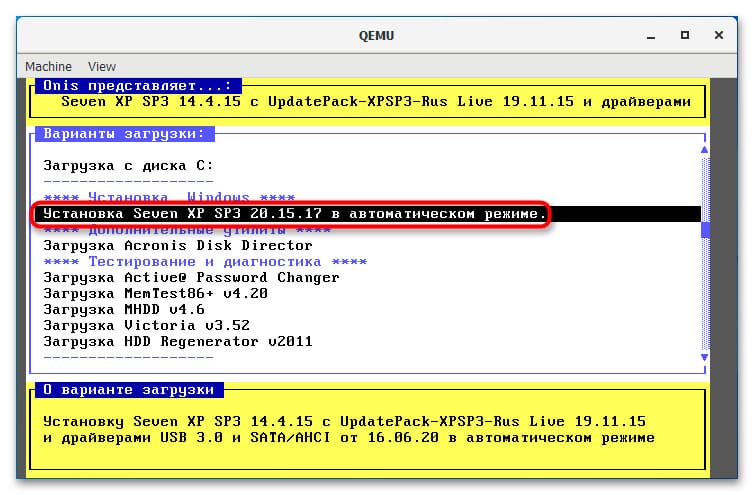
3. Запустите установку операционной системы с помощью команды:
qemu-system-i386w.exe -boot c -m 512 -hda c.img -cdrom "C:\Windows XP SP3 Seven CD.iso"
— i386w: эмулирует архитектуру x86.
— -boot c: загрузка с диска c.
— -m 512: выделяет 512 МБ оперативной памяти.
— -hda c.img: установка системы на виртуальный диск c.img.
— -cdrom: путь к установочному ISO-образу.

4. В открывшемся окне QEMU выберите пункт установки операционной системы с помощью клавиш-стрелок и следуйте стандартной процедуре установки на виртуальный диск.
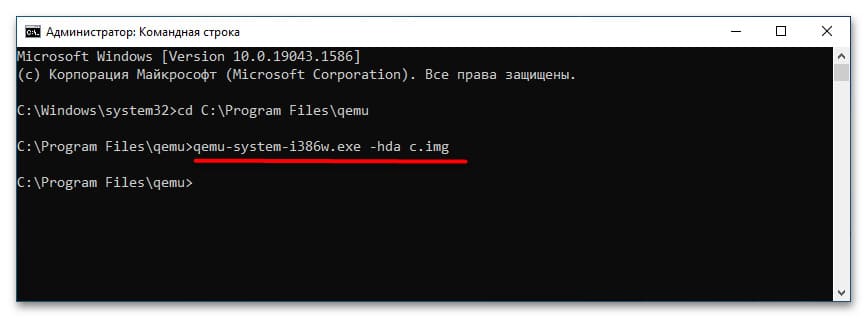
5. После завершения установки вы сможете запускать систему командой:
qemu-system-i386w.exe -hda c.img
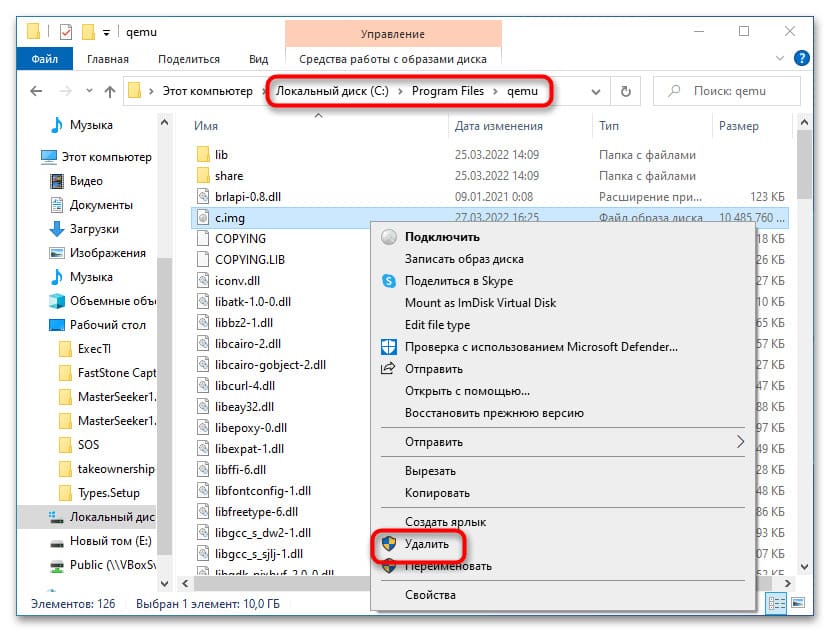
6. Если виртуальная система больше не нужна, удалите IMG-диск, расположенный в папке установки QEMU по умолчанию.
Запуск образов LiveCD в QEMU
Для запуска портативных операционных систем (LiveCD) в QEMU выполните следующую команду, предварительно перейдя в папку установки эмулятора:
qemu-system-архитектура.exe -m 1024 -cdrom "путь к образу LiveCD"
Поскольку портативная ОС загружается в оперативную память, создание виртуального диска не требуется.
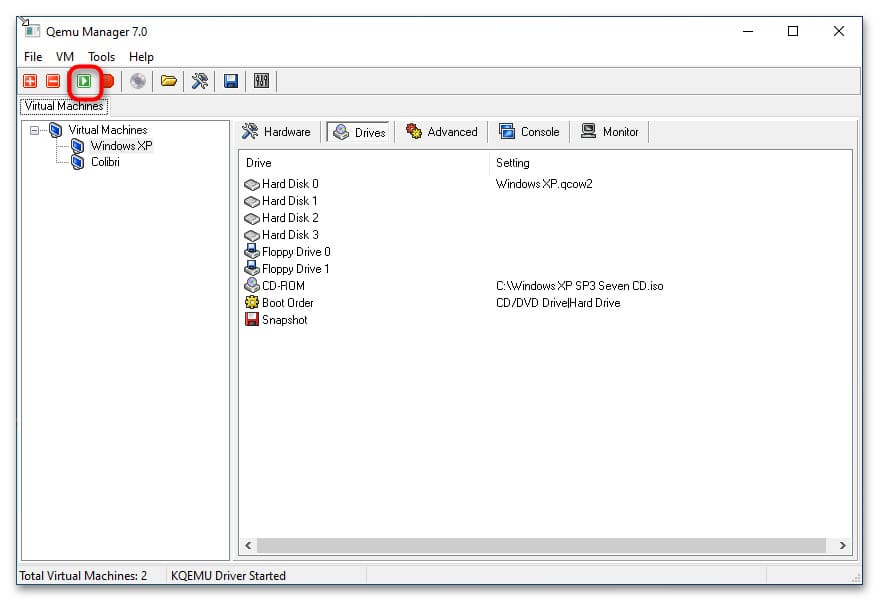
Использование Qemu Manager
Если вы предпочитаете графический интерфейс вместо командной строки, можно воспользоваться Qemu Manager — графической оболочкой для QEMU. Вот краткая инструкция по его использованию:
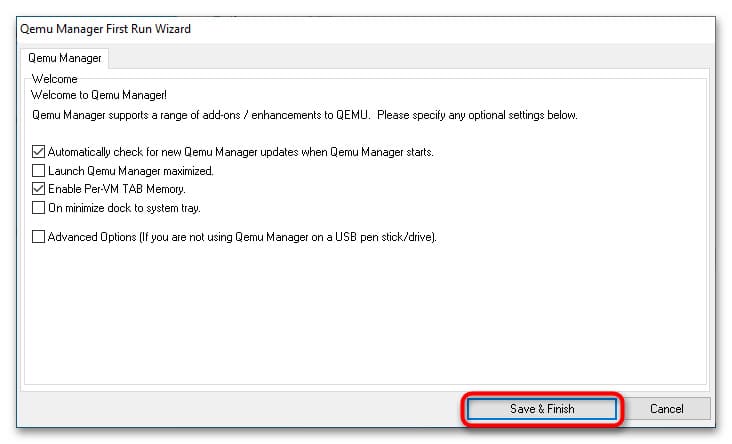
1. Скачайте, установите и запустите Qemu Manager. В окне настроек нажмите Save & Finish.
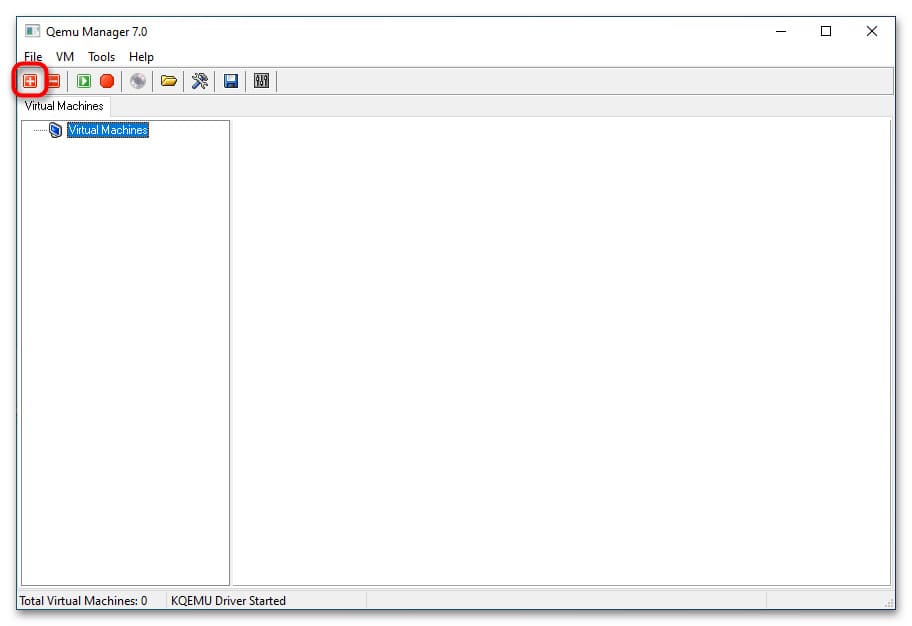
2. В основном окне менеджера нажмите кнопку + для создания новой виртуальной машины (VM).
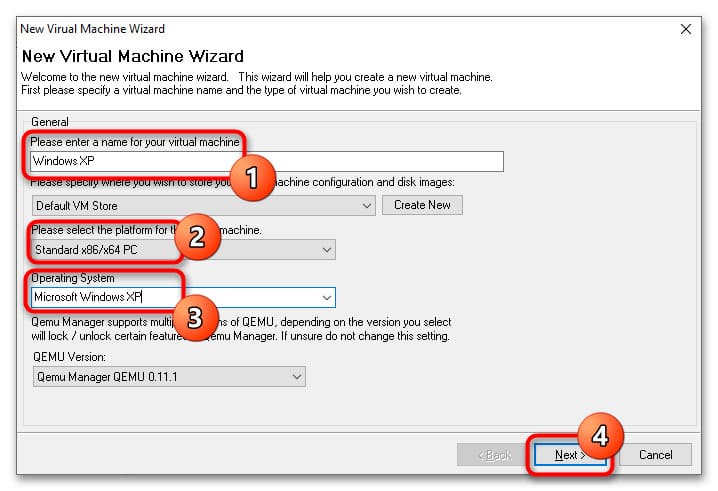
3. В поле Please enter a name for your virtual machine введите название VM. В меню Please select the platform for the virtual machine выберите архитектуру VM, а в списке Operating System укажите операционную систему.
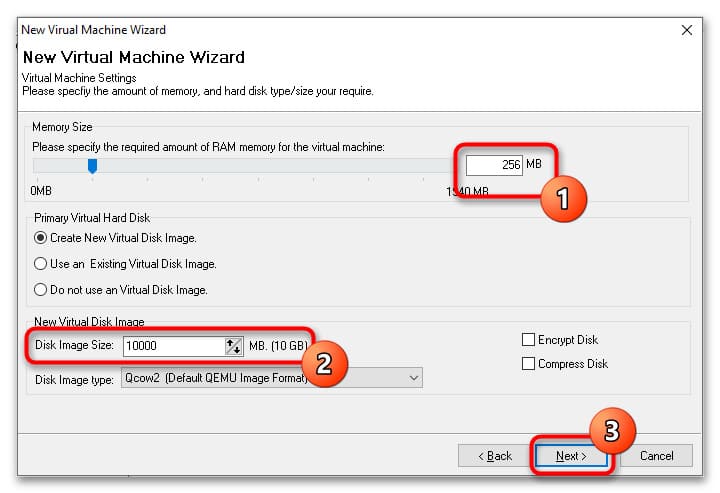
4. Установите требуемый объем оперативной памяти в разделе Memory Size, а размер виртуального диска в Disk Image Size. Если запускаете LiveCD, в настройках Primary Virtual Hard Disk выберите Do not use an Virtual Disk Image.
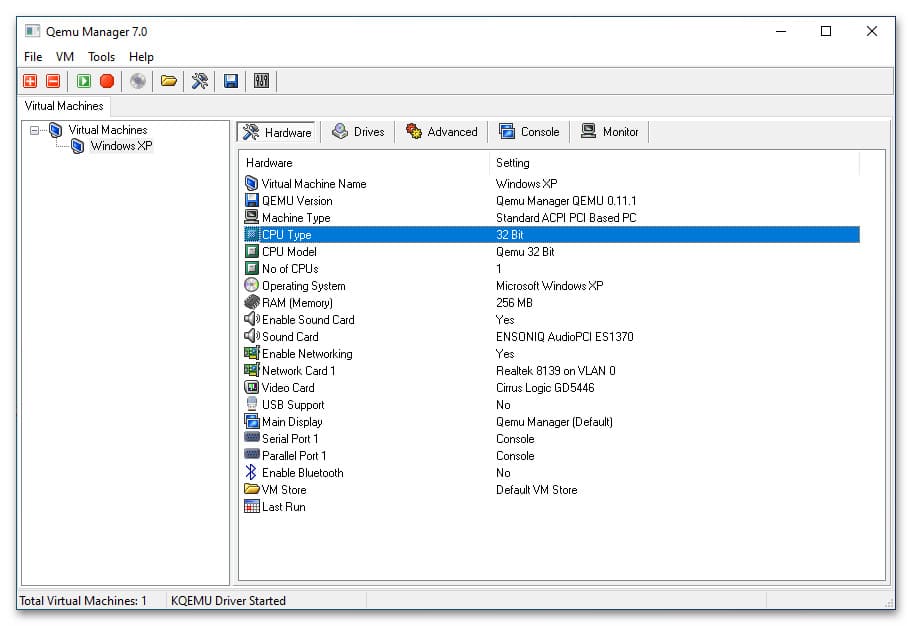
5. Нажмите кнопку Finish. В основном окне менеджера появится новая виртуальная машина с настройками по умолчанию. При необходимости вы можете изменить параметры VM, такие как архитектура процессора, объем памяти, поддержка USB и подключение новых виртуальных жестких дисков.
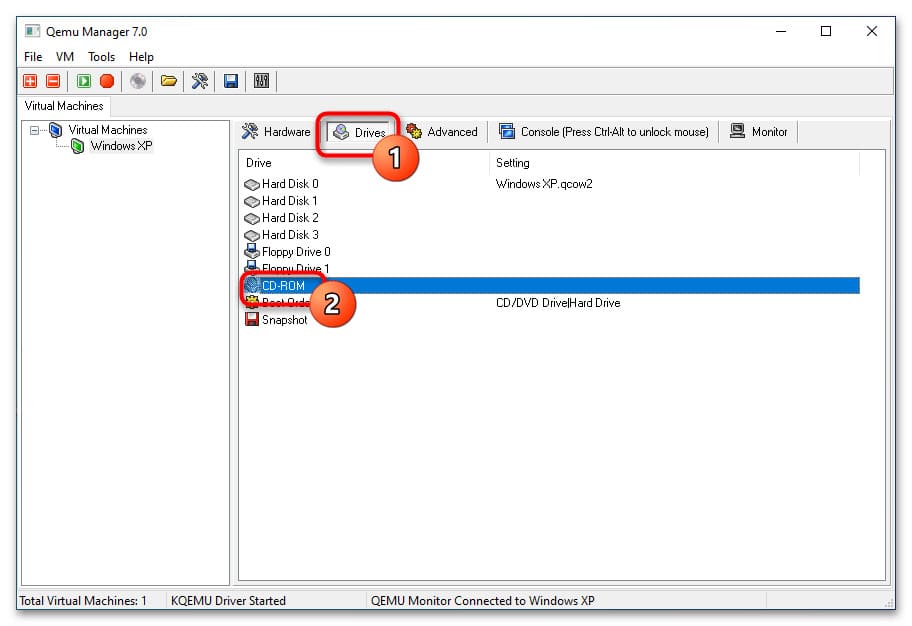
6. Перейдите на вкладку Drives и двойным кликом откройте настройку CD-ROM.
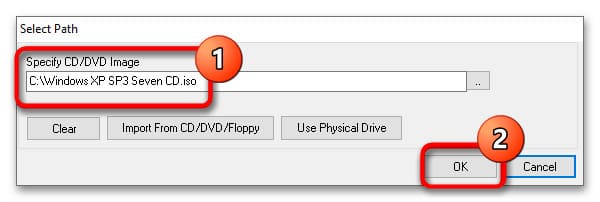
7. Укажите путь к установочному образу операционной системы или LiveCD и сохраните настройки.
8. Запустите виртуальную машину, нажав кнопку Launch Selected VM. По умолчанию Qemu Manager захватывает курсор мыши, чтобы освободить его, нажмите комбинацию клавиш Ctrl + Alt.
9. Для завершения работы виртуальной машины нажмите кнопку Quit Qemu.

Несмотря на отсутствие поддержки русского языка, Qemu Manager значительно упрощает работу с QEMU.

Server virtualization technology can help optimize IT environment so that more and more companies select virtualization solutions for better IT environment performance.
For IT administrators, it is common to process virtual disks, which work like hard drives of physical machines and contain most of VM data, in daily work, including exporting virtual disks as VM backup, importing virtual disks for VM recovery, and converting virtual disks for VM migration.
Converting virtual disks before VM migration is because there are different requirements in different virtual environments. For example, ESXi host can accept vmdk virtual disks but KVM host often needs raw or qcow2 virtual disks so the format needs to be converted for the new host.
There are many virtual disk managers for VM management but it is qemu-img that is frequently used to converting virtual disk.
P.S. Except for migrating virtual disk, you can also migrate the whole virtual machine to reduce failures during migration and boot VM faster.
What is qemu-img?
Qemu-img is the qemu disk image utility and provides many options and parameters to help convert many kinds of virtual disks including raw, qcow2, qcow, vmdk, vhd, etc. It is also can be used to manage virtual disks like creating, checking, and resizing virtual disks.
How to install qemu-img on Windows and Linux?
Qemu-img allows you to install it on both Windows and Linux operating systems. After you get the installation package, you can follow the instruction to install it.
Install qemu-img on Windows operating system
Qemu-img can be directly installed on Windows operating system with the installation package. After installation, you have to set environment variables.
Right-click Windows icon on desktop > select System > select Advanced system settings on the right > select Environment Varibales > click Path to edit or create the environment variable
To test whether environment variable has been successfully set, you can press Windows key and R to open the Run command windows > type cmd to open the Command Prompt > run qemu-img —help to see whether there are any results
Install qemu-img on Linux operating system
Qemu-img should be installed on different Linux operating systems with different commands.
For Ubuntu/Debian, type: apt install qemu-img
For CentOS/Red Hat/Oracle, type: yum install qemu-img
For SUSE/OpenSUSE, type: zypper install qemu-img
Similarly, you can check the installation by qemu-img -v.
How to convert virtual disk with qemu-img?
Qemu-img can let you simply convert virtual disk via command line but you should never process a running virtual disk or the data might be lost.
Here are some examples:
To convert vmdk to qcow2:
qemu-img convert -f vmdk -O qcow2 centos.vmdk centos.qcow2
The option convert means converting virtual disk format, parameter -f presents the source image format, and paremeter -O presents the target image format.
To convert qcow2 to vmdk:
qemu-img convert -f qcow2 -O vmdk centos.qcow2 centos.vmdk
To convert vhd to qcow2:
qemu-img convert -p -f vpc -O qcow2 centos.vhd centos.qcow2
You need to pay attention to that if you would like to convert vhd virtual disk, the argument to qemu-img is vpc.
To convert vhdx to qcow2:
qemu-img convert -p -f vhdx -O qcow2 centos.vhdx centos.qcow2
To convert raw to vmdk:
qemu-img convert -f raw -O vmdk centos.raw centos.vmdk
To convert vmdk to raw:
qemu-img convert -f vmdk -O raw centos.vmdk centos.raw
How to manage virtual disk with qemu-img?
Except for converting virtual disk, qemu-img can also help manage virtual disk like creating qcow2 image or resizing virtual disk.
To create qcow2 image:
qemu-img create -f qcow2 disk_directory.img 10G
To resize virtual disk:
qemu-img resize disk_directory.img 20G
There are many other useful qemu-img options and parameters, you can get them in its guide.
How to convert and manage VM with Vinchin Backup & Recovery?
Sometimes recovering or migrating VM via processing virtual disk might lead to failures and this will be a disaster in the event of an emergency. You can upgrade your VM management plan.
Vinchin Backup & Recovery is a professional backup and disaster recovery solution for virtual environment which supports multiple virtualization platforms including VMware vSphere, Hyper-V, Red Hat Virtualization, XenServer, OpenStack, etc. (Native KVM is not supported for now)

Agentless backup will help you quickly add all the VMs to backup system and the user-friendly web console will help you easily finish all kinds of job configuration.
You can add hosts from different hypervisors and easily migrate VM with VM backup. For example, if you have a VMware VM backup, you can select a XenServer host to recover it. Vinchin Virtual Machine Convert Engine will help you convert the image during the process so you just have to boot the VMware VM on XenServer host later.
To help quickly recover VM from any disasters, Vinchin Instant Recovery technology lets you recover a failed VM from its backup in 15 seconds.
Vinchin Backup & Recovery has been selected by thousands of companies and you can also start to use this powerful system with a 60-day full-featured free trial. Just click the button to get the installation package.
Sum Up
Qemu-img is the tool for virtual disk management and can be deployed on both Windows and Linux operating systems. IT administrators can use it to create, convert, and resize virtual disk to manage virtual disk and migrate VM between different hypervisors.
You can also choose a more powerful system, Vinchin Backup & Recovery, to protect and manage virtual environment via an easier way. Don’t miss the free trial.
Usage examples
Convert a QCOW2, RAW, VMDK or VDI image to VHDX
|
qemu—img.exe convert source.img —O vhdx —o subformat=dynamic dest.vhdx |
Convert a QCOW2, RAW, VMDK or VDI image to VHD
|
qemu—img.exe convert source.img —O vpc —o subformat=dynamic dest.vhd |
Subformat can be either “dynamic” or “fixed” for VHD (vpc) or VHDX.
Note: use the fixed VHD subformat for Azure, the conversion will automatically take care of the required 1MB virtual size alignment.
Check a virtual disk for consistency
|
qemu—img.exe check source.qcow2 |
Get info about a virtual disk
|
qemu—img.exe info image.qcow2 |
Run qemu-img.exe -h or see the manual page for a complete list of all supported options.
Recently I had an assignment that asked us to use Qemu. It took me some trouble to get it running on Windows so I thought I could document it here in case I need it in the future. It would be nice if this helps someone, too!
- Download Qemu and .iso
- Add Qemu path to environment variables settings
- Create an image
- Starting the VM
- Some problems you might encounter
1. Download Qemu and .iso
Click here to download Qemu and download your desired .iso file. After installing Qemu, open Windows Powershell and type qemu-img. Now you might see that it does not recognize the command. This takes us to number 2.
2. Add Qemu path to environment variables settings
Copy the Qemu path (should be C:\Program Files\qemu if you didn’t change anything) and open environment variables settings by Right click on "This PC" -> Properties -> Advanced system settings -> Environment Variables.
Click on path once and click «Edit…». Click «New» and paste the Qemu path.
Here’s the youtube video that taught me how to do this. Otherwise, I’d stuck here forever :P.
3. Create an image
Now you can create an image by typing qemu-img create -f qcow2 [name].qcow2 30G.

4. Starting the VM
When starting the VM, you would want to use an accelerator, or else it is going to take a lot of time installing the OS. It took me more than an hour to install Ubuntu 16.04 without the accelerator.
For Windows, there are two options: HAXM and whpx. Note that HAXM can only be used on Windows Enterprise/Pro/Education so I’m not going to introduce it here. Although I did get it working for whatever reason and after a Windows update, it just stopped working.🤔
Go to Windows Features and tick Windows Hypervisor Platform. After that, restart the computer and type this command in the powershell (in the directory where the image and .iso resides): qemu-system-x86_64 -accel whpx -hda .\[name].qcow2 -m 512 -net nic,model=virtio -net user -cdrom .\[name].iso -vga std -boot strict=on. It should start up and you can proceed to install the OS.
The second time you start up the machine you don’t need to type -cdrom anymore. Just qemu-system-x86_64 -accel whpx -hda .\[name].qcow2 -m 512 -net nic,model=virtio -net user -vga std -boot strict=on should do it.

5. Some problems you might encounter
-
You might get stuck when rebooting after installing the OS
My friend and I both encountered the problem and we both used Ubuntu 16.04 for the VM. Just close the window and restart it and it should work fine. Pretty sure this is not best practice, though. -
You can’t seem to do migration using whpx
I got this error when trying to do migration. I found this Github code and I think it has something to do with whpx. I’m not sure how to resolve this. My TA simply allowed me to do migration on the server.
-
Untick
Windows Hypervisor Platformwhen using VirtualBox
You might get an error from VirtualBox when starting the machine if you keep it ticked. Remember to untick it.