
Introduction — What is qemu-guest-agent
The qemu-guest-agent is a helper daemon, which is installed in the guest. It is used
to exchange information between the host and guest, and to execute command in the guest.
In Proxmox VE, the qemu-guest-agent is used for mainly three things:
- To properly shutdown the guest, instead of relying on ACPI commands or windows policies
- To freeze the guest file system when making a backup/snapshot (on windows, use the volume shadow copy service VSS). If the guest agent is enabled and running, it calls guest-fsfreeze-freeze and guest-fsfreeze-thaw to improve consistency.
- In the phase when the guest (VM) is resumed after pause (for example after shapshot) it immediately synchronizes its time with the hypervisor using qemu-guest-agent (as first step).
Installation
Host
You have to install guest-agent in each VM and then enable it, you can do that in the Proxmox VE Webinterface (GUI)
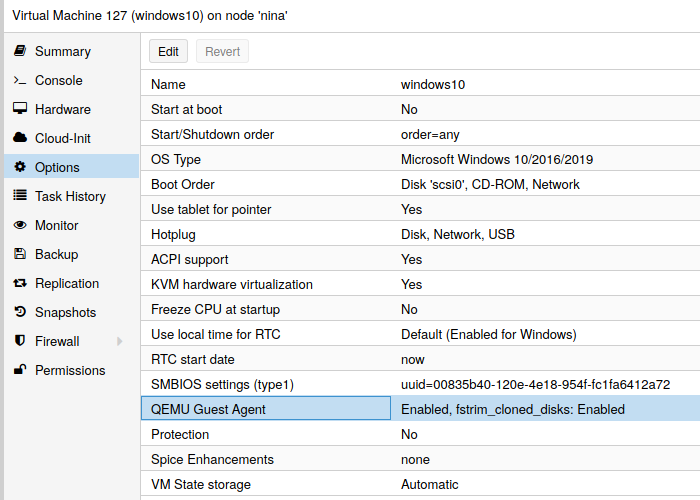
or via CLI: qm set VMID --agent 1
Guest
Linux
On Linux you have to simply install the qemu-guest-agent, please refer to the documentation of your system.
We show here the commands for Debian/Ubuntu and Redhat based systems:
on Debian/Ubuntu based systems (with apt-get) run:
apt-get install qemu-guest-agent
and on Redhat based systems (with yum):
yum install qemu-guest-agent
Depending on the distribution, the guest agent might not start automatically after the installation.
Start it either directly with
systemctl start qemu-guest-agent
Then enable the service to autostart (permanently) if not auto started, with
systemctl enable qemu-guest-agent
(should work for most distributions) or reboot the guest.
Windows
First you have to download the virtio-win driver iso (see Windows VirtIO Drivers).
Then install the virtio-serial driver:
- Attach the ISO to your windows VM (virtio-*.iso)
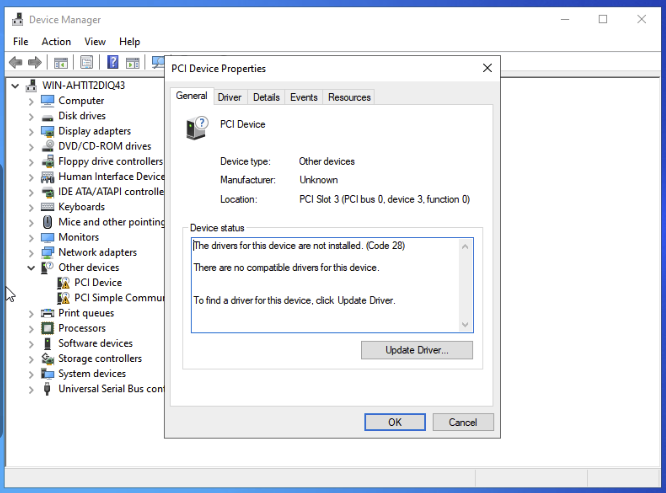
- Go to the windows Device Manager
- Look for «PCI Simple Communications Controller»
- Right Click -> Update Driver and select on the mounted iso in DRIVE:\vioserial\<OSVERSION>\ where <OSVERSION> is your Windows Version (e.g. 2k12R2 for Windows 2012 R2)
After that, you have to install the qemu-guest-agent:
- Go to the mounted ISO in explorer
- The guest agent installer is in the directory guest-agent
- Execute the installer with double click (either qemu-ga-x86_64.msi (64-bit) or qemu-ga-i386.msi (32-bit)
After that the qemu-guest-agent should be up and running. You can validate this in the list of Window Services, or in a PowerShell with:
PS C:\Users\Administrator> Get-Service QEMU-GA

Status   Name               DisplayName
------   ----               -----------
Running  QEMU-GA            QEMU Guest Agent
If it is not running, you can use the Services control panel to start it and make sure that it will start automatically on the next boot.
Testing that the communication with the guest agent is working
The communication with the guest agent takes place over a unix socket located in /var/run/qemu-server/<my_vmid>.qga
You can test the communication qm agent:
qm agent <vmid> ping
if the qemu-guest-agent is correctly runnning in the VM, it will return without an error message.
See Also
http://wiki.qemu.org/Features/GuestAgent
https://access.redhat.com/documentation/en-us/red_hat_enterprise_linux/7/html/virtualization_deployment_and_administration_guide/chap-kvm_guest_timing_management
VirtIO drivers are paravirtualized device drivers required for Microsoft Windows virtual machines (VMs) to run in OKD Virtualization. The drivers are shipped with the rest of the images and do not require a separate download.
The container-native-virtualization/virtio-win container disk must be attached to the VM as a SATA CD drive to enable driver installation. You can install VirtIO drivers during Windows installation or added to an existing Windows installation.
After the drivers are installed, the container-native-virtualization/virtio-win container disk can be removed from the VM.
Table 1. Supported drivers
| Driver name | Hardware ID | Description |
|---|---|---|
|
viostor |
VEN_1AF4&DEV_1001 |
The block driver. Sometimes labeled as an SCSI Controller in the Other devices group. |
|
viorng |
VEN_1AF4&DEV_1005 |
The entropy source driver. Sometimes labeled as a PCI Device in the Other devices group. |
|
NetKVM |
VEN_1AF4&DEV_1000 |
The network driver. Sometimes labeled as an Ethernet Controller in the Other devices group. Available only if a VirtIO NIC is configured. |
Attaching VirtIO container disk to Windows VMs during installation
You must attach the VirtIO container disk to the Windows VM to install the necessary Windows drivers. This can be done during creation of the VM.
Procedure
-
When creating a Windows VM from a template, click Customize VirtualMachine.
-
Select Mount Windows drivers disk.
-
Click the Customize VirtualMachine parameters.
-
Click Create VirtualMachine.
After the VM is created, the virtio-win SATA CD disk will be attached to the VM.
Attaching VirtIO container disk to an existing Windows VM
You must attach the VirtIO container disk to the Windows VM to install the necessary Windows drivers. This can be done to an existing VM.
Procedure
-
Navigate to the existing Windows VM, and click Actions → Stop.
-
Go to VM Details → Configuration → Disks and click Add disk.
-
Add
windows-driver-diskfrom container source, set the Type to CD-ROM, and then set the Interface to SATA. -
Click Save.
-
Start the VM, and connect to a graphical console.
Installing VirtIO drivers during Windows installation
You can install the VirtIO drivers while installing Windows on a virtual machine (VM).
|
This procedure uses a generic approach to the Windows installation and the installation method might differ between versions of Windows. See the documentation for the version of Windows that you are installing. |
Prerequisites
-
A storage device containing the
virtiodrivers must be attached to the VM.
Procedure
-
In the Windows operating system, use the
File Explorerto navigate to thevirtio-winCD drive. -
Double-click the drive to run the appropriate installer for your VM.
For a 64-bit vCPU, select the
virtio-win-gt-x64installer. 32-bit vCPUs are no longer supported. -
Optional: During the Custom Setup step of the installer, select the device drivers you want to install. The recommended driver set is selected by default.
-
After the installation is complete, select Finish.
-
Reboot the VM.
Verification
-
Open the system disk on the PC. This is typically
C:. -
Navigate to Program Files → Virtio-Win.
If the Virtio-Win directory is present and contains a sub-directory for each driver, the installation was successful.
Installing VirtIO drivers from a SATA CD drive on an existing Windows VM
You can install the VirtIO drivers from a SATA CD drive on an existing Windows virtual machine (VM).
|
This procedure uses a generic approach to adding drivers to Windows. See the installation documentation for your version of Windows for specific installation steps. |
Prerequisites
-
A storage device containing the virtio drivers must be attached to the VM as a SATA CD drive.
Procedure
-
Start the VM and connect to a graphical console.
-
Log in to a Windows user session.
-
Open Device Manager and expand Other devices to list any Unknown device.
-
Open the Device Properties to identify the unknown device.
-
Right-click the device and select Properties.
-
Click the Details tab and select Hardware Ids in the Property list.
-
Compare the Value for the Hardware Ids with the supported VirtIO drivers.
-
-
Right-click the device and select Update Driver Software.
-
Click Browse my computer for driver software and browse to the attached
SATA CD drive, where the VirtIO drivers are located. The drivers are arranged
hierarchically according to their driver type, operating system,
and CPU architecture. -
Click Next to install the driver.
-
Repeat this process for all the necessary VirtIO drivers.
-
After the driver installs, click Close to close the window.
-
Reboot the VM to complete the driver installation.
Installing VirtIO drivers from a container disk added as a SATA CD drive
You can install VirtIO drivers from a container disk that you add to a Windows virtual machine (VM) as a SATA CD drive.
|
Downloading the |
Prerequisites
-
You must have access to the Red Hat registry or to the downloaded
container-native-virtualization/virtio-wincontainer disk in a restricted environment.
Procedure
-
Add the
container-native-virtualization/virtio-wincontainer disk as a CD drive by editing theVirtualMachinemanifest:# ... spec: domain: devices: disks: - name: virtiocontainerdisk bootOrder: 2 (1) cdrom: bus: sata volumes: - containerDisk: image: container-native-virtualization/virtio-win name: virtiocontainerdisk1 OKD Virtualization boots the VM disks in the order defined in the VirtualMachinemanifest. You can either define other VM disks that boot before thecontainer-native-virtualization/virtio-wincontainer disk or use the optionalbootOrderparameter to ensure the VM boots from the correct disk. If you configure the boot order for a disk, you must configure the boot order for the other disks. -
Apply the changes:
-
If the VM is not running, run the following command:
$ virtctl start <vm> -n <namespace> -
If the VM is running, reboot the VM or run the following command:
-
-
After the VM has started, install the VirtIO drivers from the SATA CD drive.
Proxmox documentation is exceptional but we have created a quick guide for setting up a Windows host as it’s not the same defaults to be used when setting up Linux. The guide on Proxmox’s Wiki for Windows 2019 and Windows 10 seems exactly the same. We’ve included both links in the references. When doing this operation you want to focus on Virtio disk.
This article highlights the non defaults.
Table of Contents
TL;DR
- Download Windows (server = 5 GB+):
- https://www.microsoft.com/en-us/evalcenter/download-windows-server-2019
- When installing choose the desktop experience otherwise you’ll have no UI
- https://www.microsoft.com/en-us/evalcenter/download-windows-server-2019
- Download special disk, network, and ballooning drivers here: https://fedorapeople.org/groups/virt/virtio-win/direct-downloads/stable-virtio/virtio-win.iso
- If you’ve downloaded this before, choose IDE / local disk / virtio
- This is stored on Proxmox on /var/lib/vz/template/iso
- If you’ve downloaded this before, choose IDE / local disk / virtio
- In addition to mounting the Windows ISO, also mount that fresh ISO as IDE device #3 (some strange default occurs
- Be sure to mount the ISO when creating the VM otherwise you’ll have to reboot before the OS will recognize it.
- Ensure you select QEMU Agent on the second tab of the wizard.
- CPU
- Turn on
numa
- Turn on
- Disk settings:
- Set “Write back” as cache option for best performance
- Tick “Discard” to optimally use disk space (TRIM)
- Options
- On Guest Agent, also select: Run guest-trim after a disk move or VM migration
- Turn on protection
- Turn on hotplug for memory (requires
numa) and CPU
- Driver locations on Virtio CD:
- Hard disk: vioscsi\2k19\amd64
- Network: NetKVM\2k19\amd64
- Memory Balloon: Balloon\2k19\amd64
- Prep for QEMU Guest Agent
- Device Manager / Look for “PCI Simple Communications Controller”
- Update to D:\vioserial\2k19\amd64
- Device Manager / Look for “PCI Simple Communications Controller”
- You want to install all four drivers, starting with the disk driver which is needed before the disk will be seen.
- Choose SCSI bus as you normally would for the disk
- Choose this network device: VirtIO (paravirtualized)
Proxmox Wizard Steps
If you are import an existing QCOW2, then you probably only need the Proxmox wizard stuff to fill in:
- General Tab
- Name
- OS Tab
- Do not use any media
- Guest OS: Microsoft Windows version 10/2016/2019
- System Tab
- Tick Qemu Agent
- Hard Disk Tab
- Bus/Device: SCSI. That will default next line to VirtIO SCSI
- Storage: raid1 or whatever volume you decide on
- Cache: Write back
- Discard: Tick this
- CPU
- Memory
- Network
- VirtIO (paravirtualized)
Proxmox Wiki Guides
- https://pve.proxmox.com/wiki/Windows_2019_guest_best_practices
- https://pve.proxmox.com/wiki/Windows_10_guest_best_practices
Further Steps
Install QEMU Guest Agent for Windows
- Make sure you’ve followed the step to update the unknown PCI Simple Communications Controller as per previous step
- Browse to the ISO and guest-agent and install the 64bit guest agent.
- Test so:
- Services or Powershell
- Get-Service QEMU-GA
- Services or Powershell
Memory Ballooning
You should also install the VirtIO Balloon Driver to avoid an exclamation mark in your Device Manager.
Browse to the CD, Balloon, your OS, and then amd64 folder.
VirtIO Serial Driver
That’s the other exclamation mark, “PCI Simple Communications Device”.
Simply specify to browse the root of the CD to install that.
Allow Ping for Windows Server 2019
By default Windows Server 2019 doesn’t allow ping. If you want to set it, do this:
https://kb.vander.host/operating-systems/unable-to-ping-newly-installed-windows-2019-server/
Enable Remote Desktop Connection
You probably want RDP enabled:
https://kb.vander.host/operating-systems/how-to-enable-remote-desktop-protocol-for-administration-purposes-on-newly-created-windows-2019-server/
Group Policy Changes
Allow More Than One RDP Connection
- Start / Run / gpedit.msc
- Navigate to Computer Configuration >> Administrative Templates >> Windows Components >> Remote Desktop Services >> Remote Desktop Session Host >> Connections.
- Double click on “Restrict Remote Desktop Services user to a single Remote Desktop Services session and set this to Disabled.
- Next, double click on “Limit number of connections”, Enable, and set the RD Maximum Connections allowed to the maximum which is 999999 (6 x 9s).
Account Lockout
Some people like to have RDP on exposed on the internet. Your server will immediately become part of a dictionary attack. Very soon the lockout policy of RDP security will be reached. If you really have to, you can follow the route below:
Settings > Edit Group Policy
Group Policy > Computer Configuration > Windows Settings > Security Settings > Account Policies > Account Lockout Policy > Account Lockout Threshold
To use Microsoft Windows as the guest operating system in your virtual machines (VMs) on a RHEL 8 host, Red Hat recommends taking extra steps to ensure these VMs run correctly.
For this purpose, the following sections provide information about installing and optimizing Windows VMs on the host, as well as installing and configuring drivers in these VMs.
18.1. Installing Windows virtual machines
You can create a fully-virtualized Windows machine on a RHEL 8 host, launch the graphical Windows installer inside the virtual machine (VM), and optimize the installed Windows guest operating system (OS).
To create the VM and to install the Windows guest OS, use the virt-install command or the RHEL 8 web console.
Prerequisites
-
A Windows OS installation source, which can be one of the following, and be available locally or on a network:
- An ISO image of an installation medium
- A disk image of an existing VM installation
-
A storage medium with the KVM
virtiodrivers.To create this medium, see Preparing virtio driver installation media on a host machine.
-
If you are installing Windows 11, the
edk2-ovmf,swtpmandlibtpmspackages must be installed on the host.
Procedure
-
Create the VM. For instructions, see Creating virtual machines, but keep in mind the following specifics.
-
If using the
virt-installutility to create the VM, add the following options to the command:-
The storage medium with the KVM
virtiodrivers. For example:--disk path=/usr/share/virtio-win/virtio-win.iso,device=cdrom -
The Windows version you will install. For example, for Windows 10 and 11:
--os-variant win10For a list of available Windows versions and the appropriate option, use the following command:
# osinfo-query os -
If you are installing Windows 11, enable Unified Extensible Firmware Interface (UEFI) and virtual Trusted Platform Module (vTPM):
--boot uefi --tpm model=tpm-crb,backend.type=emulator,backend.version=2.0
-
-
If using the web console to create the VM, specify your version of Windows in the Operating system field of the Create new virtual machine window.
- If you are installing Windows versions prior to Windows 11 and Windows Server 2022, start the installation by clicking Create and run.
-
If you are installing Windows 11, or you want to use additional Windows Server 2022 features, confirm by clicking Create and edit and enable UEFI and vTPM using the CLI:
-
Open the VM’s XML configuration:
# virsh edit windows-vm -
Add the
firmware='efi'option to theoselement:<os firmware='efi'> <type arch='x86_64' machine='pc-q35-6.2'>hvm</type> <boot dev='hd'/> </os> -
Add the
tpmdevice inside thedeviceselement:<devices> <tpm model='tpm-crb'> <backend type='emulator' version='2.0'/> </tpm> </devices>
- Start the Windows installation by clicking Install in the Virtual machines table.
-
-
-
Install the Windows OS in the VM.
For information about how to install a Windows operating system, refer to the relevant Microsoft installation documentation.
- If using the web console to create the VM, attach the storage medium with virtio drivers to the VM by using the Disks interface. For instructions, see Attaching existing disks to virtual machines by using the web console.
-
Configure KVM
virtiodrivers in the Windows guest OS. For details, see Installing KVM paravirtualized drivers for Windows virtual machines.
18.2. Optimizing Windows virtual machines
When using Microsoft Windows as a guest operating system in a virtual machine (VM) hosted in RHEL 8, the performance of the guest may be negatively impacted.
Therefore, Red Hat recommends optimizing your Windows VMs by doing any combination of the following:
- Using paravirtualized drivers. For more information, see Installing KVM paravirtualized drivers for Windows virtual machines.
- Enabling Hyper-V enlightenments. For more information, see Enabling Hyper-V enlightenments.
- Configuring NetKVM driver parameters. For more information, see Configuring NetKVM driver parameters.
- Optimizing or disabling Windows background processes. For more information, see Optimizing background processes on Windows virtual machines.
18.2.1. Installing KVM paravirtualized drivers for Windows virtual machines
The primary method of improving the performance of your Windows virtual machines (VMs) is to install KVM paravirtualized (virtio) drivers for Windows on the guest operating system.
The virtio-win drivers are certified (WHQL) against the latest releases of Windows 10 and 11, available at the time of the respective virtio-win release. However, virtio-win drivers are generally tested and expected to function correctly on previous builds of Windows 10 and 11 as well.
To install the drivers on a Windows VM, perform the following actions:
- Prepare the install media on the host machine. For more information, see Preparing virtio driver installation media on a host machine.
- Attach the install media to an existing Windows VM, or attach it when creating a new Windows VM. For more information, see Installing Windows virtual machines on RHEL.
-
Install the
virtiodrivers on the Windows guest operating system. For more information, see Installing virtio drivers on a Windows guest. -
Install the
QEMU Guest Agenton the Windows guest operating system. For more information, see Installing QEMU Guest Agent on a Windows guest.
18.2.1.1. How Windows virtio drivers work
Paravirtualized drivers enhance the performance of virtual machines (VMs) by decreasing I/O latency and increasing throughput to almost bare-metal levels. Red Hat recommends that you use paravirtualized drivers for VMs that run I/O-heavy tasks and applications.
virtio drivers are KVM’s paravirtualized device drivers, available for Windows VMs running on KVM hosts. These drivers are provided by the virtio-win package, which includes drivers for:
- Block (storage) devices
- Network interface controllers
- Video controllers
- Memory ballooning device
- Paravirtual serial port device
- Entropy source device
- Paravirtual panic device
- Input devices, such as mice, keyboards, or tablets
- A small set of emulated devices
For additional information about emulated, virtio, and assigned devices, refer to Managing virtual devices.
By using KVM virtio drivers, the following Microsoft Windows versions are expected to run similarly to physical systems:
- Windows Server versions: See Certified guest operating systems for Red Hat Enterprise Linux with KVM in the Red Hat Knowledgebase.
-
Windows Desktop (non-server) versions:
- Windows 10 (32-bit and 64-bit versions)
18.2.1.2. Preparing virtio driver installation media on a host machine
To install or update KVM virtio drivers on a Windows virtual machine (VM), you must first prepare the virtio driver installation media on the host machine. To do so, attach the .iso file, provided by the virtio-win package, as a storage device to the Windows VM.
Prerequisites
- Ensure that virtualization is enabled in your RHEL 8 host system. For more information, see Enabling virtualization.
- Ensure that you have root access privileges to the VM.
Procedure
-
Refresh your subscription data:
# subscription-manager refresh All local data refreshed -
Get the latest version of the
virtio-winpackage.-
If
virtio-winis not installed:# yum install -y virtio-win -
If
virtio-winis installed:# yum upgrade -y virtio-winIf the installation succeeds, the
virtio-windriver files are available in the/usr/share/virtio-win/directory. These includeISOfiles and adriversdirectory with the driver files in directories, one for each architecture and supported Windows version.# ls /usr/share/virtio-win/ drivers/ guest-agent/ virtio-win-1.9.9.iso virtio-win.iso
-
-
Attach the
virtio-win.isofile as a storage device to the Windows VM.-
When creating a new Windows VM, attach the file by using the
virt-installcommand options. -
When installing the drivers on an existing Windows VM, attach the file as a CD-ROM by using the
virt-xmlutility:# virt-xml WindowsVM --add-device --disk virtio-win.iso,device=cdrom Domain 'WindowsVM' defined successfully.
-
When creating a new Windows VM, attach the file by using the
18.2.1.3. Installing virtio drivers on a Windows guest
To install KVM virtio drivers on a Windows guest operating system, you must add a storage device that contains the drivers (either when creating the virtual machine (VM) or afterwards) and install the drivers in the Windows guest operating system.
This procedure provides instructions to install the drivers by using the graphical interface. You can also use the Microsoft Windows Installer (MSI) command-line interface.
Prerequisites
-
An installation medium with the KVM
virtiodrivers must be attached to the VM. For instructions on preparing the medium, see Preparing virtio driver installation media on a host machine.
Procedure
-
In the Windows guest operating system, open the
File Explorerapplication. -
Click
This PC. -
In the
Devices and drivespane, open thevirtio-winmedium. -
Based on the operating system installed on the VM, run one of the installers:
-
If using a 32-bit operating system, run the
virtio-win-gt-x86.msiinstaller. -
If using a 64-bit operating system, run the
virtio-win-gt-x64.msiinstaller.
-
If using a 32-bit operating system, run the
-
In the
Virtio-win-driver-installersetup wizard that opens, follow the displayed instructions until you reach theCustom Setupstep.
- In the Custom Setup window, select the device drivers you want to install. The recommended driver set is selected automatically, and the descriptions of the drivers are displayed on the right of the list.
- Click next, then click Install.
- After the installation completes, click Finish.
- Reboot the VM to complete the driver installation.

Verification
-
On your Windows VM, navigate to the Device Manager:
- Click Start
- Search for Device Manager
-
Ensure that the devices are using the correct drivers:
- Click a device to open the Driver Properties window.
- Navigate to the Driver tab.
- Click Driver Details.
Next steps
- If you installed the NetKVM driver, you might also need to configure the Windows guest’s networking parameters. For more information, see Configuring NetKVM driver parameters.
18.2.1.4. Updating virtio drivers on a Windows guest
To update KVM virtio drivers on a Windows guest operating system (OS), you can use the Windows Update service, if the Windows OS version supports it. If it does not, reinstall the drivers from virtio driver installation media attached to the Windows virtual machine (VM).
Prerequisites
- A Windows guest OS with virtio drivers installed.
-
If not using
Windows Update, an installation medium with up-to-date KVMvirtiodrivers must be attached to the Windows VM. For instructions on preparing the medium, see Preparing virtio driver installation media on a host machine.
Procedure 1: Updating the drivers by using Windows Update
On Windows 10, Windows Server 2016 and later operating systems, check if the driver updates are available by using the Windows Update graphical interface:
- Start the Windows VM and log in to its guest OS.
-
Navigate to the Optional updates page:
Settings Windows Update Advanced options Optional updates
- Install all updates from Red Hat, Inc.
Procedure 2: Updating the drivers by reinstalling them
On operating systems prior to Windows 10 and Windows Server 2016, or if the OS does not have access to Windows Update, reinstall the drivers. This restores the Windows guest OS network configuration to default (DHCP). If you want to preserve a customized network configuration, you also need to create a backup and restore it by using the netsh utility:
- Start the Windows VM and log in to its guest OS.
-
Open the Windows Command Prompt:
- Use the Super+R keyboard shortcut.
-
In the window that appears, type
cmdand press Ctrl+Shift+Enter to run as administrator.
-
Back up the OS network configuration by using the Windows Command Prompt:
C:\WINDOWS\system32\netsh dump > backup.txt -
Reinstall KVM
virtiodrivers from the attached installation media. Do one of the following:-
Reinstall the drivers by using the Windows Command Prompt, where X is the installation media drive letter. The following commands install all
virtiodrivers.-
If using a 64-bit vCPU:
C:\WINDOWS\system32\msiexec.exe /i X:\virtio-win-gt-x64.msi /passive /norestart
-
If using a 32-bit vCPU:
C:\WINDOWS\system32\msiexec.exe /i X:\virtio-win-gt-x86.msi /passive /norestart
-
- Reinstall the drivers using the graphical interface without rebooting the VM.
-
-
Restore the OS network configuration using the Windows Command Prompt:
C:\WINDOWS\system32\netsh -f backup.txt - Reboot the VM to complete the driver installation.
18.2.1.5. Enabling QEMU Guest Agent on Windows guests
To allow a RHEL host to perform a certain subset of operations on a Windows virtual machine (VM), you must enable the QEMU Guest Agent (GA). To do so, add a storage device that contains the QEMU Guest Agent installer to an existing VM or when creating a new VM, and install the drivers on the Windows guest operating system.
To install the Guest Agent (GA) by using the graphical interface, see the procedure below. To install the GA on the command line, use the Microsoft Windows Installer (MSI).
Prerequisites
- An installation medium with the Guest Agent is attached to the VM. For instructions on preparing the medium, see Preparing virtio driver installation media on a host machine.
Procedure
-
In the Windows guest operating system, open the
File Explorerapplication. -
Click
This PC. -
In the
Devices and drivespane, open thevirtio-winmedium. -
Open the
guest-agentfolder. -
Based on the operating system installed on the VM, run one of the following installers:
-
If using a 32-bit operating system, run the
qemu-ga-i386.msiinstaller. -
If using a 64-bit operating system, run the
qemu-ga-x86_64.msiinstaller.
-
If using a 32-bit operating system, run the
-
Optional: If you want to use the para-virtualized serial driver (
virtio-serial) as the communication interface between the host and the Windows guest, verify that thevirtio-serialdriver is installed on the Windows guest. For more information about installingvirtiodrivers, see: Installing virtio drivers on a Windows guest.
Verification
-
On your Windows VM, navigate to the Services window.
Computer Management > Services
-
Ensure that the status of the
QEMU Guest Agentservice isRunning.
18.2.2. Enabling Hyper-V enlightenments
Hyper-V enlightenments provide a method for KVM to emulate the Microsoft Hyper-V hypervisor. This improves the performance of Windows virtual machines.
The following sections provide information about the supported Hyper-V enlightenments and how to enable them.
18.2.2.1. Enabling Hyper-V enlightenments on a Windows virtual machine
Hyper-V enlightenments provide better performance in a Windows virtual machine (VM) running in a RHEL 8 host. For instructions on how to enable them, see the following.
Procedure
-
Use the
virsh editcommand to open the XML configuration of the VM. For example:# virsh edit windows-vm -
Add the following
<hyperv>sub-section to the<features>section of the XML:<features> [...] <hyperv> <relaxed state='on'/> <vapic state='on'/> <spinlocks state='on' retries='8191'/> <vpindex state='on'/> <runtime state='on' /> <synic state='on'/> <stimer state='on'> <direct state='on'/> </stimer> <frequencies state='on'/> </hyperv> [...] </features>If the XML already contains a
<hyperv>sub-section, modify it as shown above. -
Change the
clocksection of the configuration as follows:<clock offset='localtime'> ... <timer name='hypervclock' present='yes'/> </clock>
- Save and exit the XML configuration.
- If the VM is running, restart it.
Verification
-
Use the
virsh dumpxmlcommand to display the XML configuration of the running VM. If it includes the following segments, the Hyper-V enlightenments are enabled on the VM.<hyperv> <relaxed state='on'/> <vapic state='on'/> <spinlocks state='on' retries='8191'/> <vpindex state='on'/> <runtime state='on' /> <synic state='on'/> <stimer state='on'> <direct state='on'/> </stimer> <frequencies state='on'/> </hyperv> <clock offset='localtime'> ... <timer name='hypervclock' present='yes'/> </clock>
18.2.2.2. Configurable Hyper-V enlightenments
You can configure certain Hyper-V features to optimize Windows VMs. The following table provides information about these configurable Hyper-V features and their values.
Table 18.1. Configurable Hyper-V features
| Enlightenment | Description | Values |
|---|---|---|
|
evmcs |
Implements paravirtualized protocol between L0 (KVM) and L1 (Hyper-V) hypervisors, which enables faster L2 exits to the hypervisor. This feature is exclusive to Intel processors. |
on, off |
|
frequencies |
Enables Hyper-V frequency Machine Specific Registers (MSRs). |
on, off |
|
ipi |
Enables paravirtualized inter processor interrupts (IPI) support. |
on, off |
|
reenlightenment |
Notifies when there is a time stamp counter (TSC) frequency change which only occurs during migration. It also allows the guest to keep using the old frequency until it is ready to switch to the new one. |
on, off |
|
relaxed |
Disables a Windows sanity check that commonly results in a BSOD when the VM is running on a heavily loaded host. This is similar to the Linux kernel option no_timer_check, which is automatically enabled when Linux is running on KVM. |
on, off |
|
runtime |
Sets processor time spent on running the guest code, and on behalf of the guest code. |
on, off |
|
spinlocks |
|
on, off |
|
stimer |
Enables synthetic timers for virtual processors. Note that certain Windows versions revert to using HPET (or even RTC when HPET is unavailable) when this enlightenment is not provided, which can lead to significant CPU consumption, even when the virtual CPU is idle. |
on, off |
|
stimer-direct |
Enables synthetic timers when an expiration event is delivered via a normal interrupt. |
on, off. |
|
synic |
Together with stimer, activates the synthetic timer. Windows 8 uses this feature in periodic mode. |
on, off |
|
time |
Enables the following Hyper-V-specific clock sources available to the VM,
|
on, off |
|
tlbflush |
Flushes the TLB of the virtual processors. |
on, off |
|
vapic |
Enables virtual APIC, which provides accelerated MSR access to the high-usage, memory-mapped Advanced Programmable Interrupt Controller (APIC) registers. |
on, off |
|
vpindex |
Enables virtual processor index. |
on, off |
18.2.3. Configuring NetKVM driver parameters
After the NetKVM driver is installed, you can configure it to better suit your environment. The parameters listed in the following procedure can be configured by using the Windows Device Manager (devmgmt.msc).
Modifying the driver’s parameters causes Windows to reload that driver. This interrupts existing network activity.
Prerequisites
-
The NetKVM driver is installed on the virtual machine.
For more information, see Installing KVM paravirtualized drivers for Windows virtual machines.
Procedure
-
Open Windows Device Manager.
For information about opening Device Manager, refer to the Windows documentation.
-
Locate the Red Hat VirtIO Ethernet Adapter.
- In the Device Manager window, click + next to Network adapters.
-
Under the list of network adapters, double-click Red Hat VirtIO Ethernet Adapter.
The Properties window for the device opens.
-
View the device parameters.
In the Properties window, click the Advanced tab.
-
Modify the device parameters.
-
Click the parameter you want to modify.
Options for that parameter are displayed.
-
Modify the options as needed.
For information about the NetKVM parameter options, refer to NetKVM driver parameters.
- Click OK to save the changes.
-
18.2.4. NetKVM driver parameters
The following table provides information about the configurable NetKVM driver logging parameters.
Table 18.2. Logging parameters
| Parameter | Description 2 |
|---|---|
|
Logging.Enable |
A Boolean value that determines whether logging is enabled. The default value is Enabled. |
|
Logging.Level |
An integer that defines the logging level. As the integer increases, so does the verbosity of the log.
High logging levels will slow down your virtual machine. |
The following table provides information about the configurable NetKVM driver initial parameters.
Table 18.3. Initial parameters
| Parameter | Description |
|---|---|
|
Assign MAC |
A string that defines the locally-administered MAC address for the paravirtualized NIC. This is not set by default. |
|
Init.Do802.1PQ |
A Boolean value that enables Priority/VLAN tag population and removal support. The default value is Enabled. |
|
Init.MaxTxBuffers |
An integer that represents the number of TX ring descriptors that will be allocated. The value is limited by the size of Tx queue of QEMU. The default value is 1024. Valid values are: 16, 32, 64, 128, 256, 512, and 1024. |
|
Init.MaxRxBuffers |
An integer that represents the number of RX ring descriptors that will be allocated. The value is limited by the size of Tx queue of QEMU. The default value is 1024. Valid values are: 16, 32, 64, 128, 256, 512, 1024, 2048, and 4096. |
|
Offload.Tx.Checksum |
Specifies the TX checksum offloading capability. In Red Hat Enterprise Linux 8, the valid values for this parameter are:
|
|
Offload.Rx.Checksum |
Specifies the RX checksum offloading capability. In Red Hat Enterprise Linux 8, the valid values for this parameter are:
|
|
Offload.Tx.LSO |
Specifies the TX large segments offloading (LSO) capability. In Red Hat Enterprise Linux 8, the valid values for this parameter are:
|
|
MinRxBufferPercent |
Specifies minimal amount of available buffers in RX queue in percent of total amount of RX buffers. If the actual number of available buffers is lower than that value, the NetKVM driver indicates low resources condition to the operating system (requesting it to return the RX buffers as soon as possible)
Minimum value (default) —
Maximum value — |
18.2.5. Optimizing background processes on Windows virtual machines
To optimize the performance of a virtual machine (VM) running a Windows OS, you can configure or disable a variety of Windows processes.
Certain processes might not work as expected if you change their configuration.
Procedure
You can optimize your Windows VMs by performing any combination of the following:
- Remove unused devices, such as USBs or CD-ROMs, and disable the ports.
- Disable background services, such as SuperFetch and Windows Search. For more information about stopping services, see Disabling system services or Stop-Service.
-
Disable
useplatformclock. To do so, run the following command,# bcdedit /set useplatformclock No - Review and disable unnecessary scheduled tasks, such as scheduled disk defragmentation. For more information about how to do so, see Disable Scheduled Tasks.
- Make sure the disks are not encrypted.
- Reduce periodic activity of server applications. You can do so by editing the respective timers. For more information, see Multimedia Timers.
- Close the Server Manager application on the VM.
- Disable the antivirus software. Note that disabling the antivirus might compromise the security of the VM.
- Disable the screen saver.
- Keep the Windows OS on the sign-in screen when not in use.
18.3. Enabling standard hardware security on Windows virtual machines
To secure Windows virtual machines (VMs), you can enable basic level security by using the standard hardware capabilities of the Windows device.
Prerequisites
- Make sure you have installed the latest WHQL certified VirtIO drivers.
- Make sure the VM’s firmware supports UEFI boot.
-
Install the
edk2-OVMFpackage on your host machine.# {PackageManagerCommand} install edk2-ovmf -
Install the
vTPMpackages on your host machine.# {PackageManagerCommand} install swtpm libtpms - Make sure the VM is using the Q35 machine architecture.
- Make sure you have the Windows installation media.
Procedure
-
Enable TPM 2.0 by adding the following parameters to the
<devices>section in the VM’s XML configuration.<devices> [...] <tpm model='tpm-crb'> <backend type='emulator' version='2.0'/> </tpm> [...] </devices> - Install Windows in UEFI mode. For more information about how to do so, see Creating a SecureBoot virtual machine.
- Install the VirtIO drivers on the Windows VM. For more information about how to do so, see Installing virtio drivers on a Windows guest.
- In UEFI, enable Secure Boot. For more information about how to do so, see Secure Boot.
Verification
-
Ensure that the Device Security page on your Windows machine displays the following message:
Settings > Update & Security > Windows Security > Device Security
Your device meets the requirements for standard hardware security.
18.4. Next steps
- To share files between your RHEL 8 host and its Windows VMs, you can use NFS.
Как и многие другие гипервизоры для корректной работы виртуальных машин Proxmox рекомендуется, чтобы была выполнена установка гостевых средств интеграции Proxmox. Например, такие же рекомендации есть и для гипервизоров ESXi, VMware Workstation, VirtualBox. Установка гостевых средств интеграции позволяет получить полный набор всех доступных возможностей, которые вам может предоставить Proxmox – расширенное управление электропитанием, получение дополнительной информации в веб панели управления гипервизора, дополнительные драйвера т.д.

В этой публикации я покажу установку гостевых средств интеграции для платформы Windows и для платформы Linux.
Установка гостевых средств интеграции Proxmox для Linux
Установка гостевых средств интеграции для Linux проще, чем для Windows. Для наиболее популярных дистрибутивов гостевые средства интеграции Proxmox уже доступны в репозиториях с программных обеспечением дистрибутива.
Debian дистрибутивы
Для установки гостевых средств интеграции на Debian подобных дистрибутивах выполните следующую действия:
1. Включаем гостевые средства интеграции в настройках виртуальной машины:

2. В гостевой операционной системе установите средства интеграции:
sudo apt install qemu-guest-agent3. Затем включите службу гостевых средств интеграции:
sudo systemctl enable qemu-guest-agent4. Останавливаем виртуальную машину.
5. Заново запускаем виртуальную машину.
RHEL дистрибутивы
Для установки гостевых средств интеграции на Debian подобных дистрибутивах выполните следующую действия:
1. Включаем гостевые средства интеграции в настройках виртуальной машины:
2. В гостевой операционной системе установите средства интеграции:
yum install qemu-guest-agent3. Затем включите службу гостевых средств интеграции:
systemctl enable qemu-guest-agent4. Останавливаем виртуальную машину.
5. Заново запускаем виртуальную машину.
Установка гостевых средств интеграции Proxmox для Windows
Процесс установки средств интеграции на Windows немного длиннее:
1. Загружаем дистрибутив с VirtIO.
2. Монтируем образ из п. 1 – либо непосредственно в гостевой ОС, либо через виртуальный CD/DVD привод в Proxmox.
3. Включаем гостевые средства интеграции в настройках виртуальной машины.

4. В корне смонтированного образа находим файл с дистрибутивом VirtIO нужной вам разрядности и запускаем его.

5. Следуя шагам мастера выполняем установку дистрибутива VirtIO.
6. Затем запустите дистрибутив “virtio-win-guest-tools.msi”. Следуя шагам мастера выполните установку.
7. Останавливаем виртуальную машину.
8. Заново запускаем виртуальную машину.
Процедуру проверки стоит начать с веб интерфейса администрирования Proxmox. В случае успешной установки и корректной работы гостевых средств интеграции вы должны увидеть на вкладке “Summary” сводную информацию об IP-адресах виртуальной машины.

Также в консоли Proxmox вы можете выполнить вот такую команду:
qm agent <vmid> ping
В случае, если гостевые средства интеграции доступы эта команда возвращает пустой вывод. Если средства интеграции по какой-то причине не доступны, то должна отобразиться какая-то ошибка.
Если ошибка все же возникла, то проверьте статусы служб интеграции в гостевой операционной системе. Для Linux систем это служба qume-quest-agent:
systemctl status qemu-quest-agent

Для Windows систем это служба “QEMU-GA”.
