
PyQt5 является одним из наиболее часто используемых модулей для создания GUI приложений в Python, и это связанно с его простотой, о которой вы узнаете далее.
Еще одна замечательная особенность, которая вдохновляет разработчиков пользоваться PyQt5 – это PyQt5 Designer, благодаря которому можно создавать сложные GUI приложения достаточно быстро. Вам нужно только перетаскивать свои виджеты для создания собственной формы. У нас есть готовый сборник 54 уроков по другому фреймворку wxPython.
- Создаем простой калькулятор в PyQt5
- Создаем игру Сапёр на PyQt5
- История курса рубля на PyQt5 + XML от ЦБ РФ
Другие фреймворки
- wxPython
- Tkinter
- PyCairo
В данном руководстве по PyQt5, я буду использовать Python 3.6 на Ubuntu и предположение, что вы уже имеете базовое представление о Python.
Есть вопросы по Python?
На нашем форуме вы можете задать любой вопрос и получить ответ от всего нашего сообщества!
Telegram Чат & Канал
Вступите в наш дружный чат по Python и начните общение с единомышленниками! Станьте частью большого сообщества!
Паблик VK
Одно из самых больших сообществ по Python в социальной сети ВК. Видео уроки и книги для вас!
Звучит замечательно! Начнем с установки PyQt5, и затем перейдем к тому, как разрабатывать GUI приложение с примерами.
Краткое содержание
- 1 Установка PyQt5
- 1.1 Установка PyQt5 через pip
- 1.2 Установка PyQt5 из исходников на Linux
- 1.3 Установка PyQt5 из исходников на Windows
- 2 Устанавливаем PyQt5 Designer
- 2.1 Где находится дизайнер PyQt5?
- 3 Как использовать дизайнер PyQt5
- 4 Разница между QDialog, QMainWindow, и QWidget
- 5 Загрузка .ui против конвертации .ui в .py
- 5.1 Загрузка файла .ui в ваш код Python
- 5.2 Конвертация файла .ui в .py file при помощи pyuic5
- 6 Виджет QLabel
- 6.1 Меняем шрифт QLabel
- 6.2 Меняем размер QLabel
- 6.3 Меняем текст в QLabel
- 7 Виджет QLineEdit
- 7.1 Метод setStyleSheet()
- 8 Виджет QPushButton
- 9 Визуальный редактор signal/slot
- 10 Как испускать сигналы в PyQt5
- 10.1 Как использовать сигнал в PyQt5
- 10.2 Переопределение сигнала (события) в PyQt5
- 11 Виджет QComboBox
- 11.1 Получаем все элементы из QComboBox
- 11.2 Выбор одного элемента из QCombobox
- 12 QTableWidget
- 12.1 Очистка содержимого QTableWidget
- 12.2 Заполнение QTableWidget из кода
- 12.3 Делаем QTableWidget нередактируемым (только для чтения)
- 12.4 Заголовок для столбцов в QTableWidget
- 12.5 Как сортировать QTableWidget
- 12.6 Добавляем QComboBox в QTableWidget
- 12.7 QProgressBar в QTableWidget
- 13 Компиляция Python приложения
Установка PyQt5
Существует две версии PyQt5: коммерческая и бесплатная версия GPL, которой мы будем пользоваться в этом руководстве.
Есть два способа установки PyQt5:
- Установка PyQt5 через pip
- Установка PyQt5 из исходников на Linux
Установка PyQt5 через pip
Чтобы установить PyQt5 при помощи pip, выполните следующую команду:
Чтобы убедиться в том, что установка прошла успешно, запустите следующий код:
Если не возникло ни одной ошибки, это значит, что вы успешно установили PyQt5. В случае, если ошибки возникли, возможно это связанно с тем, что вы используете версию Python, которая не поддерживается.
Установка PyQt5 из исходников на Linux
Для установки PyQt5 из исходника, вам нужно сделать следующее:
- Установить SIP;
- Скачать исходник PyQt5;
- Настроить и установить.
Как вы возможно знаете, PyQt5 связывает Python с популярной библиотекой Qt, которая написана на С++.
Инструмент, который создает эту связь, называется SIP. Так что для установки PyQt5 из исходника, вам для начала нужно установить SIP.
Для установки SIP, запустите следующую команду:
|
sudo pip3 install pyqt5—sip |
Теперь вы можете загрузить и установить исходник PyQt5.
Исходники
Скачать исходник PyQt5 можно отсюда: https://www.riverbankcomputing.com/software/pyqt/download5
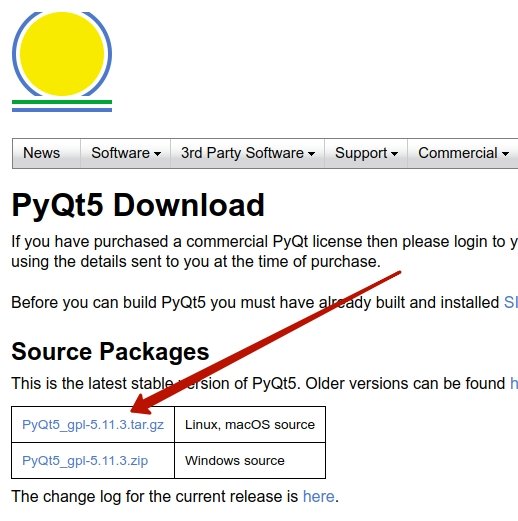
Внимание: На момент прочтения статьи возможно появилась новая версия которая отличается от той что в скрине. Версия на текущий момент 5.11.3, вы должны самостоятельно скопировать ссылку с сайта и предоставить её в wget. Заметьте, что обновить версию придется во всех ниже предоставленных командах.
|
wget https://sourceforge.net/projects/pyqt/files/PyQt5/PyQt—5.11.3/PyQt5_gpl—5.11.3.tar.gz tar —xvzf PyQt5_gpl—5.11.3.tar.gz cd PyQt5_gpl—5.11.3 |
Мы распаковали сжатый исходник, теперь запустите следующие команды внутри корня папки:
|
sudo python3 configure.py sudo make sudo make install |
Чтобы убедиться в том, что все прошло гладко, попробуйте импортировать модуль PyQt5 так же, как мы делали все раньше. Все должно пройти хорошо.
Установка PyQt5 из исходников на Windows
Скачивайте и распакуйте архив с сайта которого мы указали выше.
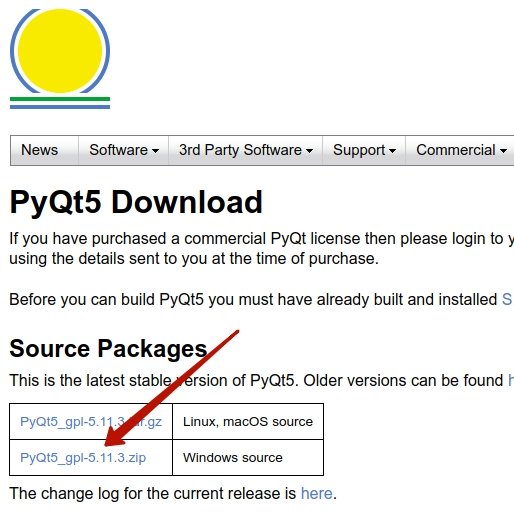
Так как SIP требует компилятор GCC, вам нужно установить MinGW, который является портом Windows для компилятора Linux, GCC.
Единственное, что нужно поменять — это момент конфигурации. Вам нужно сообщить Python о платформе.
Это можно выполнить следующим образом:
|
python configure.py —platform win32—g++ make make install |
Поздравляем! Вы успешно установили PyQt5 из исходника.
Установка PyQt5 Designer
Есть два способа создания GUI приложений при помощи PyQt5:
- Дизайн виджетов при помощи кода;
- Использование PyQt5 Designer.
В этом руководстве мы используем PyQt5 Designer, который упрощает процесс на столько, что вы можете выполнить большой объем работы за секунды.
Недорого заказать услуги SMM продвижения более чем в 9 социальных сетях можно на https://doctorsmm.com/. С помощью этого сервиса можно раскрутить свою группу, страницу, сообщество или канал и набрать нужное количество подписчиков, лайков, репостов и других соцсигналов.
Дизайнер PyQt5 поставляется вместе с набором инструментов. Для его установки, вам нужно установить эти инструменты.
|
$ pip3 install pyqt5—tools |
Где находится дизайнер PyQt5?
После удачной установки, вы можете найти дизайнер PyQt5 здесь:
|
C:\Program Files\Python36\Lib\site—packages\pyqt5—tools\ |
Кстати, если вы установили только для своего текущего пользовательского аккаунта, вы найдете дизайнер PyQt5 вот здесь:
|
C:\Users\PythonUser\AppData\Local\Programs\Python\Python36—32\Lib\site—packages\ pyqt5—tools\ |
Вы можете создать короткий путь для него, вместо того, чтобы постоянно переходить к этому расположению для запуска дизайнера PyQt5.
Как использовать дизайнер PyQt5
Откройте designer.exe и увидите диалоговое окно, спрашивающее о том, какую форму шаблона вы предпочитаете.

Существует пять видов доступных шаблонов:
- Диалоговое окно с кнопками внизу (Dialog with Buttons Bottom): создает форму с кнопками ОК и Cancel в правом нижнем углу формы.
- Диалоговое окно с кнопками справа (Dialog with Buttons Right): создает форму с кнопками OK и Cancel в верхнем правом углу формы.
- Диалоговое окно без кнопок (Dialog without Buttons): создает пустую форму;
- Главное окно (Main Window): создает окно с панелью меню и набором инструментов. Унаследовано из QmainWindow;
- Виджет (Widget): создает виджет, наследуемый из класса Qwidget. Отличается от диалоговых шаблонов тем, что они наследуются из класса QВialog
Итак, у нас есть три типа шаблонов. В чем между ними разница?
Разница между QDialog, QMainWindow, и Qwidget
- QWidget – это базовый класс для всех GUI Элементов в PyQt5;
- QDialog используется при запросе чего-либо у пользователя, например, запросы о принятии или отклонении чего-нибудь. Основан на Qwidget.
- QMainWindow – самый большой шаблон, где вы можете разместить вашу панель инструментов, меню, статус и другие виджеты. Не имеет встроенных кнопок разрешения, таких как в QDialog.
Загрузка .ui против конвертации .ui в .py
В данном руководстве мы используем PyQt5 Designer, но перед тем, как мы пойдем дальше, давайте рассмотрим, как еще мы можем использовать сгенерированный файл из PyQt5 Designer.
Нам нужно открыть PyQt5 Designer, выбрать шаблон Main Window и нажать кнопку create.
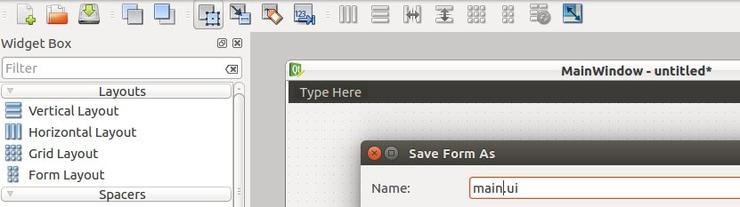
Далее в файловом меню (File), нажимаем сохранить. PyQt5 Designer экспортирует вашу форму в XML с расширением .ui.
Для использования этого дизайна, у вас есть два способа:
- Загрузить файл .ui в ваш код Python;
- Конвертировать файл .ui в файл .py при помощи pyuic5;
Загрузка .ui файла в ваш код Python
Чтобы загрузить файл .ui в ваш код Python, вы можете использовать функцию loadUI() из uic вот так:
|
from PyQt5 import QtWidgets, uic import sys app = QtWidgets.QApplication([]) win = uic.loadUi(«mydesign.ui») # расположение вашего файла .ui win.show() sys.exit(app.exec()) |
Если вы запустите код, вы увидите окно, в котором есть только ярлык.
Это значит, что ui файл успешно загрузился!
Мы используем sys.exit(app.exec()) вместо использования app.exec() напрямую, чтобы выслать правильный код статуса, родительский процесс, или процесс вызова.
Если вы использовали app.exec() напрямую, приложение отправит ноль, что говорит об успехе, и это произойдет даже если приложение упадет.
Конвертация файла .ui в файл .py при помощи pyuic5
Давайте попробуем еще один способ и конвертируем файл .ui в код Python:
|
$ pyuic5 mydesign.ui —o mydesign.py |
Да! Был создан новый файл под названием mydesign.py. Теперь, импортируем этот файл, чтобы показать его в окне.
|
1 2 3 4 5 6 7 8 9 10 11 12 13 14 15 16 17 |
from PyQt5 import QtWidgets from mydesign import Ui_MainWindow # импорт нашего сгенерированного файла import sys class mywindow(QtWidgets.QMainWindow): def __init__(self): super(mywindow, self).__init__() self.ui = Ui_MainWindow() self.ui.setupUi(self) app = QtWidgets.QApplication([]) application = mywindow() application.show() sys.exit(app.exec()) |
Если запустите этот код, вы должны увидеть то же окно, что было в первом методе.
Преимущество использования второго метода — это автоматическое завершение, которое выполнит IDE, так как все ваши виджеты импортированы. В то же время, пользуясь первым методом, вы просто загружаете файл .ui и вам нужно обращать внимание на названия ваших виджетов.
Еще одно преимущество использования второго метода. Скорость: вам не нужен парсинг XML для загрузки UI.
Так что мы можем сказать, что конвертация файла .ui в файл .py – безопаснее для кодинга и быстрее для загрузки.
Настало время закатить рукава и поиграть с виджетами PyQt5.
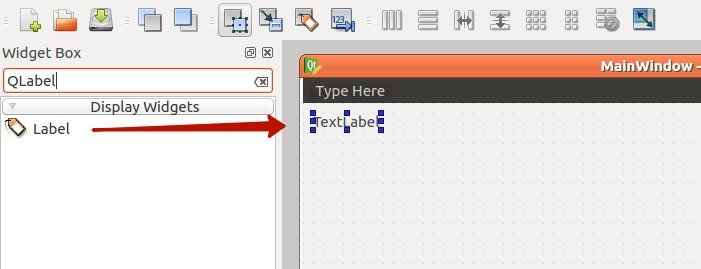
Для внесение виджета QLabel в вашу форму, выполните следующее:
- Откройте PyQt5 Designer и выберите шаблон Main Window;
- Перетяните виджет ярлыка из бокса слева;
Сохраните дизайн в файл как qlabel.ui и конвертируйте его в файл qlabel.py. Теперь поработаем с ярлыком виджета при помощи кода.
|
pyuic5 qlabel.ui —o qlabel.py |
Результат:
Меняем шрифт QLabel
Чтобы поменять шрифт QLabel, используйте метод setFont() и передайте ему QFont следующим образом:
|
1 2 3 4 5 6 7 8 9 10 11 12 13 14 15 16 17 18 19 20 21 22 |
from PyQt5 import QtWidgets, QtGui from mydesign import Ui_MainWindow import sys class mywindow(QtWidgets.QMainWindow): def __init__(self): super(mywindow, self).__init__() self.ui = Ui_MainWindow() self.ui.setupUi(self) self.ui.label.setFont( QtGui.QFont(‘SansSerif’, 30) ) # Изменение шрифта и размера app = QtWidgets.QApplication([]) application = mywindow() application.show() sys.exit(app.exec()) |
После того, как запустите этот код, обратите внимание на то, что ярлык возникает некорректно, так как размер — меньше, чем размер шрифта, который мы используем. Так что нам нужно установить размер ярлыка.
Меняем размер QLabel
Чтобы поменять размер QLabel, вам нужно указать его геометрию при помощи метода setGeometry(), вот так:
|
1 2 3 4 5 6 7 8 9 10 11 12 13 14 15 16 17 18 19 20 21 22 23 24 25 |
from PyQt5 import QtWidgets, QtGui,QtCore from mydesign import Ui_MainWindow import sys class mywindow(QtWidgets.QMainWindow): def __init__(self): super(mywindow, self).__init__() self.ui = Ui_MainWindow() self.ui.setupUi(self) self.ui.label.setFont( QtGui.QFont(‘SansSerif’, 30) ) self.ui.label.setGeometry( QtCore.QRect(10, 10, 200, 200) ) # изменить геометрию ярлыка app = QtWidgets.QApplication([]) application = mywindow() application.show() sys.exit(app.exec()) |
Меняем текст в QLabel
Чтобы изменить текст в QLabel, вы можете использовать метод setText(), вот так:
|
1 2 3 4 5 6 7 8 9 10 11 12 13 14 15 16 17 18 19 20 21 22 23 24 25 26 27 |
from PyQt5 import QtWidgets, QtGui,QtCore from qlabel import Ui_MainWindow import sys class mywindow(QtWidgets.QMainWindow): def __init__(self): super(mywindow, self).__init__() self.ui = Ui_MainWindow() self.ui.setupUi(self) self.ui.label.setFont( QtGui.QFont(‘SansSerif’, 30) ) self.ui.label.setGeometry( QtCore.QRect(10, 10, 200, 200) ) self.ui.label.setText(«PyScripts») # Меняем текст app = QtWidgets.QApplication([]) application = mywindow() application.show() sys.exit(app.exec()) |
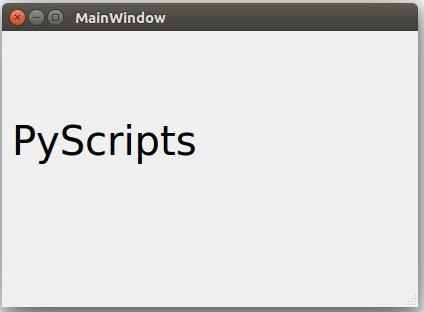
Именно на столько все просто! Давайте рассмотрим другие виджеты.
Виджет QLineEdit – это редактируемое поле, где вы можете принимать данные от пользователя. LineEdit содержит множество методов, с которыми можно работать.
Я создам новый дизайн qline.ui, используя дизайнер PyQt5 и внесу шесть виджетов QLineEdit и экспортирую его в файл qline.py.
|
pyuic5 qline.ui —o qline.py |
Cодержимое файла qline.py после конвертации:
|
1 2 3 4 5 6 7 8 9 10 11 12 13 14 15 16 17 18 19 20 21 22 23 24 25 26 27 28 29 30 31 32 33 34 35 36 37 38 39 40 41 42 43 44 45 46 47 48 49 |
# -*- coding: utf-8 -*- # Form implementation generated from reading ui file ‘qline.ui’ # # Created by: PyQt5 UI code generator 5.11.3 # # WARNING! All changes made in this file will be lost! from PyQt5 import QtCore, QtGui, QtWidgets class Ui_MainWindow(object): def setupUi(self, MainWindow): MainWindow.setObjectName(«MainWindow») MainWindow.resize(785, 600) self.centralwidget = QtWidgets.QWidget(MainWindow) self.centralwidget.setObjectName(«centralwidget») self.lineEdit = QtWidgets.QLineEdit(self.centralwidget) self.lineEdit.setGeometry(QtCore.QRect(10, 10, 291, 31)) self.lineEdit.setObjectName(«lineEdit») self.lineEdit_2 = QtWidgets.QLineEdit(self.centralwidget) self.lineEdit_2.setGeometry(QtCore.QRect(10, 50, 291, 31)) self.lineEdit_2.setObjectName(«lineEdit_2») self.lineEdit_3 = QtWidgets.QLineEdit(self.centralwidget) self.lineEdit_3.setGeometry(QtCore.QRect(10, 90, 291, 31)) self.lineEdit_3.setObjectName(«lineEdit_3») self.lineEdit_4 = QtWidgets.QLineEdit(self.centralwidget) self.lineEdit_4.setGeometry(QtCore.QRect(10, 130, 291, 31)) self.lineEdit_4.setObjectName(«lineEdit_4») self.lineEdit_5 = QtWidgets.QLineEdit(self.centralwidget) self.lineEdit_5.setGeometry(QtCore.QRect(10, 170, 291, 31)) self.lineEdit_5.setObjectName(«lineEdit_5») self.lineEdit_6 = QtWidgets.QLineEdit(self.centralwidget) self.lineEdit_6.setGeometry(QtCore.QRect(10, 210, 291, 31)) self.lineEdit_6.setObjectName(«lineEdit_6») MainWindow.setCentralWidget(self.centralwidget) self.menubar = QtWidgets.QMenuBar(MainWindow) self.menubar.setGeometry(QtCore.QRect(0, 0, 785, 25)) self.menubar.setObjectName(«menubar») MainWindow.setMenuBar(self.menubar) self.statusbar = QtWidgets.QStatusBar(MainWindow) self.statusbar.setObjectName(«statusbar») MainWindow.setStatusBar(self.statusbar) self.retranslateUi(MainWindow) QtCore.QMetaObject.connectSlotsByName(MainWindow) def retranslateUi(self, MainWindow): _translate = QtCore.QCoreApplication.translate MainWindow.setWindowTitle(_translate(«MainWindow», «MainWindow»)) |
Давайте познакомимся с методами QLineEdit:
|
1 2 3 4 5 6 7 8 9 10 11 12 13 14 15 16 17 18 19 20 21 22 23 24 25 26 27 28 29 30 31 32 33 34 35 |
from PyQt5 import QtWidgets, QtCore # Импортируем наш файл from qline import Ui_MainWindow import sys class mywindow(QtWidgets.QMainWindow): def __init__(self): super(mywindow, self).__init__() self.ui = Ui_MainWindow() self.ui.setupUi(self) # Меняем текст self.ui.lineEdit.setText(«Добро пожаловать на PythonScripts») # указать максимальную длину self.ui.lineEdit_2.setMaxLength(10) # ввод пароля self.ui.lineEdit_3.setEchoMode(QtWidgets.QLineEdit.Password) # только чтение без изменения содержимого. self.ui.lineEdit_4.setReadOnly(True) # меняем цвет вводимого текста self.ui.lineEdit_5.setStyleSheet(«color: rgb(28, 43, 255);») # изменение цвета фона QLineEdit self.ui.lineEdit_6.setStyleSheet(«background-color: rgb(28, 43, 255);») app = QtWidgets.QApplication([]) application = mywindow() application.show() sys.exit(app.exec()) |
Результат:
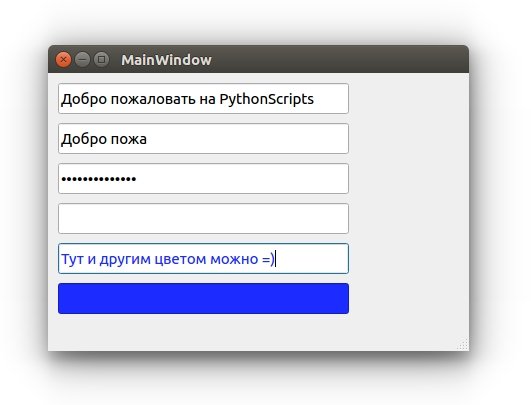
- Для 1-го QLineEdit, мы изменили текст, при помощи метода setText().
- Для 2-го QLineEdit, мы установили максимум доступных 10-и символов, так что более 10-и приниматься не будут.
- Для 3-го QLineEdit, мы установили режим пароля, так ваши введенные данные отображаются как звездочки;
- Для 4-го QLineEdit, мы установили режим «только для чтения», так что редактировать контент не представляется возможным.
- Для 5-го QLineEdit мы изменили цвет шрифта при помощи метода setStyleSheet() и указали нужный цвет с помощью CSS (как и для обычной веб страницы).
- Для 6-го QLineEdit мы изменили цвет фона при помощи метода setStyleSheet() и CSS.
Метод setStyleSheet()
Метод setStyleSheet() может быть использован с виджетами PyQt5 для изменения стилей.
Вы можете изменить следующие параметры, пользуясь методом setStyleSheet():
- Размер и тип шрифта;
- Цвет текста;
- Цвет заднего фона;
- Цвет верхней границы;
- Цвет нижней границы;
- Цвет левой границы;
- Цвет правой границы;
- Цвет выделения;
- Цвет выделения заднего фона.
Это наиболее важные значения, которые можно передать методу setStyleSheet().
Большая часть ваших программ Python будут содержать виджет QPushButton. Вы нажимаете кнопку, и какой-нибудь код выполняется.
Если у вас имеется опыт в программировании, вы могли слышать об обработке событий, где вы взаимодействуете с виджетом и функция выполняется.
Суть идеи сохранилась такой же и в PyQt5, только определения немного отличаются.
Событие клика в PyQt5 называется сигналом, и метод, который будет выполняться, называется слот.
Так что при нажатии на QPushButton, сигнал издается. Названием сигнала в данном случае, является clicked().
Чтобы связать сигнал со слотом, вам нужно использовать метод connect(), что вы сейчас и увидите.
Этот процесс обработки события продолжает работать до тех пор, пока вы не закроете вашу форму, или главный виджет.
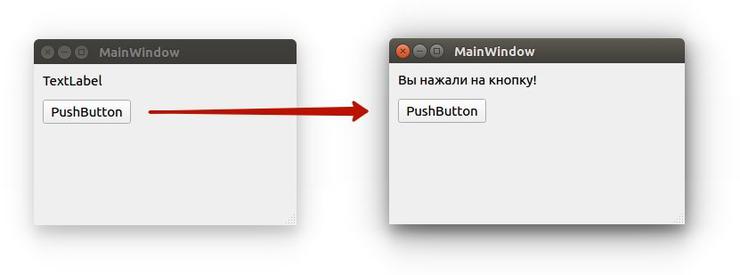
Давайте создадим форму myform.ui при помощи QLabel и QPushButton и экспортируем её в файл myform.py.
Экспортируем myform.ui в myform.py
|
pyuic5 myform.ui —o myform.py |
Сейчас, мы подключим сигнал clicked() к слоту при помощи метода connect(), вот так:
|
self.ui.pushButton.clicked.connect(self.btnClicked) |
Здесь, btnClicked – это слот, или функция, которая будет выполнена после того, как вы кликните на QPushButton.
Итак, ваш код будет выглядеть следующим образом:
|
1 2 3 4 5 6 7 8 9 10 11 12 13 14 15 16 17 18 19 20 21 22 23 24 25 26 |
from PyQt5 import QtWidgets # Импортируем наш шаблон. from myform import Ui_MainWindow import sys class mywindow(QtWidgets.QMainWindow): def __init__(self): super(mywindow, self).__init__() self.ui = Ui_MainWindow() self.ui.setupUi(self) # подключение клик-сигнал к слоту btnClicked self.ui.pushButton.clicked.connect(self.btnClicked) def btnClicked(self): self.ui.label.setText(«Вы нажали на кнопку!») # Если не использовать, то часть текста исчезнет. self.ui.label.adjustSize() app = QtWidgets.QApplication([]) application = mywindow() application.show() sys.exit(app.exec()) |
Результат:
Замечательно!
Визуальный редактор слота/сигнала
Мы видели, как подключать сигнал виджета к слоту при помощи метода connect(), но это не единственный способ.
На самом деле, для каждого виджета есть предопределенные слоты. Вы можете связать сигнал с любым предопределенным слотом, без необходимости кодить в дизайнере PyQt5.
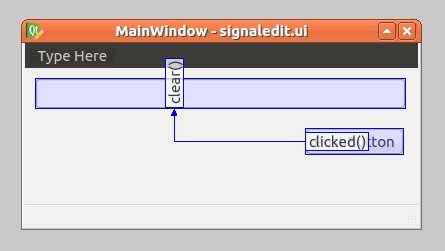
Перетяните QPushButton и QLineEdit в вашу форму.
Нажмите F4 и перетяните курсор из QPushButton и отпустите его в верхней части QLineEdit. Чтобы вернуться в обычный режим, нажмите на F3.
Благодаря этому появится редактор сигнала/слота.
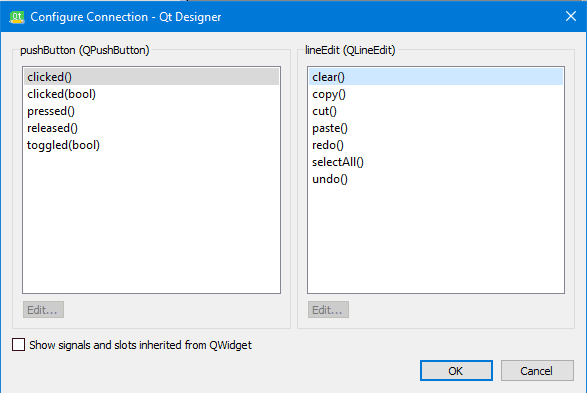
Слева находятся предопределенные сигналы, справа — предопределенные слоты. Скажем, нам нужно подключить сигнал clicked() с слотом «очистки содержимого«.
Выберите сигнал clicked слева и выберите clear слот справа и нажмите OK.
После выполнения подключений ваших сигналов и слотов, вы можете выйти из этого режима, нажав ESC, или F3.
Сейчас, если вы запустите эту форму, и нажмете QPushButton, то любой текст в QLineEdit будет очищен. Вы можете редактировать или удалять эти связи в панели редактора сигналов и слотов.
Сохраните форму как signaledit.ui и конвертируем её в signaledit.py:
|
pyuic5 signaledit.ui —o signaledit.py |
Полученный файл импортируем в наш код:
|
1 2 3 4 5 6 7 8 9 10 11 12 13 14 15 16 17 18 19 20 |
from PyQt5 import QtWidgets # Импортируем наш шаблон. from signaledit import Ui_MainWindow import sys class mywindow(QtWidgets.QMainWindow): def __init__(self): super(mywindow, self).__init__() self.ui = Ui_MainWindow() self.ui.setupUi(self) app = QtWidgets.QApplication([]) application = mywindow() application.show() sys.exit(app.exec()) |
Результат:
Как выпускать сигналы в PyQt5
Мы увидели, как работают сигналы и слоты. Все сигналы, с которыми мы работали, являются предопределенными для нас.
Но что на счет выпуска собственного сигнала?
Это очень просто! Вы можете сделать это, просто использовав класс pyqtSignal, как показано ниже:
- Определите ваше событие типом pyqtSignal;
- Вызовите метод emit() в том месте, где вы хотите, чтобы произошло событие.
Скажем, у нас есть класс nut, и мы хотим, чтобы сигнал cracked был выпущен.
|
from PyQt5.QtCore import pyqtSignal, QObject class nut(QObject): cracked = pyqtSignal() def __init__(self): QObject.__init__(self) def crack(self): self.cracked.emit() |
Как использовать сигнал
Сейчас мы сделаем наш пример более практичным, создаем экземпляр класса nut и выпуская сигнал cracked:
|
1 2 3 4 5 6 7 8 9 10 11 12 13 14 15 16 17 18 19 20 21 |
from PyQt5.QtCore import pyqtSignal, QObject class nut(QObject): cracked = pyqtSignal() def __init__(self): QObject.__init__(self) def crack(self): self.cracked.emit() def crackit(): print(«hazelnut cracked!») hazelnut = nut() # подключение сигнала cracked к слоту crackit hazelnut.cracked.connect(crackit) hazelnut.crack() |
Сигнал cracked успешно выпущен.
Переопределение сигнала (события) в PyQt5
Иногда нам может понадобиться переопределить поведение по умолчанию для особенных событий или сигналов.
Давайте рассмотрим практичный пример для этого случая. Если вы хотите закрыть окно, когда пользователь нажимает на определенную клавишу, вы можете переопределить keyPressEvent внутри вашего главного окна следующим образом:
|
def keyPressEvent(self, e): if e.key() == Qt.Key_F12: self.close() |
Теперь, если пользователь нажмет клавишу F12, главное окно будет закрыто.
Здесь мы переопределили основной сигнал нажатия в главном окне и закрыли это окно.
Вместо того, чтобы разрешить пользователю вводить свои данные в QLineEdit, или любом другом редактируемом виджете, мы можем использовать виджет QCombobBox, чтобы дать список данных, из которого он сможет выбирать.
Давайте перетянем QComboBox в нашу форму и взглянем на её методы.
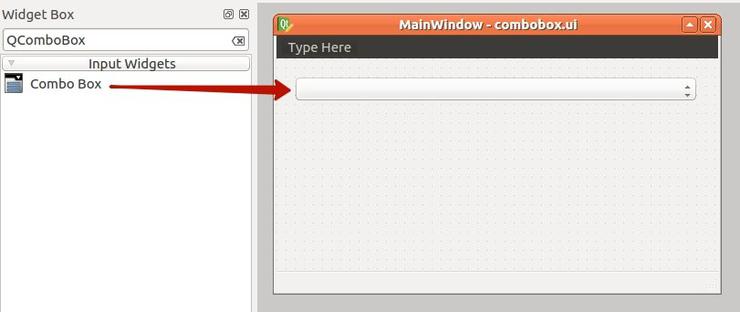
Сохраняем файл как combobox.ui и конвертируем его в combobox.py:
|
pyuic5 combobox.ui —o combobox.py |
Если вы запустите приложение сейчас, обратите внимание на то, что QComboBox — пустой. Чтобы вносить объекты в QComboBox, используйте метод addItem():
|
1 2 3 4 5 6 7 8 9 10 11 12 13 14 15 16 17 18 19 20 21 |
from PyQt5 import QtWidgets from combobox import Ui_MainWindow import sys class mywindow(QtWidgets.QMainWindow): def __init__(self): super(mywindow, self).__init__() self.ui = Ui_MainWindow() self.ui.setupUi(self) # Добавляем новые значения self.ui.comboBox.addItem(«Программист») self.ui.comboBox.addItem(«Дизайнер») app = QtWidgets.QApplication([]) application = mywindow() application.show() sys.exit(app.exec()) |
Получаем все элементы из QComboBox
Нет прямого способа получить все значения из QComboBox, но вы можете применить цикл Python для этой цели. Для этого подойдет функция range.
|
for i in range(self.ui.comboBox.count()): print(self.ui.comboBox.itemText(i)) |
Выбор одного элемента из QCombobox
Чтобы выбрать элемент из QComboBox, у вас есть два метода:
|
# по индексу, который начинается с нуля self.ui.comboBox.setCurrentIndex(1) #выбор по тексту self.ui.comboBox.setCurrentText(«Second item») |
Обратите внимание на то, что при выборе элемента по тексту, следует убедиться в том, что вы вводите правильный текст. В противном случае, QComboBox останется на первом элементе.
Если вы хотите просмотреть вашу базу данных в формате таблицы, в PyQt5 предоставляется QTableWidget как раз для этой цели.
QTableWidget состоит из клеток, каждая клетка — экземпляр класса QTableWidgetItem.
Давайте создадим форму, которая содержит QTableWidget и QPushButton.

Перетяните QTableWidget и QPushButton из PyQt5 Designer. После этого, сохраните форму как qtable.ui и конвертируйте дизайн в qtable.py.
|
pyuic5 qtable.ui —o qtable.py |
Чтобы добавлять ряды в QTableWidget, вы можете использовать метод setRowCount().
Для внесения столбцов в QTableWidget, воспользуйтесь методом setColumnCount().
|
1 2 3 4 5 6 7 8 9 10 11 12 13 14 15 16 17 18 19 20 21 22 |
from PyQt5 import QtWidgets # Импортируем нашу форму. from qtable import Ui_MainWindow import sys class mywindow(QtWidgets.QMainWindow): def __init__(self): super(mywindow, self).__init__() self.ui = Ui_MainWindow() self.ui.setupUi(self) self.ui.tableWidget.setColumnCount(2) self.ui.tableWidget.setRowCount(4) app = QtWidgets.QApplication([]) application = mywindow() application.show() sys.exit(app.exec()) |
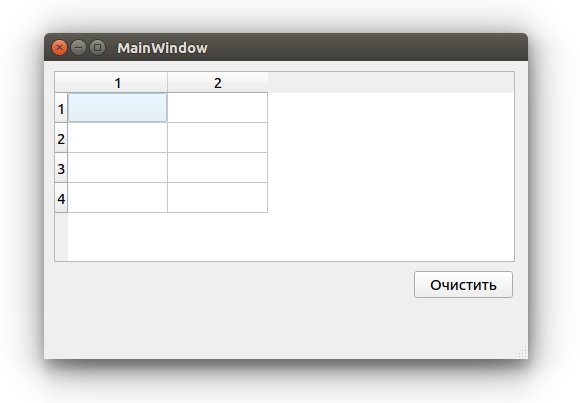
Теперь вы можете писать текст вручную внутри клеток QTableWidget.
Очистка содержимого QTableWidget
Чтобы очистить содержимое QTableWidget, вы можете использовать метод clear, вот так:
|
1 2 3 4 5 6 7 8 9 10 11 12 13 14 15 16 17 18 19 20 21 22 23 24 25 26 27 28 |
from PyQt5 import QtWidgets # Импортируем нашу форму. from qtable import Ui_MainWindow import sys class mywindow(QtWidgets.QMainWindow): def __init__(self): super(mywindow, self).__init__() self.ui = Ui_MainWindow() self.ui.setupUi(self) self.ui.tableWidget.setColumnCount(2) self.ui.tableWidget.setRowCount(4) # очистка таблицы при клике на кнопку. self.ui.pushButton.clicked.connect(self.clear) def clear(self): self.ui.tableWidget.clear() app = QtWidgets.QApplication([]) application = mywindow() application.show() sys.exit(app.exec()) |
Заполнение QTableWidget из кода
Чтобы заполнить QtableWidget программно, вам нужно использовать метод setItem() для каждого объекта QtableWidgetItem.
|
1 2 3 4 5 6 7 8 9 10 11 12 13 14 15 16 17 18 19 20 21 22 23 24 25 26 27 28 29 30 31 32 33 34 35 36 37 38 39 40 41 42 43 44 |
from PyQt5.QtWidgets import QTableWidgetItem from qtable import * import sys data = [] data.append((‘Заполнить’, ‘QTableWidget’)) data.append((‘с данными’, ‘в Python’)) data.append((‘очень’, ‘просто’)) class mywindow(QtWidgets.QMainWindow): def __init__(self): super().__init__() self.ui = Ui_MainWindow() self.ui.setupUi(self) self.ui.tableWidget.setRowCount(3) self.ui.tableWidget.setColumnCount(2) # очистка таблицы при клике на кнопку. self.ui.pushButton.clicked.connect(self.clear) row = 0 for tup in data: col = 0 for item in tup: cellinfo = QTableWidgetItem(item) self.ui.tableWidget.setItem(row, col, cellinfo) col += 1 row += 1 def clear(self): self.ui.tableWidget.clear() app = QtWidgets.QApplication([]) win = mywindow() win.show() sys.exit(app.exec()) |
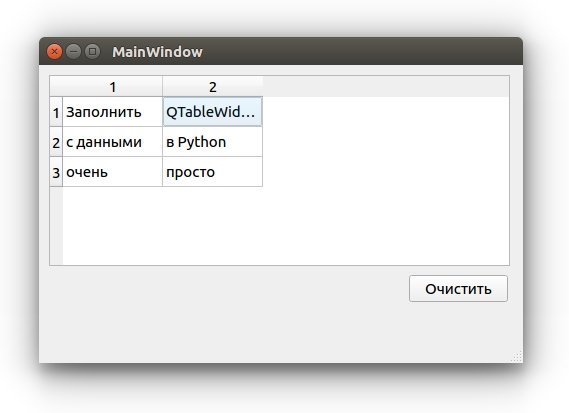
- Сначала мы создали список трех кортежей Python;
- Внутри конструктора главного окна, мы установили количество столбцов и рядов;
- Далее мы перебираем список и получаем каждый кортеж в списке, для заполнения клеток таблицы, при помощи метода setItem()
- Наконец, мы показываем главное окно.
Делаем QTableWidget нередактируемым (только для чтения)
Вам может не понравится то, что клетки в вашей таблице могут быть отредактированы пользователем в том или ином случае. Например, при отображении нередактируемых данных. В этом случае возможность редактирования не имеет никакого смысла.
Чтобы сделать QTableWidget нередактируемым, вы можете использовать метод setFlags(), чтобы сделать каждый QTableWidgetItem доступным только для чтения.
|
# Только для чтения cellinfo.setFlags( QtCore.Qt.ItemIsSelectable | QtCore.Qt.ItemIsEnabled ) |
Вам нужно установить флажки, перед тем как настраивать содержимое вашей клетки.
Таким образом, ваш код будет выглядеть вот так:
|
1 2 3 4 5 6 7 8 9 10 11 12 13 14 15 16 17 18 19 20 21 22 23 24 25 26 27 28 29 30 31 32 33 34 35 36 37 38 39 40 41 42 43 44 45 46 47 48 49 50 |
from PyQt5.QtWidgets import QTableWidgetItem from qtable import * import sys data = [] data.append((‘Заполнить’, ‘QTableWidget’)) data.append((‘с данными’, ‘в Python’)) data.append((‘очень’, ‘просто’)) class mywindow(QtWidgets.QMainWindow): def __init__(self): super().__init__() self.ui = Ui_MainWindow() self.ui.setupUi(self) self.ui.tableWidget.setRowCount(3) self.ui.tableWidget.setColumnCount(2) # очистка таблицы при клике на кнопку. self.ui.pushButton.clicked.connect(self.clear) row = 0 for tup in data: col = 0 for item in tup: cellinfo = QTableWidgetItem(item) # Только для чтения cellinfo.setFlags( QtCore.Qt.ItemIsSelectable | QtCore.Qt.ItemIsEnabled ) self.ui.tableWidget.setItem(row, col, cellinfo) col += 1 row += 1 def clear(self): self.ui.tableWidget.clear() app = QtWidgets.QApplication([]) win = mywindow() win.show() sys.exit(app.exec()) |
Теперь, если вы попробуете отредактировать какую-либо клетку — у вас не выйдет, так как QtableWidgetItem теперь нельзя редактировать
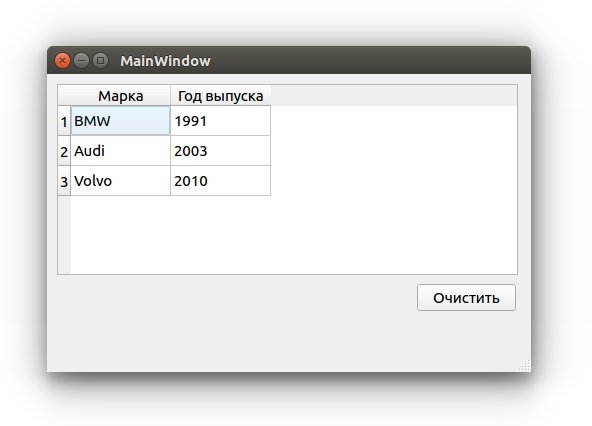
До этого момента, названия столбцов QTableWidget были числами. Как на счет того, чтобы поменять названия столбцов на что-нибудь другое?
Чтобы задать текст заголовкам QTableWidget, вы можете использовать метод setHorizontalHeaderLabels(), вот так:
|
1 2 3 4 5 6 7 8 9 10 11 12 13 14 15 16 17 18 19 20 21 22 23 24 25 26 27 28 29 30 31 32 33 34 35 36 37 38 39 40 41 42 43 44 45 46 47 48 |
from PyQt5.QtWidgets import QTableWidgetItem from qtable import * import sys data = [] data.append((‘BMW’, ‘1991’)) data.append((‘Audi’, ‘2003’)) data.append((‘Volvo’, ‘2010’)) class mywindow(QtWidgets.QMainWindow): def __init__(self): super().__init__() self.ui = Ui_MainWindow() self.ui.setupUi(self) self.ui.tableWidget.setRowCount(3) self.ui.tableWidget.setColumnCount(2) # очистка таблицы при клике на кнопку. self.ui.pushButton.clicked.connect(self.clear) # заголовки для столбцов. self.ui.tableWidget.setHorizontalHeaderLabels( (‘Марка’, ‘Год выпуска’) ) row = 0 for tup in data: col = 0 for item in tup: cellinfo = QTableWidgetItem(item) self.ui.tableWidget.setItem(row, col, cellinfo) col += 1 row += 1 def clear(self): self.ui.tableWidget.clear() app = QtWidgets.QApplication([]) win = mywindow() win.show() sys.exit(app.exec()) |
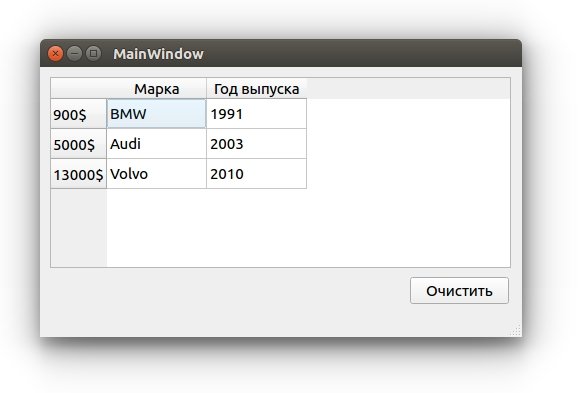
Таким же образом, вы можете менять заголовок ряда, при помощи метода setVerticalHeaderLabels():
|
1 2 3 4 5 6 7 8 9 10 11 12 13 14 15 16 17 18 19 20 21 22 23 24 25 26 27 28 29 30 31 32 33 34 35 36 37 38 39 40 41 42 43 44 45 46 47 48 49 50 51 52 53 |
from PyQt5.QtWidgets import QTableWidgetItem from qtable import * import sys data = [] data.append((‘BMW’, ‘1991’)) data.append((‘Audi’, ‘2003’)) data.append((‘Volvo’, ‘2010’)) class mywindow(QtWidgets.QMainWindow): def __init__(self): super().__init__() self.ui = Ui_MainWindow() self.ui.setupUi(self) self.ui.tableWidget.setRowCount(3) self.ui.tableWidget.setColumnCount(2) # очистка таблицы при клике на кнопку. self.ui.pushButton.clicked.connect(self.clear) # заголовки для столбцов. self.ui.tableWidget.setHorizontalHeaderLabels( (‘Марка’, ‘Год выпуска’) ) # названия рядов. self.ui.tableWidget.setVerticalHeaderLabels( (‘900$’, ‘5000$’, ‘13000$’) ) row = 0 for tup in data: col = 0 for item in tup: cellinfo = QTableWidgetItem(item) self.ui.tableWidget.setItem(row, col, cellinfo) col += 1 row += 1 def clear(self): self.ui.tableWidget.clear() app = QtWidgets.QApplication([]) win = mywindow() win.show() sys.exit(app.exec()) |
Как сортировать QTableWidget
Вы можете сделать ваш QTableWidget сортируемым, при помощи метода setSortingEnabled().
|
self.ui.tableWidget.setSortingEnabled(True) |
Теперь, если пользователь нажмет на любой заголовок столбца, он может сортировать данные в порядке убывания, или возрастания.
Вы можете использовать этот метод перед, или до наполнения QTableWidget данными.
Что на счет сортировки в QTableWidget, но только для определенного столбца?
Вы можете использовать метод sortByColumn(), и указать индекс столбца и порядок сортировки, вот так:
|
1 2 3 4 5 6 7 8 9 10 11 12 13 14 15 16 17 18 19 20 21 22 23 24 25 26 27 28 29 30 31 32 33 34 35 36 37 38 39 40 41 42 43 44 45 46 47 48 49 50 51 52 53 54 55 56 57 58 59 60 61 62 63 64 |
from PyQt5.QtWidgets import QTableWidgetItem from qtable import * import sys data = [] data.append((‘BMW’, ‘2005’)) data.append((‘Audi’, ‘2003’)) data.append((‘Volvo’, ‘1990’)) data.append((‘Toyota’, ‘2018’)) class mywindow(QtWidgets.QMainWindow): def __init__(self): super().__init__() self.ui = Ui_MainWindow() self.ui.setupUi(self) # Кол-во рядов меняется в зависимости от значений в data. self.ui.tableWidget.setRowCount( len(data) ) # Кол-во столбцов меняется в зависимости от data. self.ui.tableWidget.setColumnCount( len(data[0]) ) # очистка таблицы при клике на кнопку. self.ui.pushButton.clicked.connect(self.clear) # заголовки для столбцов. self.ui.tableWidget.setHorizontalHeaderLabels( (‘Марка’, ‘Год выпуска’) ) row = 0 for tup in data: col = 0 for item in tup: cellinfo = QTableWidgetItem(item) self.ui.tableWidget.setItem(row, col, cellinfo) col += 1 row += 1 # Сортировка по году выпуска. # 0 — Марка # 1 — Год выпуска self.ui.tableWidget.sortByColumn( 1, QtCore.Qt.AscendingOrder ) def clear(self): self.ui.tableWidget.clear() app = QtWidgets.QApplication([]) win = mywindow() win.show() sys.exit(app.exec()) |
Кстати, вы можете использовать метод sortItems() для сортировки QTableWidget в возрастающем порядке по умолчанию.
|
self.ui.tableWidget.sortItems(0) |
Или вы можете определить свой порядок сортировки:
|
self.ui.tableWidget.sortItems(1, QtCore.Qt.DescendingOrder) |
Помните, что если вы хотите сортировать ваши столбцы программно, вам нужно использовать методы сортировки после заполнения QTableWidget данными, иначе они не будут в нужном вам порядке.
Добавляем QComboBox в QTableWidget
У вас может появится задача, чтобы пользователь выбирал значение внутри QTableWidget, вместо ввода текста.
Как на счет того, чтобы добавить QComboBox в QTableWidgetItem?
Чтобы добавить QComboBox внутрь QTableWidgetItem, вы можете использовать метод setCellWidget():
|
1 2 3 4 5 6 7 8 9 10 11 12 13 14 15 16 17 18 19 20 21 22 23 24 25 26 27 28 29 30 31 32 33 34 35 |
from PyQt5.QtWidgets import QTableWidgetItem from qtable import * import sys data = [‘Python’, ‘PHP’, ‘Java’] class mywindow(QtWidgets.QMainWindow): def __init__(self): super().__init__() self.ui = Ui_MainWindow() self.ui.setupUi(self) self.ui.tableWidget.setRowCount(3) self.ui.tableWidget.setColumnCount(2) row = 0 for item in data: cellinfo = QTableWidgetItem(item) combo = QtWidgets.QComboBox() combo.addItem(«Изучить») combo.addItem(«Забыть») combo.addItem(«Удалить») self.ui.tableWidget.setItem(row, 0, cellinfo) self.ui.tableWidget.setCellWidget(row, 1, combo) row += 1 app = QtWidgets.QApplication([]) win = mywindow() win.show() sys.exit(app.exec()) |
Отлично!
Не ограничивайте себя в воображении и попробуйте вставлять различные виджеты, такие как QСheckbox, или даже QProgressBar.
QProgressBar в QTableWidget
|
1 2 3 4 5 6 7 8 9 10 11 12 13 14 15 16 17 18 19 20 21 22 23 24 25 26 27 28 29 30 31 32 33 34 35 36 37 38 39 40 41 42 43 44 45 46 47 48 49 |
from PyQt5.QtWidgets import QTableWidgetItem from qtable import * import sys data = ( (‘Python’, 95.5), (‘PHP’, 55.1), (‘Java’, 0.29) ) class mywindow(QtWidgets.QMainWindow): def __init__(self): super().__init__() self.ui = Ui_MainWindow() self.ui.setupUi(self) self.ui.tableWidget.setRowCount(3) self.ui.tableWidget.setColumnCount(2) self.ui.tableWidget.setHorizontalHeaderLabels( (‘Язык’, ‘Знания’) ) line = 0 for item in data: cellinfo = QTableWidgetItem(item[0]) self.ui.tableWidget.setItem(line, 0, cellinfo) # Создаем QProgressBar progress = QtWidgets.QProgressBar() progress.setMinimum(0) progress.setMaximum(100) # Формат вывода: 10.50% progress.setValue(item[1]) progress.setFormat(‘{0:.2f}%’.format(item[1])) # Добавляем виджет в ячейку. self.ui.tableWidget.setCellWidget(line, 1, progress) line += 1 app = QtWidgets.QApplication([]) win = mywindow() win.show() sys.exit(app.exec()) |
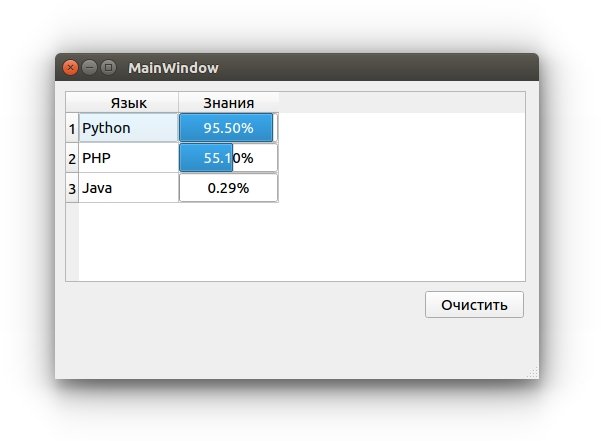
Указанный выше код будет таким же, за исключением строки, где вы создаете QСomboBox, здесь вы внесете тот виджет, который вам нужен.
Единственное ограничение — это ваше собственное воображение!
Компиляция Python приложения
Вы можете конвертировать ваши программы Python в бинарные исполняемые, и для этого имеется множество инструментов.
Лично я предпочитаю pyinstaller, который подходит для упаковки кода Python в исполняемый файл под Windows, Mac OS X, Solaris, Linux и FreeBSD. Все это будет поддерживаться 32 и 64-битной архитектурой.
Лучшая в pyinstaller для нас — это наличие полной поддержки для PyQt5.
Отлично! Для начала, установим pyinstaller:
|
$ pip3 install pyinstaller |
После проведения установки, вы можете конвертировать программы Python следующим образом:
Ваш исполняемый файл будет создан в папке под названием dist в директории вашей программы Python.
Как вы могли догадаться, вместе с исполняемым файлом будет генерироваться множество зависимостей. Как сделать из этого один файл?
Вы можете создать один исполняемый файл. Вот так:
|
$ pyinstaller —onefile test.py |
Каждый раз, когда вы запускаете ваш исполняемый файл, будет возникать окно, как его спрятать?
Вы можете использовать флажки -w или –noconsole, чтобы спрятать окно консоли:
Эта опция доступна только для Windows и Mac OS X.
Pyinstaller предоставляет множество вариантов для упаковки вашего приложения, чтобы увидеть полный список, используйте –help:
Я старался сделать все на столько простым, на сколько это возможно. Надеюсь, это руководство оказалось для вас полезным.
Спасибо.
Являюсь администратором нескольких порталов по обучению языков программирования Python, Golang и Kotlin. В составе небольшой команды единомышленников, мы занимаемся популяризацией языков программирования на русскоязычную аудиторию. Большая часть статей была адаптирована нами на русский язык и распространяется бесплатно.
E-mail: vasile.buldumac@ati.utm.md
Образование
Universitatea Tehnică a Moldovei (utm.md)
- 2014 — 2018 Технический Университет Молдовы, ИТ-Инженер. Тема дипломной работы «Автоматизация покупки и продажи криптовалюты используя технический анализ»
- 2018 — 2020 Технический Университет Молдовы, Магистр, Магистерская диссертация «Идентификация человека в киберпространстве по фотографии лица»
PyQt5 is a toolkit for creating Python GUI applications. As a cross-platform toolkit, PyQt can run on all major operating systems (Unix, Windows (Mac).
This article describes how to install Python + PyCharm + PyQt5.
With PyQt5, the GUI is designed in two ways:
- directly using the code to design the interface
- using QtDesigner to visualize the design, and then convert the resulting .ui file into a .py file.
Related course: Create Desktop Apps with Python PyQt5
Install Python + PyCharm + PyQt5.
Step 1. Install Python.
Visit the official website at https://www.python.org/ to download and install your target Python version.
Install PyQt5
Enter the cmd interface. Run the command and wait a moment.
pip install pyqt5 pyqt5-tools
The command is executed and PyQt5 is installed.
Test if pqyt5 is actually installed
Create a new file, example.py, and enter the following code.
import sys
from PyQt5 import QtWidgets, QtCore

app = QtWidgets.QApplication(sys.argv)
widget = QtWidgets.QWidget()
widget.resize(400, 200)
widget.setWindowTitle("This is PyQt Widget example")
widget.show()
exit(app.exec_())
After running, the following screen will pop up, indicating that PyQt is working normally.

3. Install PyCharm.
Visit the official website http://www.jetbrains.com/pycharm/
Choose download and install Community version.
PyCharm Basic Configuration.
Step 1 Create a new project
Step 2 Set the default PyCharm parser.
Select File | Settings | Project: first | Project Interpreter, set Project Interpreter to The version of python you are using
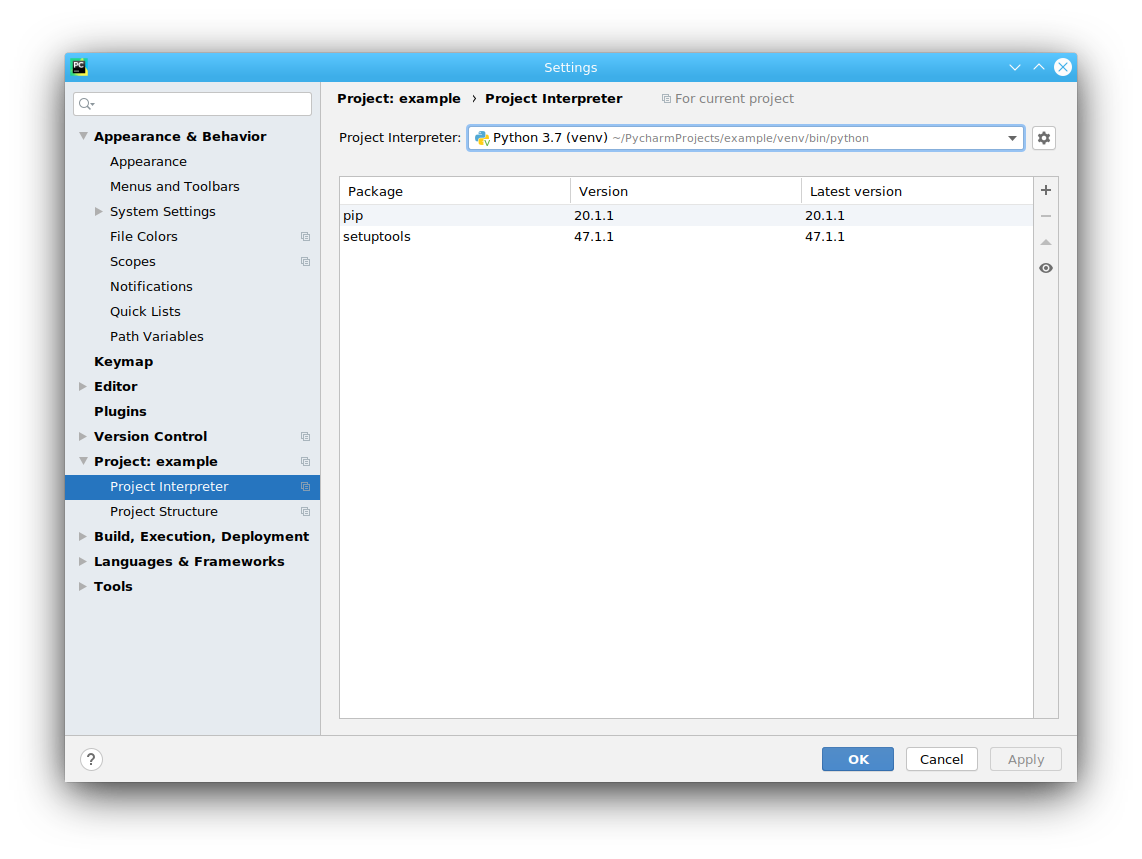
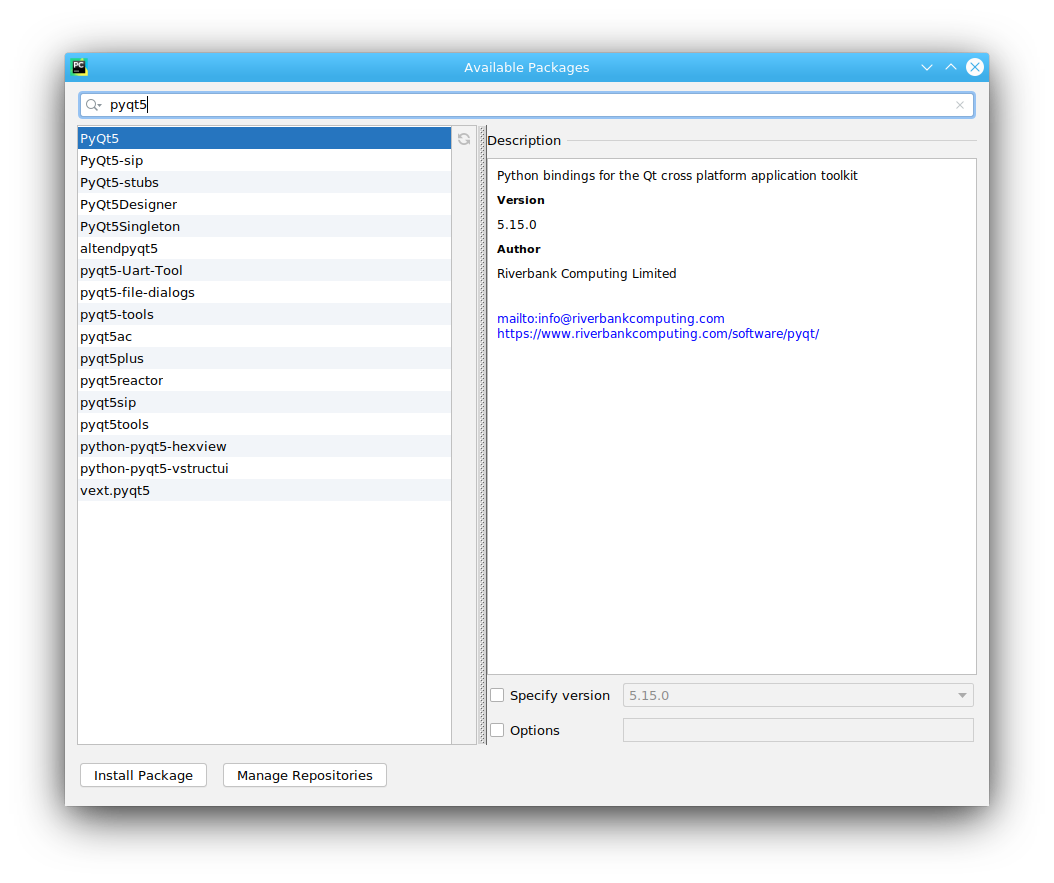
Step 3 Adding third-party libraries
Stay in the Project Interpreter interface, click on the +, find and install pyqt5. pyqt5-sip, pyqt5-tools. After successful installation, the interface should look like this.
Step 4 Configuring QtDesigner
Install designer
You can start designer directly from PyCharm. Make sure designer is installed first. Designer is not installed with the pip installation.
On Fedora Linux you can do this:
sudo dnf install qt5-designer
Ubuntu Linux users can do thiS:
sudo apt-get install qttools5-dev-tools
You can also do this:
pip install pyqt5-tools
Once qt5-designer is installed, you can configure it in PyCharm.
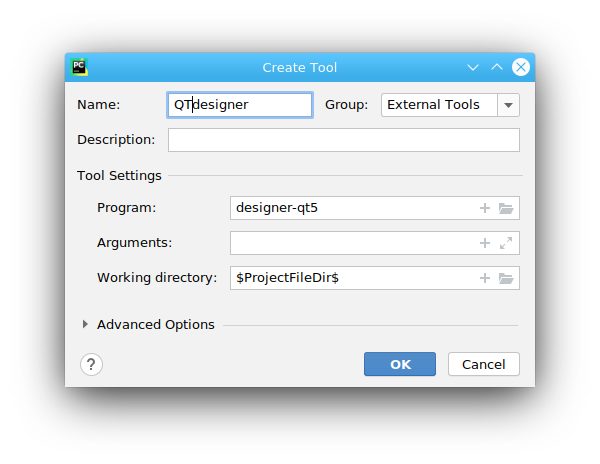
PyCharm select File | Settings | Tools | PyCharm. External Tools, click + New Tools, Create QTdesigner and PyUIC tools
Configure two key parameters.
-
Program: the path to your own
designer.-
Windows users can link to
designer.exe, for exampleC:\\xxxx\AppData\Local\Programs\Python\Python35-32\\Lib\site-packages\pyqt5-tools\designer.exe -
Fedora Linux users can link
designer-qt5 -
Ubuntu users can set it to
/usr/lib/x86_64-linux-gnu/qt5/bin/designer
-
-
Working directory:
$ProjectFileDir$
Step 5: Configure PyUIC
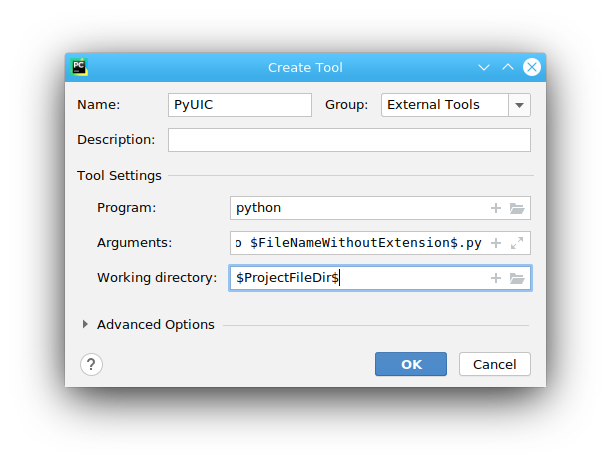
Configure three key parameters.
-
Program: Your own
python.exepath For example,C:\\xxxx\AppData\\Local\Programs\Python\Python35-32\python. -
Arguments:
-m PyQt5.uic.pyuic $FileName$ -o $FileNameWithoutExtension$.py -
Working directory:
$ProjectFileDir$
You may like: Create Desktop Apps with Python PyQt5
Test PyQt installation
From code
Now that everything is setup, it’s time to test if everything is setup correctly.
Create a GUI interface using the code below (or any PyQt code).
from PyQt5 import QtWidgets # import PyQt5 widgets
import sys

# Create the application object
app = QtWidgets.QApplication(sys.argv)

# Create the form object
first_window = QtWidgets.QWidget()

# Set window size
first_window.resize(400, 300)

# Set the form title
first_window.setWindowTitle("The first pyqt program")

# Show form
first_window.show()

# Run the program
sys.exit(app.exec())
Select Run->Run first. You should see a PyQt window popup.
QTDesigner
Use QTDesigner to generate a GUI interface and convert it to a .py file using PyUIC.
Select Tools->ExternalTools->QTdesigner.
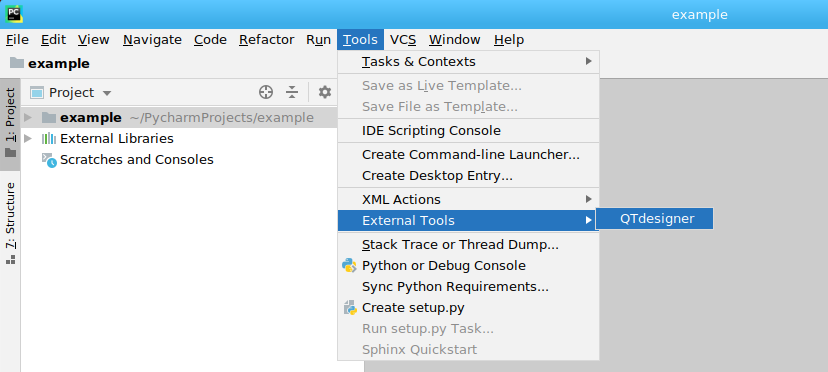
In the QT Designer interface, a GUI creation interface will pop up for the first time, click on create to automatically generate a GUI interface.
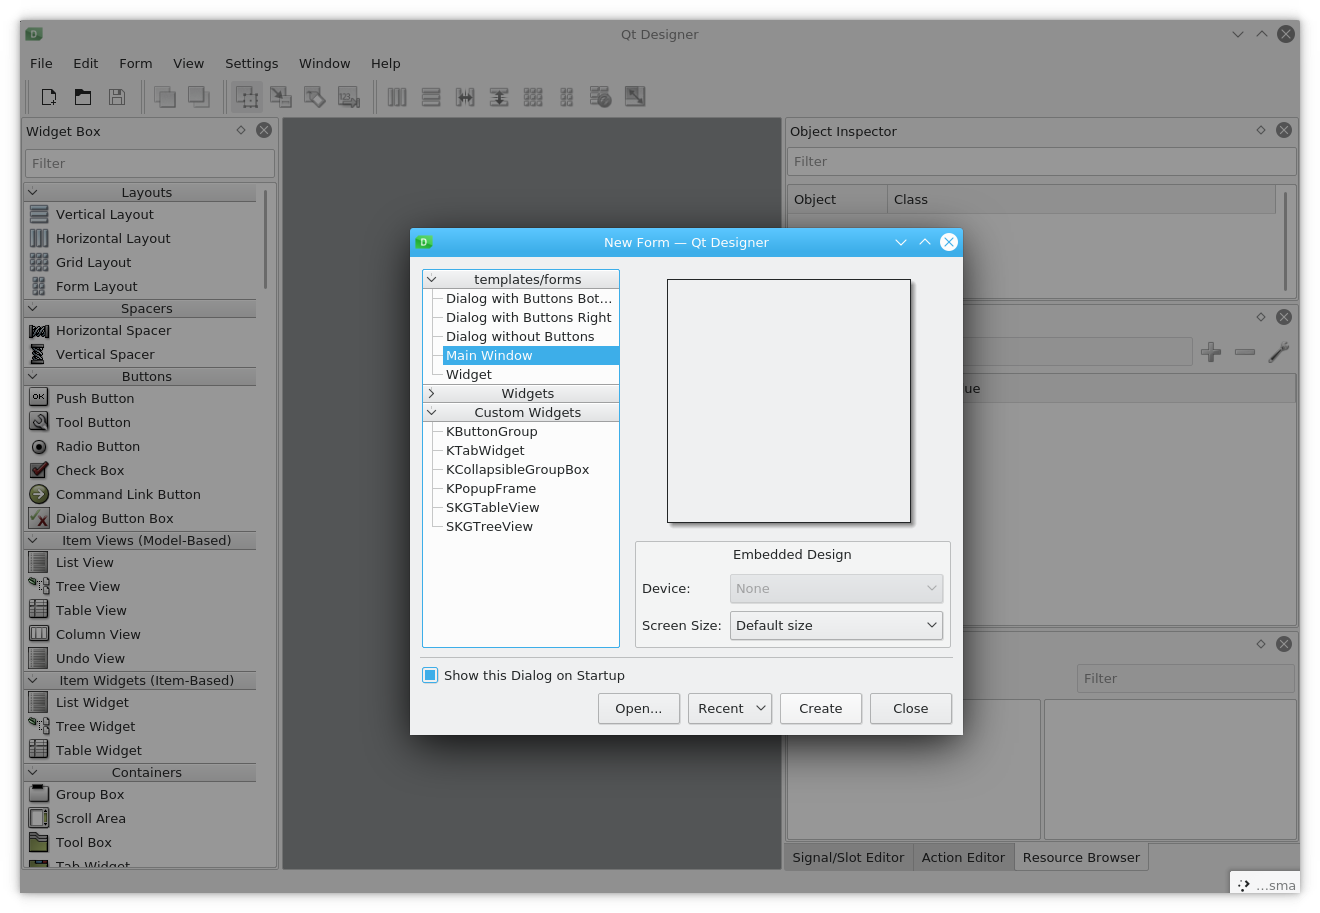
Save the interface as Untitled.ui file.
Back to the PyCharm project interface, there is an extra .ui file under the project list.
Right-click on Untitled.ui and select ExternalTools->PyUIC in the pop-up list.
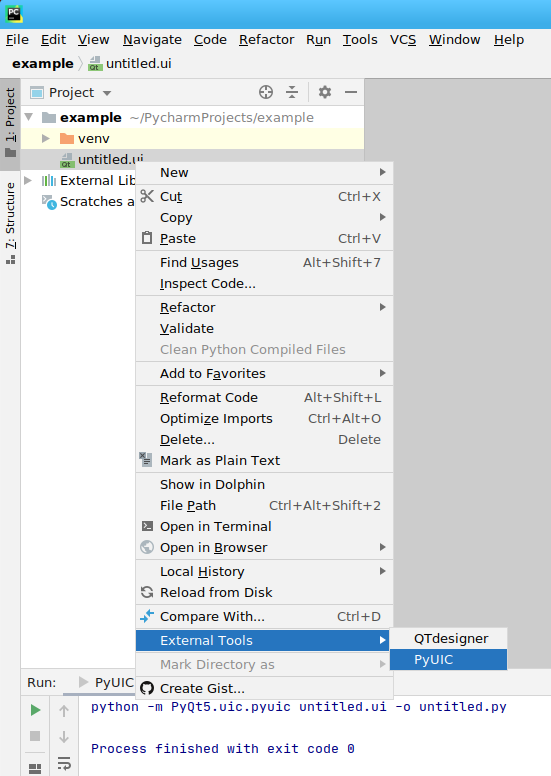
This will generate a Untitled.py file for Untitled.ui.
Introduction
Python is a versatile programming language widely used in various domains, from web development to artificial intelligence. One of its powerful libraries, PyQt5, allows developers to create stunning graphical user interfaces (GUI). Whether you are an aspiring software developer, a data analyst, or an automation engineer, learning GUI design can significantly enhance your skill set.
Graphical interfaces are essential for software usability, as they enable users to interact with applications visually rather than through the command line. simplifies GUI creation by providing a robust set of tools and widgets, making it easier to develop professional applications quickly.
With the growing demand for Python developers in fields like finance, healthcare, and cybersecurity, mastering that can help you stand out in the job market. Whether you want to build desktop applications, automation tools, or data visualization dashboards, It provides the flexibility needed to create customized solutions.
In this guide, we will walk you through setting up to designing GUI applications from scratch. By the end, you will be equipped to build interactive desktop applications using. If you are looking for structured guidance, enroll in an Online Class For Python at H2K Infosys, where you can learn Python online with expert-led training.
Why Choose PyQt5 for GUI Development?
It is a set of Python bindings for the Qt application framework, widely used to develop cross-platform desktop applications. Here’s why it is an excellent choice for GUI development:
- Cross-Platform Compatibility: Runs seamlessly on Windows, macOS, and Linux.
- Rich Widgets and Components: Provides a vast collection of ready-to-use widgets.
- Highly Customizable: Allows full control over UI design and styling.
- Object-Oriented Programming (OOP) Approach: Facilitates modular and reusable code.
- Industry Adoption: Used in applications like Autodesk Maya and VLC Media Player.
If you’re considering an online training Python course, learning it can Open Doors to career opportunities in desktop application development.
Setting Up PyQt5
Before designing GUI applications, you need to install the on your system. Follow these steps:
1. Install Python
Ensure you have Python installed on your system. If not, download and install the latest version from Python.org.
To verify Python installation, open the terminal (or Command Prompt) and type:
python --versionIf Python is installed correctly, you will see the installed version number displayed.
2. Install PyQt5 and Qt Designer
It can be installed using pip:
pip install PyQt5 PyQt5-toolsThis command installs the required to modules along with Qt Designer, a graphical tool for designing UI layouts.
3. Verify Installation
Once installed, check if it is available by running:
import PyQt5.QtWidgets
print("PyQt5 is installed successfully!")
If no errors occur, It is ready to use!
4. Install Additional Development Tools
To enhance your development experience, consider installing additional tools:
- PyCharm or VS Code: Advanced IDEs that support development.
- pyuic5: A command-line tool to convert UI files created in Qt Designer to Python code.
- pyinstaller: A tool for packaging PyQt5 applications into executable files.
Designing Your First GUI Application with PyQt5
Let’s create a simple GUI application using.
Step 1: Create a Basic PyQt5 Window
Create a new Python script (main.py) and add the following code:
from PyQt5.QtWidgets import QApplication, QWidget
import sys

class MyApp(QWidget):
    def __init__(self):
        super().__init__()
        self.setWindowTitle("My First PyQt5 App")
        self.resize(400, 300)

app = QApplication(sys.argv)
window = MyApp()
window.show()
sys.exit(app.exec_())
Explanation:
QApplication: Manages application execution.QWidget: Base class for all GUI components.setWindowTitle(): Sets the title of the application window.resize(): Defines the initial size of the window.show(): Displays the application window.exec_(): Starts the event loop, ensuring the application remains responsive.
Run the script, and you will see a basic window appear.
Step 2: Using Qt Designer for UI Design
Instead of coding the UI manually, you can use Qt Designer to create the interface visually.
1. Launch Qt Designer
Open Qt Designer by running:
pyqt5-tools designer2. Create a New UI File
- Select Main Window and click Create.
- Drag and drop widgets (buttons, labels, input fields) onto the canvas.
- Adjust the widget properties using the property editor.
- Save the file as
mydesign.ui.
3. Convert UI File to Python Code
Use the pyuic5 tool to convert the UI file:
pyuic5 -x mydesign.ui -o mydesign.pyNow, mydesign.py contains the Python equivalent of your UI design.
Step 3: Integrating UI with Python Logic
Modify main.py to integrate UI with functionality:
from PyQt5.QtWidgets import QApplication, QMainWindow
import sys
from mydesign import Ui_MainWindow

class MyApp(QMainWindow, Ui_MainWindow):
    def __init__(self):
        super().__init__()
        self.setupUi(self)
        self.pushButton.clicked.connect(self.say_hello)

    def say_hello(self):
        self.label.setText("Hello, PyQt5!")

app = QApplication(sys.argv)
window = MyApp()
window.show()
sys.exit(app.exec_())
Explanation:
setupUi(self): Loads the UI.self.pushButton.clicked.connect(self.say_hello): Connects button click to a function.say_hello(): Changes label text when the button is clicked.
Run the script, and clicking the button updates the label text.
With these enhancements, you will have a well-structured introduction and detailed setup guide for PyQt5, making it easier for learners to follow.
Real-World Applications of PyQt5
It is widely used across industries for developing applications such as:
- Banking Software: Many financial applications use PyQt5 for data visualization.
- Medical Applications: Used for medical imaging software and data management.
- Enterprise Tools: Custom internal tools for workflow automation.
A recent survey by Stack Overflow found that Python is the most sought-after language for enterprise applications, reinforcing the demand for PyQt5 skills.
Key Takeaways
- PyQt5 is a powerful Python framework for GUI development.
- Installing PyQt5 and Qt Designer is straightforward with pip.
- Qt Designer simplifies UI creation with a drag-and-drop approach.
- It is widely used in banking, medical, and enterprise applications.
- Learning if can enhance your Python Programming language certification.
Conclusion
Mastering PyQt5 opens up career opportunities in GUI application development. Enroll in our online class for Python at H2K Infosys to gain hands-on experience and elevate your programming skills!
PyQt5 is one of the most used modules in building GUI apps in Python, and that’s due to its simplicity as you will see.
Another great feature that encourages developers to use PyQt5 is the PyQt5 designer, which makes it so easy to develop complex GUI apps in a short time. You just drag your widgets to build your form.
In this PyQt5 tutorial, I will use Python 3.x on Windows 10.
Sound great! So let’s get started and install PyQt5 at first, then we will see how to develop GUI apps with examples.
-
1
Install PyQt5-
1.1
Using pip
-
1.1
-
2
Install PyQt5 designer-
2.1
Where is PyQt5 designer?
-
2.1
-
3
How to use PyQt5 designer -
4
Difference between QDialog, QMainWindow, and QWidget -
5
Load .ui VS convert .ui to .py-
5.1
Loading the .ui file in your Python code -
5.2
Converting the .ui file to a .py file using pyuic5
-
5.1
-
6
QLabel widget-
6.1
Change Font -
6.2
Change size -
6.3
Change text
-
6.1
-
7
QLineEdit widget-
7.1
The setStyleSheet() method
-
7.1
-
8
QPushButton Widget -
9
Visual signal/slot editor -
10
How to emit a signal-
10.1
How to use a signal -
10.2
Signal (event) overriding
-
10.1
-
11
QComboBox widget-
11.1
Get all items -
11.2
Select an item
-
11.1
-
12
QTableWidget-
12.1
Clear QtableWidget content -
12.2
Populate QTableWidget by code -
12.3
Make QTableWidget not editable (read-only) -
12.4
Set QTableWidget column (header) name -
12.5
How to sort QTableWidget -
12.6
Add QComboBox in QTableWidget
-
12.1
-
13
Packaging Python files (Converting to executable)
Install PyQt5
PyQt5 has two versions, the commercial version and the free GPL version that we will use in this tutorial.
To install PyQt5, you have two ways:
- Using pip
- Using source
Using pip
To install PyQt5 using pip, run the following command:
$ pip3 install PyQt5
To ensure the successful installation, run the following Python code:
import PyQt5
If no errors appeared, that means you have successfully installed PyQt5, but if you got errors, you might be using an unsupported version of Python.
Install PyQt5 designer
There are two ways to build GUI apps using PyQt5:
- Design widgets by code.
- Using PyQt5 designer.
In this PyQt5 tutorial, we will use the PyQt5 designer, which makes it so easy to finish a lot of work in a matter of seconds.
PyQt5 designer comes with PyQt5 tools. To install it, you need to install PyQt5 tools.
$ pip3 install PyQt5-tools
Where is PyQt5 designer?
After successful installation, you can find the PyQt5 designer on this location:
C:\Program Files\Python36\Lib\site-packages\pyqt5-tools\
Also, If you installed Python for your current user only, you will find the PyQt5 designer on this location:
C:\Users\LikeGeeks\AppData\Local\Programs\Python\Python36-32\Lib\site-packages\ pyqt5-tools\
You can make a shortcut for it instead of going into this location every time you want to run the PyQt5 designer.
How to use PyQt5 designer
Open designer.exe, and you will see a dialog asking you about the form template you want.
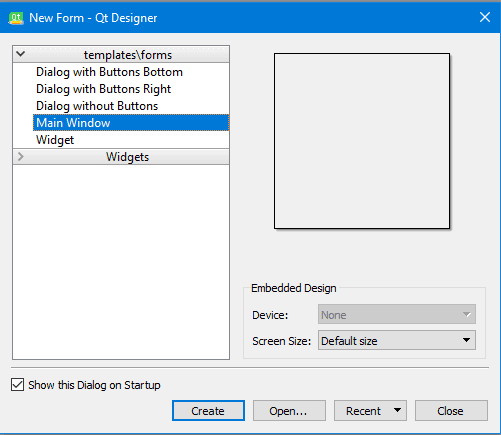
There are five templates available:
- Dialog with Buttons Bottom: Creates a form with OK and Cancel buttons at the bottom right of the form.
- Dialog with Buttons Right: Creates a form with OK and Cancel buttons at the top right of the form.
- Dialog without Buttons: Creates a blank form.
- Main Window: Creates a window with a menu bar and a toolbar and inherited from QMainWindow.
- Widget: Creates a widget that is inherited from QWidget class, unlike the Dialogs templates which inherit from QDialog class.
So we have three types of templates, what is the difference?
Difference between QDialog, QMainWindow, and QWidget
- QWidget is the base class for all GUI elements in the PyQt5.
- QDialog is used for asking the user about something, like asking the user to accept or reject something or maybe asking for input and is based on QWidget.
- QMainWindow is the bigger template where you can place your toolbar, menu bar, status bar, and other widgets. It doesn’t have a built-in allowance for buttons like those in QDialog.
Load .ui VS convert .ui to .py
In this tutorial, we will use the PyQt5 designer, but before we dig deeper, let’s see how we will use the generated design from the PyQt5 designer.
Open PyQt5 designer, and choose Main Window template and click create button.
Then from the file menu, click save; PyQt5 designer will export your form into an XML file with .ui extension. Now, to use this design, you have two ways:
- Loading the .ui file in your Python code.
- Converting the .ui file to a .py file using pyuic5.
Loading the .ui file in your Python code
To load the .ui file in your Python code, you can use the loadUI() function from uic like this:
from PyQt5 import QtWidgets, uic
import sys
app = QtWidgets.QApplication([])
win = uic.loadUi("mydesign.ui") #specify the location of your .ui file
win.show()
sys.exit(app.exec())
If you run your code, you should see a window with nothing but a label.
That means the ui file loaded successfully!
We used sys.exit(app.exec()) instead of using app.exec() directly to send the correct status code to the parent process or the calling process.
If you used app.exec() directly, the application would send zero, which means success, and this will happen even if the application crashed.
Converting the .ui file to a .py file using pyuic5
Now, let’s try the second way by converting the .ui file to a Python code:
$ pyuic5 mydesign.ui -o mydesign.py
Yes! That creates a new file with the name mydesign.py. Now, let’s import that file to show our window.
The pyuic5 stands for Python user interface converter version 5.
from PyQt5 import QtWidgets
from mydesign import Ui_MainWindow  # importing our generated file
import sys
class mywindow(QtWidgets.QMainWindow):
def __init__(self):
    super(mywindow, self).__init__()
    self.ui = Ui_MainWindow()
    self.ui.setupUi(self)
app = QtWidgets.QApplication([])
application = mywindow()
application.show()
sys.exit(app.exec())
If you run this code, you should see the same window again as we did in the first method.
The benefit of using the second method is the auto-completion that the IDE will provide since all of your widgets are imported, while the first method you just load the .ui file, and you need to be aware of your widgets names.
Another benefit of using the second method is the speed since you don’t need XML parsing to load the UI.
Now, let’s get our hands dirty and play with the PyQt5 widgets.
QLabel widget
To add a QLabel widget to your form, do the following:
- Open PyQt5 designer and choose the Main Window template.
- Drag a label widget from the widget box on the left.
Now, save the design to a .ui file and convert it to a .py file and let’s play with the label widget using code.
Change Font
To change the QLabel font, use the setFont() method and pass a QFont to it like this:
from PyQt5 import QtWidgets, QtGui
from mydesign import Ui_MainWindow
import sys
class mywindow(QtWidgets.QMainWindow):
    def __init__(self):
        super(mywindow, self).__init__()
        self.ui = Ui_MainWindow()
        self.ui.setupUi(self)
        self.ui.label.setFont(QtGui.QFont('SansSerif', 30)) # change font type and size
app = QtWidgets.QApplication([])
application = mywindow()
application.show()
sys.exit(app.exec())
If you run this code, you will note that the label does not appear correctly because the size is smaller than the font size we used. So we need to set the label size.
Change size
To change the QLabel size, you need to set its geometry using the setGeometry() method like this:
from PyQt5 import QtWidgets, QtGui,QtCore
from mydesign import Ui_MainWindow
import sys
class mywindow(QtWidgets.QMainWindow):
    def __init__(self):
        super(mywindow, self).__init__()
        self.ui = Ui_MainWindow()
        self.ui.setupUi(self)
        self.ui.label.setFont(QtGui.QFont('SansSerif', 30))
        self.ui.label.setGeometry(QtCore.QRect(10, 10, 200, 200)) # change label geometry
app = QtWidgets.QApplication([])
application = mywindow()
application.show()
sys.exit(app.exec())
Change text
To change the QLabel text, you can use the setText() method like this:
from PyQt5 import QtWidgets, QtGui,QtCore
from mydesign import Ui_MainWindow
import sys
class mywindow(QtWidgets.QMainWindow):
    def __init__(self):
        super(mywindow, self).__init__()
        self.ui = Ui_MainWindow()
        self.ui.setupUi(self)
        self.ui.label.setFont(QtGui.QFont('SansSerif', 30))
        self.ui.label.setGeometry(QtCore.QRect(10, 10, 200, 200))
        self.ui.label.setText("LikeGeeks") #change label text
app = QtWidgets.QApplication([])
application = mywindow()
application.show()
sys.exit(app.exec())
That was easy! Let’s check some other widgets.
QLineEdit widget
The QLineEdit is an editable place where you can accept input from the user. LineEdit has many methods to work with.
I will create a new design with the PyQt5 designer, and I’ll add six QLineEdit widgets, and I’ll export it to .py file.
Now, let’s see some QLineEdit methods:
from PyQt5 import QtWidgets,QtCore
from mydesign import Ui_MainWindow
import sys
class mywindow(QtWidgets.QMainWindow):
    def __init__(self):
        super(mywindow, self).__init__()
        self.ui = Ui_MainWindow()
        self.ui.setupUi(self)
        self.ui.lineEdit.setText("Welcome to LikeGeeks website") #change text
        self.ui.lineEdit_2.setMaxLength(10) #set maximum length
        self.ui.lineEdit_3.setEchoMode(QtWidgets.QLineEdit.Password) # password input
        self.ui.lineEdit_4.setReadOnly(True) #QLineEdit readonly
        self.ui.lineEdit_5.setStyleSheet("color: rgb(28, 43, 255);") #change text color
        self.ui.lineEdit_6.setStyleSheet("background-color: rgb(28, 43, 255);") #change QLineEdit background color
app = QtWidgets.QApplication([])
application = mywindow()
application.show()
sys.exit(app.exec())
The first QlineEdit, we changed the text using the setText() method.
The second QlineEdit, we set the maximum allowed characters to 10, so nothing more is accepted.
The third QlineEdit, we set it to password mode, so all your input appears as asterisks.
The fourth QlineEdit, we set it to read-only so you can’t edit its content.
The fifth QlineEdit, we changed the font color using the setStyleSheet() method, and we insert the color like web pages CSS values.
The sixth QlineEdit, we changed the background color using the setStyleSheet() method.
The setStyleSheet() method
You can use the setStyleSheet() method with all PyQt5 widgets to change the style.
You can change the following using setStyleSheet() method:
- Font type and size
- Text Color
- Background color
- Border color
- Border top color
- Border bottom color
- Border right color
- Border left color
- Selection color
- Selection background color
These are the most important values you can pass to the setStyleSheet() method.
QPushButton Widget
Most of your Python programs will have this QPushButton widget. You click the button, and some code runs.
If you have a programming background, you may hear about event handling where you interact with a widget, and a function is executed.
The idea in PyQt5 is the same, but the definitions are a bit different.
So when you click a QPushButton, a signal is emitted. The signal name in this case is called clicked().
To bind the emitted signal with a slot, you need to use the connect() method as you will see now.
This event handling process continues to work until you close your form or main widget.
Let’s build a form with a QLabel and a QPushButton and export it to a .py file.
Now, We will connect the clicked() signal with a slot using connect() method like this:
self.ui.pushButton.clicked.connect(self.btnClicked)
The btnClicked here is the slot or the function that will run when you click the QPushButton.
So your code will be like this:
from PyQt5 import QtWidgets
from mydesign import Ui_MainWindow
import sys
class mywindow(QtWidgets.QMainWindow):
    def __init__(self):
        super(mywindow, self).__init__()
        self.ui = Ui_MainWindow()
        self.ui.setupUi(self)
        self.ui.pushButton.clicked.connect(self.btnClicked) # connecting the clicked signal with btnClicked slot
    def btnClicked(self):
        self.ui.label.setText("Button Clicked")
app = QtWidgets.QApplication([])
application = mywindow()
application.show()
sys.exit(app.exec())
Awesome!
Visual signal/slot editor
We saw how to connect the widget signal to a slot using the connect() method, but this is not the only way.
There are some predefined slots for each widget. You can connect a signal to any predefined slot without coding in the PyQt5 designer.
Drag a QPushButton and a QLineEdit on your form.
Press F4 and drag the mouse from the QPushButton and release it on the top of the QLineEdit.
The signal/slot editor will show up.

On the left, the predefined signals while on the right the predefined slots. Let’s say that we want to connect the clicked() signal with the clear slot.
Choose the clicked from the left and choose clear from the right and click OK.
After finishing your signal/slot connections, you can escape from this mode by pressing ESC or F3.
Now, if you run this form and click the QPushButton, any text on the QLineEdit will be cleared. You can edit or delete this connection from the signal/slot editor panel.
How to emit a signal
We saw how signals and slots work. All signals we worked with are predefined for us.
What about emitting our custom signal?
Very easy! You can do that by using the pyqtSignal class as follows:
- Define your event with type pyqtSignal.
- Call emit() method at the place you want your event to be fired.
Let’s say we have a nut class, and we want to fire the cracked signal to be emitted when we crack it.
from PyQt5.QtCore import pyqtSignal,QObject
class nut(QObject):
    cracked = pyqtSignal()
    def __init__(self):
        QObject.__init__(self)
    def crack(self):
        self.cracked.emit()
How to use a signal
Now, let’s make our example more practical by instantiating an instance of the nut class and emitting the cracked signal:
def crackit():
    print("hazelnut cracked!")
hazelnut = nut()
hazelnut.cracked.connect(crackit) # connecting the cracked signal with crackit slot
hazelnut.crack()
The cracked signal was successfully emitted.
Signal (event) overriding
Sometimes, you need to override the default behavior for a specific signal or event.
Let’s see a practical example for that. If you want to close the main window when the user presses a specific key, you can override the keyPressEvent inside your main window like this:
 def keyPressEvent(self, e):
        if e.key() == Qt.Key_F12:
            self.close()
Now, if the user presses the F12 key, the main window will be closed.
Here we override the keypress signal of the main window and close the window.
QComboBox widget
Instead of letting the user enter values in a QLineEdit or any editable widget, we can use a QCombobBox widget to give the user a list of choices to select from.
Let’s drag a combo box to our form and take a look at some of its methods.
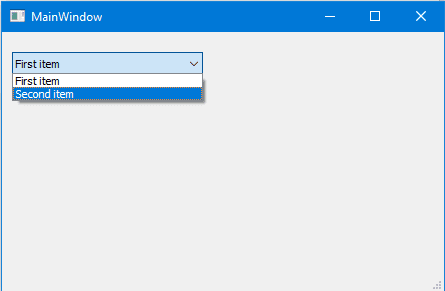
If you run the app now, you will note that the QComboBox is empty. To add items to the QComboBox, use the addItem() method:
from PyQt5 import QtWidgets
from mydesign import Ui_MainWindow
import sys
class mywindow(QtWidgets.QMainWindow):
    def __init__(self):
        super(mywindow, self).__init__()
        self.ui = Ui_MainWindow()
        self.ui.setupUi(self)
        self.ui.comboBox.addItem("First item") #add item
        self.ui.comboBox.addItem("Second item")
app = QtWidgets.QApplication([])
application = mywindow()
application.show()
sys.exit(app.exec())
Get all items
There is no direct method to get all items from a QComboBox, but you can use a for loop to do that.
for i in range(self.ui.comboBox.count()):
    print(self.ui.comboBox.itemText(i))
Select an item
To select an item from the QComboBox, you have two methods:
self.ui.comboBox.setCurrentIndex(1) #select by index which is zero-based
self.ui.comboBox.setCurrentText("Second item") #select by text
Note that when selecting an item by text, make sure you write the correct text otherwise. The QComboBox will stay at the first element.
QTableWidget
If you want to view your database data in a tabular format, PyQt5 provides the QTableWidget for that.
QTableWidget consists of cells; each cell is an instance of QTableWidgetItem class.
Let’s design a form that contains a QTableWidget and a QPushButton. Drag a table widget and a push button from the widget box. Then save and convert the design to use it.
To add rows to the QTableWidget, you can use the setRowCount() method.
To add columns to the QTableWidget, you can use the setColumnCount() method.
from PyQt5 import QtWidgets
from mydesign import Ui_MainWindow
import sys
class mywindow(QtWidgets.QMainWindow):
    def __init__(self):
        super(mywindow, self).__init__()
        self.ui = Ui_MainWindow()
        self.ui.setupUi(self)
        self.ui.tableWidget.setColumnCount(2)
        self.ui.tableWidget.setRowCount(4)
app = QtWidgets.QApplication([])
application = mywindow()
application.show()
sys.exit(app.exec())
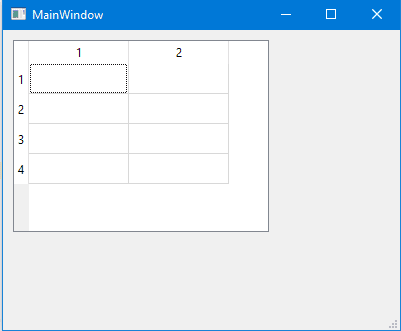
Now you can type text manually inside QTableWidget cells.
Clear QtableWidget content
To clear QTableWidget content, you can use the clear method like this:
def clear():
    self.ui.tableWidget.clear()
    self.ui.pushButton.clicked.connect(clear)
Populate QTableWidget by code
To fill QTableWidget programmatically, you should use the setItem() method for each QTableWidgetItem.
from PyQt5.QtWidgets import QTableWidgetItem
from mydesign import *
import sys
data = []
data.append(('Populating', 'QtableWidget'))
data.append(('With data', 'In Python'))
data.append(('Is easy', 'Job'))
class mywindow(QtWidgets.QMainWindow):
    def __init__(self):
        super().__init__()
        self.ui = Ui_MainWindow()
        self.ui.setupUi(self)
        self.ui.tableWidget.setRowCount(3)
        self.ui.tableWidget.setColumnCount(2)
        row=0
        for tup in data:
            col=0
            for item in tup:
                cellinfo=QTableWidgetItem(item)
                self.ui.tableWidget.setItem(row, col, cellinfo)
                col+=1
            row += 1
app = QtWidgets.QApplication([])
win = mywindow()
win.show()
sys.exit(app.exec())
- First, we create a Python list of three tuples.
- Inside the constructor of the main window, we set the rows and columns count.
- Then we iterate over the list and get every tuple on the list to fill the table cells using the setItem() method.
- Finally, we show the main window.
Make QTableWidget not editable (read-only)
You may not like leaving your table cells editable for the user in some cases. Like showing a read-only data and any editing process makes no sense.
To make QTableWidget not editable, you can use setFlags() method to set each QTableWidgetItem not editable.
cellinfo.setFlags(QtCore.Qt.ItemIsSelectable | QtCore.Qt.ItemIsEnabled) #make it not editable
You must set the flags before setting your cell content.
Therefore, your code will be like this:
from PyQt5.QtWidgets import QTableWidgetItem
from mydesign import *
import sys
data = []
data.append(('Populating', 'QtableWidget'))
data.append(('With data', 'In Python'))
data.append(('Is easy', 'Job'))
class mywindow(QtWidgets.QMainWindow):
    def __init__(self):
        super().__init__()
        self.ui = Ui_MainWindow()
        self.ui.setupUi(self)
        self.ui.tableWidget.setRowCount(3)
        self.ui.tableWidget.setColumnCount(2)
        row=0
        for tup in data:
            col=0
            for item in tup:
                cellinfo=QTableWidgetItem(item)
                cellinfo.setFlags(QtCore.Qt.ItemIsSelectable | QtCore.Qt.ItemIsEnabled)  # make cell not editable
                self.ui.tableWidget.setItem(row, col, cellinfo)
                col+=1
            row += 1
app = QtWidgets.QApplication([])
win = mywindow()
win.show()
sys.exit(app.exec())
Now, if you try to edit any cell, you can’t; because the QTableWidgetItem is not editable.
Set QTableWidget column (header) name
Until now, the column names of the QTableWidget are numbers. What about setting the column names to something else.
To set QTableWidget header text, you can use setHorizontalHeaderLabels() method like this:
from PyQt5.QtWidgets import QTableWidgetItem
from mydesign import *
import sys
data = []
data.append(('Populating', 'QtableWidget'))
data.append(('With data', 'In Python'))
data.append(('Is easy', 'Job'))
class mywindow(QtWidgets.QMainWindow):
    def __init__(self):
        super().__init__()
        self.ui = Ui_MainWindow()
        self.ui.setupUi(self)
        self.ui.tableWidget.setRowCount(3)
        self.ui.tableWidget.setColumnCount(2)
        self.ui.tableWidget.setHorizontalHeaderLabels(('Column 1', 'Column 2'))  # set header text
        row=0
        for tup in data:
            col=0
            for item in tup:
                cellinfo=QTableWidgetItem(item)
                self.ui.tableWidget.setItem(row, col, cellinfo)
                col+=1
            row += 1
app = QtWidgets.QApplication([])
win = mywindow()
win.show()
sys.exit(app.exec())
The same way, you can change the row header by using setVerticalHeaderLabels() method:
self.ui.tableWidget.setVerticalHeaderLabels(('Row 1', 'Row 2', 'Row 3'))
How to sort QTableWidget
You can make your QTableWidget sortable by using the setSortingEnabled() method.
self.ui.tableWidget.setSortingEnabled(True)
Now, if the user clicks on any column header, he can sort the data in ascending or descending order.
You can use this method before or after populating the QTableWidget with data.
What about sorting the QTableWidget to a specific column only?
You can use the sortByColumn() method and set the column index and the sorting order like this:
from PyQt5.QtWidgets import QTableWidgetItem
from mydesign import *
import sys
data = []
data.append(('Populating', 'QtableWidget'))
data.append(('With data', 'In Python'))
data.append(('Is easy', 'Job'))
class mywindow(QtWidgets.QMainWindow):
    def __init__(self):
        super().__init__()
        self.ui = Ui_MainWindow()
        self.ui.setupUi(self)
        self.ui.tableWidget.setRowCount(3)
        self.ui.tableWidget.setColumnCount(2)
        row=0
        for tup in data:
            col=0
            for item in tup:
                cellinfo=QTableWidgetItem(item)
                self.ui.tableWidget.setItem(row, col, cellinfo)
                col+=1
            row += 1
        self.ui.tableWidget.sortByColumn(0, QtCore.Qt.AscendingOrder)  # sort by the first column
app = QtWidgets.QApplication([])
win = mywindow()
win.show()
sys.exit(app.exec())
Also, you can use the sortItems() method to sort QTableWidget in ascending order by default.
self.ui.tableWidget.sortItems(0)
Or you can specify the sorting order:
self.ui.tableWidget.sortItems(0,QtCore.Qt.DescendingOrder)
Keep in mind that if you want to sort your columns programmatically, you must use the sorting methods after populating the QTableWidget with data otherwise, your data won’t be sorted.
Add QComboBox in QTableWidget
You may need the user to choose a value inside the QTableWidget instead of entering a text.
What about adding a QComboBox inside QTableWidgetItem?
To add a QComboBox inside QTableWidgetItem, you can use the setCellWidget() method:
from PyQt5.QtWidgets import QTableWidgetItem
from mydesign import *
import sys
data = ['PyQt5','Is','Awesome']
class mywindow(QtWidgets.QMainWindow):
        def __init__(self):
            super().__init__()
            self.ui = Ui_MainWindow()
            self.ui.setupUi(self)
            self.ui.tableWidget.setRowCount(3)
            self.ui.tableWidget.setColumnCount(2)
            row=0
            for item in data:
                cellinfo=QTableWidgetItem(item)
                combo = QtWidgets.QComboBox()
                combo.addItem("First item")
                combo.addItem("Second item")
                self.ui.tableWidget.setItem(row, 0, cellinfo)
                self.ui.tableWidget.setCellWidget(row, 1, combo)
                row += 1
app = QtWidgets.QApplication([])
win = mywindow()
win.show()
sys.exit(app.exec())
Cool!
Don’t stop your mind from imagination and try to insert different widgets like a QCheckbox or even a QProgressBar.
The above code will be the same except the line where you create the QComboBox; you will add the widget you want.
The only limit is your imagination.
Packaging Python files (Converting to executable)
You can convert your Python programs into binary executables using many tools.
For me, I will use pyinstaller, which is capable of packaging or freezing Python code into executable under Windows, Linux, Mac OS X, FreeBSD, and Solaris. All this with full support for 32,64-bit architecture.
The best part about pyinstaller the full support for PyQt5.
Great! First, install pyinstaller:
$ pip3 install pyinstaller
After you installed it, you can convert your Python programs like this:
$ pyinstaller test.py
That will generate the executable on the dist folder on your Python program directory.
As you will be, a lot of dependencies generated beside the executable. What about making it one file?
You can generate one executable file using the one file mode like this:
$ pyinstaller --onefile test.py
Each time you run your executable a console window appears, what about hiding this window?
You can use -w or –noconsole to hide the console window:
$ pyinstaller -w test.py
This option for Windows and Mac OS X only.
Pyinstaller provides a lot of options to pack your app, to list all options, use –help:
$ pyinstaller --help
Mokhtar is the founder of LikeGeeks.com. He is a seasoned technologist and accomplished author, with expertise in Linux system administration and Python development. Since 2010, Mokhtar has built an impressive career, transitioning from system administration to Python development in 2015. His work spans large corporations to freelance clients around the globe. Alongside his technical work, Mokhtar has authored some insightful books in his field. Known for his innovative solutions, meticulous attention to detail, and high-quality work, Mokhtar continually seeks new challenges within the dynamic field of technology.
Install PyQt5 with Qt Designer and code generator on Windows. Require Python 3.5 or newer
Requirements
- Python 3.5 or newer
- Pyinstaller library
Installation
Open CMD and type:
pip3 install pyqt5
pip3 install pyqt5-tools
Desktop Shortcut
Open Python libraries folder on file explorer. If you don’t know where is, open Python interpreter and type:
import site
print (site.getsitepackages())
Now search for pyqt5_tools or pyqt5-tools folder, open it and go to Qt\bin folder. Find file designer.exe and make shortcut to desktop.
Code Generator
Create uic.py file and paste code:
import subprocess
import sys

child = subprocess.Popen(['pyuic5' ,'-x',sys.argv[1]],stdout=subprocess.PIPE)

print(str(child.communicate()[0],encoding='utf-8'))
Open CMD and type:
pyinstaller --onefile uic.py
Go to file directory, open dist folder and copy uic.exe file to C:\python_librares_folder\pyqt5_tools\Qt\bin\bin
Code generator source: https://gist.github.com/ujjwal96/1dcd57542bdaf3c9d1b0dd526ccd44ff