
On this page: open(), file path, CWD (‘current working directory’), r ‘raw string’ prefix, os.getcwd(), os.chdir().
Referencing a File with a Full Path and Name
As seen in Tutorials #12 and #13, you can refer to a local file in Python using the file’s full path and file name. Below, you are opening up a file for reading:
>>> myfile = open('C:/Users/yourname/Desktop/alice.txt') >>> mytxt = myfile.read() >>> myfile.close() |
>>> myfile = open('/Users/yourname/Desktop/alice.txt') >>> mytxt = myfile.read() >>> myfile.close() |
In Windows, a full file directory path starts with a drive letter (C:, D:. etc.). In Linux and OS-X, it starts with «/», which is called root. Directories are separated by a slash «/». You can look up a file’s full directory path and file name through its «Properties». See how it is done in this FAQ.
Referencing a File in Windows
In Windows, there are a couple additional ways of referencing a file. That is because natively, Windows file path employs the backslash «\» instead of the slash. Python allows using both in a Windows system, but there are a couple of pitfalls to watch out for. To sum them up:
- Python lets you use OS-X/Linux style slashes «/» even in Windows. Therefore, you can refer to the file as ‘C:/Users/yourname/Desktop/alice.txt’. RECOMMENDED.
- If using backslash, because it is a special character in Python, you must remember to escape every instance: ‘C:\\Users\\yourname\\Desktop\\alice.txt’
- Alternatively, you can prefix the entire file name string with the rawstring marker «r»: r’C:\Users\yourname\Desktop\alice.txt’. That way, everything in the string is interpreted as a literal character, and you don’t have to escape every backslash.
File Name Shortcuts and CWD (Current Working Directory)
So, using the full directory path and file name always works; you should be using this method. However, you might have seen files called by their name only, e.g., ‘alice.txt’ in Python. How is it done?
The concept of Current Working Directory (CWD) is crucial here. You can think of it as the folder your Python is operating inside at the moment. So far we have been using the absolute path, which begins from the topmost directory. But if your file reference does not start from the top (e.g.,
‘alice.txt’
,
‘ling1330/alice.txt’
), Python assumes that it starts in the CWD (a «relative path«).
This means that a name-only reference will be successful only when the file is in your Python’s CWD. But bear in mind that your CWD may change. Also, your Python has different initial CWD settings depending on whether you are working with a Python script or in a shell environment.
- In a Python script:
When you execute your script, your CWD is set to the directory where your script is. Therefore, you can refer to a file in a script by its name only provided that the file and the script are in the same directory. An example:myfile = open('alice.txt') mytxt = myfile.read() myfile.close() foo.py
- In Python shell:
In your shell, the initial CWD setting varies by system. In Windows, the default location is often ‘C:/program Files (x86)/Python35-32’ (which is inconvenient — see this «Basic Configurations» page or this FAQ for how to change it). In OS-X, it is usually ‘/Users/username/Documents’ where username is your user ID. (Mac users should see this FAQ for how to change your setting.)Unless your file happens to be in your CWD, you have two options:
- Change your CWD to the file’s directory, or
- Copy or move your file to your CWD. (Not recommended, since your shell’s CWD may change.)
See this screen shot and and the next section for how to work with your CWD setting in Python shell.
Finding and Changing CWD
Python module os provides utilities for displaying and modifying your current working directory. Below illustrates how to find your CWD (.getcwd()) and change it into a different directory (.chdir()). Below is an example for the windows OS:
>>> import os >>> os.getcwd() 'D:\\Lab' >>> os.chdir('scripts/gutenberg') >>> os.getcwd() 'D:\\Lab\\scripts\\gutenberg' >>> os.chdir(r'D:\Corpora\corpus_samples') >>> os.getcwd() 'D:\\Corpora\\corpus_samples' |
Note that the CWD returned by Python interpreter is in the Windows file path format: it uses the backslash «\» for directory separator, and every instance is escaped. While Python lets Windows users use Linux/OS-X style «/» in file paths, internally it uses the OS-native file path format.
Watch Now This tutorial has a related video course created by the Real Python team. Watch it together with the written tutorial to deepen your understanding: Using Python’s pathlib Module
Python’s pathlib module helps streamline your work with file and directory paths. Instead of relying on traditional string-based path handling, you can use the Path object, which provides a cross-platform way to read, write, move, and delete files.
pathlib also brings together functionality previously spread across other libraries like os, glob, and shutil, making file operations more straightforward. Plus, it includes built-in methods for reading and writing text or binary files, ensuring a clean and Pythonic approach to handling file tasks.
By the end of this tutorial, you’ll understand that:
pathlibprovides an object-oriented interface for managing file and directory paths in Python.- You can instantiate
Pathobjects using class methods like.cwd(),.home(), or by passing strings toPath. pathliballows you to read, write, move, and delete files efficiently using methods.- To get a list of file paths in a directory, you can use
.iterdir(),.glob(), or.rglob(). - You can use
pathlibto check if a path corresponds to a file by calling the.is_file()method on aPathobject.
You’ll also explore a bunch of code examples in this tutorial, which you can use for your everyday file operations. For example, you’ll dive into counting files, finding the most recently modified file in a directory, and creating unique filenames.
It’s great that pathlib offers so many methods and properties, but they can be hard to remember on the fly. That’s where a cheat sheet can come in handy. To get yours, click the link below:
The Problem With Representing Paths as Strings
With Python’s pathlib, you can save yourself some headaches. Its flexible Path class paves the way for intuitive semantics. Before you have a closer look at the class, take a moment to see how Python developers had to deal with paths before pathlib was around.
Traditionally, Python has represented file paths using regular text strings. However, since paths are more than plain strings, important functionality was spread all around the standard library, including in libraries like os, glob, and shutil.
As an example, the following code block moves files into a subfolder:
You need three import statements in order to move all the text files to an archive directory.
Python’s pathlib provides a Path class that works the same way on different operating systems.
Instead of importing different modules such as glob, os, and shutil, you can perform the same tasks by using pathlib alone:
Just as in the first example, this code finds all the text files in the current directory and moves them to an archive/ subdirectory.
However, with pathlib, you accomplish these tasks with fewer import statements and more straightforward syntax, which you’ll explore in depth in the upcoming sections.
Path Instantiation With Python’s pathlib
One motivation behind pathlib is to represent the file system with dedicated objects instead of strings. Fittingly, the official documentation of pathlib is called pathlib — Object-oriented filesystem paths.
The object-oriented approach is already quite visible when you contrast the pathlib syntax with the old os.path way of doing things. It gets even more obvious when you note that the heart of pathlib is the Path class:
If you’ve never used this module before or just aren’t sure which class is right for your task,
Pathis most likely what you need. (Source)
In fact, Path is so frequently used that you usually import it directly:
Because you’ll mainly be working with the Path class of pathlib, this way of importing Path saves you a few keystrokes in your code. This way, you can work with Path directly, rather than importing pathlib as a module and referring to pathlib.Path.
There are a few different ways of instantiating a Path object. In this section, you’ll explore how to create paths by using class methods, passing in strings, or joining path components.
Using Path Methods
Once you’ve imported Path, you can make use of existing methods to get the current working directory or your user’s home directory.
The current working directory is the directory in the file system that the current process is operating in. You’ll need to programmatically determine the current working directory if, for example, you want to create or open a file in the same directory as the script that’s being executed.
Additionally, it’s useful to know your user’s home directory when working with files. Using the home directory as a starting point, you can specify paths that’ll work on different machines, independent of any specific usernames.
To get your current working directory, you can use .cwd():
- Windows
- Linux
- macOS
When you instantiate pathlib.Path, you get either a WindowsPath or a PosixPath object.
The kind of object will depend on which operating system you’re using.
On Windows, .cwd() returns a WindowsPath. On Linux and macOS, you get a PosixPath.
Despite the differences under the hood, these objects provide identical interfaces for you to work with.
It’s possible to ask for a WindowsPath or a PosixPath explicitly, but you’ll only be limiting your code to that system without gaining any benefits. A concrete path like this won’t work on a different system:
But what if you want to manipulate Unix paths on a Windows machine, or vice versa? In that case, you can directly instantiate PureWindowsPath or PurePosixPath on any system.
When you make a path like this, you create a PurePath object under the hood. You can use such an object if you need a representation of a path without access to the underlying file system.
Generally, it’s a good idea to use Path. With Path, you instantiate a concrete path for the platform that you’re using while also keeping your code platform-independent. Concrete paths allow you to do system calls on path objects, but pure paths only allow you to manipulate paths without accessing the operating system.
Working with platform-independent paths means that you can write a script on Windows that uses Path.cwd(), and it’ll work correctly when you run the file on macOS or Linux.
The same is true for .home():
- Windows
- Linux
- macOS
With Path.cwd() and Path.home(), you can conveniently get a starting point for your Python scripts.
In cases where you need to spell paths out or reference a subdirectory structure, you can instantiate Path with a string.
Passing in a String
Instead of starting in your user’s home directory or your current working directory, you can point to a directory or file directly by passing its string representation into Path:
- Windows
- Linux
- macOS
This process creates a Path object. Instead of having to deal with a string, you can now work with the flexibility that pathlib offers.
On Windows, the path separator is a backslash (\). However, in many contexts, the backslash is also used as an escape character to represent non-printable characters. To avoid problems, use raw string literals to represent Windows paths:
A string with an r in front of it is a raw string literal. In raw string literals, the \ represents a literal backslash. In a normal string, you’d need to use two backslashes (\\) to indicate that you want to use the backslash literally and not as an escape character.
You may have already noticed that although you enter paths on Windows with backslashes, pathlib represents them with the forward slash (/) as the path separator. This representation is named POSIX style.
POSIX stands for Portable Operating System Interface, which is a standard for maintaining the compability between operating systems. The standard covers much more than path representation. You can learn more about it in Open Group Base Specifications Issue 7.
Still, when you convert a path back to a string, it’ll use the native form—for example, with backslashes on Windows:
In general, you should try to use Path objects as much as possible in your code to take advantage of their benefits, but converting them to strings can be necessary in certain contexts. Some libraries and APIs still expect you to pass file paths as strings, so you may need to convert a Path object to a string before passing it to certain functions.
Joining Paths
A third way to construct a path is to join the parts of the path using the special forward slash operator (/), which is possibly the most unusual part of the pathlib library. You may have already raised your eyebrows about it in the example at the beginning of this tutorial:
The forward slash operator can join several paths or a mix of paths and strings as long as you include one Path object.
You use a forward slash regardless of your platform’s actual path separator.
If you don’t like the special slash notation, then you can do the same operation with the .joinpath() method:
This notation is closer to os.path.join(), which you may have used in the past. It can feel more familiar than a forward slash if you’re used to backslashed paths.
After you’ve instantiated Path, you probably want to do something with your path. For example, maybe you’re aiming to perform file operations or pick parts from the path. That’s what you’ll do next.
File System Operations With Paths
You can perform a bunch of handy operations on your file system using pathlib.
In this section, you’ll get a broad overview of some of the most common ones. But before you start performing file operations, have a look at the parts of a path first.
Picking Out Components of a Path
A file or directory path consists of different parts. When you use pathlib, these parts are conveniently available as properties. Basic examples include:
.name: The filename without any directory.stem: The filename without the file extension.suffix: The file extension.anchor: The part of the path before the directories.parent: The directory containing the file, or the parent directory if the path is a directory
Here, you can observe these properties in action:
- Windows
- Linux
- macOS
Note that .parent returns a new Path object, whereas the other properties return strings. This means, for instance, that you can chain .parent in the last example or even combine it with the slash operator to create completely new paths:
That’s quite a few properties to keep straight. If you want a handy reference for these Path properties, then you can download the Real Python pathlib cheat sheet by clicking the link below:
Reading and Writing Files
Consider that you want to print all the items on a shopping list that you wrote down in a Markdown file. The content of shopping_list.md looks like this:
Traditionally, the way to read or write a file in Python has been to use the built-in open() function.
With pathlib, you can use open() directly on Path objects.
So, a first draft of your script that finds all the items in shopping_list.md and prints them may look like this:
Python
read_shopping_list.py
In fact, Path.open() is calling the built-in open() function behind the scenes. That’s why you can use parameters like mode and encoding with Path.open().
On top of that, pathlib offers some convenient methods to read and write files:
.read_text()opens the path in text mode and returns the contents as a string..read_bytes()opens the path in binary mode and returns the contents as a byte string..write_text()opens the path and writes string data to it..write_bytes()opens the path in binary mode and writes data to it.
Each of these methods handles the opening and closing of the file. Therefore, you can update read_shopping_list.py using .read_text():
Python
read_shopping_list.py
You can also specify paths directly as filenames, in which case they’re interpreted relative to the current working directory. So you can condense the example above even more:
Python
read_shopping_list.py
If you want to create a plain shopping list that only contains the groceries, then you can use .write_text() in a similar fashion:
Python
write_plain_shoppinglist.py
When using .write_text(), Python overwrites any existing files on the same path without giving you any notice. That means you could erase all your hard work with a single keystroke!
As always, when you write files with Python, you should be cautious of what your code is doing. The same is true when you’re renaming files.
Renaming Files
When you want to rename files, you can use .with_stem(), .with_suffix(), or .with_name(). They return the original path but with the filename, the file extension, or both replaced.
If you want to change a file’s extension, then you can use .with_suffix() in combination with .replace():
Using .with_suffix() returns a new path. To actually rename the file, you use .replace(). This moves txt_path to md_path and renames it when saving.
If you want to change the complete filename, including the extension, then you can use .with_name():
The code above renames hello.txt to goodbye.md.
If you want to rename the filename only, keeping the suffix as it is, then you can use .with_stem(). You’ll explore this method in the next section.
Copying Files
Surprisingly, Path doesn’t have a method to copy files. But with the knowledge that you’ve gained about pathlib so far, you can create the same functionality with a few lines of code:
You’re using .with_stem() to create the new filename without changing the extension.
The actual copying takes place in the highlighted line, where you use .read_bytes() to read the content of source and then write this content to destination using .write_bytes().
While it’s tempting to use pathlib for everything path related, you may also consider using shutil for copying files. It’s a great alternative that also knows how to work with Path objects.
Moving and Deleting Files
Through pathlib, you also have access to basic file system–level operations like moving, updating, and even deleting files. For the most part, these methods don’t give a warning or wait for confirmation before getting rid of information or files. So, be careful when using these methods.
To move a file, you can use .replace(). Note that if the destination already exists, then .replace() will overwrite it. To avoid possibly overwriting the destination path, you can test whether the destination exists before replacing:
However, this does leave the door open for a possible race condition. Another process may add a file at the destination path between the execution of the if statement and the .replace() method. If that’s a concern, then a safer way is to open the destination path for exclusive creation then explicitly copy the source data and delete the source file afterward:
If destination already exists, then the code above catches a FileExistsError and prints a warning. To perform a move, you need to delete source with .unlink() after the copy is done. Using else ensures that the source file isn’t deleted if the copying fails.
Creating Empty Files
To create an empty file with pathlib, you can use .touch().
This method is intended to update a file’s modification time, but you can use its side effect to create a new file:
In the example above, you instantiate a Path object and create the file using .touch(). You use .exists() both to verify that the file didn’t exist before and then to check that it was successfully created.
If you use .touch() again, then it updates the file’s modification time.
If you don’t want to modify files accidentally, then you can use the exist_ok parameter and set it to False:
When you use .touch() on a file path that doesn’t exist, you create a file without any content.
Creating an empty file with Path.touch() can be useful when you want to reserve a filename for later use, but you don’t have any content to write to it yet. For example, you may want to create an empty file to ensure that a certain filename is available, even if you don’t have content to write to it at the moment.
Python pathlib Examples
In this section, you’ll see some examples of how to use pathlib to deal with everyday challenges that you’re facing as a Python developer.
You can use these examples as starting points for your own code or save them as code snippets for later reference.
Counting Files
There are a few different ways to get a list of all the files in a directory with Python. With pathlib, you can conveniently use the .iterdir() method, which iterates over all the files in the given directory. In the following example, you combine .iterdir() with the collections.Counter class to count how many files of each file type are in the current directory:
You can create more flexible file listings with the methods .glob() and .rglob(). For example, Path.cwd().glob("*.txt") returns all the files with a .txt suffix in the current directory. In the following, you only count file extensions starting with p:
If you want to recursively find all the files in both the directory and its subdirectories, then you can use .rglob(). This method also offers a cool way to display a directory tree, which is the next example.
Displaying a Directory Tree
In this example, you define a function named tree(), which will print a visual tree representing the file hierarchy, rooted at a given directory. This is useful when, for example, you want to peek into the subdirectories of a project.
To traverse the subdirectories as well, you use the .rglob() method:
Python
display_dir_tree.py
Note that you need to know how far away from the root directory a file is located. To do this, you first use .relative_to() to represent a path relative to the root directory. Then, you use the .parts property to count the number of directories in the representation. When run, this function creates a visual tree like the following:
If you want to push this code to the next level, then you can try building a directory tree generator for the command line.
Finding the Most Recently Modified File
The .iterdir(), .glob(), and .rglob() methods are great fits for generator expressions and list comprehensions. To find the most recently modified file in a directory, you can use the .stat() method to get information about the underlying files. For instance, .stat().st_mtime gives the time of last modification of a file:
The timestamp returned from a property like .stat().st_mtime represents seconds since January 1, 1970, also known as the epoch. If you’d prefer a different format, then you can use time.localtime or time.ctime to convert the timestamp to something more usable. If this example has sparked your curiosity, then you may want learn more about how to get and use the current time in Python.
Creating a Unique Filename
In the last example, you’ll construct a unique numbered filename based on a template string.
This can be handy when you don’t want to overwrite an existing file if it already exists:
In unique_path(), you specify a pattern for the filename, with room for a counter. Then, you check the existence of the file path created by joining a directory and the filename, including a value for the counter. If it already exists, then you increase the counter and try again.
Now you can use the script above to get unique filenames:
If the directory already contains the files test001.txt and test002.txt, then the above code will set path to test003.txt.
Conclusion
Python’s pathlib module provides a modern and Pythonic way of working with file paths, making code more readable and maintainable.
With pathlib, you can represent file paths with dedicated Path objects instead of plain strings.
In this tutorial, you’ve learned how to:
- Work with file and directory paths in Python
- Instantiate a
Pathobject in different ways - Use
pathlibto read and write files - Carefully copy, move, and delete files
- Manipulate paths and the underlying file system
- Pick out components of a path
The pathlib module makes dealing with file paths convenient by providing helpful methods and properties.
Peculiarities of the different systems are hidden by the Path object, which makes your code more consistent across operating systems.
If you want to get an overview PDF of the handy methods and properties that pathlib offers, then you can click the link below:
Frequently Asked Questions
Now that you have some experience with Python’s pathlib module, you can use the questions and answers below to check your understanding and recap what you’ve learned.
These FAQs are related to the most important concepts you’ve covered in this tutorial. Click the Show/Hide toggle beside each question to reveal the answer.
The pathlib module provides a more intuitive and readable way to handle file paths with its object-oriented approach, methods, and attributes, reducing the need to import multiple libraries and making your code more platform-independent.
You can instantiate a Path object by importing Path from pathlib and then using Path() with a string representing the file or directory path. You can also use class methods like Path.cwd() for the current working directory or Path.home() for the user’s home directory.
You can check if a path is a file by using the .is_file() method on a Path object. This method returns True if the path points to a file and False otherwise.
You can join paths using the forward slash operator (/) or the .joinpath() method to combine path components into a single Path object.
You can read a file using pathlib by creating a Path object for the file and then calling the .read_text() method to get the file’s contents as a string. Alternatively, use .open() with a with statement to read the file using traditional file handling techniques.
You can use the .touch() method of a Path object to create an empty file with pathlib.
You can use the .read_text() and .write_text() methods of a pathlib.Path object for reading and writing text files, and .read_bytes() and .write_bytes() for binary files. These methods handle file opening and closing for you.
You can create a unique filename by constructing a path with a counter in a loop, checking for the existence of the file using .exists(), and incrementing the counter until you find a filename that doesn’t exist.
Watch Now This tutorial has a related video course created by the Real Python team. Watch it together with the written tutorial to deepen your understanding: Using Python’s pathlib Module
Работа с операционной системой и файлами имеет широкий спектр практических применений. Например:
- Управление файлами и директориями:
- Создание, перемещение, переименование и удаление файлов и директорий.
- Навигация по файловой системе для поиска и обработки нужных данных.
- Обработка данных из файлов:
- Чтение и запись данных из/в текстовые файлы, CSV, JSON и другие форматы.
- Обработка больших объемов данных, например, в лог-файлах.
- Автоматизация задач:
- Автоматизация повседневных задач, таких как переименование множества файлов по определенному шаблону.
- Пакетная обработка файлов, например, изменение размера изображений.
- Системное администрирование:
- Изменение конфигурационных файлов и настройка системных параметров.
- Мониторинг состояния файловой системы и ресурсов компьютера.
- Взаимодействие с операционной системой:
- Запуск внешних программ и команд из скриптов.
- Работа с переменными окружения и другими системными ресурсами.
- Обеспечение безопасности данных:
- Шифрование и дешифрование файлов.
- Управление правами доступа к файлам и директориям.
- Работа с базами данных:
- Импорт и экспорт данных из и в базы данных.
- Архивация и резервное копирование данных.
- Разработка веб-приложений:
- Загрузка, сохранение и обработка файлов, отправленных пользователями.
- Чтение и запись данных в файловую систему, кэширование данных.
- Модуль
osиos.path:os: Предоставляет функции для взаимодействия с операционной системой.os.path: Предоставляет функции для работы с путями к файлам и директориям.
- Модуль
pathlib:- Предоставляет объектно-ориентированный интерфейс для работы с путями к файлам и директориям.
- Модуль
shutil:- Позволяет выполнить различные операции с файлами, включая копирование, перемещение и удаление.
- Модуль
glob:- Позволяет использовать шаблоны для поиска файлов в директориях.
- Модуль
subprocess:- Предоставляет возможность запуска внешних процессов и выполнения команд в командной строке.
- Библиотека
os.environ:- Позволяет взаимодействовать с переменными окружения операционной системы.
- Библиотека
fileinput:- Упрощает обработку текстовых файлов в потоковом режиме.
- Библиотека
csv:- Предоставляет функциональность для работы с файлами в формате CSV (Comma-Separated Values).
- Библиотека
json:- Позволяет кодировать и декодировать данные в формате JSON.
- Библиотека
sqlite3:- Интегрированная библиотека для работы с базой данных SQLite.
- Библиотека
gzipиzipfile:- Позволяют работать с сжатыми файлами в форматах Gzip и Zip соответственно.
- Библиотека
hashlib:- Предоставляет интерфейс для работы с хеш-функциями, полезен для контроля целостности файлов.
- Библиотека
pathvalidate:- Позволяет валидировать и нормализовать пути файлов и директорий.
- Библиотека
openpyxlиpandas:- Предоставляют возможности для работы с файлами Excel, как для чтения, так и для записи данных.
Модуль os
Основные функции для работы с файловой системой
os.getcwd():- Получение текущей рабочей директории.
import os

current_directory = os.getcwd()
print(f"Текущая директория: {current_directory}")
- Получение текущей рабочей директории.
os.chdir(path):- Изменение текущей директории.
import os

new_directory = "/путь/к/новой/директории"
os.chdir(new_directory)
- Изменение текущей директории.
os.listdir(path='.'):- Получение списка файлов и директорий в указанной директории.
import os

files_in_directory = os.listdir("/путь/к/директории")
print(f"Список файлов и директорий: {files_in_directory}")
- Получение списка файлов и директорий в указанной директории.
os.mkdir(path):- Создание новой директории.
import os

new_directory_path = "/путь/к/новой_директории"
os.mkdir(new_directory_path)
- Создание новой директории.
os.remove(path):- Удаление файла.
import os

file_to_delete = "/путь/к/удаляемому_файлу.txt"
os.remove(file_to_delete)
- Удаление файла.
os.rmdir(path):- Удаление директории (должна быть пустой).
import os

directory_to_delete = "/путь/к/удаляемой_директории"
os.rmdir(directory_to_delete)
- Удаление директории (должна быть пустой).
os.rename(src, dst):- Переименование файла или директории.
import os

old_name = "/путь/к/старому_файлу.txt"
new_name = "/путь/к/новому_файлу.txt"
os.rename(old_name, new_name)
- Переименование файла или директории.
os.path.exists(path):- Проверка существования файла или директории.
import os

path_to_check = "/путь/к/файлу_или_директории"
if os.path.exists(path_to_check):
    print("Файл или директория существует.")
else:
    print("Файл или директория не существует.")
- Проверка существования файла или директории.
os.path.isfile(path),os.path.isdir(path):- Проверка, является ли объект файлом или директорией.
import os

path_to_check = "/путь/к/файлу_или_директории"
if os.path.isfile(path_to_check):
    print("Это файл.")
elif os.path.isdir(path_to_check):
    print("Это директория.")
else:
    print("Объект не является ни файлом, ни директорией.")
- Проверка, является ли объект файлом или директорией.
os.path.join(path1, path2):- Объединение путей.
import os

path1 = "/путь/к/директории"
path2 = "файл.txt"
full_path = os.path.join(path1, path2)
print(f"Полный путь: {full_path}")
- Объединение путей.
Дополнительные возможности os для работы с операционной системой
os.environ:- Содержит словарь переменных окружения текущего процесса.
import os

# Получение значения переменной окружения
username = os.environ.get('USERNAME')
print(f"Имя пользователя: {username}")

# Установка новой переменной окружения
os.environ['MY_VARIABLE'] = 'my_value'
- Содержит словарь переменных окружения текущего процесса.
os.system(command):- Выполняет команду в командной строке.
import os

# Пример: выполнение команды 'dir' (Windows) или 'ls' (Linux)
os.system('dir')
- Выполняет команду в командной строке.
os.name:- Строка, предоставляющая имя операционной системы.
import os

print(f"Имя операционной системы: {os.name}")
- Строка, предоставляющая имя операционной системы.
os.getlogin():- Получение имени пользователя, под которым запущен процесс.
import os

print(f"Имя текущего пользователя: {os.getlogin()}")
- Получение имени пользователя, под которым запущен процесс.
os.getpid(),os.getppid():- Получение идентификаторов текущего процесса и его родительского процесса.
import os

print(f"Идентификатор текущего процесса: {os.getpid()}")
print(f"Идентификатор родительского процесса: {os.getppid()}")
- Получение идентификаторов текущего процесса и его родительского процесса.
os.cpu_count():- Возвращает количество доступных процессорных ядер.
import os

print(f"Количество процессорных ядер: {os.cpu_count()}")
- Возвращает количество доступных процессорных ядер.
os.get_terminal_size():- Возвращает размер терминала в виде кортежа (ширина, высота).
import os

terminal_size = os.get_terminal_size()
print(f"Размер терминала: {terminal_size.columns}x{terminal_size.lines}")
- Возвращает размер терминала в виде кортежа (ширина, высота).
os.urandom(n):- Возвращает строку случайных байтов заданной длины.
import os

random_bytes = os.urandom(4)
print(f"Случайные байты: {random_bytes}")
- Возвращает строку случайных байтов заданной длины.
Задания на закрепление
Простые
Задание 1. Вывести текущую директорию.
Задание 2. Перейти в домашнюю директорию пользователя.
Задание 3. Вывести список файлов в текущей директории.
Задание 4. Создать новую директорию с именем «НоваяДиректория».
Задание 5. Проверить существование файла «example.txt» в текущей директории.
Решения 1-5
import os

# Задание 1: Вывести текущую директорию
current_directory = os.getcwd()
print(f"Текущая директория: {current_directory}")

# Задание 2: Перейти в домашнюю директорию пользователя
home_directory = os.path.expanduser("~")
print(f"Домашняя директория: {home_directory}")

# Задание 3: Вывести список файлов в текущей директории
files_in_current_directory = os.listdir(".")
print(f"Список файлов в текущей директории: {files_in_current_directory}")

# Задание 4: Создать новую директорию "НоваяДиректория"
new_directory_name = "НоваяДиректория"
os.mkdir(new_directory_name)
print(f"Создана новая директория: {new_directory_name}")

# Задание 5: Проверить существование файла "example.txt"
file_to_check = "example.txt"
if os.path.exists(file_to_check):
    print(f"Файл {file_to_check} существует.")
else:
    print(f"Файл {file_to_check} не существует.")
Задания средней сложности.
Задание 6. Переместите все файлы с расширением «.txt» из текущей директории в новую поддиректорию «Текстовые_файлы».
Задание 7. Напишите программу для подсчета общего размера всех файлов в указанной директории (включая файлы в поддиректориях).
Задание 8. Создайте резервную копию всех файлов с расширением «.py» в текущей директории, добавив к их именам суффикс «_backup».
Задание 9. Найдите и выведите на экран пять самых больших файлов в текущей директории.
Задание 10. Напишите скрипт, который переименует все файлы в текущей директории, добавив к их именам текущую дату.
Решения 6-10
import os
import shutil
import datetime

# Задание 6: Переместить все файлы с расширением ".txt" в новую директорию
txt_files = [file for file in os.listdir(".") if file.endswith(".txt")]
new_directory = "Текстовые_файлы"
os.mkdir(new_directory)
for txt_file in txt_files:
    shutil.move(txt_file, os.path.join(new_directory, txt_file))

# Задание 7: Подсчитать общий размер всех файлов в указанной директории
directory_path = "/путь/к/директории"
total_size = 0
for dirpath, dirnames, filenames in os.walk(directory_path):
    for filename in filenames:
        file_path = os.path.join(dirpath, filename)
        total_size += os.path.getsize(file_path)
print(f"Общий размер файлов: {total_size} байт")

# Задание 8: Создать резервную копию всех файлов с расширением ".py"
py_files = [file for file in os.listdir(".") if file.endswith(".py")]
for py_file in py_files:
    shutil.copy2(py_file, f"{py_file}_backup")

# Задание 9: Найти и вывести на экран пять самых больших файлов
all_files = [(file, os.path.getsize(file)) for file in os.listdir(".") if os.path.isfile(file)]
largest_files = sorted(all_files, key=lambda x: x[1], reverse=True)[:5]
print(f"Пять самых больших файлов: {largest_files}")

# Задание 10: Переименовать все файлы, добавив к их именам текущую дату
current_date = datetime.datetime.now().strftime("%Y-%m-%d")
for file_to_rename in os.listdir("."):
    new_name = f"{current_date}_{file_to_rename}"
    os.rename(file_to_rename, new_name)
Модуль pathlib
pathlib — это модуль в стандартной библиотеке Python, предназначенный для более удобной и интуитивно понятной работы с путями к файлам и директориям в сравнении с более старыми методами, предоставляемыми модулем os.
Основные классы в модуле pathlib:
Path:- Основной класс, представляющий путь к файлу или директории.
- Основные методы класса
Path:Path.cwd(): Возвращает текущую рабочую директорию в виде объектаPath.Path.home(): Возвращает домашнюю директорию пользователя в виде объектаPath.Path.exists(): Проверяет, существует ли файл или директория по указанному пути.Path.is_file(),Path.is_dir(): Проверяют, является ли объект файлом или директорией соответственно.Path.mkdir(): Создает новую директорию.Path.rmdir(): Удаляет пустую директорию.Path.rename(): Переименовывает файл или директорию.Path.glob(pattern): Возвращает генератор объектовPathдля всех файлов, соответствующих заданному шаблону.Path.iterdir(): Возвращает генератор объектовPathдля всех файлов и поддиректорий в текущей директории.Path.resolve(): Преобразует путь в абсолютный.Path.unlink(): Удаляет файл.Path.with_suffix(new_suffix): Возвращает новый объектPathс измененным расширением файла.Path.joinpath(other_path): Объединяет текущий путь с другим путем и возвращает новый объектPath.
- Атрибуты класса
Path:Path.parts: Возвращает кортеж с компонентами пути.Path.parent: Возвращает родительскую директорию.Path.name: Возвращает последний компонент пути (имя файла или директории).Path.stem: Возвращает имя файла без расширения.Path.suffix: Возвращает расширение файла (пустая строка, если расширение отсутствует).
Пример использования модуля pathlib:
from pathlib import Path

# Создание объекта Path
file_path = Path("/путь/к/файлу.txt")

# Проверка существования файла
if file_path.exists():
    print(f"{file_path} существует.")

# Вывод родительской директории
print(f"Родительская директория: {file_path.parent}")

# Создание нового пути с измененным расширением
new_path = file_path.with_suffix(".html")
print(f"Новый путь: {new_path}")
- Создание нового файла:
from pathlib import Path # Создание объекта Path для нового файла new_file_path = Path("новый_файл.txt") # Запись в файл with new_file_path.open(mode="w") as file: file.write("Привет, мир!") - Перебор файлов в директории:
from pathlib import Path # Создание объекта Path для текущей директории current_directory = Path.cwd() # Перебор файлов в текущей директории for file_path in current_directory.iterdir(): print(file_path) - Поиск файлов с определенным расширением:
from pathlib import Path # Создание объекта Path для текущей директории current_directory = Path.cwd() # Поиск файлов с расширением ".txt" txt_files = list(current_directory.glob("*.txt")) print("Текстовые файлы:", txt_files) - Создание резервной копии всех файлов в директории:
from pathlib import Path import shutil # Создание объекта Path для текущей директории current_directory = Path.cwd() # Создание поддиректории для резервных копий backup_directory = current_directory / "backup" backup_directory.mkdir(exist_ok=True) # Копирование файлов в резервную директорию for file_path in current_directory.iterdir(): if file_path.is_file(): shutil.copy2(file_path, backup_directory / file_path.name) - Рекурсивное удаление директории:
from pathlib import Path
import shutil

# Создание объекта Path для директории, которую нужно удалить
directory_to_delete = Path("удаляемая_директория")

# Рекурсивное удаление директории
shutil.rmtree(directory_to_delete)
Задания на использование pathlib
Задание 11. Создайте объект
Pathдля текущей рабочей директории и выведите его на экран.
Задание 12. Проверьте существование файла «example.txt» в текущей директории.
Задание 13. Создайте новый файл «новый_файл.txt» и напишите в него любой текст.
Задание 14. Переместите файл «новый_файл.txt» в поддиректорию «Документы».
Задание 15. Найдите все файлы с расширением «.py» в текущей и поддиректориях и выведите их на экран.
Решения 11-15
from pathlib import Path

# Задание 11: Создать объект Path для текущей рабочей директории
current_directory_path = Path.cwd()
print(f"Текущая директория: {current_directory_path}")

# Задание 12: Проверить существование файла "example.txt"
example_file_path = Path("example.txt")
if example_file_path.exists():
    print(f"Файл {example_file_path} существует.")
else:
    print(f"Файл {example_file_path} не существует.")

# Задание 13: Создать новый файл "новый_файл.txt" и записать в него текст
new_file_path = Path("новый_файл.txt")
with new_file_path.open(mode="w") as file:
    file.write("Привет, мир!")

# Задание 14: Переместить файл "новый_файл.txt" в поддиректорию "Документы"
documents_directory = current_directory_path / "Документы"
new_file_path.rename(documents_directory / new_file_path.name)

# Задание 15: Найти все файлы с расширением ".py" и вывести их на экран
py_files = list(current_directory_path.rglob("*.py"))
print("Python-файлы:")
for py_file in py_files:
    print(py_file)
Библиотека shutil
Модуль shutil предоставляет удобные функции для выполнения различных операций с файлами и директориями в высокоуровневом стиле.
Методы:
shutil.copy(src, dst, *, follow_symlinks=True):- Копирует файл из
srcвdst.
- Копирует файл из
shutil.copy2(src, dst, *, follow_symlinks=True):- Копирует файл из
srcвdstи сохраняет метаданные (время создания, последнего доступа).
- Копирует файл из
shutil.copyfile(src, dst, *, follow_symlinks=True):- Копирует содержимое файла из
srcвdst.
- Копирует содержимое файла из
shutil.copytree(src, dst, symlinks=False, ignore=None, copy_function=copy2, ignore_dangling_symlinks=False):- Рекурсивно копирует директорию из
srcвdst.
- Рекурсивно копирует директорию из
shutil.rmtree(path, ignore_errors=False, onerror=None):- Рекурсивно удаляет директорию.
shutil.move(src, dst, copy_function=copy2):- Перемещает файл или директорию из
srcвdst.
- Перемещает файл или директорию из
shutil.rmtree(path, ignore_errors=False, onerror=None):- Рекурсивно удаляет директорию.
shutil.make_archive(base_name, format, root_dir=None, base_dir=None, verbose=0, dry_run=0, owner=None, group=None, logger=None):- Создает архив и возвращает полный путь к созданному архиву.
Исключения:
shutil.Error:- Исключение, которое возникает при ошибках в операциях
shutil.
- Исключение, которое возникает при ошибках в операциях
Примеры использования shutil
import shutil

# Пример 1: Копирование файла
shutil.copy("source.txt", "destination.txt")

# Пример 2: Копирование директории
shutil.copytree("source_directory", "destination_directory")

# Пример 3: Перемещение файла
shutil.move("old_location/file.txt", "new_location/file.txt")

# Пример 4: Удаление директории
shutil.rmtree("directory_to_delete")

# Пример 5: Создание архива
shutil.make_archive("archive", "zip", root_dir="source_directory")
Объяснения:
shutil.copy(): Копирует файл из «source.txt» в «destination.txt».shutil.copytree(): Рекурсивно копирует директорию «source_directory» в «destination_directory».shutil.move(): Перемещает файл «old_location/file.txt» в «new_location/file.txt».shutil.rmtree(): Рекурсивно удаляет директорию «directory_to_delete».shutil.make_archive(): Создает архив «archive.zip» из директории «source_directory».
Модуль glob
Модуль glob предоставляет функции для поиска файлов, соответствующих заданному шаблону, используя синтаксис, похожий на регулярные выражения.
Методы:
glob.glob(pathname, *, recursive=False):- Возвращает список путей, соответствующих шаблону
pathname.
- Возвращает список путей, соответствующих шаблону
glob.iglob(pathname, *, recursive=False):- Возвращает генератор, который возвращает пути, соответствующие шаблону
pathname.
- Возвращает генератор, который возвращает пути, соответствующие шаблону
Атрибуты:
glob.escape(pathname):- Экранирует все специальные символы в шаблоне
pathname.
- Экранирует все специальные символы в шаблоне
Пример использования методов и атрибута модуля glob:
import glob

# Пример 1: Поиск всех файлов с расширением .txt в текущей директории
txt_files = glob.glob("*.txt")
print("Текстовые файлы:", txt_files)

# Пример 2: Поиск всех файлов с расширением .py в текущей и поддиректориях
py_files_recursive = glob.glob("*.py", recursive=True)
print("Python-файлы (рекурсивно):", py_files_recursive)

# Пример 3: Использование генератора iglob для поиска файлов
for file_path in glob.iglob("*.txt"):
    print(f"Найден файл: {file_path}")

# Пример 4: Экранирование специальных символов в шаблоне
escaped_pattern = glob.escape("?.txt")
print("Экранированный шаблон:", escaped_pattern)
Модуль subprocess
Модуль subprocess в Python предоставляет удобные средства для запуска и взаимодействия с дочерними процессами.
Классы:
subprocess.CompletedProcess:- Класс, представляющий результат выполнения процесса.
Методы:
subprocess.run(args, *, stdin=None, input=None, stdout=None, stderr=None, capture_output=False, shell=False, cwd=None, timeout=None, check=False, text=None, encoding=None, errors=None, env=None, universal_newlines=None, pass_fds=(), *, start_new_session=False, **other_popen_kwargs):- Запускает команду в новом процессе и возвращает объект
CompletedProcess.
- Запускает команду в новом процессе и возвращает объект
subprocess.Popen(args, bufsize=-1, executable=None, stdin=None, stdout=None, stderr=None, preexec_fn=None, close_fds=True, shell=False, cwd=None, env=None, universal_newlines=None, startupinfo=None, creationflags=0, restore_signals=True, start_new_session=False, pass_fds=(), *, encoding=None, errors=None):- Запускает новый процесс и возвращает объект
Popen, представляющий дочерний процесс.
- Запускает новый процесс и возвращает объект
Атрибуты:
subprocess.PIPE:- Константа, используемая для указания, что нужно создать канал для ввода/вывода.
subprocess.STDOUT:- Константа, используемая для указания, что нужно объединить стандартный вывод и стандартный поток ошибок.
Пример использования методов и атрибутов модуля subprocess:
import subprocess

# Пример 1: Запуск команды и получение результата
result = subprocess.run(["ls", "-l"], capture_output=True, text=True)
print("Вывод команды 'ls -l':", result.stdout)

# Пример 2: Запуск процесса и передача данных через стандартный ввод
input_data = "Hello, subprocess!"
result = subprocess.run(["cat"], input=input_data, capture_output=True, text=True)
print("Вывод команды 'cat' с передачей данных:", result.stdout)

# Пример 3: Запуск процесса с использованием Popen
process = subprocess.Popen(["echo", "Hello, Popen!"], stdout=subprocess.PIPE, text=True)
output, _ = process.communicate()
print("Вывод команды 'echo' через Popen:", output)
Объяснения:
subprocess.run(["ls", "-l"], capture_output=True, text=True): Запускает команду «ls -l» и возвращает объектCompletedProcess, содержащий результат выполнения команды.subprocess.run(["cat"], input=input_data, capture_output=True, text=True): Запускает команду «cat» и передает данные через стандартный ввод, затем возвращает объектCompletedProcessс результатом.subprocess.Popen(["echo", "Hello, Popen!"], stdout=subprocess.PIPE, text=True): Запускает процесс с использованиемPopen, организует взаимодействие с процессом и получает результат черезcommunicate().
Модуль fileinput
Модуль fileinput в Python предоставляет удобные средства для итерации по строкам текстовых файлов.
Классы:
fileinput.FileInput:- Класс, предоставляющий удобный интерфейс для обработки файлов.
Методы:
fileinput.input(files=None, inplace=False, backup='', mode='r', openhook=None):- Возвращает объект
FileInput, предназначенный для итерации по строкам текстовых файлов.
- Возвращает объект
Атрибуты:
fileinput.filename():- Возвращает имя текущего обрабатываемого файла.
fileinput.lineno():- Возвращает номер текущей строки в текущем файле.
fileinput.filelineno():- Возвращает номер текущей строки в текущем файле, начиная с 1 для каждого файла.
fileinput.isfirstline():- Возвращает
True, если текущая строка является первой в файле.
- Возвращает
fileinput.isstdin():- Возвращает
True, если текущая строка считана из стандартного ввода.
- Возвращает
fileinput.nextfile():- Закрывает текущий файл и переходит к следующему.
Пример использования методов и атрибутов модуля fileinput:
import fileinput

# Пример: Замена всех вхождений слова "old" на "new" в файлах "example.txt" и "example2.txt"
with fileinput.input(files=["example.txt", "example2.txt"], inplace=True, backup=".bak") as f_input:
    for line in f_input:
        if "old" in line:
            line = line.replace("old", "new")
        print(line, end="")

# Пример использования атрибутов
with fileinput.input(files=["example.txt"]) as f_input:
    for line in f_input:
        if f_input.isfirstline():
            print(f"Processing file: {f_input.filename()}")
        print(f"Line {f_input.lineno()}: {line.strip()}")
Объяснения:
fileinput.input(files=["example.txt", "example2.txt"], inplace=True, backup=".bak"): Возвращает объектFileInputдля итерации по строкам из указанных файлов с заменой содержимого в тех файлах, где обнаружены изменения, и созданием резервных копий файлов с расширением «.bak».f_input.filename(): Возвращает имя текущего обрабатываемого файла.f_input.lineno(): Возвращает номер текущей строки в текущем файле.f_input.isfirstline(): ВозвращаетTrue, если текущая строка является первой в файле.f_input.nextfile(): Закрывает текущий файл и переходит к следующему файлу в списке.
Работа с архивами в Python. Модули zipfile и gzip
Модуль gzip
Классы:
gzip.GzipFile(fileobj=None, mode=None, compresslevel=9, *, filename=None, mtime=None):- Класс для работы с gzip-файлами.
Методы:
gzip.open(filename, mode='rb', compresslevel=9, encoding=None, errors=None, newline=None):- Открывает gzip-файл в указанном режиме.
Атрибуты:
gzip.READABLEиgzip.WRITABLE(константы):- Используются для определения режима открытия gzip-файла на чтение или запись.
Модуль zipfile
Классы:
zipfile.ZipFile(file, mode='r', compression=ZIP_STORED, allowZip64=True, compresslevel=None, strict_timestamps=True):- Класс для работы с ZIP-архивами.
Методы:
zipfile.ZipFile.extractall(path=None, members=None, pwd=None):- Извлекает все файлы из архива в указанную директорию.
zipfile.ZipFile.extract(member, path=None, pwd=None):- Извлекает указанный файл из архива в указанную директорию.
zipfile.ZipFile.read(name, pwd=None):- Считывает содержимое файла из архива в бинарном режиме.
zipfile.ZipFile.open(name, mode='r', pwd=None, *, force_zip64=False):- Открывает файл из архива в текстовом или бинарном режиме.
Атрибуты:
zipfile.ZIP_STORED,zipfile.ZIP_DEFLATED,zipfile.ZIP_BZIP2,zipfile.ZIP_LZMA(константы):- Типы компрессии для ZIP-архивов.
Пример использования модулей gzip и zipfile:
import gzip
import zipfile
import os

# Пример с gzip
with open("example.txt", "w") as file:
    file.write("Hello, Gzip!")

with gzip.open("example.txt.gz", "wb") as gz_file:
    with open("example.txt", "rb") as file:
        gz_file.write(file.read())

# Пример с zipfile
with zipfile.ZipFile("example.zip", "w") as zip_file:
    zip_file.write("example.txt")

# Извлекаем содержимое из архива
with zipfile.ZipFile("example.zip", "r") as zip_file:
    zip_file.extractall("extracted_content")

# Чтение содержимого из gzip-файла
with gzip.open("example.txt.gz", "rt") as gz_file:
    content = gz_file.read()
    print(content)

# Удаление временных файлов
os.remove("example.txt")
os.remove("example.txt.gz")
os.remove("example.zip")
os.rmdir("extracted_content")
Модуль hashlib
Модуль hashlib в Python предоставляет функции хеширования для создания криптографически безопасных хеш-функций.
Классы:
hashlib.algorithms_guaranteed:- Список алгоритмов хеширования, доступных в модуле на всех платформах.
hashlib.algorithms_available:- Список алгоритмов хеширования, доступных в модуле на текущей платформе.
hashlib.Hash(algorithm, *, data=b''):- Класс для создания объекта хеша для конкретного алгоритма.
Методы:
hash.update(data):- Обновляет хеш-объект данными.
hash.digest():- Возвращает байтовую строку, представляющую хеш-значение.
hash.hexdigest():- Возвращает строку, представляющую хеш-значение в виде шестнадцатеричной строки.
Атрибуты:
hash.block_size:- Размер блока хеширования.
hash.digest_size:- Размер хеш-значения в байтах.
Пример использования методов и атрибутов модуля hashlib:
import hashlib

# Пример: Хеширование строки с использованием различных алгоритмов
message = "Hello, hashlib!"

# Доступные алгоритмы хеширования
available_algorithms = hashlib.algorithms_available
print("Доступные алгоритмы:", available_algorithms)

# Хеширование с использованием различных алгоритмов
for algorithm in available_algorithms:
    # Создание объекта хеша для конкретного алгоритма
    hash_object = hashlib.new(algorithm)

    # Обновление хеша данными
    hash_object.update(message.encode("utf-8"))

    # Получение и вывод хеш-значения в виде шестнадцатеричной строки
    hash_value_hex = hash_object.hexdigest()
    print(f"{algorithm}: {hash_value_hex}")
Объяснения:
hashlib.algorithms_available: Возвращает список алгоритмов хеширования, доступных в модуле на текущей платформе.hashlib.new(algorithm): Создает новый объект хеша для указанного алгоритма.hash.update(data): Обновляет хеш-объект данными.hash.hexdigest(): Возвращает строку, представляющую хеш-значение в виде шестнадцатеричной строки.- В приведенном примере строки «Hello, hashlib!» хешируются с использованием всех доступных алгоритмов, и для каждого алгоритма выводится его хеш-значение.
Использование hashlib при работе с файлами и операционной системой
Библиотека hashlib в первую очередь используется для создания хеш-значений данных, таких как строки или байтов. Однако, в контексте работы с файловой системой или операционной системой, она может быть применена для следующих задач:
- Проверка целостности файлов:
- При скачивании файлов из сети или получении данных от других источников, можно создать хеш-сумму файла с помощью
hashlibи затем сравнить ее с известным хешем-значением. Если хеш-суммы совпадают, это может служить индикатором целостности файла.import hashlib def calculate_file_hash(file_path, algorithm="sha256", buffer_size=8192): hash_object = hashlib.new(algorithm) with open(file_path, "rb") as file: while chunk := file.read(buffer_size): hash_object.update(chunk) return hash_object.hexdigest() # Пример: Проверка целостности файла expected_hash = "..." # известное хеш-значение file_path = "example_file.txt" calculated_hash = calculate_file_hash(file_path) if calculated_hash == expected_hash: print("Файл целостен.") else: print("Файл поврежден или изменен.")
- При скачивании файлов из сети или получении данных от других источников, можно создать хеш-сумму файла с помощью
- Сравнение содержимого файлов:
- При необходимости сравнения содержимого двух файлов, можно создать хеш-суммы для обоих файлов и сравнить их. Если хеш-суммы совпадают, содержимое файлов идентично.
import hashlib

def compare_files(file1_path, file2_path, algorithm="sha256", buffer_size=8192):
    hash1 = calculate_file_hash(file1_path, algorithm, buffer_size)
    hash2 = calculate_file_hash(file2_path, algorithm, buffer_size)
    return hash1 == hash2

# Пример: Сравнение содержимого двух файлов
file1_path = "file1.txt"
file2_path = "file2.txt"

if compare_files(file1_path, file2_path):
    print("Содержимое файлов идентично.")
else:
    print("Содержимое файлов различно.")
- При необходимости сравнения содержимого двух файлов, можно создать хеш-суммы для обоих файлов и сравнить их. Если хеш-суммы совпадают, содержимое файлов идентично.
- Генерация уникальных идентификаторов для файлов:
- Можно использовать хеш-значение файла в качестве уникального идентификатора, который может быть использован, например, для идентификации файлов в системе управления версиями или для создания уникальных имен файлов.
import hashlib
import os

def generate_unique_filename(file_path, algorithm="sha256"):
    hash_value = calculate_file_hash(file_path, algorithm)
    file_name, file_extension = os.path.splitext(os.path.basename(file_path))
    unique_filename = f"{hash_value}{file_extension}"
    return unique_filename

# Пример: Генерация уникального имени файла на основе хеша
original_file_path = "document.pdf"
unique_filename = generate_unique_filename(original_file_path)

print(f"Оригинальное имя файла: {os.path.basename(original_file_path)}")
print(f"Уникальное имя файла: {unique_filename}")
- Можно использовать хеш-значение файла в качестве уникального идентификатора, который может быть использован, например, для идентификации файлов в системе управления версиями или для создания уникальных имен файлов.
Модуль pathvalidate
Классы:
Platform(value, names=None, *, module=None, qualname=None, type=None, start=1, boundary=None)- Атрибуты:
LINUX = 'Linux'MACOS = 'macOS'POSIX = 'POSIX'UNIVERSAL = 'universal'WINDOWS = 'Windows'
- Атрибуты:
Методы:
validate_filename(filename: PathType, platform: PlatformType | None = None, min_len: int = 1, max_len: int = 255, fs_encoding: str | None = None, check_reserved: bool = True, additional_reserved_names: Sequence[str] | None = None) -> None- Проверяет, является ли заданное имя файла допустимым.
- Параметры:
filename: Имя файла для проверки.platform: Целевая платформа имени файла.min_len: Минимальная длина имени файла в байтах.max_len: Максимальная длина имени файла в байтах.fs_encoding: Кодировка файловой системы.check_reserved: Проверять ли зарезервированные имена.additional_reserved_names: Дополнительные зарезервированные имена.
is_valid_filename(filename: PathType, platform: PlatformType | None = None, min_len: int = 1, max_len: int | None = None, fs_encoding: str | None = None, check_reserved: bool = True, additional_reserved_names: Sequence[str] | None = None) -> bool- Проверяет, является ли заданное имя файла допустимым, возвращая булево значение.
validate_filepath(file_path: PathType, platform: PlatformType | None = None, min_len: int = 1, max_len: int | None = None, fs_encoding: str | None = None, check_reserved: bool = True, additional_reserved_names: Sequence[str] | None = None) -> None- Проверяет, является ли заданный путь к файлу допустимым.
is_valid_filepath(file_path: PathType, platform: PlatformType | None = None, min_len: int = 1, max_len: int | None = None, fs_encoding: str | None = None, check_reserved: bool = True, additional_reserved_names: Sequence[str] | None = None) -> bool- Проверяет, является ли заданный путь к файлу допустимым, возвращая булево значение.
validate_symbol(text: str) -> None- Проверяет, содержит ли текст символы.
replace_symbol(text: str, replacement_text: str = '', exclude_symbols: Sequence[str] = [], is_replace_consecutive_chars: bool = False, is_strip: bool = False) -> str- Заменяет символы в тексте.
Пример использования:
from pathvalidate import (
    validate_filename, is_valid_filename,
    validate_filepath, is_valid_filepath,
    validate_symbol, replace_symbol
)

# Пример использования validate_filename
try:
    validate_filename("file:name.txt", platform='Windows', check_reserved=False)
except ValidationError as e:
    print(f"ValidationError: {e}")

# Пример использования is_valid_filename
filename_validity = is_valid_filename("file_name.txt", platform='universal')
print(f"Is Valid Filename? {filename_validity}")

# Пример использования validate_filepath
try:
    validate_filepath("/path/to/file:name.txt", platform='Linux')
except ValidationError as e:
    print(f"ValidationError: {e}")

# Пример использования is_valid_filepath
filepath_validity = is_valid_filepath("/path/to/file_name.txt", platform='Linux')
print(f"Is Valid Filepath? {filepath_validity}")

# Пример использования validate_symbol
try:
    validate_symbol("text_with_@_symbol")
except ValidationError as e:
    print(f"ValidationError: {e}")

# Пример использования replace_symbol
modified_text = replace_symbol("text@with@symbols", replacement_text='_', exclude_symbols=['@'])
print(f"Modified Text: {modified_text}")
Задания на тренировку работы с библиотеками
Задание 16. Создайте пустой текстовый файл «example.txt» в текущей директории с использованием модуля pathlib.
Задание 17. Скопируйте файл «example.txt» в новый файл «example_copy.txt» в текущей директории с использованием модуля shutil.
Задание 18. Используя модуль subprocess, выполните команду «echo Hello, World!» в командной оболочке и получите вывод.
Задание 19. С помощью модуля glob найдите все файлы с расширением «.txt» в текущей директории и выведите их список.
Задание 20. Создайте архив «example.zip» и добавьте в него файлы «example.txt» и «example_copy.txt» с использованием модуля zipfile.
Задание 21. Используя модуль fileinput, замените все вхождения слова «Hello» на «Hi» в файле «example.txt».
Задание 22. Вычислите MD5 хэш файла «example.txt» с использованием модуля hashlib и выведите его.
Задание 23. Архивируйте файл «example.txt» с использованием модуля gzip и сохраните его как «example.txt.gz».
Задание 24. Проверьте, существует ли файл «example.txt.gz» и распакуйте его с использованием модуля gzip.
Задание 25. Используя модуль pathvalidate, создайте функцию, которая проверяет, содержится ли введенная строка валидное имя файла и возвращает True или False.
Решения
# Решения заданий с объяснениями в комментариях
from pathlib import Path
import shutil
import subprocess
import glob
import zipfile
import fileinput
import hashlib
import gzip
from pathvalidate import is_valid_filename

# Задание 16
Path("example.txt").write_text("")

# Задание 17
shutil.copy("example.txt", "example_copy.txt")

# Задание 18
result = subprocess.run(["echo", "Hello, World!"], capture_output=True, text=True)
print(result.stdout)

# Задание 19
txt_files = glob.glob("*.txt")
print(txt_files)

# Задание 20
with zipfile.ZipFile("example.zip", "w") as zip_file:
    zip_file.write("example.txt")
    zip_file.write("example_copy.txt")

# Задание 21
with fileinput.FileInput("example.txt", inplace=True, backup=".bak") as file:
    for line in file:
        print(line.replace("Hello", "Hi"), end="")

# Задание 22
md5_hash = hashlib.md5(Path("example.txt").read_bytes()).hexdigest()
print(md5_hash)

# Задание 23
with open("example.txt", "rb") as f_in, gzip.open("example.txt.gz", "wb") as f_out:
    shutil.copyfileobj(f_in, f_out)

# Задание 24
if Path("example.txt.gz").exists():
    with gzip.open("example.txt.gz", "rb") as f_in, open("unzipped_example.txt", "wb") as f_out:
        shutil.copyfileobj(f_in, f_out)

# Задание 25
def is_valid_filename_check(input_str):
    return is_valid_filename(input_str)

# Пример использования:
input_string = "example.txt"
print(is_valid_filename_check(input_string))
Задания повышенной сложности.
Задание 26. Создайте функцию, которая принимает путь к директории и сжимает все текстовые файлы в этой директории в архив «archive.zip» с использованием модуля shutil и zipfile.
Задание 27. Используя модуль subprocess, выполните команду «dir» (или «ls» на Linux/Mac) в командной оболочке и выведите результат выполнения.
Задание 28. С использованием модуля glob найдите все файлы с расширением «.log» в текущей директории и объедините их в один текстовый файл «merged_logs.txt».
Задание 29. Создайте архив «backup.zip», включающий в себя все файлы (включая поддиректории) из директории «backup_source», используя модуль shutil и zipfile.
Задание 30. Используя модуль fileinput, добавьте текущую дату и время в начало каждого файла с расширением «.txt» в текущей директории.
Решения
# Решения заданий с объяснениями в комментариях
import shutil
import subprocess
import glob
import zipfile
import fileinput
import gzip
from datetime import datetime
from pathlib import Path
from pathvalidate import sanitize_filename

# Задание 26
def compress_text_files(directory_path):
    with zipfile.ZipFile("archive.zip", "w") as zip_file:
        for txt_file in glob.glob(f"{directory_path}/*.txt"):
            zip_file.write(txt_file)

# Задание 27
result = subprocess.run(["dir"], capture_output=True, text=True)
print(result.stdout)

# Задание 28
log_files = glob.glob("*.log")
with open("merged_logs.txt", "w") as merged_file:
    for log_file in log_files:
        with open(log_file, "r") as current_file:
            merged_file.write(current_file.read())

# Задание 29
shutil.make_archive("backup", "zip", "backup_source")

# Задание 30
current_datetime = datetime.now().strftime("%Y-%m-%d %H:%M:%S")
for txt_file in glob.glob("*.txt"):
    with fileinput.FileInput(txt_file, inplace=True, backup=".bak") as file:
        for line in file:
            print(f"{current_datetime}: {line}", end="")

# Замечание: Для заданий 28 и 30 можно использовать библиотеку logging для более эффективной записи логов.
Решение потенциальных проблем с ОС и файлами. Обработка ошибок
Работа с операционной системой и файлами может столкнуться с различными потенциальными проблемами. Обработка ошибок позволяет эффективно управлять возможными ситуациями, таким образом, повышая надежность и безопасность программы. Рассмотрим некоторые типичные проблемы и способы их решения через обработку ошибок:
- Отсутствие файла или директории:
- Проблема: Попытка доступа или выполнения операций над файлом или директорией, которых нет.
- Обработка ошибок: Использование конструкции
try-exceptдля перехвата и обработки исключения FileNotFoundError или IsADirectoryError.try: with open("не_существующий_файл.txt", "r") as file: content = file.read() except FileNotFoundError: print("Файл не найден.") except IsADirectoryError: print("Это директория, а не файл.")
- Недостаточные права доступа:
- Проблема: Попытка выполнения операций, для которых у пользователя нет достаточных прав доступа.
- Обработка ошибок: Использование
try-exceptдля перехвата и обработки исключения PermissionError.try: with open("/etc/sudoers", "r") as file: content = file.read() except PermissionError: print("Недостаточно прав доступа для чтения файла.")
- Нехватка ресурсов:
- Проблема: Исчерпание системных ресурсов при выполнении операций.
- Обработка ошибок: Обработка исключения OSError или других связанных с ресурсами исключений.
import os

try:
    os.mkdir("/полный_путь/к/директории")
except OSError as e:
    print(f"Не удалось создать директорию: {e}")
- Неправильный формат данных:
- Проблема: Попытка выполнения операций над данными в неправильном формате.
- Обработка ошибок: Проверка формата данных и использование конструкции
try-exceptдля обработки исключений, связанных с неправильным форматом данных.try: int_value = int("abc") except ValueError: print("Неправильный формат данных для преобразования в int.")
- Конфликт имен файлов:
- Проблема: Попытка создания файла или директории с именем, которое уже существует.
- Обработка ошибок: Использование
try-exceptдля обработки исключения FileExistsError или других связанных с конфликтом имен исключений.try: with open("существующий_файл.txt", "x"): pass except FileExistsError: print("Файл уже существует.")
- Проблемы с кодировкой:
- Проблема: Ошибки при чтении или записи файлов из-за несоответствия кодировок.
- Обработка ошибок: Указание явно кодировки при открытии файла и обработка UnicodeError.
try:
    with open("файл.txt", "r", encoding="utf-8") as file:
        content = file.read()
except UnicodeError as e:
    print(f"Ошибка кодировки: {e}")
Задания для тренировки обработки ошибок
Задание 31: Обработка ошибки открытия файла.
Откройте файл «несуществующий_файл.txt» для чтения. Обработайте исключение FileNotFoundError и выведите сообщение «Файл не найден».
Задание32: Обработка ошибки записи в существующий файл.
Попробуйте открыть файл «существующий_файл.txt» для записи с использованием режима «x». Обработайте исключение FileExistsError и выведите сообщение «Файл уже существует».
Задание33: Обработка ошибки чтения файла с неправильной кодировкой.
Откройте файл «некорректная_кодировка.txt» для чтения с указанием неверной кодировки (например, «utf-16»). Обработайте исключение UnicodeError и выведите сообщение «Ошибка при чтении файла из-за неправильной кодировки».
Задание34: Обработка ошибки удаления файла.
Попробуйте удалить файл «защищенный_файл.txt», который имеет атрибут «защищенный» (например, через атрибут только для чтения). Обработайте исключение PermissionError и выведите сообщение «Недостаточно прав для удаления файла».
Задание35: Обработка ошибки создания директории.
Попробуйте создать директорию «существующая_директория» с использованием режима «x». Обработайте исключение FileExistsError и выведите сообщение «Директория уже существует».
Решение
# Решения с объяснениями в комментариях

# Задание 31
try:
    with open("несуществующий_файл.txt", "r") as file:
        content = file.read()
except FileNotFoundError:
    print("Файл не найден.")

# Задание 32
try:
    with open("существующий_файл.txt", "x") as file:
        file.write("Тестовое содержимое.")
except FileExistsError:
    print("Файл уже существует.")

# Задание 33
try:
    with open("некорректная_кодировка.txt", "r", encoding="utf-16") as file:
        content = file.read()
except UnicodeError:
    print("Ошибка при чтении файла из-за неправильной кодировки.")

# Задание 34
import os

try:
    os.remove("защищенный_файл.txt")
except PermissionError:
    print("Недостаточно прав для удаления файла.")

# Задание 35
try:
    os.mkdir("существующая_директория")
except FileExistsError:
    print("Директория уже существует.")
Примеры проектных работ на тему работа с файлами и операционной системой.
- Система управления файлами и директориями:
- Разработайте консольное приложение для управления файлами и директориями. Пользователь должен иметь возможность просматривать содержимое текущей директории, создавать новые файлы, директории, копировать, перемещать и удалять файлы и директории.
- Резервное копирование:
- Создайте программу для регулярного резервного копирования важных файлов пользователя. Реализуйте возможность выбора файлов или директорий для резервного копирования, выбора места назначения и частоты выполнения резервного копирования (ежедневно, еженедельно и т.д.).
- Архиватор файлов:
- Реализуйте простой архиватор файлов. Пользователь должен иметь возможность создавать архивы из файлов и директорий, а также извлекать содержимое архивов. Добавьте опцию сжатия файлов для уменьшения размера архива.
- Хэширование файлов:
- Создайте программу для генерации хэш-сумм файлов. Пользователь может выбрать файл или директорию, и программа должна рассчитать MD5 или SHA-256 хэш для каждого файла в выбранной директории. Результаты должны быть сохранены в текстовом файле.
- Поиск дубликатов файлов:
- Напишите скрипт для поиска дубликатов файлов на компьютере. Программа должна сканировать все файлы в указанных директориях, вычислять хэш-суммы файлов и идентифицировать дубликаты. Пользователь должен иметь возможность выбрать, хочет ли он удалить дубликаты или просто получить отчет.
Индивидуальное и групповое обучение «Python Junior»
Если вы хотите научиться программировать на Python, могу помочь. Запишитесь на мой курс «Python Junior» и начните свой путь в мир ИТ уже сегодня!
Контакты
Для получения дополнительной информации и записи на курсы свяжитесь со мной:
Телеграм: https://t.me/Vvkomlev
Email: victor.komlev@mail.ru
Объясняю сложное простыми словами. Даже если вы никогда не работали с ИТ и далеки от программирования, теперь у вас точно все получится! Проверено десятками примеров моих учеников.
Гибкий график обучения. Я предлагаю занятия в мини-группах и индивидуально, что позволяет каждому заниматься в удобном темпе. Вы можете совмещать обучение с работой или учебой.
Практическая направленность. 80%: практики, 20% теории. У меня множество авторских заданий, которые фокусируются на практике. Вы не просто изучаете теорию, а сразу применяете знания в реальных проектах и задачах.
Разнообразие учебных материалов: Теория представлена в виде текстовых уроков с примерами и видео, что делает обучение максимально эффективным и удобным.
Понимаю, что обучение информационным технологиям может быть сложным, особенно для новичков. Моя цель – сделать этот процесс максимально простым и увлекательным. У меня персонализированный подход к каждому ученику. Максимальный фокус внимания на ваши потребности и уровень подготовки.

Environment setup is the process of organizing your computer so you can write code. This involves installing any necessary tools, configuring them, and handling any hiccups during the setup. There is no single setup process because everyone has a different computer with a different operating system, version of the operating system, and version of the Python interpreter. Even so, this chapter describes some basic concepts to help you administer your own computer using the command line, environment variables, and filesystem.
Learning these concepts and tools might seem like a headache. You want to write code, not poke around configuration settings or understand inscrutable console commands. But these skills will save you time in the long run. Ignoring error messages or randomly changing configuration settings to get your system working well enough might hide problems, but it won’t fix them. By taking the time to understand these issues now, you can prevent them from reoccurring.
The Filesystem
The filesystem is how your operating system organizes data to be stored and retrieved. A file has two key properties: a filename (usually written as one word) and a path. The path specifies the location of a file on the computer. For example, a file on my Windows 10 laptop has the filename project.docx in the path C:\Users\Al\Documents. The part of the filename after the last period is the file’s extension and tells you a file’s type. The filename project.docx is a Word document, and Users, Al, and Documents all refer to folders (also called directories). Folders can contain files and other folders. For example, project.docx is in the Documents folder, which is in the Al folder, which is in the Users folder. Figure 2-1 shows this folder organization.
Figure 2-1: A file in a hierarchy of folders
The C:\ part of the path is the root folder, which contains all other folders. On Windows, the root folder is named C:\ and is also called the C: drive. On macOS and Linux, the root folder is /. In this book, I’ll use the Windows-style root folder, C:\. If you’re entering the interactive shell examples on macOS or Linux, enter / instead.
Additional volumes, such as a DVD drive or USB flash drive, will appear differently on different operating systems. On Windows, they appear as new, lettered root drives, such as D:\ or E:\. On macOS, they appear as new folders within the /Volumes folder. On Linux, they appear as new folders within the /mnt (“mount”) folder. Note that folder names and filenames are not case sensitive on Windows and macOS, but they’re case sensitive on Linux.
Paths in Python
On Windows, the backslash (\) separates folders and filenames, but on macOS and Linux, the forward slash (/) separates them. Instead of writing code both ways to make your Python scripts cross-platform compatible, you can use the pathlib module and / operator instead.
The typical way to import pathlib is with the statement from pathlib import Path. Because the Path class is the most frequently used class in pathlib, this form lets you type Path instead of pathlib.Path. You can pass a string of a folder or filename to Path() to create a Path object of that folder or filename. As long as the leftmost object in an expression is a Path object, you can use the / operator to join together Path objects or strings. Enter the following into the interactive shell:
>>> from pathlib import Path
>>> Path('spam') / 'bacon' / 'eggs'
WindowsPath('spam/bacon/eggs')
>>> Path('spam') / Path('bacon/eggs')
WindowsPath('spam/bacon/eggs')
>>> Path('spam') / Path('bacon', 'eggs')
WindowsPath('spam/bacon/eggs')
Note that because I ran this code on a Windows machine, Path() returns WindowsPath objects. On macOS and Linux, a PosixPath object is returned. (POSIX is a set of standards for Unix-like operating systems and is beyond the scope of this book.) For our purposes, there’s no difference between these two types.
You can pass a Path object to any function in the Python standard library that expects a filename. For example, the function call open(Path('C:\\') / 'Users' / 'Al' / 'Desktop' / 'spam.py') is equivalent to open(r'C:\Users\Al\Desktop\spam.py').
The Home Directory
All users have a folder called the home folder or home directory for their own files on the computer. You can get a Path object of the home folder by calling Path.home():
>>> Path.home()
WindowsPath('C:/Users/Al')
The home directories are located in a set place depending on your operating system:
- On Windows, home directories are in C:\Users.
- On Mac, home directories are in /Users.
- On Linux, home directories are often in /home.
Your scripts will almost certainly have permissions to read from and write to the files in your home directory, so it’s an ideal place to store the files that your Python programs will work with.
The Current Working Directory
Every program that runs on your computer has a current working directory (cwd). Any filenames or paths that don’t begin with the root folder you can assume are in the cwd. Although “folder” is the more modern name for a directory, note that cwd (or just working directory) is the standard term, not “current working folder.”
You can get the cwd as a Path object using the Path.cwd() function and change it using os.chdir(). Enter the following into the interactive shell:
>>> from pathlib import Path
>>> import os
1 >>> Path.cwd()
WindowsPath('C:/Users/Al/AppData/Local/Programs/Python/Python38')
2 >>> os.chdir('C:\\Windows\\System32')
>>> Path.cwd()
WindowsPath('C:/Windows/System32')
Here, the cwd was set to C:\Users\Al\AppData\Local\Programs\Python\Python381, so the filename project.docx would refer to C:\Users\Al\AppData\Local\Programs\Python\Python38\project.docx. When we change the cwd to C:\Windows\System322, the filename project.docx would refer to C:\Windows\System32\project.docx.
Python displays an error if you try to change to a directory that doesn’t exist:
>>> os.chdir('C:/ThisFolderDoesNotExist')
Traceback (most recent call last):
  File "<stdin>", line 1, in <module>
FileNotFoundError: [WinError 2] The system cannot find the file specified:
'C:/ThisFolderDoesNotExist'
The os.getcwd() function in the os module is a former way of getting the cwd as a string.
Absolute vs. Relative Paths
There are two ways to specify a file path:
- An absolute path, which always begins with the root folder
- A relative path, which is relative to the program’s cwd
There are also the dot (.) and dot-dot (..) folders. These are not real folders but special names that you can use in a path. A single period (.) for a folder name is shorthand for “this directory.” Two periods (..) means “the parent folder.”
Figure 2-2 shows an example of some folders and files. When the cwd is set to C:\bacon, the relative paths for the other folders and files are set as they are in the figure.
The .\ at the start of a relative path is optional. For example, .\spam.txt and spam.txt refer to the same file.
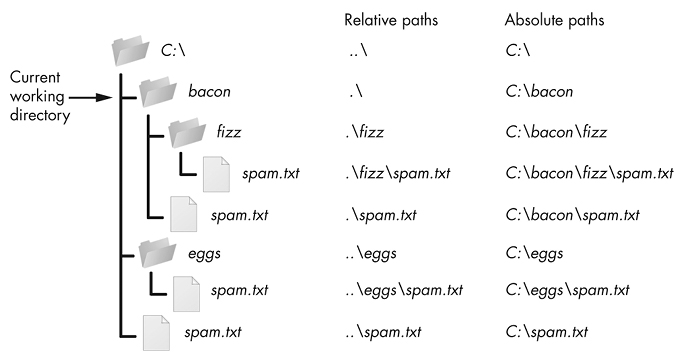
Figure 2-2: The relative paths for folders and files in the working directory C:\bacon
Programs and Processes
A program is any software application that you can run, such as a web browser, spreadsheet application, or word processor. A process is a running instance of a program. For example, Figure 2-3 shows five running processes of the same calculator program.
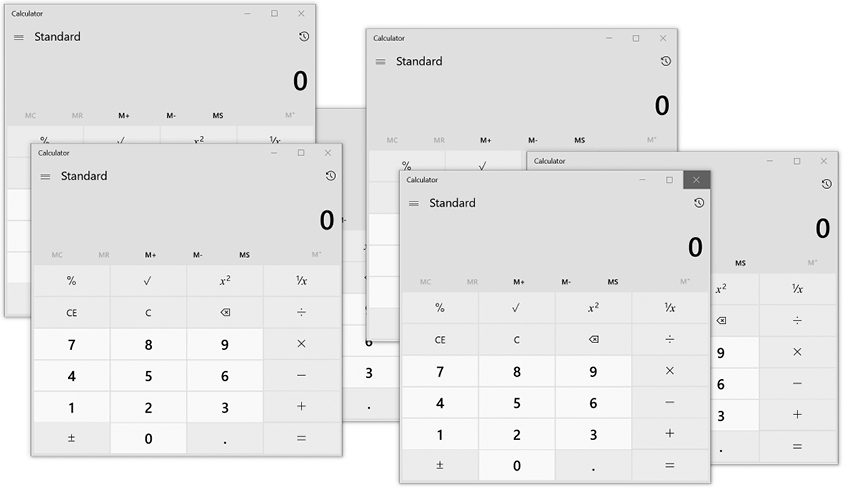
Figure 2-3: One calculator program running multiple times as multiple, separate processes
Processes remain separate from each other, even when running the same program. For example, if you ran several instances of a Python program at the same time, each process might have separate variable values. Every process, even processes running the same program, has its own cwd and environment variable settings. Generally speaking, a command line will run only one process at a time (although you can have multiple command lines open simultaneously).
Each operating system has a way of viewing a list of running processes. On Windows, you can press Ctrl—Shift—Esc to bring up the Task Manager application. On macOS, you can run ApplicationsUtilitiesActivity Monitor. On Ubuntu Linux, you can press Ctrl—Alt—Del to open an application also called the Task Manager. These task managers can force a running process to terminate if it’s unresponsive.
The Command Line
The command line is a text-based program that lets you enter commands to interact with the operating system and run programs. You might also hear it called the command line interface (CLI, which rhymes with “fly”), command prompt, terminal, shell, or console. It provides an alternative to a graphical user interface (GUI, pronounced “gooey”), which allows the user to interact with the computer through more than just a text-based interface. A GUI presents visual information to a user to guide them through tasks more easily than the command line does. Most computer users treat the command line as an advanced feature and never touch it. Part of the intimidation factor is due to the complete lack of hints of how to use it; although a GUI might display a button showing you where to click, a blank terminal window doesn’t remind you what to type.
But there are good reasons for becoming adept at using the command line. For one, setting up your environment often requires you to use the command line rather than the graphical windows. For another, entering commands can be much faster than clicking graphical windows with the mouse. Text-based commands are also less ambiguous than dragging an icon to some other icon. This lends them to automation better, because you can combine multiple specific commands into scripts to perform sophisticated operations.
The command line program exists in an executable file on your computer. In this context, we often call it a shell or shell program. Running the shell program makes the terminal window appear:
- On Windows, the shell program is at C:\Windows\System32\cmd.exe.
- On macOS, the shell program is at /bin/bash.
- On Ubuntu Linux, the shell program is at /bin/bash.
Over the years, programmers have created many shell programs for the Unix operating system, such as the Bourne Shell (in an executable file named sh) and later the Bourne-Again Shell (in an executable file named Bash). Linux uses Bash by default, whereas macOS uses the similar Zsh or Z shell in Catalina and later versions. Due to its different development history, Windows uses a shell named Command Prompt. All these programs do the same thing: they present a terminal window with a text-based CLI into which the user enters commands and runs programs.
In this section, you’ll learn some of the command line’s general concepts and common commands. You could master a large number of cryptic commands to become a real sorcerer, but you only need to know about a dozen or so to solve most problems. The exact command names might vary slightly on different operating systems, but the underlying concepts are the same.
Opening a Terminal Window
To open a terminal window, do the following:
- On Windows, click the Start button, type
Command Prompt, and then press Enter. - On macOS, click the
Spotlighticon in the upper-right corner, typeTerminal, and then press Enter. - On Ubuntu Linux, press the Win key to bring up Dash, type
Terminal, and press Enter. Alternatively, use the keyboard shortcut Ctrl—Alt-T.
Like the interactive shell, which displays a >>> prompt, the terminal displays a shell prompt at which you can enter commands. On Windows, the prompt will be the full path to the current folder you are in:
C:\Users\Al>your commands go hereOn macOS, the prompt shows your computer’s name, a colon, and the cwd with your home folder represented as a tilde (~). After this is your username followed by a dollar sign ($):
Als-MacBook-Pro:~ al$ your commands go hereOn Ubuntu Linux, the prompt is similar to the macOS prompt except it begins with the username and an at (@) symbol:
al@al-VirtualBox:~$ your commands go hereMany books and tutorials represent the command line prompt as just $ to simplify their examples. It’s possible to customize these prompts, but doing so is beyond the scope of this book.
Running Programs from the Command Line
To run a program or command, enter its name into the command line. Let’s run the default calculator program that comes with the operating system. Enter the following into the command line:
- On Windows, enter
calc.exe. - On macOS, enter
open -a Calculator. (Technically, this runs theopenprogram, which then runs the Calculator program.) - On Linux, enter
gnome-calculator.
Program names and commands are case sensitive on Linux but case insensitive on Windows and macOS. This means that even though you must type gnome-calculator on Linux, you could type Calc.exe on Windows and OPEN –a Calculator on macOS.
Entering these calculator program names into the command line is equivalent to running the Calculator program from the Start menu, Finder, or Dash. These calculator program names work as commands because the calc.exe, open, and gnome-calculator programs exist in folders that are included in the PATH environment variables. “Environment Variables and PATH” on page 35 explains this further. But suffice it to say that when you enter a program name on the command line, the shell checks whether a program with that name exists in one of the folders listed in PATH. On Windows, the shell looks for the program in the cwd (which you can see in the prompt) before checking the folders in PATH. To tell the command line on macOS and Linux to first check the cwd, you must enter ./ before the filename.
If the program isn’t in a folder listed in PATH, you have two options:
- Use the
cdcommand to change the cwd to the folder that contains the program, and then enter the program name. For example, you could enter the following two commands:cd C:\Windows\System32calc.exe - Enter the full file path for the executable program file. For example, instead of entering
calc.exe, you could enterC:\Windows\System32\calc.exe.
On Windows, if a program ends with the file extension .exe or .bat, including the extension is optional: entering calc does the same thing as entering calc.exe. Executable programs in macOS and Linux often don’t have file extensions marking them as executable; rather, they have the executable permission set. “Running Python Programs Without the Command Line” on page 39 has more information.
Using Command Line Arguments
Command line arguments are bits of text you enter after the command name. Like the arguments passed to a Python function call, they provide the command with specific options or additional directions. For example, when you run the command cd C:\Users, the C:\Users part is an argument to the cd command that tells cd to which folder to change the cwd. Or, when you run a Python script from a terminal window with the python yourScript.py command, the yourScript.py part is an argument telling the python program what file to look in for the instructions it should carry out.
Command line options (also called flags, switches, or simply options) are a single-letter or short-word command line arguments. On Windows, command line options often begin with a forward slash (/); on macOS and Linux, they begin with a single dash (–) or double dash (--). You already used the –a option when running the macOS command open –a Calculator. Command line options are often case sensitive on macOS and Linux but are case insensitive on Windows, and we separate multiple command line options with spaces.
Folders and filenames are common command line arguments. If the folder or filename has a space as part of its name, enclose the name in double quotes to avoid confusing the command line. For example, if you want to change directories to a folder called Vacation Photos, entering cd Vacation Photos would make the command line think you were passing two arguments, Vacation and Photos. Instead, you enter cd "Vacation Photos":
C:\Users\Al>cd "Vacation Photos"

C:\Users\Al\Vacation Photos>
Another common argument for many commands is --help on macOS and Linux and /? on Windows. These bring up information associated with the command. For example, if you run cd /? on Windows, the shell tells you what the cd command does and lists other command line arguments for it:
C:\Users\Al>cd /?
Displays the name of or changes the current directory.

CHDIR [/D] [drive:][path]
CHDIR [..]
CD [/D] [drive:][path]
CD [..]

  ..   Specifies that you want to change to the parent directory.

Type CD drive: to display the current directory in the specified drive.
Type CD without parameters to display the current drive and directory.

Use the /D switch to change current drive in addition to changing current
directory for a drive.
--snip—
This help information tells us that the Windows cd command also goes by the name chdir. (Most people won’t type chdir when the shorter cd command does the same thing.) The square brackets contain optional arguments. For example, CD [/D] [drive:][path] tells you that you could specify a drive or path using the /D option.
Unfortunately, although the /? and --help information for commands provides reminders for experienced users, the explanations can often be cryptic. They’re not good resources for beginners. You’re better off using a book or web tutorial instead, such as The Linux Command Line, 2nd Edition (2019) by William Shotts, Linux Basics for Hackers (2018) by OccupyTheWeb, or PowerShell for Sysadmins (2020) by Adam Bertram, all from No Starch Press.
Running Python Code from the Command Line with -c
If you need to run a small amount of throwaway Python code that you run once and then discard, pass the –c switch to python.exe on Windows or python3 on macOS and Linux. The code to run should come after the –c switch, enclosed in double quotes. For example, enter the following into the terminal window:
C:\Users\Al>python -c "print('Hello, world')"
Hello, world
The –c switch is handy when you want to see the results of a single Python instruction and don’t want to waste time entering the interactive shell. For example, you could quickly display the output of the help() function and then return to the command line:
C:\Users\Al>python -c "help(len)"
Help on built-in function len in module builtins:

len(obj, /)
    Return the number of items in a container.

C:\Users\Al>
Running Python Programs from the Command Line
Python programs are text files that have the .py file extension. They’re not executable files; rather, the Python interpreter reads these files and carries out the Python instructions in them. On Windows, the interpreter’s executable file is python.exe. On macOS and Linux, it’s python3 (the original python file contains the Python version 2 interpreter). Running the commands python yourScript.py or python3 yourScript.py will run the Python instructions saved in a file named yourScript.py.
Running the py.exe Program
On Windows, Python installs a py.exe program in the C:\Windows folder. This program is identical to python.exe but accepts an additional command line argument that lets you run any Python version installed on your computer. You can run the py command from any folder, because the C:\Windows folder is included in the PATH environment variable. If you have multiple Python versions installed, running py automatically runs the latest version installed on your computer. You can also pass a -3 or -2 command line argument to run the latest Python version 3 or version 2 installed, respectively. Or you could enter a more specific version number, such as -3.6 or -2.7, to run that particular Python installation. After the version switch, you can pass all the same command line arguments to py.exe as you do to python.exe. Run the following from the Windows command line:
C:\Users\Al>py -3.6 -c "import sys;print(sys.version)"
3.6.6 (v3.6.6:4cf1f54eb7, Jun 27 2018, 03:37:03) [MSC v.1900 64 bit (AMD64)]

C:\Users\Al>py -2.7
Python 2.7.14 (v2.7.14:84471935ed, Sep 16 2017, 20:25:58) [MSC v.1500 64 bit (AMD64)] on win32
Type "help", "copyright", "credits" or "license" for more information.
>>>
The py.exe program is helpful when you have multiple Python versions installed on your Windows machine and need to run a specific version.
Running Commands from a Python Program
Python’s subprocess.run() function, found in the subprocess module, can run shell commands within your Python program and then present the command output as a string. For example, the following code runs the ls –al command:
>>> import subprocess, locale
1 >>> procObj = subprocess.run(['ls', '-al'], stdout=subprocess.PIPE)
2 >>> outputStr = procObj.stdout.decode(locale.getdefaultlocale()[1])
>>> print(outputStr)
total 8
drwxr-xr-x  2 al al 4096 Aug  6 21:37 .
drwxr-xr-x 17 al al 4096 Aug  6 21:37 ..
-rw-r--r--  1 al al    0 Aug  5 15:59 spam.py
We pass the ['ls', '-al'] list to subprocess.run()1. This list contains the command name ls, followed by its arguments, as individual strings. Note that passing ['ls –al'] wouldn’t work. We store the command’s output as a string in outputStr2. Online documentation for subprocess.run() and locale.getdefaultlocale() will give you a better idea of how these functions work, but they make the code work on any operating system running Python.
Minimizing Typing with Tab Completion
Because advanced users enter commands into computers for hours a day, modern command lines offer features to minimize the amount of typing necessary. The tab completion feature (also called command line completion or autocomplete) lets a user type the first few characters of a folder or filename and then press the Tab key to have the shell fill in the rest of the name.
For example, when you type cd c:\u and press Tab on Windows, the current command checks which folders or files in C:\ begin with u and tab completes to c:\Users. It corrects the lowercase u to U as well. (On macOS and Linux, tab completion doesn’t correct the casing.) If multiple folders or filenames begin with U in the C:\ folder, you can continue to press Tab to cycle through all of them. To narrow down the number of matches, you could also type cd c:\us, which filters the possibilities to folders and filenames that begin with us.
Pressing the Tab key multiple times works on macOS and Linux as well. In the following example, the user typed cd D, followed by Tab twice:
al@al-VirtualBox:~$ cd D
Desktop/   Documents/ Downloads/
al@al-VirtualBox:~$ cd D
Pressing Tab twice after typing the D causes the shell to display all the possible matches. The shell gives you a new prompt with the command as you’ve typed it so far. At this point, you could type, say, e and then press Tab to have the shell complete the cd Desktop/ command.
Tab completion is so useful that many GUI IDEs and text editors include this feature as well. Unlike command lines, these GUI programs usually display a small menu under your words as you type them, letting you select one to autocomplete the rest of the command.
Viewing the Command History
In their command history, modern shells also remember the commands you’ve entered. Pressing the up arrow key in the terminal fills the command line with the last command you entered. You can continue to press the up arrow key to find earlier commands, or press the down arrow key to return to more recent commands. If you want to cancel the command currently in the prompt and start from a fresh prompt, press Ctrl-C.
On Windows, you can view the command history by running doskey /history. (The oddly named doskey program goes back to Microsoft’s pre-Windows operating system, MS-DOS.) On macOS and Linux, you can view the command history by running the history command.
Working with Common Commands
This section contains a short list of the common commands you’ll use in the command line. There are far more commands and arguments than listed here, but you can treat these as the bare minimum you’ll need to navigate the command line.
Command line arguments for the commands in this section appear between square brackets. For example, cd [destination folder] means you should enter cd, followed by the name of a new folder.
Match Folder and Filenames with Wildcard Characters
Many commands accept folder and filenames as command line arguments. Often, these commands also accept names with the wildcard characters * and ?, allowing you to specify multiple matching files. The * character matches any number of characters, whereas the ? character matches any single character. We call expressions that use the * and ? wildcard characters glob patterns (short for “global patterns”).
Glob patterns let you specify patterns of filenames. For example, you could run the dir or ls command to display all the files and folders in the cwd. But if you wanted to see just the Python files, dir *.py or ls *.py would display only the files that end in .py. The glob pattern *.py means “any group of characters, followed by .py”:
C:\Users\Al>dir *.py
 Volume in drive C is Windows
 Volume Serial Number is DFF3-8658

 Directory of C:\Users\Al

03/24/2019  10:45 PM             8,399 conwaygameoflife.py
03/24/2019  11:00 PM             7,896 test1.py
10/29/2019  08:18 PM            21,254 wizcoin.py
               3 File(s)         37,549 bytes
               0 Dir(s)  506,300,776,448 bytes free
The glob pattern records201?.txt means “records201, followed by any single character, followed by .txt.” This would match record files for the years records2010.txt to records2019.txt (as well as filenames, such as records201X.txt). The glob pattern records20??.txt would match any two characters, such as records2021.txt or records20AB.txt.
Change Directories with cd
Running cd [destination folder] changes the shell’s cwd to the destination folder:
C:\Users\Al>cd Desktop

C:\Users\Al\Desktop>
The shell displays the cwd as part of its prompt, and any folders or files used in commands will be interpreted relative to this directory.
If the folder has spaces in its name, enclose the name in double quotes. To change the cwd to the user’s home folder, enter cd ~ on macOS and Linux, and cd %USERPROFILE% on Windows.
On Windows, if you also want to change the current drive, you’ll first need to enter the drive name as a separate command:
C:\Users\Al>d:

D:\>cd BackupFiles

D:\BackupFiles>
To change to the parent directory of the cwd, use the .. folder name:
C:\Users\Al>cd ..

C:\Users>
List Folder Contents with dir and ls
On Windows, the dir command displays the folders and files in the cwd. The ls command does the same thing on macOS and Linux. You can display the contents of another folder by running dir [another folder] or ls [another folder].
The -l and -a switches are useful arguments for the ls command. By default, ls displays only the names of files and folders. To display a long listing format that includes file size, permissions, last modification timestamps, and other information, use –l. By convention, the macOS and Linux operating systems treat files beginning with a period as configuration files and keep them hidden from normal commands. You can use -a to make ls display all files, including hidden ones. To display both the long listing format and all files, combine the switches as ls -al. Here’s an example in a macOS or Linux terminal window:
al@ubuntu:~$ ls
Desktop    Downloads         mu_code  Pictures  snap       Videos
Documents  examples.desktop  Music    Public    Templates
al@ubuntu:~$ ls -al
total 112
drwxr-xr-x 18 al   al   4096 Aug  4 18:47 .
drwxr-xr-x  3 root root 4096 Jun 17 18:11 ..
-rw-------  1 al   al   5157 Aug  2 20:43 .bash_history
-rw-r--r--  1 al   al    220 Jun 17 18:11 .bash_logout
-rw-r--r--  1 al   al   3771 Jun 17 18:11 .bashrc
drwx------ 17 al   al   4096 Jul 30 10:16 .cache
drwx------ 14 al   al   4096 Jun 19 15:04 .config
drwxr-xr-x  2 al   al   4096 Aug  4 17:33 Desktop
--snip--
The Windows analog to ls –al is the dir command. Here’s an example in a Windows terminal window:
C:\Users\Al>dir
 Volume in drive C is Windows
 Volume Serial Number is DFF3-8658

 Directory of C:\Users\Al

06/12/2019  05:18 PM    <DIR>          .
06/12/2019  05:18 PM    <DIR>          ..
12/04/2018  07:16 PM    <DIR>          .android
--snip--
08/31/2018  12:47 AM            14,618 projectz.ipynb
10/29/2014  04:34 PM           121,474 foo.jpg
List Subfolder Contents with dir /s and find
On Windows, running dir /s displays the cwd’s folders and their subfolders. For example, the following command displays every .py file in my C:\github\ezgmail folder and all of its subfolders:
C:\github\ezgmail>dir /s *.py
 Volume in drive C is Windows
 Volume Serial Number is DEE0-8982

 Directory of C:\github\ezgmail

06/17/2019  06:58 AM             1,396 setup.py
               1 File(s)          1,396 bytes

 Directory of C:\github\ezgmail\docs

12/07/2018  09:43 PM             5,504 conf.py
               1 File(s)          5,504 bytes

 Directory of C:\github\ezgmail\src\ezgmail

06/23/2019  07:45 PM            23,565 __init__.py
12/07/2018  09:43 PM                56 __main__.py
               2 File(s)         23,621 bytes

     Total Files Listed:
               4 File(s)         30,521 bytes
               0 Dir(s)  505,407,283,200 bytes free
The find . –name command does the same thing on macOS and Linux:
al@ubuntu:~/Desktop$ find . -name "*.py"
./someSubFolder/eggs.py
./someSubFolder/bacon.py
./spam.py
The . tells find to start searching in the cwd. The –name option tells find to find folders and filenames by name. The "*.py" tells find to display folders and files with names that match the *.py pattern. Note that the find command requires the argument after –name to be enclosed in double quotes.
Copy Files and Folders with copy and cp
To create a duplicate of a file or folder in a different directory, run copy [source file or folder][destination folder] or cp [source file or folder] [destination folder]. Here’s an example in a Linux terminal window:
al@ubuntu:~/someFolder$ ls
hello.py  someSubFolder
al@ubuntu:~/someFolder$ cp hello.py someSubFolder
al@ubuntu:~/someFolder$ cd someSubFolder
al@ubuntu:~/someFolder/someSubFolder$ ls
hello.py
Move Files and Folders with move and mv
On Windows, you can move a source file or folder to a destination folder by running move [source file or folder] [destination folder]. The mv [source file or folder][destination folder] command does the same thing on macOS and Linux.
Here’s an example in a Linux terminal window:
al@ubuntu:~/someFolder$ ls
hello.py  someSubFolder
al@ubuntu:~/someFolder$ mv hello.py someSubFolder
al@ubuntu:~/someFolder$ ls
someSubFolder
al@ubuntu:~/someFolder$ cd someSubFolder/
al@ubuntu:~/someFolder/someSubFolder$ ls
hello.py
The hello.py file has moved from ~/someFolder to ~/someFolder/someSubFolder and no longer appears in its original location.
Rename Files and Folders with ren and mv
Running ren [file or folder] [new name] renames the file or folder on Windows, and mv [file or folder] [new name] does so on macOS and Linux. Note that you can use the mv command on macOS and Linux for moving and renaming a file. If you supply the name of an existing folder for the second argument, the mv command moves the file or folder there. If you supply a name that doesn’t match an existing file or folder, the mv command renames the file or folder. Here’s an example in a Linux terminal window:
al@ubuntu:~/someFolder$ ls
hello.py  someSubFolder
al@ubuntu:~/someFolder$ mv hello.py goodbye.py
al@ubuntu:~/someFolder$ ls
goodbye.py  someSubFolder
The hello.py file now has the name goodbye.py.
Delete Files and Folders with del and rm
To delete a file or folder on Windows, run del [file or folder]. To do so on macOS and Linux, run rm [file] (rm is short for, remove).
These two delete commands have some slight differences. On Windows, running del on a folder deletes all of its files, but not its subfolders. The del command also won’t delete the source folder; you must do so with the rd or rmdir commands, which I’ll explain in “Delete Folders with rd and rmdir” on page 34. Additionally, running del [folder] won’t delete any files inside the subfolders of the source folder. You can delete the files by running del /s /q [folder]. The /s runs the del command on the subfolders, and the /q essentially means “be quiet and don’t ask me for confirmation.” Figure 2-4 illustrates this difference.
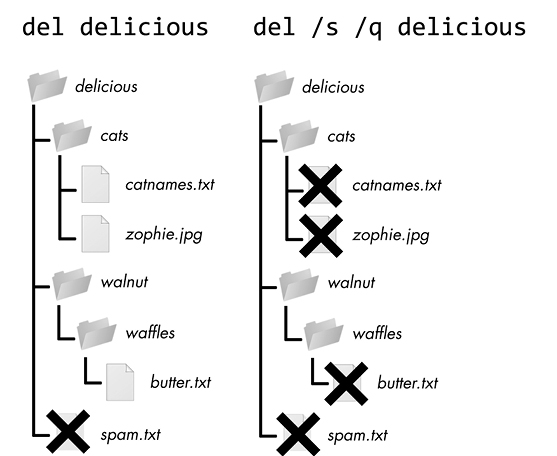
Figure 2-4: The files are deleted in these example folders when you run del delicious (left) or del /s /q delicious (right).
On macOS and Linux, you can’t use the rm command to delete folders. But you can run rm –r [folder] to delete a folder and all of its contents. On Windows, rd /s /q [folder] will do the same thing. Figure 2-5 illustrates this task.
Figure 2-5: The files are deleted in these example folders when you run rd /s /q delicious or rm –r delicious.
Make Folders with md and mkdir
Running md [new folder] creates a new, empty folder on Windows, and running mkdir [new folder] does so on macOS and Linux. The mkdir command also works on Windows, but md is easier to type.
Here’s an example in a Linux terminal window:
al@ubuntu:~/Desktop$ mkdir yourScripts
al@ubuntu:~/Desktop$ cd yourScripts
1 al@ubuntu:~/Desktop/yourScripts$ ls
al@ubuntu:~/Desktop/yourScripts$
Notice that the newly created yourScripts folder is empty; nothing appears when we run the ls command to list the folder’s contents 1.
Delete Folders with rd and rmdir
Running rd [source folder] deletes the source folder on Windows, and rmdir [source folder] deletes the source folder on macOS and Linux. Like mkdir, the rmdir command also works on Windows, but rd is easier to type. The folder must be empty before you can remove it.
Here’s an example in a Linux terminal window:
al@ubuntu:~/Desktop$ mkdir yourScripts
al@ubuntu:~/Desktop$ ls
yourScripts
al@ubuntu:~/Desktop$ rmdir yourScripts
al@ubuntu:~/Desktop$ ls
al@ubuntu:~/Desktop$
In this example, we created an empty folder named yourScripts and then removed it.
To delete nonempty folders (along with all the folders and files it contains), run rd /s/q [source folder]on Windows or rm –rf [source folder] on macOS and Linux.
Find Programs with where and which
Running where [program] on Windows or which [program] on macOS and Linux tells you the exact location of the program. When you enter a command on the command line, your computer checks for the program in the folders listed in the PATH environment variable (although Windows checks the cwd first).
These commands can tell you which executable Python program is run when you enter python in the shell. If you have multiple Python versions installed, your computer might have several executable programs of the same name. The one that is run depends on the order of folders in your PATH environment variable, and the where and which commands will output it:
C:\Users\Al>where python
C:\Users\Al\AppData\Local\Programs\Python\Python38\python.exe
In this example, the folder name indicates that the Python version run from the shell is located at C:\Users\Al\AppData\Local\Programs\Python\Python38\.
Clear the Terminal with cls and clear
Running cls on Windows or clear on macOS and Linux will clear all the text in the terminal window. This is useful if you simply want to start with a fresh-looking terminal window.
Environment Variables and PATH
All running processes of a program, no matter the language in which it’s written, have a set of variables called environment variables that can store a string. Environment variables often hold systemwide settings that every program would find useful. For example, the TEMP environment variable holds the file path where any program can store temporary files. When the operating system runs a program (such as a command line), the newly created process receives its own copy of the operating system’s environment variables and values. You can change a process’s environment variables independently of the operating system’s set of environment variables. But those changes apply only to the process, not to the operating system or any other process.
I discuss environment variables in this chapter because one such variable, PATH, can help you run your programs from the command line.
Viewing Environment Variables
You can see a list of the terminal window’s environment variables by running set (on Windows) or env (on macOS and Linux) from the command line:
C:\Users\Al>set
ALLUSERSPROFILE=C:\ProgramData
APPDATA=C:\Users\Al\AppData\Roaming
CommonProgramFiles=C:\Program Files\Common Files
--snip--
USERPROFILE=C:\Users\Al
VBOX_MSI_INSTALL_PATH=C:\Program Files\Oracle\VirtualBox\
windir=C:\WINDOWS
The text on the left side of the equal sign (=) is the environment variable name, and the text on the right side is the string value. Every process has its own set of environment variables, so different command lines can have different values for their environment variables.
You can also view the value of a single environment variable with the echo command. Run echo %HOMEPATH%echo $HOME on macOS and Linux to view the value of the HOMEPATH or HOME environment variables, respectively, which contain the current user’s home folder. On Windows, it looks like this:
C:\Users\Al>echo %HOMEPATH%
\Users\Al
On macOS or Linux, it looks like this:
al@al-VirtualBox:~$ echo $HOME
/home/al
If that process creates another process (such as when a command line runs the Python interpreter), that child process receives its own copy of the parent process’s environment variables. The child process can change the values of its environment variables without affecting the parent process’s environment variables, and vice versa.
You can think of the operating system’s set of environment variables as the “master copy” from which a process copies its environment variables. The operating system’s environment variables change less frequently than a Python program’s. In fact, most users never directly touch their environment variable settings.
Working with the PATH Environment Variable
When you enter a command, like python on Windows or python3 on macOS and Linux, the terminal checks for a program with that name in the folder you’re currently in. If it doesn’t find it there, it will check the folders listed in the PATH environment variable.
For example, on my Windows computer, the python.exe program file is located in the C:\Users\Al\AppData\Local\Programs\Python\Python38 folder. To run it, I have to enter C:\Users\Al\AppData\Local\Programs\Python\Python38\python.exe, or switch to that folder first and then enter python.exe.
This lengthy pathname requires a lot of typing, so instead I add this folder to the PATH environment variable. Then, when I enter python.exe, the command line searches for a program with this name in the folders listed in PATH, saving me from having to type the entire file path.
Because environment variables can contain only a single string value, adding multiple folder names to the PATH environment variable requires using a special format. On Windows, semicolons separate the folder names. You can view the current PATH value with the path command:
C:\Users\Al>path
C:\Path;C:\WINDOWS\system32;C:\WINDOWS;C:\WINDOWS\System32\Wbem;
--snip--
C:\Users\Al\AppData\Local\Microsoft\WindowsApps
On macOS and Linux, colons separate the folder names:
al@ubuntu:~$ echo $PATH
/home/al/.local/bin:/usr/local/sbin:/usr/local/bin:/usr/sbin:/usr/bin:/sbin:/bin:/usr/games:/usr/local/games:/snap/bin
The order of the folder names is important. If I have two files named someProgram.exe in C:\WINDOWS\system32 and C:\WINDOWS, entering someProgram.exe will run the program in C:\WINDOWS\system32 because that folder appears first in the PATH environment variable.
If a program or command you enter doesn’t exist in the cwd or any of the directories listed in PATH, the command line will give you an error, such as command not found or not recognized as an internal or external command. If you didn’t make a typo, check which folder contains the program and see if it appears in the PATH environment variable.
Changing the Command Line’s PATH Environment Variable
You can change the current terminal window’s PATH environment variable to include additional folders. The process for adding folders to PATH varies slightly between Windows and macOS/Linux. On Windows, you can run the path command to add a new folder to the current PATH value:
1 C:\Users\Al>path C:\newFolder;%PATH%

2 C:\Users\Al>path
C:\newFolder;C:\Path;C:\WINDOWS\system32;C:\WINDOWS;C:\WINDOWS\System32\Wbem;
--snip--
C:\Users\Al\AppData\Local\Microsoft\WindowsApps
The %PATH% part 1 expands to the current value of the PATH environment variable, so you’re adding the new folder and a semicolon to the beginning of the existing PATH value. You can run the path command again to see the new value of PATH2.
On macOS and Linux, you can set the PATH environment variable with syntax similar to an assignment statement in Python:
1 al@al-VirtualBox:~$ PATH=/newFolder:$PATH
2 al@al-VirtualBox:~$ echo $PATH
/newFolder:/home/al/.local/bin:/usr/local/sbin:/usr/local/bin:/usr/sbin:/usr/bin:/sbin:/bin:/usr/games:/usr/local/games:/snap/bin
The $PATH part 1 expands to the current value of the PATH environment variable, so you’re adding the new folder and a colon to the existing PATH value. You can run the echo $PATH command again to see the new value of PATH2.
But the previous two methods for adding folders to PATH apply only to the current terminal window and any programs run from it after the addition. If you open a new terminal window, it won’t have your changes. Permanently adding folders requires changing the operating system’s set of environment variables.
Permanently Adding Folders to PATH on Windows
Windows has two sets of environment variables: system environment variables (which apply to all users) and user environment variables (which override the system environment variable but apply to the current user only). To edit them, click the Start menu and then enter Edit environment variables for your account, which opens the Environment Variables window, as shown in Figure 2-6.
Select Path from the user variable list (not the system variable list), click Edit, add the new folder name in the text field that appears (don’t forget the semicolon separator), and click OK.
This interface isn’t the easiest to work with, so if you’re frequently editing environment variables on Windows, I recommend installing the free Rapid Environment Editor software from https://www.rapidee.com/. Note that after installing it, you must run this software as the administrator to edit system environment variables. Click the Start menu, type Rapid Environment Editor, right-click the software’s icon, and click Run as administrator.
From the Command Prompt, you can permanently modify the system PATH variable using the setx command:
C:\Users\Al>setx /M PATH "C:\newFolder;%PATH%"You’ll need to run the Command Prompt as the administrator to run the setx command.
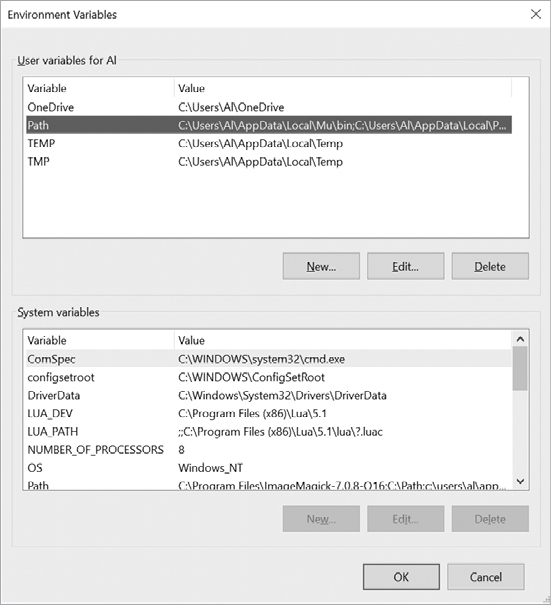
Figure 2-6: The Environment Variables window on Windows
Permanently Adding Folders to PATH on macOS and Linux
To add folders to the PATH environment variables for all terminal windows on macOS and Linux, you’ll need to modify the .bashrc text file in your home folder and add the following line:
export PATH=/newFolder:$PATHThis line modifies PATH for all future terminal windows. On macOS Catalina and later versions, the default shell program has changed from Bash to Z Shell, so you’ll need to modify .zshrc in the home folder instead.
Running Python Programs Without the Command Line
You probably already know how to run programs from whatever launcher your operating system provides. Windows has the Start menu, macOS has the Finder and Dock, and Ubuntu Linux has Dash. Programs will add themselves to these launchers when you install them. You can also double-click a program’s icon in a file explorer app (such as File Explorer on Windows, Finder on macOS, and Files on Ubuntu Linux) to run them.
But these methods don’t apply to your Python programs. Often, double-clicking a .py file will open the Python program in an editor or IDE instead of running it. And if you try running Python directly, you’ll just open the Python interactive shell. The most common way of running a Python program is opening it in an IDE and clicking the Run menu option or executing it in the command line. Both methods are tedious if you simply want to launch a Python program.
Instead, you can set up your Python programs to easily run them from your operating system’s launcher, just like other applications you’ve installed. The following sections detail how to do this for your particular operating system.
Running Python Programs on Windows
On Windows, you can run Python programs in a few other ways. Instead of opening a terminal window, you can press win-R to open the Run dialog and enter py C:\path\to\yourScript.py, as shown in Figure 2-7. The py.exe program is installed at C:\Windows\py.exe, which is already in the PATH environment variable, and the .exe file extension is optional when you are running programs.
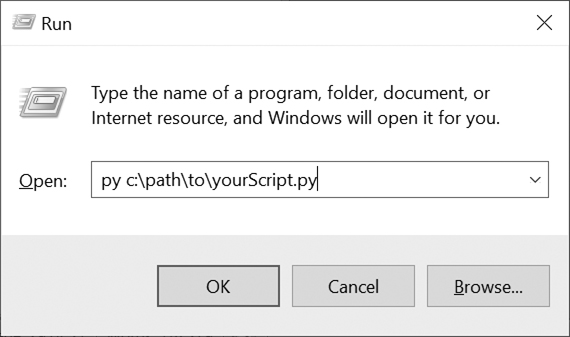
Figure 2-7: The Run dialog on Windows
Still, this method requires you to enter your script’s full path. Also, the terminal window that displays the program’s output will automatically close when the program ends, and you might miss some output.
You can solve these problems by creating a batch script, which is a small text file with the .bat file extension that can run multiple terminal commands at once, much like a shell script in macOS and Linux. You can use a text editor, such as Notepad, to create these files. Make a new text file containing the following two lines:
@py.exe C:\path\to\yourScript.py %*
@pause
Replace this path with the absolute path to your program, and save this file with a .bat file extension (for example, yourScript.bat). The @ sign at the start of each command prevents it from being displayed in the terminal window, and the %* forwards any command line arguments entered after the batch filename to the Python script. The Python script, in turn, reads the command line arguments in the sys.argv list. This batch file will spare you from having to type the Python program’s full absolute path every time you want to run it. The @pause command adds Press any key to continue... to the end of the Python script to prevent the program’s window from disappearing too quickly.
I recommend you place all of your batch and .py files in a single folder that already exists in the PATH environment variable, such as your home folder at C:\Users\<USERNAME>. With a batch file set up, you can run your Python script by simply pressing win-R, entering the name of your batch file (entering the .bat file extension is optional), and pressing Enter.
Running Python Programs on macOS
On macOS, you can create a shell script to run your Python scripts by creating a text file with the .command file extension. Make one in a text editor, such as TextEdit, and add the following content:
#!/usr/bin/env bash
python3 /path/to/yourScript.py
Save this file in your home folder. In a terminal window, make this shell script executable by running chmod u+x yourScript.command. Now you should be able to click the Spotlight icon (or press Command—Space) and enter the name of your shell script to run it. The shell script, in turn, will run your Python script.
Running Python Programs on Ubuntu Linux
There isn’t a quick way to run your Python scripts on Ubuntu Linux like there is in Windows and macOS, although you can shorten some of the steps involved. First, make sure your .py file is in your home folder. Second, add this line as the first line of your .py file:
#!/usr/bin/env python3This is called a shebang line, and it tells Ubuntu that when you run this file, you want to use python3 to run it. Third, add the execute permission to this file by running the chmod command from the terminal:
al@al-VirtualBox:~$ chmod u+x yourScript.pyNow whenever you want to quickly run your Python script, you can press Ctrl-Alt-T to open a new terminal window. This terminal will be set to the home folder, so you can simply enter ./yourScript.py to run this script. The ./ is required because it tells Ubuntu that yourScript.py exists in the cwd (the home folder, in this case).
Summary
Environment setup involves all the steps necessary to get your computer into a state where you can easily run your programs. It requires you to know several low-level concepts about how your computer works, such as the filesystem, file paths, processes, the command line, and environment variables.
The filesystem is how your computer organizes all the files on your computer. A file is a complete, absolute file path or a file path relative to the cwd. You’ll navigate the filesystem through the command line. The command line has several other names, such as terminal, shell, and console, but they all refer to the same thing: the text-based program that lets you enter commands. Although the command line and the names of common commands are slightly different between Windows and macOS/Linux, they effectively perform the same tasks.
When you enter a command or program name, the command line checks the folders listed in the PATH environment variable for the name. This is important to understand to figure out any command not found errors you might encounter. The steps for adding new folders to the PATH environment variable are also slightly different between Windows and macOS/Linux.
Becoming comfortable with the command line takes time because there are so many commands and command line arguments to learn. Don’t worry if you spend a lot of time searching for help online; this is what experienced software developers do every day.
Part 2
Best Practices, Tools, and Techniques
bogotobogo.com site search:
Directories
The module called os contains functions to get information on local directories, files, processes, and environment variables.
os.getcwd()
The current working directory is a property that Python holds in memory at all times. There is always a current working directory, whether we’re in the Python Shell, running our own Python script from the command line, etc.
>>> import os
>>> print(os.getcwd())
C:\Python32
>>> os.chdir('/test')
>>> print(os.getcwd())
C:\test
We used the os.getcwd() function to get the current working directory. When we run the graphical Python Shell, the current working directory starts as the directory where the Python Shell executable is. On Windows, this depends on where we installed Python; the default directory is c:\Python32. If we run the Python Shell from the command line, the current working directory starts as the directory we were in when we ran python3.
Then, we used the os.chdir() function to change the current working directory.
Note that when we called the os.chdir() function, we used a Linux-style pathname (forward slashes, no drive letter) even though we’re on Windows. This is one of the places where Python tries to paper over the differences between operating systems.
os.path.join()
os.path contains functions for manipulating filenames and directory names.
>>> import os
>>> print(os.path.join('/test/', 'myfile'))
/test/myfile
>>> print(os.path.expanduser('~'))
C:\Users\K
>>> print(os.path.join(os.path.expanduser('~'),'dir', 'subdir', 'k.py'))
C:\Users\K\dir\subdir\k.py
The os.path.join() function constructs a pathname out of one or more partial pathnames. In this case, it simply concatenates strings. Calling the os.path.join() function will add an extra slash to the pathname before joining it to the filename.
The os.path.expanduser() function will expand a pathname that uses ~ to represent the current user’s home directory. This works on any platform where users have a home directory, including Linux, Mac OS X, and Windows. The returned path does not have a trailing slash, but the os.path.join() function doesn’t mind.
Combining these techniques, we can easily construct pathnames for directories and files in the user’s home directory. The os.path.join() function can take any number of arguments.
Note: we need to be careful about the string when we use os.path.join. If we use «/», it tells Python that we’re using absolute path, and it overrides the path before it:
>>> import os
>>> print(os.path.join('/test/', '/myfile'))
/myfile
As we can see the path «/test/» is gone!
os.path.split()
os.path also contains functions to split full pathnames, directory names, and filenames into their constituent parts.
>>> pathname = "/Users/K/dir/subdir/k.py"
>>> os.path.split(pathname)
('/Users/K/dir/subdir', 'k.py')
>>> (dirname, filename) = os.path.split(pathname)
>>> dirname
'/Users/K/dir/subdir'
>>> pathname
'/Users/K/dir/subdir/k.py'
>>> filename
'k.py'
>>> (shortname, extension) = os.path.splitext(filename)
>>> shortname
'k'
>>> extension
'.py'
The split() function splits a full pathname and returns a tuple containing the path and filename. The os.path.split() function does return multiple values. We assign the return value of the split function into a tuple of two variables. Each variable receives the value of the corresponding element of the returned tuple. The first variable, dirname, receives the value of the first element of the tuple returned from the os.path.split() function, the file path. The second variable, filename, receives the value of the second element of the tuple returned from the os.path.split() function, the filename.
os.path also contains the os.path.splitext() function, which splits a filename and returns a tuple containing the filename and the file extension. We used the same technique to assign each of them to separate variables.
glob.glob()
The glob module is another tool in the Python standard library. It’s an easy way to get the contents of a directory programmatically, and it uses the sort of wildcards that we may already be familiar with from working on the command line.
>>> import glob
>>> os.chdir('/test')
>>> import glob
>>> glob.glob('subdir/*.py')
['subdir\\tes3.py', 'subdir\\test1.py', 'subdir\\test2.py']
The glob module takes a wildcard and returns the path of all files and directories matching the wildcard.
File metadata
Every file system stores metadata about each file: creation date, last-modified date, file size, and so on. Python provides a single API to access this metadata. We don’t need to open the file and all we need is the filename.
>>> import os
>>> print(os.getcwd())
C:\test
>>> os.chdir('subdir')
>>> print(os.getcwd())
C:\test\subdir
>>> metadata = os.stat('test1.py')
>>> metadata.st_mtime
1359868355.9555483
>>> import time
>>> time.localtime(metadata.st_mtime)
time.struct_time(tm_year=2013, tm_mon=2, tm_mday=2, tm_hour=21,
tm_min=12, tm_sec=35, tm_wday=5, tm_yday=33, tm_isdst=0)
>>> metadata.st_size
1844
Calling the os.stat() function returns an object that contains several different types of metadata about the file. st_mtime is the modification time, but it’s in a format that isn’t terribly useful. Actually, it’s the number of seconds since the Epoch, which is defined as the first second of January 1st, 1970.
The time module is part of the Python standard library. It contains functions to convert between different time representations, format time values into strings, and fiddle with timezones.
The time.localtime() function converts a time value from seconds-since-the-Epoch (from the st_mtime property returned from the os.stat() function) into a more useful structure of year, month, day, hour, minute, second, and so on. This file was last modified on Feb 2, 2013, at around 9:12 PM.
The os.stat() function also returns the size of a file, in the st_size property. The file «test1.py» is 1844 bytes.
os.path.realpath() — Absolute pathname
The glob.glob() function returned a list of relative pathnames. If weu want to construct an absolute pathname — i.e. one that includes all the directory names back to the root directory or drive letter — then we’ll need the os.path.realpath() function.
>>> import os
>>> print(os.getcwd())
C:\test\subdir
>>> print(os.path.realpath('test1.py'))
C:\test\subdir\test1.py
os.path.expandvars() — Env. variable
The expandvars function inserts environment variables into a filename.
>>> import os
>>> os.environ['SUBDIR'] = 'subdir'
>>> print(os.path.expandvars('/home/users/K/$SUBDIR'))
/home/users/K/subdir
Opening Files
To open a file, we use built-in open() function:
myfile = open('mydir/myfile.txt', 'w')
The open() function takes a filename as an argument. Here the filename is mydir/myfile.txt, and the next argument is a processing mode. The mode is usually the string ‘r’ to open text input (this is the default mode), ‘w’ to create and open open for text output. The string ‘a’ is to open for appending text to the end. The mode argument can specify additional options: adding a ‘b’ to the mode string allows for binary data, and adding a + opens the file for both input and output.
The table below lists several combination of the processing modes:
| Mode | Description |
|---|---|
| r | Opens a file for reading only. The file pointer is placed at the beginning of the file. This is the default mode. |
| rb | Opens a file for reading only in binary format. The file pointer is placed at the beginning of the file. This is the default mode. |
| r+ | Opens a file for both reading and writing. The file pointer will be at the beginning of the file. |
| rb+ | Opens a file for both reading and writing in binary format. The file pointer will be at the beginning of the file. |
| w | Opens a file for writing only. Overwrites the file if the file exists. If the file does not exist, creates a new file for writing. |
| wb | Opens a file for writing only in binary format. Overwrites the file if the file exists. If the file does not exist, creates a new file for writing. |
| w+ | Opens a file for both writing and reading. Overwrites the existing file if the file exists. If the file does not exist, creates a new file for reading and writing. |
| a | Opens a file for appending. The file pointer is at the end of the file if the file exists. That is, the file is in the append mode. If the file does not exist, it creates a new file for writing. |
| ab | Opens a file for appending in binary format. The file pointer is at the end of the file if the file exists. That is, the file is in the append mode. If the file does not exist, it creates a new file for writing. |
| a+ | Opens a file for both appending and reading. The file pointer is at the end of the file if the file exists. The file opens in the append mode. If the file does not exist, it creates a new file for reading and writing. |
| ab+ | Opens a file for both appending and reading in binary format. The file pointer is at the end of the file if the file exists. The file opens in the append mode. If the file does not exist, it creates a new file for reading and writing. |
There are things we should know about the filename:
- It’s not just the name of a file. It’s a combination of a directory path and a filename. In Python, whenever we need a filename, we can include some or all of a directory path as well.
- The directory path uses a forward slash without mentioning operating system. Windows uses backward slashes to denote subdirectories, while Linux use forward slashes. But in Python, forward slashes always work, even on Windows.
- The directory path does not begin with a slash or a drive letter, so it is called a relative path.
- It’s a string. All modern operating systems use Unicode to store the names of files and directories. Python 3 fully supports non-ASCII pathnames.
Character Encoding
A string is a sequence of Unicode characters. A file on disk is not a sequence of Unicode characters but rather a sequence of bytes. So if we read a file from disk, how does Python convert that sequence of bytes into a sequence of characters?
Internally, Python decodes the bytes according to a specific character encoding algorithm and returns a sequence of Unicode character string.
I have a file (‘Alone.txt’):
나 혼자 (Alone) - By Sistar
추억이 이리 많을까 넌 대체 뭐할까
아직 난 이래 혹시 돌아 올까 봐
Let’s try to read the file:
>>> file = open('Alone.txt')
>>> str = file.read()
Traceback (most recent call last):
  File "", line 1, in
    str = file.read()
  File "C:\Python32\lib\encodings\cp1252.py", line 23, in decode
    return codecs.charmap_decode(input,self.errors,decoding_table)[0]
UnicodeDecodeError: 'charmap' codec can't decode byte 0x90 in position 6: character maps to
>>>
What just happened?
We didn’t specify a character encoding, so Python is forced to use the default encoding.
What’s the default encoding? If we look closely at the traceback, we can see that it’s crashing in cp1252.py, meaning that Python is using CP-1252 as the default encoding here. (CP-1252 is a common encoding on computers running Microsoft Windows.) The CP-1252 character set doesn’t support the characters that are in this file, so the read fails with an UnicodeDecodeError.
Actually, when I display the Korean character, I had to put the following lines of html to the header section:
<!--
  <meta http-equiv="Content-Type"
 content="text/html; charset=ISO-8859-1" /> -->
 <meta http-equiv="Content-Type" content="text/html; charset=utf-8" />
ASCII and Unicode
There are character encodings for each major language in the world. Since each language is different, and memory and disk space have historically been expensive, each character encoding is optimized for a particular language. Each encoding using the same numbers (0-255) to represent that language’s characters. For instance, the ASCII encoding, which stores English characters as numbers ranging from 0 to 127. (65 is capital A, 97 is lowercase a). English has a very simple alphabet, so it can be completely expressed in less than 128 numbers.
Western European languages like French, Spanish, and German have more letters than English. The most common encoding for these languages is CP-1252. The CP-1252 encoding shares characters with ASCII in the 0-127 range, but then extends into the 128-255 range for characters like ñ, ü, etc. It’s still a single-byte encoding, though; the highest possible number, 255, still fits in one byte.
Then there are languages like Chinese and Korean, which have so many characters that they require multiple-byte character sets. That is, each character is represented by a two-byte number (0-65535). But different multi-byte encodings still share the same problem as different single-byte encodings, namely that they each use the same numbers to mean different things. It’s just that the range of numbers is broader, because there are many more characters to represent.
Unicode is designed to represent every character from every language. Unicode represents each letter, character, or ideograph as a 4-byte number. Each number represents a unique character used in at least one of the world’s languages. There is exactly 1 number per character, and exactly 1 character per number. Every number always means just one thing; there are no modes to keep track of. U+0061 is always ‘a’, even if a language doesn’t have an ‘a’ in it.
This appears to be a great idea. One encoding to rule them all. Multiple languages per document. No more mode switching to switch between encodings mid-stream. But Four bytes for every single character? That is really wasteful, especially for languages like English and Spanish, which need less than one byte (256 numbers) to express every possible character.
Unicode — UTF-32
There is a Unicode encoding that uses four bytes per character. It’s called UTF-32, because 32 bits = 4 bytes. UTF-32 is a straightforward encoding; it takes each Unicode character (a 4-byte number) and represents the character with that same number. This has some advantages, the most important being that we can find the Nth character of a string in constant time, because the Nth character starts at the 4xNth byte. It also has several disadvantages, the most obvious being that it takes four freaking bytes to store every freaking character.
Unicode — UTF-16
Even though there are a lot of Unicode characters, it turns out that most people will never use anything beyond the first 65535. Thus, there is another Unicode encoding, called UTF-16 (because 16 bits = 2 bytes). UTF-16 encodes every character from 0-65535 as two bytes, then uses some dirty hacks if we actually need to represent the rarely-used Unicode characters beyond 65535. Most obvious advantage: UTF-16 is twice as space-efficient as UTF-32, because every character requires only two bytes to store instead of four bytes. And we can still easily find the Nth character of a string in constant time.
But there are also non-obvious disadvantages to both UTF-32 and UTF-16. Different computer systems store individual bytes in different ways. That means that the character U+4E2D could be stored in UTF-16 as either 4E 2D or 2D 4E, depending on whether the system is big-endian or little-endian. (For UTF-32, there are even more possible byte orderings.)
To solve this problem, the multi-byte Unicode encodings define a Byte Order Mark, which is a special non-printable character that we can include at the beginning of our document to indicate what order our bytes are in. For UTF-16, the Byte Order Mark is U+FEFF. If we receive a UTF-16 document that starts with the bytes FF FE, we know the byte ordering is one way; if it starts with FE FF, we know the byte ordering is reversed.
Still, UTF-16 isn’t exactly ideal, especially if we’re dealing with a lot of ASCII characters. If we think about it, even a Chinese web page is going to contain a lot of ASCII characters — all the elements and attributes surrounding the printable Chinese characters. Being able to find the Nth character in constant time is nice, but we can’t guarantee that every character is exactly two bytes, so we can’t really find the Nth character in constant time unless we maintain a separate index.
Unicode — UTF-8
UTF-8 is a variable-length encoding system for Unicode. That is, different characters take up a different number of bytes. For ASCII characters (A-Z) UTF-8 uses just one byte per character. In fact, it uses the exact same bytes; the first 128 characters (0-127) in UTF-8 are indistinguishable from ASCII. Extended Latin characters like ñ and ü end up taking two bytes. (The bytes are not simply the Unicode code point like they would be in UTF-16; there is some serious bit-twiddling involved.) Chinese characters like ç end up taking three bytes. The rarely-used astral plane characters take four bytes.
Disadvantages: because each character can take a different number of bytes, finding the Nth character is an O(N) operation — that is, the longer the string, the longer it takes to find a specific character. Also, there is bit-twiddling involved to encode characters into bytes and decode bytes into characters.
Advantages: super-efficient encoding of common ASCII characters. No worse than UTF-16 for extended Latin characters. Better than UTF-32 for Chinese characters. Also there are no byte-ordering issues. A document encoded in utf-8 uses the exact same stream of bytes on any computer.
File Object
The open() function returns a file object, which has methods and attributes for getting information about and manipulating a stream of characters.
>>> file = open('Alone.txt')
>>> file.mode
'r'
>>> file.name
'Alone.txt'
>>> file.encoding
'cp1252'
If we specify the encoding:
>>> # -*- coding: utf-8 -*-
>>> file = open('Alone.txt', encoding='utf-8')
>>> file.encoding
'utf-8'
>>> str = file.read()
>>> str
'나 혼자 (Alone) - By Sistar\n추억이 이리 많을까 넌 대체 뭐할까\n아직 난 이래 혹시 돌아 올까 봐\n'
The first line was encoding declaration which needed to make the Python aware of Korean.
The name attribute reflects the name we passed in to the open() function when we opened the file. The encoding attribute reflects the encoding we passed in to the open() function. If we didn’t specify the encoding when we opened the file, then the encoding attribute will reflect locale.getpreferredencoding(). The mode attribute tells us in which mode the file was opened. We can pass an optional mode parameter to the open() function. We didn’t specify a mode when we opened this file, so Python defaults to ‘r’, which means open for reading only, in text mode. The file mode serves several purposes; different modes let us write to a file, append to a file, or open a file in binary mode.
read()
>>> file = open('Alone.txt', encoding='utf-8')
>>> str = file.read()
>>> str
'나 혼자 (Alone) - By Sistar\n추억이 이리 많을까 넌 대체 뭐할까\n아직 난 이래 혹시 돌아 올까 봐\n'
>>> file.read()
''
Reading the file again does not raise an exception. Python does not consider reading past end-of-file to be an error; it simply returns an empty string.
>>> file.read()
''
Since we’re still at the end of the file, further calls to the stream object’s read() method simply return an empty string.
>>> file.seek(0)
0
The seek() method moves to a specific byte position in a file.
>>> file.read(10)
'나 혼자 (Alon'
>>> file.seek(0)
0
>>> file.read(15)
'나 혼자 (Alone) - '
>>> file.read(1)
'B'
>>> file.read(10)
'y Sistar\n추'
>>> file.tell()
34
The read() method can take an optional parameter, the number of characters to read. We can also read one character at a time. The seek() and tell() methods always count bytes, but since we opened this file as text, the read() method counts characters. Korean characters require multiple bytes to encode in UTF-8. The English characters in the file only require one byte each, so we might be misled into thinking that the seek() and read() methods are counting the same thing. But that’s only true for some characters.
close()
It’s important to close files as soon as we’re done with them because open files consume system resources, and depending on the file mode, other programs may not be able to access them.
>>> file.close()
>>> file.read()
Traceback (most recent call last):
  File "", line 1, in
    file.read()
ValueError: I/O operation on closed file.
>>> file.seek(0)
Traceback (most recent call last):
  File "", line 1, in
    file.seek(0)
ValueError: I/O operation on closed file.
>>> file.tell()
Traceback (most recent call last):
  File "", line 1, in
    file.tell()
ValueError: I/O operation on closed file.
>>> file.close()
>>> file.closed
True
- We can’t read from a closed file; that raises an IOError exception.
- We can’t seek in a closed file either.
- There’s no current position in a closed file, so the tell() method also fails.
- Calling the close() method on a stream object whose file has been closed does not raise an exception. It’s just a no-op.
- Closed stream objects do have one useful attribute: the closed attribute will confirm that the file is closed.
«with» statement
Stream objects have an explicit close() method, but what happens if our code has a bug and crashes before we call close()? That file could theoretically stay open for longer than necessary.
Probably, we could use the try..finally block. But we have a cleaner solution, which is now the preferred solution in Python 3: the with statement:
>>> with open('Alone.txt', encoding='utf-8') as file:
	file.seek(16)
	char = file.read(1)
	print(char)


16
o
The code above never calls file.close(). The with statement starts a code block, like an if statement or a for loop. Inside this code block, we can use the variable file as the stream object returned from the call to open(). All the regular stream object methods are available — seek(), read(), whatever we need. When the with block ends, Python calls file.close() automatically.
Note that no matter how or when we exit the with block, Python will close that file even if we exit it via an unhandled exception. In other words, even if our code raises an exception and our entire program comes to a halt, that file will get closed. Guaranteed.
Actually, the with statement creates a runtime context. In these examples, the stream object acts as a context manager. Python creates the stream object file and tells it that it is entering a runtime context. When the with code block is completed, Python tells the stream object that it is exiting the runtime context, and the stream object calls its own close() method.
There’s nothing file-specific about the with statement; it’s just a generic framework for creating runtime contexts and telling objects that they’re entering and exiting a runtime context. If the object in question is a stream object, then it closes the file automatically. But that behavior is defined in the stream object, not in the with statement. There are lots of other ways to use context managers that have nothing to do with files.
Reading lines one by one
A line of text is a sequence of characters delimited by what exactly? Well, it’s complicated, because text files can use several different characters to mark the end of a line. Every operating system has its own convention. Some use a carriage return character(\r), others use a line feed character(\n), and some use both characters(\r\n) at the end of every line.
However, Python handles line endings automatically by default. Python will figure out which kind of line ending the text file uses and and it will all the work for us.
# line.py

lineCount = 0
with open('Daffodils.txt', encoding='utf-8') as file:
    for line in file:
        lineCount += 1
        print('{:<5} {}'.format(lineCount, line.rstrip()))
If we run it:
C:\TEST> python line.py
1     I wandered lonely as a cloud
2     That floats on high o'er vales and hills,
3     When all at once I saw a crowd,
4     A host, of golden daffodils;
- Using the with pattern, we safely open the file and let Python close it for us.
- To read a file one line at a time, use a for loop. That’s it. Besides having explicit methods like read(), the stream object is also an iterator which spits out a single line every time we ask for a value.
- Using the format() string method, we can print out the line number and the line itself. The format specifier {:<5} means print this argument left-justified within 5 spaces. The a_line variable contains the complete line, carriage returns and all. The rstrip() string method removes the trailing whitespace, including the carriage return characters.
write()
We can write to files in much the same way that we read from them. First, we open a file and get a file object, then we use methods on the stream object to write data to the file, then close the file.
The method write() writes a string to the file. There is no return value. Due to buffering, the string may not actually show up in the file until the flush() or close() method is called.
To open a file for writing, use the open() function and specify the write mode. There are two file modes for writing as listed in the earlier table:
- write mode will overwrite the file when the mode=‘w’ of the open() function.
- append mode will add data to the end of the file when the mode=‘a’ of the open() function.
We should always close a file as soon as we’re done writing to it, to release the file handle and ensure that the data is actually written to disk. As with reading data from a file, we can call the stream object’s close() method, or we can use the with statement and let Python close the file for us.
>>> with open('myfile', mode='w', encoding='utf-8') as file:
	file.write('Copy and paste is a design error.')

>>> with open('myfile', encoding='utf-8') as file:
	print(file.read())

Copy and paste is a design error.
>>>
>>> with open('myfile', mode='a', encoding='utf-8') as file:
	file.write('\nTesting shows the presence, not the absence of bugs.')

>>> with open('myfile', encoding='utf-8') as file:
	print(file.read())

Copy and paste is a design error.
Testing shows the presence, not the absence of bugs.
We startedby creating the new file myfile, and opening the file for writing. The mode=‘w’ parameter means open the file for writing.
We can add data to the newly opened file with the write() method of the file object returned by the open() function. After the with block ends, Python automatically closes the file.
Then, with mode=‘a’ to append to the file instead of overwriting it. Appending will never harm the existing contents of the file. Both the original line we wrote and the second line we appended are now in the file. Also note that neither carriage returns nor line feeds are included. Note that we wrote a line feed with the ‘\n’ character.
Binary files
Picture file is not a text file. Binary files may contain any type of data, encoded in binary form for computer storage and processing purposes.
Binary files are usually thought of as being a sequence of bytes, which means the binary digits (bits) are grouped in eights. Binary files typically contain bytes that are intended to be interpreted as something other than text characters. Compiled computer programs are typical examples; indeed, compiled applications (object files) are sometimes referred to, particularly by programmers, as binaries. But binary files can also contain images, sounds, compressed versions of other files, etc. — in short, any type of file content whatsoever.
Some binary files contain headers, blocks of metadata used by a computer program to interpret the data in the file. For example, a GIF file can contain multiple images, and headers are used to identify and describe each block of image data. If a binary file does not contain any headers, it may be called a flat binary file. But the presence of headers are also common in plain text files, like email and html files. — wiki
>>> my_image = open('python_image.png', mode='rb')
>>> my_image.mode
'rb'
>>> my_image.name
'python_image.png'
>>> my_image.encoding
Traceback (most recent call last):
  File "", line 1, in
    my_image.encoding
AttributeError: '_io.BufferedReader' object has no attribute 'encoding'
Opening a file in binary mode is simple but subtle. The only difference from opening it in text mode is that the mode parameter contains a ‘b’ character. The stream object we get from opening a file in binary mode has many of the same attributes, including mode, which reflects the mode parameter we passed into the open() function. Binary file objects also have a name attribute, just like text file objects.
However, a binary stream object has no encoding attribute. That’s because we’re reading bytes, not strings, so there’s no conversion for Python to do.
Let’s continue to do more investigation on the binary:
>>> my_image.tell()
0
>>> image_data = my_image.read(5)
>>> image_data
b'\x89PNG\r'
>>> type(image_data)

>>> my_image.tell()
5
>>> my_image.seek(0)
0
>>> image_data = my_image.read()
>>> len(image_data)
14922
Like text files, we can read binary files a little bit at a time. As mentioned previously, there’s a crucial difference. We’re reading bytes, not strings. Since we opened the file in binary mode, the read() method takes the number of bytes to read, not the number of characters.
That means that there’s never an unexpected mismatch between the number we passed into the read() method and the position index we get out of the tell() method. The read() method reads bytes, and the seek() and tell() methods track the number of bytes read.
read()
size parameter
We can read a stream object is with a read() method that takes an optional size parameter. Then, the read() method returns a string of that size. When called with no size parameter, the read() method should read everything there and return all the data as a single value. When called with a size parameter, it reads that much from the input source and returns that much data. When called again, it picks up where it left off and returns the next chunk of data.
>>> import io
>>> my_string = 'C is quirky, flawed, and an enormous success. - Dennis Ritchie (1941-2011)'
>>> my_file = io.StringIO(my_string)
>>> my_file.read()
'C is quirky, flawed, and an enormous success. - Dennis Ritchie (1941-2011)'
>>> my_file.read()
''
>>> my_file.seek(0)
0
>>> my_file.read(10)
'C is quirk'
>>> my_file.tell()
10
>>> my_file.seek(10)
10
>>> my_file.read()
'y, flawed, and an enormous success. - Dennis Ritchie (1941-2011)'
The io module defines the StringIO class that we can use to treat a string in memory as a file.
To create a stream object out of a string, create an instance of the io.StringIO() class and pass it the string we want to use as our file data. Now we have a stream object, and we can do all sorts of stream-like things with it.
Calling the read() method reads the entire file, which in the case of a StringIO object simply returns the original string.
We can explicitly seek to the beginning of the string, just like seeking through a real file, by using the seek() method of the StringIO object.
We can also read the string in chunks, by passing a size parameter to the read() method.
Reading compressed files
The Python standard library contains modules that support reading and writing compressed files. There are a number of different compression schemes. The two most popular on non-Windows systems are gzip and bzip2.
Though it depends on the intended application. gzip is very fast and has small memory footprint. bzip2 can’t compete with gzip in terms of speed or memory usage. bzip2 has notably better compression ratio than gzip, which has to be the reason for the popularity of bzip2; it is slower than gzip especially in decompression and uses more memory.
Data from gzip vs bzip2.
The gzip module lets us create a stream object for reading or writing a gzip-compressed file. The stream object it gives us supports the read() method if we opened it for reading or the write() method if we opened it for writing. That means we can use the methods we’ve already learned for regular files to directly read or write a gzip-compressed file, without creating a temporary file to store the decompressed data.
>>> import gzip
>>> with gzip.open('myfile.g', mode='wb') as compressed:
	compressed.write('640K ought to be enough for anybody (1981). - Bill Gates(1981)'.encode('utf-8'))

$ ls -l myfile.gz
-rwx------+ 1 Administrators None 82 Jan  3 22:38 myfile.gz

$ gunzip myfile.gz

$ cat myfile
640K ought to be enough for anybody (1981). - Bill Gates(1981)
We should always open gzipped files in binary mode. (Note the ‘b’ character in the mode argument.)
The gzip file format includes a fixed-length header that contains some metadata about the file, so it’s inefficient for extremely small files.
The gunzip command decompresses the file and stores the contents in a new file named the same as the compressed file but without the .gz file extension.
The cat command displays the contents of a file. This file contains the string we wrote directly to the compressed file myfile.gz from within the Python Shell.
stdout and stderr
stdin, stdout, and stderr are pipes that are built into every system such as Linux and MacOSX . When we call the print() function, the thing we’re printing is sent to the stdout pipe. When our program crashes and prints out a traceback, it goes to the stderr pipe. By default, both of these pipes are just connected to the terminal. When our program prints something, we see the output in our terminal window, and when a program crashes, we see the traceback in our terminal window too. In the graphical Python Shell, the stdout and stderr pipes default to our IDE Window.
>>> for n in range(2):
	print('Java is to JavaScript what Car is to Carpet')

Java is to JavaScript what Car is to Carpet
Java is to JavaScript what Car is to Carpet

>>> import sys
>>> for n in range(2):
	s = sys.stdout.write('Simplicity is prerequisite for reliability. ')

Simplicity is prerequisite for reliability. Simplicity is prerequisite for reliability.

>>> for n in range(2):
	s = sys.stderr.write('stderr ')

stderr stderr
The stdout is defined in the sys module, and it is a stream object. Calling its write() function will print out whatever string we give, then return the length of the output. In fact, this is what the print() function really does; it adds a carriage return to the end of the string we’re printing, and calls sys.stdout.write.
sys.stdout and sys.stderr send their output to the same place: the Python ide if we’re in , or the terminal if we’re running Python from the command line. Like standard output, standard error does not add carriage returns for us. If we want carriage returns, we’ll need to write carriage return characters.
Note that stdout and stderr are write-only. Attempting to call their read() method will always raise an IOError.
>>> import sys
>>> sys.stdout.read()
Traceback (most recent call last):
  File "", line 1, in
    sys.stdout.read()
AttributeError: read
stdout redirect
stdout and stderr only support writing but they’re not constants. They’re variables! That means we can assign them a new value to redirect their output.
#redirect.py
import sys
class StdoutRedirect:
    def __init__(self, newOut):
        self.newOut = newOut

    def __enter__(self):
        self.oldOut = sys.stdout
        sys.stdout = self.newOut

    def __exit__(self, *args):
        sys.stdout = self.oldOut

print('X')
with open('output', mode='w', encoding='utf-8') as myFile:
    with StdoutRedirect(myFile):
	print('Y')
print('Z')
If we run it:
$ python redirect.py
X
Z

$ cat output
Y
We actually have two with statements, one nested within the scope of the other. The outer with statement opens a utf-8-encoded text file named output for writing and assigns the stream object to a variable named myFile.
However,
with StdoutRedirect(myFile):
Where’s the as clause?
The with statement doesn’t actually require one. We can have a with statement that doesn’t assign the with context to a variable. In this case, we’re only interested in the side effects of the StdoutRedirect context.
What are those side effects?
Take a look inside the StdoutRedirect class. This class is a custom context manager. Any class can be a context manager by defining two special methods: __enter__() and __exit__().
The __init__() method is called immediately after an instance is created. It takes one parameter, the stream object that we want to use as standard output for the life of the context. This method just saves the stream object in an instance variable so other methods can use it later.
The __enter__() method is a special class method. Python calls it when entering a context (i.e. at the beginning of the with statement). This method saves the current value of sys.stdout in self.oldOut, then redirects standard output by assigning self.newOut to sys.stdout.
__exit__() method is another special class method. Python calls it when exiting the context (i.e. at the end of the with statement). This method restores standard output to its original value by assigning the saved self.oldOut value to sys.stdout.
This with statement takes a comma-separated list of contexts. The comma-separated list acts like a series of nested with blocks. The first context listed is the outer block; the last one listed is the inner block. The first context opens a file; the second context redirects sys.stdout to the stream object that was created in the first context. Because this print() function is executed with the context created by the with statement, it will not print to the screen; it will write to the file output.
Now, the with code block is over. Python has told each context manager to do whatever it is they do upon exiting a context. The context managers form a last-in-first-out stack. Upon exiting, the second context changed sys.stdout back to its original value, then the first context closed the file named output. Since standard output has been restored to its original value, calling the print() function will once again print to the screen.
File read/write — sample
The following example shows another example of reading and writing. It reads two data file (linux word dictionary, and top-level country domain names such as .us, .ly etc.), and find the combination of the two for a given length of the full domain name.
# Finding a combination of words and domain name (.ly, .us, etc).
LENGTH = 8

d_list = []
with open('domain.txt', 'r') as df:
    for d in df:
        d_list.append((d[0:2]).lower())
print d_list[:10]
d_list = ['us','ly']

wf = open('words.txt', 'r')
w_list = wf.read().split()
wf.close()

print len(w_list)
print w_list[:10]

with open('domain_out.txt', 'w') as outf:
    for d in d_list:
        print '------- ', d, ' ------\n'
        outf.write('------- ' + d +  ' ------\n')
        for w in w_list:
            if w[-2:] == d and len(w) == LENGTH:
                print w[:-2] + '.' + d
                outf.write(w[:-2] + '.' + d + '\n')
Sample output:
------- us ------
...
enormo.us
exiguo.us
fabulo.us
genero.us
glorio.us
gorgeo.us
...
virtuo.us
vitreo.us
wondro.us
------- ly ------
Connol.ly
Kimber.ly
Thessa.ly
abject.ly
abrupt.ly
absent.ly
absurd.ly
active.ly
actual.ly
...
keyword finally
The keyword finally makes a difference if our code returns early:
try:
    code1()
except TypeError:
    code2()
    return None
finally:
    other_code()
With this code, the finally block is assured to run before the method returns. The cases when this could happen:
- If an exception is thrown inside the except block.
- If an exception is thrown in run_code1() but it’s not a TypeError.
- Other control flow statements such as continue and break statements.
However, without the finally block:
try:
    run_code1()
except TypeError:
    run_code2()
    return None
other_code()
the other_code() doesn’t get run if there’s an exception.