В этой статье мы рассмотрим, как установить Windows 10 или 11 по сети без использования загрузочной USB флешки (установочного DVD диска). Для загрузки компьютера по сети через PXE мы будем использовать небольшой Tiny PXE Server. Инструкция применима для установки Windows на устройствах как с UEFI, так и с BIOS прошивкой.
В корпоративных сетях для разливки образов Windows по сети используются более функциональные Windows Deployment Services (WDS) и Microsoft Deployment Toolkit (MDT). В этой статье мы покажем, как быстро запустить PXE сервер на любом имеющемся компьютере (будь то устройство с Windows или Linux) и использовать его для сетевой установки Windows на компьютеры в этой же LAN с помощью простых средств.
Нам понадобятся:
- Установочный ISO образ с Windows 10 или 11 (проще всего создать его с помощью Windows Media Creation Tool согласно инструкции https://winitpro.ru/index.php/2013/12/31/sozdaem-zagruzochnuyu-fleshku-s-windows-7-dlya-uefi-sistemy/ )
- Образ Windows PE — можно использовать свой образ WinPE, извлечь его из образа восстановления MS DART, получить оригинальный WinPE с помощью Windows Assessment and Deployment Kit (Windows ADK), или использовать готовый образ типа Hiren’s BootCD PE.
- Сервер Tiny PXE (http://reboot.pro/files/file/303-tiny-pxe-server/ )
Содержание:
- Создаем загрузочный образ Windows PE с помощью ADK
- Подготовка сервера сетевой установки TinyPXE
- Сетевая установка Windows 10 и 11 с PXE сервера
Создаем загрузочный образ Windows PE с помощью ADK
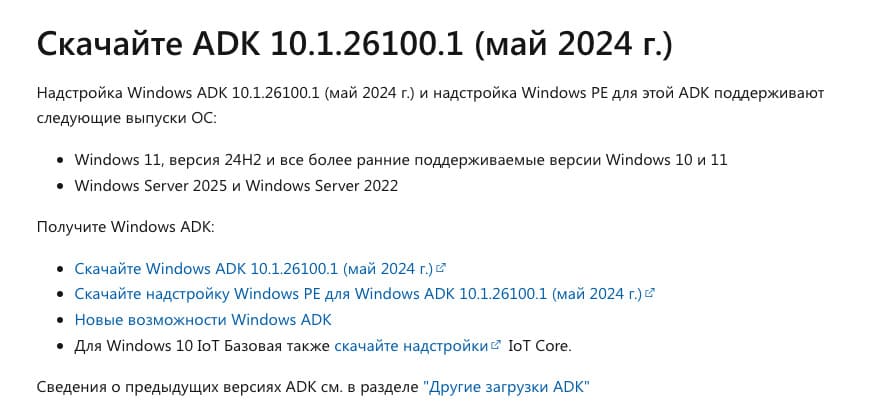
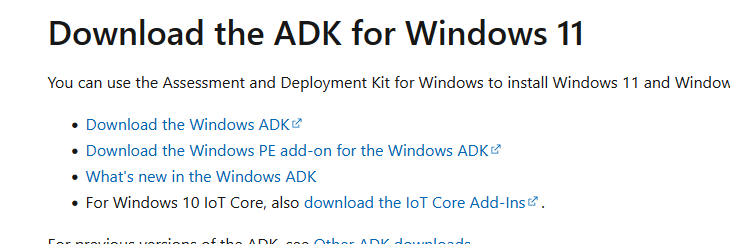
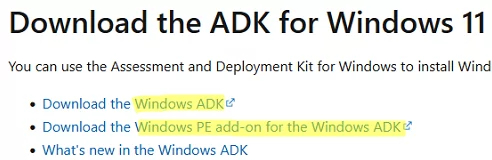
Скачайте Windows ADK для Windows 11 и Windows PE add-on for the Windows ADK по ссылкам на странице https://docs.microsoft.com/en-us/windows-hardware/get-started/adk-install .
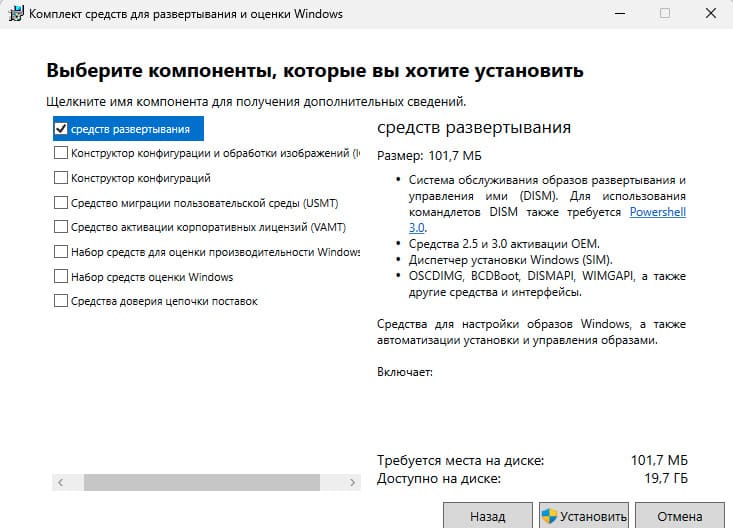
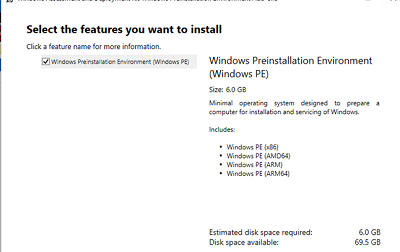
При установке Windows ADK выберите минимальную установку Deployment Tools.
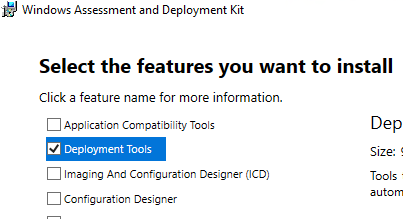
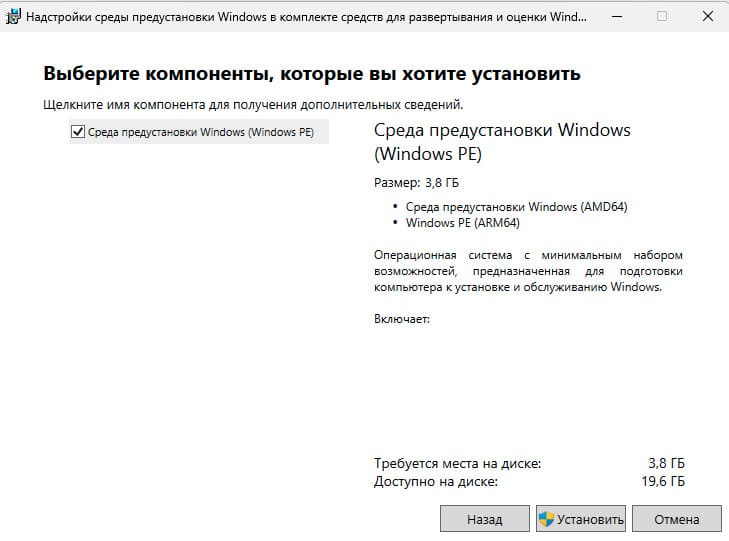
Затем аналогично установите Windows PE add-on for Windows ADK.
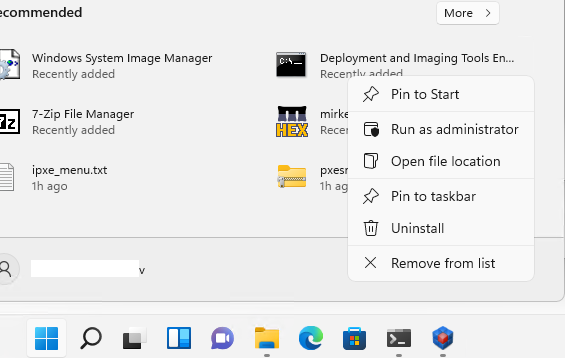
После окончания установки запустите Deployment and Imaging Tool из стартового меню Windows. Или запустите вручную команду:
"C:\Program Files (x86)\Windows Kits\10\Assessment and Deployment Kit\Deployment Tools\DandISetEnv.bat"
Теперь скопируйте файлы для среды WinPE в указанный каталог (создавать не нужно):
copype amd64 C:\tools\winpe
В данном случае я создаю файлы для среды WinPE x64. Можно использовать другие опции в зависимости от архитектуры: x86, arm или arm64.

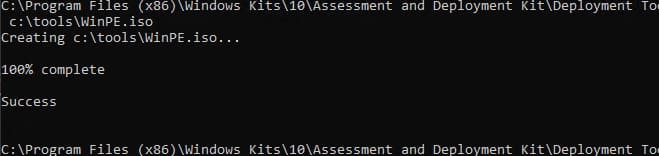
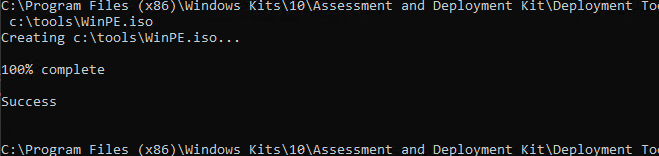
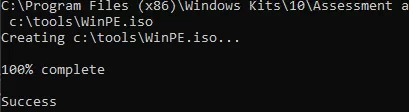
Теперь можно создать загрузочный ISO образ с WinPE:
MakeWinPEMedia /ISO C:\tools\winpe c:\tools\WinPE.iso
Подготовка сервера сетевой установки TinyPXE
Теперь нужно настроить ваш PXE сервер:
- Распакуйте архив pxesrv.zip в каталог C:\tools\pxesrv;
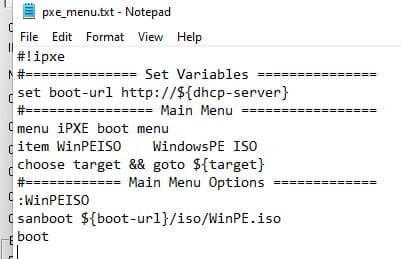
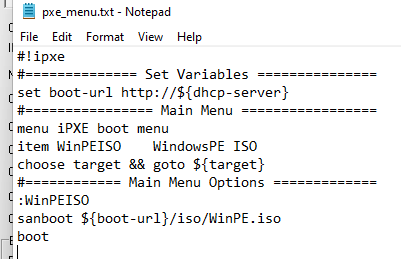
- Перейдите в каталог C:\tools\pxesrv и создайте текстовый файл pxe_menu.txt со следующим содержимым:
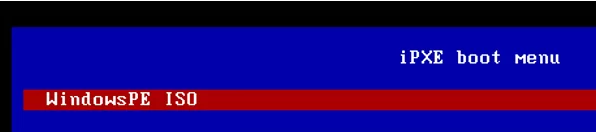
#!ipxe
set boot-url http://${dhcp-server}
 #================ Main Menu =================
menu iPXE boot menu
item WinPEISO WindowsPE ISO
choose target && goto ${target}
#============ Main Menu Options =============
:WinPEISO
sanboot ${boot-url}/iso/WinPE.iso
boot
- Скопируйте полученный ранее файл WinPE.iso в каталог C:\tools\pxesrv\files\iso;
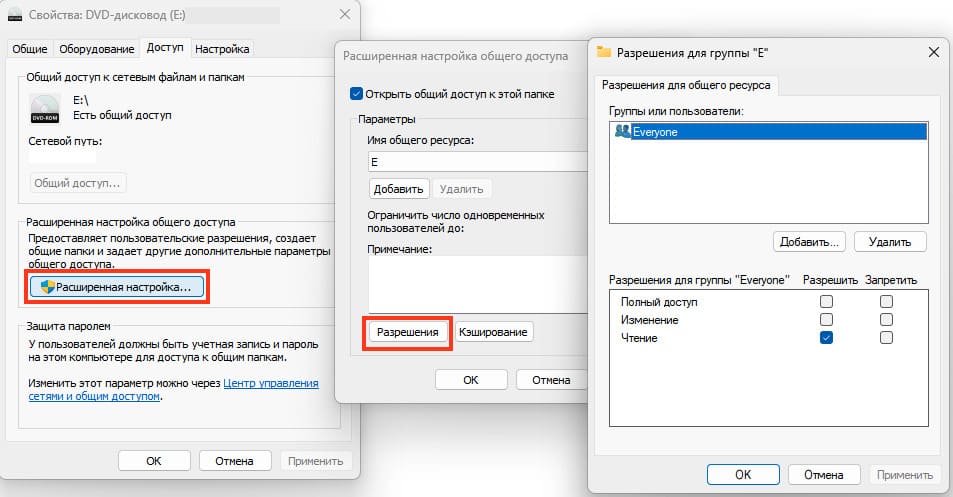
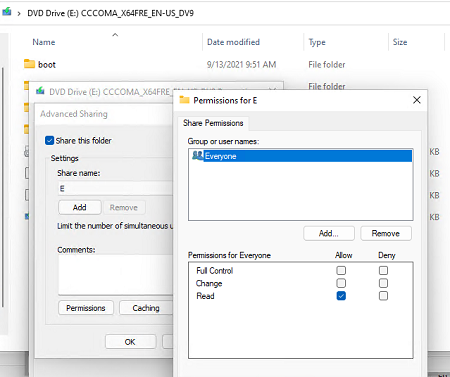
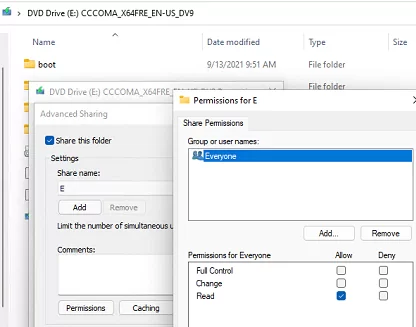
- Смонтируйте установочный ISO образ в виртуальный привод Windows и откройте общий сетевой доступ к нему (если хотите, можете открыть к нему анонимный доступ, но это не обязательно);
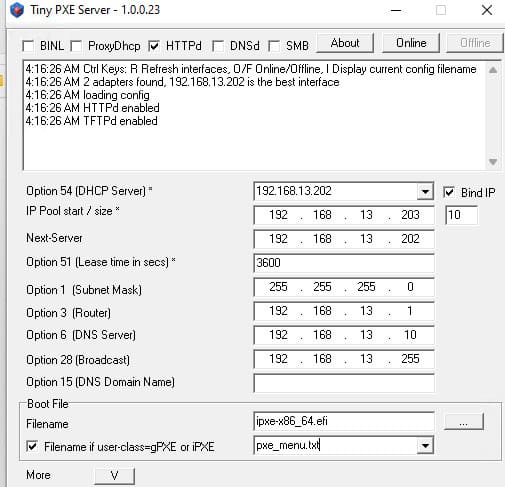
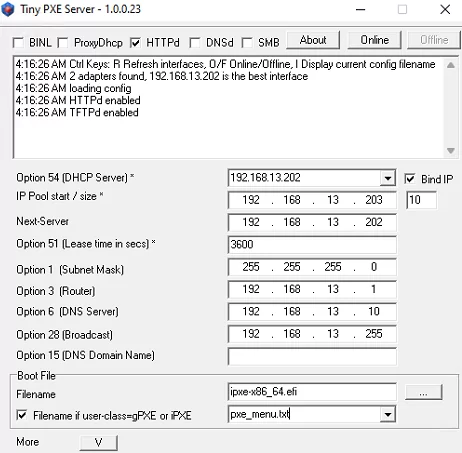
- Запустите файл pxesrv.exe с правами администратора;
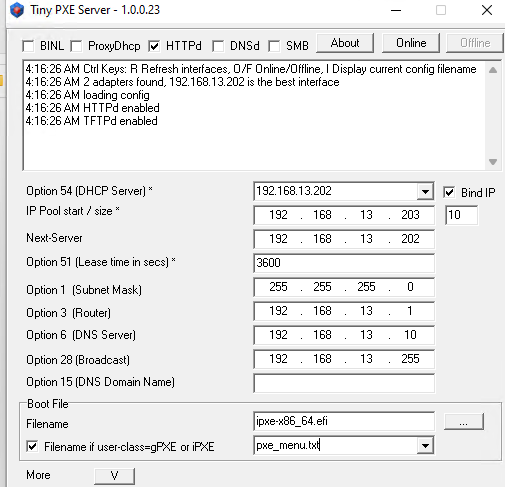
- Включите опцию HTTPd;
- Если ваш компьютер сам будет раздавать IP адреса по DHCP (Tiny PXE это умеет), отключите опцию ProxyDHCP. Убедитесь, что в полях Option 54 DHCP Server и Next-Server указан IP адрес вашего компьютера. В поле IP Pool start указано начало диапазона DHCP, убедитесь что этот диапазон не занят в вашей сети;
- В разделе Boot File укажите ipxe.pxe (для загрузки на BIOS устройствах) или ipxe-x86_64.efi (для UEFI устройств);
- В поле Filename if user-class=gPXE or IPXE укажите имя файла меню, который вы создали ранее pxe_menu.txt;
- Запустите PXE сервер, нажав кнопку Online;
Итак, ваш PXE сервер запущен и готов к работе. Если в Windows включен брандмауэр (проще), отключите его или разрешите входящий трафик для процесса pxesrv.exe по протоколам DHCP, PXE, HTTP, TFTPS и SMB.
Сетевая установка Windows 10 и 11 с PXE сервера
Теперь вам нужно загрузить ваш компьютер, на который вы хотите установить Windows, с PXE сервера. Компьютер должен находится в той же локальной сети (VLAN), что и компьютер с PXE сервером.
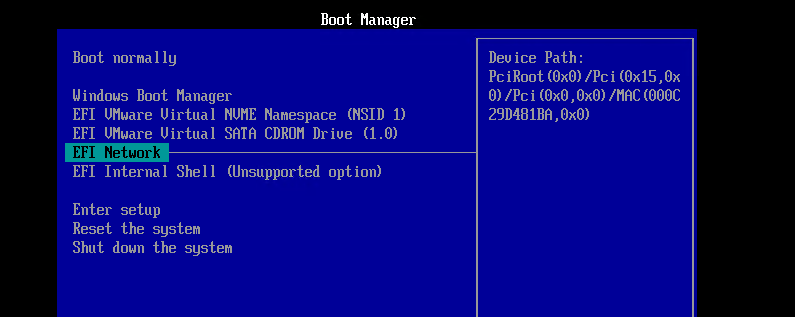
В настройках BIOS/UEFI компьютера выберите в качестве первичного устройства загрузки PXE.
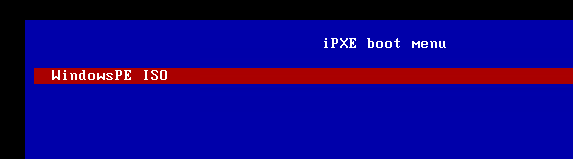
При запуске среды PXE компьютер обнаружит в сети DHCP сервер, получит IP адрес и получит доступных опции в меню iPXE.
Компьютер загрузится по сети в среде WinPE.
В моем случае при тестировании загрузки с PXE сервера виртуальной машины VMWare с UEFI прошивкой появилась ошибка:
Could not describe SAN devices: Operation not supported
Could not boot image: Operation not supported https://ipxe.org/err/3c2220
Как оказалось, в UEFI прошивки виртуальной машины на моем хосте VMware ESXi есть баг:
This error indicates that your UEFI firmware has a bug that prevents the installation of the iSCSI boot firmware table (iBFT). Switch to booting in “legacy” BIOS mode rather than UEFI mode.
Пришлось переключить ВМ в режим BIOS и запускать PXE сервер с опцией ipxe.pxe. После этого пошла нормальная установка Windows по сети.
Вам осталось подключить по SMB сетевой каталог, в котором хранится ваш установочный ISO образ Windows 11.
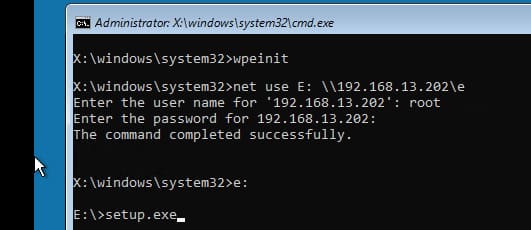
После инициализации среды командой
wpeinit
подключите ваш сетевой каталог, в который смонтирован установочный образ Windows. Выполните команду:
Net use E: \\192.168.13.202\e
Где
192.168.13.202
– имя компьютера на котором хранится установочный образ, а
E
– название общей папки.
Введите имя пользователя, с правами доступа к вашей Windows с PXE сервером.
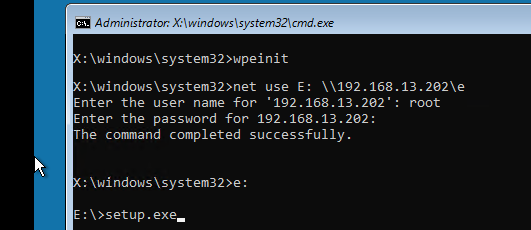
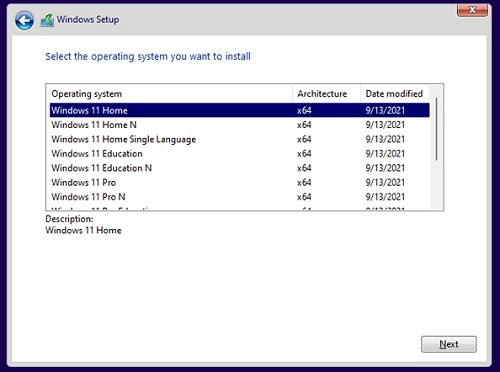
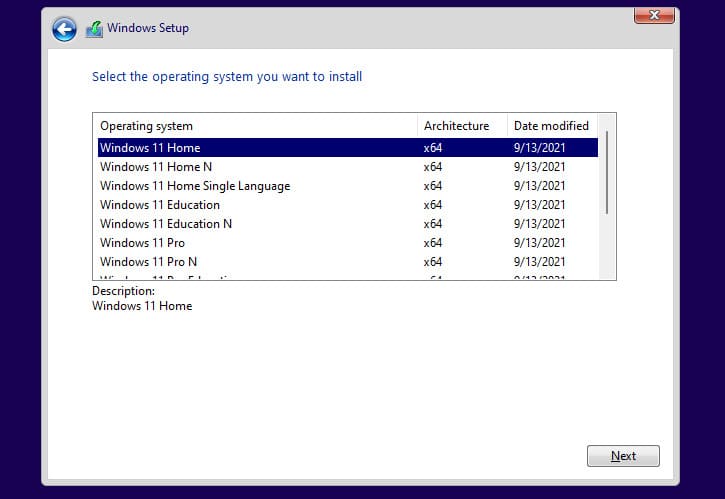
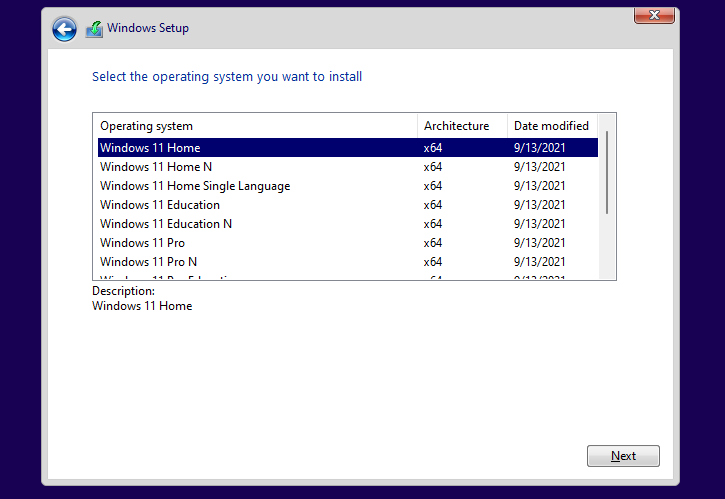
Запустите знакомый мастер установки Windows.
Discover how to install Windows 10 over PXE Linux server in just a few steps! Don’t miss out—learn the efficient, sysadmin-friendly method to deploy Windows OS remotely like a pro. #centlinux #linux #pxe
Table of Contents
Problem Statement
In our previous posts, we have configured a PXE boot server for automated installation of RHEL 7.5 operating system that supports both BIOS and UEFI based clients. Later on, we added RHEL 6 and Ubuntu 18.10 installation options in our PXE boot server. We have also written Kickstart files for automated installations of both operating systems.
Before concluding our PXE configuration series, we decided to write an article to add the installation option of a Microsoft’s operating system. Therefore, we have selected the Microsoft Windows 10 (the latest OS at the time of this writeup) as the candidate for our PXE boot server.
Linux Server Specification
In this article, we will install Windows 10 over PXE Server.
We use the same Linux server that we have configured as PXE Boot Server in our previous article. These specifications have been re-mentioned below for convenience of the readers.
- CPU – 2 Core (2.4 Mhz)
- Memory – 2 GB
- Storage – 50 GB
- Operating System – RHEL 7.5
- Hostname – pxe-server.itlab.com
- IP Address – 192.168.116.41/24
Furthermore, we need a client system to create Windows PE iso file. Here, we are using a MS Windows 8.1 machine for this purpose, however, you can use other versions of MS Windows as well (be noted that configurations are slightly different in MS Windows versions prior to 8.1).
Recommended Training: The Linux Command Line Bootcamp: Beginner To Power User from Colt Steele
Read Also: How to install Linux over PXE Server
Install Samba Server on Linux
We used Samba server to share installation media of MS Windows 10 Operating System with PXE clients.
Connect to pxe-server.itlab.com using ssh and install Samba server.
yum install -y sambaCreate a directory to share Windows 10 installation media.
mkdir /smbshareAdjust SELinux permissions.
semanage fcontext -a '/smbshare(/.*)?' -t samba_share_t
restorecon -Rv /smbshare
Create an user to control access to Samba share.
useradd -s /sbin/nologin ahmer
smbpasswd -a ahmer
Change owner of the shared directory with user ahmer.
chown ahmer:ahmer /smbshare/Allow Samba service in Linux Firewall.
firewall-cmd --permanent --add-service=samba
firewall-cmd --reload
Add directives in /etc/samba/smb.conf to share the directory /smbshare with clients.
cat >> /etc/samba/smb.conf << EOF
[install]
        comment = Installation Media
        path = /smbshare
        public = yes
        writable = no
        printable = no
        browseable = yes
EOF
Start and enable Samba services.
systemctl start smb nmb
systemctl enable smb nmb
Attach MS Windows 10 ISO/DVD and mount it at /mnt/iso (you can use any mountpoint, according to your choice).
mount -t iso9660 /dev/cdrom /mnt/isoOutput:
mount: /dev/sr0 is write-protected, mounting read-only
Copy contents of /mnt/iso to /smbshare/windows10 directory.
cp -rf /mnt/iso /smbshare/windows10Create a Customized Windows PE ISO
Connect to MS Windows 8.1 client.
We required Windows ADK (Assessment and Deployment Kit) to create our Windows PE iso. Therefore, we have downloaded it from Microsoft’s website and installed it on our Windows 8.1 client.
After installation, run Deployment and Imaging Tools Environment as Administrator.
Run the following command to create working directories for Win PE. (Command output has been trimmed to show only success status)
cd C:\Program Files (x86)\Windows Kits\8.0\Assessment and Deployment Kit\Windows Preinstallation Environment
copype x86 c:\WinPE_x86\
Output:
---
186 File(s) copied
        1 file(s) copied.
        1 file(s) copied.
        1 file(s) copied.Success
We will customize the startup script startcmd.net, so MS Windows 10 setup will start automatically. Therefore, mount the image file and customize it accordingly.
Dism /Mount-Image /ImageFile:"c:\WinPE_x86\media\sources\boot.wim" /index:1 /MountDir:"c:\WinPE_x86\mount"Output:
Deployment Image Servicing and Management tool
Version: 6.2.9200.16384Mounting image
[==========================100.0%==========================]
The operation completed successfully.
Now, edit startnet.cmd.
notepad c:\WinPE_x86\mount\Windows\System32\Start\net.cmdAnd add following lines therein.
wpeinit
net use z: \\192.168.116.41\install\windows10 /user:ahmer@123
z:\setup.exe
Save and unmount the image file.
Dism /Unmount-Image /MountDir:"c:\WinPE_x86\mount" /commitOutput:
Deployment Image Servicing and Management tool
Version: 6.2.9200.16384Saving image
[==========================100.0%==========================]
Unmounting image
[==========================100.0%==========================]
The operation completed successfully.
Generate winpe.iso file.
MakeWinPEMedia /ISO c:\WinPE_x86 c:\winpe.isoOutput:
Creating c:\winpe.iso...100% complete
Success
Transfer winpe.iso file to pxe-server-itlab.com and copy it to /var/lib/tftpboot/networkboot/windows10/ directory.
Now, connect to pxe-server.itlab.com again using ssh.
Copy Kernel boot image for MS Windows in tftpboot directory.
cp /usr/lib/syslinux/memdisk /var/lib/tftpboot/Edit PXE boot menu for BIOS based clients.
vi /var/lib/tftpboot/pxelinux.cfg/defaultAnd add following menu option at the end of file.
label Install MS Windows 10
menu label Install MS Windows 10
kernel memdisk
initrd /networkboot/windows10/winpe.iso
append iso raw
Connect a new client to your network and turn it on. It should get the IP address from DHCP server and display our PXE boot Menu as follows:
Select Install MS Windows 10 option and press <ENTER>.
We have successfully added the MS Windows 10 installation option in our Linux based PXE server.
Frequently Asked Questions (FAQs)
What is PXE booting, and how does it help install Windows 10?
PXE (Preboot Execution Environment) allows a computer to boot and install an operating system over a network instead of using physical media. A Linux server can host the Windows 10 installation files for remote deployment.
Do I need a Windows server to set up PXE for Windows 10?
No, you can use a Linux server (like Ubuntu or CentOS) to configure a PXE boot environment for Windows 10 installation with the right tools and configurations.
What files are required on the Linux server for Windows 10 PXE installation?
You’ll need the Windows 10 ISO (or extracted files), a TFTP server to host boot files, a DHCP server to assign IPs, and a network share (SMB/NFS) for the Windows installation files.
Can I use PXE to install Windows 10 on multiple computers at once?
Yes! Once the PXE server is set up, any device connected to the same network can boot and install Windows 10 simultaneously (depending on network bandwidth and server capacity).
Are there any risks when installing Windows 10 over PXE?
If configured incorrectly, you might face boot failures or network issues. Ensure proper DHCP settings, correct file paths, and compatible hardware (PXE-supported network cards). Always back up data before installation.
Final Thoughts
By now, you’ve seen how straightforward it can be to install Windows 10 over a PXE Linux server. From setting up the TFTP and DHCP services to booting the Windows installer remotely, you’re just steps away from streamlining your deployment process.
If you’re still manually installing operating systems or juggling bootable USBs, you’re already falling behind. Modern sysadmins automate and scale—and PXE booting is at the heart of that transformation.
Don’t let outdated methods slow you down. Get ahead, save time, and take control of your infrastructure.
✅ Ready to level up your deployment game? Start implementing PXE boot with Linux today—your future self will thank you.
Struggling with Linux server management? I offer professional support to ensure your servers are secure, optimized, and always available. Visit my Fiverr profile to learn more!
Looking for something?
Latest Articles
How to PXE Boot Windows 10
PXE booting Windows 10 is a process that allows you to boot a computer using a network interface instead of a local disk. This can be especially useful for deploying Windows 10 across multiple computers without needing to use physical media like USB drives or DVDs. In just a few steps, you’ll set up a PXE server, configure your network, and boot your target machine with Windows 10 over the network.
This step-by-step tutorial guides you through the process of setting up a PXE server and booting a machine with Windows 10 using the network. By the end, you’ll have a working PXE boot environment for deploying Windows 10.
Step 1: Set up a DHCP Server
First, set up a DHCP server that will assign IP addresses to client machines.
A DHCP server is crucial because it handles the IP address distribution, which is essential for network communication. Without it, your PXE boot process won’t work.
Step 2: Install and Configure the Windows Deployment Services (WDS)
Next, install WDS on your server to manage the deployment of Windows 10.
WDS is Microsoft’s solution for network-based OS installation. You’ll need to add the WDS role to your server, which involves a few clicks through the Server Manager.
Step 3: Add a Boot Image to WDS
After installing WDS, add a Windows 10 boot image to WDS.
The boot image is what the client machine will load during the PXE boot process. Use the Windows 10 installation ISO to extract the necessary boot files.
Step 4: Configure the Network Boot Program
Now, configure the network boot program in the WDS settings.
This helps the client machine know what to do when it boots from the network. Usually, this involves pointing to the correct boot image file.
Step 5: Enable PXE Boot on Client Machine
Finally, enable PXE boot on the client machine by adjusting its BIOS settings.
Every computer’s BIOS is a bit different, but generally, you will need to enable network boot and prioritize it over other boot devices like hard drives.
After you complete these steps, your client machine will attempt to boot from the network, fetch the boot image from the PXE server, and begin the Windows 10 installation process. The entire Windows 10 OS will be installed over the network, without any need for physical media.
Tips for PXE Booting Windows 10
- Ensure that your network infrastructure supports PXE. Some older network hardware might not fully support PXE booting.
- Keep your WDS server up to date to avoid compatibility issues with newer versions of Windows 10.
- Make sure that the DHCP server and WDS server are properly configured to communicate with each other.
- Test the PXE boot process on a single machine before deploying it across multiple devices to ensure everything works as expected.
- Secure your PXE server to prevent unauthorized access, which could compromise your network.
Frequently Asked Questions
What is PXE booting?
PXE booting stands for Preboot Execution Environment booting. It allows a computer to boot from a network interface, rather than from a local hard drive or removable media.
Why would I use PXE boot to install Windows 10?
PXE boot is useful for deploying Windows 10 to multiple machines without needing physical installation media like CDs or USB drives. It’s handy for IT departments in large organizations.
Do I need special hardware to PXE boot Windows 10?
No special hardware is required, but your network card must support PXE booting. Most modern network cards have this capability.
Can I PXE boot over Wi-Fi?
PXE boot typically requires a wired Ethernet connection. Wireless PXE booting is generally not supported due to limitations in wireless network protocols.
What should I do if my client machine can’t find the PXE server?
Check your DHCP server settings and ensure that the network boot program is correctly configured in WDS. Also, make sure that the client machine is on the same network segment as the PXE server.
Summary
- Set up a DHCP Server.
- Install and Configure WDS.
- Add a Boot Image to WDS.
- Configure the Network Boot Program.
- Enable PXE Boot on Client Machine.
Conclusion
PXE booting Windows 10 is an efficient way to deploy the operating system across multiple machines using a network interface. By following the steps outlined in this guide, you can set up a PXE server and configure your client machines to boot from the network easily. This method saves time and reduces the need for physical installation media.
For those who manage multiple computers, mastering PXE booting can be a game-changer. Not only does it streamline the deployment process, but it also makes it easier to manage updates and roll out new installations. If you found this guide helpful, consider exploring further reading on network management and server maintenance to optimize your PXE boot setup even more.
Matt Jacobs has been working as an IT consultant for small businesses since receiving his Master’s degree in 2003. While he still does some consulting work, his primary focus now is on creating technology support content for SupportYourTech.com.
His work can be found on many websites and focuses on topics such as Microsoft Office, Apple devices, Android devices, Photoshop, and more.
In this article, we will look at how to deploy Windows 10 or 11 over the network without using local installation media (USB flash drive, DVD, ISO image) and without USB ports. We will use a small portable Tiny PXE Server to boot a computer over the network via PXE. This guide will help you to deploy Windows on devices both with UEFI and BIOS firmware.
Contents:
- Creating a Windows PE Boot Image Using ADK
- How to Configure a TinyPXE Network Installation Server?
- Using PXE Server to Install Windows 10 or 11 Over the Network
We will need:
- An installation Windows 10 or 11 ISO image (it is easier to create it using Windows Media Creation Tool according to the post: https://woshub.com/how-to-create-uefi-bootable-usb-drive-to-install-windows-7/);
- A Windows PE image — you can use your own WinPE image, extract it from an MS DART recovery image, get an original WinPE using Windows Assessment and Deployment Kit (Windows ADK), or use a pre-built image like Hiren’s BootCD PE;
- A Tiny PXE Server (http://reboot.pro/files/file/303-tiny-pxe-server/).
In corporate networks, Windows Deployment Services (WDS) or Microsoft Deployment Toolkit (MDT) with more features are used to deploy Windows images to user computers over a network. In this article, we’ll show how to quickly start a PXE server on any computer (no matter if it is running Windows or Linux) and use it to deploy Windows OS on the computers in the same LAN using simple tools.
Creating a Windows PE Boot Image Using ADK
Download Windows ADK for Windows 11 and Windows PE add-on for the Windows ADK following the links at https://docs.microsoft.com/en-us/windows-hardware/get-started/adk-install.
When installing the Windows AD, select the Deployment Tools only.
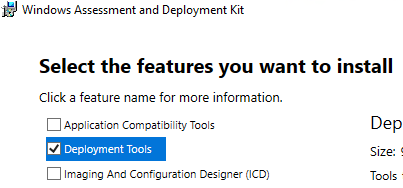
Then install the Windows PE add-on for Windows ADK in the same way.
After the installation is over, run the Deployment and Imaging Tool from the Windows Start menu. Or use the command:
"C:\Program Files (x86)\Windows Kits\10\Assessment and Deployment Kit\Deployment Tools\DandISetEnv.bat"
Then copy files for WinPE to your target folder:
copype amd64 C:\tools\winpe
In this case, I’m creating environment files for WinPE x64. You can use other options depending on your architecture: x86, arm, or arm64.

Then generate a bootable WinPE ISO image:
MakeWinPEMedia /ISO C:\tools\winpe c:\tools\WinPE.iso
How to Configure a TinyPXE Network Installation Server?
Then configure your PXE server:
- Extract pxesrv.zip to C:\tools\pxesrv;
- Go to C:\tools\pxesrv and create a text file pxe_menu.txt with the following contents:
#!ipxe set boot-url http://${dhcp-server} #================ Main Menu ================= menu iPXE boot menu item WinPEISO WindowsPE ISO choose target && goto ${target} #============ Main Menu Options ============= :WinPEISO sanboot ${boot-url}/iso/WinPE.iso boot - Copy the WinPE.iso file you got earlier to C:\tools\pxesrv\files\iso;
- Mount the Windows install ISO image to your virtual drive Windows and share it on the network (if you want, you may allow anonymous access to it, but it is optional);
- Run pxesrv.exe as administrator;
- Enable the HTTPd option;
- If you want your computer to assign IP addresses on the local network via DHCP (Tiny PXE can do this), disable the ProxyDHCP option. Make sure that the IP address of your computer is specified in the
Option 54 DHCP ServerandNext-Serverfields. The IP Pool start field shows the beginning of the DHCP range, so make sure that the range is not busy in your network; - In the Boot File section, specify ipxe.pxe (for BIOS devices) or ipxe-x86_64.efi (for UEFI devices);
- In the Filename if user-class=gPXE or IPXE field, enter the name of the menu file you created earlier: pxe_menu.txt;
- Start your PXE server by clicking Online.
So, your PXE server is up and running. If a firewall is enabled in Windows, disable it or allow inbound traffic for pxesrv.exe over DHCP, PXE, HTTP, TFTPS, and SMB protocols.
Using PXE Server to Install Windows 10 or 11 Over the Network
Then you must boot the computer on which you want to install Windows from a PXE server. The computer must be in the same local network (VLAN) as the PXE server host.
Select PXE as a primary boot device in BIOS/UEFI settings of the computer.
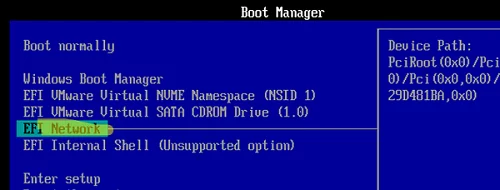
After running PXE, the computer will find the DHCP server in the network, get an IP address and available options in the iPXE menu.
The computer will boot over the network in the WinPE environment.
When I tested booting from a PXE server on a VMWare virtual machine with UEFI, an error appeared:
Could not describe SAN devices: Operation not supported
Could not boot image: Operation not supported https://ipxe.org/err/3c2220
As it turned out, there was a bug in the virtual machine UEFI firmware on my VMware ESXi host:
This error indicates that your UEFI firmware has a bug that prevents the installation of the iSCSI boot firmware table (iBFT). Switch to booting in “legacy” BIOS mode rather than UEFI mode.
I had to switch the VM to BIOS mode and start the PXE server with the ipxe.pxe option. Then the Windows is normally deployed over the network.
Now you need to map a shared folder with your Windows 11 ISO image using the SMB protocol.
Initialize the environment using the wpeinit command and mount the shared folder with Windows installation files:
Net use E: \\192.168.103.202\E
(192.168.103.202 is the name of the computer the installation image is located on, and E is the name of the shared folder).
Enter the user credentials that are allowed to access the Windows host with the PXE server.
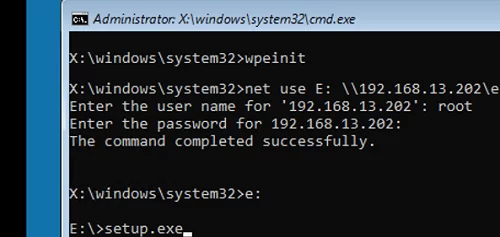
Run Windows Setup with the setup.exe command.