
DNS works by mapping name-to-IP address. To perform this function, we need to know the hostname so that we can get the IP address information from the DNS server. However, sometimes what we have is the IP address and we want to know what hostname that is using this IP address. The good news is that DNS server can also do reverse lookup where mapping is performed from IP address-to-name. To do reverse lookup, DNS server needs a Pointer record (PTR). In this post, we’ll explain the way for administrator to Add PTR Record in Windows DNS Server.
PTR record can be created automatically when creating Host A record or created manually. There are two ways to manually add PTR record in Windows DNS server. We can either add the PTR Record using DNS Manager or using PowerShell. But before we can add the PTR record, we need to ensure that the related zone has been created in Reverse Lookup Zones. Usually, the zone name for reverse lookup is in x.x.x.in-addr.arpa format, where x.x.x is the first three octets of the IP address in reversed order. For example, zone name for subnet 172.31.1.0/24 is 1.31.172.in-addr.arpa.
Now we’ll use scenario below to demonstrate the steps to add PTR record in Windows DNS server:
AS-DCO001 is a Windows Server 2012 R2 machine, serves as the Domain Controller and DNS server of a domain named mustbegeek.com. An application in the network requires the DNS server to map the IP address information into host name. One of the host named “AS-SVC001” is known to have the IP address of 192.168.0.20. You are the network administrator of mustbegeek.com and you need to add this information in a reversed way so when the application queries the DNS server about the hostname with IP 192.168.0.20, the DNS able to answer the query with hostname “AS-SVC001.mustbegeek.com”.
Add PTR Record using DNS Manager
Open up DNS Manager and browse to the zone name under Reverse Lookup Zones. Ensure the zone name suits the IP subnet of the record that you want to add. In this scenario, the IP subnet is 192.168.0.0/24 therefore the suitable zone name is 0.168.192.in-addr-arpa.
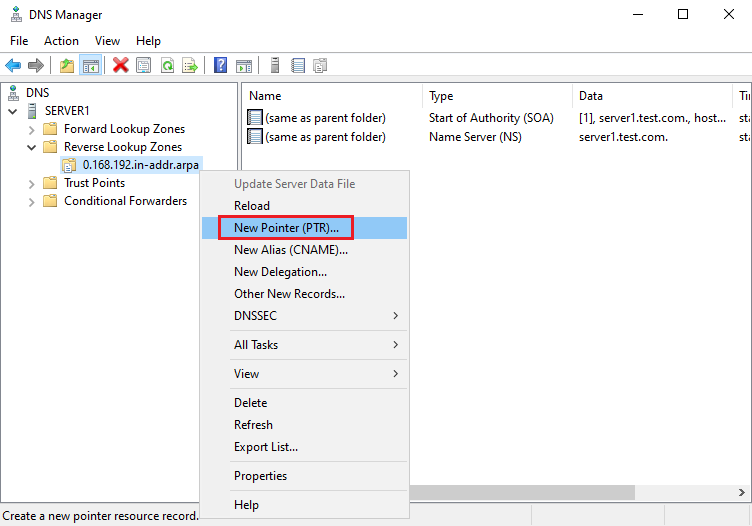
Right click on the zone name and select New Pointer (PTR)…
The popup window as shown below will appear.

In this popup window, fill in the details of the record:
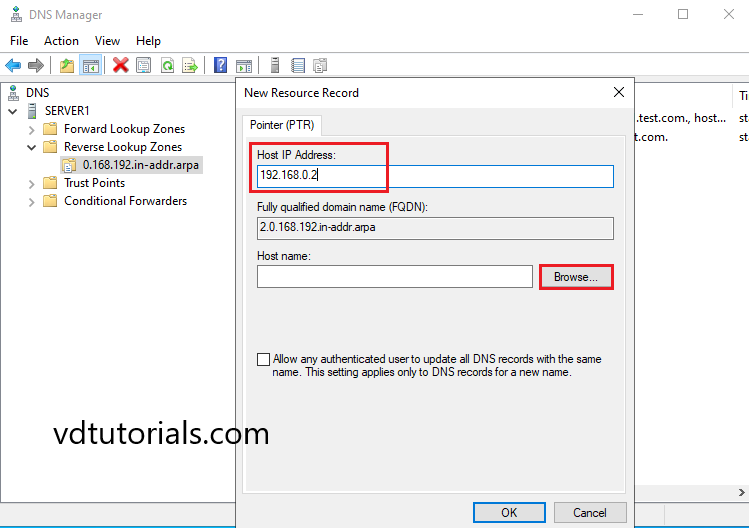
- Host IP address: in this field, fill in only the last octet of the IP address record that you want to add. For this scenario, the IP address of the server is 192.168.0.20 and therefore fill the host IP address only with “20”. Notice that Fully Qualified Domain Name (FQDN) will be automatically updated as you fill in the IP address field.
- Host name: type in the FQDN of the hostname that is using the related IP address, or click Browse button to select a valid Host A record for the related hostname. In this example scenario, the FQDN of the hostname is AS-SVC001.mustbegeek.com
- Optionally, you can tick the option to Delete this record when it becomes stale to make this PTR record becomes dynamic. By default if you don’t tick this option the PTR record will be created as static.
- Also optionally, tick the option to Allow any authenticated user to update all DNS records with the same name to allow automatic update of this PTR record should the information on the related host is changed.
- The last detail is also optional, you can choose to modify the TTL value or let it be the default. TTL value configures how long client can keep this record in their resolver cache. In this example we’re setting it to 8 hours.

Click OK to finish adding the PTR record.
Add PTR Record using PowerShell
The command to add PTR record using PowerShell is:
Add-DnsServerResourceRecordPtr -Name "IP_ADDRESS_LAST_OCTET" -ZoneName "ZONE_NAME" -PtrDomainName "HOST_NAME_FQDN" [-AllowUpdateAny] [-AgeRecord] [-TimeToLive TTL_VALUE]
Note that you need to run PowerShell as admin to use the command, and you need to modify these variables below according to the details you want.
Mandatory input
- IP_ADDRESS_LAST_OCTET = Replace this with the last octet of your host IP address. For this example we will replace this value with “20”.
- ZONE_NAME = Replace this with the zone name that match your host IP subnet. For this example we will replace zone name with “0.168.192.in-addr.arpa”.
- HOST_NAME_FQDN = Replace this with the FQDN of the hostname. In this scenario the hostname is “as-svc001.mustbegeek.com”.
Optional input
- [-AllowUpdateAny] = This keyword has the same purpose as the “Allow any authenticated user to update all DNS records with the same name” option. Include this keyword only if you want to allow automatic updates of the PTR record.
- [-AgeRecord] = Include this keyword only if you want to make the PTR record as dynamic, as this keyword serves the same purpose as option to “Delete this record when it becomes stale”.
- [-TimeToLive TTL_VALUE] = Only include this keyword if you want to customize the TTL value, and replace the TTL_VALUE with the value in HH:MM:SS format. In this example we replace the value with “08:00:00”.
Below is the full command that reflects the same setting as the previous setting in the DNS Manager:

Working with PTR Record in Windows DNS Server
Same with Host A records, multiple PTR Record with the same “Name” can exists together for redundancy or load-balance purpose. However, this may not be the best practice as the DNS server will randomly use one of these records to answer a DNS query.

Also, when you add PTR record for an IP address, you need to ensure that the PTR record is pointing to the correct host that is using the same IP address. If a PTR record created pointing to a host that is using different IP address, the result may be invalid.
And that’s all you need to know before you add PTR record in Windows DNS Server.
The following two tabs change content below.
- Bio
- Latest Posts
I am IT practitioner in real life with specialization in network and server infrastructure. I have years of experience in design, analysis, operation, and optimization of infrastructure solutions for enterprise-scaled network. You can send me a message on LinkedIn or email to arranda.saputra@outlook.com for further inquiry regarding stuffs that I wrote or opportunity to collaborate in a project.
In this tutorial, I’ll show you how to create reverse DNS lookup zones and PTR Records on Windows Server.
Reverse lookup zones are used to resolve IP addresses to a hostname. For reverse lookup zones to work they use a PTR record that provides the mapping of the IP address in the zone to the hostname.
For example, I can look up the IP 10.1.2.88 and see that it resolves to the hostname “nodaway”. Without a reverse lookup zone and PTR record, I would not be able to do this.
Do You Really Need Reverse Lookup Zones and PTR Records?
Every network is different so it depends. Unless you host your own email server or have an application that requires it may not be required.
Even if you don’t have requirements for them I still recommend setting them up because they are extremely helpful when troubleshooting. You can read more about this in my DNS Best Practices guide.
How to Create Reverse Lookup Zone
Step 1: Open the DNS Management Console
On your Windows Server type DNS in the search box to quickly find the DNS console.
Step 2: Create New Reverse Lookup Zone
In the DNS console right click on “Reverse Lookup Zones” and Select “New Zone”.
This will start the new zone wizard.
Step 3: Choose Zone Type (New Zone Wizard)
On the Zone Type page select Primary Zone.
Choose to replicate to all DNS servers running on domain controllers in this domain.
Choose IPv4 or IPv6, for this demo I’m setting up IPv4.
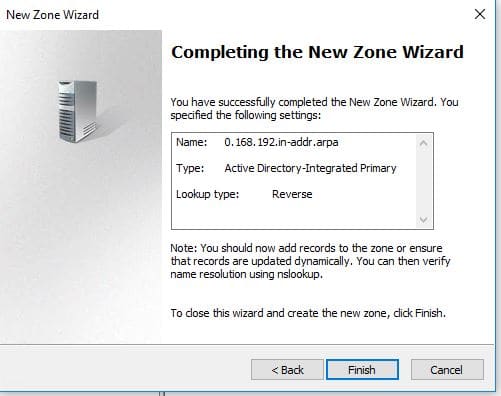
Now, type in the start of the subnet range of your network.
For this demo, I’m creating a zone for subnet 192.168.0.0/24.
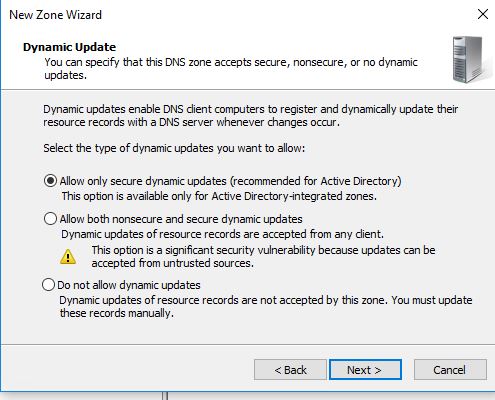
Choose the dynamic update option.
I recommend picking the first option “Allow only secure dynamic updates”.
That completes the wizard, click finish.
Verify Reverse Lookup Zone
Back in the DNS console click on “Reverse Lookup Zone”
I can now see the new zone listed. The subnet will display backwards which is normal.
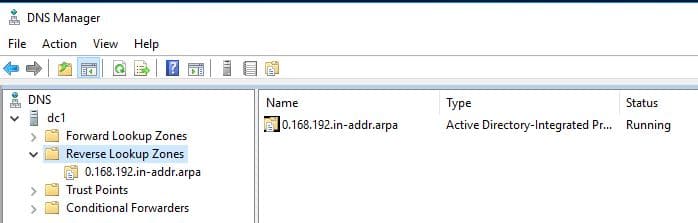
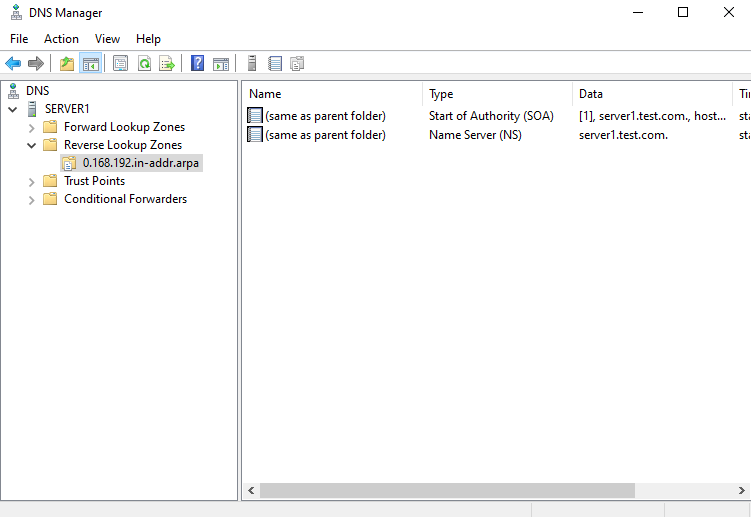
Now I’ll click the 0.168.192.in.addr.arpa zone to view the DNS records.
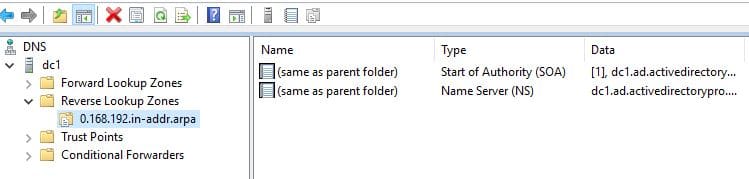
So far I have only the SOA and NS resource records, no PTR records.
Once clients start dynamically updating their DNS the PTR records should start populating. You can also manually create PTR records for systems that are not configured to dynamically update.
How to Create PTR Records
Let’s walk through manually creating a PTR record. This is only needed if a system is not configured to dynamically update. This may be the case for systems with static IP addresses like servers.
Right click the zone and select “New Pointer (PTR)”.

Enter the Host IP Address and Host name fields and click OK.
I’m creating a record for IP, 192.168.0.206 with the hostname of pc1.
Back in the DNS console, I can see the PTR record listed.

How to Verify PTR Record Is Working
To verify the PTR record is working you can use the nslookup command.
Open Powershell and type nslookup followed by the IP you want to lookup.
You can see in the picture above the IP returned the hostname PC1.
That is all there is to it.
Pretty easy right?
This Windows Server 2022 Tutorial covers how to create DNS (Domain Name System) Reverse Lookup Zone and PTR Record on Windows Server 2022. Domain Name System is a name resolution service that provides a naming system for computers, services, and other resources in the network. The DNS Server resolves computer names or other hostnames to IP addresses and IP addresses to computer names or other hostnames. A DNS zone is the specific portion of a DNS namespace hosted on a DNS server and it contains resource records. The reverse lookup zones are used only for resolving an IP address to a name.
Note: In this Tutorial Active Directory-Integrated DNS is used, DNS servers running on domain controllers can store their zones in Active Directory Domain Services.
Resource records in reverse lookup zones
- Pointer (PTR): PTR record used to resolve an IP address to a name.
- Start of authority (SOA): Start of authority Contains configuration information for the zone, including the name of the primary DNS server and how often secondary servers should be synchronized. There’s one SOA record per zone.
- Name server (NS): NS Identifies a DNS server for the domain. There’s one NS record for each DNS server that has a copy of the zone.
Table of Contents
- Create DNS Reverse Lookup Zone
- Create DNS PTR Record
Demo environment
- Computer Name: server1.test.com
- Operating System: Windows Server 2022 Datacenter
- IP Address: 192.168.0.2.
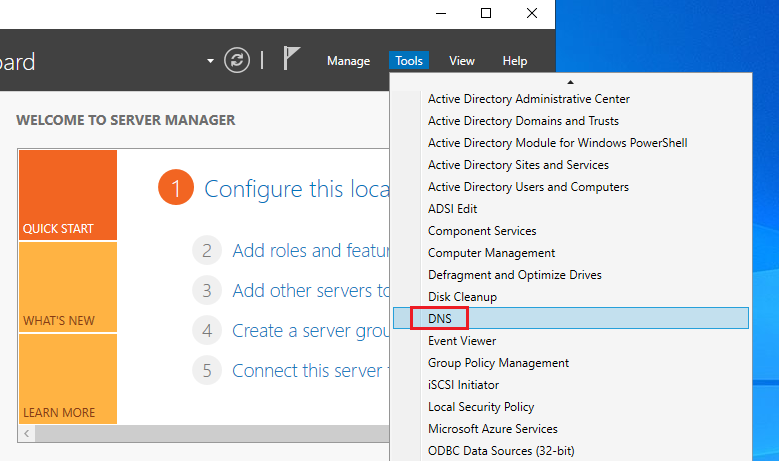
1. Open the Server Manager dashboard click Tools and select DNS.
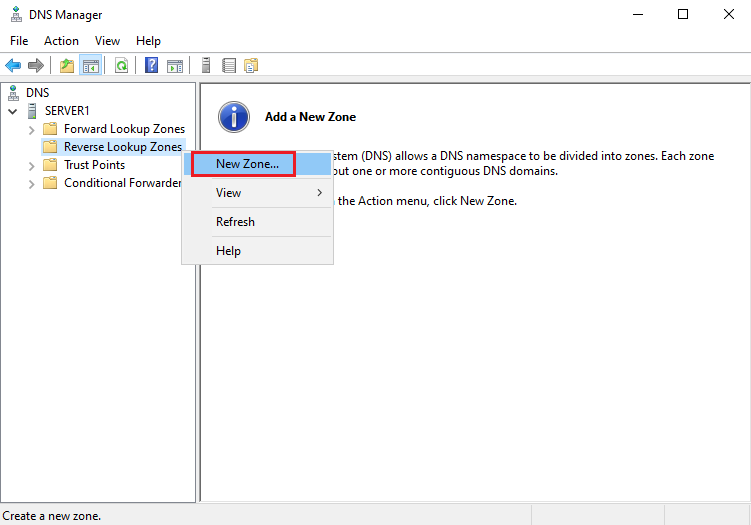
2. Right-click on the Reverse lookup zone and click New Zone.
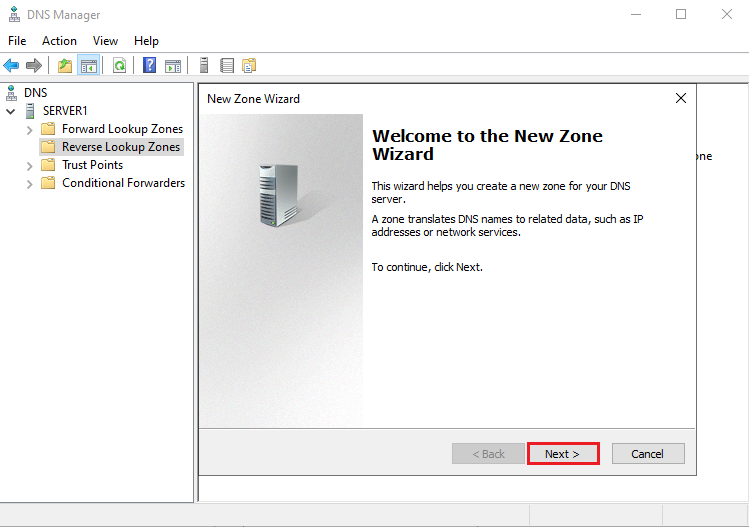
3. To continue, click Next.
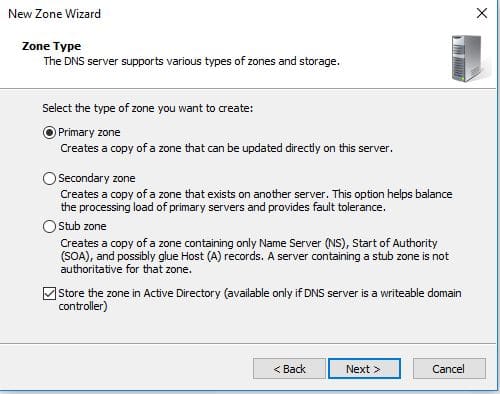
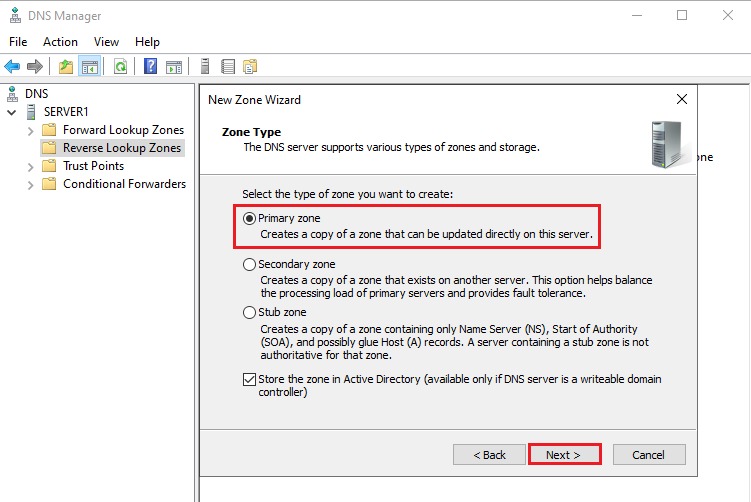
4. In Zone type selection, select the Primary zone and click Next.
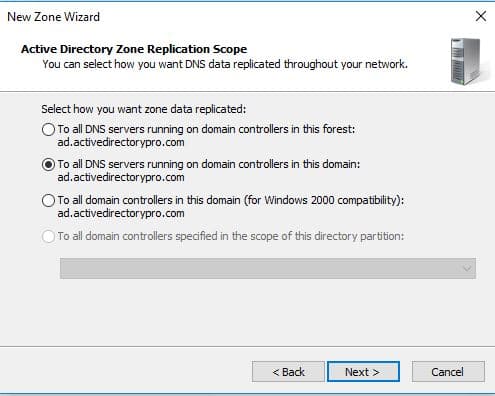
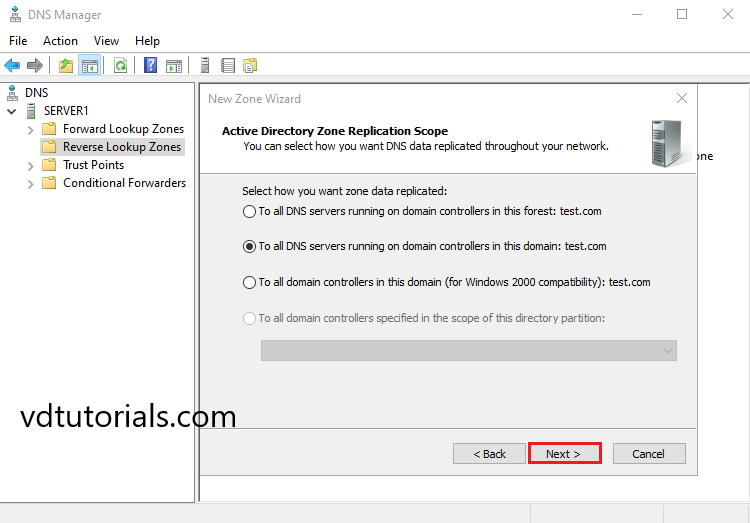
5. Configure Active Directory Zone Replication Scope and click Next.
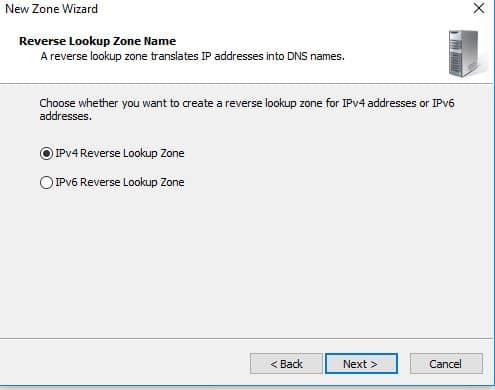
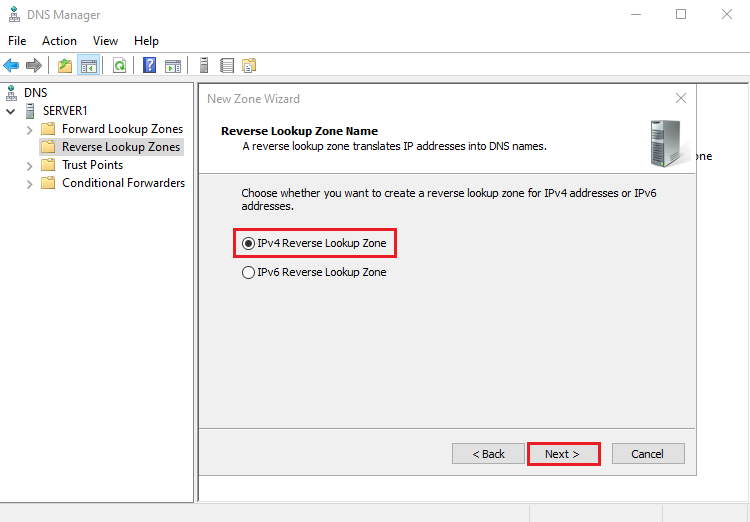
6. Select the IPv4 Reverse Lookup Zone and click Next.
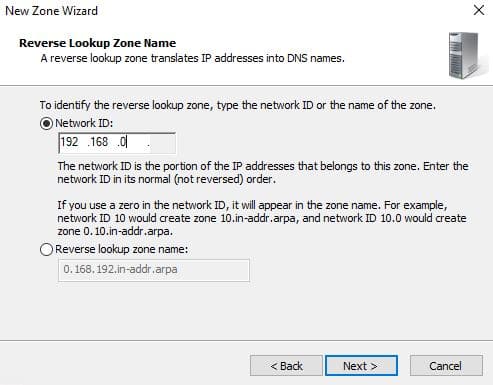
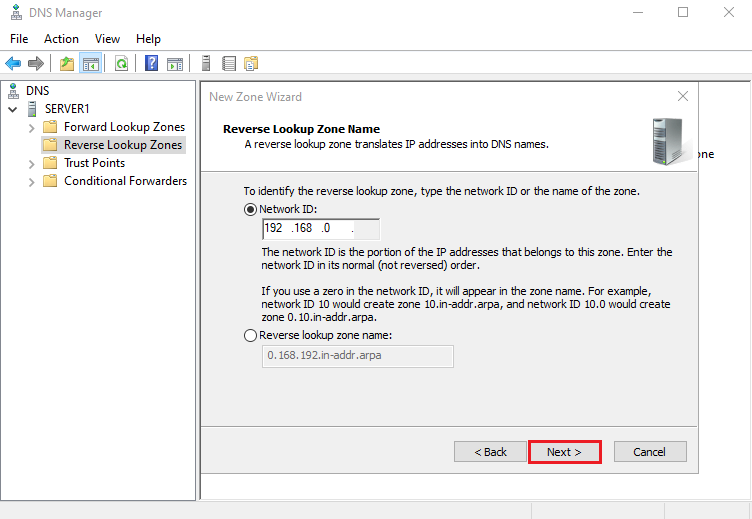
7. Configure the Network ID and click Next.
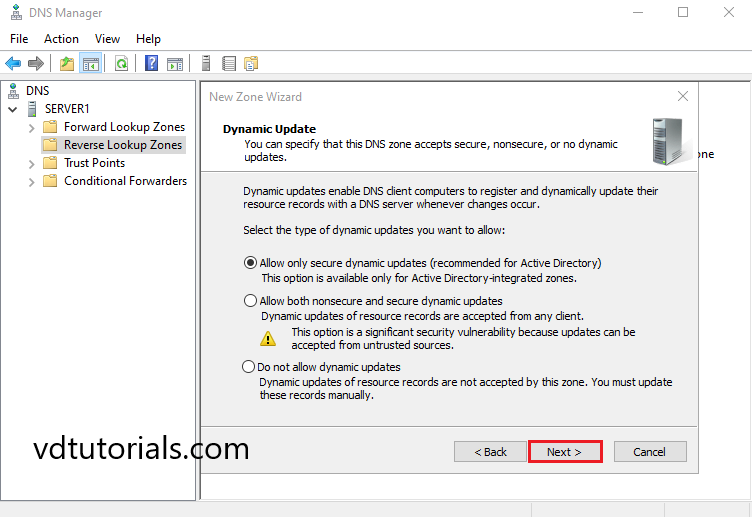
8. Configure Dynamic Update and click Next.
9. To close the wizard and create the new zone, click Finish.
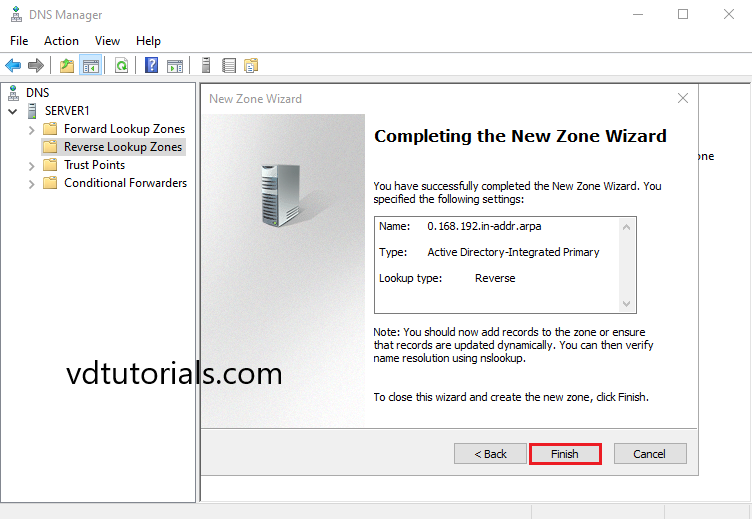
10. The DNS Reverse Lookup Zone created.
Create DNS PTR Record
In this case, the DNS A Record has already been created.
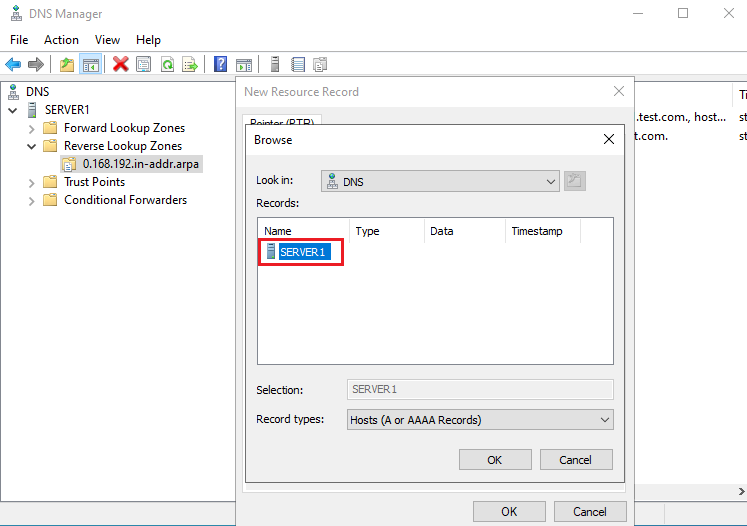
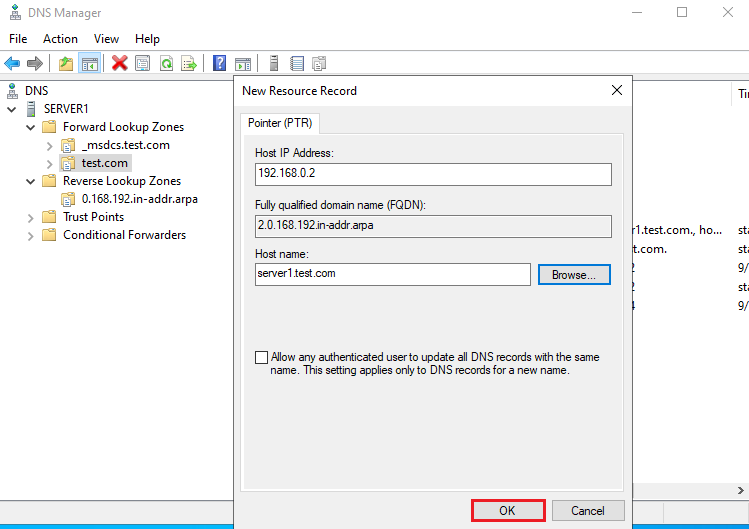
1. Open DNS Manager, Right-click on the Reverse Lookup Zone name, and click New Pointer (PTR).
2. Enter the Host IP Address and click Browse.
3. Select DNS Server (SERVER1).
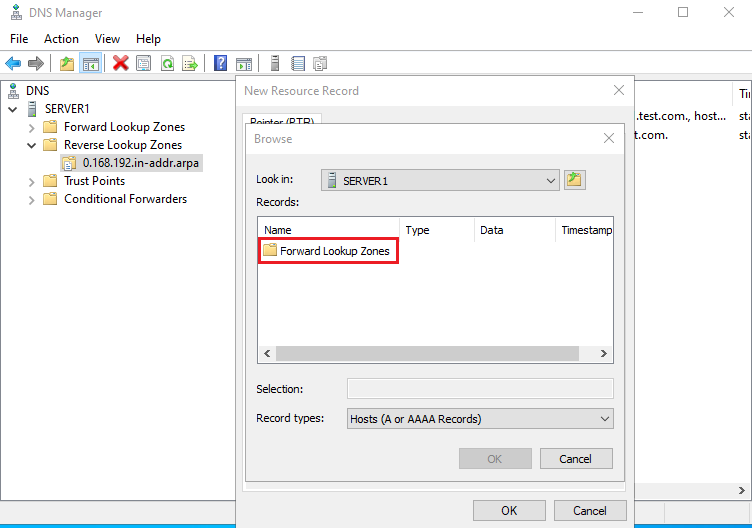
4. Select Forward Lookup Zone.
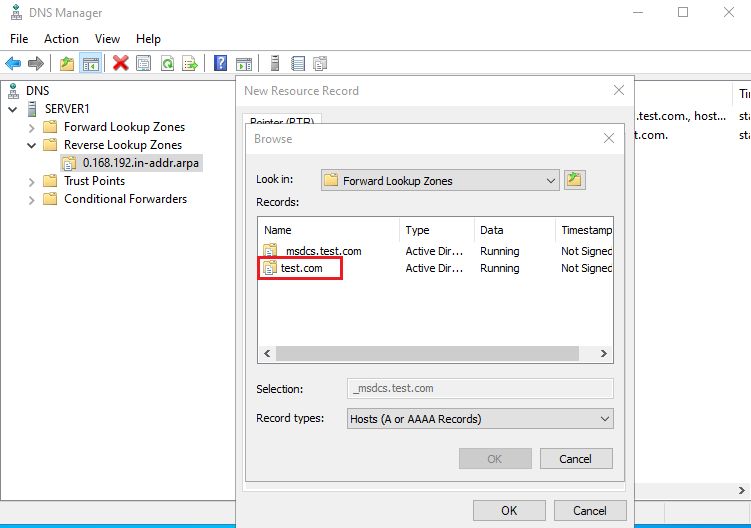
5. Select Forward Lookup Zone Name (test.com).
6. Select A Record and click OK.
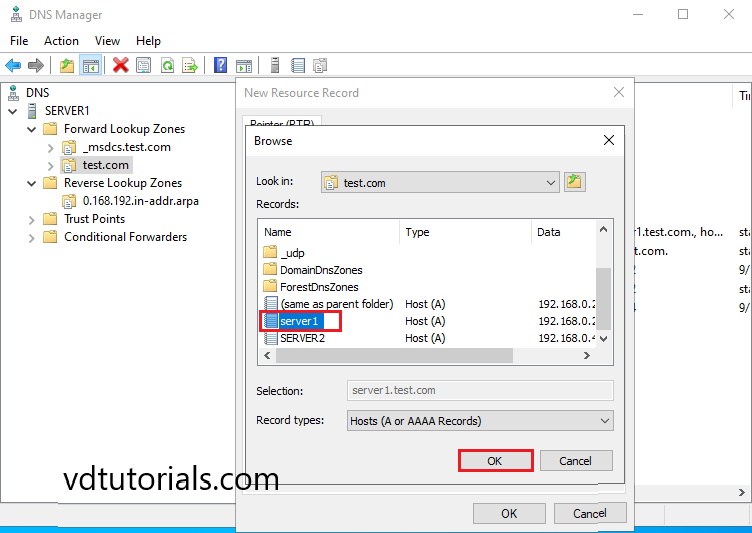
7. Click OK.
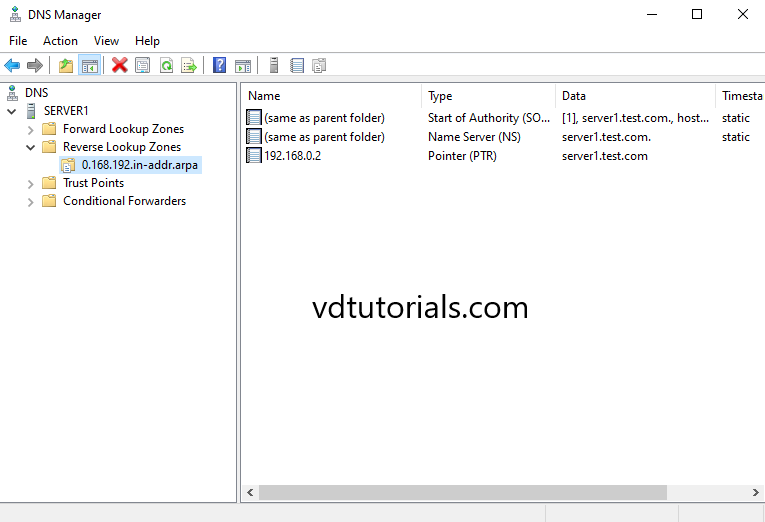
8. DNS PTR Record has been created. Verify the DNS PTR Record.
Windows Server 2022 Tutorials
PTR-записи (Pointer Records) — тип DNS-записей, используемых для обратного соответствия (reverse DNS lookup). Они связывают IP-адрес с доменным именем, выполняя обратное действие по сравнению с A-записями, которые связывают доменное имя с IP-адресом.
PTR-записи применяются для проверки подлинности серверов, особенно в SMTP — протоколах передачи почты. Основное предназначение PTR-записи заключается в том, чтобы удостовериться, что IP-адрес связан с доверенным доменным именем. Таким образом это повышает репутацию сервера при отправке сообщений электронной почты. В частности, почтовые серверы могут отклонять письма от почтовых серверов, не имеющих корректной PTR-записи.
При стандартном DNS-запросе, под которым мы понимаем A-запись, вы запрашиваете доменное имя узла и получаете его IP-адрес. При обратном же DNS-запросе, использующим именно PTR-запись, вы запрашиваете IP-адрес и получаете доменное имя.
Проще говоря, прямой запрос выглядит как domain.ru ➝ 192.168.0.1, а обратный запрос, в свою очередь, как 192.168.0.1domain.ru.
Как настроить PTR-записи
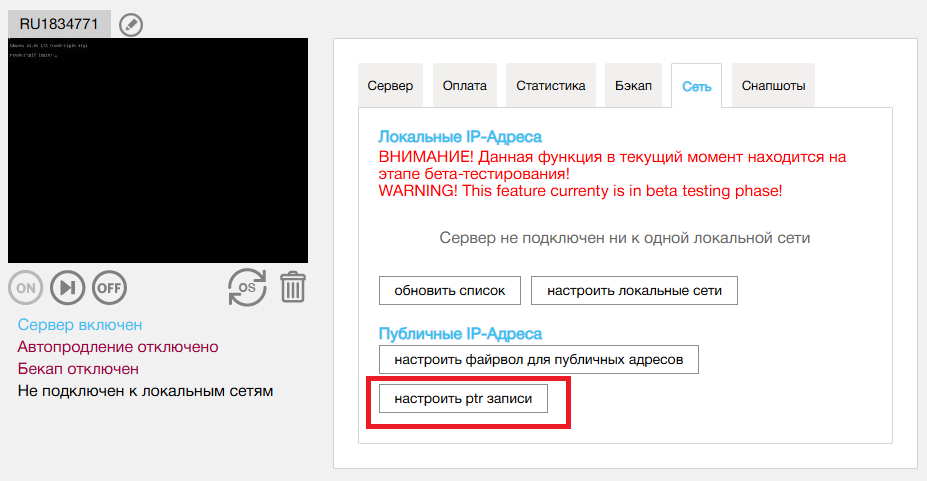
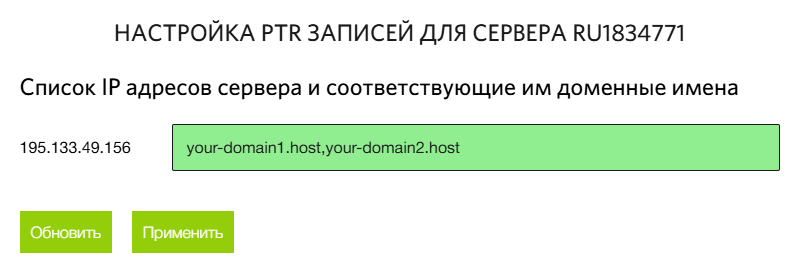
На хостинге RUVDS существует возможность настроить одну или несколько PTR-записей для виртуального выделенного сервера.
Чтобы это сделать, перейдите на страницу сервера в личном кабинете. Там переключитесь на вкладку Сеть и кликните кнопку настроить ptr записи.
Далее, в открывшемся окне укажите доменное имя сервера в соответствующей строке и нажмите Применить.
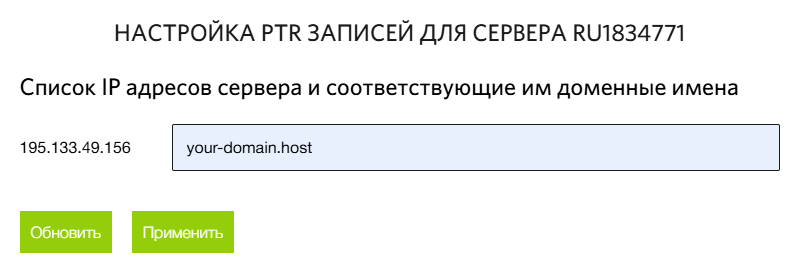
Если вы используете несколько имён доменов на одной виртуальной машине, укажите требуемые доменные имена через запятую.
Проверка настройки PTR-записи
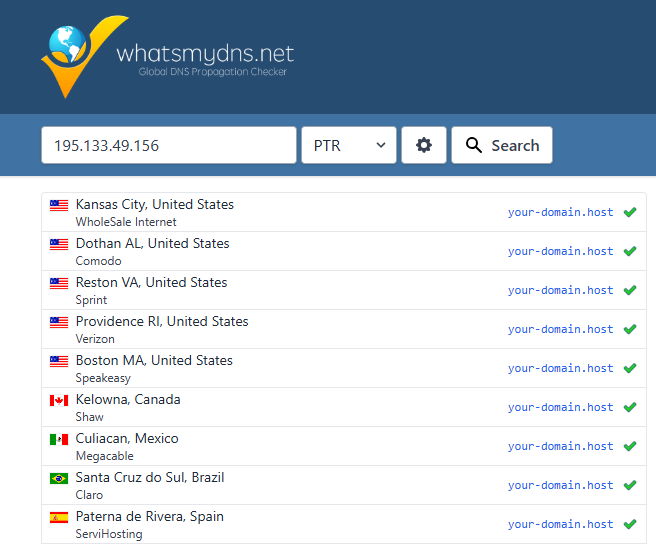
После настройки PTR-записи на странице виртуальной машины можно проверить её корректность, например, при помощи утилиты nslookup. Для чего в командной строке выполните команду nslookup X.X.X.X, где замените X.X.X.X на IP-адрес вашего сервера.
В нашем примере из вывода команды видно, что IP-адрес ассоциирован с доменом your-domain.host, то есть PTR-запись в данном случае настроена корректно.
То же можно сделать с использованием утилиты dig:
dig -x 195.133.49.156В числе прочего из вывода команды видно, что для IP-адреса 195.133.49.156 настроена PTR-запись. Об этом говорит соответствующая строка в секции ANSWER SECTION:

Ещё одна утилита, которую можно применить для проверки обратного запроса, это — host:
host 195.133.49.156Вывод утилиты содержит доменное имя искомого хоста:
Также можно воспользоваться онлайн-инструментами, например, WhatsMyDNS.
Заключение
PTR-записи могут иметь особую важность для почтовых серверов, при использовании которых необходимо избегать попадания в различные спам-листы. Естественно, перед тем, как настроить PTR-записи, следует убедиться, что доменное имя, указанное в PTR-записи, корректно настроено с помощью A-записи и указывает обратно на IP-адрес виртуального сервера. Это и называется прямым и обратным соответствием.
Администратор DNS сервера на Windows для управления сервером, DNS зонами и записями может использовать старую добрую утилиту
Dnscmd
, или воспользоваться возможностями PowerShell модуля DNSServer. В этой статье мы рассмотрим основные операцию по массовому созданию, модификации и удалению различных DNS записей и зон с помощью PowerShell.
Содержание:
- Модуль PowerShell — DNSServer
- Управление DNS зонами из PowerShell
- Управление DNS записиями с помошью модуля DNSServer
- Как добавить сразу несколько A / PTR записей в DNS зону с помощью PowerShell?
Модуль PowerShell — DNSServer
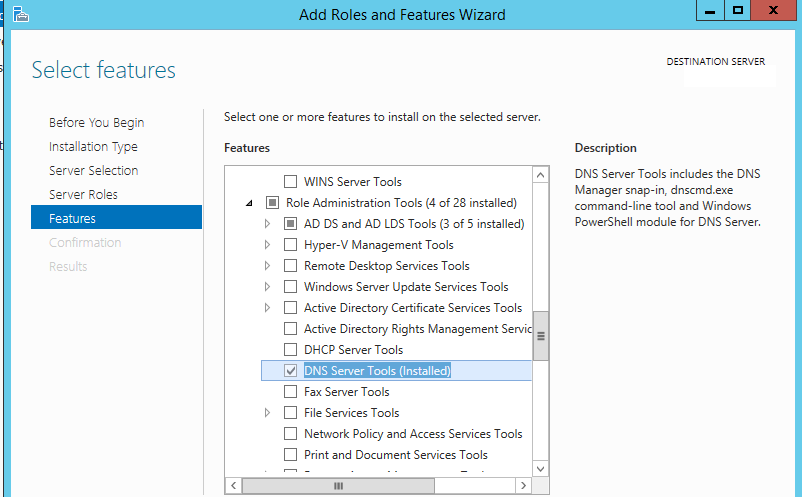
PowerShell модуль DNSServer входит в состав RSAT. В Windows 10 RSAT устаналивается отдельно, а в Windows Server вы можете установить модуль через Server Manager (Role Administration Tools -> Dns Server Tools).
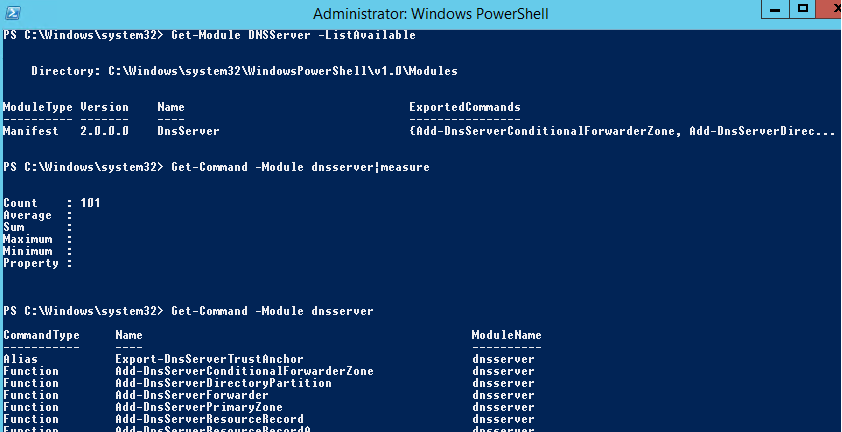
Проверим, что в системе имеется модуль PoSh DNSServer:
Get-Module DNSServer –ListAvailable
Можно вывести список команд в нем (в версии модуля на Windows Server 2012 R2 доступно более 100 команд):
Get-Module DNSServer
Управление DNS зонами из PowerShell
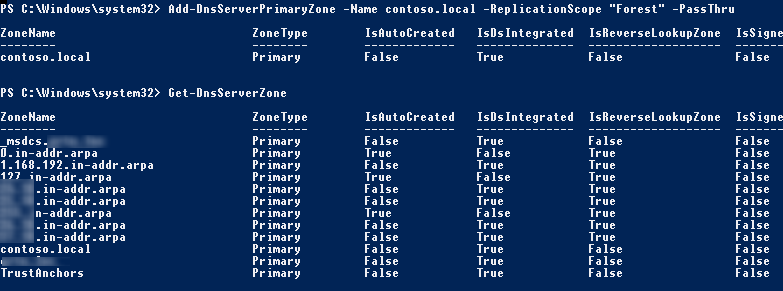
Выведем список зон на DNS сервере (в нашем случае это контроллер домен):
Get-DnsServerZone –ComputerName dc01
Чтобы добавить новую первичную DNS зону с именем contoso.local, выполните команду:
Add-DnsServerPrimaryZone -Name contoso.local -ReplicationScope "Forest" –PassThru
Как вы видите, была создана первичная DNS зона, интегрированная в Active Directory (isDsIntegrated=True).
Можно создать зону обратного просмотра (Lockup Zone):
Add-DnsServerPrimaryZone -NetworkId "192.168.1.0/24" -ReplicationScope Domain
Чтобы синхронизировать новую зону с другими DC в домене, выполните команду:
Sync-DnsServerZone –passthru
Выведем список записей в новой DNS зоне (она пуста):
Get-DnsServerResourceRecord -ComputerName dc01 -ZoneName contoso.local

Для удаления зоны воспользуйтесь командой:
Remove-DnsServerZone -Name contoso.local -ComputerName dc01
Эта команда также удалит все существующие DNS записи в зоне.
Управление DNS записиями с помошью модуля DNSServer
Чтобы создать новую A запись в указнаной DNS зоне, воспользуемся командой:
Add-DnsServerResourceRecordA -Name rds1 -IPv4Address 192.168.1.30 -ZoneName contoso.local -TimeToLive 01:00:00
Чтобы добавить PTR запись в обратной зоне, в предыдущей команде можно добавить параметр –CreatePtr или создать указатель вручную командлетом Add-DNSServerResourceRecordPTR:
Add-DNSServerResourceRecordPTR -ZoneName 1.168.192.in-addr.arpa -Name 30 -PTRDomainName rds1.contoso.local
Для добавления алиаса (CNAME) для определенной A записи, воспользуйтесь командой:
Add-DnsServerResourceRecordCName -ZoneName contoso.local -Name RDSFarm -HostNameAlias rds1.contoso.local
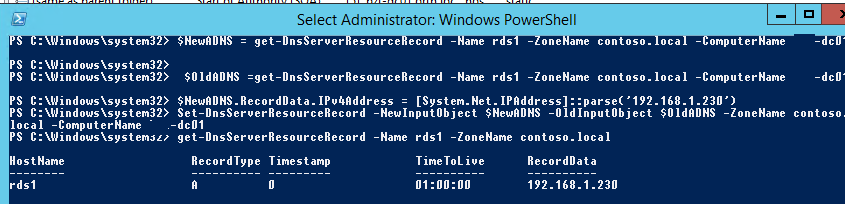
Чтобы изменить IP адрес данной A записи нужно воспользоваться довольно сложной схемой, т.к. вы не можете напрямую изменить IP адрес у DNS записи.
$NewADNS = get-DnsServerResourceRecord -Name rds1 -ZoneName contoso.local -ComputerName dc01
$OldADNS =get-DnsServerResourceRecord -Name rds1 -ZoneName contoso.local -ComputerName dc01
Теперь изменим свойство IPV4Address у объекта $NewADNS
$NewADNS.RecordData.IPv4Address = [System.Net.IPAddress]::parse('192.168.1.230')
Теперь изменим IP адрес A записи с помощью Set-DnsServerResourceRecord:
Set-DnsServerResourceRecord -NewInputObject $NewADNS -OldInputObject $OldADNS -ZoneName contoso.local -ComputerName dc01
Проверим, что IP адрес A записи изменился:
get-DnsServerResourceRecord -Name rds1 -ZoneName contoso.local
Можно вывести список DNS записей одного типа, указав тип в аргументе –RRType. Выведем список записей CNAME в зоне:
Get-DnsServerResourceRecord -ComputerName DC01 -ZoneName contoso.local -RRType CNAME

Также вы можете использовать фильтр по различным параметрам DNS записей с помощью Where-Object. Например, выведем список A записей, у которых в имени есть фраза rds.
Get-DnsServerResourceRecord -ZoneName contoso.local -RRType A | Where-Object HostName -like "*rds*"

Для удаления записей в DNS используется командлет Remove-DnsServerResourceRecord.
Например, для удаления CNAME записи, выполните:
Remove-DnsServerResourceRecord -ZoneName contoso.local -RRType CName -Name RDSFarm
Для удаления A записи:
Remove-DnsServerResourceRecord -ZoneName contoso.local -RRType A -Name rds1 –Force
Для удаления PTR записи в обратной зоне:
Remove-DnsServerResourceRecord -ZoneName “1.168.192.in-addr.arpa” -RRType “PTR” -Name “30”
Как добавить сразу несколько A / PTR записей в DNS зону с помощью PowerShell?
Допустим, вам нужно создать сразу множество A записей в определенной DNS зоне прямого просмотра. Вы можете завести их по-одной с помощью команды Add-DnsServerResourceRecordA, но гораздол проще и быстрее массово завести A записи по списку из файла.
Создайте текстовый файл NewDnsRecords.txt ч именами и IP адресами, которые вы хотите завести. Формат файла такой:
HostName, IPAddress
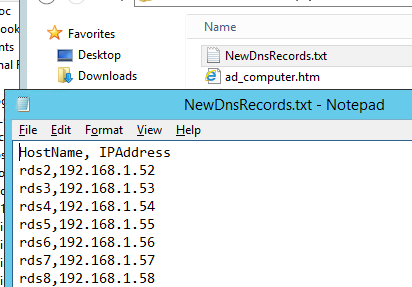
Чтобы завести A записи в зоне contoso.local по данным из TXT/CSV файла, воспользуйтесь следующим скриптом PowerShell:
Import-CSV "C:\PS\NewDnsRecords.txt" | %{
Add-DNSServerResourceRecordA -ZoneName contoso.local -Name $_."HostName" -IPv4Address $_."IPAddress"
}
Если нужно сразу завести записи в обратной зоне, добавьте в команду Add-DNSServerResourceRecordA параметр –CreatePtr.
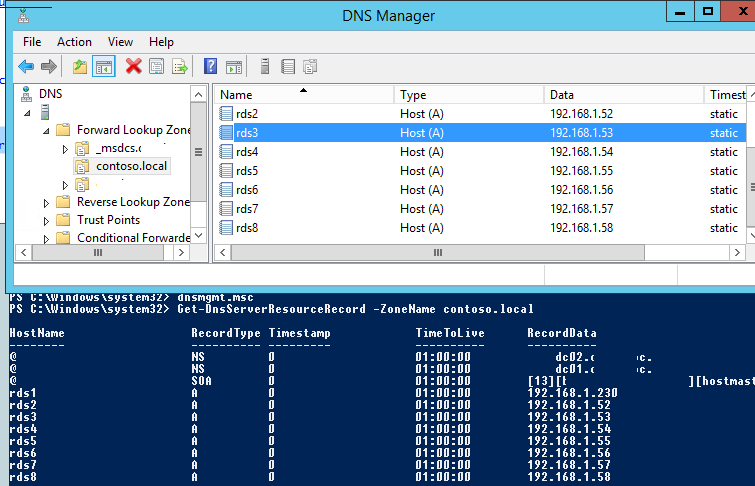
Теперь с помощью консоли DNS Manager (dnsmgmt.msc) или команнды
Get-DnsServerResourceRecord -ZoneName contoso.local
убедитесь, что все A записи успешно созданы.
Если нужно массово завести PTR записи в зоне обратного просмотра создайте текстовый/csv файл со следующей структурой
octet,hostName,zoneName
65,rds5.contoso.local,1.168.192.in-addr.arpa
66,rds6.contoso.local,1.168.192.in-addr.arpa
67,rds7.contoso.local,1.168.192.in-addr.arpa.
Затем запустите такой скрипт:
Import-CSV "C:\PS\NewDnsPTRRecords.txt" | %{
Add-DNSServerResourceRecordPTR -ZoneName $_."zoneName" -Name $_."octet" -PTRDomainName $_."hostName"
}
Убедитесь, что PTR записи появились в указанной Reverse зоне DNS.