
Interactive installer by EDB
Download the installer
certified by EDB for all supported Postgres versions.
Note! This installer is hosted by EDB and not on the PostgreSQL community servers.
If you have issues with the website it’s hosted on, please contact
webmaster@enterprisedb.com.
This installer includes:
- The PostgreSQL server
- pgAdmin, a graphical tool for managing and developing your databases
- StackBuilder, a package manager for downloading and installing
additional PostgreSQL tools and drivers. Stackbuilder includes management,
integration, migration, replication, geospatial, connectors and other tools.
This installer can run in graphical or silent install modes.
The Windows installer is designed to be a straightforward, fast way to get up and running with
Postgres. In the unlikely event that you have issues with the installer,
please report them on the
installer Github page. Issues with the installed packages should be reported to the
appropriate project directly.
Advanced users can also download a
zip archive
of the binaries, without the installer.
This download is intended for users who wish to include Postgres as part of another application installer.
Platform support
The installers are tested by EDB on the following platforms.
They can generally be expected to run on other comparable versions,
for example, desktop releases of Windows:
| Postgres Version | 64 Bit Windows Platforms |
|---|---|
| 17 | 2022, 2019 |
| 16 | 2022, 2019 |
| 15 | 2019, 2016 |
| 14 | 2019, 2016 |
| 13 | 2019, 2016 |
| 12 | 2019, 2016, 2012 R2 |
-
Download the Complete PostgreSQL Binaries to Install the PostgreSQL Client Tools
-
Use PostgreSQL Installer to Install the PostgreSQL Client Tools

When we develop applications, we end up hosting them to the desired cloud provider based on a specific monthly or yearly subscription. Depending on your plan, these subscriptions give us different services such as data stored on a database, bandwidth, email services, and others.
There are different ways to access the remote database from your local computer, and one of them is through the graphical user interface client or the command line interface over TCP.
This tutorial will teach us how to install only the PostgreSQL client tools that we need to access the remote database on a Windows machine.
Download the Complete PostgreSQL Binaries to Install the PostgreSQL Client Tools
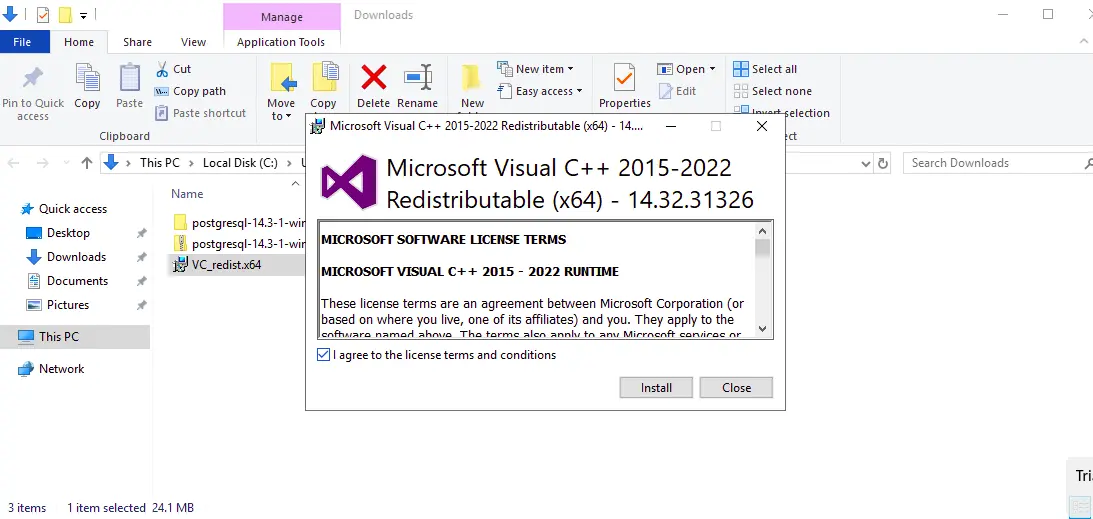
This is the first approach that we can use to install the PostgreSQL client tools.
We must first install Microsoft Visual C++ Redistributable for this approach to work.
Download the zip archive of the complete PostgreSQL binaries for the Windows operating system.
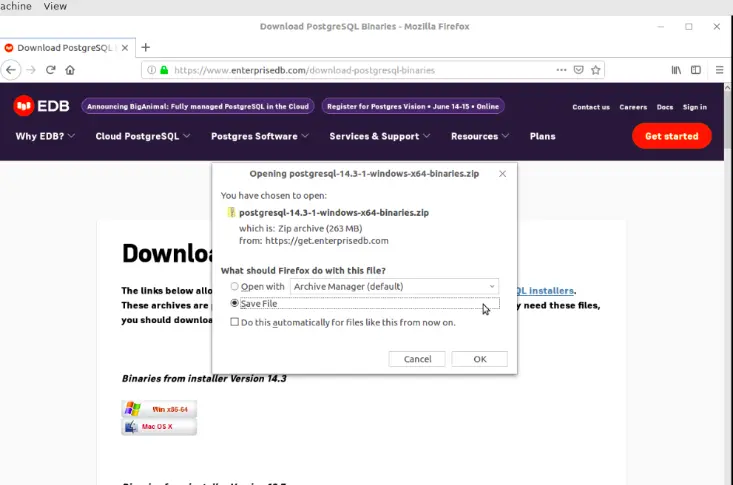
Note that these binary files are provided for convenience to expert users, and a user should use an installer unless they need these files.
Go to your Downloads folder where the PostgreSQL binary is saved and unzip the archive.
A folder named pgsql is extracted from the archive, and it has the folders shown in the following image.
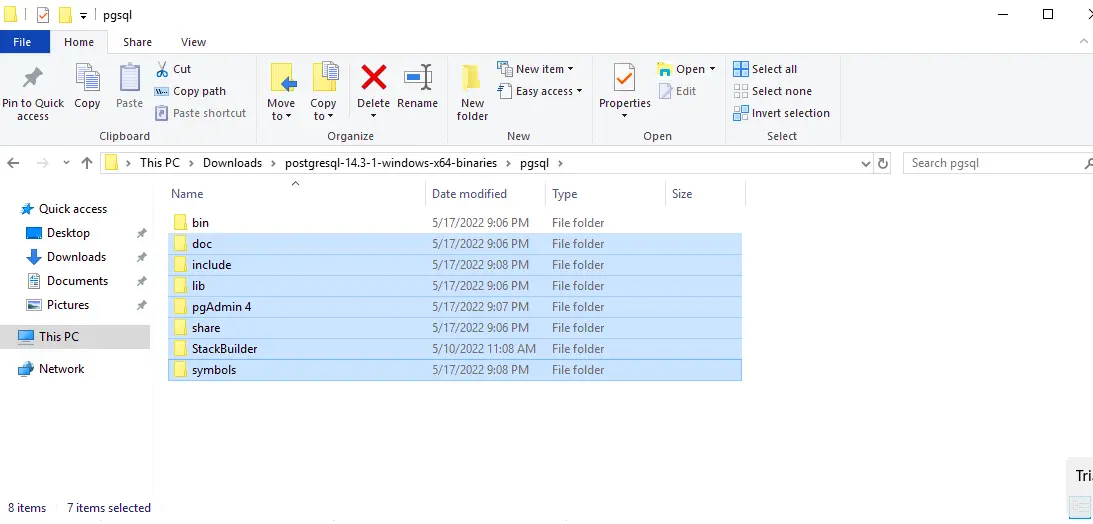
Delete the selected folders as indicated in the above image as they are not required to access your remote database.
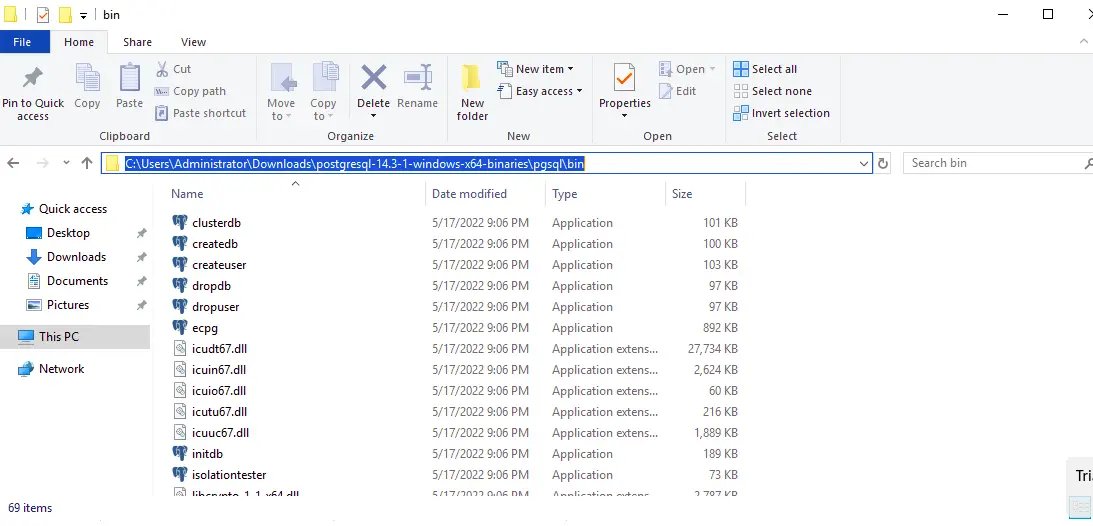
The remaining folder is the bin folder required in this approach. Go into the bin folder and copy the path of its location, as shown below.
The next step is to add this path to the System Environment Variables so that we can execute the PostgreSQL commands.
Click the Windows logo key, search for Environment, and click the Enter key when the Edit the system environment variables option is returned.
This will return the System properties window, as shown below.
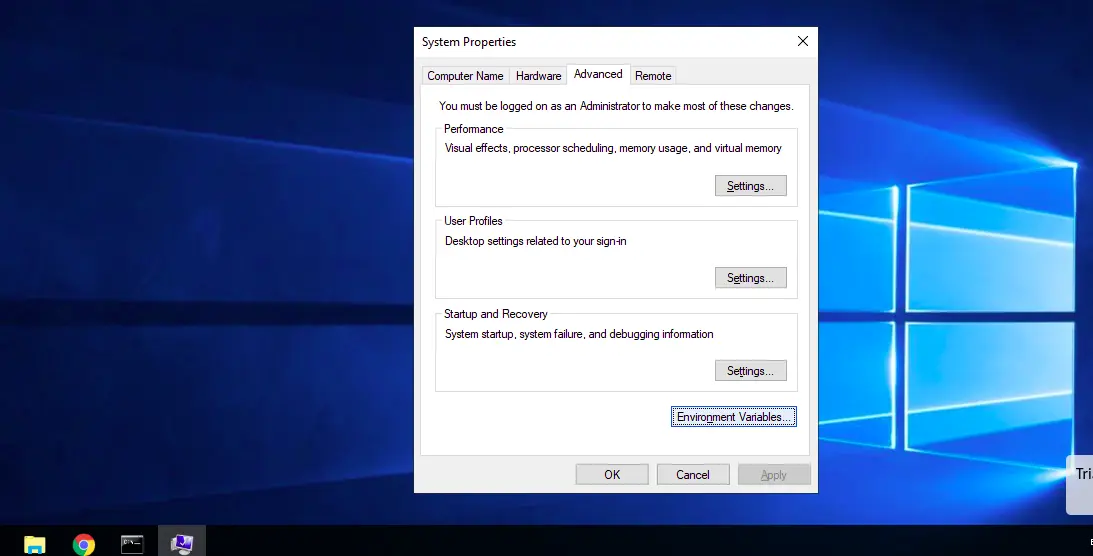
Click on the Environment variables window, which opens another window for User variables and System variables. Select the Path option and click the Edit button.

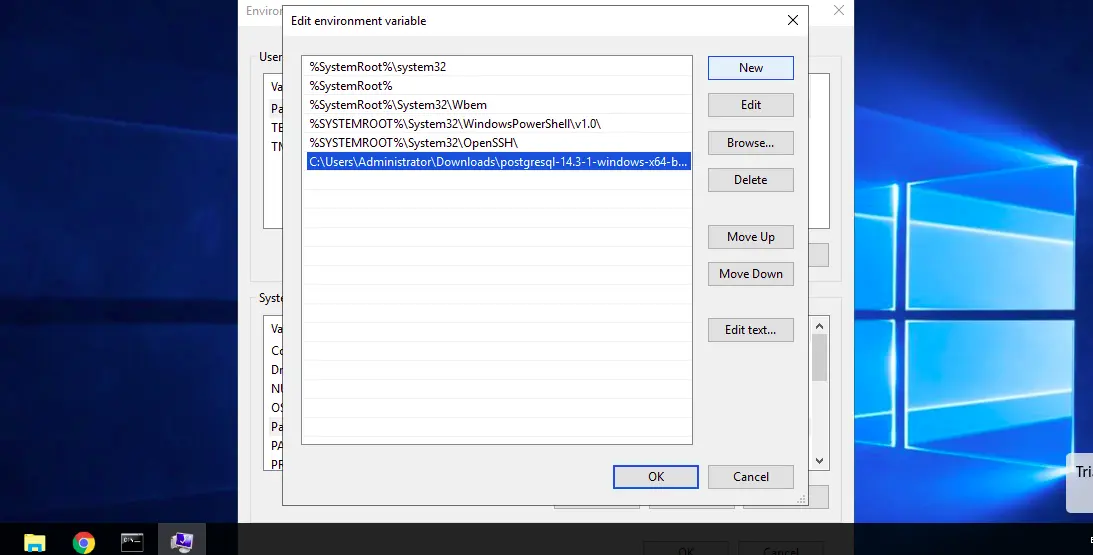
On the new window that opens, press the new button and paste the location of the PostgreSQL bin folder that we copied in the empty field, as shown below.
The final step is to verify whether we can execute PostgreSQL commands from our terminal. In this example, we will not connect to any remote database, but if you have one, use the following command to access your database.
>psql -h <host> -d <database> -U <username> -p <port> -W
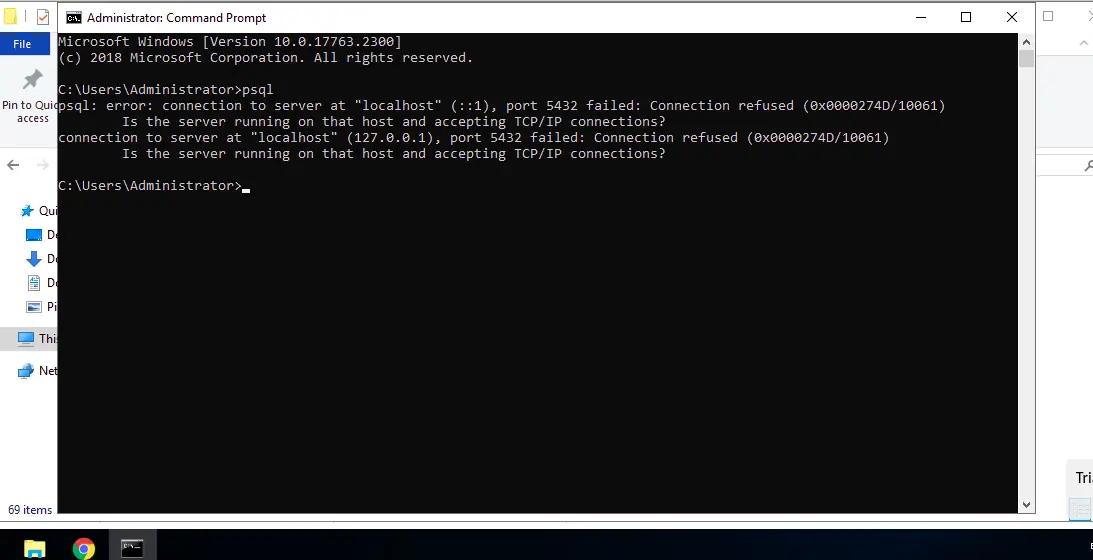
Open the Windows command prompt to verify that our configuration is working, type psql, and press Enter on your keyboard. As shown below, the command attempts to connect to a local PostgreSQL server, but it does not work since we have not installed any PostgreSQL server.
Use PostgreSQL Installer to Install the PostgreSQL Client Tools
Download the PostgreSQL installer for Windows and run the software.
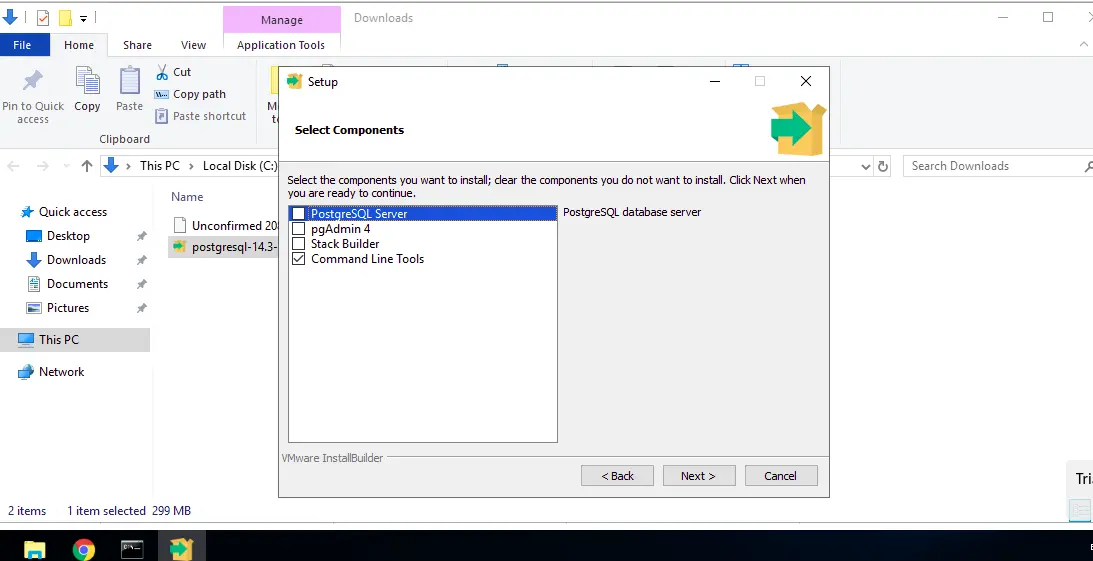
The software has several products that can be installed, as shown below, but since we are only interested in the command line tools, deselect all the others and click Next.
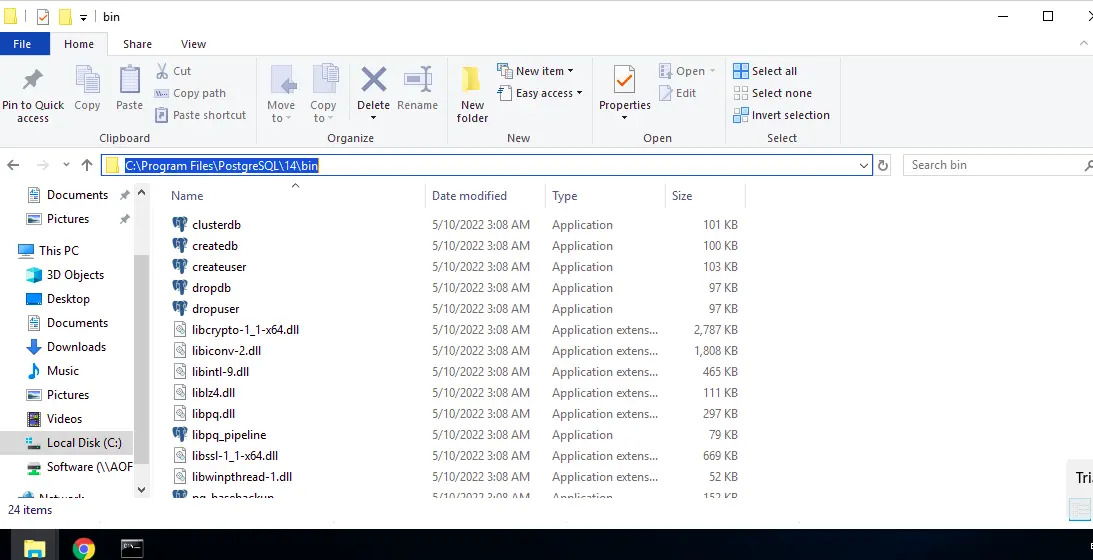
Once the installation is complete, copy the bin folder location installed under Program Files > PostgreSQL > 14, as shown below.
The next step is installing and adding the location to the System variables. The steps we covered above are similar to this approach; hence there is no need to repeat them.
Ensure you delete the previous PostgreSQL environment variable that we added. After adding the new environment variable under the location Program Files > PostgreSQL > 14 > bin, open the Windows command prompt and test the configuration again using the psql command.
The command attempts to connect to a local PostgreSQL server but is unsuccessful because we have not installed any database server as we saw in the previous approach.

Enjoying our tutorials? Subscribe to DelftStack on YouTube to support us in creating more high-quality video guides. Subscribe
Do you want to access the remote databases installed on the PostgreSQL server from Windows 11 or 10? But don’t want the complete suite of this Database server. Then there is a way using which we can only get the PostgreSQL client but without PGAdmin and other tools on our local machine. In this tutorial, we learn how you can install PSQL Client on Windows 10 or 11:
1. Download the PostgreSQL Client Installer2. Choose Your Installation Folder3. Select Command Line Tools to install the PSQL client4. Run PSQL Client Shell on Windows 11 or 105. Connect your remote PostgreSQL server Database
1. Download the PostgreSQL Client Installer
We can use the Winget package manager to install the PostgreSQL client on Windows 10/11 but it will install the complete server setup. However, here in this tutorial we only want the PSQL client and other important command line tools of it. Therefore, first manually download the PostgreSQL installer package from the EnterpriseDB. Use the link and get the Windows x86-64 Installer.

2. Choose Your Installation Folder
Once the Installer setup is downloaded successfully, double-click to start it. The system will give a warning, ignore it and just click on the RUN button.
After that click on the NEXT from the installation wizard. Now, it will ask for the Installation folder, by default it will be at C:\Program Files\PostgreSQL\”version”.
If you want to change because your C drive doesn’t have enough space or due to any other reason then click on the folder icon and select the directory you want to set.
However, it is recommended to let the default folder be selected if you are not sure about it and simply click on the Next button.

By default, the installer will have all the PostgreSQL components selected such as Server, pgAdmin 4, Stack builder, and Command Line Tools. However, we don’t want the server and other components instead only the PSQL client.
So, uncheck other options and let the CL tools only be selected. This will also install other necessary CLI tools such as pg_dump, pg_restore, pg_bench, pg_basebackup, and more. Now, move forward using the Next button and finish the installation process.

4. Run PSQL Client Shell on Windows 11 or 10
Click on the Windows Start button and type psql in the search box. Soon you will see SQL Shell (psql) client app option. Select it to run.

5. Connect your remote PostgreSQL server Database
- Once you are on the PSQL client Shell you will see, it will ask you for the Server address. As we don’t have a Database server installed locally, therefore, enter the IP address or domain name of your remote PostgreSQL server.
- After that, enter the name of the Database you want to connect.
- By default, the port to access the PostgreSQL server is 5432, if you haven’t changed it then simply press the Enter key to go by the default one.
- Now, provide the username that is associated with the Database you want to access.
- If everything is correct, the PSQL client will establish a successful connection with the PostgreSQL server and will ask you for the password set for the User of the Database. Provide that and hit the Enter key.
- You will have the shell of the Database to execute SQL commands.

Related Links:
- How to Install Postgresql 14 on Ec2 Amazon Linux 2
- How to create a Mysql Database on Amazon LightSail
- 2 Ways to install pgAdmin 4 on Windows 11 or 10
less than 1 minute read
The installation process for the PostgreSQL client, psql, may vary depending on your operating system. Here are the general steps for some popular operating systems:
Linux (Ubuntu)
- Open the terminal and run the following command to update the package list:
- Install the PostgreSQL client by running the following command:
sudo apt-get install postgresql-client
macOS
- Install Homebrew by running the following command in Terminal:
/bin/bash -c "$(curl -fsSL https://raw.githubusercontent.com/Homebrew/install/HEAD/install.sh)"
- Once Homebrew is installed, run the following command to install PostgreSQL:
Alternatively, you could also use homebrew to install libpq that gives you psql, pg_dump and a whole bunch of other client utilities.
Unfortunately, since it provides some of the same utilities as are included in the full PostgreSQL package, brew installs it “keg-only” which means it isn’t in the PATH by default.
Windows
- Download the PostgreSQL installer for Windows from the official website.
- Run the downloaded installer and follow the prompts to install PostgreSQL.
After completing the installation process, you should be able to run psql in the terminal/command prompt to connect to your PostgreSQL database.
Install only the necessary tools for a lean, mean PostgreSQL client machine
Why install all of PostgreSQL when your database server is up in the cloud, managed as an IBM Cloud® Database for PostgreSQL?
Most instructions for installing the PostgreSQL tools assume you want the database installed too. It’s a reasonable assumption if you’re dealing with users who don’t have access to PostgreSQL in the cloud or on a remote server.
In this PostgreSQL Tip, we’ll look at how you can install just psql on Windows, Linux, and macOS, allowing you to quickly get up and running and connected to your IBM Cloud Databases (ICD) for PostgreSQL service. We’ll cover the following:
-
macOS with Homebrew
-
Ubuntu 16.04 and 18.04
-
Red Hat Enterprise Linux 7 (and others)
-
Fedora 27 and 28
-
Windows 10
Let’s dive in.
macOS with Homebrew
We recommend Homebrew (link resides outside ibm.com) as a package manager for macOS. With Homebrew in place, you’ll be able to install numerous applications, usually with the programs available in /usr/local/bin. Homebrew’s package for the PostgreSQL client tools is the libpq package. Brew makes it easy to install:
brew install libpq
There’s a small catch though—libpq won’t install itself in the /usr/local/bin directory. To make that happen, you need to run:
brew link --force libpq
This will symlink all the tools (not just libpq) into the /usr/local/bin directory. You’re now ready to run psql and start connecting.
Ubuntu 16.04 and 18.04
Linux systems (unlike macOS) have a package manager built in. For Ubuntu (and Debian-based distributions) thats’s the apt command. The PostgreSQL client is distributed in the appositely named postgresql-client, so all you need to do is run the following:
sudo apt-get install postgresql-client
This will install the PostgreSQL 10 client, which can easily connect to earlier versions of PostgreSQL.
Red Hat Enterprise Linux 7 (and others)
For Red Hat Enterprise Linux (RHEL), there’s a little more set up to do than with Ubuntu. For RHEL, the package manager is yum. First, you need to point yum at the PostgreSQL repository like this:
sudo yum install
https://download.postgresql.org/pub/repos/yum/10/redhat/rhel-7-x86_64/pgdg-redhat10-10-2.noarch.rpm
Yum goes to that URL and configures itself to use that package repository. With that done, you can add packages from it by name:
sudo yum install postgresql10
This installs just the client packages. If you are wondering where to find that repository URL, head to Linux Downloads (Red Hat Family) (link resides outside ibm.com). You’ll find a form which will let you select the PostgreSQL version, platform, and architecture, and it’ll give you the appropriate instructions for that Red Hat variant—that includes CentOS, Scientific Linux, and Oracle Enterprise Linux. It also includes Fedora.
Fedora 27 and 28
Fedora’s default repositories already have a PostgreSQL client available from them. So, for Fedora 27, 28, and later, install the PostgreSQL client from the terminal with:
sudo dnf install postgresql.x86_64
And that’s all you need to do!
Windows 10
On Windows 10, there’s a bit more work to be done. We currently recommend using the PostgreSQL installer from Enterprise DB (link resides outside ibm.com). It’s a full installation package for PostgreSQL on Windows but you can set it to only install the command line tools like psql. Click on that link and select PostgreSQL 9.6 or 10 and Windows 10 as the platform. Once the executable file is downloaded, run it and you’ll see the following options:
Select only the Command Line Tools because we don’t need the server installed. After it installs, you’ll need to set up your Windows environment variables so that you can use the psql client in the command prompt.
Go to the Control Panel > System and Security > System and select Advanced system settings.
From there, you’ll see a box called System Properties. Select Environment Variables. A window will appear with the two sets of environment variables. In the top set (marked User variables for…), select the PATH entry and then click the Edit button. An edit window will appear. Click New and add the path to the psql client. Your path will depend on where PostgreSQL installed, but typically that would be:
C:\Program Files\PostgreSQL\10\bin
After that, click OK a couple of times to go back to the desktop. Start a new Command Prompt, and you should be able to run psql. With no server set and no server running locally, you’ll see the following, which means that it’s working:
Summing up
Now that we’ve covered getting set up with the psql client for PostgreSQL, you can start connecting to IBM Cloud Databases for PostgreSQL without having to install PostgreSQL itself on your local machine. In future PostgreSQL Tips, we’ll cover some of the basic features and functions of the database using your new psql client.