
Introduction
VirtIO Drivers are paravirtualized drivers for kvm/Linux (see http://www.linux-kvm.org/page/Virtio). In short, they enable direct (paravirtualized) access to devices and peripherals for virtual machines using them, instead of slower, emulated, ones.
A quite extended explanation about VirtIO drivers can be found here http://www.ibm.com/developerworks/library/l-virtio.
At the moment these kind of devices are supported:
- block (disks drives), see Paravirtualized Block Drivers for Windows
- network (ethernet cards), see Paravirtualized Network Drivers for Windows
- balloon (dynamic memory management), see Dynamic Memory Management
You can maximize performances by using VirtIO drivers. The availability and status of the VirtIO drivers depends on the guest OS and platform.
Windows OS Support
Windows does not have native support for VirtIO devices included.
But, there is excellent external support through opensource drivers, which are available compiled and signed for Windows:
https://fedorapeople.org/groups/virt/virtio-win/direct-downloads/archive-virtio/?C=M;O=D
Note that this repository provides not only the most recent, but also many older versions.
Those older versions can still be useful when a Windows VM shows instability or incompatibility with a newer driver version.
The binary drivers are digitally signed by Red Hat, and will work on 32-bit and 64-bit versions of Windows
Installation
Using the ISO
You can download the latest stable or you can download the most recent build of the ISO.
Normally the drivers are pretty stable, so one should try out the most recent release first.
You can access the ISO in a VM by mounting the ISO with a virtual CD-ROM/DVD drive on that VM.
Wizard Installation
You can use an easy wizard to install all, or a selection, of VirtIO drivers.
- Open the Windows Explorer and navigate to the CD-ROM drive.
- Simply execute (double-click on) virtio-win-gt-x64
- Follow its instructions.
- (Optional) use the virtio-win-guest-tools wizard to install the QEMU Guest Agent and the SPICE agent for an improved remote-viewer experience.
- Reboot VM
Manual Installation
- Open the Windows Explorer and navigate to the CD-ROM drive.
- There you can see that the ISO consists of several directories, each having sub-directories for supported OS version (for example, 2k19, 2k12R2, w7, w8.1, w10, …).
- Balloon
- guest-agent
- NetKVM
- qxl
- vioscsi
- …
- Navigate to the desired driver directories and respective Windows Version
- Right-click on the file with type «Setup Information»
- A context menu opens, select «Install» here.
- Repeat that process for all desired drivers
- Reboot VM.
Downloading the Wizard in the VM
You can also just download the most recent virtio-win-gt-x64.msi or virtio-win-gt-x86.msi from inside the VM, if you have already network access.
Then just execute it and follow the installation process.
Troubleshooting
Try an older version of the drivers first, if that does not help ask in one of our support channels:
https://pve.proxmox.com/wiki/Get_support
Further Reading
https://docs.fedoraproject.org/en-US/quick-docs/creating-windows-virtual-machines-using-virtio-drivers/index.html
http://www.linux-kvm.org/page/WindowsGuestDrivers
The source code of those drivers can be found here: https://github.com/virtio-win/kvm-guest-drivers-windows
http://www.linux-kvm.org/page/WindowsGuestDrivers/Download_Drivers
See also
- Paravirtualized Block Drivers for Windows
- Paravirtualized Network Drivers for Windows
- Dynamic Memory Management
Чтобы не забыть про нюансы, которые могут возникать при установке Windows Server 2019 на Proxmox Virtual Environment (PVE), я решил описать, как это можно сделать шаг за шагом, от создания виртуальной машины до установки драйверов и настройки сети интернет.
Для начала авторизуемся в панели управления по адресу https://IP:8006. Создадим новую виртуальную машину, кликнув правой кнопкой на узле и нажмем Создать ВМ. Данный пункт позволяет создать VDS/VPS на основе виртуализации KVM, одной из самых распространенных и при этом бесплатных систем виртуализации.
Создадим для установки виртуальную машину (VDS/VPS) со следующими характеристиками:
- 2 ядра процессора;
- 2 ГБ оперативной памяти (можно установить это значение немного выше, поскольку приведенная ниже конфигурация может работать медленно);
- 50 ГБ места на диске.
Пункт Создать контейнер, создал бы LXC контейнер Proxmox VE, но в нем нельзя установить систему Windows, так как это подсистема контейнеризации, позволяющая запускать несколько изолированных экземпляров операционной только системы Linux на одном узле.

На вкладке Общее (General) укажем наименование машина и ID
- Узел (Node): 3vps
- VM ID: 102
- Имя (Name): win2019temp, данная машина в будущем будет служить шаблоном для копирования других Windows серверов;
- Пул ресурсов (Resource Pool): оставляем пустым.

Скачаем ISO образ системы Windows Server 2019 с официального сайта Microsoft и загрузим в Proxmox VE, выберем в дереве нужное хранилище, раздел ISO-образы и кликнем по кнопке Отправить или загрузим через SFTP в директорию:
/var/lib/vz/template/iso/

Теперь когда образ системы Windows загружен перейдем на вкладку ОС (OS) , где укажем использовать файл с образом CD/DVD:
- Хранилище (Storage): local
- ISO Image: выбираю ru_windows_server_2019.iso
- Тип (Type): Microsoft Windows
- Версия (Version): 10/2016/2019

На вкладке система (System) укажем следующие параметры:
- Видеокарта (Graphic card): По умолчанию;
- Контроллер SCSI (SCSI Controller): VirtIO SCSI;
- Qemu Agent: установим флаг;

На вкладке Диски (Hard Disk) укажем VirtIO Block в качестве устройства жесткого диска виртуальной машины для повышения производительности, для чего потребуются драйверы VirtIO, которые мы установим позже.
- Шина/Устройство (Bus/Device): VirtIO Block/0
- Хранилище (Storage): data2
- Размер диска (Disk size (GiB): 50
- Кэш (Cache): По умолчанию (Нет)
Здесь можно выбрать один из двух типов виртуальный дисков raw (лучшая производительностью) или qcow2 (расширенный функционал и поддержка снапшотов).

На вкладке Процессор (CPU), укажем характеристики виртуального процессора, двух ядер для Windows мало, но достаточно для запуска:
- Сокеты (Sockets): 1;
- Ядра (Cores): 2;
- Тип (Type): host, означает,что в качестве процессора в виртуальной машине будет указываться название и тип основного процессора на ноде;

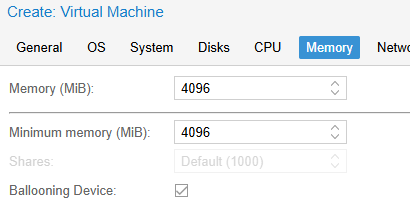
На вкладке Память (Memory) укажем: 4096 (MiB)

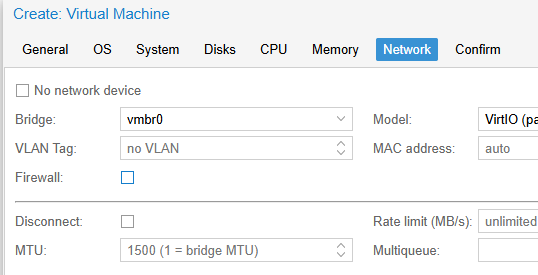
Перейдем на вкладку Сеть (Network). Выберите тип виртуальной карты VirtIO (paravirtualized) вместо Intel E1000.
- Нет сетевого устройства (No network device): галочку не ставим;
- Сетевой мост (Bridge): vmbr0;
- Модель (Model): VirtIO (paravirtualized);

На вкладке Подтверждение (Confirm) проверяем введенные параметры и кликнем по кнопке Готово (Finish).

После того, как вы создали новую виртуальную машину Proxmox VE для Windows, на вкладке Оборудование нужно добавить еще один CD/DVD привод и подключить в него ISO файл с VirtIO драйверами.
Скачаем virtio-win-0.1.240.iso, это набор паравиртуализированных драйверов для KVM/Linux, который обеспечит более высокую производительность виртуальных устройств, чем встроенные эмулированные драйвера, подробнее читаем тут Windows VirtIO Drivers.

Загрузим ISO образ virtio-win-0.1.240.iso в хранилище Proxmox VE


Также можно в ручную загрузить ISO образ в директорию Proxmox VE по SFTP.
/var/lib/vz/template/iso/
Добавим еще один виртуальный дисковод с загруженным ISO образом:

В результате у виртуальной машины (VPS/VDS) должно отразиться два дисковода, первый с ISO образом системы Windows, второй с ISO образом драйверов VirtIO.

На этом создание нового виртуального сервера закончено, можно переходить к установке операционной системы Windows Server 2019.
Установка гостевой Windows Server 2019 на VDS (VPS) в Proxmox VE
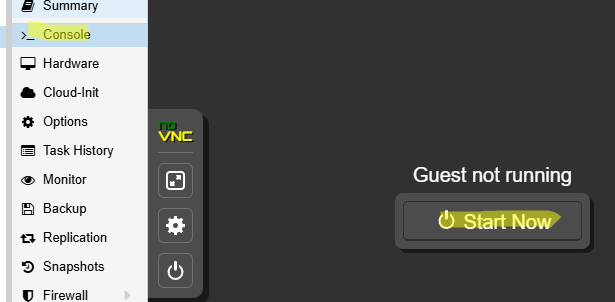
Перейдем на вкладку Консоль и запустим созданную виртуальную машину с Windows Server 2019.


Выберем язык гостевой операционной системы и раскладку клавиатуры, двигаемся дальше по установщику

Выберем операционную систему Windows Server 2019 Standard (Возможности рабочего стола Desktop Experience), если не выбрать эту опцию, то система будет работать только в режиме командной строки.

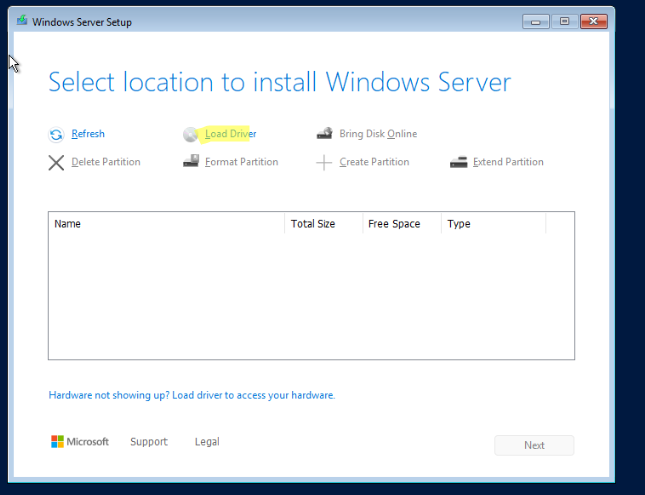
На вкладке выбора раздела установки гостевой ОС нет жесткого диска, хотя при создании виртуальной машины мы создали виртуальный жесткий диск. Дело в том, что нам необходимо установить драйвера.
Мы можем загрузить драйвер из нашего VirtIO ISO, используя кнопку Загрузить (Load driver).

Выберем правильный драйвер с помощью кнопки Обзор (Browse). Драйвер хранилища находится по адресу <CD-Drive>:/viostor/2k16/amd64 – нам нужно выбрать именно эту папку.


Если вы сделали все правильно, то гостевая система предложит выбрать найденный драйвер viostor.inf, выберем драйвер и кликнем по кнопке Далее.

После установки драйвера появится неразмеченное пространство на диске, а значит диск найден системой.

Кликнем по кнопке Далее и мастер установки начнет процесс копирования файлов и дальнейшей установки гостевой системы Windows Server 2019.

Далее выполняем указания мастера установки Windows Server 2019, после чего попадем в настройки параметров для указания пароля администратора системы.

На этом Windows Server 2019 установлена на виртуальную машину Proxmox VE, теперь попробуем авторизоваться в системе.

Выберем комбинацию клавиш Ctrl + Alt + Del и введем установленный пароль.

Если все получилось, то мы попадаем на рабочий стол установленной системы Windows.

Настройка доступа по RDP к Windows Server 2019 в Proxmox VE
Для дальнейшей работы в системе Windows Server 2019, нам нужен доступ по RDP, сразу включим его в Диспетчере серверов, откроем вкладку Локальный сервер, выберем пункт Удаленный рабочий стол, изменим значение параметра на Включено.


Для этого установим флаг Разрешить удаленные подключения в этому компьютеру.

Теперь возможен доступ к виртуальному серверу по RDP протоколу через удаленный рабочий стол, указав IP адрес сервера логин и пароль.

Установка драйверов Windows Server 2019 в Proxmox VE
Для удаленного подключения к серверу нужно настроить сеть и подключиться к интернету, для этого нужно установить драйвера на сетевую карту.
Драйвера мы будем устанавливать с загруженного нами virtio-win-0.1.240.iso, расположение драйверов на Virtio CD:
- Жесткий диск: vioscsi \ 2k19 \ amd64
- Сеть: NetKVM \ 2k19 \ amd64
- Объем памяти: Balloon \ 2k19 \ amd64
Диспетчер устройств (Device Manager) можно открыть из Панели управления. А также с помощью командной строки, или команды Выполнить (Win+R). В обоих случаях ввести: devmgmt.msc. Или же, просто ввести данную команду в строку поиска меню Пуск и нажать результат поиска. Правый клик по значку “компьютер”, выбираем “управление “, и в открывшемся окне, слева, найдешь В свойствах.

Ethernet-контроллер наша сетевая карта драйвера к которой нужно установить.

Обновим драйвер, кликнув по Ethernet-контроллер правой клавишей мыши.

Выполним поиск драйверов на этом компьютере вручную

Укажем на диск Virtio CD в дисководе и система найдет нужный драйвер для устройства.

Аналогично установим драйвера на остальные устройства.

Проверим, что все устройства настроены и работают правильно.

После установки драйверов не забудьте установите Агент VirtIO (\guest-agent\quemu-ga-x86_64.msi). Это аналог VMware Tools и Hyper-V Integration Services, который позволяет отправлять информацию о гостевой ОС в гипервизор Proxmox.

Есть еще вариант установки драйверов с помощью установщика драйверов Windows, но это другая история.


Настройки сети Windows Server 2019 в Proxmox VE
Перейдем к настройкам сети, укажем IP адрес и шлюз, чтобы Windows Server 2019 получил сеть из Proxmox VE и имел доступ к интернет. Далее мы сможем подключиться по RDP и продолжить настройку системы под себя.
Откроем Параметры сети и Интернет, кликнув правой кнопкой по значку компьютера в правом углу рабочего стола.

Кликнем по кнопке Настройка параметров адаптера для просмотра сетевых адаптеров и изменения параметров подключения.

Если все сделано согласно данной инструкции, то в списке должен появиться один сетевой адаптер, кликнем по нему правой клавишей мыши и перейдем к настройкам.

Уберем флажок с IP версии 6 (TCP/IPv6), так как в случае установки 1С или PostgreSQL, могут возникнуть проблемы в сетевых настройках.

Перейдем к настройкам IP версии 4 (TCP/IPv4), укажем IP адрес, маску подсети и основной шлюз, а также предпочитаемый DNS-сервер, например 8.8.8.8.


Сохраним сетевые параметры и проверим доступ в интернет.

Как видите доступ в интернет есть, а значит мы сделали все верно. Вы можете продолжить настройку Windows, например добавить в домен Active Directory или установить 1С сервер. Если у вас остались вопросы задавайте их в комментариях и я постараюсь на них ответить, также подписывайтесь на наш телеграмм канал для администраторов.
Консультирую по разным конфигурациям 1С, дорабатываю, разрабатываю расширения, отчеты и обработки, администрирую базы 1С на linux.
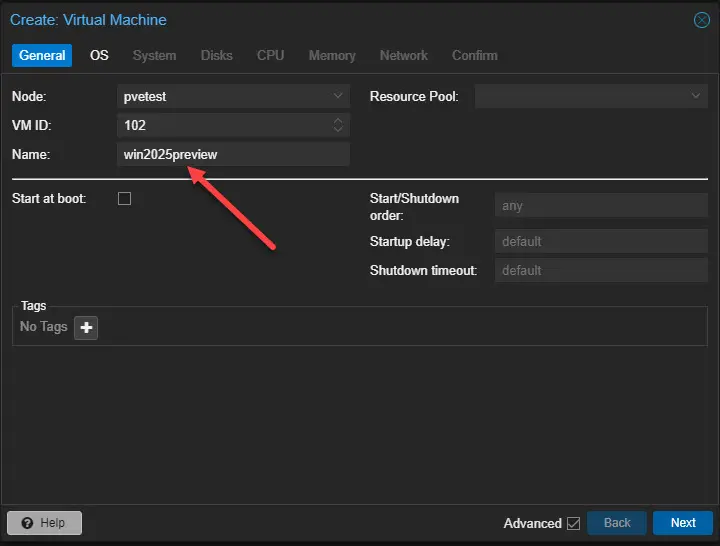
With the Windows Server 2025 Preview release available, I know many are trying out Windows Server 2025 across their environments, including home labs running Proxmox VE Server. Let’s take a look at the process to install Windows Server 2025 on Proxmox and see what this process looks like.
Table of contents
- Lab setup
- Upload your ISO images to Proxmox storage location
- Create the Windows Server 2025 virtual machine in Proxmox
- Mount the ISO images in Proxmox
- Install Windows Server 2025 on Proxmox
- Install the VirtIO storage driver during installation
- Installing the VirtIO guest tools in Windows Server 2025
- Installing the QEMU agent
- Wrapping up
Lab setup
Before installing, I wanted to share with you guys the versions of everything that I am using for the Windows Server 2025 install. I have the following configured:
- Proxmox VE Server 8.2.7 patched
- Windows Server 2025 Preview release ISO downloaded
- VirtIO drivers (virtio-win-0.1.262.iso) image
Upload your ISO images to Proxmox storage location
I am using a Proxmox ISO image library shared on an NFS location. You can read how to easily mount Synology Drive in Proxmox with NFS.
You will need (2) ISO images:
- The Microsoft Windows Server 2025 Preview ISO, which you can download from the Microsoft Evaluations Center. Sign up and click download for the ISO.
- The VirtIO drivers for Windows
Once you have uploaded your ISO images to Proxmox, you can begin with the installation of Windows Server 2025.
Create the Windows Server 2025 virtual machine in Proxmox
After we have uploaded the ISO images we need to a storage location in Proxmox that we can retrieve from, we can create the actual virtual machine configuration that will be used for installing Windows Server 2025.
Let’s look at the wizard to do that:
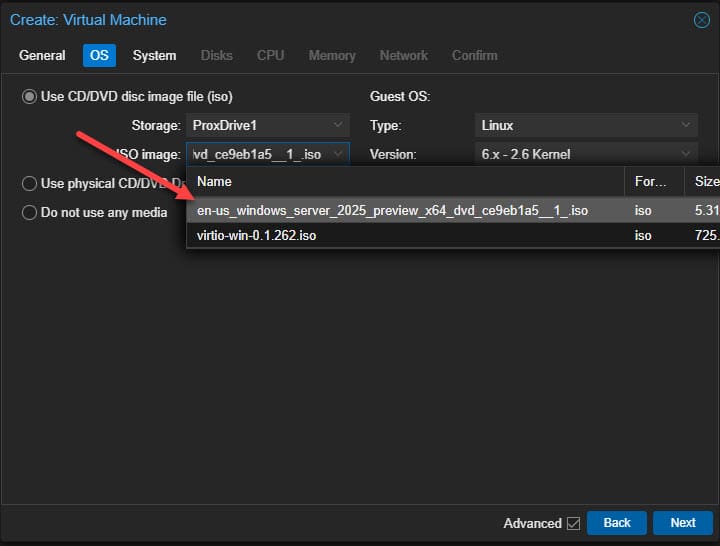
Select from the ISO images you have available. On the select ISO images dropdown, you will see the VirtIO drivers ISO as well but just select the Windows Server 2025 ISO.
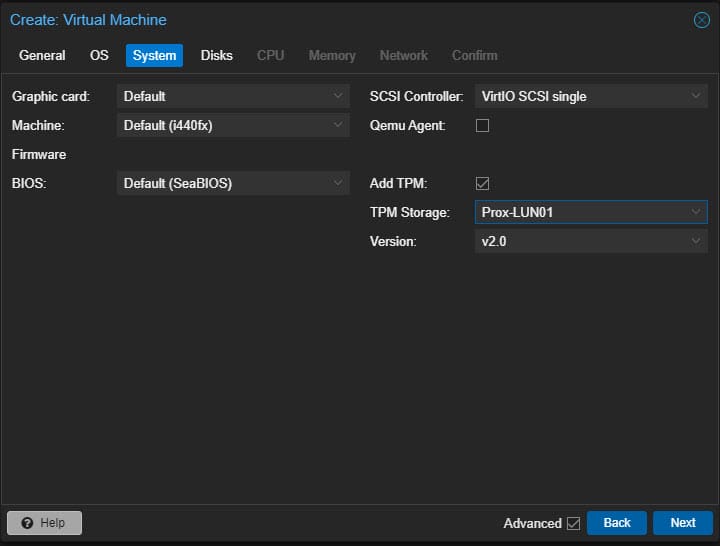
We can leave the defaults on the system tab. The important bit here is adding the TPM storage so we can encrypt the disk with Windows Server 2025.
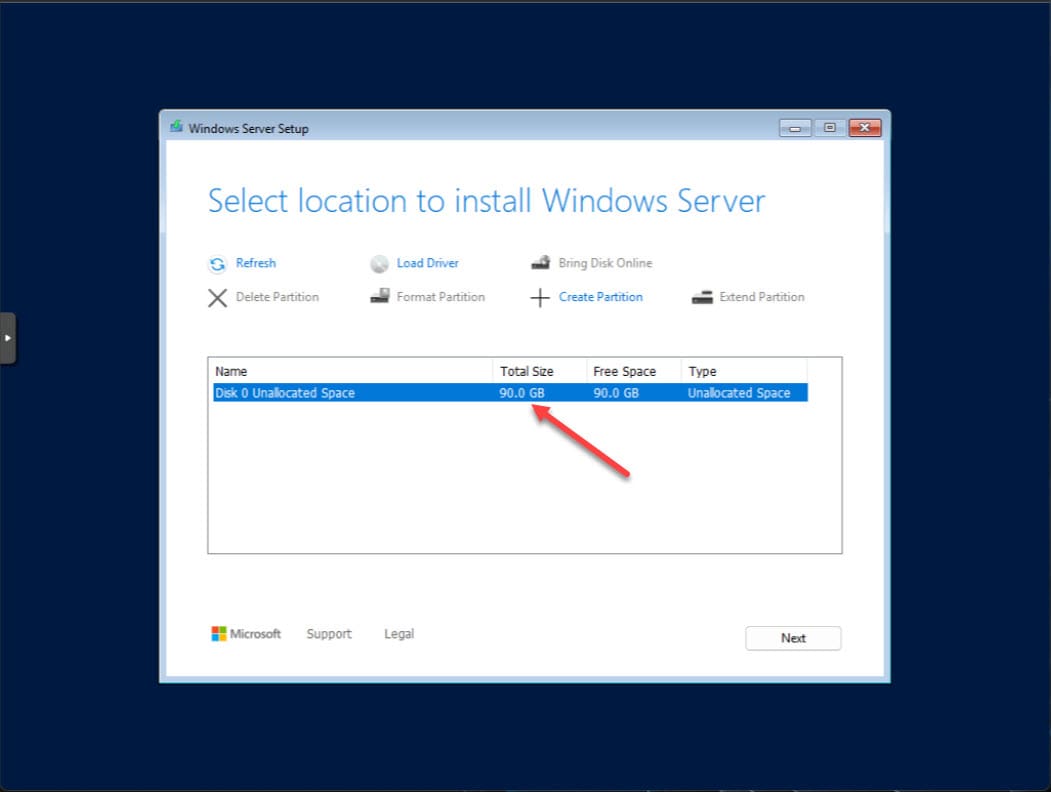
On the disks tab, you can configure the disk size, which probably needs to be around 90 GB at least.

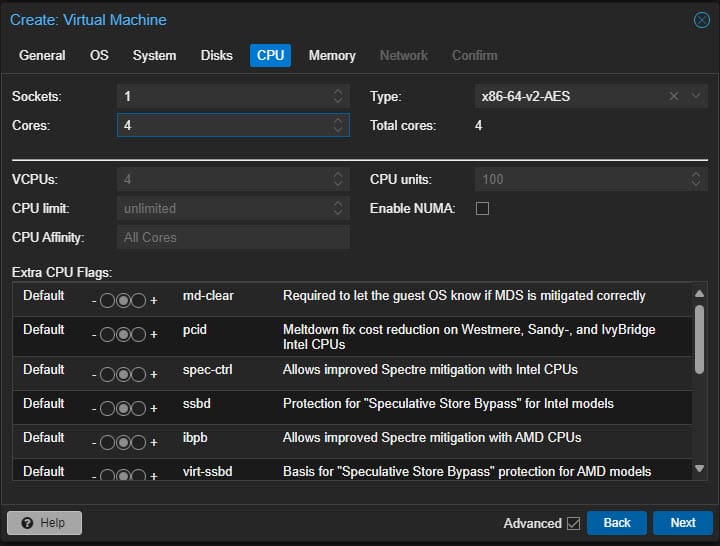
Next, on the CPU tab, configure the CPU sockets and cores configuration.
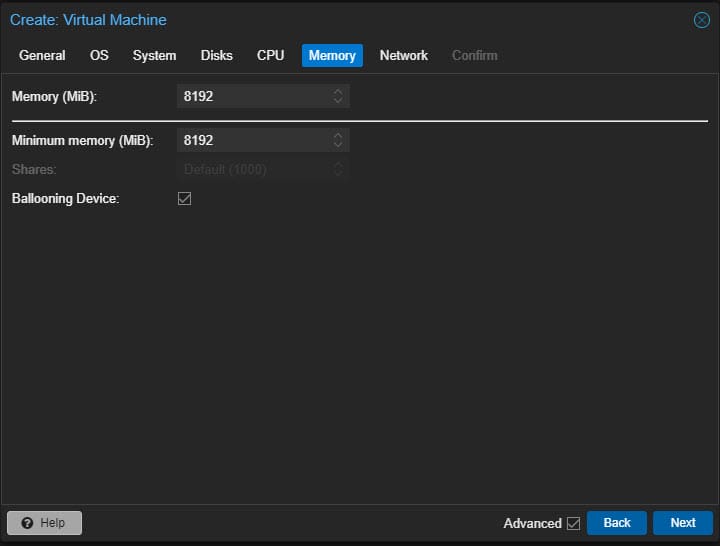
On the memory tab, configure the memory settings for the new Windows Server 2025 virtual machine in Proxmox.
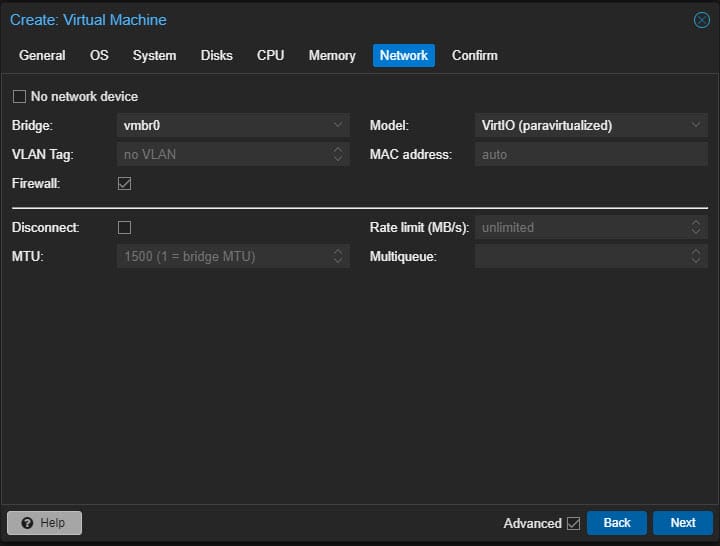
Connect the VM to the specified network on the network tab.
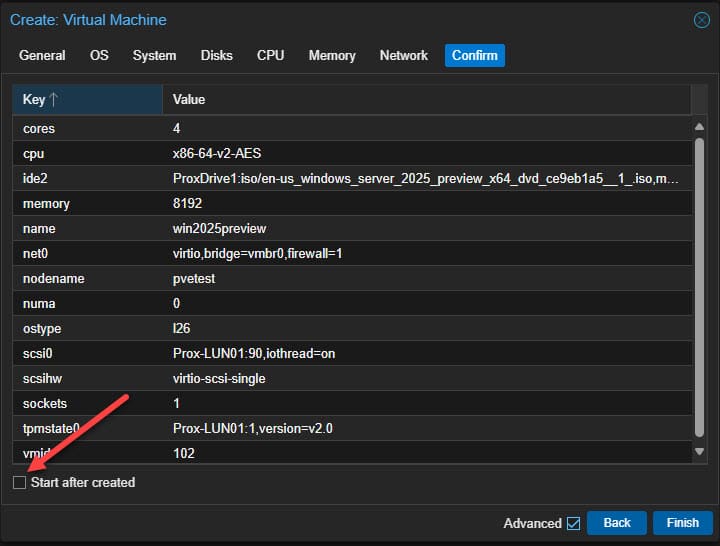
Confirm and finish the creation of the new Windows Server 2025 VM running in Proxmox.
Mount the ISO images in Proxmox
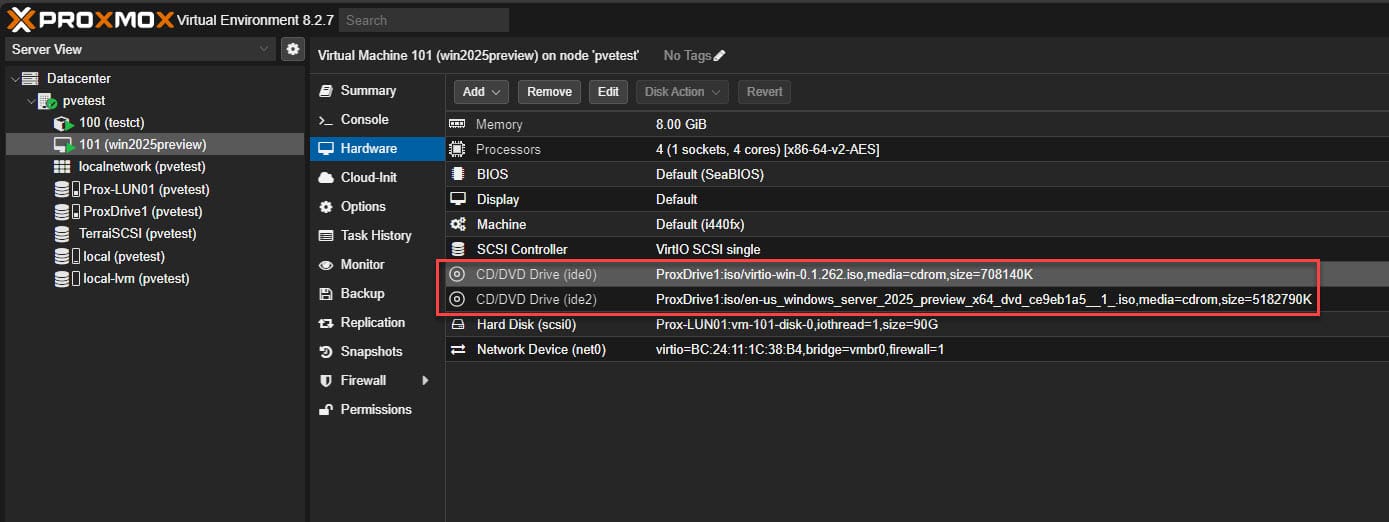
You will want to mount the ISO images in Proxmox to (2) different CD-ROM drives. We will need both the Windows Server 2025 ISO mounted and also the VirtIO disc ISO mounted in the Proxmox virtual machine.
You can mount the ISOs by navigating in the Proxmox web UI select virtual machine > hardware > add.
Now we can power on the virtual machine, click the VM click console, launch the console, and begin the installation of Windows Server 2025. First, we will be prompted to choose the keyboard settings.

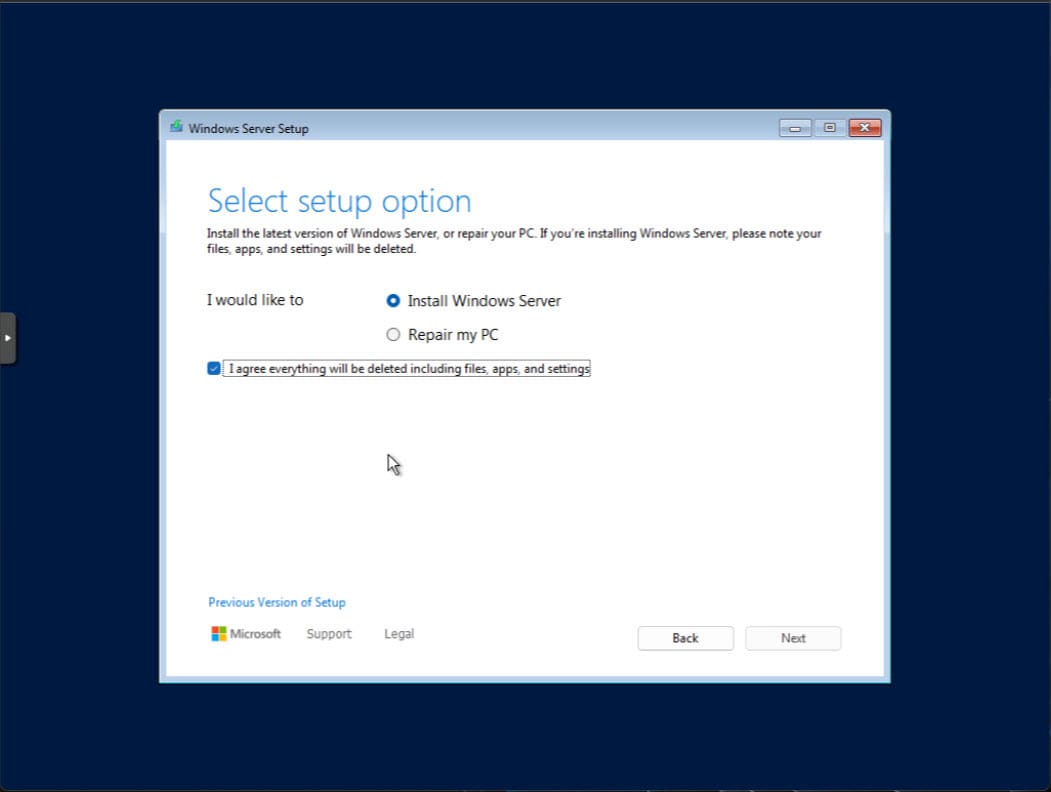
Next, we will select setup option for installing Windows Server. Here we will have the choice to:
- Install Windows Server
- Repair my PC
Since we are doing a fresh installation, we will need to check the box that I agree everything will be deleted including files, apps, and settings. Then, click Next.
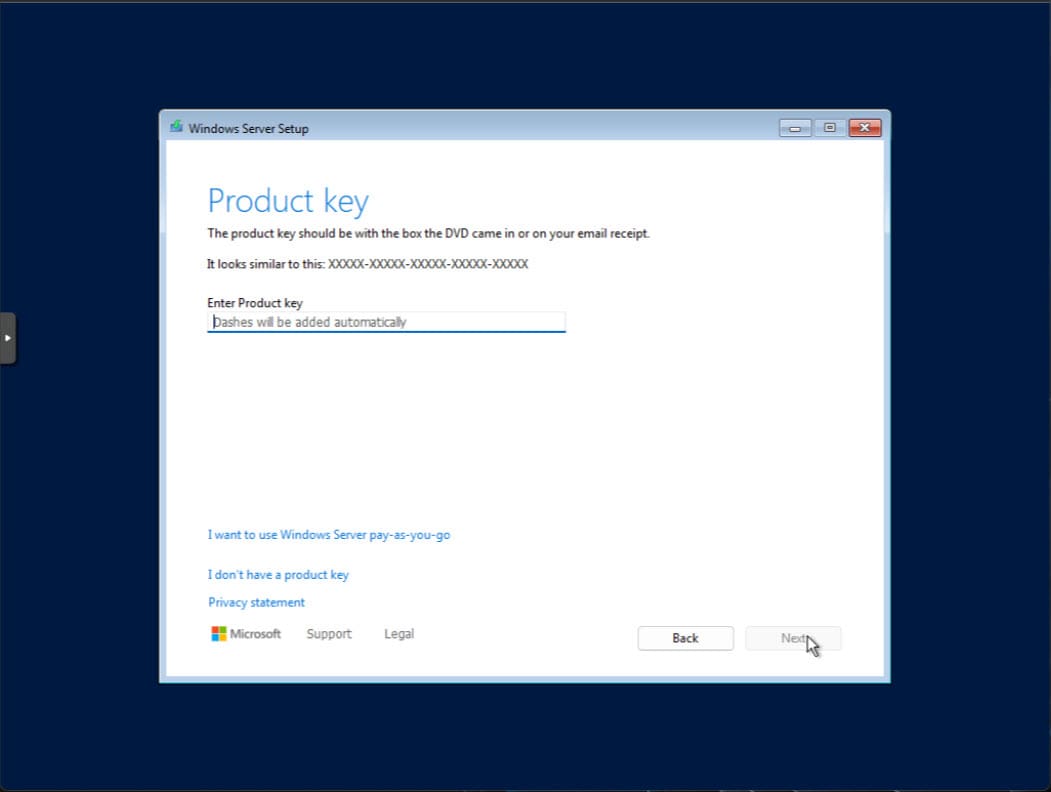
Enter a product key if you have one. However, if you are using the Evaluation copy or you just want to trial out the installation, you can skip this step and move on. Just select I don’t have a product key.
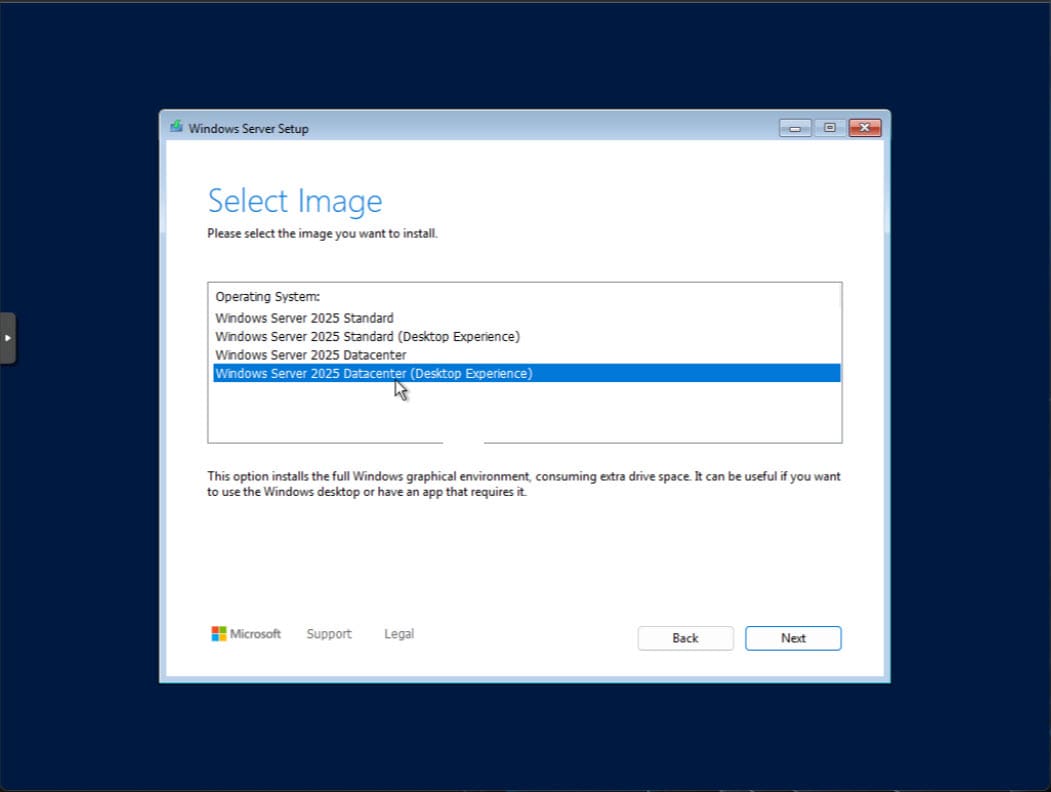
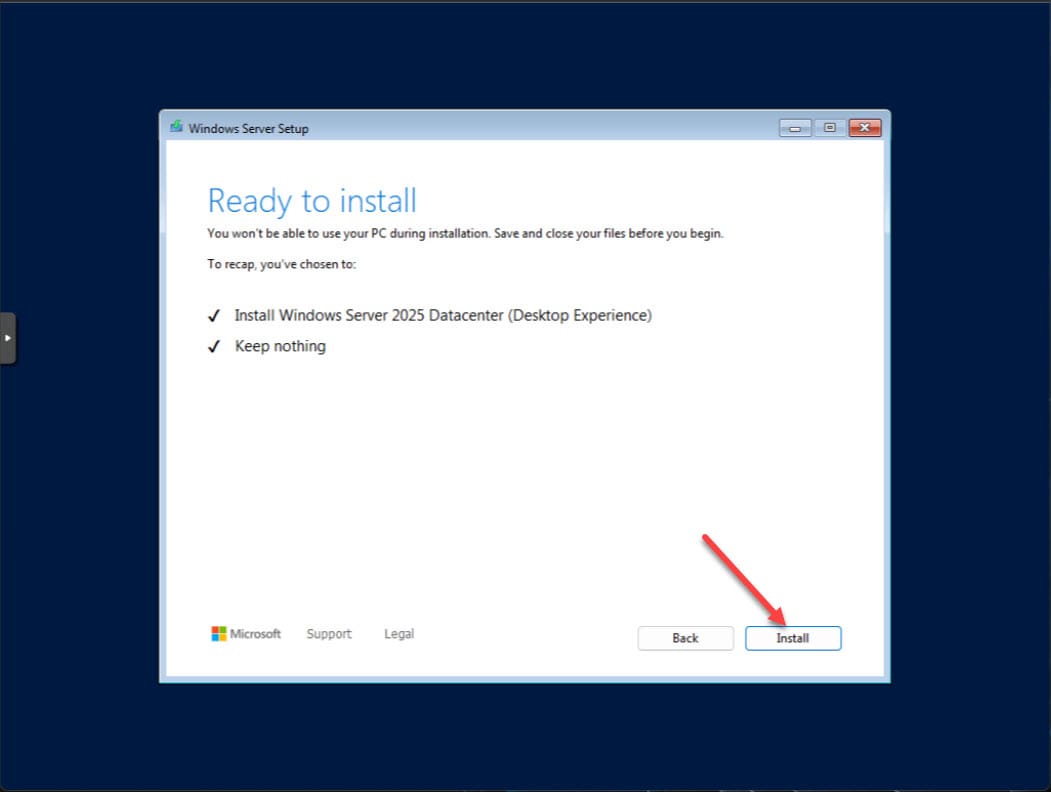
Select the image you want to install. Here we are selecting Windows Server 2025 Datacenter (Desktop Experience) which will install the GUI.
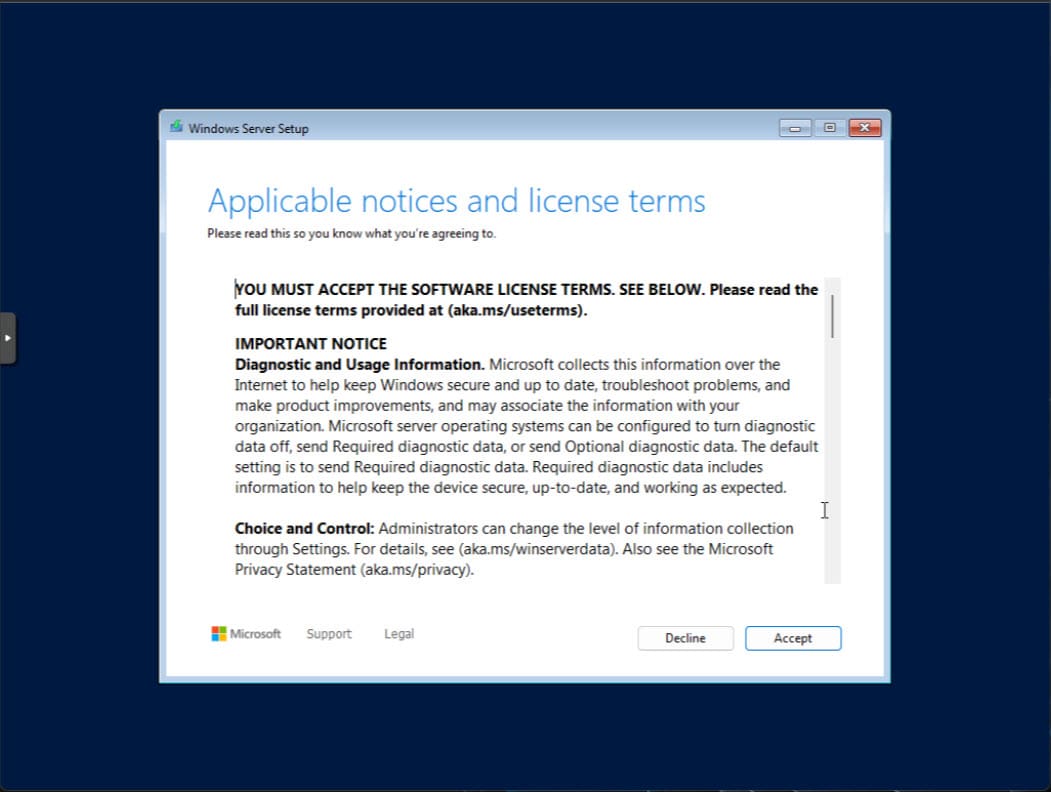
Accept the EULA agreement.
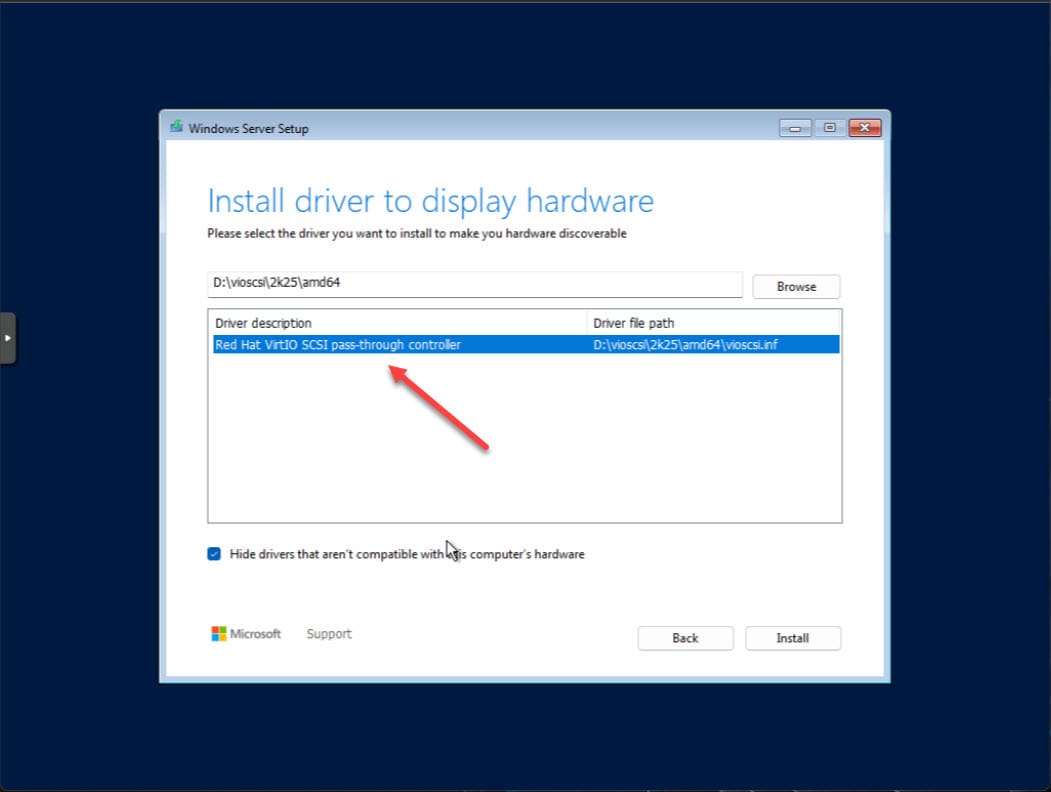
Install the VirtIO storage driver during installation
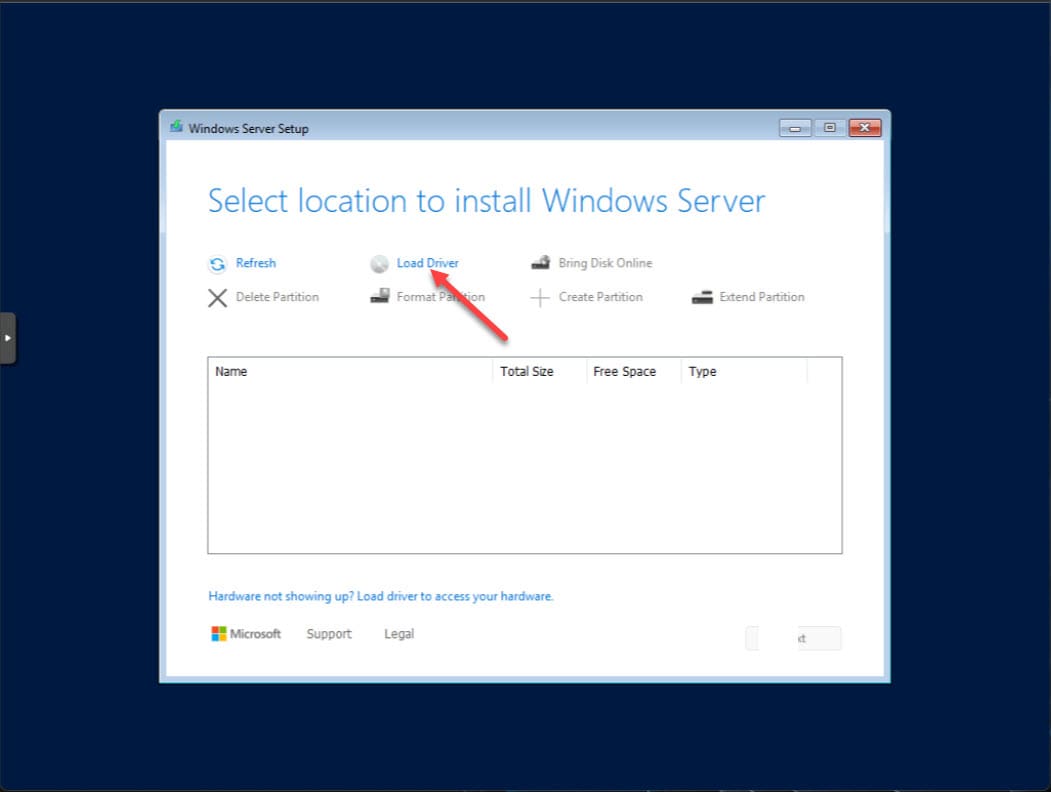
We will need to select the VirtIO storage driver during the install of Windows Server 2025. Click the Load Driver button.
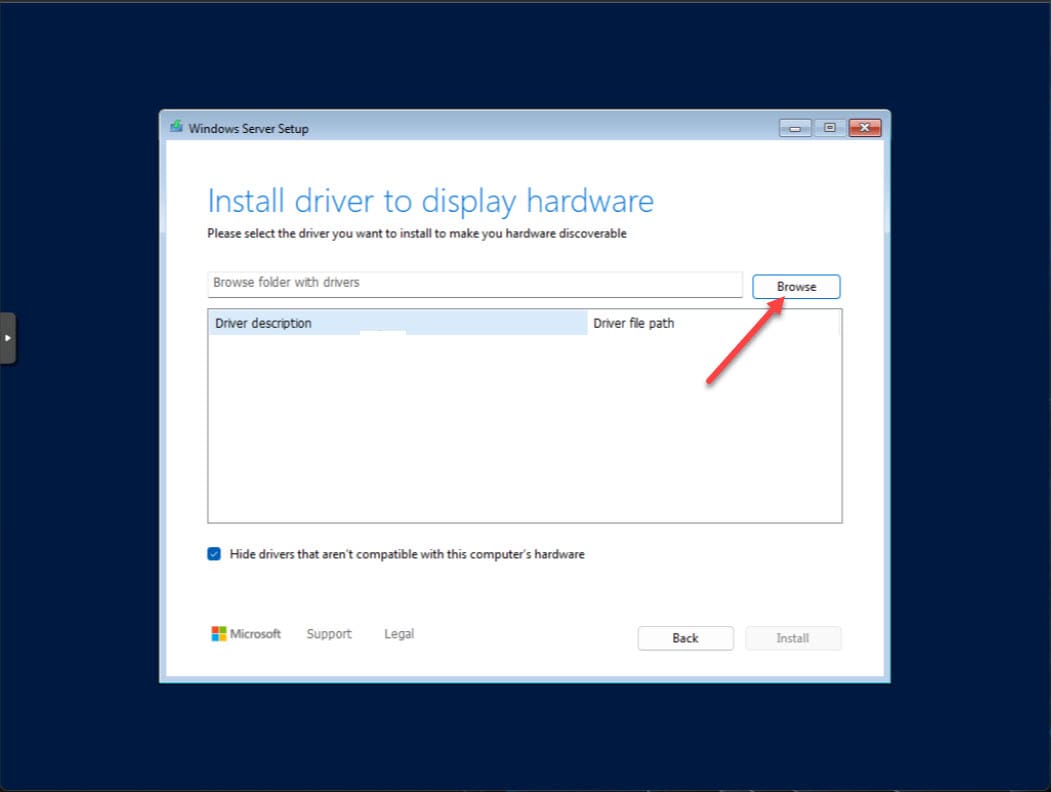
Click Browse to find the VirtIO driver ISO.
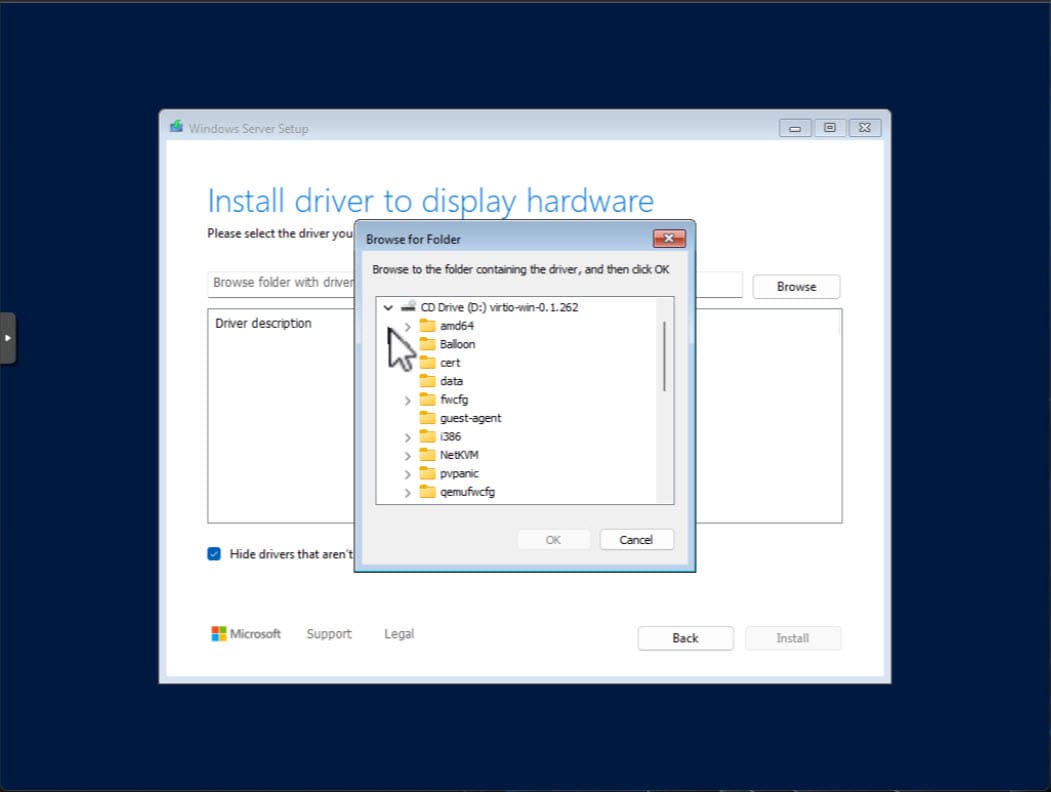
Browse to the mounted VirtIO ISO.
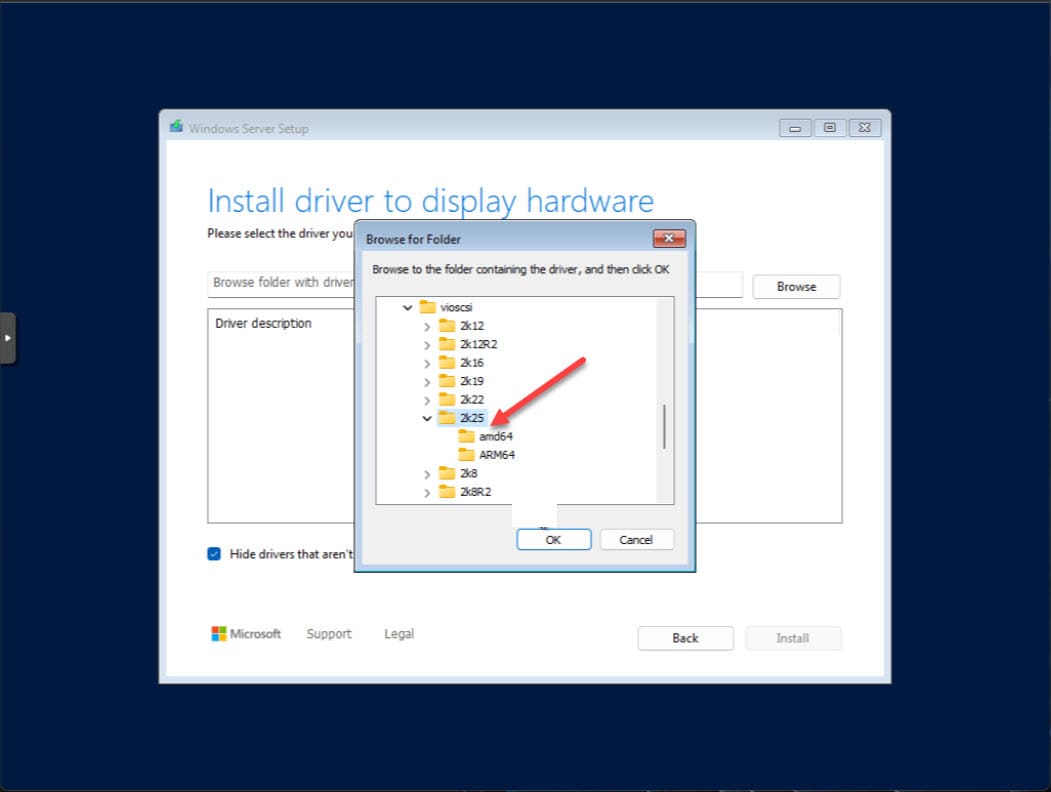
Scroll down to 2k25 folder and select the CPU architecture driver to load for your Windows VM.
Now we will see the virtual hard disk listed.
Select the disk.
Now, we are ready to install. Click the Install button to start the installation process.
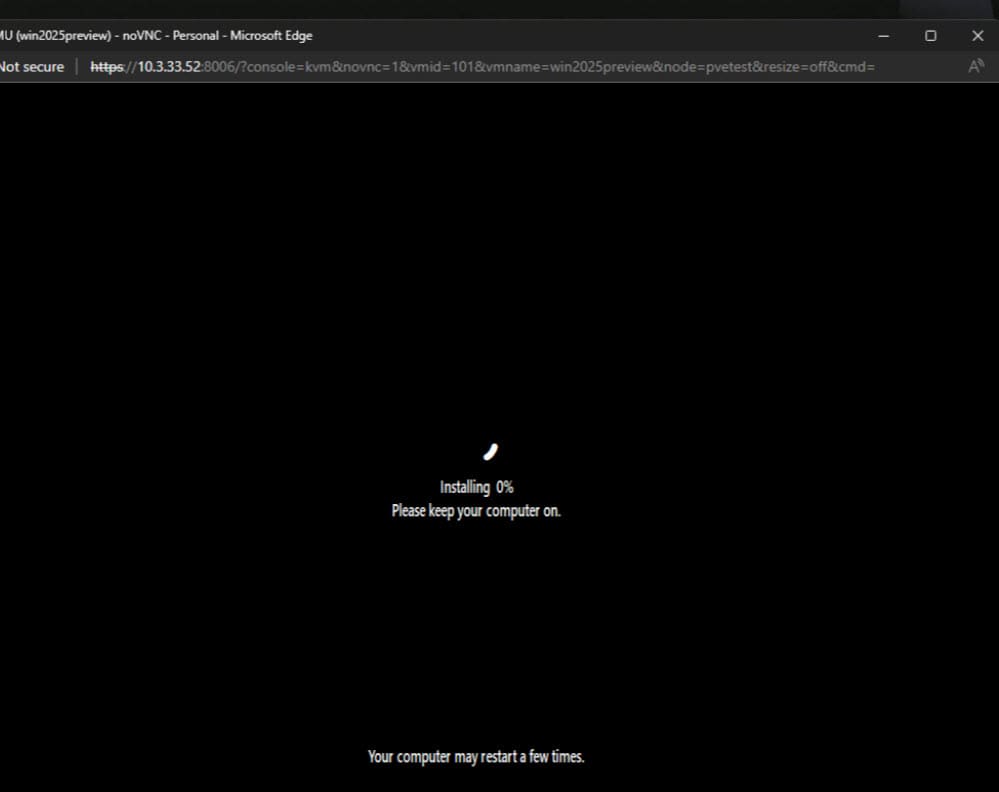
The installation will begin. That is the end of user input during this phase of the install. Sit back and wait for Windows Server 2025 to install.
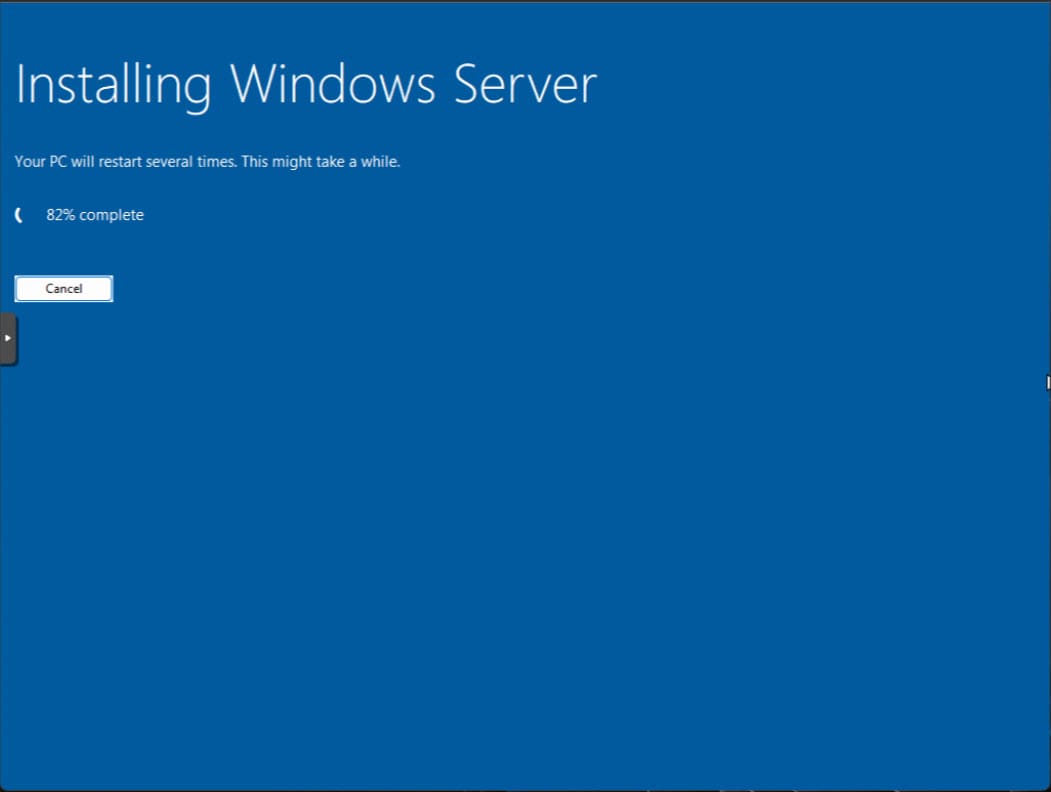
You will see at least 1 reboot.
The next phase of the installation begins.
Once the installation completes, you will be prompted to create the administrator account and will be automatically logged in.
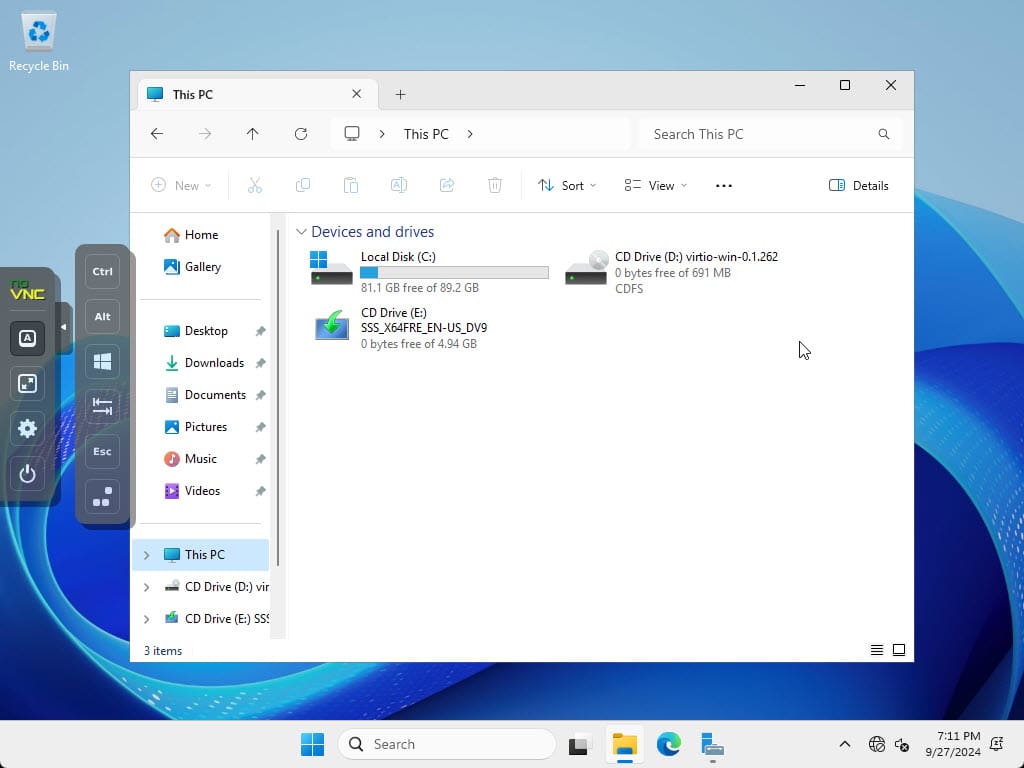
Once Windows Server 2025 is installed and you create your admin account and login, we need to install the VirtIO guest tools in Windows Server 2025. This will take care of our network connection and make sure all the Windows Server drivers are installed and ready to go.
Browse to the VirtIO ISO that is mounted in Windows Explorer. We don’t have to do anything extra here since we mounted the ISOs when we created the virtual machine and left them mounted through the install.
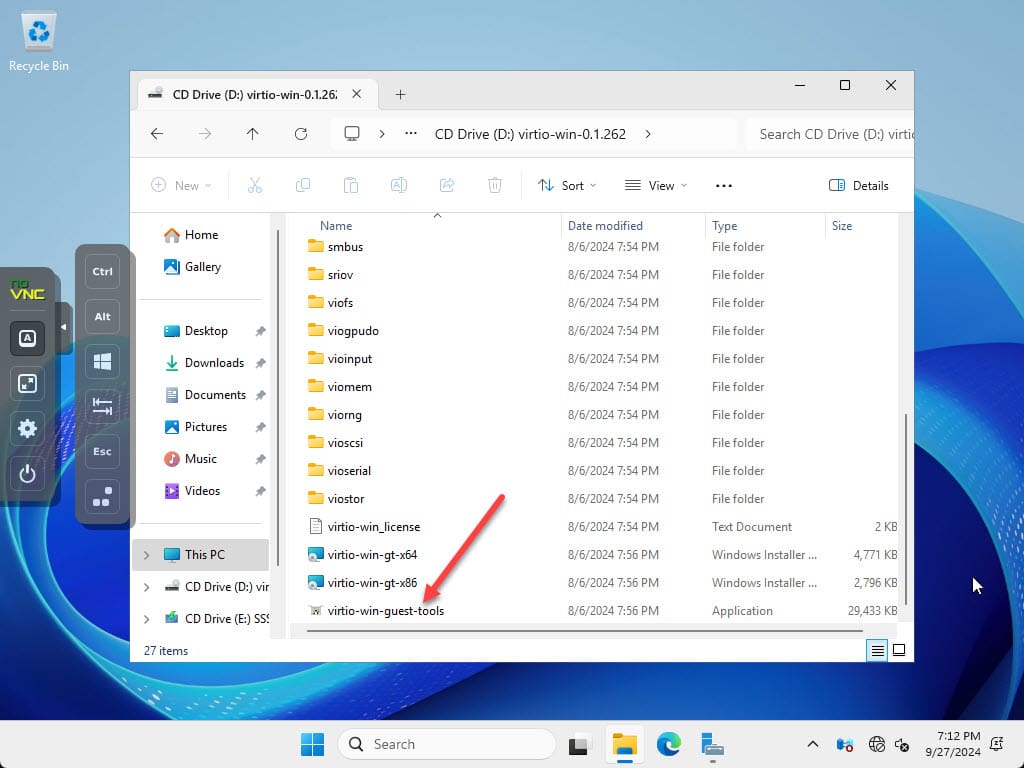
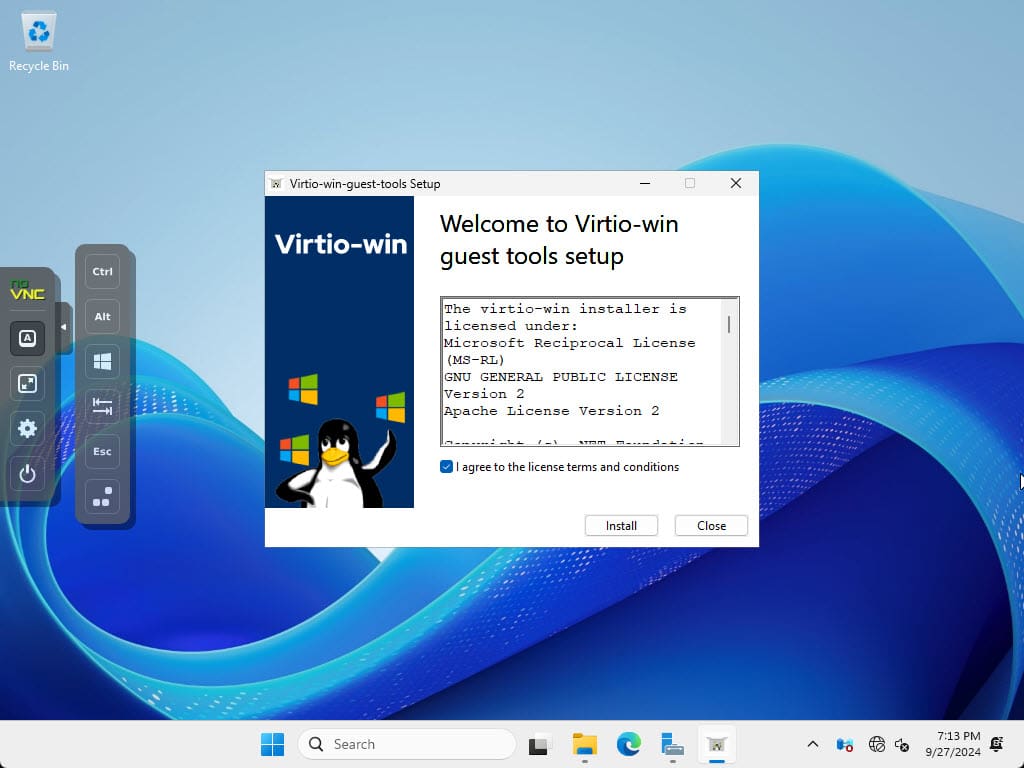
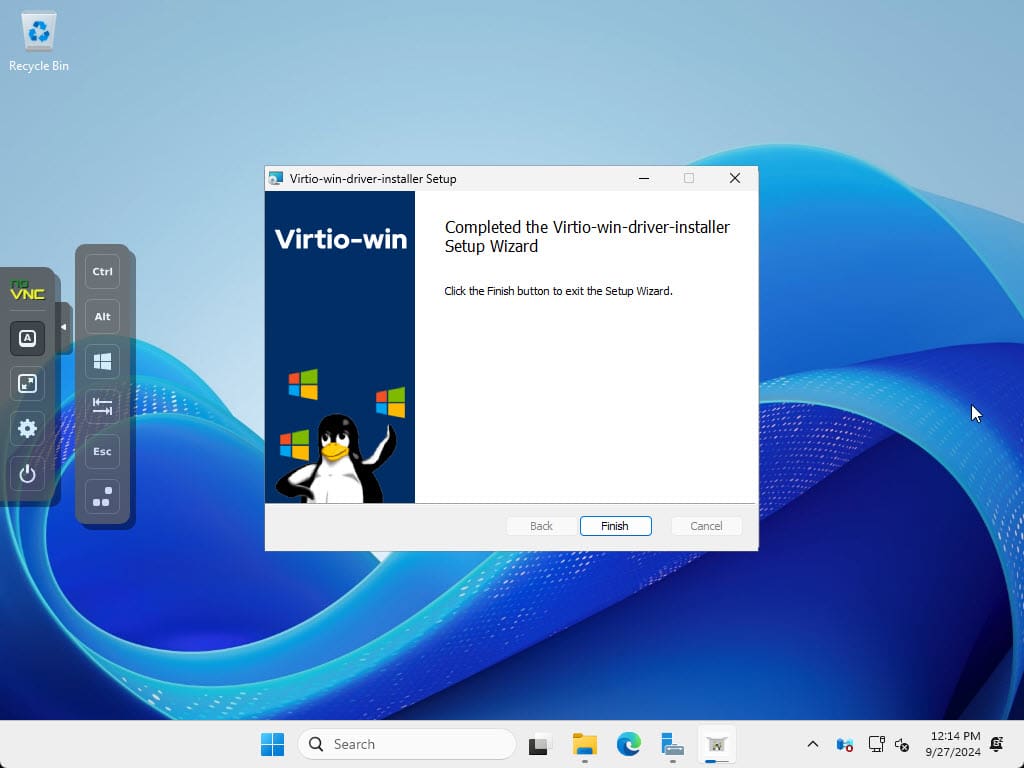
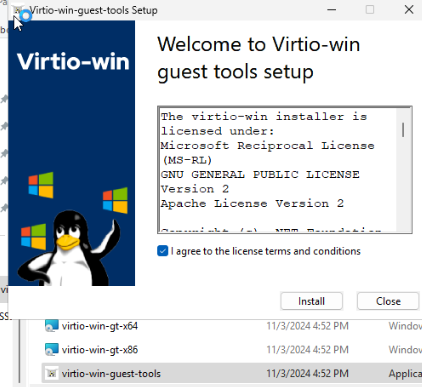
Launch the virtio-win-guest-tools package and follow the installation instructions of the wizard of the VirtIO driver disc.
This will begin the Virtio-win guest tools setup. Accept the EULA and click Install.
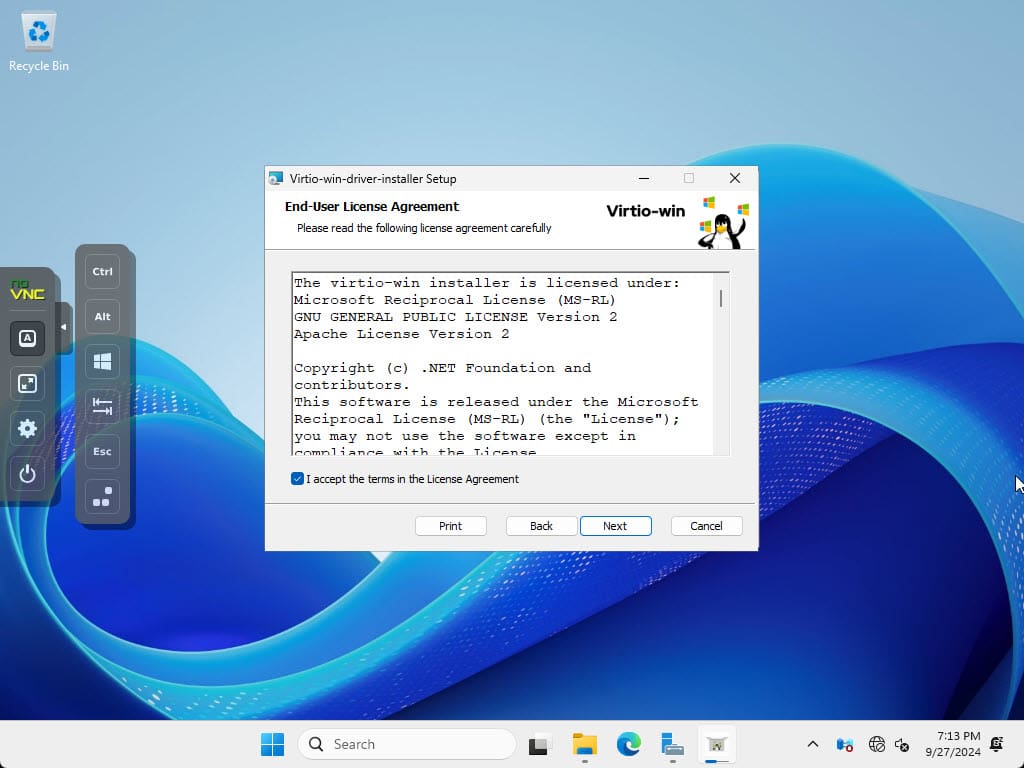
The installation gets started.

Accept another EULA with the checkbox.
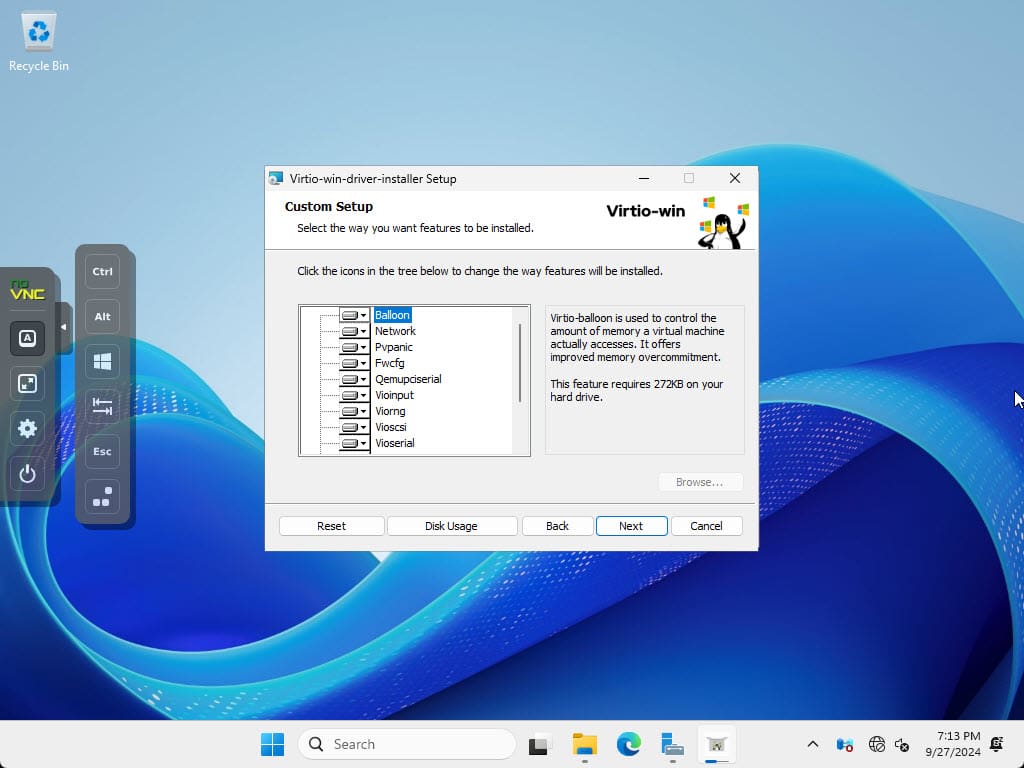
Customize the components you want.
Click Install.
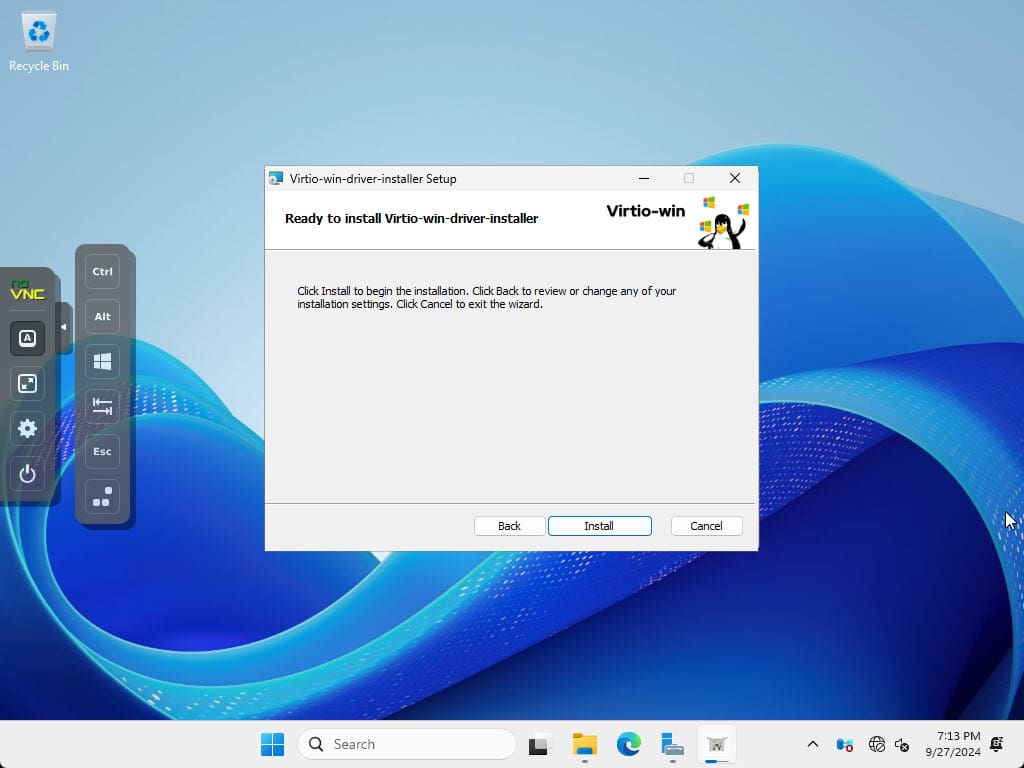
Finish out the installation.
The splash screen will display that the installation has been successful. You can see as well that once installed, we can see the network connection is now working after the driver was installed.

Installing the QEMU agent
The QEMU Guest Agent is a service that runs inside the guest virtual machine (VM) and communicates with the QEMU hypervisor. This is different than the VirtIO drivers. Its job when you check the QEMU agent box is to allow the host to issue commands to the guest, like filesystem freeze and thaw, shutting down the guest cleanly, and it also helps provide more detailed guest information. This is really useful as well when snapshotting VMs or live migration activities.
Wrapping up
Hopefully, this walkthrough of installing Windows Server 2025 in Proxmox will help anyone who may want to take Microsoft’s latest Windows Server operating system for a spin. You will want to make sure you have your VirtIO driver ISO downloaded and ready to go with the install.
В этой статье мы рассмотрим процесс развертывания виртуальной машины с Windows на гипервизоре Proxmox VE. Подробно рассмотрим базовые рекомендации и best practices по оптимальным параметрам ВМ, установке, и запуску гостевой Windows Server в виртуальной машине Proxmox.
Содержание:
- Создаем виртуальную машину для Windows Server на Proxmox
- Установка гостевой Windows Server в ВМ Proxmox
Подготовительные шаги:
- СкачайтеISO образ с драйверами VirtIO для гостевой Windows (virtio-win.iso)
- Получите установочный ISO образ с Windows (в нашем примере это Windows Server 2025)
Подключитесь к веб интерфейсу Proxmox (
https://proxmox-ip:8006
), и загрузите ISO образы в локальное хранилище. Перейдите в раздел ISO images —> нажмите Upload и укажите путь к ISO файлу на диске.
По умолчанию для хранения ISO образов в Proxmox используется директория /var/lib/vz/templates/iso
Создаем виртуальную машину для Windows Server на Proxmox
Создадим на хосте Proxmox виртуальную машину для установки Windows Server.
- Щелкните по хосту Proxmox и выберите Create VM
- На вкладке General укажите осмысленное имя и ID виртуальной машины (предлагаемый ID можно оставить по умолчанию, либо вручную задать в нем другой номер, например последний октет IP адреса ВМ).
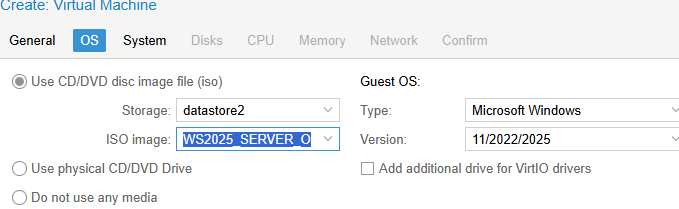
- На вкладке OS выберите тип гостевой ОС (Microsoft Windows 11/2022/2025) и установочный ISO образ с Windows, который вы загрузили в хранилище

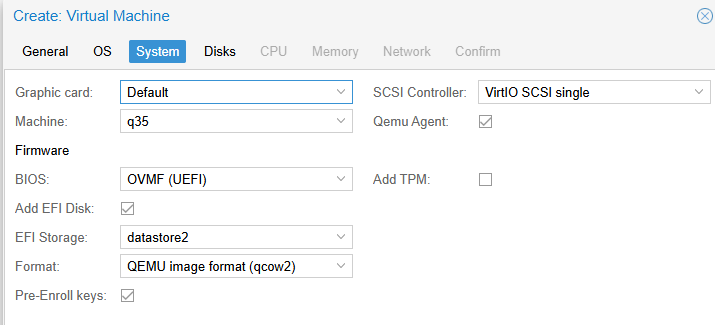
- На вкладке System выберите следующие настройки:
Firmware: OVMF (UEFI) – рекомендуемый тип платформы для современных версий Windows. Для старых систем можно использовать SeaBIOS
Add EFI Disk: включить
Выберите хранилище, где будет хранится EFI диск. Тип диска оставить по-умолчанию (qcow2)
Pre-Enroll keys: включить (прописывает стандартные ключи Microsoft Secure Boot)
Тип контроллера: VirtIO SCSI single
Qemu Agent: включить
TPM: включите, если нужна поддержка виртуального TPM в виртуальной машине (для Windows 11 TPM 2.0 является обязательным требованием)
- На вкладке Disks добавляем диск типа SCSI вместо IDE (SCSI протокол производительнее и быстрее, чем IDE или SATA). Выберите размер диска (для Windows не менее 40 Гб)
- В качестве типа диска доступны RAW (минимум возможностей, но лучшая производительность), VMDK (совместимость с VMware) или QCOW2 (расширенный формат с поддержкой снапшотов). Формат qcow2 используется по умолчанию (оставляем его).
- Включаем параметр Discard для более эффективного использования места на диске (работает по аналогии с TRIM в SSD, очищая реально удаленные данные, освобождая место). В качестве типа кэширования выберете Write Back (повышает производительность). Если кэш отключен (Default (no cache)), этот режим безопаснее с точки зрения потери несохраненных данных на диске при отключении ВМ, но медленнее. Режим Write through оптимален в случае высокой нагрузки на чтение

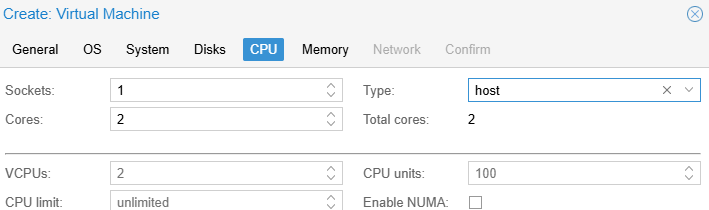
- На вкладке CPU укажите сколько ядер (cores) выделить для ВМ (не менее 2 ядер типа host для Windows). Для производительных ВМ с Windows можно дополнительно добавлять CPU сокеты и включить поддержку NUMA.
Тип CPU host позволяет ВМ получать доступ ко всем возможностях физического CPU, исключая эмуляцию. В том числе в таком режиме в гостевой Windows может работать вложенная виртуализация. Это позволит запускать Hyper-V и подсистемы Linux (WSL) внутри виртуальной машины.

- На вкладке Memory укажите, сколько оперативной памяти выделить для ВМ. Рекомендуется не менее 4096 Мб для Windows. С помощью опции Minimum memory можно зарезервировать оперативную память под ВМ. Режим ballooning позволяет гипервизору изымать неиспользуемую память у ВМ при высокой нагрузке (более 80%) на RAM хоста.
- На вкладке Network выбираем модель виртуальной сетевой карты VirtIO (paravirtualized) вместо Intel E1000. Выберите сетевой мост, через который ваша ВМ будет выходить наружу (в этом примере vmbr0 подключен к физическому сетевому интерфейсу сервера Proxmox).
- Отключите опцию Firewall, если вы не хотите, чтобы правила файервола Proxmox применялись к ВМ. В этом случае подразумевается, что будет использоваться встроенный Windows Defender Firewall в гостевой ОС виртуальной машины.
- На следующей вкладке проверяем результирующие настройки и создаем ВМ, нажав Finish.

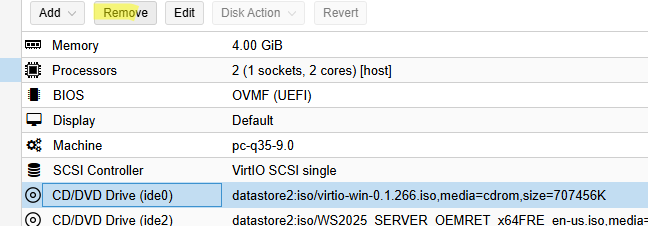
После того, как ВМ создана, нужно добавить в ее настройках дополнительный виртуальны CD/DVD привод. Выберите ВМ -> вкладка Hardware -> Add -> CD/DVD drive.
Смонтируйте в виртуальный привод ISO образ с драйверами VirtIO. Все готово к установке гостевой Windows в виртуальную машину Proxmox.
Установка гостевой Windows Server в ВМ Proxmox
В параметрах ВМ перейдите на вкладку Console и запустите ВМ (Start Now).
Нажимаем любую кнопку, чтобы начать установку Windows. Далее запускается стандартный мастер установки Windows, где нужно будет выбрать языковые настройки, редакцию Windows Server и и т.д.
В окне, где нужно выбрать диск для установки ОС, вы обнаружите, что установщик Windows не увидел ваш виртуальный жесткий диск. Дело в том, что в образе Windows отсутствуют драйвера для VirtIO SCSI контроллера.
Чтобы загрузить драйвер в режиме WinPE, нажмите кнопку Load Driver.
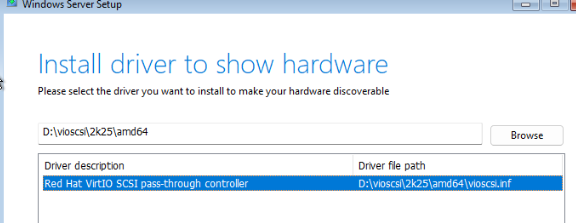
Укажите папку с драйвером Red Hat VirtIO SCSI pass-throught controller на смонтированном ISO образе с драйверами VirtIO: d:\vioscsi\2k25\amd64. Установите драйвер.
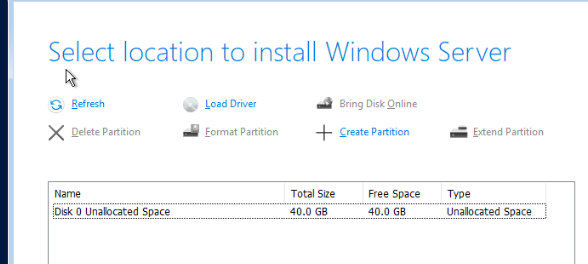
Установщик Windows должен увидеть неразмеченный локальный диск. Выберите его и продолжите установку.
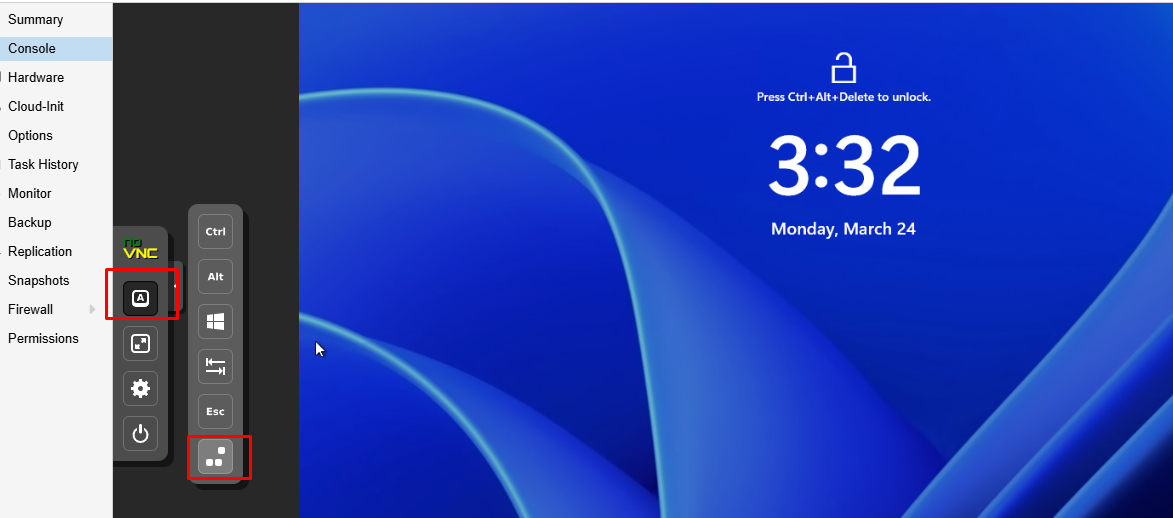
После завершения установки Windows, логинимся в гостевую ОС через консоль Proxmox. Чтобы отправить в консоль сочетание
Ctrl+Alt+Del
для ввода учетной записи Windows, выберите в левой панели Show Extra Keys и отправьте нужную комбинацию клавиш.
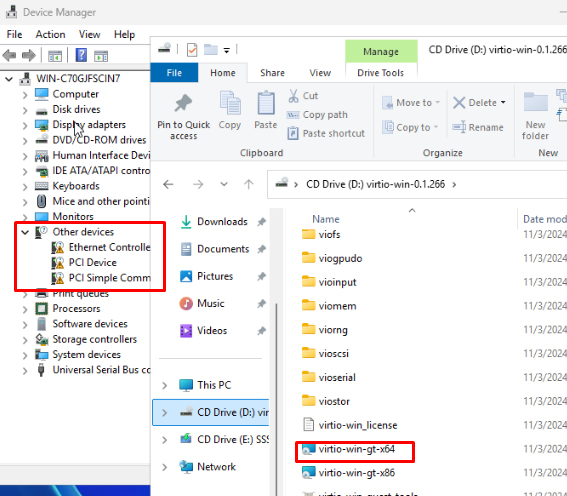
Запустите диспетчер устройств Windows. Как вы видите отсутствует ряд драйверов, которые нужно установить с диска с драйверами VirtIO. Запустите установщик virtio-win-gt-x64.msi с диска и установите с настройками по-умолчанию.
Затем установите гостевой агент Qemu, запустив virtio-win-guest-tools.exe.
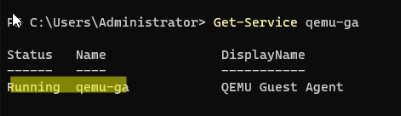
Проверим, что служба агента запущена в Windows:
Get-Service QEMU-GA
После установки гостевых средств интеграции QEMU в консоли Proxmox на вкладке Summary виртуальной машины будет отображаться информация об IP адресе, полученном из гостевой ОС.
Проверить наличие агента Qemu в ВМ можно из консоли хоста Proxmox:
qm agent <vmid> ping
После завершения установки, удалите из виртуального оборудования ВМ диск с драйверами VirtIO.
Осталось завершить настройку Windows в гостевой машине: задать имя компьютера, статический IP (если применимо), время и часовой пояс, включить RDP, установить обновления Windows, добавить необходимые службы и роли и т.д.
Guide to Slipstream VirtIO Drivers into Windows ISO’s
Introduction
This guide will help manually add VirtIO drivers to Windows ISO’s so that the drivers are automatically installed and available to a Windows VM on Proxmox. This way the VirtIO ISO will not need to be attached to a virtual machine on Proxmox and there will be no need to manually load the drivers 1-by-1 in Windows Setup at install time. While these ISO’s should work with any KVM based virtualization, I am only testing them using a Proxmox host.
By slipstreaming these drivers direct into an ISO, it drastically reduces the work required to setup new Windows based VM’s by removing the need to manually install these drivers for each machine.
Tested Windows Versions
I have only tried and tested the following methods with the following Windows Versions/ISO’s:
- Windows 10 version 1903 (acquired direct from Media Creation Tool or the Microsoft website here)
- Windows Server 2019 (acquired from the Microsoft Evaluation Center)
Just because I have not tested a version of Windows does not mean the methods outlined here will not work. They may work as is, with modification or not at all. Feel free to try other versions as needed.
Disclaimers
These methods are NOT intended to circumvent licensing or legitimate purchase/use of the mentioned software. Users are responsible for properly licensing and activating their copies/installation of Windows. The details provided in this guide are intended to help users test Windows in virtual environments using either evaluation licenses or licenses the user owns already. All users are responsible for legally licensing, activating and using their installation(s) of Windows on their own systems.
I also am not covering how to inject updates into Windows, though it is possible using similar methods. Should you want to also inject Windows updates I suggest you research the topic and incorporate the additional setup and commands into your workflow.
What are VirtIO Drivers?
In brief, VirtIO drivers are drivers designed to allow Windows VM’s to perform better when used with KVM based virtualization, like Proxmox currently uses. This includes but is not limited to: display drivers, storage drivers, networking drivers, etc. The VirtIO ISO also contains the qemu guest agent which allows the KVM host (Proxmox) to have better control over a guest OS, in this case Windows. This allows functions like properly shutting down a Windows VM from Proxmox’s controls. The ISO also contains the Balloon service files as well as the driver, which when installed allow a Windows guest to work with the memory ballooning feature of KVM/Proxmox. Generally speaking, the drivers make the VM run more smoothly, with more control and less issues.
Resources
The following are good resources to help with the process.
- Official VirtIO ISO and drivers: https://docs.fedoraproject.org/en-US/quick-docs/creating-windows-virtual-machines-using-virtio-drivers/ (I generally use the «Latest virtio-win iso» entry under «Direct downloads»)
- Windows 10 Media Creation Tool or ISO download: https://www.microsoft.com/en-us/software-download/windows10
- Windows Server Evaluation Center: https://www.microsoft.com/en-us/evalcenter/evaluate-windows-server-2019?filetype=ISO
- Windows Assessment and Deployment Toolkit (ADK): https://docs.microsoft.com/en-us/windows-hardware/get-started/adk-install (generally grab the latest version)
- Recommended Settings for Windows Proxmox VM’s: https://davejansen.com/recommended-settings-windows-10-2016-2018-2019-vm-proxmox/ (Great article on the manual process and settings to use for the VM)
- Installing Windows Server GUI-less as a Proxmox VM: https://medium.com/@carll/installing-server-2016-2019-core-gui-less-with-proxmox-649ba8d634db (Another great article from the perspective of doing the process without a desktop GUI)
Tips
- Keep original copies of your ISO’s in a safe place, especially if they are not simply downloads from Microsoft’s site (like a retail ISO).
- Prior to doing any of these steps, ensure your original ISO works for installation.
- You may consider keeping copies of the modified install.wim and boot.wim in case you need to inject additional drivers or updates to them at another time.
- Read over the entire guide before attempting the steps. Understand what each step does and why you are doing it.
Preparation
The following are the steps to prepare for slipstreaming the VirtIO drivers into a Windows ISO.
- Setup a Windows based machine to prepare the ISO’s on. This can be another VM or a physical machine. I recommend using either Windows 10 Pro or Windows Server 2019 to do this on. Install Windows, update it, etc. Make sure to have enough space to handle your ISO’s + spare space. I would generally recommend ~25GB free space per ISO plus at least 32GB for Windows and programs to install.
- Install Windows ADK. The only required selection from the checklist of install options is «Development Tools». If PXE booting Windows images you may also choose «Windows Preinstall Environment (Windows PE)». This will give us access to commands like
dismand commands in PowerShell needed for working with the ISO’s. - Download the VirtIO ISO and have whatever Windows ISO(s) you plan to work with on this machine.
- In file explorer, change the settings to show hidden files and folders and to display file extensions. Generally on the View Tab, 2 check boxes.
Next, make the following directories. These are not hard requirements. You can name them whatever you like and place them any place on the system you like. I am going to use and reference the directories below throughout the guide however and will be placing them all in the Downloads folder of my current user.
iso-win#— This directory will contain all the files from the ISO of a specific version of Windowsiso-virtio— This directory will contain all the files from the VirtIO ISOdrv-win#— This directory will contain only the drivers needed for a specific version of Windowswim-win#— This directory will contain the currentinstall.esd,install.wimand/orboot.wimto be modifiedmount— The directory we will mount the .wim files to modify them.
For entries with win# replace «#» with whatever version/abbreviation you like. Ex: iso-win10 or drv-win2k19.
After making the above directories, we need to copy files from the ISO’s to the proper locations.
- Mount the Windows ISO.
- Select all the files and folders on the Windows ISO and copy them. Paste them to the
iso-win#directory. - Unmount the Windows ISO and Mount the VirtIO ISO.
- Select all the files and folders on the VirtIO ISO and copy them. Paste them to the
iso-virtiodirectory. - Unmount the VirtIO ISO.
The VirtIO contents is explained here. The gist is there is a folder for each type of driver (display, network, etc.). Within each folder are multiple folders, one for each version of Windows. Within each of those folders is a folder for the CPU architecture like amd64, ARM64 or x86. We only need to inject the drivers that match the same version of Windows being used with the same architecture planned (generally speaking only «amd64»).
I am sure there are ways to automate the following separation of drivers, but I just did it manually.
I copied all the files/folders in iso-virtio to drv-win#. I then went into each folder and deleted any folder representing a version of windows other than the one matching the drv-win# folder, the version of Windows we are currently working on injecting drivers in. Ex: if working with a Windows 10 ISO, in the NetKVM directory select all folder, ctrl+click the w10 folder to de-select it and then delete. This will leave only the w10 folder in the NetKVM folder. Repeat this for every folder under drv-win#.
While neither file in guest-agent is a driver, I would keep at least the version matching the architecture (typically the x86_64.msi file). It will prove helpful post install.
I then went back to the drv-win# folder.
- Click in the search bar at the top right of the file explorer window.
- From the «Search» tab, select «Kind» and select «folder». This inserts «kind:=folder» in the search box.
- Put a single space after that entry and then type in «ARM» and hit enter or wait.
- Once complete, select all the results and delete them. This should delete all of the «ARM» subfolders in
drv-win#as we don’t need those drivers. - Repeat steps 2-3 but instead of «ARM», type in «x86». Only do this if you do not plan to install Windows as 32bit/x86 (in some cases it’s not supported anyway, like in Windows Server). Then repeat step 4 and delete all the resulting folders. This deletes all the «x86» subfolders from the
drv-win#folder.
This should leave just the folders/drivers needed for the version of Windows we are injecting the drivers into. This is important to help reduce the size of an image and to avoid having incompatible drivers loaded/installed.
Optional but Recommended
I recommend taking the drv-win# folder and copying it to the iso-win# folder. Doing so will help make post install steps easier.
Now we need to copy/move the install.esd or install.wim (depends on Windows version) file from the Windows ISO to the wim-win# directory. We also need to copy the boot.wim file.
- Copy
install.esdorinstall.wimfromC:\Users\myuser\Downloads\iso-win#\sourcestoC:\Users\myuser\Downloads\wim-win# - Copy
boot.wimfromC:\Users\myuser\Downloads\iso-win#\sourcestoC:\Users\myuser\Downloads\wim-win#
This should leave us with:
- Contents of the Windows ISO in
iso-win# - Contents of the VirtIO ISO in
iso-virtio - Only the folders/files of the drivers needed for the specific version of Windows being worked on in
drv-win# - 2 files in
wim-win#,install.wimorinstall.esdandboot.wim - An empty
mountfolder. - Windows ADK installed
Slipstream VirtIO Drivers into Windows ISO
This process is repetitious. .wim files (and .esd) often have multiple indexes. So when you boot from a Windows 10 ISO for example, and you have options to install «Windows 10 Home», «Windows 10 Pro», etc. each is a different index in the same install.wim/install.esd on the same ISO. This means we need to inject the driver into each option we intend to keep/use. We also need to inject the driver into the boot.wim, which also has indexes (generally 1 for Win PE and 2 for the Windows Setup). Unless PXE booting and using the Win PE portion, we only need to inject into the Windows Setup portion for the boot.wim.
To cut down on this, I recommend removing any index (option) that you do not intend to use ever. For example if you will never be using «Windows 10 Education» from a Windows 10 ISO, better to remove it then to spend time injecting drivers to it. We will cover how to do this soon.
The following directions will typically provide 2 methods for each step. One using the «Deployment and Imaging Tools Environment» (I will refer to this as ADK, though not technically true), the other using Windows Powershell (PS) and commands provided to it by the ADK module. Both should have the same end result, it’s just a matter of preference. However, do not mix and match them as I have not tested it in this fashion. To open «Deployment and Imaging Tools Environment» go to «Start | Windows Kits | Deployment and Imaging Tools Environment». To instead open PowerShell do «Start | Windows PowerShell | Windows PowerShell». It may be required to open either as administrator. This can be done by right clicking its icon in the Start menu and selecting «More | Run as Administrator».
For all commands below replace paths with your actual paths, IE: Do NOT just copy and paste these commands. For reference I will use C:\Users\myuser\Downloads\ as the base path, with subfolders as laid out above.
1. Getting Wim Info
This command will display information about a given image file (.wim or .esd). Primarily we want to know how many indexes there are, and which index(s) we will use and which we won’t.
ADK
dism /Get-WimInfo /WimFile:C:\Users\myuser\Downloads\wim-win#\install.wim
PS
Get-WindowsImage -ImagePath C:\Users\myuser\Downloads\wim-win#\install.wim
2. (Situational) Remove Unused Indexes
This command will remove the designated index from the image. If you are unsure, do NOT delete an index. Only use this command to delete options from an ISO you are sure you will not use. I also highly recommend to re-run the command from step 1 above after removing each index. This is because options are re-indexed after each removal. IE: if index 3 was «Windows 10 Home» and index 4 was «Windows 10 Pro», after removing index 3, «Windows 10 Pro» now becomes index 3 instead of 4. AKA: Dont assume the indexes are the same after removing another.
ADK (replace «1» with the desired index number found using the command from step 1)
dism /Delete-Image /ImageFile:C:\Users\myuser\Downloads\wim-win#\install.wim /Index:1 /CheckIntegrity
PS
Remove-WindowsImage -ImagePath "C:\Users\myuser\Downloads\wim-win#\install.wim" -Index 1 -CheckIntegrity
3. (Situational) Convert .esd to .wim
This step is only needed if the Windows ISO had an install.esd instead of install.wim, if you already have an install.wim skip this step. I am providing this step for educational purposes only, I suggest you research the difference between .esd and .wim. Users are responsible for doing this step and understanding the implications. It should be noted that using install.esd and not converting it is unlikely to work for the rest of this guide.
This step can also take a relatively long time (like 5-15 mins on a modern machine). Just let it run to completion.
ADK
dism /Export-Image /SourceImageFile:C:\Users\myuser\Downloads\wim-win#\install.esd /SourceIndex:1 /DestinationImageFile:C:\Users\myuser\Downloads\wim-win#\install.wim /Compress:Max /CheckIntegrity
PS
Export-WindowsImage -SourceImagePath "C:\Users\myuser\Downloads\wim-win#\install.esd" -SourceIndex 1 -DestinationImagePath "C:\Users\myuser\Downloads\wim-win#\install.wim" -CompressionType Max -CheckIntegrity
Per Index Steps
The following steps will need to be repeated per index that needs to be modified. Generally, this is a minimum of 2 times, once for at least one index of the install.wim and again for the boot.wim setup index. It needs to be done for each additional index in the install.wim that you want the drivers available to.
Perform the steps 4-7 in order for a single image/index before repeating them for the next.
Replace install.wim with boot.wim when injecting drivers into the setup image.
4. Mount an Image
In this step we mount an image/index to inject the drivers into. This is similar in concept to mounting an ISO except that we are mounting a specific index within the install.wim or boot.wim image.
ADK
dism /Mount-Image /ImageFile:C:\Users\myuser\Downloads\wim-win#\install.wim /Index:1 /MountDir:C:\Users\myuser\Downloads\mount
PS
Mount-WindowsImage -Path "C:\Users\myuser\Downloads\mount" -ImagePath "C:\Users\myuser\Downloads\wim-win#\install.wim" -Index 1
5. Inject/Slipstream Drivers
Now we are going to slipstream or inject all of the drivers we have in C:\Users\myuser\Downloads\drv-win# into the currently mounted Windows image. This way they will be pre-installed and we will not need to manually install them one by one during setup or after installation.
ADK
dism /Add-Driver /image:C:\Users\myuser\Downloads\mount /driver:C:\Users\myuser\Downloads\drv-win# /Recurse /ForceUnsigned
PS
Add-WindowsDriver -Path "C:\Users\myuser\Downloads\mount" -Driver "C:\Users\myuser\Downloads\drv-win#"" -Recruse -ForceUnsigned
In the above commands, -Recurse has the command look through all the folders and subfolders of our drv-win# directory for drivers. The -ForceUnsigned switch removes the requirement for drivers to be digitally signed to be installed which may be required for some drivers in the VirtIO collection.
6. Verify Drivers Have Been Added
It’s a good idea to ensure that the drivers have actually been added to the image. While not essential to the process, IE: skipping this step will still result in the same outcome, it’s a good practice to help avoid mistakes. The following command will list out the 3rd part drivers in the image, which should list the VirtIO drivers we previously injected.
ADK
dism /Image:C:\Users\myuser\Downloads\mount /Get-Drivers
PS
Get-WindowsDriver -Path C:\Users\myuser\Downloads\mount
7. Save Changes and Un-mount the Image
Once the drivers have been injected, we need to save the changes to the image while we un-mount it.
ADK
dism /Unmount-Image /MountDir:C:\Users\myuser\Downloads\mount /Commit /CheckIntegrity
PS
Dismount-WindowsImage -Path "C:\Users\myuser\Downloads\mount" -Save -CheckIntegrity
Final One Time Steps (per ISO)
The proceeding step is meant to be done after steps 4-7 have been repeated for each file/index required. Be sure that you have done steps 4-7 for the setup index of boot.wim and at least one index of the install.wim.
8. Copy Updated .wim Files Back to ISO Folder
We need to take the modified install.wim and boot.wim and place them back in the ISO file/folder structure. These steps can be done in File Explorer.
- Copy
install.wimfrom theC:\Users\myuser\Downloads\wim-win#directory. - Paste
install.wimtoC:\Users\myuser\Downloads\iso-win#\sources\directory. - Copy
boot.wimfrom theC:\Users\myuser\Downloads\wim-win#directory. - Paste
boot.wimtoC:\Users\myuser\Downloads\iso-win#\sources\directory.
9. Rebuild Windows ISO
Our last step takes everything we have done and rebuilds a new ISO using the updated images with the drivers contained within them. The resulting ISO will be what we want to install Windows VM’s from going forward.
This particular step doesn’t have ADK/PS variations, it’s just a single command. As far as I am aware, the same command can be run from either ADK (cmd) or PS.
oscdimg -u2 -m -bC:\Users\myuser\Downloads\iso-win#\efi\microsoft\boot\efisys.bin C:\Users\myuser\Downloads\iso-win#\ C:\Users\myuser\Downloads\iso-win#\new-iso-name.iso
Replace new-iso-name.iso with the desired name of the new Windows ISO. I recommend this not be the same as the original ISO. The above command also assumes UEFI bootable media, I am personally not concerned with BIOS booting Windows.
This will allow for ISO images larger than 4.7GB single layer DVD’s and beyond the approx. 4GB install.wim limit for an ISO.
Post Install Using the New ISO
After installing Windows in a Proxmox VM using your new ISO, there are still a few steps that you need to take to get the most out of it. Earlier in the guide, I recommended copying our drv-win# folder to the iso-win# folder. I am going to assume in the steps below this was done. If not, you will need to mount the VirtIO ISO/disc for the current Windows VM to finish the post install steps.
1. Install QEMU Guest Agent
The Windows ISO (and the VirtIO ISO) which should be still mounted post Windows Install as a CD/DVD drive/disc contains a folder drv-win#\guest-agent which should contain at least a single .msi file (if not 2 files) named qemu-ga-i386.msi or qemu-ga-x86_64.msi (for 32bit/64bit Windows OS’s respectively). This is similar to the VMWare/ESXi guest agent allowing the host (in this case Proxmox) to have more accurate information of and better control over its guest VM’s.
To install this on the Windows guest VM, in File Explorer:
- Navigate to the Windows CD/DVD (the ISO mounted within the VM that we installed from), let’s assume
D:\and go to the guest-agent folderD:\drv-win#\guest-agent. - Double click on the appropriate
.msifor your architecture of Windows (i386= 32bit andx86_64= 64bit).
A command prompt window will open briefly then vanish, that’s it. It should be installed.
2. Enable the Balloon Service
The Balloon driver and service allow KVM guests like our Windows VM to work with the memory ballooning feature of KVM. While our previous steps have added the driver to the ISO and thus our install, we still need to setup and activate the service for ballooning in our Windows VM.
To install/activate the ballooning service:
- Create a new folder
C:\Program Files\Balloon. - Navigate to the Windows CD/DVD (the ISO mounted within the VM that we installed from), let’s assume
D:\and go to the proper balloon directoryD:\drv-win#\Balloon\w10\amd64. Replacew10with the folder for your version of Windows andamd64for your architecture of Windows. - Copy all the files in the proper sub directory of
Balloon\w10\amd64\*. There are roughly 6 files in this folder, one of which should beblnsvr.exe. - Paste these files into the created directory from step 1 at
C:\Program Files\Balloon. - Open
cmd(command prompt) as an Admin fromC:\Program Files\BalloonorcdtoC:\Program Files\Balloon. - Run the command
blnsvr.exe -i. This should give a few lines of output in cmd about starting the service.
3. Reboot the VM
To finalize the post install configuration, reboot the Windows VM. To verify that the guest agent is working, you can look at the Summary of the Windows VM in Proxmox. Specifically under «Bootdisk size» should be the «IPs» entry listing the IP addresses of the VM with a button that says «More». The «More» button displays further guest agent network info.
You can confirm that the Balloon service is running from the Windows guest using the PS command: get-service -name ballo*. It should return a result stating the Balloon Service is running.
Conclusion
This guide should provide the means to:
- Create a Windows ISO (or ISO’s) with VirtIO drivers baked in.
- Implement post install steps for Windows VM’s in Proxmox to take advantage of qemu guest agent and the balloon driver/service.
- Reproduce the process of injecting the VirtIO drivers into Windows media using ADK (cmd) or PowerShell.
- Eliminate the need to manually install VirtIO drivers during installation or post install for Windows VM’s.
Hopefully you find this guide helpful. Please open an issue should you have any corrections, updates, questions or input on this guide. Thank you.