
-
-
#1
Hello dear hive mind!
I am comming to you to seek your wisdom because I surely do not know the solutions to my problem. I am currently working on PCIe pass through for some old Windows OSes (XP, vista, 7, 8.1) and working along some instructions I found on Youtube, Reddit and elswhere. Before doing so I have to create a working VM. Right now trying to get my Windows 7 machine started. I have done the configurations as the instructors done it. Yet their VMs start without any Problem and mine doesn’t. I assume that there has to be a mistake with the EFI configurations since the same ISOs start boot up with SeaBIOS. I even went into the Boot Manager and manually selected the .efi files but the VM still does not boot. Instead I get the message that it «failed to start boot0008 …. : unsupported».
I also guess that I have done a mistake with the EFI-disk you have to attach when choosing OIVMF (UEFI). Is there anything special I have to considere when slecting the disk?
The current .conf of the VM is following:
balloon: 0
bios: ovmf
boot: order=ide2;sata0
cores: 6
cpu: host
efidisk0: local-lvm:vm-106-disk-0,efitype=4m,pre-enrolled-keys=1,size=4M
ide2: local:iso/WIN7X86.ENU.JAN2023.iso,media=cdrom,size=4087328K
machine: pc-q35-9.0
memory: 16384
meta: creation-qemu=9.0.2,ctime=1738925974
name: win7
net0: e1000=BC:24:11:B4:39:FF,bridge=vmbr0,firewall=1
numa: 0
ostype: win7
sata0: machines:106/vm-106-disk-0.qcow2,size=32G
scsihw: virtio-scsi-single
smbios1: uuid=084c65e0-d525-4c48-a833-437151dc1d04
sockets: 1
vmgenid: d3d3a93c-5743-4faa-a52a-f68b4a8b0fc5
I am working on that for a few days now. I have been browsing forums yet their solutions are not mine. I have tried what they did (as far as i could) but still no improvement. Maybe anyone of you know what could be wrong. I hope you guys have some good guesses.
Thank you in advance
-
-
#3
Windows 7 doesn’t support OVMF UEFI.
it require SeaBIOS.
Ohhh damn it. So much time wasted then :,c Do you know about the other OSes I mentioned? Does Windows 8.1 already support OVMF UEFI?
A different question: Will I be able to pass through pci devices even if the VM runs with SeaBios? Or is it only when running a VM with OVMF UEFI?
P2V Windows OS with UEFI BIOS to Proxmox
Create Virtual Hard Disk (VHD) on physical Windows machine using Disk2vhd
Create a VM in Proxmox like you normally do including a harddisk on ‘local’
Change the BIOS to OVMF (UEFI) in the Options section
Add an EFI disk to that same VM on ‘local’
Import disk (VHD) to proxmox
# qm importdisk VMID XXXXXX.vhd local-lvm -format raw
Load & Boot Windows OS iso same version as physical
Repair your computer
Troubleshoot
Command Prompt
Diskpart
List disk
Select disk 0
List vol
Select raw volume
Select vol
Assign letter L:
FORMAT FS=FAT32 LABEL=”BOOT”
EXIT
L:
Md efi
Cd efi
Md microsoft
Cd microsoft
Md boot
Cd boot
Bootrec /fixboot
Bcdboot c:\Windows /l en-us /s L: /f ALL
Exit
Turn Off
Turn on VM
This entry was posted on October 30, 2020 at 4:51 am and is filed under Uncategorized. You can follow any responses to this entry through the RSS 2.0 feed.
You can leave a response, or trackback from your own site.
По умолчанию при создании виртуальной машины (kvm) на Proxmox VE 6 создаётся виртуальный BIOS, но вместо него можно создать виртуальный UEFI.
Изменение BIOS на UEFI
Для правильной эмуляции компьютера QEMU необходимо эмулировать прошивку. На компьютерах такая прошивка называется BIOS или UEFI. Эта прошивка выполняется как один из первых шагов при загрузке виртуальной машины. Она отвечает за выполнение базовой инициализации оборудования и за обеспечение интерфейса к оборудованию для операционной системы. По умолчанию QEMU использует для этого SeaBIOS, который эмулирует BIOS x86 с открытым исходным кодом. Однако, вы можете в качестве прошивки выбрать OVMF, который эмулирует UEFI с открытым исходным кодом.
На практике вы должны на Proxmox создать виртуальную машину (kvm) стандартным способом, а затем поменять тип прошивки на uefi. Для этого вам нужно зайти на вкладку «Hardware» и там найти настройку для BIOS:
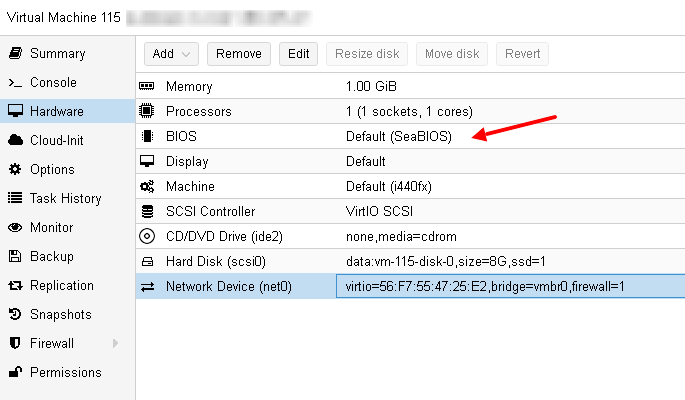
Её нужно поменять на «OVMF (UEFI)«.
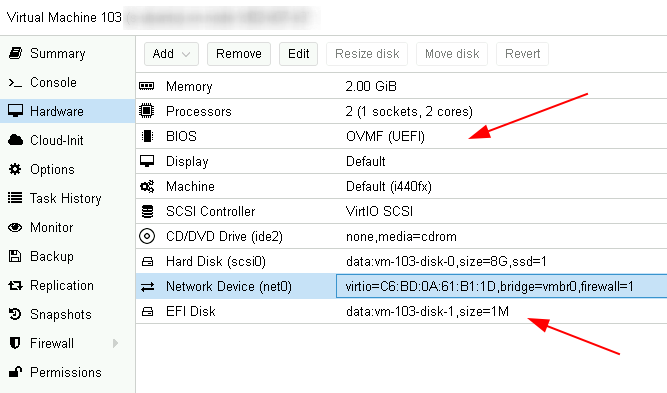
Добавление EFI Disk
Но просто поменять прошивку не достаточно. Дополнительно вы должны добавить в конфигурацию виртуальной машины EFI Disk.
Этот диск хранит EFIVARS. Это специальная файловая система которая хранит переменные EFI. Там же хранится порядок загрузки. Если EFI Disk не указан, то каждый раз при запуске виртуальной машины для неё будет создаваться временный efidisk. При этом каждый раз порядок загрузки может меняться.
Чтобы добавить такой диск, просто нажмите на кнопку «Add» и добавьте «EFI Disk«:
Размер такого диска всегда равен 1 MB и его нельзя изменить. Также нельзя создать несколько таких дисков.
После проделанного раздел «Hardware» у вас будет выглядеть примерно так:
Что в итоге?
После проделанного подключите образ установочного диска к виртуальному cdrom, и как обычно установите вашу систему. Это может быть любая система с поддержкой UEFI, например: Debian, Ubuntu или Windows.
Например, после установки Ubuntu 20.04 на такую виртуальную машину с разбивкой по умолчанию (без lvm) у меня следующая таблица разделов:
$ lsblk -l /dev/sda
NAME MAJ:MIN RM  SIZE RO TYPE MOUNTPOINT
sda    8:0    0    8G  0 disk
sda1   8:1    0  512M  0 part /boot/efi
sda2   8:2    0  7.5G  0 part /
Раздел sda1 это efi раздел в котором хранятся загрузчики которые запускает UEFI. Ubuntu при установки на этом разделе создала каталог для своей загрузки — /boot/efi/EFI/ubuntu/:
$ ls -l /boot/efi/EFI/ubuntu/
total 3480
-rwxr-xr-x 1 root root     108 Nov  8 11:55 BOOTX64.CSV
-rwxr-xr-x 1 root root     126 Nov  8 11:55 grub.cfg
-rwxr-xr-x 1 root root 1734528 Nov  8 11:55 grubx64.efi
-rwxr-xr-x 1 root root  856232 Nov  8 11:55 mmx64.efi
-rwxr-xr-x 1 root root  955656 Nov  8 11:55 shimx64.efi
Главным загрузчиком в этом примере выступает /boot/efi/EFI/ubuntu/shimx64.efi, который имеет цифровую подпись от Microfoft и поддерживает Secure Boot. Этот загрузчик затем запускает grubx64.efi который подписан цифровой подписью от Canonical.
EFI Disk же примонтировался в /sys/firmware/efi/efivars/:
$ ls -l /sys/firmware/efi/efivars/
total 0
-rw-r--r-- 1 root root   66 Nov  8 12:22 Boot0000-8be4df61-93ca-11d2-aa0d-00e098032b8c
-rw-r--r-- 1 root root  110 Nov  8 12:22 Boot0001-8be4df61-93ca-11d2-aa0d-00e098032b8c
-rw-r--r-- 1 root root  106 Nov  8 12:22 Boot0002-8be4df61-93ca-11d2-aa0d-00e098032b8c
-rw-r--r-- 1 root root   92 Nov  8 12:22 Boot0003-8be4df61-93ca-11d2-aa0d-00e098032b8c
-rw-r--r-- 1 root root  122 Nov  8 12:22 Boot0004-8be4df61-93ca-11d2-aa0d-00e098032b8c
-rw-r--r-- 1 root root    6 Nov  8 12:22 BootCurrent-8be4df61-93ca-11d2-aa0d-00e098032b8c
-rw-r--r-- 1 root root    8 Nov  8 12:22 BootOptionSupport-8be4df61-93ca-11d2-aa0d-00e098032b8c
-rw-r--r-- 1 root root   14 Nov  8 12:22 BootOrder-8be4df61-93ca-11d2-aa0d-00e098032b8c
-rw-r--r-- 1 root root   53 Nov  8 12:22 ConIn-8be4df61-93ca-11d2-aa0d-00e098032b8c
-rw-r--r-- 1 root root   38 Nov  8 12:22 ConInDev-8be4df61-93ca-11d2-aa0d-00e098032b8c
-rw-r--r-- 1 root root   34 Nov  8 12:22 ConOut-8be4df61-93ca-11d2-aa0d-00e098032b8c
-rw-r--r-- 1 root root   34 Nov  8 12:22 ConOutDev-8be4df61-93ca-11d2-aa0d-00e098032b8c
-rw-r--r-- 1 root root   34 Nov  8 12:22 ErrOutDev-8be4df61-93ca-11d2-aa0d-00e098032b8c
-rw-r--r-- 1 root root   18 Nov  8 12:22 Key0000-8be4df61-93ca-11d2-aa0d-00e098032b8c
-rw-r--r-- 1 root root   18 Nov  8 12:22 Key0001-8be4df61-93ca-11d2-aa0d-00e098032b8c
-rw-r--r-- 1 root root    8 Nov  8 12:22 Lang-8be4df61-93ca-11d2-aa0d-00e098032b8c
-rw-r--r-- 1 root root   17 Nov  8 12:22 LangCodes-8be4df61-93ca-11d2-aa0d-00e098032b8c
-rw-r--r-- 1 root root    8 Nov  8 12:22 MTC-eb704011-1402-11d3-8e77-00a0c969723b
-rw-r--r-- 1 root root 1128 Nov  8 12:22 MokListRT-605dab50-e046-4300-abb6-3dd810dd8b23
-rw-r--r-- 1 root root   80 Nov  8 12:22 MokListXRT-605dab50-e046-4300-abb6-3dd810dd8b23
-rw-r--r-- 1 root root   12 Nov  8 12:22 OsIndicationsSupported-8be4df61-93ca-11d2-aa0d-00e098032b8c
-rw-r--r-- 1 root root    7 Nov  8 12:22 PlatformLang-8be4df61-93ca-11d2-aa0d-00e098032b8c
-rw-r--r-- 1 root root   22 Nov  8 12:22 PlatformLangCodes-8be4df61-93ca-11d2-aa0d-00e098032b8c
-rw-r--r-- 1 root root  112 Nov  8 12:22 PlatformRecovery0000-8be4df61-93ca-11d2-aa0d-00e098032b8c
-rw-r--r-- 1 root root   22 Nov  8 12:22 SbatLevelRT-605dab50-e046-4300-abb6-3dd810dd8b23
-rw-r--r-- 1 root root    6 Nov  8 12:22 Timeout-8be4df61-93ca-11d2-aa0d-00e098032b8c
-rw-r--r-- 1 root root    5 Nov  8 12:22 VarErrorFlag-04b37fe8-f6ae-480b-bdd5-37d98c5e89aa
Теперь у нас диск размечен как GPT, если бы мы оставили BIOS, то он был бы MBR:
$ sudo parted -l
Model: QEMU QEMU HARDDISK (scsi)
Disk /dev/sda: 8590MB
Sector size (logical/physical): 512B/512B
Partition Table: gpt
Disk Flags:

Number  Start   End     Size    File system  Name  Flags
 1      1049kB  538MB   537MB   fat32              boot, esp
 2      538MB   8589MB  8051MB  ext4
Для того, чтобы зайти в настройки UEFI вам нужно при запуске виртуальной машины открыть её консоль и там нажать клавишу «Esc«. После входа вы увидите такое окно:
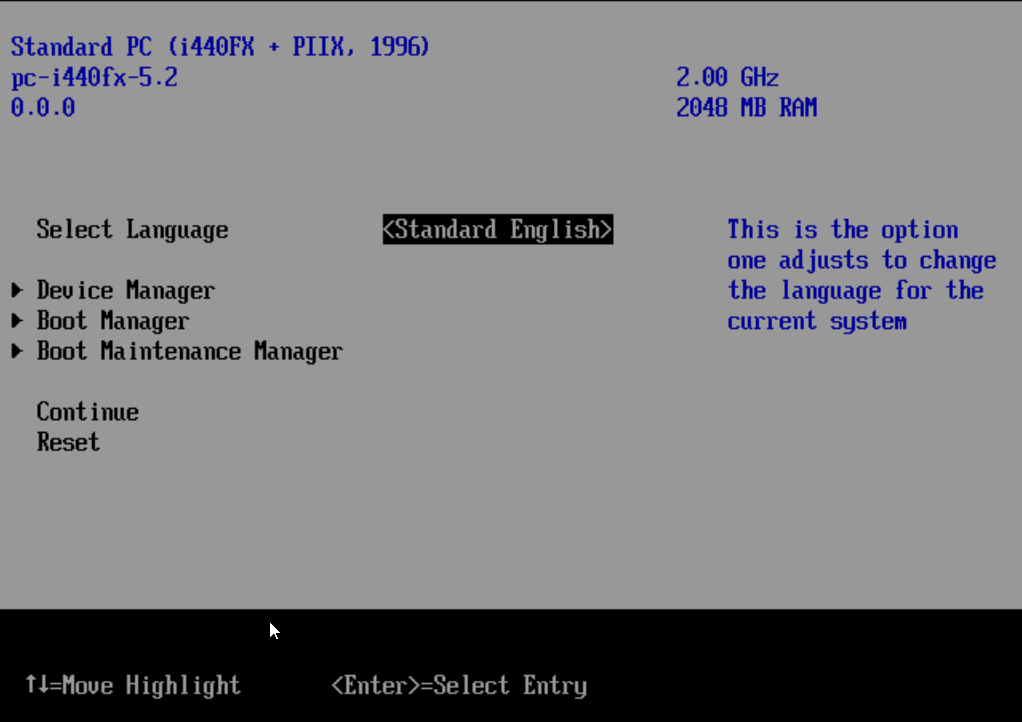
Здесь вы можете создать новую boot опцию и управлять очерёдностью загрузки. Пример создания boot опции есть на сайте proxmox.
Если вам интересна тема Proxmox VE, у меня про эту систему виртуализации и контейнерезации есть и другие статьи.
Если понравилась статья, подпишись на мой канал в VK или Telegram.
To install Windows 7 VM on Proxmox VE
This tutorial shows how to install a Windows 7 VM with spice client and VirtIO Drivers on Proxmox VE. Spice is a client software, which runs under spice protocol created for virtualization environment to allow remote sessions very fast. And VirtIO Drivers is a hard disk bus type which is faster than IDE and SCSI type
Installing Windows 7
Log into your Proxmox and click Create VM from your Proxmox Node.
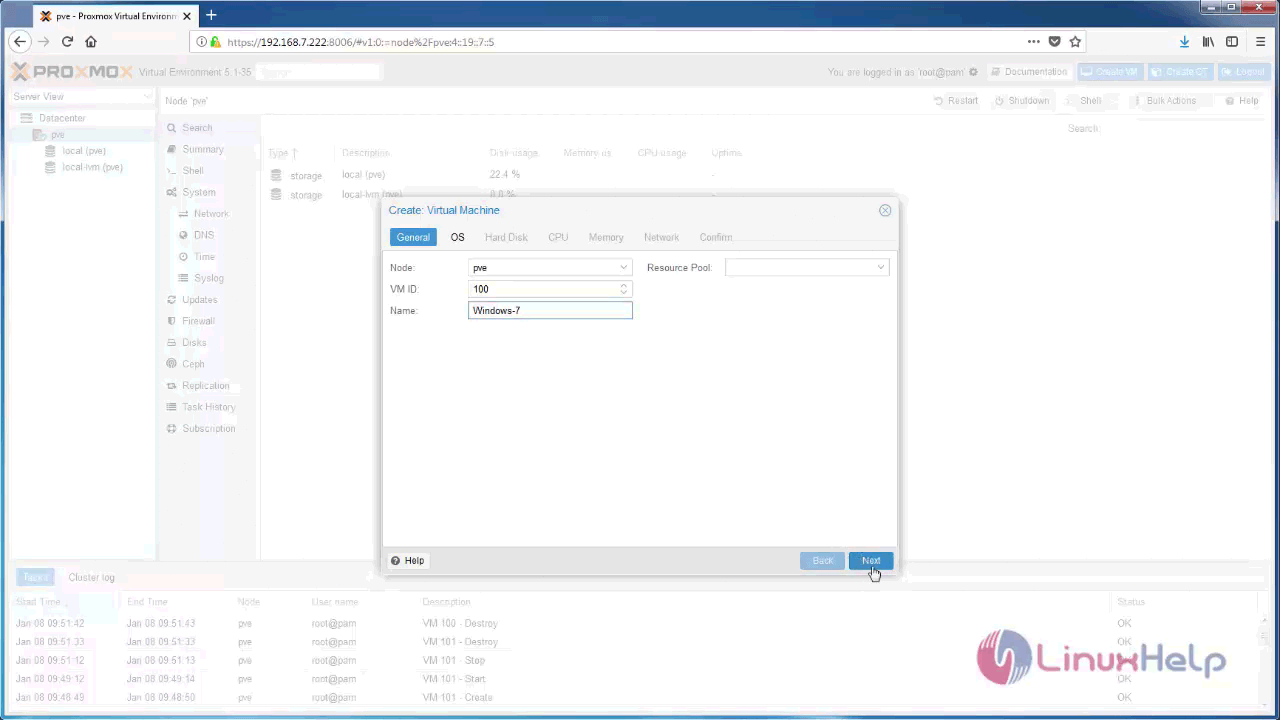
In the OS configuration, you need to choose your storage and ISO file.
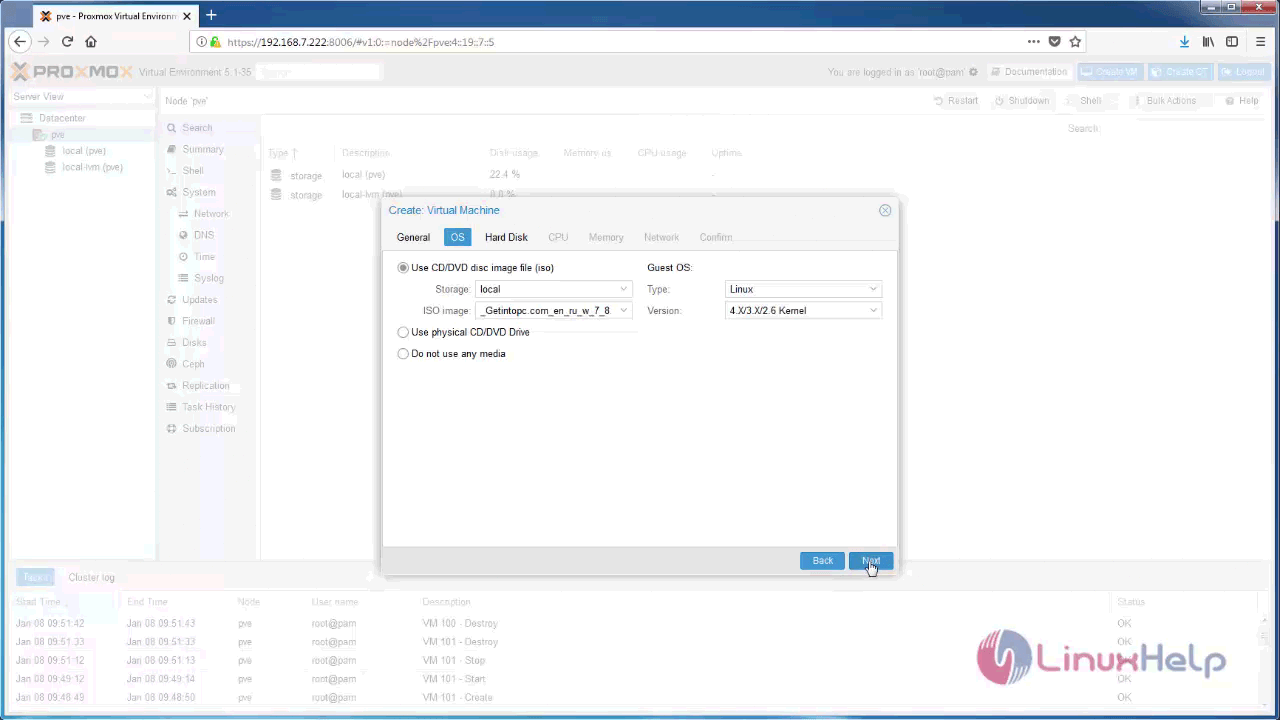
And then, choose Hard disk Bus Device as VirtIO Block and cache as Write-back.
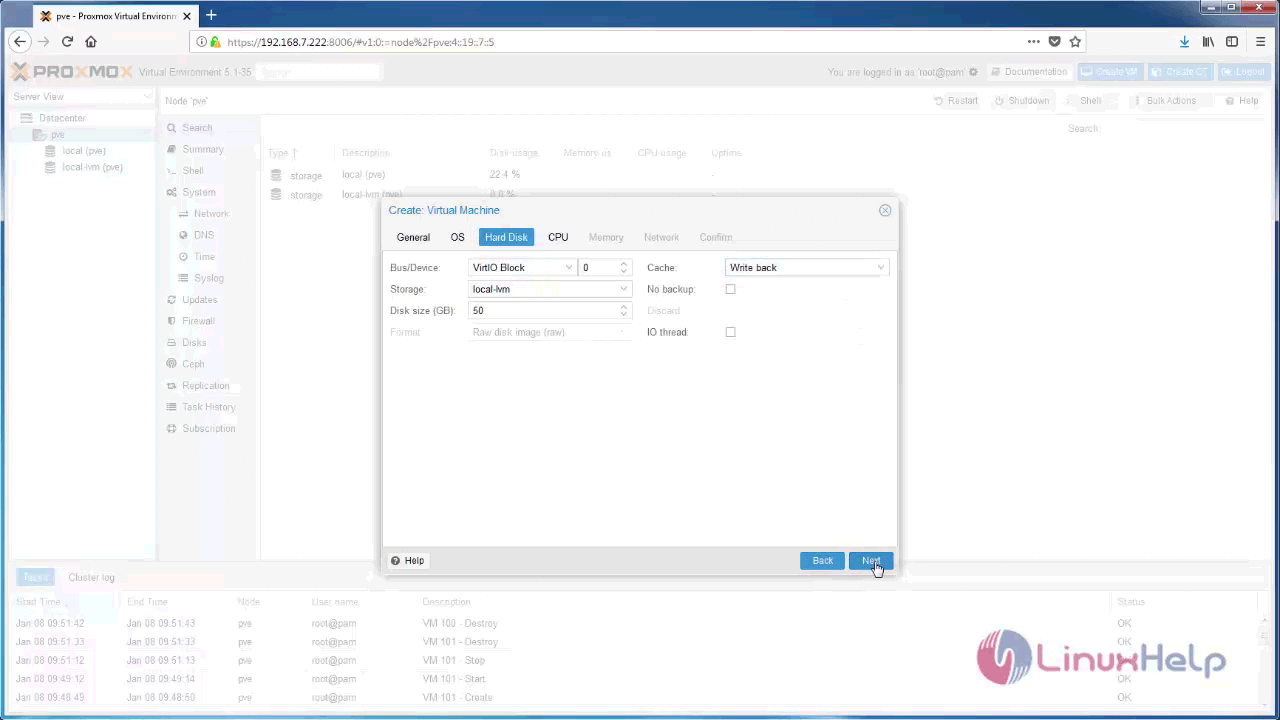
After that, you need to configure CPU and proceed further.
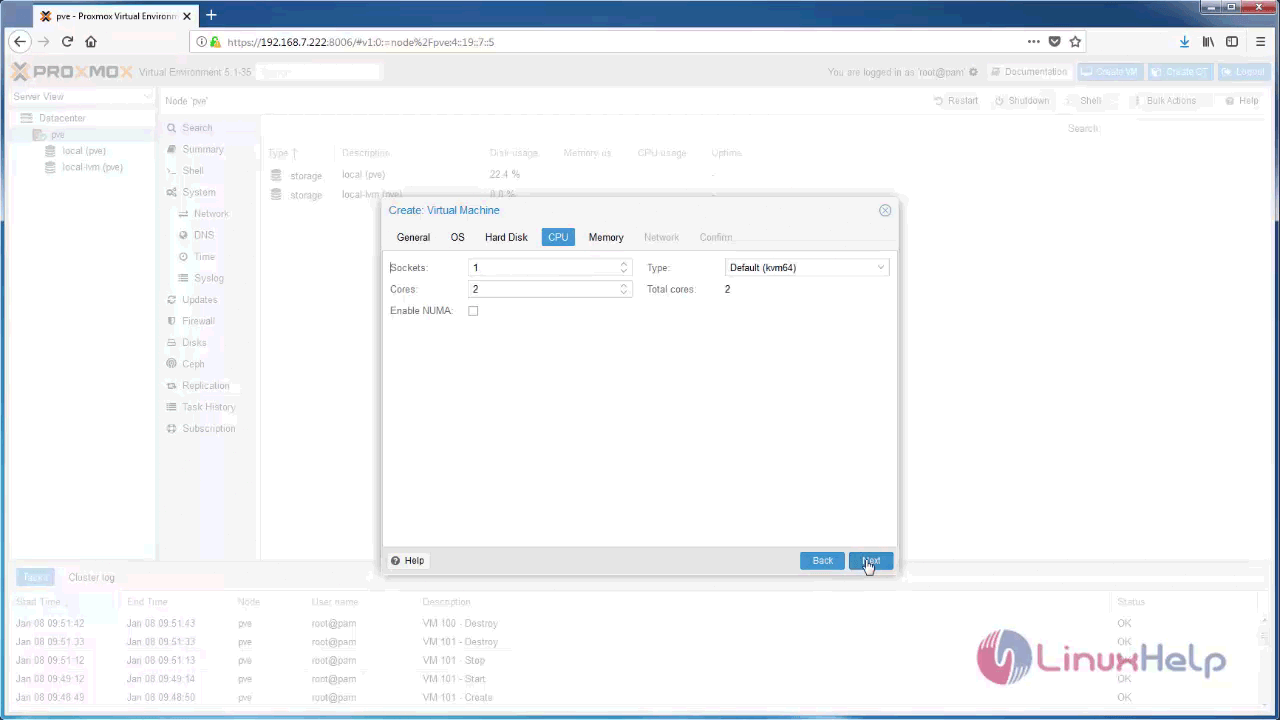
Later, in the next step, you need to allocate memory Size for RAM
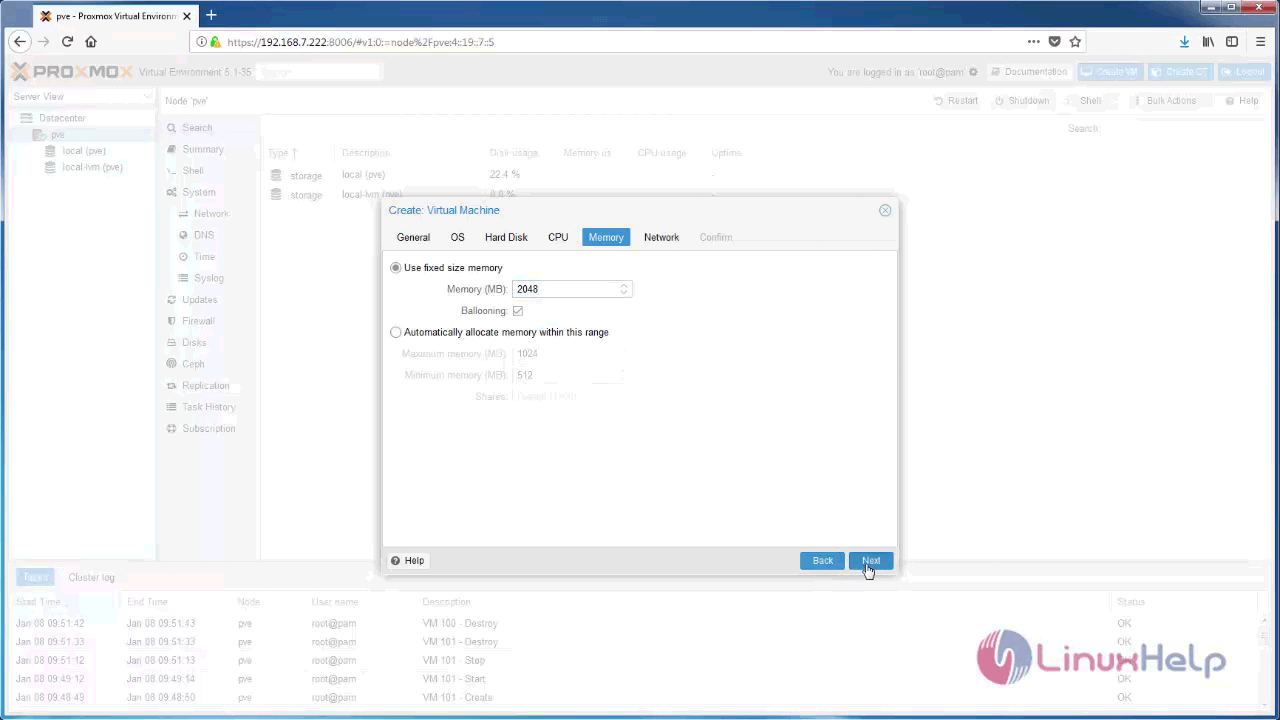
And then, you need to configure your network interface and proceed further to next step.
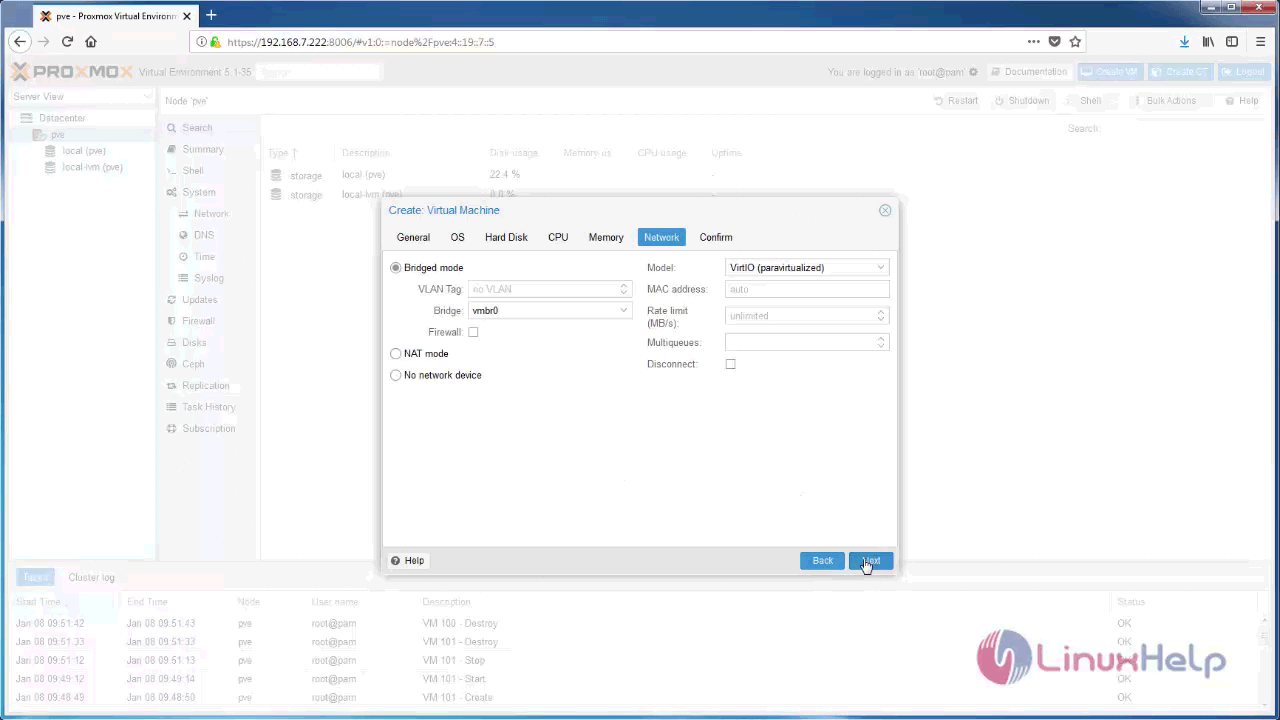
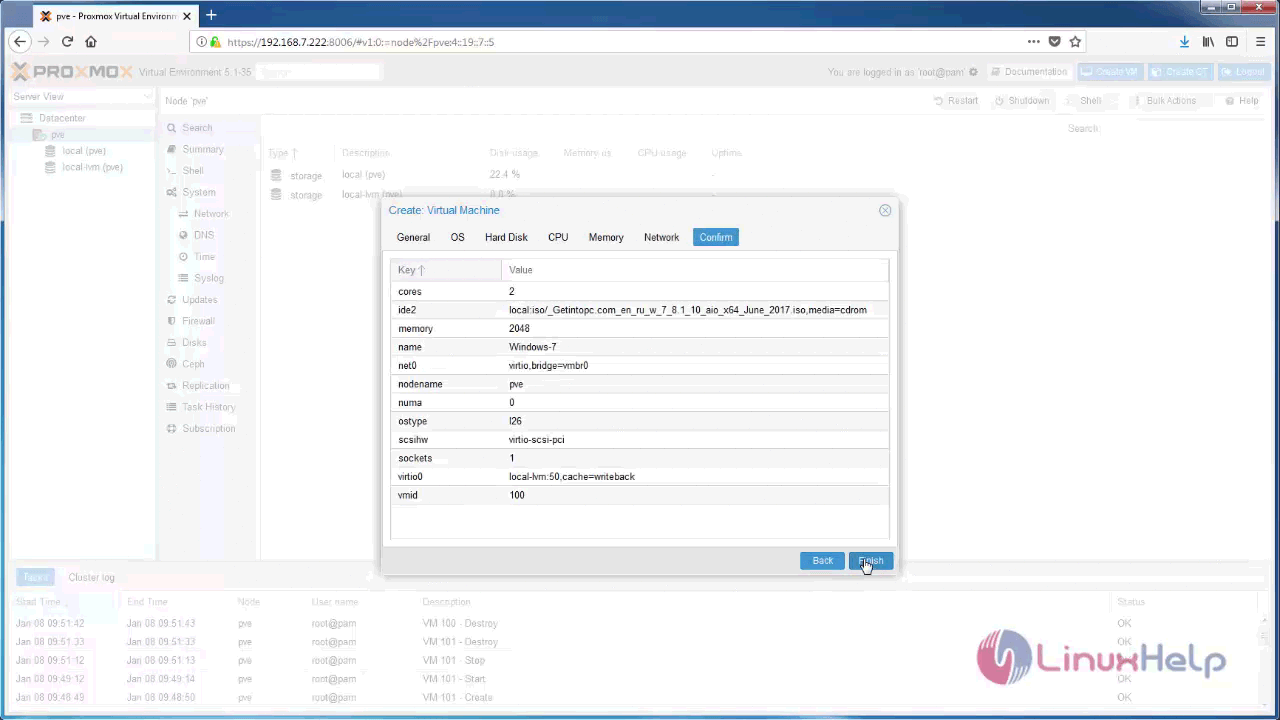
And now, check all the details and click on the Finish button.
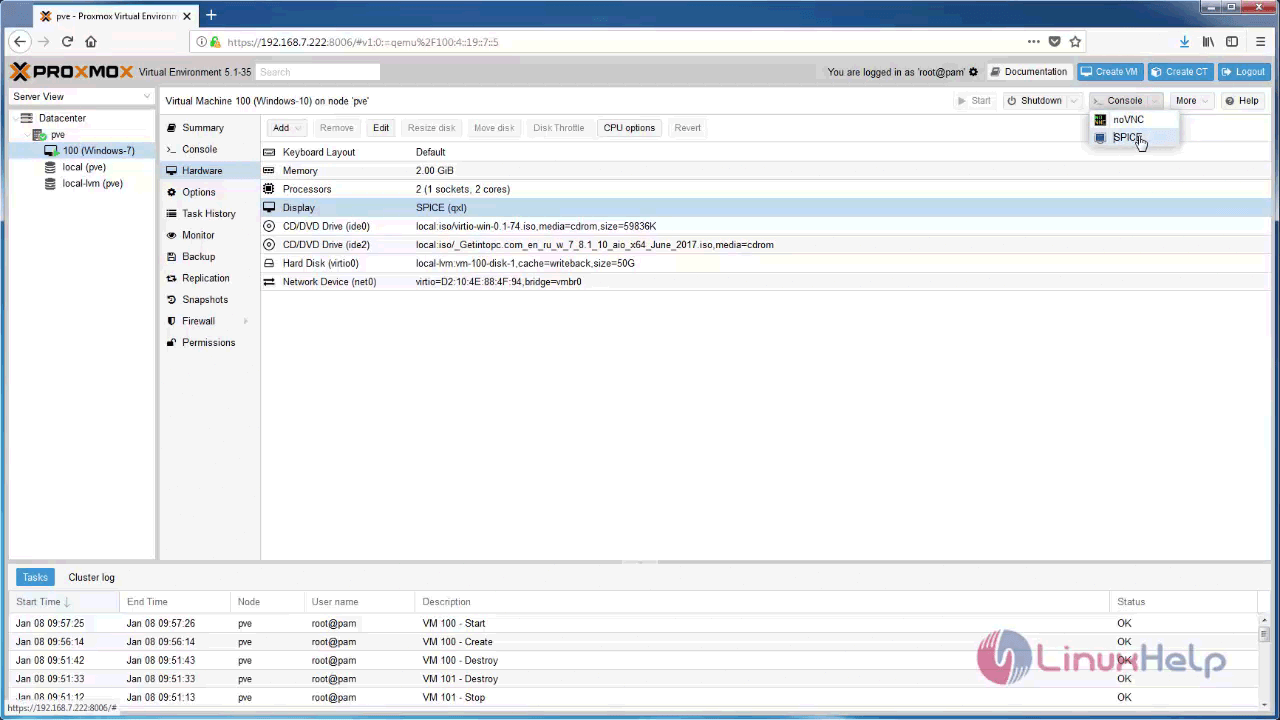
Afterwards, click display and choose your display type as SPICE.

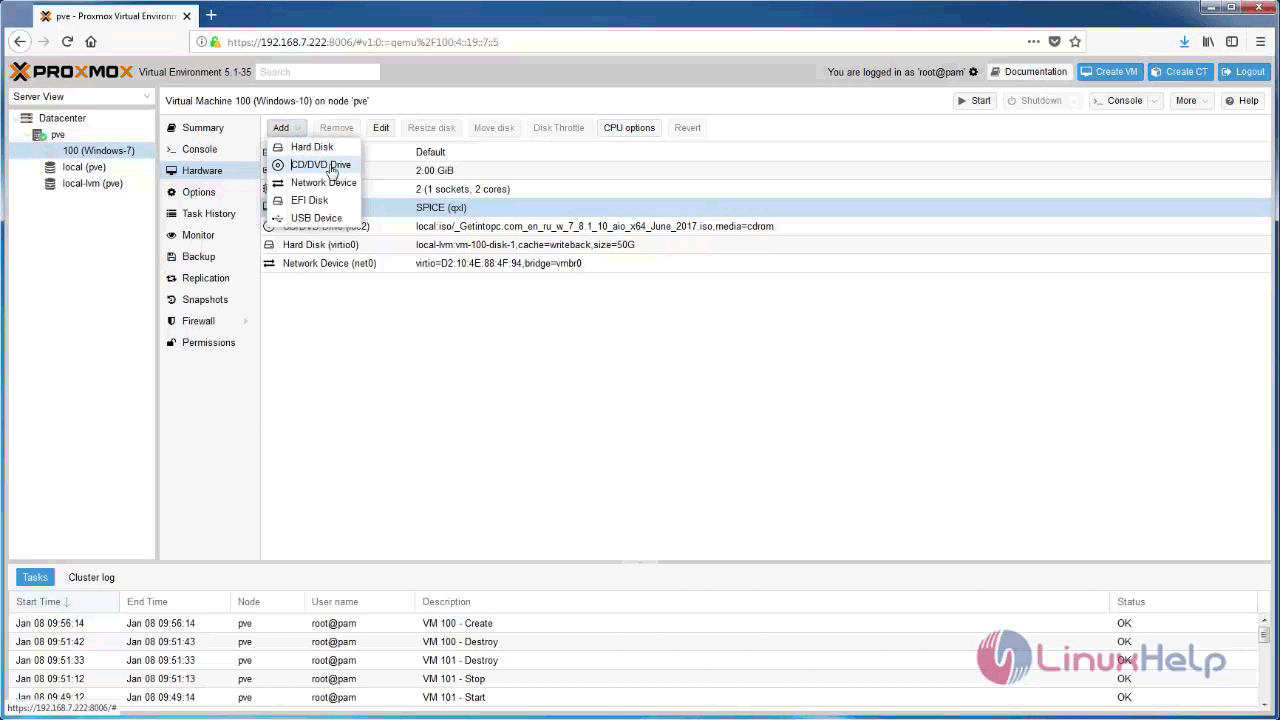
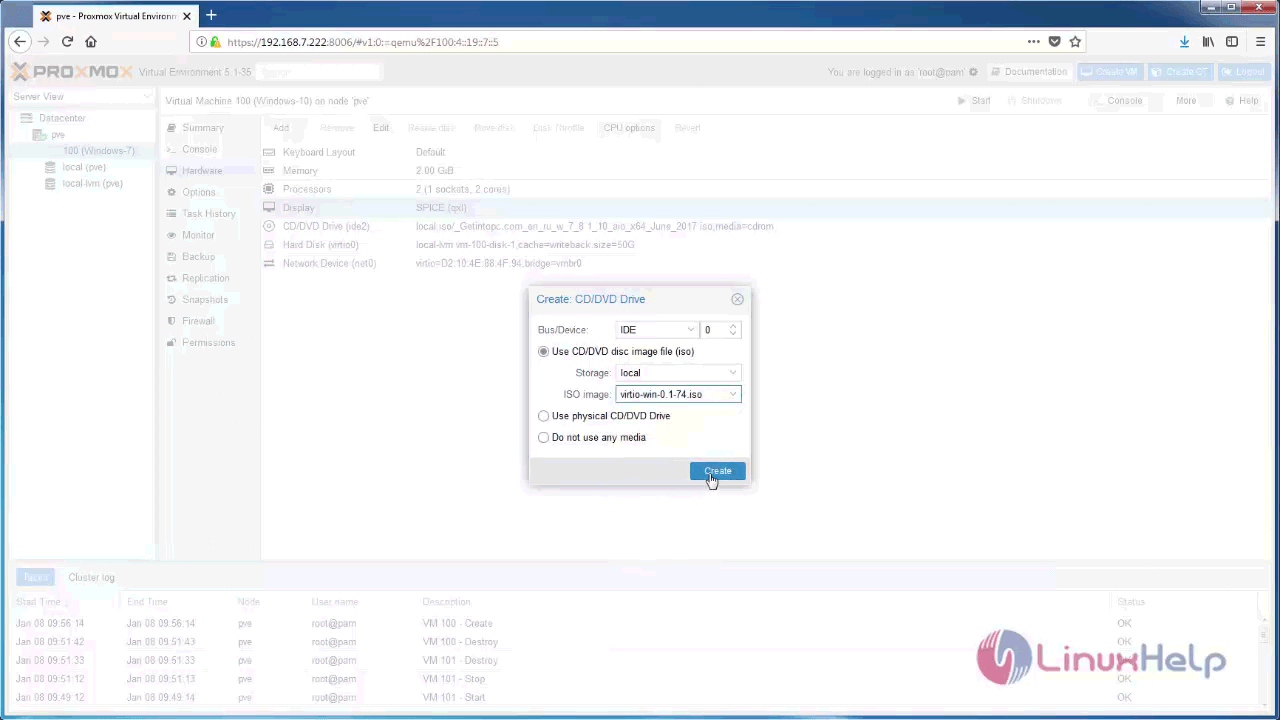
Now, You need to add the secondary DVD Drive for inserting VirtIO Drivers ISO.
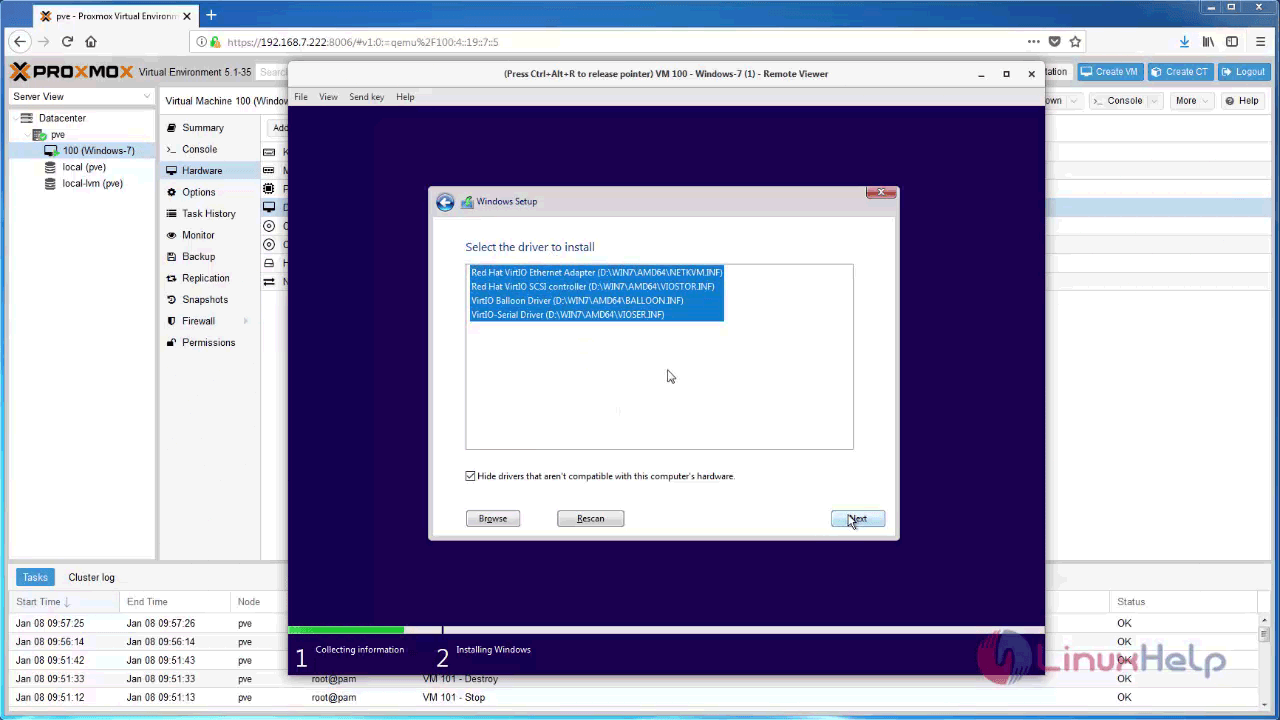
After that, you need to choose your VirtIO drivers.ISO
And then, click “ Start” to power on your vm, and choose the Console as SPICE.
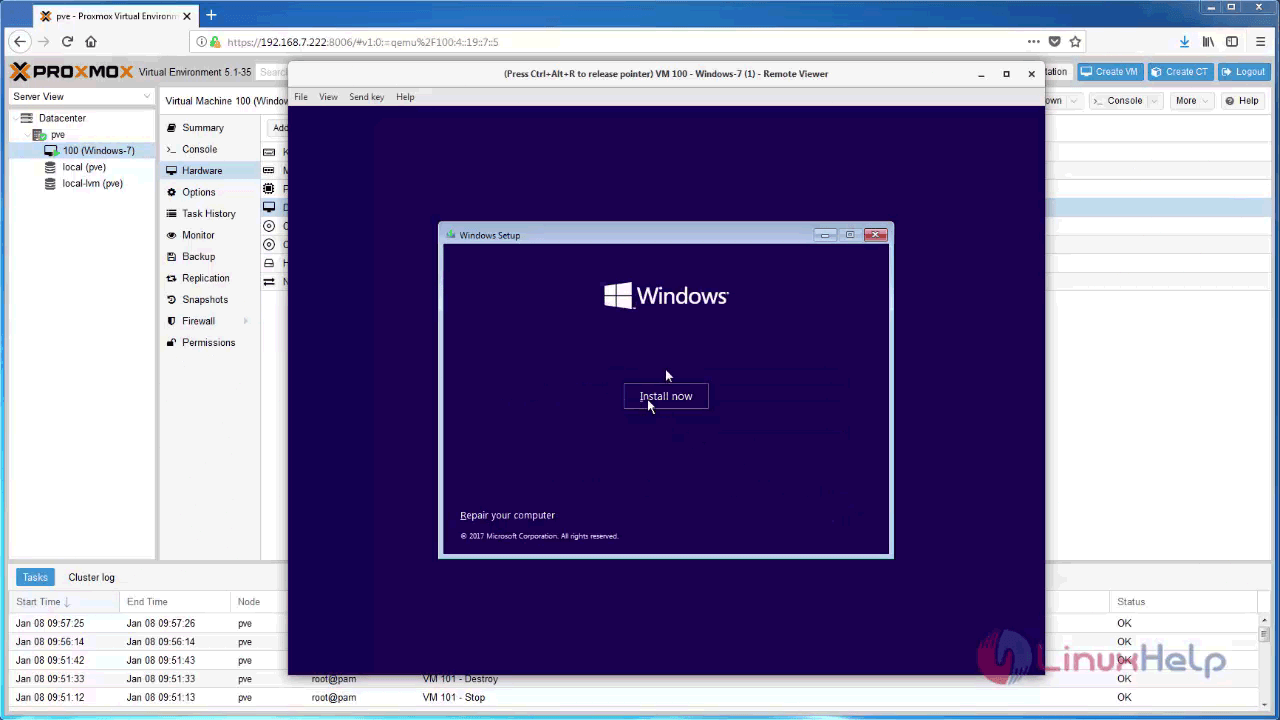
You shall now go on with the installation of the Windows.
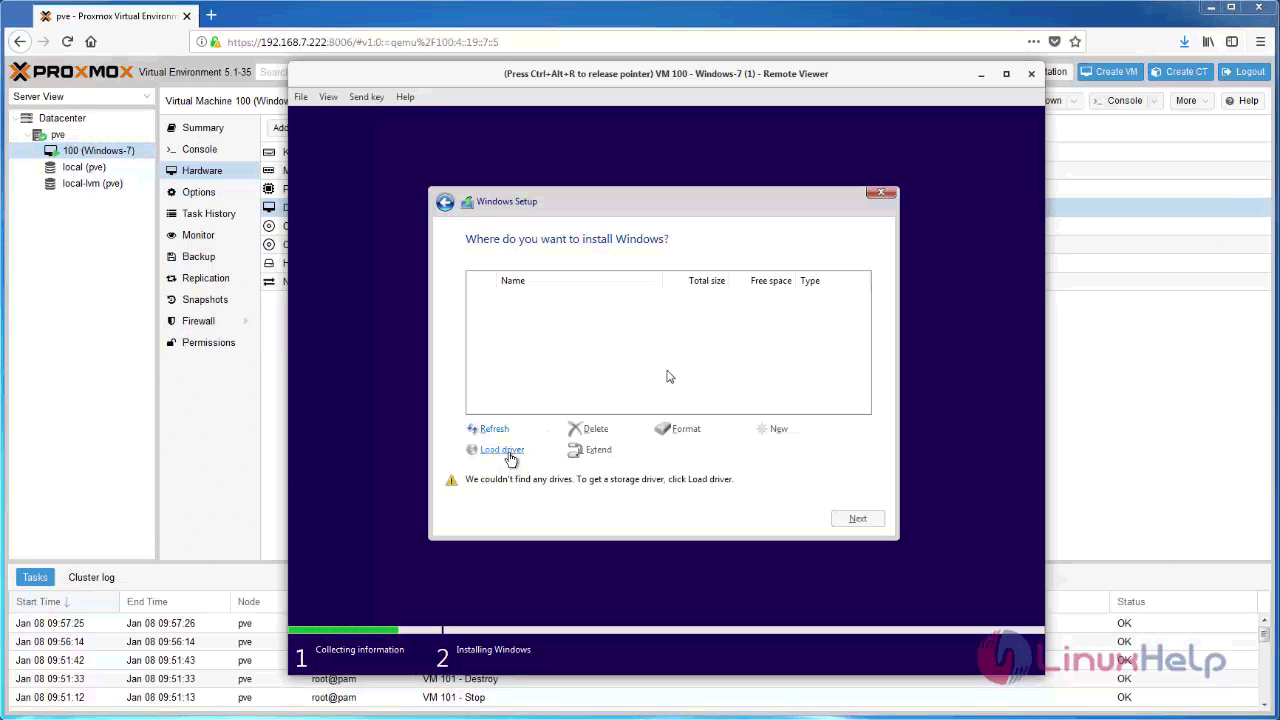
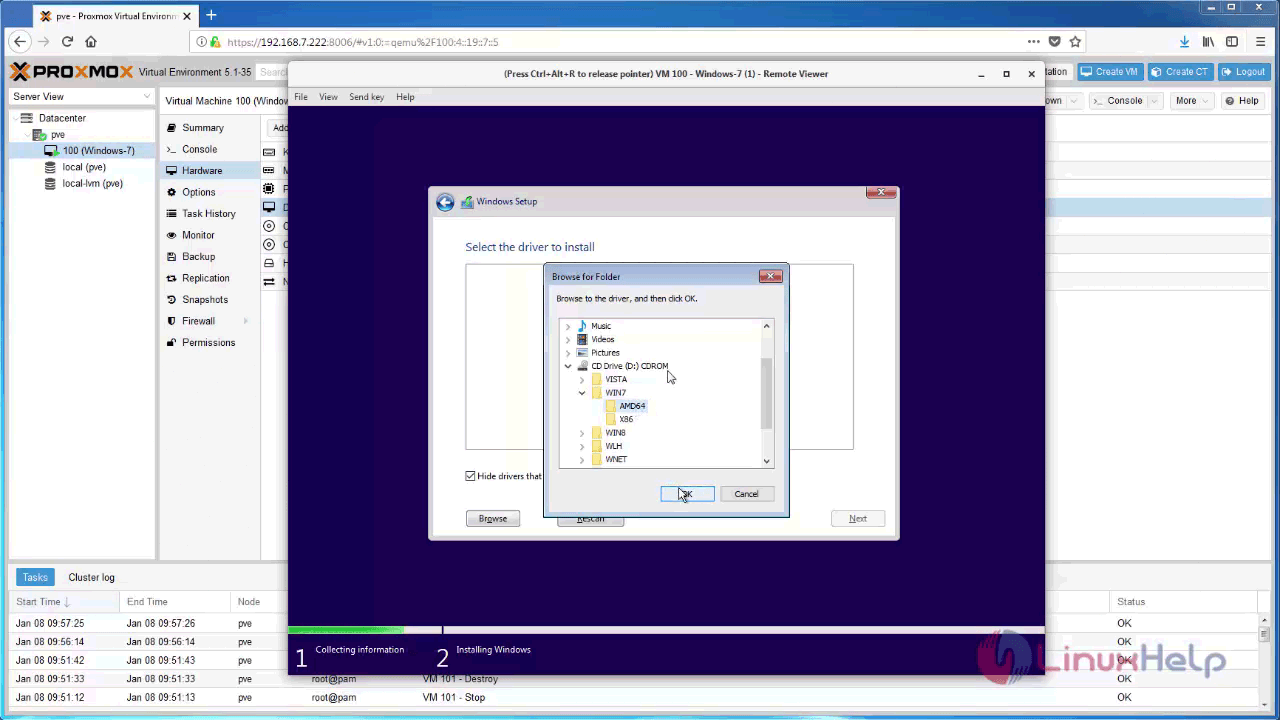
Here the Hard disk is not identified, so we need to install the VirtIO drivers to identify hard disk. Now click Load Driver.
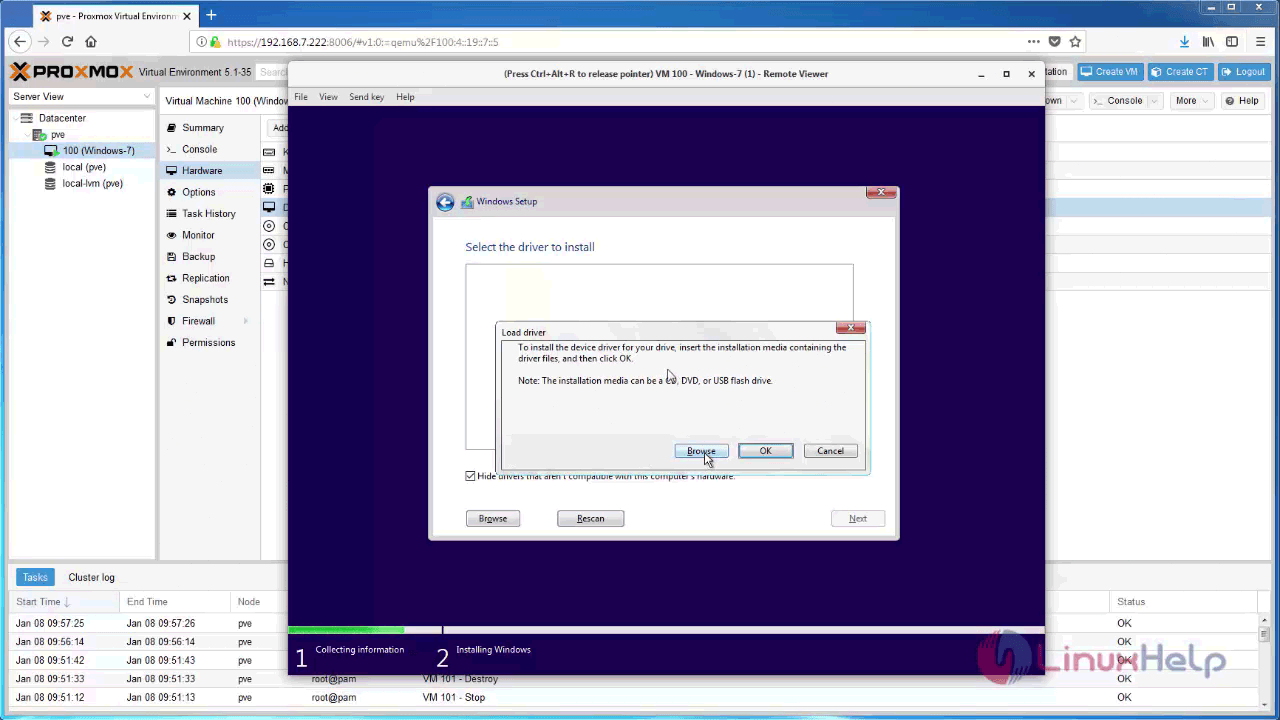
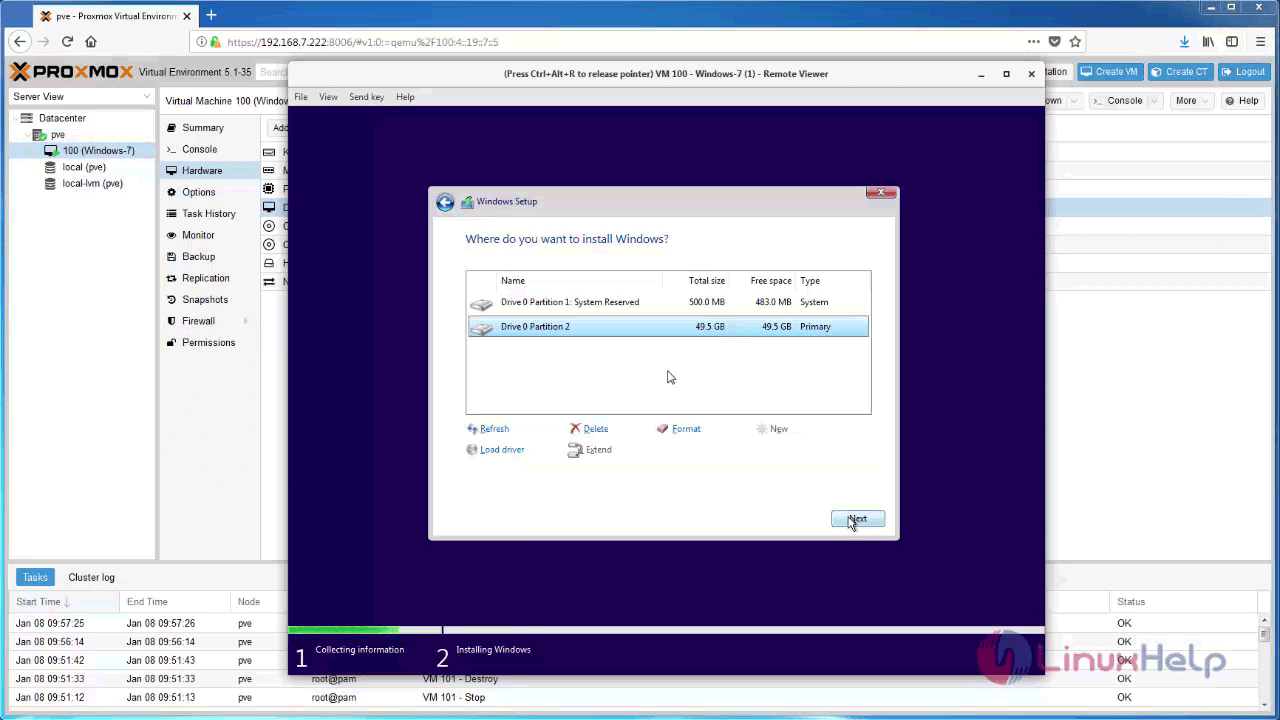
Now, you can find your hard disk, and partition it for Windows 7 installation.
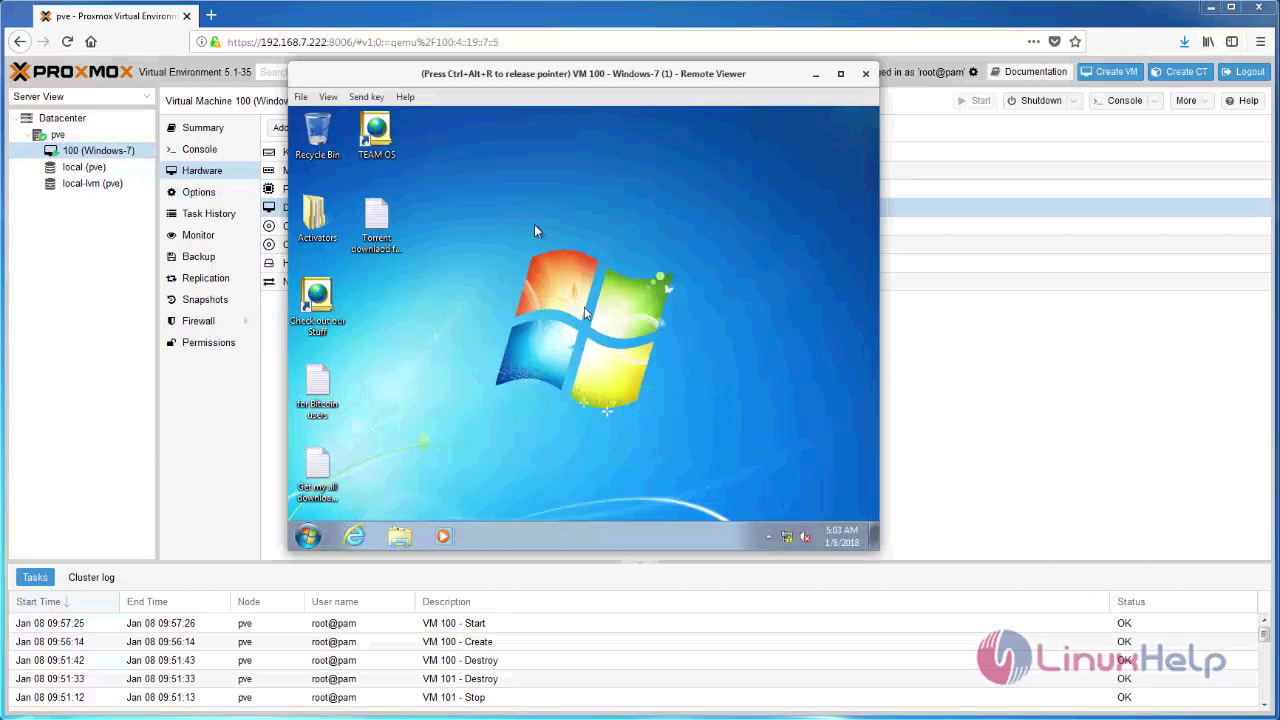
You are now in the penultimate stage of your Windows 7 installation.
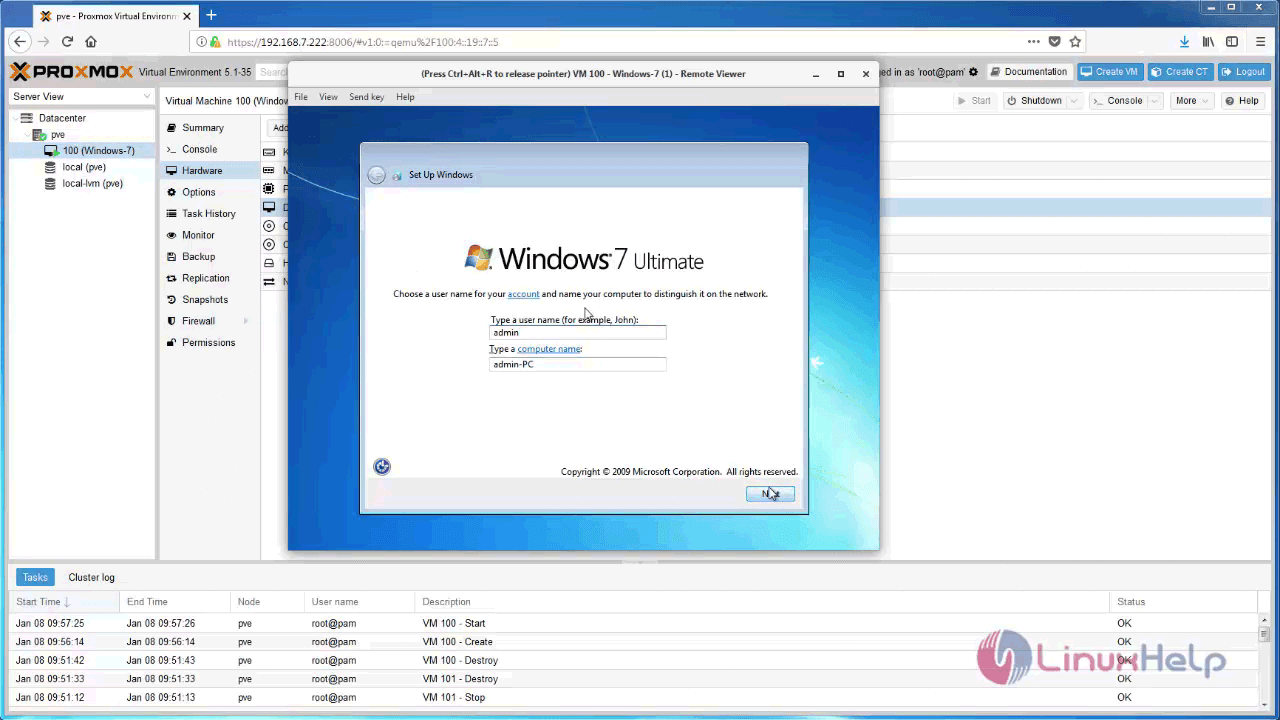
You are now asked to set up the windows. Give the necessary credentials.
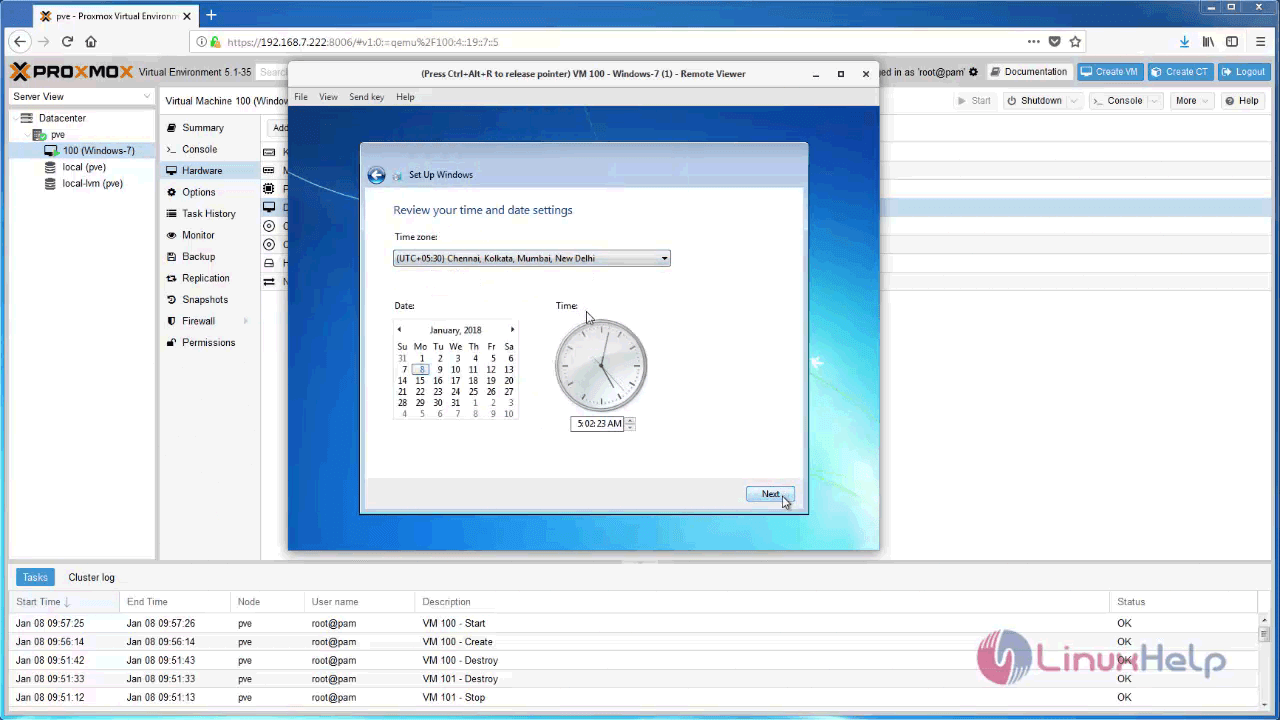
And then review your time and date settings.
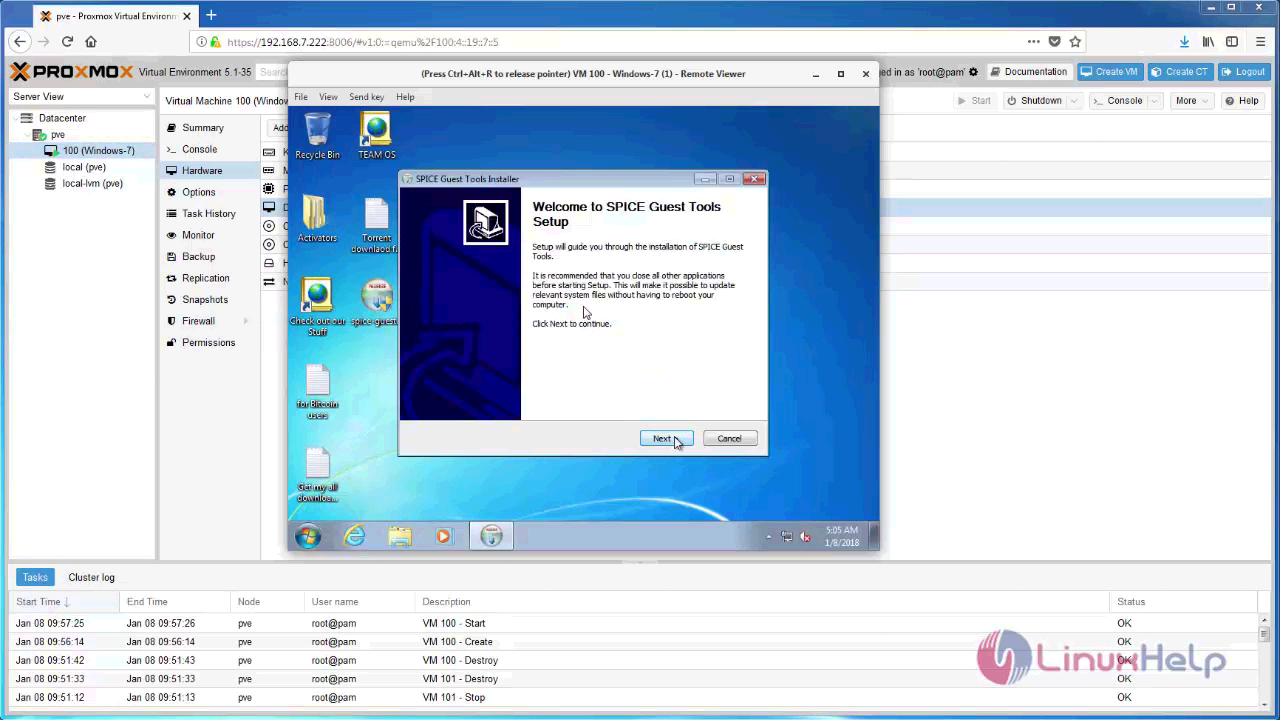
After completing the windows 7 installation you need to install guest tools for windows 7 VM, download it from spice official website https://www.spice-space.org/download.html.
The License agreement now appears on screen. Accept it and proceed.

Your SPICE Guest Tools setup now appears on your screen.
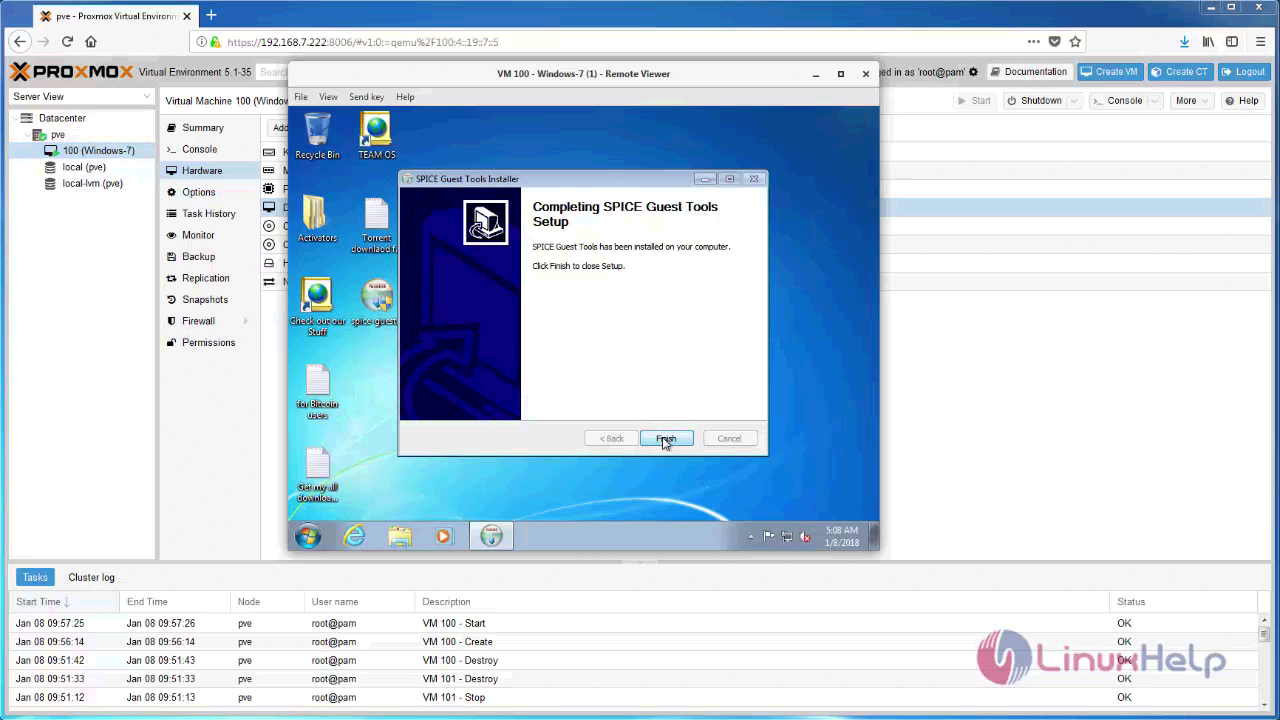
The setup is now done.
With this, the method to install Proxmox on Windows 7 comes to an end.
In order to upgrade to a guest to Windows 11 or to passthrough a GPU the way it’s recommended in the official Proxmox documentation, you need to make sure the guest uses UEFI to boot.
By default, Proxmox uses SeaBIOS, thus chances are high that your Windows guest was installed in BIOS mode.
Gladly, in Windows 10, there’s a quick and easy fix to that. In this guide, I’ll walk you through the steps needed to convert your Proxmox Windows guest to UEFI.
This guide is based on the information provided in a Reddit post by user Browncow8.
Prerequisites
Before you begin, you’ll need to make sure that your Windows guest meets the following prerequisites:
- It is running Windows 10 version 1703 or later
Converting the Windows Guest to UEFI
Once you have the prerequisites in place, follow these steps to convert your Proxmox Windows guest to UEFI:
- Open Command Prompt as an administrator in the guest machine.
- Run the following command to validate the conversion process:
mbr2gpt /validate /allowFullOS - If the validation is successful, run the following command to convert the disk to GPT format:
mbr2gpt /convert /disk:0 /allowFullOS - Power down the machine.
- Open the Proxmox web interface and navigate to the options for the guest machine.
- Add a new “EFI disk” to the guest machine, making sure to enable the “Pre-Enrolled-Keys” option.
- Add a new “TPM” device to the guest machine. (only necessary if you plan to upgrade to Windows 11)
- Change the “BIOS” option from “SeaBIOS” to “OVMF”.
- Change the “Machine” option to “q35”. (only if you wish to passthrough the GPU as a PCIe device)
- Start the guest machine.
_Note: If you receive an error saying Failed to update ReAgent.xml, it refers to the hidden recovery environment and it should be ok to ignore it, or you can try
reagentc /disablefollowed by
reagentc /enableThat’s it! You have successfully converted your Proxmox Windows guest to UEFI.
If you’re performing GPU passthrough to the Windows guest, make sure to follow the additional steps found in the Proxmox documentation at https://pve.proxmox.com/wiki/Pci_passthrough#GPU_Passthrough.
If you encounter any problems during the conversion process or with GPU passthrough, refer to the Proxmox documentation or seek help from the Proxmox community forums.