
1. Resizing guest disk
General considerations
When you resize the disk of a VM, to avoid confusion and disasters think the process like adding or removing a disk platter.
If you enlarge the hard disk, once you have added the disk plate, your partition table and file system knows nothing about the new size, so you have to act inside the VM to fix it.
If you reduce (shrink) the hard disk, of course removing the last disk plate will probably destroy your file system and remove the data in it! So in this case it is paramount to act in the VM in advance, reducing the file system and the partition size. SystemRescueCD comes very handy for it, just add its iso as cdrom of your VM and set boot priority to CD-ROM.
Shrinking disks is not supported by the PVE API and has to be done manually.
Another page (deleted) with overlapping content was Resizing disks | Archive
qm command
You can resize your disks online or offline with command line:
qm resize <vmid> <disk> <size>
exemple: to add 5G to your virtio0 disk on vmid100:
qm resize 100 virtio0 +5G
For virtio disks:
Linux should see the new size online without reboot with kernel >= 3.6
Windows should see the new size online without reboot with last virtio drivers.
for virtio-iscsi disk:
Linux should see the new size online without reboot with kernel >= 3.7
Windows should see the new size online without reboot with last virtio drivers.
Using GUI
You can also select your VM from the list > Hardware > Hard Disk > Disk Action > Resize
You will be presented with the option of increasing the disk size:
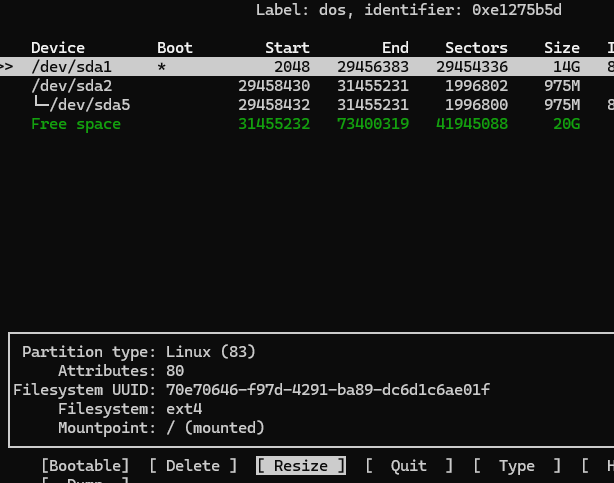
2. Enlarge the partition(s) in the virtual disk
Depending on the installed guest there is several diffent ways to resize the partions
Offline for all guests
Use gparted or similar tool (recommended)
In gparted and possibly most other tools, LVM and Windows dynamic disc is not supported
Boot the virtual machine with gparted or similar tool, enlarge the partion and optionally the file system. With som linux clients you often need to enlarge the extended partion, move the swappartion, shrink the extended partion and enlarge the root partion. (or simple delete the swap and partion andre create it again — but remember to activwate the swap agin (last step).
Gparted have some warnings about some specific operations not well supported with windows guest — outside the scope of this document but read the warnings in gparted.
Online for Windows Guests
- Guest is Windows 7, Windows Vista or Windows Server 2008
- logon as administrator and extend the disk and filesystem (Using Disk manager)
- For more info www.petri.co.il/extend-disk-partition-vista-windows-server-2008.htm
- Guest is Windows 10: logon as administrator and extend the disk and filesystem (Using Disk manager). If you do not see the ability to extend the disk (i.e. nothing seems to have happened as a result of using the resize command), go to the Windows command prompt and do a: shutdown -s -t 0 (This is a «normal» shutdown, as opposed to the «fast» shutdown that’s the default for Win 8 and onwards.) After a reboot, you’ll now see the ability to expand the disk.
Online for Linux Guests
Here we will enlarge a LVM PV partition, but the procedure is the same for every kind of partitions.
Note that the partition you want to enlarge should be at the end of the disk.
If you want to enlarge a partition which is anywhere on the disk, use the offline method.
- Check that the kernel has detected the change of the hard drive size
(here we use VirtIO so the hard drive is named vda)
dmesg | grep vda
[ 3982.979046] vda: detected capacity change from 34359738368 to 171798691840
Example with EFI
- Print the current partition table
fdisk -l /dev/vda | grep ^/dev
GPT PMBR size mismatch (67108863 != 335544319) will be corrected by w(rite).
/dev/vda1      34     2047     2014 1007K BIOS boot
/dev/vda2    2048   262143   260096  127M EFI System
/dev/vda3  262144 67108830 66846687 31.9G Linux LVM
- Resize the partition 3 (LVM PV) to occupy the whole remaining space of the hard drive)
parted /dev/vda
(parted) print
Warning: Not all of the space available to /dev/vda appears to be used, you can
fix the GPT to use all of the space (an extra 268435456 blocks) or continue
with the current setting?
Fix/Ignore? F
(parted) resizepart 3 100%
(parted) quit
Example without EFI
Another example without EFI using parted:
parted /dev/vda
(parted) print
Number  Start   End     Size    Type      File system  Flags
1       1049kB  538MB   537MB   primary   fat32        boot
2       539MB   21.5GB  20.9GB  extended
3       539MB   21.5GB  20.9GB  logical                lvm
Yoy will want to resize the 2nd partition first (extended):
(parted) resizepart 2 100%
(parted) resizepart 3 100%
- Check the new partition table
(parted) print
Number  Start   End     Size    Type      File system  Flags
1       1049kB  538MB   537MB   primary   fat32        boot
2       539MB   26.8GB  26.3GB  extended
3       539MB   26.8GB  26.3GB  logical                lvm
(parted) quit
3. Enlarge the filesystem(s) in the partitions on the virtual disk
If you did not resize the filesystem in step 2
Online for Linux guests with LVM
Enlarge the physical volume to occupy the whole available space in the partition:
pvresize /dev/vda3
List logical volumes:
lvdisplay
 --- Logical volume ---
 LV Path                /dev/{volume group name}/root
 LV Name                root
 VG Name                {volume group name}
 LV UUID                DXSq3l-Rufb-...
 LV Write Access        read/write
 LV Creation host, time ...
 LV Status              available
 # open                 1
 LV Size                <19.50 GiB
 Current LE             4991
 Segments               1
 Allocation             inherit
 Read ahead sectors     auto
 - currently set to     256
 Block device           253:0
Enlarge the logical volume and the filesystem (the file system can be mounted, works with ext4 and xfs).
Replace «{volume group name}» with your specific volume group name:
#This command will increase the partition up by 20GB
lvresize --size +20G --resizefs /dev/{volume group name}/root
#Use all the remaining space on the volume group
lvresize --extents +100%FREE --resizefs /dev/{volume group name}/root
Online for Linux guests without LVM
Enlarge the filesystem (in this case root is on vda1)
resize2fs /dev/vda1
Если на диске виртуальной машины Proxmox заканчивается свободное место, его можно расширить. В большинстве случае увеличить размер виртуального диска можно на лету, без остановки виртуальной машины (у ВМ не должно быть снапшотов).
- Откройте веб интерфейс PVE, выберите виртуальную машину и перейдите на вкладку Hardware.
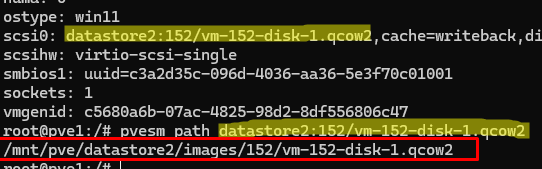
- Выберите ваш диск: hard disk (scsi0) в моем примере.
- Здесь видно, что диск хранится в хранилище datastore2, тип диска qcow2, размер 40 Гб, имя файла диска vm-152-disk-1.qcow2, идентификатор VM ID – 152.
Проверьте, что на хранилище, на котором находится диск виртуальной машины достаточно свободного места:
# pvesm status

Вывести информацию о виртуальной машине по ее ID:
# qm config 152
Получить полный путь к файлу виртуального жесткого диска:
# pvesm path datastore2:152/vm-152-disk-1.qcow2
Чтобы узнать, сколько места фактически занимает в хранилище виртуальный диск, используйте команду:
# qemu-img info /mnt/pve/datastore2/images/152/vm-152-disk-1.qcow2
В этом примере фактический размер диска 19.5 Гб (disk size). При этом в виртуальной машине размер отображается как 40 Гб (virtual size).

Чтобы увеличить размер диска, выберите в верхнем меню Disk Action -> Resize
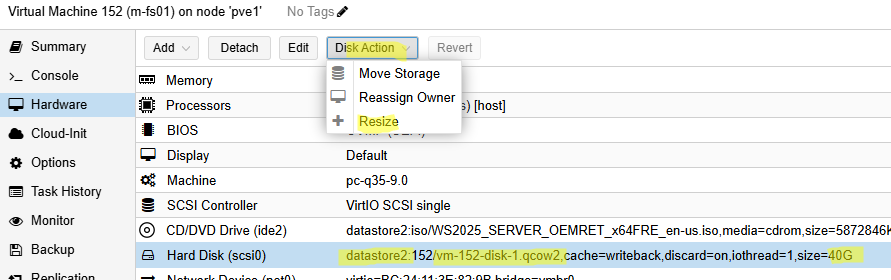
Укажите, на сколько Гб нужно расширить диск.
Можно изменить размер виртуального диска из консоли с помощью команды qm resize:
qm resize [VM_ID] [DISK_NAME] +[SIZE_INCREASE]G
Следующая команду увеличит размер диска на 10 Гб:
# qm resize 152 scsi0 +10G
Итак, вы увеличили размер виртуального диска в Proxmox, но гостевая операционная система еще не знает, что диск был увеличен. Нужно расширить раздел диска и файловую систему в гостевой ВМ.
Сначала рассмотрим, как увеличить размер диска в гостевой Windows (Установка гостевой Windows в виртуальную машину Proxmox) для увеличения размера раздела используется графическая оснастка Disk Management (
diskmgmt.msc
).
- Откройте на консоль виртуальной машины. Выполните вход в Windows и запустите консоль управления дисками
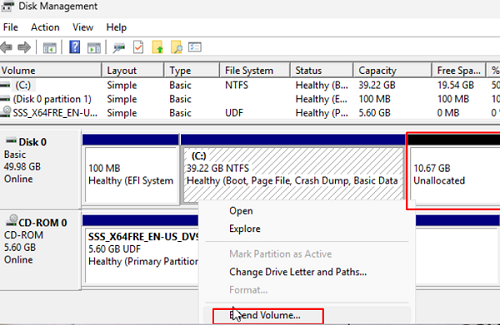
- Выберите Action -> Rescan Disks, чтобы обновить информацию о дисках
- В конце диска должно появится дополнительное место, которое вы добавили. Оно помечено черным цветом как Неразмеченное (Unallocated).
- Щелкните по разделу, который вы хотите расширить (он должен находится слева от неразмеченного пространства) и выберите Extend Volume.

- Выберите, на сколько вы хотите расширить раздел (укажите все доступное место)
- Нажмите Next -> Finish. Проверьте, что диск в Windows был успешно увеличен.
Пункт Расширить том будет недоступен, если между разделом, который вы хотите расширить и дополнительно добавленным местом есть другие разделы (как правило, это раздел восстановления Windows). По ссылке доступен подробный гайд для этого случая.
Увеличение размера виртуального диска в Linux.
Выведите информацию о свободном месте на разделах:
# df -h

В данном случае размер корневого раздела 12 Гб. Выполните следующую команду:
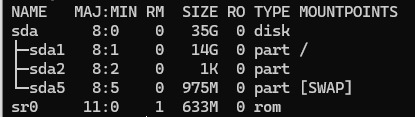
# dmesg | grep sda
sda: detected capacity change from xxxxx to xxxxx
[sda] 512-byte logical blocks 35.0 GiB

Выведем информацию об устройствах и точках монтирования:
# lsblk
В данном случае у нас не используется LVM тома и нужно расширить корневой раздел sda1.
Для расширения раздела, если он не смонтирован удобно использовать утилиту parted (установите ее, если отсутствует). Формат команды увеличения раздела:
parted /dev/<DISK> resizepart <PARTITION_NUMBER> 100%
Если нужно расширить корневой раздел, запустите утилиту:
# cfdisk
На диске /dev/sda есть свободное место 20Gb. Выбираем раздел, который нужно расширить (у нас это sda1) и в меню нажимаем Resize. Увеличим его до максимального размера. Чтобы сохранить изменения, нужно выбрать в меню пункт Write.
После этого нужно расширить файловую систему (у нас это ext4):
# resize2fs /dev/sda1
Если у вас используются LVM тома, то для увеличения раздела будет использоваться такая последовательность.
Увеличить размер физического раздела утилитой:
# cfdisk
Сообщаем LVM, что физический раздел увеличен:
# pvresize /dev/sda3
Расширяем логический LVM том:
# lvextend -l +100%FREE /dev/mapper/ubuntu--vg-ubuntu—lv
Расширяем файловую систему:
# resize2fs /dev/mapper/ubuntu--vg-ubuntu--lv
Introduction
This guide will tackle increasing your VM disk space in Proxmox. It’s easier than you think, and I’ll walk you through every step. So, let’s get your VMs the room they need to breathe and grow!

Understanding VM Disk in Proxmox
Before we jump into expanding disk space, let’s understand what a VM disk in Proxmox is. Essentially, a VM disk in Proxmox is a virtual hard drive. It’s where your virtual machine stores its operating system, applications, and data. Like a physical hard drive, this virtual disk has a fixed size – but with a twist. Unlike physical hardware, you can resize this virtual disk as your needs change.
In Proxmox, VM disks are managed through storage pools consisting of local storage, network-attached storage (NAS), or even more complex configurations like SAN (Storage Area Network). Each VM disk is a file or a block device on these storage pools, and they can be in various formats like qcow2, raw, or others, depending on your setup and requirements.
Understanding these basics is key to effectively managing your VMs.

Why should you create a new VM Disk in Proxmox?
Creating a new VM Disk in Proxmox can help handle various needs, not the least of which is expanding your storage capacity. Picture this: your data is growing rapidly, and the current storage cannot keep up. Sounds scary, right? This is where the concept of creating a new disk comes to the rescue. You can use it for storing virtual machines, containers, and images. Additionally, NVMe disks, affordable and known for their speed, make for excellent choices when you’re considering adding a new VM Disk. Trust me, your Proxmox host will love it!
Does increasing disk size affect my data?
The short answer is, no, it should not. Increasing the size of your VM Disk in Proxmox doesn’t translate to immediate data loss. It is more like adding an extra room to your house to store more items. You get extra storage space to accommodate more data. However, a word to the wise: messing up with partitions while increasing disk size without knowing what you’re doing can lead to data loss. Hence, it’s highly recommended to back up your data before making any changes for your peace of mind.
Back-Up Your Data for Safety
A backup becomes essential for data safety as your virtual machine (VM) grows. With Proxmox, you can use the newly added storage space as backup storage for your VMs and containers. Just follow these steps:
- Select the VM to back up in the Proxmox web interface.
- Click on the “Backup” button in the top menu.
- In the “Backup” window, select the new storage space as the “Storage” target and configure other backup options as needed. Click “Backup” to start.
- Monitor the backup progress in the “Task Log” tab.
Now, you can rest easy knowing your data is safe and sound.

- In the left-hand pane, click on ‘Datacenter’, then select the server, and finally choose the VM where you want to add the disk
- With the VM selected, click on the ‘Hardware’ tab in the right-hand pane.
- Click the ‘Add’ button and select ‘Hard Disk’ from the dropdown menu.

A new window will appear where you can configure the disk settings:
- Storage: Choose the storage where the disk will be located.
- Disk size: Specify the size of the new disk.
- Format: Select the disk format (e.g., qcow2, raw).
- Bus/Device: Choose the bus type (e.g., VirtIO, SCSI, IDE).
- Cache: Set the cache mode if necessary.
- Additional options: Configure any additional options as needed.

- After configuring the settings, click ‘Create’. The new disk will be added to your VM.
- The new disk should now be listed under the ‘Hardware’ tab of your VM. You can also verify its presence within the VM’s operating system.
Tips:
- VM State: Adding disks while the VM is shut down is generally recommended to avoid any potential issues.
- Disk Size: Ensure the disk size is within the limits of your storage backend.
How to expand/resize a VM disk in Proxmox
- In the left-hand pane, click on ‘Datacenter’, then select the server, and choose the VM whose disk you want to expand.
- With the VM selected, click on the ‘Hardware’ tab in the right-hand pane.
- Locate the disk you want to expand in the list of hardware components. It’s usually labeled as ‘Hard Disk’ with its corresponding storage device identifier (e.g.,
virtio0,sata0, etc.). - Click on the disk to select it, then click the ‘Disk Action’, Resize
- In the resize dialog, enter the increment size.


- Click ‘OK’ or ‘Resize’ to confirm and apply the new disk size.
Affordable Servers for Virtualization Enthusiasts
Enhance your virtualization experience with these budget-friendly and high-performing servers.
Check the boot order after adding a new VM Disk.
When adding a new disk to a VM in Proxmox, paying attention to the boot order settings is crucial. This step is often overlooked but can be vital, primarily if the new disk is not intended to be the primary boot device. Incorrect boot order settings can lead to boot issues or the VM attempting to boot from the wrong disk.
After adding a new disk, always double-check the VM’s boot order configuration to ensure it aligns with your intended setup. This simple check can save you from potential headaches caused by boot-related problems and ensures a smooth, uninterrupted operation of your VMs

Does reducing VM disk size make sense?
Reducing the size of a VM disk is generally not recommended and can be quite risky. It’s a complex process that often involves shrinking the file system first, which carries a significant risk of data loss if not done correctly. Additionally, many virtualization platforms, including Proxmox, don’t natively support reducing the size of a VM disk due to these risks. However, advanced users may be able to utilize tools such as GParted to safely and effectively reduce the size of the VM disk.
In most cases, it’s safer and more practical to manage disk usage within the VM, such as by deleting unnecessary files or using disk cleanup tools, rather than attempting to reduce the disk size itself. If you need a smaller disk size, it’s often better to create a new VM with the desired disk size and migrate the necessary data. However, some virtualization software may offer a resize option that allows you to adjust the disk size without creating a new VM.
Dealing with Different Operating Systems
Understanding Windows Partitions Created During Installation
When you install Windows on a virtual machine, the setup process automatically creates several partitions, each serving a specific purpose. The most notable ones are:
- This small partition, usually around 100-500 MB, is crucial for booting Windows. It contains the Boot Manager, Boot Configuration Data, and other system files needed for startup.
- This is the main partition where the Windows operating system, your applications, and files are stored. Its size varies depending on the total disk space allocated during installation.
Understanding these partitions is key when resizing or modifying your VM’s disk space, especially if you want to increase the boot partition size.
When setting up a Windows VM in Proxmox, carefully plan your disk space allocation. Ideally, size the installation disk (C: drive) appropriately before installing Windows, ensuring it has enough space for the operating system and essential applications. This foresight can prevent the need for complex resizing operations later on.
Adding a separate disk to your virtual machine is a good idea if you need more storage space for things like user data, documents, or specific applications. You can mount this disk as the D: drive (or any other letter you prefer) within Windows. This approach makes it easier to manage your disks, keeps your data organized, and can help improve your system’s performance and backup efficiency.
The screenshot below displays the resized Proxmox disk we completed earlier. However, only the last partition can be expanded in the Windows guest, not the C Drive.
However, with partition tools, you can rearrange the partition Windows created during setup. This process needs more time, and I don’t recommend it.

Some references for Partition management.
- Quora Discussion on Partition Management Tools: This Quora thread discusses various tools for managing hard disk partitions in Windows, including built-in options and third-party software.
- How to Geek Guide: This How to Geek article explains how to manage partitions on Windows without downloading any additional software, focusing on using the built-in Disk Management tool.
Initializing and Using a New VM Disk in Windows
Step 1: Add a New Disk to Your VM in Proxmox
- Before starting with Windows, ensure you’ve added a new disk to your VM in Proxmox. This can be done through the Proxmox web interface under the VM’s ‘Hardware’ tab.
Step 2: Start Your Windows VM
- Boot up your Windows VM where you’ve added the new disk.
Step 3: Open Disk Management in Windows
- Once logged into Windows, right-click the ‘Start’ button and select ‘Disk Management’. This utility allows you to manage disk drives in Windows.
Step 4: Initialize the New Disk
- In Disk Management, you should see the new disk listed as ‘Unknown’ and ‘Not Initialized’.
- Right-click on the new disk, select “Online” and then ‘Initialize Disk’.
- Choose the partition style: MBR (Master Boot Record) or GPT (GUID Partition Table). GPT is recommended for modern systems.

Step 5: Create a New Volume
- After initializing, right-click on the unallocated space of the new disk and select ‘New Simple Volume’.
- Follow the New Simple Volume Wizard to:
- Specify the volume size.
- Assign a drive letter (like D: or E:).
- If desired, format the volume with a file system like NTFS or REFS (recommended) and set a volume label (disk name).
Step 6: Complete the Setup and Use the Disk
- Once the wizard completes, the new disk will be ready for use and will appear in ‘This PC’ as a new drive with the assigned letter.
Increasing VM Disk Size for Linux Guests
There are a lot of Linux flavors available. I stick to this article for the Ubuntu distro.
In a standard installation of Ubuntu Server 22.04, the partition structure is designed to be straightforward and efficient, particularly when following the recommended setup. The installer primarily creates the following key partition:
- Root Partition (
/): This is the central partition where the Ubuntu operating system and all system files, applications, and user data are stored. It forms the core of the Ubuntu file system hierarchy.
Unlike previous versions, Ubuntu Server 22.04 typically uses a swap file instead of a dedicated swap partition. The system dynamically manages this swap file and resides.
For more detailed information, you can use:
fdisk -l (requires superuser privileges):
- Type
sudo fdisk -land press Enter. - This command provides detailed information about each disk and its partitions, including the type, size, and partition ID.

Adding and Mounting a New Disk in Ubuntu
Step 1: Verify the New Disk
- After adding the new disk to your system, open a terminal.
- Use
lsblkto list all block devices and confirm the new disk is recognized (e.g.,/dev/sdb).

Step 2: Partition the Disk with fdisk
- Start
fdiskwith superuser privileges:sudo fdisk /dev/sdb(replace/dev/sdbwith your disk identifier). - To create a new partition, type
nand follow the prompts to specify partition size and type. - Once you’ve created the partition, type
wto write the changes and exitfdisk.
Step 3: Format the New Partition
- Format the new partition with a file system, like
ext4, using:sudo mkfs.ext4 /dev/sdb1(replace/dev/sdb1with your new partition identifier).
Step 4: Create a Mount Point
- Create a directory to mount the new partition:
sudo mkdir /mnt/newdisk(you can replace/mnt/newdiskwith your preferred mount point).
Step 5: Mount the New Partition
- Mount the partition to the directory:
sudo mount /dev/sdb1 /mnt/newdisk.
Step 6: Automate Mounting on Boot
- To mount the partition automatically at boot, edit the
/etc/fstabfile. - Use
sudo nano /etc/fstab(or your preferred editor) to open the file. - Add a new line:
/dev/sdb1 /mnt/newdisk ext4 defaults 0 2(adjust the partition identifier and mount point as necessary). - Save and close the file.
Step 7: Verify the Setup
- Verify the mounting works:
df -hIt should now show the new partition mounted in your specified directory.

Important Notes:
- Disk Identifier: Replace
/dev/sdband/dev/sdb1with the actual identifiers for your disk and partition. - File System:
ext4It is a common choice, but you can use other file systems as needed.
Before you go..
And there we have it! You’ve just increased your VM Disk in Proxmox, step by step. Now, if you’re as thrilled about Proxmox as I am and wonder how it squares up against other server virtualization platforms, I’ve got just the read for you. Head on over to my other blog post, “Proxmox vs. ESXI: Is Proxmox an alternative to ESXi?” where I dive into a detailed comparison. I’m sure you’ll find it enlightening!
Any purchases made from clicks on links to products on this page may result in an affiliate commission for me.
Please keep in mind that the quantity or price of items can change at any time.
As an Amazon Associate, I earn from qualifying purchases.
Als Amazon-Partner verdiene ich an qualifizierten Verkäufen
Let us take learn how to do the proxmox increase vm disk size with the support of our Proxmox support services at Bobcares.
How to increase VM disk size in Proxmox?
Below, we’ll look at how to increase VM disk space in Proxmox. We’ll be utilizing a Windows virtual machine here, but the procedure will be slightly different depending on the operating system.
Keep in mind that there are adjustments that must be done to the VM.
- In Promox, first, check the VM Disk size using the Proxmox Web Gui. Navigate to Target VM > Hardware > On Harddisk.
Then, using the CLI Console, log in to the Virtual Machine > See also Disk size > Using the Commands Below:
df -h - Take note of the hard drive name (in the example below, it is sata0) and the VM ID (101).
- Open the Shell, then enter the command below, specifying the disk name, VM ID, and the amount of space we want to add to this VM disk.
qm resize [VM_ID] [DISK_NAME] +[SIZE_INCREASE]GExample:
qm resize 101 sata0 +20G - If we return to the VM’s hardware tab, the disk size should be raised.
Windows VM Changes – How to Increase VM Disk Size in Proxmox?
As an example, the disk capacity was raised to 120GB above, but the VM still only has 100GB accessible.
- When we open Disk Management, we can see that the C: disk still only has 100GB available. If the VM is still operating and we don’t notice the newly allocated space, restart it.
- We can observe that there is 20GB of unallocated space after restarting the VM.
- When we see unallocated space, right-click the C: drive (or the disk we want to enlarge) and choose enlarge Volume.
- To begin the Extend Volume Wizard, click Next.
- Change the disk from Available to Selected, then Next (check all other options).
- Choose Finish to complete the proxmox increase vm disk size process.
- The disk should now be enlarged, and it should be using its whole storage space!
Linux VM Changes – How to Increase VM Disk Size in Proxmox
Make a backup of the VM before proceeding. Use the instructions below to locate the partition we want to extend, erase it, and then reconstruct it.
- Locate the disk. (I’m using /dev/sda3, but we’ll just need /dev/sda in the following step.)
sudo fdisk -l - After that Run fdisk:
sudo fdisk [PATH] - To remove the partition, set the partition number (3 in my case for /dev/sda3), create a new partition, and then write the partition, use the instructions listed below.
d

[PARTITION_NUMBER]

default

default

n (if there's a signature)

w
After making the aforementioned modifications, the disk should now be a new size.
[Need assistance with similar queries? We are here to help]
Conclusion
To sum up we have now seen more on how to proxmox increase vm disk size with the support of our tech team.
PREVENT YOUR SERVER FROM CRASHING!
Never again lose customers to poor server speed! Let us help you.
Our server experts will monitor & maintain your server 24/7 so that it remains lightning fast and secure.
GET STARTED
Hello World,
Lately, as you might have noticed, I’m focusing on KVM Virtual machines running Windows operating systems (the recent versions). This post will again focus on KVM virtual machines. We will talk about resizing virtual disks.
It might happen that your virtual machine is running out of space or that you have provisioned too much disk space and you want to change this. This operation can be performed within a Proxmox VE (PVE) infrastructure but only from the command line (the Web interface does not provide this option yet – maybe in version 2.0)
The resizing process is basically a 2-step process and the order of these steps are different if you are increasing or shrinking the size of the disk.
To increase the size of the disk, you will perform the actions in the following order
- increase the size of the virtual disk (through the command line)
- Then, you will increase the size of the partition within the Operating system in order to reflect the changes in disk size.
To Shrink the size of the disk, you will perform the actions in the following order
- first,you will shrink the size of the partition within the Operating system in order to reflect the changes in disk size.
- and then you will reduce the size of the virtual disk (through the command line)
Resizing the Virtual Disk file- How To
Let have a look to the first part of the process.
Step 1 – Backup your Virtual Machine
Before performing this operation, you should first backup your virtual machine in case something goes bad – shouldn’t but you never know 🙂
Step 2 – Power off your Virtual Machine
You should power off your virtual machine before applying changes. This ensures that the modifications are committed correctly by the PVE infrastructure.
Step 3 – Resizing the virtual disk
As mentioned earlier, to perform this change, you need to go through the command line (no GUI available yet). You will need to connect to the PVE Console locally or remotely via putty for example. From the console, if you type the following command
qemu-img –help
Click to enlarge
You will see a list of supported options. If you have a recent Proxmox VE installation, you will see an option called resize. As the name implies, using this option will allow you to increase or shrink the size of the virtual disk in qcow2,raw or vmdk format. (that’s cool all supported format used by PVE). The command can be used as follow
qemu-img resize <%location of the file%> +| – <%size%>
Note : Wait before using this command – read this till end !!
Step 4 – Checking news the virtual disk size
You can use the ls –lh command to check that the file has been modified accordingly.
Click to enlarge
Or you can use the qemu-img info <%name of the virtual disk file%> to check that the file has been resized as required.
Click to enlarge
All in all the process is really not too difficult and you should be able to resizing disks image file as needed. Before closing this post, I thought that having practical examples might be useful.
Practical Examples
Example 1 – Increasing disk size
In this scenario, we have a virtual machine with the VMID 111 that has a c: drive partition set to 20 GB. We need to increase the size of the partition to 25 GB.
Click to enlarge
We shutdown the virtual machine and as described earlier, I’ll make a console connection (through putty) to the PVE host. I go to the folder holding all my virtual disks files (by default, all the virtual disks are located in /var/lib/vz/images) and then cd to the folder holding the virtual disk I want to resize. (In my case the vmid is 111 – view screenshot)
Click to enlarge
I need to increase the size of the disk up to 25 GB. I basically need to add 5 GB to the initial file. I’ll then type the following command
qemu-img resize vm-111-disk-1.raw +5GB
Click to enlarge
I can now reboot the virtual machine and you will see that the disk size has been set to 25 GB within the Operating system
Click to enlarge
Example 2 – Shrinking disk size
In this scenario, we have a virtual machine with the VMID 111 that has a c: drive partition set to 25 GB. We need to decrease the size of the partition to 20 GB.
Click to enlarge
Note :
You will first need to shrink the size of the disk in the Operating system first. To see how you can shrink the disk within the Operating System, check out the part II
I’ll shutdown the virtual machine, make a putty connection to the PVE host and go to the directory holding the virtual disk file I need to resize. To shrink a disk, you need to type the following command
qemu-img resize <%name of the virtual disk%> – – -5GB
Click to enlarge
If you boot your virtual machine, you will see that the disk has been reduced accordingly.
Note :
There is a difference in the notation between increasing and shrinking disk. If you type this command,
qemu-img resize <%name of the virtual disk%> -5GB
the new virtual disk will be only 5 GB in size. Pay attention when using the command to reduce the size. This is not what you want. Instead you need to type
qemu-img resize <%name of the virtual disk%> – – – 5GB
to shrink the size of the disk by 5 GB.
Source:
I have found the correct shrinking command here http://forum.proxmox.com/threads/6580-Shrink-a-disk-with-qemu-img-parsing-error
Final Notes
So far, we have just changed the size of the virtual disk. Proxmox VE knows now that disk size has been updated. However, we might still need to perform additional actions within the Operating system to apply these changes. This will be explained in the next part of this post
Till then
See ya