
Introduction
This is a set of best practices to follow when installing a Windows Server 2008 R2 guest on a Proxmox VE server 2.x (2.3 at time of writing). Right now it’s a work in progress but hopefully soon it will be a comprehensive and reliable document. Please feel free to add to it, even if just to pose a potential best practice.
Install
Prepare
- After clicking «Create VM» enter a Name: for your vm, select your Resource Pool (if you have one) and click Next
- Select Microsoft Windows 7/2008 in the OS tab and click Next.
- Select an ISO Image: for Windows Server 2008 in the CD/DVD tab and click Next.
- Select Bus/Device: IDE, Storage: «your preferred storage» and Cache: Write back in the Hard Disk tab and click Next.
- Select number of Sockets and cores (the default of 1 is mostly sufficient) in the CPU tab and click Next.
- Select Automatically allocate memory and set the Maximum memory to a number you may require in the memory tab and click Next.
- Select Model: VirtIO (paravirtualized) in the Network tab and click Next
- Click finish and go to the Hardware tab of your newly created VM and click Add -> CD/DVD drive
- Select Storage:local and ISO image: virtio-win-x.x.iso and click create.
- To add a temporary disk for installing VirtIO block driver go to the Hardware tab of your newly created VM again and click Add -> Hard Disk
- Select Bus/Device: VIRTIO, Storage: «your preferred storage» and Cache: Write back and click Add
Launch Windows install
- start your newly created virtual machine using the «Start» link in the upper right.
- wait until the vm icon has turned white before you login using the «Console» link in the upper right. (NOTE: Sometimes the java console does not start at the first attempt. Please click refresh/reload in this case)
- Start the server install with «Install Now» and select the Operating System Flavor you like and click next and select «Custom: Install Windows only»
- Wait until Windows is installed and select a Password for the local Administrator account and login to Windows.
Install additional VirtIO drivers
- Start Explorer, Go to CDROM, copy folder WIN7\AMD64 to C:\Program Files\ and rename AMD64 to C:\Program Files\VirtIO
- open Device Manager and right click on Other Devices -> Ethernet Controller and select update driver software
- select «Browse my computer» select folder «C:\Program Files\VirtIO» and click «Install» for Red Hat VirtIO Ethernet Adapter.
- again in Device Manager right click on Other Devices -> PCI Device and select update driver software
- again «Browse my computer» select folder «C:\Program Files\VirtIO» and click «Install» for VirtIO Ballon Driver.
- open a powershell window, cd to «C:\Program Files\VirtIO» and enter: blnsvr.exe -i.
The BallonService that can help free up memory is installed. The BallonService is also responsible for displaying the correct amount of memory in the Proxmox console.
further info
raw vs qcow2
Raw file format provides better performance while qcow2 offers advanced features such as copy on write and snapshots. As of Qemu 1.4 / PVE 2.3 qcow2 is expected to provide superior performance.
virtio drivers
Use virtio dirvers for best performance. More info:
Paravirtualized Block Drivers for Windows
latest iso with virtio drivers :
https://fedorapeople.org/groups/virt/virtio-win/direct-downloads/latest-virtio/
Power settings
- In Windows Server 2008, you need to disable the ‘Shutdown Event Tracker’. This setting in Group Policy. If the server is part of a domain, you need to edit the group policy for the organizational unit with the server. If you’re not using a domain, you can edit the local group policy. This can be accessed by doing the following:
- Start -> Run -> gpedit.msc -> ok -> open «Computer Configuration» then «Policy» then «Administrative Templates» then «System». In the right pane, double click on ‘Display Shutdown Event Tracker’ and select ‘disable’ and OK. To make sure the new group policy is applied. Go to Start -> run -> cmd -> ok and type in ‘gpupdate /force’ without the quotes. Now when you select shutdown, you won’t be promoted with the box asking why you are shutting down the server.
- In order to make Windows 2008 R2 guest shutdown cleanly on the event of a shutdown (power button) on the Proxmox VE host you need make the following changes:
- Control Panel -> System and Security -> Power Options -> Edit Plan Settings -> Turn off the display: Never
See also
Windows 2003 guest best practices
Windows 2012 guest best practices
Описываю оптимальную, на мой взгляд, установку Windows 2008R2:
-
В режиме просмотра по хранилищам, в хранилище «local» ноды, на которой
создается VM необходимо загрузить установочный образ W2008R2 и актуальный
стабильный
образ
virtio-win drivers
-
В правом верхнем углу интерфейса жмем кнопку «Создать VM»

-
Попадаем на первую вкладку мастера — задаем VM ID, имя машины, ставим
галку агента:
-
Выбираем,загруженный на шаге 1, образ
диска с Windows и тип операционной системы
-
Далее
создаем/подключаем образ диска VM (я использовал iSCSI таргет, вы можете
указать хранилище и размер создаваемого образа). Обратите внимание на тип
шины и птицу нет резервных копий.
-
Указываем тип и количество сокетов/ядер процессора (по умолчанию «KVM64» —
самый совместимый, я выбираю «host»), обращаю внимание на птицу NUMA, если
ядер больше 1
-
Настраиваем память: можно использовать динамическое выделение — для этого
указать верхнюю и нижнюю границы
-
Настраиваем сеть — обратите внимание на тип интерфейса
-
Проверяем сводные характеристики VM, при необходимости правим на
соответствующих вкладках
-
Переключаемся в режим просмотра по серверам, становимся на новосозданную
VM и заходим во вкладку оборудование, жмем кнопку
«Добавить»->»CD/DVD»
-
В процессе создания привода выбираем образ virtio-win

-
Запускаем VM

-
Переходим во вкладку «Консоль»

-
Идет тривиальная установка Winows вплоть до выбора диска для установки

-
Жмем на загрузку и на диске с virtio-win выбираем папку
d:\viostor\2k8r2\amd64
-
Устанавливаем драйвер, после чего продолжаем и заканчиваем установку.

-
После завершения установки заходим в систему и ставим гостевой агент,
который находится в папке guest-agent диска virtio-win

-
После установки агента идем в диспетчер устройств
-
Устанавливаем недостающие драйвера


-
На одном из устройств получаем следующее сообщение:

-
Смотрим dev_id устройства — дело в том, что последние версии Proxmox VE
поддерживают Virtual Machine Generation ID, поддержка которого Windows,
появилась только начиная с 8/2012 версий
-
Для удаления неподдерживаемого усторйства выключаем VM, заходим по SSH на
ноду Proxmox VE и выполняем:qm set vm_id -delete vmgenidвместо vm_id ID вашей машины, в моем случае 720

-
Запускаем VM и смотрим в диспетчере устройств


Установка VM завершена — дальше идет обычная настройка сервера..
Рекомендуемые настройки:
- Отключить автоматическое обновление
-
Система -> Дополнительные параметры системы ->дополнительно
->загрузка и восстановление ->малый дамп памяти -
Диспетчер сервера -> отключить отчеты об ошибках


Hello World,
Today, we will provide a quick how to guide. If you have noticed, Proxmox VE wiki provides a lot of information about how to install Windows XP/Windows 2003 operating systems and how to install virtio drivers. However, you will not see much information about installing/configuring a Windows 7/Windows 2008 (or later) operating system. As I mentioned in other posts, It’s time to move on and start to use and work with the recent operating systems version. This post is a first step in that direction.
1. Preparing your Windows 2008 R2/Windows 7 installation
We assume that you have a running Proxmox VE infrastructure in your infrastructure.
Step 1 – Get Windows 2008R2/Windows 7 and Virtio ISO images
To perform such installation , you will need to upload the following iso images
- Windows 7/windows 2008 R2 Iso image
- Virtio Drivers (can be downloaded from the Fedora project web site : http://alt.fedoraproject.org/pub/alt/virtio-win/latest/images/bin/)
Step 2 – Upload your ISO Images
To upload the ISO images on your Proxmox VE server, you simply open the web interface. On the navigation menu, in the VM Manager Section (on the left side on your screen, you click on the ISO images. You will be presented with the following screen
Click to Enlarge
You click on the Browse button, you specify the location where you have stored you ISO images and then you click on Upload link. When the upload is completed, at the bottom of the page, you can list the ISO Files that have been loaded
Click to enlarge
Step 3 – Create you Virtual Machine
In this post, we have explained in details how to create a virtual machine. We assume that you have a working experience with the Proxmox VE software and we will simply describe the big steps of creating the virtual machine.
Within the Interface, you click on virtual machine in the left menu. In the virtual machine page, you have to click on the Create tab. The virtual machine creation form will be displayed as shown in the following screenshot
Click to Enlarge
In this page, be sure to select the following options :
- Disk type : Virtio
- Guest Type: Windows 2008
- Network Card: Virtio
- Installation medio : the Windows 2008 or Windows 7 ISO image
Press on the create button. Click then on the List Tab and you will see that your new virtual machine has been created. You are ready to move to the next step : Installation of the operating system
Perform your Windows 2008 R2/Windows 7 installation
We are ready to perform our standard Windows 2008/Windows 7 installation. This post will demonstrate how to install the Windows 2008 Operating System. The procedure should be the same for Windows 7 installation.
Within the Proxmox VE (PVE) web interface, you click on the Virtual machine link (on the menu on the left). Click on the virtual machine you’ve just created in the previous section. In the Virtual Machine Configuration page, click on the Start button. After a short time, you will see a link called Open VNC Console
Note : Do not close you browser, we will need to come back to this screen
Step A – Starting the Windows 2008 Setup routine
Click on the link to access the virtual machine through the console. After sometime, you will see the familiar Windows Setup Wizard starting. Select your settings accordingly and press Next
Click to Enlarge
In the Install Windows Page, Click on Install Now
Click to Enlarge
Select the Correct version of the Operating System you want to install and Press Next
Click to Enlarge
Step B – Upload Drivers
At this stage, you will be presented with the following window. As you can see, there is no disks detected by the Setup routine. We are indeed using VIRTIO drivers. The new Setup routine make it more easy (compared to windows 2003) to specify additional drivers. On this page, you can click on the Load Driver option
Click to Enlarge
You will then be presented with a screen where you will be asked to specify the location of the additional drivers to be used
Click to Enlarge
Before continuing, we will need to go back the PVE Web Interface, in the Virtual Machine Configuration Page and we will need to click on the Hardware Tab. There, we have to load the Virtio ISO image into the CD-ROM Drive. When this is done, we can go back to the Virtual machine and proceed with the installation.
Click to Enlarge
Back on the Virtual Machine, you can browse to the CD-Rom device and select the appropriate drivers
Click to Enlarge
As you can see on the screenshot below, the VIRTIO Drivers are now recognized by the Setup routine and we are ready to install them onto the system. Press Next
Click to Enlarge
At the end of this process, you will see that the installation wizard page is now presenting you 1 or more disks (depending on your configuration).
Click to Enlarge
Step C – Setup Routine Installation Completion
We are almost there. But you will notice that the button Next is greyed out and that a warning message is available at the bottom of the dialog box. You can click on Show details to have more information.
Click to Enlarge
What’s does that means ? Okay, no panic ! This cryptic message simply means that the Windows installation files are not available. We simply need to go back the PVE Web interface and again unload the Virtio drivers and reload the Windows installation iso image into the cdrom of the virtual machine (same procedure as above – Step B)
When the Windows CD is reload into the virtual machine, you will see that you can now indeed click on the next button and that the Windows Setup process will simply continue as it should.
Click to Enlarge
Click to Enlarge
Final Steps
The Setup routine will finalize the installation and the system will reboot automatically. When the virtual machine reboots, you will get a running Windows 2008 R2 virtual machine. However, we haven’t finished yet. If you have a look at your network connections, you will see that no network card are available within your virtual machine.
Click to Enlarge
If you open the Device Manager, you will see that the ethernet controller is there but that no drivers are available for it.
Click to Enlarge
Again, we have to load the Virtio ISO in the virtual machine and install the missing drivers. Simply right-click the Ethernet controller in the device manager and click on Update Drivers. The Wizard will start. You simply specify to the wizard where to look for the needed drivers. During the wizard, you might see a warning message. Simply press Install to authorize installation of the virtio drivers and have your network card installed within Windows operating system.
Click to Enlarge
Note : You might be prompted to reboot your server after installing the driver
At the end of the process, you should see your network card (as shown below). We are done. Now simply configure your virtual machine as you need.
Click to Enlarge
Conclusion
In this post, we explained how to create a Windows 2008R2/Windows 7 Virtual machine using VIRTIO drivers when using a Proxmox VE infrastructure. As you have seen the process is quite straightforward (isn’t it !). Because we are using virtio drivers, you will need to perform some additional operations in order for windows to recognize the storage controller. The process to specify additional drivers within Windows 2008 R2/Windows 7 is far easier than with previous versions.
In the future post, we will see how we can integrate the drivers into your windows installation file
Till then, Stay Tuned
See ya

How To Create Virtual Machine On Proxmox Server Decode Virtio win gt x64.exe failed with «os must be windows 8, windows server 2012 or higher» message. all of this happens with windows 7 or windows server 2008 r2. on windows 10 drivers installed with no problems (no yellow signs in device manager). Virtio drivers are paravirtualized drivers for kvm linux (see linux kvm.org page virtio). in short, they enable direct (paravirtualized) access to devices and peripherals for virtual machines using them, instead of slower, emulated, ones.

How To Create Virtual Machine On Proxmox Server Decode This tutorial shows you how you can inject all virtio drivers into all of your windows install isos in one step using windows® automated installation kit and some batch files. this makes it really easy to deploy windows with the most efficient hardware driver configuration. Today, i will show you how to create a windows vm in proxmox. this may sound like a straightforward task, but there are certain settings in proxmox ve that are worth checking out to make sure you get better performance in windows. By default proxmox will emulate sata ide and intel e1000 hardware. however, this presents a performance hit so the ideal way is to use the virtio drivers. however, windows does not support. We show you how to create a virtual machine and install windows on it with neccesary drivers. additionaly we describe how to configure your server. first, download the windows server image from manufacturer’s website and upload it to your local proxmox drive. then download the virtio virtual machine drivers.

How To Install Virtio Drivers For Virtual Machine On Proxmox Server By default proxmox will emulate sata ide and intel e1000 hardware. however, this presents a performance hit so the ideal way is to use the virtio drivers. however, windows does not support. We show you how to create a virtual machine and install windows on it with neccesary drivers. additionaly we describe how to configure your server. first, download the windows server image from manufacturer’s website and upload it to your local proxmox drive. then download the virtio virtual machine drivers. In this post, we explained how to create a windows 2008r2 windows 7 virtual machine using virtio drivers when using a proxmox ve infrastructure. as you have seen the process is quite straightforward (isn’t it !). Now that you have your domain controller virtual machine created along with networking, boot the virtual machine to install the windows server operating system, and run the powershell. By following these steps, you can successfully create and configure a windows virtual machine in proxmox. for further performance optimization, consider installing tools like qemu guest agent to enhance the integration between the system and the virtualization platform.

How To Install Virtio Drivers For Virtual Machine On Proxmox Server In this post, we explained how to create a windows 2008r2 windows 7 virtual machine using virtio drivers when using a proxmox ve infrastructure. as you have seen the process is quite straightforward (isn’t it !). Now that you have your domain controller virtual machine created along with networking, boot the virtual machine to install the windows server operating system, and run the powershell. By following these steps, you can successfully create and configure a windows virtual machine in proxmox. for further performance optimization, consider installing tools like qemu guest agent to enhance the integration between the system and the virtualization platform.

How To Build A Virtual Machine Server A Proxmox Guide By following these steps, you can successfully create and configure a windows virtual machine in proxmox. for further performance optimization, consider installing tools like qemu guest agent to enhance the integration between the system and the virtualization platform.

How To Create Virtual Machine In Proxmox Step By Step Getlabsdone
В этой статье мы рассмотрим процесс развертывания виртуальной машины с Windows на гипервизоре Proxmox VE. Подробно рассмотрим базовые рекомендации и best practices по оптимальным параметрам ВМ, установке, и запуску гостевой Windows Server в виртуальной машине Proxmox.
Содержание:
- Создаем виртуальную машину для Windows Server на Proxmox
- Установка гостевой Windows Server в ВМ Proxmox
Подготовительные шаги:
- СкачайтеISO образ с драйверами VirtIO для гостевой Windows (virtio-win.iso)
- Получите установочный ISO образ с Windows (в нашем примере это Windows Server 2025)
Подключитесь к веб интерфейсу Proxmox (
https://proxmox-ip:8006
), и загрузите ISO образы в локальное хранилище. Перейдите в раздел ISO images —> нажмите Upload и укажите путь к ISO файлу на диске.
По умолчанию для хранения ISO образов в Proxmox используется директория /var/lib/vz/templates/iso
Создаем виртуальную машину для Windows Server на Proxmox
Создадим на хосте Proxmox виртуальную машину для установки Windows Server.
- Щелкните по хосту Proxmox и выберите Create VM
- На вкладке General укажите осмысленное имя и ID виртуальной машины (предлагаемый ID можно оставить по умолчанию, либо вручную задать в нем другой номер, например последний октет IP адреса ВМ).
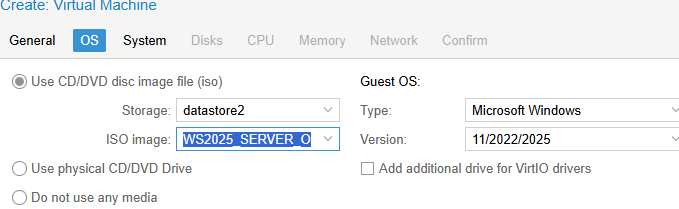
- На вкладке OS выберите тип гостевой ОС (Microsoft Windows 11/2022/2025) и установочный ISO образ с Windows, который вы загрузили в хранилище

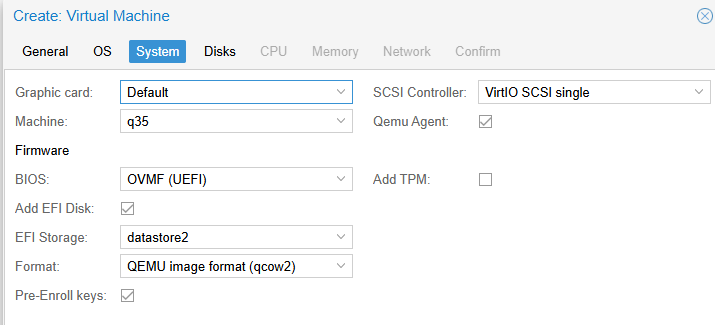
- На вкладке System выберите следующие настройки:
Firmware: OVMF (UEFI) – рекомендуемый тип платформы для современных версий Windows. Для старых систем можно использовать SeaBIOS
Add EFI Disk: включить
Выберите хранилище, где будет хранится EFI диск. Тип диска оставить по-умолчанию (qcow2)
Pre-Enroll keys: включить (прописывает стандартные ключи Microsoft Secure Boot)
Тип контроллера: VirtIO SCSI single
Qemu Agent: включить
TPM: включите, если нужна поддержка виртуального TPM в виртуальной машине (для Windows 11 TPM 2.0 является обязательным требованием)
- На вкладке Disks добавляем диск типа SCSI вместо IDE (SCSI протокол производительнее и быстрее, чем IDE или SATA). Выберите размер диска (для Windows не менее 40 Гб)
- В качестве типа диска доступны RAW (минимум возможностей, но лучшая производительность), VMDK (совместимость с VMware) или QCOW2 (расширенный формат с поддержкой снапшотов). Формат qcow2 используется по умолчанию (оставляем его).
- Включаем параметр Discard для более эффективного использования места на диске (работает по аналогии с TRIM в SSD, очищая реально удаленные данные, освобождая место). В качестве типа кэширования выберете Write Back (повышает производительность). Если кэш отключен (Default (no cache)), этот режим безопаснее с точки зрения потери несохраненных данных на диске при отключении ВМ, но медленнее. Режим Write through оптимален в случае высокой нагрузки на чтение

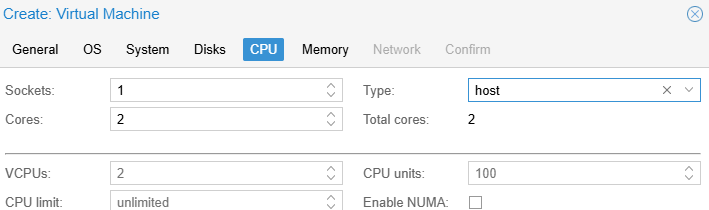
- На вкладке CPU укажите сколько ядер (cores) выделить для ВМ (не менее 2 ядер типа host для Windows). Для производительных ВМ с Windows можно дополнительно добавлять CPU сокеты и включить поддержку NUMA.
Тип CPU host позволяет ВМ получать доступ ко всем возможностях физического CPU, исключая эмуляцию. В том числе в таком режиме в гостевой Windows может работать вложенная виртуализация. Это позволит запускать Hyper-V и подсистемы Linux (WSL) внутри виртуальной машины.

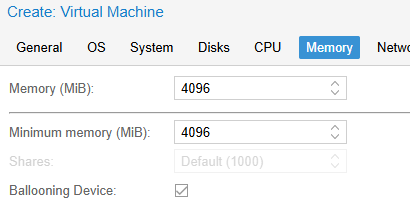
- На вкладке Memory укажите, сколько оперативной памяти выделить для ВМ. Рекомендуется не менее 4096 Мб для Windows. С помощью опции Minimum memory можно зарезервировать оперативную память под ВМ. Режим ballooning позволяет гипервизору изымать неиспользуемую память у ВМ при высокой нагрузке (более 80%) на RAM хоста.
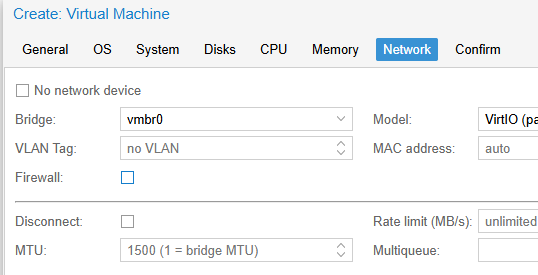
- На вкладке Network выбираем модель виртуальной сетевой карты VirtIO (paravirtualized) вместо Intel E1000. Выберите сетевой мост, через который ваша ВМ будет выходить наружу (в этом примере vmbr0 подключен к физическому сетевому интерфейсу сервера Proxmox).
- Отключите опцию Firewall, если вы не хотите, чтобы правила файервола Proxmox применялись к ВМ. В этом случае подразумевается, что будет использоваться встроенный Windows Defender Firewall в гостевой ОС виртуальной машины.
- На следующей вкладке проверяем результирующие настройки и создаем ВМ, нажав Finish.

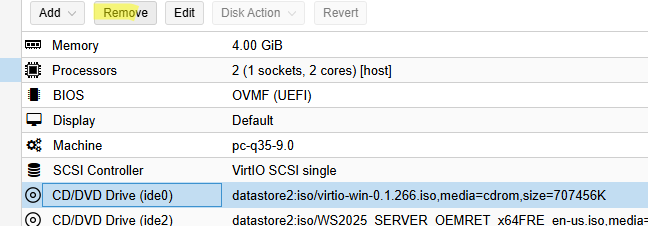
После того, как ВМ создана, нужно добавить в ее настройках дополнительный виртуальны CD/DVD привод. Выберите ВМ -> вкладка Hardware -> Add -> CD/DVD drive.
Смонтируйте в виртуальный привод ISO образ с драйверами VirtIO. Все готово к установке гостевой Windows в виртуальную машину Proxmox.
Установка гостевой Windows Server в ВМ Proxmox
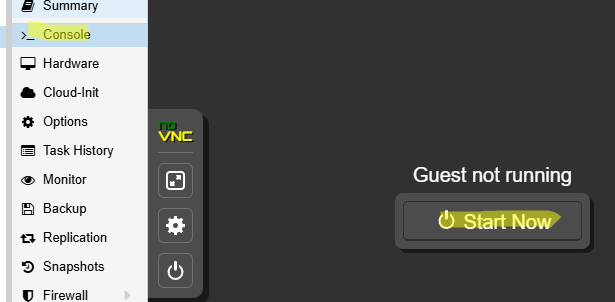
В параметрах ВМ перейдите на вкладку Console и запустите ВМ (Start Now).
Нажимаем любую кнопку, чтобы начать установку Windows. Далее запускается стандартный мастер установки Windows, где нужно будет выбрать языковые настройки, редакцию Windows Server и и т.д.
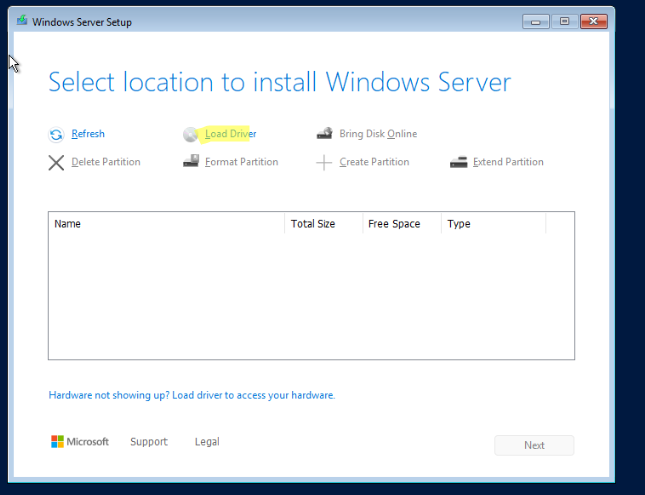
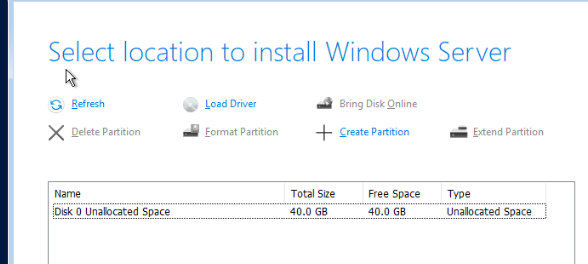
В окне, где нужно выбрать диск для установки ОС, вы обнаружите, что установщик Windows не увидел ваш виртуальный жесткий диск. Дело в том, что в образе Windows отсутствуют драйвера для VirtIO SCSI контроллера.
Чтобы загрузить драйвер в режиме WinPE, нажмите кнопку Load Driver.
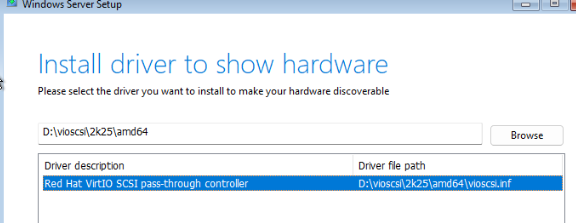
Укажите папку с драйвером Red Hat VirtIO SCSI pass-throught controller на смонтированном ISO образе с драйверами VirtIO: d:\vioscsi\2k25\amd64. Установите драйвер.
Установщик Windows должен увидеть неразмеченный локальный диск. Выберите его и продолжите установку.
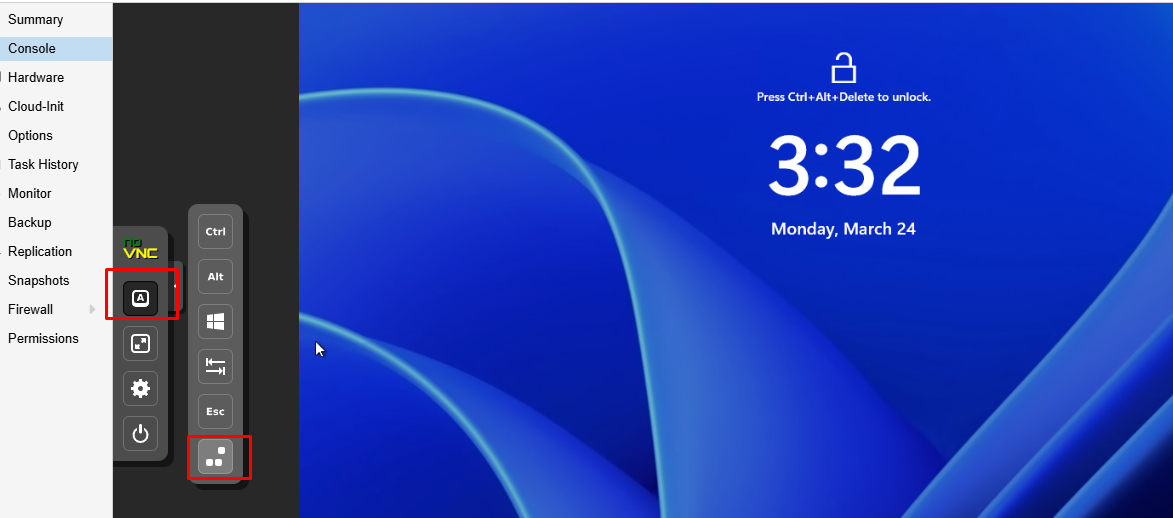
После завершения установки Windows, логинимся в гостевую ОС через консоль Proxmox. Чтобы отправить в консоль сочетание
Ctrl+Alt+Del
для ввода учетной записи Windows, выберите в левой панели Show Extra Keys и отправьте нужную комбинацию клавиш.
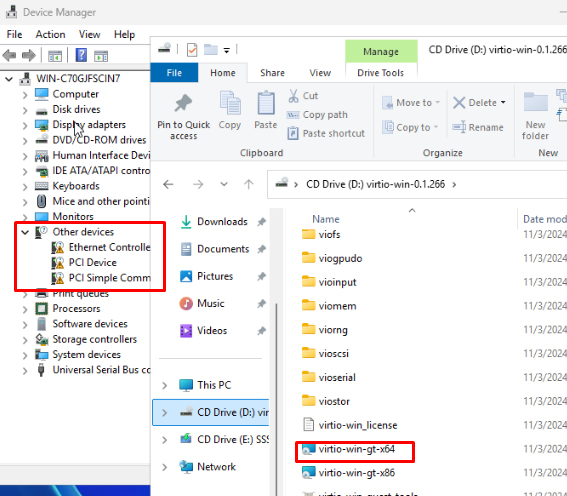
Запустите диспетчер устройств Windows. Как вы видите отсутствует ряд драйверов, которые нужно установить с диска с драйверами VirtIO. Запустите установщик virtio-win-gt-x64.msi с диска и установите с настройками по-умолчанию.
Затем установите гостевой агент Qemu, запустив virtio-win-guest-tools.exe.
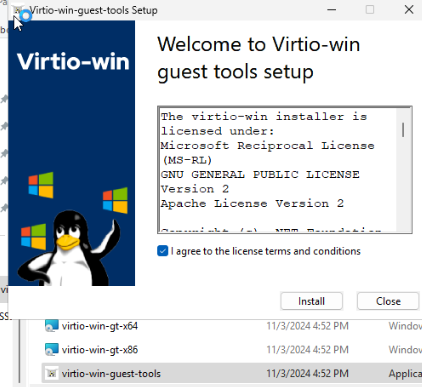
Проверим, что служба агента запущена в Windows:
Get-Service QEMU-GA
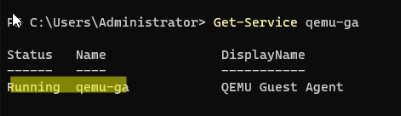
После установки гостевых средств интеграции QEMU в консоли Proxmox на вкладке Summary виртуальной машины будет отображаться информация об IP адресе, полученном из гостевой ОС.
Проверить наличие агента Qemu в ВМ можно из консоли хоста Proxmox:
qm agent <vmid> ping
После завершения установки, удалите из виртуального оборудования ВМ диск с драйверами VirtIO.
Осталось завершить настройку Windows в гостевой машине: задать имя компьютера, статический IP (если применимо), время и часовой пояс, включить RDP, установить обновления Windows, добавить необходимые службы и роли и т.д.