
Introduction
This is a set of best practices to follow when installing a Windows Server 2012(R2) guest on a Proxmox VE server 6.x.
Install
Prepare
To obtain a good level of performance, we will install the Windows VirtIO Drivers during the Windows installation.
- Create a new VM, select «Microsoft Windows 8.x/2012/2012r2» as Guest OS and enable the «Qemu Agent» in the System tab. Continue and mount your Windows Server 2012 ISO in the CDROM drive
- For your virtual hard disk select «SCSI» as bus with «VirtIO SCSI» as controller. Set «Write back» as cache option for best performance (the «No cache» default is safer, but slower) and tick «Discard» to optimally use disk space (TRIM).
- Configure your memory settings as needed, continue and set «VirtIO (paravirtualized)» as network device, finish your VM creation.
- For the VirtIO drivers, upload the driver ISO (use the stable VirtIO ISO, download it from here) to your storage, create a new CDROM drive (use «Add -> CD/DVD drive» in the hardware tab) with Bus «IDE» and number 0. Load the Virtio Drivers ISO in the new virtual CDROM drive.
- Now your ready to start the VM, just follow the Windows installer.
- Note for Older Version of Windows like Windows-2012 (use the stable older version of VirtIO ISO — virtio-win-0.1.189.iso, download it from here)
Launch Windows install
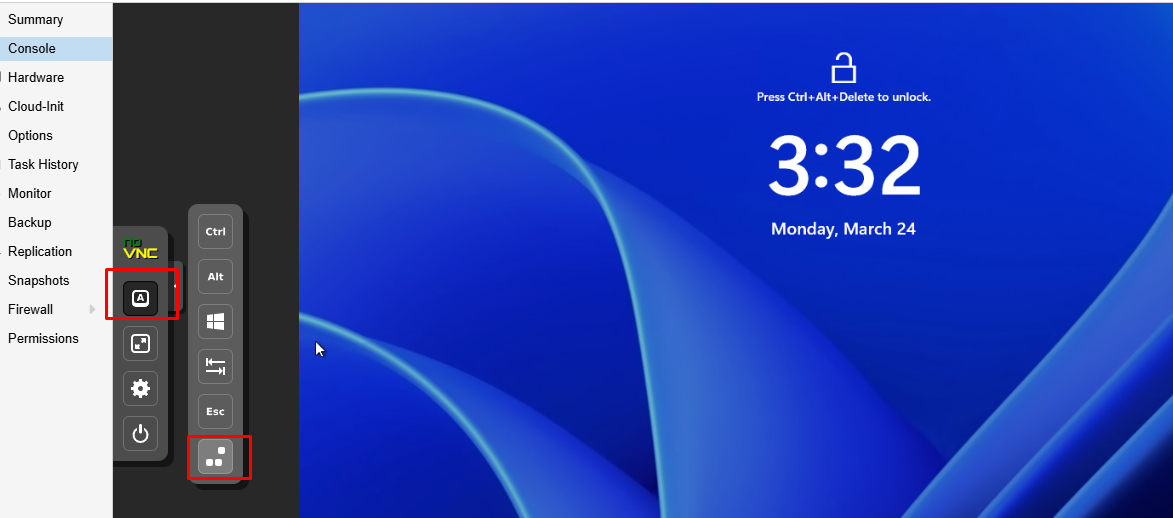
- After starting your VM launch the noVNC console
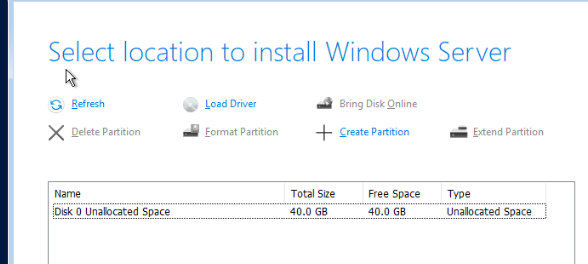
- Follow the installer steps until you reach the installation type selection where you need to select «Custom (advanced)»
- Now click «Load driver» to install the VirtIO drivers for hard disk and the network.
- Hard disk: Browse to the CD drive where you mounted the VirtIO driver and select folder «vioscsi\2k12\amd64» and confirm. Select the «Red Hat VirtIO SCSI pass-through controller» and click next to install it. Now you should see your drive.
- Network: Repeat the steps from above (click again «Load driver», etc.) and select the folder «NetKVM\2k12\amd64», confirm it and select «Redhat VirtIO Ethernet Adapter» and click next.
- Memory Ballooning: Again, repeat the steps but this time select the «Balloon\2k12\amd64» folder, then the «VirtIO Balloon Driver» and install it by clicking next. With these three drivers you should be good covered to run a fast virtualized Windows Server 2012 system.
- Choose the drive and continue the Windows installer steps.
HINT: There is a video showing the process for a Windows Server 2016 installation which is the same as for Windows Server 2012.
Install Guest Agent and Services
Guest Agent
If you enabled the Qemu Agent option for the VM the mouse pointer will probably be off after the first boot.
To remedy this install the «Qemu Guest Agent». The installer is located on the driver CD under guest-agent\qemu-ga-x86_64.msi.
Drivers and Services
VirtIO guest tools installer
The easiest way to install missing drivers and services is to use the provided MSI installer. It is available on the driver CD since version «virtio-win-0.1.173-2».
Run the «virtio-win-gt-x64.msi» file located directly on the CD. If you do not plan to use SPICE you can deselect the «Qxl» and «Spice» features. Restart the VM after the installer is done.
After all this the RAM usage and IP configuration should be shown correctly in the summary page of the VM.
For more information and configuration about ballooning, see Dynamic Memory Management
Check for missing drivers
- See also: Paravirtualized Block Drivers for Windows
Unknown device in device manager
Make sure to include subfolders
Go to the Device Manager to see if there are any drivers missing.
For any unknown device:
- Right click an select «Update driver».
- Select «Browse my computer for driver software».
- Select the Driver CD. Make sure that «Include subfolders» is checked.
- Once a driver has been found you might be prompted with a security warning asking if you «Would like to install this device software». Click «Install».
Installing WSL(g)
To run WSL (Windows Subsystem for Linux) you need to enable Nested Virtualization. Make sure to set your processor to ‘host’; if you already set up your VM and did not select ‘host’ as processor, you can change it in the ‘Hardware’ section of your VM in the web interface.
Follow the official instructions.
If you are using a GPU via PCI(e) passthrough, you might need to add
args: -cpu host,kvm=off
to your config file at /etc/pve/qemu-server/<vm_id>.conf, see the vfio blog
Further Information
RAW vs QCOW2
The RAW file format provides slightly better performance WHILE qcow2 offers advanced features such as copy on write and Live_Snapshots independent of the backing storage.
Since Proxmox VE version 2.3, qcow2 is the default format.
VirtIO Drivers
Make it really easy:Build your ISO with drivers already included:
Windows guests — build ISOs including VirtIO drivers
Latest ISO file with VirtIO drivers:
https://fedorapeople.org/groups/virt/virtio-win/direct-downloads/latest-virtio/
See also
Windows 2003 guest best practices
Windows 2008 guest best practices
Printable templates have revolutionized the way we approach DIY projects, offering a convenient and flexible solution for various needs. Whether you’re planning an event, organizing your workspace, or crafting a personal project, these templates can be your best ally.
Benefits of Using DIY Templates
- Cost-Effective: DIY templates save you money. Instead of hiring a designer or purchasing pre-made items, you can customize templates to fit your needs.
- Personal Touch: With DIY templates, you can add a personal touch to your projects, ensuring they reflect your style and personality.
- Versatility: Printable templates are versatile. They can be used for various purposes, from invitations to planners and more.
How to Use Printable Templates
Using printable templates is straightforward. All you need is the template itself, a printer, and some creativity. Download the template, customize it to your liking, and print!
Steps to Customize Your Printables
- 1. Choose the Right Template: Start by selecting a template that fits your project’s requirements.
• How to: Browse online platforms or software that offer a variety of templates. Consider the purpose of your project and the design you envision. - Edit the Text: Modify the text to suit your needs.
• How to: Use software like Microsoft Word, Adobe Acrobat, or online platforms like Canva to edit the text. Ensure the font, size, and color match your theme. - Add Images or Graphics: Enhance your template with visuals.
• How to: Insert images or graphics using the editing software’s tools. Ensure they are high resolution and complement the overall design. - Adjust Colors and Design Elements: Make sure the design aligns with your vision.
• How to: Use the color palette options in your software to change background colors, text colors, or any design elements. Ensure consistency throughout the template. - Print and Test: Before finalizing, print a test copy to check the design.
• How to: Use a good quality printer and paper. Check for any alignment issues, color discrepancies, or design flaws. Make necessary adjustments before the final print.

Printable templates offer a world of possibilities for DIY enthusiasts. With the right tools and a touch of creativity, you can transform any template into a masterpiece that resonates with your personal touch. Whether you’re a newbie or a seasoned DIYer, these tips will ensure you make the most out of your printable templates.
Printable templates have revolutionized the way we approach DIY projects, offering a convenient and flexible solution for various needs. Whether you’re planning an event, organizing your workspace, or crafting a personal project, these templates can be your best ally.
Benefits of Using DIY Templates
- Cost-Effective: DIY templates save you money. Instead of hiring a designer or purchasing pre-made items, you can customize templates to fit your needs.
- Personal Touch: With DIY templates, you can add a personal touch to your projects, ensuring they reflect your style and personality.
- Versatility: Printable templates are versatile. They can be used for various purposes, from invitations to planners and more.
How to Use Printable Templates
Using printable templates is straightforward. All you need is the template itself, a printer, and some creativity. Download the template, customize it to your liking, and print it!
Steps to Customize Your Printables
- Choose the Right Template: Start by selecting a template that fits your project’s requirements.
• How to: Browse online platforms or software that offer a variety of templates. Consider the purpose of your project and the design you envision. - Edit the Text: Modify the text to suit your needs.
• How to: Use software like Microsoft Word, Adobe Acrobat, or online platforms like Canva to edit the text. Ensure the font, size, and color match your theme. - Add Images or Graphics: Enhance your template with visuals.
• How to: Insert images or graphics using the editing software’s tools. Ensure they are high resolution and complement the overall design. - Adjust Colors and Design Elements: Make sure the design aligns with your vision.
• How to: Use the color palette options in your software to change background colors, text colors, or any design elements. Ensure consistency throughout the template. - Print and Test: Before finalizing, print a test copy to check the design.
• How to: Use a good quality printer and paper. Check for any alignment issues, color discrepancies, or design flaws. Make necessary adjustments before the final print.
Printable templates offer a world of possibilities for DIY enthusiasts. With the right tools and a touch of creativity, you can transform any template into a masterpiece that resonates with your personal touch. Whether you’re a newbie or a seasoned DIYer, these tips will ensure you make the most out of your printable templates.
INSTALL WINDOWS SERVER R2 PROXMOX 8.0.3 WITH WORKING SCSI FOR PROXMOX INSTALL WINDOWS SERVER AND FIX Problem with VirtIO in Windows Server 2012 r2 installation PROXMOX FIX MAX VCPU ALLOWED PER VM
Download ISO For Windows Server 2012 R2 :
Download SCSI DRIVER
[ad_2]
source
Related Articles
В этой статье мы рассмотрим процесс развертывания виртуальной машины с Windows на гипервизоре Proxmox VE. Подробно рассмотрим базовые рекомендации и best practices по оптимальным параметрам ВМ, установке, и запуску гостевой Windows Server в виртуальной машине Proxmox.
Содержание:
- Создаем виртуальную машину для Windows Server на Proxmox
- Установка гостевой Windows Server в ВМ Proxmox
Подготовительные шаги:
- СкачайтеISO образ с драйверами VirtIO для гостевой Windows (virtio-win.iso)
- Получите установочный ISO образ с Windows (в нашем примере это Windows Server 2025)
Подключитесь к веб интерфейсу Proxmox (
https://proxmox-ip:8006
), и загрузите ISO образы в локальное хранилище. Перейдите в раздел ISO images —> нажмите Upload и укажите путь к ISO файлу на диске.
По умолчанию для хранения ISO образов в Proxmox используется директория /var/lib/vz/templates/iso
Создаем виртуальную машину для Windows Server на Proxmox
Создадим на хосте Proxmox виртуальную машину для установки Windows Server.
- Щелкните по хосту Proxmox и выберите Create VM
- На вкладке General укажите осмысленное имя и ID виртуальной машины (предлагаемый ID можно оставить по умолчанию, либо вручную задать в нем другой номер, например последний октет IP адреса ВМ).
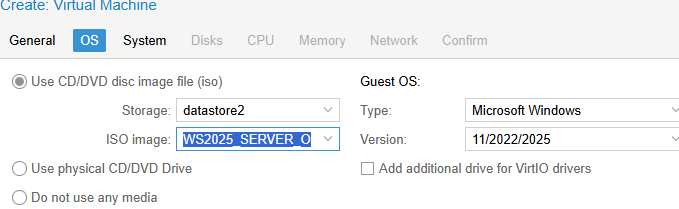
- На вкладке OS выберите тип гостевой ОС (Microsoft Windows 11/2022/2025) и установочный ISO образ с Windows, который вы загрузили в хранилище

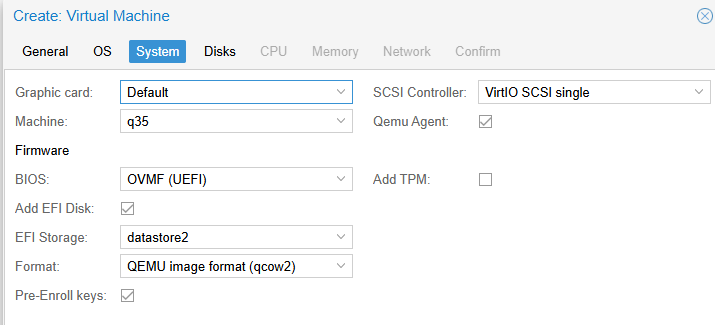
- На вкладке System выберите следующие настройки:
Firmware: OVMF (UEFI) – рекомендуемый тип платформы для современных версий Windows. Для старых систем можно использовать SeaBIOS
Add EFI Disk: включить
Выберите хранилище, где будет хранится EFI диск. Тип диска оставить по-умолчанию (qcow2)
Pre-Enroll keys: включить (прописывает стандартные ключи Microsoft Secure Boot)
Тип контроллера: VirtIO SCSI single
Qemu Agent: включить
TPM: включите, если нужна поддержка виртуального TPM в виртуальной машине (для Windows 11 TPM 2.0 является обязательным требованием)
- На вкладке Disks добавляем диск типа SCSI вместо IDE (SCSI протокол производительнее и быстрее, чем IDE или SATA). Выберите размер диска (для Windows не менее 40 Гб)
- В качестве типа диска доступны RAW (минимум возможностей, но лучшая производительность), VMDK (совместимость с VMware) или QCOW2 (расширенный формат с поддержкой снапшотов). Формат qcow2 используется по умолчанию (оставляем его).
- Включаем параметр Discard для более эффективного использования места на диске (работает по аналогии с TRIM в SSD, очищая реально удаленные данные, освобождая место). В качестве типа кэширования выберете Write Back (повышает производительность). Если кэш отключен (Default (no cache)), этот режим безопаснее с точки зрения потери несохраненных данных на диске при отключении ВМ, но медленнее. Режим Write through оптимален в случае высокой нагрузки на чтение

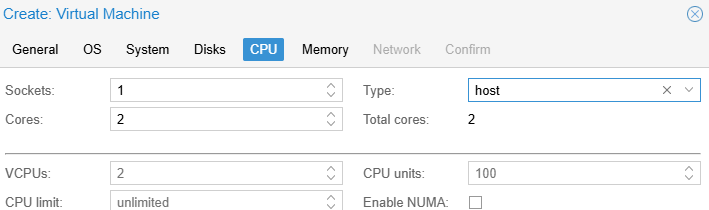
- На вкладке CPU укажите сколько ядер (cores) выделить для ВМ (не менее 2 ядер типа host для Windows). Для производительных ВМ с Windows можно дополнительно добавлять CPU сокеты и включить поддержку NUMA.
Тип CPU host позволяет ВМ получать доступ ко всем возможностях физического CPU, исключая эмуляцию. В том числе в таком режиме в гостевой Windows может работать вложенная виртуализация. Это позволит запускать Hyper-V и подсистемы Linux (WSL) внутри виртуальной машины.

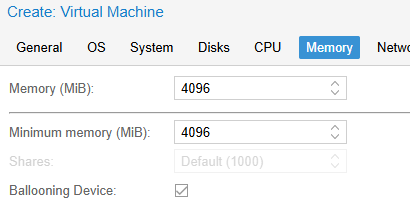
- На вкладке Memory укажите, сколько оперативной памяти выделить для ВМ. Рекомендуется не менее 4096 Мб для Windows. С помощью опции Minimum memory можно зарезервировать оперативную память под ВМ. Режим ballooning позволяет гипервизору изымать неиспользуемую память у ВМ при высокой нагрузке (более 80%) на RAM хоста.
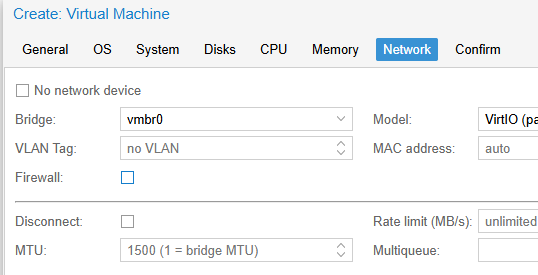
- На вкладке Network выбираем модель виртуальной сетевой карты VirtIO (paravirtualized) вместо Intel E1000. Выберите сетевой мост, через который ваша ВМ будет выходить наружу (в этом примере vmbr0 подключен к физическому сетевому интерфейсу сервера Proxmox).
- Отключите опцию Firewall, если вы не хотите, чтобы правила файервола Proxmox применялись к ВМ. В этом случае подразумевается, что будет использоваться встроенный Windows Defender Firewall в гостевой ОС виртуальной машины.
- На следующей вкладке проверяем результирующие настройки и создаем ВМ, нажав Finish.

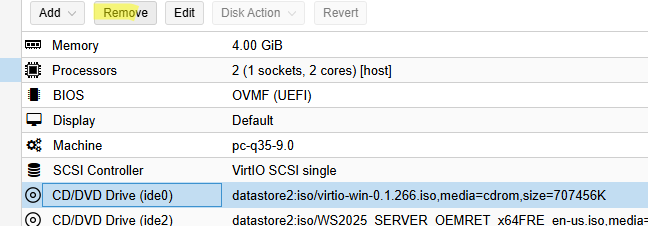
После того, как ВМ создана, нужно добавить в ее настройках дополнительный виртуальны CD/DVD привод. Выберите ВМ -> вкладка Hardware -> Add -> CD/DVD drive.
Смонтируйте в виртуальный привод ISO образ с драйверами VirtIO. Все готово к установке гостевой Windows в виртуальную машину Proxmox.
Установка гостевой Windows Server в ВМ Proxmox
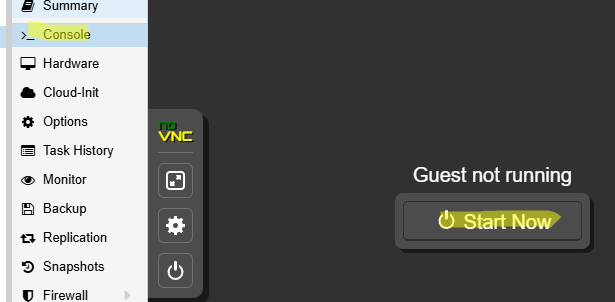
В параметрах ВМ перейдите на вкладку Console и запустите ВМ (Start Now).
Нажимаем любую кнопку, чтобы начать установку Windows. Далее запускается стандартный мастер установки Windows, где нужно будет выбрать языковые настройки, редакцию Windows Server и и т.д.
В окне, где нужно выбрать диск для установки ОС, вы обнаружите, что установщик Windows не увидел ваш виртуальный жесткий диск. Дело в том, что в образе Windows отсутствуют драйвера для VirtIO SCSI контроллера.
Чтобы загрузить драйвер в режиме WinPE, нажмите кнопку Load Driver.
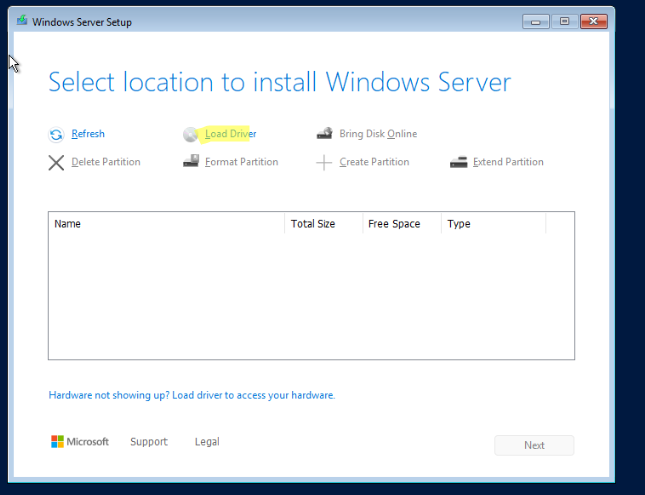
Укажите папку с драйвером Red Hat VirtIO SCSI pass-throught controller на смонтированном ISO образе с драйверами VirtIO: d:\vioscsi\2k25\amd64. Установите драйвер.
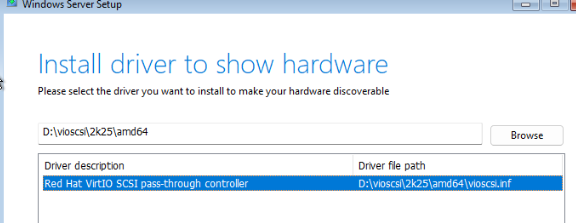
Установщик Windows должен увидеть неразмеченный локальный диск. Выберите его и продолжите установку.
После завершения установки Windows, логинимся в гостевую ОС через консоль Proxmox. Чтобы отправить в консоль сочетание
Ctrl+Alt+Del
для ввода учетной записи Windows, выберите в левой панели Show Extra Keys и отправьте нужную комбинацию клавиш.
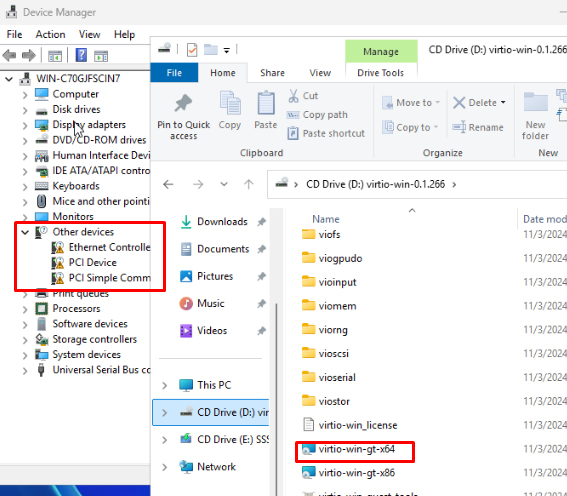
Запустите диспетчер устройств Windows. Как вы видите отсутствует ряд драйверов, которые нужно установить с диска с драйверами VirtIO. Запустите установщик virtio-win-gt-x64.msi с диска и установите с настройками по-умолчанию.
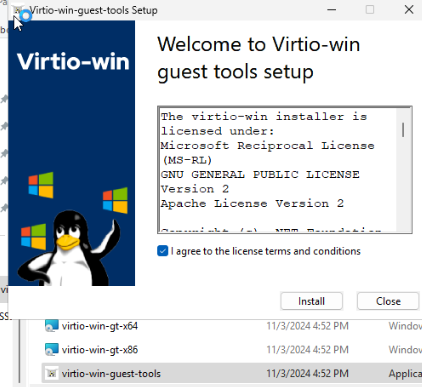
Затем установите гостевой агент Qemu, запустив virtio-win-guest-tools.exe.
Проверим, что служба агента запущена в Windows:
Get-Service QEMU-GA
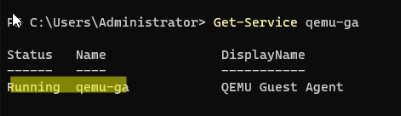
После установки гостевых средств интеграции QEMU в консоли Proxmox на вкладке Summary виртуальной машины будет отображаться информация об IP адресе, полученном из гостевой ОС.
Проверить наличие агента Qemu в ВМ можно из консоли хоста Proxmox:
qm agent <vmid> ping
После завершения установки, удалите из виртуального оборудования ВМ диск с драйверами VirtIO.
Осталось завершить настройку Windows в гостевой машине: задать имя компьютера, статический IP (если применимо), время и часовой пояс, включить RDP, установить обновления Windows, добавить необходимые службы и роли и т.д.
Proxmox. Установка Windows.
Создадим виртуальную машину:
qm create 200 --name pdc2 --memory 16000 --cores 4 --sockets 1 --net0 virtio,bridge=vmbr1,firewall=1,mtu=1,tag=180 --agent enabled=1
tagзадаёт используемый vlan.
Установим тип операционной системы.
Можно выбрать из списка: wxp, w2k, w2k3, w2k8, wvista, win7, win8, win10, win11.
qm set 200 --ostype win10
Подключим QEMU Guest Agent (см. KVM. QEMU Guest Agent):
qm set 200 --agent enabled=1,fstrim_cloned_disks=1
Создадим диск (160GB):
pvesm alloc local-lvm 200 vm-200-disk-0 160G
Зададим драйвер диска:
qm set 200 --scsihw virtio-scsi-single
Подключим диск:
qm set 200 --virtio0 local-lvm:vm-200-disk-0
Подключим CDROM:
qm set 200 --ide2 local:iso/windows-server-2019.iso,media=cdrom
Подключим диск с драйверами VirtIO:
qm set 200 --ide3 local:iso/virtio-win.iso,media=cdrom
Зададим порядок загрузки (CD-ROM, затем диск)
qm set 200 --boot c --bootdisk virtio0
qm set 200 --boot order='ide2;ide3;virtio0'
Зададим тип CPU:
qm set 200 --cpu cputype=host
Подключим для мышки:
#!/bin/bash

# Configuration variables
NODE="pve"
VMID="200"                    # Change this to your desired VM ID
VM_NAME="win11-test"           # Change this to your desired VM name
VM_MEMORY="4096"              # Memory in MB
VM_CORES="2"                  # Number of CPU cores
VM_SOCKET="1"                 # Number of CPU sockets
STORAGE="local-lvm"           # Storage location
DISK_SIZE="160G"              # Disk size
ISO_STORAGE="/mnt/pve/nfs/template/iso"           # Storage location for ISOs
WIN_ISO="Win11_23H2_x64v2_auto.iso"         # Windows ISO filename
VIRTIO_ISO="virtio-win.iso"   # VirtIO drivers ISO filename
OS_TYPE="win10"               # Options: wxp, w2k, w2k3, w2k8, wvista, win7, win8, win10, win11

# Function to check if VM ID already exists
check_vmid() {
    if qm status $VMID &>/dev/null; then
        echo "Error: VM ID $VMID already exists"
        exit 1
    fi
}

# Function to check storage availability
check_storage() {
    if ! pvesm status | grep -q "^$STORAGE"; then
        echo "Error: Storage '$STORAGE' not found"
        exit 1
    fi
}

# Function to check ISO files
check_isos() {
    if [ ! -f "/mnt/pve/nfs/template/iso/$WIN_ISO" ]; then
        echo "Warning: Windows ISO not found at /var/lib/vz/template/iso/$WIN_ISO"
    fi
    if [ ! -f "/mnt/pve/nfs/template/iso/$VIRTIO_ISO" ]; then
        echo "Warning: VirtIO ISO not found at /var/lib/vz/template/iso/$VIRTIO_ISO"
    fi
}

# Run checks
check_vmid
check_storage
check_isos

# Create and add main disk using VirtIO Block
echo "Creating disk with size $DISK_SIZE..."
pvesm alloc $STORAGE $VMID vm-$VMID-disk-2 $DISK_SIZE || {
    echo "Error: Failed to create disk"
    qm destroy $VMID
    exit 1
}

# Create VM
echo "Creating VM with ID $VMID..."
qm create $VMID --name $VM_NAME --memory $VM_MEMORY --cores $VM_CORES --sockets $VM_SOCKET --net0 virtio,bridge=vmbr0
qm set $VMID --ostype "$OS_TYPE"

qm set $VMID --virtio0 $STORAGE:vm-$VMID-disk-2

# Add Windows installation media
qm set $VMID --ide2 nfs:iso/$WIN_ISO,media=cdrom

# Add VirtIO drivers
qm set $VMID --ide3 nfs:iso/$VIRTIO_ISO,media=cdrom

# Configure boot order (CD-ROM first, then disk)
#qm set $VMID --boot c --bootdisk virtio0
#qm set $VMID --boot order='ide2;ide3;virtio0'

# Enable QEMU Guest Agent
qm set $VMID --agent enabled=1,fstrim_cloned_disks=1

#create TPM
pvesm alloc local-lvm 1022 vm-1022-disk-1.raw 4M

#create EFI Disk
pvesm alloc local-lvm 1022 vm-1022-disk-0.qcow2 4M

# Add TPM support (required for Windows 11)
echo "Configuring Windows 11 specific settings (TPM, UEFI)..."
qm set $VMID --tpmstate0 local-lvm:vm-1022-disk-1.raw,size=4M,version=v2.0
qm set $VMID --machine q35
qm set $VMID --bios ovmf
qm set 1022 --efidisk0 local-lvm:vm-1022-disk-0.qcow2,size=528K,efitype=4m,pre-enrolled-keys=1

# Configure boot order (CD-ROM first, then disk)
qm set $VMID --boot c --bootdisk virtio0
qm set $VMID --boot order='ide2;ide3;virtio0'

# Configure CPU type for better performance
qm set 1022 --cpu cputype=host

# Add tablet device for better mouse handling
qm set 1022 --tablet 1

echo "VM $VMID created successfully. Before starting the VM, ensure:"
echo "1. Windows ISO ($WIN_ISO) is present in $ISO_STORAGE:iso/"
echo "2. VirtIO drivers ISO ($VIRTIO_ISO) is present in $ISO_STORAGE:iso/"
echo ""
echo "During Windows installation, when prompted for drivers, browse the VirtIO ISO (IDE3) and select:"
echo "- For storage: /viostor/w10/amd64/"
echo ""
echo "To download the latest VirtIO drivers:"
echo "wget https://fedorapeople.org/groups/virt/virtio-win/direct-downloads/latest-virtio/virtio-win.iso -O /var/lib/vz/template/iso/virtio-win.iso"
echo ""
echo "To start the VM:"
echo "qm start $VMID"