
1. Resizing guest disk
General considerations
When you resize the disk of a VM, to avoid confusion and disasters think the process like adding or removing a disk platter.
If you enlarge the hard disk, once you have added the disk plate, your partition table and file system knows nothing about the new size, so you have to act inside the VM to fix it.
If you reduce (shrink) the hard disk, of course removing the last disk plate will probably destroy your file system and remove the data in it! So in this case it is paramount to act in the VM in advance, reducing the file system and the partition size. SystemRescueCD comes very handy for it, just add its iso as cdrom of your VM and set boot priority to CD-ROM.
Shrinking disks is not supported by the PVE API and has to be done manually.
Another page (deleted) with overlapping content was Resizing disks | Archive
qm command
You can resize your disks online or offline with command line:
qm resize <vmid> <disk> <size>
exemple: to add 5G to your virtio0 disk on vmid100:
qm resize 100 virtio0 +5G
For virtio disks:
Linux should see the new size online without reboot with kernel >= 3.6
Windows should see the new size online without reboot with last virtio drivers.
for virtio-iscsi disk:
Linux should see the new size online without reboot with kernel >= 3.7
Windows should see the new size online without reboot with last virtio drivers.
Using GUI
You can also select your VM from the list > Hardware > Hard Disk > Disk Action > Resize
You will be presented with the option of increasing the disk size:
2. Enlarge the partition(s) in the virtual disk
Depending on the installed guest there is several diffent ways to resize the partions
Offline for all guests
Use gparted or similar tool (recommended)
In gparted and possibly most other tools, LVM and Windows dynamic disc is not supported
Boot the virtual machine with gparted or similar tool, enlarge the partion and optionally the file system. With som linux clients you often need to enlarge the extended partion, move the swappartion, shrink the extended partion and enlarge the root partion. (or simple delete the swap and partion andre create it again — but remember to activwate the swap agin (last step).
Gparted have some warnings about some specific operations not well supported with windows guest — outside the scope of this document but read the warnings in gparted.
Online for Windows Guests
- Guest is Windows 7, Windows Vista or Windows Server 2008
- logon as administrator and extend the disk and filesystem (Using Disk manager)
- For more info www.petri.co.il/extend-disk-partition-vista-windows-server-2008.htm
- Guest is Windows 10: logon as administrator and extend the disk and filesystem (Using Disk manager). If you do not see the ability to extend the disk (i.e. nothing seems to have happened as a result of using the resize command), go to the Windows command prompt and do a: shutdown -s -t 0 (This is a «normal» shutdown, as opposed to the «fast» shutdown that’s the default for Win 8 and onwards.) After a reboot, you’ll now see the ability to expand the disk.
Online for Linux Guests
Here we will enlarge a LVM PV partition, but the procedure is the same for every kind of partitions.
Note that the partition you want to enlarge should be at the end of the disk.
If you want to enlarge a partition which is anywhere on the disk, use the offline method.
- Check that the kernel has detected the change of the hard drive size
(here we use VirtIO so the hard drive is named vda)
dmesg | grep vda
[ 3982.979046] vda: detected capacity change from 34359738368 to 171798691840
Example with EFI
- Print the current partition table
fdisk -l /dev/vda | grep ^/dev
GPT PMBR size mismatch (67108863 != 335544319) will be corrected by w(rite).
/dev/vda1      34     2047     2014 1007K BIOS boot
/dev/vda2    2048   262143   260096  127M EFI System
/dev/vda3  262144 67108830 66846687 31.9G Linux LVM
- Resize the partition 3 (LVM PV) to occupy the whole remaining space of the hard drive)
parted /dev/vda
(parted) print
Warning: Not all of the space available to /dev/vda appears to be used, you can
fix the GPT to use all of the space (an extra 268435456 blocks) or continue
with the current setting?
Fix/Ignore? F
(parted) resizepart 3 100%
(parted) quit
Example without EFI
Another example without EFI using parted:
parted /dev/vda
(parted) print
Number  Start   End     Size    Type      File system  Flags
1       1049kB  538MB   537MB   primary   fat32        boot
2       539MB   21.5GB  20.9GB  extended
3       539MB   21.5GB  20.9GB  logical                lvm
Yoy will want to resize the 2nd partition first (extended):
(parted) resizepart 2 100%
(parted) resizepart 3 100%
- Check the new partition table
(parted) print
Number  Start   End     Size    Type      File system  Flags
1       1049kB  538MB   537MB   primary   fat32        boot
2       539MB   26.8GB  26.3GB  extended
3       539MB   26.8GB  26.3GB  logical                lvm
(parted) quit
3. Enlarge the filesystem(s) in the partitions on the virtual disk
If you did not resize the filesystem in step 2
Online for Linux guests with LVM
Enlarge the physical volume to occupy the whole available space in the partition:
pvresize /dev/vda3
List logical volumes:
lvdisplay
 --- Logical volume ---
 LV Path                /dev/{volume group name}/root
 LV Name                root
 VG Name                {volume group name}
 LV UUID                DXSq3l-Rufb-...
 LV Write Access        read/write
 LV Creation host, time ...
 LV Status              available
 # open                 1
 LV Size                <19.50 GiB
 Current LE             4991
 Segments               1
 Allocation             inherit
 Read ahead sectors     auto
 - currently set to     256
 Block device           253:0
Enlarge the logical volume and the filesystem (the file system can be mounted, works with ext4 and xfs).
Replace «{volume group name}» with your specific volume group name:
#This command will increase the partition up by 20GB
lvresize --size +20G --resizefs /dev/{volume group name}/root
#Use all the remaining space on the volume group
lvresize --extents +100%FREE --resizefs /dev/{volume group name}/root
Online for Linux guests without LVM
Enlarge the filesystem (in this case root is on vda1)
resize2fs /dev/vda1
В статье мы рассмотрим вариант уменьшения размера образа диска в формате Qcow2 для виртуальной машины на Proxmox VE.
На протяжении всей статьи используются такие понятия как «диск», «образ диска», «виртуальный диск». Под этими понятиями мы всегда понимаем диск нашей виртуальной машины.
ВНИМАНИЕ! Процедура является потенциально опасной и может привести к потере данных. Проверяйте каждое выполняемое действие и соблюдайте порядок, описанный в статье.
Все консольные команды, представленные в статье, требуется выполнять из-под пользователя root или иного пользователя с аналогичными привилегиями.
- Как происходит фактическое потребление пространства
- Создание копии виртуальной машины
- Загрузка виртуальной машины в SystemRescue
- Уменьшение размера файловой системы
- Уменьшение размера диска виртуальной машины
- Подключение нового диска к виртуальной машине
- Запуск виртуальной машины с новым диском
Как происходит фактическое потребление пространства
Qcow2 является форматом хранения виртуальных дисков. Он использует тонкое выделение пространства. То есть после создания диск не занимает все пространство, что ему выделено. А только то пространство, что ему фактически требуется. При этом, если потребление уменьшилось, освобожденное пространство не возвращается родительской машине, а уже принадлежит образу.
Давайте рассмотрим это на примере (вы можете этого не делать).
У нас есть виртуальный диск объемом 20 Гб. Чтобы проверить его размер, используем утилиту qemu-img и её команду info:
qemu-img info <device_path>
Где <device_path> – путь до образа диска ВМ.
Вывод команды будет примерно такой:
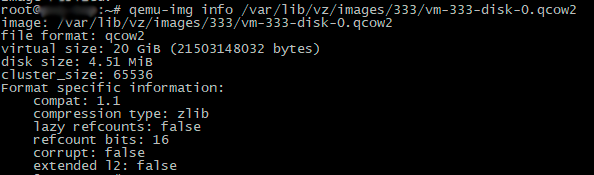
В выводе нас интересуют два параметра:
virtual size – заданный размер виртуального диска,
disk size – фактически занимаемое пространство.
Как видно из вывода, размер нашего образа составляет 20 Гб и при этом фактически он занимает чуть больше 4 Мб.
Теперь, чтобы проверить, что место выделяется только по факту потребления, создадим на виртуальной машине файл размером 3 Гб:
dd if=/dev/zero of=fakefile bs=1G count=3
И проверим, что фактический размер диска после этого увеличился уже знакомой командой:
qemu-img info <device_path>
Где <device_path> – путь до образа диска ВМ.
Вывод команды будет примерно такой:
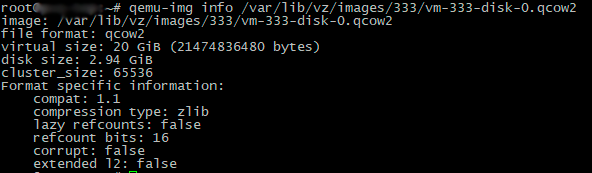
Теперь, если мы удалим созданный ранее файл и снова выполним команду qemu-img info <device_path>, то увидим, что фактический размер диска (disk size) остался прежним. При этом, если смотреть объем занимаемого пространства в гостевой системе, то будет видно что потребление места уменьшилось. Это хорошо видно на выводе команды df-h из гостевой машины:

Таким образом, мы убедились, что выделенное ранее пространство при его очистке фактически не было возвращено родительской машине. Оно осталось в использовании у виртуального диска.
Создание копии виртуальной машины
Чтобы избежать возможной потери файлов на боевой виртуальной машине, мы создадим копию виртуальной машины и на ней произведем все необходимые манипуляции с диском.
Создать копию виртуальной машины можно через консоль SSH или через веб-интерфейс Proxmox VE — выберите способ, который вам удобнее.
ВАЖНО! Все работы следует производить на выключенной виртуальной машине.
Через консоль SSH
Чтобы создать копию виртуальной машины через консоль SSH, воспользуемся следующей командой:
qm clone <source_vmid> <new_vmid> --name <new_vm_name>Где:
<source_vmid>– VMID исходной виртуальной машины, которую вы хотите клонировать;<new_vmid>– VMID для новой клонированной виртуальной машины;<new_vm_name>– имя для новой клонированной виртуальной машины (опционально).
Пример команды:
qm clone 333 444 --name resizevmcopy Через веб-интерфейс Proxmox VE
Создать копию виртуальной машины можно и через веб-интерфейс Proxmox VE:
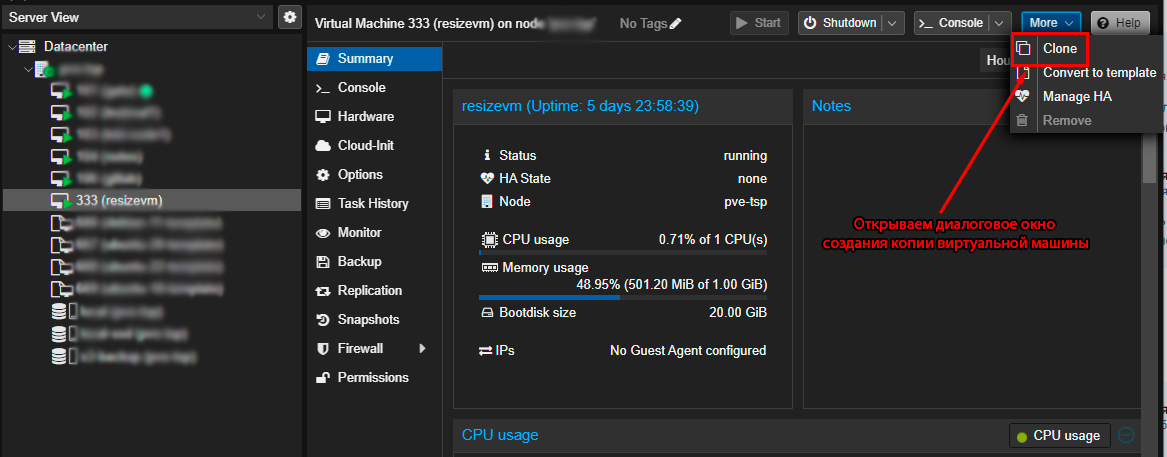
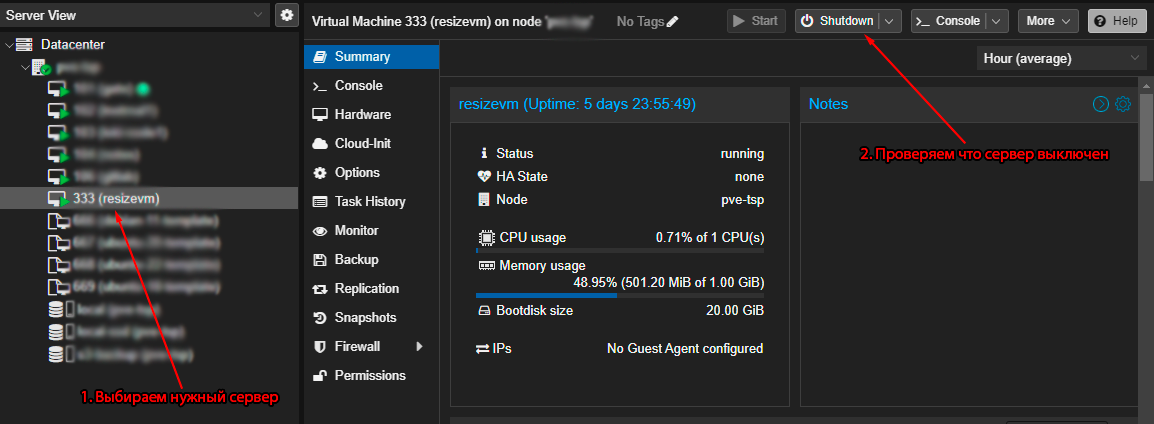
Шаг 1. Выбираем виртуальную машину, для которой будем создавать копию. Проверяем, что виртуальная машина выключена.

Шаг 2. Открываем диалоговое окно создания копии виртуальной машины.
Шаг 3. В диалоговом окне указываем необходимые параметры и запускаем процедуру создания виртуальной машины, где:
Target node– узел кластера Proxmox, на котором будет создана виртуальная машина (если узлов больше одного);VM ID– VMID для новой виртуальной машины;Name– имя для новой виртуальной машины;Target Storage– хранилище, на котором будет хранится образ диска;Format– формат хранения образа. В нашем случае Qcow2.
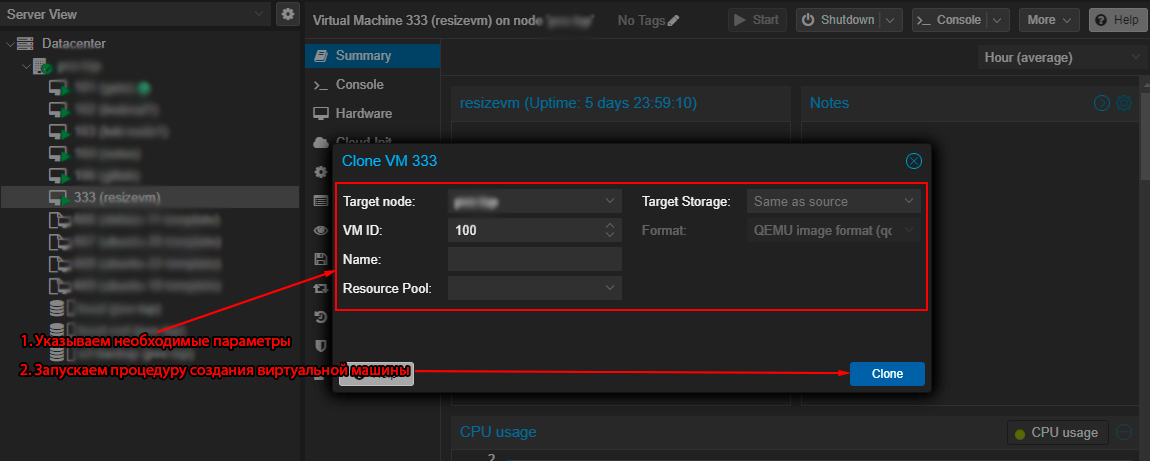
Когда процедура создания виртуальной машины будет завершена, мы получим точную копию боевой машины.
Все дальнейшие действия мы будем производить на этой виртуальной машине, чтобы не повредить данные на исходном сервере.
Теперь можно переходить к следующему пункту.
Загрузка виртуальной машины в SystemRescue
На следующем этапе нужно загрузить виртуальную машину в SystemRescue — при использовании одноименного загрузочного образа.
ВАЖНО! Все работы следует производить на выключенной виртуальной машине.
Подразумевается, что на сервер уже добавлен образ SystemRescueCD.
Через консоль SSH
Чтобы добавить новое устройство CD/DVD-дисковода к виртуальной машине через консоль SSH, воспользуемся следующей командой:
qm set <VMID> --cdrom <storage>:iso/<iso_file>
Где:
<VMID>– идентификатор виртуальной машины, к которой хотим добавить CD/DVD-дисковод;<storage>– имя хранилища, где находится ISO-образ;<iso_file>– имя файла ISO-образа.
Пример команды:
qm set 444 --cdrom local:iso/systemrescue-10.02-amd64.iso
Далее требуется скорректировать приоритет загрузки, чтобы добавленный образ стоял первым в списке. Для этого выполняем команду:
qm set <VMID> --bootorder <device1>,<device2>,<device3>
Где <device1>, <device2>, <device3> и т. д. — это устройства ide0, sata0, virtio0, net0 и другие в порядке, в котором их загрузить.
Пример команды:
qm set 444 --bootorder ide2,scsi0,net0
Теперь запускаем виртуальную машину командой:
qm start <VMID>
Где <VMID> – идентификатор виртуальной машины, которую вы хотите запустить.
Через веб-интерфейс Proxmox VE
Как и в предыдущем пункте, описанные действия можно выполнить через веб-интерфейс Proxmox VE:
Шаг 1. Выбираем тестовую виртуальную машину. Проверяем, что виртуальная машина выключена.
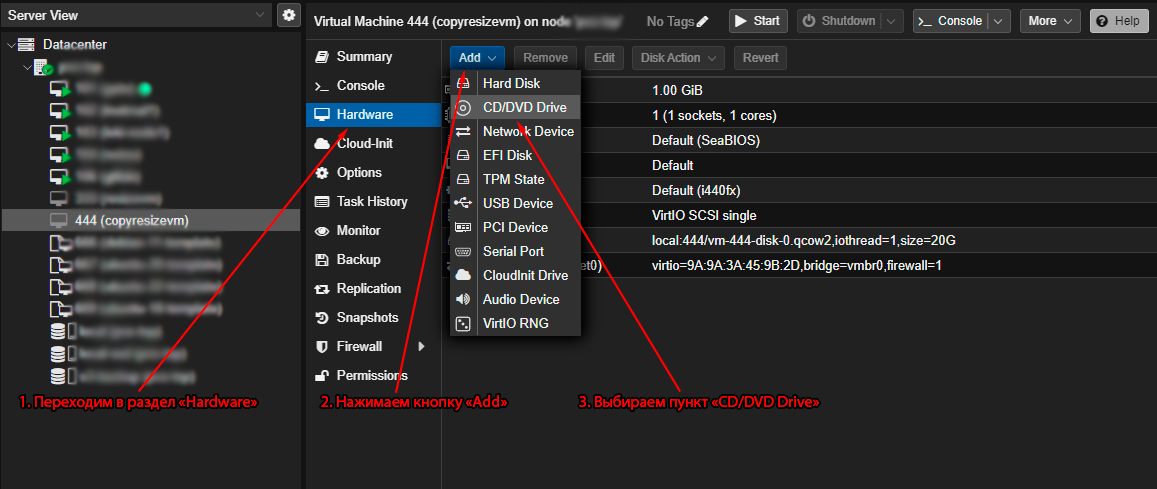
Шаг 2. Переходим в раздел «Hardware». Нажимаем кнопку «Add» и выбираем пункт «CD/DVD Drive».
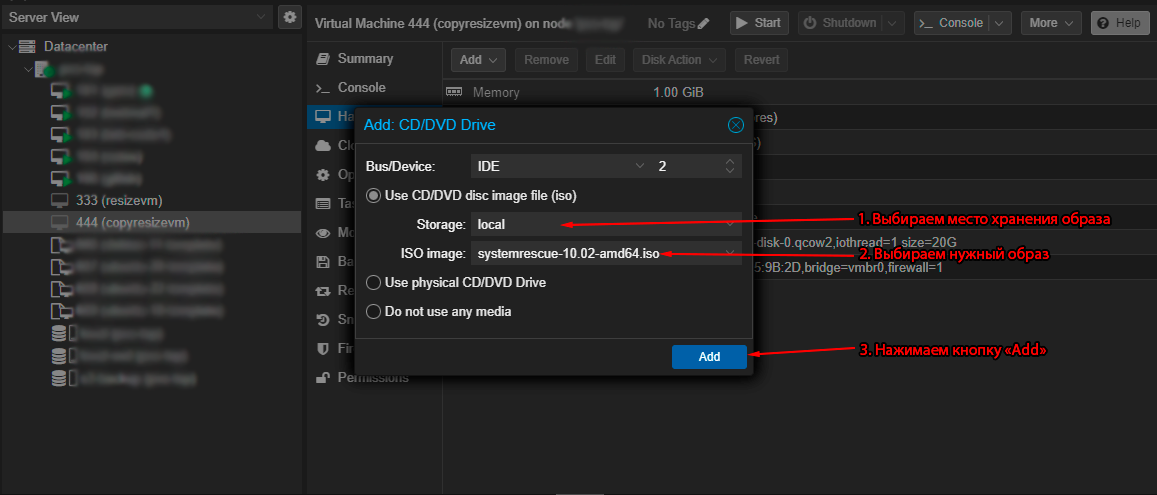
Шаг 3. В открывшемся окне выбираем хранилище, нужный образ и нажимаем кнопку «Add».
Шаг 4. Теперь переходим в раздел «Options». Выбираем пункт «Boot Order» и нажимаем кнопку «Edit».
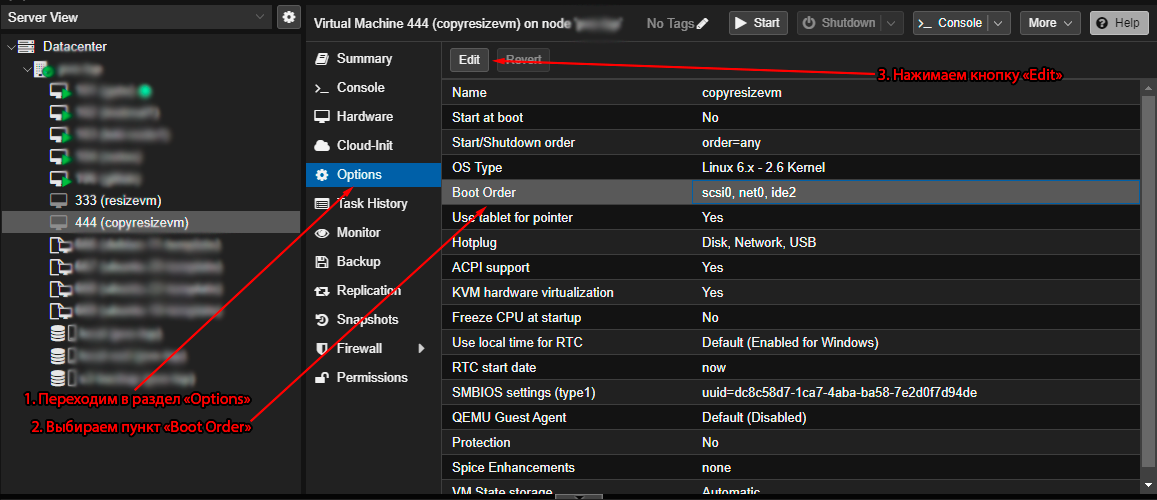
Шаг 5. В открывшемся окне меняем порядок загрузки, чтобы добавленный образ «SystemRescue» оказался первым в списке, и нажимаем кнопку «OK»
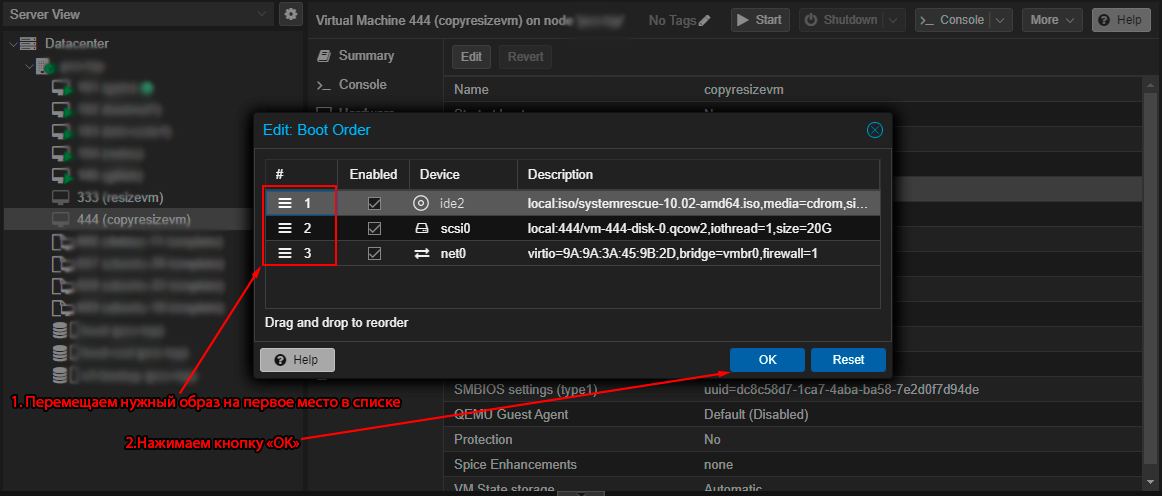
Готово. Образ добавлен, порядок загрузки изменен. Можно переходить с к следующему пункту.
Уменьшение размера файловой системы
Чтобы избежать потери/повреждения данных, требуется выделить пространство, которое мы хотим забрать в отдельный раздел. Для этого мы будем использовать утилиту GParted, которая включена в состав SystemRescue. Проводить работы мы будем через noVNC-консоль в веб-интерфейсе Proxmox VE.
После запуска сервера и SystemRescue нужно запустить графический интерфейс. Сделать это можно с помощью команды startx.
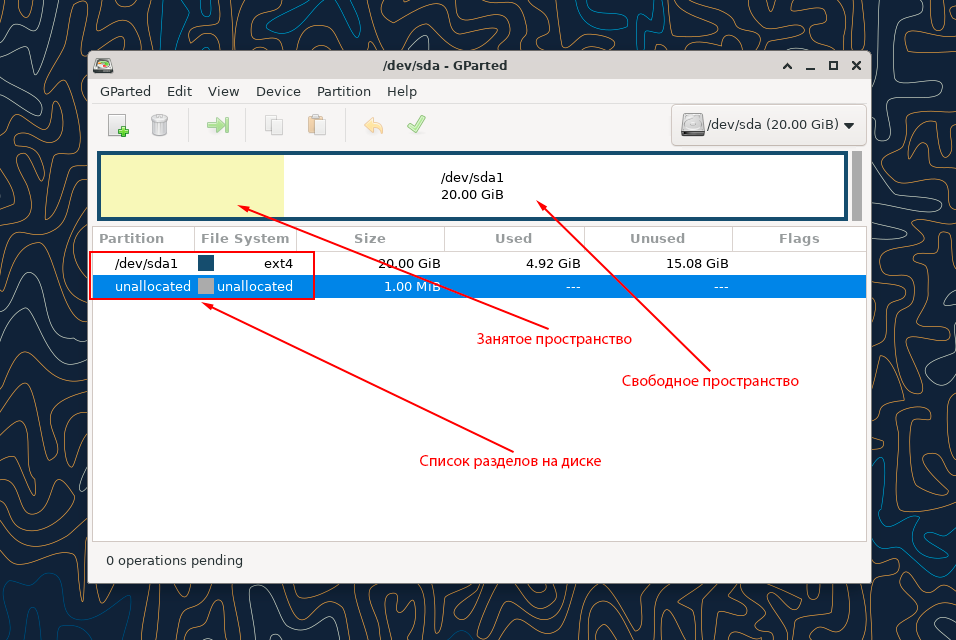
Шаг 1. Когда графический интерфейс будет загружен, нужно запустить утилиту GParted. Для этого нажмите на иконку в горизонтальном меню с одноименным названием.

В главном окне утилиты мы видим разбивку разделов на диске. Желтым цветом в разделе помечено занятое пространство, белым – свободное. Ниже представлен список всех разделов диска.
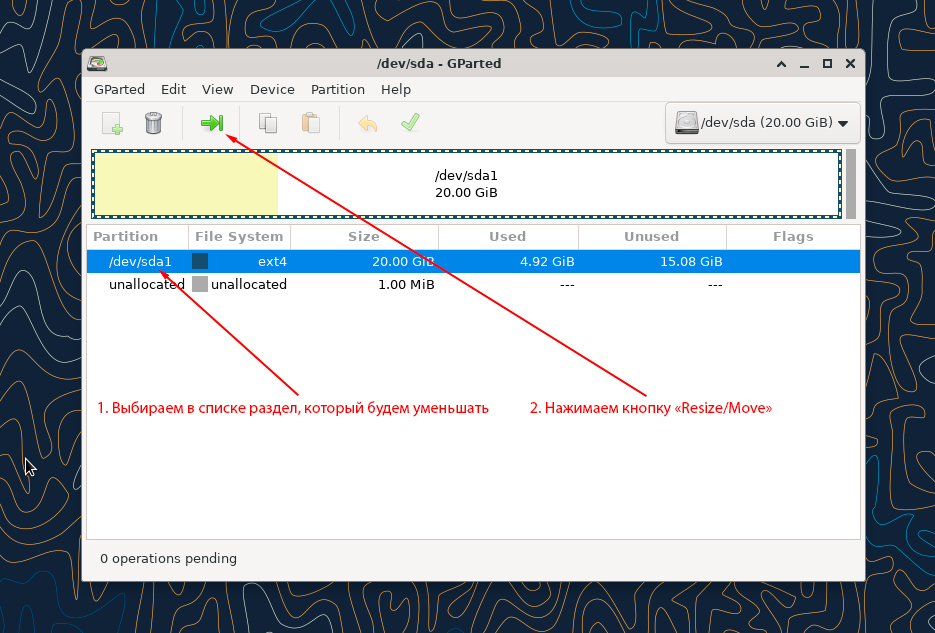
Шаг 2.Выбираем в списке раздел, который будем уменьшать, и нажимаем кнопку «Resize/Move». У вас разделы могут иметь другие имена.
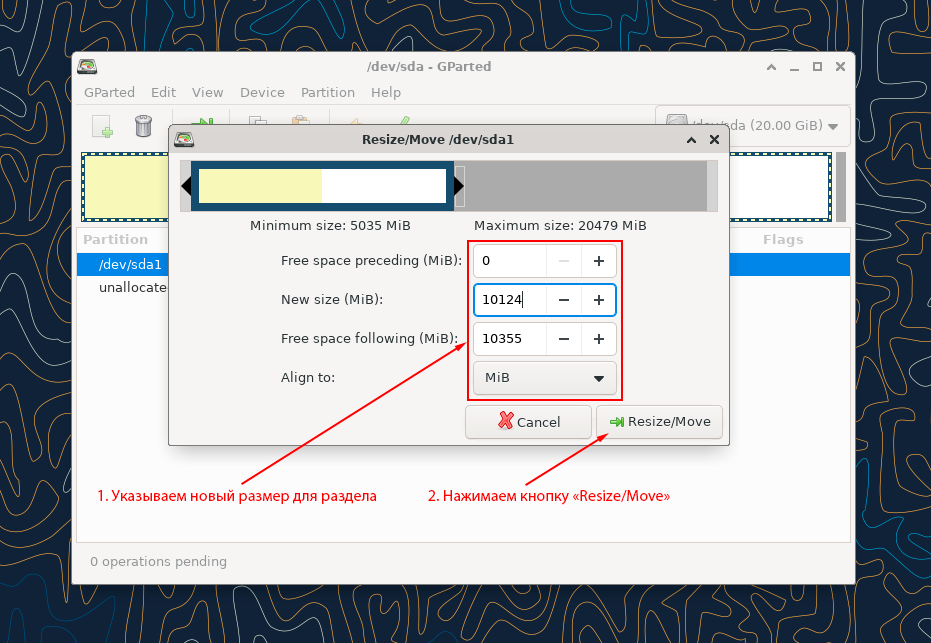
Шаг 3. В открывшемся диалоговом окне указываем новый размер для выбранного раздела и нажимаем кнопку «Resize/Move».
ВАЖНО! При уменьшении раздела обязательно оставляйте свободное место с запасом, чтобы избежать повреждения файлов из-за ошибок при расчете размера.
Шаг 4. Для применения выполненных изменений нажимаем кнопку «Apply All Operations». Утилита дополнительно запросит подтверждение операции, и после процесс изменения размера будет запущен.
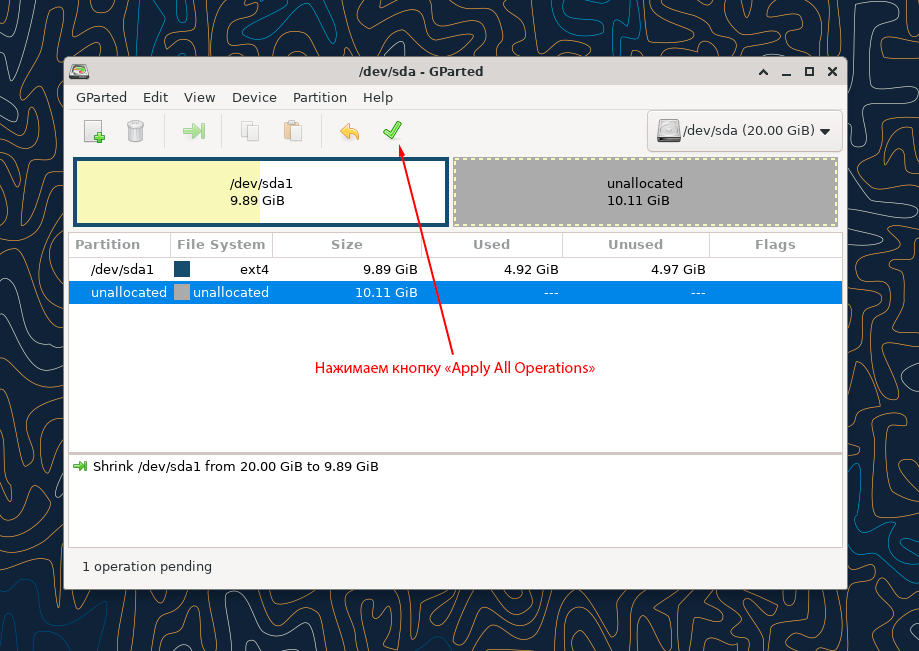
По завершению процедуры размер раздела будет изменен и появится освобожденное пространство. Это хорошо видно на скриншоте ниже.

Теперь можно выключить сервер, отключить образ SystemRescue и переходить к следующему пункту.
Уменьшение размера диска виртуальной машины
Этот пункт мы будем выполнять в консоли SSH.
ВАЖНО! Все работы следует производить на выключенной виртуальной машине.
Для уменьшения размера диска виртуальной машины используем утилиту qemu-img и команду resize:
qemu-img resize <device_path> --shrink -<size>G
Где:
<device_path>– путь до образа диска ВМ;<size>– количество Гб, на которое нужно уменьшить диск. Значение обязательно указывается со знаком «-», как в команде.
Пример команды:
qemu-img resize /var/lib/vz/images/444/vm-444-disk-0.qcow2 --shrink -10G
В результате выполнения этой команды мы уменьшили размер образа виртуальной машины.
Проверить, что все прошло успешно, можно той же утилитой qemu-img с помощью команды info:
qemu-img info <device_path>
Где <device_path> – путь до образа диска ВМ.
Вывод команды будет примерно такой:

Как видим, размер диска стал меньше и уменьшилось фактически занятое пространство.
Подключение нового диска к виртуальной машине
После того как мы уменьшили наш новый диск, его нужно подключить к виртуальному серверу.
ВАЖНО! Все работы следует производить на выключенной виртуальной машине.
Для этого мы сначала меняем имя старого диска, например, с помощью команды mv:
mv <old_name> <new_name>
Где:
<old_name>– путь и имя старого диска;<new_name>– путь и имя нового диска.
Пример команды:
mv /var/lib/vz/images/333/vm-333-disk-0.qcow2 /var/lib/vz/images/333/vm-333-disk-0.qcow2.old
Затем нужно переместить новый диск в директорию диска нашей виртуальной машины и изменить его имя. Сделаем все это также командой mv.
Пример команды:
mv /var/lib/vz/images/444/vm-444-disk-0.qcow2 /var/lib/vz/images/333/vm-333-disk-0.qcow2
В результате содержимое директории станет примерно таким:

Теперь в директории два образа — старый и новый. И при запуске виртуальная машина будет использовать добавленный нами диск.
Можем удалить копию виртуальной машины, она более не требуется. Её диск при этом остается в сохранности.
Запуск виртуальной машины с новым диском
При попытке запуска виртуальной машины мы можем столкнуться с тем, что она не может загрузиться с нового диска. Это может произойти по причине того, что размер диска меньше, чем указано в основном заголовке диска.
Чтобы проверить это, запускаем виртуальную машину в SystemRescue и вводим команду:
gdisk -l <name_disk>
Где <name_disk> – имя нашего виртуального диска.
Пример команды:
gdisk -l /dev/sda
В выводе команды мы увидим в том числе такое предупреждение:
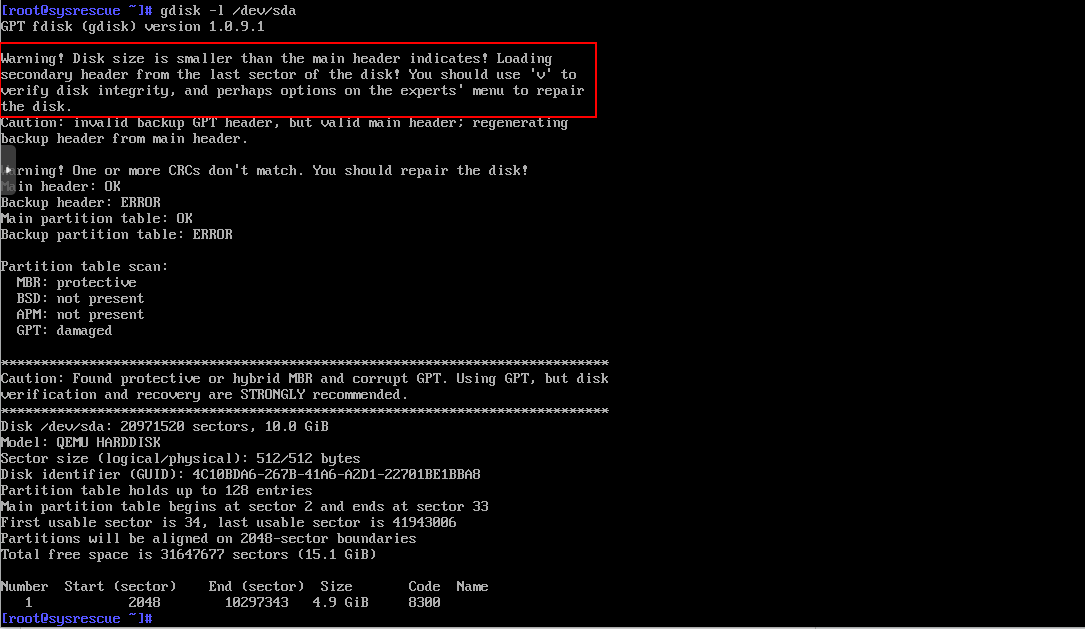
В этом случае выполняем команду:
gdisk <name_disk>
Где <name_disk> – имя нашего виртуального диска.
Пример команды:
gdisk /dev/sda
И поочередно, когда система будет запрашивать ввод команд – вводим v, x, e, w, y.

По завершению мы можем выйти из режима SystemRescue, выключить виртуальную машину и отключить образ SystemRescue. После запускаем виртуальную машину.
Выполнив все шаги последовательно, мы произвели уменьшение размера образа диска. На этом работы можно считать оконченными.
I wrote a post about how to expand the VM disk in Proxmox VE last year. Now I want to show you how to shrink the disk or reduce the size of the disk of VM in Proxmox VE.
Background information:
- Host: Proxmox VE 8.2.4
- Guest VM: VM 303
- The harddisk is 48GB
- Snap backup file is 34.60GB in zst format
- The purpose of this VM is Minecraft server

The used space in the VM disk is checked with the command df.
davidyin@minecraft:~$ df -h
Filesystem      Size  Used Avail Use% Mounted on
tmpfs           593M 1020K  592M   1% /run
/dev/sda2        47G   11G   35G  24% /
tmpfs           2.9G     0  2.9G   0% /dev/shm
tmpfs           5.0M     0  5.0M   0% /run/lock
tmpfs           593M   12K  593M   1% /run/user/1000
davidyin@minecraft:~$
Only 11GB was used of a total 47GB in /dev/sda2.
I prefer to reduce it to 20GB. I believe the backup file will also be smaller.
step 0
Backup! Backup! Backup!
Nothing more important than backup.
So, I repeated it three times.
Step 1
Prepare a Debian 12.1.0 live CD iso file. Upload to the ISO images folder of the Proxmox drive.
I am using debian-live-12.1.0-amd64-gnome.iso.
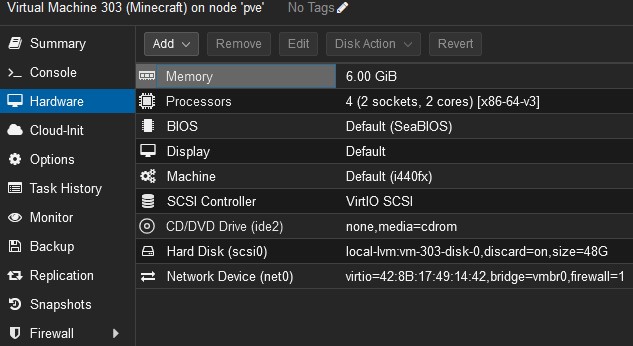
VM303 > Hardware > CD/DVD Drive(ide2), select “Use CD/DVD disk image file(iso). Choose the Storage and the ISO file.

VM303 > Options > Boot Order, move the “ide2” to the top.
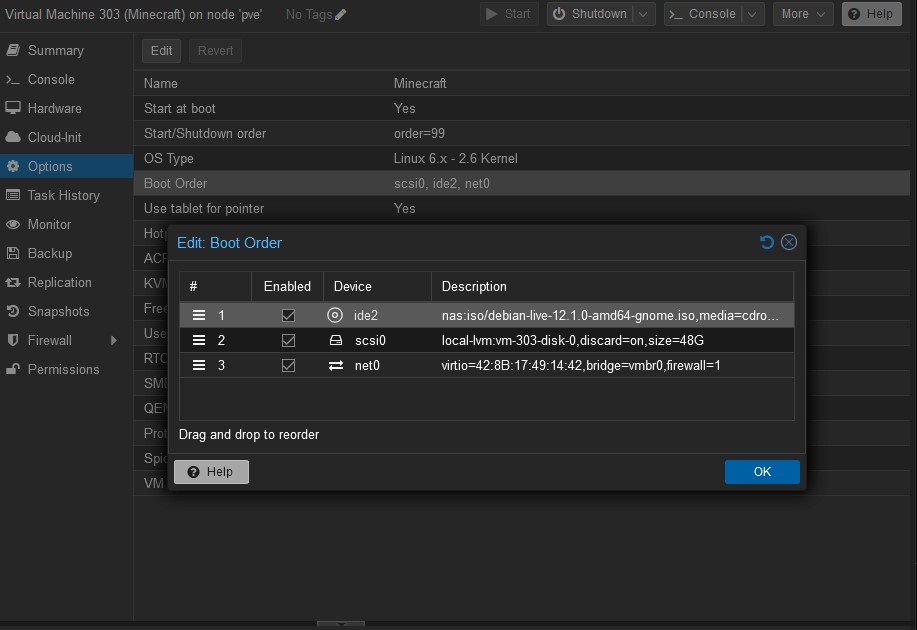
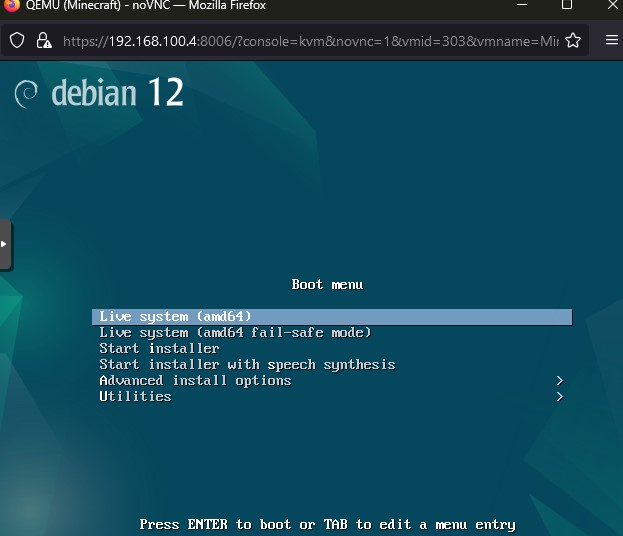
Reboot the VM303. Check Console.
Select Live system (amd64)
Wait, until the desktop.
Click the nine-dots icon to show the applications, then click Terminal.

sudo apt install gparted
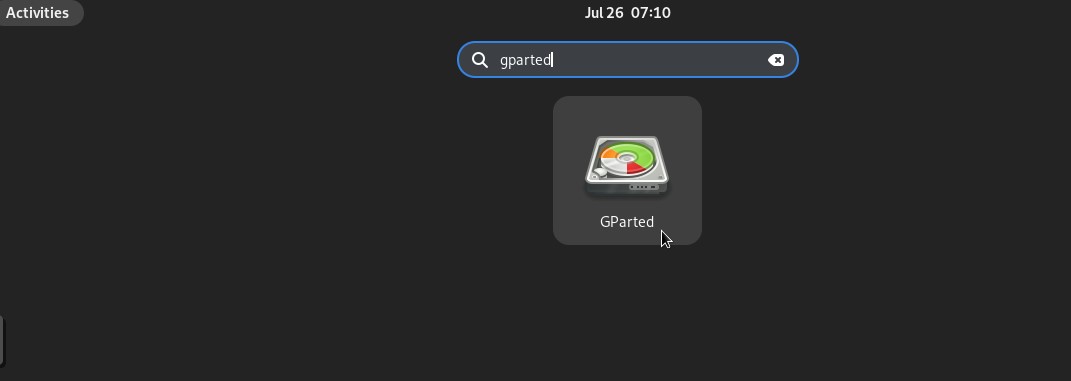
After installation of Gparted, click the left-up corner, or Activities, then type “gparted” in the top-middle search bar to run the application.
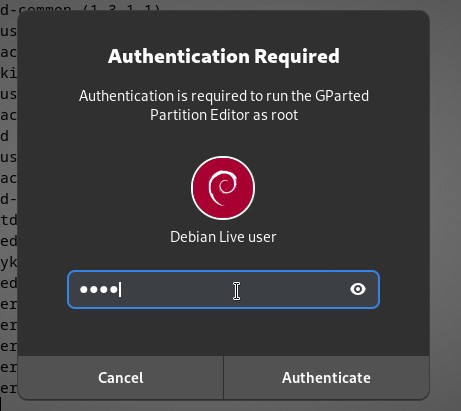
It may ask you the Password of the Debian Live user. It is “live”.
see the current situation of /dev/sda.
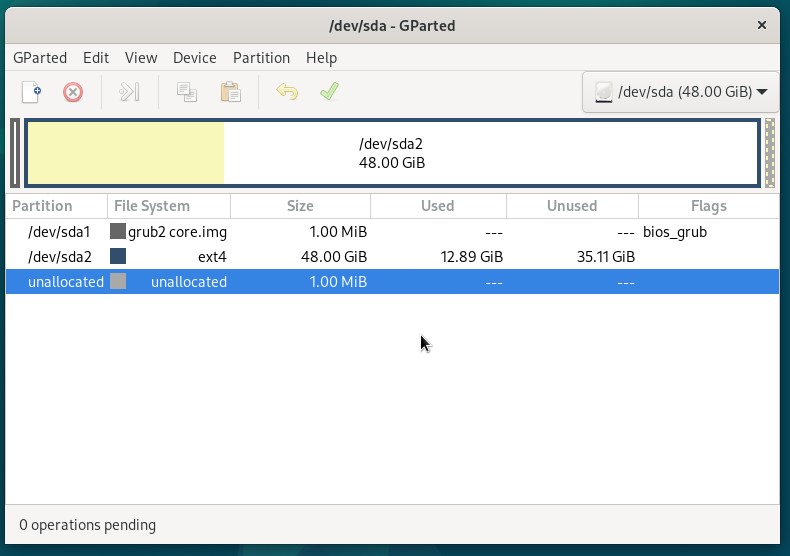
Click /dev/sda2 to select it, Menu Partition > Resize/Move
I just entered 20477 into the New size(MiB). Then click the “0” of “Free space preceding (MiB)”.

Press the “Resize/Move” button.

Click the green check mark to apply the operation. It will ask you again to confirm it.
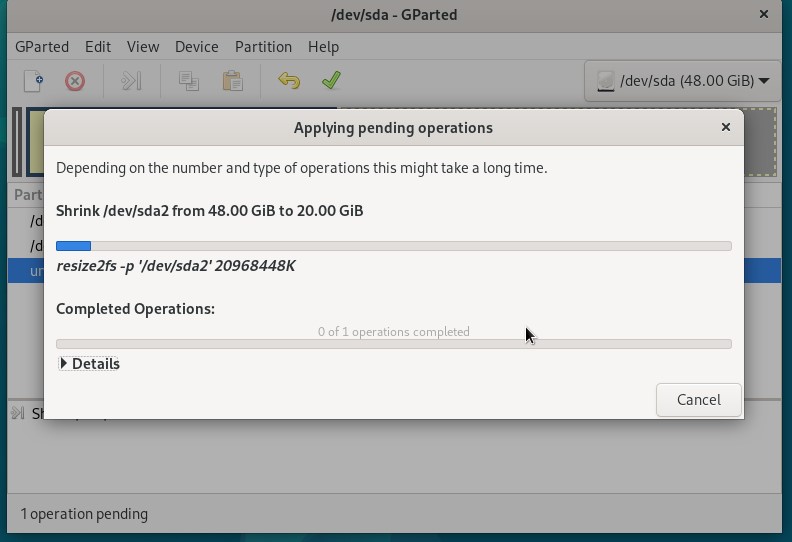
It takes a while to complete the operation.
Close the window when it is done.
Shut down the VM/ Power off the VM. Or, Stop the VM in the Proxmox VE
VM303 > Hardware > CD/DVD Drive, change it to “Do not use any media”.
Step 2
Backup GUID partition table.
In Proxmox VE Console.
root@pve:~# gdisk /dev/pve/vm-303-disk-0
GPT fdisk (gdisk) version 1.0.9

Partition table scan:
  MBR: protective
  BSD: not present
  APM: not present
  GPT: present

Found valid GPT with protective MBR; using GPT.

Command (? for help): b
Enter backup filename to save: guid-bak
The operation has completed successfully.

Command (? for help): q
root@pve:~# ls
guid-bak  l.sh  s.sh
The file table of VM303 is saved at /root/guid-bak file.
Step 3
Resize the VM disk with LVM.
In the step 1, I reduced 28GB. Here I have to reduce less than 28GB. I prefer to give 2GB space. So the command is lvreduce -L -26G /dev/pve/vm-303-disk-0.
root@pve:~# lvreduce -L -26G /dev/pve/vm-303-disk-0
  WARNING: Reducing active logical volume to 22.00 GiB.
  THIS MAY DESTROY YOUR DATA (filesystem etc.)
Do you really want to reduce pve/vm-303-disk-0? [y/n]: y
  Size of logical volume pve/vm-303-disk-0 changed from 48.00 GiB (12288 extents) to 22.00 GiB (5632 extents).
  Logical volume pve/vm-303-disk-0 successfully resized.
Step 4
Restore the GUID partition table.
The command is r, l, /root/guid-bak, w, y
root@pve:~# gdisk /dev/pve/vm-303-disk-0
GPT fdisk (gdisk) version 1.0.9

Warning! Disk size is smaller than the main header indicates! Loading
secondary header from the last sector of the disk! You should use 'v' to
verify disk integrity, and perhaps options on the experts' menu to repair
the disk.
Caution: invalid backup GPT header, but valid main header; regenerating
backup header from main header.

Warning! One or more CRCs don't match. You should repair the disk!
Main header: OK
Backup header: ERROR
Main partition table: OK
Backup partition table: ERROR

Partition table scan:
  MBR: protective
  BSD: not present
  APM: not present
  GPT: damaged

****************************************************************************
Caution: Found protective or hybrid MBR and corrupt GPT. Using GPT, but disk
verification and recovery are STRONGLY recommended.
****************************************************************************

Command (? for help): r

Recovery/transformation command (? for help): l
Enter backup filename to load: /root/guid-bak
Warning! Current disk size doesn't match that of the backup!
Adjusting sizes to match, but subsequent problems are possible!

Recovery/transformation command (? for help): w

Final checks complete. About to write GPT data. THIS WILL OVERWRITE EXISTING
PARTITIONS!!

Do you want to proceed? (Y/N): y
OK; writing new GUID partition table (GPT) to /dev/pve/vm-303-disk-0.
Warning: The kernel is still using the old partition table.
The new table will be used at the next reboot or after you
run partprobe(8) or kpartx(8)
The operation has completed successfully.
Step 5
qm rescan to update the VM303 disk information.
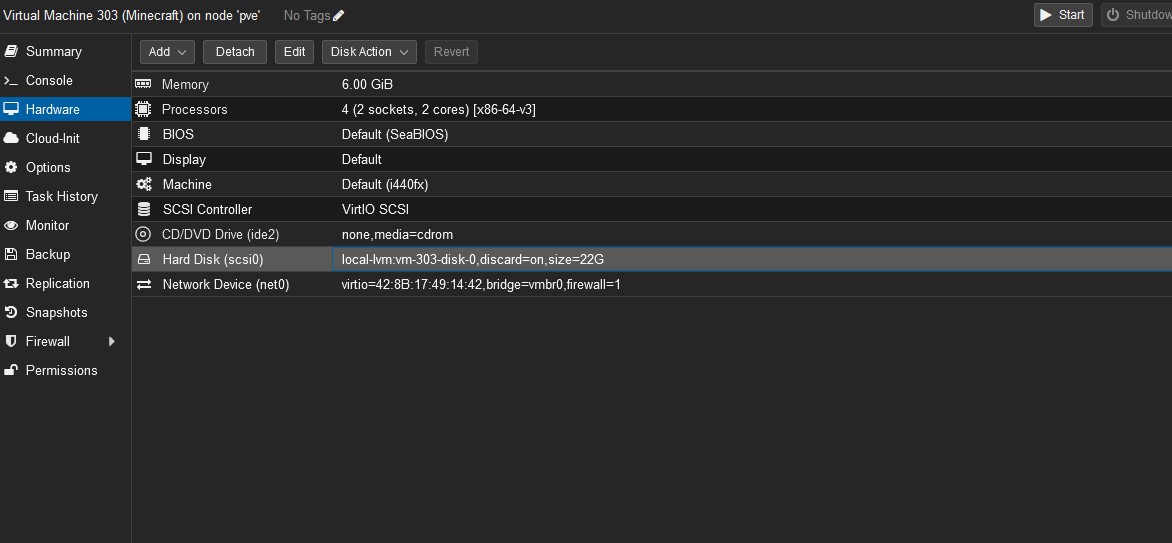
root@pve:~# qm rescan
rescan volumes...
  WARNING: Thin volume pve/vm-303-disk-0 maps 46461222912 while the size is only 23622320128.
  WARNING: Thin volume pve/vm-303-disk-0 maps 46461222912 while the size is only 23622320128.
  WARNING: Thin volume pve/vm-108-disk-0 maps 133059510272 while the size is only 42949672960.
  WARNING: Thin volume pve/vm-108-disk-0 maps 133059510272 while the size is only 42949672960.
VM 303 (scsi0): size of disk 'local-lvm:vm-303-disk-0' updated from 48G to 22G
Now, I can see the 22GB of hard disk size in the Proxmox interface.
Step 6
Start the VM303.
In VM303 Console to double-check it.
Oh, enter the following command to use all the space of the VM disk.

The total size of the disk is 22GB. 11GB used, 9.8GB available.
Make a backup. The new backup file is only 11.90GB.
After shrinking the VM disk, I made the VM size smaller and saved the space for backup.
Credit: OPS HUB
Увеличить раздел жесткого диска в Proxmox можно прямо из графического интерфейса, но вот уменьшить его можно только с помощью консоли.
Разработчики Proxmox не предусмотрели возможность изменение жесткого диска виртуальной машины в обратную сторону. Увеличить можно легко, а уменьшить — нет!
Все команды по уменьшению жесткого диска в Proxmox, выполняются непосредственно на машине-гипервизоре. Чтобы изменить раздел на жестком диске, нужно знать ID контейнера или ID виртуальной машины.
Нужно понимать, что все процедуры с уменьшением жесткого диска виртуальной машины на Proxmox, нужно делать после освобождения места на разделе виртуальной машины. Если мы хотим у виртуальной машины «отрезать» 20 Gb жесткого диска, то у виртуальной машины должно быть неразмечено 20Gb. В обратном случае все сломается и виртуальная машина не сможет запуститься.
Если жесткий диск виртуальной машины был расширили больше чем планировался, то уменьшить его легко можно командами ниже.
Уменьшаем размер HDD виртуальной машины в Proxmox
Для этого нам поможет команда qemu-img с параметром resize. К выполнению команды стоит отнестись очень серьезно, так как любое действие является необратимым. Необдуманное выполнение команд, приведет к проблемам.
В приведенных примерах ниже, мы изменяем размер жесткого диска в Proxmox для виртуальной машины с ID — 100. У Вас этот номер может быть другим.
Уменьшить на 20Gb
qemu-img resize /var/lib/vz/images/100/vm-100-disk-0.raw -20GЗдесь ключевой символ – — отнимаем от раздела 20Gb.
Увеличить на 20Gb
qemu-img resize /var/lib/vz/images/100/vm-100-disk-0.raw +20GЗдесь ключевой символ + — добавляем разделу 20Gb.
Сделать ровно 200Gb
qemu-img resize /var/lib/vz/images/100/vm-100-disk-0.raw 200GHello World,
Lately, as you might have noticed, I’m focusing on KVM Virtual machines running Windows operating systems (the recent versions). This post will again focus on KVM virtual machines. We will talk about resizing virtual disks.
It might happen that your virtual machine is running out of space or that you have provisioned too much disk space and you want to change this. This operation can be performed within a Proxmox VE (PVE) infrastructure but only from the command line (the Web interface does not provide this option yet – maybe in version 2.0)
The resizing process is basically a 2-step process and the order of these steps are different if you are increasing or shrinking the size of the disk.
To increase the size of the disk, you will perform the actions in the following order
- increase the size of the virtual disk (through the command line)
- Then, you will increase the size of the partition within the Operating system in order to reflect the changes in disk size.
To Shrink the size of the disk, you will perform the actions in the following order
- first,you will shrink the size of the partition within the Operating system in order to reflect the changes in disk size.
- and then you will reduce the size of the virtual disk (through the command line)
Resizing the Virtual Disk file- How To
Let have a look to the first part of the process.
Step 1 – Backup your Virtual Machine
Before performing this operation, you should first backup your virtual machine in case something goes bad – shouldn’t but you never know 🙂
Step 2 – Power off your Virtual Machine
You should power off your virtual machine before applying changes. This ensures that the modifications are committed correctly by the PVE infrastructure.
Step 3 – Resizing the virtual disk
As mentioned earlier, to perform this change, you need to go through the command line (no GUI available yet). You will need to connect to the PVE Console locally or remotely via putty for example. From the console, if you type the following command
qemu-img –help
Click to enlarge
You will see a list of supported options. If you have a recent Proxmox VE installation, you will see an option called resize. As the name implies, using this option will allow you to increase or shrink the size of the virtual disk in qcow2,raw or vmdk format. (that’s cool all supported format used by PVE). The command can be used as follow
qemu-img resize <%location of the file%> +| – <%size%>
Note : Wait before using this command – read this till end !!
Step 4 – Checking news the virtual disk size
You can use the ls –lh command to check that the file has been modified accordingly.
Click to enlarge
Or you can use the qemu-img info <%name of the virtual disk file%> to check that the file has been resized as required.
Click to enlarge
All in all the process is really not too difficult and you should be able to resizing disks image file as needed. Before closing this post, I thought that having practical examples might be useful.
Practical Examples
Example 1 – Increasing disk size
In this scenario, we have a virtual machine with the VMID 111 that has a c: drive partition set to 20 GB. We need to increase the size of the partition to 25 GB.
Click to enlarge
We shutdown the virtual machine and as described earlier, I’ll make a console connection (through putty) to the PVE host. I go to the folder holding all my virtual disks files (by default, all the virtual disks are located in /var/lib/vz/images) and then cd to the folder holding the virtual disk I want to resize. (In my case the vmid is 111 – view screenshot)
Click to enlarge
I need to increase the size of the disk up to 25 GB. I basically need to add 5 GB to the initial file. I’ll then type the following command
qemu-img resize vm-111-disk-1.raw +5GB
Click to enlarge
I can now reboot the virtual machine and you will see that the disk size has been set to 25 GB within the Operating system
Click to enlarge
Example 2 – Shrinking disk size
In this scenario, we have a virtual machine with the VMID 111 that has a c: drive partition set to 25 GB. We need to decrease the size of the partition to 20 GB.
Click to enlarge
Note :
You will first need to shrink the size of the disk in the Operating system first. To see how you can shrink the disk within the Operating System, check out the part II
I’ll shutdown the virtual machine, make a putty connection to the PVE host and go to the directory holding the virtual disk file I need to resize. To shrink a disk, you need to type the following command
qemu-img resize <%name of the virtual disk%> – – -5GB
Click to enlarge
If you boot your virtual machine, you will see that the disk has been reduced accordingly.
Note :
There is a difference in the notation between increasing and shrinking disk. If you type this command,
qemu-img resize <%name of the virtual disk%> -5GB
the new virtual disk will be only 5 GB in size. Pay attention when using the command to reduce the size. This is not what you want. Instead you need to type
qemu-img resize <%name of the virtual disk%> – – – 5GB
to shrink the size of the disk by 5 GB.
Source:
I have found the correct shrinking command here http://forum.proxmox.com/threads/6580-Shrink-a-disk-with-qemu-img-parsing-error
Final Notes
So far, we have just changed the size of the virtual disk. Proxmox VE knows now that disk size has been updated. However, we might still need to perform additional actions within the Operating system to apply these changes. This will be explained in the next part of this post
Till then
See ya