
В релизе Proxmox VE 8.4 появилась возможность создавать общие директории на хосте для прямого доступа из виртуальных машин (аналог общих папок в VMware Workstation). Виртуальные машины могут получать прямой доступ (без использования сети) к общим директориям (файлам) на хосте Proxmox с помощью файловой системы VirtIOFS. В этой статье мы рассмотрим, как создать общую директорию на Proxmox и смонтировать ее в виртуальных машинах с гостевыми Linux или Windows.
Общие папки удобны, когда нужно быстро получить доступ из ВМ к файлам на локальном хосте Proxmox без использования сетевых протоколов типа SMB или NAS. Такая общая папка может содержать утилитами, образы, конфигурационные файлы, обновлениями, доступ к которым можно получить, не копирую их в каждую ВМ.
Для проброса директорий с хоста Proxmox в ВМ используется демон virtiofsd, встроенная поддержка которого появилась в версии 8.4.
Проверьте версию Proxmox на хосте:
# pveversion -v
Если версия ниже, чем 8.4, выполните обновление Proxmox.
Проверьте, что virtiofsd установлен на хосте:
# dpkg -l | grep virtiofsd
Создайте общую директорию на хосте Proxmox, к которой вы хотите предоставить доступ для виртуальных машин:
# mkdir /mnt/VMShare
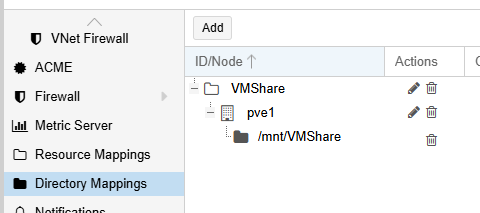
Откройте Proxmox web UI и перейдите в раздел Datacenter -> Directory Mappings. Добавьте новое сопоставление для ресурса, который ссылается на локальную папку /mnt/VMShare.
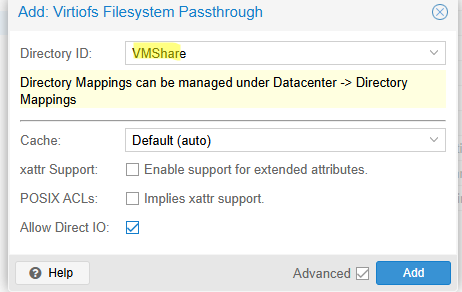
Теперь нужно в настройках виртуальной машины добавить общую ресурс (папку) VirtioFS. Отройте настройки ВМ -> Hardware -> Virtiofs.
Укажите локальную директорию, которую вы хотите пробросить в ВМ.
Virtiofsd поддерживает проброс ACL и xattr атрибутов объектов общей директории в гостевую ВМ. Так вы можете управлять правами доступа к объектам, конечно если гостевая файловая система их поддерживает (имеет смысл только для файловых систем Linux).
Виртуальные машины с ядром Linux 5.4+ по умолчанию поддерживают virtiofs. Проверьте, что драйвер загружен:
# lsmod | grep virtiofs
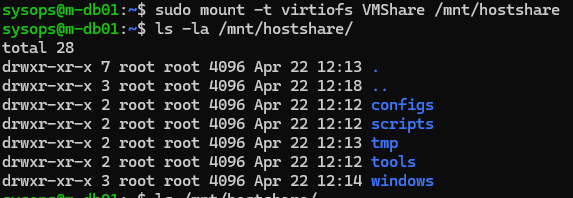
Чтобы в ВМ с гостевой Linux временно смонтировать директорию с хоста Proxmox с помощью драйвера virtiofs, выполните в гостевой ВМ команду:
# mount -t virtiofs VMShare /mnt/hostshare
Или добавьте запись в fstab, чтобы иметь постоянную смонтированную директорию:
VMShare /mnt/hostshare virtiofs rw,relatime 0 0
При запуске команды монтирования virtiofs может появится ошибкаL
mount: /mnt/hostshare: wrong fs type, bad option, bad superblock on vmshare, missing codepage or helper program, or other error. dmesg(1) may have more information after failed mount system call.
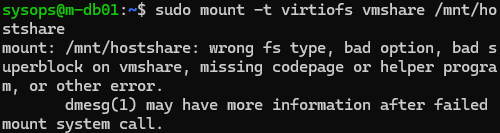
Дело в том, чтобы виртуальное устройство virtiofs появилось в оборудовании ВМ, ее нужно выключить (простой перезагрузки ВМ недостаточно).
После включения выведем конфигурацию ВМ, проверим что в настройках появилось устройство virtiofs:
# qm config 154 --current
virtiofs0: VMShare
В гостевой ВМ с Windows для использования virtiofs нужно дополнительно установить VirtioFS Guest Tools, которые включаю в себя драйвер для доступа к устройству. Смонтируйте в ВМ последую версию ISO образа Virtio ISO (
virtio-win-0.1.271.iso
или выше). Запустите установщик
virtio-win-gt-x64.msi
, установите драйвера viofs/VirtioFS (подробнее в статье об установке Windows в виртуальную машину Proxmox).

Проверим, что драйвер службы установлен и само устройство Virtio FS доступно из гостевой Windows:
Get-Service VirtioFsDrv
Get-PnpDevice | Where-Object { $_.FriendlyName -like "*VirtioFS*" -or $_.FriendlyName -like "*Virtio FS*" }

Для монтирования директории VirtioFS в Windows понадобится утилита WinFSP (Windows File System Proxy), которая позволяет подключать файловые системы в пользовательском режиме (аналог FUSE для Linux)
Скачайте и установите WinFSP https://github.com/winfsp/winfsp/releases
Перезапустите службу VirtIO-FS Service (VirtioFsSvc), которая через winfsp смонтирует общую папку virtiofs.

Общая папка хоста Proxmox появится в виде отдельного диска в проводнике гостевой Windows в виртуальной машине.
Виртуальные машины с подключенной общей папкой virtiofs не поддерживают live migration между хостами.
Storage pool type: cifs
The CIFS backend extends the directory backend, so that no manual
setup of a CIFS mount is needed. Such a storage can be added directly
through the Proxmox VE API or the web UI, with all our backend advantages,
like server heartbeat check or comfortable selection of exported
shares.
Configuration
The backend supports all common storage properties, except the shared
flag, which is always set. Additionally, the following CIFS special
properties are available:
- server
-
Server IP or DNS name. Required.
| To avoid DNS lookup delays, it is usually preferable to use an IP address instead of a DNS name — unless you have a very reliable DNS server, or list the server in the local /etc/hosts file. |
- share
-
CIFS share to use (get available ones with pvesm scan cifs <address> or the
web UI). Required. - username
-
The username for the CIFS storage. Optional, defaults to ‘guest’.
- password
-
The user password. Optional.
It will be saved in a file only readable by root
(/etc/pve/priv/storage/<STORAGE-ID>.pw). - domain
-
Sets the user domain (workgroup) for this storage. Optional.
- smbversion
-
SMB protocol Version. Optional, default is 3.
SMB1 is not supported due to security issues. - path
-
The local mount point. Optional, defaults to /mnt/pve/<STORAGE_ID>/.
- content-dirs
-
Overrides for the default directory layout. Optional.
- options
-
Additional CIFS mount options (see man mount.cifs). Some options are set
automatically and shouldn’t be set here. Proxmox VE will always set the option
soft. Depending on the configuration, these options are set automatically:
username, credentials, guest, domain, vers. - subdir
-
The subdirectory of the share to mount. Optional, defaults to the root directory
of the share.
Configuration Example (
/etc/pve/storage.cfg
)
cifs: backup
        path /mnt/pve/backup
        server 10.0.0.11
        share VMData
        content backup
        options noserverino,echo_interval=30
        username anna
        smbversion 3
        subdir /data
Storage Features
CIFS does not support snapshots on a storage level. But you may use
qcow2 backing files if you still want to have snapshots and cloning
features available.
Table 1. Storage features for backend cifs
| Content types | Image formats | Shared | Snapshots | Clones |
|---|---|---|---|---|
|
images rootdir vztmpl iso backup snippets |
raw qcow2 vmdk |
yes |
qcow2 |
qcow2 |
Examples
You can get a list of exported CIFS shares with:
# pvesm scan cifs <server> [--username <username>] [--password]
Then you can add one of these shares as a storage to the whole Proxmox VE cluster
with:
# pvesm add cifs <storagename> --server <server> --share <share> [--username <username>] [--password]
See Also
it is quite simple to add a Samba share to Proxmox as a storage drive. You are going to need to open you Proxmox web interface and start a shell session link below.
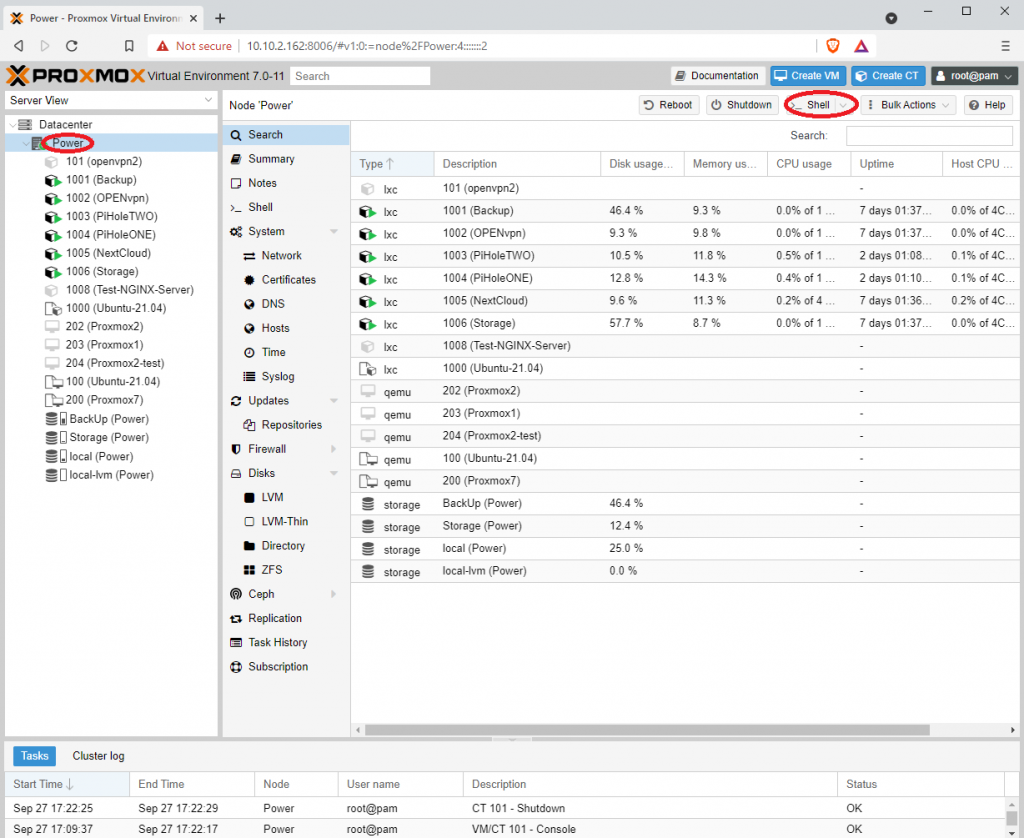
Now with your shell session started you can start entering commands the first command that you need to enter i
$ apt install cifs-utils -y
After cifs-utils is installed you can enter the command
$ mkdir /media/share
This command will make a folder called share in the media directory.
Now it’s time to make the file that’s going to hold credentials for the login of SMB share. to do this were going to use nano text editor by running the command.
$ nano ~/.smb
Now place the contents below in the file. SMB_username equals the username of your SMB login, SMB_password equals the password of your SMB login.
username=smb_username
password=smb_password
Press ctrl + x, Y to save and Enter
Now it is time to use nano one more time to edit a system file called fstab
$ nano /etc/fstab
and were going to add the below line to the fstab system files.
//[ip of server]/[name of share] /media/share cifs credentials=/root/.smb,users,rw,iocharset=utf8
IP server equals the IP address to your SMB share, and name of share equals the name that you have called the share when configuring your SMB server.
Your last step is going to need to run the below command this command mounts the added storage directory to your products on server.
$ mount -a
There you have it you have successfully mounted your SMB share to your Proxmox server but you can’t yet begin working with this share using your Proxmox web interface or your Proxmox commands because we have not yet configured Proxmox to use this share.
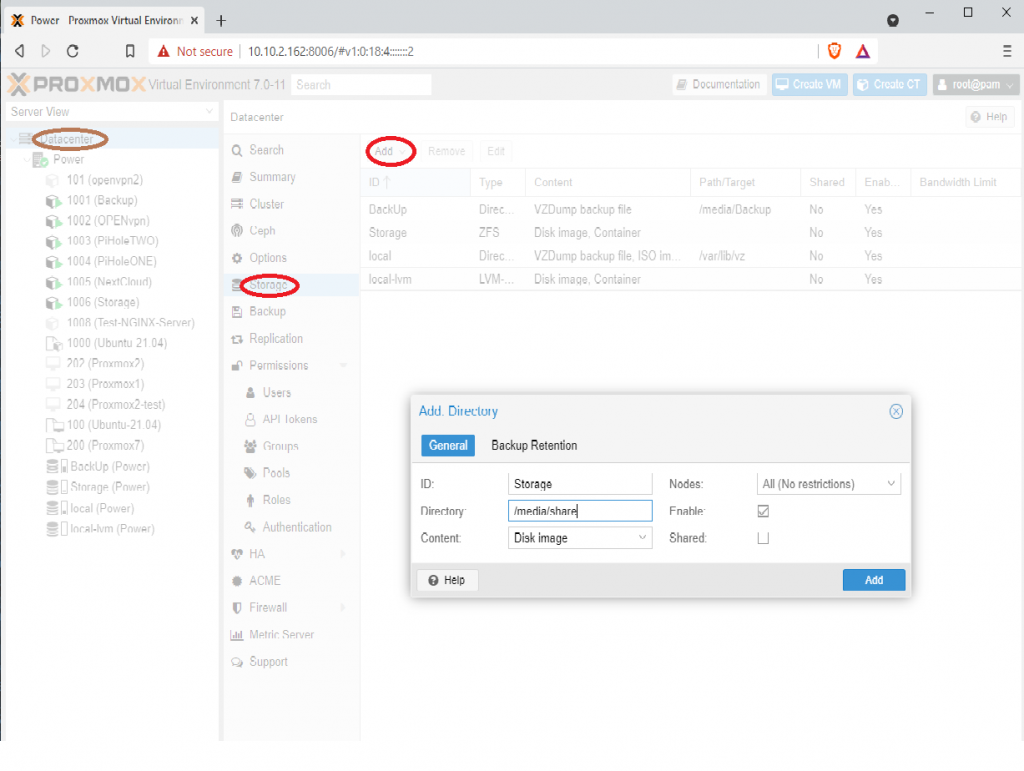
To do this were going to head back to our Proxmox web interface and select the datacenter drop-down in the left-hand corner. Now that we have selected the datacenter we can move to the next column and select storage. With storage selecting you should see a screen appear with three buttons at the top were going to press the add button select directory, and fill out the ID with our desired name for the storage. then fill out the directory as the mount path that we as configured in the previous tutorial in our case it’s going to be /media/share.
After successfully testing access to the host folder in Linux VM on Proxmox Using Virtiofs, I want to test also in Windows VM.
Below is how to do it
– Please ensure that virtiofsd is installed on the Proxmox host
apt install virtiofsd
– Create share directory on Proxmox
mkdir -p /srv/sharefolder/vm101
– Go to Proxmox GUI. Select Datacenter | Directory Mappings. Click add to create a new mapping.

– Select VM who will access share folder from Proxmox Host. Select Hardware | Add | Virtiofs


– Start VM who has been added Virtiofs
If the VM was already running, shut it down and then start it again
– Install WinFsp and virtiofs driver
For WinFsp, please download here: https://github.com/winfsp/winfsp/releases.
For VirtioFS driver, please download here: https://fedorapeople.org/groups/virt/virtio-win/direct-downloads/stable-virtio/virtio-win.iso
Install both on the Windows VM

Enable the VirtIO-FS service and ensure it starts automatically on boot

Once active, open This PC in File Explorer, and you will see a new drive (the shared folder from the host).

Good Luck 🙂
In this article, we see how to add CIFS storage to Proxmox. Bobcares, as a part of our Proxmox Support Services offers solutions to every query that comes our way.
How to add CIFS storage to Proxmox?
Common Internet File System (CIFS) is a network file-system protocol that allows computers on a network to share access to files and printers. It enables us to use network-attached storage, also referred to as a Samba share, as local storage by connecting to it from the server as though it were local. The benefit of CIFS’s network-attached storage is that it provides a centralised location for bulk file storage.
So it’s economically beneficial to store those big, bulky files on less expensive storage media. Also, we need to maintain one centralized server, but we can concentrate on making sure that the server’s valuable files are better protected.
Prerequisites: Already have an SMB share configured, and the file server is broadcasting it.
Adding CIFS storage to Proxmox involves the following steps:
- Connect to Datacenter >> Storage >> Add >> CIFS in the Proxmox webGUI after starting it up.
- On the loading page, we have to provide the details needed to create the new CIFS storage pool.
ID: New storage pool name
Server: IP address of the CIFS server.
Username: The login username required to access the SMB share.
Password: Password for the above username.
Share: Select the specific Samba share being broadcast by the file server.
Max Backups: The number of backups of an individual VM Proxmox will keep on the storage pool before automatically deleting the oldest ones first.
Content: This is a multi-select menu used to determine what kind of files can be stored on this Proxmox store.
- After providing the details, hit the Add button.
- Finally, we can see the new CIFS storage pool available in the Proxmox WebGUI.
[Need help with another issue? We’re here to help.]
Conclusion
In this article, we have provided the easiest way from our Support team to add CIFS storage to Proxmox.
PREVENT YOUR SERVER FROM CRASHING!
Never again lose customers to poor server speed! Let us help you.
Our server experts will monitor & maintain your server 24/7 so that it remains lightning fast and secure.
GET STARTED