
This article is about the Microsoft Windows file listing browser. For exploring file system listings, see file browser. For exploring inside files, see file viewer.
«Windows Explorer» and «explorer.exe» redirect here. They are not to be confused with Internet Explorer (iexplore.exe).
Windows File Explorer
|
File Explorer on Windows 11 in Light App Mode showing special folders on Home, with the new command bar and tabs feature |
|
| Developer(s) | Microsoft |
|---|---|
| Initial release | August 15, 1995; 29 years ago |
| Stable release |
24H2 (10.0.26100.3915) (April 25, 2025; 11 days ago[1]) [±] |
| Preview release |
;Release Preview Channel 24H2 (10.0.26100.3915) (April 25, 2025; 11 days ago[2][3]) [±]
24H2 (10.0.26120.3950) (May 5, 2025; 1 day ago[4]) [±]
24H2 (10.0.26200.5581) (May 5, 2025; 1 day ago[5]) [±]
10.0.27842.1000 (April 23, 2025; 13 days ago[6]) [±] |
| Included with | Windows 95 and later |
| Predecessor | Program Manager, File Manager |
| Type | Shell, file manager |
File Explorer, previously known as Windows Explorer, is a file manager application and default desktop environment that is included with releases of the Microsoft Windows operating system from Windows 95 onwards. It provides a graphical user interface for accessing the file systems, as well as user interface elements such as the taskbar and desktop.
The application was renamed from «Windows Explorer» to «File Explorer» in Windows 8;[7] however, the old name of «Windows Explorer» can still be seen in the Windows Task Manager.
Windows Explorer was first included with Windows 95 as a replacement for File Manager, which came with all versions of Windows 3.x operating systems. Explorer could be accessed by double-clicking the new My Computer desktop icon or launched from the new Start Menu that replaced the earlier Program Manager. There is also a shortcut key combination: Windows key+E. Successive versions of Windows (and in some cases, Internet Explorer) introduced new features and capabilities, removed other features, and generally progressed from being a simple file system navigation tool into a task-based file management system.
While «Windows Explorer» or «File Explorer» is a term most commonly used to describe the file management aspect of the operating system, the Explorer process also houses the operating system’s search functionality and File Type associations (based on filename extensions), and is responsible for displaying the desktop icons, the Start Menu, the Taskbar, and the Control Panel. Collectively, these features are known as the Windows shell.
File Explorer is the default user interface for accessing and managing the file systems, but it is possible to perform such tasks on Windows without File Explorer. For example, the File ▸ Run menu option in Task Manager on Windows NT or later functions independently of File Explorer, as do commands run within a command prompt window.
After a user logs in, the explorer process is created by the userinit process. Userinit performs some initialization of the user environment (such as running the login script and applying group policies) and then looks in the registry at the Shell value and creates a process to run the system-defined shell – by default, Explorer.exe. Then Userinit exits. This is why Explorer.exe is shown by various process explorers with no parent – its parent has exited.
In 1995, Microsoft first released test versions of a shell refresh, named the Shell Technology Preview, and often referred to informally as «NewShell».[8] The update was designed to replace the Windows 3.x Program Manager/File Manager based shell with Windows Explorer. The release provided capabilities quite similar to that of the Windows «Chicago» (codename for Windows 95) shell during its late beta phases, however was intended to be nothing more than a test release.[9] There were two public releases of the Shell Technology Preview, made available to MSDN and CompuServe users: May 26, 1995, and August 8, 1995. Both held Windows Explorer builds of 3.51.1053.1. The Shell Technology Preview program never saw a final release under NT 3.51. The entire program was moved across to the Cairo development group who finally integrated the new shell design into the NT code with the release of NT 4.0 in July 1996.
Windows 98 and Windows Desktop Update
[edit]
With the release of the Windows Desktop Update (packaged with Internet Explorer 4 as an optional component, and included in Windows 98), Windows Explorer became «integrated» with Internet Explorer, most notably with the addition of navigation arrows (back and forward) for moving between recently visited directories, as well as Internet Explorer’s Favorites menu.
An address bar was also added to Windows Explorer, which a user could type in directory paths directly, and be taken to that folder.
Another feature that was based on Internet Explorer technology was customized folders. Such folders contained a hidden web page that controlled the way the Windows Explorer displayed the contents of the folder.
Windows ME and Windows 2000
[edit]
The «Web-style» folders view, with the left Explorer pane displaying details for the object currently selected, is turned on by default. For certain file types, such as pictures and media files, a preview is also displayed in the left pane.[10] The Windows 2000 Explorer featured an interactive media player as the previewer for sound and video files. However, such a previewer can be enabled in Windows ME through the use of folder customization templates.[11] Windows Explorer in Windows 2000 and Windows ME allows for custom thumbnail previewers and tooltip handlers. The default file tooltip displays file title, author, subject and comments;[12] this metadata may be read from a special NTFS stream, if the file is on an NTFS volume, or from a COM Structured Storage stream, if the file is a structured storage document. All Microsoft Office documents since Office 95[13] make use of structured storage, so their metadata is displayable in the Windows 2000 Explorer default tooltip. File shortcuts can also store comments which are displayed as a tooltip when the mouse hovers over the shortcut.
The right-hand pane, which usually just lists files and folders, can also be customized. For example, the contents of the system folders aren’t displayed by default, instead showing in the right pane a warning to the user that modifying the contents of the system folders could harm their computer. It’s possible to define additional Explorer panes by using DIV elements in folder template files.[14] This feature was abused by computer viruses that employed malicious scripts, Java applets, or ActiveX controls in folder template files as their infection vector. Two such viruses are VBS/Roor-C[15] and VBS.Redlof.a.[16]
Other Explorer UI elements that can be customized include columns in «Details» view, icon overlays, and search providers: the new DHTML-based search pane is integrated into Windows 2000 Explorer, unlike the separate search dialog found in all previous Explorer versions.[17]
Search capabilities were added, offering full-text searches of documents, with options to filter by date (including arbitrary ranges like «modified within the last week»), size, and file type. The Indexing Service has also been integrated into the operating system and the search pane built into Explorer allows searching files indexed by its database.[18] The ability to customize the standard buttons was also added.
Windows XP and Windows Server 2003
[edit]
There were significant changes made to Windows Explorer in Windows XP, both visually and functionally. Microsoft focused especially on making Explorer more discoverable and task-based, as well as adding several new features to reflect the growing use of a computer as a digital hub.
Windows Explorer in Windows Server 2003 contains all the same features as Windows XP, but the task panes and search companion are disabled by default.
The task pane is displayed on the left-hand side of the window instead of the traditional folder tree view. It presents the user with a list of common actions and destinations that are relevant to the current directory or file(s) selected. For instance, when in a directory containing mostly pictures, a set of «Picture tasks» is shown, offering the options to display these pictures as a slide show, to print them out, or to go online to order prints. Conversely, a folder containing music files would offer options to play those files in a media player or to go online to purchase music. Windows XP had a Media bar but it was removed with SP1. The Media Bar was only available with Windows XP RTM.
Every folder also has «File and Folder Tasks», offering options to create new folders, share a folder on the local network, publish files or folders to a website, and other common tasks like copying, renaming, moving, and deleting files or folders. File types that have identified themselves as being printable also have an option listed to print the file.
Underneath «Other Places» is a «Details» pane which gives additional information – typically file size and date, but depending on the file type, a thumbnail preview, author, image dimensions, or other details.
The «Folders» button on the Windows Explorer toolbar toggles between the traditional tree view of folders, and the task pane. Users can get rid of the task pane or restore it using the sequence: Tools – Folder Options – General – Show Common Tasks/Use Windows Classic Folders.
Microsoft introduced animated «Search Companions» in an attempt to make searching more engaging and friendly; the default character is a puppy named Rover (previously used in Microsoft Bob), with three other characters (Merlin the magician, Earl the surfer, and Courtney) also available. These search companions use the same technology as Microsoft Office’s Office Assistants, even incorporating «tricks» and sound effects, and they can be used as Office Assistants if their files are copied into the C:\Windows\msagent\chars folder.[19]
The search capability itself is fairly similar to Windows ME and Windows 2000, with one major addition: Search can also be instructed to search only files that are categorical «Documents» or «Pictures, music and video»; this feature is noteworthy largely because of how Windows determines what types of files can be classified under these categories. In order to maintain a relevant list of file types, Windows Explorer connects to Microsoft and downloads a set of XML files that define what these file types are. The Search Companion can be disabled in favor of the classic search pane used in Windows 2000 by using the Tweak UI applet from Microsoft’s PowerToys for Windows XP, or by manually editing the registry.
Windows XP improves image preview in Explorer by offering a Filmstrip view. «Back» and «Previous» buttons facilitate navigation through the pictures, and a pair of «Rotate» buttons offer 90-degree clockwise and counter-clockwise (lossy)[20] rotation of images. Aside from the Filmstrip view mode, there is a ‘Thumbnails’ mode, which displays thumbnail-sized images in the folder. A Folder containing images will also show thumbnails of four of the images from that folder overlaid on top of a large folder icon.
Web sites that offer image hosting services can be plugged into Windows Explorer, which the user can use to select images on their computer, and have them uploaded correctly without dealing with comparatively complex solutions involving FTP or web interfaces.[citation needed]
- Explorer gained the ability to understand the metadata of a number of types of files. For example, with images from a digital camera, the Exif information can be viewed, both in the Properties pages for the photo itself, as well as via optional additional Details View columns.
- A Tile view mode was added, which displays the file’s icon in a larger size (48 × 48), and places the file name, descriptive type, and additional information (typically the file size for data files, and the publisher name for applications) to the right.
- The Details view also presented an additional option called «Show in Groups» which allows the Explorer to separate its contents by headings based on the field which is used to sort the items.
- The taskbar can be locked to prevent it from accidentally being moved.
- Windows Explorer also gained the ability to burn CDs and DVD-RAM discs in Windows XP.
- Ability to create and open ZIP files, called «compressed folders», which is a file containing other files.[21][22]
- Ability to open Cabinet (.cab) files, another type of file that contains other files.[23]
- If a
.HTMor.HTMLfile is copied or moved, the accompanying_filessuffix folder is copied or moved among it automatically.[24]
ZIP and CAB files are integrated into the user interface so they can be browsed as if they were ordinary folders. Given that files contained inside ZIP files can not be opened directly, they are automatically extracted to a temporary location and launched with the associated program from the temporary location when opened, to make the appearance that the ZIP file is a real directory.[21]
Removed and changed features
[edit]
|
This section needs expansion. You can help by adding to it. (December 2012) |
- The sort order has changed compared to the one in Windows 2000. For file names containing numbers Windows Explorer now tries to sort based on numerical value rather than just comparing each number digit by digit.[25]
Windows Vista and Windows Server 2008
[edit]
Search, organizing and metadata
[edit]
Windows Explorer includes significant changes from previous versions of Windows such as improved filtering, sorting, grouping and stacking. Combined with integrated desktop search, Windows Explorer allows users to find and organize their files in new ways, such as stacks.[26][27] The new Stacks viewing mode groups files according to the criterion specified by the user.[27] Stacks can be clicked to filter the files shown in Windows Explorer. There is also the ability to save searches as virtual folders or search folders.[28] A search folder is simply an XML file, which stores the query in a form that can be used by the Windows search subsystem.[29] When accessed, the search is executed and the results are aggregated and presented as a virtual folder.[28] Windows Vista includes six search folders by default: recent documents, recent e-mail, recent music, recent pictures and videos, recent changed, and «Shared by Me».[30] Additionally, search operators for properties were introduced, such as kind:music.[31] Since at least Windows 7, comparison operators «greater than» and «less than» are supported to search for any supported attribute such as date ranges and file sizes, like size:>100MB to search for all files that are greater than 100 MB.[32] Attributes sortable and searchable in Windows Explorer include pictures’ dimensions, Exif data such as aperture and exposure, video duration and framerate and width.[33]
When sorting items, the sort order no longer remains consistently Ascending or Descending. Each property has a preferred sort direction. For example, sort by date defaults to descending order, as does size. But name and type default to ascending order.
Searching for files containing a given text string became problematic with Vista unless the files had been indexed. An alternative is to use the findstr command-line function.[34] After right-clicking on a folder one can open a command-line prompt in that folder.
Windows Explorer also contains modifications in the visualization of files on a computer. A new addition to Windows Explorer in Vista and Server 2008 is the details pane, which displays metadata and information relating to the currently selected file or folder. The details pane will also display a thumbnail of the file or an icon of the filetype if the file does not contain visual information. Furthermore, different imagery is overlaid on thumbnails to give more information about the file, such as a picture frame around the thumbnail of an image file, or a filmstrip on a video file.
The details pane also allows for the change of some textual metadata such as author and title in files that support them within Windows Explorer. A new type of metadata called tags allows users to add descriptive terms to documents for easier categorization and retrieval. Some files support open metadata, allowing users to define new types of metadata for their files. Out-of-the-box, Windows Vista and Windows Server 2008 supports Microsoft Office documents and most audio and video files. Support for other file types can however be added by writing specialized software to retrieve the metadata at the shell’s request. Metadata stored in a file’s alternate data stream only on NTFS volumes cannot be viewed and edited through the summary tab of the file’s properties anymore. Instead, all metadata is stored inside the file, so that it will always travel with the file and not be dependent on the file system.[35]
Windows Explorer in Windows Vista and Windows Server 2008 also introduces a new layout. The task panes from Windows XP are replaced with a toolbar on top and a navigation pane on the left. The navigation pane contains commonly accessed folders and preconfigured search folders. Eight different views are available to view files and folders, including extra large, large, medium, small, list, details, tiles, and content. In addition, column headers now appear in all icon viewing modes,[27] unlike Windows XP where they only appear in the details icon viewing mode.[26] File and folder actions such as cut, copy, paste, undo, redo, delete, rename and properties are built into a dropdown menu which appears when the Organize button is clicked. It is also possible to change the layout of the Explorer window by using the Organize button. Users can select whether to display classic menus, a search pane, a preview pane, a reading pane, and the navigation pane. The preview pane enables users to preview files (e.g., documents or media files) without opening them. If an application, such as Office 2007, installs preview handlers for file types, then these files can also be edited within the preview pane itself.[36]
Windows Vista saw the introduction of the breadcrumb bar for easier navigation. As opposed to the prior address bar which displayed the current folder in a simple editable combobox, this new style structures the path into clickable levels of folder hierarchy (though falls back to the classic edit mode when a blank area is clicked), enabling the user to skip as many levels as desired in one click rather than repeatedly clicking «Up». It is also possible to navigate to any subfolder of the current folder using the arrow to the right of the last item. The menu bar is now hidden by default but reappears temporarily when the user presses Alt.
Check boxes in Windows Explorer allow the selection of multiple files.[37] Free and used space on all drives is shown in horizontal indicator bars. Icons of various sizes are supported: 16 x 16, 24 x 24, 32 x 32, 48 x 48, 64 x 64, 96 x 96, 128 x 128 and 256 x 256. Windows Explorer can zoom the icons in and out using a slider or by holding down the Ctrl key and using the mouse scrollwheel.[38] Live icons can display the content of folders and files themselves rather than generic icons.[39]
With the release of Windows Vista and Server 2008 and Windows Internet Explorer 7 for Windows XP, Internet Explorer is no longer integrated with Windows Explorer. In Windows Vista and Server 2008 (and in Windows XP as well if IE7 or 8 is installed), Windows Explorer no longer displays web pages, and IE7 does not support use as a file manager, although one will separately launch the other as necessary.
When moving or copying files from one folder to another, if two files have the same name, an option is now available to rename the file; in previous versions of Windows, the user was prompted to choose either a replacement or cancel moving the file. Also, when renaming a file, Explorer only highlights the filename without selecting the extension. Renaming multiple files is quicker as pressing Tab automatically renames the existing file or folder and opens the file name text field for the next file for renaming. Shift+Tab allows renaming in the same manner upwards.
Support for burning data on DVDs (DVD±R, DVD±R DL, DVD±R RW) in addition to CDs and DVD-RAM using version 2.0 of the Image Mastering API, as well as Live File System support was added.[40]
If a file is in use by another application, Windows Explorer tells users to close the application and retry the file operation. Also, a new interface IFileIsInUse is introduced into the API which developers can use to let other applications switch to the main window of the application that has the file open or simply close the file from the «File in Use» dialog. If the running application exposes these operations by means of the IFileIsInUse interface, Windows Explorer, upon encountering a locked file, allows the user to close the file or switch to the application from the dialog box itself.[41]
Windows Vista introduced pre-included support for the Media Transfer Protocol.[citation needed]
Removed and changed features
[edit]
The ability to customize the layout and buttons on the toolbars has been removed in Windows Vista’s Explorer, as has the ability to add a password to a zip file (compressed folder). The Toolbar button in Explorer to go up one folder from the current folder has been removed (the function still exists however, one can move up a folder by pressing Alt + ↑). Although still fully available from the menus and keyboard shortcuts, toolbar buttons for Cut, Copy, Paste, Undo, Delete, Properties and some others are no longer available. The Menu Bar is also hidden by default but is still available by pressing the Alt key or changing its visibility in the layout options. Several other features are removed such as showing the size on the status bar without selecting items, storing metadata in NTFS alternate data streams,[42] the IColumnProvider interface which allowed addition of custom columns to Explorer[43] and folder background customization using desktop.ini.
The ability to right-click a folder and hit «Search» was removed in Windows Vista Service Pack 1. Users must open the folder they wish to search in and enter their keywords in the search field located on the top right corner of the window. Alternatively, users can specify other search parameters through the «Advanced Search» UI, which can be accessed by clicking on the Organize Bar and selecting Search Pane under the Layout submenu. Pressing F3 also opens the «Advanced Search» interface.
Windows 7 and Windows Server 2008 R2
[edit]
Windows Explorer in Windows 7 and Windows Server 2008 R2 supports libraries, virtual folders described in a .library-ms file that aggregates content from various locations – including shared folders on networked systems if the shared folder has been indexed by the host system – and present them in a unified view. Searching in a library automatically federates the query to the remote systems, in addition to searching on the local system, so that files on the remote systems are also searched. Unlike search folders, Libraries are backed by a physical location which allows files to be saved in the libraries. Such files are transparently saved in the backing physical folder. The default save location for a library may be configured by the user, as can the default view layout for each library. Libraries are generally stored in the libraries special folder, which allows them to be displayed on the navigation pane.
By default, a new user account in Windows 7 contains four libraries, for different file types: Documents, Music, Pictures, and Videos. They are configured to include the user’s profile folders for these respective file types, as well as the computer’s corresponding Public folders.
In addition to aggregating multiple storage locations, Libraries enable Arrangement Views and Search Filter Suggestions. Arrangement Views allow users to pivot their views of the library’s contents based on metadata. For example, selecting the «By Month» view in the Pictures library will display photos in stacks, where each stack represents a month of photos based on the date they were taken. In the Music library, the «By Artist» view will display stacks of albums from the artists in their collections, and browsing into an artist stack will then display the relevant albums.
Search Filter Suggestions are a new feature of the Windows 7 and Windows Server 2008 R2 Explorer’s search box. When the user clicks in the search box, a menu shows up below it showing recent searches as well as suggested Advanced Query Syntax filters that the user can type. When one is selected (or typed in manually), the menu will update to show the possible values to filter by for that property, and this list is based on the current location and other parts of the query already typed. For example, selecting the «tags» filter or typing «tags:» into the search box will display the list of possible tag values which will return search results.
The metadata written within the file, implemented in Vista, is also utilized in Windows 7. This can sometimes lead to long wait times displaying the contents of a folder. For example, if a folder contains many large video files totaling hundreds of gigabytes, and the Window Explorer pane is in Details view mode showing a property contained within the metadata (for example Date, Length, Frame Height), Windows Explorer might have to search the contents of the whole file for the meta data. Some damaged files can cause a prolonged delay as well. This is due to metadata information being able to be placed anywhere within the file, beginning, middle, or end, necessitating a search of the whole file. Lengthy delays also occur when displaying the contents of a folder with many different types of program icons. The icon is contained in the metadata. Some programs cause the activation of a virus scan when retrieving the icon information from the metadata, hence producing a lengthy delay.[35]
Arrangement Views and Search Filter Suggestions are database-backed features that require that all locations in the Library be indexed by the Windows Search service. Local disk locations must be indexed by the local indexer, and Windows Explorer will automatically add locations to the indexing scope when they are included in a library. Remote locations can be indexed by the indexer on another Windows 7 and Windows Server 2008 R2 machine, on a Windows machine running Windows Search 4 (such as Windows Vista or Windows Home Server), or on another device that implements the MS-WSP remote query protocol.[44]
Windows Explorer also supports federating search to external data sources, such as custom databases or web services, that are exposed over the web and described via an OpenSearch definition. The federated location description (called a Search Connector) is provided as a .osdx file. Once installed, the data source becomes queryable directly from Windows Explorer. Windows Explorer features, such as previews and thumbnails, work with the results of a federated search as well.
- Windows 7 and Windows Server 2008 R2 support showing icons in the context menu and creating cascaded context menus with static verbs in submenus using the Registry instead of a shell extension.[45]
- The search box in the Explorer window and the address bar can be resized.
- Certain folders in the navigation pane can be hidden to reduce clutter.
- Progress bars and overlay icons on an application’s button on the taskbar.
- Content view which shows thumbnails and metadata.
- Buttons to toggle the preview pane and create a new folder.
Removed or changed features
[edit]
In Windows 7, several features have been removed from Windows Explorer, including the collapsible folder pane, overlay icon for shared items, remembering individual folder window sizes and positions, free disk space on the status bar, icons on the command bar, ability to disable Auto Arrange and Align to Grid, sortable column headings in other views except details view, ability to disable full row selection in details view, automatic horizontal scrolling and scrollbar in the navigation pane and maintaining selection when sorting from the Edit menu.
Windows 8 and Windows Server 2012
[edit]
The file manager on Windows 8 and Windows Server 2012 is renamed File Explorer and introduces new features such as a redesigned interface incorporating a ribbon toolbar, and a redesigned file operation dialog that displays more detailed progress and allows for file operations to be paused and resumed. The details pane from Windows Vista and 7 was removed and replaced with a narrower pane with no icons and fewer detail columns. But other details are displayed by hovering over the file’s name.[46][7]
Windows 10 and Windows Server 2016
[edit]
File Explorer’s icons were redesigned to fit with the more flat and simplified theming of Windows 10 as a whole. The window border padding is thinner than previous versions. Windows 10 Creators Update and later versions come with a new Universal File Explorer (also known as the UWP File Explorer). Although hidden, it can be opened by creating a shortcut pointing to «explorer shell:AppsFolder\c5e2524a-ea46-4f67-841f-6a9465d9d515_cw5n1h2txyewy!App» [47][48] A Dark mode was added to the software in 2018, to match similar themes available for other inbuilt Windows applications.[49]
Windows 10, version 1809 and Windows Server 2019
[edit]
A «dark mode» has been added to File Explorer in Windows 10, version 1809 and Windows Server 2019.[50] The Universal File Explorer also includes new features.[51][52]
Windows 10, version 1909
[edit]
Windows Search and OneDrive have been integrated into File Explorer’s search feature in Windows 10, version 1909.[53]
In Windows 11, File Explorer had undergone significant UI changes, with the Ribbon Interface dating back to Windows 7 having been reworked into a command bar. Translucency, shadows, and rounded geometry have also been added, following the Microsoft’s new Fluent Design System. In March 2022, Microsoft introduced adverts into File Explorer, but later stated that these were «not intended to be published externally» after significant negative media coverage.[54]
Windows 11 2022 Update
[edit]
On April 5, 2022, Microsoft announced that it would be adding tabs, favorites, and a new homepage to File Explorer.[55] These features were eventually introduced via an update to the Windows 11 2022 Update on October 18, 2022.[56]
Windows 11 2023 Update
[edit]
On 21 September, 2023, Microsoft announced that it would be adding a modern home page, address bar, search experience, and details pane, along with an update gallery pane.[57] This update was released to most Windows 11 users via an enablement package to Windows 11, 22H2. The full release is slated to come out with the full release of Windows 11 23H2. The new File Explorer is now based on XAML technology, instead of the former Win32 technology.
File Explorer can be extended to support non-default functionality by means of Windows shell extensions, which are COM objects that plug the extended functionality into Windows Explorer.[58] Shell extensions can be in the form of shell extension handlers, toolbars or even namespace extensions that allow certain folders (or even non-filesystem objects such as the images scanned by a scanner) to be presented as a special folder. File Explorer also allows metadata for files to be added as NTFS alternate data streams, separate from the data stream for the file.
Shell extension handlers are queried by the shell beforehand for modifying the action the shell takes. They can be associated on a per file type – where they will show up only when a particular action takes place on a particular file type – or on a global basis – which are always available. The shell supports the following extension handlers:
| Handler | Description | Can be implemented on | Required shell version |
|---|---|---|---|
| Context menu handler | Adds menu items to the context menu. It is called before the context menu is displayed. | Per file type | Windows 95 and later. Windows 7 introduced IExecuteCommand |
| Drag-and-drop handler | Controls the action upon right-click drag and drop and modifies the context menu that appears. | Global | Windows 95 and later |
| Drop target handler | Controls the action after a data object is dragged and dropped over a drop target such as a file. | Per file type | Windows 95 and later |
| Data object handler | Controls the action after a file is copied to the clipboard or dragged and dropped over a drop target. It can provide additional clipboard formats to the drop target. | Per file type | Windows 95 and later |
| Icon handler | Assigns a custom icon to an individual file amongst a class of file types. It is called before file icons are displayed. | Per file type | Windows 95 and later |
| Property sheet handler | Replaces or adds pages to the property sheet dialog box of an object. | Per file type | Windows 95 and later |
| Copy hook handler | Allows running, modifying or denying the action when a user or application tries to copy, move, delete, or rename an object. | Not associated with a file type | Windows 95 and later |
| Search handler | Allows shell integration of a custom search engine. | Not associated with a file type | Windows 95 through Windows XP |
| Infotip handler | Allows retrieving flags and infotip information for an item and displaying it inside a popup tooltip upon mouse hover. | Per file type | Windows Desktop Update and later |
| Thumbnail image handler | Provides for a thumbnail image to be generated and displayed along with its alpha type when a file is selected or the thumbnail view is activated. | Per file type | Windows Desktop Update and later. Windows Vista introduced a newer IThumbnailProvider interface that also shows thumbnails in the Details pane. The older IExtractImage is still supported but not in the Details pane.[59] |
| Disk Cleanup handler | Add a new entry to the Disk Cleanup application and allows specifying additional disk locations or files to clean up. | Per folder | Windows 98 and later |
| Column handler | Allows creating and displaying custom columns in Windows Explorer details view. It can be used to extend sorting and grouping. | Per folder | Windows 2000 and later |
| Icon overlay handler | Allows displaying an overlay icon over a shell object (a file or folder icon). | Per file type | Windows 2000 and later |
| Metadata handler | Allows viewing and modifying metadata stored in a file. It can be used to extend details view columns, infotips, property pages, sorting and grouping. | Per file type | Windows 2000 and later |
| Filter handler (IFilter) | Allows file properties and its contents to be indexed and searched by Indexing Service or Windows Search | Per file type | Windows 2000 and later |
| AutoPlay handler | Examines newly discovered removable media and devices and, based on content such as pictures, music or video files, launches an appropriate application to play or display the content. | Per file type category Windows XP only: per device and per file type category |
Windows XP and later |
| Property handler | Allows viewing and modifying system-defined and custom properties of a file. | Per file type | Windows Vista and later; on Windows XP if Windows Search is installed. |
| Preview handler | Renders enhanced previews of items without launching the default application when a file is selected. It can also provide file type-specific navigation such as browsing a document, or seeking inside a media file. | Per file type | Windows Vista and later |
Namespace extensions are used by Explorer and Common Dialogs to either display some data – which are not necessarily persisted as files – in a folder-like view or to present data in a way that is different from their organization on the file system. This feature can be exploited by a any hierarchical data source that can be represented as a file system like the Windows one, including Cloud-based implementation. Special folders, such as My Computer and Network Places in Windows Explorer are implemented this way, as are Explorer views that let items in a mobile phone or digital camera be explored. Source-control systems that use Explorer to browse source repositories also use Namespace extensions to allow Explorer to browse the revisions. To implement a namespace extension, the IPersistFolder, IShellView, IShellFolder, IShellBrowser and IOleWindow interfaces need to be implemented and registered. The implementation needs to provide the logic for navigating the data store as well as describing the presentation. Windows Explorer will instantiate the COM objects as required.[60]
While Windows Explorer natively exposes the extensibility points as COM interfaces, .NET Framework can also be used to write some types of extensions, using the COM Interop functionality of .NET Framework.[60] While Microsoft itself makes available extensions – such as the photo info tool[61] – which are authored using .NET Framework, they currently recommend against writing managed shell extensions, as only one instance of the CLR (prior to version 4.0) can be loaded per-process. This behavior will cause conflicts if multiple managed add-ins, targeting different versions of the CLR, are attempted to be run simultaneously.[62][63]
- Comparison of file managers
- List of alternative shells for Windows
Notes and references
[edit]
- ^ «April 25, 2025—KB5055627 (OS Build 26100.3915) Preview». Microsoft Support. Microsoft.
- ^ «Releasing Windows 11 Build 26100.3902 to the Release Preview Channel». Windows Insider Blog. April 10, 2025.
- ^ «April 25, 2025—KB5055627 (OS Build 26100.3915) Preview». Microsoft Support. Microsoft.
- ^ «Announcing Windows 11 Insider Preview Build 26120.3950 (Beta Channel)». Windows Insider Blog. May 5, 2025.
- ^ «Announcing Windows 11 Insider Preview Build 26200.5581 (Dev Channel)». Windows Insider Blog. May 5, 2025.
- ^ «Announcing Windows 11 Insider Preview Build 27842 (Canary Channel)». Windows Insider Blog. April 23, 2025.
- ^ a b «Microsoft switches to File Explorer name in Windows 8, bids farewell to Windows Explorer». The Verge. June 29, 2012. Archived from the original on August 17, 2012. Retrieved August 3, 2012.
- ^ Lineback, Nathan. «Misc Windows». toastytech.com. Archived from the original on July 3, 2018. Retrieved June 19, 2018.
- ^ John D. Ruley (September 1995). «NT Gets the Look But Not the Logo». How-To Columns. WinMag. Archived from the original on March 14, 2006. Retrieved September 4, 2009. Internet Archive
- ^ «Managing Files, Folders, and Search Methods: Microsoft TechNet». microsoft.com. Archived from the original on January 12, 2009. Retrieved June 19, 2018.
- ^ «Serenity Macros Home Page – Resources for MS Word». www.mvps.org. Archived from the original on June 27, 2018. Retrieved June 19, 2018.
- ^ Windows 2000 Registry: Latest Features and APIs Provide the Power to Customize and Extend Your Apps, MSDN Magazine, November 2000, archived from the original on April 15, 2003, retrieved August 26, 2007
- ^ «COM Objects and Structured Storage» Archived 2018-12-18 at the Wayback Machine, Windows Dev Center, May 31, 2018
- ^ Esposito, Dino (June 2000), More Windows 2000 UI Goodies: Extending Explorer Views by Customizing Hypertext Template Files, MSDN Magazine, archived from the original on August 24, 2007, retrieved August 26, 2007
- ^ Sophos, VBS/Roor-C threat analysis Archived 2007-11-30 at the Wayback Machine. Accessed August 26, 2007.
- ^ «Virus.VBS.Redlof.a», Virus Encyclopedia, Viruslist.com, January 15, 2004, archived from the original on October 28, 2007, retrieved August 26, 2007
- ^ Figure 1 Windows Shell Extensions, MSDN Magazine, June 2000, archived from the original on August 31, 2004, retrieved August 26, 2007
- ^ «What is Indexing Service?». msdn.microsoft.com. November 6, 2009. Archived from the original on January 1, 2011. Retrieved June 19, 2018.
- ^ «Is Microsoft Office 2003 still decent for general use on Windows 7, 8.1 and 10». answers.microsoft.com. Archived from the original on February 7, 2016. Retrieved June 19, 2018.
- ^ «What is Windows XP?». www.computerhope.com. Retrieved August 12, 2022.
- ^ a b «Windows XP – What’s new with files and folders». Windows. Microsoft. Archived from the original on May 23, 2007.
- ^ How to create and extract a Zip File in Windows ME/XP/2003
- ^ How To: Open a Cab file – Quote: «If you’re using Windows XP or Windows Vista, then your operating system has built-in support for opening Cab files.»
- ^ «Moving web pages saved by IE (HTM file & _FILES folder)». Directory Opus Resource Centre. May 4, 2009. Archived from the original on December 16, 2020. Retrieved December 16, 2020.
When Windows Explorer […] move a Web page both the HTML file and the directory are automatically moved together. […] Moreover, the user only has to drag EITHER part—the file or the directory and the other part will follow automatically. This way the page is kept intact irrespective of where Windows stores it.
- ^ The sort order for files and folders whose names contain numerals is different in Windows Vista, Windows XP, and Windows Server 2003 than it is in Windows 2000, support.microsoft.com, August 28, 2007, archived from the original on September 27, 2010, retrieved July 6, 2009
- ^ a b Shultz, Greg (August 10, 2006). «Examine the filtering, grouping, and stacking features in Windows Vista’s Windows Explorer». TechRepublic. CBS Interactive. Archived from the original on December 22, 2015. Retrieved December 19, 2015.
- ^ a b c Reid, Rory (January 30, 2007). «Seven days of Vista — day 4: Stacking and filtering». CNET. CBS Interactive. Archived from the original on December 22, 2015. Retrieved December 19, 2015.
- ^ a b Kaelin, Mark (July 17, 2007). «How do I… Save and refine desktop searches in Microsoft Windows Vista?». TechRepublic. CBS Interactive. Archived from the original on November 17, 2015. Retrieved November 11, 2015.
- ^ Microsoft. «Saved Search File Format». MSDN. Archived from the original on December 10, 2015. Retrieved December 21, 2015.
- ^ Bentz, Ben (October 31, 2006). «Query Composition: Building a search upon another search». Shell: Revealed Blog. Microsoft. Archived from the original on December 15, 2006. Retrieved December 21, 2015.
- ^ Using search operators to find pictures, music and videos in Windows Vista
- ^ Windows 7: Find/Search Files By Date And Size
- ^ Windows Explorer Columns — Are you Fully Using Them?
- ^ «How to Search for Contents in Any File Type Without Indexing Service Enabled in Windows Vista and Windows 7». Wikihow.com. January 27, 2014. Archived from the original on March 19, 2017. Retrieved January 31, 2014.
- ^ a b Microsoft. «Add tags or other properties to a file». Windows How-to. Archived from the original on December 22, 2015. Retrieved December 21, 2015.
- ^ White, Nick (July 13, 2007). «10 Things – Windows Explorer Has a New Preview Pane». Windows Vista Team Blog. Microsoft. Archived from the original on July 15, 2007. Retrieved December 14, 2015.
- ^ Microsoft. «Pen and Touch Input in Windows Vista». MSDN. Archived from the original on December 22, 2015. Retrieved December 21, 2015.
- ^ Oiaga, Marius (September 27, 2006). «Quick Zoom on the Windows Vista Desktop and in Explorer». Softpedia. Archived from the original on December 22, 2015. Retrieved December 21, 2015.
- ^ McFedries, Paul (2008). Microsoft Windows Vista Unleashed. Sams Publishing. p. 87. ISBN 978-0-672-33013-1. Retrieved December 21, 2015.
- ^ Mangefeste, Tony; Walp, David (2006). «Optical Platform: Windows Vista and Beyond». Microsoft. Archived from the original (PPT) on June 4, 2011. Retrieved December 21, 2015.
- ^ Davis, Christopher (March 29, 2007). «Your File Is In Use… Demystified». Shell: Revealed Blog. Microsoft. Archived from the original on April 29, 2007. Retrieved December 21, 2015.
- ^ «Properties». msdn2.microsoft.com. Archived from the original on October 9, 2007. Retrieved June 19, 2018.
- ^ «IColumnProvider interface (Windows)». msdn2.microsoft.com. Archived from the original on April 17, 2008. Retrieved June 19, 2018.
- ^ «MS-WSP: Windows Search Protocol», MSDN Library, Microsoft, December 18, 2006, archived from the original on May 16, 2010, retrieved June 10, 2009
- ^ «Creating Shortcut Menu Handlers (Windows)». msdn.microsoft.com. Archived from the original on November 22, 2010. Retrieved June 19, 2018.
- ^ «Improvements in Windows Explorer». Archived from the original on November 7, 2011. Retrieved October 30, 2011.
- ^ «How to open UWP File Explorer on Windows 10 – Step by step». Windows Latest. May 7, 2017. Archived from the original on August 24, 2018. Retrieved August 24, 2018.
- ^ «Windows 10 Tip: Unlock the UWP File Explorer – Thurrott.com». Thurrott.com. May 6, 2017. Archived from the original on August 24, 2018. Retrieved August 24, 2018.
- ^ Blog, Windows Experience; Writer, Athima Chansanchai (April 1, 2019). «Windows 10 Tip: Dark theme in File Explorer». Windows Experience Blog. Retrieved May 7, 2024.
- ^ «Inspired by Insiders – Dark Theme in File Explorer». August 8, 2018. Archived from the original on August 12, 2018. Retrieved August 23, 2018.
- ^ «Microsoft updates universal File Explorer with new features in Windows 10 version 1809». Windows Central. Archived from the original on August 25, 2018. Retrieved August 24, 2018.
- ^ «UWP File Explorer has got new features in Windows 10 version 1809». Winaero. August 23, 2018. Archived from the original on August 25, 2018. Retrieved August 24, 2018.
- ^ «Windows 10 version 1909: new and changed features — gHacks Tech News». www.ghacks.net. October 2019. Archived from the original on October 25, 2019. Retrieved October 25, 2019.
- ^ Warren, Tom (March 15, 2022). «Microsoft says Windows 11’s File Explorer ads were ‘not intended to be published externally’«. The Verge. Retrieved July 28, 2022.
- ^ Warren, Tom (April 5, 2022). «Windows 11’s refreshed File Explorer gets tabs, favorites, and a new homepage». The Verge. Retrieved August 12, 2022.
- ^ Warren, Tom (October 18, 2022). «Windows 11’s new tabbed File Explorer and taskbar improvements are available today». The Verge. Retrieved October 18, 2022.
- ^ Mehdi, Yusuf (September 21, 2023). «Announcing Microsoft Copilot, your everyday AI companion». The Official Microsoft Blog. Retrieved October 31, 2023.
- ^ ShellExView v1.19 – Shell Extensions Manager for Windows, archived from the original on October 24, 2010, retrieved March 31, 2008
- ^ «Thumbnail Handlers (Windows)». msdn.microsoft.com. Archived from the original on June 19, 2018. Retrieved June 19, 2018.
- ^ a b Rensin, Dave (January 2004). «Create Namespace Extensions for Windows Explorer with the .NET Framework». msdn.microsoft.com. Archived from the original on May 8, 2008. Retrieved March 31, 2008.
- ^ «Microsoft Download Center: Windows, Office, Xbox & More». www.microsoft.com. Archived from the original on May 13, 2008. Retrieved June 19, 2018.
- ^ «MSDN Magazine Issues». msdn.microsoft.com. Archived from the original on May 21, 2008. Retrieved June 19, 2018.
- ^ Zhang, Junfeng (November 18, 2005). «Don’t do Shell Extension Handlers in .NET». msdn.com. Archived from the original on January 5, 2010. Retrieved June 19, 2018.
- Sullivan, Kent. «The Windows 95 User Interface: A Case Study in Usability Engineering» (1996) for Association for Computing Machinery. (Sullivan was a developer on the Windows 95 UI team)
- How To Customize the Windows Explorer Views in Windows XP
- MSDN: Creating Shell Extension Handlers, Windows Dev Center, May 31, 2018
- The Complete Idiot’s Guide to Writing Shell Extensions, by Michal Dunn, March 15, 2006
- Namespace extensions – the undocumented Windows Shell, by Henk Devos, November 30, 1999
В приложении «Параметры» можно управлять различными параметрами языка и клавиатуры и макета ввода в Windows, в том числе:
-
Установка и удаление языков.
-
Изменение языка интерфейса Windows.
-
Изменение языка, используемого приложениями и веб-сайтами Microsoft Store.
-
Добавление функций речи в язык.
-
Добавление и удаление раскладок клавиатуры и ввода.
-
Изменение раскладок клавиатуры и ввода.
В этой статье рассматриваются эти задачи.
Примечание: Для простоты остальная часть этой статьи относится к раскладке клавиатуры и ввода как к простой раскладке клавиатуры.
Выберите нужную задачу из следующего списка:
Чтобы проверка, какие языки в настоящее время установлены в Windows, выполните следующие действия:
-
Нажмите кнопку Пуск , а затем выберите Параметры > время & язык > язык & регион .
Или
Выберите следующий ярлык «Язык > & время & язык &»:
«Время & язык > язык & регион
-
В окне Время & язык > язык & регионе установленные языки отображаются в разделе Язык .
Первым шагом в настройке языковых параметров в Windows является установка нужного языка. Чтобы установить язык в Windows, выполните приведенные далее действия.
-
Так как языковые пакеты скачиваются через Интернет, убедитесь, что устройство с Windows подключено к Интернету.
-
Сохраните все работы и закройте все открытые приложения.
-
Нажмите кнопку Пуск , а затем выберите Параметры > время & язык > язык & регион .
Или
Выберите следующий ярлык «Язык > & время & язык &»:
«Время & язык > язык & регион
-
В окне Язык & времени > язык & регионе в разделе Язык нажмите кнопку Добавить язык рядом с пунктом Предпочитаемые языки.
-
В окне Выбор языка для установки введите имя нужного языка в текстовом поле Введите имя языка… или прокрутите список доступных языков. После отображения нужного языка выберите его и нажмите кнопку Далее .
-
В окне Установка языковых компонентов :
-
В разделе Необязательные функции языка убедитесь, что выбран языковой пакет .
-
В разделе Необязательные функции языка выберите все дополнительные необходимые функции, например распознавание речи.
-
В разделе Языковые параметры, если устанавливаемый язык должен быть задан в качестве языка интерфейса Windows, выберите Задать в качестве языка интерфейса Windows. Дополнительные сведения см. в разделе Изменение языка интерфейса Windows этой статьи.
-
-
После выбора всех параметров в окне Установка языковых компонентов нажмите кнопку Установить .
-
В окне Время & язык > язык & регионе в разделе Язык отображается следующее сообщение:
Подождите, пока установка языка завершится. Это может занять несколько минут.
В списке языков также отображается ход загрузки и установки выбранного языка.
-
После завершения установки выбранного языка он добавляется как язык в разделе Язык в окне Язык & языка > язык & регионе .
-
Если выбран параметр Задать в качестве языка интерфейса Windows :
-
В разделе Язык в окне Язык & языка > язык & регионе отображается следующее сообщение с предложением выйти из Windows:
Windows необходимо выйти из окна, чтобы применить новый язык интерфейса.
Чтобы выйти из Windows, нажмите кнопку Выйти рядом с сообщением.
Примечание: Если рядом с сообщением нет кнопки Выйти , выйдите вручную, щелкнув правой кнопкой мыши меню Пуск , а затем выберите Завершение работы или выход > Выйти.
-
На экране входа в Windows снова войдите в Windows. Язык интерфейса Windows применяется и изменяет выбранный язык интерфейса.
Предупреждение: При изменении языка интерфейса Windows он также может изменить раскладку клавиатуры в соответствии с языком. На значке языка ввода на экране входа отображается выбранная в данный момент раскладка клавиатуры. При вводе имени пользователя и пароля на экране входа Windows имейте в виду возможные различные раскладки клавиатуры.
При необходимости используйте значок отображения пароля в поле пароля, чтобы убедиться, что пароль введен правильно с текущей раскладкой клавиатуры. Раскладку клавиатуры можно изменить на экране входа с помощью значка языка ввода.
Изменение раскладки клавиатуры изменяет только макет и не изменяет язык интерфейса Windows.
-
Примечание: Один языковой выпуск Windows может быть установлен, если при попытке добавить языковой пакет отображается одно из следующих сообщений:
Разрешен только один языковой пакет.
Ваша лицензия Windows поддерживает только один язык интерфейса.
Дополнительные сведения см. в разделе Проверка того, поддерживает ли версия Windows несколько языков.
Язык интерфейса Windows определяет язык, используемый пользовательским интерфейсом Windows. Он также определяет язык, используемый функциями Windows, такими как приложение «Параметры» и проводник.
Изменение языка интерфейса Windows также приводит к переходу выбранного языка в начало списка предпочитаемых языков . Первый поддерживаемый язык в списке Предпочитаемые языки определяет язык, используемый приложениями и веб-сайтами Microsoft Store.
Важно: Некоторые языки локализуются не полностью. Для языков, которые не полностью локализованы, некоторые элементы в Windows могут по-прежнему отображаться на первом языке, который полностью локализован в списке Предпочитаемые языки .
Чтобы изменить язык интерфейса Windows, выполните следующие действия:
-
Перед переходом на него убедитесь, что в Windows уже установлен нужный язык. Чтобы проверка, какие языки в настоящее время установлены в Windows, следуйте инструкциям в разделе Проверка установленных языков в Windows в этой статье. Если нужный язык в настоящее время не установлен, следуйте инструкциям в разделе Установка языкового пакета этой статьи.
-
Сохраните все работы и закройте все открытые приложения.
-
Нажмите кнопку Пуск , а затем выберите Параметры > время & язык > язык & регион .
Или
Выберите следующий ярлык «Язык > & время & язык &»:
«Время & язык > язык & регион
-
В окне Язык & времени > язык & регион в разделе Язык выберите нужный язык интерфейса Windows в раскрывающемся меню рядом с пунктом Язык интерфейса Windows.
Совет: Если нужный язык интерфейса не отображается в раскрывающемся меню Язык интерфейса Windows , см. раздел Установка языкового пакета этой статьи, чтобы установить язык.
-
В разделе Язык интерфейса Windows отображается следующее сообщение:
Windows необходимо выйти, чтобы применить новый язык интерфейса.
Чтобы выйти из Windows, нажмите кнопку Выйти .
Примечание: Если рядом с сообщением нет кнопки Выйти , выйдите вручную, щелкнув правой кнопкой мыши меню Пуск , а затем выберите Завершение работы или выход > Выход.
-
На экране входа в Windows снова войдите в Windows. Язык интерфейса Windows применяется и изменяется на выбранном языке интерфейса.
Предупреждение: При изменении языка интерфейса Windows он также может изменить раскладку клавиатуры в соответствии с языком. На значке языка ввода на экране входа отображается выбранная в данный момент раскладка клавиатуры. При вводе имени пользователя и пароля на экране входа Windows имейте в виду возможные различные раскладки клавиатуры.
При необходимости используйте значок отображения пароля в поле пароля, чтобы убедиться, что пароль введен правильно с текущей раскладкой клавиатуры. Раскладку клавиатуры можно изменить на экране входа с помощью значка языка ввода.
Изменение раскладки клавиатуры изменяет только макет и не изменяет язык интерфейса Windows.
Изменение языка интерфейса Windows изменяет язык, используемый пользовательским интерфейсом Windows и функциями Windows, такими как приложение «Параметры» и проводник. По умолчанию он также изменяет язык, используемый приложениями и веб-сайтами Microsoft Store, перемещая выбранный язык интерфейса Windows в начало списка Предпочитаемые языки . Дополнительные сведения см. в разделе Изменение языка интерфейса Windows этой статьи.
Однако языком, используемым приложениями или веб-сайтами Microsoft Store, можно управлять независимо от языка интерфейса Windows. Например, язык интерфейса Windows может быть на одном языке, а язык, используемый приложениями или веб-сайтами Microsoft Store, — на другом. Первый поддерживаемый язык в списке Предпочитаемые языки определяет язык, используемый приложениями и веб-сайтами Microsoft Store.
Чтобы изменить язык, используемый приложениями и веб-сайтами Microsoft Store, выполните следующие действия:
-
Нажмите кнопку Пуск , а затем выберите Параметры > время & язык > язык & регион .
Или
Выберите следующий ярлык «Язык > & время & язык &»:
«Время & язык > язык & регион
-
В окне Язык & времени > язык & регионе в разделе Язык отображается текущий предпочтительный порядок установленных языков.
-
Чтобы переместить нужный язык для приложений и веб-сайтов Microsoft Store в начало списка Предпочитаемые языки , выберите язык и перетащите его в начало списка. Обратите внимание, что перемещение языка в начало списка Предпочитаемые языки не влияет на язык, выбранный в качестве языка интерфейса Windows.
-
При необходимости переупорядоставьте предпочтения других установленных языков, выбрав язык и перетащив его в нужное расположение в списке Предпочитаемые языки .
Чтобы установить функции распознавания речи для языка, выполните следующие действия:
-
Так как функции распознавания речи скачиваются через Интернет, убедитесь, что устройство с Windows подключено к Интернету.
-
Убедитесь, что язык, на котором будет использоваться речь, установлен в качестве языка интерфейса.
-
Нажмите кнопку Пуск , а затем выберите Параметры > время & язык > язык & регион .
Или
Выберите следующий ярлык «Язык > & время & язык &»:
«Время & язык > язык & регион
-
В окне Язык & времени > язык & регионе в разделе Язык выберите многоточие рядом с текущим языком интерфейса Windows, а затем выберите Параметры языка.
-
В окне Язык & времени > язык & регион > в разделе Языковые компоненты нажмите кнопку Скачать рядом с нужными функциями речи, которые должны быть установлены. Например:
-
Преобразование текста в речь.
-
Базовое распознавание речи.
-
Улучшенное распознавание речи.
Примечание: Не во всех языках есть функции речи. Если некоторые или все перечисленные выше функции недоступны в качестве параметра, в этом языке отсутствуют функции речи.
-
Добавление раскладки клавиатуры позволяет выбрать альтернативную раскладку клавиатуры для текущего языка интерфейса Windows. Альтернативные раскладки клавиатуры позволяют напрямую вводить символы с помощью клавиатуры или устройства ввода, которые недоступны в раскладке клавиатуры текущего языка интерфейса Windows. Например, символы находятся только в других языках.
Примечание: Полный языковой пакет, соответствующий языку требуемой раскладки клавиатуры, не всегда требуется установить, чтобы получить доступ к этой раскладке клавиатуры. Все языки, включая текущий язык интерфейса Windows, имеют раскладки клавиатуры на разных языках. Текущий язык интерфейса Windows может иметь раскладку клавиатуры нужной раскладки клавиатуры на другом языке.
Чтобы добавить раскладку клавиатуры, выполните приведенные ниже действия.
-
Нажмите кнопку Пуск , а затем выберите Параметры > время & язык > язык & регион .
Или
Выберите следующий ярлык «Язык > & время & язык &»:
«Время & язык > язык & регион
-
В окне Язык & времени > язык & регионе в разделе Язык выберите многоточие рядом с текущим языком интерфейса Windows, а затем выберите Параметры языка.
-
В окне Время & язык > язык & регион > параметры в разделе Клавиатуры убедитесь, что требуемая раскладка клавиатуры еще не установлена. Если это не так, нажмите кнопку Добавить клавиатуру рядом с элементом Установленные клавиатуры.
-
В появившемся всплывающем меню прокрутите список раскладок клавиатуры и выберите нужную раскладку клавиатуры. Список сначала сортируется с раскладками клавиатуры из выбранного языка, а затем в алфавитном порядке.
Важно: Если нужной раскладки клавиатуры нет в списке, начните этот раздел сначала, но вместо текущего языка интерфейса Windows выберите язык, соответствующий требуемой раскладке клавиатуры.
Если язык, соответствующий требуемой раскладке клавиатуры, не установлен, следуйте инструкциям в разделе Установка языкового пакета этой статьи, чтобы установить язык требуемой раскладки клавиатуры.
-
Когда выбрана требуемая раскладка клавиатуры, она должна отображаться в окне Язык & > язык & > в разделе «Клавиатуры «. Чтобы переключиться на установленную раскладку клавиатуры, см. раздел Изменение раскладки клавиатуры этой статьи.
Раскладку клавиатуры можно выбрать на значке языка ввода в области области панели задач. На значке языка ввода отображается выбранная в данный момент раскладка клавиатуры. Чтобы выбрать другую раскладку клавиатуры, выполните приведенные ниже действия.
-
В области системного панели задач выберите значок языка ввода.
-
Появится всплывающее меню с доступными раскладками клавиатуры. Выберите нужную раскладку клавиатуры.
-
Значок языка ввода изменится на выбранную раскладку клавиатуры.
Советы: Раскладку клавиатуры также можно выбрать, удерживая клавишу с логотипом Windows на клавиатуре, а затем выбрав пробел. Каждый выбор пробела, удерживая клавишу с логотипом Windows, циклически проходит по установленным раскладкам клавиатуры. Если при выборе пробела ничего не происходит, устанавливается только одна раскладка клавиатуры. Чтобы узнать, какие языки и раскладки клавиатуры в настоящее время установлены в Windows, см. в следующих разделах этой статьи:
-
Проверьте, какие языки установлены в Windows.
-
Добавьте раскладку клавиатуры.
Если требуемая раскладка клавиатуры недоступна, следуйте инструкциям в разделе Добавление раскладки клавиатуры в этой статье.
Чтобы удалить установленный языковой пакет, выполните приведенные далее действия.
-
Нажмите кнопку Пуск , а затем выберите Параметры > время & язык > язык & регион .
Или
Выберите следующий ярлык «Язык > & время & язык &»:
«Время & язык > язык & регион
-
В окне Время & язык > язык & регионе в разделе Язык выберите многоточие рядом с языком, который необходимо удалить, и нажмите кнопку Удалить.
Примечание: Если кнопка Удалить выделена серым цветом, выбранным языком для удаления является текущий язык интерфейса Windows. Переключитесь на другой язык интерфейса Windows, прежде чем пытаться удалить его. Дополнительные сведения см. в разделе Изменение языка интерфейса Windows этой статьи.
-
В появившемся диалоговом окне подтвердите удаление языка, нажав кнопку Да .
Чтобы удалить установленную раскладку клавиатуры, выполните приведенные ниже действия.
-
Нажмите кнопку Пуск , а затем выберите Параметры > время & язык > язык & регион .
Или
Выберите следующий ярлык «Язык > & время & язык &»:
«Время & язык > язык & регион
-
В окне Время & язык > язык & регионе в разделе Язык выберите многоточие рядом с языком, который содержит клавиатуру, которую необходимо удалить, а затем выберите Параметры языка.
Примечание: Установленные раскладки клавиатуры не всегда являются частью соответствующего языка. Раскладка клавиатуры может быть установлена как часть текущего языка интерфейса Windows. Языки могут содержать раскладки клавиатуры, которые не совпадают с языком языкового пакета.
По этой причине раскладка клавиатуры может находиться под текущим языком интерфейса Windows или языком, соответствующим раскладке клавиатуры. Если удаляемая раскладка клавиатуры не соответствует текущему языку интерфейса Windows, проверка язык, соответствующий раскладке клавиатуры.
-
В окне Язык & времени > язык & регион > в разделе Клавиатуры выберите многоточие рядом с клавиатурой, которую необходимо удалить, и нажмите кнопку Удалить.
Примечание: Если кнопка Удалить неактивна, выбранная раскладка клавиатуры является единственной установленной раскладкой клавиатуры для текущего языка интерфейса Windows. Добавьте другую раскладку клавиатуры, прежде чем пытаться удалить раскладку клавиатуры. Дополнительные сведения см. в разделе Добавление раскладки клавиатуры в этой статье.
Значок языка ввода в области области панели задач позволяет выбирать раскладки клавиатуры. По умолчанию значок языка ввода включен и отображается на панели задач. Дополнительные сведения см. в разделе Изменение раскладки клавиатуры этой статьи.
Альтернативой значку языка ввода является устаревшая языковая панель, найденная в предыдущих версиях Windows. Если включена устаревшая языковая панель, значок языка ввода на панели задач отключен и больше не отображается. Чтобы повторно включить значок языка ввода и отобразить его на панели задач, выполните следующие действия.
-
Нажмите кнопку Пуск , а затем выберите Параметры > время & языка > ввод .
Или
Выберите следующий язык времени & > ярлыка typeing :
Open Time & language > Typeing
-
В окне Время & язык > ввод выберите Дополнительные параметры клавиатуры.
-
В окне Время & языка > ввод > дополнительные параметры клавиатуры в разделе Переключение методов ввода снимите флажок Использовать языковую панель рабочего стола, если он доступен.
Предупреждение: При снятии флажка Использовать языковую панель рабочего стола, когда она доступна , значок языка ввода снова отобразится на панели задач. Однако это приводит к тому, что устаревшая языковая панель больше не отображается. Если устаревшая языковая панель предпочтительна, чем значок языка ввода, оставьте параметр Использовать языковую панель рабочего стола, когда она доступна .
Дополнительные параметры для устаревшей языковой панели можно найти по ссылке Параметры языковой панели в окне Время & языка > ввод текста > дополнительные параметры клавиатуры .
Reading time4 min
Views13K
Read this article to find out how to change the language of Windows 10 interface without having to reinstall it, what system languages can be installed and what settings should be modified for that purpose.

Introduction
In Windows 10, people usually choose the preferred language for the entire operating system when they install it. However, if the language settings were wrong, or people have to use computing devices with certain language preferences, there are some settings to be modified in order to bring them in line with your personal likings.
So if you ever need to change language preferences in Windows 10, this can be done in a quick and easy way with the help of the Settings app and without having to reinstall the operating system.
In today’s article, we will show you how to change the default display language into any other, including doing it for new and existing user accounts.
How to change the default display language in Windows 10?
If you have to move to a different region or you need to use a display language different from the default choice, or the initial language settings for the computing device have been wrong, there is absolutely no point in reinstalling Windows 10. All you need is to modify a couple of system settings to enjoy the experience of using your operating system in the right language.
Disable language synchronization
If you are using a Microsoft account, the language settings will apply to all devices linked to such account. If you plan to change regional and language settings for one computer only, you need to disable synchronization of such settings before you proceed.
This is how you disable language sync in Windows 10.
Open the main system application, Settings. You can do it in any way you prefer. For example, click on the Start button in the lower left corner of your desktop, on the Taskbar, and open the main Windows menu. Use the scroll bar or the mouse wheel to search the list of all programs and applications installed on this computer and find the line Settings, or click on the Settings button in the left side of the user menu, and the application will open.

In the main Settings window, scroll down if necessary and choose the tab Accounts.

In the left panel, go to Sync your settings.
In the right panel, find the section Individual sync settings and the line Language preferences, then set the slider to the Off position (disabled).

When these steps are taken, you can start changing language settings for the copy of Windows 10 installed on this computer, without worrying that this can affect similar settings in other linked devices.
The steps to take if you want to change the display language
To change the display language of your Windows 10, you should close all running applications and do what is described below.
Use any method you prefer to open the Settings application. For example, right-click on the Start button that you can find on the Taskbar, in the left lower corner of the desktop, or press the key sequence Windows + X instead to open the context menu, and select the line Settings. The application will start immediately.

Use the scroll bar or the mouse wheel to navigate the Settings window, and find the tab Time and language.

In the left panel, go to Language.
Now look to the right and find the section Preferred languages, where you can prioritize language settings, and click on the button Add a preferred language, with a + (plus) symbol on it.

In the new window Choose a language to install use the scroll bar or the mouse wheel to find the language you need, or start typing its name in the search field above.
Choose the language pack you are planning to use in Windows 10 from the list.

When the language is chosen, hit Next.
In the next page Install language features check the box for Install language pack to confirm your choice (the box with the tick will become blue, i.e. active).

Click Install below.
Changes will take effect after the language package is installed, which usually takes several minutes only. In some cases, restarting your Windows 10 may be required, and then the corresponding language settings will apply to all system elements. The changes will affect the sign-in screen, the Settings app, Windows Explorer, desktop, all applications, preferred browsers and websites you visit. From now on, they will use the new language by default. Besides, Windows 10 may suggest reviewing your current privacy settings.
Changing region settings
If you change the display language for Windows 10 because you move to a different region, then regional settings should be modified too.
Changing them in Windows 10 is easy enough: just follow the steps below.
Open the main system application, Settings, using any way you prefer. For example, press the keyboard shortcut Windows + I to access the app directly.
In the main window of the Settings app, find and select the tab Time and language.
In the left panel, select Region.
In the right panel, find the section Region and use the nested menu Country or region to specify your new location if it differs from the current settings.
In the section Regional format use another nested menu to select proper formats to display date and time in Windows, if these differ for your time and region.

Now look at the left panel and jump to the tab Language again.
Use the scroll bar or the mouse wheel to find the section Related settings and click on the link Administrative language settings.

In the new pop-up Region window, jump to the tab Administrative and in the section Welcome screen and new user accounts hit the button Copy settings.

The new window will show you corresponding screen and account settings. In the section Copy your current settings to check the boxes for each option: Welcome screen and system accounts and New user accounts.

Click ОК.
Click ОК one more time, and then restart the computer.
After all these steps, your computer will display proper regional settings specified according to your physical location.
Most of the time, people don’t change or install additional languages regularly for their personal needs. This opportunity to change language packs quickly is more often required in small or large companies that need to deal with customers having various language preferences.
Besides, this option would be useful for people who have to move to a different region and would like their regional settings to comply. Another scenario is buying a computer from another country when the required configuration is not available locally.
Also, you should remember that modifying language settings may disable some functions like Cortana because this service is not supported in certain regions.
Conclusion
Preferred display language is one of the easily customizable things in the operating system. If you ever need to change the language settings, use one of the methods described here to replace the language pack currently used by Windows 10 without having to reinstall it.
See the full article with all additional video tutorials. If you still have any questions, please ask in a comments. Also visit our Youtube channel, there are over 400 video tutorials.
Если все элементы интерфейса Windows 10 отображаются на иностранном языке, работа с операционной системой не будет вызывать у пользователя ничего, кроме дискомфорта. В этой статье мы покажем, как быстро поменять язык интерфейса в Windows 10. При подготовке инструкции мы использовали русскоязычный интерфейс системы, поэтому если язык вашей Windows 10 отличается от русского, ориентируйтесь на пиктограммы и иконки напротив соответствующих функций.
- Перейдите в Параметры Windows (для этого достаточно нажать на клавиатуре клавиши Windows + I).
- В открывшемся окне выберите элемент настроек «Время и язык».

- Перейдите в раздел «Язык» в левой части окна и выберите необходимый язык в подразделе «Язык интерфейса Windows». На выбранном языке будут показываться такие компоненты Windows, как приложение «Параметры» и Проводник.

- Если необходимый язык отсутствует, добавьте язык в подразделе «Предпочитаемые языки», нажав кнопку «Добавление языка».

- В появившемся окне будет отображаться список всех доступных языков для установки на Windows. Вы можете воспользоваться строкой, для набора наименования языка вручную или пролистать список роликом мыши. Выберите язык, который вам требуется, и нажмите кнопку «Далее».

- После этого в новом окне «Установка языковых компонентов» отметьте галочкой параметр «Назначить языком интерфейса Windows» и нажмите кнопку «Установить».

- После установки язык интерфейса Windows сменится на ранее выбранный, о чем будет сообщено в начале раздела «Язык». Как видите, новый установленный язык «Русский (Беларусь)» установлен в качестве основного для дисплея Windows, приложений и веб-сайтов, клавиатуры и формата региона.

- Теперь осталось только выйти из учетной записи или перезагрузить компьютер, чтобы внесённые изменения вступили в силу.
Помогла ли Вам наша инструкция поменять язык интерфейса Windows 10?
Расскажите в комментариях 😉
Все способы:
- Открываем «Проводник» в Виндовс 10
- Способ 1: Комбинация клавиш
- Способ 2: Поиск по системе
- Способ 3: «Выполнить»
- Способ 4: «Пуск»
- Способ 5: Контекстное меню кнопки «Пуск»
- Способ 6: «Диспетчер задач»
- Способ 7: Исполняемый файл
- Дополнительно: Настройка быстрого доступа
- Заключение
- Вопросы и ответы: 9
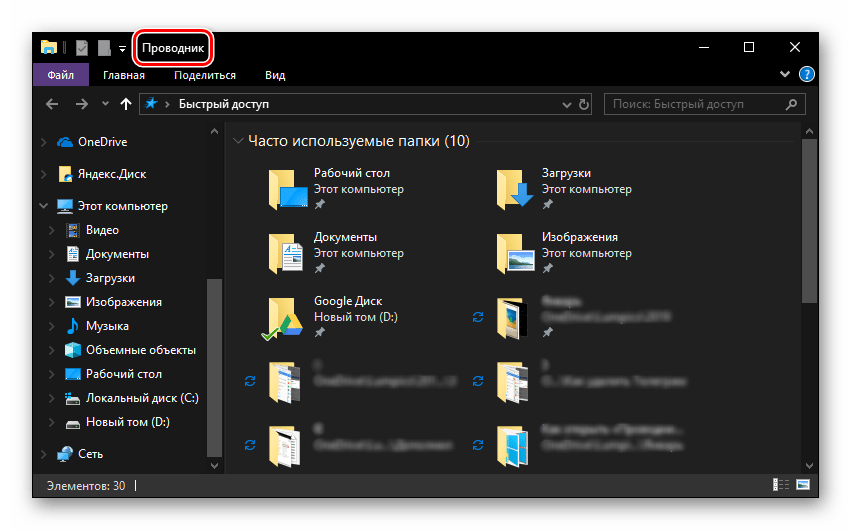
Одним из важнейших компонентов любой версии Windows является «Проводник», ведь именно через него можно получить доступ ко всем файлам и папкам, которые есть на диске. «Десятка», несмотря на ощутимое изменение ее интерфейса и общую переработку функциональности, тоже не лишена данного элемента, и в нашей сегодняшней статье мы расскажем о различных вариантах его запуска.
Открываем «Проводник» в Виндовс 10
По умолчанию «Проводник» или, как он называется на английском, «Explorer» закреплен на панели задач Windows 10, но ради экономии места или просто по неосторожности он может быть удален оттуда. Именно в таких случаях, а также просто для общего развития, будет полезно знать, какие существуют способы открытия этого системного компонента в «десятке».
Способ 1: Комбинация клавиш
Самый простой, удобный, да и наиболее быстрый (при условии отсутствия ярлыка на панели задач) вариант запуска «Эксплорера» заключается в использовании горячих клавиш «WIN+E». Буква E – логичное сокращение от Explorer, и зная это, наверняка вам будет проще запомнить данную комбинацию.
Способ 2: Поиск по системе
Одним из ключевых достоинств Виндовс 10 является ее проработанная функция поиска, благодаря которой можно не только находить различные файлы, но и запускать приложения и компоненты системы. Открыть с ее помощью «Проводник» тоже не составит большого труда.
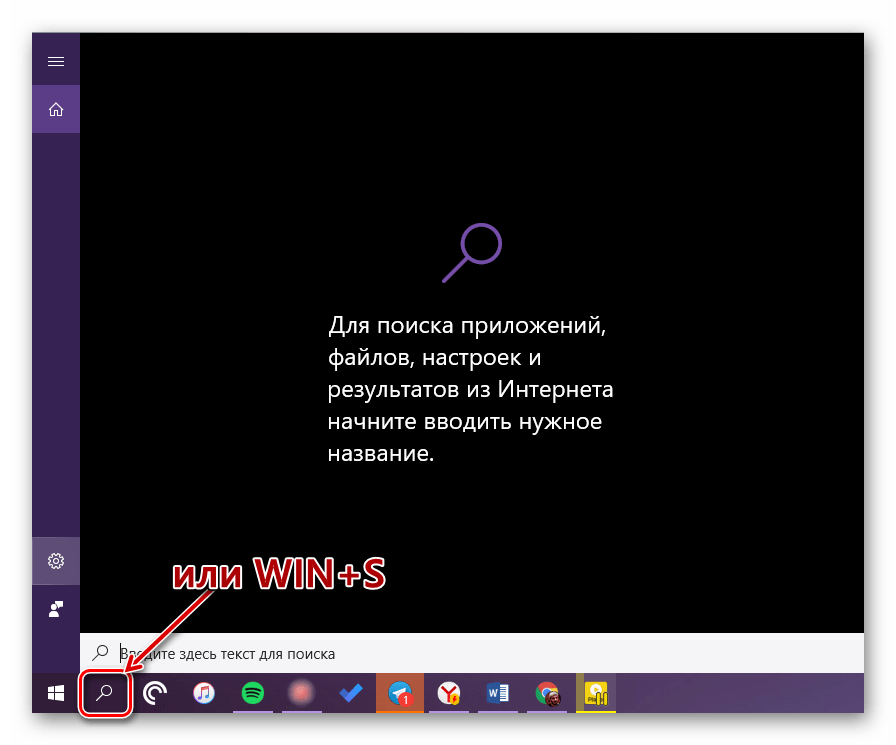
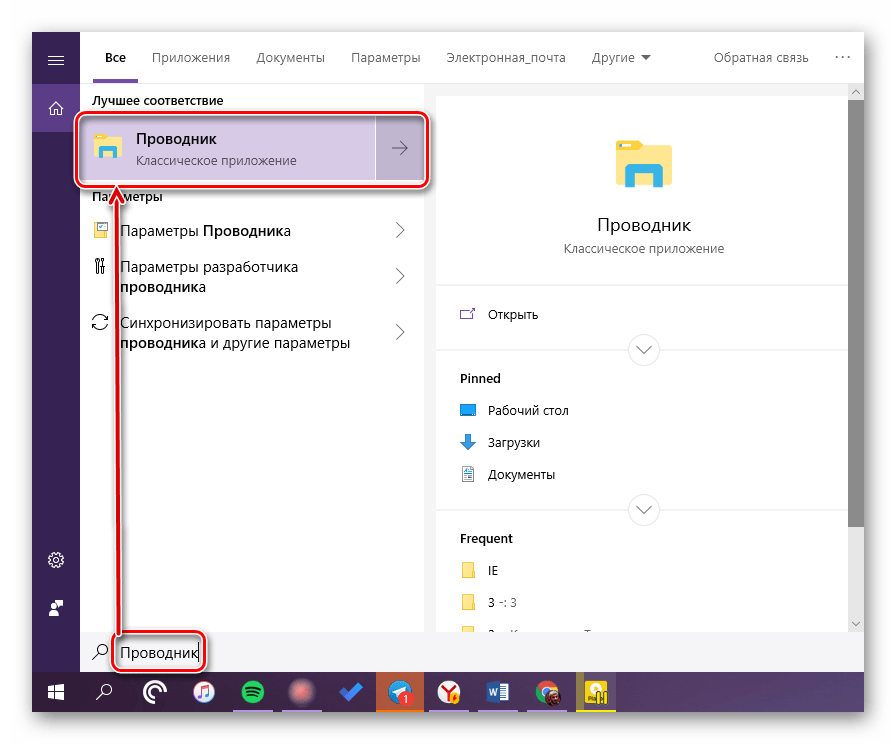
Воспользуйтесь кнопкой поиска на панели задач или клавишами «WIN+S» и начните вводить в строку запрос «Проводник» без кавычек. Как только он появится в поисковой выдаче, вы сможете запустить его одинарным кликом.
Способ 3: «Выполнить»
В отличие от упомянутого выше поиска, окно «Выполнить» используется исключительно для запуска стандартных приложений и компонентов системы, к коим и относится герой нашей сегодняшней статьи. Нажмите «WIN+R» и введите в строку представленную ниже команду, после чего нажмите «ENTER» или кнопку «ОК» для подтверждения.
explorer
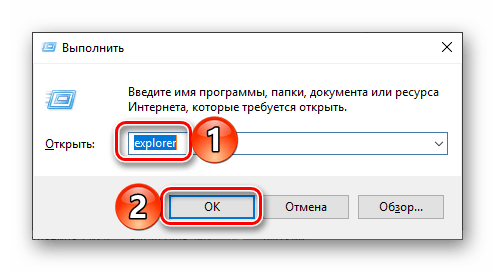
Как видите, для запуска «Explorer» можно воспользоваться и одноименной командой, главное, вводить ее без кавычек.
Способ 4: «Пуск»
Конечно же, «Проводник» есть в списке всех установленных приложений, просмотреть который можно через меню «Пуск». Оттуда же мы с вами можем его открыть.
- Запустите стартовое меню Windows, нажав по соответствующей кнопке на панели задач, или воспользуйтесь аналогичной клавишей на клавиатуре – «WIN».
- Пролистайте перечень представленных там программ вплоть до папки «Служебные Windows» и разверните ее, воспользовавшись указывающей вниз стрелкой.
- В открывшемся списке найдите «Проводник» и запустите его.
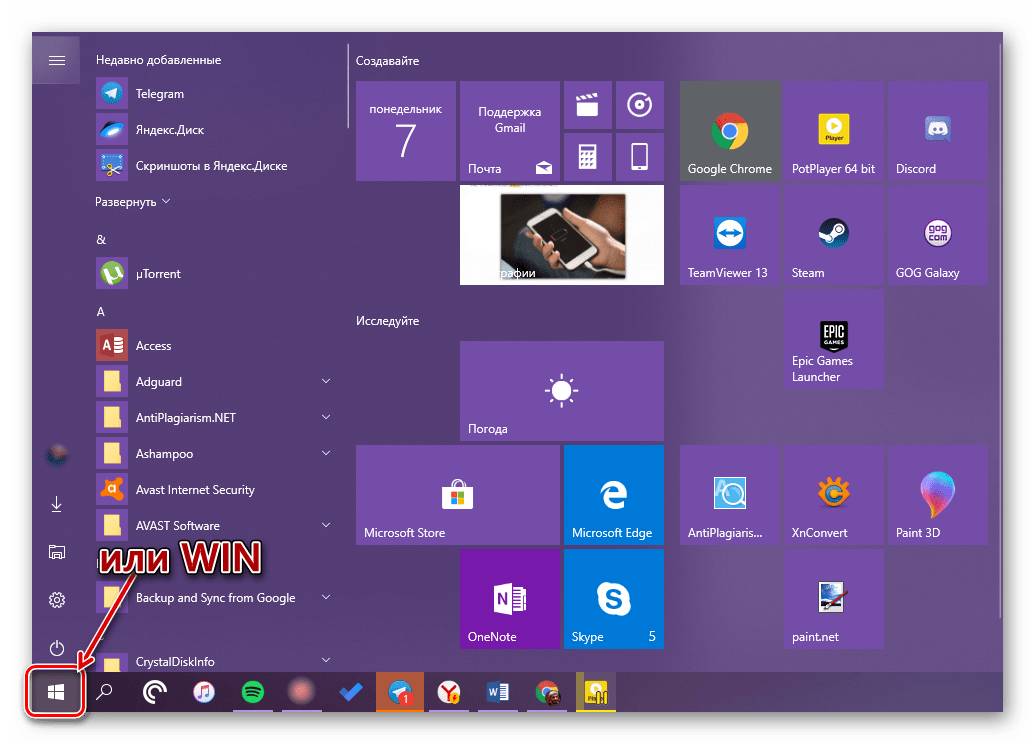
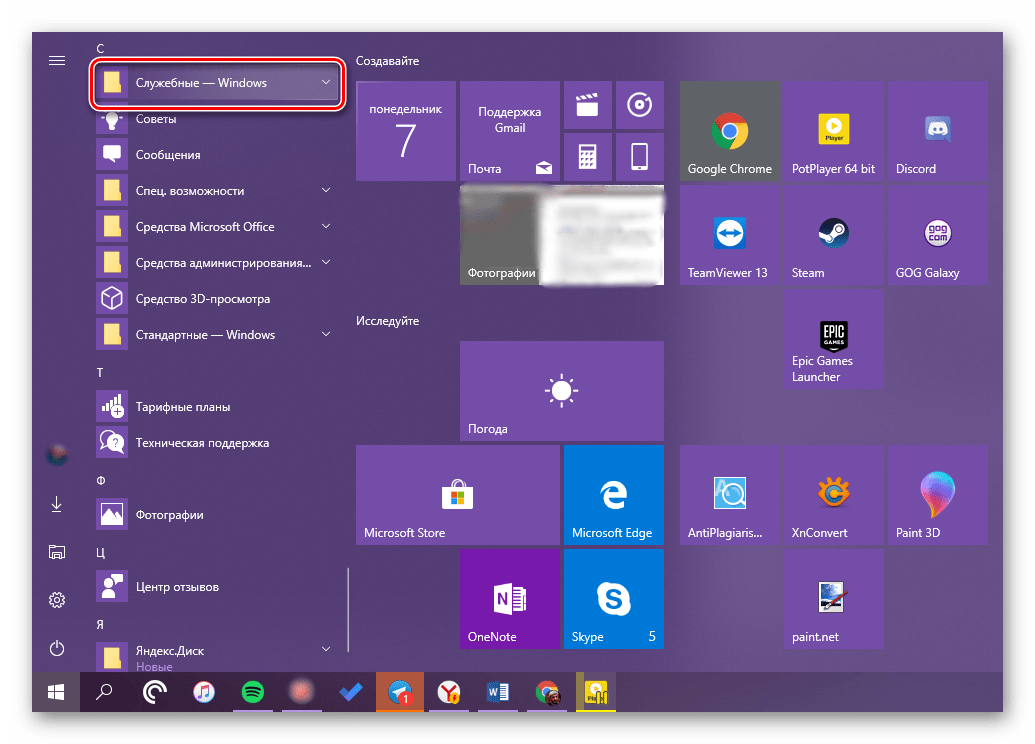

Способ 5: Контекстное меню кнопки «Пуск»
Многие стандартные программы, системные утилиты и прочие важные элементы ОС могут быть запущены не только через «Пуск», но и через его контекстное меню, вызываемое нажатием правой кнопки мышки по данному элементу. Можно воспользоваться и исключительно клавишами «WIN+X», которые вызывают это же меню. Какой бы из способов открытия вы не использовали, просто найдите в представленном списке «Проводник» и запустите его.
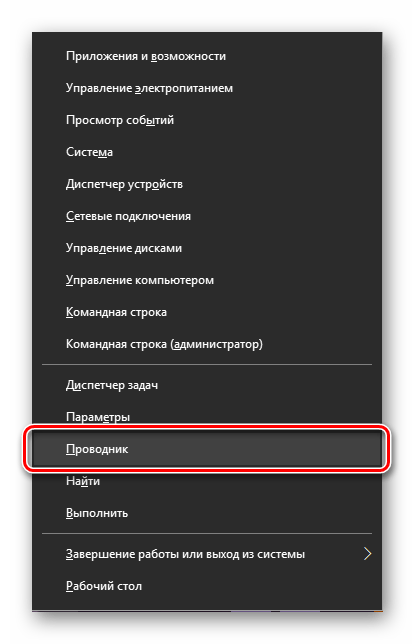
Способ 6: «Диспетчер задач»
Если вы хотя бы время от времени обращаетесь к «Диспетчеру задач», то наверняка видели в списке активных процессов и «Проводник». Так вот, из данного раздела системы можно не только завершить его работу, но и инициировать запуск. Делается это следующим образом.
- Правой кнопкой мышки нажмите по пустому месту на панели задач и выберите в открывшемся меню пункт «Диспетчер задач». Вместо этого можно просто нажать клавиши «CTRL+SHIFT+ESC».
- В открывшемся окне кликните по вкладке «Файл» и выберите пункт «Запустить новую задачу».
- Введите в строку команду
«explorer», но без кавычек, и нажмите «ОК» или «ENTER».
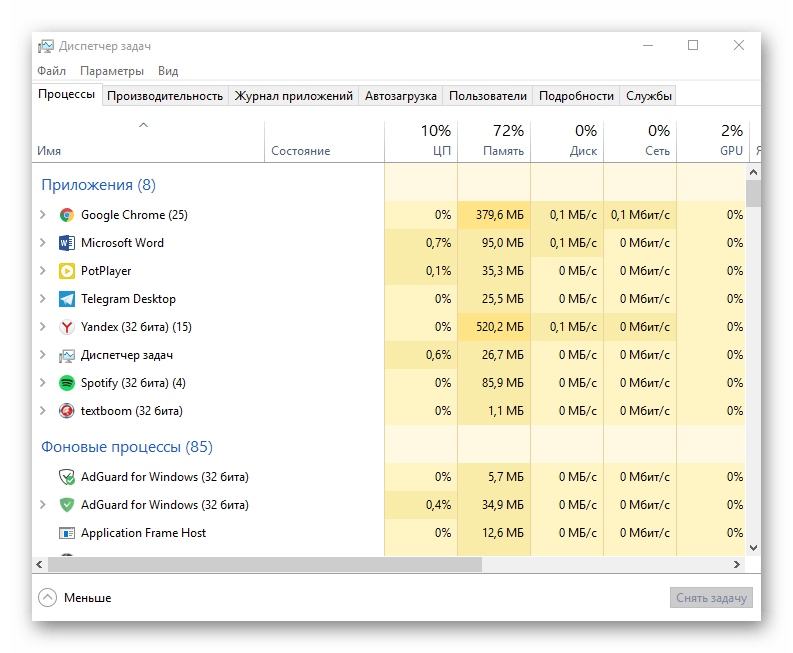
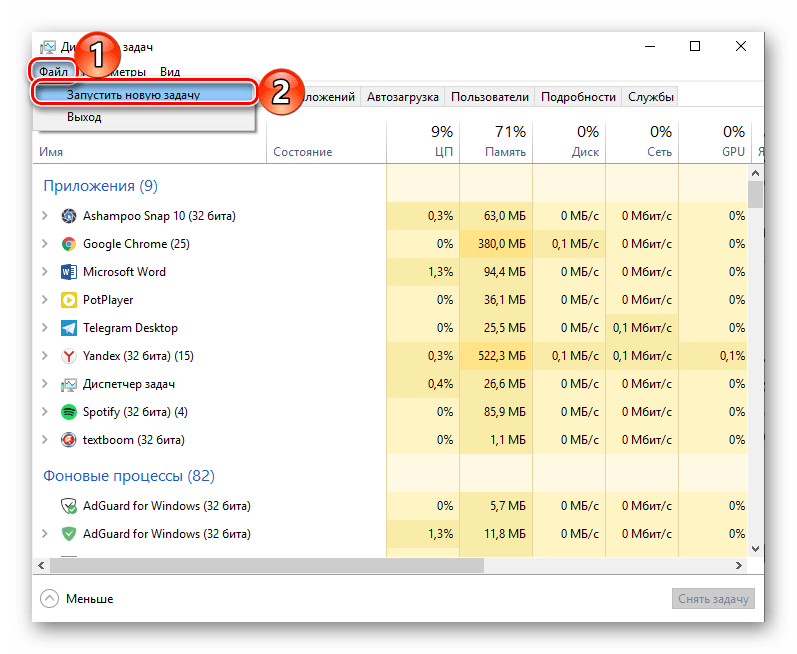
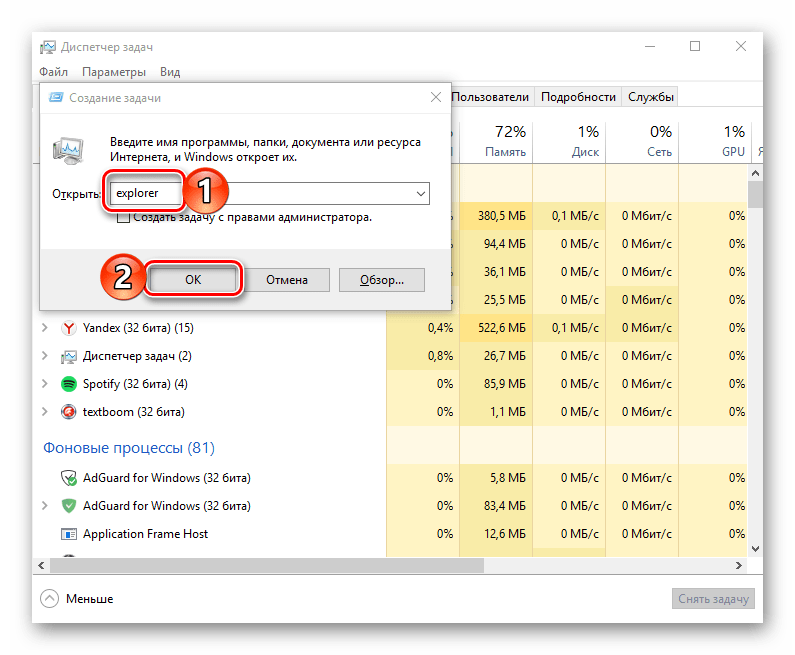
Как видите, здесь работает та же логика, что и с окном «Выполнить» — для запуска нужного нам компонента используется его оригинальное название.
Способ 7: Исполняемый файл
«Проводник» мало чем отличается от обычных программ, поэтому у него тоже есть свой исполняемый файл, который и может использоваться для запуска. explorer.exe находится по представленному ниже пути, практически в самом низу этой папки. Отыщите его там и откройте двойным кликом ЛКМ
C:\Windows
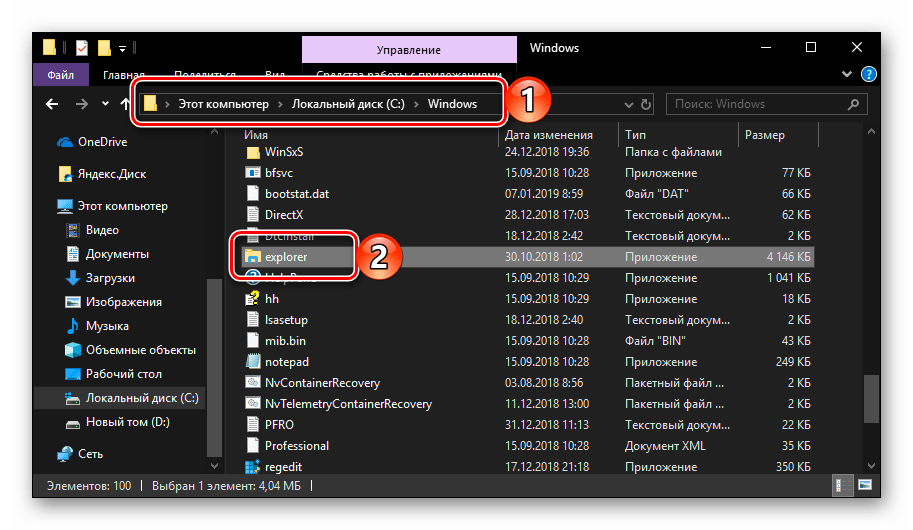
Как вы могли заметить из всего вышесказанного, в Windows 10 существует довольно много способов запуска «Проводника». Вам достаточно запомнить всего один или два из них и пользоваться ими по мере необходимости.
Дополнительно: Настройка быстрого доступа
Ввиду того, что «Explorer» приходится вызывать постоянно, помимо запоминания представленных выше способов, можно и нужно закрепить данное приложение на самом видном и просто доступном месте. Таковых в системе как минимум два.
Панель задач
Любым из описанных выше способов запустите «Проводник», а затем нажмите по его значку на панели задач правой кнопкой мышки. Выберите в контекстном меню пункт «Закрепить на панели задач» и, если посчитаете нужным, переместите его в наиболее удобное место.
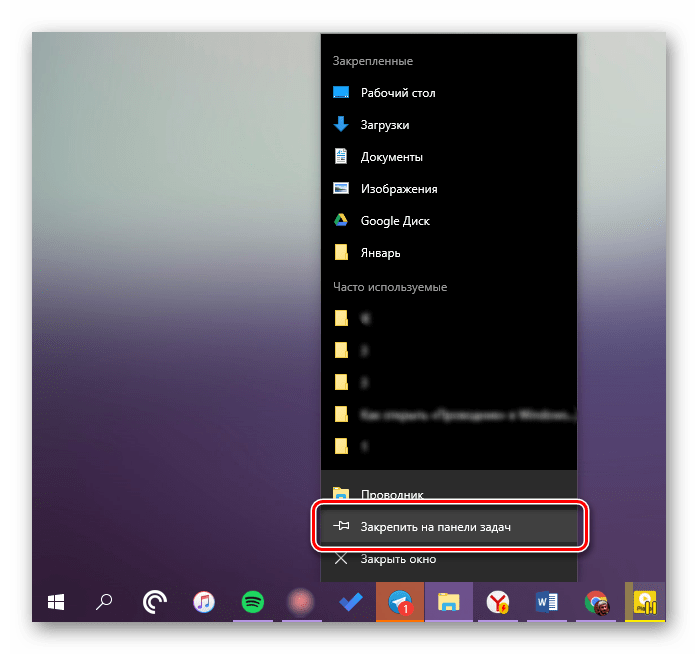
Стартовое меню «Пуск»
Если вы не хотите постоянно искать «Explorer» в данном разделе системы, можно закрепить ярлык для его запуска на боковой панели, рядом с кнопками «Завершение работы» и «Параметры». Делается это следующим образом:
- Откройте «Параметры», воспользовавшись меню «Пуск» или клавишами «WIN+I».
- Перейдите к разделу «Персонализация».
- В боковом меню переместитесь во вкладку «Пуск» и нажмите по ссылке «Выберите, какие папки будут отображаться в меню…».
- Переведите в активное положение переключатель напротив «Проводника».
- Закройте «Параметры» и повторно откройте «Пуск», чтобы убедиться в наличии там ярлыка для быстрого запуска «Эксплорера».
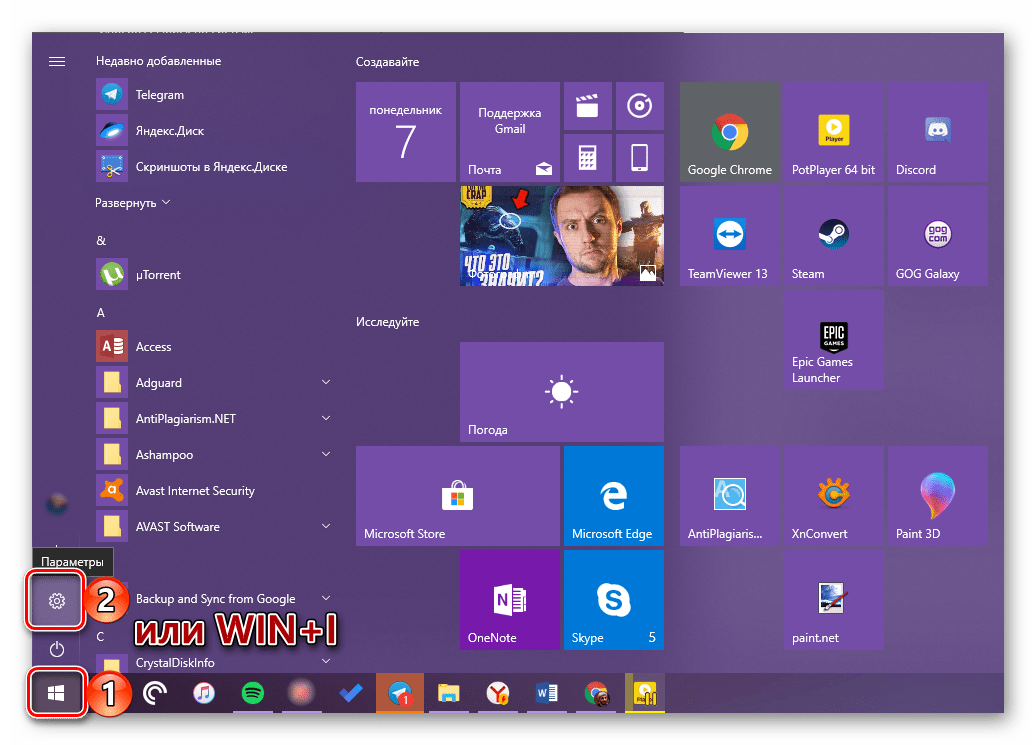
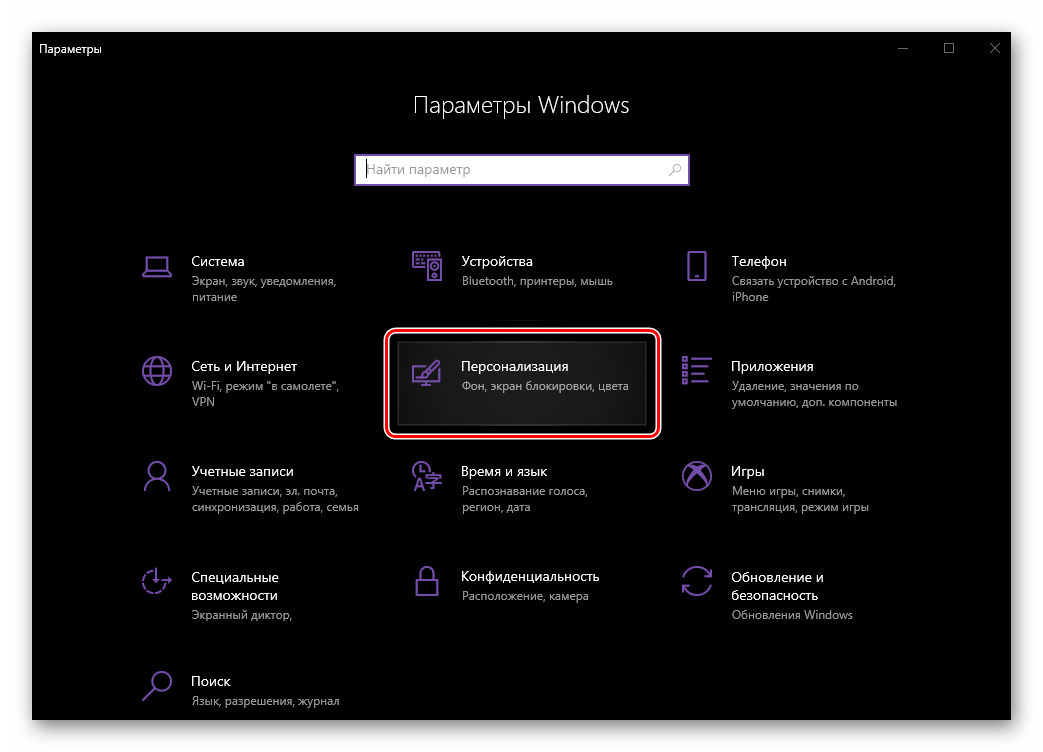
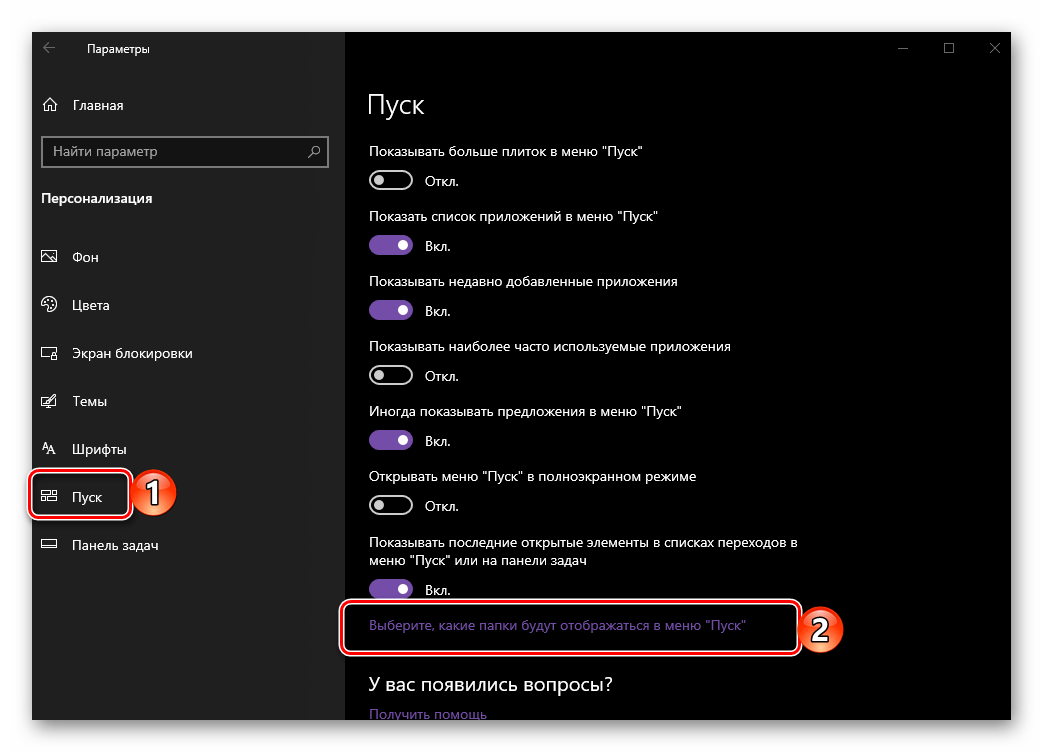
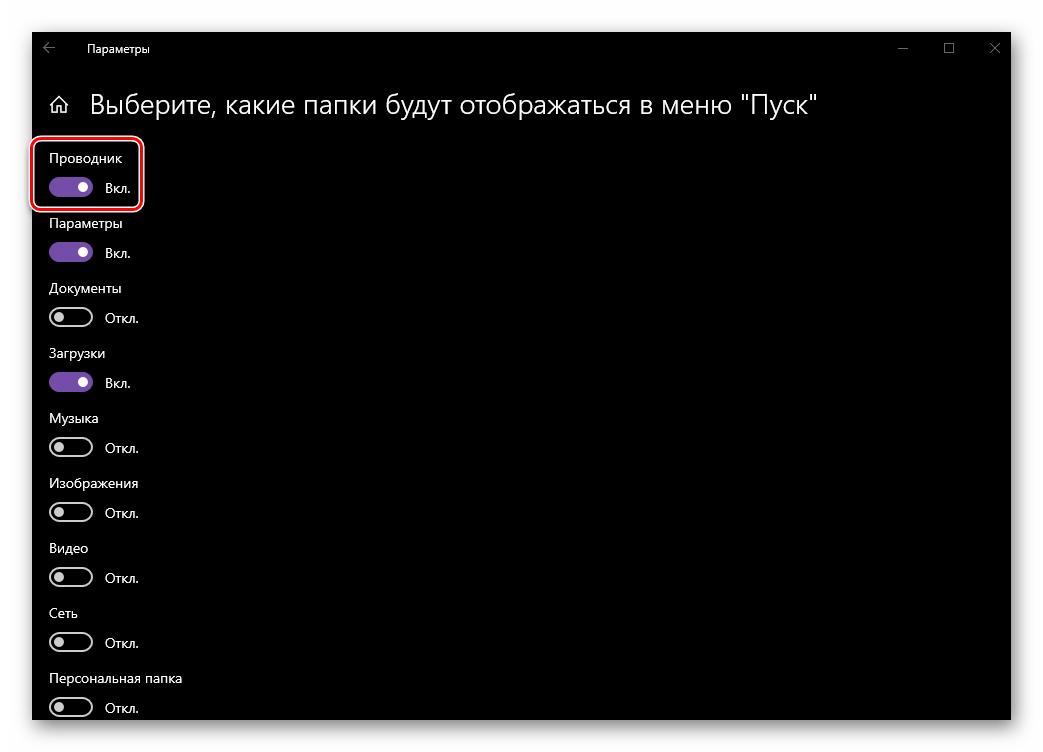
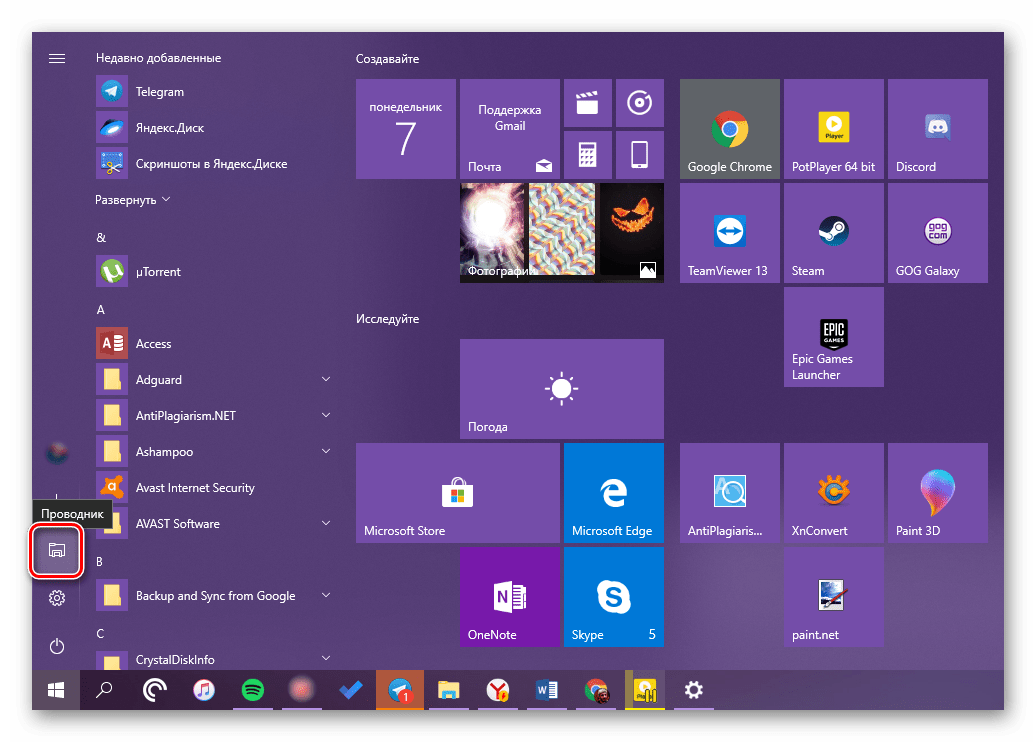
Читайте также: Как сделать панель задач прозрачной в Windows 10
Заключение
Теперь вы знаете не только обо всех возможных вариантах открытия «Проводника» на компьютере или ноутбуке с Виндовс 10, но и о том, как не потерять его из виду ни при каких обстоятельствах. Надеемся, эта небольшая статья была полезна для вас.
Наша группа в TelegramПолезные советы и помощь