
Disabling Windows Defender SmartScreen in Windows 11
Published
5 min read
How to Turn Off Windows Defender SmartScreen in Windows 11
In the digital age, security is paramount. Windows 11, like its predecessors, comes equipped with a range of built-in features designed to protect your system from malware, ransomware, and other online threats. One such feature is Windows Defender SmartScreen, which acts as a shield against unverified applications and potentially harmful websites. However, there may be instances where users prefer to disable this feature for various reasons, such as software compatibility issues, performance concerns, or personal preference. This article will provide a comprehensive guide on how to effectively turn off Windows Defender SmartScreen in Windows 11, along with important considerations and alternative security measures.
Understanding Windows Defender SmartScreen
Before diving into the steps for disabling SmartScreen, it’s essential to understand what it is and how it functions. Windows Defender SmartScreen is a security feature built into Windows 11 that helps protect users by checking downloaded files and applications against a database of known threats. When you try to open an unrecognized file or visit a potentially harmful website, SmartScreen displays a warning message, giving you the option to proceed or cancel the action.
How SmartScreen Works
-
File and Website Reputation Checks: SmartScreen evaluates files and URLs against Microsoft’s cloud service, which monitors suspicious activities online. If a file or site is deemed unsafe based on user reports and behavior analytics, SmartScreen will block access.
-
User Feedback and Community Reports: The SmartScreen service is continuously updated with reports from users and security experts. User feedback plays a crucial role in identifying new threats.
-
Integration with Other Security Features: SmartScreen works in conjunction with other Windows security features, enhancing the overall protection of your computer.
Understanding these components can help users appreciate the functionality of SmartScreen, even as they consider turning it off.
Reasons to Turn Off SmartScreen
While Windows Defender SmartScreen provides vital protection, there are legitimate reasons for disabling it, including:
-
Software Compatibility Issues: Some third-party applications may be incorrectly flagged as harmful by SmartScreen, preventing their installation or operation.
-
Performance Concerns: Users who operate resource-intensive applications may find that SmartScreen interferes with their performance, leading to a desire for less restrictive security measures.
-
Customization Preferences: Some experienced users prefer to manage their security settings manually and feel comfortable without SmartScreen’s constant intervention.
-
Development and Testing: Developers may need to disable SmartScreen when creating or testing applications that are not yet widely recognized by the antivirus community.
Although these reasons highlight the potential benefits of disabling SmartScreen, it’s crucial to weigh the risks before proceeding.
Precautionary Measures Before Disabling SmartScreen
Disabling any security feature leaves your system more vulnerable, and this is especially true for SmartScreen. Here are some precautionary measures to consider:
-
Use Reliable Antivirus Software: Ensure that you have a reputable antivirus program installed and running on your system to fill the security gap that SmartScreen might leave.
-
Enable Windows Firewall: The built-in Windows Firewall can offer an additional layer of protection.
-
Regular Backups: Keep regular backups of your important data to safeguard against potential loss during a security incident.
-
Educate Yourself on Internet Safety: Familiarize yourself with best practices for online safety to mitigate risks when navigating unverified software and websites.
-
Consider Alternative Security Solutions: If you decide to turn off SmartScreen but want some form of protection, consider third-party security solutions that can offer comparable or enhanced features.
Step-by-Step Guide to Turn Off SmartScreen in Windows 11
With a clear understanding of what SmartScreen is and the potential risks involved with disabling it, let’s proceed with the step-by-step process of turning off Windows Defender SmartScreen in Windows 11.
Method 1: Using Windows Security Settings
-
Open Windows Security:
- Click on the Start button or press the Windows key on your keyboard.
- Type “Windows Security” in the search bar and press Enter.
-
Navigate to App & Browser Control:
- In the Windows Security window, select “App & browser control.”
-
Manage SmartScreen Settings:
- In the App & browser control section, you’ll find three settings under the “Check apps and files” section.
- Find «SmartScreen for Microsoft Edge», «SmartScreen for Microsoft Store apps», and «Check apps and files».
- Click the link labeled «Off» to disable SmartScreen for each setting.
-
Confirm Your Choice:
- A warning message may appear. Read it carefully and, if you wish to proceed, click “Yes” or “Turn off.”
Method 2: Using Group Policy Editor (For Windows Pro Users)
For users running Windows 11 Pro or Enterprise editions, the Group Policy Editor provides additional configuration options. Here’s how:
-
Open Group Policy Editor:
- Press Windows + R on your keyboard to open the Run dialog.
- Type “gpedit.msc” and hit Enter.
-
Navigate to Local Computer Policy:
- In the Group Policy Editor, expand the “Computer Configuration” section.
- Proceed to “Administrative Templates” > “Windows Components” > “File Explorer”.
-
Locate SmartScreen Settings:
- Locate the policy labeled “Turn off Windows Defender SmartScreen.”
-
Edit the Policy:
- Double-click on the setting and change it to “Enabled” to disable SmartScreen.
-
Apply Changes:
- Click on “Apply” and then “OK” to confirm.
-
Close the Group Policy Editor.
Method 3: Using the Registry Editor
Another method to turn off SmartScreen involves modifying the registry. Always back up the registry before making changes, as incorrect edits can cause system instability:
-
Open the Registry Editor:
- Press Windows + R to open the Run dialog.
- Type “regedit” and press Enter.
-
Navigate to SmartScreen Registry Key:
- Go to the following path:
HKEY_LOCAL_MACHINESOFTWAREMicrosoftWindowsCurrentVersionpoliciesSystem
- Go to the following path:
-
Create or Modify a Registry Value:
- Look for a DWORD value named “EnableLUA”. If it does not exist, right-click and create a new DWORD (32-bit) value, and name it “EnableLUA”.
- Set the value to 0 to disable SmartScreen.
-
Close the Registry Editor:
- After making your changes, close the Registry Editor and restart your computer to apply the new settings.
Confirming that SmartScreen is Disabled
Once you have completed the steps to disable SmartScreen, it’s a good practice to confirm that it is indeed turned off:
-
Download a Test File: Find a file that is known to trigger SmartScreen warnings (e.g., a benign file not recognized by Windows).
-
Attempt to Open the File: If SmartScreen is off, you should be able to open the file without a warning message.
-
Check SmartScreen Settings: Go back to Windows Security to verify that the SmartScreen settings reflect your changes.
Conclusion
Disabling Windows Defender SmartScreen in Windows 11 can be a necessary step for specific users who experience frequent compatibility issues or prefer a more customized security approach. However, it’s vital to recognize the risks associated with turning off such a protective feature and to take alternative measures to maintain your system’s security.
By following the processes detailed in this guide, users can confidently navigate the decision to disable SmartScreen while remaining vigilant of potential threats. Always consider your particular needs and ensure robust security measures are in place, so you can enjoy a safe computing experience in this evolving digital landscape.
In today’s digital age, cybersecurity is a significant concern for both individuals and organizations. One core component of this cybersecurity landscape is Windows Defender, a built-in antivirus software in Windows operating systems that helps protect your computer against malware, viruses, and other potential threats. An essential feature of Windows Defender is its security notification icon, which provides users with quick access to security alerts and system status. However, there are instances when the Windows Defender Security Notification icon may go missing, causing unnecessary anxiety and confusion. This article will delve into the reasons for this issue, troubleshooting steps, and preventive measures to ensure your icon remains accessible.
Understanding Windows Defender
Windows Defender is Microsoft’s in-house antivirus solution, initially introduced in Windows Vista as a basic anti-spyware tool and evolving over the years into a comprehensive security suite. It actively protects your system against various threats, including viruses, malware, ransomware, and phishing attempts. The security notification icon plays a pivotal role in this suite, appearing often in the system tray or taskbar, allowing users to quickly access security notifications, perform scans, and manage their protection settings.
Causes of Missing Windows Defender Notification Icon
The absence of the Windows Defender security notification icon can occur due to various reasons. Identifying the potential cause is the first step in troubleshooting the problem effectively. Below are some common causes of the missing icon:
-
System Updates: Occasionally, after a major Windows update, glitches or changes in system files could lead to the disappearance of certain icons, including the Windows Defender notification icon.
-
Corrupted Files: If there are corrupted files within the Windows operating system or the Windows Defender application, this could prevent the icon from displaying correctly.
-
Disabled Services: Windows Defender relies on various services to operate effectively. If some of these services are disabled, it might lead to the absence of the icon.
-
Conflicting Software: The presence of third-party antivirus software can sometimes lead to conflicts with Windows Defender, which may cause the notification icon to disappear.
-
System Tray Settings: Sometimes, the icon might not be missing; it may just be hidden in your system tray settings.
Troubleshooting Steps
If you notice that the Windows Defender Security Notification icon is missing, follow these troubleshooting steps to potentially recover it.
1. Check System Tray Settings
The first step is to ensure that the icon is not hidden. Windows allows users to customize which icons appear in the system tray. To check your system tray settings:
- Right-click on the taskbar and select «Taskbar settings.»
- Scroll down to «Notification area.»
- Click on «Select which icons appear on the taskbar.»
- Make sure that the toggle for Windows Defender Security Center is turned on.
Restart your computer to ensure changes take effect.
2. Restart Windows Defender Services
If the icon is still missing, it might be a good idea to restart the Windows Defender services. To do this:
- Press
Windows + Rto open the Run dialog. - Type
services.mscand press Enter. - In the Services window, locate the following services:
- Windows Defender Antivirus Service
- Windows Defender Firewall
- Right-click each service and select «Restart.»
Once you’ve restarted these services, check if the notification icon has reappeared.
3. Run the Windows Troubleshooter
Windows has a built-in troubleshooter that can help identify and fix common issues:
- Open the Windows Settings (press
Windows + I). - Go to «Update & Security.»
- Select «Troubleshoot» from the left menu.
- Click «Additional troubleshooters.»
- Run the «Windows Store Apps» troubleshooter and any others that may be pertinent.
After the troubleshooter completes its tasks, check if the issue persists.
4. Repair Corrupted Files
Corrupted or missing system files can lead to various issues, including the notification icon disappearing. To repair these files, you can use the System File Checker (SFC) and the Deployment Imaging Service and Management Tool (DISM):
- Open the Command Prompt as an administrator (search for “cmd” in the Start menu, right-click, and choose «Run as administrator»).
- Type
sfc /scannowand press Enter. This command will scan for and repair corrupted system files. - After the scan completes, type the following DISM commands:
DISM /Online /Cleanup-Image /CheckHealth
DISM /Online /Cleanup-Image /ScanHealth
DISM /Online /Cleanup-Image /RestoreHealth
Allow the commands to execute fully and then restart your computer.
5. Disable Third-Party Antivirus Software
If you have third-party antivirus software installed, it may conflict with Windows Defender, potentially causing the notification icon to disappear. To check if this is the issue:
- Temporarily disable your third-party antivirus software.
- After disabling, check if the Windows Defender icon shows up in the system tray.
If the icon returns, you may need to adjust settings in the third-party software or consider uninstalling it to allow Windows Defender to function correctly.
6. Update Windows
Outdated Windows versions might have unresolved issues. Therefore, ensuring your operating system is fully updated is critical:
- Open the Windows Settings (
Windows + I). - Navigate to «Update & Security.»
- Click on «Windows Update» and select «Check for updates.»
Install any pending updates, and restart your computer.
7. Re-register Windows Defender Notifications
If the problem persists, the notification feature might need to be re-registered in your system. Use the following method to achieve this:
- Open Windows PowerShell as an administrator (search for “PowerShell” in the Start menu, right-click, and choose «Run as administrator»).
- Enter the following command:
Get-AppxPackage -AllUsers | Foreach {Add-AppxPackage -DisableDevelopmentMode -Register "$($_.InstallLocation)AppXManifest.xml"} - Press Enter and allow it to execute. This command re-registers the built-in applications, including system notifications.
After completing this, check for the notification icon again.
Preventive Measures
Once you’ve resolved the issue of the missing Windows Defender security notification icon, you may want to take preventive measures to avoid similar problems in the future. Here are some best practices:
-
Regular Updates: Always keep your Windows operating system updated to the latest version. Regular updates ensure that any bugs or vulnerabilities are patched.
-
Conduct System Scans: Run regular system scans with Windows Defender and check for malware or files that could compromise your system.
-
Backup Important Files: Regularly back up your files. In the event of a system corruption issue, a backup can help you recover without loss.
-
Manage Third-Party Security Software: If you choose to use third-party antivirus software, ensure it is compatible with Windows Defender. Consider relying solely on Windows Defender to eliminate possible conflicts.
-
Educate Yourself on Security Practices: Familiarize yourself with safe internet browsing practices. This minimizes risks associated with malware and phishing attempts.
Conclusion
The absence of the Windows Defender Security Notification icon can be inconvenient and concerning for users who rely on it for their digital security. Understanding the potential causes and troubleshooting steps allows you to regain functionality in a streamlined manner. By following these comprehensive steps and implementing preventive measures, you can ensure that your Windows Defender operates effectively, keeping your system secure and reducing the likelihood of encountering similar issues in the future.
Invest time in regular maintenance and updates of your system, embrace best practices in digital security, and empower yourself through knowledge to stay vigilant against online threats. A proactive approach to cybersecurity is your best defense in today’s ever-evolving digital environment.
Taking on a virus on one’s system can begin a dreadful experience for a computer user. From gritting your teeth at the occasional BSOD and feeling awful irritation at the very minimal effectiveness gotten from your system, you sure will have a lot on your plate.
The security notification icon is a setting brought forward by Windows to solve many security issues. It offers real-time internal protection, helps to automatically download updates, scans for malware and security hazards, and much more. The process works just like any normal antivirus software.
Nonetheless, some had difficulty finding the icon, and others didn’t even want the icon on their taskbar. This article explains removing or adding the security notification icon to the toolbar, especially as a Wins 11 user.
Quick Fixes for Tray Pop-Up Issue
1. Show or Hide from System Panel
Step 1: Move your cursor and find your way to the Settings process.
Step 2: On the left corner, scroll over and press down on “Personalization.” After this, move your cursor over to the right corner of the screen and find the “Taskbar” at the bottom of the screen.
Step 3: Now, move ahead and find the “Taskbar corner overflow” or the “other system tray icons” option and select it.
Step 4: Under it, scroll over and switch “On” or “Off” to the notification icon. Doing this either reveals or hides the icon respectively.
And you are good to go. Check if the issue is rectified now. If it still isn’t, do check out the next option.
2. Adjust Preferences in Settings
Step 1: You should find and access the “Settings” program.
Step 2: On the left corner, scroll over and press down on “Apps.” After this, move your cursor over the right corner of the screen and find “Startup” at the bottom of the screen.
Step 3: To remove or add the security icon, navigate to the Turn “On” or “Off” option and choose the one you want.
Step 4: Restart the PC
3. Enable or Disable This Tray Item
Step 1: Navigate to the Local Group Policy Editor option
Step 2: Scroll over and discover the policy location at a corner on the set-up
Step 3: Navigate your way from the “Computer Configuration” to the “Admin Templates.” Then, find your way to the “Wins Components” and then the “Wins Security” option till you find “Systray.”
Step 4: Under this, find and press down on the Hide option for the security Systray.
Step 5: You can either enable or disable the windows security notification icon by either choosing “not configured” or “Disable,” respectively. After each option, you are to scroll over to the bottom of the screen and click down on “OK.”
And voila, you are done!
4. Delete Extra Antivirus Programs
Your security icon not showing up might be because you have some AV(antivirus) installed more than one time. So it helps to uninstall such software. As some antiviruses already have a designated way of removing them, you can easily go ahead to the program’s software and gather more information on how to remove them effectively.
Be rest assured that your system won’t be left without protection because Windows already has its internal security option installed.
5. Restart Without Third-Party Apps
A Clean restart is for you to infer if a background program is intruding on your PC or to maybe you need to boost your system load. Follow the steps below for a clean restart:
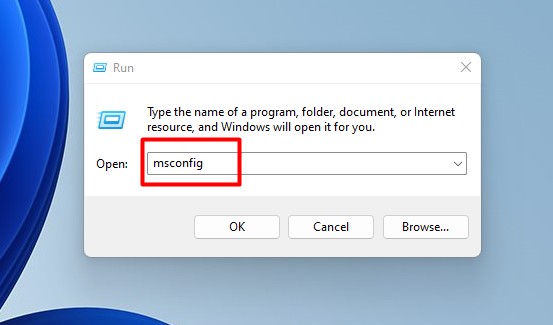
Step 1: To open the Run Menu option, press the windows key and the R option together on your keyboard.
Step 2: In the command box, press the “msconfig” command and press down on OK to access the System Configuration.
Step 3: Check through the Services tab and then tick the box for “Hide All Microsoft Services.”
Step 4: Press down on “Disable All“
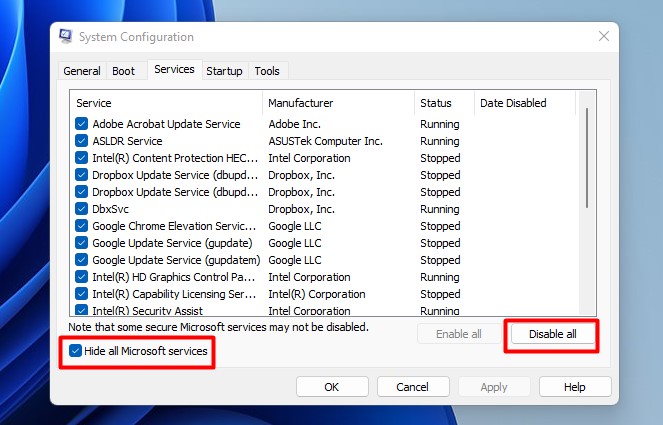
Step 5: You should then scroll over to “Apply“, select, and navigate to “On” to complete the procedure.
Step 6: Start up your system again now.
P.s: Please note that this process deactivates all 3rd party programs from your system’s Startup. Now, if you want to have some apps placed on your Startup after the issue is solved, you can go ahead and enable them. However, if the issue comes back after doing this, then the problem is with that particular software.
6. Use CMD for Troubleshooting
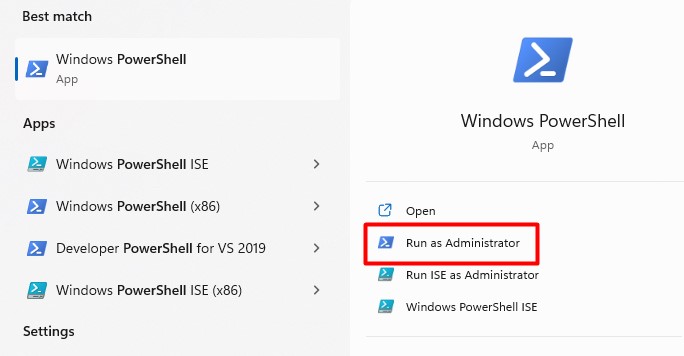
Step 1: You should find your way to the “Start” option.
Step 2: Then open and load the Command prompt by admin or the Power Shell by admin
Step 3: Now, try to copy and paste the command below in the required box:
Step 4: DISM.exe /Online /Cleanup-image /Restorehealth
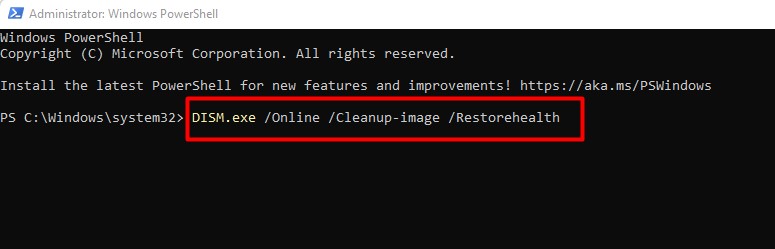
Step 5: You should press in on “Enter” now.
P.s: Do note that the process might take a while to load and end. Nonetheless, do wait patiently, and after you’ve seen a message indicating successful completion, you can now go ahead and paste the other command states below.
Step 1: Paste in the “sfc /scannow” command
Step 2: Strike your Enter key on your keyboard.
Step 1: Take your time and wait till a message comes up. It should indicate that a complete verification is already done.
Why This Symbol Might Keep Appearing
There is no primary reason for the Windows Security Notification Icon Startup showing up or not showing up. You might have mistakenly disabled or enabled it. Or maybe it isn’t set up on your PC by default. So, it helps to just go to your settings and manage it as you want it.
Final Thoughts
Getting antivirus software is vital for any PC in this era where it’s pretty easy to take most viruses. And Windows has taken it into its hands to give internal real-time protection too.
However, some with more powerful AVs might consider the Wins version bothersome, hence, the reason for this article. So, if you plan to add or remove the security notification icon, this article offers all the guides you need.
Answers to Common Questions
What Does The “Windows Security Notification Icon Startup” Issue Cause?
It offers real-time protection. But it might be deemed unnecessary if you already have a better antivirus guiding your PC.
How Does One Add Or Remove The “Windows Security Notification Icon Startup” Issue?
He is hiding or showing the windows security notification icon for current users, adding or removing the icon, and following some other means. The article above has explicitly explained these processes.
Can I disable the Windows security notification icon in Startup?
Yes, you can. Among the many remedies in the article, Solution 2 explains how to do this.
Is The Windows security notification needed at Startup?
Having the security notification icon at Startup is a good option, but it’s not essential. You can very well do without it. And if you do have it at your Startup, be sure that some malware is not camouflaging it.
What is the Windows Security Notification icon?
As rightly explained in the article, the Windows security notification is an internal antivirus system designed by Windows to help you safeguard your system.
Windows Defender что это за программа и как ее отключить? (Windows 10)
Всем привет Значит этот Windows Defender это оказывается просто защитник винды — вот защищает он ее от всяких там недоброжелателей. А то знаете, некоторые программы попадают в винду и хотят ее обидеть, а этот защитник говорит, а ну с той, эй ты, я щас тебе дам! Ну примерно так он и работает.. Я сегодня расскажу немного про эту программу и покажу как ее отключить, но знайте, что если отключите, то тогда винда останется без охранника своего…
В этой статье я расскажу о том защитнике, который есть в Windows 10! А вот по поводу защитника в Windows 7, то об этом я писал здесь!
Значит вернемся еще немного к защитнику. Раньше он прикрывался под именем Microsoft AntiSpyware, но когда он понял что он крутой спаситель, то он сменил название на Windows Defender! И что интересно еще, то он встроен не только в Windows 10, как я думал, но и также в более старые винды, ну например Windows XP. Вот такие дела!
Windows Defender это вам не какой-то там антивирус, это продвинутый инструмент по нахождению вирусных обьектов, опасных изменений в системе. Если защитник поймал какую-то прогу но не знает, вирус это или нет, то он прогу отправляет посылкой в сеть Microsoft SpyNet. Это секретная сесть, по которой передаются опасные обьекты и там в Microsoft ставят опыты чтобы установить, насколько та или иная программа опасная, насколько она угрожает человечеству.. Как видите, это все серьезно..
Помимо защитника, в винде есть еще его помощник в виде брандмауэра. Я расскажу вкратце что такое брандмауэр, ну чтобы вы все понимали и были продвинутыми юзерами! Значит смотрите, вот сейчас год современный, много всяких технологий и тут никак уже без интернета не выжить! И не только нам, людям, но и прогам. Теперь почти все проги лезут в интернет. В том числе и вредные проги, то есть вирусы. Короче брандмауэр это такой начальник лазанья в интернет — кому-то можно это делать, а кому-то нельзя. Грубо говоря обычным программам он разрешает, а всяким проходимцам не разрешает, вдруг они хотят вынести с компа в сеть какие-то там пароли.. Ну вы поняли.. Кстати, такие вот проходимцы, которые сливают пароли, вот они и называются троянами, это вирусы, задача которых засесть в компе и по команде или в определенное время переслать хакеру с вашего компа всю ценную инфу…
Теперь давайте посмотрим на этого защитника, смотрите как его открыть, зажимаете Win + X и выбираете в меню пункт Панель управления (это все я имею ввиду в Windows 10):

Теперь тут будет куча значков, вам тут нужно найти Защитник Windows, вот он, красавец сидит:

Ну и собственно вот окно этого защитника:

Справа там можно проверить комп, есть три вида проверки, ну ничего особенного. На вкладке Обновить вы можете проверить, актуальные ли антивирусные базы и если что все это одним махом обновить! Вот эта вкладка:

Ну и последняя вкладка, это Журнал. Ну как уже понятно из названия, тут вы можете посмотреть каике-то отчеты, что было найдено, что было перемещено в карантин:

Как видите, все сделано просто и все понятно
Если нажать вот на эту кнопку Параметры:

То откроется окно виндовское, ну то есть то окно Настройки, где всякие идут настройки. То что вызывается из Пуск, ну думаю что вы понимаете о чем это я..

Тут есть всякие настройки по отключению некоторых штук в плане защиты. Чтобы отключить Защитник Windows, то нужно вот в этих настройках все переключатели перевести в режим Выкл, вот так:

У меня тут всего три переключатели, а у вас ну может и больше будет, я не знаю.. После отключения у меня появилось вот такое сообщение:

То есть защитник мы таки отключили!
Потом, я посмотрел снова на защитника и увидел что он аж покраснел после того как мы его отключили, вот такой прикол:

Я надеюсь вы понимаете, что просто так отключать данный защитник не нужно, ибо всякое в жизни может быть, вирус там, вирус тут… То такое.. Нужно быть осторожным.. И поэтому лучше не отключать защитник без причины…
Comments
Хорошо пишите А то понаписали всяких программ, программисты понимаешь. Че делают — фиг знает… Все непонятные названия поудалял к чертям А особенно те, что в названиях имеют слово ASUS
к стати этот дефендер ,ловит шпионов и троянов на раз два, помните летом вирус «ПЕТЯ» атаковал всех ,так вот мой комп этот защитничек спас ,предупредил меня во время ,да и парочку троянов замёл и в карантин посадил , а там уже вам решать что с ними делать , ,я удаляла, так что вещь нужная и безопасная
Спасибо, очень познавательная и полезная тема.
Вы, именно Вы меня успокоили, так по-простецки изложили суть дела.
Ну Вы меня поняли я надеюсь.
Добавить комментарий Отменить ответ
Этот сайт использует Akismet для борьбы со спамом. Узнайте как обрабатываются ваши данные комментариев.
Источник
Как в Windows 10 отключить отображение значка Защитника Windows в области уведомлений

В данной статье показаны действия, с помощью которых можно отключить отображение значка Защитника Windows в области уведомлений панели задач.
В операционной системе Windows 10 по умолчанию значок Защитника Windows отображается на панели задач в области уведомлений (системном трее), и при наведении на него курсора мыши появляется подсказка которая отображает состояние защиты компьютера. С помощью значка можно открыть интерфейс Защитника Windows и выполнить сканирование, проверить наличие обновлений или удалить обнаруженные угрозы.
В Windows 10 за отображение значка Защитника Windows в области уведомлений отвечает файл MSASCuiL.exe, который находится по следующему адресу:
%SystemDrive%\\Program Files\\Windows Defender
По умолчанию файл MSASCuiL.exe прописан в автозагрузку и, если его отключить, то значок Защитника Windows в области уведомлений больше появляться не будет. При этом сам Защитник Windows не отключится и будет работать в штатном режиме.
Если Вы хотите отключить отображение иконки Защитника Windows в области уведомлений, то выполните несколько не сложных действий.
Запустите Диспетчер задач любым удобным для Вас способом: нажмите сочетание клавиш + X и в открывшемся контекстном меню выберите пункт Диспетчер задач или нажмите правой кнопкой мыши в пустой области панели задач и в появившемся контекстном меню выберите пункт Диспетчер задач, или нажмите на клавиатуре сочетание клавиш Ctrl + Shift + Esc

Далее перейдите на вкладку Автозагрузка , выберите Windows Defender notification icon и нажмите кнопку Отключить .
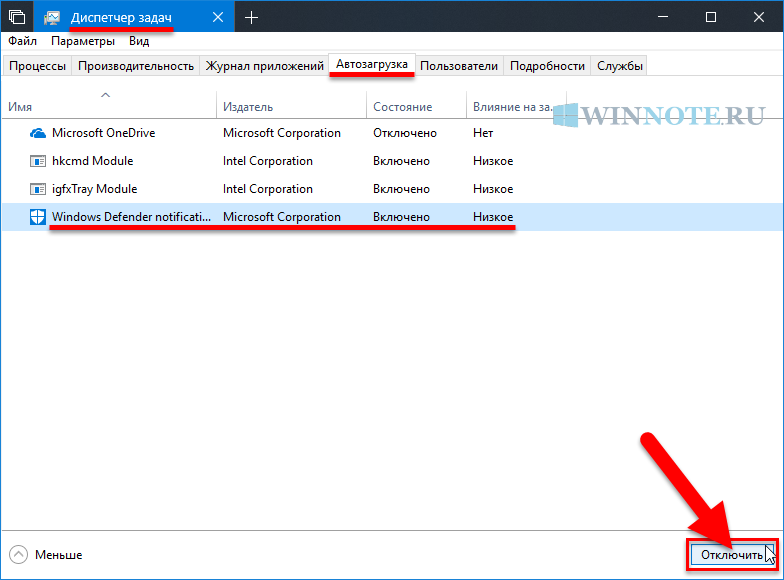
Закройте Диспетчер задач и выполните выход из системы. Теперь при загрузке или входе в систему, иконка Защитника Windows появляться не будет, однако если вы откроете Защитник Windows, иконка вновь появится. В этом случае для ее отключения достаточно будет перезайти в Windows.
Также, после того как Вы произвели какие-то действия в интерфейсе Защитника Windows, Вы можете отключить отображение иконки не выходя из системы, для этого в диспетчере задач на вкладке Процессы найдите процесс с именем Windows Defender notification icon, выберите его и нажмите кнопку Снять задачу. Затем наведите курсор мыши на значок Защитника Windows в панели задач, после этого он исчезнет.

Если вам в дальнейшем понадобится открыть Защитник Windows, то откройте меню Пуск и в списке установленных программ выберите Служебные ── Windows.
Tакже открыть Защитник Windows можно используя приложение «Параметры Windows», в котором выберите раздел «Обновление и безопасность» и далее откройте вкладку «Защитник Windows».
Еще можно воспользоваться поиском в Windows, для этого в строке поиска введите Защитник Windows и в результатах поисковой выдачи выберите Защитник Windows Классическое приложение.
Источник
Как отключить защитник Windows 10 — пошаговая инструкция
Стандартный защитник Windows может вызывать множество проблем: конфликты со сторонними антивирусами, чрезмерное потребление ресурсов, зависания во время проверки файлов, скачиваемых из интернета и многое другое. Поскольку при деактивации данного ПО у многих возникают проблемы, в этой статье речь пойдёт о том, как отключить защитник Windows 10 навсегда быстро и просто.
Как отключить защитник Windows 10 на время
В Win10 есть встроенная возможность в один клик отключить базовое защитное ПО, однако через какое-то время или при следующем запуске системы оно автоматически включится снова. Если вам нужно простое, быстрое и безопасное отключение защитника, то данный способ подойдёт. Если же требуется его отключить насовсем, то смотрите несколькими пунктами ниже.
В поисковой строке панели управления вводим «Защита от вирусов и угроз» и переходим в центр безопасности Защитника, где находятся все его настройки.
Кликаем по «Параметры защиты от вирусов и других угроз».
Отключаем ползунок «Защита в режиме реального времени» и остальные пункты настроек.
Если сами функции Windows Defender вам никак не мешают, а дискомфорт доставляют постоянно всплывающие уведомления, то защитник можно не выключать, ограничившись лишь настройкой уведомлений.Делается это в той же вкладке «Параметры защиты от вирусов и других угроз», в самом низу которой нужно выбрать «Изменение параметров уведомлений» и отключить пункт «Получить последние действия и результаты сканирования»
Отключение защитника через реестр
Отключение защитника в системном реестре — самый надёжный, но и самый рискованный путь. С одной стороны, если вы всё сделаете правильно, то гарантированно отключите надоедливое ПО, однако ошибочные действия в структуре реестра могут привести к серьёзным проблемам с Windows. Дабы минимизировать риск перед проведением манипуляций с реестром рекомендуем делать все строго по инструкции и создать точку восстановления системы. Это позволит откатить изменения в случае неудачи.
Как полностью отключить защитник Windows 10:
Зажимаем Win + R и вводим regedit
Переходим по пути HKEY_LOCAL_MACHINE\SOFTWARE\Policies\Microsoft\Windows Defender.
Выбрав папку Windows Defender кликаем ПКМ по пустому пространству справа > Создать > Параметр DWORD 32 бита. Именно 32 бита, даже если у вас 64 битная система. Называем параметр DisableAntiSpyware и даблкликнув по нему устанавливаем значение 1.
Далее необходимо создать два таких же параметра (DWORD32), но со значением 0 и названиями ServiceKeepAlive и AllowFastServiceStartup.
Cлева в папке Windows Defender выбираем раздел Real-Time Protection (если таковой отсутствует, создайте его) и аналогичным образом добавляем два параметра DisableIOAVProtection и DisableRealtimeMonitoring со значением 1.
- Затем создаем новый раздел в папке Windows Defender. Название раздела — Spynet.
- Внутри новой папки Spynet нужно создать такие же, как и ранее (DWORD32), параметры со следующими названиями и значениями (в скобках): LocalSettingOverrideSpynetReporting (0), DisableBlockAtFirstSeen (1), SubmitSamplesConsent (2).
На этом все, при закрытии редактора реестра защитник Windows будет отключен. Дополнительно можно удалить его значок с панели уведомлений, для этого вызовите диспетчер задач, перейдите во вкладку Автозагрузка и кликнув ПКМ по строке Windows Defender notification icon нажмите отключить.
Отключение защитника с помощью сторонних программ
Использование сторонних программ для отключения Защитника Windows или брандмауэра опасно, поскольку может привести к краже ваших персональных данных если вы используете непроверенный софт. Однако есть хорошие приложения отлично справляющиеся с данной задачей.
NoDefender
NoDefender — одна из наиболее простых программ для отключения Защитника, которая даже не требует установки. Несмотря на тот факт, что ее интерфейс на английском языке, вряд ли кому-то будет трудно понять, о чём говорится в пунктах меню.
На первом этапе необходимо отключить Защитник в настройках панели управления (как рассказано в начале статьи), кликнув Open Windows Defender Setting вы попадете в нужную вкладку с настройками.
Отключив нужные ползунки возвращаемся в утилиту, нажимаем Next и кликаем по Disable Windows Defender. Подтверждаем выбор и радуемся полностью отключенному Защитнику. При необходимости можно обратно включить ПО через NoDefender.
O&O ShutUp10
Программа с говорящим названием, которое можно перевести как «Заткнись, десятка», позволяет в один клик убрать ненужные, раздражающие или нагружающие систему элементы системы, в том числе и Defender. Функционал данного приложения крайне обширен, потому предварительно разберитесь с его возможностями.
Один из главных плюсов программы, выделяющих её на общем фоне — это автоматическое создание точек восстановления, благодаря чему можно быстро откатить изменение, если оно нанесло вред системе
Несмотря на излишнюю навязчивость некоторых служб Windows 10, их отключение — не такой уж и трудный процесс. Сделать это можно вручную либо же скачав подходящее приложение. Однако сразу же после отключения защитника рекомендуем установить антивирусную программу на свое усмотрение, так как оставлять систему без защиты вообще — не лучшее решение.
Источник
Содержание
- 990x.top
- Простой компьютерный блог для души)
- Windows Security notification icon — что это за программа и нужна ли она в автозагрузке? (SecurityHealthSystray.exe)
- Windows Security notification icon — что это такое?
- Что будет если отключить?
- Как отключить Безопасность Windows 10 (встроенный антиврус)
- Через параметры
- Через редактор групповой политики
- Через редактор реестра
- Убрать иконку защитника windows из трея
- Как отключить Безопасность Windows
- Windows Security notification icon — что это в автозагрузке
- Что это такое Windows Security notification icon & SecurityHealthSystray.exe
- Как убрать значок Защитник Windows из трея
- Программвы в автозагрузке
990x.top
Простой компьютерный блог для души)
Windows Security notification icon — что это за программа и нужна ли она в автозагрузке? (SecurityHealthSystray.exe)
Приветствую! Сегодня мы будем разбираться с автозагрузкой, а точнее с одним пунктом в ней, который предположительно имеет отношение к встроенному антивирусу.
Windows Security notification icon — что это такое?
Компонент, отвечающий за отображение иконки Защитника Windows в области уведомлений (системный трей).
Работает под процессом SecurityHealthSystray.exe.
Если отключить — то ничего страшного не произойдет, Защитник продолжит работать в прежнем режиме.
Вместо слова Security в названии может быть слово Defender — сути не меняет.

Собственно сама запись. Это автозагрузка Windows 10, которая находится в диспетчере задач. Чтобы отключить — просто нажмите правой кнопкой и выберите Отключить.
Как я понимаю — компонент отвечает за показ именно такой иконки:

Вполне возможно, что если по ней нажать правой кнопкой — будет меню с некоторыми функциями, например открыть Защитник Windows. Поэтому удалять запись в автозагрузке не стоит, вдруг вам эта иконка еще понадобится.
Что будет если отключить?
Как уже выяснили — ничего страшного не будет, однако стоит понимать, что в области уведомлений вообще не будут показываться сообщения защиты от вирусов и угроз.
В самом крайнем случае перед отключением можно создать точку восстановления, но думаю это лишнее.
Как отключить Безопасность Windows 10 (встроенный антиврус)
Защитник Windows, в последних версиях Windows 10 он называется «Безопасность Windows» — это встроенное антивирусное приложение от Microsoft. Когда вы устанавливаете сторонний антивирусный продукт, то защитник Windows автоматически отключается, и когда удаляете сторонний антивирус, то безопасность Windows автоматически активируется.
В последнее время Защитник Windows в Windows 10 показывает отличные результаты по независимым тестам. Не спорю, в Windows XP, 7, 8.1 он был совсем дырявый и толку от него было мало, но сейчас он быстро набрал темпы и продолжает набирать. Если вы следите за различными тестами, то наверняка заметите, что защитник Windows 10 входит в топ 5 антивирусных программ. Для любителей и фанатов сторонних антивирусов, разберем, как полностью отключить защитник windows 10, центр безопасности, также уберем иконку защитника windows 10 из трея. Эти способы подойдут для версий 1809, 1709, 1909, 2004.
Через параметры
Самый простой способ отключить встроенный антивирус от microsoft — это просто отключить его в настройках безопасности windows. Откройте «Безопасность Windows» и перейдите «Защита от вирусов и угроз» (Иконка в виде щита). Далее в графе «Параметры защиты от вирусов и других угроз» нажмите на «Управление настройками» и Выключите все ползунки:
- Защита в реальном времени
- Облачная защита
- Автоматическая отправка образцов
- Защита от подделки
- Контролируемый доступ к папкам, если его включали
Через редактор групповой политики
Важно: В редакции Windows 10 HOME, нет редактора групповых политик.
Шаг 1. Первым делом нужно отключить функцию «Защита от подделки», которая при включенном состоянии не позволит вносить изменения через групповую политику. Откройте встроенный антивирус windows 10 и отключите защиту от подделки.
Шаг 2. Нажмите сочетание кнопок Win+R и ведите gpedit.msc, чтобы открыть редактор групповых политик. В политиках перейдите:
- Конфигурация компьютера > административные шаблоны > Компоненты Windows > Антивирусная программа Защитника Windows.
- Справа нажмите два раза на «Выключить антивирусную программу Защитник Windows«.
- В новом окне выберите «Включено«, нажмите применить и ok.
- Не закрывайте редактор, это не все, следуем шагу 3.
Шаг 3. Теперь отключим дополнительные параметры сканирования и работы безопасности windows. Разверните графу «Антивирусная программа Защитника Windows» > «Защита в режиме реального времени» и справа отключите:
- Включить наблюдение за поведением.
- Проверять все загруженные файлы и вложения.
- Отслеживать активность программ и файлов на компьютере.
- Включить проверку процессов, если включена защита реального времени.
Через редактор реестра
Microsoft убрала возможность полного отключения антивируса через реестр. Компания утверждает, когда пользователь устанавливает сторонний антивирус, то безопасность windows автоматически отключается и не работает. В частности убран из реестра параметр DisableAntiSpyware, который не будет работать даже при создании ключей. Не рекомендую проделывать данный способ, так как последствия неизвестны после последних обновлений. Вы можете просто ознакомиться с данным способом, он в точности такой же как и в групповой политики, только через реестр. Также, если у вас редакция HOME, то можно:
Шаг 1. Жмем Win+R, пишем regedit для входа в системный реестр и переходим по пути:
- HKEY_LOCAL_MACHINE\SOFTWARE\Policies\Microsoft\Windows Defender
- Перейдите к папке Windows Defender.
- Нажмите справа на пустом поле правой кнопкой мыши и выберите Создать >Параметр DWORD (32 бита).
- Создайте новое значение с именем DisableAntiSpyware и значением 1.
Чтобы включить защиту обратно, задайте обратно значение 0, удалите ключ, затем раздел (папку).
Шаг 2. Теперь создайте новую подпапку Real-Time Protection в папке Windows defender для этого:
- Нажмите правой кнопкой мыши на папке Windows defender >Создать >Раздел.
- Назовите новый раздел (папку) Real-Time Protection.
Шаг 3. В новом созданном разделе Real-Time Protection нужно будет создать четыре новых ключа со значением 1. Нажмите справа на пустом поле «Создать» > «Параметр DWORD (32 бита)» и:
-
- DisableBehaviorMonitoring
- DisableOnAccessProtection
- DisableScanOnRealtimeEnable
- DisableIOAVProtection
Перезагрузите компьютер и защитник windows 10 будет отключен полностью.
Убрать иконку защитника windows из трея
Если у кого иконка не пропала, то запустите диспетчер задач, нажатием кнопок Ctrl+Alt+Delete и перейдите во вкладку «Автозагрузка», найдите «Windows Security notification icon» и отключите его, нажав правую кнопку мыши по нему.
Как отключить Безопасность Windows
Также, вы можете отключить сам центр управление параметрами антивируса «Безопасность Windows».
Нажмите Windows + R и введите regedit, чтобы вызвать редактор реестра. Перейдите по следующему пути:
- HKEY_LOCAL_MACHINE\SYSTEM\CurrentControlSet\Services\SecurityHealthService
- Ищем с права значение с именем Start, жмем по нему два раза и в поле вводим цифру 4.
Чтобы вернуть обратно «Центр безопасности» введите значение 3.
Windows Security notification icon — что это в автозагрузке
В автозагрузке диспетчере задач появилось приложение Windows Security notification icon (файл SecurityHealthSystray.exe). Понятно, то что оно имеет отношение к Защитнику Windows 10. Из названия становится ясно, что этот файлик как-то относится к иконке уведомления.
Эта статья расскажет, что такое Windows Security notification icon в автозагрузке. Можно ли его отключить или нет. И нужно разобраться, повлияет ли это на работоспособность встроенного антивируса. Вопрос в том, а зачем реализовали отображение иконки именно таким способом.
Что это такое Windows Security notification icon & SecurityHealthSystray.exe
В разделе Автозагрузка найдите Windows Security notification icon. Оно имеет издателя Microsoft Corporation и Среднее влияние на запуск. И как показ иконки может иметь такое влияние…
Нажимаем Открыть расположение файла в контекстном меню. И получаем выполняемый файл SecurityHealthSystray.exe, который располагается в системной папке C:\ Windows\ System32.

Что это такое? Запуск Windows Security notification icon отвечает за показ значка на панели задач. Его можно отключить без влияния на функциональность Защитника Windows. Компонент просто загружает многофункциональную иконку безопасность Windows и рекомендованные действия.
Как убрать значок Защитник Windows из трея
Необязательно отключать автозагрузку, можно временно снять задачу Windows Security notification icon. И протестировать работоспособность Защитника Windows. Иконка безопасность Windows больше не отображается в трее. А дальше решайте, оставить или нет.
Или ещё один альтернативный вариант. Самостоятельно выберите значки, отображаемые в трее панели задач. В разделе Параметры > Персонализация > Панель задач. По умолчанию было установлено значение, чтобы все значки области уведомлений всегда отображались.
Пользуетесь Вы себе компьютером и тут бац, уведомление обнаружены угрозы. Или ещё лучше, мы всё проверили, и угроз не обнаружено. В трее на иконке безопасности ещё может отображаться знак восклицания. Это и есть основная задача Windows Security notification icon.
Программвы в автозагрузке
Буду Благодарен за Вашу Помощь!
На первом настольном компьютере фирмы HP в автозагрузке следующие программы:
Прикреплён скриншот ( самый верхний)
а)Какие программы можно выключить в автозагрузке?
б)Если я выключаю программу, можно ли её стереть из списка?
в) Какие Лишние программы в автозагрузке замедляют работу опер, системы?
г) Как лучше удалить антивирус McAfee Security Startup обычным метом удаления или через спец. программу?
Прикрепил скриншот!
На втором настольном компьютере
д) Я оставил в автозагрузке только Windows Security notification icon Правильно ли я сделалал? Как Ваше мнение?
ж ) Как можно стереть строки DAEMON Tools Lite Agent, IntEdReg. Send to OneNote Tool ? ( на скриншоте)?
БОЛЬШОЕ СПАСИБО ЗА ПОМОЩЬ .
Перечисленные вами программы не являются важными для Windows, их отключение из автозагрузки не приведет к негативным последствиям, неполадкам в работе системы.
BTServer.exe файл – это компонент программного обеспечения от компании Realtek для Realtek Bluetooth. Realtek Bluetooth – это утилита конфигурации для устройств Bluetooth. BTServer.ехе запускает процесс, который передает данные, такие как аудио через соединение Bluetooth.
HP Lighting Bar Control – это часть утилиты HP Phoenix Control software, которая позволяет настроить RGB-панель на компьютерах HP для отображения состояния использования процессора и его температуры.
HP Message Service относится к программе HP Quick launch, используется для работы кнопок быстрого запуска.
Процесс Realtek Wowl Utility, принадлежит программному обеспечению Realtek Wireless LAN Driver или Realtek Wowl Utility от Realtek и используется для настройки беспроводного подключения и подключения к Wi-Fi сети.
Windows Defender notification icon или Windows Security notification icon отвечает за отображение значка Защитника Windows в области уведомлений. Отключение этих программ не приведет к отключению самого Защитника Windows.
Если вы не используете перечисленные программы от Realtek и HP и если вам не нужно отображение иконки Защитника в трее, то все эти программы вы можете отключить без всякого опасения.