
Thanks to a radical redesign the disk remains online during Server 2012’s chkdsk’s analysis phase. Furthermore, the new chkdsk utility can analyze a terabyte disk in two minutes.
If there is any actual file corruption then chkdsk schedules a repair, and while ‘spot fix’ requires the disk to be dismounted briefly, there is no longer any need for a reboot if this is a data volume.
Using the Chkdsk Utility in Windows Server 2012
- Chkdsk Theory and Goals
- Chkdsk Reporting
- Chkdsk Utility Example
- Chkdsk Parameters (Switches)
♦
Chkdsk Theory and Goals
Disk health is vital, yet it’s probably the weakest link in a Windows Server 2012 computer system. RAID provides a safety net to compensate for disk errors, but better still is curing disk corruptions at the NTFS level.
NTFS now has the intelligence to work out if the error is related to memory, and if so, it will direct online self-heal to correct this transient anomaly.
If the error is more serious, and the disk must taken offline, then the Server 2012 completes the repair in seconds rather than hours. Chkdsk’s new techniques involve a lengthy, but online detection phase, followed by a very short offline phase dealing with just the disk corruption(s). Previous versions of chkdsk had to take the disk offline to run the analysis phase, which could be interminably long on large volumes.
Chkdsk Reporting
While previous Windows operating systems, recorded zillions of disk events in the logs, it took experience and effort to sift serious disk problems from transient ‘normal’ errors.
Windows Server 2012 makes a point of providing better reporting on drive status, see Action Center in the screenshot to the right.
Online Spot Verification
If self-heal does not fix the disk problem, then the file system briefly enters a transient state so that it can confirm there really is disk corruption.
Note: Spot Verification is different from Spot Fixing.
Online Scan
Once the checking phase confirms there really is a disk problem, the Action Center receives a message is sent to the Action Center that an ‘Online scan needed’. The scan is run automatically at the next maintenance interval. This scan should happen when Windows 2012 detects ‘idle time’, consequently, the server remains online. Alternatively, if you see the message flag in the notification area, you can manually ‘Scan drive for errors’.
Spot Fix Needed
Once the Online Scan determines there is an error NTFS calls for a spot fix. On Windows Server 2012 you can repair the corrupt disk without a reboot provided it’s a data volume that’s affected. However, if it’s a Windows 8 client – they share the same chkdsk technology – you would need a restart, as you would if it was system volume on the Windows 2012 server.
When you get a message in the action center saying: ‘Restart to repair drive errors’, instead of rebooting see if you can use the ‘Tools’ tab on volume properties, select ‘Error Checking’ and make a spot fix without restarting. See screenshot below right.
Chkdsk Utility Example (Use PowerShell or CMD)
Here below you can see the three stages of scanning the filesystem on the D: volume.
Chkdsk D: /scan
Stage 1: Examining basic file system structure …
Progress: Stage: 0%; Total: 0%; Time Remaining: 0:04:04
Progress: Stage: 5%; Total: 20%; Time Remaining: 0:02:20 …
Stage 2: Examining file name linkage …
Progress: Stage: 13%; Total: 24%; Time Remaining: 0:02:13
Progress: Stage: 88%; Total: 57%; Time Remaining: 0:00:24 ..
Stage 3: Examining security descriptors …
Progress: Stage: 0%; Total: 71%; Time Remaining: 0:00:24 …
Progress: Stage: 74%; Total: 77%; Time Remaining: 0:00:21 ..
Windows has scanned the file system and found no problems.
No further action is required.
Guy Recommends: A Free Trial of the Network Performance Monitor (NPM) v12
SolarWinds’ Network Performance Monitor will help you discover what’s happening on your network. This utility will also guide you through troubleshooting; the dashboard will indicate whether the root cause is a broken link, faulty equipment or resource overload.
Perhaps the NPM’s best feature is the way it suggests solutions to network problems. Its second best feature is the ability to monitor the health of individual VMware virtual machines. If you are interested in troubleshooting, and creating network maps, then I recommend that you give this Network Performance Monitor a try.
Download your free trial of SolarWinds Network Performance Monitor.
Server 2012 Chkdsk Utility Parameters
CHKDSK [volume[[path]filename]]] [/F] [/V] [/R] [/X] [/I] [/C] [/L[:size]] [/B] [/scan] [/spotfix]
- Volume: The drive letter, or volume name, remember that colon (D:).
- /F Fixes errors on the disk.
- /V Displays cleanup messages if any.
- /R Locates bad sectors and recovers readable information (implies /F, when /scan not specified).
- /L:size Changes the log file size to the specified number of kilobytes. If size is not specified, displays current size.
- /X Forces the volume to dismount first if necessary.
All opened handles to the volume would then be invalid (implies /F). - /I Performs a less vigorous check of index entries.
- /C Skips checking of cycles within the folder structure.
- /B Re-evaluates bad clusters on the volume (implies /R)
- /scan Runs a online scan on the volume
- /forceofflinefix (Must be used with «/scan») Bypass all online repair; all defects found are queued for offline repair (i.e. «chkdsk /spotfix»).
- /perf (Must be used with «/scan») Uses more system resources to complete a scan as fast as possible. This may have a negative performance impact on other tasks running on the system.
- /spotfix Runs spot fixing on the volume
- /sdcleanup Garbage collect unneeded security descriptor data (implies /F).
- /offlinescanandfix Runs an offline scan and fix on the volume.
Note: that many parameters imply other parameters. Incidentally, you have to precede the parameter with a forward slash (/), and not a dash (-).
Guy’s View on the New Chkdsk Utility
It was only after using hard disks for 5 years that it occurred to me that disk storage could give problem. I took the view that disk failures only ever happened to other people and seemed about as likely as winning the lottery. Two disk failures later and I have now gone to the other extreme, while it’s great that disk sizes continue to grow, I have become concerned that the technology is moving too fast, and disk manufactures are happy to trade extra performance for reliability. Windows Server 2012 NTFS filesystem and chkdsky utility give me confidence that my disks are providing reliable data performance.
See more Windows Server 2012 features »
FREE White Paper: The ROI of Network Management & Monitoring
This is the equation we need to evaluate
ROI = (Gain from Investment – Cost of Investment) / Costs
Here are the factors to calculate your Return on Investment:
- Staff time savings. -v- Cost of Licenses
- Less network downtime. -v- Dedicated Hardware
- Reduced support calls. -v- Installation
- Download your free copy
Summary Windows Server 2012 Chkdsk Utility
The first tool in troubleshooting disk corruption problems is chkdsk, the problem was that in Windows Server 2008 it seemed to take for ever to analyze even a modestly sized disk. All that has changed with Server 2012’s chkdsk thanks to offline analysis and spot fixing.
If you like this page then please share it with your friends
Microsoft Windows Server 2012 Topics
• Windows Server 2012 Home • Disable UAC Windows Server 2012 • Server 2012 Chkdsk Utility
• Install Windows Server 2012 • PowerShell Add-WindowsFeature • Network Performance Monitor
• Shutdown Windows Server 2012 • Disable Shutdown Event Tracker Server 2012
Встроенная утилита CHKDSK.exe (check disk) используется в Windows для проверки диска на ошибки. Сhkdsk проверяет файловую систему на физические и логические ошибки, находит поврежденные секторы (bad sectors) и исправляет найденные проблемы.
Содержание:
- Проверка и восстановление диска с помощью команды chkdsk
- Просмотр результатов проверки Chkdsk в Windows
Проверка и восстановление диска с помощью команды chkdsk
Чтобы проверить жесткий диск на ошибки, запустите командную строку с правами администратора и выполните:
chkdsk E: /F /R
Данная команда:
- Выполнит проверку диска E:\
- Исправит автоматически найденные ошиьки (/F)
- Попытаться восстановить данные при обнаружении поврежденных секторов, она попытается восстановить информации (/R).
Полная проверка диска может занять длительное время в зависимости от емкости носителя и количества файлов. После окончания проверки диска вы увидите подробную статистику диска, информацию о поврежденных секторах и файлах, предпринятых действиях по восстановлению.
Если утилита chkdsk не обнаружила проблем на диске, появится сообщение:
Windows has scanned the file system and found no problems. No further action is required.

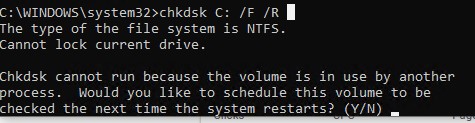
Утилита chkdsk не позволяет выполнить online проверку системного диска (C:\). При запуске команды chkdsk C: /F /R появится уведомление:
Cannot lock current drive. Chkdsk cannot run because the volume is in use by another process. Would you like to schedule this volume to be checked the next time the system restarts? (Y/N).
Невозможно выполнить команду Chkdsk, так как указанный том используется другим процессом. Следует ли выполнить проверку этого тома при следующей перезагрузке системы?
Чтобы запланировать проверку диска при следующей загрузке Windows, нажмите
Y
->
Enter
.
This volume will be checked the next time the system restarts
.
Чтобы отменить запланированную проверку диска, выполните:
chkntfs /x c:
Чтобы отключить топ перед проверкой, добавьте атрибут /X в команде chkdsk. В этом случае Windows принудительно закрое все открытые файловые дескрипторы, отмонтирует диск и выполнит проверку на ошибки.
Если вам нужно выполнить проверку большого NTFS тома, но вы не хотите блокировать диск, можно сначала просканировать диск на ошибки:
chkdsk E: /f /offlinescanandfix
Утилита найдет ошибки и сохранит их в файл $corrupt для дальнейшего исправления
Чтобы исправить найденные ошибки, не тратя время на полное сканирование тома, выполните:
chkdsk D: /spotfix
Это существенно сократит время недоступности тома для пользователя при исправлении ошибок.
В консоли PowerShell для проверки диска можно использовать командлет Repair-Volume как аналог команды chkdsk:
Repair-Volume -driveletter C -scan
Также рекомендуем перед проверкой проверить SMART состояние жестких дисков с помощью встроенных PowerShell командлетов из модуля управления дисками:
Get-PhysicalDisk | Sort Size | FT FriendlyName, Size, MediaType,SpindleSpeed, HealthStatus, OperationalStatus -AutoSize

Просмотр результатов проверки Chkdsk в Windows
Chkdsk при онлайн сканировании диска выводит результаты прямо в консоль. Если вы запланировали проверку диска при загрузке Windows, то результаты можно получить только из журнала событий Windows (Event Viewer).
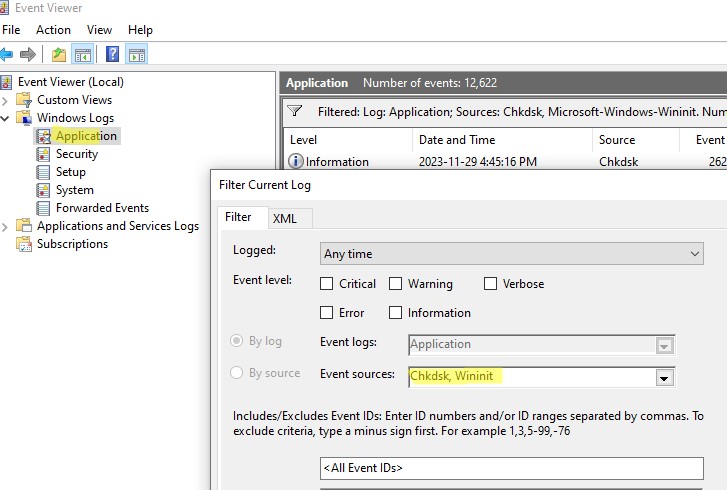
- Откройте консоль Event Viewer (
Eventvwr.msc
) и перейдите в раздел Windows Logs -> Application; - Щелкните правой клавишей по разделы Application и выберите Filter Current Log. В поле Event Source выберите Chkdsk и Wininit и нажмите ОК;

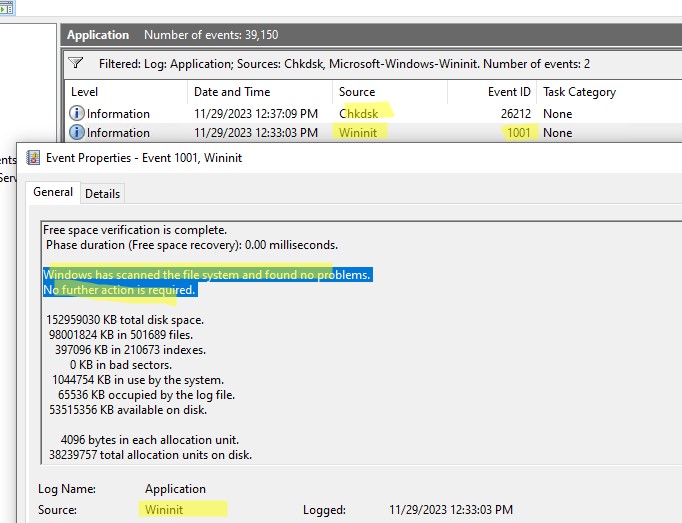
- Подробные результаты проверки диска содержатся в описании события. Обратите внимание, что у онлайн событий проверки диска будет указан источник Chkdsk. Если выполнялась офлайн проверка диска при загрузке Windows, у такого события будет источник Wininit и EventID 1001.

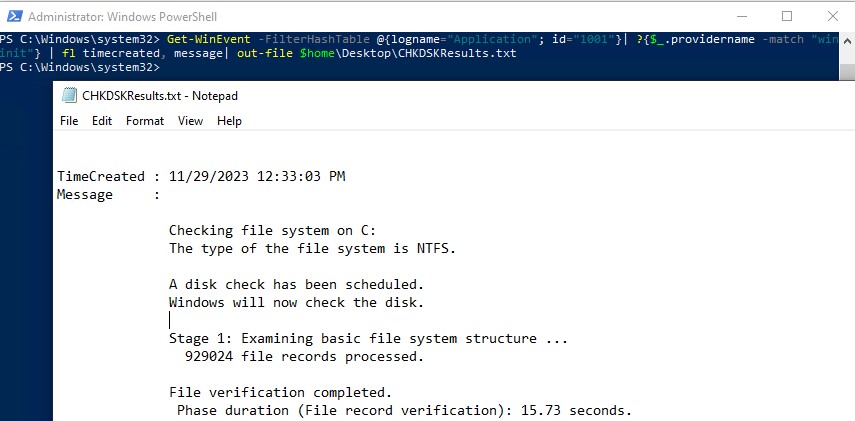
Можно получить лог проверки диска с помощью PowerShell командлета Get-WinEvent. Например, чтобы выгрузить результаты последних 5 проверок диска в текстовый файл CHKDSK_SCAN.txt на рабочем столе, выполните команду:
Get-WinEvent -FilterHashTable @{logname="Application"; id="1001"}| ?{$_.providername –match "wininit"} | fl timecreated, message| out-file $home\Desktop\CHKDSKResults.txt
Открыть полученный файл с логом chkdsk:
notepad.exe $home\Desktop\CHKDSKResults.txt
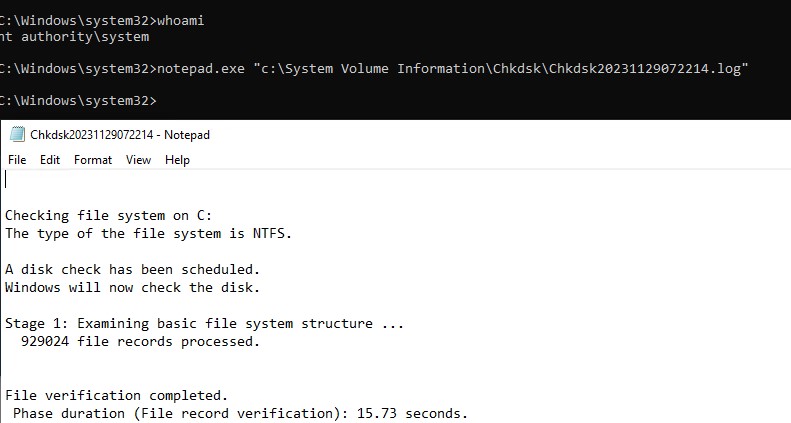
Если размер лога Chkdks очень большой, журнал событий может обрезать его. В этом случае можно открыть полный лог проверки диск в System Volume Information. Чтобы получить доступ к этой папке, нужно запустить командную строку от имени SYSTEM (проще всего с помощью утилиты psexec):
.\PsExec.exe -i -s cmd.exe
После этого можно открыть лог chkdsk:
notepad.exe "c:\System Volume Information\Chkdsk\Chkdsk20231129072214.log"
- Running Defrag on a CSV:
- Running ChkDsk on a CSV:
- Detection of Corruptions – ChkDsk /Scan:
- Resolution of CSV corruptions during Physical Disk Resource IsAlive Checks:
- Running Defrag or ChkDsk through Repair-ClusterSharedVolume cmdlet:
First published on MSDN on Jan 01, 2014
Cluster Shared Volumes (CSV) is a layer of abstraction on either the ReFS or NTFS file system (which is used to format the underlying private cloud storage). Just as with a non-CSV volume, at times it may be necessary to run ChkDsk and Defrag on the file system. In this blog, I am going to first address the recommended procedure to run Defrag on your CSV, in Windows Server 2012 R2 and later. I will then discuss how ChkDsk is run on your CSVs.
Running Defrag on a CSV:
Fragmentation of files on a CSV can impact the perceived file system performance by increasing the seek time to retrieve file system metadata. It is therefore recommended to periodically run Defrag on your CSV volume. Fragmentation is primarily a concern when running dynamic VHDs and less prevalent with static VHDs. On a stand-alone server defrag runs as part of the “Maintenance Task”, so it runs automatically. However, on a CSV volume it will never run automatically, so you need to run it manually or script it to run (potentially using a
Clustered Scheduled Task
). It is recommended to conduct this process during non-peak production times, as performance may be impacted. The following are the steps to defragment your CSV:
1. Determine if defragmentation is required for your CSV by running the following on an elevated command prompt:
Defrag.exe <CSV Mount Point> /A /U /V
/A Perform analysis on the specified volumes
/U Print the progress of the operation on the screen
/V Print verbose output containing the fragmentation statistics
Note:
If your CSV is backed by thinly provisioned storage, slab consolidation analysis (not the actual slab consolidation) is run during defrag analysis. Slab consolidation analysis requires the CSV to be placed in redirected mode before execution. Please refer to step 2, for instructions on how to place your CSV into redirected mode.
2. If defragmentation is required for your CSV, put the CSV into redirected mode. This can be achieve in either of the following ways:
a. Using Windows PowerShell© open a new elevated Windows PowerShell console and run the following:
Suspend-ClusterResource
<Cluster Disk Name> -RedirectedAccess
b. Using the Failover Cluster Manager right-click on the CSV and select “Turn On Redirected Access”:
Note:
If you attempt to run Defrag on a CSV without first putting it in redirected mode, it will fail with the following error:
CSVFS failed operation as volume is not in redirected mode. (0x8007174F)
You may also run into the following error:
This operation is not supported on this filesystem. (0x89000020)
3. Run defrag on your CSV by running the following on an elevated command prompt:
Defrag.exe <CSV Mount Point>
4. Once defrag has completed, revert the CSV back into direct mode by using either of the follow methods:
a. Using Windows PowerShell© open a new elevated Windows PowerShell console and run the following:
Resume-ClusterResource
<Cluster Disk Name>
b. Using the Failover Cluster Manager right-click on the CSV and select “Turn Off Redirected Access”:
Running ChkDsk on a CSV:
During the lifecycle of your file system corruptions may occur which require resolution through ChkDsk. As you are aware, CSVs in Windows Server 2012 R2 also supports the ReFS file system. However, the ReFS filesystem achieves self-healing through integrity checks on metadata. As a consequence, ChkDsk does not need to be run for CSV volumes with the ReFS file system. Thus, this discussion is scoped to corruptions in CSV with the NTFS file system. Also, note the
redesigned ChkDsk operation
introduced with Windows Server 2012, which separates the ChkDsk scan for errors (online operation) and the ChkDsk fix (offline operation). This results in higher availability for your Private Cloud storage since you only need to take your storage offline to fix corruptions in your storage (which is a significantly faster process than the scan for corruptions). In Windows Server 2012, we integrated ChkDsk /SpotFix into the cluster IsAlive health check for the Physical Disk Resource corresponding to the CSV. As a consequence we will now attempt to fix corruptions in your CSV without any perceptible downtime for your application.
Detection of Corruptions – ChkDsk /Scan:
The following is the workflow on Windows Server 2012 R2 or later systems to scan for NTFS corruptions:
Note:
If the system is never idle it is possible that the ChkDsk scan will never be run. In this case the administrator will need to invoke this operation manually. To invoke this operation manually, on an elevated command prompt run the following:
chkdsk.exe <CSV mount point name> /scan
Resolution of CSV corruptions during Physical Disk Resource IsAlive Checks:
The following is the CSV workflow in Windows Server 2012 R2 or later to fix corruptions:
Note:
In the rare event that a single CSV corruption takes greater than 15 seconds to fix, the above workflow will not resolve the error. In this case the administrator will need to manually fix this error. A CSV does not need to be place in maintenance or redirected mode before invoking chkdsk. The CSV will re-establish its state automatically once the chkdsk run has completed. To invoke this operation manually, on an elevated command prompt run the following:
chkdsk.exe <CSV mount point name> /SpotFix
Running Defrag or ChkDsk through Repair-ClusterSharedVolume cmdlet:
Running Defrag or ChkDsk on your CSV, through the Repair-ClusterSharedVolume, is deprecated with Windows Server 2012 R2 and the cmdlet has been removed completely in Windows Server 2016. It is instead highly encouraged to directly use either Defrag.exe or ChkDsk.exe for your CSV, using the procedure indicated in the preceding sections. While not recommended the use of the Repair-ClusterSharedVolume cmdlet is still supported by Microsoft. To use this cmdlet to run chkdsk or defrag, run the following on a new elevated Windows PowerShell console:
Repair-ClusterSharedVolume
<Cluster Disk Name> -ChkDsk –Parameters <ChkDsk parameters>
Repair-ClusterSharedVolume
<Cluster Disk Name> –Defrag –Parameters <Defrag parameters>
You can determine the Cluster Disk Name corresponding to your CSV using the Get-ClusterSharedVolume cmdlet by running the following:
Get-ClusterSharedVolume | fl *
Thanks!
Subhasish Bhattacharya
Senior Program Manager
Clustering and High Availability
Microsoft
Related Posts
Long back we had a very tough time on solving the Windows 2003 system volume corruption issue and the main challenge is we cannot predict the time consuming to complete the chkdisk.
One of our main Tier-1 Application was running on Windows 2003 in which we had a corruption issue and in windows 2003 we have to take the disk offline and the data would be unavailable for users until the chkdsk ran to repair the corruption and it depends on the number of files present in the volume and another most painful issue is for a single corruption ,the entire volume and all of its files would still be analyzed offline.
Fortunately Windows 2012 addresses the issue and introduced new model of managing the file system corruption .
Found the below article from the Microsoft TechNet Library which explains the new CHKDSK benefits and its features .
Benefits ::
- Customers can confidently deploy large volumes. Corruption-related downtime is now proportional to only the number of corruptions on the volume.
- Customers who are using clustered shared volumes do not see any downtime, even for correcting corruption events that would normally require a remount.
- Windows Server 2012 actively monitors the health state of the file system volume, and it always provides the health state to the administrator.
- Customers do not see any downtime for transient corruption events.
- Customers experience significantly fewer corruption events.
Features::
- Improved self-healing: NTFS instantaneously self-heals more issues online without requiring chkdsk to run offline. This reduces the number of times that chkdsk is required to run.
- Online analysis: In the previous model, almost all of the offline time required to run chkdsk was spent scanning and analyzing the drive. In Windows Server 2012, the analysis phase of chkdsk, which was responsible for the majority of the offline time, becomes an online, background task. This allows the volume to remain online and available while the system determines whether there is corruption. There is also added logic in the model that verifies the type of corruption is not transient, preventing unnecessary analysis.
- Corruption correction: When the scan is completed, Windows Server 2012 informs the administrator (by using events and the management consoles), that the volumes need to be repaired and suggests a solution, such as performing a remount or reboot. Because the analysis phase has already completed, no additional scanning or detection is required. Chkdsk directly fixes the identified corruption, and the offline time is minimized to seconds. Therefore, the offline time for a volume is no longer proportional to the number of files on the volume, but rather to the number of corruptions on the volume.
Windows Server 2012 always provides the current health state of the file system volume by using standard events that indicate the current state of the volume. The following figure illustrates how significantly the new chkdsk model changes downtime in the event of corruption.
Reference : http://technet.microsoft.com/en-us/library
Support NLB Solutions – https://www.patreon.com/NLBSolutions
In this video I am going to show you how you can fix issues related to corruption on your NTFS file system by using the command chkdsk. I am going to provide you with an on the job issue and how I managed to resolve it with using check disk.
source
windows server 2012