
Встроенная утилита CHKDSK.exe (check disk) используется в Windows для проверки диска на ошибки. Сhkdsk проверяет файловую систему на физические и логические ошибки, находит поврежденные секторы (bad sectors) и исправляет найденные проблемы.
Содержание:
- Проверка и восстановление диска с помощью команды chkdsk
- Просмотр результатов проверки Chkdsk в Windows
Проверка и восстановление диска с помощью команды chkdsk
Чтобы проверить жесткий диск на ошибки, запустите командную строку с правами администратора и выполните:
chkdsk E: /F /R
Данная команда:
- Выполнит проверку диска E:\
- Исправит автоматически найденные ошиьки (/F)
- Попытаться восстановить данные при обнаружении поврежденных секторов, она попытается восстановить информации (/R).
Полная проверка диска может занять длительное время в зависимости от емкости носителя и количества файлов. После окончания проверки диска вы увидите подробную статистику диска, информацию о поврежденных секторах и файлах, предпринятых действиях по восстановлению.
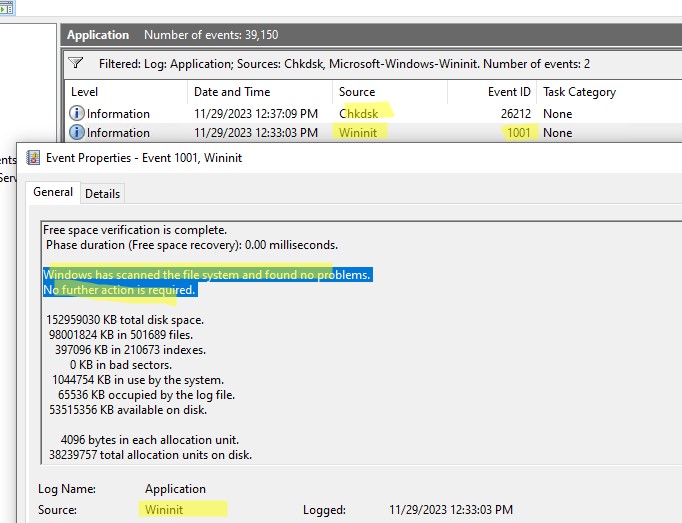
Если утилита chkdsk не обнаружила проблем на диске, появится сообщение:
Windows has scanned the file system and found no problems.
No further action is required.

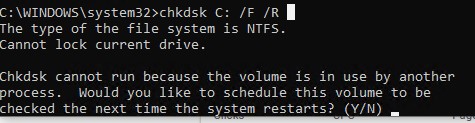
Утилита chkdsk не позволяет выполнить online проверку системного диска (C:\). При запуске команды chkdsk C: /F /R появится уведомление:
Cannot lock current drive. Chkdsk cannot run because the volume is in use by another process. Would you like to schedule this volume to be checked the next time the system restarts? (Y/N).
Невозможно выполнить команду Chkdsk, так как указанный том используется другим процессом. Следует ли выполнить проверку этого тома при следующей перезагрузке системы?
Чтобы запланировать проверку диска при следующей загрузке Windows, нажмите
Y
->
Enter
.
This volume will be checked the next time the system restarts
.
Чтобы отменить запланированную проверку диска, выполните:
chkntfs /x c:
Чтобы отключить топ перед проверкой, добавьте атрибут /X в команде chkdsk. В этом случае Windows принудительно закрое все открытые файловые дескрипторы, отмонтирует диск и выполнит проверку на ошибки.
Если вам нужно выполнить проверку большого NTFS тома, но вы не хотите блокировать диск, можно сначала просканировать диск на ошибки:
chkdsk E: /f /offlinescanandfix
Утилита найдет ошибки и сохранит их в файл $corrupt для дальнейшего исправления
Чтобы исправить найденные ошибки, не тратя время на полное сканирование тома, выполните:
chkdsk D: /spotfix
Это существенно сократит время недоступности тома для пользователя при исправлении ошибок.
В консоли PowerShell для проверки диска можно использовать командлет Repair-Volume как аналог команды chkdsk:
Repair-Volume -driveletter C -scan
Также рекомендуем перед проверкой проверить SMART состояние жестких дисков с помощью встроенных PowerShell командлетов из модуля управления дисками:
Get-PhysicalDisk | Sort Size | FT FriendlyName, Size, MediaType,SpindleSpeed, HealthStatus, OperationalStatus -AutoSize

Просмотр результатов проверки Chkdsk в Windows
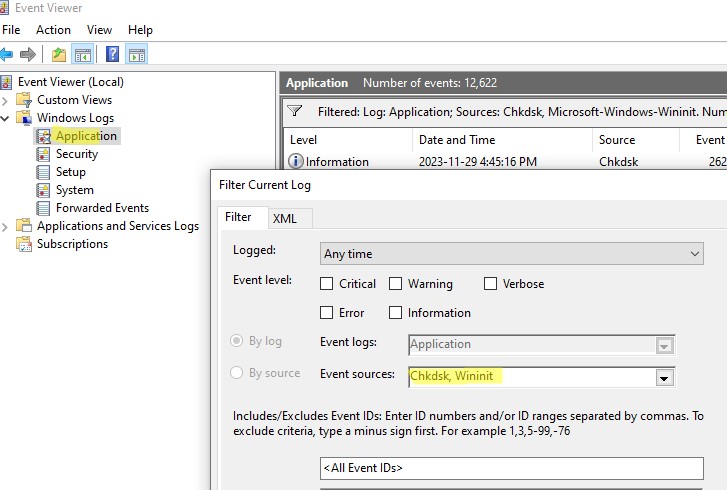
Chkdsk при онлайн сканировании диска выводит результаты прямо в консоль. Если вы запланировали проверку диска при загрузке Windows, то результаты можно получить только из журнала событий Windows (Event Viewer).
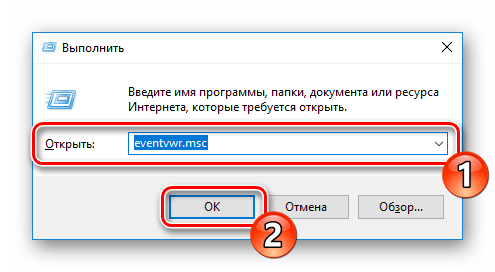
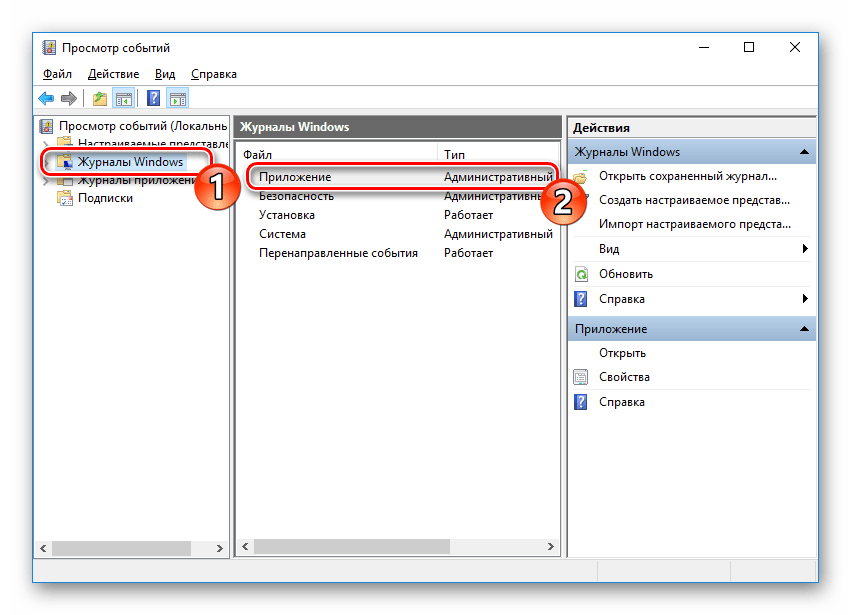
- Откройте консоль Event Viewer (
Eventvwr.msc
) и перейдите в раздел Windows Logs -> Application; - Щелкните правой клавишей по разделы Application и выберите Filter Current Log. В поле Event Source выберите Chkdsk и Wininit и нажмите ОК;

- Подробные результаты проверки диска содержатся в описании события. Обратите внимание, что у онлайн событий проверки диска будет указан источник Chkdsk. Если выполнялась офлайн проверка диска при загрузке Windows, у такого события будет источник Wininit и EventID 1001.

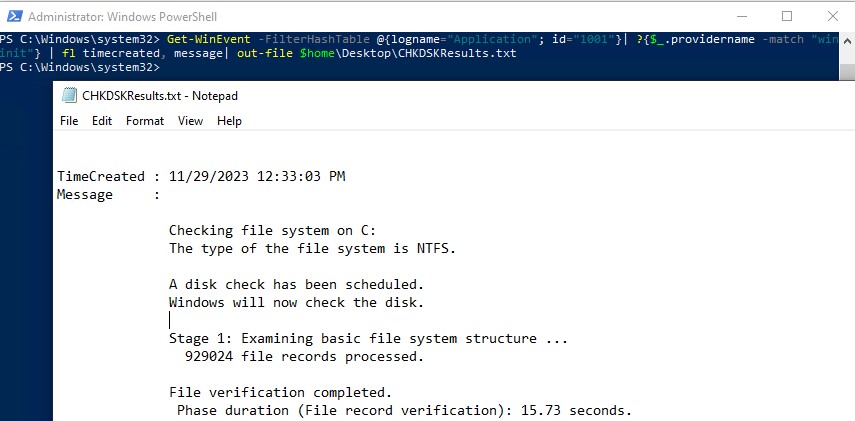
Можно получить лог проверки диска с помощью PowerShell командлета Get-WinEvent. Например, чтобы выгрузить результаты последних 5 проверок диска в текстовый файл CHKDSK_SCAN.txt на рабочем столе, выполните команду:
Get-WinEvent -FilterHashTable @{logname="Application"; id="1001"}| ?{$_.providername –match "wininit"} | fl timecreated, message| out-file $home\Desktop\CHKDSKResults.txt
Открыть полученный файл с логом chkdsk:
notepad.exe $home\Desktop\CHKDSKResults.txt
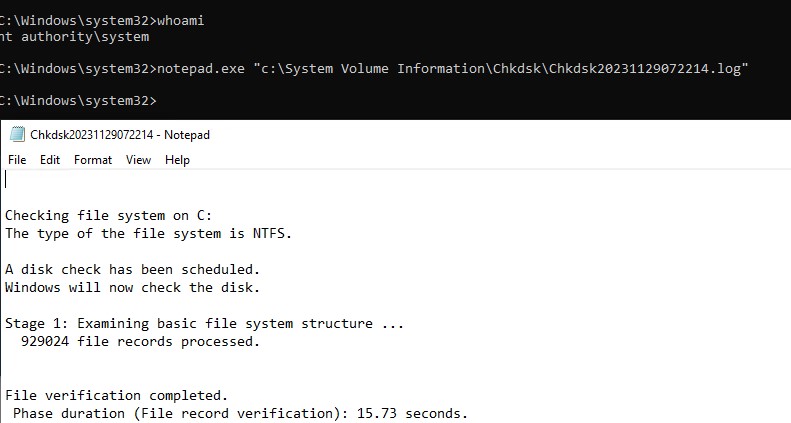
Если размер лога Chkdks очень большой, журнал событий может обрезать его. В этом случае можно открыть полный лог проверки диск в System Volume Information. Чтобы получить доступ к этой папке, нужно запустить командную строку от имени SYSTEM (проще всего с помощью утилиты psexec):
.\PsExec.exe -i -s cmd.exe
После этого можно открыть лог chkdsk:
notepad.exe "c:\System Volume Information\Chkdsk\Chkdsk20231129072214.log"
Все способы:
- Способ 1: Специальное программное обеспечение
- Способ 2: Системные средства Windows
- Вариант 1: Проверка на наличие ошибок
- Вариант 2: Check Disk
- Вариант 3: Repair-Volume
- Вопросы и ответы: 2
Некоторые пользователи задались вопросом о проверке рассматриваемого комплектующего из-за того, что оно начало издавать характерные звуки, например щелчки. При возникновении подобной ситуации мы рекомендуем обратиться к другой нашей статье по ссылке ниже, где вы узнаете основные причины и решения этой проблемы. Мы же переходим непосредственно к методам анализа.
Читайте также: Причины, по которым щелкает жесткий диск, и их решение
Способ 1: Специальное программное обеспечение
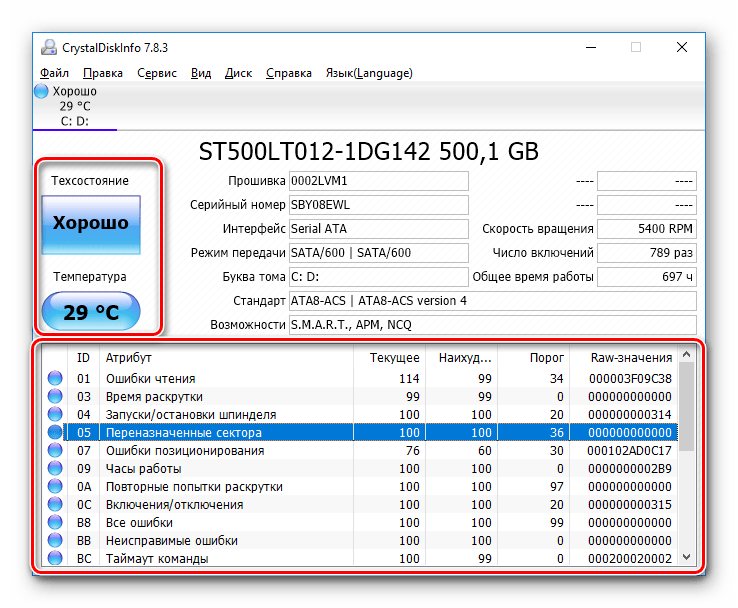
Детальную проверку и исправление ошибок винчестера проще всего осуществить с помощью специального стороннего программного обеспечения. Одним из представителей такого софта является CrystalDiskInfo.
Скачать CrystalDiskInfo
- После скачивания установите и запустите софт. В главном окне вы сразу увидите информацию об общем техническом состоянии HDD и его температуру. Ниже находится раздел со всеми атрибутами, где отображаются данные всех критериев диска.
- Переключаться между всеми физическими накопителями вы можете через всплывающее меню «Диск».
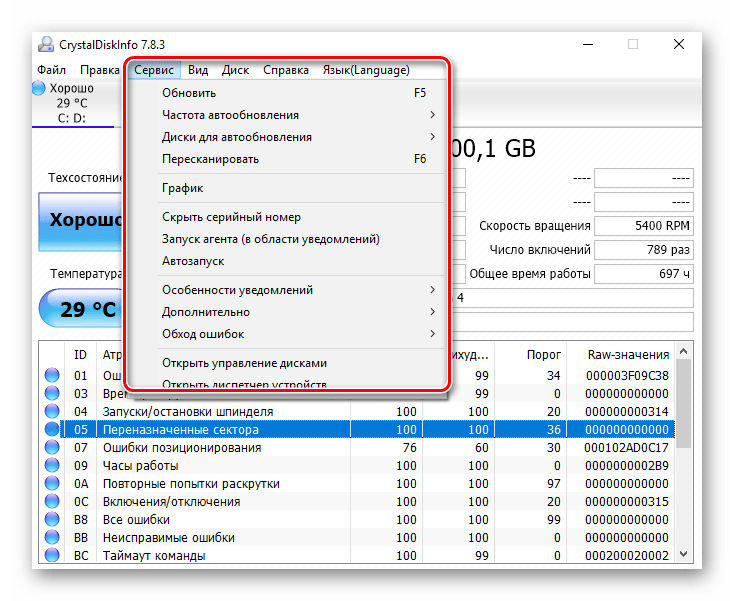
- Во вкладке «Сервис» доступно обновление информации, отображение дополнительных графиков и расширенные инструменты.

Возможности CrystalDiskInfo огромные, поэтому мы предлагаем ознакомиться со всеми ними в другом нашем материале по следующей ссылке.
Подробнее: CrystalDiskInfo: использование основных возможностей
На просторах интернета присутствует и другое ПО, разработанное специально для проверки HDD. В нашей статье по ссылке ниже рассказано о лучших представителях подобного софта.
Подробнее: Программы для проверки жесткого диска
Способ 2: Системные средства Windows
Как уже было сказано в начале статьи, в Виндовс есть встроенные инструменты, позволяющие выполнить поставленную задачу. Каждый из них работает по разным алгоритмам, однако проводит примерно одинаковую диагностику. Разберем каждое средство по отдельности.
Вариант 1: Проверка на наличие ошибок
В меню свойств логических разделов жесткого диска имеется функция для поиска и исправления проблем. Запускается она следующим образом:
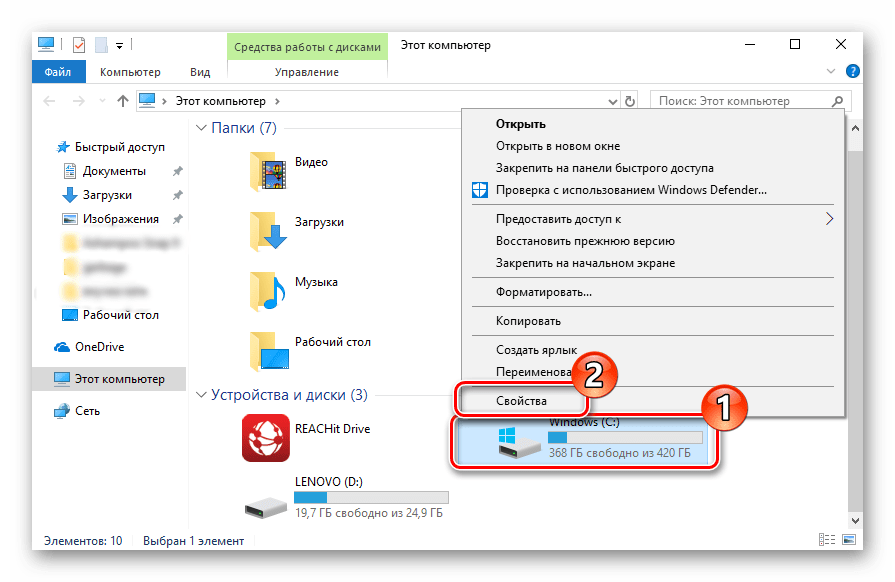
- Перейдите в «Этот компьютер», кликните правой кнопкой мыши на необходимом разделе и выберите пункт «Свойства».
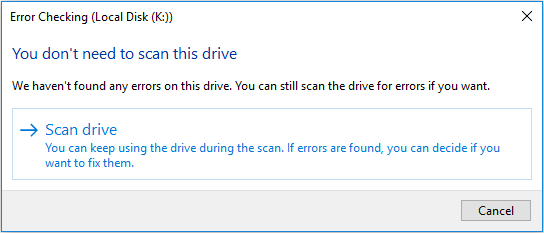
- Переместитесь во вкладку «Сервис». Здесь находится инструмент «Проверка на наличие ошибок». Он позволяет найти и исправить неполадки файловой системы. Нажмите на соответствующую кнопку, чтобы произвести запуск.
- Иногда такой анализ выполняется автоматически, поэтому вы можете получить уведомление о ненадобности проведения сканирования на данный момент. Нажмите на «Проверить диск» для повторного старта анализа.
- Во время сканирования лучше не осуществлять каких-либо других действий и дождаться завершения. Его состояние отслеживается в специальном окне.

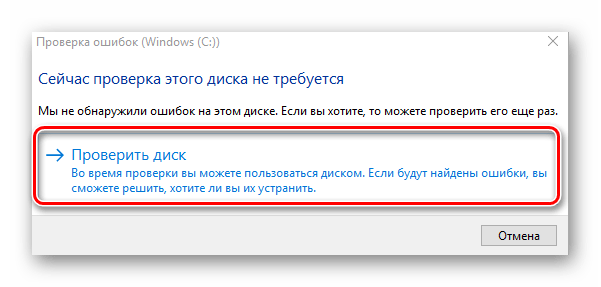
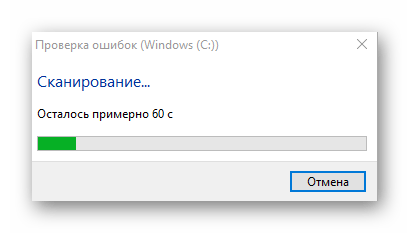
После окончания процедуры найденные проблемы файловой системы будут исправлены, а работа логического раздела оптимизирована.
Вариант 2: Check Disk
Сканирование носителей с файловой системой FAT32 или NTFS доступна с помощью утилиты Check Disk, а запускается она через «Командную строку». Она не только проводит диагностику выбранного тома, но и восстанавливает битые секторы и информацию, главное задать соответствующие атрибуты. Пример оптимального сканирования выглядит так:
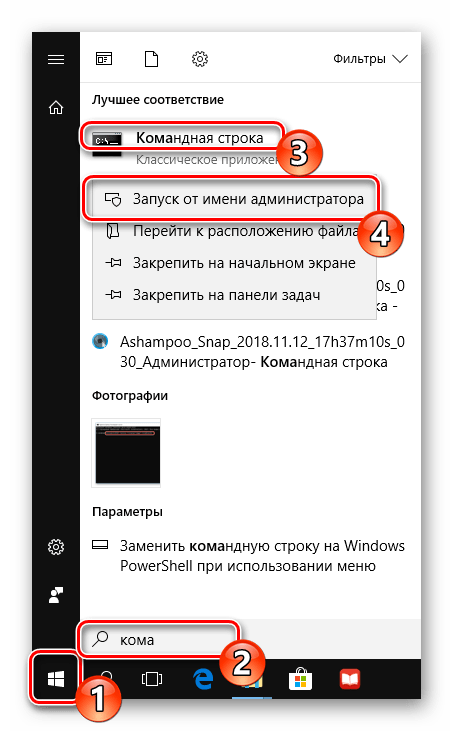
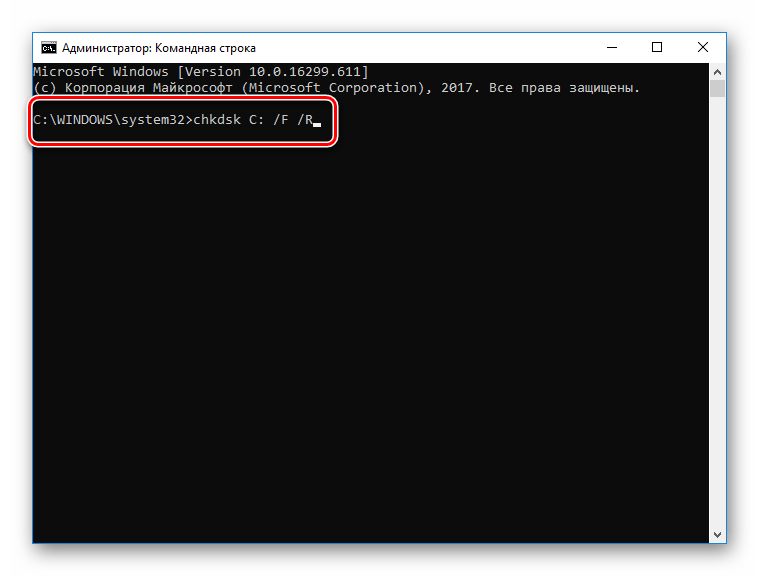
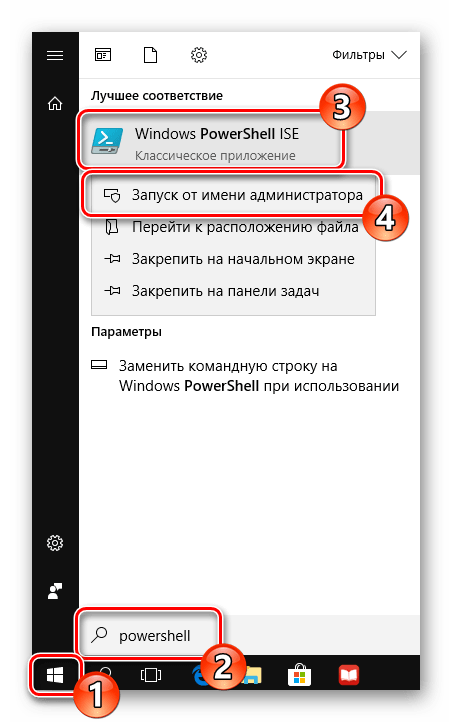
- Через меню «Пуск» отыщите «Командную строку», кликните на ней ПКМ и запустите от имени администратора.
- Напечатайте команду
chkdsk C: /F /R, где С: – раздел HDD, /F – автоматическое решение проблем, /R – проверка битых секторов и восстановление поврежденной информации. После ввода нажмите на клавишу Enter. - Если вы получили уведомление, что раздел задействуется другим процессом, подтвердите его начало при следующем перезапуске компьютера и выполните его.
- Результаты анализа помещаются в отдельный файл, где их можно подробно изучить. Его нахождение и открытие выполняется через журнал событий. Сначала откройте «Выполнить» комбинацией клавиш Win + R, там напишите
eventvwr.mscи кликните на «ОК». - В директории «Журналы Windows» перейдите в раздел «Приложение».
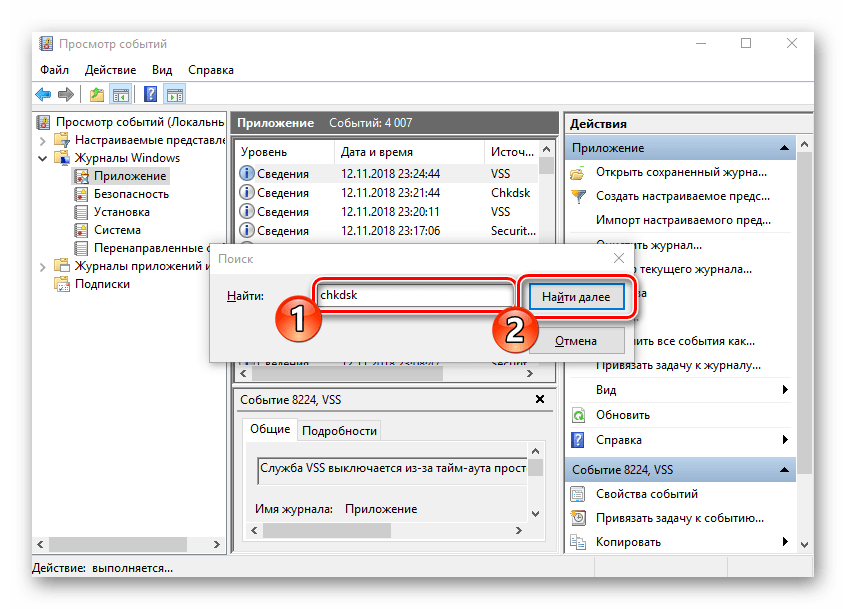
- Нажмите на нем ПКМ и выберите «Найти».
- В поле введите
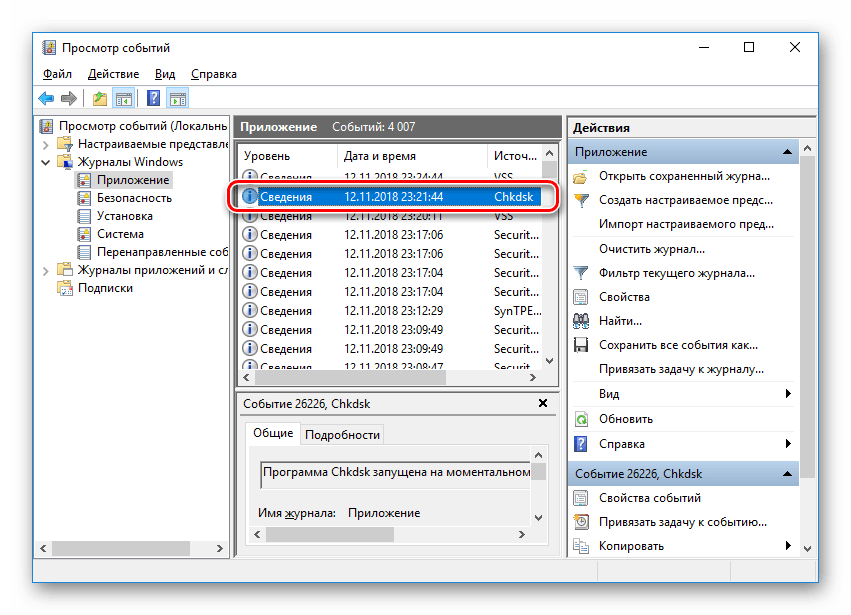
chkdskи укажите «Найти далее». - Запустите найденное приложение.
- В открывшемся окне вы можете детально изучить все подробности диагностики.


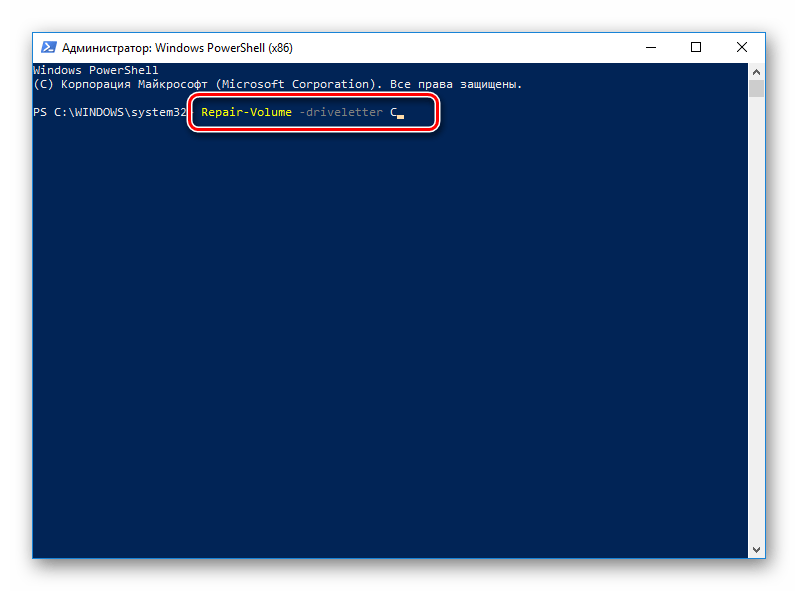
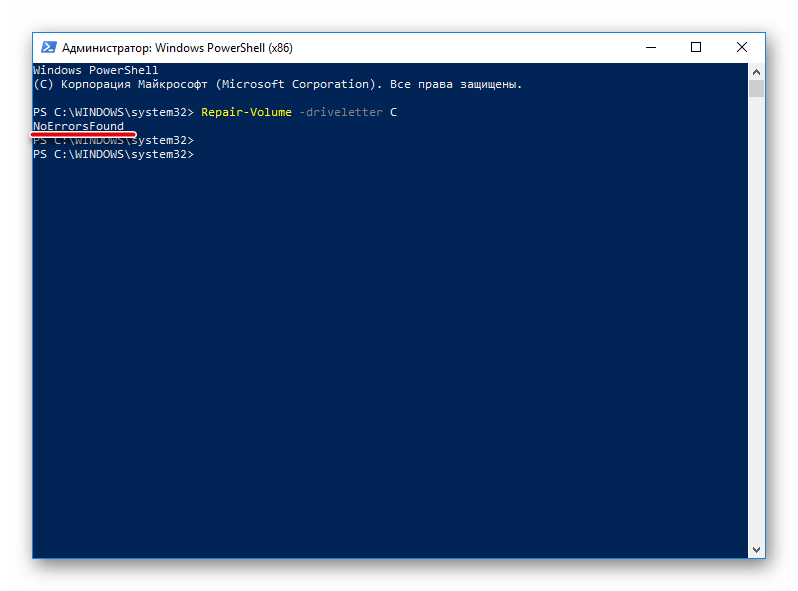
Вариант 3: Repair-Volume
Управление определенными процессами и системными операциями удобнее всего осуществлять через PowerShell – оболочку «Командной строки». В ней присутствует утилита для анализа HDD, а запускается она за несколько действий:
- Откройте «Пуск», через поле поиска найдите «PowerShell» и запустите приложение от имени администратора.
- Впишите команду
Repair-Volume -driveLetter C, где C – имя необходимого тома, и активируйте ее. - Найденные ошибки будут по возможности исправлены, а в случае их отсутствия вы увидите надпись «NoErrorsFound».
Наша группа в TelegramПолезные советы и помощь
Hard drive errors caused by power outages, hardware failure, system crash, or human error can lead to drive inaccessible, data loss or subpar performance. How to free check and fix hard drive error Windows 10? This article tells how to scan and resolve hard drive problems to its utmost by running CHKDSK Windows 10 in 4 methods.
Many Windows users check their hard drives regularly as disk error will slow down or damage a hard drive in an accumulated way. The best way to check and fix hard drive errors or bad sectors to keep it healthy is to use Windows built-in CHKDSK utility – a useful hard disk scanning and repair utility which helps to examine hard drives for errors and repair them.
What Is CHKDSK Utility
Some users may don’t know what CHKDSK is and how to run it. Actually, CHKDSK is the abbreviation of Check Disk, which is a system tool provided in Windows, OS/2 and DOS to check file system integrity of a partition and fix logical file errors.
CHKDSK can help you fix hard drive errors caused by bad sectors, improper or sudden shutdowns, corrupted software and meta data corruption. Whenever you have hard drive errors like you need to format the partition before you can use it caused by improper shutdown of the machine or abnormal removal of USB drives, you can use CHKDSK to find out errors and fix them.
Then how to repair hard drive windows 10 with CHKDSK utility? Here I will illustrate you 4 ways to run Windows 10 Check Disk utility and fix hard drive errors.
Method 1. Run Check Disk Windows 10 from Partition Property
You can run Windows 10 CHKDSK from Windows desktop and the detailed steps are as below.
Step 1. Right-click Windows Start Menu and select Disk Management to open it.
Step 2. When you get the main interface of Disk Management, you can select the drive that you want to check and fix, then right-click it and choose Property.

Step 3. On the Tools tab, click Check.
Step 4. If the system detects that there are errors, you will be asked to check the disk. If no errors are found, you will see a message as shown in the following picture. You can still choose to check the drive if you want to. Click on Scan drive.
Step 5. Windows will display a message as below after completion. If no errors are found, it will say no error found. Then click Close to exit it. If there are some errors found on the drive, Windows will ask for a restart to fix the errors.
Method 2. CHKDSK Windows 10 with Elevated Command Prompt.
CHKDSK Windows 10 with elevated Command Prompt performs a couple of functions. Although running it may take some time, it does prevent hard disk from being damaged and loss of data in the long term. It is recommended to run it whenever Windows has shut down abnormally or hard disk performs abnormally.
Step 1. Input cmd in the Windows 10 Cortana search box. Right-click the best match then select Run as administrator.
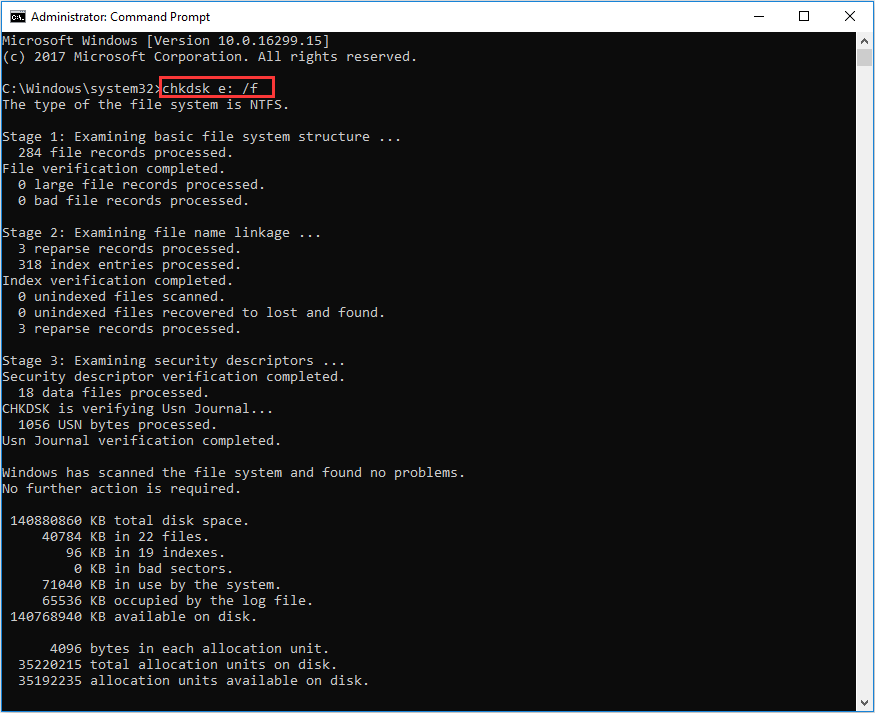
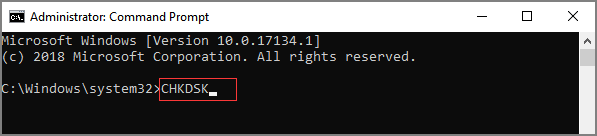
Step 2. In the elevated Command Prompt, type CHKDSK *: /f (* represents the drive letter of the specific drive that you want to scan and fix) and then press Enter. This CHKDSK Windows 10 command will scan your computer drive for errors and try to fix any that it finds.
Here I take CHKDSK e: /f as an example (e represent the drive letter that I want to scan). The bellowing picture shows there is no file system error with the partition. If there is any hard drive errors detected, CHKDSK will help you fix it automatically.
Tip: If you want to check and fix the partition that being used, you may see “CHKDSK cannot run because the volume is in use by another process. Would you like to schedule this volume to be checked the next time the system restarts?” in the Command Prompt Windows.
Type Y and press Enter to comfirm, and then restart your computer to continue with the CHKDSK repair. C drive and system partition will always ask for a reboot.
Step 3. Input exit to exit the Command Prompt Window after performing all operations.
Note: The command supports a number of hard disk operations, but we mainly focus on two of them: /f and /r.
/f – fix any errors it detected
/r – Locate bad sectors on the drive and try to recover any and all readable information from them
Apart from commonly used /f and /r, you can choose the following parameters valid for both FAT32 / NTFS partition when running the CHKDSK utility from an elevated Command Prompt.
- /v – Display list of every file in every directory on FAT32 partition. On NTFS, it displays the cleanup messages.
- /x – force the volume to dismount. Also invalidates all open file handles. This should be avoided in Desktop Editions of Windows, because it may cause data loss/corruption.
The following are valid for NTFS volumes only.
- /c – skip checking of cycles within the folder structure.
- /I – perform a less vigorous check of index entries.
- /L[:size] – change the size of the log file to specified number of kilobytes. If size is not specified, it will display current size.
- /b – re-evaluates bad clusters on the volume (implies /R)
Besides, CHKDSK cannot repair hard bad sectors, in which case, data can get lost and become unusable. If you have very important files and data stored on the drive, you’d better backup the hard drive as this occasion could happen sometimes.
If you cannot boot up your computer, you can run the tool from Command Prompt either by booting your computer into the Recovery Mode or by using the original installation disc to run Command Prompt (For detailed steps, please see Method 4). If you can, you may also run CHKDSK repair with third-party software, but be sure to choose a reliable one.
Method 3. Windows 10 CHKDSK Repair with Third-party Software
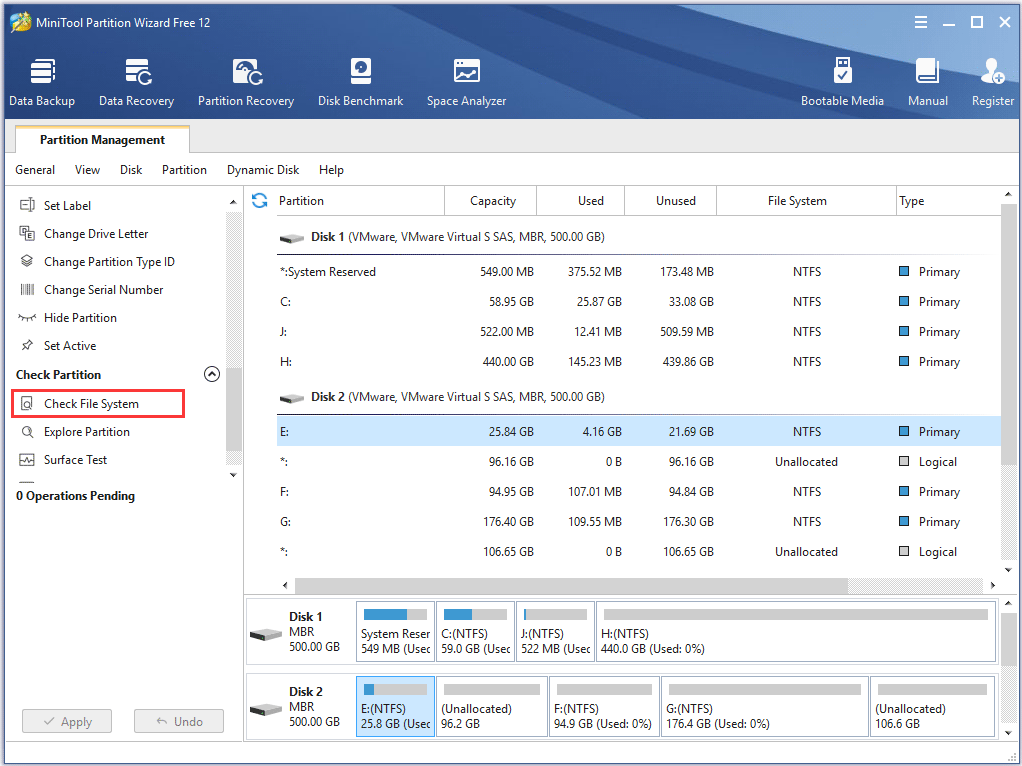
If you are not familiar with commands or find that using commands is error-prone as it requires you to input every command correctly, in this way, you can use a free CHKDSK repair alternative to repair hard drive Windows 10. It is recommended to use MiniTool Partition Wizard Free Edition, which makes CHKDSK Windows 10 as a breeze.
MiniTool Partition Wizard Free Edition is an easy-to-use partition manager. Its Check File System function can scan through your hard drive and fix all errors detected. It is not as complicated and time-consuming as running CHKDSK in Command Prompt. And it is simpler to operate with its intuitive interface.
Apart from Check file system function, it can also perform other operations like format partition, resize partition, extend partition, copy partition/disk, convert MBR to GPT without data loss, wipe disk, convert FAT to NTFS.
Note: This function can only be used when the selected partition has a drive letter. For the partition without drive letter, you should appoint it a drive letter and then use this function.
Next, let’s see detailed steps about how to run CHKDSK Windows 10 to fix hard drive error with third-party software.
Step 1. Download MiniTool Partition Wizard Free Edition by clicking the following button. Install it on your computer and launch it to get the main interface.
MiniTool Partition Wizard FreeClick to Download100%Clean & Safe
Then select the target partition, and choose “Check File System” from the Check Partition group or from Partition menu.
Step 2. You will see a new window with two options: Check only and Check & fix detected errors. If you only want to check, select Check only; if you want to recover mistakes during the checking process, select Check & fix detected errors. After that, click Start button. Once you click Start, MiniTool Partition Wizard will check/fix file system immediately.
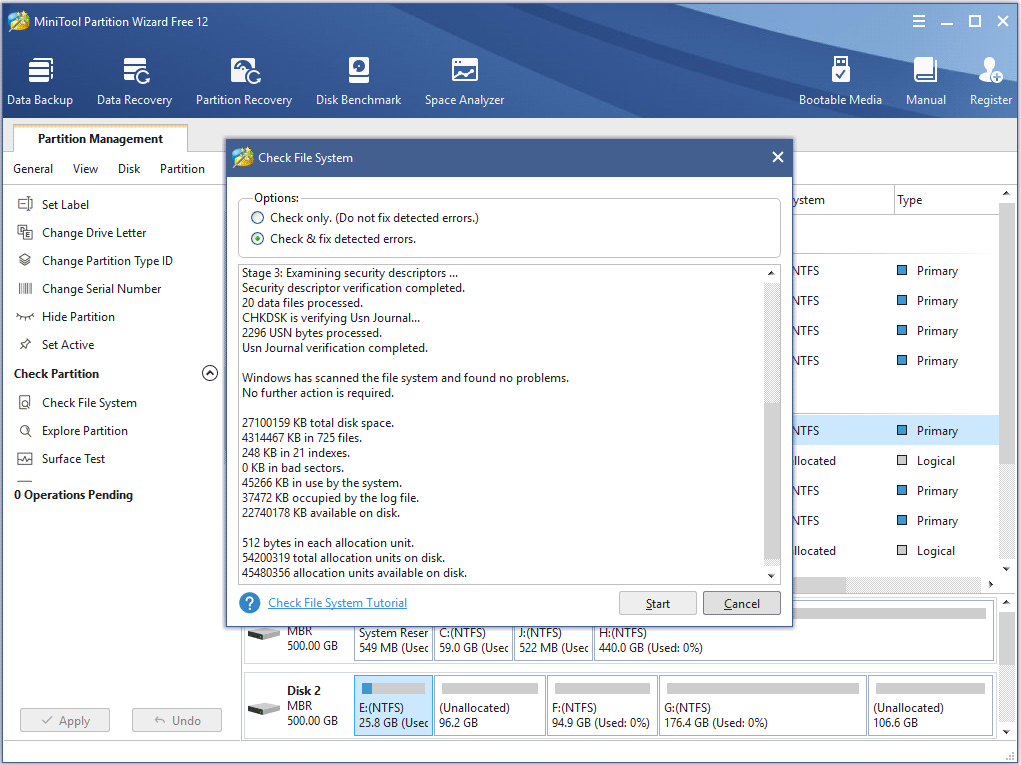
This page shows that MiniTool found no problems. If there is an error detected by MiniTool Partition Wizard, just let Partition Wizard fix it.
Method 4.Run Check Disk Windows 10 from Installation Disc/USB drive
The above three methods show you how to run CHKDSK when your computer can boot up successfully. However, if Windows won’t start, how can you check disk Windows 10?
Well, in this case, you can run CHKDSK on boot and check the hard drive for errors via Windows installation disc or USB drive. By following the steps as below, CHKDSK utility can be accessed easily.
Note: If you don’t have Windows 10 installation disc or USB flash drive to run CHKDSK, you can also run CHKDSK on MiniTool Partition Wizard Bootable Edition, which is very light and user-friendly.
Step 1. Insert Windows 10 installation disc or USB flash drive with Windows.
Step 2. Change the BIOS boot sequence to boot from the disc or USB drive.
Step 3. Select your language performance and click Next.
Step 4. Click Repair your computer.
Step 5. Then choose Troubleshoot on this page.
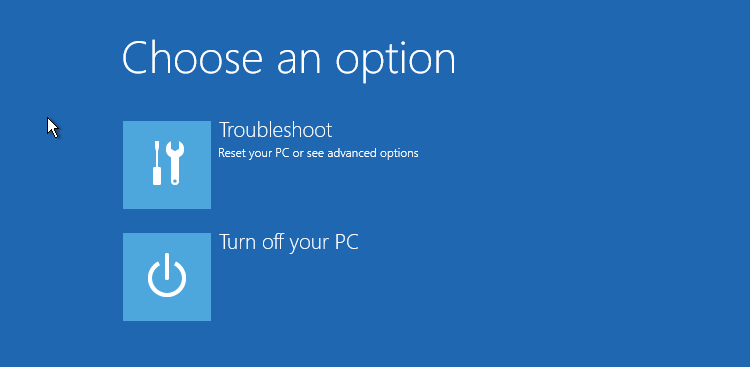
Step 6. On the Advanced options page, click Command Prompt to open it.
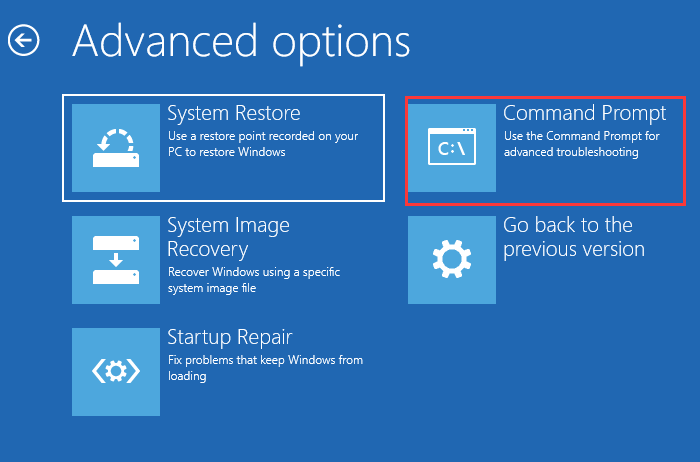
Step 6. When you successfully open the Command Prompt, you can follow the steps in Method 2 to execute CHKDSK commands.
After reading the 4 free methods in this post, I’m sure that you have learned how to use Windows 10 CHKDSK utility to repair hard drive errors. Now try one of them to complete hard drive repair by yourself.
“After reading this post, I learned how to repair hard drive Windows 10 with CHKDSK utility. People who don’t know how to run CHKDSK utility to fix hard drive error may check this post.”Click to Tweet
Wrapping Things Up
Have you fixed your hard drive with CHKDSK utility? Hope CHKDSK will help you fix all kinds of hard drive problems, and you can go back using your computer normally.
If you have any question about how to repair hard drive error with Window 10 Check Disk utility or if you have other better solutions, you can leave a message in the following comment zone and we will reply as soon as possible. If you need any help when using MiniTool software, you may contact us via [email protected].
CHKDSK Windows 10 FAQ
How do I run chkdsk in Windows 10?
To run chkdsk, please type cmd in the Windows 10 Cortana search box. Right-click the best match Command Prompt and select Run as administrator. In the command prompt window, type chkdsk e: /f (e represents the drive letter of the specific drive you want to scan and fix). Then CHKDSK will scan your drive and fix detected errors automatically.
Which is better chkdsk R or F?
Chkdsk /f will scan your drive and fix any errors it detected. Chkdsk /r will locate bad sectors on the drive and try to recover any and all readable information from them. Chkdsk /f will only check and fix disk errors, not bad sectors. So, chkdsk /r is better.
What is chkdsk f command?
Chkdsk /f is a Command Prompt command that is used to check a target drive on your computer and fix any hard drive errors it detects. Apart from chkdsk f, chkdsk /r is also commonly used to detect sectors on the hard drive and recovers any information still intact.
How do I repair my hard drive Windows 10?
Open Disk Management, select the drive that you want to check and fix, then right-click it and choose Property. On the Tools tab, click Check. Then it will scan your drive for hard drive errors and repair hard drive Windows 10 automatically.
What does CHKDSK /F /R do? How to use CHKDSK to repair the hard drive errors on Windows 10/8/7? Here is the full guide.
| Workable Solutions | Step-by-step Troubleshooting |
|---|---|
| What is CHKDSK command | CHKDSK (Check Disk Utility) can be used to check and fix any errors on the targeted disk. You can run it from the Command Prompt/PowerShell…Full steps |
| What does CHKDSK /F /R /X mean | CHKDSK /F can fix disk errors. CHKDSK /R does the same thing as CHKDSK /F only it also checks for bad sectors on the disk and recovers any readable information…Full steps |
| CHKDSK Alternative — Run a partition tool to fix disk error (1 Step) | Download EaseUS partition tool for free and use it to check and repair the corrupted file systems with clicks. No need to type commands manually…Full steps |
| Use CHKDSK manually | Run CHKDSK /F /R /X from the Command Prompt/Power shell or via the Properties window…Full steps |
What Is CHKDSK Command
In computing, CHKDSK (short for «check disk») is a system tool and command in DOS, Digital Research FlexOS, IBM/Toshiba 4690 OS, IBM OS/2, Microsoft Windows and related operating systems. It verifies the file system integrity of a volume and attempts to fix logical file system errors. — explained by Wikipedia
CHKDSK, also known as Microsoft Check Disk, is a utility that can be used in almost all Windows versions. The CHKDSK command is used to scan through your entire hard drive to find and fix any errors. For example, when your computer freezes, you cannot access a certain disk due to a corrupted file system, then you can use the CHKDSK commands to check and fix the drive errors.
💡💡💡It can be difficult to run CHKDSK /f /r /x commands for beginners. Hence, for beginners, you can use a professional alternative. Without giving any commands, you can check the disk for errors, check bad sectors, and check file system errors. Click the blue button to obtain the CHKDSK alternative — EaseUS Partition Master.
What Does CHKDSK /F /R /X Command Mean
What is CHKDSK /F /R /X? The primary function of CHKDSK /F /R /X is to scan the integrity of the file system and file system metadata on a disk volume and fix any logical file system errors that it finds. Besides, CHKDSK also can be used for detecting bad sectors on the target disk that occur because of physical damage. Then, it automatically fixes these errors as well.
CHKDSK /F VS CHKDSK /R VS CHKDSK /X, What’s The Difference
CHKDSK can fix two types of disk errors: logical errors and physical errors. Based on the disk error types, you can use the different CHKDSK commands and switches to fix hard drive errors. CHKDSK /F, CHKDSK /R, and CHKDSK /X are the most commonly used CHKDSK commands. What is the difference between CHKDSK /F /R and /X?
- CHKDSK /F: Check for disk errors, not bad sectors.
- CHKDSK /R: Locate the bad sectors on the target hard disk and try to recover the readable information from the bad sectors (implies /F).
- CHKDSK /X: Forces the volume to dismount first, if necessary. It also includes the functionality of /f.
When to use chkdsk /f, chkdsk /r, and chkdsk/x? You want to see existing errors, use CHKDSK /f command, you want recover readable information from back sectors, use CHKDSK /R, and dismount problematic disk, use CHKDSK /X.
If you feel like the provided information about CHKDSK, and it did help you have a better undersanding CHKDSK command lines, please share this guide to help more people around you!
What Does Each CHKDSK Parameter Means?
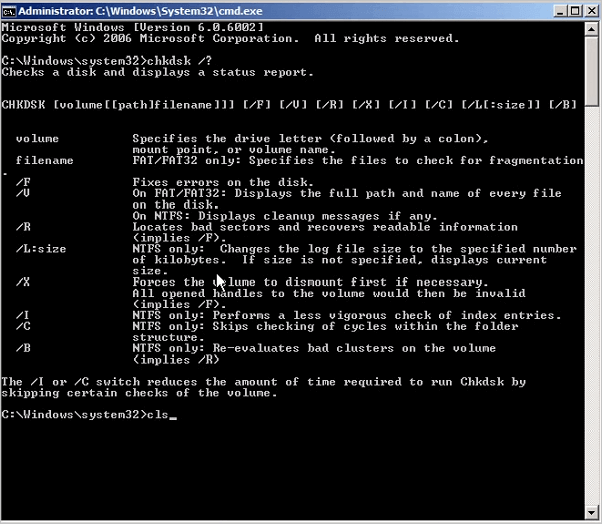
The syntax of the CHKDSK command is: chkdsk volume /f /v /r /x /i /c
- If used without parameters, CHKDSK displays only the volume’s status and does not fix any errors.
- If used with the /f, /r, /x, or /b parameters, it fixes errors on the volume.
What do the parameters ( /f /r /x… ) mean? Here are some common CHKDSK parameters and their meanings:
| Parameters | Details of the Parameters |
|---|---|
| /f | Fixes errors on the disk. The disk must be locked. If CHKDSK cannot lock the drive, a message appears that asks you if you want to check the drive the next time you restart the computer. |
| /r | Locates bad sectors and recovers readable information. The disk must be locked. It includes the functionality of /f, with the additional analysis of physical disk errors. |
| /x | Forces the volume to dismount first, if necessary. All open handles to the drive are invalidated. It also includes the functionality of /f. |
| /b | NTFS only. It clears the list of bad clusters on the volume and rescans all allocated and free clusters for errors. It includes the functionality of /r. Use this parameter after imaging a volume to a new hard disk drive. |
| /v | Displays the name of each file in every directory as the disk is checked. |
| /scan | NTFS only. It runs an online scan on the volume. |
| /i | NTFS only. It performs a less vigorous check of index entries, which reduces the amount of time required to run CHKDSK. |
| /c | NTFS only. It does not check cycles within the folder structure, which reduces the amount of time required to run CHKDSK. |
Run CHKDSK /F /R /X Alternative Tool to Fix and Repair Disk Errors
If you are not so tech-savvy and know little about computers, we highly recommend you try a professional CHKDSK /f /r /x alternative tool — EaseUS Partition Master to fix hard drive errors efficiently. It perfectly replaces CMD as reliable disk management tool and releases you from typing the commands manually.
EaseUS partition tool makes it effortless to repair disk errors. Follow the steps to check and repair your file system error:
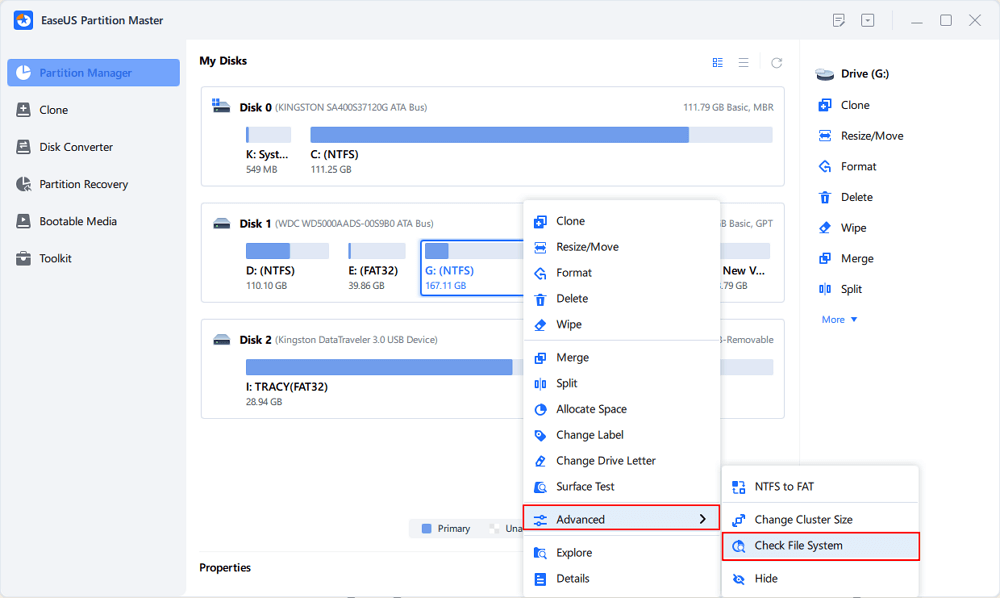
Step 1. Open EaseUS Partition Master on your computer. Then, locate the disk, right-click the partition you want to check, and choose «Advanced» > «Check File System».
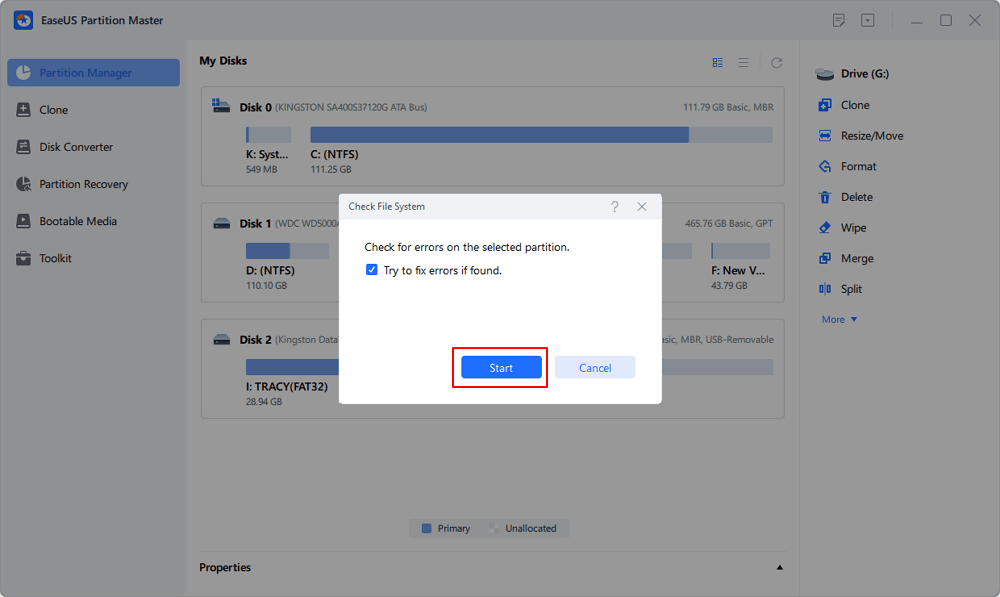
Step 2. In the Check File System window, keep the «Try to fix errors if found» option selected and click «Start».
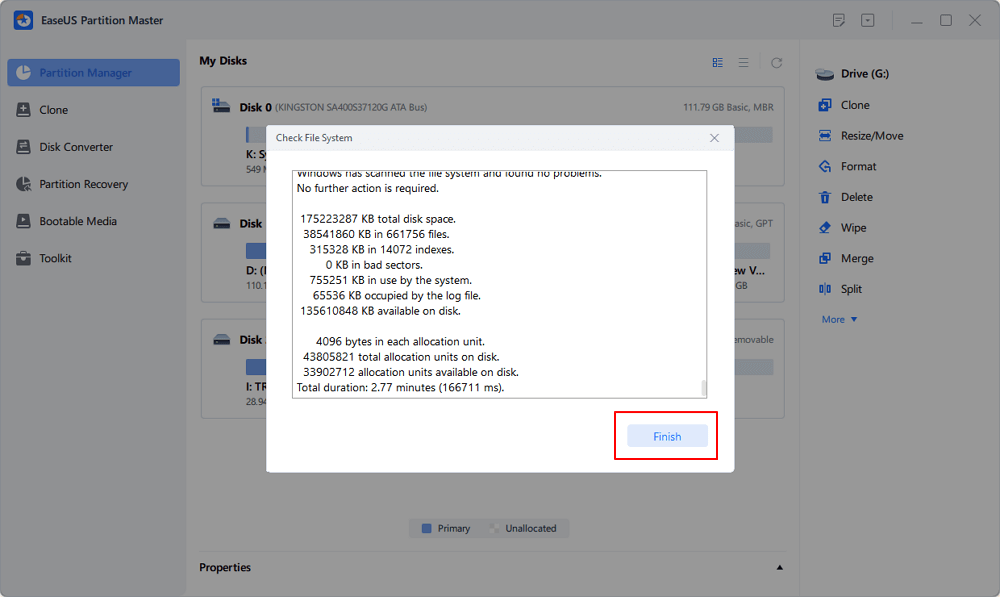
Step 3. The software will begin checking your partition file system on your disk. When it completes, click «Finish».
Fixing disk error and repair internal file system error with EaseUS Partitoin Master is so easy It is one of the best repair tool for hard drives, especially the best Toshiba External Hard Drive Repair Tool and Seagate Hard Drive Repair Tool. Share this tip to help more of your friends to rescue their problematic storage devices now:
How to Run CHKDSK /F /R /X Command to Fix Disk Errors on Windows 10/8/7
If you don’t like to use the simple third-party CHKDSK tool, you can run CHKDSK in a harder way via 3 methods: using Command prompt, Windows PowerShell, and disk check tool.
1. Run CHKDSK in Command Prompt
Whenever you find your hard drive performs poorly or Windows asks you to repair drive errors, you can try to run CHKDSK to do the job. Here’s how to run CHKDSK /f on Windows 10/8.1/8/7.
Use CHKDSK /F /R on Windows 10
Note: If you can’t boot into Windows 10 to run CHKDSK, fix the UEFI boot issue in Windows 10 with 5+ solutions.
Step 1. Press the Windows key and type cmd.
Step 2. Right-click «Command Prompt» and choose «Run as administrator».
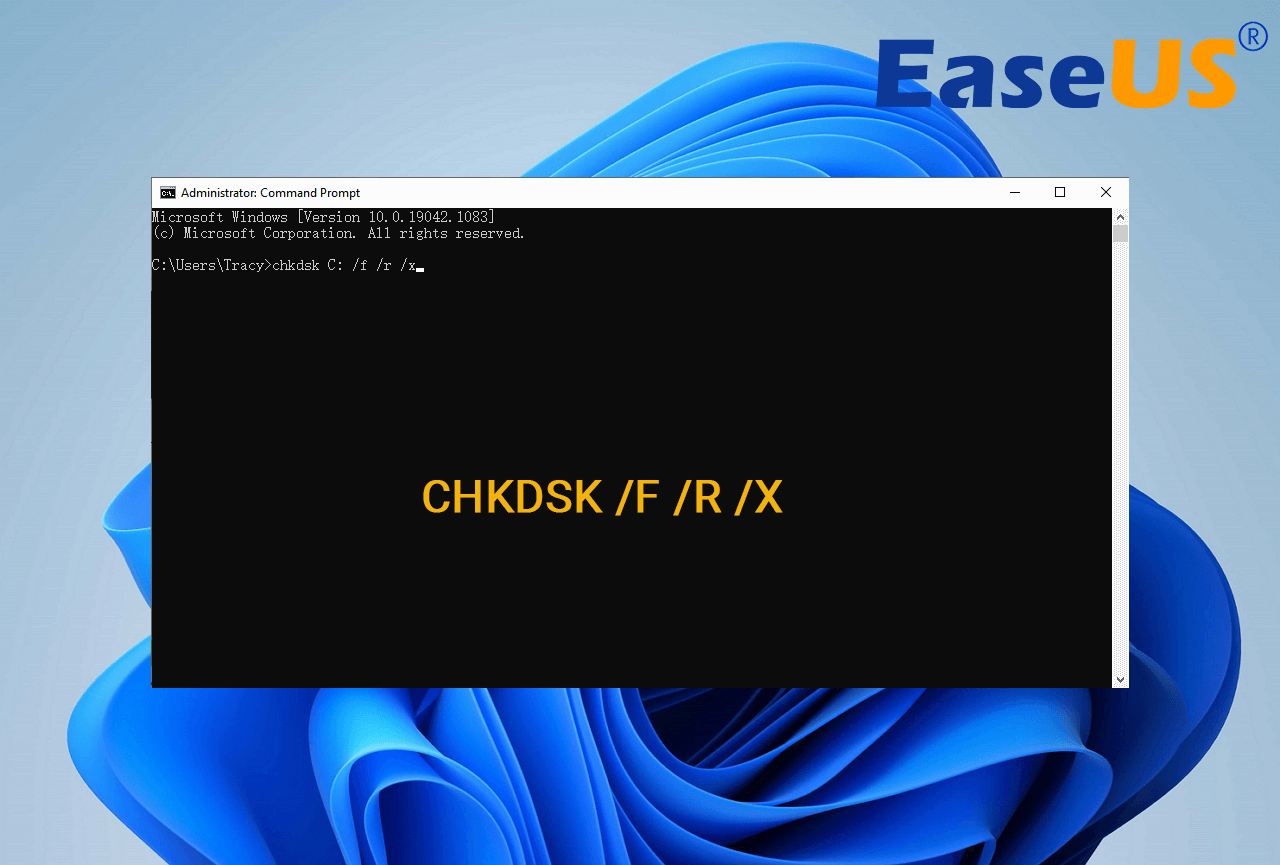
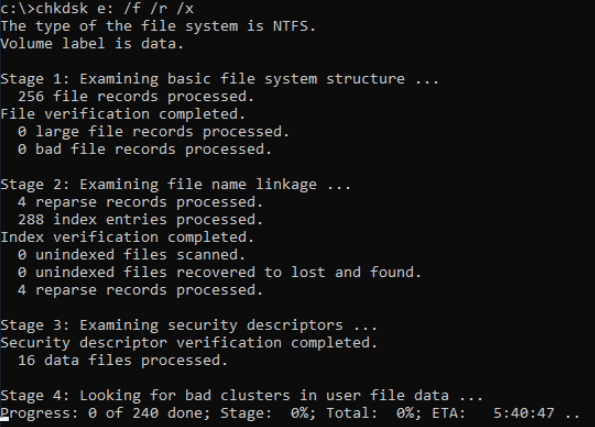
Step 3. Enter the following command and press Enter: chkdsk C: /f /r /x. Replace «C» with the drive letter of the partition you want to repair.

Do not interrupt CHKDSK and wait patiently for the process to end.
Aside from applying CHKDSK to fix disk errors, here are some tutorials that you may follow to learn more details about this command:
Run CHKDSK on Windows 8.1/8
To run the utility from Command Prompt for Windows 8.1/8 users, here are the instructions:
Step 1. Press the Windows and C key to open the Charm bar.
Step 2. Select «Search» and type cmd.
Step 3. Right-click on «Command Prompt» and click «Run as administrator.»
Step 4. When Command Prompt launches, type the command below and press «Enter»: chkdsk E: /f /r /x.
Run CHKDSK on Windows 7 CMD
If you are a Windows 7 user, you can run the CHKDSK command by the following steps:
Step 1. Click «Start». Type cmd at the search box.
Step 2. Right-click on cmd.exe and click «Run as Administrator». Enter your Administrator password if necessary.
Step 3. When cmd.exe opens, type the command below and press «Enter»: chkdsk c /f /r.
If you receive the «Chkdsk cannot run because the volume is in use by another process.» message, type Y to restart the computer and let the utility to run a scan at the next boot of your PC.
Extended Reading:
If you are looking for a guide to run CHKDSK to check and fix disk errors on Wnidows 11, try this recommended guide page and you’ll learn how to do so.
Check and Fix Disk Error in Windows 11
Are you looking to check disk errors in Windows 11? If yes, you might need a guide on checking and fixing disk errors in Windows 11. We have compiled the best methods for you.
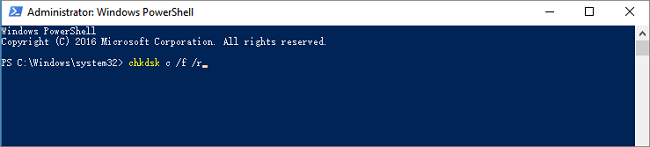
2. Use CHKDSK/F/R in Windows PowerShell
If the Command Prompt not working in Windows 10, you can also run the CHKDSK /F or /R command in Windows PowerShell to fix hard drive errors.
Step 1. Click the Search button and type PowerShell.
Step 2. Right-click the PowerShell and choose Run as administrator.
Step 3. Type chkdsk c /f /r to start fixing disk error. Replace C with the drive letter of the target disk.
3. Run CHKDSK Alternative — CheckDisk in Properties Window
Running the Check Disk tool from the Windows desktop is easy. Follow the steps below to run CHKDSK in Windows 10. It works the same way on Windows 8 and Windows 7.
Step 1. Open This PC in File Explorer > right-click the HDD/SSD you want to scan > choose «Properties».
Step 2. Under the Tools tab > click the «Check» button under the Error-checking section.
Step 3. Next, you can choose to Scan drive if wanted or Repair drive if errors were found.
Step 4. When the scanning finishes, click on the Show Details link to see the CHKDSK log in Event Viewer.
Conclusion
Any time you have hard drive errors or corrupted files, the CHKDSK can be a lifesaver. You can use the disk error checker that comes with every Windows version with the full guide above.
Or you can use the ultimate disk management tool — EaseUS Partition Master to repair organize your hard drive to enhance system performance easily.
FAQs About CHKDSK /F /R That You May Be Interested In
You may encounter CHKDSK related problems; what to do then? Here are the common issues of CHKDSK errors; read on to figure out the solutions.
1. Is CHKDSK R safe?
It’s safe to run the CHKDSK /R command under normal circumstances as long as you’re using the syntax properly. There are different parameters with CHKDSK; you can check the CHKDSK parameters and choose the one that suits your problem to fix disk errors.
2. How long does chkdsk /f /r take?
It depends.
- chkdsk -f should take under an hour on that hard drive.
- chkdsk -r will take some time. It could take over an hour, maybe two, three, or more, depending on your partitioning.
You can interrupt the scan, but not recommended. Canceling or interrupting CHKDSK should not leave the volume any more corrupt than it was before CHKDSK was run. You can start it again, and it will check and repair any remaining corruption on the volume.
3. What to do when CHKDSK is stuck or frozen?
- Restart your computer.
- Press Esc or Enter to stop chkdsk from running.
- Run the Disk Cleanup utility to clear out junk files.
- Open an elevated CMD, type sfc /scannow, and press Enter to run the System File Checker.
- Restart and exit chkdsk again during the startup by pressing Esc or Enter.
- Open CMD as admin, type Dism /Online /Cleanup-Image /RestoreHealth, and press Enter to repair the Windows image.
- Run CHKDSK again.
The scan should be able to run to completion this time.
4. CHKDSK /F /R VS CHKDSK /R /F on Windows
What’s the difference between CHKDSK /F /R and CHKDSK /R /F commands on Windows computer?
This is no much difference between chkdsk /f /r and chkdsk /r /f. The only difference is the sequence of two parameters /f and /r. /f means to fix errors on target disk and /r means to locate bad sectors and recover readable information. Mostly, the correct form should be chkdsk /f /r. Basically, when we don’t know if the target drive contains bad sectors, we would suggest that you run the overall CHKDSK command: chkdsk /f /r /x together.