
Windows — NTP server installation
Windows — NTP server installation
Would you like to learn how to install the NTP server on Windows? In this tutorial, we are going to show you how to configure an NTP server on a computer running Windows.
• Windows 2012 R2
• Windows 2016
• Windows 2019
• Windows 10
• Windows 7
Equipment list
Here you can find the list of equipment used to create this tutorial.
This link will also show the software list used to create this tutorial.
Windows — Related Tutorial:
On this page, we offer quick access to a list of tutorials related to Windows.
Tutorial Windows — NTP server installation
As Administrator, start an elevated command-line.

Create a backup of the Windows registry entries.
Configure the Windows time service as an NTP server.
Configure the list of NTP servers.
Configure the NTP poll interval.
Configure the Windows time service to start automatically.
Start the Windows time service.
Optionally, restart the Windows time service using the graphical interface.

Create a Firewall rule to allow the input of packets on the NTP port.
Verify the NTP server configuration.
Here is the command output.
Congratulations! You have finished the installation of the NTP server on Windows.
Tutorial Windows — NTP server verification
Verify the NTP server peer list.
Verify the NTP service communication.
From a remote computer, test your NTP server.
Here is the command output.
In our example, the NTP server IP address is 172.31.0.84.
From a computer running Linux, test your NTP server.
Here is the command output.
Congratulations! You have finished the NTP server configuration on Windows.
VirtualCoin CISSP, PMP, CCNP, MCSE, LPIC22020-12-03T09:48:59-03:00
Related Posts
Page load link
Ok
A Time Server or NTP Server is used to synchronize the time across devices in a network. For example, in Windows, your time automatically gets synchronized with time.windows.com. The time.windows.com is the time server or NTP server created by Microsoft. Similarly, you can also make your computer a time server or NTP server. And then, you can synchronize the time of all devices in your local (LAN) network with your PC.
In this tutorial, we are going to show you how to make your computer an NTP or Time Server. And, you don’t need to install any software to do this. We will be using Windows Registry Editor to turn your computer into Time Server.
SEE ALSO: How to Make Your Computer a Web Server?
Follow these steps to configure your Windows 10 or Windows 11 PC as a Time Server.
Step 1: Open Services and Stop Windows Time Service
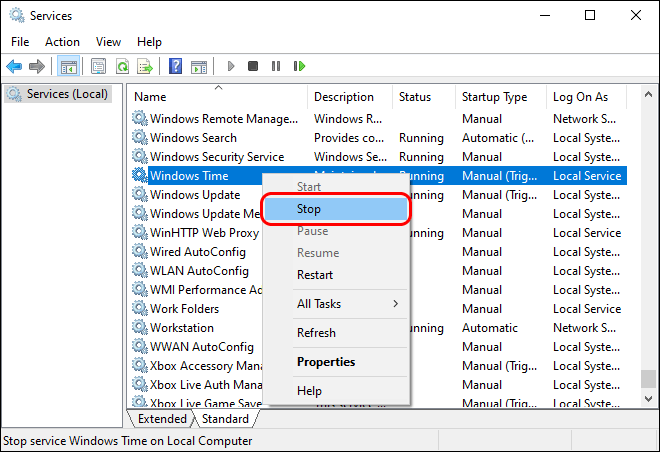
To make your computer a time server, we will need to make some changes to Windows Time Service. So, first of all, we will need to stop the Windows Time service in the Windows services console.
Go to Start > Control Panel > System & Security > Administrative Tools > Services to open the Windows Services console. Alternatively, you can type services.msc in RUN and press ENTER.
Now, the Windows Services console will open. Here, look for the ‘Windows Time‘ service. After that, right-click on Windows Time service and select Stop to stop this service. But if the service is already in the stopped state, you can move to the next step.
Step 2: Open Registry Editor and Create LocalNTP DWORD
Now, open Registry Editor. Go to RUN, type regedit , and press the Enter button to launch Registry Editor.
You may see UAC Prompt, click on Yes to continue. Registry Editor will open. In Registry Editor, go to the following registry key:
HKEY_LOCAL_MACHINE\SYSTEM\CurrentControlSet\Services\W32Time\Parameters
If you don’t see the LocalNTP DWORD on the right side, you will have to create it to make your computer a time server. So, to create the DWORD, right-click in the blank space and select New > DWORD (32-bit) Value.
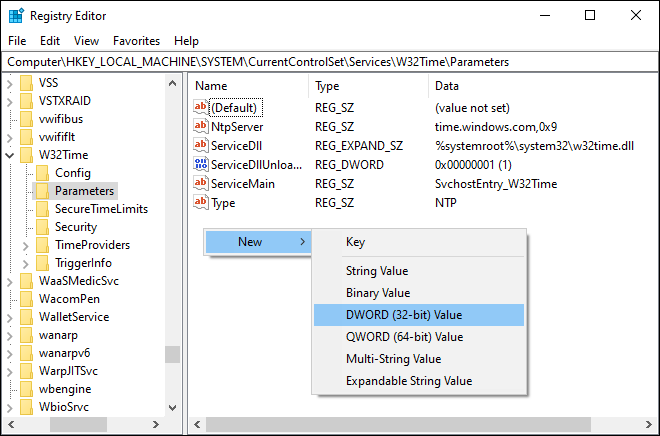
Now, type the name of the new DWORD as LocalNTP (case sensitive).

After creating the DWORD, double-click on it to modify its value. Then set the DWORD value to 1 (Hexadecimal).
Step 3: Enable NTP Server in Windows
This is one of the most important steps to make your PC an NTP server. Do not close the Registry Editor yet, go to the following key in the Registry Editor.
HKEY_LOCAL_MACHINE\SYSTEM\CurrentControlSet\services\W32Time\TimeProviders\NtpServer
Here, on the right side, you will find a DWORD named Enabled. Right-click and select Modify to change its value.

Now, set the value data of Enabled DWORD to “1” (Hexadecimal).
Step 4: Set Announce Flags
Now, go to the following key in Registry Editor.
HKEY_LOCAL_MACHINE\SYSTEM\CurrentControlSet\services\W32Time\Config
Here, we will change the value of AnnounceFlags DWORD. So, right-click on it and select Modify.
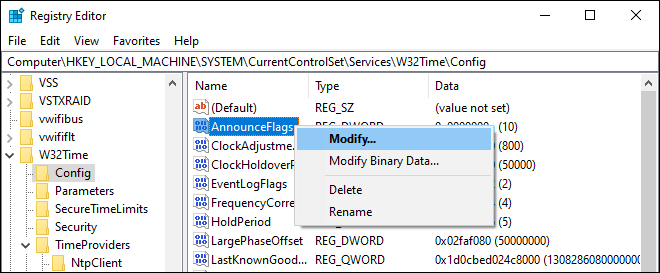
Now, set the value of AnnounceFlags DWORD to “5” (Hexadecimal). Now, your PC will advertise itself as an NTP server.
Step 5: Start Windows Time Service
Go to Start > Control Panel > System and Security > Administrative Tools > Services again. Now, double-click on the “Windows Time” service to open its Properties. Here, set the Startup type to Automatic, start the service, and then click OK.
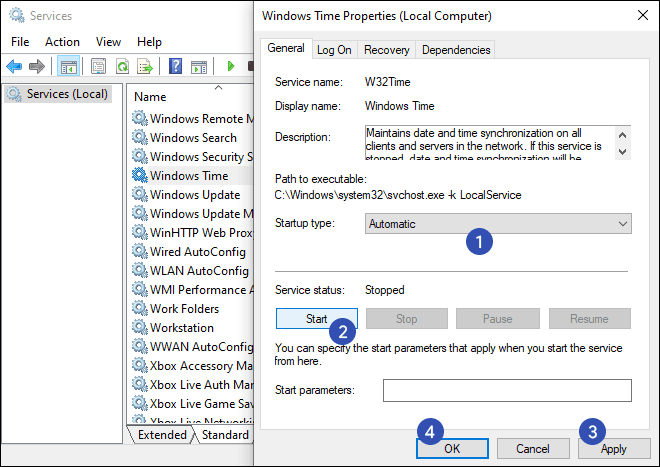
Now, you can use your computer as an NTP server. You can now synchronize the time of other computers in your LAN/Local network with your PC.
SEE ALSO: Check these 10 Cool Command Prompt Tricks for you.
Step 6: Synchronize Time with NTP Server
Let’s see how to synchronize the time of any other PC using this newly created NTP Server. First, you need to find the IP address of your PC. You can check your IP in Network Settings or via Command prompt using the ipconfig command. In this tutorial, the IP address of our PC is 192.168.56.101. This is just an example, it may be different for you.
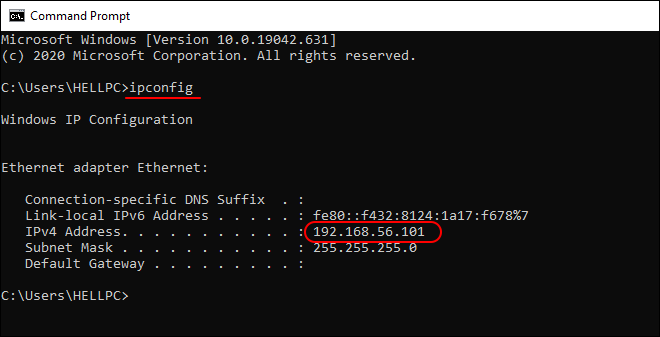
ipconfig command to find the IP Address of Your PCNow, go to another computer whose time you want to synchronize. Open the Control Panel and search for date time and click on Set the time and date link from the search results.
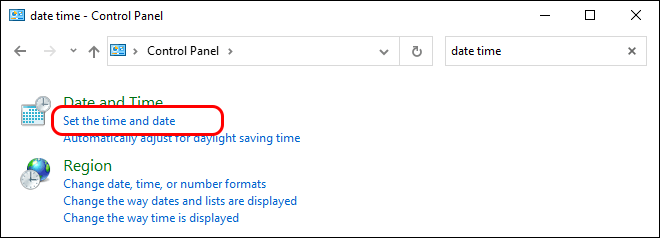
Date and Time settings will open. Go to the Internet Time tab and click on Change Settings.
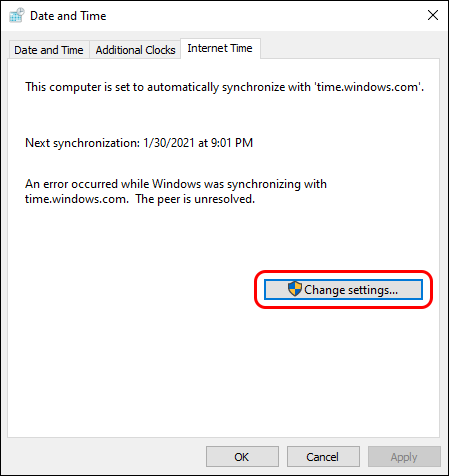
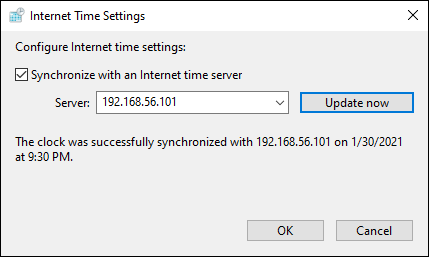
A small Internet Time Settings window will open. Here, enter the IP address of your NTP server (192.168.56.101 in our case) in the box and click on Update Now to synchronize time. It may give you an error on the first attempt. Click on Update Now again and your time will be synchronized successfully. Now, you can click OK to close the time settings window.
SEE ALSO: How to Set up Minecraft Server on Android Phone?
Turn your PC into an NTP Server without Any Software
Now, you have successfully turned your computer into an NTP or Time Server without any software. You can synchronize the time of every device on your network using this NTP server. You can also synchronize the time of any remote device using this NTP server by forwarding the NTP port on your router. NTP port is “123” by default. The process of forwarding a port in your router depends on the type of router you use. You can check your router’s manual for more details.
We hope you liked this tutorial. In case you have any problems, feel free to write them down in the comment section below. Feel free to subscribe to our newsletter to get the latest tutorials directly into your inbox.
Довелось мне как то поработать с особо параноидально-жадным клиентом. Было закуплено куча китайских камер и несколько регистраторов на 64 канала. Камеры все были подключены по Onvif, потому часть с них могла синхронизировать время с регистратором, а часть не могла. Весь зоопарк неплохо показывал, но вот время на камерах прыгало спустя неделю-вторую. А все из-за того что на объекте не было интернета или локального NTP сервера, зато был охранник который 24 часа долбился в монитор на компе. На предложение поставить хотя бы простой роутер с сим-картой чтобы отрабатывал как ntp сервер ответ был один — это небезопасно и вообще за это наказывают (клиент с Дубая). В общем решением стало установка ntp сервера на компе охранника. И если время сбивается он просто переводит его на компе, и все камеры показывают нужное время
Настройка
- Запустить
windows_server_NTP.bat от имени Администратора
Запускает службу Времени Windows. Добавляет службу в автозагрузку. Включает NTP server. Обновляет конфигурацию. Перезагружает ПК для применения изменений - Запустить
Check_NTP.batот имени Администратора
Если видите такие же строки в своей командной строке, значит все ок
NtpServer (Локально)
DllName: C:\WINDOWS\system32\w32time.dll (Локально)
Enabled: 1 (Локально)
InputProvider: 0 (Локально)
AllowNonstandardModeCombinations: 1 (Локально)
Онлайн сервис проверки NTP сервера
https://servertest.online/ntp
Maintaining accurate time on your server is critical largely because many services and IT applications rely on accurate time settings to function as expected. These include logging services, monitoring and auditing applications, and database replication to mention a few.
Time skew in servers, and any client systems for that matter, is undesirable and usually causes conflict in time-critical applications. To maintain accurate time settings on your server and across the network by extension, it’s preferred to install and enable a NTP server on your server.

What is an NTP server?
NTP, short for Network Time Protocol, is a protocol that synchronizes time across network devices. It listens on UDP port 123 and always ensures that time inconsistencies across the server and client systems are mitigated and that client systems are always in sync with the server.
NTP server refers to a network device or a service that fetches time from an external time source and syncs the time across the network using the NTP protocol. This guide will focus on installing NTP service on Windows server 2019.
How Does NTP Work ?
Being a protocol, NTP requires a client-server architecture. The NTP client residing on a Windows PC, for example, initiates a time request exchange with the NTP server.
A time-stamp data exchange happens between the server and client and this helps in adjusting the clock on client’s systems to the highest degree of accuracy to match the time on the NTP server. In this guide, we will walk you through the installation and configuration of NTP server on Windows Server 2019.

There are several ways of setting up NTP server and we will look at each in turn.
In Windows Server environments, there is a special Windows time service that handles time synchronization between the server and the client systems. This is known as Windows Time service. PowerShell provides a command-line tool known as w32tm.exe and comes included in all versions of Windows from Windows XP and Windows Server 2008 to the latest versions of each OS.
Using the w32tm.exe utility, you can configure your Windows system to sync with online time servers. Usually, this is the tool of choice when setting up and monitoring time on your Windows Server system.
Using the command-line utility is quite straightforward.
For example, to set the Server to point to 2 different time servers, namely 0.us.pool.ntp.org and 1.us.pool.ntp.org , launch PowerShell as the Administrator and run the command below
w32tm /config /syncfromflags:manual /manualpeerlist:”0.us.pool.ntp.org 1.us.pool.ntp.org” /update
Then restart Windows Time service using the commands:
Stop-Service w32time
Start-Service w32time
Here’s a snippet of the commands.

You can thereafter confirm the values of NTP servers configured in the registry by running this command:
w32tm /dumpreg /subkey:parameters

Configure NTP Server on Windows Server 2019 using Registry editor
The second method of installing and configuring the NTP server is using the registry editor. If you are not a fan of the Windows PowerShell, then this will truly come in handy.
To get started, open the registry editor. Press ‘Windows key + R’ and type ‘regedit’ and hit ENTER. The windows registry will be launched as shown below.

Next, head over to the path shown below
Computer\HKEY_LOCAL_MACHINE\SYSTEM\CurrentControlSet\Services\W32Time\TimeProviders\NtpServer
On the right pane. Be sure to find & double-click the file labelled ‘Enabled’ in the diagram shown below.

Next, In the ‘value data’ text field, set the value to ‘1’ and click the ‘Ok’ button.

Next, head over to the path:
Computer\HKEY_LOCAL_MACHINE\SYSTEM\CurrentControlSet\Services\W32Time\Config
In the right pane, double click the ‘Announce Flags’ file.

Double-click the file and in the Value data text field, type the value ‘5’ and click ‘OK’.

For the changes to come into effect, you need to reboot the NTP server by heading to the services Window. To achieve this, press ‘Windows key + R’ and type ‘services.msc’. Scroll and find ‘Windows Time’, right-click on it and select the ‘Restart’ option.

Useful w32tm commands
Once you have set up your NTP server, you can use the following commands to verify various aspects of the server:
To check the status of the NTP server, run the command:
w32tm /query /status

To reveal the current NTP pool being used to sync time with execute:
w32tm /query /source

You can also display a list of NTP time servers along with their configuration status as shown.
w32tm /query /peers

To display NTP server configuration settings, run the command:
w32tm /query /source
This shows quite a wealth of information.

Final Take
We cannot stress enough how important it is to maintain accurate time and date settings on your server. As you have seen, setting up an NTP server on your Windows server instance is quite easy and straight forward.
Once you have configured the NTP service on your server, other domain controllers in your environment will sync with this server and the Windows clients in the domain will sync with the domain controllers. Hopefully, you can now install and configure NTP on Windows Server 2019.
For many types of applications having your own NTP server is unnecessary. For example, you do not need one if you want to use the protocol and can reliably access and synchronize with 3rd party NTP servers over the internet (more on those resources below). However, in high-demand, timing-critical, remotely located or bandwidth constrained applications, these may be too unreliable, or worse yet, not work at all. It’s also useful for when you have a high number of client devices on the same network that require accurate synchronization. These cases are where having your own NTP server synchronized to GPS time can be essential.
According to Wikipedia, “NTP can usually maintain time to within tens of milliseconds over the public Internet, and can achieve better than one millisecond accuracy in local area networks under ideal conditions. Asymmetric routes and network congestion can cause errors of 100 ms or more.[1]” That sure sounds like a compelling use of local NTP servers for timing critical applications, right?!
If you are lucky enough to make due with the latencies and higher error associated with Internet NTP servers we have a few pointers. When selecting a publicly accessible NTP server, it is important to follow the access guidelines provided by the server. These restrictions include, but are not limited to:
- Service only to clients within a specified service area
- Service only for non commercial use
- Maximum number of clients
- Minimum polling interval
A large list of publicly accessible devices worldwide is provided by ntp.org, the online home for the NTP project. Usually you want to pick a server nearest your client device to reduce latencies.