
Первое приложение с .NET CLI
Последнее обновление: 25.11.2023
Для создания графических интерфейсов с помощью платформы .NET применяются разные технологии — Window Forms, WPF, UWP.
Однако наиболее простой и удобной платформой до сих пор остается Window Forms или сокращенно WinForms. Данное руководство ставит своей целью дать понимание принципов создания графических интерфейсов с помощью технологии WinForms
и работы основных элементов управления.
Создадим первое приложение на C# и Windows Forms. Что нам для этого потребуется? Прежде всего необходим текстовый редактор для написания кода программы.
Можно взять любой понравившийся текстовый редактор, например, Visual Studio Code
Также для компиляции и запуска программы нам потребуется .NET SDK. Для его установки перейдем на официальный сайт по ссылке
.NET SDK
После установки .NET SDK для первого проекта определим какую-нибудь папку. Например, в моем случае это будет папка C:\dotnet\winforms\helloapp.
Откроем терминал/командную строку и перейдем к созданной папке проекта с помощью команды cd
cd C:\dotnet\winforms\helloapp
В данном случае мы для создания и запуска проекта мы будем использовать встроенную инфраструктуру .NET CLI, которая устанавливается вместе с .NET SDK.
Для создания проекта в .NET CLI применяется команда dotnet new, после которой указывается тип проWindows Formsекта. Для создания проекта
Windows Forms применяется шаблон — winforms. Поэтому введем в терминале команду dotnet new winforms
C:\Users\eugen>cd C:\dotnet\winforms\helloapp

C:\dotnet\winforms\helloapp>dotnet new winforms
Шаблон "Приложение Windows Forms" успешно создан.

Идет обработка действий после создания...
Восстановление C:\dotnet\winforms\helloapp\helloapp.csproj:
  Определение проектов для восстановления...
  Восстановлен C:\dotnet\winforms\helloapp\helloapp.csproj (за 1,04 sec).
Восстановление выполнено.


C:\dotnet\winforms\helloapp>
После выполнения этой команды у нас будет создан следующий проект:
Структура проекта Windows Forms
Рассмотрим базовую структуру простейшего стандартного проекта Windows Forms:
-
helloapp.csproj: стандартный файл проекта C#, который соответствует назанию проекта (по умолчанию названию каталога) и описывает все его настройки.
-
helloapp.csproj.user: дополнительный файл проекта C#, который хранит специфичные для текущего пользователя настройки.
-
Form1.cs: содержит класс формы, которая по умолчанию запускается при старте приложения
-
Form1.Designer.cs: он содержит определение компонентов формы, добавленных
на форму в графическом дизайнере (графический дизайнер Windows Forms на данный момент официально доступен только в Visual Studio) -
Program.cs: определяет класс Program, который запускается при старте приложения и запускает форму Form1
Например, посмотрим на содержимое файла helloapp.csproj
<Project Sdk="Microsoft.NET.Sdk">

  <PropertyGroup>
    <OutputType>WinExe</OutputType>
    <TargetFramework>net8.0-windows</TargetFramework>
    <Nullable>enable</Nullable>
    <UseWindowsForms>true</UseWindowsForms>
    <ImplicitUsings>enable</ImplicitUsings>
  </PropertyGroup>

</Project>
Для компиляции приложения Windows Forms указаны следующие настройки:
-
OutputType: определяет выходной тип проекта. Должен иметь значение WinExe — то есть выполняемое приложение с
расширением exe под Windows -
TargetFramework: определяет применяемую для компиляции версию фреймворка .NET. Поскольку при создании проекта
была выбрана версия .NET 8, а сам проект зависит от компонентов Windows, то здесь должно быть значение net7.0-windows -
Nullable: подключает в проект функционалность ссылочных nullable-типов
-
UseWindowsForms: указывает, будет ли проект использовать Windows Forms (для этого устанавливается значение
true) -
ImplicitUsings: подключает в проект функциональность неявно подключаемых глобальных пространств имен
Запуск проекта
Проект по умолчанию не представляет какой-то грандиозной функциональности, тем не менее этот проект мы уже можем запустить. Итак, запустим проект. Для этого выполним команду
dotnet run
C:\dotnet\winforms\helloapp>dotnet run
При запуске запускается графическая форма, код которой определяет класс Form1:
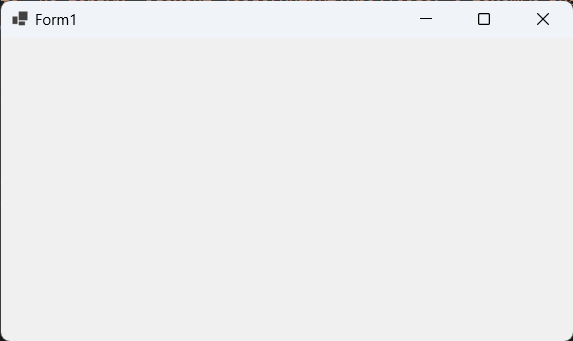
Запуск приложения
Файл Program.cs определяет точку входа в приложение:
namespace helloapp;

static class Program
{
    [STAThread]
    static void Main()
    {
        ApplicationConfiguration.Initialize();
        Application.Run(new Form1());
    }
}
Метод Main снабжен атрибутом [STAThread]. Этот атрибут, грубого говоря,
необходим для корректной работы компонентов Windows. В самом методе сначала вызывается метод
ApplicationConfiguration.Initialize()
который устанавливает некоторую базовую конфигурацию приложения
Затем вызывается метод
Application.Run(new Form1());
в который передается объект отображаемой по умолчанию на экране формы.
То есть, когда мы запустим приложение, сработает метод Main, в котором будет вызван метод Application.Run(new Form1()),
благодаря чему мы увидим форму Form1 на экране.
Определение формы
Теперь посмотрим на определение формы и немного изменим его. Для этого откроем файл Form1.cs в текстовом редакторе. По умолчанию он выглядит следующим образом:
namespace helloapp;

public partial class Form1 : Form
{
    public Form1()
    {
        InitializeComponent();
    }
}
Класс формы — Form1 представляет графическую форму — фактически то окно, которое мы увидим на экране при запуске проекта.
Этот класс определяется как частичный (с модификатором partial) и наследуется от встроенного класса Form,
который содержит базовую функциональность форм.
В самом классе Form1 определен по умолчанию только конструктор, где вызывается метод InitializeComponent(), который выполняет инициализацию компонентов формы из файла дизайнера
Form1.Designer.cs. По сути именно код этого файла передается выше через вызов InitializeComponent()
Теперь изменим его код следующим образом:
namespace helloapp;

public partial class Form1 : Form
{
    public Form1()
    {
        InitializeComponent();
        // определяем кнопку
        Button button = new Button();
        // текст кнопки
        button.Text ="Click";
        // положение кнопки
        button.Location = new Point(50, 50);
        // размер кнопки
        button.Size = new Size { Width = 80, Height = 30 };
        // обработчик нажатия кнопки
        button.Click += (o, e) => MessageBox.Show("Hello METANIT.COM!");
        // добавление кнопки на форму
        this.Controls.Add(button);
    }
}
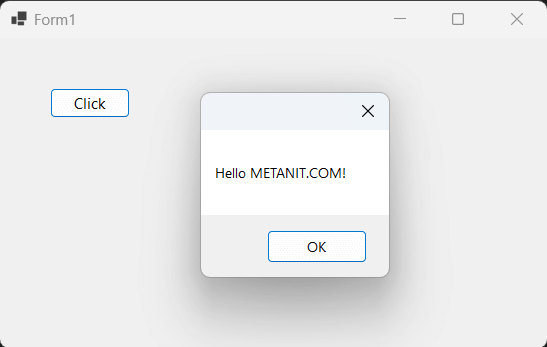
В данном случае на форму добавляется кнопка, и у нее настраиваются различные свойства, как текст, положение на форме, размер, а также обработчик нажатия.
Заново запустим проект, и нам отобразится та же форма, которая теперь будет содержать кнопку. И по нажатию на кнопку появится маленькое окно с сообщением.
До сих пор мы создавали только консольные приложения.
Но программисты на C# широко используют формы для создания пользовательских интерфейсов.
И в сегодняшней статье мы создадим простое оконное приложение.
В примерах используем русскую версию программы Visual Studio 2012.
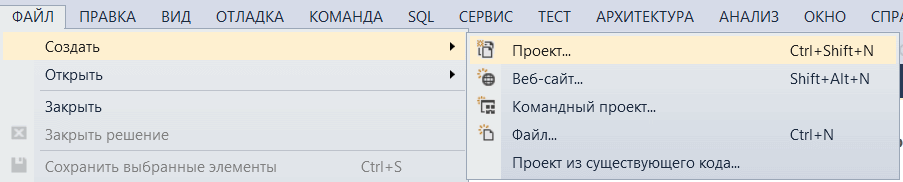
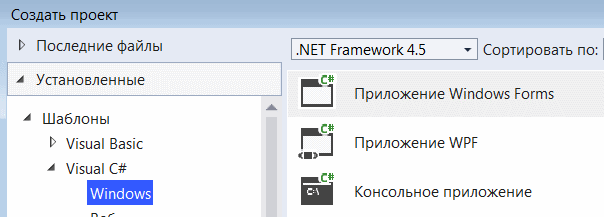
Первый шаг — начать новый проект и создать форму. Для чего откройте Visual Studio и выберите Файл-> Создать -> Проект, а в диалоговом окне нового проекта выберите Visual C#- Windows и выберите Приложение Windows Forms. Введите имя проекта в нижней части диалогового окна и нажмите кнопку ОК. На следующем рисунке показано, как создать новую форму в Visual Studio.
В диалоговом окне Новый проект выберите Приложение Windows Forms».
После выбора приложения Windows Forms вы можете увидеть форму по умолчанию (Form1) в своем новом проекте C#. Форма Windows Form, которую вы видите в представлении «Конструктор», представляет собой визуальное представление окна, которое открывается при открытии вашего приложения.
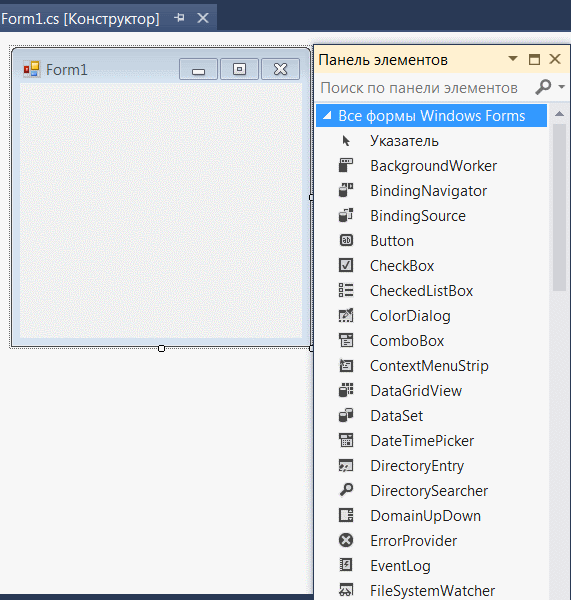
Каждый раз, когда вы создаете приложение Windows, Visual Studio будет отображать пустую форму по умолчанию, на которую вы можете перетащить элементы управления на основную форму приложения и настроить их размер и положение.
Если вы хотите установить какие-либо свойства формы, вы можете использовать окно свойств Visual Studio, чтобы изменить их. Есливы не видите окно Свойств, в меню ВИД щелкните Окно свойств. В этом окне перечислены свойства выбранной в данный момент формы Windows или элемента управления, и здесь вы можете изменить существующие значения.
Далее на вкладке ВИД открываем панель элементов. Находим там виджет Button и перетаскиваем его на форму. Дважды щелкаем по новому элементу и открываем окно с кодом кнопки.
private void button1_Click(object sender, EventArgs e)
{
// вводим следующий код
MessageBox.Show("Привет Мир");
}
Запускаем приложение.
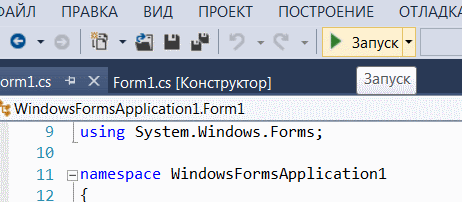
При нажатии на кнопку на экране должно появиться приветствие.
Результат:
Таким образом мы наглядно увидели возвожности создания оконных приложений с C# и Visual Studio, а также привязали к форме кнопку реагирующей на нажатие.
-
Создано 12.10.2021 11:38:18
-
Михаил Русаков
Копирование материалов разрешается только с указанием автора (Михаил Русаков) и индексируемой прямой ссылкой на сайт (http://myrusakov.ru)!
Добавляйтесь ко мне в друзья ВКонтакте: http://vk.com/myrusakov.
Если Вы хотите дать оценку мне и моей работе, то напишите её в моей группе: http://vk.com/rusakovmy.
Если Вы не хотите пропустить новые материалы на сайте,
то Вы можете подписаться на обновления: Подписаться на обновления
Если у Вас остались какие-либо вопросы, либо у Вас есть желание высказаться по поводу этой статьи, то Вы можете оставить свой комментарий внизу страницы.
Если Вам понравился сайт, то разместите ссылку на него (у себя на сайте, на форуме, в контакте):
-
Кнопка:
Она выглядит вот так:
-
Текстовая ссылка:
Она выглядит вот так: Как создать свой сайт
- BB-код ссылки для форумов (например, можете поставить её в подписи):
In this article, we’ll learn How to how to create a Windows Forms Application in Visual Studio with C#.
Create a New Project
First, you’ll create a C# application project. The project type comes with all the template files you’ll need, before you’ve even added anything.
On the Create a new project window, choose the Windows Forms App (.NET Framework) template for C#.
(If you prefer, you can refine your search to quickly get to the template you want.)
In the Configure your new project window, type or enter HelloWorld in the Project name box. Then, choose Create.
After you select your C# project template and name your file, Visual Studio opens a form for you. A form is a Windows user interface.
On the left-hand side of Visual Studio, you will also see a ToolBox. The toolbox contains all the controls which can be added to a Windows Forms. Controls like a text box or a label are just some of the controls which can be added to a Windows Forms.
Example 1 : Add Two Numbers in C# Windows Form Application.
The following example creates a C# windows Form application with two text boxes, one button,four label controls. When user enters two numbers in to first two text boxes and clicks on button1 then sum has to be calculated for those two numbers and display the result in label4.
Step 1:
Create a windows application and design the form as follows.
Open Visual Studio ->File -> New Project ->Visual C#-> select Windows Forms Application
Give the name of the application and click on OK.
Step 2:
Set the following properties for the controls on the form.
label1 >> Text: First Number
label2 >> Text: Second Number
label3 >> Text: Result
label4 >> Text: Name: lblResult
button1 >> Text: Sum Name: btnSum
textBox1>> Name: txtNumber1
textBox2>> Name: txtNumber2
Step 3:
Double click on the sum button and write the following code in the click event of that button to calculate sum and display the result in result textbox.
|
private void btnSum_Click(object sender, EventArgs e) { int num1, num2, sum; num1=Convert.ToInt32(txtNumber1.Text); num2 = Convert.ToInt32(txtNumber2.Text); sum = num1 + num2; lblResult.Text = sum.ToString(); } |
Output:
Example 2: MessageBox.Show Method in C#
MessageBox is a class in C# and Show is a method that displays a message in a small window in the center of the Form. MessageBox is used to provide confirmations of a task being done or to provide warnings before a task is done. Create a Windows Forms app in Visual Studio and add a button on it. Something like this below.
Let’s say, you want to show a message on a button click event handler. Here is the code for that.
Note: By default the OK Button will be shown.
MessageBox with Title
The following code snippet creates a simple MessageBox with a title.
|
string message = «Simple MessageBox»; string title = «Title»; MessageBox.Show(message, title); |
MessageBox with Buttons
A MessageBox can have different button combinations such as YesNo and OKCancel. The MessageBoxButtons enumeration represents the buttons to be displayed on a MessageBox and has following values.
- OK
- OKCancel
- AbortRetryIgnore
- YesNoCancel
- YesNo
- RetryCancel
The following code snippet creates a MessageBox with a title and Yes and No buttons. This is a typical MessageBox you may call when you want to close an application. If the Yes button is clicked, the application will be closed. The Show method returns a DialogResult enumeration.
|
string message = «Do you want to close this window?»; string title = «Close Window»; MessageBoxButtons buttons = MessageBoxButtons.YesNo; DialogResult result = MessageBox.Show(message, title, buttons); if (result == DialogResult.Yes) { this.Close(); } else { // Do something } |
MessageBox with Icon
A MessageBox can display an icon on the dialog. A MessageBoxIcons enumeration represents an icon to be displayed on a MessageBox and has the following values.
- None
- Hand
- Question
- Exclamation
- Asterisk
- Stop
- Error
- Warning
- Information
The following code snippet creates a MessageBox with a title, buttons, and an icon.
|
string message = «Do you want to abort this operation?»; string title = «Close Window»; MessageBoxButtons buttons = MessageBoxButtons.AbortRetryIgnore; DialogResult result = MessageBox.Show(message, title, buttons, MessageBoxIcon.Warning); if (result == DialogResult.Abort) { this.Close(); } elseif(result == DialogResult.Retry) { // Do nothing } else { // Do something } |
MessageBox with Default Button
We can also set the default button on a MessageBox. By default, the first button is the default button. The MessageBoxDefaultButton enumeration is used for this purpose and it has the following three values.
- Button1
- Button2
- Button3
The following code snippet creates a MessageBox with a title, buttons, and an icon and sets the second button as a default button.
|
string message = «Do you want to abort this operation?»; string title = «Close Window»; MessageBoxButtons buttons = MessageBoxButtons.AbortRetryIgnore; DialogResult result = MessageBox.Show(message, title, buttons, MessageBoxIcon.Warning, MessageBoxDefaultButton.Button2); if (result == DialogResult.Abort) { this.Close(); } elseif(result == DialogResult.Retry) { // Do nothing } else { // Do something } |
Example 3: Calculate Area and Perimeter of a Rectangle Using C# Windows Form Application
In this example, we’ll learn How to calculate area and perimeter of a rectangle in C# WinForm. To find the area of a rectangle or a square you need to multiply the length and the width of a rectangle.
Form Design:
Source Code:
|
private void button1_Click(object sender, EventArgs e) { int width = Convert.ToInt32(txtWidth.Text); int length = Convert.ToInt32(txtLength.Text); int area = width * length; int perimeter = (width + length) * 2; lblPerimeter.Text = «Perimeter : « + perimeter; lblArea.Text = «Area : « + area; } |
Output:
Example 4:
Приложения Windows Forms
Если вы захотите писать программы, похожие на привычные приложения Windows, то наверняка воспользуетесь классами из пространства имен System.Windows.Forms. Они позволяют задействовать кнопки, списки, текстовые поля, меню, окна сообщений и множество других «элементов управления». Элементы управления — это то, что вы помещаете в форму. Они нужны для вывода информации, например, текстовой (элемент управления Label ) или графической (элемент управления PictureBox ), либо для выполнения определенных действий, например, выбора значения или перехода к другой форме после нажатия кнопки. Все элементы управления помещаются на форму.
Понятие «форма», принятое в программировании, родственно понятию «форма анкеты» или «форма документа» из обычной жизни. На форме можно в определенном порядке расположить различные элементы (текст, картинки, поля для заполнения и т. д.). Когда нам дают готовую форму документа и просят ее заполнить, мы обычно читаем содержащуюся в ней типовую информацию, а затем вписываем недостающие данные в определенные строки.

В программировании понятие формы во многом похоже: форма позволяет размещать текст, изображения, поля ввода, кнопки и т. п., добиваясь их точного расположения на экране. В консольном приложении на экран выводятся только строки текста.
Компания Майкрософт предоставила в составе библиотеки классов .NET Framework огромное количество «элементов управления», которые можно помещать на формы. Освоив этот инструмент, вы сможете быстро создавать эффектные приложения.
Некоторые полезные классы из пространства имен System.Windows.Forms
Вот некоторые элементы управления, которые можно размещать на формах:
- Label (Надпись).
- Button (Кнопка).
- ListBox (Список).
- CheckBox (Флажок).
- RadioButton (Переключатель).
- MessageBox (Окно сообщений).
- Menu (Меню).
- TabControl (Управление вкладками).
- Toolbar (Панель инструментов).
- TreeView (Дерево).
- DataGrid (Сетка данных).
- PictureBox (Изображение).
- RichTextBox (Текстовое поле с поддержкой формата RTF).
Работа с примерами программ Windows Forms в Visual C# Express
Возможно, вы предпочтете не использовать уже заготовленные примеры проектов, а разрабатывать их «с нуля». В таком случае нужно учесть, что для каждого проекта C# Express сразу же создает два файла (с именами Form1.cs и Program.cs ) и наполняет их исходным кодом на языке C#, то есть вы изначально получаете простейшую, но полноценную программу. Предлагаемый нами способ работы с уже полученным проектом состоит в выполнении следующих действий:
- Удалите файл Form1.cs.
- Замените код в файле Program.cs на код примера, с которым вы работаете.
Оба этих действия не понадобятся, если вы открываете программы с помощью команды «Открыть проект» в меню «Файл» и находите нужный проект в той папке, куда его поместили после разархивации.
Пример программы 3.3
Рассмотрим пример простейшего приложения Windows Forms. Оно всего лишь создает новую форму и выводит определенный текст в заголовок окна формы.
using System.Windows.Forms;
  class SimpleWindowsForm : Form
  {
    // Метод-конструктор нашего класса
    public SimpleWindowsForm()
    {
      // Указываем заголовок окна
      this.Text = "Это простая форма с заголовком";
    }
    static void Main()
    {
      // Создаем новый экземпляр класса
      //и запускаем его на выполнение
      // В результате на экране дисплея откроется форма
      Application.Run(new SimpleWindowsForm());
    }
  }
Листинг
3.3.
Пример программы 3.4
Следующий пример тоже достаточно прост, но мы делаем шаг вперед — размещаем на форме кнопку.
using System.Windows.Forms;
  class SimpleWindowsFormWithButton : Form
  {
    Button button1;

    // Метод-конструктор нашего класса
    public SimpleWindowsFormWithButton()
    {
      // Указываем заголовок окна
      this.Text = "Форма с командной кнопкой";

      // Добавляем кнопку в коллекцию элементов управления формы
      // Хотя на кнопке написано: "Нажми меня!",
      // пока при нажатии ничего не происходит!
      button1 = new Button();
      button1.Text = "Нажми меня!";
      button1.Top = 100;
      button1.Left = 100;
      button1.Height = 50;
      button1.Width = 70;
      this.Controls.Add(button1);
    }

    static void Main()
    {
      // Создаем и запускаем форму
      Application.Run(new SimpleWindowsFormWithButton());
    }
  }
Листинг
3.4.
Пример программы 3.5
Кнопку на форму мы поместили, но при нажатии на нее ничего не происходит. Это скучно.
Нам нужно описать метод, который будет выполнять какое-либо действие при нажатии на кнопку. Пусть при этом текст в заголовке окна будет меняться. Поскольку такой метод отслеживает наступление некоторого события (в нашем случае – нажатие на кнопку) и затем каким-то образом обрабатывает его, он, напомним, называется «обработчик события». Кроме того, надо привязать обработчик события к соответствующему событию, то есть к нажатию на кнопку.
using System;
using System.Windows.Forms;
using System.Drawing;

class FormWithWorkingButton : Form
{
  Button mrButton;
  // Метод-конструктор нашего класса
  public FormWithWorkingButton()
  {
    // Указываем заголовок окна
    this.Text = "Форма с работающей кнопкой!";
    // Добавляем кнопку и привязываем ее к обработчику события
    mrButton = new Button();
    mrButton.Text = "Нажми меня";
    mrButton.Top = 100;
    mrButton.Left = 100;
    mrButton.Height = 50;
    mrButton.Width = 70;
    mrButton.Click += new System.EventHandler(mrButton_Click);
    this.Controls.Add(mrButton);
  }

  static void Main()
  {
    // Создаем и запускаем форму
    Application.Run(new FormWithWorkingButton());
  }

  // Обработчик события, срабатывающий при нажатии кнопки
  void mrButton_Click(object sender, EventArgs e)
  {
    // Изменяем текст
    mrButton.Text = "Кнопка была нажата!";
  }
}
Листинг
3.5.
Пример программы 3.6
Мы добились успеха: наша программа умеет выполнять основные действия. Теперь добавим на форму несколько новых элементов управления, аккуратно разместим их и немного поработаем с ними. Возьмем элементы управления 4-х типов: Button, ListBox, MessageBox и PictureBox.
Обратите внимание: кроме System.Windows.Forms в этом примере упоминается пространство имен System.Drawing. Дело в том, что мы используем элемент управления PictureBox, а для работы с изображениями требуются классы Drawing.
using System.Windows.Forms;
using System.Drawing;

class MyForm : Form
{
  // Объявим элемент ListBox как поле класса:
  // нам придется обращаться к нему из разных методов
  ListBox listBox1;

  // Метод-конструктор нашего класса
  public MyForm()
  {
    //Размеры формы
    this.Size = new Size(400, 400);
    // Создадим элемент PictureBox, поместим в него изображение,
    // добавим его на форму
    PictureBox pictureBox1 = new PictureBox();
    pictureBox1.SizeMode = PictureBoxSizeMode.StretchImage;
    Bitmap image1 = new Bitmap ("..//..//images//Zakat.jpg");
    pictureBox1.ClientSize = new Size(this.Width, 150);
    pictureBox1.Image = (Image)image1;
    this.Controls.Add(pictureBox1);
    // Создаем объект Button, определяем некоторые из его свойств
    Button button1 = new System.Windows.Forms.Button();
    button1.Location = new Point(150, 160);
    button1.Size = new Size(100, 30);
    button1.Text = "Нажми меня";
    button1.Click += new System.EventHandler(button1_Click);
    this.Controls.Add(button1);

    // Создаем ListBox, определяем свойства и добавляем на форму
    listBox1 = new System.Windows.Forms.ListBox();
    listBox1.Location = new System.Drawing.Point(20, 200);
    listBox1.Size = new Size(100, 100);
    listBox1.Items.Add("Лес");
    listBox1.Items.Add("Степь ");
    listBox1.Items.Add("Озеро");
    listBox1.Items.Add("Море");
    listBox1.Items.Add("Океан");
    listBox1.SelectedIndex = 2;
    this.Controls.Add(listBox1);
  }

  // Обработчик события, срабатывающий при нажатии кнопки
  void button1_Click(object sender, System.EventArgs e)
  {
    // Выводим сообщение с указанием выбранного в списке пункта
    MessageBox.Show(this, "Вы выбрали " + listBox1.SelectedItem,
    "Уведомление", MessageBoxButtons.OK);
  }

  static void Main()
  {
    // Создаем и запускаем форму
    Application.Run(new MyForm());
  }

  private void InitializeComponent()
  {
    this.SuspendLayout();
    //
    // MyForm
    //
    this.BackColor = System.Drawing.SystemColors.Control;
    this.ClientSize = new System.Drawing.Size(292, 273);
    this.Name = "MyForm";
    this.ResumeLayout(false);
  }
}
Листинг
3.6.
Windows Forms is a framework available in Visual Studio that allows you to build desktop applications with the assistance of a graphical user interface. This allows you to click and drag widgets such as buttons or labels directly onto a canvas, and manipulate the properties of each widget such as its font-size, color or border.
In this article, a simple Celsius to Fahrenheit Converter will be used as an example to go through the basics of how to set up a Windows Form Application. Visual Studio 2019 Community Edition is the edition used for this tutorial.
How to Create the Windows Forms Project in Visual Studio
First, create the project in Visual Studio.
- Open Visual Studio and select Create a New Project.
- Visual Studio will provide you with a list of project templates you can choose from.
-
To create a Windows Forms Application, search for Windows Form App and select it from the list of templates. Once this is selected, click on Next.

If the Windows Form App option is not available on the list, modify your installed version of Visual Studio. In Visual Studio Installer, add the .NET desktop development workload for Desktop and Mobile, and re-launch Visual Studio.
-
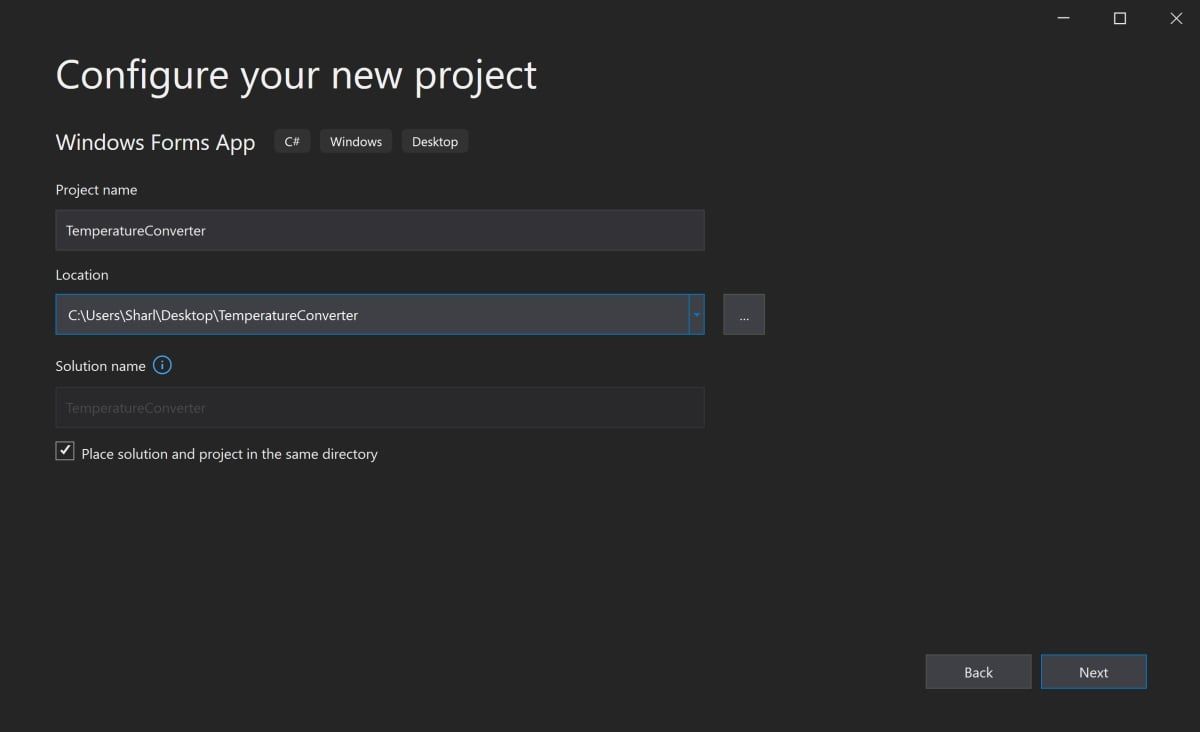
Add a name and location for the project, and click on Next. The location is the directory where the code files will be stored.

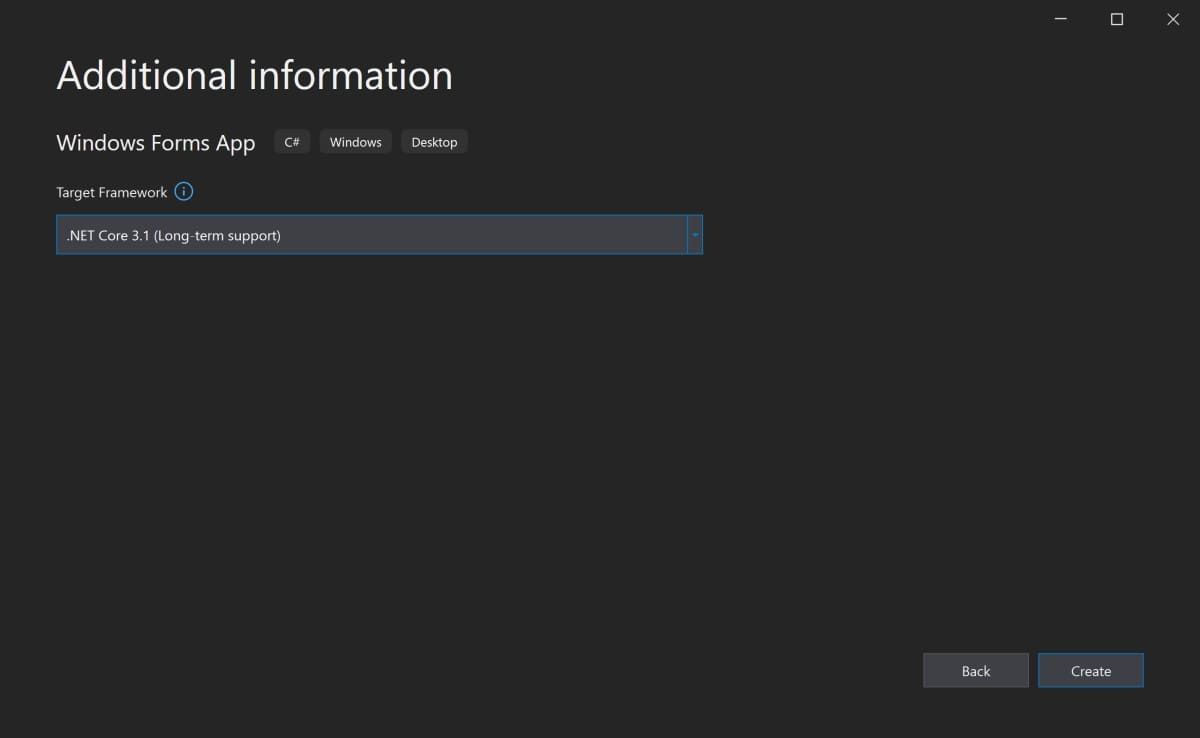
- On the next screen, keep the default selection of .NET Core 3.1.
-
Click Create.

-
Once Visual Studio has finished creating the project, the project will open.


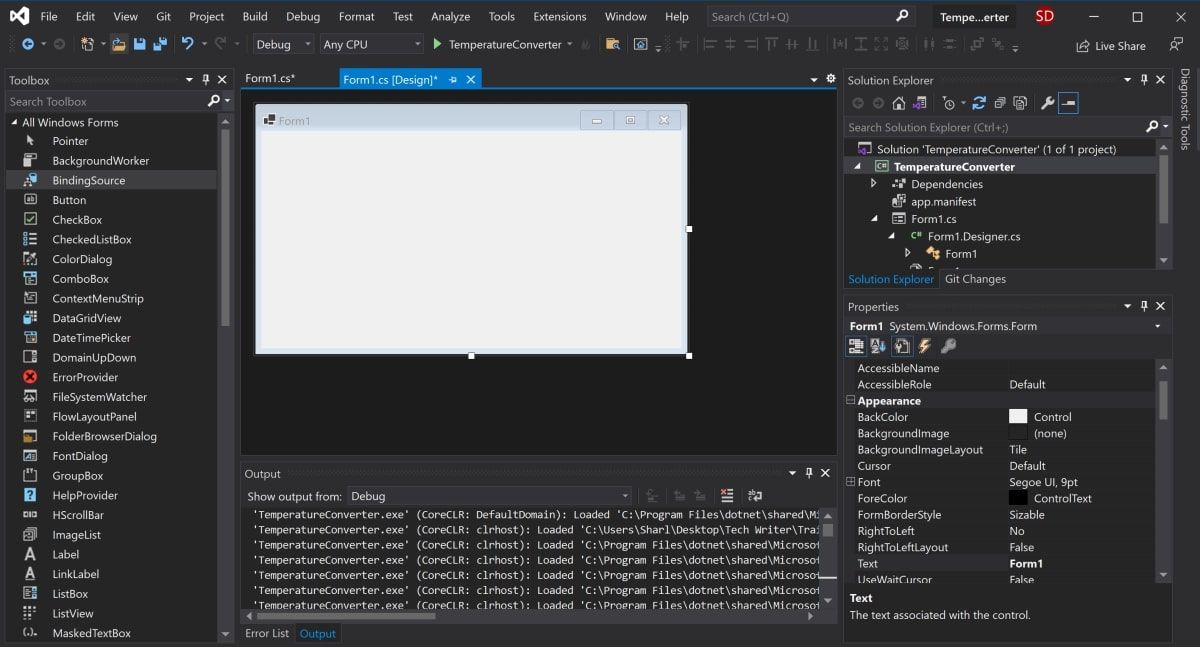
How to Add Elements to the Project Canvas
The canvas is the white area located at the top-left of the screen. Click and drag the points on the bottom, right, or bottom-right of the canvas to resize it if needed.
To create the UI of the application, add widgets such as buttons or text boxes onto the canvas.
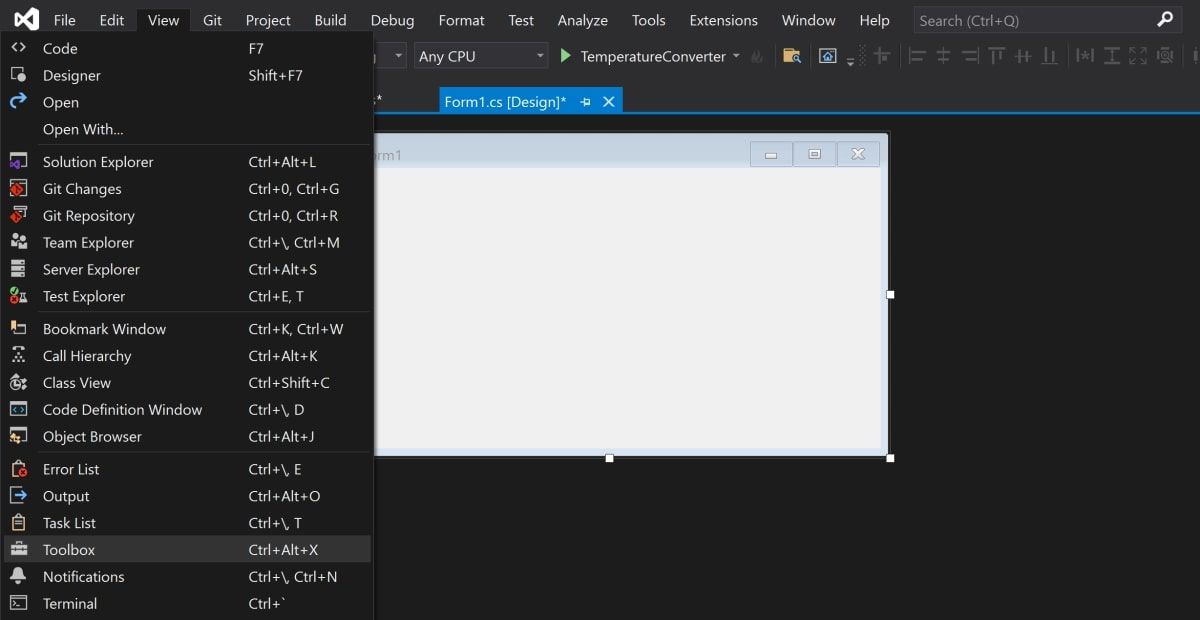
-
Open the View Tab at the top of the window, and select Toolbox.

- This will add a toolbox to the left side of the application. Select the pin icon in the top-right of the toolbox to pin it there permanently.
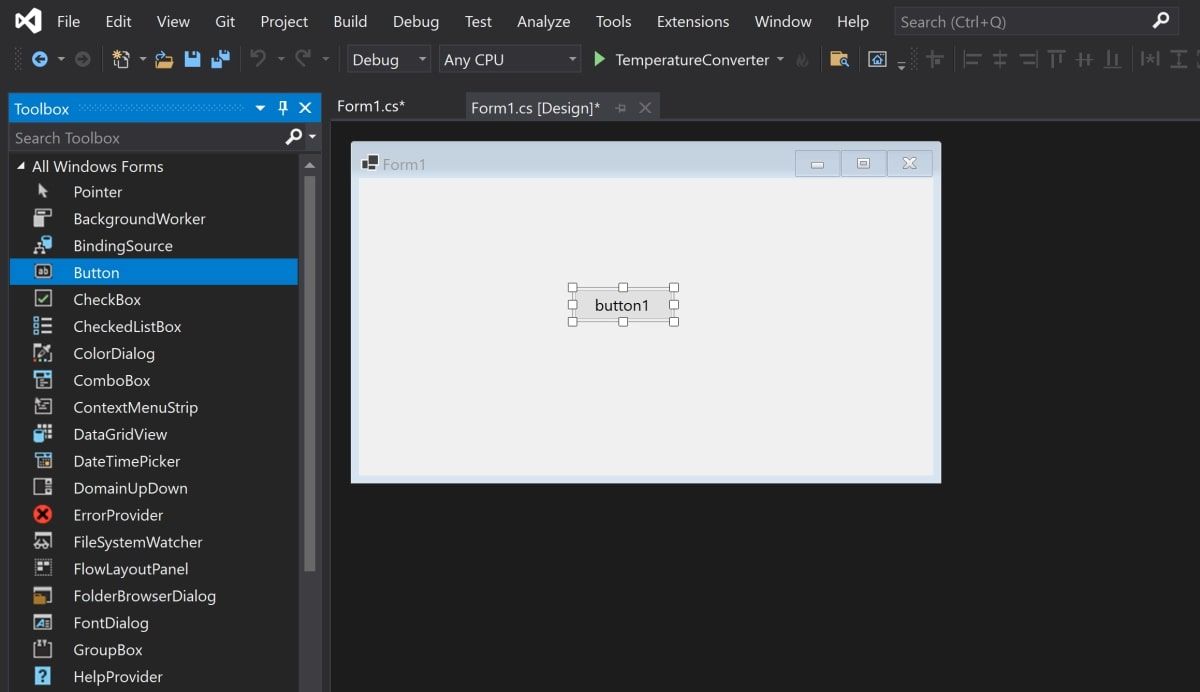
-
This is where you can drag any widget from the toolbox onto the canvas. Highlight a button from the toolbox, and drag it onto the canvas.

-
Drag two more text boxes onto the canvas, along with three labels (two labels for each text box, and one label for the title at the top of the application).

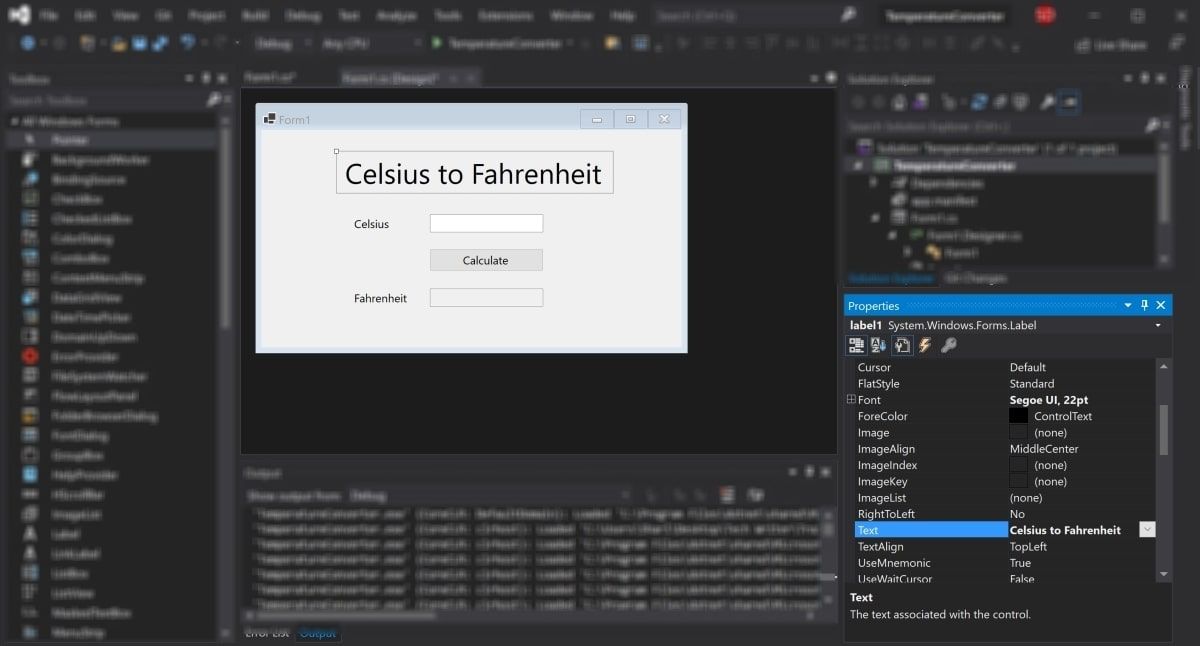
- Every widget on the canvas has properties associated with them. Highlight a widget to display the Properties window in the bottom-right of Visual Studio, which lists all the properties that widget has. These properties can include the text, name, font size, border, or alignment of the highlighted widget.
-
At the moment, the text on these widgets still say label1, label2, or button1. Select the label1 widget and edit the Text property in the properties window to say «Celsius to Fahrenheit». Change the font size to be 22pt.

-
Similarly, edit the properties of the other widgets on the canvas to be the following:
Widget
Property
New Value
label2
Text
Celsius
label3
Text
Fahrenheit
button
Text
Calculate
Fahrenheit text box
ReadOnly
True

How to Handle Events and Write Code in the Code-Behind
Widgets on the canvas can be tied to events. Events can include things like clicking on a button, changing the text inside a text box, or selecting a particular radio button. When these events happen, it can cause a section of code in the Code-Behind to trigger.
C# is the language used when creating Windows Forms. If you haven’t already used C#, there are many practical reasons to learn C# programming.
For this particular application, add an event to the Calculate button, to trigger a section of code to run when this button is pressed.
-
Double-click the Calculate button to automatically open Form1.cs with a new Event method:
private void calculateButton_Click(object sender, EventArgs e) - This is where you will add the code that will perform the Celsius to Fahrenheit calculation, and display the result in the Fahrenheit text box. To do this, you need to be able to read the value from the Celsius text box, and modify the Fahrenheit text box to display the result.
-
Go back to the canvas, and re-edit the properties as shown before. This time, edit the Name property for both the Celsius and Fahrenheit text boxes. These names can be used to reference the text boxes in the code.
Widget
Property
New Value
Celsius Text Box
Name
celsiusTextBox
Fahrenheit Text Box
Name
fahrenheitTextBox
- Go back to the calculateButton_Click function in Form1.cs.
-
Now, the Celsius text box can be referred to in the code using the name «celsiusTextBox». The Celsius value the user entered is stored in its Text property. However, since it’s a string, parse this into a double in order to include it in the future Fahrenheit calculations.
        private void calculateButton_Click(object sender, EventArgs e)
{
    // Get the value that the user entered in the Celsius Text Box
   double celsiusValue = Double.Parse(celsiusTextBox.Text);
} -
The celsiusValue variable now stores the value that the user entered in the Celsius Text Box. The formula for converting Celsius to Fahrenheit is (celsiusValue * 9 / 5) + 32. Therefore, the result can now be calculated and stored in the Fahrenheit Text Box.
private void calculateButton_Click(object sender, EventArgs e)
{
// Get the value that the user entered in the Celsius Text Box
double celsiusValue = Double.Parse(celsiusTextBox.Text);// Apply the calculation
double result = (celsiusValue * 9 / 5) + 32;// Store the result in the Fahrenheit Textbox
fahrenheitTextBox.Text = result.ToString();
}
How to Run and Debug the Windows Forms Program
Running the Windows Forms Program in Visual Studio
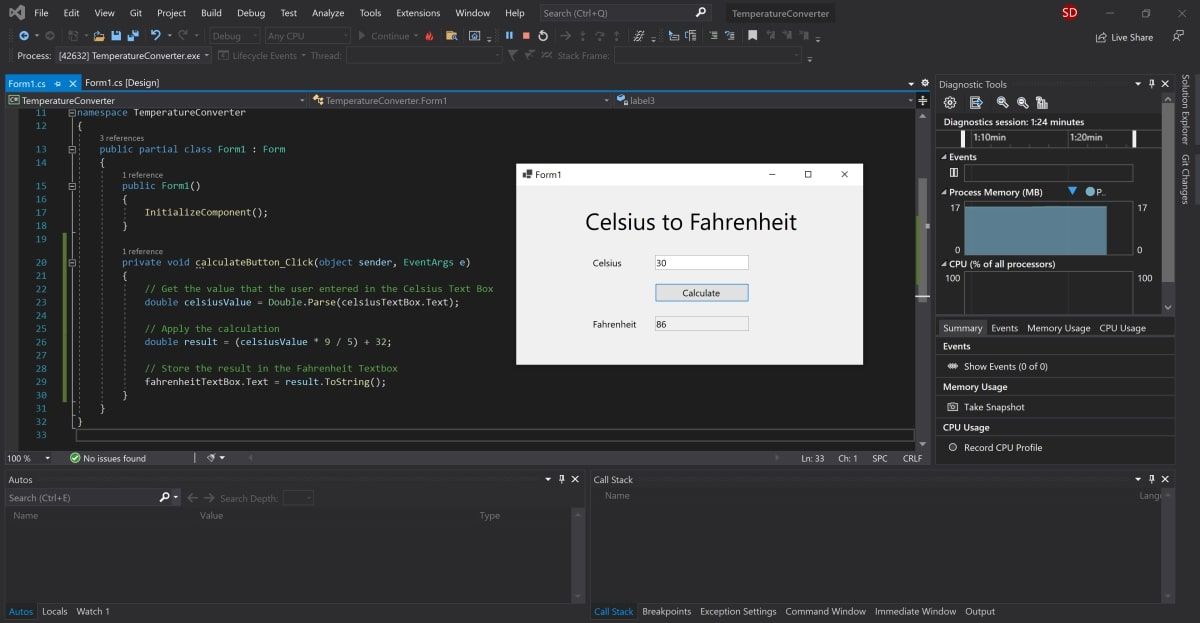
Now that the UI and code logic is set up, run the program to see it working.
-
To run the program, select the green arrow at the top of the toolbar in Visual Studio.

-
Once the project has loaded, add a value into the Celsius text box and press the Calculate button. This will add the result into the Fahrenheit text box.

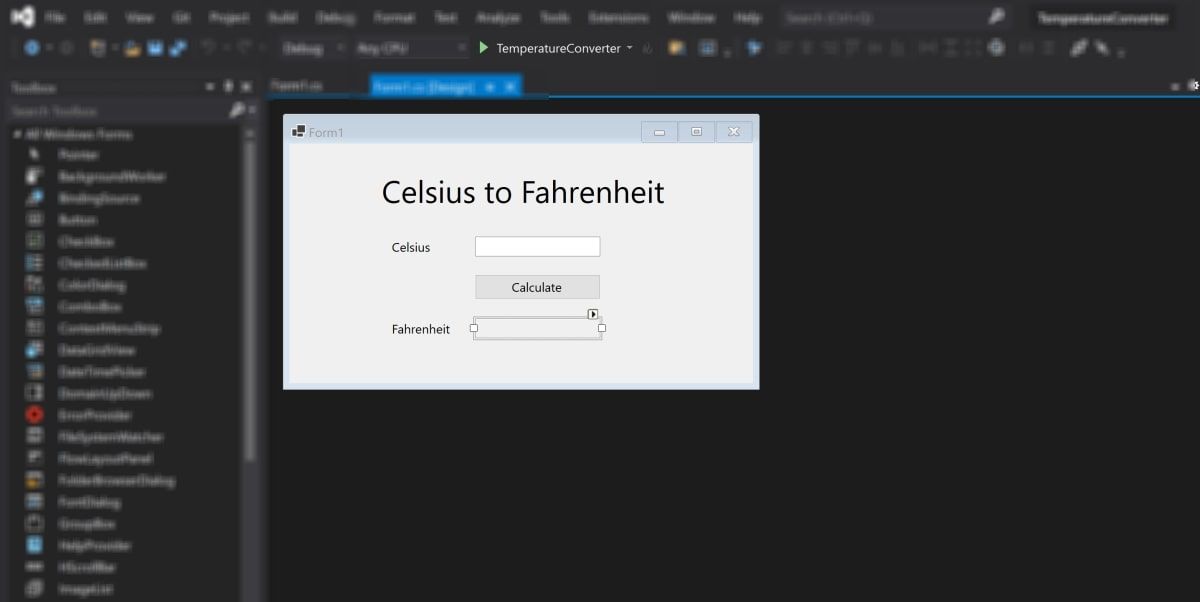
- If the program is blurry at runtime, it is likely your application is not DPI aware. This can cause scaling and resolution issues, so this will need to be enabled. You can also read more about configuring display scaling on Windows 10 for High-DPI monitors.
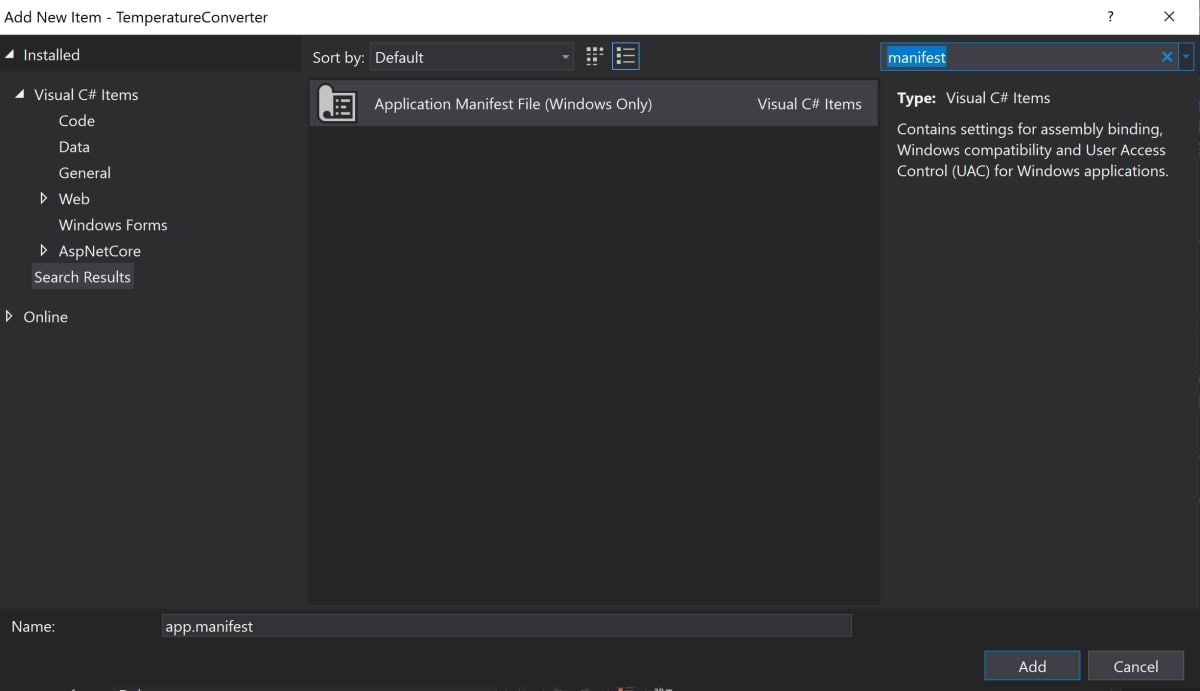
- Right-click on the TemperatureConverter Project in the Solutions Explorer. Select Add, then select New Item.
-
Search for the Application Manifest File, and click Add.

-
Copy the following code into the new app.manifest file, as a child of the assembly tag (if the code is already generated, just un-comment it).
        <application xmlns="urn:schemas-microsoft-com:asm.v3">
 <windowsSettings>
   <dpiAware xmlns="http://schemas.microsoft.com/SMI/2005/WindowsSettings">true</dpiAware>
   <longPathAware xmlns="http://schemas.microsoft.com/SMI/2016/WindowsSettings">true</longPathAware>
 </windowsSettings>
</application> - For this change to take effect, re-run the program. Select the red stop button at the top of the toolbar, then select the green play button again.
Debugging the Windows Forms Program
You may want to debug the program if the logic of your Windows Forms application is not working as expected.
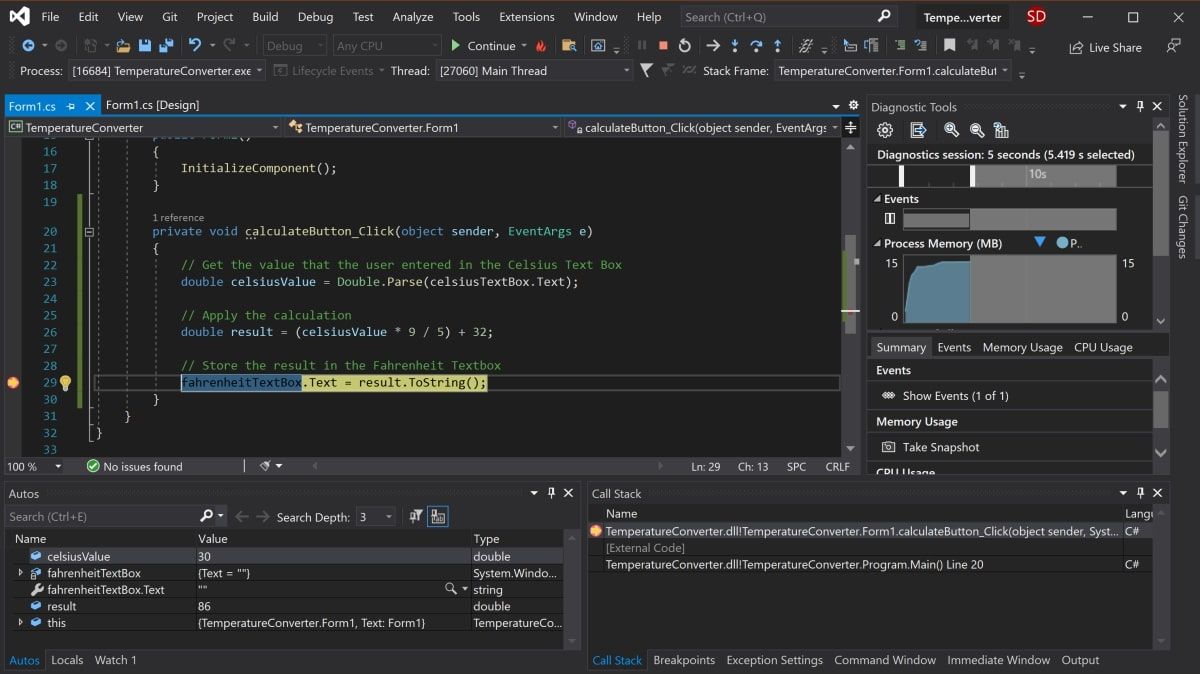
- Navigate back to the calculateButton_Click function in Form1.cs and click anywhere on the gray bar in the far-left of the screen. This will add a breakpoint, which is indicated by a red circle.
- Press the «Calculate» button again to trigger this method to execute. The program will pause when it hits the breakpoint to show all the values stored in the variables at that point.
-
To continue the program, click the green Continue arrow at the top of the toolbar.

Running the Program Using an Executable File
If you don’t want to run your program through Visual Studio, use the standalone executable file for the program. This is automatically generated.
-
Navigate to the executable file, which can be found here:
<your-project-folder>/bin/Debug/netcoreapp3.1/TemperatureConverter.exe - Click on the executable file to directly run the program.
Adding More to Your Windows Form
Hopefully you now have a basic understanding of the basic structure of a Windows Form Application. You can continue exploring additional Windows Forms features by experimenting with new widgets, and taking a deeper dive into the other various events that can be handled.
Once you are more familiar with Windows Forms, you can start creating more complex applications. You can also explore many of the other ways you can create applications on Windows desktop.