
Windows 10 is considered to be one of the best and secure OS among all the versions. There are so many system updates that keep on taking place internally and help you in potentializing your system to keep it safe and secure. Windows 10 receives the updates pushed by “Microsoft”.
It happens so many times that Windows keeps on downloading updates automatically and when it gets completed, these updates get installed instantly. They don’t require any review or check of any kind. Sometimes, it might be necessary to check or find out about what are the updates which are getting installed on your system. Windows 10 provides a very simple solution to such problems. Using this operating system, you can easily See Update History in Windows 10 which has been installed in your systems so far. Let’s see how to do this.
Methods list
Way-1: Manually through Settings
Way-2: Using URI Command or shortcut
Way-3: Via CMD Command prompt
Way-4: By running SystemInfo
Way-5: Via Windows PowerShell
See Update History in Windows 10
To view your update history in Windows 10, follow the steps mentioned below –
Way-1: Manually through Settings
- Press – Winkey+I.
- Select – Update & Security.
- Click on – Windows update.
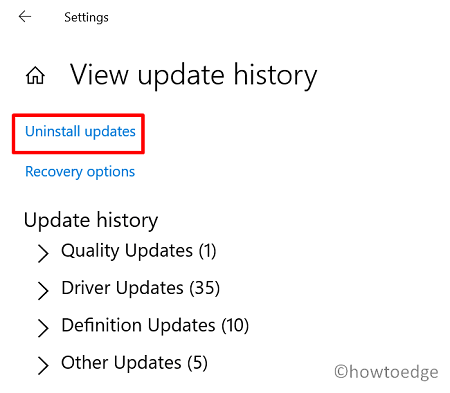
- Next, click – View your update history.
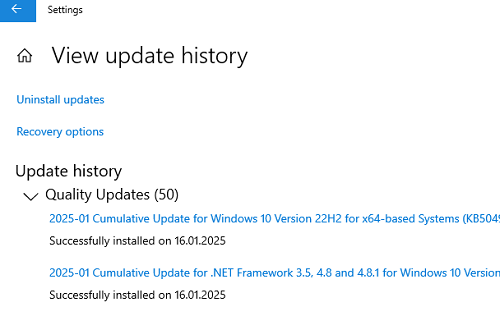
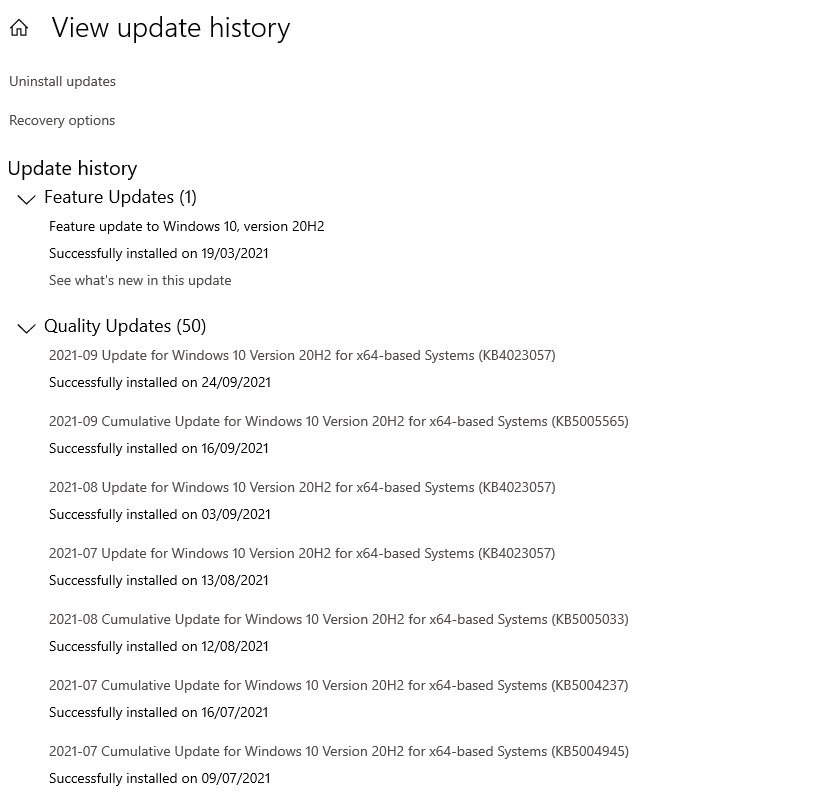
- Here, you will see a list of “Quality Updates”, “Driver Updates”, “Definition Updates”, and “Other Updates” installed so far in Windows 10, with the most recent appearing on the top. The View update history Settings page is shown as in the below screenshot –
- Expand the categories of updates to see the full list respectively.
Way-2: Using URI Command or shortcut
- Press – Win+R.
- Type – ms-settings:windowsupdate-history.
- Hit – Enter or click OK.
Way-3: Via CMD Command prompt
You are able to easily and directly see Update History in Windows 10 through some cmd commands. Follow the steps –
- Click the – Start.
- Type – cmd.
- Press – Ctrl+Shift+Enter.
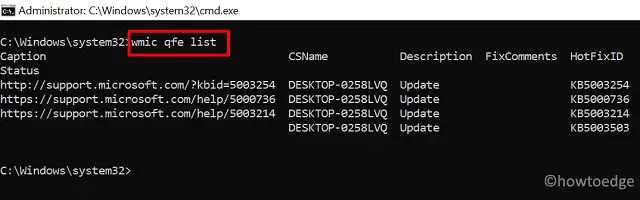
- Once the Elevated command prompt appears, enter the following commands and press Enter –
Have the brief of the updates –
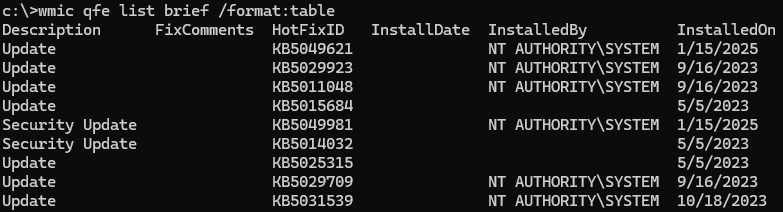
wmic qfe list brief
See the full list of each hotfix installed on your PC –
wmic qfe list full
Get the updates in tabular form –
wmic qfe list full /format:table
Save the output in a file –
wmic qfe list full /format:table > C:\Users\navin\Desktop\WindowsUpdatesReport.htmlWay-4: By running SystemInfo command
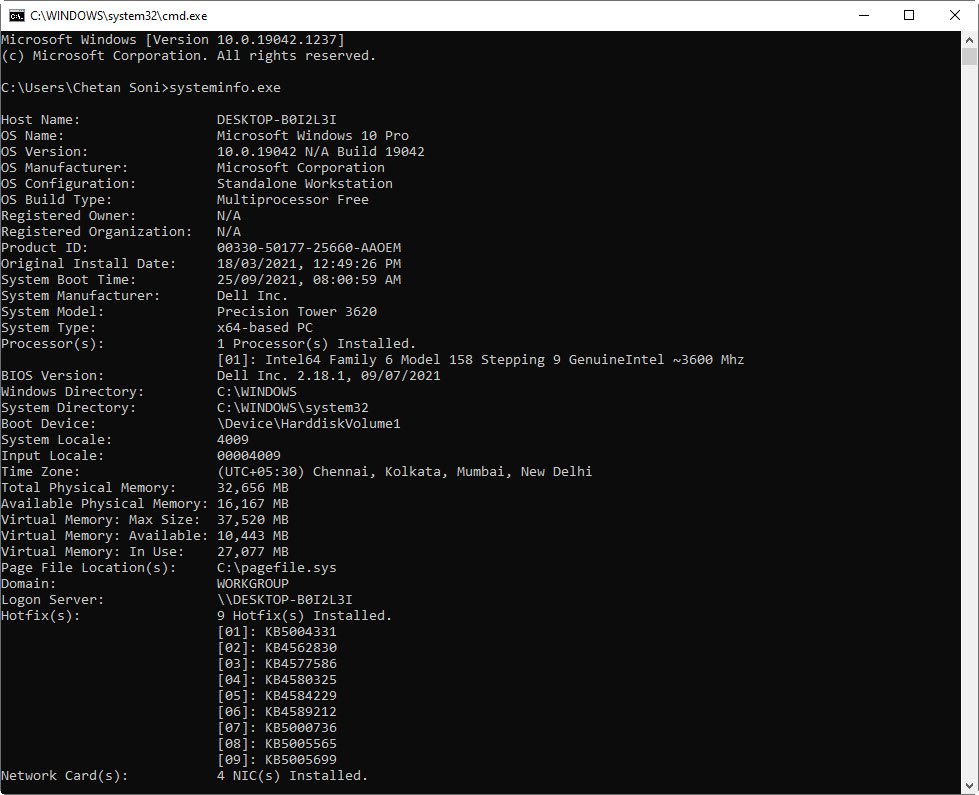
In case, you only are trying to view a list of KB numbers, then run the following command –
systeminfo | find “KB”
Way-5: Via Windows PowerShell
- Press the – Win+X.
- Select the – Windows PowerShell (admin).
- Type the following cmdlet and hit the Enter –
Get-Hotfix.
Conclusion
System Updates are a very useful and powerful thing for any version of windows. It not only enhances the speed of your system but also makes your PC secure against new viruses and Trojan attacks. It basically works as the powerhouse of an operating system. Having the access to see review the update is something prettier. See Update History in Windows 10 and tell us your views on this in the comment box below.
Another useful:
- How to View and Customize Windows Update on Windows 10
- How to Pause App Updates Download in Store Beta Windows 10
Графический журнал истории обновлений в Windows в панели управления содержит базовую информацию об установленных обновлений (URI команда быстрого доступа
ms-settings:windowsupdate-history
) и не удобен для поиска. В этой статье рассмотрим, как вывести список установленных обновлений в Windows из командной строки, узнать, когда последний раз ставились обновления на компьютере, и как проверить, установлено ли определенное обновление на локальном или удаленном компьютере.
Ранее для вывода списка обновлений в Windows чаще использовалась утилита командной строки wmic. Чтобы получить удобную табличку со списком установленных обновлений, запустите
cmd.exe
и выполните команду:
wmic qfe list brief /format:table
В таблице будут показаны номера обновлений (HotFixID), даты установки (InstalledOn), а также имя пользователя, который установил обновление (InstalledBy).
Пользователь
NT AUTHORITY\SYSTEM
указывает на то, что обновление было установлено автоматически службой Windows Update. Если обновление Windows было установлено вручную, здесь будет указано имя пользователя.
Однако Microsoft анонсировала, что поддержка использование инструментов для обращения к WMI (включая утилиту wmic) будет отключена по умолчанию в новых версиях Windows (начиная с Windows 11 24H2), поэтому для получения информации об обновления лучше использовать PowerShell.
Аналогичная PowerShell команда для вывода таблицы со список установленных обновлений (с сортировкой по дате установки):
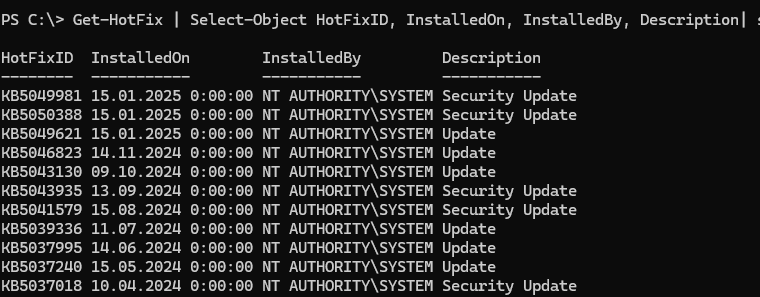
Get-HotFix | Select-Object HotFixID, InstalledOn, InstalledBy, Description| sort InstalledOn -Desc
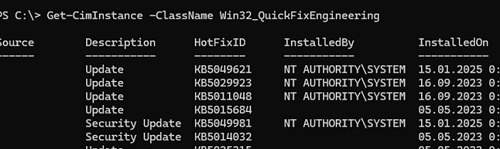
Этот командлет получает информацию из класса Win32_QuickFixEngineering, поэтому такой же список можно вывести так:
Get-CimInstance -ClassName Win32_QuickFixEngineering| select HotFixID, InstalledOn | sort InstalledOn -Descending
Выгрузить список установленных обновлений в текстовый файл:
Get-HotFix |Format-Table -AutoSize > c:\temp\updatelist.txt
Проверить, установлено ли конкретное обновление по (KBID):
Get-HotFix -id 'KB5049621'
Вывести список обновлений на удаленном компьютере:
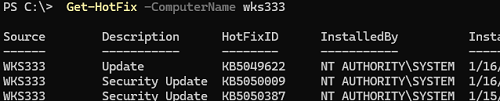
Get-HotFix -ComputerName wks333
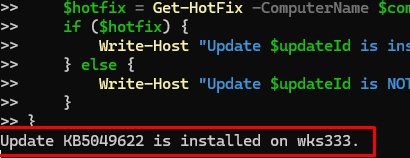
Проверить, установлено ли определенное обновление на нескольких компьютерах (список компьютеров в AD можно сформировать с помощью командлета Get-ADComputer).
$computers = @('Computer1', 'Computer2', 'Computer3')
$updateId = 'KB5049622'
foreach ($computer in $computers) {
$hotfix = Get-HotFix -ComputerName $computer -Id $updateId -ErrorAction SilentlyContinue
if ($hotfix) {
Write-Host "Update $updateId is installed on $computer."
} else {
Write-Host "Update $updateId is NOT installed on $computer."
}
}
Вывести дату последней успешной установки обновлений в Windows:
Get-HotFix| sort InstalledOn -Desc|select InstalledOn -First 1

Есть отдельный PowerShell модуль PSWindowsUpdate для управления обновлениями. В его состав входя командлеты
Get-WUHistory
(вывести полную историю установки обновления, включая ошибк) и
Get-WULastResults
(дату последнего успешного обновления и сканирования на сервере обновлений).
-
Home
-
News
- How to Check Windows 10 Update History – 3 Ways
By Alisa |
Last Updated
If you want to check what updates are installed in your Windows 10 computer, you can check Windows 10 update history. This tutorial provides three ways to help you check update history in Windows 10 so as to check if a specific Windows update is installed. MiniTool software also provides you free data recovery software, hard drive partition manager, etc.
Windows 10 regularly checks and installs new updates to fix bugs and glitches of the OS, add security updates, add new features, etc. You can view what updates are installed in your Windows 10 computer by checking Windows 10 update history if you want.
This tutorial introduces 3 ways to allow you check update history in Windows 10 and check if specific Windows update is installed in Windows 10.
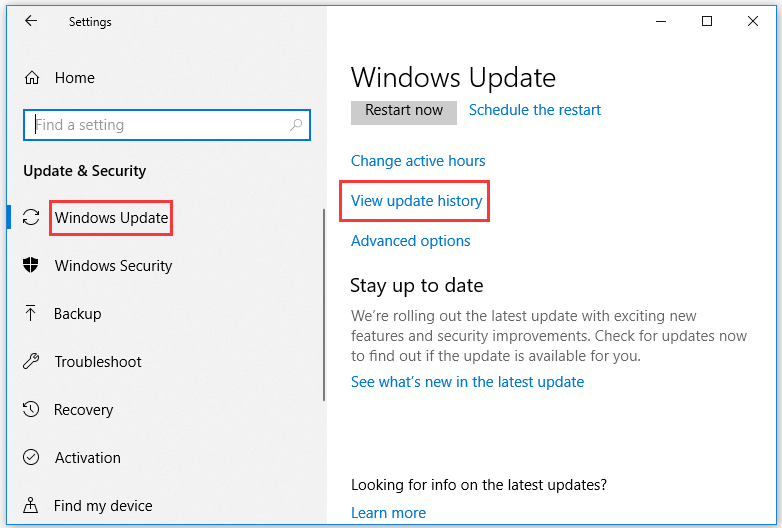
How to Check Windows 10 Update History from Settings
- You can click Start -> Settings, or you can press Windows + I to open Settings
- Click Update & Security in Settings, and click Windows Update in the left pane.
- In the right window, you should see a View update history link under Windows Update, click this link.
- In the pop-up window, you can check the complete list of installed updates in Window 10, incl. Quality Updates, Driver Updates, and Other Updates. Some updates are successfully installed while some may be failed.
- You can check if specific Windows update is installed in the list. If you click the target Windows update link, you will be directed to a Microsoft support website that provides details of this update.
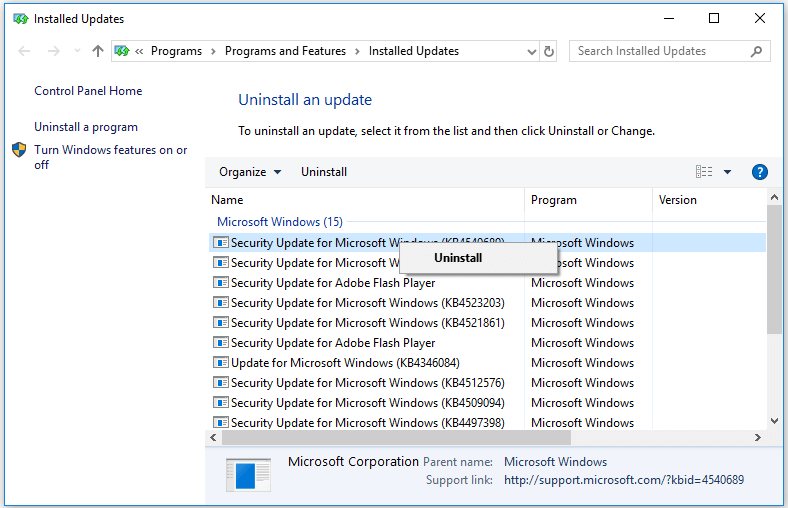
If a Windows 10 update causes problems to your computer, you can click Uninstall updates link to open the Uninstall an update window. You can right-click the problematic Windows update to uninstall the Windows 10 update.
How to Check Update History Windows 10 from Control Panel
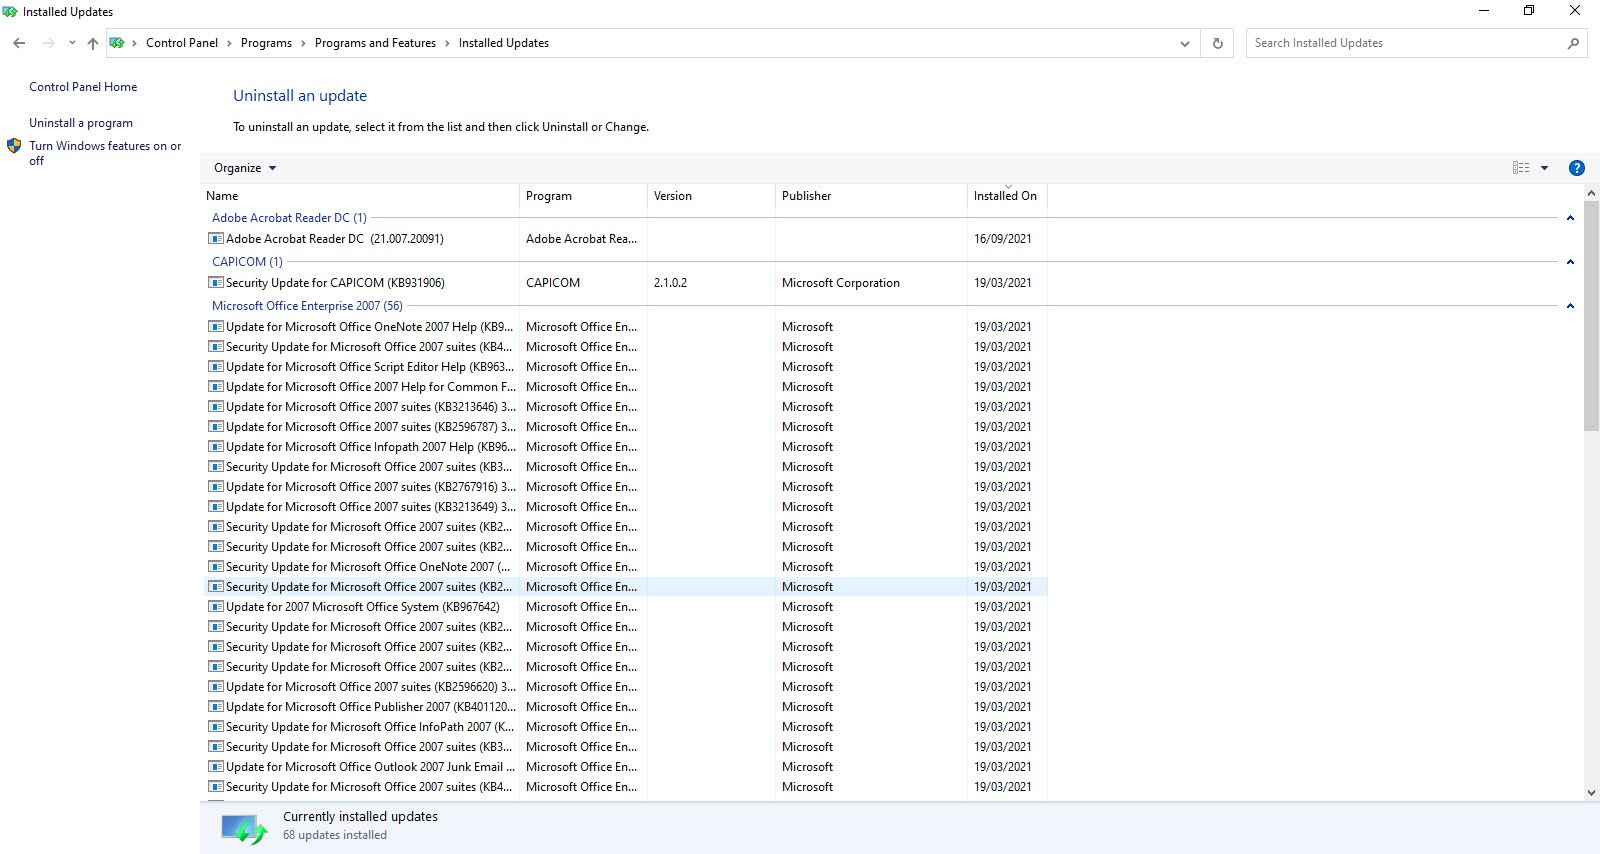
- You can also check installed updates Windows 10 from Control Panel. You can open Control Panel in Windows 10.
- Click Programs -> Programs & Features, and click View installed updates in the left panel to open the Uninstall an update screen like the image above.
- You can check Windows update history in the list. If you want to remove a Windows update, you can right-click it to choose Uninstall.
How to View Windows 10 Update History via Command Prompt
- You can also use Windows Command Prompt to check if an update is installed in Windows 10. Press Windows + R, type cmd, and press Enter to open Command Prompt in Windows 10.
- Next type the following command wmic qfe list in Command Prompt and press Enter. After a while, you can see the list of all installed history updates in your Windows 10 computer.
- If you want to check if a specific update is installed in Windows 10, you can add the KB number of the update and type the command like this: wmic qfe | find “4540689”, and press Enter.

As you can see, it also lists the Microsoft support website link of each update, and it provides detailed information about this update.
If you want to remove one installed Windows update in Command Prompt, you can type this command with its KB number: wusa /uninstall /kb: 4540689 /quiet. You should replace “4540689” with the exact KB number of the specific update that you want to uninstall.
Bottom Line
By using one of the 3 ways above, you can easily check Windows 10 update history and check if specific update is installed in your Windows 10 computer. Hope it helps.
About The Author
Position: Columnist
Alisa is a professional English editor with 4-year experience. She loves writing and focuses on sharing detailed solutions and thoughts for computer problems, data recovery & backup, digital gadgets, tech news, etc. Through her articles, users can always easily get related problems solved and find what they want. In spare time, she likes basketball, badminton, tennis, cycling, running, and singing. She is very funny and energetic in life, and always brings friends lots of laughs.
Windows 10 receives quite a number of updates every now and then to improve its overall security and functionalities. The update can be of anything like security patches, servicing stack, installed apps, device drivers, and many more. When there are so many updates going on, there is a chance that a few of them get corrupted somehow and start failing the basic operations. This might also come into effect when you download and install buggy software.
To find and uninstall problematic patches, you obviously need access to them. Well, in this post, we have come up with four handy ways that you can use to check Windows Update history. They are using the Settings app, Control Panel, CMD, and PowerShell Module. Let’s explore these methods in detail –
To look into Windows 10 Update history data on your device, try any one of the below-discussed methods –
1. View Windows 10 update history using Settings
To get the list of Windows 10 recent updates via Settings, use these steps –
- Press Win & X and select Settings on the Power Menu.
- Expand Update & Security category.
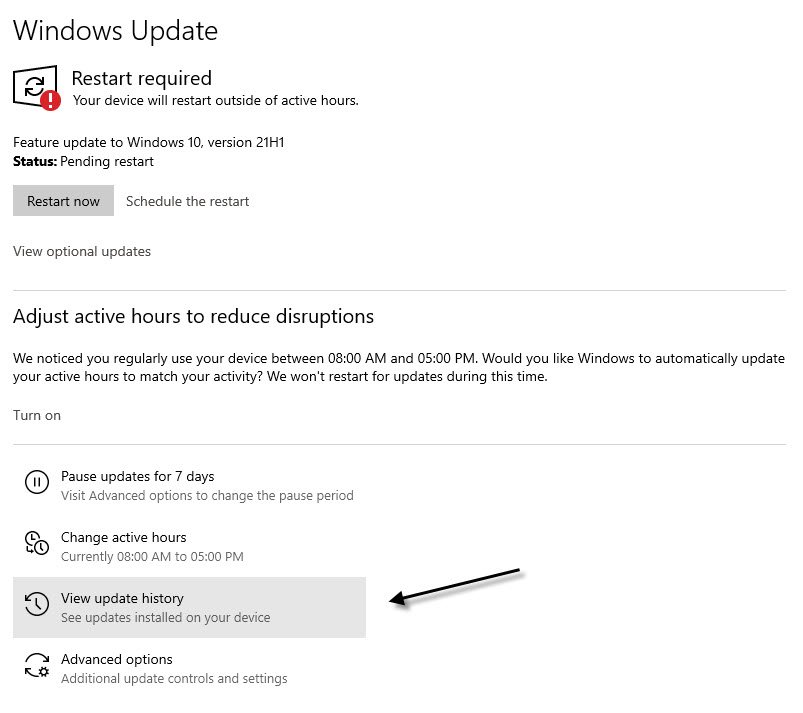
- Under Windows Update, click on the View update history link.
- The system will then display all of the installed updates including quality updates, drivers, definition updates (Windows Defender Antivirus), or the optional ones.
- Click on the individual update to visit the Microsoft Official site wherein you can get to know more about the chosen one. You will get information like changes, improvements, and known issues (if persists any).
Note: In case you are facing issues after installing a particular update, you may uninstall it right on the Settings page itself. Here’s how to proceed –
- On the View update History page, you will find a link to Uninstall updates, click once over it.
- Doing so will redirect you to the Control Panel.
- Select the individual update on the right side, and hit the Uninstall button.
2. Check the installed Windows 10 updates via Control Panel
Some patches like SSU, Microcode, Visual studio are not listed directly on the Settings page. Thanks to Control Panel, you may find all the additional updates here. To view them, use these steps –
- Press Win & S to open the Search window.
- Type Control Panel and hit over the best-matched result.
- When it opens, go to Programs > Programs & Features.
- To check Windows Update history, click View Installed Updates available on the left column.

Remove an update: If you want to find and remove a specific update, search by typing the KB number in the search box.
- Removing any security or non-security patches on the Control Panel is quite easy. Make a right-click on the individual update and hit Uninstall using the context menu.
3. Check the installed update history via Command Prompt
Users may view or remove a buggy update using Command Prompt as well. All you require is to execute a few codes on the elevated console. To do so, read and apply the steps discussed below –
- Open Command Prompt as Admin first.
- Execute this command next to view the list of all installed updates on the computer.
wmic qfe list
- To find a particular update, run this code instead –
wmic qfe | find "KB number"
- Running the above command will open the Microsoft support link containing all the relevant information about the typed-in KB number.
- The command Prompt also provides a feature to remove an installed update. If you do want to uninstall a security/non-security patch, run this code –
wusa /uninstall /kb number /quiet
4. Check update history using PowerShell
Similar to that of Command Prompt, users may also use PowerShell to view and manage Windows 10 updates. However, in this, you need to install a module on the computer i.e. PowerShell Module. Here’s the process goes –
- Open Windows PowerShell as Administrator.
- When it does, install the PSWindowsUpdate Module on your device. To do so, copy/paste the code below and press Enter.
Install-Module PSWindowsUpdate
- PowerShell will then prompt a message asking if you really want to proceed further.
- Type “A” and press Enter to accept installing the module.
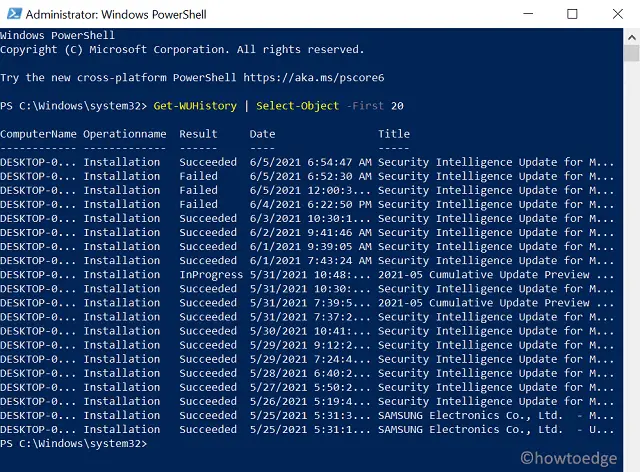
- Next, run this command to see a list of recent 20 updates on the computer –
Get-WUHistory | Select-Object -First 20
Note: You may sometimes receive error messages if PowerShell is not allowed to run scripts locally. Well, in such a scenario, you must tweak a few settings. To do so, read this tutorial.
- To view, even more, replace “20” with the desired number.
Note: If any latest Windows 10 installation is causing you problems, get rid of the same by executing the code below –
Remove-WindowsUpdate -KBArticleID KBNUMBER
- Replace ‘KBNUMBER’ with the actual cumulative update number.
That’s it, if you face any difficulty performing either of the above methods, tell us in the comment section.

Windows 10 is one of the world’s most popular operating system by Microsoft. Updating the OS is very important for system maintenance, better security and faster speed. Microsoft’s Windows 10 is rapidly catching up around the world.
Also Read: How To Enable Telnet Client in Windows 10
Windows 10 is a major release of the Windows NT operating system developed by Microsoft. On Windows 10, there are many ways from where you can easily check your “windows update history” to see a list of updates installed on your computer.
The Windows 10 update history can also come in handy when you want to know more about a recently installed quality update.
1. Using Settings
Settings on Windows 10 allow you to control almost all of your computer’s activities at all times.
To view Windows Update History using Settings, navigate to Start Menu and navigate to Settings -> Update and Security.
Next you need to click on View Update History. In the update history list, you will get a lot of information such as: Update name, date and time of update, version code.
2. Using Command Prompt
Command Prompt is Windows command line terminal which provides a lot of information related to your system.
To view Windows Update History using CMD, type the following command and press enter:
Command: systeminfo.exe
3. Using Control Panel
Control Panel is very special for the computer because inside this panel there are all the settings from which we can control all the things of the computer. You can use the Control Panel to change various settings for Windows.
To view Windows Update History using control panel, you have to navigate Control Panel -> Programs -> Program and Features -> View Installed Updates
4. Using PowerShell
PowerShell is an another terminal like the Command Prompt with more informative and powerful. Basically this tool has been designed for system administration and automation.
Built on the .NET Framework, Windows PowerShell enables IT professionals and developers control and automate the administration of Windows and applications.
To view Windows Update History using Windows PowerShell, type the following command and press enter.
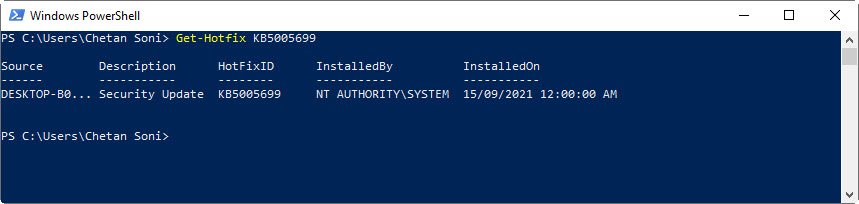
Command: Get-Hotfix
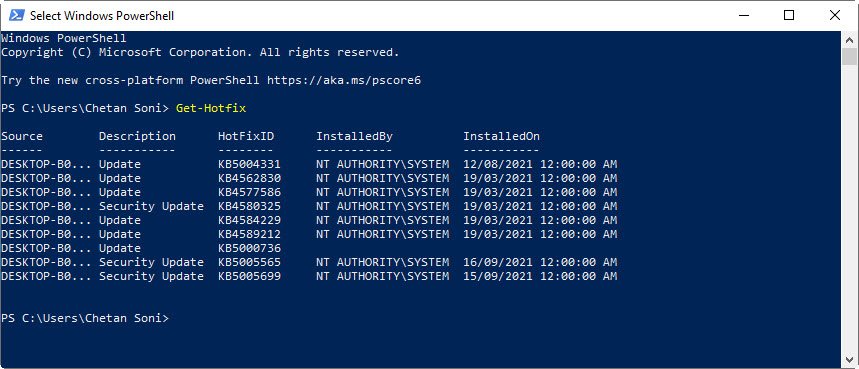
A list of updates will appear for you, and in case, if you need to look carefully, please pay attention to the Hotfix ID or you can also type the following command to get the full information about the particular Hotfix ID.
Command: Get-Hotfix KB5005699
Note: Don’t forget to run CMD or Windows PowerShell as an Administrator.
Happy Reading!
Command Prompt Windows 10 Learn Windows 10 PowerShell Windows 10 PowerShell Windows 10 Techhyme Windows 10 Tutorials Windows 10 Update History Windows 10 Update History Techhyme Windows Tutorials