
Программистам часто приходится работать в консоли — например, чтобы запустить тестирование проекта, закоммитить новый код на Github или отредактировать документ в vim. Всё это происходит так часто, что все основные действия с файлами становится быстрее и привычнее выполнять в консоли. Рассказываем и показываем основные команды, которые помогут ускорить работу в терминале под OS Windows.
Для начала нужно установить терминал или запустить командную строку, встроенную в Windows — для этого нажмите Win+R и введите cmd. Терминал часто встречается и прямо в редакторах кода, например, в Visual Studio Code.
Чтобы ввести команду в консоль, нужно напечатать её и нажать клавишу Enter.
Содержимое текущей папки — dir
Выводит список файлов и папок в текущей папке.
C:\content-server>dir
 Том в устройстве C имеет метку SYSTEM
 Серийный номер тома: 2C89-ED9D

 Содержимое папки C:\content-server

06.10.2020  00:41    <DIR>          .
06.10.2020  00:37    <DIR>          .circleci
16.07.2020  16:04               268 .editorconfig
16.07.2020  16:04                10 .eslintignore
16.07.2020  16:04               482 .eslintrc
06.10.2020  00:37    <DIR>          .github
16.07.2020  16:04                77 .gitignore
06.10.2020  00:41    <DIR>          assets
06.10.2020  00:41    <DIR>          gulp
16.07.2020  16:10               379 gulpfile.js
16.07.2020  16:10           296 320 package-lock.json
16.07.2020  16:10               751 package.json
16.07.2020  16:04               509 README.md
Открыть файл
Чтобы открыть файл в текущей папке, введите его полное имя с расширением. Например, blog.txt или setup.exe.
Перейти в другую папку — cd
Команда cd без аргументов выводит название текущей папки.
Перейти в папку внутри текущего каталога:
C:\content-server>cd assets
C:\content-server\assets>
Перейти на одну папку вверх:
C:\content-server\assets>cd ..
C:\content-server>
Перейти в папку на другом диске:
c:\content-server>cd /d d:/
d:\>
Чтобы просто изменить диск, введите c: или d:.
Создать папку — mkdir или md
Создаём пустую папку code внутри папки html:
d:\html>mkdir coded:\html>dir

 Содержимое папки d:\html

03.11.2020  19:23    <DIR>           .
03.11.2020  19:23    <DIR>           ..
03.11.2020  19:25    <DIR>           code
               0 файлов              0 байт
               3 папок  253 389 438 976 байт свободно
Создаём несколько пустых вложенных папок — для этого записываем их через косую черту:
d:\html>mkdir css\js
d:\html>dir
 Том в устройстве D имеет метку DATA
 Серийный номер тома: 0000-0000

 Содержимое папки d:\html

03.11.2020  19:23    <DIR>           .
03.11.2020  19:23    <DIR>           ..
03.11.2020  19:25    <DIR>           code
03.11.2020  19:29    <DIR>           css
Создаётся папка css, внутри которой находится папка js. Чтобы проверить это, используем команду tree. Она показывает дерево папок.
Удалить папку — rmdir или rd
Чтобы удалить конкретную папку в текущей, введите команду rmdir:
d:\html\css>rmdir js
При этом удалить можно только пустую папку. Если попытаться удалить папку, в которой что-то есть, увидим ошибку:
d:\html\css>d:\html>rmdir css
Папка не пуста.
Чтобы удалить дерево папок, используйте ключ /s. Тогда командная строка запросит подтверждение перед тем, как удалить всё.
d:\html>rmdir css /s
css, вы уверены [Y(да)/N(нет)]? y
Показать дерево папок — tree
В любом момент мы можем увидеть структуру папок. Для этого используется команда tree.
d:\html>tree
Структура папок тома DATA
Серийный номер тома: 0000-0000
D:.
├───code
└───css
    └───js
Если вы хотите посмотреть содержимое всего диска, введите tree в корне нужного диска. Получится красивая анимация, а если файлов много, то ещё и немного медитативная.
Удаление файла — del или erase
Команда для удаления одного или нескольких файлов.
d:\html>del blog.txt
Переименование файла — ren или rename
Последовательно вводим ren, старое и новое имя файла.
d:\html>dir
 Содержимое папки d:\html

03.11.2020  19:23    <DIR>            .
03.11.2020  19:23    <DIR>            ..
03.11.2020  19:59                 0 blag.txt

d:\html>ren blag.txt blog.txt

d:\html>dir
 Содержимое папки d:\html

03.11.2020  19:23    <DIR>            .
03.11.2020  19:23    <DIR>            ..
03.11.2020  19:59                 0 blog.txt
Команды одной строкой
Очистить консоль — cls.
Информация о системе — systeminfo.
d:\html>systeminfo

Имя узла:                         DESKTOP-6MHURG5
Название ОС:                      Майкрософт Windows 10 Pro
Версия ОС:                        10.0.20246 Н/Д построение 20246
Изготовитель ОС:                  Microsoft Corporation
Параметры ОС:                     Изолированная рабочая станция
Сборка ОС:                        Multiprocessor Free
Информация о сетевых настройках — ipconfig.
d:\html>ipconfig
Настройка протокола IP для Windows
Адаптер Ethernet Ethernet 2:

   Состояние среды. . . . . . . . : Среда передачи недоступна.
   DNS-суффикс подключения . . . . . :
Список запущенных процессов — tasklist.
c:\>tasklist

Имя образа                     PID Имя сессии          № сеанса       Память
========================= ======== ================ =========== ============
System Idle Process              0 Services                   0         8 КБ
System                           4 Services                   0     2 688 КБ
Secure System                   72 Services                   0    23 332 КБ
…
Справка по командам — help
Команда help без аргументов выводит список всех возможных команд. help вместе с именем команды выведет справку по этой команде.
d:\html>help tree
Графическое представление структуры папок или пути.

TREE [диск:][путь] [/F] [/A]

   /F   Вывод имён файлов в каждой папке.
   /A   Использовать символы ASCII вместо символов национальных алфавитов.
В этой статье приведены не все команды и не все их возможности, но вы всегда можете воспользоваться командой help и узнать о том, что ещё может командная строка.
👉🏻 Больше статей о фронтенде и работе в айти в телеграм-канале.
Подписаться
Материалы по теме
- 10 горячих клавиш VS Code, которые ускорят вашу работу
- Полезные команды для работы с Git
- Полезные команды для работы с Node. js
«Доктайп» — журнал о фронтенде. Читайте, слушайте и учитесь с нами.
ТелеграмПодкастБесплатные учебники
Когда ко мне обратились с вопросом о том, как быстро вывести список файлов в текстовый файл, я понял, что ответа я не знаю. Хотя задача, как оказалось, достаточно часто встречающаяся. Это может потребоваться для передачи списка файлов специалисту (для решения какой-то проблемы), самостоятельного ведения журнала содержимого папок и других целей.
Решено было устранить пробел и подготовить инструкцию на эту тему, в которой будет показано, как получить список файлов (и вложенных папок) в папке Windows средствами командной строки, а также о том, как автоматизировать этот процесс, если задача возникает часто.
Получение текстового файла с содержимым папки в командной строке
Сначала о том, как сделать текстовый документ, содержащий список файлов в нужной папке, вручную.
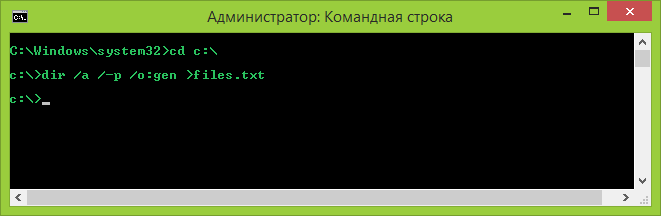
- Запустите командную строку от имени администратора.
- Введите cd x:\folder\ где x:\folder\ — полный путь к папке, список файлов из которой нужно получить. Нажмите Enter.
- Введите команду dir /a /-p /o:gen >files.txt (где files.txt — текстовый файл, в котором будет сохранен список файлов). Нажмите Enter.
- Если использовать команду с параметром /b (dir /a /b /-p /o:gen >files.txt), то в полученном списке будет отсутствовать любая дополнительная информация о размерах файлов или дате создания — только список имен.
Готово. В результате будет создан текстовый файл, содержащий необходимую информацию. В команде выше, данный документ сохраняется в той же папке, список файлов из которой требуется получить. Можно также убрать вывод в текстовый файл, в этом случае список будет отображаться только в командной строке.

Кроме этого, для пользователей русскоязычной версии Windows следует учитывать то, что файл сохраняется в кодировке Windows 866, то есть в обычном блокноте вместо русских символов вы увидите иероглифы (но можно использовать альтернативный текстовый редактор для просмотра, например, Sublime Text).
Получаем список файлов с помощью Windows PowerShell
Вы также можете получить список файлов в папке используя команды Windows PowerShell. Если вы хотите сохранить список в файл, то запустите PowerShell от имени администратора, если просто просмотреть в окне — достаточно простого запуска.
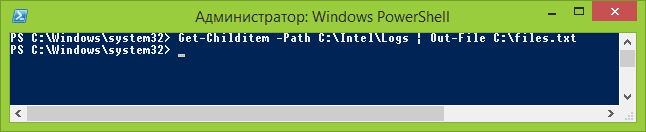
Примеры команд:
- Get-Childitem -Path C:\Folder — вывод списка всех файлов и папок, находящихся в папке Folder на диске C в окне Powershell.
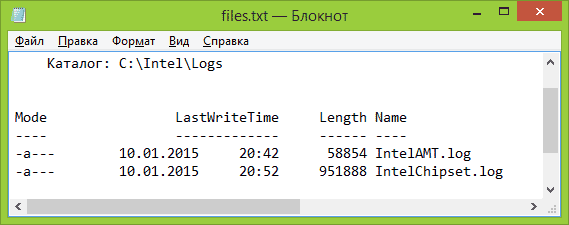
- Get-Childitem -Path C:\Folder | Out-File C:\Files.txt — создание текстового файла Files.txt со списком файлов в папке Folder.
- Добавление параметра -Recurse к первой описанной команде выводит в списке также содержимое всех вложенных папок.
- Параметры -File и -Directory позволяют получить список только файлов или только папок соответственно.
Выше перечислены далеко не все параметры Get-Childitem, но в рамках описываемой в этом руководстве задачи, думаю, их будет достаточно.
Утилита Microsoft Fix it для печати содержимого папки
На странице https://support.microsoft.com/ru-ru/kb/321379 присутствует утилита Microsoft Fix It, добавляющая в контекстное меню проводника пункт «Print Directory Listing», выводящий список файлов в папке на печать.

Несмотря на то, что программа предназначена только для Windows XP, Vista и Windows 7, она успешно сработала и в Windows 10, достаточно было запустить ее в режиме совместимости.
Дополнительно, на той же странице показан порядок ручного добавления команды вывода списка файлов в проводник, при этом вариант для Windows 7 подойдет и для Windows 8.1 и 10. А если вам не требуется вывод на печать, вы можете немного подправить предлагаемые Microsoft команды, удалив параметр /p в третьей строке и полностью убрав четвертую.
- Use the “DIR” command to list files and folders in the current directory, or “DIR /S” to list files and folders recursively, in subdirectories as well.
- To search for specific file types use the asterisk followed by the file extension type, in this syntax: DIR *.jpg
- Use attribute switches to filter the type of files and folders to list.
It can be tricky to keep tabs on all files and folders on a Windows computer, especially if there are too many. There can be many folders and subfolders inside a partition, and many different types of file extensions. It can be difficult to view all the files and folders, or even search for specific ones using File Explorer.
Using the Command Prompt, you can view and list all sorts of files and folders inside a directory, and even its subdirectories using recursive switches. Not only that, but you can also list all items with a specific file type, or exclude them. Moreover, you can also view hidden items as well directly from the Command Prompt.
In this article, we give you a bunch of different examples to list files and folders inside the Command Prompt using the DIR cmdlet.
Command to List Files and Folders in Command Prompt
The DIR command is used to list files and folders inside a directory in Command Prompt. This command can be used with a number of switches and attributes to filter the items to display, their order or displaying, to include and exclude, and so on.
However, the only switches we will be interested in are /a and /s.
Using the DIR command alone will display all the files and folders inside that particular directory. It will not show any hidden items, and it will now show any items inside the subdirectories. However, if you use DIR /a, it will show the hidden items as well.
To perform a recursive search, we must use the /s switch.
The table below summarises the commands to use to list files and folders and these switches:
| Command | Description |
| DIR | Display items inside the current directory |
| DIR /a | Display all items inside the current directory, including hidden ones. |
| DIR /s | List items inside the current directory as well as all subdirectories |
With that known, there is a list of attributes that you can use with the DIR /a cmdlet to filter the type of information you want to list. Here is a list of the attributes you can use with /a.
| Attribute Alphabet | Description | Syntax Example |
| d | Shows directories only | DIR /ad |
| h | Show hidden items only | DIR /ah |
| s | Show system files only | DIR /as |
| l | Show reparse points only | DIR /al |
| r | Show read-only files | DIR /ar |
| a | Show files that can be archived | DIR /aa |
| i | Show files whose content is not indexed | DIR /ai |
| – (hyphen) | Used before an attribute to exclude it from the list | DIR /a-s (hide system files) |
| : (colon) | To combine multiple attributes | DIR /a:h-s (Show hidden items but hide system files) |
Example Commands to List Files and Folders in Command Prompt
Let us now continue to see more extensive examples with images to better understand how you can list files and folders using the DIR cmdlet.
-
To list all files and folders in the current directory:
DIR
List files and folders in the current directory using Command Prompt -
To list all files and folders in the current directory and subdirectories:
DIR /S
List recursive files and folders in Command Prompt -
To list only folders in the current directory:
DIR /AD
List only folders in the current directory in Command Prompt -
To list only folders in the current directory and subdirectories:
DIR /AD /S
List only folders in the current directory and subdirectories in Command Prompt -
To list all files in the current directory and exclude all folders:
DIR /A-D
List all files and exclude folders in the current directory in Command Prompt -
To list all hidden system files in the current directory:
DIR /ASH
List all hidden system files in current directory in Command Prompt -
To list all system files and exclude read-only files in the current directory and subdirectories:
DIR /A:S-A /S
List all system files and exclude read-only files in the current directory and subdirectories using Command Prompt -
To list all specific file type files in the current directory and subdirectories:
Note: You can change the file type extension to list the files you are looking for.
DIR *.txt
List all files with a specific file type using Command Prompt -
To list multiple file types in the current directory and subdirectories:
DIR *.txt *.doc *.docx /S
List multiple file types in the current directory and subdirectories from Command Prompt


There can be many different examples and syntaxes to list files and folders inside the Command Prompt. However, we hope that the examples above are sufficient so that you can combine and modify them as per your requirements.
Closing Words
The Windows command line offers much more control over the fetched data than its GUI. Using the Command Prompt, you can list different files and folders inside the current directory as well as its subdirectories. You can also filter out the type of files and folders to include, or exclude from the list.
The dir command is a Command Prompt command used to display a list of the files and subfolders contained in a folder.
For each file or folder listed, the command will, by default, show the date and time the item was last changed, if the item is a folder (labeled with DIR) or file, the size of the file if applicable, and finally the name of the file or folder including the file extension.
Outside of the file and folder list, the dir command also displays the current drive letter of the partition, the volume label, volume serial number, total number of files listed, total size of those files in bytes, the number of subfolders listed, and the total bytes remaining free on the drive.
Dir Command Availability
The dir command is available from within the Command Prompt in all Windows operating systems including Windows 11, Windows 10, Windows 8, Windows 7, Windows Vista, and Windows XP.
Older versions of Windows include the dir command as well but with a few fewer options than we have listed below. The dir command is also a DOS command, available in all versions of MS-DOS.
The dir command can be found in offline Command Prompt versions, like the ones available from Advanced Startup Options and System Recovery Options. The dir command is also included in the Recovery Console in Windows XP.
The availability of certain dir command switches and other dir command syntax may differ from operating system to operating system.
Dir Command Syntax
dir [drive:][path][filename] [/a[[:]attributes]] [/b] [/c] [/d] [/l] [/n] [/o[[:]sortorder]] [/p] [/q] [/r] [/s] [/t[[:]timefield]] [/w] [/x] [/4]
See How to Read Command Syntax if you’re not sure how to interpret the syntax of the dir command as it’s written above or shown in the table below.
| Dir Command Options | |
|---|---|
| Item | Explanation |
| drive:, path, filename | This is the drive, path, and/or filename that you want to see results for. All three are optional since the command can be executed alone. Wildcards are allowed. See the Dir Command Examples section below if this isn’t clear. |
| /a |
When executed alone, this switch shows all types of files and folders, including those with file attributes that typically prevent them from showing up in Command Prompt or in Windows. Use /a with one or more of the following attributes (colon is optional, no spaces needed) to show only those types of files in the command result: a = archive files d = directories h = hidden files i = not content indexed files l = reparse points r = read-only files s = system files v = integrity files x = no scrub files — = Use this as a prefix to any of the above attributes to exclude items with those file attributes from the results. |
| /b | Use this option to show the dir results using «bare» format, which removes the typical header and footer information, as well as all the details on each item, leaving only the directory name or file name and extension. |
| /c | This switch forces the use of the thousands separator when the command is used in a way that shows file sizes. This is the default behavior on most computers, so the practical use is /-c to disable the thousands separator in results. |
| /d | Use /d to limit the items displayed to just folders (contained within brackets) and file names with their extensions. Items are listed top-to-bottom and then across columns. Standard dir command header and footer data remain the same. |
| /l | Use this option to show all folder and file names in lowercase. |
| /n | This switch produces a result with columns in the date > time > directory > file size > file or folder name column structure. Since this is the default behavior, the practical use is /-n which produces columns in the file or folder name > directory > file size > date > time order. |
| /o |
Use this option to specify a sort order for the results. When executed alone, /o lists directories first, followed by files, both in alphabetical order. Use this option with one or more of the following values (colon is optional, no spaces needed) to sort the dir command result in the specified manner: d = sort by date/time (oldest first) e = sort by extension (alphabetical) g = group directory first, followed by files n = sort by name (alphabetical) s = sort by size (smallest first) — = Use this as a prefix with any of the above values to reverse the order (-d to sort by newest first, -s for largest first, etc.). |
| /p | This option displays the results one page at a time, interrupted with a Press any key to continue… prompt. Using /p is very similar to using the dir command with the more command. |
| /q | Use this switch to display the owner of the file or folder in the results. The easiest way to view or change a file’s ownership from within Windows is via the Advanced button in the Security tab when looking at the file’s Properties. |
| /r | The /r option shows any alternate data streams (ADS) that are part of a file. The data stream itself is listed in a new row, under the file, and is always suffixed with $DATA, making them easy to spot. |
| /s | This option shows all the files and folders in the specified directory plus all of the files and folders contained within any subdirectories of that specified directory. |
| /t |
Use this option with one of the values below (colon is optional, no spaces needed) to specify a time field to be used when sorting and/or displaying results: a = last access c = created w = last written |
| /w | Use /w to show results in «wide format» which limits the items displayed to just folders (contained within brackets) and file names with their extensions. Items are listed left-to-right and then down rows. Standard dir command header and footer data remain the same. |
| /x | This switch shows the «short name» equivalent for files whose long names don’t comply with non-8dot3 rules. |
| /4 | The /4 switch forces the use of 4-digit years. At least in newer versions of Windows, the 4-digit year display is the default behavior and /-4 doesn’t result in a 2-digit year display. |
| /? | Use the help switch with the dir command to show details about the above options directly in the Command Prompt window. Executing dir /? is the same as using the help command to execute help dir. |
Dir Command Examples
Below are some of the different ways you can use the dir command:
Run Without Switches
dir
In this example, the dir command is used alone, without any drive:, path, filename specifications, nor any switches, producing a result like this:
C:\>dirVolume in drive C has no label.Volume Serial Number is F4AC-9851Directory of C:\09/02/2015 12:41 PM$SysReset05/30/2016 06:22 PM 93 HaxLogs.txt05/07/2016 02:58 AM PerfLogs05/22/2016 07:55 PM Program Files05/31/2016 11:30 AM Program Files (x86)07/30/2015 04:32 PM Temp05/22/2016 07:55 PM Users05/22/2016 08:00 PM Windows05/22/2016 09:50 PM Windows.old1 File(s) 93 bytes
As you can see, the dir command was executed from the root directory of C (i.e., C:\>). Without specifying where exactly to list the folder and file contents from, the command defaults to displaying this information from where the command was executed.
List Hidden Items
dir c:\users /ah
In the above example, we’re requesting that the dir command show results from the drive: and path of c:\users, not from the location we’re running the command from. We’re also specifying, via the /a switch with the h attribute, that we’d like to only see hidden items, resulting in something like this:
C:\>dir c:\users /ahVolume in drive C has no label.Volume Serial Number is F4AC-9851Directory of c:\users05/07/2016 04:04 AM All Users [C:\ProgramData]05/22/2016 08:01 PMDefault05/07/2016 04:04 AM Default User [C:\Users\Default]05/07/2016 02:50 AM 174 desktop.ini1 File(s) 174 bytes
The small list of directories and the single file you see in the result above doesn’t make up the entirety of the c:\users folder—just the hidden files and folders. To see all files and folders, you would execute dir c:\users /a (removing the h) instead.
Search for File In Any Folder
dir c:\*.csv /s /b > c:\users\tim\desktop\csvfiles.txt
In this slightly more complex, but much more practical, example for the dir command, we’re requesting that our entire hard drive be searched for CSV files and then the bare minimum results are outputted to a text document. Let’s look at this piece by piece:
- c:\*.csv tells the dir command to look at all files (*) that end in the CSV (.csv) extension in the root of the c: drive.
- /s instructs it to go deeper than the root of c: and instead, search for files like this in every folder, as deep as the folders go.
- /b removes anything but the path and file name, essentially creating a readable «list» of these files.
- > is a redirection operator, meaning «send to» somewhere.
- c:\users\tim\desktop\csvfiles.txt is the destination for the > redirector, meaning that results will be written to the csvfiles.txt file instead of in Command Prompt, which will be created at the c:\users\tim\desktop location (i.e., the Desktop you see when you’re logged in).
When you redirect command output to a file, as we did here in this dir command example, Command Prompt doesn’t display anything. However, the exact output you would have seen is instead located inside that text file. Here’s what our csvfiles.txt looked like after the dir command had completed:
c:\ProgramData\Intuit\Quicken\Inet\merchant_alias.csvc:\ProgramData\Intuit\Quicken\Inet\merchant_common.csvc:\Users\All Users\Intuit\Quicken\Inet\merchant_alias.csvc:\Users\All Users\Intuit\Quicken\Inet\merchant_common.csvc:\Users\Tim\AppData\Roaming\condition.2.csvc:\Users\Tim\AppData\Roaming\line.csvc:\Users\Tim\AppData\Roaming\media.csv
While you certainly could have skipped the file redirection, and even the «bare format» switch, the results would have been very difficult to work within the Command Prompt window, making it hard to get to what you were after.
Related Commands
The dir command is often used with the del command. After using dir to find the name and location of the file(s) in any particular folder(s), del can be used to delete files directly from the Command Prompt.
Similar is the rmdir /s command, and older deltree command, used to delete folders and files. The rmdir command (without the /s option) is useful for deleting empty folders that you find with the dir command.
As mentioned above, the dir command is also often used with a redirection operator.
Thanks for letting us know!
Get the Latest Tech News Delivered Every Day
Subscribe
The dir command is one of the most useful commands while navigating the command line, and is present in its different forms in several operating systems. In this article, we will look at the Dir command and learn several use cases for it.
What is the dir Command
dir command in Windows OS is a built-in function that allows the user to do the following task:
- View the contents of any directory
- Check file attributes (both hidden and read-only)
- Filter search results based on date or file type.
Basic Syntax
The general syntax of the dir command is:
dir [path] [options]
- Path: specifies the location
- Options: modifies to filter the output
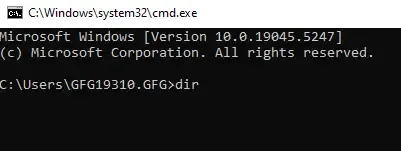
1. List Files & Directories
This command is used to list all files and directories in the current one:
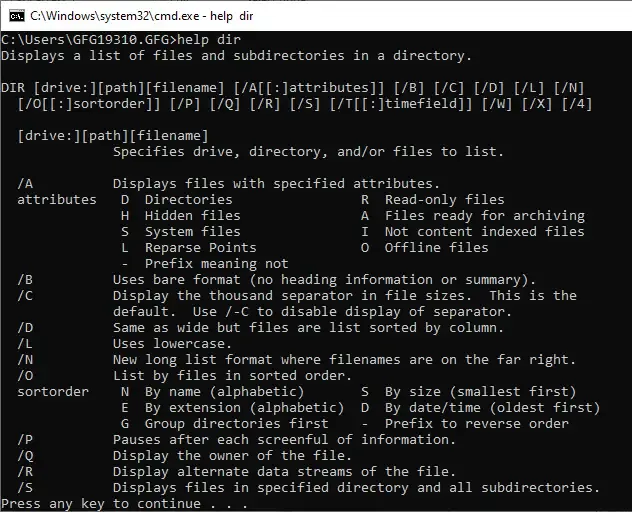
help dir

help dir command
Output :
Displays a list of files and subdirectories in a directory.

DIR [drive:][path][filename] [/A[[:]attributes]] [/B] [/C] [/D] [/L] [/N]
 [/O[[:]sortorder]] [/P] [/Q] [/R] [/S] [/T[[:]timefield]] [/W] [/X] [/4]

 [drive:][path][filename]
             Specifies drive, directory, and/or files to list.

 /A          Displays files with specified attributes.
 attributes   D  Directories                R  Read-only files
              H  Hidden files               A  Files ready for archiving
              S  System files               I  Not content indexed files
              L  Reparse Points             O  Offline files
              -  Prefix meaning not
 /B          Uses bare format (no heading information or summary).
 /C          Display the thousand separator in file sizes.  This is the
 .
 .
output
Usage explanation:
The command is mainly used for displaying the list of files and subdirectories in a directory. This could be done by executing the Dir command without any arguments.
Dir
dir
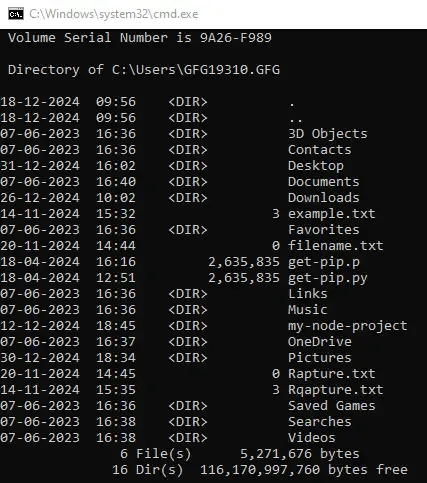
Which would produce an output similar to this.
Output
Directory of C:\Users

09/26/2020  11:34 AM    <DIR>          .
09/26/2020  11:34 AM    <DIR>          ..
09/02/2020  07:07 PM             1, 000 applese
09/24/2020  08:59 PM    <DIR>          Public
10/20/2020  06:39 PM    <DIR>          Soap
              1 File(s)          1, 000 bytes
              4 Dir(s)  13, 879, 459, 840 bytes free
Output
2. List Content of a Specific Directory
The output of the dir command in this enable users to specify a directory to view its contents. The syntax for this command is as follows:
Input
dir C:\Users\gfg19310\Documents
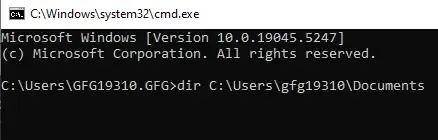
List all content – Input
Output
Directory of C:\Users\gfg19310\Documents

20-03-2023  13:02    <DIR>          .
20-03-2023  13:02    <DIR>          ..
20-03-2023  13:02    <DIR>          Custom Office Templates
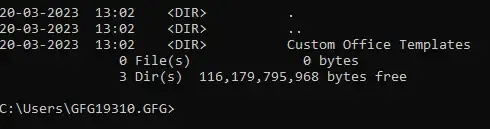
List all content – Output
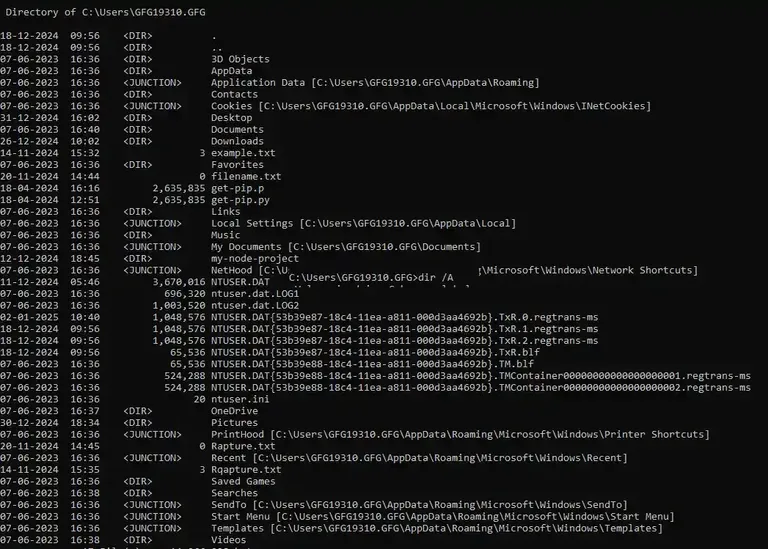
3. Show Hidden Files
Here, we will use /A option with the H attribute to include hidden files along with it. Here’s the syntax:
Input
dir /A:H
show hidden file – Input
Output
07-06-2023  16:36    <DIR>          AppData
07-06-2023  16:36    <JUNCTION>     Application Data [C:\Users\GFG19310.GFG\AppData\Roaming]
07-06-2023  16:36    <JUNCTION>     Cookies [C:\Users\GFG19310.GFG\AppData\Local\Microsoft\Windows\INetCookies]
07-06-2023  16:36    <JUNCTION>     Local Settings [C:\Users\GFG19310.GFG\AppData\Local]
07-06-2023  16:36    <JUNCTION>     My Documents [C:\Users\GFG19310.GFG\Documents]
07-06-2023  16:36    <JUNCTION>     NetHood [C:\Users\GFG19310.GFG\AppData\Roaming\Microsoft\Windows\Network Shortcuts]
11-12-2024  05:46         3,670,016 NTUSER.DAT
07-06-2023  16:36           688,128 ntuser.dat.LOG1
07-06-2023  16:36         1,085,440 ntuser.dat.LOG2
02-01-2025  10:40         1,048,576 NTUSER.DAT{53b39e87-18c4-11ea-a811-000d3aa4692b}.TxR.0.regtrans-ms
18-12-2024  09:56         1,048,576 NTUSER.DAT{53b39e87-18c4-11ea-a811-000d3aa4692b}.TxR.1.regtrans-ms
18-12-2024  09:56         1,048,576 NTUSER.DAT{53b39e87-18c4-11ea-a811-000d3aa4692b}.TxR.2.regtrans-ms
18-12-2024  09:56            65,536 NTUSER.DAT{53b39e87-18c4-11ea-a811-000d3aa4692b}.TxR.blf
07-06-2023  16:36            65,536 NTUSER.DAT{53b39e88-18c4-11ea-a811-000d3aa4692b}.TM.blf
07-06-2023  16:36           524,288 NTUSER.DAT{53b39e88-18c4-11ea-a811-000d3aa4692b}.TMContainer00000000000000000001.regtrans-ms
07-06-2023  16:36           524,288 NTUSER.DAT{53b39e88-18c4-11ea-a811-000d3aa4692b}.TMContainer00000000000000000002.regtrans-ms
07-06-2023  16:36                20 ntuser.ini
07-06-2023  16:36    <JUNCTION>     PrintHood [C:\Users\GFG19310.GFG\AppData\Roaming\Microsoft\Windows\Printer Shortcuts]
07-06-2023  16:36    <JUNCTION>     Recent [C:\Users\GFG19310.GFG\AppData\Roaming\Microsoft\Windows\Recent]
07-06-2023  16:36    <JUNCTION>     SendTo [C:\Users\GFG19310.GFG\AppData\Roaming\Microsoft\Windows\SendTo]
07-06-2023  16:36    <JUNCTION>     Start Menu [C:\Users\GFG19310.GFG\AppData\Roaming\Microsoft\Windows\Start Menu]
07-06-2023  16:36    <JUNCTION>     Templates [C:\Users\GFG19310.GFG\AppData\Roaming\Microsoft\Windows\Templates]
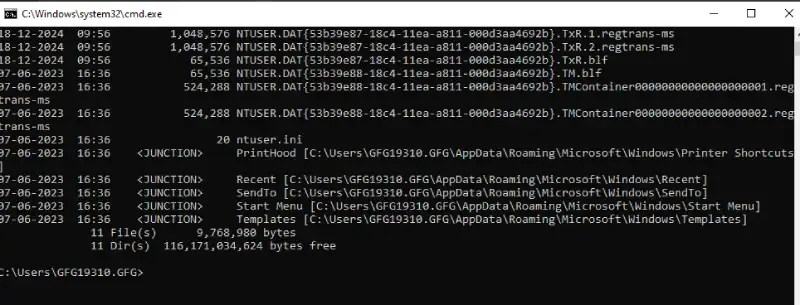
show hidden file – Output
4. List Files with Specific Extensions
To display files with a specific extension (e.g., .txt): Here’s a sample
Input
dir *.txt
Display Text -input
Output
Directory of C:\Users\GFG19310.GFG

14-11-2024  15:32                 3 example.txt
20-11-2024  14:44                 0 filename.txt
20-11-2024  14:45                 0 Rapture.txt
14-11-2024  15:35                 3 Rqapture.txt
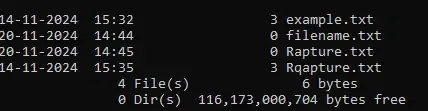
Display Text -Output
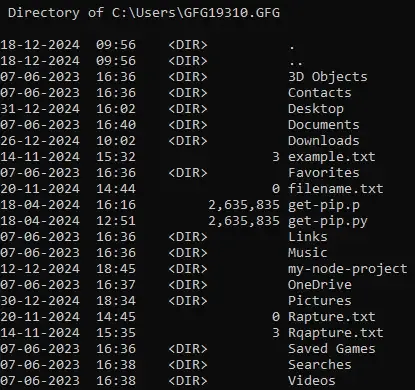
5. View Subdirectories
To include all subdirectories and their contents, use the following command:
Input
dir /S
dir /S
Output
Directory of C:\Users\GFG19310.GFG\Saved Games

07-06-2023  16:36    <DIR>          .
07-06-2023  16:36    <DIR>          ..
               0 File(s)              0 bytes

Directory of C:\Users\GFG19310.GFG\Searches

07-06-2023  16:38    <DIR>          .
07-06-2023  16:38    <DIR>          ..
08-11-2022  16:52               855 winrt--{S-1-5-21-1623517014-2252875782-278851815-1404}-.searchconnector-ms
07-06-2023  16:37               859 winrt--{S-1-5-21-2245693176-3959787992-2909979321-1244}-.searchconnector-ms
               2 File(s)          1,714 bytes

Directory of C:\Users\GFG19310.GFG\Videos

07-06-2023  16:38    <DIR>          .
07-06-2023  16:38    <DIR>          ..
26-12-2024  13:37    <DIR>          Captures
               0 File(s)              0 bytes

Directory of C:\Users\GFG19310.GFG\Videos\Captures

26-12-2024  13:37    <DIR>          .
26-12-2024  13:37    <DIR>          ..
26-12-2024  13:37           185,053 File Explorer 26-12-2024 13_37_47.png
11-10-2023  15:51            23,668 Network Connections .png
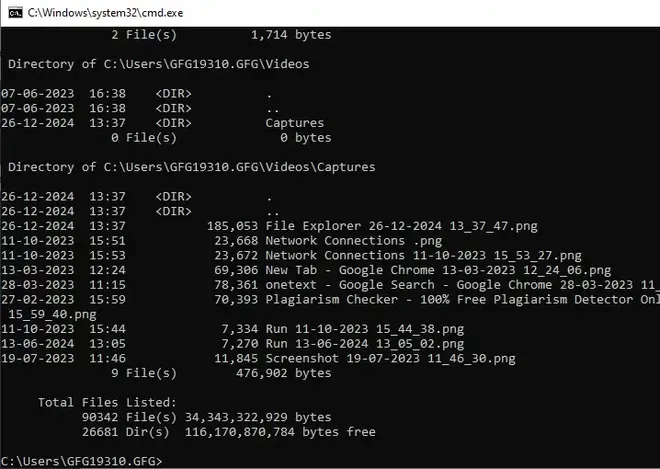
Fetching Directory
6. Sort by Date, Size, or Name
We can fetch data based on date, size or name. Let’s check them out:
By Date:
Input
dir /O:D
dir /O:D
Output
Directory of C:\Users\GFG19310.GFG

07-06-2023  16:36    <DIR>          3D Objects
07-06-2023  16:36    <DIR>          Contacts
07-06-2023  16:36    <DIR>          Favorites
07-06-2023  16:36    <DIR>          Music
07-06-2023  16:36    <DIR>          Saved Games
07-06-2023  16:36    <DIR>          Links
07-06-2023  16:37    <DIR>          OneDrive
07-06-2023  16:38    <DIR>          Searches
07-06-2023  16:38    <DIR>          Videos
07-06-2023  16:40    <DIR>          Documents
18-04-2024  12:51         2,635,835 get-pip.py
18-04-2024  16:16         2,635,835 get-pip.p
14-11-2024  15:32                 3 example.txt
14-11-2024  15:35                 3 Rqapture.txt
20-11-2024  14:44                 0 filename.txt
20-11-2024  14:45                 0 Rapture.txt
12-12-2024  18:45    <DIR>          my-node-project
18-12-2024  09:56    <DIR>          .
18-12-2024  09:56    <DIR>          ..
26-12-2024  10:02    <DIR>          Downloads
30-12-2024  18:34    <DIR>          Pictures
31-12-2024  16:02    <DIR>          Desktop
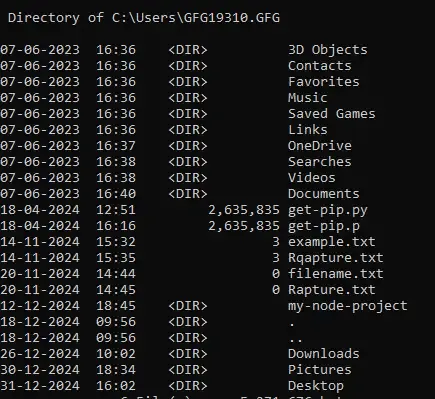
Output
By Size:
Input
dir /O:S
dir /O:S
Output
Directory of C:\Users\GFG19310.GFG

18-12-2024  09:56    <DIR>          .
18-12-2024  09:56    <DIR>          ..
07-06-2023  16:36    <DIR>          3D Objects
07-06-2023  16:36    <DIR>          Contacts
31-12-2024  16:02    <DIR>          Desktop
07-06-2023  16:40    <DIR>          Documents
26-12-2024  10:02    <DIR>          Downloads
07-06-2023  16:38    <DIR>          Searches
07-06-2023  16:36    <DIR>          Favorites
20-11-2024  14:44                 0 filename.txt
07-06-2023  16:36    <DIR>          Saved Games
07-06-2023  16:38    <DIR>          Videos
07-06-2023  16:36    <DIR>          Links
07-06-2023  16:36    <DIR>          Music
12-12-2024  18:45    <DIR>          my-node-project
07-06-2023  16:37    <DIR>          OneDrive
30-12-2024  18:34    <DIR>          Pictures
20-11-2024  14:45                 0 Rapture.txt
14-11-2024  15:32                 3 example.txt
14-11-2024  15:35                 3 Rqapture.txt
18-04-2024  12:51         2,635,835 get-pip.py
18-04-2024  16:16         2,635,835 get-pip.p

Output
By Name:
Input
dir /O:N
dir /O:N
Output
Directory of C:\Users\GFG19310.GFG

18-12-2024  09:56    <DIR>          .
18-12-2024  09:56    <DIR>          ..
07-06-2023  16:36    <DIR>          3D Objects
07-06-2023  16:36    <DIR>          Contacts
31-12-2024  16:02    <DIR>          Desktop
07-06-2023  16:40    <DIR>          Documents
26-12-2024  10:02    <DIR>          Downloads
14-11-2024  15:32                 3 example.txt
07-06-2023  16:36    <DIR>          Favorites
20-11-2024  14:44                 0 filename.txt
18-04-2024  16:16         2,635,835 get-pip.p
18-04-2024  12:51         2,635,835 get-pip.py
07-06-2023  16:36    <DIR>          Links
07-06-2023  16:36    <DIR>          Music
12-12-2024  18:45    <DIR>          my-node-project
07-06-2023  16:37    <DIR>          OneDrive
30-12-2024  18:34    <DIR>          Pictures
20-11-2024  14:45                 0 Rapture.txt
14-11-2024  15:35                 3 Rqapture.txt
07-06-2023  16:36    <DIR>          Saved Games
07-06-2023  16:38    <DIR>          Searches
07-06-2023  16:38    <DIR>          Videos
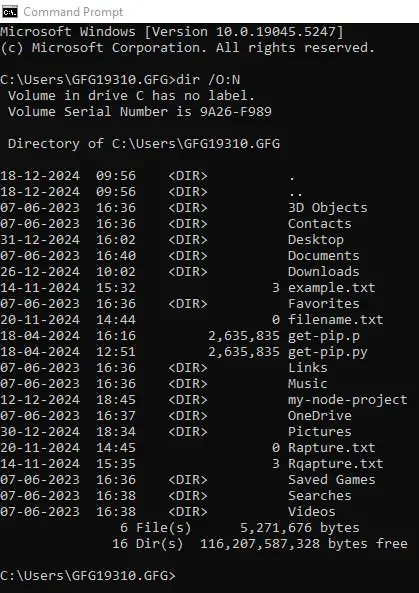
Output
7. View Results Page by Page
This command is used where too many files exists, we can use the /P option to get results one page at a time. Here’s the command:
Input
dir /P
dir /P
Output
Directory of C:\Users\GFG19310.GFG

18-12-2024  09:56    <DIR>          .
18-12-2024  09:56    <DIR>          ..
07-06-2023  16:36    <DIR>          3D Objects
07-06-2023  16:36    <DIR>          Contacts
31-12-2024  16:02    <DIR>          Desktop
07-06-2023  16:40    <DIR>          Documents
26-12-2024  10:02    <DIR>          Downloads
14-11-2024  15:32                 3 example.txt
07-06-2023  16:36    <DIR>          Favorites
20-11-2024  14:44                 0 filename.txt
18-04-2024  16:16         2,635,835 get-pip.p
18-04-2024  12:51         2,635,835 get-pip.py
07-06-2023  16:36    <DIR>          Links
07-06-2023  16:36    <DIR>          Music
12-12-2024  18:45    <DIR>          my-node-project
07-06-2023  16:37    <DIR>          OneDrive
30-12-2024  18:34    <DIR>          Pictures
20-11-2024  14:45                 0 Rapture.txt
14-11-2024  15:35                 3 Rqapture.txt
07-06-2023  16:36    <DIR>          Saved Games
07-06-2023  16:38    <DIR>          Searches
07-06-2023  16:38    <DIR>          Videos
Output
8. List File Attributes
We can also include attributes such as read-only files and archives using the following command:
Input
dir /A
dir /A
Output
Directory of C:\Users\GFG19310.GFG

18-12-2024  09:56    <DIR>          .
18-12-2024  09:56    <DIR>          ..
07-06-2023  16:36    <DIR>          3D Objects
07-06-2023  16:36    <DIR>          AppData
07-06-2023  16:36    <JUNCTION>     Application Data [C:\Users\GFG19310.GFG\AppData\Roaming]
07-06-2023  16:36    <DIR>          Contacts
07-06-2023  16:36    <JUNCTION>     Cookies [C:\Users\GFG19310.GFG\AppData\Local\Microsoft\Windows\INetCookies]
31-12-2024  16:02    <DIR>          Desktop
07-06-2023  16:40    <DIR>          Documents
26-12-2024  10:02    <DIR>          Downloads
14-11-2024  15:32                 3 example.txt
07-06-2023  16:36    <DIR>          Favorites
20-11-2024  14:44                 0 filename.txt
18-04-2024  16:16         2,635,835 get-pip.p
18-04-2024  12:51         2,635,835 get-pip.py
07-06-2023  16:36    <DIR>          Links
07-06-2023  16:36    <JUNCTION>     Local Settings [C:\Users\GFG19310.GFG\AppData\Local]
07-06-2023  16:36    <DIR>          Music
07-06-2023  16:36    <JUNCTION>     My Documents [C:\Users\GFG19310.GFG\Documents]
12-12-2024  18:45    <DIR>          my-node-project
07-06-2023  16:36    <JUNCTION>     NetHood [C:\Users\GFG19310.GFG\AppData\Roaming\Microsoft\Windows\Network Shortcuts]
11-12-2024  05:46         3,670,016 NTUSER.DAT
07-06-2023  16:36           696,320 ntuser.dat.LOG1
07-06-2023  16:36         1,003,520 ntuser.dat.LOG2
02-01-2025  10:40         1,048,576 NTUSER.DAT{53b39e87-18c4-11ea-a811-000d3aa4692b}.TxR.0.regtrans-ms
18-12-2024  09:56         1,048,576 NTUSER.DAT{53b39e87-18c4-11ea-a811-000d3aa4692b}.TxR.1.regtrans-ms
18-12-2024  09:56         1,048,57 ..
Output
9. Display File Size
You can also check the file size (in bytes) using the following command:
Input
dir /-C
dir /-C
Output
Directory of C:\Users\GFG19310.GFG

18-12-2024  09:56    <DIR>          .
18-12-2024  09:56    <DIR>          ..
07-06-2023  16:36    <DIR>          3D Objects
07-06-2023  16:36    <DIR>          Contacts
31-12-2024  16:02    <DIR>          Desktop
07-06-2023  16:40    <DIR>          Documents
26-12-2024  10:02    <DIR>          Downloads
14-11-2024  15:32                 3 example.txt
07-06-2023  16:36    <DIR>          Favorites
20-11-2024  14:44                 0 filename.txt
18-04-2024  16:16           2635835 get-pip.p
18-04-2024  12:51           2635835 get-pip.py
07-06-2023  16:36    <DIR>          Links
07-06-2023  16:36    <DIR>          Music
12-12-2024  18:45    <DIR>          my-node-project
07-06-2023  16:37    <DIR>          OneDrive
30-12-2024  18:34    <DIR>          Pictures
20-11-2024  14:45                 0 Rapture.txt
14-11-2024  15:35                 3 Rqapture.txt
07-06-2023  16:36    <DIR>          Saved Games
07-06-2023  16:38    <DIR>          Searches
07-06-2023  16:38    <DIR>          Videos
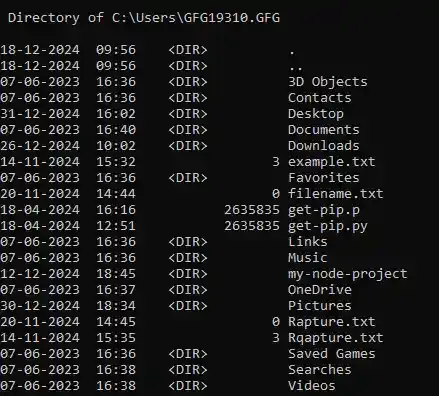
Output
Advanced Syntax
The above-mentioned syntaxes is for general usage. Now, let’s see some of the advanced usage syntax along with their examples.
10. Save Output to a File
We can redirect the output to a text file (dir command) using the syntax below:
Input (file name: rapture.txt)
dir /S > rapture.txt
dir /S > filename
Output
A file name with the provided name will be created containing the directory list.
Output
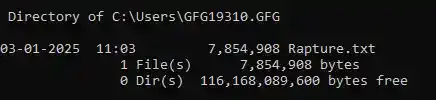
11. Search for any Specific File
You can search for any file by its name (or even partial name), following this syntax:
Input (file name: rapture – taken as a partial name “rapt”)
dir *rapt*
*filename*
Output
Directory of C:\Users\GFG19310.GFG

03-01-2025  11:03         7,854,908 Rapture.txt
               1 File(s)      7,854,908 bytes
               0 Dir(s)  116,168,089,600 bytes free
Output
12. Check the Total Number of Files
This syntax will summarise the total count of a file including directory:
Input
dir /W
dir /W
Output

Output
Bonus: Useful cmd Options (Summarization)
| Option | Description |
|---|---|
/P |
Fetch results one page at a time |
/S |
Includes all files in subdirectories. |
/A |
Displays files with specified attributes (e.g., /A:H for hidden files). |
/O |
Sorts output (e.g., /O:D for date, /O:N for name). |
/B |
Displays output in bare format (file names only, without additional details). |
/L |
Displays names in lowercase. |
/T |
Displays time attributes (e.g., /T:C for creation time). |
/Q |
Displays file ownership information. |
The dir command is vastly used among users for managing and exploring directories through different ways and patterns in Windows OS. You can give it all a try and organize your work smoothly.