
Для различных событий и ошибок системы и приложений Windows ведёт журналы событий, которые можно просмотреть и получить дополнительную информацию, которая может быть полезной при решении проблем с компьютером.
В этой инструкции для начинающих — способы открыть просмотр событий Windows 11/10 и дополнительная информация на тему, которая может пригодиться. На близкую тему: Как отключить журнал событий в Windows.
Контекстное меню кнопки Пуск и поиск
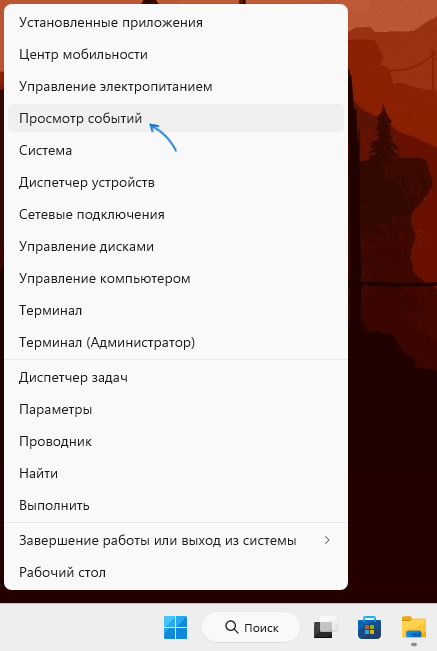
Самый быстрый способ перейти к просмотру журналов событий в Windows 11 и 10 — нажать правой кнопкой мыши по кнопке «Пуск» или нажать клавиши Win+X на клавиатуре и выбрать пункт «Просмотр событий» в открывшемся меню.
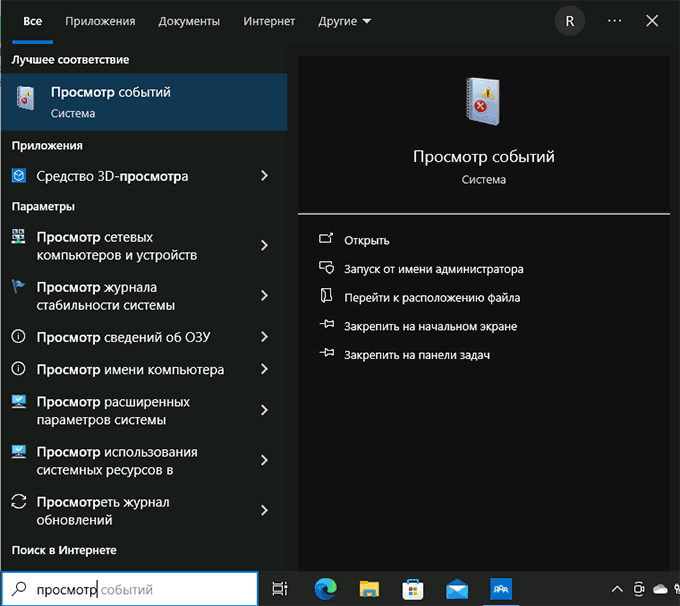
Ещё один простой и в большинстве случаев работающий способ открыть какой-либо системный инструмент, расположение которого вам неизвестно — использовать поиск в панели задач.
Начните вводить «Просмотр событий» в поиске, после чего запустите найденный результат:
Почему не «Журнал событий» или «Журнал ошибок», которые пользователи обычно ищут? Причина в том, что сами журналы — это файлы на диске в папках
C:\Windows\System32\winevt\Logs
C:\Windows\System32\LogFiles
Пользователи, задавая вопрос о том, где журнал событий в Windows, обычно имеют в виду именно системный инструмент «Просмотр событий» для удобного просмотра соответствующих журналов.
Команда «Выполнить»
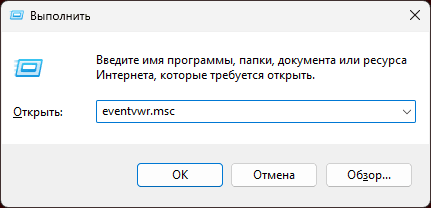
Самый быстрый и часто используемый метод запуска просмотра журналов событий Windows — использование команды «Выполнить»:
- Нажмите клавиши Win+R на клавиатуре, либо нажмите правой кнопкой мыши по кнопке «Пуск» и выберите пункт «Выполнить».
- Введите eventvwr.msc (или просто eventvwr) и нажмите Enter.

- Откроется «Просмотр событий».
Эту же команду можно использовать для создания ярлыка или для открытия журнала событий в командной строке. Возможно, вам пригодится информация о других полезных командах «Выполнить».
Обычно описанных выше вариантов бывает достаточно для открытия просмотра журналов событий и ошибок в Windows, но есть и другие подходы:
Помимо просмотра журнала событий, в Windows присутствует ещё один полезный инструмент — Монитор стабильности системы, позволяющий наглядно получить информацию о работе вашей системы по дням на основании данных из журнала событий.
The Windows 10 Event Viewer is an app that shows a log detailing information about significant events on your computer. This information includes automatically downloaded updates, errors, and warnings.
In this article, you’ll learn what the event viewer is, the different logs it has, and most importantly, how to access it on a Windows 10 computer.
What is the Event Viewer?
Each program you open on your Windows 10 computer sends a notification to a particular activity log in the Event Viewer.
All other activity such as OS changes, security updates, driver quirks, hardware failure, and so on are also posted to a particular log. So you can think of the event viewer as a database that records every activity on your computer.
With the event viewer, you can troubleshoot different Windows and application issues.
If you explore the event viewer in-depth, you will see different information, warnings, and plenty of errors. Don’t freak out – this is normal. Even the best-maintained computers show plenty of errors and warnings.
There are 3 main ways you can gain access to the event viewer on Windows 10 – via the Start menu, Run dialogue, and the command line.
Step 1: Click on Start or press the WIN (Windows) key on your keyboard
Step 2: Search for “Event Viewer”
Step 3: Click on the first search result or press ENTER
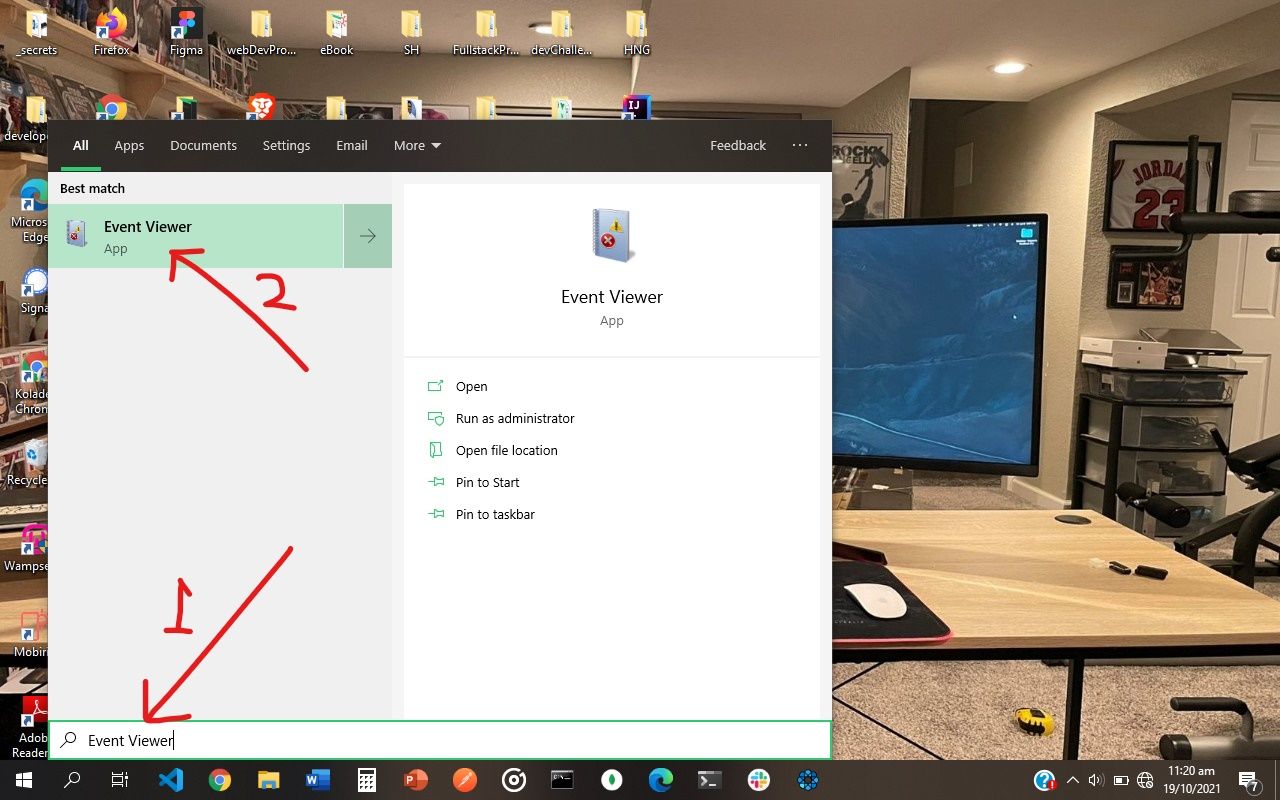
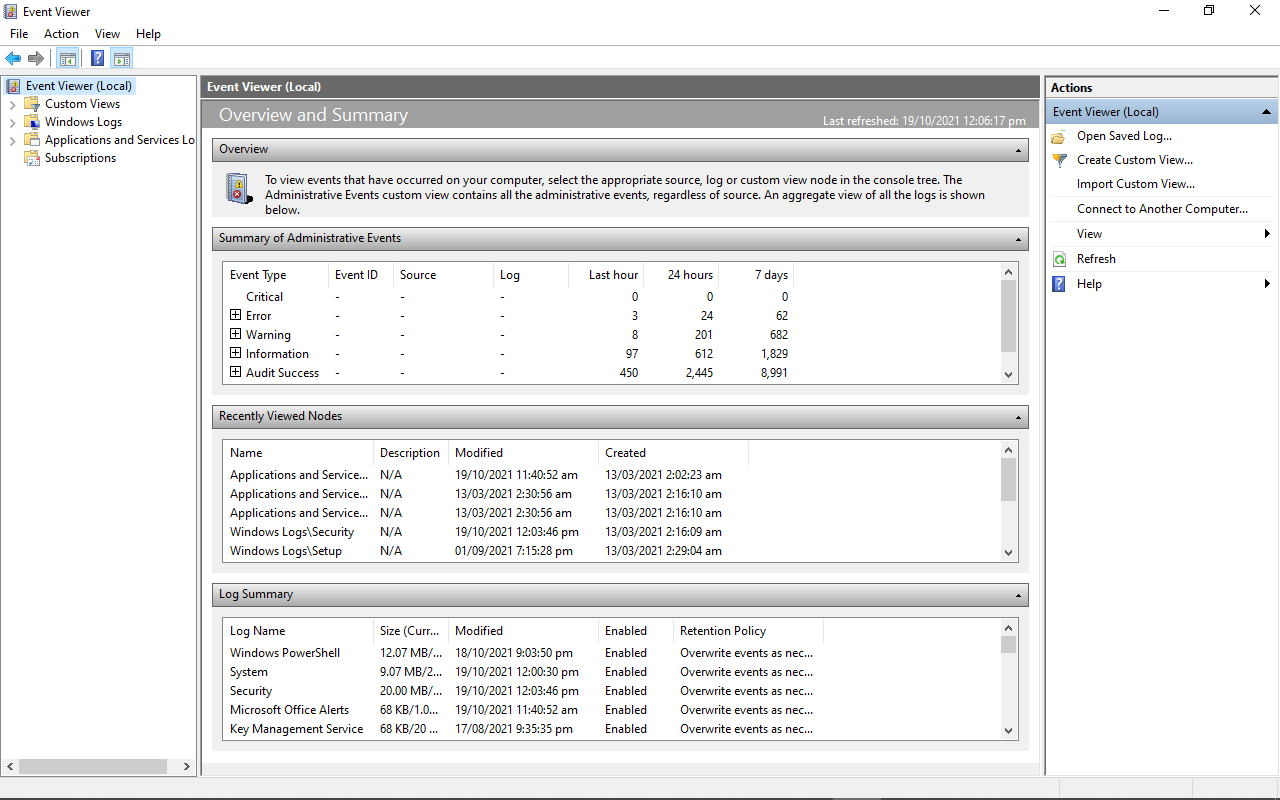
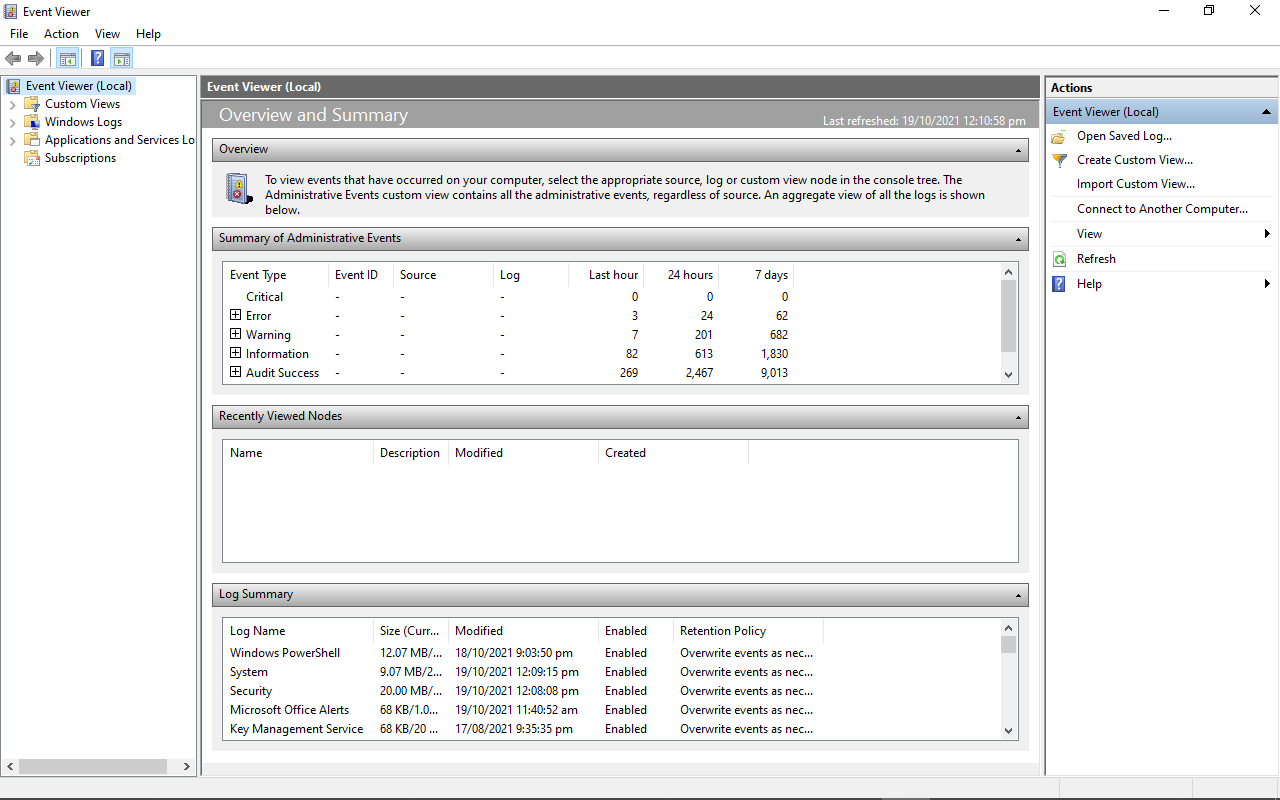
You will be greeted with this page:
How to Access the Windows 10 Activity Log through the Run Dialogue
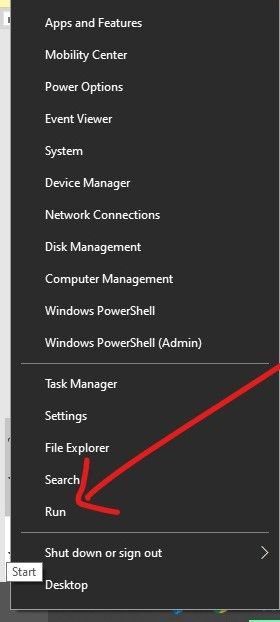
Step 1: Right-click on Start (Windows log) and select “Run”, or press WIN (Windows key) + R on your keyboard
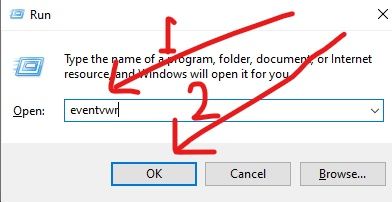
Step 2: Type in “eventvwr” to the editor and click “Ok” or hit ENTER
How to Access the Windows 10 Activity Log through the Command Prompt
Step 1: Click on Start (Windows logo) and search for “cmd”
Step 2: Hit Enter or click on the first search result (should be the command prompt) to launch the command prompt
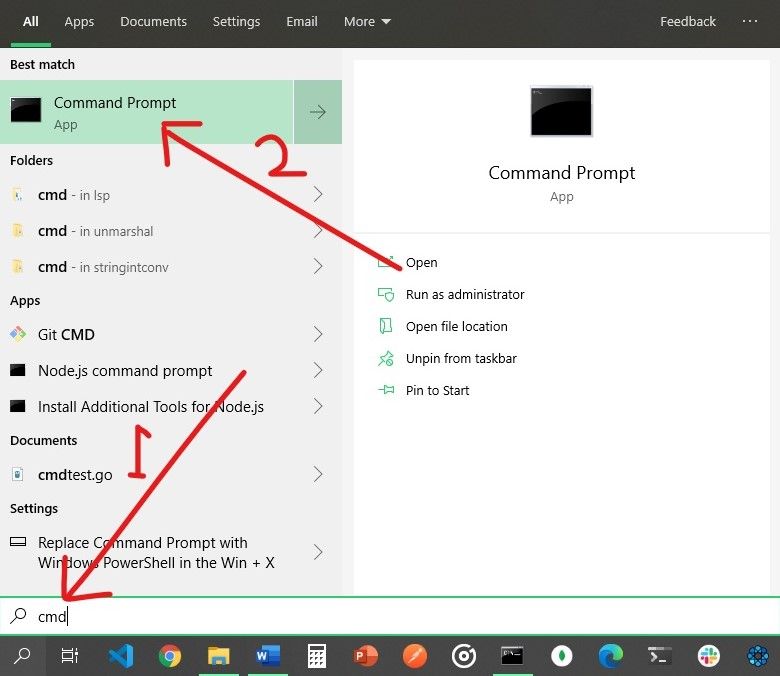
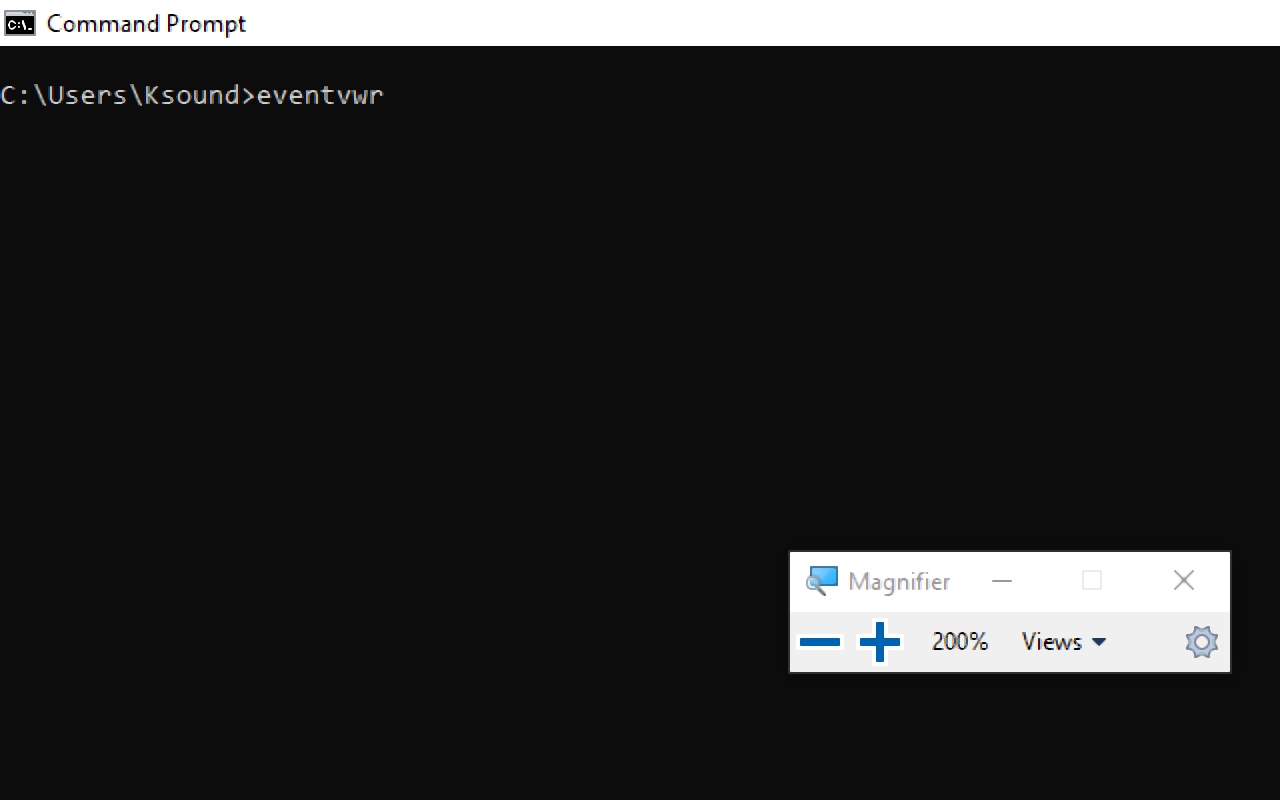
Step 3: Type in “eventvwr” and hit ENTER
Event Viewer Activity Logs
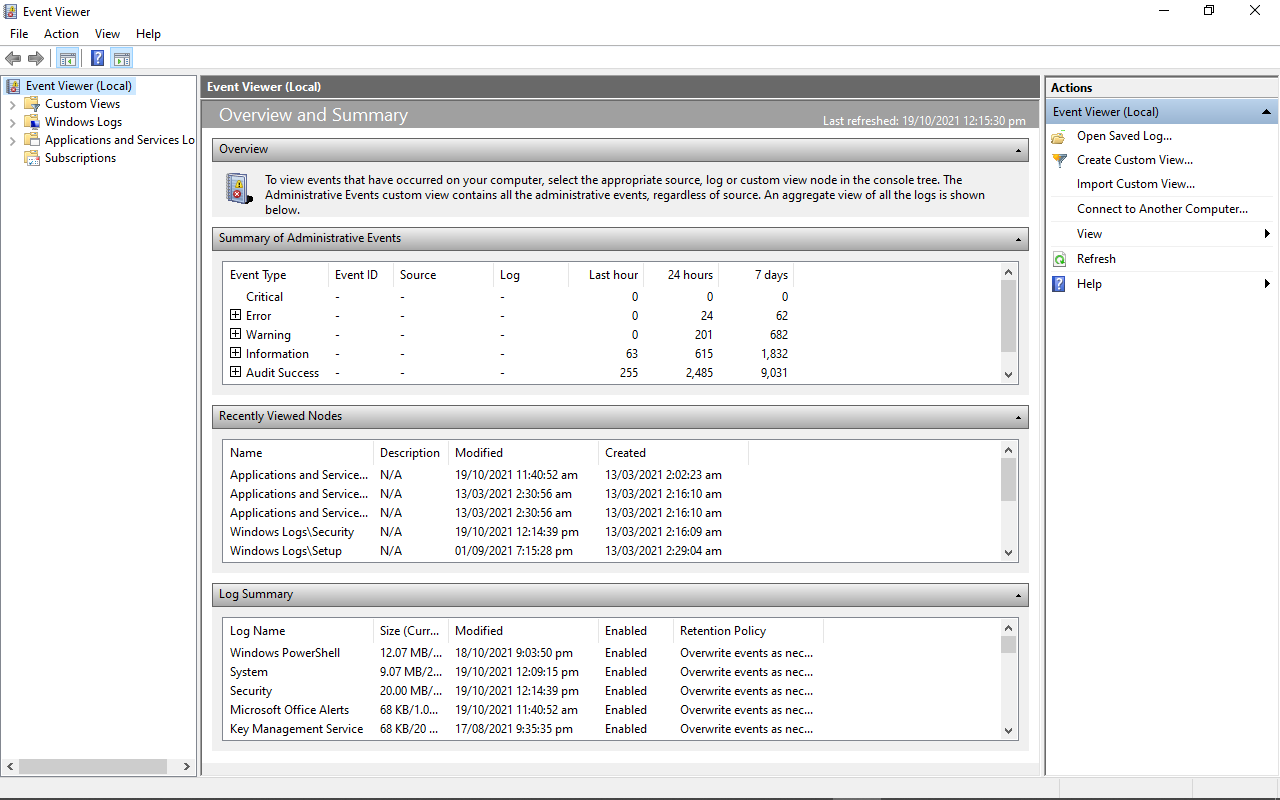
When you open the event viewer to see your computer’s activity logs, you are automatically shown the Event Viewer (Local) tab. But this might not contain the details you need, as it’s just a page you are greeted with when you open the Event Viewer.
There is lots more to the Event Viewer than this.
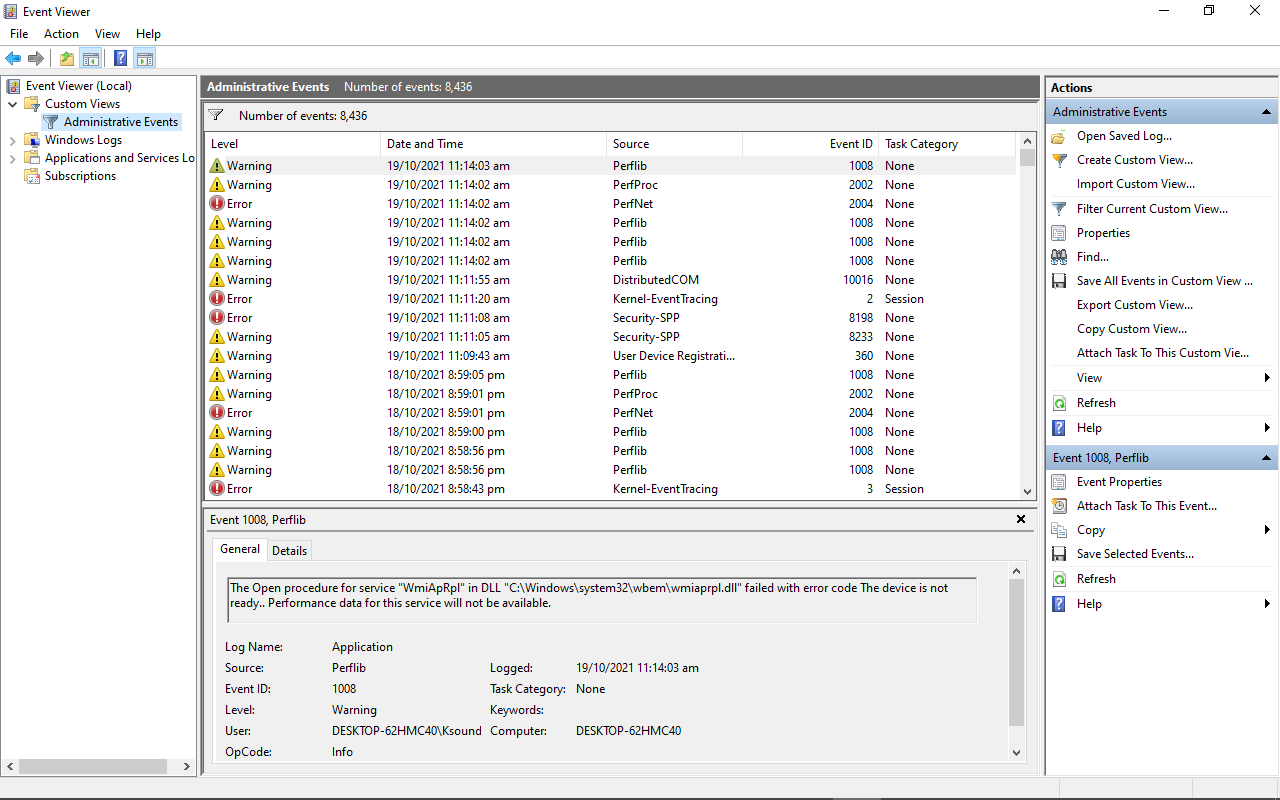
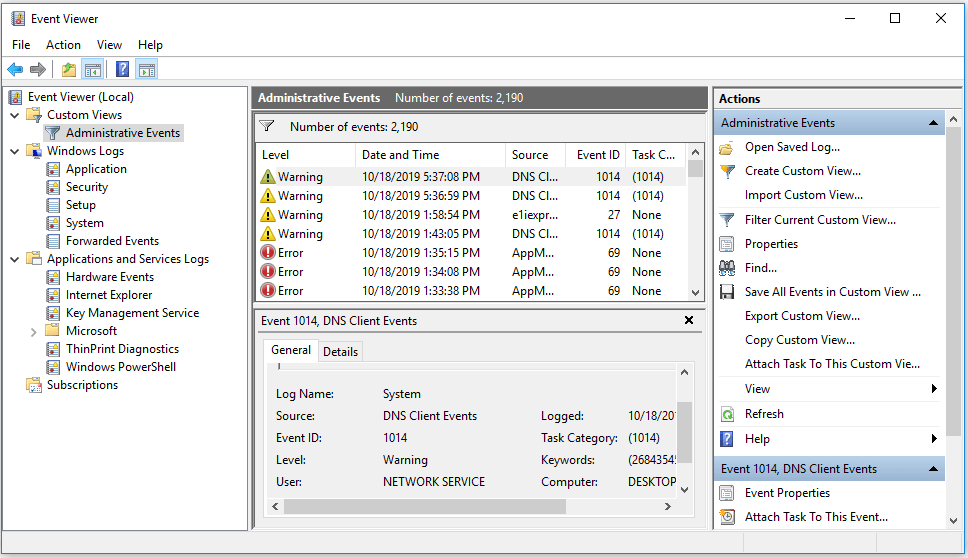
The Administrative Events Log
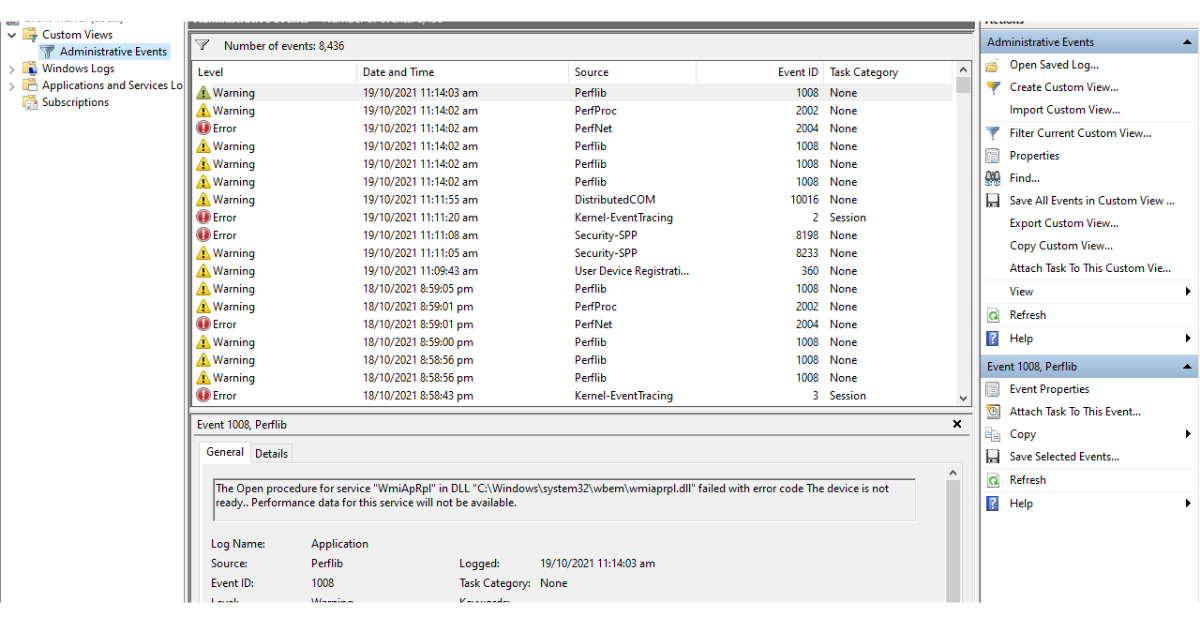
You can expand the Custom Views tab to see your computer’s administrative events, like this:
The Windows Activity Logs
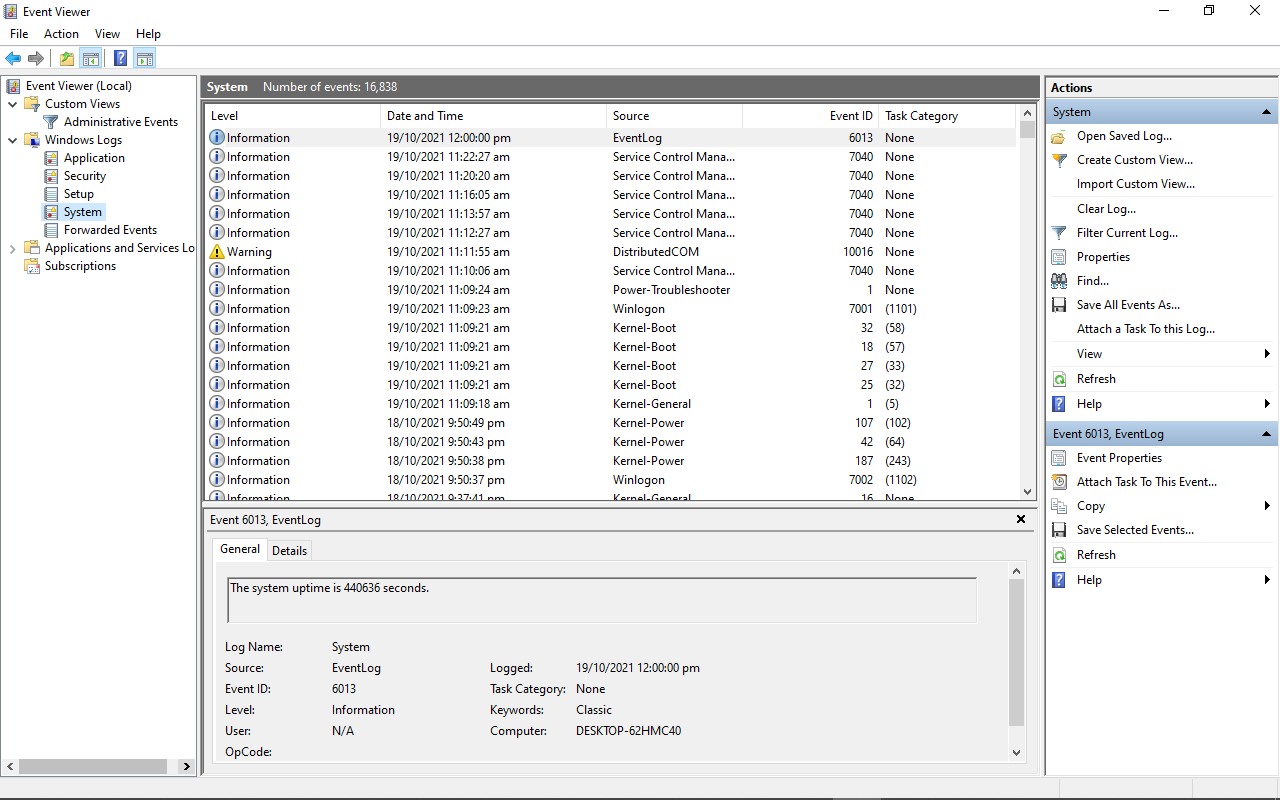
You can also expand the Windows Logs to show various activities such as:
-
Application Events: Information, errors, and warning reports of program activities

-
Security Events: This shows the results of various security actions. They are called audits and each of them can be a success or a failure
-
Setup Event: this has to do with domain controllers, which is a server that verifies users on computer networks. You shouldn’t worry about them day-to-day.
-
System Events: these are reports from system files detailing the errors they have encountered
-
Forwarded Events: these are sent to your computer from other computers in the same network. They help you keep track of the event logs of other computers in the same newtwork.


In addition, there are the Application and Service logs, which show hardware and Internet Explorer activities, alongside Microsoft Office apps activities.
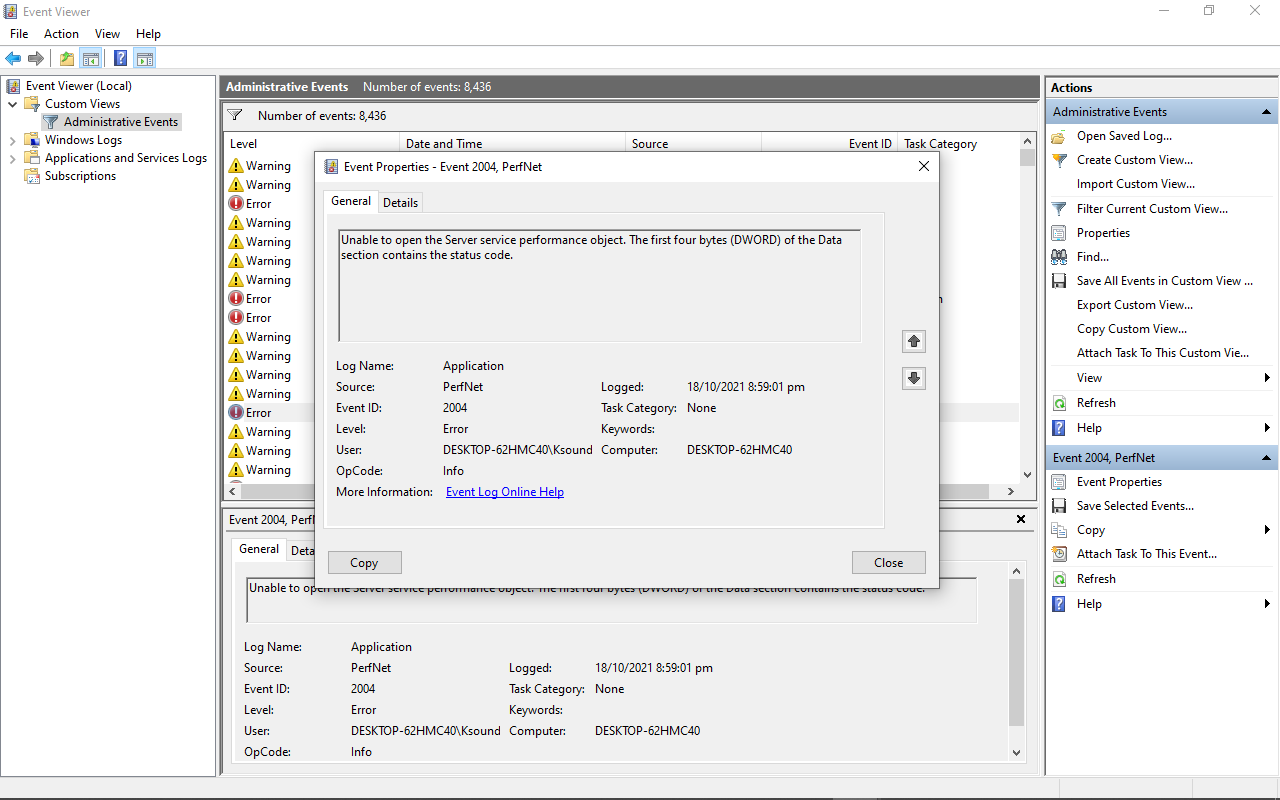
You can double click on an error to check its properties, and look up the event ID of the error online. This can help you discover more information on the error so you can fix it if you need to.
Conclusion
In this article, you learned about the Windows 10 Event Viewer, which is a very powerful tool Windows users should know how to use.
Apart from viewing various activity logs, it also helps you be aware of what’s happening on your computer.
Thank you for reading. If you consider this article helpful, please share it with your friends and family.
Learn to code for free. freeCodeCamp’s open source curriculum has helped more than 40,000 people get jobs as developers. Get started
(Image credit: Mauro Huculak)
On Windows 10, Event Viewer remains one of the most underrated yet effective diagnostic tools. While it’s a legacy utility, it still plays an essential role since it collects detailed logs from apps, drivers, services, and core components. Whether you’re dealing with hardware failures, app crashes, driver issues, system errors, or even successful operations, Event Viewer has likely already logged the details.
If you’ve ever had your computer reboot without warning, freeze unexpectedly, or display a Blue Screen of Death (BSoD), the answer may already be in the logs. In my experience, Event Viewer should be one of the first places to check when something goes wrong on your computer. Even if you don’t immediately understand the logs, they often contain clues (timestamps, error codes, warnings) that can help you fix, research, or explain the issue to tech support.
Typically, most users overlook this tool simply because they don’t know it exists or find it intimidating. However, once you understand how to read its logs, it becomes a valuable part of your troubleshooting toolkit.
In this how-to guide, I’ll outline the steps to navigate and use the Event Viewer on Windows 10.
Recent updates
These instructions has been updated to ensure accuracy and reflect changes to the process in the operating system.
How to use Event Viewer on Windows 10
On Windows 10, Event Viewer exists to help you monitor apps and system components as well as troubleshoot problems.
Interface navigation
To open the Event Viewer on Windows 10, simply open start and perform a search for Event Viewer, and click the top result to launch the console.
The experience is divided into four main groups, including «Custom Views,» «Windows Logs,» «Applications and Services Logs,» and «Subscriptions. « Each group stores related logs.
All the latest news, reviews, and guides for Windows and Xbox diehards.
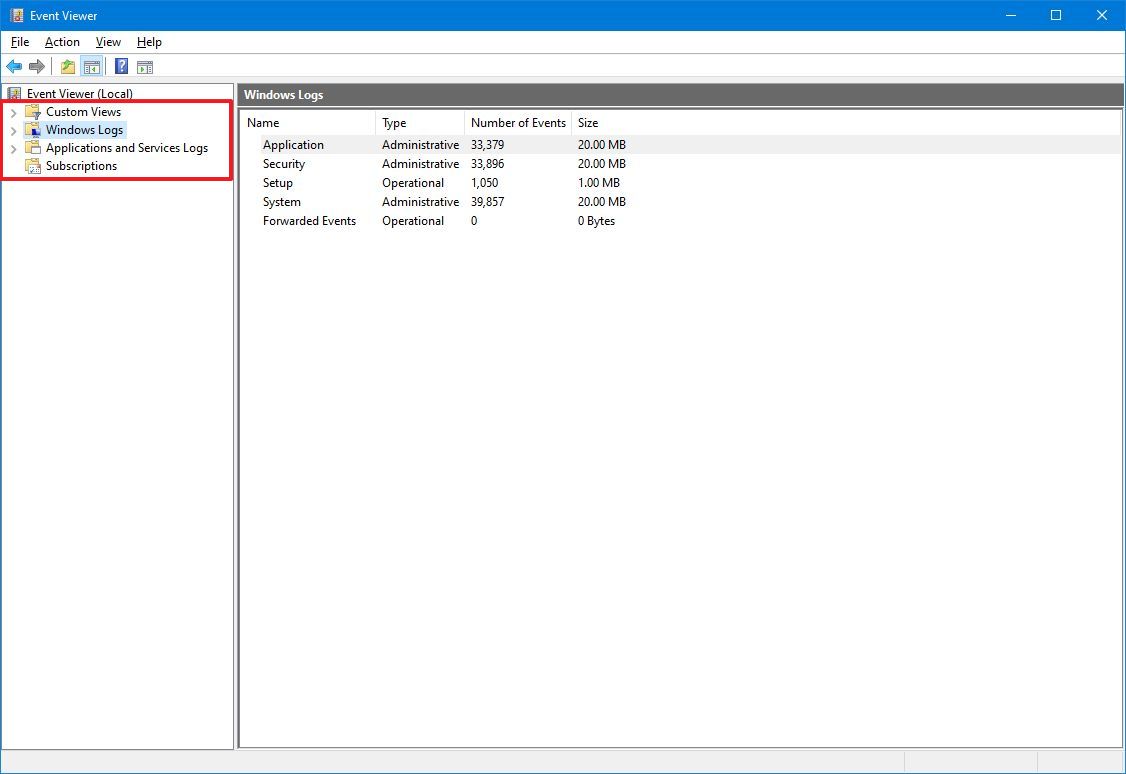
Although each group can hold different app and system logs, you’ll usually only check the Application, Security, and System logs inside the «Windows Logs» group to investigate an issue.
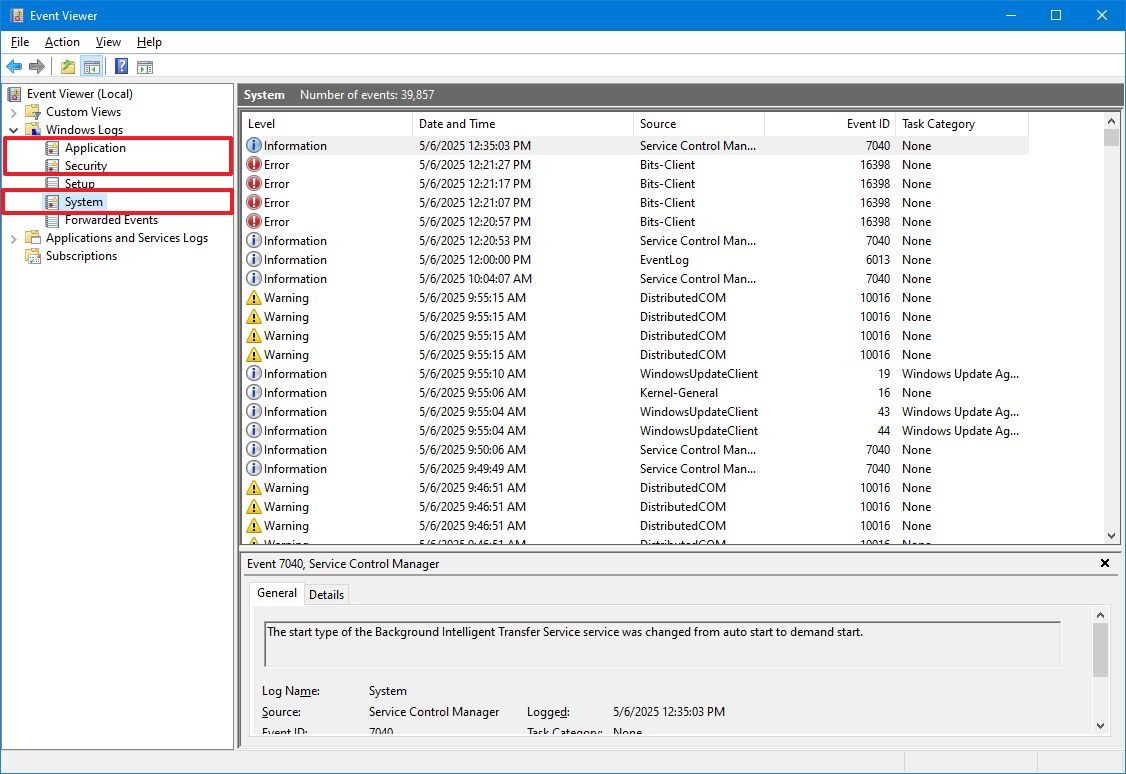
Inside the «Application» log, you’ll find events related to the user interface and other critical components required for running apps. The «Security» log contains events tied to login attempts and security-related features. Finally, the «System» log records events related to core system processes, including services and apps installed on Windows 10.
The Event Viewer classifies logs into three primary event levels:
- Error: Indicates serious issues that typically require immediate attention.
- Warning: Suggests potential problems that aren’t critical but may impact system performance or behavior.
- Information: Captures standard operations and successful execution of processes and services.
Although most applications (especially those from Microsoft) log events in Event Viewer, this isn’t always the case for third-party programs. Many external apps do not use this logging system consistently.
It’s also normal to see a few errors or warnings even when your system is functioning correctly. For instance:
- A service might fail to load during startup but successfully restart later.
- Windows Time Service could experience sync issues if it can’t connect to the internet temporarily.
- A file on a network share might be inaccessible due to a brief connectivity drop.
- An app may crash unexpectedly but then reopen and continue to work as expected.
These events are usually normal and expected and not a cause for concern unless they occur frequently or negatively affect your workflow.
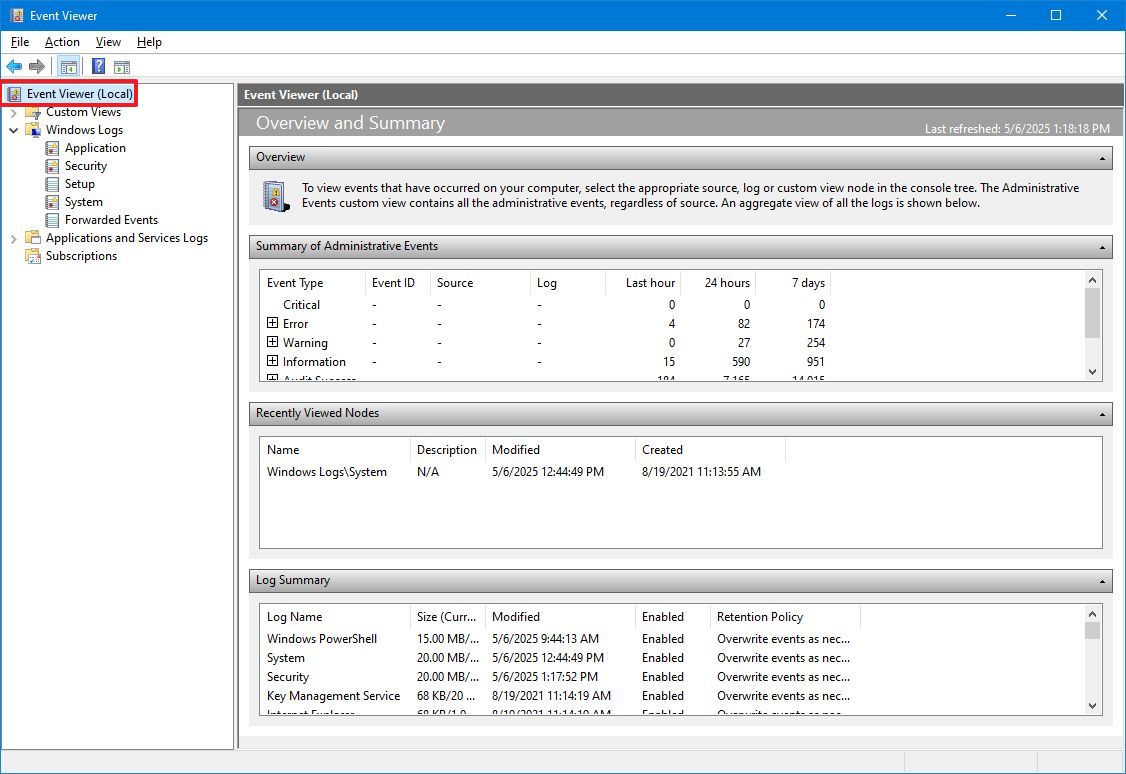
In the Event Viewer console, you can select any of the main categories (Application, Security, or System) to access detailed information, including the number of logged events and their disk size. Alternatively, selecting «Event Viewer (Local)» from the top-left panel provides a centralized overview. This summary includes recently viewed logs, an event summary by category, and overall health insights of your system.
If you select one of the groups, on the right side, you’ll see all the events with their «Level» information, «Date and Time» of creation, «Source,» «Event ID,» and «Task Category.» If you want to see more details, you can select the event, and the information will be displayed at the bottom of the console, or you can double-click the event to access more details.
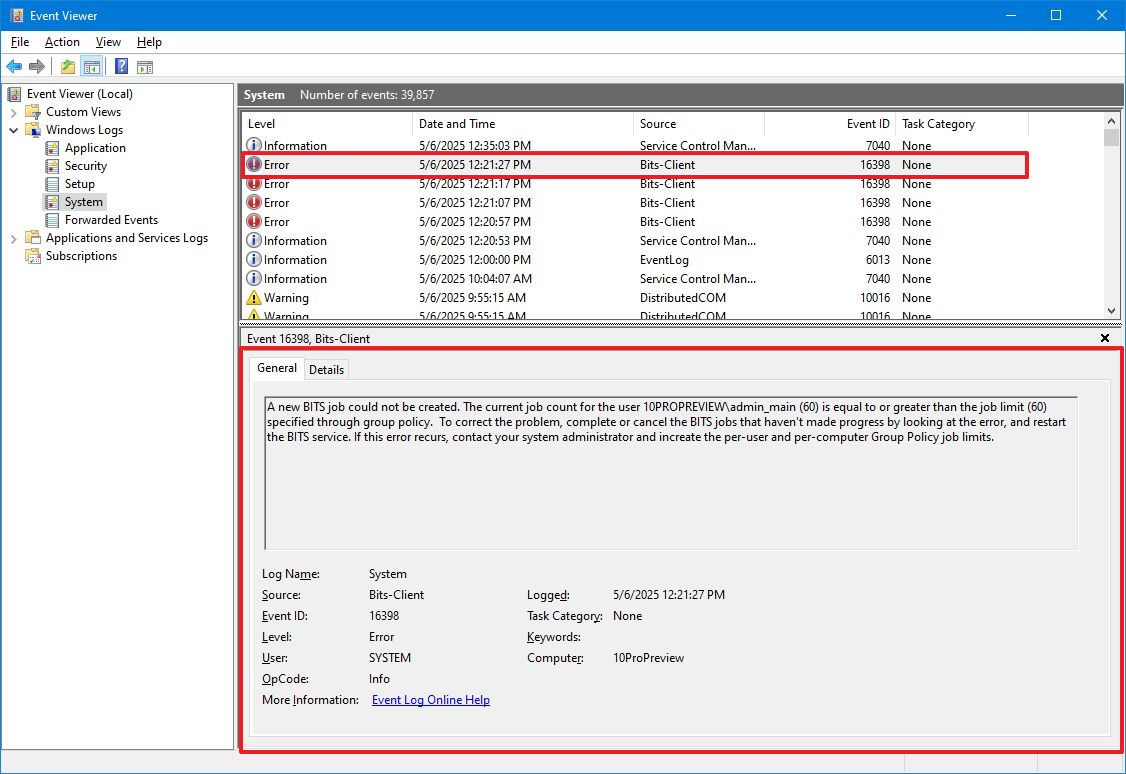
In the event properties window, the «General» tab includes an easy-to-understand description of the error, warning, or information.
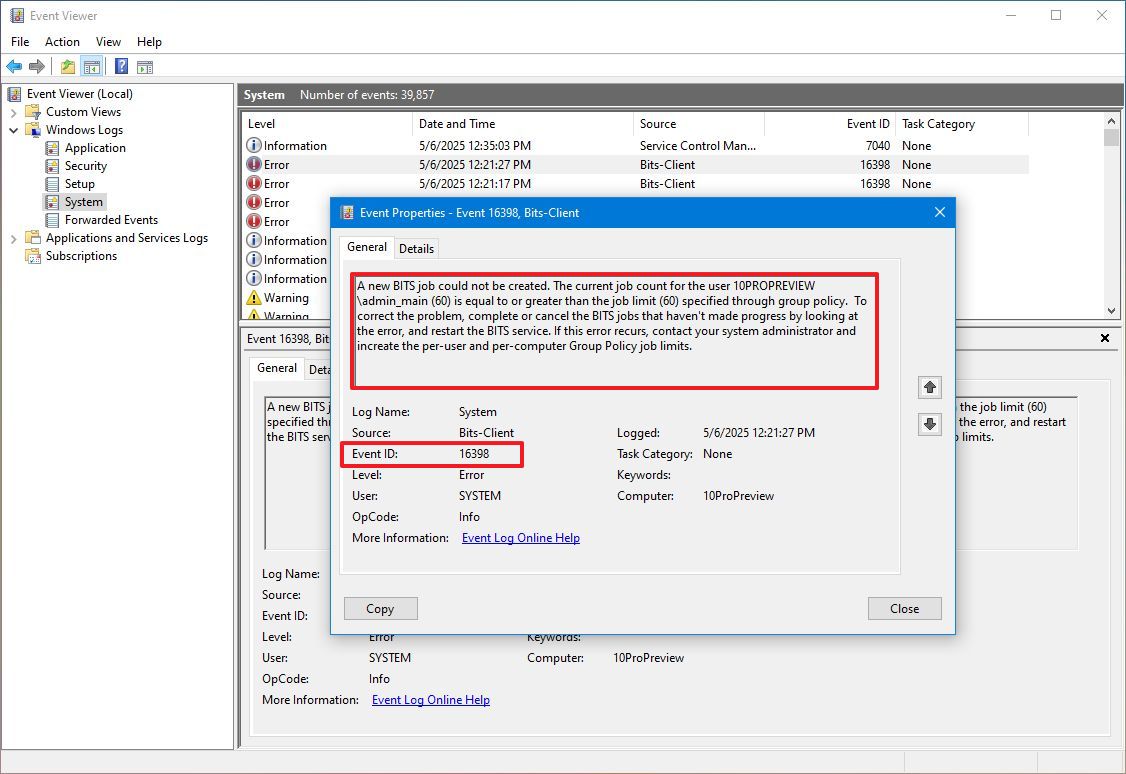
Usually, the description should give you enough information to understand and resolve the issue. However, the «Event ID» is also an important piece of information, as you can use it to search online for more information and possible instructions to fix the problem.
Search for specific logs
If you’re looking for a specific event, the console provides at least two ways to find events using the filters or keyword search.
Advanced search
To use the filters to find a specific type of log, use these steps:
- Open Start.
- Search for Event Viewer and select the top result to open the console.
- Expand the event group.
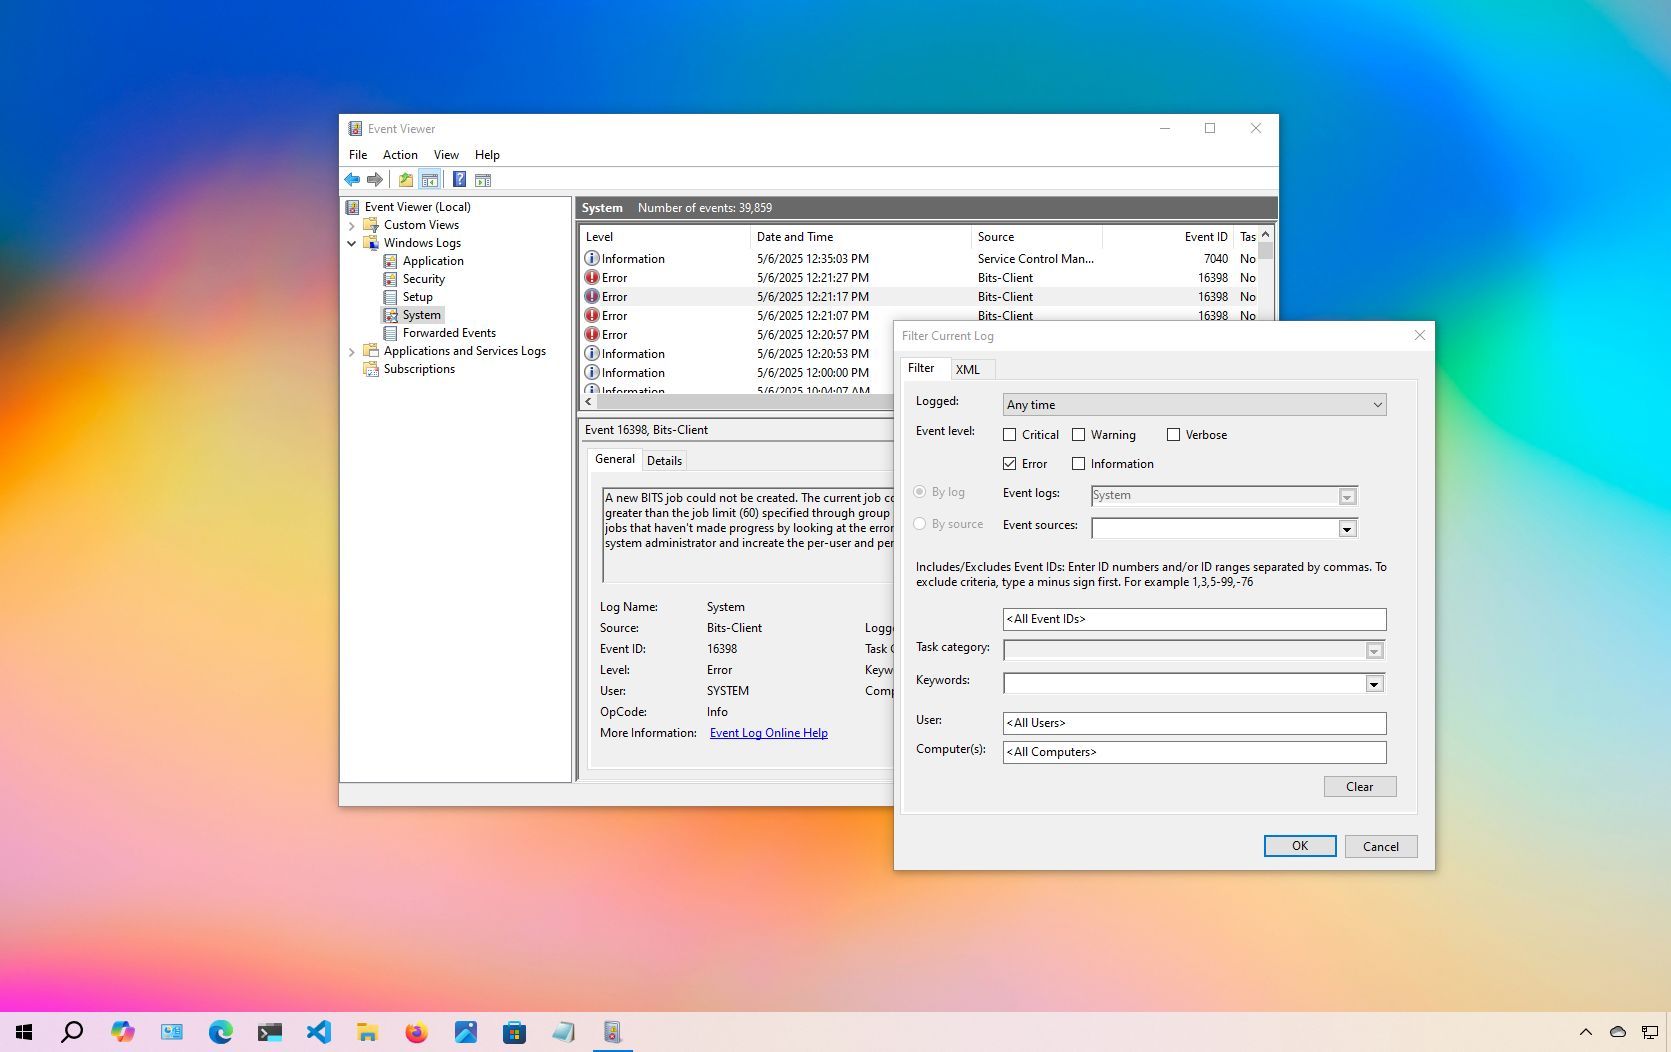
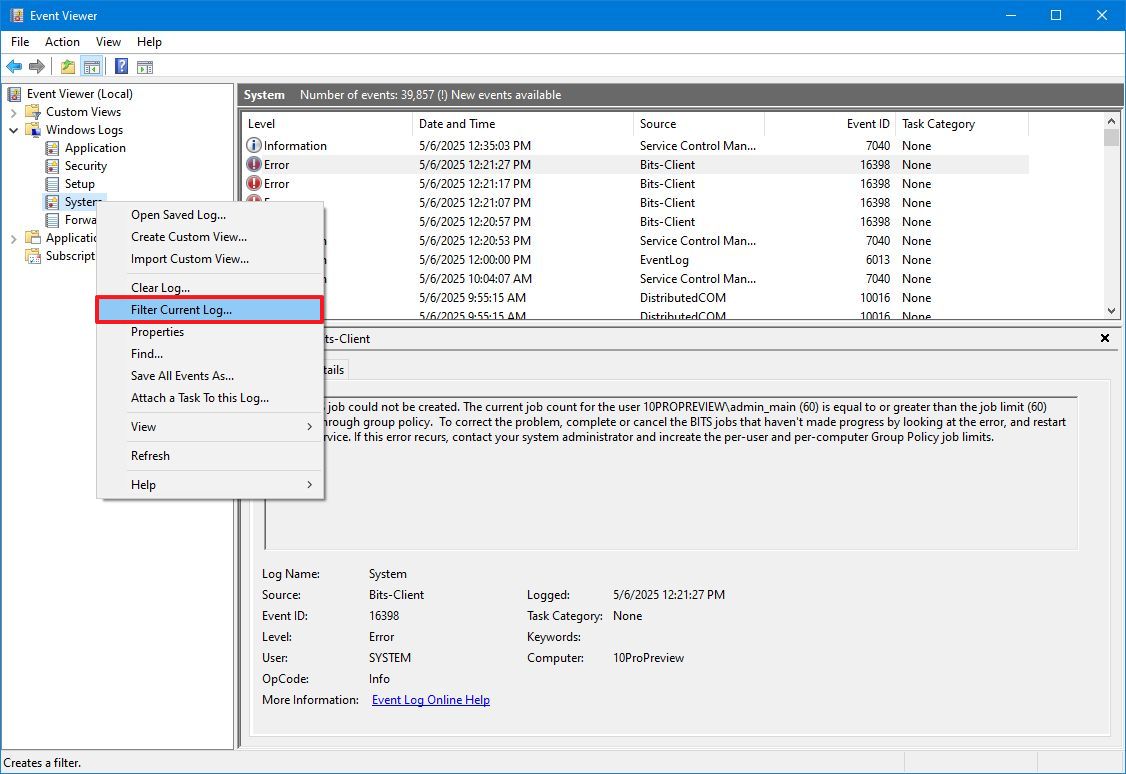
- Right-click a category and choose the «Filter Current Log» option
- .Quick note: You can also access the filter and other common options in the «Action» pane available in the right side of the console.
- Click the Filter tab.
- Use the «Logged» drop-down menu and select a time range when the event might have occurred, including:
- Any time.
- Last hour.
- Last 12 hours.
- Last 24 hours.
- Last 7 days.
- Last 30 days.
- Custom range.
- Select the event level of interest, including:
- Critical.
- Warning.
- Verbose.
- Error.
- Information.
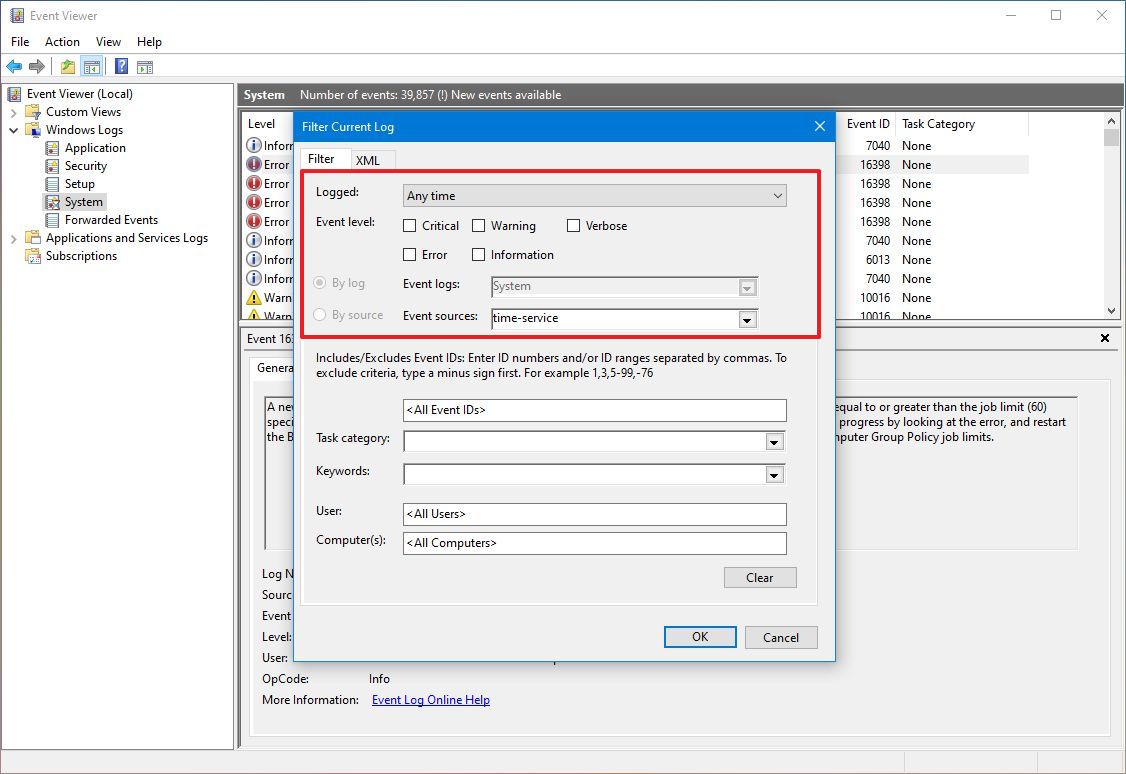
- (Optional) Select the event sources. This can be from one or more apps and services.
- (Optional) Select the Task category.
- (Optional) Select or confirm a keyword to help narrow down the log.
- Use the default selections for User and Computers.
- Click the OK button.
Once you complete the steps, related logs will appear filtered in the console. If you want to clear the current filter, right-click the group, and select the Clear Filter option.
Basic search
To use a keyword to find an error, warning, or information event with Event Viewer, use these steps:
- Open Start.
- Search for Event Viewer and select the top result to open the console.
- Expand the event groups.
- Right-click a category and choose the Find option.
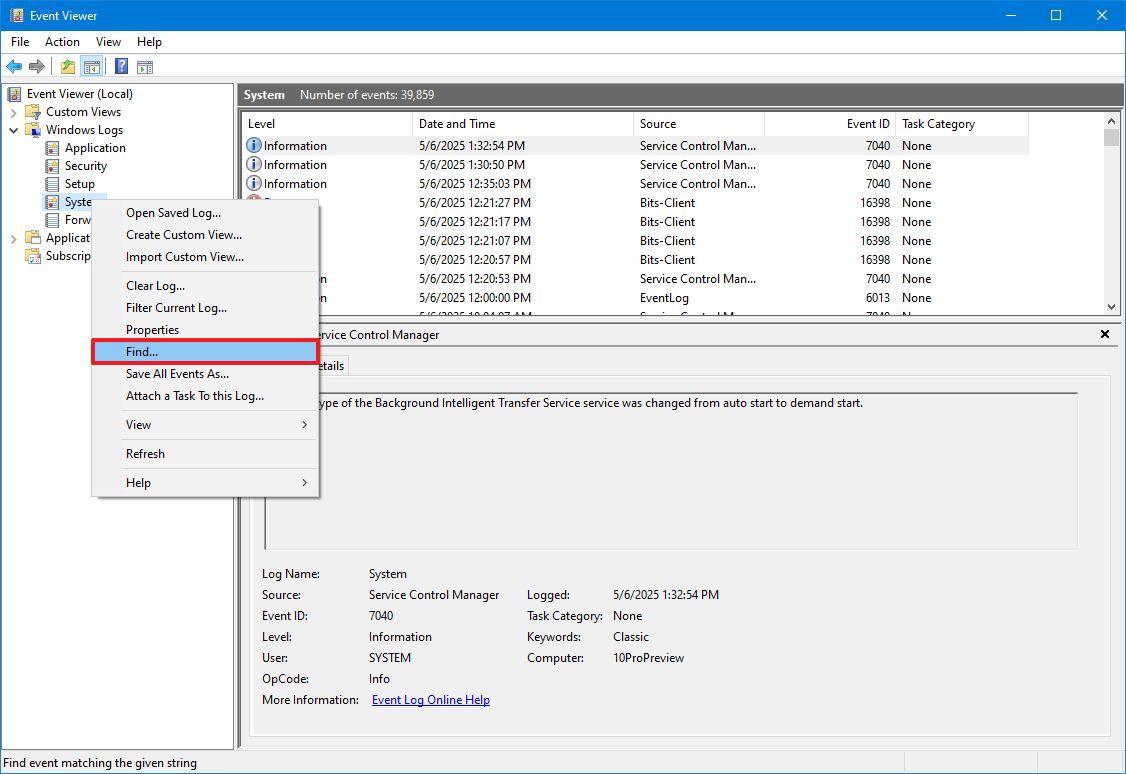
- Type a keyword and press the Find Next button.
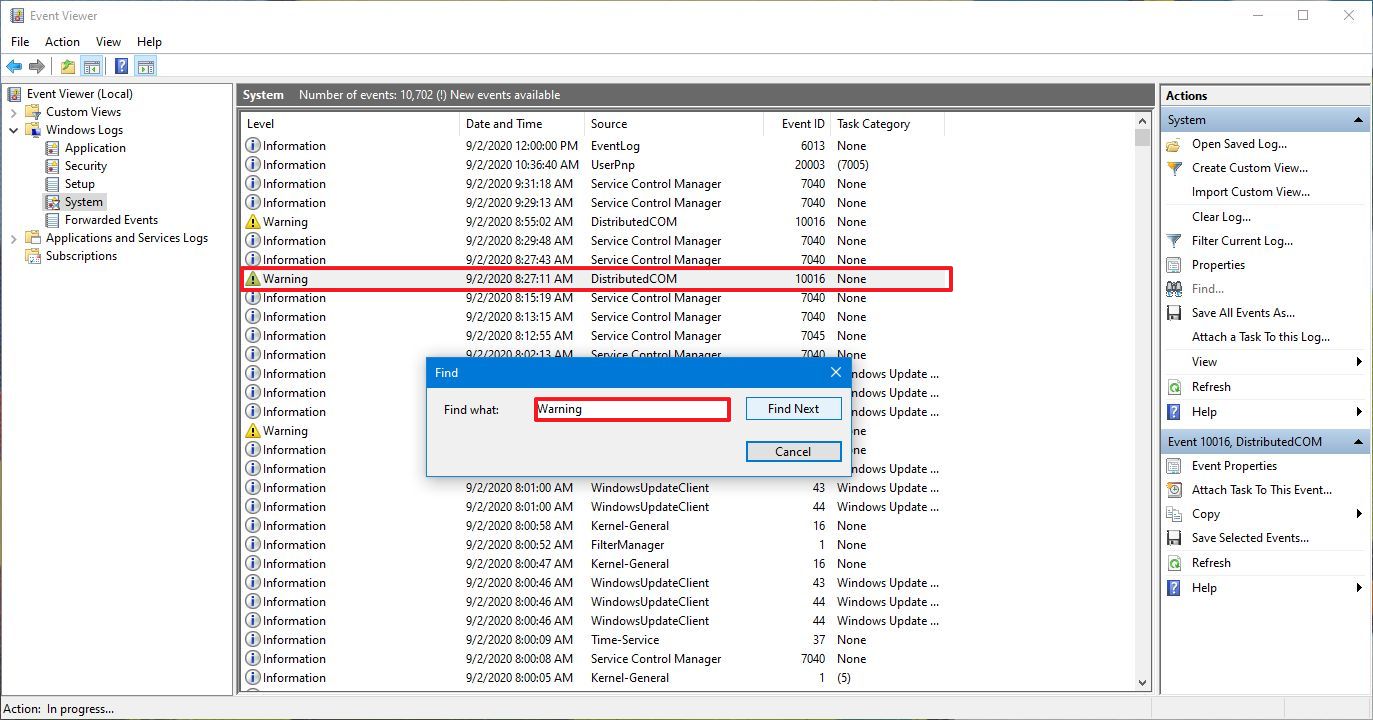
After you complete the steps, the event will be highlighted in the list if a match is found.
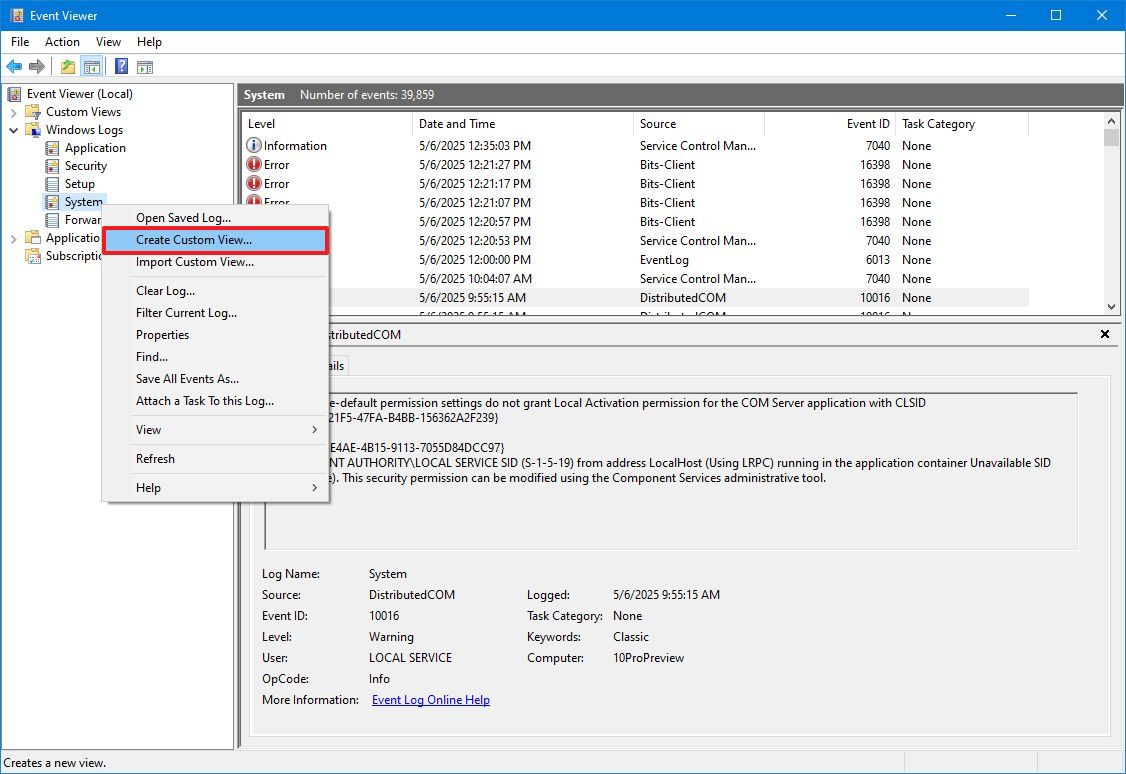
Create custom views
If you frequently search for the same type of events, the Event Viewer also comes with an option to create custom views, which allows you to quickly filter the logs to view only those that are relevant to you.
To create a custom view in the Event Viewer, use these steps:
- Open Start.
- Search for Event Viewer and select the top result to open the console.
- Expand the event group.
- Right-click a category and choose the «Create Custom View» option.
- Click the Filter tab.
- Use the «Logged» drop-down menu and select a time range.
- Select the By log option.
- Choose the event category you want to filter (for example, System) using the «Event logs» setting.
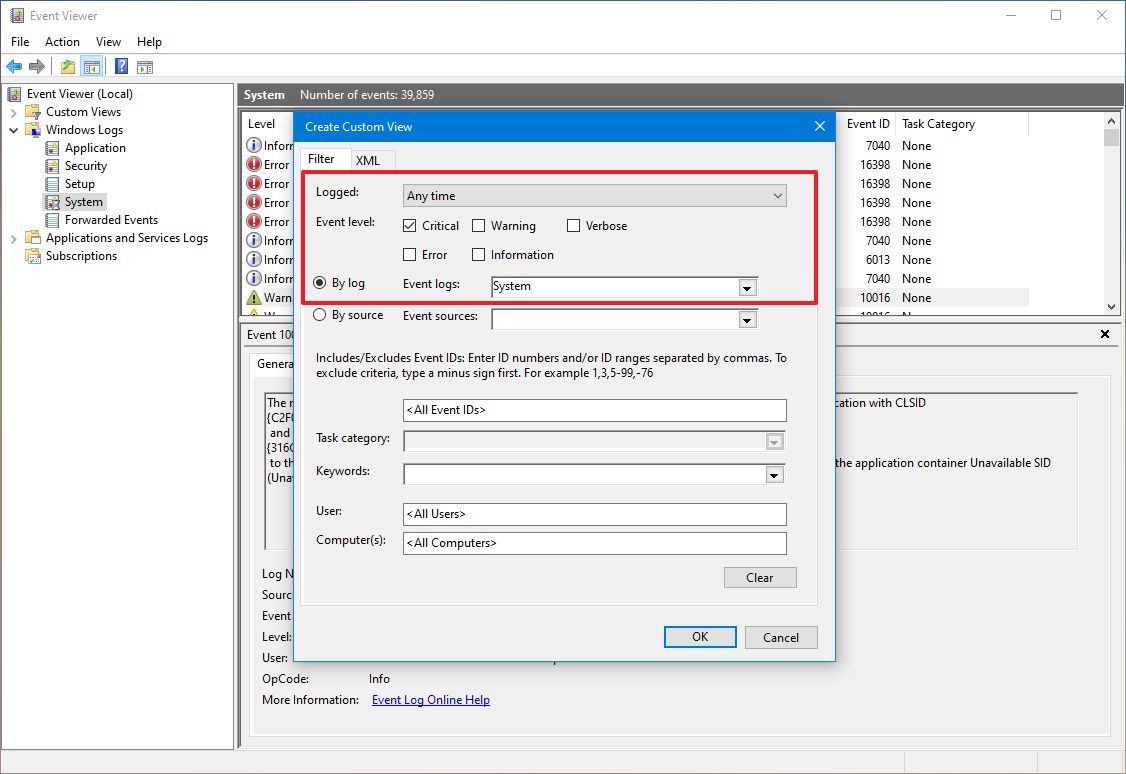
- Select or confirm a keyword to help narrow down the log.
- Use the default selections for User and Computers.
- Click the OK button.
- Confirm a name for the custom view.
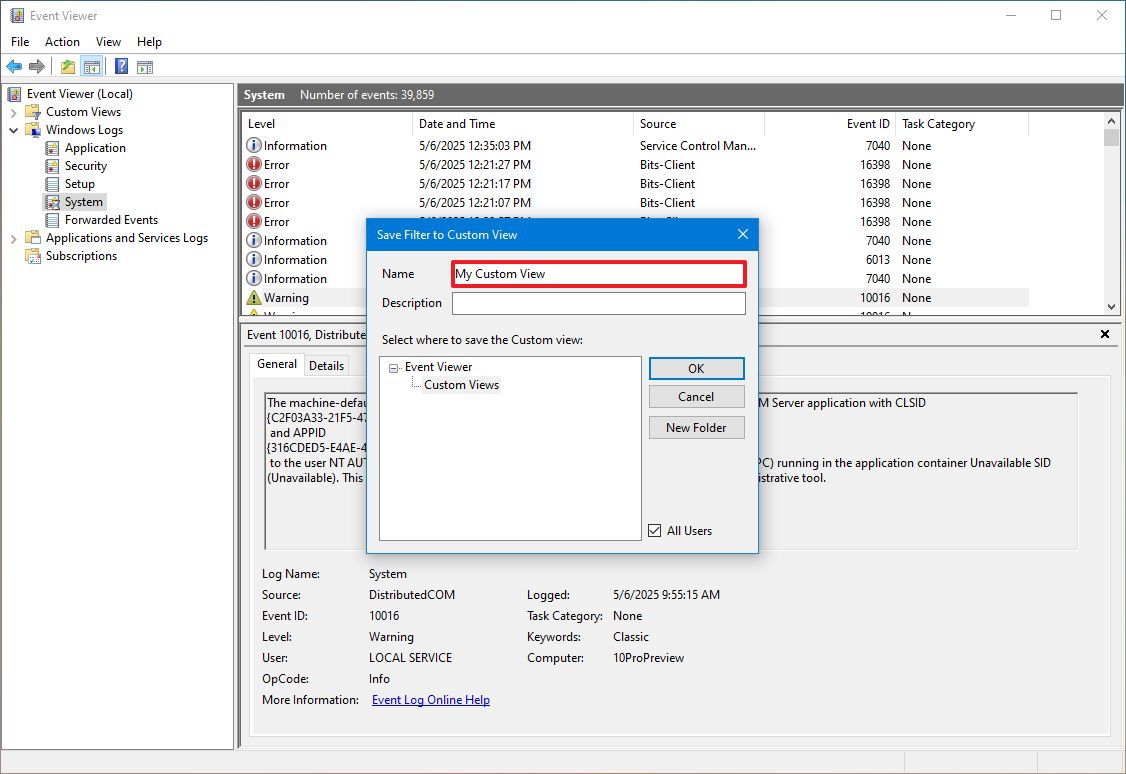
- (Optional) Compose a description for the custom view.
- Select where to save the view.
- Quick note: The default location is always recommended, but you can always create a new folder to store them.
- Click the OK button.
Once you complete the steps, the next time you need to view specific logs, you can expand the «Custom Views» folder and select the view you created.
Clear log history
On Windows 10, logs help you track your device’s health and troubleshoot problems, and you should keep them as long as possible. However, you can clear the log history to free up space or make it easier to track an existing problem.
To clear the log history of a particular category, use these steps:
- Open Start.
- Search for Event Viewer and select the top result to open the console.
- Expand the event group.
- Right-click a category, and select the Clear Log option.
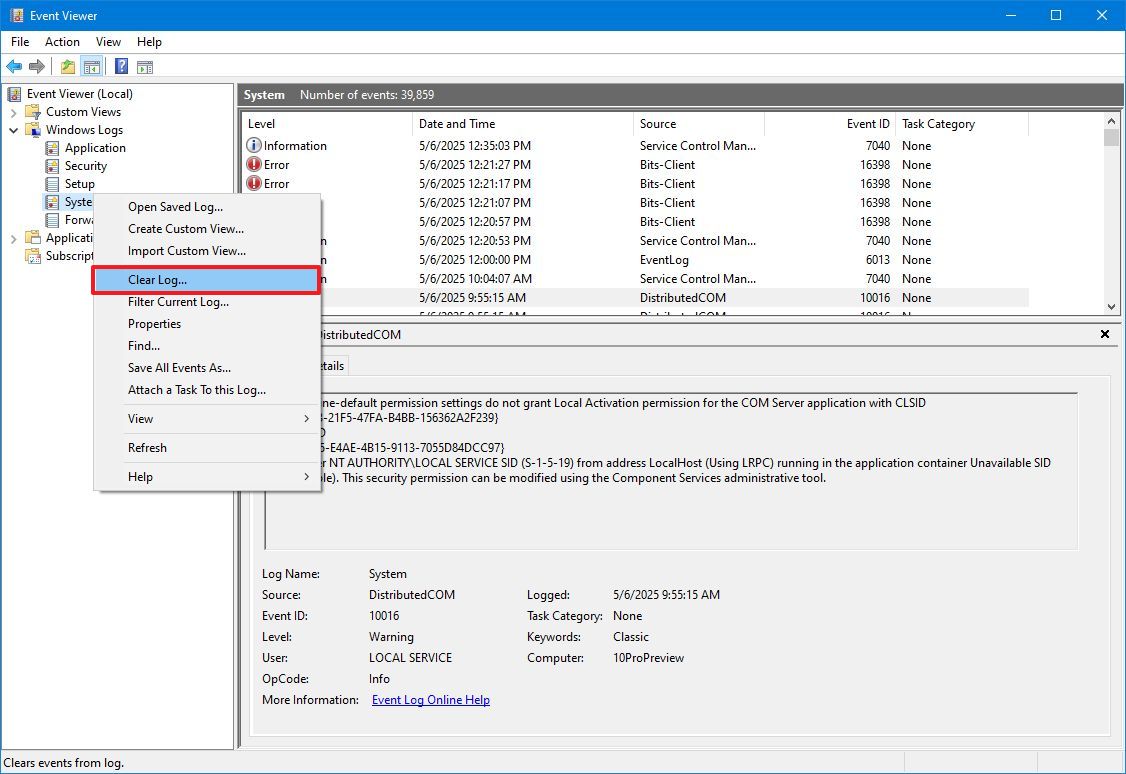
- Click the Clear button.
- Quick note: If you want to archive the log history on a file outside the Event Viewer, you can also click the «Save and Clear» button.
After you complete the steps, the events will be deleted, and the console will start recording new events.
More resources
Find in-depth guides, troubleshooting tips, and the latest updates on Windows 11 and 10 here:
- Windows 11 on Windows Central — All you need to know
- Windows 10 on Windows Central — All you need to know
Mauro Huculak has been a Windows How-To Expert contributor for WindowsCentral.com for nearly a decade and has over 15 years of experience writing comprehensive guides. He also has an IT background and has achieved different professional certifications from Microsoft, Cisco, VMware, and CompTIA. He has been recognized as a Microsoft MVP for many years.
-
Home
-
News
- 7 Ways to Open Event Viewer Windows 10 | How to Use Event Viewer
By Alisa |
Last Updated
Check the 7 ways to open Event Viewer Windows 10. Each way includes a step-by-step guide. This post also teaches you how to use Event Viewer on Windows 10. If you are searching for a reliable data recovery tool, hard drive partition manager, system backup and restore assistant, MiniTool software covers all of them for you.
You can open Event Viewer Windows 10 to check the detailed information of important events occurring on your computer, e.g. Windows system, security, setup, application, hardware, services events, etc. If your computer has some problems, Event Viewer is helpful to let you check, troubleshoot and repair Windows 10 errors like application errors and system errors.
Check the 7 ways below for how to open Event Viewer Windows 10, and how to use Event Viewer on Windows 10.
Video Guide:
7 Ways to Open Event Viewer Windows 10
Way 1. Access Event Viewer through Search Box
Click Start or Search Box at the toolbar -> Type event, and click Event Viewer to open it.
Way 2. Open Event Viewer through Run Dialog
Press Windows + R to open Windows Run dialog -> Type eventvwr.msc in Run box and hit Enter button to open it.
Way 3. Launch Event Viewer Windows 10 with CMD
Press Windows + R, type cmd, and hit Enter to open Command Prompt Windows 10 -> Type eventvwr in Command Prompt window, and hit Enter to open Event Viewer.
Way 4. How to Open Event Viewer with PowerShell
Press Windows + X, and click Windows PowerShell to open it -> Type eventvwr.msc, and press Enter button to open Event Viewer.
Way 5. Get into Event Viewer App in Control Panel
Open Control Panel Windows 10 -> Type event in the search box at the upper-right of Control Panel window, and click Search -> Click View event logs link under Administrative Tools to open Event Viewer Windows 10.
Way 6. Access Event Viewer from File Explorer Window
Click This PC on Windows 10 computer desktop -> Type event viewer in the search field -> Double-click Event Viewer application in the search result to open it.
Way 7. Open Event Viewer Windows 10 from Computer Management
Open Computer Management Windows 10 -> Expand System Tools in Computer Management window, and click Event Viewer to access it.
How to Use Event Viewer Windows 10
After you open Event Viewer in Windows 10, you can click one main category from the left pane and the total number of events of this category will be logged in the middle window.
You can click one of the events to check the event ID and the detailed information of the Event.
You can see some of events are marked Error, Warning, or Information. They have different meanings.
- Error means a significant problem and it may include some loss of data on your computer. (Recover my files)
- Warning indicates that there may be a potential problem of your computer.
- Information means the program functions normal.
Each main category under Windows logs refers to different events on your computer.
- Application: System components like drivers on your Windows 10 computer report their problems.
- Security: Events under this category show the results of a security action.
- Setup: Refer to domain controllers.
- System: System events report problems and warnings from Windows system files and programs installed on the system. Most of them can be self-healed.
- Forwarded Events: Events sent from other computers.
You can use Event Viewer to troubleshoot computer problems like blue screen error, program or system crash, view each shut down or system restart and its reason, and more. You can also search any Event ID online for detailed explanation.
How to Create Event Viewer Shortcut on Windows 10
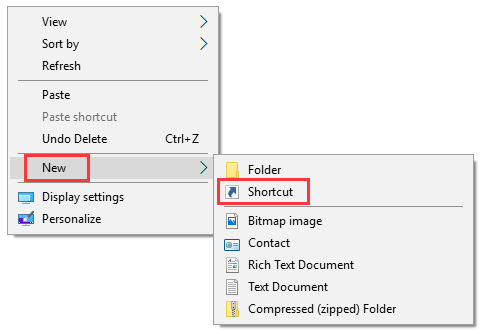
You can easily create a desktop shortcut of Event Viewer on Windows 10 to quickly access it when needed.
- Right-click the blank area of computer desktop to click New -> Shortcut.
- Type %windir%\system32\eventvwr.msc in Create Shortcut window, and click Next.
- Type Event Viewer as the name of the shortcut, and click Finish to create Event Viewer Shortcut on Windows 10.
Conclusion
Now you should know how to open and use Event Viewer in Windows 10 so as to troubleshoot Windows 10 computer problems.
About The Author
Position: Columnist
Alisa is a professional English editor with 4-year experience. She loves writing and focuses on sharing detailed solutions and thoughts for computer problems, data recovery & backup, digital gadgets, tech news, etc. Through her articles, users can always easily get related problems solved and find what they want. In spare time, she likes basketball, badminton, tennis, cycling, running, and singing. She is very funny and energetic in life, and always brings friends lots of laughs.
Все способы:
- Просмотр событий в Виндовс 10
- Способ 1: «Панель управления»
- Способ 2: Окно «Выполнить»
- Способ 3: Поиск по системе
- Создание ярлыка для быстрого запуска
- Заключение
- Вопросы и ответы: 8
«Просмотр событий» — один из множества стандартных инструментов Виндовс, предоставляющий возможность просмотра всех событий, происходящих в среде операционной системы. В числе таковых всевозможные неполадки, ошибки, сбои и сообщения, связанные как непосредственно с ОС и ее компонентами, так и сторонними приложениями. О том, как в десятой версии Windows открыть журнал событий с целью его дальнейшего использования для изучения и устранения возможных проблем, пойдет речь в нашей сегодняшней статье.
Просмотр событий в Виндовс 10
Существует несколько вариантов открытия журнала событий на компьютере с Windows 10, но в целом все они сводятся к ручному запуску исполняемого файла или его самостоятельному поиску в среде операционной системы. Расскажем подробнее о каждом из них.
Способ 1: «Панель управления»
Как понятно из названия, «Панель» предназначена для того, чтобы управлять операционной системой и входящими в ее состав компонентами, а также быстрого вызова и настройки стандартных инструментов и средств. Неудивительно, что с помощью этого раздела ОС можно вызвать в том числе и журнал событий.
Читайте также: Как открыть «Панель управления» в Виндовс 10
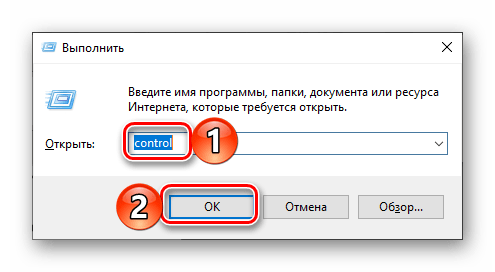
- Любым удобным способом откройте «Панель управления». Например, нажмите на клавиатуре «WIN+R», введите в строку открывшегося окна выполнить команду «control» без кавычек, нажмите «ОК» или «ENTER» для запуска.
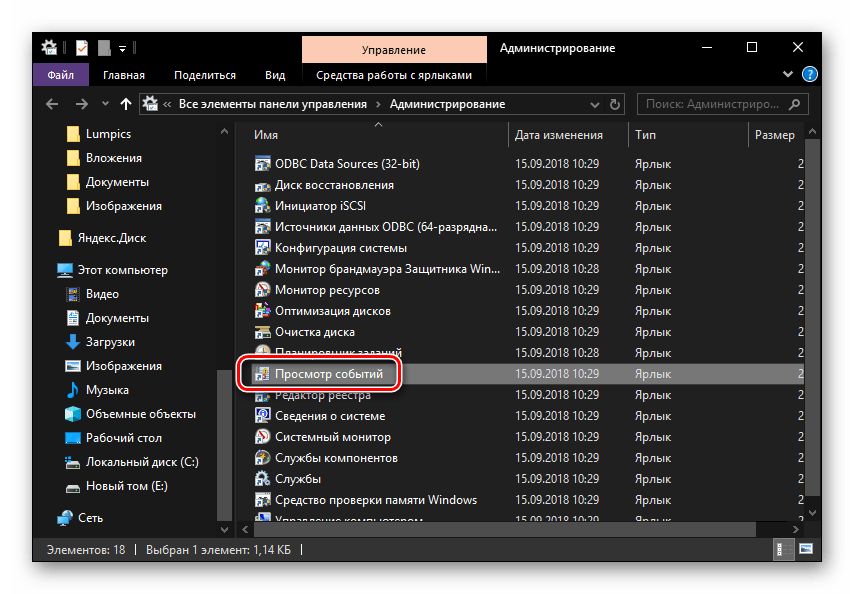
- Найдите раздел «Администрирование» и перейдите в него, кликнув левой кнопкой мышки (ЛКМ) по соответствующему наименованию. Если потребуется, предварительно измените режим просмотра «Панели» на «Мелкие значки».
- Отыщите в открывшейся директории приложение с наименованием «Просмотр событий» и запустите его двойным нажатием ЛКМ.

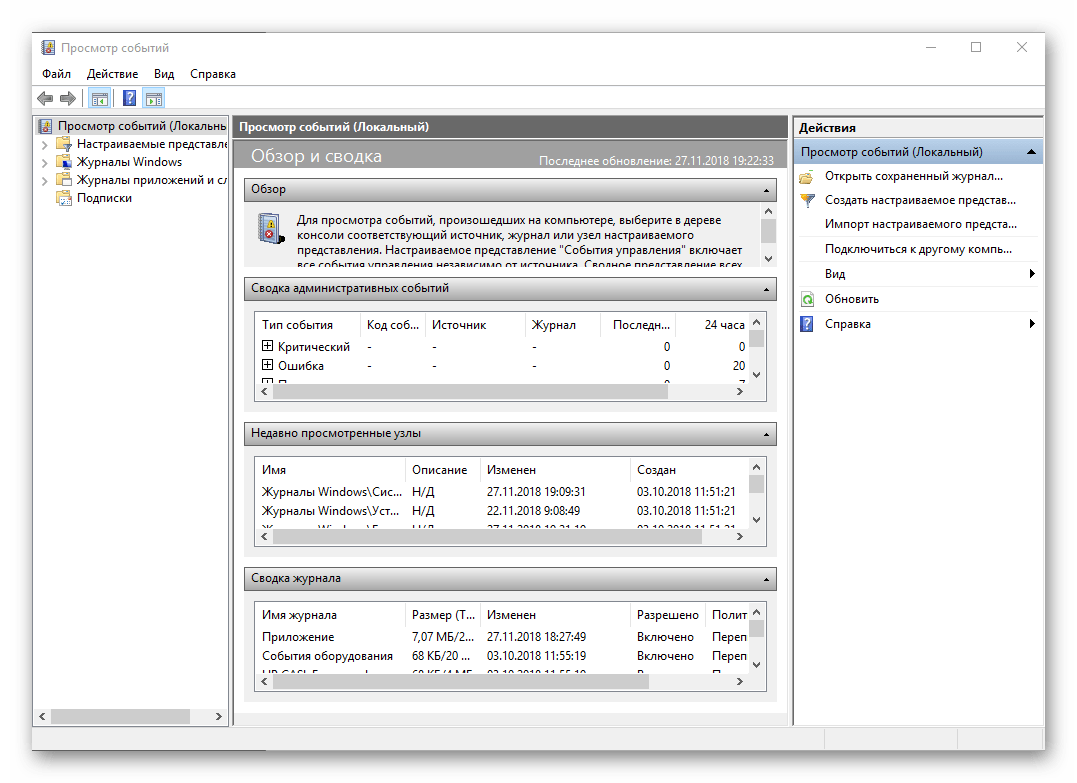
Журнал событий Windows будет открыт, а значит, вы сможете перейти к изучению его содержимого и использованию полученной информации для устранения потенциальных проблем в работе операционной системы либо же банальному изучению того, что происходит в ее среде.
Способ 2: Окно «Выполнить»
И без того простой и быстрый в своем выполнении вариант запуска «Просмотра событий», который нами был описан выше, при желании можно немного сократить и ускорить.
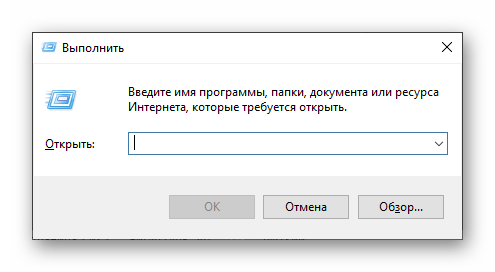
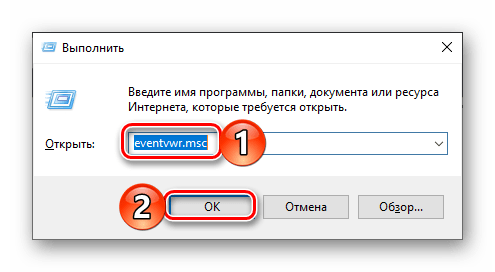
- Вызовите окно «Выполнить», нажав на клавиатуре клавиши «WIN+R».
- Введите команду «eventvwr.msc» без кавычек и нажмите «ENTER» или «ОК».
- Журнал событий будет открыт незамедлительно.
Способ 3: Поиск по системе
Функцию поиска, которая в десятой версии Виндовс работает особенно хорошо, тоже можно использовать для вызова различных системных компонентов, и не только их. Так, для решения нашей сегодняшней задачи необходимо выполнить следующее:
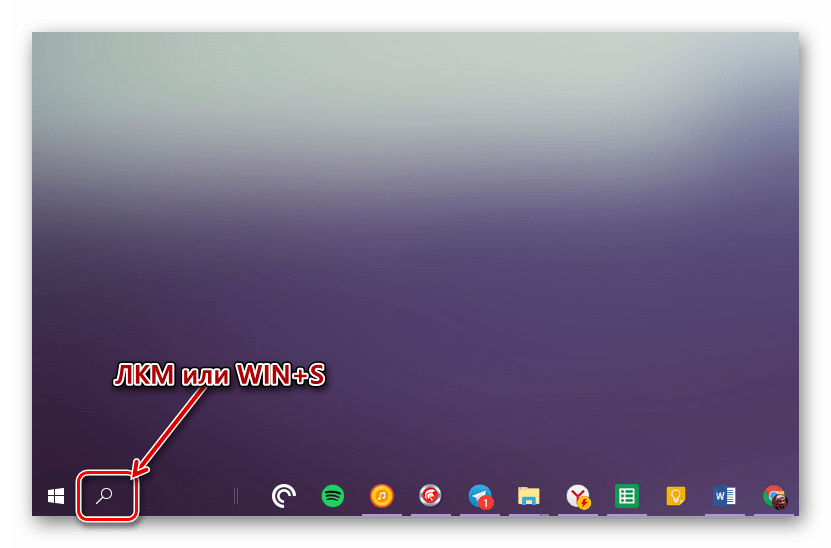
- Нажмите по значку поиска на панели задач левой кнопкой мышки или воспользуйтесь клавишами «WIN+S».
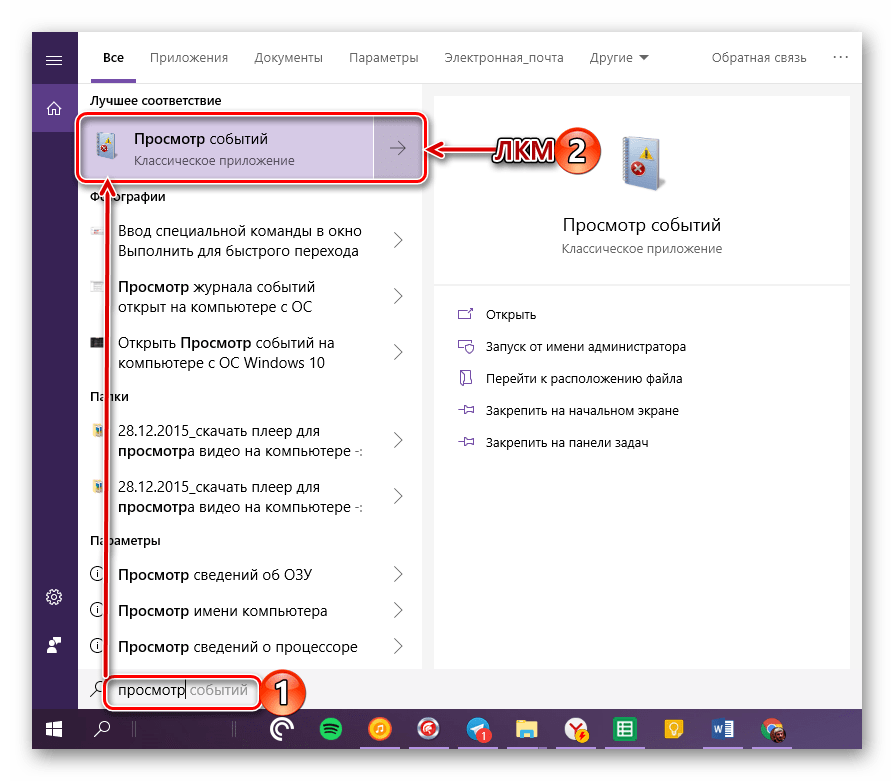
- Начните вводить в поисковую строку запрос «Просмотр событий» и, когда увидите в перечне результатов соответствующее приложение, кликните по нему ЛКМ для запуска.
- Это откроет журнал событий Windows.
Читайте также: Как сделать панель задач в Виндовс 10 прозрачной
Создание ярлыка для быстрого запуска
Если вы планируете часто или хотя бы время от времени обращаться к «Просмотру событий», рекомендуем создать на рабочем столе его ярлык – это поможет ощутимо ускорить запуск необходимого компонента ОС.
- Повторите шаги 1-2, описанные в «Способе 1» данной статьи.
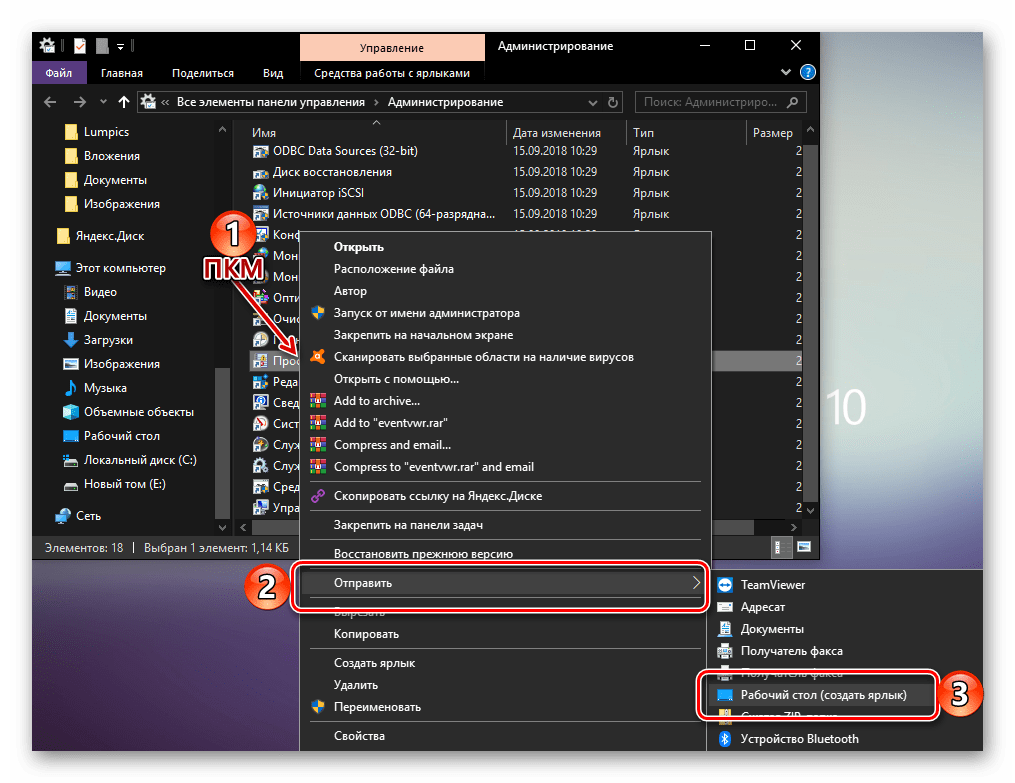
- Отыскав в списке стандартных приложений «Просмотр событий», кликните по нему правой кнопкой мышки (ПКМ). В контекстном меню выберите поочередно пункты «Отправить» — «Рабочий стол (создать ярлык)».
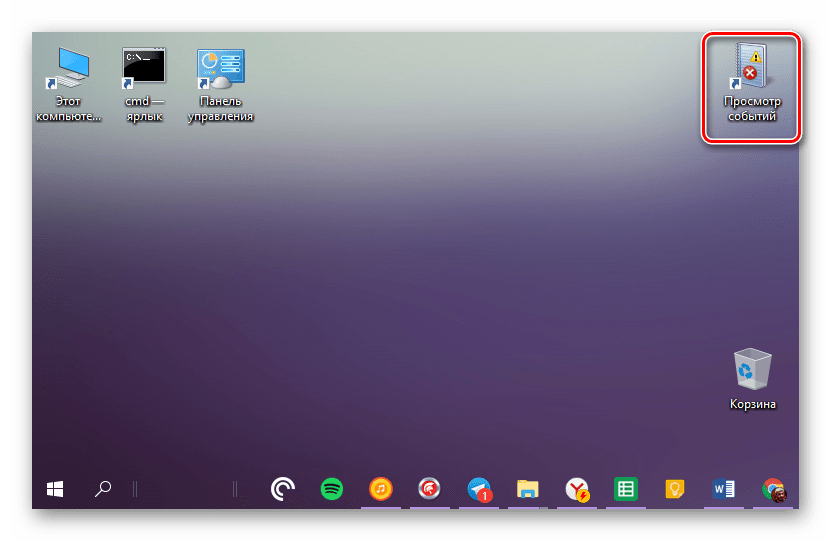
- Сразу же после выполнения этих простых действий на рабочем столе Windows 10 появится ярлык под названием «Просмотр событий», который и можно использовать для открытия соответствующего раздела операционной системы.
Читайте также: Как создать ярлык «Мой компьютер» на рабочем столе Виндовс 10
Заключение
Из этой небольшой статьи вы узнали о том, как на компьютере с Windows 10 можно посмотреть журнал событий. Сделать это можно с помощью одного из трех рассмотренных нами способов, но если к данному разделу ОС приходится обращаться довольно часто, рекомендуем создать ярлык на рабочем столе для его быстрого запуска. Надеемся, данный материал был полезен для вас.
Наша группа в TelegramПолезные советы и помощь